release of information disclosure system (brn) and patient management system . release of...
TRANSCRIPT

RESOURCE AND PATIENT MANAGEMENT SYSTEM
Release of Information Disclosure System
(BRN)
User Manual
Version 2.0 Patch 1 May 2008
Office of Information Technology (OIT) Division of Information Resource Management
Albuquerque, New Mexico

Release of Information Disclosure System (BRN) v2.0 Patch 1
User Manual ii Preface May 2008
Preface
This manual is designed to assist the end-user in the use of the Release of Information (ROI) Disclosure program. This User Manual is designed to be helpful to the end-user. This documentation will provide sufficient information for users to competently operate the national software package.

Release of Information Disclosure System (BRN) v2.0 Patch 1
User Manual iii Table of Contents May2008
Table of Contents
1.0 Introduction ..................................................................................................... 1
2.0 ROI Main Menu ................................................................................................ 4
3.0 ROI Edit Menu (DE) ......................................................................................... 5
3.1 Add a New Disclosure (ADD) ..................................................................... 6 3.2 Add Multiple Patients Under One Request (AMD) ..................................... 9 3.3 Edit Existing Disclosure Record (MOD) ................................................... 10 3.4 Enter Disclosure Documentation (DIS) .................................................... 10 3.5 Print Mailing Labels (LBL) ........................................................................ 12 3.6 Delete Open Disclosure Records (DEL) .................................................. 12 3.7 Enter Additional Request Receipt Dates (2nd/3rd) (AREQ) ....................... 13 3.8 Patient Detailed Disclosure Log (Cumulative) (DDL) ............................... 14 3.9 Inquire to a Specific ROI Disclosure Record (DSP) ................................. 15 3.10 Listing of Patient Cumulative Disclosures (PTC) ..................................... 16 3.11 Edit Request Status (STAT) ..................................................................... 16 3.12 Enter Patient Address (if different from Pt Reg) (ADDR) ......................... 17 3.13 Enter or Edit Beg/End Suspend Dates (SUDT) ........................................ 17
4.0 ROI Reports Menu (RPT)............................................................................... 18
4.1 Print All Disclosures w/2nd and/or 3rd Requests (2ND)........................... 19 4.2 Print Aging Reports (AGE) ....................................................................... 20
4.2.1 By Request Status ........................................................................ 20 4.2.2 By Aging Range ............................................................................ 21 4.2.3 By Staff Assignment ...................................................................... 22 4.2.4 By Purpose.................................................................................... 23
4.3 Count Closed Disclosures by Purpose/Date Range (CNT) ...................... 24 4.4 Patient Detail Disclosure Log (Cumulative) (DDL) ................................... 25 4.5 Print Closed Disclosure Records (DIS) .................................................... 26 4.6 Print Total Number First Party Requests (FOIA) ...................................... 27 4.7 Inquire to a Specific ROI Disclosure Record (IQ) ..................................... 27 4.8 Print Master Log (By Date Range) (ML)................................................... 28 4.9 Print Open Disclosures Only (OP) ........................................................... 29 4.10 Print Reproduction Page Costs (By Date Range) (PAGE) ....................... 30 4.11 Priority Request Report (By STATUS) (REQ) .......................................... 31 4.12 Print Requesting Party Workload by Date Range (RPW) ........................ 32 4.13 Print Suspend Disclosures Only (For Date Range) (SUSP) ..................... 33 4.14 Print User Workload by Date Range (WK) ............................................... 34
5.0 ROI Management Menu (MGT) ..................................................................... 36
5.1 Change Spelling of Requesting Party (CHG) ........................................... 36 5.2 Edit Date Request Initiated (EDT) ............................................................ 37 5.3 Enter or Edit Requesting/Receiving Parties (PE) ..................................... 38 5.4 Print Listing of all Parties (PRT) ............................................................... 38 5.5 Inquire to a Specific Requesting Party (RR) ............................................ 39
Release of Information Disclosure System (BRN) v2.0 Patch 1
User Manual iv Table of Contents May 2008
5.6 Enter or Edit Site Parameter (SITE) ......................................................... 39
6.0 ROI Reporting Utility (RRU) .......................................................................... 41
Glossary ....................................................................................................................... 45
Appendix A: Rules of Behavior .................................................................................. 48 A.1 All RPMS Users ....................................................................................... 48
A.1.1 Access .......................................................................................... 48 A.1.2 Information Accessibility ................................................................ 49 A.1.3 Accountability ................................................................................ 49 A.1.4 Confidentiality................................................................................ 50 A.1.5 Integrity ......................................................................................... 50 A.1.6 System Logon ............................................................................... 50 A.1.7 Passwords..................................................................................... 51 A.1.8 Backups ........................................................................................ 52 A.1.9 Reporting ...................................................................................... 52 A.1.10 Session Timeouts .......................................................................... 52 A.1.11 Hardware ...................................................................................... 52 A.1.12 Awareness .................................................................................... 53 A.1.13 Remote Access ............................................................................. 53
A.2 RPMS Developers ................................................................................... 53 A.3 Privileged Users ....................................................................................... 54
Contact Information .................................................................................................... 57

Release of Information Disclosure System (BRN) v2.0 Patch 1
User Manual 1 Introduction May 2008
1.0 Introduction The Release of Information Disclosure System (ROI) is designed to assist you in the automatic recording, tracking, and maintenance of all requests for Patient Medical Information data from the IHS field facility.
Each disclosure entered into the system is automatically assigned a sequential disclosure number preceded by the ASUFAC number for that particular site. Multiple site parameters can be created under the Management Menu option for tracking individual field site requests.
The program tracks the following information:
1. Requesting Party
2. Disclosure Record Status (Open/Closed/Hold)
3. Type of Disclosure (Medical, Record, Other);
4. Purpose of the Disclosure (Further Medical Care, Insurance, Attorney, Personal, School, Tort, ROI, Subpoena, Other)
5. Detailed Description/Additional pertinent information/Medical Record Date Range
6. Request Priority (Non-Critical, Stat)
7. Field Staff Assignment
8. Congressional Requests
9. Receiving Parties
New disclosure request statuses are automatically tagged as Open. Upon complete dissemination of records to all receiving parties the request status is automatically tagged as Closed.
All disclosures are tagged with a request priority of Non-Critical. Selected records can then be tagged later as Stat, allowing quick and easy access to selected higher-level priority disclosures.
Each disclosure request can also be assigned to a specific field staff, allowing balanced staff workload distribution and tracking.
The ROI Reports module is designed to assist users with the management, control, and maintenance of all incoming/completed requests. A brief description and example of each report is provided within this User Manual.

Release of Information Disclosure System (BRN) v2.0 Patch 1
User Manual 2 Introduction May 2008
Utilizing a variety of reports, the user can quickly inquire to the status of a particular request; obtain a list of all disclosures for a selected patient or group of patients; print a list of all ‘open’ disclosures; print a list of staff workload (by the user who created) and for a particular timeframe; print all disclosures by request priority; print closed disclosures, etc.
Newly added enhancements in patch 1 include:
1. Facility is now stored for each request and has been added as a choice in printing the ROI reports, for multi-division sites.
2. Intro logo now lists latest patch # installed and date installed.
3. Added option to print mailing labels for receiving parties with disclosure dates.
4. Added new option (AMP – Add Multiple Patients Under One Request) that allows you to enter the requesting party information once when the request is for multiple patients.
5. New ROI Reporting Utility. Much like VGEN and PGEN in PCC, this allows a facility to build customized reports on the ROI data, thus eliminating the wait for newly requested reports.
6. New field added: Request Method. Choices are In Person, Telephone Call, Regular Mail, Electronic Mail, and Fax. Field has been added to data entry options and the following reports: Print All Disclosures w/2nd and/or 3rd Requests, Inquire to a Specific Disclosure Record and Print Open Disclosures Only.
7. "Inquire to a Specific ROI Disclosure Record" option is now easier to read and displays patient's chart #.
8. Updated data entry process:
a. If you enter and close a disclosure in one step, you are now asked for NUMBER OF PAGES and COST PER PAGE when a disclosure date is entered for a receiving party.
b. If you do not enter a DISCLOSURE DATE for a receiving party, you will not be asked the other questions (Record Dissemination, # of Pages and Cost per Page).
c. ONLY if TYPE=OTHER will you be asked for OTHER TYPE DESCRIPTION.
9. AGING REPORTS are now grouped under one menu option. Two new Aging Reports have been added: by Staff Assignment and by Purpose.
10. "Priority Request Report – By Status" has been modified to display patient's chart # instead of a partial disclosure number. Also, report title has been fixed: used to say FOIA report which it is not.

Release of Information Disclosure System (BRN) v2.0 Patch 1
User Manual 3 Introduction May 2008
11. "Print User Workload by Date Range" has been enhanced. You now have a choice to run it for a user who Initiated request, who was Assigned request, or who Closed request. You can select one user or run for all.
12. New choice has been added to PURPOSE. It is DISABILITY.
13. Adding and Editing of Requesting and Receiving Parties is now controlled. New parties can only be added under the ROI Management Menu. That is also the only place to update addresses and phone numbers. You can now INACTIVATE a party too.
Note: At the time of install of the new version 2.0 Package, all data will convert from the old version 1.0 Files and Globals (AZXA Namespace) to the new BRN name spacing conventions.

Release of Information Disclosure System (BRN) v2.0 Patch 1
User Manual 4 ROI Main Menu May 2008
2.0 ROI Main Menu The ROI Main Menu allows you to access three sub menus, ROI Edit Menu, ROI Reports Menu, and ROI Management Menu. Also with patch 1, the new option for an ad hoc reporting utility has been added.
******************************************** * INDIAN HEALTH SERVICE * * RELEASE OF INFORMATION SYSTEM * * VERSION 2.0 P1, Jan 20, 2008 * ******************************************** TEST HOSPITAL RELEASE OF INFORMATION SYSTEM DE ROI EDIT MENU ... RPT ROI REPORTS MENU ... MGT ROI MANAGEMENT MENU ... RRU ROI REPORTING UTILITY Select RELEASE OF INFORMATION SYSTEM Option:
Figure 2-1: ROI main menu

Release of Information Disclosure System (BRN) v2.0 Patch 1
User Manual 5 ROI Edit Menu (DE) May 2008
3.0 ROI Edit Menu (DE) This menu provides you with a choice of options that allow you to add/edit/enter ROI disclosures.
• To access the ROI Disclosure Edit Menu, type DE at “Select Release of Information System Option:” prompt at the ROI Main Menu.
******************************************** * INDIAN HEALTH SERVICE * * RELEASE OF INFORMATION SYSTEM * * VERSION 2.0 P1, Jan 20, 2008 * ******************************************** TEST HOSPITAL RELEASE OF INFORMATION SYSTEM DE ROI EDIT MENU ... RPT ROI REPORTS MENU ... MGT ROI MANAGEMENT MENU ... RRU ROI REPORTING UTILITY Select RELEASE OF INFORMATION SYSTEM Option: DE
Figure 3-1: Using the main menu
• The ROI Edit Menu will be displayed (Figure 3-2). Sections 3.1 through 3.12 explain each of the options listed in this menu.
******************************************** * INDIAN HEALTH SERVICE * * RELEASE OF INFORMATION SYSTEM * * VERSION 2.0 P1, Jan 20, 2008 * ******************************************** TEST HOSPITAL ROI EDIT MENU ADD Add a New Disclosure Record AMP Add Multiple Patients Under One Request MOD Edit Existing Disclosure Record DIS Enter Disclosure Documentation LBL Print Mailing Labels DEL Delete Open Disclosure Records AREQ Enter Additional Request Receipt Dates (2nd/3rd) DDL PATIENT Detail Disclosure Log (Cummulative) DSP Inquire to a Specific ROI Disclosure Record PTC Listing Patient Cumulative Disclosures (SUSPEND) STAT Edit Request Status ADDR Enter Patient Address (If different from Pt Reg) SUDT Enter or Edit Beg/End SUSPEND Dates Select ROI EDIT MENU Option:
Figure 3-2: Accessing the ROI disclosure edit menu

Release of Information Disclosure System (BRN) v2.0 Patch 1
User Manual 6 ROI Edit Menu (DE) May 2008
3.1 Add a New Disclosure (ADD) Use this option to add a new disclosure request.
Important: Requesting and receiving parties must already be defined under the “Enter or Edit Requesting/Receiving Parties” option on the ROI Management Menu. They can no longer be added on-the-fly. This new feature was added with patch 1 to help sites better control the entries in the file.
1. To add a new disclosure request, type ADD at the prompt in the ROI Edit Menu.
2. Type the patient’s name or Health Record Number (HRN) at the “Select Patient Name:” prompt.
3. The system will automatically display the last one to four (1-4) requests (Figure 3-3).
4. Press the Return key at the “Do You Want to Continue with Adding a New Disclosure:” prompt.
Select PATIENT NAME: PATIENT,N ************************* **LAST 4 DISCLOSURES** ************************* 04/11/00 290646 PATIENT,N PATIENT 04/15/00 Purpose: OTHER Status: CLOSED Type: MEDICAL RECORD 04/07/00 290640 PATIENT,N FALLON SCHOOL DISTRICT UNKNOWN DISCLOSURE DATE Purpose: ATTORNEY Status: OPEN Type: MEDICAL RECORD 04/07/00 290639 PATIENT,N RENO DIAGNOSTICS UNKNOWN DISCLOSURE DATE Purpose: TORT Status: OPEN Type: Do you want to continue with adding a new Disclosure? Y// [RET]
Figure 3-3: Adding a new disclosure (steps 1-4)
5. Type the desired date or press the Return key to accept the default of TODAY at the “Date Request Initiated:” prompt.
6. The system will automatically assign a disclosure number and display it before moving to the next data field.
7. Select a type of disclosure by typing MEDICAL RECORD or OTHER at the “Type:” prompt.

Release of Information Disclosure System (BRN) v2.0 Patch 1
User Manual 7 ROI Edit Menu (DE) May 2008
8. If you selected OTHER as your disclosure type, then type a narrative description of the disclosure type at the “Other Type Description:” prompt.
9. Type the name of the requesting party at the “Requesting Party:” prompt. The requesting party must already be on the list.
10. Type a purpose at the “Purpose:” prompt. You can select from:
• Further Medical Care
• Insurance
• Attorney
• Personal
• School
• Tort
• FOIA
• Subpoena
• Other
• Disability
DATE REQUEST INITIATED: TODAY// [RET] DISCLOSURE NUMBER: 290647 TYPE: OTHER OTHER TYPE DESCRIPTION: (Only appears if OTHER was chosen as TYPE) REQUESTING PARTY: COUNTY HEALTH DEPARTMENT PURPOSE: FURTHER MEDICAL CARE
Figure 3-4: Adding a new disclosure (steps 5-10)
11. Type the request priority at the “Request Priority:” prompt. Choose either STAT or Non-Critical.
12. Type the name of the staff assigned to this disclosure at the “Staff Assignment:” prompt. This field is not mandatory; you may press the Return key to bypass.
13. Type YES or NO at the “Entire Record:” prompt. Type YES only if the entire record is sent.

Release of Information Disclosure System (BRN) v2.0 Patch 1
User Manual 8 ROI Edit Menu (DE) May 2008
14. If the disclosure is not to include the entire record, type the visit date range at the “Beginning Event Date:” and “Ending Event Date:” prompts. These fields are not mandatory. Enter the specific record information at the “Specific Record Information:” prompt. Your answer must be 1-40 characters in length. Enter a detailed description only if you are sending specific information (i.e. you are sending only back injury related medical information). This is only asked if the entire record is not being sent.
REQUEST PRIORITY: NON-CRITICAL STAFF ASSIGNMENT: CLERK,B ENTIRE RECORD: BEGINNING EVENT DATE: 1-1-2000 ENDING EVENT DATE: 1-4-2000 SPECIFIC RECORD INFORMATION: LAB RESULTS ONLY
Figure 3-5: Adding a new disclosure (steps 11-15)
15. Enter any other additional useful information at the “Disclosure Notes:” prompt. This field is not required. This is a word processing field for which you must answer YES to enter the Screen Editor function.
16. Type the name of the party who is receiving this information at the “Select Receiving Party:” prompt. This party may or may not be the same party requesting this information. The receiving party must already be on the list which is updated using the “Enter or Edit Requesting/Receiving Parties” option on the ROI Management Menu.
17. Type the date the information was disclosed at the “Disclosure Date:” prompt. If the request has just been made and the disclosure not yet been sent, leave this prompt blank.
18. If a disclosure date was entered, type the method of delivery at the “Record Dissemination:” prompt. Select from:
• H Hand Deliver
• I In Person
• MR Mail Regular
• MC Mail Certified
• F Fax
• O Other
• E Electronic 19. If this is a First Party Request, answer YES at that prompt.

Release of Information Disclosure System (BRN) v2.0 Patch 1
User Manual 9 ROI Edit Menu (DE) May 2008
20. Type the next (if any) receiving party at the next “Select Receiving Party:” prompt. When you are finished entering receiving parties, press the Return key at a blank “Select Receiving Party:” prompt.
DISCLOSURE NOTES: Is this a First Party Request?: NO Select RECEIVING PARTY: FALLON SCHOOL DISTRICT Are you adding 'FALLON SCHOOL DISTRICT' as a new RECEIVING PARTY (the 1ST for this ROI DISCLOSURE)? No// YES DISCLOSURE DATE: 4-15-00 RECORD DISSEMINATION: MAIL CERTIFIED Select RECEIVING PARTY: [RET]
Figure 3-6: Adding a new disclosure (steps 16-21)
3.2 Add Multiple Patients Under One Request (AMD) Use this option when a request from one requesting party is for information on multiple patients. You only answer the main request information once for all the patients and then the specific information for each patient.
DATE REQUEST INITIATED: TODAY// TYPE: MEDICAL RECORD REQUEST METHOD: REGULAR MAIL REQUESTING PARTY: COUNTY HEALTH DEPARTMENT PURPOSE: A DISABILITY REQUEST PRIORITY: NON-CRITICAL// NON-CRITICAL Select PATIENT: PATIENT,MANUEL PATIENT,MANUEL <A> M 03-31-1992 000060783 THC 104063 Do you want to continue with adding a new Disclosure? YES// [RET] DISCLOSURE NUMBER: 157619 STAFF ASSIGNMENT: NURSE,A ENTIRE RECORD: YES (or bypass and enter encounter dates) DISCLOSURE NOTES: No existing text Edit? NO// (YES to type in notes on this patient’s request) Is this a First Party Request?: NO Select RECEIVING PARTY: COUNTY HEALTH DEPARTMENT Are you adding 'COUNTY HEALTH DEPARTMENT' as a new RECEIVING PARTY (the 1ST for this ROI LISTING RECORD)? No// YES DISCLOSURE DATE: [RET] unless already disclosed Select RECEIVING PARTY: (May enter another receiving party here) Select Another PATIENT: (Now enter information on the next patient)
Figure 3-7: Adding multiple patients under one request

Release of Information Disclosure System (BRN) v2.0 Patch 1
User Manual 10 ROI Edit Menu (DE) May 2008
3.3 Edit Existing Disclosure Record (MOD) Use this option to modify an existing disclosure record. You may select the existing record by entering the date the disclosure was initiated, the disclosure number, the patient’s name, or the patient’s HRN. Once the desired record is selected, you can change any of the existing field values (which are displayed with the current value and two forward slashes [//]).
1. To edit an existing disclosure record, type MOD at the prompt in the ROI Edit Menu.
2. To select an existing record, type the date that the disclosure was initiated, the disclosure number, the patient’s name, or the patient’s HRN at the “Select ROI Disclosure Date Request Initiated:” prompt. The system will then bring up the disclosure.
3. To edit a given field, type the new information after the two forward slashes (//). If no editing is needed, press the Return key to view the next field.
Select ROI DISCLOSURE DATE REQUEST INITIATED: 4-13-2000 290647 PATIENT,N FALLON SCHOOL DISTRICT DISCLOSURE NUMBER: 290647// (No Editing) PATIENT: SMITH,ANITA// (No Editing) TYPE: MEDICAL// [RET] OTHER TYPE DESCRIPTION: [RET] REQUESTING PARTY: FALLON SCHOOL DISTRICT// [RET] PURPOSE: FOIA// SCHOOL REQUEST PRIORITY: NON-CRITICAL// STAT STAFF ASSIGNMENT: CLERK,B//[RET] ENTIRE RECORD: [RET] BEGINNING EVENT DATE: JAN 1,2000//[RET] ENDING EVENT DATE: APR 13,2000//[RET] SPECIFIC RECORD INFORMATION: [RET] DISCLOSURE NOTES: No existing text Edit? NO//[RET] Is this a First Party Request?: NO// [RET] Select RECEIVING PARTY: FALLON SCHOOL DISTRICT//[RET] Select RECEIVING PARTY: [RET]
Figure 3-8: Editing an existing disclosure
3.4 Enter Disclosure Documentation (DIS) Use this option to document who, when, and how the documentation was provided for this disclosure request. You can select the existing record by entering the date that the disclosure was initiated, the disclosure number, the patient’s name, or the patient’s HRN.
You can also change any of the existing field values (which are displayed with current Value and two forward slashes [//]).

Release of Information Disclosure System (BRN) v2.0 Patch 1
User Manual 11 ROI Edit Menu (DE) May 2008
1. To select an existing record, type DIS at the prompt in the ROI Edit Menu.
2. Type the date that the disclosure was initiated, the disclosure number, the patient’s name, or the patient’s HRN at the “Select ROI Disclosure Date Request Initiated:” prompt.
3. Type the receiving party’s name (either from the existing list for this request or add a new receiving party) or press the Return key to edit the current entry.
4. Type the date of disclosure at the “Disclosure Date:” prompt.
5. Type how the disclosure was completed at the “Record Dissemination:” prompt. Select from:
• H Hand Deliver
• I In Person
• MR Mail Regular
• MC Mail Certified
• F Fax
• O Other
• E Electronic 6. Type the number of individual pages that were copied at the “Number of Pages:”
prompt.
7. Type the cost of each copy page at the “Cost per Page:” prompt.
8. Type the next receiving party at the next “Select Receiving Party:” prompt. When you are finished entering receiving parties, press the Return key at a blank “Select Receiving Party:” prompt.
Select ROI DISCLOSURE DATE REQUEST INITIATED: 4-13-2000 290647 PATIENT,N FALLON SCHOOL DISTRICT Select RECEIVING PARTY: FALLON SCHOOL DISTRICT// [RET] DISCLOSURE DATE: T 4-17-2000 RECORD DISSEMINATION: Choose from: H HAND DELIVER I IN PERSON MR MAIL REGULAR MC MAIL CERTIFIED F FAX O OTHER E ELECTRONIC RECORD DISSEMINATION: MC MAIL CERTIFIED NUMBER OF PAGES: 50 COST PER PAGE: .10 Select RECEIVING PARTY: PATIENT Are you adding 'PATIENT' as a new RECEIVING PARTY (the 2ND) No// YES

Release of Information Disclosure System (BRN) v2.0 Patch 1
User Manual 12 ROI Edit Menu (DE) May 2008
DISCLOSURE DATE: T 4-17-2000 RECORD DISSEMINATION: MC MAIL CERTIFIED NUMBER OF PAGES: 50 COST PER PAGE: .10 Select RECEIVING PARTY:
Figure 3-9: Entering disclosure documentation
3.5 Print Mailing Labels (LBL) Use this option to print mailing labels for any disclosure record with a disclosure date defined. The mailing labels are set up in the same format as patient address labels in Patient Registration.
Select Disclosure: PATIENT,R COUNTY HEALTH DEPARTMENT COUNTY HEALTH DEPARTMENT added to list Select Disclosure: (Enter another disclosure here) How many COPIES of each label: (1-5): 1// 2 (NOTE: Mailing Labels need to be loaded in the printer.) DEVICE: (Type in printer name once lables are loaded)
Figure 3-10: Printing mailing labels
3.6 Delete Open Disclosure Records (DEL) Use this Option to DELETE an Open Disclosure. Closed disclosures cannot be deleted. You can select the desired disclosure by entering the disclosure number, patient name, or patient HRN. The disclosure and verification message are displayed to ensure that you selected the correct disclosure.
1. To delete an open disclosure, type DEL at the prompt in the ROI Disclosure Edit Menu.
2. Type the date that the disclosure was initiated, the disclosure number, the patient’s name, or the patient’s HRN at the “Select Disclosure by Patient or by Disclosure Date or Disclosure #:” prompt.
3. To confirm deletion, type YES at the “Sure you want to delete?” prompt.
4. The message Disclosure Record Deleted will be displayed.
Select DISCLOSURE by Patient or by Disclosure Date or Disclosure #: 4-7-2000 290637 PATIENT,A May 25, 2000 15:42:45 **DISCLOSURE RECORD IS DISPLAYED IN BROWSER MODE PRIOR TO DELETION DECISION** Page: 1 of 3 User: USER,A **********************************************************

Release of Information Disclosure System (BRN) v2.0 Patch 1
User Manual 13 ROI Edit Menu (DE) May 2008
Patient Name: PATIENT,A Chart #: 78910 Date of Birth: MAR 01, 1949 Sex: F =============== DISCLOSURE RECORD =============== DATE REQUEST INITIATED: APR 07, 2000 DISCLOSURE NUMBER: 290637 PATIENT: PATIENT,A TYPE: MEDICAL RECORD OTHER TYPE DESCRIPTION: This Back Injury Specific REQUESTING PARTY: FALLON TRIBAL HLTH CLINIC PURPOSE: FURTHER MEDICAL CARE REQUEST STATUS: OPEN REQUEST PRIORITY: STAT STAFF ASSIGNMENT: CLERK,B USER INITIATED: CLERK,A USER COMPLETED: CLERK,B ENTIRE RECORD: NO BEGINNING EVENT DATE: JAN 01, 2000 ENDING EVENT DATE: MAY 25, 2000 SPECIFIC RECORD INFORMATI: Back Injury DATE DISCLOSURE CLOSED: MAY 25, 2000 PURPOSE OF DISCLOSURE: FURTHER MEDICAL CARE DISCLOSURE NOTES: Original request was from the Patient (Self); then the Fall Tribal Health Clinic requested the identical information. This resulted in 2 Receiving Parties for same request. ROI RECEIVING PARTIES: RECEIVING PARTY: PATIENT DISCLOSURE DATE: MAY 25, 2000 RECORD DISSEMINATION: MAIL CERTIFIED NUMBER OF DAYS OLD: 48 RECEIVING PARTY: FALLON TRIBAL HLTH CLINIC DISCLOSURE DATE: MAY 01, 2000 RECORD DISSEMINATION: MAIL CERTIFIED NUMBER OF DAYS OLD: 24 THE ABOVE DISCLOSURE AND RELATED ENTRIES WILL BE REMOVED FOREVER !!! Sure you want to delete? No// YES Disclosure Record Deleted - 290637
Figure 3-11: Deleting an open disclosure
3.7 Enter Additional Request Receipt Dates (2nd/3rd) (AREQ) The purpose of this function is to allow you to document second and/or third requests for medical information. You select the desired disclosure and populate the Date Received field. Once a second request date is entered, you cannot edit the value. The next edit will take you automatically to the third request date. See all reports for second and/third requests disclosures.

Release of Information Disclosure System (BRN) v2.0 Patch 1
User Manual 14 ROI Edit Menu (DE) May 2008
1. To enter additional request receipt dates, type AREQ at the prompt in the ROI Disclosure Edit Menu.
2. Type the date that the disclosure was initiated, the disclosure number, the patient’s name, or the patient’s HRN at the “Select ROI Disclosure Date Request Initiated:” prompt.
3. Type the second request date at the “2nd Request Date:” prompt. Then type the method used to send in the 2nd request.
4. Type the third request date at the “3rd Request Date:” prompt. Then type the method used to send in the 3rd request.
Select ROI DISCLOSURE DATE REQUEST INITIATED: 29062 3-6-2000 29062 PATIENT,A SHROEDER,RICKY ATTORNEY 2ND REQUEST DATE: 5-1-00 (MAY 01, 2000) 2ND REQUEST METHOD: FAX 3RD REQUEST DATE: 3RD REQUEST METHOD:
Figure 3-12: Entering additional request dates
3.8 Patient Detailed Disclosure Log (Cumulative) (DDL) This report will print a cumulative list of one individual patient’s disclosure requests. You simply enter the name of the desired patient. This report is useful for placing in the individual patient chart and serves as a total historical listing of all requests for information for this particular patient. Once a new request is received, this report should be generated again for this particular patient for documenting all disclosure requests.
1. To print a Patient Detailed Disclosure log, type DDL at the prompt in the ROI Disclosure Edit Menu.
2. Type the patient’s name at the “Enter a Patient Name:” prompt.
3. Type the name of a print device at the “Device:” prompt.
Enter a Patient Name: PATIENT,A F 03-01-1949 000044584 PAH 78910 DEVICE: (Type in HOME or printer name) **CONFIDENTIAL PATIENT DATA COVERED BY PRIVACY ACT** ROI CUMMULATIVE PATIENT RECORD OCT 30,2001 PAGE 1 PATIENT,A –HR#: 78910 RECORD INFORMATION REC PTY DATE DISC ----------------------------------------------------------------------------- 03/16/00 290626 TENN P.I.M.C. FURTHER MEDI MEDICAL RE 04/07/00 290637 PATIENT FALLON TRIBAL H FURTHER MEDI MEDICAL RE 05/25/00

Release of Information Disclosure System (BRN) v2.0 Patch 1
User Manual 15 ROI Edit Menu (DE) May 2008
04/07/00 290641 FALLON SCHOOL D OTHER MEDICAL 04/10/00 290642 FALLON SCHOOL D SUBPOENA OTHER 04/10/00 07/07/00 290657 PATIENT SUBPOENA MEDICAL RE 07/21/00 12/05/00 290660 RENO DIAGNOSTIC INSURANCE OTHER
Figure 3-13: Printing a Patient Detailed Disclosure log
3.9 Inquire to a Specific ROI Disclosure Record (DSP) This report allows you to quickly display or print a specific disclosure record. You will be asked to select the desired record. You may enter the disclosure number, the date of disclosure, the patient’s name, or the patient’s HRN. The report will list all current data recorded for this selected disclosure record.
1. To inquire to a specific ROI record, type DSP at the prompt in the ROI Edit Menu.
2. Type the date that the disclosure was initiated, the disclosure number, the patient’s name, or the patient’s HRN at the “Select ROI Disclosure Date Request Initiated:” prompt.
3. Type the name of a print device at the “Device:” prompt.
Select ROI DISCLOSURE DATE REQUEST INITIATED: PATIENT,C DEVICE: (Type HOME to view on screen or printer name) **CONFIDENTIAL PATIENT DATA COVERED BY PRIVACY ACT** INQUIRE TO ROI REQUEST RECORD FEB 14,2008 09:29 PAGE 1 ----------------------------------------------------------------------------- DISCLOSURE #157615 Initiated On JAN 16,2008 by TELEPHONE CALL REQUEST STATUS: OPEN PRIORITY: NON-CRITICAL PATIENT: PATIENT,C (#102585) FACILITY: TAOS-PICURIS HEALTH CENTER REQUESTING PARTY: COUNTY HEALTH DEPARTMENT PURPOSE: SCHOOL TYPE: MEDICAL RECORD TESTING INIITIATED BY: CLERK,B ASSIGNED TO: CLERK,C COMPLETED BY: CLOSED: DISCLOSURE NOTES: 2ND REQUEST: FEB 14,2008 2ND REQUEST METHOD: FAX RECEIVING PARTY: COUNTY HEALTH DEPARTMENT DISCLOSURE DATE: DISSEMINATION:
Figure 3-14: Inquiring to a specific ROI record

Release of Information Disclosure System (BRN) v2.0 Patch 1
User Manual 16 ROI Edit Menu (DE) May 2008
3.10 Listing of Patient Cumulative Disclosures (PTC) This option provides a quick onscreen display of only all disclosure records for a selected patient. The report prints the number of disclosures for this patient, the disclosure number, the date received, the requesting party, the type of disclosure, and the disclosure status.
1. To display a brief listing, type PTC at the prompt in the ROI Edit Menu.
2. Type the patient’s name or HRN at the “Select Patient Name:” prompt.
3. Press the Return key at the “Do You Wish to Print Suspended Disclosures?” prompt. By selecting NO, all disclosures (tagged with a beginning and ending suspend date) will not print, providing that the suspend dates fall within today’s date (the date the report is printed). If you type YES, all disclosures will print for the selected patient (whether or not the suspend date exists).
4. Type the name of a print device at the “Device:” prompt.
Select PATIENT NAME: PATIENT,N Do You Wish to print SUSPENDED Disclosures? NO// [RET] DEVICE: **CONFIDENTIAL PATIENT DATA COVERED BY PRIVACY ACT** CUMMULATIVE DISCLOSURE RECORDS FOR: PATINET,N HEALTH RECORD #: PAH 1905 DISPLAY DATE: Apr 17, 2000 Number DISC # DT REC'D REQUESTING PARTY TYPE STATUS ____________________________________________________________________________ 1) 29064 3/7/00 FT. PECK TRIBE P H 2) 290625 3/15/0 RENO DIAGNOSTICS O O 3) 290635 4/7/00 YOH MA MA M C 4) 290638 4/7/00 P.I.M.C. P O 5) 290639 4/7/00 RENO DIAGNOSTICS P O 6) 290640 4/7/00 FALLON SCHOOL DISTRICT M O 7) 290646 4/11/00 YOH MA MA M O 8) 290647 4/13/00 FALLON SCHOOL DISTRIC P C
Figure 3-15: Displaying a brief listing
3.11 Edit Request Status (STAT) This option allows you to quickly tag disclosures with a request status.
1. To edit a request status, type STAT at the prompt in the ROI Edit Menu.
2. Type the date that the disclosure was initiated, the disclosure number, the patient’s name, or the patient’s HRN at the “Select ROI Disclosure Date Request Initiated:” prompt.
3. Type a Request Status option at the “Request Status:” prompt. Your options are:
• O (OPEN)

Release of Information Disclosure System (BRN) v2.0 Patch 1
User Manual 17 ROI Edit Menu (DE) May 2008
• H (HOLD)
• C (CLOSED)
• D (DENIED)
• S (SUSPEND)
Select ROI DISCLOSURE DATE REQUEST INITIATED: 290621 REQUEST STATUS: OPEN
Figure 3-16: Editing a request status
3.12 Enter Patient Address (if different from Pt Reg) (ADDR) Use this option only if the Receiving Party is PATIENT or SELF and the mailing address is different than Patient Registration for this specific disclosure.
Select ROI LISTING RECORD DATE REQUEST INITIATED: PATIENT,N PATIENT MAILING STREET/PO BOX: PATIENT MAILING CITY: PATIENT MAILING STATE: PATIENT MAILING ZIP:
Figure 3-17: Entering patient address
3.13 Enter or Edit Beg/End Suspend Dates (SUDT) This option allows you to tag specified disclosures with a suspend date range. You are prompted for a starting date and then an ending date. The purpose of the suspend dates are to prevent the printing of this disclosure when printing the PTC (Listing of Patient Cumulative Disclosures (Suspend)) report. This report allows you to not print any disclosures if those suspend dates fall within the date the report is printed.
1. To enter or edit beg/end suspend dates, type SUDT at the prompt in the ROI Edit menu.
2. Type date disclosure was initiated, the disclosure number, the patient’s name, or the patient’s HRN at the “Select ROI Disclosure Date Request Initiated:” prompt.
3. Type the start of the suspend date at the “Suspend Start DT:” prompt.
4. Type the end of the suspend sate at the “Suspend Stop DT:” prompt.
Select ROI DISCLOSURE DATE REQUEST INITIATED: 290621 SUSPEND START DT:: T (JAN 13, 2003) SUSPEND STOP DT: T+30 (FEB 12, 2003)
Figure 3-18: Entering suspend dates

Release of Information Disclosure System (BRN) v2.0 Patch 1
User Manual 18 ROI Reports Menu (RPT) May 2008
4.0 ROI Reports Menu (RPT) This menu allows you to print several reports specific to the ROI disclosure system.
• To access the ROI Reports Menu, type RPT at “Select Release of Information System Option:” prompt at the ROI Main Menu.
******************************************** * INDIAN HEALTH SERVICE * * RELEASE OF INFORMATION SYSTEM * * VERSION 2.0 P1, Jan 20, 2008 * ******************************************** TEST HOSPITAL RELEASE OF INFORMATION SYSTEM DE ROI EDIT MENU ... RPT ROI REPORTS MENU ... MGT ROI MANAGEMENT MENU ... RRU ROI REPORTING UTILITY Select RELEASE OF INFORMATION SYSTEM Option: RPT
Figure 4-1: Accessing the report menu
• The ROI Reports Menu will be displayed (Figure 4-2). Sections 4.1 through 4.14 explain each of the options listed in this menu.
******************************************** * INDIAN HEALTH SERVICE * * RELEASE OF INFORMATION SYSTEM * * VERSION 2.0 P1, Jan 20, 2008 * ******************************************** TEST HOSPITAL ROI REPORTS MENU 2ND Print All Disclosures W/2nd and/or 3rd Requests AGE Print AGING REPORTS CNT Count Closed Disclosures By Purpose/Date Range DDL PATIENT Detail Disclosure Log (Cummulative) DIS Print CLOSED Disclosure Records FOIA Print Total Number First Party Requests IQ Inquire to a Specific ROI Disclosure Record ML Print Master Log (By Date Range) OP Print OPEN Disclosures Only PAGE Print Reproduction Page Costs (By Date Range) REQ Priority Request Report (By STATUS) RPW Print Requesting Party Workload by Date Range SUSP Print SUSPEND Disclosures Only (For Date Range) WK Print User Workload by Date Range Select ROI REPORTS MENU Option:
Figure 4-2: Using the ROI reports menu

Release of Information Disclosure System (BRN) v2.0 Patch 1
User Manual 19 ROI Reports Menu (RPT) May 2008
4.1 Print All Disclosures w/2nd and/or 3rd Requests (2ND) The purpose of this report is to print a listing of all disclosures during a specified date range for which there was either a second and/or third request for the same patient medical information. The request method for each request is also listed.
1. To print all disclosures with a second and/or third request, type 2nd at the ROI Reports Menu.
2. Type the beginning of the date range at the “Enter Beginning ROI Initiated Date:” prompt.
3. Type the ending of the date range at the “Enter Ending ROI Initiated Date:” prompt.
4. If you are a multi-division site with more than one site set up in the ROI Parameters, you will be asked to choose to print this report for all facilities or just one.
5. Type the name of a print device at the “Device:” prompt.
Enter beginning ROI Initiated Date: 1-1-00 (JAN 01, 2000) Enter ending ROI Initiation Date: (1/1/00 - 99/99/99): TODAY (OCT 30, 2001) ==================== ** If you are a multi-division site, you will be asked the following: Print for ALL Facilities? YES// (Answer YES or NO; if NO, choose a site => Select Facility: ? Answer with ROI LISTING PARAMETER FACILITY NAME Choose from: TEST HOSPITAL IHS CLINIC Select Facility: TEST HOSPITAL ==================== DEVICE: (Type in HOME to view on screen OR printer name) **CONFIDENTIAL PATIENT DATA COVERED BY PRIVACY ACT** 2ND & 3RD DISCLOSURE REQUESTS OCT 30,2001 14:27 PAGE 1 1ST DISCLOSURE REQUEST NUMBER STATUS REQUESTING PARTY REQUEST METHOD 2ND / 3RD ----------------------------------------------------------------------------- FACILITY: TEST HOSPITAL 02/29/00 29061 CLOSED FT. PECK TRIBE FAX TELEPHONE CALL 10/04/01 03/06/00 29062 CLOSED LOCAL ATTORNEY REGULAR MAIL FAX 05/01/00 TELEPHONE CALL 05/15/00
Figure 4-3: Printing all disclosures

Release of Information Disclosure System (BRN) v2.0 Patch 1
User Manual 20 ROI Reports Menu (RPT) May 2008
4.2 Print Aging Reports (AGE) Use this report to print one of the four reports based on the age of the disclosure request. The following reports are available:
Select one of the following: 1 By Request STATUS 2 By AGING Range 3 By STAFF Assignment 4 By PURPOSE Select a Report:
Figure 4-4: Menu options for printing aging reports
4.2.1 By Request Status The By Request Status Aging Report prints disclosures based on their current status (Open, Hold, Closed, or Denied). It displays the disclosure number, disclosure status, date received, receiving party(s), the date disclosed (if any), the request priority, purpose, and staff assignment. The number of days old is calculated at the time the report is printed (using today’s date).
1. To print an aging report by request status, type AGE at the ROI Reports Menu. Then select 1 from the list of reports.
2. Type YES or NO at the “Would You Like to Include Only a Particular ROI Disclosure Status in this Report?” prompt.
3. If you answered YES, type the status you are interested in at the “Enter the Status:” prompt.
4. If you are a multi-division site with more than one site set up in the ROI Parameters, you will be asked to choose to print this report for all facilities or just one.
5. Type the name of a print device at the “Device:” prompt.
Would you like to INCLUDE ONLY a particular ROI Disclosure Status in this report? NO// YES Enter the Status: HOLD ==================== ** If you are a multi-division site, you will be asked the following: Print for ALL Facilities? YES// (Answer YES or NO; if NO, choose a site => Select Facility: ? Answer with ROI LISTING PARAMETER FACILITY NAME Choose from: TEST HOSPITAL IHS CLINIC Select Facility: TEST HOSPITAL ==================== DEVICE: (Type in HOME to view on screen OR printer name)

Release of Information Disclosure System (BRN) v2.0 Patch 1
User Manual 21 ROI Reports Menu (RPT) May 2008
AGING REPORT **CONFIDENTIAL PATIENT DATA COVERED BY PRIVACY ACT** JUL 5,2000 16:23 PAGE 1 DISC # ST DT REC'D RECEIVING AGE DISC DT P PURPOSE STAFF ----------------------------------------------------------------------------- 29062 H 03/06/00 LOCAL ATTOR 1 03/07/00 N ATTORNEY CLERK,B 29064 H 03/07/00 FT. PECK TR 0 03/07/00 PATIENT 0 03/07/00 N SUBPOENA CLERK,B 29068 H 03/01/00 LOCAL ATTOR 126 N ATTORNEY CLERK,D 290610 H 01/15/97 INSURANCE CO 1267 N ATTORNEY CLERK,A
Figure 4-5: Printing aging report by status
4.2.2 By Aging Range Use the By Aging Range report to print a listing of the disclosure by a selected age range (i.e., 30 days +, 60 days +, 90 days +, 120 days +).
The report prints the disclosure number, disclosure status, date received, receiving party(s), the date disclosed (if any), the request priority, purpose, and staff assignment. The days old is calculated at the time the report is printed (using today’s date).
1. To print an aging report by selected age range, type AGER at the ROI Reports Menu. Then select 2 from the list of reports.
2. Type YES or NO at the “Would You Like to Include a Particular Aging Starting Range?” prompt.
3. If you answered YES, type the number of days you would like to start at the “Enter the Number Starting Point:” prompt.
4. If you are a multi-division site with more than one site set up in the ROI Parameters, you will be asked to choose to print this report for all facilities or just one.
5. Type the name of a print device at the “Device:” prompt.
Would you like to include a particular Aging Starting Range? ? NO// YES Select one of the following: 30 30 DAYS + 60 60 DAYS + 90 90 DAYS + 120 120 DAYS + Enter the Number Starting Point: 120 DAYS + ==================== ** If you are a multi-division site, you will be asked the following: Print for ALL Facilities? YES// (Answer YES or NO; if NO, choose a site => Select Facility: ?

Release of Information Disclosure System (BRN) v2.0 Patch 1
User Manual 22 ROI Reports Menu (RPT) May 2008
Answer with ROI LISTING PARAMETER FACILITY NAME Choose from: TEST HOSPITAL IHS CLINIC Select Facility: TEST HOSPITAL ==================== DEVICE: AGING REPORT **CONFIDENTIAL PATIENT DATA COVERED BY PRIVACY ACT** JUL 5,2000 16:30 PAGE 1 DISC # ST DT REC'D RECEIVING AGE DISC DT P PURPOSE STAFF ----------------------------------------------------------------------------- 29068 C 03/01/00 LOCAL ATTOR 126 04/13/00 N ATTORNEY CLERK,D 290610 H 01/15/97 INSURANCE CO 1267 N ATTORNEY CLERK,A
Figure 4-6: Printing an aging report by a selected aging range
4.2.3 By Staff Assignment 1. The By Staff Assignment Aging Report prints disclosures based on which staff
member was assigned to handle the request. It displays the disclosure number, disclosure status, date received, receiving party(s), the date disclosed (if any), the request priority, purpose, and staff assignment. The number of days old is calculated at the time the report is printed (using today’s date).
2. To print an aging report by request status, type AGE at the ROI Reports Menu. Then select 3 from the list of reports.
3. Type YES or NO at the “Would You Like to Include Only a particular staff member in this Report?” prompt.
4. If you answered YES, type the status you are interested in at the “Enter the Status:” prompt.
5. If you are a multi-division site with more than one site set up in the ROI Parameters, you will be asked to choose to print this report for all facilities or just one.
6. Type the name of a print device at the “Device:” prompt.
Would you like to run this report for ONLY a particular staff member? NO// YES Select STAFF ASSIGNED: CLERK,B ==================== ** If you are a multi-division site, you will be asked the following: Print for ALL Facilities? YES// (Answer YES or NO; if NO, choose a site => Select Facility: ? Answer with ROI LISTING PARAMETER FACILITY NAME Choose from: TEST HOSPITAL IHS CLINIC Select Facility: TEST HOSPITAL ====================

Release of Information Disclosure System (BRN) v2.0 Patch 1
User Manual 23 ROI Reports Menu (RPT) May 2008
DEVICE: (Type in HOME to view on screen OR printer name) AGING REPORT **CONFIDENTIAL PATIENT DATA COVERED BY PRIVACY ACT** JUL 5,2000 16:23 PAGE 1 DISC # ST DT REC'D RECEIVING AGE DISC DT P PURPOSE STAFF ----------------------------------------------------------------------------- 29062 C 03/06/00 LOCAL ATTOR 1 03/07/00 N ATTORNEY CLERK,B 29064 C 03/07/00 FT. PECK TR 0 03/07/00 PATIENT 0 03/07/00 N SUBPOENA CLERK,B
Figure 4-7: Printing aging report by staff assignment
4.2.4 By Purpose The By Purpose Aging Report prints disclosures based on which staff member was assigned to handle the request. It displays the disclosure number, disclosure status, date received, receiving party(s), the date disclosed (if any), the request priority, purpose, and staff assignment. The number of days old is calculated at the time the report is printed (using today’s date).
1. To print an aging report by request status, type AGE at the ROI Reports Menu. Then select 4 from the list of reports.
2. Type YES or NO at the “Would You Like to Include Only one PURPOSE in this Report?” prompt.
3. If you answered YES, type the status you are interested in at the “Enter the Status:” prompt.
4. If you are a multi-division site with more than one site set up in the ROI Parameters, you will be asked to choose to print this report for all facilities or just one.
5. Type the name of a print device at the “Device:” prompt.
Would you like to run this report for ONLY one PURPOSE? NO// YES Select PURPOSE: DISABILITY ==================== ** If you are a multi-division site, you will be asked the following: Print for ALL Facilities? YES// (Answer YES or NO; if NO, choose a site => Select Facility: ? Answer with ROI LISTING PARAMETER FACILITY NAME Choose from: TEST HOSPITAL IHS CLINIC Select Facility: TEST HOSPITAL ==================== DEVICE: (Type in HOME to view on screen OR printer name)

Release of Information Disclosure System (BRN) v2.0 Patch 1
User Manual 24 ROI Reports Menu (RPT) May 2008
AGING REPORT **CONFIDENTIAL PATIENT DATA COVERED BY PRIVACY ACT** JUL 5,2000 16:23 PAGE 1 DISC # ST DT REC'D RECEIVING AGE DISC DT P PURPOSE STAFF ----------------------------------------------------------------------------- 29062 C 03/06/00 LOCAL ATTOR 1 03/07/00 N DISABILITY CLERK,B 29064 C 03/07/00 FT. PECK TR 0 03/07/00 PATIENT 0 03/07/00 N DISABILITY CLERK,B
Figure 4-8: Printing aging report by purpose
4.3 Count Closed Disclosures by Purpose/Date Range (CNT) Use this report to count and print a summary listing of closed disclosures (for a specified date range). This count is then sub-totaled by purpose of disclosure.
1. To print a count of closed disclosures, type CNT at the ROI Reports Menu.
2. Type the beginning date of the date range at the “Enter beginning ROI initiated Date:” prompt.
3. Type the ending date of the date range at the “Enter ending ROI Initiation Date:” prompt.
4. If you are a multi-division site with more than one site set up in the ROI Parameters, you will be asked to choose to print this report for all facilities or just one.
5. Type the name of a print device at the “Device:” prompt.
Enter beginning ROI Initiated Date: 1-1-00 (JAN 01, 2000) Enter ending ROI Initiation Date: (1/1/00 - 99/99/99): TODAY (OCT 30, 2001) ==================== ** If you are a multi-division site, you will be asked the following: Print for ALL Facilities? YES// (Answer YES or NO; if NO, choose a site => Select Facility: ? Answer with ROI LISTING PARAMETER FACILITY NAME Choose from: TEST HOSPITAL IHS CLINIC Select Facility: TEST HOSPITAL ==================== DEVICE: (Type in HOME to view on screen OR printer name) ROI DISCLOSURE STATISTICS OCT 30,2001 14:36 PAGE 1 PURPOSE ----------------------------------------------------------------------------- PURPOSE: FURTHER MEDICAL CARE SUBCOUNT 5

Release of Information Disclosure System (BRN) v2.0 Patch 1
User Manual 25 ROI Reports Menu (RPT) May 2008
PURPOSE: ATTORNEY SUBCOUNT 4 PURPOSE: PERSONAL SUBCOUNT 1 PURPOSE: SCHOOL SUBCOUNT 5 PURPOSE: TORT SUBCOUNT 1 PURPOSE: FOIA SUBCOUNT 3 PURPOSE: SUBPOENA SUBCOUNT 3 PURPOSE: OTHER SUBCOUNT 1 COUNT 23
Figure 4-9: Printing a count of closed disclosures
4.4 Patient Detail Disclosure Log (Cumulative) (DDL) Use this report to print a cumulative list of one individual patient’s disclosure requests. This report is useful for placing in the individual patient chart and serves as a total historical listing of all requests for information for this particular patient. Once a new request is received, this report should be generated again for this particular patient for documenting all disclosure requests. This report can also be printed under the ROI Edit Menu option.
1. To print a detailed patient disclosure log, type DLL at the ROI Reports menu.
2. Type the patient’s name at the “Enter a Patient Name:” prompt.
3. Type the name of a print device at the “Device:” prompt.
Enter a Patient Name: PATIENT,A F 03-01-1949 000044584 PAH 78910 DEVICE: (Type in HOME or printer name) **CONFIDENTIAL PATIENT DATA COVERED BY PRIVACY ACT** ROI CUMMULATIVE PATIENT RECORD OCT 30,2001 PAGE 1 PATIENT,A –HR#: 78910 RECORD INFORMATION REC PTY DATE DISC ----------------------------------------------------------------------------- 03/16/00 290626 TENN P.I.M.C. FURTHER MEDI MEDICAL RE 04/07/00 290637 PATIENT FALLON TRIBAL H FURTHER MEDI MEDICAL RE 05/25/00 04/07/00 290641 FALLON SCHOOL D OTHER MEDICAL

Release of Information Disclosure System (BRN) v2.0 Patch 1
User Manual 26 ROI Reports Menu (RPT) May 2008
04/10/00 290642 FALLON SCHOOL D SUBPOENA OTHER 04/10/00 07/07/00 290657 PATIENT SUBPOENA MEDICAL RE 07/21/00 12/05/00 290660 RENO DIAGNOSTIC INSURANCE OTHER
Figure 4-10: Printing a detailed patient disclosure log
4.5 Print Closed Disclosure Records (DIS) This report will print all closed disclosures for any given time frame. The report displays the disclosure number, date the disclosure initiated, the requesting party, the staff who entered the disclosure, the user who completed the disclosure, the receiving party(s), and the date disclosed.
1. To print a closed disclosure record, type DIS at the ROI Reports menu.
2. Type the beginning date at the “Enter Beginning ROI Initiated Date:” prompt.
3. Type the ending date at the “Enter Ending ROI Initiated Date:” prompt.
4. If you are a multi-division site with more than one site set up in the ROI Parameters, you will be asked to choose to print this report for all facilities or just one.
5. Type the name of a print device at the “Device:” prompt.
Enter beginning ROI Initiated Date: 1-1-1998 Enter ending ROI Initiation Date: (1/1/00 - 99/99/99): 3-1-00 ==================== ** If you are a multi-division site, you will be asked the following: Print for ALL Facilities? YES// (Answer YES or NO; if NO, choose a site => Select Facility: ? Answer with ROI LISTING PARAMETER FACILITY NAME Choose from: TEST HOSPITAL IHS CLINIC Select Facility: TEST HOSPITAL ==================== DEVICE: (Type in HOME to view on screen OR printer name) CLOSED DISCLOSURES - **CONFIDENTIAL PATIENT DATA COVERED BY PRIVACY ACT** APR 13,2000 13:48 PAGE 1 DISCLOSURE REQUESTING USER USER RECEIVING DISCLOSURE NUMBER PARTY INITIATED COMPLETED PARTY DATE ----------------------------------------------------------------------------- 29067 FT. PECK TRIB CLERK,B CLERK,B BROWN,JAMES A 08/27/98 290619 P.I.M.C. CLERK,B CLERK,B P.I.M.C. 11/26/99 290618 NIKE CORPORAT CLERK,B CLERK,B NIKE CORPORAT 01/02/00 290618 NIKE CORPORAT CLERK,B CLERK,B DRINKING WATE 01/03/00 290612 DRINKING WATE MGR,TWO CLERK,B DRINKING WATE 02/24/00

Release of Information Disclosure System (BRN) v2.0 Patch 1
User Manual 27 ROI Reports Menu (RPT) May 2008
NIKE CORPORAT 02/24/00
Figure 4-11: Printing a closed disclosure record
4.6 Print Total Number First Party Requests (FOIA) Use this report to count and print a summary listing of disclosures (for a specified date range). This count is sub-totaled by purpose of disclosure and can be selected for only one facility in multi-division systems.
Beginning October 2, 2001, the Freedom of Information Act (IHS Headquarters) requires monthly/quarterly reporting of all “First Party” requests for medical records (access requests).
This report is designed to respond to these newly mandated reporting requirements.
FOIA First Party Requests JAN 14,2002 14:10 PAGE 1 PURPOSE ----------------------------------------------------------------------------- PURPOSE: FURTHER MEDICAL CARE SUBCOUNT 2 PURPOSE: INSURANCE SUBCOUNT 6 PURPOSE: PERSONAL SUBCOUNT 1 PURPOSE: SCHOOL SUBCOUNT 7 PURPOSE: TORT SUBCOUNT 1 PURPOSE: OTHER SUBCOUNT 1 COUNT 18
Figure 4-12: Printing total number of first party requests
4.7 Inquire to a Specific ROI Disclosure Record (IQ) Use this report to quickly display or print a specific disclosure record. You will be asked to select the desired record. The report will list all current data recorded for the selected disclosure record.
1. To inquire about a specific ROI disclosure record, type the Disclosure number, date of Disclosure, patient’s name, or HRN at the “Select ROI Disclosure Date Request Initiated:” prompt.
2. Type the name of a print device at the “Device:” prompt.
Select ROI DISCLOSURE DATE REQUEST INITIATED: PATIENT,C DEVICE: (Type HOME to view on screen or printer name) **CONFIDENTIAL PATIENT DATA COVERED BY PRIVACY ACT** INQUIRE TO ROI REQUEST RECORD FEB 14,2008 09:29 PAGE 1

Release of Information Disclosure System (BRN) v2.0 Patch 1
User Manual 28 ROI Reports Menu (RPT) May 2008
----------------------------------------------------------------------------- DISCLOSURE #157615 Initiated On JAN 16,2008 by TELEPHONE CALL REQUEST STATUS: OPEN PRIORITY: NON-CRITICAL PATIENT: PATIENT,C (#102585) FACILITY: TAOS-PICURIS HEALTH CENTER REQUESTING PARTY: COUNTY HEALTH DEPARTMENT PURPOSE: SCHOOL TYPE: MEDICAL RECORD TESTING INIITIATED BY: CLERK,B ASSIGNED TO: CLERK,C COMPLETED BY: CLOSED: DISCLOSURE NOTES: 2ND REQUEST: FEB 14,2008 2ND REQUEST METHOD: FAX RECEIVING PARTY: COUNTY HEALTH DEPARTMENT DISCLOSURE DATE: DISSEMINATION:
Figure 4-13: Inquiring about a specific ROI Disclosure record
4.8 Print Master Log (By Date Range) (ML) This report prints a master log of all disclosure requests for a given date range entered by the user. The report prints the name/address of the requesting party, the patient/health record, date request received, date request closed/completed, and the purpose of the request. This report serves as a replacement to the currently maintained hand-written master log.
1. To print a master log, type ML at the ROI Reports menu.
2. Type the beginning date at the “Enter Beginning ROI Initiated Date:” prompt.
3. Type the ending date at the “Enter Ending ROI Initiated Date:” prompt.
4. If you are a multi-division site with more than one site set up in the ROI Parameters, you will be asked to choose to print this report for all facilities or just one.
5. Type the name of a print device at the “Device:” prompt.
Enter beginning ROI Initiated Date: 1-1-00 Enter ending ROI Initiation Date: (1/1/00 - 99/99/99): 3-30-00 ==================== ** If you are a multi-division site, you will be asked the following: Print for ALL Facilities? YES// (Answer YES or NO; if NO, choose a site => Select Facility: ? Answer with ROI LISTING PARAMETER FACILITY NAME Choose from: TEST HOSPITAL IHS CLINIC Select Facility: TEST HOSPITAL

Release of Information Disclosure System (BRN) v2.0 Patch 1
User Manual 29 ROI Reports Menu (RPT) May 2008
==================== DEVICE: (Type HOME to view on screen or printer name) MASTER CONTROL LOG -CONFIDENTIAL PATIENT DATA COVERED BY PRIVACY AGE JAN 13,2003 PAGE 1 DT REC'D REQ PTY/ADDRESS PATIENT/HR # DESCRIPTION PURPOSE DT DISCLOSED ----------------------------------------------------------------------------- 01/01/00 HHHI PATIENT,A DIABETES INFO P O BOX 1234 HR# 9190 08/23/02 TUCSON, ARIZONA 85746 OTHER DISCLOSURE #: 29062 01/15/00 SALT RIVER CLINIC PATIENT,B SCHOOL IMMUNIZATION 123 GOLD STREET HR# 7593 PHOENIX, ARIZONA 85004 FURTHER MEDICAL DISCLOSURE #: 29061
Figure 4-14: Printing the Master Log
4.9 Print Open Disclosures Only (OP) This report will print all open disclosure records. The report will list all current data recorded for each disclosure record.
1. To print open disclosures, type OP at the ROI Reports menu.
2. If you are a multi-division site with more than one site set up in the ROI Parameters, you will be asked to choose to print this report for all facilities or just one.
3. Type the name of a print device at the “Device:” prompt.
==================== ** If you are a multi-division site, you will be asked the following: Print for ALL Facilities? YES// (Answer YES or NO; if NO, choose a site => Select Facility: ? Answer with ROI LISTING PARAMETER FACILITY NAME Choose from: TEST HOSPITAL IHS CLINIC Select Facility: TEST HOSPITAL ==================== DEVICE: (Type HOME to view on screen or printer name) **CONFIDENTIAL PATIENT DATA COVERED BY PRIVACY ACT** ROI LISTING RECORD LIST APR 13,2000 12:12 PAGE 1 ----------------------------------------------------------------------------- FACILITY: TEST HOSPITAL DATE REQUEST INITIATED: DEC 30, 1999 DISCLOSURE NUMBER: 29065 PATIENT: PATINET,A TYPE: MEDICAL RECORD REQUESTING PARTY: LOCAL ATTORNEY PURPOSE: FURTHER MEDICAL CARE REQUEST STATUS: OPEN REQUEST PRIORITY: NON-CRITICAL STAFF ASSIGNMENT: ADAM,ADAM

Release of Information Disclosure System (BRN) v2.0 Patch 1
User Manual 30 ROI Reports Menu (RPT) May 2008
USER INITIATED: CLERK,B ENTIRE RECORD: YES RECEIVING PARTY: LOCAL ATTORNEY DISCLOSURE DATE: JAN 15, 2000 RECORD DISSEMINATION: MAIL CERTIFIED USER DISSENMINATED: CLERK,B NUMBER OF PAGES: 5 COST PER PAGE: .15 RECEIVING PARTY: DEWEY CHEATUM AND HOWE DATE REQUEST INITIATED: MAR 05, 2000 DISCLOSURE NUMBER: 29066 PATIENT: PATIENT,B TYPE: MEDICAL RECORD REQUESTING PARTY: PATIENT PURPOSE: PERSONAL REQUEST STATUS: OPEN REQUEST PRIORITY: NON-CRITICAL USER INITIATED: CLERK,A RECEIVING PARTY: PATIENT
Figure 4-15: Printing open disclosures
4.10 Print Reproduction Page Costs (By Date Range) (PAGE) Use this to print a summary of all the reproduction costs associated with all disclosures for a given date range. You must first enter the number of pages and the cost of each of those pages (for each receiving party). The total cost is automatically calculated for these disclosures (including the average cost for the total number of disclosures for that given date range).
1. To print the reproduction page cost report, type PAGE at the ROI Reports menu.
2. Type the beginning date at the “Enter Beginning ROI Initiated Date:” prompt.
3. Type the ending date at the “Enter Ending ROI Initiated Date:” prompt.
4. If you are a multi-division site with more than one site set up in the ROI Parameters, you will be asked to choose to print this report for all facilities or just one.
5. Type the name of a print device at the “Device:” prompt.
Enter beginning ROI Initiated Date: 1-1-80 (JAN 01, 1980) Enter ending ROI Initiation Date: (1/1/80 - 99/99/99): T (JAN 03, 2003) ==================== ** If you are a multi-division site, you will be asked the following: Print for ALL Facilities? YES// (Answer YES or NO; if NO, choose a site => Select Facility: ? Answer with ROI LISTING PARAMETER FACILITY NAME Choose from: TEST HOSPITAL IHS CLINIC Select Facility: TEST HOSPITAL ==================== DEVICE: (Type HOME to view on screen or printer name) ROI LISTING RECORD STATISTICS JAN 3,2003 11:06 PAGE 1 DISCLOSURE TOTAL NUMBER PAGES TOTAL REPRODUCTION COST
Release of Information Disclosure System (BRN) v2.0 Patch 1
User Manual 31 ROI Reports Menu (RPT) May 2008
---------------------------------------------------------------------------- TOTAL 78 8.00 COUNT 243 243 MEAN 0.03
Figure 4-16: Printing reproduction page costs report
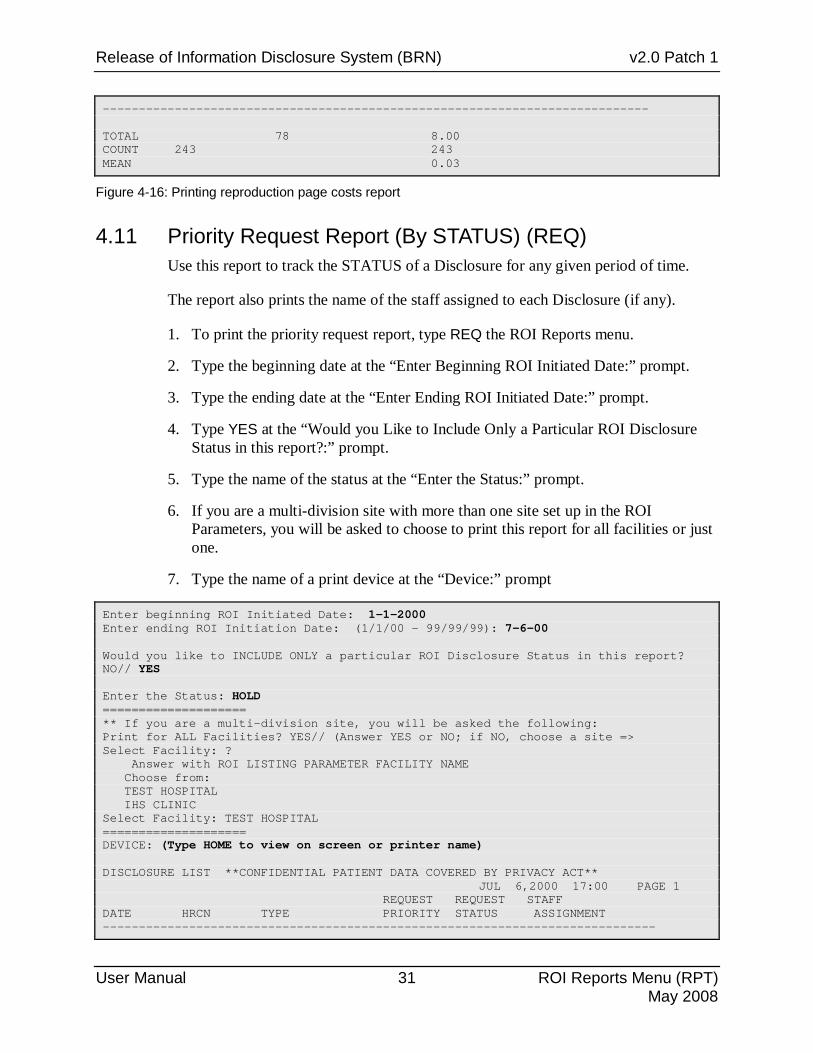
4.11 Priority Request Report (By STATUS) (REQ) Use this report to track the STATUS of a Disclosure for any given period of time.
The report also prints the name of the staff assigned to each Disclosure (if any).
1. To print the priority request report, type REQ the ROI Reports menu.
2. Type the beginning date at the “Enter Beginning ROI Initiated Date:” prompt.
3. Type the ending date at the “Enter Ending ROI Initiated Date:” prompt.
4. Type YES at the “Would you Like to Include Only a Particular ROI Disclosure Status in this report?:” prompt.
5. Type the name of the status at the “Enter the Status:” prompt.
6. If you are a multi-division site with more than one site set up in the ROI Parameters, you will be asked to choose to print this report for all facilities or just one.
7. Type the name of a print device at the “Device:” prompt
Enter beginning ROI Initiated Date: 1-1-2000 Enter ending ROI Initiation Date: (1/1/00 - 99/99/99): 7-6-00 Would you like to INCLUDE ONLY a particular ROI Disclosure Status in this report? NO// YES Enter the Status: HOLD ==================== ** If you are a multi-division site, you will be asked the following: Print for ALL Facilities? YES// (Answer YES or NO; if NO, choose a site => Select Facility: ? Answer with ROI LISTING PARAMETER FACILITY NAME Choose from: TEST HOSPITAL IHS CLINIC Select Facility: TEST HOSPITAL ==================== DEVICE: (Type HOME to view on screen or printer name) DISCLOSURE LIST **CONFIDENTIAL PATIENT DATA COVERED BY PRIVACY ACT** JUL 6,2000 17:00 PAGE 1 REQUEST REQUEST STAFF DATE HRCN TYPE PRIORITY STATUS ASSIGNMENT -----------------------------------------------------------------------------

Release of Information Disclosure System (BRN) v2.0 Patch 1
User Manual 32 ROI Reports Menu (RPT) May 2008
03/01/00 12345 MEDICAL RECORD NON-CRI HOLD CLERK,B 03/06/00 22446 MEDICAL RECORD NON-CRI HOLD CLERK,A 03/07/00 114477 MEDICAL NON-CRI HOLD CLERK,B
Figure 4-17: Printing a priority request report
4.12 Print Requesting Party Workload by Date Range (RPW) Use this report to provide a listing (for a specified date range entered by the User) of all disclosures by the requesting party. You will be asked if a specific requesting party is desired. If so, you enter that requesting party. The report displays the disclosure number, date initiated, user who entered record, patient name, type of disclosure and the requesting party.
1. To print the requesting party workload by date report, type RPW the ROI Reports Menu.
2. Type the beginning date at the “Enter Beginning ROI Initiated Date:” prompt.
3. Type the ending date at the “Enter Ending ROI Initiated Date:” prompt.
4. Type YES at the “Want to Include a Particular Party Who Requested the Disclosure:” prompt.
5. Type the name of the requesting party at the “Enter Requesting Party Name:” prompt.
6. If you are a multi-division site with more than one site set up in the ROI Parameters, you will be asked to choose to print this report for all facilities or just one.
7. Type the name of a print device at the “Device:” prompt.
Enter beginning ROI Initiated Date: 1-1-01 (JAN 01, 2001) Enter ending ROI Initiation Date: (1/1/01 - 99/99/99): T (OCT 26, 2001) Want to INCLUDE a particular Party Who Requested the Disclosure? NO// YES Enter Requesting Party Name: PATIENT ==================== ** If you are a multi-division site, you will be asked the following: Print for ALL Facilities? YES// (Answer YES or NO; if NO, choose a site => Select Facility: ? Answer with ROI LISTING PARAMETER FACILITY NAME Choose from: TEST HOSPITAL IHS CLINIC Select Facility: TEST HOSPITAL ==================== DEVICE: (Type HOME to view on screen or printer name)

Release of Information Disclosure System (BRN) v2.0 Patch 1
User Manual 33 ROI Reports Menu (RPT) May 2008
USER WORKLOAD - **CONFIDENTIAL PATIENT DATA COVERED BY PRIVACY ACT** JAN 7,2003 12:53 PAGE 1 USER REQUESTING DIS# DATE INITIATED PATIENT HRN # PARTY ----------------------------------------------------------------------------- 29064 11/25/02 CLERK,B PATIENT,A 1905 FT. PECK TRIBE 290654 06/27/00 CLERK,A PATIENT,N 2255 FT. PECK TRIBE 290625 03/15/00 CLERK,B PATIENT,A 1905 RENO DIAGNOSTIC 290639 04/07/00 CLERK,B PATIENT,A 1905 RENO DIAGNOSTIC 290660 12/05/00 CLERK,M PATIENT,K 8910 RENO DIAGNOSTIC COUNT 5
Figure 4-18: Printing a requesting party report
4.13 Print Suspend Disclosures Only (For Date Range) (SUSP) Use this report to print a listing of all disclosures which have been tagged with a Status of suspend. You will be asked for a specific date range.
1. To print the suspend disclosures only report, type SUSP at the ROI Reports Menu.
2. Type the beginning date at the “Enter Beginning ROI Initiated Date:” prompt.
3. Type the ending date at the “Enter Ending ROI Initiated Date:” prompt.
4. If you are a multi-division site with more than one site set up in the ROI Parameters, you will be asked to choose to print this report for all facilities or just one.
5. Type the name of a print device at the “Device:” prompt.
Enter beginning ROI Initiated Date: 1-1-80 (JAN 01, 1980) Enter ending ROI Initiation Date: (1/1/80 - 99/99/99): T (JAN 03, 2003) ==================== ** If you are a multi-division site, you will be asked the following: Print for ALL Facilities? YES// (Answer YES or NO; if NO, choose a site => Select Facility: ? Answer with ROI LISTING PARAMETER FACILITY NAME Choose from: TEST HOSPITAL IHS CLINIC Select Facility: TEST HOSPITAL ==================== DEVICE: (Type HOME to view on screen or printer name) SUSPENDED DISCLOSURES - **CONFIDENTIAL PATIENT DATA COVERED BY PRIVACY ACT** JAN 3,2003 15:10 PAGE 1

Release of Information Disclosure System (BRN) v2.0 Patch 1
User Manual 34 ROI Reports Menu (RPT) May 2008
REQUESTING USER USER RECEIVING DIS# PARTY INITIATED COMPLETED PARTY DISC DT ----------------------------------------------------------------------------- 29067 FT. PECK TRIB CLERK,B CLERK,B LOCAL CLINIC 08/27/98 S 29062 LOCAL ATTORNE CLERK,B CLERK,B LOCAL ATTORNE 03/07/00 PATIENT 01/03/03 S
Figure 4-19: Printing suspended disclosures only
4.14 Print User Workload by Date Range (WK) Use this report to track data entry staff workload for a given date range.
1. To print the user workload by date range, type WK at the ROI Reports Menu.
2. Type the beginning date at the “Enter Beginning ROI Initiated Date:” prompt.
3. Type the ending date at the “Enter Ending ROI Initiated Date:” prompt.
4. Select the user’s role you wish to track in this report. Your choices are user who initiated the request, user who was assigned to the request, or user who closed the request.
5. Type either YES or NO at the “Want to INCLUDE a particular User?” prompt. If you answered YES, type the user’s name at the “Enter User Name:” prompt.
6. If you are a multi-division site with more than one site set up in the ROI Parameters, you will be asked to choose to print this report for all facilities or just one.
7. Type the name of a print device at the “Device:” prompt.
Enter beginning ROI Initiated Date: 4-1-2000 Enter ending ROI Initiation Date: (1/1/00 - 99/99/99): 4-30-00 Select one of the following: I User Who INITIATED Request A User Who was ASSIGNED Request C User Who CLOSED Request Select USER'S ROLE for Workload Reporting: I User Who INITIATED Request Want to INCLUDE a particular User? NO// YES Enter User Name: CLERK,B ==================== ** If you are a multi-division site, you will be asked the following: Print for ALL Facilities? YES// (Answer YES or NO; if NO, choose a site => Select Facility: ? Answer with ROI LISTING PARAMETER FACILITY NAME Choose from: TEST HOSPITAL IHS CLINIC Select Facility: TEST HOSPITAL

Release of Information Disclosure System (BRN) v2.0 Patch 1
User Manual 35 ROI Reports Menu (RPT) May 2008
==================== DEVICE: (Type HOME to view on screen or printer name) USER WORKLOAD **CONFIDENTIAL PATIENT DATA COVERED BY PRIVACY ACT** APR 13,2000 13:03 PAGE 1 USER REQUESTING DIS # STARTED INITIATED PATIENT HRCN PARTY ----------------------------------------------------------------------------- 290635 04/07/00 CLERK,B PATIENT,A 12345 MEDICAL REVIEW BOARD 290636 04/17/00 CLERK,B PATIENT,N 5432 LOCAL CLINIC 290637 04/18/00 CLERK,B PATIENT,K 34345 LOCAL ATTORNEY 290638 04/18/00 CLERK,B PATIENT,B 54321 PATIENT 290639 04/22/00 CLERK,B PATIENT,A 12345 MEDICAL DIAGNOSTIC 290640 04/24/00 CLERK,B PATIENT,P 9988 LOCAL CLINIC 290641 04/30/00 CLERK,B PATIENT,Y 89898 PATIENT --------------- COUNT 7
Figure 4-20: Printing user workload

Release of Information Disclosure System (BRN) v2.0 Patch 1
User Manual 36 ROI Management Menu (MGT) May 2008
5.0 ROI Management Menu (MGT) This menu contains options that allow you to edit/enter several fields in the ROI system and print listing.
• To access the ROI Management Menu, type MGT at the “Select Release of Information System Option:” prompt at the ROI Main Menu.
******************************************** * INDIAN HEALTH SERVICE * * RELEASE OF INFORMATION SYSTEM * * VERSION 2.0 P1, Jan 20, 2008 * ******************************************** TEST HOSPITAL RELEASE OF INFORMATION SYSTEM DE ROI EDIT MENU ... RPT ROI REPORTS MENU ... MGT ROI MANAGEMENT MENU ... RRU ROI REPORTING UTILITY Select RELEASE OF INFORMATION SYSTEM Option: MGT
Figure 5-1: Accessing the ROI Mgt menu
• The ROI Management Menu will be displayed (Figure 5-2). Sections 5.1 through 5.6 explain each of the options listed in the ROI Management menu.
******************************************** * INDIAN HEALTH SERVICE * * RELEASE OF INFORMATION SYSTEM * * VERSION 2.0 P1, Jan 20, 2008 * ******************************************** TEST HOSPITAL ROI MANAGEMENT MENU CHG Change Spelling of Requesting Party EDT Edit Date Request Initiated PE Enter or Edit Requesting/Receiving Parties PRT Print Listing of all Parties RR Inquire to a Specific Requesting Party SITE Enter or Edit Site Parameter Select ROI MANAGEMENT MENU Option:
Figure 5-2: Selecting the ROI Management Menu
5.1 Change Spelling of Requesting Party (CHG) Use this option to change the spelling of existing records. You cannot delete records; you can only change the spelling.

Release of Information Disclosure System (BRN) v2.0 Patch 1
User Manual 37 ROI Management Menu (MGT) May 2008
1. To change the spelling of a requesting party, type CHG at the “Select ROI Management Menu Option:” prompt.
2. Type the name of the desired requesting party at the “Select ROI Listing Rec Party Name:” prompt.
3. Type the new spelling at the “Name:” prompt and press the Return key to record your changes.
4. Type another receiving party’s name at the next “Select ROI Listing Rec Party Name:” prompt.
5. When you have no more names to correct, press the Return key at a blank “Select Listing Rec Party Name:” prompt.
Select ROI LISTING REC PARTY NAME: JOHNSON,CAROLYN NAME: JOHNSON,CAROLYN// JOHNSON,KAROL Select ROI LISTING REC PARTY NAME:
Figure 5-3: Changing spelling
5.2 Edit Date Request Initiated (EDT) Use this option to edit the date the request was initiated. The user is prompted for a disclosure number or date. When the date prompt is displayed, change the date to the correct date.
1. To edit the disclosure date initiated, type EDT at the “Select ROI Management Menu Option:” prompt.
2. Select the entry at the “Select ROI Listing Record Date Request Initiated:” prompt.
3. Type the new date at the “Date Request Initiated:” prompt.
4. When you have no more dates to correct, press the Return key at the “Select ROI Listing Record Date Request Initiated:” prompt.
Select ROI LISTING RECORD DATE REQUEST INITIATED: 5-30-2001 30182183 WYCLIFFE,JOHNNY,JR. DATE REQUEST INITIATED: MAY 30,2001// 5-31-01 (MAY 31, 2001) Select ROI DISCLOSURE DATE REQUEST INITIATED:
Figure 5-4: Editing the disclosure date

Release of Information Disclosure System (BRN) v2.0 Patch 1
User Manual 38 ROI Management Menu (MGT) May 2008
5.3 Enter or Edit Requesting/Receiving Parties (PE) Use this option to build the requesting and Receiving Party Table file entries. With patch 1, staff can no longer add entries at the time of the request. This allows more control on the quality of the data in this table. Table file entries can also be modified using this option. You can also use this option to inactivate entries so they can no longer be used for new requests. Entries cannot be deleted, only inactivated.
1. To enter or edit requesting/receiving parties, type PE at the “Select ROI Management Menu Option:” prompt.
2. Type the name of the requesting party at the “Select ROI Listing Rec Party Name:” prompt. If you are adding a new entry, you will be asked if a new entry is being added to the Table File.
3. Type responses to the prompts as they appear on your screen.
Select ROI LISTING REC PARTY NAME: FALLON SCHOOL DISTRICT NAME: FALLON SCHOOL DISTRICT Replace ACTIVE/INACTIVE: ACTIVE// MNEMONIC: FSD STREET/PO BOX: 122345 AVE CITY: PHOENIX STATE: ARIZONA ZIP: 59880 Select CONTACT TYPE: WORK PHONE NUMBERS: (602) 345-8765 EXTENSION NUMBER: 78 Select CONTACT TYPE:
Figure 5-5: Entering or editing requesting/receiving parties
5.4 Print Listing of all Parties (PRT) Use this option to print all table file entries of the ROI requesting and/or receiving parties.
1. To print a list of all parties, type PRT at the “Select ROI Management Menu Option:” prompt.
2. Type the name of a print device at the “Device:” prompt.
DEVICE: ROI REQ REC PARTY LIST APR 17,2000 11:52 PAGE 1 ----------------------------------------------------------------------------- NAME: PATIENT MNEMONIC: PAT ACTIVE/INACTIVE: ACTIVE NAME: FALLON SCHOOL DISTRICT MNEMONIC: FSD STREET/PO BOX: 1234 E. FILLMORE CITY: PHOENIX

Release of Information Disclosure System (BRN) v2.0 Patch 1
User Manual 39 ROI Management Menu (MGT) May 2008
STATE: ARIZONA ZIP: 85004 CONTACT TYPE: WORK PHONE NUMBERS: 224-5555 EXTENSION NUMBER: 223 CONTACT TYPE: FAX PHONE NUMBERS: 222-3333 NAME: LOCAL CLINIC CITY: PHOENIX STATE: ARIZONA ZIP: 85004 CONTACT TYPE: WORK PHONE NUMBERS: (602) 364-5268
Figure 5-6: Printing a list of all parties
5.5 Inquire to a Specific Requesting Party (RR) Use this option to display one requesting or receiving party table file entry at a time.
1. To inquire to a specific requesting party, type RR at the “Select ROI Management Menu Option:” prompt.
2. Type the name of the requesting party at the “Select ROI Listing Rec Party Name:” prompt.
3. Type the name of a print device at the “Device:” prompt.
Select ROI LISTING REC PARTY NAME: FALLON SCHOOL DISTRICT DEVICE: ROI REQ REC PARTY LIST APR 17,2000 11:56 PAGE 1 ----------------------------------------------------------------------------- NAME: FALLON SCHOOL DISTRICT MNEMONIC: FSD STREET/PO BOX: 1234 E. FILLMORE CITY: PHOENIX STATE: ARIZONA ZIP: 85004 CONTACT TYPE: WORK PHONE NUMBERS: 224-5555 EXTENSION NUMBER: 223 CONTACT TYPE: FAX PHONE NUMBERS: 222-3333
Figure 5-7: Inquiring to a specific requesting party
5.6 Enter or Edit Site Parameter (SITE) Use this option to complete a one-time setup for each receiving facility. This option allows for entry of multiple facilities and provides separate sequential numbering of requests per facility. If you set up more than one facility in this parameter table, your staff will be asked to choose a facility for each ROI report. Facilities can also be inactivated here.
1. Type the name of the facility you are editing at the “Select ROI Site Parameter Facility Name:” prompt.

Release of Information Disclosure System (BRN) v2.0 Patch 1
User Manual 40 ROI Management Menu (MGT) May 2008
2. If you type UNIVERSAL at the “Universal/Site Specific:” prompt the software will allow universal lookup of patient Health Record Numbers. This means one staff handles all the requests for multiple sites.
Select ROI SITE PARAMETER FACILITY NAME: TEST HOSPITAL FACILITY NAME: TEST HOSPITAL// (No Editing) UNIVERSAL/SITE SPECIFIC: PROMPT FOR DEPARTMENT: YES// INACTIVATION DATE:
Figure 5-8: Entering or editing site parameters

Release of Information Disclosure System (BRN) v2.0 Patch 1
User Manual 41 ROI Reporting Utility (RRU) May 2008
6.0 ROI Reporting Utility (RRU) This option allows you to create ad hoc reports from the ROI data in your system. The format is similar to both the VGEN and PGEN report utilities in the RPMS Patient Care Component (PCC). If you need to report ROI data in such a way that is not already available in the reports on the RPT menu, use this option. Here are snapshots of the setup screens.
DATE RANGE SELECTION Enter Beginning Request Date for search: T-300 Enter Ending Request Date for search: T Do you want to use a PREVIOUSLY DEFINED REPORT? NO// **If you answered YES, you can select the previuosly defined report here: REPORT NAME:
Figure 6-1: ROI reporting utility date range selection
Select Screening Criteria:
Screen Report by . . Feb 15, 2008 10:05:18 Page: 1 of 1 Disclosure Request Selection Menu Disclosure requests can be selected based upon any of the following items. Select as many as you wish, in any order or combination. An (*) asterisk indicates items already selected. To select all disclosures press Q. ____________________________________________________________________________ 1) Patient Name 10) Request Priority 19) Suspend Started 2) Sex 11) Only Entire Records 20) Suspend Stopped 3) Age Range 12) Request Method 21) Suspended Requests 4) Community 13) Staff Assignment 22) 2nd Request Date 5) Facility 14) User Initiated 23) 2nd Request Method 6) Type 15) User Completed 24) 3rd Request Date 7) Requesting Party 16) Only Congressionals 25) 3rd Request Method 8) Purpose 17) First Party Request 26) Receiving Party 9) Request Status 18) Date Closed Enter ?? for more actions S Select Item(s) + Next Screen Q Quit Item Selection R Remove Item(s) - Previous Screen E Exit Report Select Action: S//
Figure 6-2: Screening criteria options available
Example of selecting screening criteria:
Select Action: S// S Select Item(s)

Release of Information Disclosure System (BRN) v2.0 Patch 1
User Manual 42 ROI Reporting Utility (RRU) May 2008
Which disclosure item(s): (1-26): 8,12 8) Purpose Selection. ENTER Purpose: SUBPOENA ENTER Purpose: TORT ENTER Purpose: 12) Request Method Selection. ENTER Request Method: FAX ENTER Request Method: TELEPHONE CALL ENTER Request Method: Disclosure Request Selection Criteria: Request Date range: Feb 15, 2008 to Feb 15, 2008 Purpose: TORT ; SUBPOENA Request Method: TELEPHONE CALL ; FAX Press ENTER to continue:
Figure 6-3: Selecting screening criteria
Report printing selections:
Select one of the following: T Total Count Only S Sub-counts and Total Count D Detailed Listing L Delimited Output File for use in Excel Choose Type of Report: D//
Figure 6-4: Printing report
Example of screen to select detailed listing items:
Screen Report by . . Feb 15, 2008 10:11:05 Page: 1 of 1 Print Items Selection Menu The following data items can be printed. Choose the items in the order you want them to appear on the printout. Keep in mind that you have an 80 column screen available, or a printer with either 80 or 132 column width. ___________________________________________________________________________ 1) Patient Name 14) Request Priority 27) Suspend Stopped 2) Chart # 15) Entire Record? 28) Suspended Requests 3) Sex 16) Request Method 29) 2nd Request Date 4) Age Range 17) Staff Assignment 30) 2nd Request Method 5) Community 18) User Initiated 31) 3rd Request Date 6) Disclosure # 19) User Completed 32) 3rd Request Method 7) Date Initiated 20) Beginning Event Date 33) Total Pages 8) Facility 21) Ending Event Date 34) Total Cost 9) Type 22) Specific Record Info 35) Disclosure Notes 10) Other Type Description 23) Congressional? 36) Receiving Party 11) Requesting Party 24) First Party Request 37) Recg Party Discl Da 12) Purpose 25) Date Closed 38) Recvg Party Method 13) Request Status 26) Suspend Started

Release of Information Disclosure System (BRN) v2.0 Patch 1
User Manual 43 ROI Reporting Utility (RRU) May 2008
Enter ?? for more actions S Select Item(s) + Next Screen Q Quit Item Selection R Remove Item(s) - Previous Screen E Exit Report Select Action: S// Select Item(s) Which disclosure item(s): (1-38): 1,2,7,12,16
Figure 6-5: Detailed listing view
Setting up field lengths:
Enter Column width for Patient Name (suggested: 20): (2-80): 20// Total Report width (including column margins - 2 spaces): 22 Enter Column width for Chart # (suggested: 6): (2-80): 6// Total Report width (including column margins - 2 spaces): 30 Enter Column width for Date Initiated (suggested: 14): (2-80): 14// Total Report width (including column margins - 2 spaces): 46 Enter Column width for Purpose (suggested: 12): (2-80): 12// Total Report width (including column margins - 2 spaces): 60 Enter Column width for Request Method (suggested: 15): (2-80): 15// Total Report width (including column margins - 2 spaces): 77 Press ENTER to continue:
Figure 6-6: Field length selection
Example of screen to select sort:
Screen Report by . . Feb 15, 2008 13:40:09 Page: 1 of 1 Sorting Criteria Selection Menu The disclosure requests can be SORTED by ONLY ONE of the following items. If you don't select a sort item, the report will be sorted by Date Request Initi ____________________________________________________________________________ 1) Patient Name 10) Requesting Party 19) Suspend Started 2) Chart # 11) Purpose 20) Suspend Stopped 3) Sex 12) Request Status 21) 2nd Request Date 4) Age Range 13) Request Priority 22) 2nd Request Method 5) Community 14) Request Method 23) 3rd Request Date 6) Disclosure # 15) Staff Assignment 24) 3rd Request Method 7) Date Initiated 16) User Initiated 25) Total Pages 8) Facility 17) User Completed 26) Total Cost 9) Type 18) Date Closed Enter ?? for more actions S Select Item(s) + Next Screen Q Quit Item Selection R Remove Item(s) - Previous Screen E Exit Report Select Action: S//
Figure 6-7: Sorting criteria selection menu

Release of Information Disclosure System (BRN) v2.0 Patch 1
User Manual 44 ROI Reporting Utility (RRU) May 2008
The rest of possible questions to set title, page breaks, and save logic:
Do you want a separate page for each Patient Name? N// O Would you like a custom title for this report? NO// Do you wish to SAVE this SEARCH/PRINT/SORT logic for future use? NO//
Figure 6-8: Set title, page break, and save logic selections
Report Summary before printing report:
REPORT SUMMARY Disclosure Request Selection Criteria: Request Date range: Feb 15, 2008 to Feb 15, 2008 REPORT/OUTPUT Type: PRINT Items Selected: Patient Name - column width 20 Chart # - column width 6 Date Initiated - column width 14 Purpose - column width 12 Request Method - column width 15 Total Report width (including column margins - 2 spaces): 77 SORTING Item: Disclosure requests will be sorted by: Patient Name Select one of the following: P PRINT Output B BROWSE Output on Screen Do you wish to : P//
Figure 6-9: Report summary

Release of Information Disclosure System (BRN) v2.0 Patch 1
User Manual 45 Glossary May 2008
Glossary
ASUFAC number Area Service Unit Facility; A unique identifier for each facility within IHS. A six-digit number comprised of 2 digits for Area, 2 digits for Service Unit, and 2 digits for Facility.
AZXA Previous namespace of v1.0 of the Release of Information Disclosure System.
BRN Namespace for the Release of Information Disclosure System.
Default Facility A user selects a facility identification to work with patients registered to that facility.
Device A device that either displays or prints information.
Entry Point Entry point within a routine that is referenced by a “DO” or “GOTO” command from a routine internal to a package.
File A set of related records or entries treated as a single unit.
FileMan The database management system for RPMS.
FOIA Freedom of Information Act
Forward Slashes (//) Usually preceding a default entry.
Health Record Number (HRN) Each facility assigns a unique number within that facility to each patient. Each HRN with its facility identification ‘ASUFAC’ make a unique identifier within all of IHS.
Mandatory Required. A mandatory field is a field that must be completed before the system will allow you to continue.

Release of Information Disclosure System (BRN) v2.0 Patch 1
User Manual 46 Glossary May 2008
Menu A list of choices for computing activity. A menu is a type of option designed to identify a series of items (other options) for presentation to the user for selection. When displayed, menu-type options are preceded by the word “Select” and followed by the word “option” as in Select Menu Management option: (the menu’s select prompt).
Mnemonic A short cut that designated to access a particular party, name, or facility.
Namespace A unique set of 2 to 4 alpha characters that are assigned by the database administrator to a software application.
Non-Critical Not critical, does not require immediate attention.
Official Registering Facility A facility so designated that when HRNs are added/modified, those changes are sent to the central database. A Service Unit may have several satellites for which it is registering patients.
Option An entry in the Option file. As an item on a menu, an option provides an opportunity for users to select it, thereby invoking the associated computing activity. Options may also be scheduled to run in the background, non-interactively, by TaskMan.
Party A person or a group
Queuing Requesting that a job be processed at a later time rather than within the current session.
Receipt dates The date that the party received the information
Receiving Party The person or organization that is receiving the information.

Release of Information Disclosure System (BRN) v2.0 Patch 1
User Manual 47 Glossary May 2008
Return key Press the Return key to show the end of an entry such as a number or a word. Press the Return key each time you respond to a computer prompt. If you want to return to the previous screen, simply press the Return key without entering a response. This will take you back to the previous menu screen. The Return key on some keyboards are shown as the Enter Key. Whenever you see [RET] or the Return key, press the Return or Enter Key.
Sequential Arranged in a particular order
Site Specific Particular to a specific site
STAT Immediately
Up-Hat (^) A circumflex, also know as a “hat” or “caret,” that is used as a piece delimiter in a global. The up-hat is denoted as “^” and is typed by pressing Shift+6 on the keyboard.

Release of Information Disclosure System (BRN) v2.0 Patch 1
User Manual 48 Appendix A: Rules of Behavior May 2008
Appendix A: Rules of Behavior The Resource and Patient Management (RPMS) system is a United States Department of Health and Human Services (HHS), Indian Health Service (IHS) information system that is FOR OFFICIAL USE ONLY. The RPMS system is subject to monitoring; therefore, no expectation of privacy shall be assumed. Individuals found performing unauthorized activities are subject to disciplinary action including criminal prosecution.
All users (Contractors and IHS Employees) of RPMS will be provided a copy of the Rules of Behavior (RoB) and must acknowledge that they have received and read them prior to being granted access to a RPMS system, in accordance IHS policy.
• For a listing of general ROB for all users, see the most recent edition of IHS General User Security Handbook (SOP 06-11a).
• For a listing of system administrators/managers rules, see the most recent edition of the IHS Technical and Managerial Handbook (SOP 06-11b).
Both documents are available at this IHS Web site: http://security.ihs.gov/.
The ROB listed in the following sections are specific to RPMS.
A.1 All RPMS Users In addition to these rules, each application may include additional RoBs that may be defined within the documentation of that application (e.g., Dental, Pharmacy).
A.1.1 Access RPMS users shall
• Only use data for which you have been granted authorization.
• Only give information to personnel who have access authority and have a need to know.
• Always verify a caller’s identification and job purpose with your supervisor or the entity provided as employer before providing any type of information system access, sensitive information, or nonpublic agency information.
• Be aware that personal use of information resources is authorized on a limited basis within the provisions Indian Health Manual Part 8, “Information Resources Management,” Chapter 6, “Limited Personal Use of Information Technology Resources.”
RPMS users shall not
• Retrieve information for someone who does not have authority to access the information.

Release of Information Disclosure System (BRN) v2.0 Patch 1
User Manual 49 Appendix A: Rules of Behavior May 2008
• Access, research, or change any user account, file, directory, table, or record not required to perform their official duties.
• Store sensitive files on a PC hard drive, or portable devices or media, if access to the PC or files cannot be physically or technically limited.
• Exceed their authorized access limits in RPMS by changing information or searching databases beyond the responsibilities of their jobs or by divulging information to anyone not authorized to know that information.
A.1.2 Information Accessibility RPMS shall restrict access to information based on the type and identity of the user. However, regardless of the type of user, access shall be restricted to the minimum level necessary to perform the job.
RPMS users shall
• Access only those documents they created and those other documents to which they have a valid need-to-know and to which they have specifically granted access through an RPMS application based on their menus (job roles), keys, and FileMan access codes. Some users may be afforded additional privileges based on the functions they perform, such as system administrator or application administrator.
• Acquire a written preauthorization in accordance with IHS polices and procedures prior to interconnection to or transferring data from RPMS.
A.1.3 Accountability RPMS users shall
• Behave in an ethical, technically proficient, informed, and trustworthy manner.
• Log out of the system whenever they leave the vicinity of their personal computers (PCs).
• Be alert to threats and vulnerabilities in the security of the system.
• Report all security incidents to their local Information System Security Officer (ISSO)
• Differentiate tasks and functions to ensure that no one person has sole access to or control over important resources.
• Protect all sensitive data entrusted to them as part of their government employment.
• Abide by all Department and Agency policies and procedures and guidelines related to ethics, conduct, behavior, and information technology (IT) information processes.

Release of Information Disclosure System (BRN) v2.0 Patch 1
User Manual 50 Appendix A: Rules of Behavior May 2008
A.1.4 Confidentiality RPMS users shall
• Be aware of the sensitivity of electronic and hard copy information, and protect it accordingly.
• Store hard copy reports/storage media containing confidential information in a locked room or cabinet.
• Erase sensitive data on storage media prior to reusing or disposing of the media.
• Protect all RPMS terminals from public viewing at all times.
• Abide by all Health Insurance Portability and Accountability Act (HIPAA) regulations to ensure patient confidentiality.
RPMS users shall not
• Allow confidential information to remain on the PC screen when someone who is not authorized to that data is in the vicinity.
• Store sensitive files on a portable device or media without encrypting.
A.1.5 Integrity RPMS users shall
• Protect their systems against viruses and similar malicious programs.
• Observe all software license agreements.
• Follow industry standard procedures for maintaining and managing RPMS hardware, operating system software, application software, and/or database software and database tables.
• Comply with all copyright regulations and license agreements associated with RPMS software.
RPMS users shall not
• Violate federal copyright laws.
• Install or use unauthorized software within the system libraries or folders.
• Use freeware, shareware, or public domain software on/with the system without their manager’s written permission and without scanning it for viruses first.
A.1.6 System Logon RPMS users shall
• Have a unique User Identification/Account name and password.
• Be granted access based on authenticating the account name and password entered.

Release of Information Disclosure System (BRN) v2.0 Patch 1
User Manual 51 Appendix A: Rules of Behavior May 2008
• Be locked out of an account after five successive failed login attempts within a specified time period (e.g., one hour).
A.1.7 Passwords RPMS users shall
• Change passwords a minimum of every 90 days.
• Create passwords with a minimum of eight characters.
• If the system allows, use a combination of alpha-numeric characters for passwords, with at least one uppercase letter, one lower case letter, and one number. It is recommended, if possible, that a special character also be used in the password.
• Change vendor-supplied passwords immediately.
• Protect passwords by committing them to memory or store them in a safe place (do not store passwords in login scripts or batch files).
• Change passwords immediately if password has been seen, guessed, or otherwise compromised, and report the compromise or suspected compromise to their ISSO.
• Keep user identifications (IDs) and passwords confidential. RPMS users shall not
• Use common words found in any dictionary as a password.
• Use obvious readable passwords or passwords that incorporate personal data elements (e.g., user’s name, date of birth, address, telephone number, or social security number; names of children or spouses; favorite band, sports team, or automobile; or other personal attributes).
• Share passwords/IDs with anyone or accept the use of another’s password/ID, even if offered.
• Reuse passwords. A new password must contain no more than five characters per eight characters from the previous password.
• Post passwords.
• Keep a password list in an obvious place, such as under keyboards, in desk drawers, or in any other location where it might be disclosed.
• Give a password out over the phone.

Release of Information Disclosure System (BRN) v2.0 Patch 1
User Manual 52 Appendix A: Rules of Behavior May 2008
A.1.8 Backups RPMS users shall
• Plan for contingencies such as physical disasters, loss of processing, and disclosure of information by preparing alternate work strategies and system recovery mechanisms.
• Make backups of systems and files on a regular, defined basis.
• If possible, store backups away from the system in a secure environment.
A.1.9 Reporting RPMS users shall
• Contact and inform their ISSO that they have identified an IT security incident and begin the reporting process by providing an IT Incident Reporting Form regarding this incident.
• Report security incidents as detailed in the IHS Incident Handling Guide (SOP 05-03).
RPMS users shall not
• Assume that someone else has already reported an incident. The risk of an incident going unreported far outweighs the possibility that an incident gets reported more than once.
A.1.10 Session Timeouts RPMS system implements system-based timeouts that back users out of a prompt after no more than 5 minutes of inactivity.
RPMS users shall
• Utilize a screen saver with password protection set to suspend operations at no greater than 10 minutes of inactivity. This will prevent inappropriate access and viewing of any material displayed on the screen after some period of inactivity.
A.1.11 Hardware RPMS users shall
• Avoid placing system equipment near obvious environmental hazards (e.g., water pipes).
• Keep an inventory of all system equipment.
• Keep records of maintenance/repairs performed on system equipment.
RPMS users shall not
• Eat or drink near system equipment.

Release of Information Disclosure System (BRN) v2.0 Patch 1
User Manual 53 Appendix A: Rules of Behavior May 2008
A.1.12 Awareness RPMS users shall
• Participate in organization-wide security training as required.
• Read and adhere to security information pertaining to system hardware and software.
• Take the annual information security awareness.
• Read all applicable RPMS manuals for the applications used in their jobs.
A.1.13 Remote Access Each subscriber organization establishes its own policies for determining which employees may work at home or in other remote workplace locations. Any remote work arrangement should include policies that
• Are in writing.
• Provide authentication of the remote user through the use of ID and password or other acceptable technical means.
• Outline the work requirements and the security safeguards and procedures the employee is expected to follow.
• Ensure adequate storage of files, removal, and nonrecovery of temporary files created in processing sensitive data, virus protection, and intrusion detection, and provide physical security for government equipment and sensitive data.
• Establish mechanisms to back up data created and/or stored at alternate work locations.
Remote RPMS users shall
• Remotely access RPMS through a virtual private network (VPN) whenever possible. Use of direct dial in access must be justified and approved in writing and its use secured in accordance with industry best practices or government procedures.
Remote RPMS users shall not
• Disable any encryption established for network, internet, and Web browser communications.
A.2 RPMS Developers RPMS developers shall
• Always be mindful of protecting the confidentiality, availability, and integrity of RPMS when writing or revising code.
• Always follow the IHS RPMS Programming Standards and Conventions (SAC) when developing for RPMS.

Release of Information Disclosure System (BRN) v2.0 Patch 1
User Manual 54 Appendix A: Rules of Behavior May 2008
• Only access information or code within the namespaces for which they have been assigned as part of their duties.
• Remember that all RPMS code is the property of the U.S. Government, not the developer.
• Not access live production systems without obtaining appropriate written access, and shall only retain that access for the shortest period possible to accomplish the task that requires the access.
• Observe separation of duties policies and procedures to the fullest extent possible.
• Document or comment all changes to any RPMS software at the time the change or update is made. Documentation shall include the programmer’s initials, date of change, and reason for the change.
• Use checksums or other integrity mechanism when releasing their certified applications to assure the integrity of the routines within their RPMS applications.
• Follow industry best standards for systems they are assigned to develop or maintain, and abide by all Department and Agency policies and procedures.
• Document and implement security processes whenever available. RPMS developers shall not
• Write any code that adversely impacts RPMS, such as backdoor access, “Easter eggs,” time bombs, or any other malicious code or make inappropriate comments within the code, manuals, or help frames.
• Grant any user or system administrator access to RPMS unless proper documentation is provided.
• Release any sensitive agency or patient information.
A.3 Privileged Users Personnel who have significant access to processes and data in RPMS, such as, system security administrators, systems administrators, and database administrators, have added responsibilities to ensure the secure operation of RPMS.
Privileged RPMS users shall
• Verify that any user requesting access to any RPMS system has completed the appropriate access request forms.
• Ensure that government personnel and contractor personnel understand and comply with license requirements. End users, supervisors, and functional managers are ultimately responsible for this compliance.
• Advise the system owner on matters concerning information technology security.
• Assist the system owner in developing security plans, risk assessments, and supporting documentation for the certification and accreditation process.

Release of Information Disclosure System (BRN) v2.0 Patch 1
User Manual 55 Appendix A: Rules of Behavior May 2008
• Ensure that any changes to RPMS that affect contingency and disaster recovery plans are conveyed to the person responsible for maintaining continuity of operations plans.
• Ensure that adequate physical and administrative safeguards are operational within their areas of responsibility and that access to information and data is restricted to authorized personnel on a need-to-know basis.
• Verify that users have received appropriate security training before allowing access to RPMS.
• Implement applicable security access procedures and mechanisms, incorporate appropriate levels of system auditing, and review audit logs.
• Document and investigate known or suspected security incidents or violations and report them to the ISSO, Chief Information Security Officer (CISO), and systems owner.
• Protect the supervisor, superuser, or system administrator passwords.
• Avoid instances where the same individual has responsibility for several functions (i.e., transaction entry and transaction approval).
• Watch for unscheduled, unusual, and unauthorized programs.
• Help train system users on the appropriate use and security of the system.
• Establish protective controls to ensure the accountability, integrity, confidentiality, and availability of the system.
• Replace passwords when a compromise is suspected. Delete user accounts as quickly as possible from the time that the user is no longer authorized system. Passwords forgotten by their owner should be replaced, not reissued.
• Terminate user accounts when a user transfers or has been terminated. If the user has authority to grant authorizations to others, review these other authorizations. Retrieve any devices used to gain access to the system or equipment. Cancel logon IDs and passwords, and delete or reassign related active and backup files.
• Use a suspend program to prevent an unauthorized user from logging on with the current user's ID if the system is left on and unattended.
• Verify the identity of the user when resetting passwords. This can be done either in person or having the user answer a question that can be compared to one in the administrator’s database.
• Shall follow industry best standards for systems they are assigned to, and abide by all Department and Agency policies and procedures.
Privileged RPMS users shall not
• Access any files, records, systems, etc., that are not explicitly needed to perform their duties

Release of Information Disclosure System (BRN) v2.0 Patch 1
User Manual 56 Appendix A: Rules of Behavior May 2008
• Grant any user or system administrator access to RPMS unless proper documentation is provided.
• Release any sensitive agency or patient information.

Release of Information Disclosure System (BRN) v2.0 Patch 1
User Manual 57 Contact Information May 2008
Contact Information
If you have any questions or comments regarding this distribution, please contact the OIT Help Desk (IHS).
Phone: (505) 248-4371 or (888) 830-7280 (toll free)
Fax: (505) 248-4363
Web: http://www.ihs.gov/GeneralWeb/HelpCenter/Helpdesk/index.cfm
Email: [email protected]