rej09b0566 rsk2+sh726b tutorialmanual
TRANSCRIPT

YRSPSH7267-0103
Everywhere you imagine
Renesas Starter Kit for SH7267
User's Manual
RENESAS SINGLE-CHIP MICROCOMPUTER TM
SuperH RISC engine
Rev.1.00 Renesas Electronics America
Revision date: May 22, 2012 www.renesas.com
ii
Table of Contents
Chapter 1. Preface .................................................................................................................................................. 1
Chapter 2. Introduction............................................................................................................................................ 2
Chapter 3. Tutorial Project Workspace ................................................................................................................... 3
Chapter 4. Project Workspace ................................................................................................................................ 4
4.1. Introduction ................................................................................................................................................... 4
4.2. Creating a new Project Workspace .............................................................................................................. 4
4.3. Build Configurations and Debug Sessions ................................................................................................... 5
4.3.1. Build Configuration ................................................................................................................................ 5
4.3.2. Debug Session....................................................................................................................................... 5
Chapter 5. Building the Tutorial Project .................................................................................................................. 6
5.1. Building Code ............................................................................................................................................... 6
5.2. Connecting the debugger ............................................................................................................................. 7
5.3. Connecting to the target with the E10A........................................................................................................ 7
Chapter 6. Downloading and Running the Tutorial ................................................................................................. 9
Chapter 7. Project Files......................................................................................................................................... 13
7.1. Standard Project Files ................................................................................................................................ 13
7.1.1. Initialization code (resetprg.c / resetprg.h) .......................................................................................... 13
7.1.2. External bus and Memory configuration (bus-init.c/bus-init.h) ............................................................ 14
7.1.3. Board Initialization code (hwsetup.c / hwsetup.h)................................................................................ 15
7.1.4. Main tutorial code (main.c / main.h)..................................................................................................... 16
Chapter 8. Additional Information.......................................................................................................................... 17

1
Chapter 1. Preface
Cautions
This document may be, wholly or partially, subject to change without notice.
All rights reserved. Duplication of this document, either in whole or part is prohibited without the written permission of Renesas
Technology Europe Limited.
Trademarks
All brand or product names used in this manual are trademarks or registered trademarks of their respective companies or
organizations.
Copyright
© 2010 Renesas Electronics America All rights reserved.
Website: http://www.am.renesas.com/
Glossary
ADC Analog to Digital Converter
CD Compact Disc
CPU Central Processing Unit
E10A ‘E10A for Starter Kit’ debugger
HEW High-performance Embedded Workshop
LCD Liquid Crystal Display
LED Light Emitting Diode
MCU Microcontroller Unit
PC Program Counter
RAM Random Access Memory
ROM Read Only Memory RSK
Renesas Starter Kit
RSK2+ Renesas Starter Kit Plus
USB Universal Serial Bus

2
Chapter 2. Introduction
This manual is designed to answer, in tutorial form, the most common questions asked about using a Renesas Starter Kit (RSK): The
tutorials help explain the following:
• How do I compile, link, download, and run a simple program on the RSK?
• How do I build an embedded application?
• How do I use Renesas’ tools?
The project generator will create a tutorial project with two selectable build configurations
• ‘Debug’ is a project built with the debugger support included.
• ‘Release’ build demonstrating code suitable for release in a product.
Files referred to in this manual are installed using the project generator as you work through the tutorials. The tutorial examples in this
manual assume that installation procedures described in the RSK Quick Start Guide have been completed. Please refer to the Quick
Start Guide for details of preparing the configuration.
NOTE: These tutorials are designed to show you how to use the RSK and are not intended as a comprehensive introduction to
the High-performance Embedded Workshop (HEW) debugger, the compiler tool chains or the E10A Emulator – please consult
the relevant user manuals for more in-depth information.

3
Chapter 3. Tutorial Project Workspace
The workspace includes all of the files for two build configurations. The tutorial code is common to both the ‘Debug’ and the ‘Release’
build configurations. The tutorial is designed to show how code can be written, debugged and then downloaded without the debug
monitor in a ‘Release’ situation.
The build configuration menu in High-performance Embedded Workshop (HEW) allows the project to be configured such that certain
files may be excluded from each of the build configurations. This allows the inclusion of the debug monitor within the Debug build, and
its exclusion in the Release build. Contents of common C files are controlled with defines set up in the build configuration options and
#ifdef statements within the same files.
Maintaining only one set of project files means that projects are more controllable.
4
Chapter 4. Project Workspace
4.1. Introduction
HEW is an integrated development tool that allows the user to write, compile, program and debug a software project on any of the Renesas
Microcontrollers. HEW will have been installed during the installation of the software support for the RSK product. This manual will describe
the stages required to create and debug the supplied tutorial code.
4.2. Creating a new Project Workspace
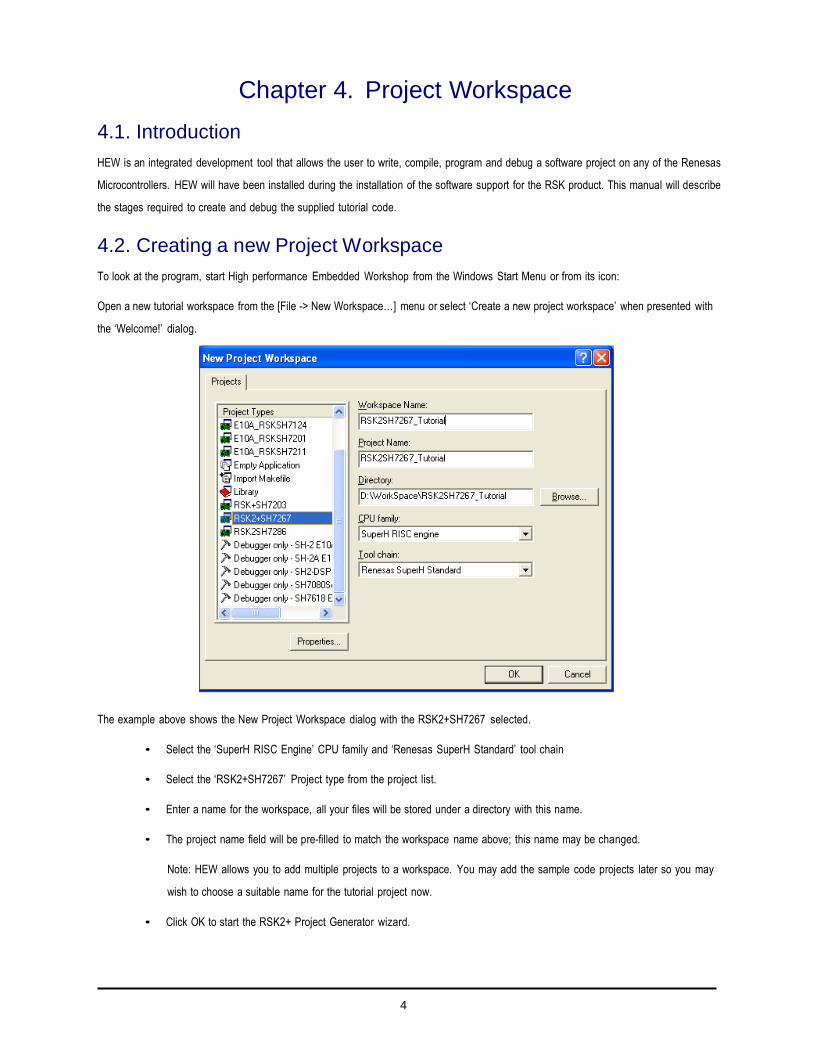
To look at the program, start High performance Embedded Workshop from the Windows Start Menu or from its icon:
Open a new tutorial workspace from the [File -> New Workspace…] menu or select ‘Create a new project workspace’ when presented with
the ‘Welcome!’ dialog.
The example above shows the New Project Workspace dialog with the RSK2+SH7267 selected.
• Select the ‘SuperH RISC Engine’ CPU family and ‘Renesas SuperH Standard’ tool chain
• Select the ‘RSK2+SH7267’ Project type from the project list.
• Enter a name for the workspace, all your files will be stored under a directory with this name.
• The project name field will be pre-filled to match the workspace name above; this name may be changed.
Note: HEW allows you to add multiple projects to a workspace. You may add the sample code projects later so you may
wish to choose a suitable name for the tutorial project now.
• Click OK to start the RSK2+ Project Generator wizard.

5
The next dialog presents the example projects available. Choose the tutorial code which will be explained later in this manual. There is
also an option for sample code which provides examples for using various peripherals. This will open a new dialog allowing the selection
of many code examples for the peripheral modules on the device. The final option is for an application code build where the debugger is
configured but there is no program code. This project is suitable for the user to add code without having to configure the debugger.
• Select “Tutorial” as the type of project to generate and then click “Next”.
• Click “Finish” to create the project
The project generator wizard will display a confirmation dialog. Press ‘OK’ to create the project and insert the necessary files.
A tree showing all the files in this project will appear in HEW.
• To view the file ‘main.c’, double click on the file in the Workspace window. A new window will open showing the code.
4.3. Build Configurations and Debug Sessions
The workspace that has been created contains two build configurations and two debug sessions. The build configuration allows the same
project to be built but with different compiler options. The options available to the user are described fully in the HEW User’s Manual.
4.3.1. Build Configuration
The build configurations are selected from the left hand drop down list on the toolbar. The options available are ‘Debug’ and ‘Release’. The
‘Debug’ build is configured for use with the debugger. The ‘Release’ build is configured for final ROM-able code.
A common difference between the two builds may be the optimization settings. With the optimization turned on the debugger may seem to
execute code in an unexpected order. To assist in debugging it is often helpful to turn off optimization on the code being debugged.
• Select the ‘Debug’ build Configuration.
4.3.2. Debug Session
The ‘Debug’ sessions are selected from the right hand drop down list on the toolbar. The options vary between RSK however one will
always start ‘Debug’ and include the type of debug interface. The alternate selection will be ‘DefaultSession’. The purpose of the ‘Debug’
session is to allow the use of different debugger tools or different debugger settings on the same project.
• Select ‘SessionSH2A_FPU_E10A_USB_SYSTEM’
debug session.

6
Chapter 5. Building the Tutorial Project
The tutorial project build settings have been pre-configured in the tool-chain options. To view the tool chain options select the ‘Build’ Menu
item and the relevant tool chain. This should be the first option on the drop down menu.
The dialog that is displayed will be specific to the tool chain selected.
The configuration pane on the left hand side will exist on all the
tool-chain options. It is important when changing any setting to
be aware of the current configuration that is being modified. If
you wish to modify multiple or all build configurations this is
possible by selecting ‘All’ or ‘Multiple’ from the ‘Configuration’
drop down list.
• Review the options on each of the tabs and
‘Category’ dropdown lists to be aware of the
options available.
When complete, close the dialog box by clicking <OK>.
5.1. Building Code
There are three shortcuts available for building the project.
1. Select the ‘Build All’ toolbar button.
This will build everything in the project that has not been excluded from the build. This includes the standard library.
2. Select the ‘Build’ toolbar button.
This will build all files that have changed since the last build. The standard library will not be built unless an option has been
changed.
3. Press ‘F7’
This is equivalent to pressing the ‘Build’ button described above.
Build the project now by pressing ‘F7’ or pressing one of the build icons as shown above.
During the build each stage will be reported in the Output Window.
The build will complete with an indication of errors and warnings encountered during the build.

7
5.2. Connecting the debugger
For this tutorial, it is necessary for you to power the RSK2+ from the supplied PSU, as the E10A debugger cannot supply power to the
RSK. The E10A debugger will be powered via the USB cable. Please be aware that if you have too many devices connected to your
USB port, it may be shut down by Windows. If this happens disconnect some of the connected USB devices and try again. Alternatively
you can provide an external power source, taking care to ensure the correct polarity and voltage.
The Quick Start Guide provided with the RSK2+ board gives detailed instructions on how to connect the E10A to the host computer. The
following assumes that the steps in the Quick Start Guide have been followed and the E10A drivers have been installed.
• Fit the LCD module to ‘J6’ on the RSK2+. Ensure all the pins of the connector are correctly inserted in the socket.
• Connect the E10A debugger to any spare USB port on your computer.
• Connect the E10A debugger to the target hardware, ensuring that it is plugged into the connector marked ‘E10A’ on the
RSK2+.
• Turn on the external power to the board.
5.3. Connecting to the target with the E10A
This section will take you through the process of connecting to the device, programming the Flash and executing the code.
• Select the
‘SessionSH2A_FPU_E10A_USB_SYSTEM’
debug session.
• Click the <Connect> button on the debug toolbar.
• In the ‘Select Emulator mode’ dialog
For Device, select ‘SH7267’
For Mode, select ‘E10A-USB Emulator’
• Click <OK>

8
• Press the ‘RST’ button on the RSK2+ board.
• Click <OK>
• Please wait until the message “Connected”
appears in the ‘HEW output’ window – this
indicates that the RSK2+ board has successfully
connected.
• Click ‘Emulator System’ icon on the tool bar.
• Switch to the ‘Loading flash memory’ Tab
Note: Please ensure all settings for both tabs of the
‘Configuration Dialog’ match the diagrams shown.
• Select the ‘Disable’ radio button for both ‘Loading
flash memory’ and for ‘Erasing flash memory’
options.
• Click <OK>
• Browse and run the ‘fmtool_SH7267.hdc’ file available in the FMTool folder present in the project directory
Now is a good time to save the HEW session.
• Select ‘File’ | ‘Save Session’.
If you have changed any workspace settings now is a good time to save the workspace.
• Select ‘File’ | ‘Save Workspace’.

9
Chapter 6. Downloading and Running the Tutorial
Once the code has been built in HEW it needs to be downloaded to the RSK2+.
There will now be an additional category in the workspace view for ‘Download Modules’
• Right click on the download module listed and
select ‘Download’.
• On completion, the debugger and code are ready to
be executed.
To start debugging, we need to reset the debugger and target.
• Press ‘Reset CPU’ on the Debug Toolbar.
The File window should open the tutorial code at the entry point. An arrow marks the current position of the program counter.

1010
We will now skip over the initialization code and proceed to the main tutorial.
• In ‘Source View’ scroll down the file until you see the call to main.
• Place an eventpoint at the call to main(); by double clicking in the ‘Event’ column next to the line to stop at.
Maximum eleven eventpoints can be set. Eventpoints do not require programming the flash memory, and thus are faster to
use.
Please refer to the following document for further information: SuperH™ Family E10A-USB Emulator Additional Document for
User’s Manual Supplementary Information on Using SH7266 and SH7267.
• Press ‘Go’ on the Debug Toolbar.
The code will execute to the event point. At this point, all the device Initialization will have been completed.
• Press ‘Step In’ on the Debug Toolbar.
The code window will open ‘main.c’ and show the new position of the program counter.

1111
Support for the LCD display is included in the tutorial code. We do not need to be concerned about the details of the LCD interface except
that the interface is write-only and so is not affected if the LCD display is attached or not.
• Open the file ‘main.c’
• Insert an event point at ‘Statics_Test()’ function.
• Right click on the ‘FlashLEDs(); function and select
‘Go to cursor’.
The code will execute to the selected line and stop.
• Press ‘Step Over’ on the Debug Toolbar.
The code will run and flash the LED1 and LED2 for 200 times. The debugger will not exit until all 200 flashes have completed or a switch is
pressed on the RSK2+.
• If the LEDs are still flashing, press the switch SW2 on the RSK2+ to exit the ‘FlashLEDs()’ function.
The code will run to the event point we previously set on the ‘Statics_Test’ function.
The Statics_Test() is used to demonstrate that the Initialization routine has successfully copied all the initialised variables from storage
in flash to RAM.
• Press <Step In> on the Debug Toolbar.
It is possible to monitor variables while debugging the code. To set up a ‘watch’ on a variable place the mouse over the variable. If the
variable is available in the current context a tool-tip will be displayed with the current value of the variable.
• Hover, the mouse over the ‘ucStr’ variable to see the tooltip value. Then Right click on the variable name and select ‘Instant
Watch’.
A dialog will open showing the variable and allowing further details to be explored.
• Press <Add>
The dialog will close and a new pane will open in the workspace containing the variable.
It is possible to see that the string has been successfully initialised to ‘STATIC ‘.
• Set an event point on the call to ‘DisplayString();’ inside the for loop.
• Press ‘Go’ to run the code from the current PC
position.
When the program stops you can see the modified string displayed on the second line of the LCD.

1212
Inspection of the watch pane will show that the first character of the variable string has been replaced with the first character of the constant
replacement string.
• Remove the event point
• Right click on the ‘DisplayString();’ function call after the loop and select ‘Go to cursor’.
This shows that the variable was initialised at program start up and can be overwritten with ‘TESTTEST’.
The modified string is also displayed on the LCD
There are several versions of the timer function depending upon the peripherals available in the device. The default function is
TimerADC which we shall demonstrate here.
The ‘TimerADC’ function initialises an interrupt on an available internal timer. On a compare match in the timer module, an interrupt is
generated. In the ‘TimerADC’ code version, the interrupt reads the last ADC conversion from the external potentiometer and uses the result
to set the next underflow value. The ADC conversion is then restarted.
• Clear all eventpoints as mentioned below.
• Press ‘CTRL-E’ to open the ‘Eventpoints’ window.
• Click on the ‘Event condition’ tab.
• Select the eventpoints displayed in the window.
• Click on ‘Delete eventpoint’ icon to remove
eventpoints.
The interrupt Initialization is completed as part of the hardware setup. This is contained in the file ‘interrupts.c’.
• Open the file ‘interrupts.c’ by double clicking on the file in the workspace view.
• Review this file and find the interrupt function that changes the LED pins, INT_MTU2_TGI3B ().
• Set an event point on the line where the LED pins are modified.
• Press <Go> or <F5> to run the code from the
position of the PC.
The code will stop in the interrupt routine. It is now possible to step through the interrupt function.
• Remove the event point in the interrupt by double clicking it again before exiting the function.
• Press <Go> to run the code from the current
position of the PC.
The code will now run to the infinite loop at the end of main() function. The user LED1 and LED2 should now be flashing. You can modify
the flashing rate by adjusting the potentiometer on the board.
You have now run the tutorial code and used many of the common features of the debugger. We suggest that you review the rest of the
tutorial code as many functions have important information on the operation of the code, the compiler directives and comments on when
they should or must be used. Please refer to Chapter 7 for more information on the project files.
1313
Chapter 7. Project Files
7.1. Standard Project Files
The RSK tutorials are configured so that it is possible to provide the same tutorial code on multiple RSK products. This allows the
evaluation of the different processor cores using equivalent code. To achieve this, the following files are common between all device cores
and tool chains.
Each of the tutorial files has a detailed comment section, describing the function of each code entry. Please refer to the source code for
greater detail on the purpose and operation of the compiler specific details.
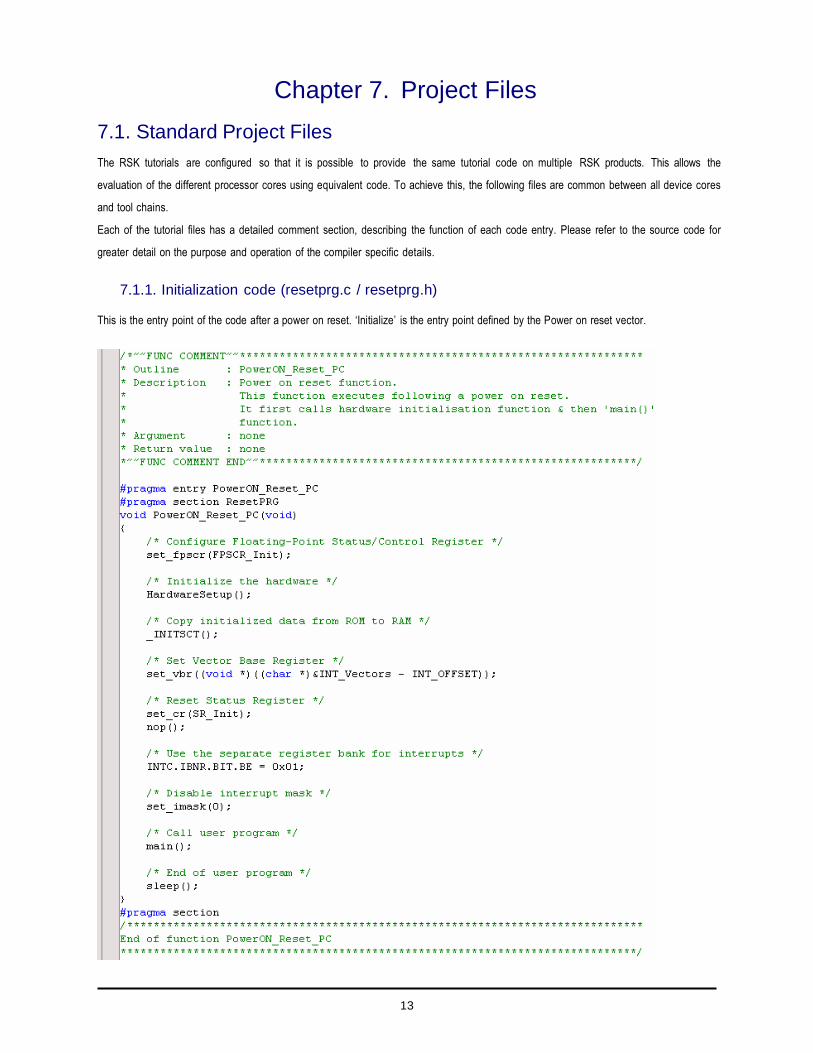
7.1.1. Initialization code (resetprg.c / resetprg.h)
This is the entry point of the code after a power on reset. ‘Initialize’ is the entry point defined by the Power on reset vector.
1414
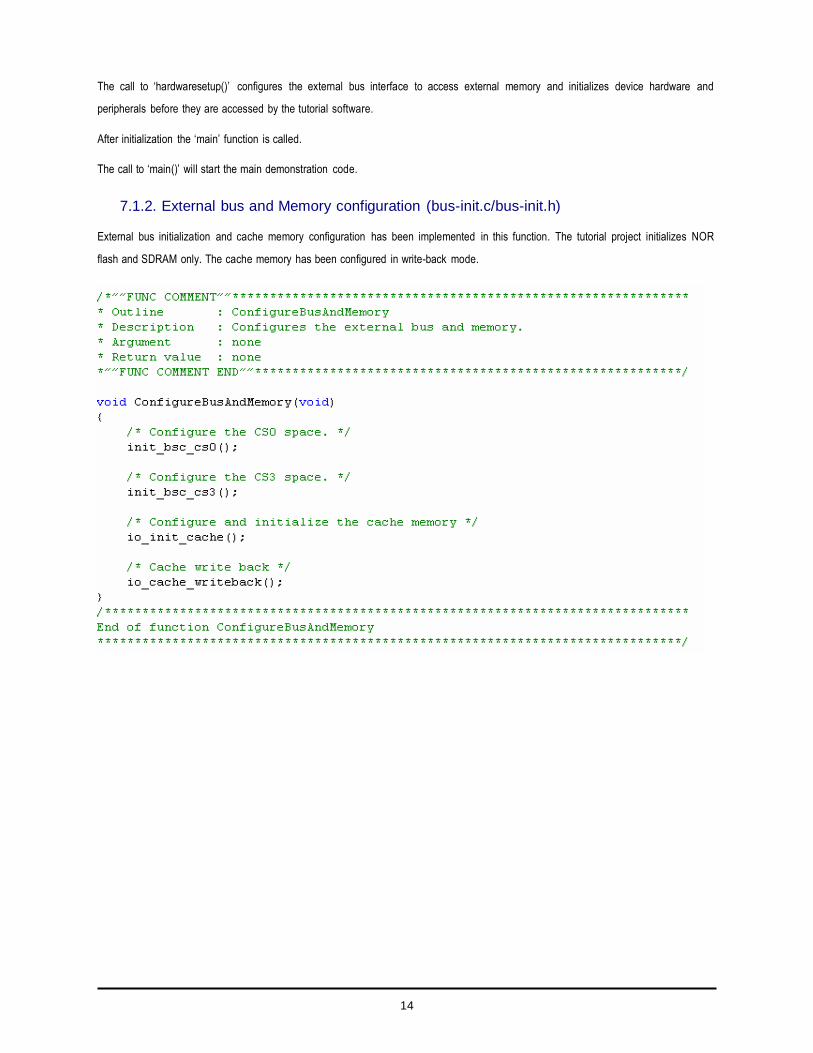
The call to ‘hardwaresetup()’ configures the external bus interface to access external memory and initializes device hardware and
peripherals before they are accessed by the tutorial software.
After initialization the ‘main’ function is called.
The call to ‘main()’ will start the main demonstration code.
7.1.2. External bus and Memory configuration (bus-init.c/bus-init.h)
External bus initialization and cache memory configuration has been implemented in this function. The tutorial project initializes NOR
flash and SDRAM only. The cache memory has been configured in write-back mode.
1515
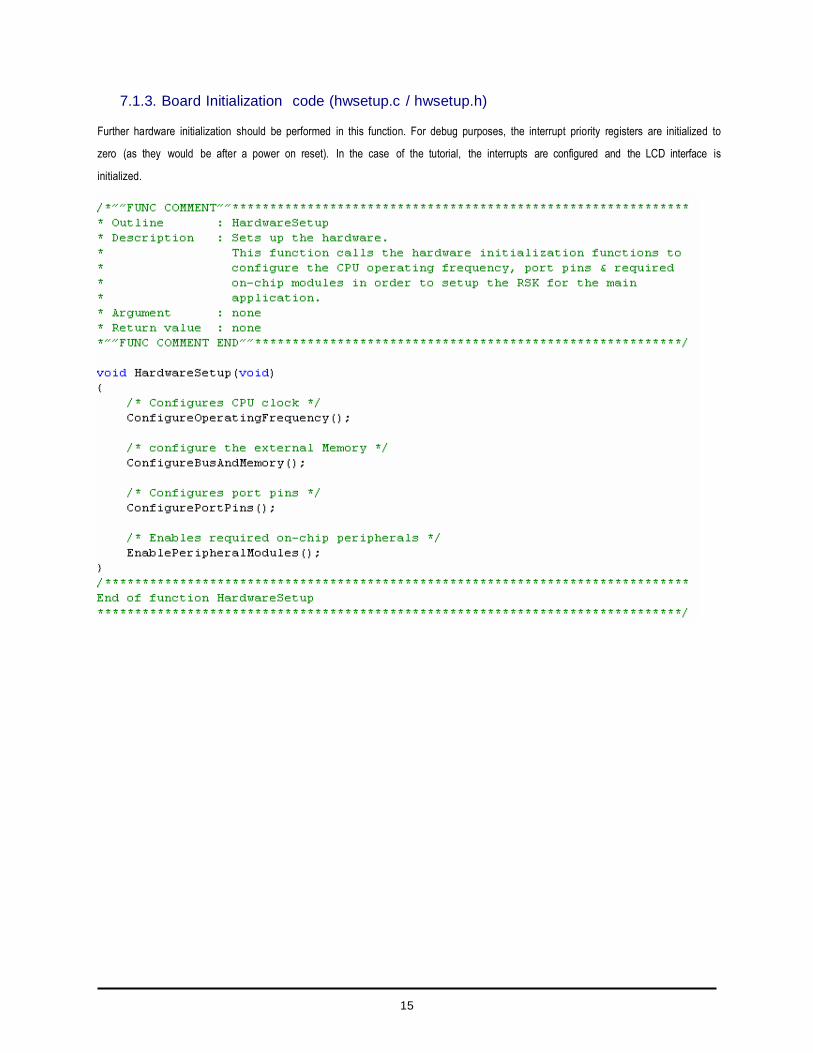
7.1.3. Board Initialization code (hwsetup.c / hwsetup.h)
Further hardware initialization should be performed in this function. For debug purposes, the interrupt priority registers are initialized to
zero (as they would be after a power on reset). In the case of the tutorial, the interrupts are configured and the LCD interface is
initialized.

1616
7.1.4. Main tutorial code (main.c / main.h)
The display Initialization and string display functions operate on the LCD display module. In addition to the tutorial code several samples
of use of the on chip peripherals are supplied. Check compatibility with a ks0066u controller and pin connection on the schematic before
connecting an LCD module not supplied by Renesas.

1717
Chapter 8. Additional Information
For details on how to use High-performance Embedded Workshop (HEW), refer to the HEW manual available on the CD or from the web
site.
Further information available for this product can be found on the Renesas website at:
http://www.renesas.com/renesas_starter_kits
General information on Renesas Microcontrollers can be found at the following website.
Global: http://www.renesas.com/
Regional (English language) sites can be accessed from the Global site, or directly by going to:
Europe: http://renesas.eu
Americas: http://america.renesas.com
Asia: http://sg.renesas.com
Renesas Starter Kit+ for SH7267
Tutorial Manual
Publication Date Rev.1.00 May 22, 2012
Published by: Renesas Electronics America
2880 Scott Blvd., Santa Clara California
USA
©2012 Renesas Electronics America, All Rights Reserved.