reefton shower unit square (2 sided)€¦ · reefton shower unit 2 sided - installation...
TRANSCRIPT
REEFTON SHOWER UNIT SQUARE (2 SIDED)
INSTALLATION INSTRUCTIONS
2016 / V1
INCLUDES INSTRUCTIONS FOR:Reefton Acrylic Applications
Reefton Tile ApplicationsReefton Square (2 Sided) Configurations

1REEFTON SHOWER UNIT 2 Sided - Installation Instructions
REEFTON SHOWER UNIT2 SIDED
INSTALLATION INSTRUCTIONS
PLEASE READ CAREFULLY
GENERAL INFORMATIONThank you for choosing Stein Bathroomware. When you receive your Reefton Shower package please check for any damage. If damage has occurred advise your supplier immediately and do not proceed with installation.
DISCLAIMER Stein International Ltd are not liable for any Reefton shower unit that has not been installed correctly.
GLASS WARRANTY CLAIMSGlass breakages on site are not replaced under warranty.
SAFETY GUIDE• The glass requires two people to handle.• Always stand glass up after unpacking the components and use soft packing when in contact with
hard surfaces. Take care not to strike an edge or corner on a hard surface.• All glass is toughened and cannot be reworked or drilled.• Wear protective gloves and eye protection.• Special care should be taken when drilling walls to avoid hidden pipes or electrical cables
TOOLS REQUIRED• Soft pencil and masking tape• Spirit level and large square• Screwdrivers• Tape measure• Drill and bits• Hammer
MATERIALS REQUIRED• Sika Silaflex NG Translucent • Rags and suitable cleaning materials
STEIN RECOMMENDS THAT A PROFESSIONAL SHOWER INSTALLER IS USED FOR INSTALLATION OF THIS PRODUCT

2REEFTON SHOWER UNIT 2 Sided - Installation Instructions
Before commencing installation, please ensure you have the following components in your package to complete installation.
PACKAGE CONTENTS
ASSEMBLY DIAGRAM
REF DESCRIPTION PART NO. QTY REF DESCRIPTION PART NO. QTY
1 Wall channels PAR1080 2 13 Magnetic seals PAR1089 2
2 Fixed panel 1 14 Drip seal PAR1090 1
3 Fixed side panel 1 15 Handle set PAR1019 1
4 Rails PAR1081 2 16 Rail fixing M6 screws -16mm PAR1087 8
5 Door panel 1 17 Wall plugs PAR1087 4
6 Hinge mountain blocks PAR1082 2 18 Fixed panel M4 screw caps 10mm PAR1087 8
7 Hinges PAR1083 2 19 Wall plugs PAR1087 8
8 Hinge caps PAR1084 8 20 Fixed panel M4 screw caps 10mm PAR1087 8
9 Rail cap bases PAR1085 8 21 Fixed panel screw caps PAR1087 8
10 Rail caps PAR1086 8 22 Bumper mouldings PAR1091 8
11 Hinge mounting blocksM6 screws - 16mm PAR1087 4 23 Posts PAR1092 2
12 Splash guard PAR1088 1 24 Allen key PAR1087 1

3REEFTON SHOWER UNIT 2 Sided - Installation Instructions
SHOWER TYPE FRONT PANEL (A) MIN/MAX RETURN PANEL (B) MIN/MAX
900 x 900 Two Sided 850mm to 875mm 850mm to 875mm
1000 x 1000 Two Sided 950mm to 975mm 950mm to 975mm
LAYOUT PLAN
WALL CHANNEL
WALL CHANNEL
BA
B A
OTHER APPLICATIONS:
1. Use the table below to establish the A and B measurement range for the outer line of the wall channels.
2. Measurements are based on the floor being level, walls plumb and all surfaces flat. Any variations must be taken into account when marking out the position within the minimum to maximum range.
ACRYLIC TRAY APPLICATION:
1. Applies to Reefton 900x900 and 1000x1000 showers.
2. To set out the Shower position mark out the outside line of the Return and Door set Wall Channels 25mm in from the outside of the tray. This will allow for a approximately 10mm variation from plumb on the walls. Any significant variations to plumb on the walls will need to be allowed for in the layout.

4REEFTON SHOWER UNIT 2 Sided - Installation Instructions
checked
checked
checked
checked
checked
checked
Solid fixing must be provided in the walls behind the wall channels. Refer to the Layout Plan (Page 3) to establish your shower type.
To ensure a successful result the walls must be plumb and the floor flat and level.
Contract a plumber to ensure waste fitting is correctly installed.
To install acrylic tray and liner, please refer to separate installation instructions with packaged with the product.
Wall and floor surfaces must be waterproofed by a Certified Applicator and a Producer Statement provided for the local council.
All tiling must be completed and allowed to cure before installing the shower enclosure.
PREPARATION CHECKLIST
THE FOLLOWING ITEMS MUST BE COMPLETED PRIOR TO INSTALLATION
ACRYLIC INSTALLATIONS OPTION
TILE INSTALLATIONS OPTION
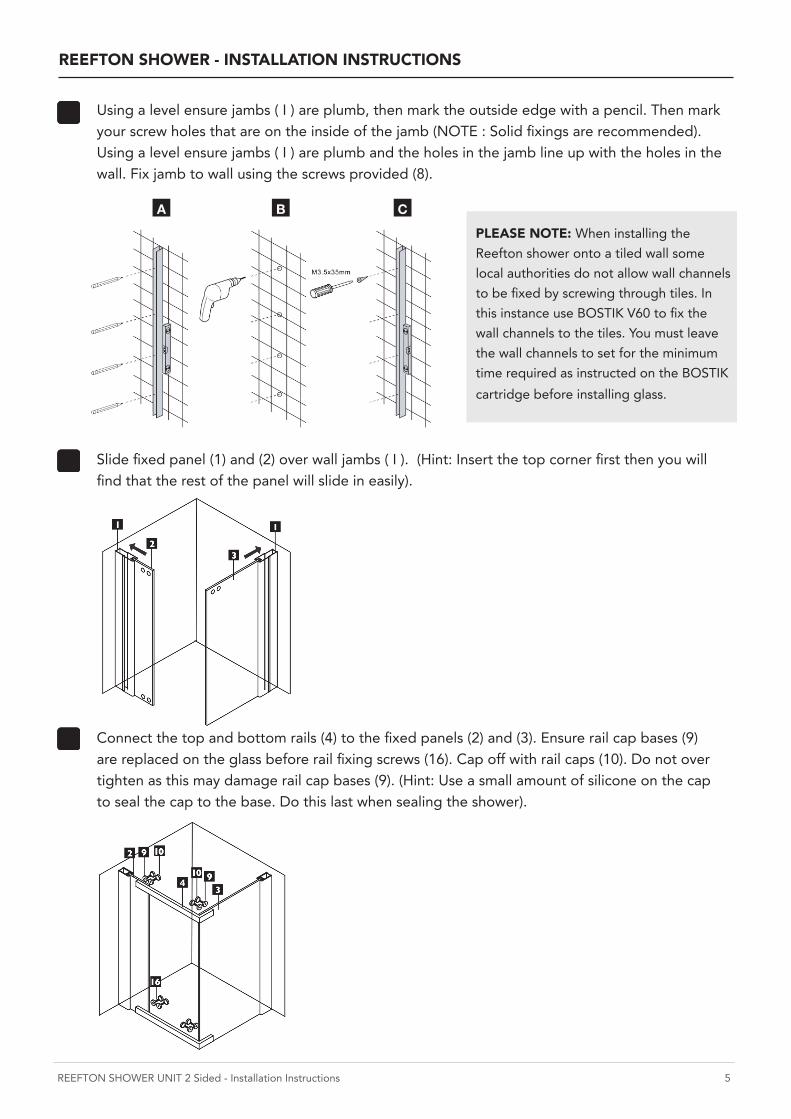
PLEASE NOTE: When installing the Reefton shower onto a tiled wall some local authorities do not allow wall channels to be fixed by screwing through tiles. In this instance use BOSTIK V60 to fix the wall channels to the tiles. You must leave the wall channels to set for the minimum time required as instructed on the BOSTIK cartridge before installing glass.
A B C
Using a level ensure jambs ( I ) are plumb, then mark the outside edge with a pencil. Then mark your screw holes that are on the inside of the jamb (NOTE : Solid fixings are recommended).Using a level ensure jambs ( I ) are plumb and the holes in the jamb line up with the holes in the wall. Fix jamb to wall using the screws provided (8).
Slide fixed panel (1) and (2) over wall jambs ( I ). (Hint: Insert the top corner first then you will find that the rest of the panel will slide in easily).
Connect the top and bottom rails (4) to the fixed panels (2) and (3). Ensure rail cap bases (9) are replaced on the glass before rail fixing screws (16). Cap off with rail caps (10). Do not over tighten as this may damage rail cap bases (9). (Hint: Use a small amount of silicone on the cap to seal the cap to the base. Do this last when sealing the shower).
5REEFTON SHOWER UNIT 2 Sided - Installation Instructions
1
REEFTON SHOWER - INSTALLATION INSTRUCTIONS
2
3

Adjust fixed panel (2) and (3) in or out of the wall jambs ( I ) so that the top rail (4) is horizontal and the whole screen sits square on the shower base /shower area (Bmm = Cmm). Also ensure both fixed panels (2) and (3) sit vertical.
Now drill 4 equally spaced 3.2mm holes into the wall jambs ( I ) on the INSIDE of the screen. Make sure that your drill holes are more than 20mm back from the edge of the glass when using the smallest screen size, otherwise the glass may break. Make sure the holes also go through the aluminium of the fixed panels. Fix off the fixed panels (2) and (3) using the fixed panel screws (19) and caps (20).
Attach the bottom hinge mounting block (6) to the bottom rail (4) using the screws provided (11). Make sure the mounting block is facing the right way. See AI. Make sure the mounting block is in the middle of its adjustment range.
Place the bottom door hinge (7) which is already attached to the door into the bottom mounting block (6). Try to keep the door (5) as vertical as possible to prevent damage. Slide the second mounting block (6) onto the top hinge (7). Make sure the mounting block is facing the right way. See AI. Screw mounting block (6) to the top rail (4) using the screws provided (11).
Adjustment to the door (5) is made by the screws (11) and sliding the hinge mounting block (6) along the rail. Adjust the door panel so there is an equal gap between the fixed panels (2) and (3). Also make sure the top rail (4) and the top door (5) have an equal gap. Now tighten the hinge mounting blocks.
6REEFTON SHOWER UNIT 2 Sided - Installation Instructions
4
5
6

Slide hinge caps (8) over both hinges. (Hint: Place a small amount of silicone under each cap before installing to ensure caps remains in position permanently. This can be done last when sealing the outside shower).
Attach handle to door as shown. Make sure that on the inside of the door the clear washers are next to the glass. See Step 1 for assembly instructions.
Push the magnetic seals (13) onto the door panel (5) and fix the side panel (3).
Push the splash guard ( 12 ) on to the door panel (5).Push the drip seal (14) onto the bottom of the door panel (5). Note that the top flap is to the inside.
7REEFTON SHOWER UNIT 2 Sided - Installation Instructions
7

Apply silicone sealer around all external joint of the shower screen and allow 24 hours for the silicone to set.
Silicone is not used on the inside of the shower screen because in time water can build up within the wall jamb and the screen will leak water out of the shower area. The screens are designed to allow the water to return into the shower area, if there is any present.
WARNING! SCREENS THAT ARE SEALED ON THE INSIDE, WILL VOID WARRANTY.
8
113 Newton Street, Mount MaunganuiFreephone 0800 002 299 | Phone +64 7 928 9990
www.stein.co.nz