redline drums user guide - ion audio · redline drums user guide english ( 3 – 10 ) guía del...
TRANSCRIPT

Redline Drums
User Guide English ( 3 – 10 )
Guía del usuario Español ( 11 – 18 )
Guide d'utilisation Français ( 19 – 26 )
Guida per l'uso Italiano ( 27 – 34 )
Benutzerhandbuch Deutsch ( 35 – 42 )
Appendix English ( 43 – 47 )


3
User Guide (English) Support For complete system requirements, compatibility information, and product registration, visit: ionaudio.com/redline-drums.
For additional product support, visit ionaudio.com/support.
Quick Start Connecting the Drum Module
Selecting a Kit To select one of the module's 10 preset Kits, do one of the following:
• Press the Variation Button so it is lit red, and then press the 1, 2, 3, 4, or 5 Button to select Kit 1, 2, 3, 4, or 5 (respectively).
• Press the Variation Button so it is lit green, and then press the 1, 2, 3, 4, or 5 Button to select Kit 6, 7, 8, 9, or 10 (respectively).
The Kit number will appear in the display. Once you have selected a Kit, you can select others by repeating one of the steps above or by using the – and + Buttons. Playing the Pads If your electronic drum kit has velocity-sensitive pads, this drum module will play sounds of varying timbres depending on how hard you hit the pads. Try hitting the pads with different amounts of force to experiment with the different sounds produced by the module!
Note: The hi-hat sound will vary based on the position of the hi-hat controller pedal: • Open hi-hat: With your foot off of the pedal, hit the hi-hat pad. • Closed hi-hat: With your foot pressing the pedal all the way down, hit the hi-hat pad. • Pedal close: Press the hi-hat pedal all the way down without hitting the hi-hat pad. • Splash: Quickly press the hi-hat pedal all the way down, and then release it immediately.
Learn more about using the drum module in the Using the Module section of this manual.
Connect the cable snake here (using the two screws to secure it), and then connect the 1/4" ends of the cables to their respective pads.
1 2 3 4 5 VARIATION

4
Features
Front Panel 1. Power Button: Press this button to turn the
drum module on. Press and hold it for 2 seconds to turn the drum module off.
2. Display: This area shows values and text relevant to the drum module's functions and operation.
3. Volume Knob: Turn this knob to adjust the volume of the Main Outputs and Phones Output.
4. – / + : Press either of these buttons to decrease or increase the value shown in the display.
5. Click Button: Press this button to turn the metronome ("click") on or off. See the Using the Metronome (Click) section for more information.
6. Start/Stop Button: Press this button to start or stop playback of a Pattern. See the Playing Along With Patterns section for more information.
7. Pattern Button: Press this button to enter Pattern Mode. Press both this button and the Tempo Button simultaneously to use the Built-In Drum Coach. See the Playing Along With Patterns and Using the Built-In Drum Coach sections for more information.
8. Tempo: Press this button to enter Tempo Mode, and use the – and + buttons to adjust the tempo. Press both this button and the Pattern Button simultaneously to use the Built-In Drum Coach. See the Using the Metronome (Click) and Using the Built-In Drum Coach sections for more information.
9. 1-5/Variation Buttons: Press any one of these buttons to enter Kit Mode and select a Kit. When using the Built-In Drum Coach, you can use these buttons to select an exercise. See the Using Kits and Using the Built-In Drum Coach sections for more information.
Rear Panel 1. Power Jack: Use a power adapter
(included, 9 V, 500 mA, center pin-positive) to connect this jack to your power outlet.
2. Cable Snake Connector: Connect your cable snake (included) here, and connect the cable snake's cables to your kit's triggers (drum pads, cymbal pads, and pedals).
3. Main Outputs: Use standard 1/4" mono cables (not included) to connect these outputs to your monitor, amplifier, or PA system. Adjust the volume with the Volume Knob on the top panel.
4. Phones Output: Connect standard 1/8" stereo headphones to this output. Adjust the volume with the Volume Knob on the top panel.
5. Aux In: Use a 1/8" stereo cable (not included) to connect an external audio device (smartphone, CD player, etc.) to this input.
6. USB Port: Use a standard USB cable (not included) to connect your computer to this port, allowing you to send and receive MIDI messages to and from your computer. See the Using MIDI section for more information.
PHONES OUTPUTAUX IN USBL/MONOR
14 5 3
2
3 6
SLOW GOOD FAST
1 2 3 4 5 VARIATION
PATTERN
VOLUME
COACH
TEMPO
START/STOPCLICK
1
9 9 9 9 9 9
2 3
45 6 7 8
4

5
Using the Module Using Kits Selecting a Kit
To select one of the module's 10 preset Kits, do one of the following:
• With the Variation Button lit red, press the 1, 2, 3, 4, or 5 Button to select Kit 1, 2, 3, 4, or 5 (respectively).
• With the Variation Button lit green, press the 1, 2, 3, 4, or 5 Button to select Kit 6, 7, 8, 9, or 10 (respectively).
The Kit number will appear in the display. Once you have selected a Kit, you can select others by repeating one of the steps above or by using the – and + Buttons. Adjusting Kit Volumes
To adjust the volume of each separate Kit:
1. Do one of the following:
• With the Variation Button lit red, double-press the 1, 2, 3, 4, or 5 Button to select Kit 1, 2, 3, 4, or 5 (respectively).
• With the Variation Button lit green, double-press the 1, 2, 3, 4, or 5 Button to select Kit 6, 7, 8, 9, or 10 (respectively).
2. The display will show an L ("level") and the volume level (00 – 32). Use the – or + Buttons to set the Kit's volume level. (The default volume level is 28.)
3. Wait for 4 seconds. The drum module will automatically save the new setting.
Playing Along With Patterns Selecting and Playing a Pattern
To select one of the 30 preset Patterns:
1. Press the Pattern Button to enter Pattern Mode. The button's LED will light up, and the display will show the current Pattern's number.
2. Use the – or + buttons to select a Pattern. (You can hold down the – or + buttons to scan quickly through the list.)
3. Press the Start/Stop Button to start the Pattern's playback.
4. Play along to the Pattern!
5. Press the Start/Stop Button to stop the Pattern's playback. Adjusting the Pattern Volume
To adjust the volume of each separate Pattern:
1. Double-press the Pattern Button.
2. The display will show the volume level (00 – 32). Use the – or + Buttons to set the Pattern's volume level. (The default volume level is 25.)
1 2 3 4 5 VARIATION
PATTERN
1 2 3 4 5 VARIATION
START/STOP
PATTERN

6
Using the Metronome (Click) You can use the built-in metronome ("click") to help you keep time while practicing with the Built-In Drum Coach or with Patterns. You can change the metronome's tempo (speed), volume, sound, and time signature. Turning the Metronome On or Off
To turn the metronome on or off, press the Click button. Adjusting the Metronome Tempo
To adjust the metronome's tempo (speed):
1. Press the Tempo Button.
2. The display will show the current tempo (30 – 280) in BPM ("beats per minute"). Use the – or + Buttons to set the new tempo.
3. Wait for 4 seconds. The drum module will automatically save the new setting.
Adjusting the Metronome Volume
To adjust the metronome's volume:
1. Double-press the Click Button.
2. The display will show an L ("level") and the volume level (00 – 32). Use the – or + Buttons to set the metronome's volume level. (The default volume level is 25.)
3. Wait for 4 seconds. The drum module will automatically save the new setting.
Changing the Metronome Sound
To change the metronome's "click" sound:
1. Press the Click Button and 1 Button simultaneously.
2. The display will show CL ("click") and the number of the sound (CL1 – CL5). Use the – or + Buttons to set the metronome sound:
• CL1: Chime and click (default)
• CL2: Clave
• CL3: Side-stick
• CL4: Cowbell
• CL5: Vocal
3. Wait for 4 seconds. The drum module will automatically save the new setting. Changing the Metronome Time Signature
To change the metronome's time signature:
1. Press the Click Button and 2 Button simultaneously.
2. The display will show the current time signature. Use the – or + Buttons to select a time signature: 1/2, 2/2, 3/4, 4/4, or 6/8.
3. Wait for 4 seconds. The drum module will automatically save the new setting.
CLICK
TEMPO
CLICK
CLICK
1
CLICK2

7
Changing the Metronome Interval
To change the metronome's note division (the note value it measures with each click):
1. Press the Click Button and 3 Button simultaneously.
2. The display will show the current interval. Use the – or + Buttons to select a new interval: 2 (half note), 3 (triplet), 4 (quarter note), 6 (sextuplet), 8 (eighth note), or 16 (sixteenth note). (The default is 4.)
3. Wait for 4 seconds. The drum module will automatically save the new setting.
Using the Built-In Drum Coach The Built-In Drum Coach contains five different exercises to help you develop and improve a sense of tempo, accuracy, or stamina: Beat Check, Gradual Up/Down, Rhythm Change Up, Follow Me, and Drum Mute. To use the Built-In Drum Coach, press the Pattern Button and Tempo Button at the same time. Then, press the 1, 2, 3, 4, or 5 Button that corresponds to the exercise you want to do. The display will show which exercise you have selected.
1. Beat Check (bCH) 2. Gradual Up/Down (GUd) 3. Rhythm Change Up (C-U) 4. Follow Me (FLo) 5. Drum Mute (d-U)
Using Beat Check This exercise evaluates your sense of time and how accurately you play along with the metronome. To use Beat Check: 1. Press the Pattern Button and Tempo Button at the
same time, and then press the 1 Button. 2. Set the metronome's time signature and interval
(described in the Using the Metronome (Click) section). 3. Press the Start/Stop Button to begin. 4. Hit the pads in time with the metronome. The six LEDs of the 1-5/Variation Buttons indicate
how accurate (how "on time") you are.
• When you are right on the beat, the 3 and 4 Button light up.
• When you are slightly off the beat, the 2 or 5 Button will light up.
• When you are off the beat, the 1 or Variation Button will light up.
• When you are completely off the beat, no buttons will light up.
5. Press the Start/Stop Button to stop. Using Gradual Up/Down Gradual Up/Down evaluates how quickly you can play while still maintaining accurate time. To use Gradual Up/Down: 1. Press the Pattern Button and Tempo Button at the
same time, and then press the 2 Button. 2. Set the metronome's time signature and interval
(described in the Using the Metronome (Click) section). 3. Press the Start/Stop Button.
CLICK
3
START/STOP
SLOW GOOD FAST
1 2 3 4 5 VARIATION
PATTERN
COACH
TEMPO
1
PATTERN
COACH
TEMPO
2
START/STOP
8
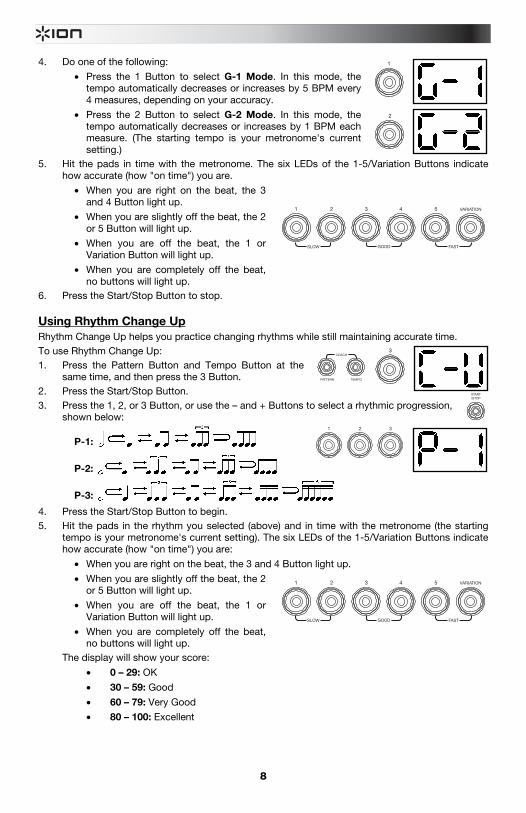
4. Do one of the following:
• Press the 1 Button to select G-1 Mode. In this mode, the tempo automatically decreases or increases by 5 BPM every 4 measures, depending on your accuracy.
• Press the 2 Button to select G-2 Mode. In this mode, the tempo automatically decreases or increases by 1 BPM each measure. (The starting tempo is your metronome's current setting.)
5. Hit the pads in time with the metronome. The six LEDs of the 1-5/Variation Buttons indicate how accurate (how "on time") you are.
• When you are right on the beat, the 3 and 4 Button light up.
• When you are slightly off the beat, the 2 or 5 Button will light up.
• When you are off the beat, the 1 or Variation Button will light up.
• When you are completely off the beat, no buttons will light up.
6. Press the Start/Stop Button to stop. Using Rhythm Change Up Rhythm Change Up helps you practice changing rhythms while still maintaining accurate time. To use Rhythm Change Up: 1. Press the Pattern Button and Tempo Button at the
same time, and then press the 3 Button. 2. Press the Start/Stop Button. 3. Press the 1, 2, or 3 Button, or use the – and + Buttons to select a rhythmic progression,
shown below:
P-1:
P-2:
P-3: 4. Press the Start/Stop Button to begin. 5. Hit the pads in the rhythm you selected (above) and in time with the metronome (the starting
tempo is your metronome's current setting). The six LEDs of the 1-5/Variation Buttons indicate how accurate (how "on time") you are:
• When you are right on the beat, the 3 and 4 Button light up.
• When you are slightly off the beat, the 2 or 5 Button will light up.
• When you are off the beat, the 1 or Variation Button will light up.
• When you are completely off the beat, no buttons will light up.
The display will show your score:
• 0 – 29: OK
• 30 – 59: Good
• 60 – 79: Very Good
• 80 – 100: Excellent
1
2
SLOW GOOD FAST
1 2 3 4 5 VARIATION
START/STOP
1 2 3
PATTERN
COACH
TEMPO
3
SLOW GOOD FAST
1 2 3 4 5 VARIATION

9
Using Follow Me Follow Me helps you practice identifying different drums by their sound and memorizing drum rhythms that use the entire drum kit. In this exercise, a drum loop will repeat, alternating between (1) the drum pattern itself and (2) a metronome track of the same length during which you play the drum pattern yourself.
To use Follow Me:
1. Press the Pattern Button and Tempo Button at the same time, and then press the 4 Button.
2. Press the Start/Stop Button.
3. Use the – and + Buttons to select the drum pattern you want to play to.
4. Press the Start/Stop Button to begin.
5. When you hear the drum pattern, try to learn which pads are being played and when. During the metronome track that follows, play the same drum pattern in time with the metronome. For reference, the display will show the current beat. The six LEDs of the 1-5/Variation Buttons indicate how accurate you are.
6. Press the Start/Stop Button to stop. Using Drum Mute Drum Mute lets you silence certain parts of various drum patterns, allowing you to play freely and create your own parts over the rest of the drum pattern.
To use Drum Mute:
1. Press the Pattern Button and Tempo Button at the same time, and then press the 5 Button.
2. Press the Start/Stop Button.
3. Use the – and + Buttons to select the drum pattern you want to play to.
4. Press one or several of the 1-5/Variation Buttons to select the sound or sounds you want to mute:
• 1: Kick drum
• 2: Snare drum
• 3: Hi-hat
• 4: Toms
• 5: Crash and ride cymbals
• Variation: Percussion
5. Press the Start/Stop Button to begin.
6. Play freely along with the drum pattern you hear. The drum pattern will not include any sounds you muted in Step 4, allowing you to create your own part.
7. Press the Start/Stop Button to stop.
Automatic Power-Off To save energy, the drum module will power off automatically after 30 minutes of no activity. If you do not need this feature, disable it by powering off the drum module, and then pressing and holding the Start/Stop Button while powering it back on. PoF will appear on the display to confirm the feature is off.
Note: After powering off, this feature will be re-enabled. Repeat the procedure above to disable it each time you power on the module.
PATTERN
COACH
TEMPO
4
START/STOP
SLOW GOOD FAST
1 2 3 4 5 VARIATION
START/STOP
PATTERN
COACH
TEMPO
5

10
Using MIDI About MIDI MIDI (Musical Instrument Digital Interface) is a standard way in which certain electronic musical devices can communicate with each other. When two MIDI devices are connected, they can send/receive MIDI "messages," "data," or "information" over either a 5-pin MIDI cable or a standard USB cable (depending on the available ports on the devices). In the case of the DM Lite module, you can connect its USB port to a USB port on your computer with a standard USB cable (sold separately). All MIDI messages will travel to and from your computer over this connection. This allows you to do one of two things:
• Use an electronic drum kit connected to the drum module to trigger sounds on an external MIDI device (e.g., a sequencer, your computer if you use software that can receive MIDI notes, etc.). See Triggering Sounds on an External MIDI Device later in this section.
• Use an external MIDI device to play sounds in the drum module. See Using the Drum Module as the Sound Module later in this section.
Triggering Sounds on an External MIDI Device
PHONES OUTPUTAUX IN USBL/MONOR
MIDI INVOL MIDI OUT R L R L USB
1. Using a standard USB cable (not included), connect the drum module's USB port to a USB port on your computer.
2. If you are triggering sounds in software, skip to the next step.
If you are triggering sounds in an external MIDI device, make sure that device is connected to your computer (either directly via USB or through a USB-MIDI interface).
3. Set the active track of your MIDI software, sequencer, etc. to Channel 10, and start recording. 4. Play your electronic drum kit. The MIDI information will be sent to your computer, sequencer, etc. See
the Trigger MIDI Notes section of this manual's Appendix for a list of the MIDI notes sent out by each trigger.
5. Stop recording. Using the Drum Module as the Sound Module
PHONES OUTPUTAUX IN USBL/MONOR
MIDI INVOL MIDI OUT R L R L USB
1. Using a standard USB cable (not included), connect the drum module's USB port to a USB port on your computer.
2. If you are using software to play the drum module's sounds, skip to the next step.
If you are using an external MIDI device to play the drum module's sounds, make sure that device is connected to your computer (either directly via USB or through a USB-MIDI interface).
3. Set the the active track of your MIDI software, sequencer, etc. to the desired channel (1-16).
Note: Channel 10 of the drum module is reserved for drum sounds. 4. Play your sequencer or other external device to hear the drum module's internal sounds.
5. See the Presets and General MIDI (GM) sections of this manual's Appendix for lists of the available sounds.
11
Guía del usuario (Español)
Soporte Para obtener información completa sobre requisitos del sistema, compatibilidad y registro del producto, visite ionaudio.com/redline-drums.
Para soporte adicional del producto, visite ionaudio.com/support.
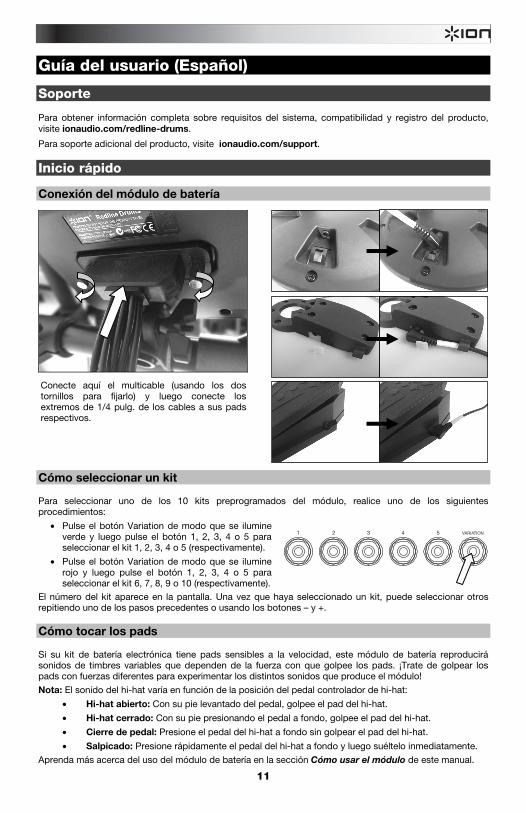
Inicio rápido Conexión del módulo de batería
Cómo seleccionar un kit Para seleccionar uno de los 10 kits preprogramados del módulo, realice uno de los siguientes procedimientos:
• Pulse el botón Variation de modo que se ilumine verde y luego pulse el botón 1, 2, 3, 4 o 5 para seleccionar el kit 1, 2, 3, 4 o 5 (respectivamente).
• Pulse el botón Variation de modo que se ilumine rojo y luego pulse el botón 1, 2, 3, 4 o 5 para seleccionar el kit 6, 7, 8, 9 o 10 (respectivamente).
El número del kit aparece en la pantalla. Una vez que haya seleccionado un kit, puede seleccionar otros repitiendo uno de los pasos precedentes o usando los botones – y +. Cómo tocar los pads Si su kit de batería electrónica tiene pads sensibles a la velocidad, este módulo de batería reproducirá sonidos de timbres variables que dependen de la fuerza con que golpee los pads. ¡Trate de golpear los pads con fuerzas diferentes para experimentar los distintos sonidos que produce el módulo!
Nota: El sonido del hi-hat varía en función de la posición del pedal controlador de hi-hat:
• Hi-hat abierto: Con su pie levantado del pedal, golpee el pad del hi-hat.
• Hi-hat cerrado: Con su pie presionando el pedal a fondo, golpee el pad del hi-hat.
• Cierre de pedal: Presione el pedal del hi-hat a fondo sin golpear el pad del hi-hat.
• Salpicado: Presione rápidamente el pedal del hi-hat a fondo y luego suéltelo inmediatamente.
Aprenda más acerca del uso del módulo de batería en la sección Cómo usar el módulo de este manual.
1 2 3 4 5 VARIATION
Conecte aquí el multicable (usando los dos tornillos para fijarlo) y luego conecte los extremos de 1/4 pulg. de los cables a sus pads respectivos.
12
Características
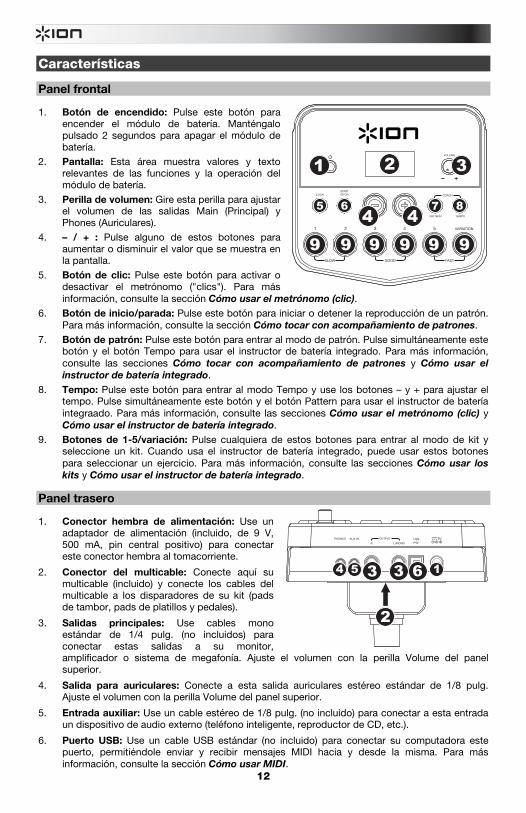
Panel frontal 1. Botón de encendido: Pulse este botón para
encender el módulo de batería. Manténgalo pulsado 2 segundos para apagar el módulo de batería.
2. Pantalla: Esta área muestra valores y texto relevantes de las funciones y la operación del módulo de batería.
3. Perilla de volumen: Gire esta perilla para ajustar el volumen de las salidas Main (Principal) y Phones (Auriculares).
4. – / + : Pulse alguno de estos botones para aumentar o disminuir el valor que se muestra en la pantalla.
5. Botón de clic: Pulse este botón para activar o desactivar el metrónomo ("clics"). Para más información, consulte la sección Cómo usar el metrónomo (clic).
6. Botón de inicio/parada: Pulse este botón para iniciar o detener la reproducción de un patrón. Para más información, consulte la sección Cómo tocar con acompañamiento de patrones.
7. Botón de patrón: Pulse este botón para entrar al modo de patrón. Pulse simultáneamente este botón y el botón Tempo para usar el instructor de batería integrado. Para más información, consulte las secciones Cómo tocar con acompañamiento de patrones y Cómo usar el instructor de batería integrado.
8. Tempo: Pulse este botón para entrar al modo Tempo y use los botones – y + para ajustar el tempo. Pulse simultáneamente este botón y el botón Pattern para usar el instructor de batería integraado. Para más información, consulte las secciones Cómo usar el metrónomo (clic) y Cómo usar el instructor de batería integrado.
9. Botones de 1-5/variación: Pulse cualquiera de estos botones para entrar al modo de kit y seleccione un kit. Cuando usa el instructor de batería integrado, puede usar estos botones para seleccionar un ejercicio. Para más información, consulte las secciones Cómo usar los kits y Cómo usar el instructor de batería integrado.
Panel trasero 1. Conector hembra de alimentación: Use un
adaptador de alimentación (incluido, de 9 V, 500 mA, pin central positivo) para conectar este conector hembra al tomacorriente.
2. Conector del multicable: Conecte aquí su multicable (incluido) y conecte los cables del multicable a los disparadores de su kit (pads de tambor, pads de platillos y pedales).
3. Salidas principales: Use cables mono estándar de 1/4 pulg. (no incluidos) para conectar estas salidas a su monitor, amplificador o sistema de megafonía. Ajuste el volumen con la perilla Volume del panel superior.
4. Salida para auriculares: Conecte a esta salida auriculares estéreo estándar de 1/8 pulg. Ajuste el volumen con la perilla Volume del panel superior.
5. Entrada auxiliar: Use un cable estéreo de 1/8 pulg. (no incluido) para conectar a esta entrada un dispositivo de audio externo (teléfono inteligente, reproductor de CD, etc.).
6. Puerto USB: Use un cable USB estándar (no incluido) para conectar su computadora este puerto, permitiéndole enviar y recibir mensajes MIDI hacia y desde la misma. Para más información, consulte la sección Cómo usar MIDI.
PHONES OUTPUTAUX IN USBL/MONOR
14 5 3
2
3 6
SLOW GOOD FAST
1 2 3 4 5 VARIATION
PATTERN
VOLUME
COACH
TEMPO
START/STOPCLICK
1
9 9 9 9 9 9
2 3
45 6 7 8
4

13
Cómo usar el módulo Cómo usar los kits Cómo seleccionar un kit
Para seleccionar uno de los 10 kits preprogramados del módulo, realice uno de los siguientes procedimientos:
• Con el botón Variation de encendido en rojo, pulse el botón 1, 2, 3, 4 o 5 para seleccionar el kit 1, 2, 3, 4 o 5 (respectivamente).
• Con el botón Variation de encendido en verde, pulse el botón 1, 2, 3, 4 o 5 para seleccionar el kit 6, 7, 8, 9 o 10 (respectivamente).
El número del kit aparece en la pantalla. Una vez que haya seleccionado un kit, puede seleccionar otros repitiendo uno de los pasos precedentes o usando los botones – y +. Cómo ajustar los volúmenes de los kits
Para ajustar el volumen de cada kit por separado:
1. Seleccione una de los siguientes procedimientos:
• Con el botón Variation de encendido en rojo, pulse dos veces el botón 1, 2, 3, 4 o 5 para seleccionar el kit 1, 2, 3, 4 o 5 (respectivamente).
• Con el botón Variation de encendido en verde, pulse dos veces el botón 1, 2, 3, 4 o 5 para seleccionar el kit 6, 7, 8, 9 o 10 (respectivamente).
2. La pantalla muestra una L ("nivel") y el nivel de volumen (00 – 32). Use los botones – o + para ajustar el volumen del kit. (El nivel de volumen predeterminado es 28).
3. Espere 4 segundos. El módulo de batería guarda automáticamente el nuevo ajuste. Cómo tocar con acompañamiento de patrones Cómo seleccionar y tocar un patrón
Para seleccionar uno de los 30 patrones preprogramados:
1. Pulse el botón Pattern para entrar al modo de patrón. Se enciende el LED del botón y aparece en la pantalla el número del patrón actual.
2. Use los botones – o + para seleccionar un patrón. (Puede mantener pulsados los botones – o + para recorrer rápidamente la lista).
3. Pulse el botón Start/Stop para iniciar inmediatamente la reproducción del patrón.
4. ¡Toque con el acompañamiento del patrón!
5. Pulse el botón Start/Stop para detener inmediatamente la reproducción del patrón.
Cómo ajustar el volumen del patrón Para ajustar el volumen de cada patrón por separado:
1. Pulse dos veces el botón Pattern.
2. Aparece en la pantalla el nivel de volumen (00 – 32). Use los botones – o + para ajustar el nivel de volumen del patrón. (El nivel de volumen predeterminado es 25).
1 2 3 4 5 VARIATION
PATTERN
1 2 3 4 5 VARIATION
START/STOP
PATTERN
14
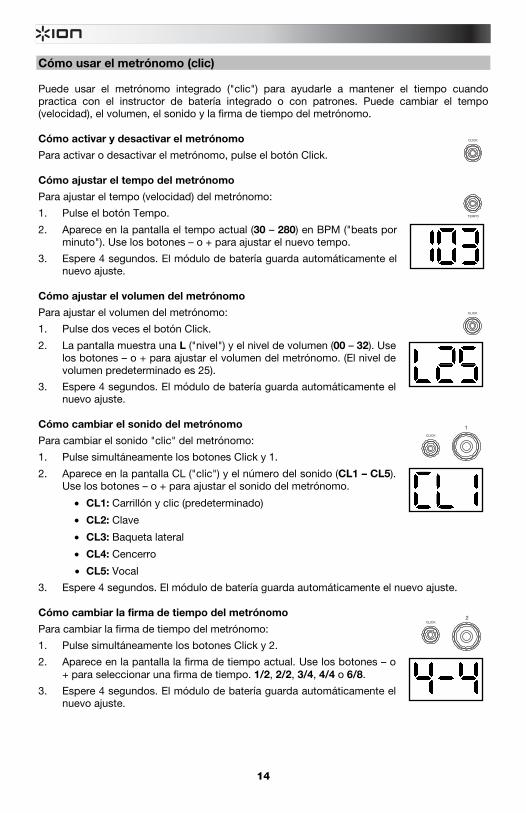
Cómo usar el metrónomo (clic) Puede usar el metrónomo integrado ("clic") para ayudarle a mantener el tiempo cuando practica con el instructor de batería integrado o con patrones. Puede cambiar el tempo (velocidad), el volumen, el sonido y la firma de tiempo del metrónomo. Cómo activar y desactivar el metrónomo
Para activar o desactivar el metrónomo, pulse el botón Click. Cómo ajustar el tempo del metrónomo
Para ajustar el tempo (velocidad) del metrónomo:
1. Pulse el botón Tempo.
2. Aparece en la pantalla el tempo actual (30 – 280) en BPM ("beats por minuto"). Use los botones – o + para ajustar el nuevo tempo.
3. Espere 4 segundos. El módulo de batería guarda automáticamente el nuevo ajuste.
Cómo ajustar el volumen del metrónomo
Para ajustar el volumen del metrónomo:
1. Pulse dos veces el botón Click.
2. La pantalla muestra una L ("nivel") y el nivel de volumen (00 – 32). Use los botones – o + para ajustar el volumen del metrónomo. (El nivel de volumen predeterminado es 25).
3. Espere 4 segundos. El módulo de batería guarda automáticamente el nuevo ajuste.
Cómo cambiar el sonido del metrónomo
Para cambiar el sonido "clic" del metrónomo:
1. Pulse simultáneamente los botones Click y 1.
2. Aparece en la pantalla CL ("clic") y el número del sonido (CL1 – CL5). Use los botones – o + para ajustar el sonido del metrónomo.
• CL1: Carrillón y clic (predeterminado)
• CL2: Clave
• CL3: Baqueta lateral
• CL4: Cencerro
• CL5: Vocal
3. Espere 4 segundos. El módulo de batería guarda automáticamente el nuevo ajuste. Cómo cambiar la firma de tiempo del metrónomo
Para cambiar la firma de tiempo del metrónomo:
1. Pulse simultáneamente los botones Click y 2.
2. Aparece en la pantalla la firma de tiempo actual. Use los botones – o + para seleccionar una firma de tiempo. 1/2, 2/2, 3/4, 4/4 o 6/8.
3. Espere 4 segundos. El módulo de batería guarda automáticamente el nuevo ajuste.
CLICK
TEMPO
CLICK
CLICK
1
CLICK2

15
Cómo cambiar el intervalo del metrónomo Para cambiar la división de notas (el valor de la nota que mide con cada clic) del metrónomo: 1. Pulse simultáneamente los botones Click y 3. 2. Aparece en la pantalla el intervalo actual. Use los botones – o + para
seleccionar un nuevo intervalo. 2 (blanca), 3 (tresillo), 4 (negra), 6 (seisillo), 8 (corchea), or 16 (semicorchea). (El valor predeterminado es 4).
3. Espere 4 segundos. El módulo de batería guarda automáticamente el nuevo ajuste.
Cómo usar el instructor de batería integrado El instructor de batería integrado contiene cinco ejercicios diferentes para ayudarle a desarrollar y mejorar el sentido de tiempo, precisión o fibra: Beat Check (Chequeo del beat), Gradual Up/Down (Arriba/abajo gradual), Rhythm Change Up (Cambio de ritmo ascendente), Follow Me (Sígame) y Drum Mute (Silencio de batería). Para usar el instructor de batería integrado, pulse simultáneamente los botones Pattern y Tempo. Luego, pulse el botón 1, 2, 3, 4 o 5 que corresponde al ejercicio que desea realizar. Aparece en la pantalla el ejercicio que seleccionó.
1. Chequeo del beat (bCH) 2. Arriba/abajo gradual (GUd) 3. Cambio ascendente de ritmo (C-U) 4. Sígame (FLo) 5. Silencio de batería (d-U)
Cómo usar el chequeo del beat Este ejercicio permite evaluar su sentido del tiempo y con qué precisión toca acompañado por el metrónomo. Para usar el chequeo del beat: 1. Pulse simultáneamente los botones Pattern y Tempo
y luego pulse el botón 1. 2. Ajuste la firma de tiempo y el intervalo del metrónomo (según se explica en la sección
Cómo usar el metrónomo (clic)). 3. Pulse el botón Start/Stop para comenzar. 4. Golpee los pads al ritmo del metrónomo. Los seis LED de los botones 1-5/Variation indican
cuán preciso ("a tiempo") va usted.
• Cuando está bien en el beat, se encienden los botones 3 y 4.
• Cuando está ligeramente fuera del beat, se encienden los botones 2 o 5.
• Cuando está fuera del beat, se enciende el botón 1 o Variation.
• Cuanto está completamente fuera del beat, no se enciende ningún botón. 5. Pulse el botón Start/Stop para parar. Cómo usar el arriba/abajo gradual El ejercicio arriba/abajo gradual permite evaluar cuán rápidamente puede tocar mientras mantiene un tiempo preciso. Para usar el arriba/abajo gradual: 1. Pulse simultáneamente los botones Pattern y Tempo
y luego pulse el botón 2. 2. Ajuste la firma de tiempo y el intervalo del metrónomo
(según se explica en la sección Cómo usar el metrónomo (clic)). 3. Pulse el botón Start/Stop.
CLICK
3
START/STOP
SLOW GOOD FAST
1 2 3 4 5 VARIATION
PATTERN
COACH
TEMPO
1
PATTERN
COACH
TEMPO
2
START/STOP

16
4. Seleccione una de los siguientes procedimientos:
• Pulse el botón 1 para seleccionar el modo G-1. En este modo, el tempo disminuye o aumenta en 5 BPM cada 4 medidas, dependiendo de su precisión.
• Pulse el botón 2 para seleccionar el modo G-2. En este modo, el tempo disminuye o aumenta en 1 BPM cada medida. (El tempo inicial es el ajuste de su metrónomo en ese momento).
5. Golpee los pads al ritmo del metrónomo. Los seis LED de los botones 1-5/Variación indican cuán preciso ("a tiempo") va usted.
• Cuando está bien en el beat, se encienden los botones 3 y 4.
• Cuando está ligeramente fuera del beat, se encienden los botones 2 y 5.
• Cuando está fuera del beat, se enciende el botón 1 o Variation.
• Cuanto está completamente fuera del beat, no se enciende ningún botón.
6. Pulse el botón Start/Stop para parar. Cómo usar el cambio ascendente de ritmo El ejercicio de cambio ascendente de ritmo le ayuda a practicar el cambio de ritmos mientras mantiene al mismo tiempo un tiempo preciso. Para usar el cambio ascendente de ritmo: 1. Pulse simultáneamente los botones Pattern y Tempo
y luego pulse el botón 3. 2. Pulse el botón Start/Stop. 3. Pulse el botón 1, 2 o 3 o use los botones – y + para seleccionar una progresión rítmica,
como se muestra a continuación:
P-1:
P-2:
P-3: 4. Pulse el botón Start/Stop para comenzar. 5. Golpee los pads al ritmo que seleccionó (arriba) y en sincronismo con el metrónomo (el tempo
inicial es el ajuste de su metrónomo de ese momento). Los seis LED de los botones 1-5/Variation indican cuán preciso ("a tiempo") va usted:
• Cuando está bien en el beat, se encienden los botones 3 y 4.
• Cuando está ligeramente fuera del beat, se encienden los botones 2 y 5.
• Cuando está fuera del beat, se enciende el botón 1 o Variation.
• Cuanto está completamente fuera del beat, no se enciende ningún botón. Pulse el botón Start/Stop para parar. Aparece en la pantalla su puntaje:
• 0 – 29: Aceptable
• 30 – 59: Bueno
• 60 – 79: Muy bueno
• 80 – 100: Excelente
1
2
SLOW GOOD FAST
1 2 3 4 5 VARIATION
START/STOP
1 2 3
PATTERN
COACH
TEMPO
3
SLOW GOOD FAST
1 2 3 4 5 VARIATION
17
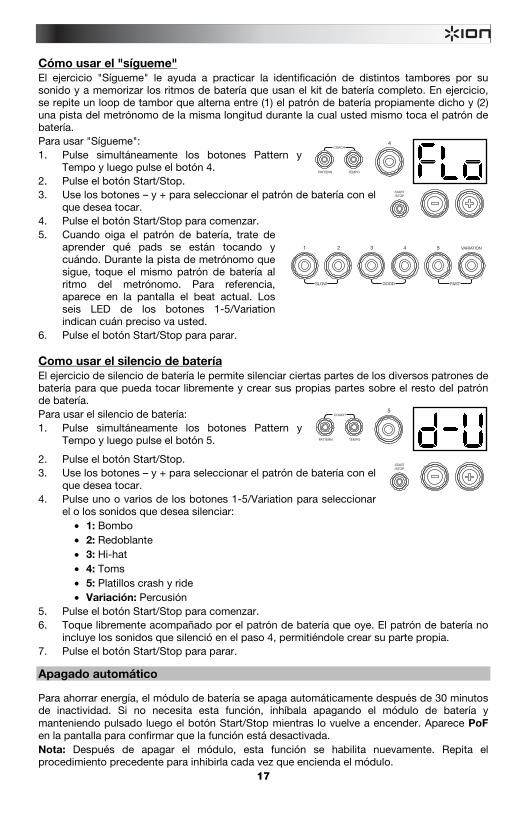
Cómo usar el "sígueme" El ejercicio "Sígueme" le ayuda a practicar la identificación de distintos tambores por su sonido y a memorizar los ritmos de batería que usan el kit de batería completo. En ejercicio, se repite un loop de tambor que alterna entre (1) el patrón de batería propiamente dicho y (2) una pista del metrónomo de la misma longitud durante la cual usted mismo toca el patrón de batería. Para usar "Sígueme": 1. Pulse simultáneamente los botones Pattern y
Tempo y luego pulse el botón 4. 2. Pulse el botón Start/Stop. 3. Use los botones – y + para seleccionar el patrón de batería con el
que desea tocar. 4. Pulse el botón Start/Stop para comenzar. 5. Cuando oiga el patrón de batería, trate de
aprender qué pads se están tocando y cuándo. Durante la pista de metrónomo que sigue, toque el mismo patrón de batería al ritmo del metrónomo. Para referencia, aparece en la pantalla el beat actual. Los seis LED de los botones 1-5/Variation indican cuán preciso va usted.
6. Pulse el botón Start/Stop para parar. Como usar el silencio de batería El ejercicio de silencio de batería le permite silenciar ciertas partes de los diversos patrones de batería para que pueda tocar libremente y crear sus propias partes sobre el resto del patrón de batería. Para usar el silencio de batería: 1. Pulse simultáneamente los botones Pattern y
Tempo y luego pulse el botón 5.
2. Pulse el botón Start/Stop. 3. Use los botones – y + para seleccionar el patrón de batería con el
que desea tocar. 4. Pulse uno o varios de los botones 1-5/Variation para seleccionar
el o los sonidos que desea silenciar: • 1: Bombo • 2: Redoblante • 3: Hi-hat • 4: Toms • 5: Platillos crash y ride • Variación: Percusión
5. Pulse el botón Start/Stop para comenzar. 6. Toque libremente acompañado por el patrón de batería que oye. El patrón de batería no
incluye los sonidos que silenció en el paso 4, permitiéndole crear su parte propia. 7. Pulse el botón Start/Stop para parar.
Apagado automático Para ahorrar energía, el módulo de batería se apaga automáticamente después de 30 minutos de inactividad. Si no necesita esta función, inhíbala apagando el módulo de batería y manteniendo pulsado luego el botón Start/Stop mientras lo vuelve a encender. Aparece PoF en la pantalla para confirmar que la función está desactivada. Nota: Después de apagar el módulo, esta función se habilita nuevamente. Repita el procedimiento precedente para inhibirla cada vez que encienda el módulo.
PATTERN
COACH
TEMPO
4
START/STOP
SLOW GOOD FAST
1 2 3 4 5 VARIATION
START/STOP
PATTERN
COACH
TEMPO
5
18
Cómo usar MIDI Acerca de MIDI MIDI (Interfaz digital de instrumentos musicales) es una manera estándar en que ciertos dispositivos musicales se pueden comunicar entre sí. Cuando se conectan dos dispositivos MIDI, pueden enviar y recibir "mensajes", "datos" o "información" ya sea por un cable MIDI de 5 pines o un cable USB estándar (dependiendo de los puertos disponibles de los dispositivos). En el caso del módulo DM Lite, usted puede conectar su puerto USB al puerto USB de su computadora por un cable USB estándar (que se vende por separado). Todos los mensajes MIDI viajan hacia y desde su computadora por esta conexión. Esto le permite hacer una de dos cosas:
• Usar un kit de batería electrónica conectado al módulo de batería para disparar sonidos en un dispositivo MIDI externo (por ejemplo un secuenciador, su computadora si usa software que puede recibir notas MIDI, etc.). Consulte Cómo disparar sonidos en un dispositivo MIDI externo más adelante en esta sección.
• Usar un dispositivo MIDI externo para reproducir sonidos en el módulo de batería. Consulte Cómo usar el módulo de batería como módulo de sonido más adelante en esta sección.
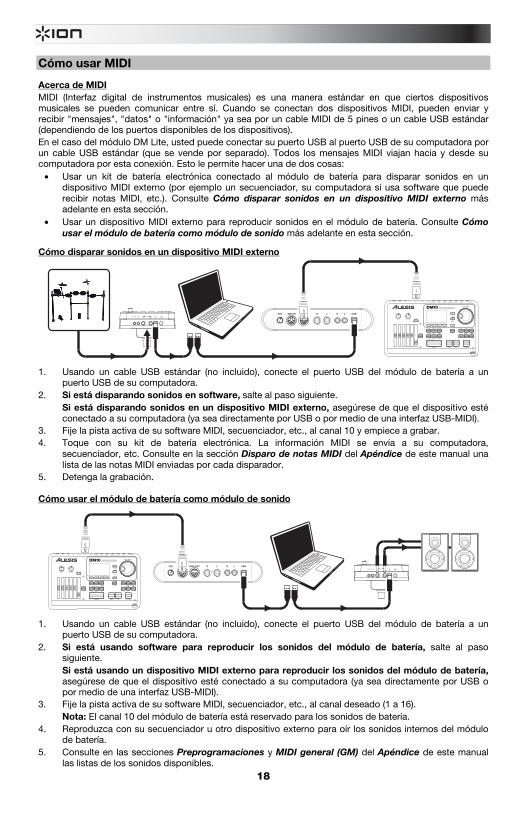
Cómo disparar sonidos en un dispositivo MIDI externo
PHONES OUTPUTAUX IN USBL/MONOR
MIDI INVOL MIDI OUT R L R L USB
1. Usando un cable USB estándar (no incluido), conecte el puerto USB del módulo de batería a un puerto USB de su computadora.
2. Si está disparando sonidos en software, salte al paso siguiente. Si está disparando sonidos en un dispositivo MIDI externo, asegúrese de que el dispositivo esté conectado a su computadora (ya sea directamente por USB o por medio de una interfaz USB-MIDI).
3. Fije la pista activa de su software MIDI, secuenciador, etc., al canal 10 y empiece a grabar. 4. Toque con su kit de batería electrónica. La información MIDI se envía a su computadora,
secuenciador, etc. Consulte en la sección Disparo de notas MIDI del Apéndice de este manual una lista de las notas MIDI enviadas por cada disparador.
5. Detenga la grabación. Cómo usar el módulo de batería como módulo de sonido
PHONES OUTPUTAUX IN USBL/MONOR
MIDI INVOL MIDI OUT R L R L USB
1. Usando un cable USB estándar (no incluido), conecte el puerto USB del módulo de batería a un puerto USB de su computadora.
2. Si está usando software para reproducir los sonidos del módulo de batería, salte al paso siguiente. Si está usando un dispositivo MIDI externo para reproducir los sonidos del módulo de batería, asegúrese de que el dispositivo esté conectado a su computadora (ya sea directamente por USB o por medio de una interfaz USB-MIDI).
3. Fije la pista activa de su software MIDI, secuenciador, etc., al canal deseado (1 a 16). Nota: El canal 10 del módulo de batería está reservado para los sonidos de batería.
4. Reproduzca con su secuenciador u otro dispositivo externo para oír los sonidos internos del módulo de batería.
5. Consulte en las secciones Preprogramaciones y MIDI general (GM) del Apéndice de este manual las listas de los sonidos disponibles.

19
Guide d'utilisation (Français)
Assistance technique Pour tous les renseignements concernant la configuration système minimale requise, la compatibilité et l’enregistrement du produit, veuillez visiter le site ionaudio.com/redline-drums. Pour de l’assistance supplémentaire, veuillez visiter le site ionaudio.com/support.
Guide de démarrage
Raccordement du module de percussion
Sélection d’un ensemble de sonorités de batterie (kit) Pour sélectionner un des 10 ensembles de sonorités programmés du module, effectuez l'une des opérations suivantes :
• Appuyez sur la touche Variation afin qu’elle s’allume rouge, puis sur la touche 1, 2, 3, 4 ou 5 pour sélectionne l’ensemble 1, 2, 3, 4 ou 5 (respectivement).
• Appuyez sur la touche Variation afin qu’elle s’allume verte, puis sur la touche 1, 2, 3, 4 ou 5 pour sélectionner l’ensemble 6, 7, 8, 9 ou 10 (respectivement).
Le numéro de l’ensemble s’affichera à l'écran. Une fois que vous avez sélectionné un ensemble, vous pouvez en sélectionner d'autres en répétant l’une des étapes ci-dessus, ou en utilisant les touches – et +.
Jouer avec les pads Si votre ensemble de batterie électronique dispose de pads sensibles à la dynamique, ce module de percussion jouera diverses sonorités en fonction de la force de frappe sur les pads. Essayez de varier la force de frappe afin d'expérimenter les différents sons produits par le module. Remarque : La sonorité de la Charleston varie selon la position de la pédale Charleston :
• Charleston ouverte : Frappez le pad de Charleston sans mettre le pied sur la pédale de Charleston. • Charleston fermée : Avec la pédale de Charleston enfoncée complètement, frappez le pad de
Charleston. • Pédale fermée : Enfoncez la pédale de Charleston complètement sans frapper le pad de Charleston. • Splash : Enfoncez à fond rapidement la pédale de Charleston, puis relâcher immédiatement.
Pour de plus amples informations sur l’utilisation du module de percussion, veuillez consulter la section Utilisation du module de percussion.
1 2 3 4 5 VARIATION
Branchez le câble multipaire ici (en utilisant les deux vis pour le fixer), puis branchez les extrémités 6,35 mm (1/4 po) des câbles à leurs pads respectifs.

20
Caractéristiques
Panneau avant 1. Interrupteur d'alimentation : Appuyez sur cette
touche afin de mettre le module sous tension. Maintenez-la enfoncée pendant 2 secondes afin de mettre le module hors tension.
2. Écran d’affichage : Cet écran affiche les valeurs et le texte pertinent selon les fonctions et le fonctionnement du module.
3. Volume : Tournez ce bouton pour régler le volume de la sortie principale et casque.
4. – / + : Ces touches permettent d’augmenter ou de diminuer la valeur du champ sélectionné à l’écran.
5. Click : Cette touche permet d’activer ou de désactiver le métronome (clic). Veuillez consulter la section Utilisation du métronome (clic) pour plus d’information sur cette fonction.
6. Start/Stop : Appuyez sur cette touche pour lancer ou arrêter la lecture d'un enchaînement (Pattern). Pour de plus amples informations sur les enchaînements, veuillez consulter la section Utilisation d’enchaînements d’accompagnement.
7. Pattern : Appuyez sur cette touche pour accéder au mode Pattern. Appuyez sur cette touche et sur la touche Tempo en même temps afin d'utiliser le professeur de batterie intégré. Pour de plus amples informations sur les enchaînements et sur le professeur, veuillez consulter les sections Utilisation d’enchaînements d’accompagnement et Utilisation du professeur de batterie intégré.
8. Tempo : Cette touche permet d’accéder au mode Tempo, puis d’ajuster le tempo à l’aide des touches + et -. Appuyez sur cette touche et sur la touche Pattern afin d'utiliser le professeur de batterie intégré. Veuillez consulter les sections Utilisation du métronome (clic) et Utilisation du professeur intégré pour plus d’information.
9. Touches 1 à 5/Variation : Appuyez sur l'une de ces touches pour accéder au mode Kit et choisir un ensemble de sonorités. Lorsque vous utilisez le professeur de batterie intégré, ces touches permettent de sélectionner un exercice. Veuillez consulter les sections Utilisation d’ensemble de sons de batterie et Utilisation du professeur intégré pour plus d’information.
Panneau arrière 1. Entrée d’alimentation : Utilisez l’adaptateur
secteur inclus (9 V, 500 mA, fiche à centre positif) pour relier cette entrée à une prise secteur.
2. Connecteur de câble multipaire : Branchez le câble multipaire inclus ici, puis ses extrémités aux déclencheurs de votre ensemble de batterie (pads de batterie, pads de cymbales et pédales).
3. Sorties principales : Utilisez des câbles mono standards de 6,35 mm (¼ po) non inclus afin de brancher ces sorties à une enceinte, un amplificateur ou à un système de sonorisation. Réglez le volume à l’aide du bouton Volume du panneau avant.
4. Sortie casque : Cette sortie permet de brancher un casque d’écoute 3,5 mm (1/8 po) stéréo. Réglez le volume à l’aide du bouton Volume du panneau avant.
5. Entrée auxiliaire : Utilisez un câble stéréo 3,5 mm (1/8 po) non inclus pour brancher un appareil audio externe (téléphone intelligent, lecteur CD, etc.) à cette entrée.
6. Port USB : Utilisez un câble USB standard non inclus pour brancher votre ordinateur afin de transmettre et recevoir des messages MIDI. Veuillez consulter la section Utilisation des messages MIDI pour plus d'informations.
PHONES OUTPUTAUX IN USBL/MONOR
14 5 3
2
3 6
SLOW GOOD FAST
1 2 3 4 5 VARIATION
PATTERN
VOLUME
COACH
TEMPO
START/STOPCLICK
1
9 9 9 9 9 9
2 3
45 6 7 8
4

21
Utilisation du module de percussion
Utilisation d'ensemble de sonorités de batterie (Kit)
Sélection d’un ensemble de sonorités de batterie (kit) Pour sélectionner un des 10 ensembles de sonorités programmés, effectuez l'une des opérations suivantes :
• Avec la touche Variation s'allume en rouge, appuyez sur la touche 1, 2, 3, 4 ou 5 pour sélectionner l’ensemble 1, 2, 3, 4 ou 5 (respectivement).
• Avec la touche Variation s'allume en vert, appuyez sur la touche 1, 2, 3, 4 ou 5 pour sélectionner l’ensemble 6, 7, 8, 9 ou 10 (respectivement).
Le numéro de l’ensemble s’affichera à l'écran. Une fois que vous avez sélectionné un ensemble, vous pouvez en sélectionner d'autres en répétant l’une des étapes ci-dessus, ou en utilisant les touches – et +.
Réglage du volume des ensembles de sonorités Pour régler le volume individuel de chaque ensemble : 1. Sélectionnez une des options suivantes :
• Avec la touche Variation s'allume en rouge, appuyez brièvement deux fois de suite sur la touche 1, 2, 3, 4 ou 5 pour sélectionner l’ensemble 1, 2, 3, 4 ou 5 (respectivement).
• Avec la touche Variation s'allume en vert tion, appuyez brièvement deux fois de suite sur la touche 1, 2, 3, 4 ou 5 pour sélectionner l’ensemble 6, 7, 8, 9 ou 10 (respectivement).L’écran affichera un L (« niveau ») et le niveau de volume (00-32).
2. Utilisez les touches – ou + afin de régler le niveau du volume de l'ensemble. (Le niveau par défaut est 28.)
3. Attendez 4 secondes. Le module enregistrera automatiquement le nouveau réglage.
Utilisation d’enchaînements d’accompagnement
Sélection et lecture d’un enchaînement d’accompagnement Pour sélectionner un des 30 enchaînements programmés : 1. Appuyez sur la touche Pattern pour accéder au mode Pattern. La DEL de la
touche devrait s’allumer et le numéro de l'enchaînement en cours devrait
s’afficher. 2. Utilisez les touches - et + pour sélectionner un enchaînement. (Vous
pouvez maintenir les touches – ou + enfoncées afin de parcourir rapidement la liste.)
3. Appuyez sur la touche Start/Stop pour lancer la lecture de l'enchaînement. 4. Jouez en même temps que l’enchaînement. 5. Appuyez sur la touche Start/Stop pour arrêter la lecture de l'enchaînement.
Réglage du volume de l’enchaînement Pour régler le volume individuel de chaque enchaînement : 1. Appuyez brièvement deux fois de suite sur la touche Pattern. 2. L’écran affichera le niveau de volume (00-32). Utilisez les touches – ou +
afin de régler le niveau du volume de l'enchaînement. (Le niveau par défaut est 25.)
1 2 3 4 5 VARIATION
PATTERN
1 2 3 4 5 VARIATION
START/STOP
PATTERN

22
Utilisation du métronome (clic) Vous pouvez utiliser le métronome intégré (« clic ») pour vous aider à garder le rythme tout en pratiquant avec le professeur de batterie intégré ou avec des enchaînements. Vous pouvez modifier le tempo (vitesse), le volume, le son et la division temporelle du métronome. Activation ou désactivation du métronome
Pour activer ou désactiver le métronome, cliquez sur la touche Click. Réglage du tempo du métronome
Pour régler le tempo (vitesse) du métronome :
1. Appuyez sur la touche Tempo.
2. L’écran affichera le tempo actuel (30 – 280) en BPM (battements par minute). Utilisez les touches – et + pour modifier le tempo.
3. Attendez 4 secondes. Le module enregistrera automatiquement le nouveau réglage.
Réglage du volume du métronome
Pour régler le volume du métronome :
1. Appuyez brièvement deux fois de suite sur la touche Click.
2. L’écran affichera un L (« niveau ») et le niveau de volume (00 – 32). Utilisez les touches – ou + afin de régler le niveau du volume du métronome. (Le niveau par défaut est 25.)
3. Attendez 4 secondes. Le module enregistrera automatiquement le nouveau réglage.
Modification du son du métronome
Pour modifier le son « clic » du métronome :
1. Appuyez simultanément sur les touches Click et 1.
2. L'afficheur indique CL (« clic ») et le numéro du son (CL1 – CL5). Utilisez les touches – et + afin de régler le son du métronome :
• CL1 : Carillon et clic (par défaut)
• Cl2 : Claves
• CL3: Baguettes croisées sur caisse claire
• CL4 : Cloche
• CL5 : Voix
3. Attendez 4 secondes. Le module enregistrera automatiquement le nouveau réglage. Modification de la division temporelle du métronome
Pour modifier la division temporelle du métronome :
1. Appuyez simultanément sur les touches Click et 2.
2. L’écran affiche la division temporelle en cours. Utilisation les touches – et + pour sélectionner une division temporelle : 1/2, 2/2, 3/4, 4/4 ou 6/8.
3. Attendez 4 secondes. Le module enregistrera automatiquement le nouveau réglage.
CLICK
TEMPO
CLICK
CLICK
1
CLICK2

23
Modification de l’intervalle du métronome Pour modifier la division du temps du métronome (le nombre de temps par mesure pour chaque clic) : 1. Appuyez simultanément sur les touches Click et 3. 2. L’écran affiche l’intervalle en cours. Utilisez les touches – et + pour
sélectionner un nouvel intervalle : 2 (blanche), 3 (triolet), 4 (noire), 6 (sextolet), 8 (croche) ou 16 (double croche). (La valeur par défaut est 4.)
3. Attendez 4 secondes. Le module enregistrera automatiquement le nouveau réglage.
Utilisation du professeur de batterie intégré Le professeur de batterie intégré dispose de cinq exercices différents pour vous aider à développer et à améliorer votre sens du tempo, votre précision ou endurance : Beat Check, Gradual Up/Down, Rhythm Change Up, Follow Me et Drum Mute. Pour utiliser le professeur de batterie intégré, appuyez simultanément sur les touches Pattern et Tempo. Puis, appuyez sur la touche 1, 2, 3, 4, ou 5 qui correspond à l'exercice que vous désirez faire. L’écran affichera l’exercice sélectionné.
1. Beat Check (bCH) 2. Gradual Up/Down (GUd) 3. Rhythm Change Up (C-U) 4. Follow Me (FLo) 5. Drum Mute (d-U)
Beat check (vérification rythmique) Cet exercice évalue votre sens du rythme et la précision avec laquelle vous suivez le métronome. Pour utiliser la vérification rythmique : 1. Appuyez simultanément sur les touches Pattern et
Tempo, puis sur la touche 1. 2. Réglez les paramètres de la division temporelle et de
l’intervalle (comme indiqué dans la section Utilisation du métronome (clic)). 3. Appuyez sur la touche Start/Stop pour commencer. 4. Frappez les pads au rythme du métronome. Les six DEL des touches 1-5/Variation
indiquent la précision avec laquelle (en temps) vous frappez les pads. • Lorsque vous suivez le rythme, les
touches 3 et 4 s’allument. • Lorsque vous êtes légèrement décalé, la
touche 2 ou 5 s'allume. • Lorsque vous êtes décalé, la touche 1
ou Variation s'allume. • Lorsque vous ne suivez pas du tout le rythme, aucune touche ne s'allume.
5. Appuyez sur la touche Start/Stop pour arrêter. Gradual Up/Down (accélération et ralentissement progressif) L’option d’accélération et de ralentissement progressif permet d’évaluer la vitesse avec laquelle vous jouer tout en conservant les temps. Pour utiliser Gradual Up/Down : 1. Appuyez simultanément sur les touches Pattern et
Tempo, puis sur la touche 2. 2. Réglez les paramètres de la division temporelle et de
l’intervalle (comme indiqué dans la section Utilisation du métronome (clic)).
3. Appuyez sur la touche Start/Stop.
CLICK
3
START/STOP
SLOW GOOD FAST
1 2 3 4 5 VARIATION
PATTERN
COACH
TEMPO
1
PATTERN
COACH
TEMPO
2
START/STOP

24
4. Sélectionnez une des options suivantes :
• Appuyez sur la touche 1 pour choisir le Mode G-1. En ce mode, le tempo diminue ou augmente automatiquement de 5 BPM toutes les 4 mesures, selon votre précision.
• Appuyez sur la touche 2 pour choisir le Mode G-2. En ce mode, le tempo diminue ou augmente automatiquement de 1 BPM à chaque mesure. (Le tempo initial est la valeur actuelle du réglage du métronome).
5. Frappez les pads au rythme du métronome. Les six DEL des touches 1-5/Variation indiquent la précision (en temps) avec laquelle vous frappez les pads.
• Lorsque vous suivez le rythme, les touches 3 et 4 s’allument.
• Lorsque vous êtes légèrement décalé, la touche 2 ou 5 s'allume.
• Lorsque vous êtes décalé, la touche 1 ou Variation s'allume.
• Lorsque vous ne suivez pas du tout le rythme, aucune touche ne s'allume.
6. Appuyez sur la touche Start/Stop pour arrêter. Rhythm Change Up (modification du rythme) L'option de modification du rythme vous permet de pratiquer les changements de rythme tout en conservant les temps. Pour utiliser Rhythm Change Up : 1. Appuyez simultanément sur les touches Pattern et
Tempo, puis sur la touche 3. 2. Appuyez sur la touche Start/Stop. 3. Appuyez sur la touche 1, 2 ou 3, ou utilisez les touches – et + pour sélectionner une
progression rythmique, illustrée ci-dessous :
P-1 :
P-2 :
P-3 : 4. Appuyez sur la touche Start/Stop pour commencer. 5. Frappez les pads au rythme sélectionné (ci-dessus) et en temps avec le métronome (le tempo
initial est la valeur actuelle du réglage du métronome). Les six DEL des touches 1-5/Variation indiquent la précision (en temps) avec laquelle vous frappez les pads :
• Lorsque vous suivez le rythme, les touches 3 et 4 s’allument.
• Lorsque vous êtes légèrement décalé, la touche 2 ou 5 s'allume.
• Lorsque vous êtes décalé, la touche 1 ou Variation s'allume.
• Lorsque vous ne suivez pas du tout le rythme, aucune touche ne s'allume.
Appuyez sur la touche Start/Stop pour arrêter. L’écran affiche votre score :
• 0 – 29 : Correct
• 30 – 59 : Bon
• 60 – 79 : Très bon
• 80 – 100 : Excellent
1
2
SLOW GOOD FAST
1 2 3 4 5 VARIATION
START/STOP
1 2 3
PATTERN
COACH
TEMPO
3
SLOW GOOD FAST
1 2 3 4 5 VARIATION

25
Follow Me (accompagnement) L’option d’accompagnement vous permet de pratiquer à identifier différentes batteries par leur son et à mémoriser des rythmes de batterie qui utilisent tout l’ensemble de batterie. Dans cet exercice, une boucle de batterie se répète, alternant entre (1) l’enchaînement de batterie et (2) une piste de métronome de la même durée au cours de laquelle vous devez jouer l'enchaînement. Pour utiliser Follow Me : 1. Appuyez simultanément sur les touches Pattern et
Tempo, puis sur la touche 4. 2. Appuyez sur la touche Start/Stop. 3. Utilisez les touches – et + pour sélectionner l’enchaînement de
batterie que vous désirez jouer. 4. Appuyez sur la touche Start/Stop pour commencer. 5. Lorsque vous entendez l'enchaînement,
essayez d’identifier quels pads sont joués et quand. Lorsque la piste de métronome commence, essayez de jouer le même enchaînement en temps avec le métronome. L’écran affiche le battement actuel. Les six DEL des touches 1-5/Variation indiquent la précision avec laquelle vous frappez les pads.
6. Appuyez sur la touche Start/Stop pour arrêter.
Drum Mute (Mise en sourdine de certaines parties de l’enchaînement) L’option de mise en sourdine de certaines parties de l’enchaînement vous permet de jouer en toute liberté et de créer vos propres composants que vous pouvez ajouter à l'enchaînement. Pour utiliser Drum Mute : 1. Appuyez simultanément sur les touches Pattern et
Tempo, puis sur la touche 5. 2. Appuyez sur la touche Start/Stop. 3. Utilisez les touches – et + pour sélectionner l’enchaînement de
batterie que vous désirez jouer. 4. Appuyez sur une ou plusieurs des touches 1-5/Variation pour choisir
le son ou les sons que vous désirez mettre en sourdine :
• 1 : Grosse caisse
• 2 : Caisse claire
• 3 : Charleston
• 4 : Toms
• 5 : Cymbales crash et ride
• Variation : Percussions 5. Appuyez sur la touche Start/Stop pour commencer. 6. Jouez avec l'enchaînement de batterie que vous entendez. L'enchaînement ne contiendra pas
les sons que vous avez mis en sourdine à l'étape 4, vous permettant donc de créer votre propre partie.
7. Appuyez sur la touche Start/Stop pour arrêter.
Arrêt automatique Pour économiser l'énergie, le module s'éteint automatiquement après 30 minutes d'inactivité. Si vous ne désirez pas utiliser cette fonctionnalité, désactivez-la en éteignant le module, puis en le rallumant en maintenant l’interrupteur d'alimentation enfoncé. PoF apparaîtra à l'écran pour confirmer que la fonctionnalité est désactivée. Remarque : Après la mise hors tension, cette fonction sera réactivée. Répétez la procédure ci-dessus pour la désactiver chaque fois que vous allumez le module.
PATTERN
COACH
TEMPO
4
START/STOP
SLOW GOOD FAST
1 2 3 4 5 VARIATION
START/STOP
PATTERN
COACH
TEMPO
5

26
Utilisation des messages MIDI À propos de la norme MIDI La norme MIDI (Musical Instrument Digital Interface) est une façon dont certains appareils de musique électroniques peuvent communiquer entre eux. Lorsque deux appareils MIDI sont connectés, ils peuvent transmettre et recevoir des « messages », « données », ou « informations » MIDI par le biais d’un câble MIDI 5 broches ou un câble USB standard (selon les ports disponibles sur les appareils). Dans le cas du module DM Lite, vous pouvez relier son port USB au port USB de votre ordinateur avec un câble USB standard (vendu séparément). Tous les messages MIDI seront transmis vers et depuis votre ordinateur par cette connexion. Cela vous permet de faire deux choses :
• Utiliser un ensemble de batterie électronique branché au module de percussion pour déclencher les sons sur un appareil MIDI externe (p. ex., un séquenceur, votre ordinateur, si vous utilisez un logiciel qui peut recevoir les notes MIDI, etc.). Consultez la section Déclencher les sons d’un appareil MIDI externe un peu plus loin dans le présent guide.
• Utiliser un autre appareil MIDI afin de déclencher les sons du module de percussion. Consultez la section Utilisation du module de percussion comme module de son un peu plus loin dans le présent guide.
Déclencher des sons sur un appareil MIDI externe
PHONES OUTPUTAUX IN USBL/MONOR
MIDI INVOL MIDI OUT R L R L USB
1. À l'aide d'un câble USB standard non inclus, reliez le port USB du module de percussion à un port USB sur votre ordinateur.
2. Si vous déclenchez des sons d’un logiciel, passez à l'étape suivante. Si vous déclenchez des sons d’un appareil MIDI externe, assurez-vous que cet appareil est branché à votre ordinateur (que ce soit directement via le port USB ou via une interface USB-MIDI).
3. Réglez la piste en cours sur le logiciel MIDI, le séquenceur, etc. au canal 10 et lancez l’enregistrement. 4. Jouez votre ensemble de batterie électronique. Les informations MIDI seront transmises à votre
ordinateur, séquenceur, etc. Consultez la section Déclenchement des notes MIDI de l'Appendice de ce guide pour obtenir la liste des notes MIDI transmises par chaque déclencheur.
5. Arrêtez l'enregistrement Utilisation du module de percussion comme module de son
PHONES OUTPUTAUX IN USBL/MONOR
MIDI INVOL MIDI OUT R L R L USB
1. À l'aide d'un câble USB standard non inclus, reliez le port USB du module de percussion à un port USB sur votre ordinateur.
2. Si vous utilisez un logiciel pour faire jouer les sons du module, passez à l’étape suivante. Si vous utilisez un appareil MIDI externe pour faire jouer les sons du module de percussion, assurez-vous que cet appareil est branché à votre ordinateur (que ce soit directement via le port USB ou via une interface USB-MIDI).
3. Réglez la piste en cours sur le logiciel MIDI, le séquenceur, etc. au canal désiré (1-16). Remarque : Le canal 10 du module de percussion est réservé aux sons de batterie.
4. Faites jouer votre séquenceur ou autre appareil externe afin d'entendre les sons internes du module de percussion.
5. Consultez les sections Préréglages et General MIDI (GM) de l'Appendice de ce guide pour des listes des sons disponibles.

27
Guida per l'uso (Italiano) Assistenza Per conoscere i requisiti di sistema completi, ottenere informazioni in merito alla compatibilità e per la registrazione del prodotto, recarsi alla pagina ionaudio.com/redline-drums. Per ulteriore assistenza sul prodotto, recarsi alla pagina ionaudio.com/support.
Guida rapida Collegare il modulo batteria
Selezionare un Kit Per selezionare uno dei 10 Kit preset del modulo, procedere in uno dei seguenti modi:
• Premere il tasto Variation in modo da farlo accendere rosso, quindi premil tasto 1, 2, 3, 4 o 5 per selezionare il Kit 1, 2, 3, 4 o 5 (rispettivamente).
• Premere il tasto Variation in modo da farlo accendere verde, quindi premere il tasto 1, 2, 3, 4 o 5 per selezionare il Kit 6, 7, 8, 9 o 10 (rispettivamente).
Il numero di Kit compare a display. Una volta selezionato un Kit, è possibile selezionarne altri ripetendo uno dei passaggi di cui sopra o servendosi dei tasti – e +. Suonare con i pad Se il set batteria elettronico dispone di pad sensibili alla velocità, questo modulo batteria riprodurrà suoni di timbri variabili a seconda della forza con la quale vengono suonati i pad. Provare a battere i pad con diversi livelli di forza per sperimentare i vari suoni prodotti dal modulo! Nota bene: il suono dell'hi-hat varia a seconda della posizione del pedale di controllo dell'hi-hat
• Hi-hat aperto: con il piede lontano dal pedale, battere il pad hi-hat. • Hi-hat chiuso: premendo il pedale a fondo, battere il pad hi-hat. • Pedale chiuso: premere a fondo il pedale hi-hat, senza battere il pad hi-hat. • Splash: premere rapidamente a fondo il pedale hi-hat, quindi lasciare immediatamente la
pressione. Per saperne di più sull'utilizzo del modulo batteria, si veda il paragrafo Utilizzo del modulo del presente manuale.
1 2 3 4 5 VARIATION
Collegare il fascio di cavi a questo livello (servendosi delle due viti per fissarlo), quindi collegare i capi da 1/4" dei cavi ai rispettivi pad.

28
Caratteristiche
Pannello anteriore 1. Tasto di alimentazione: premere questo
pulsante per accendere il modulo batteria. Tenerlo premuto per 2 secondi per spegnere il modulo batteria.
2. Display: quest'area mostra valori e scritte specifiche relativi alle funzioni e al funzionamento del modulo batteria.
3. Manopola volume: girare questa manopola per regolare il volume delle uscite principali e dell’uscita cuffie.
4. – / + : premere uno di questi tasti per alzare o abbassare il valore illustrato a display.
5. Tasto Click: premere questo pulsante per accendere e spegnere il metronomo ("click"). Per maggiori informazioni, si veda il paragrafo Utilizzo del Metronomo (Click).
6. Tasto Start/Stop: premere questo tasto per avviare o interrompere la riproduzione di un Pattern. Per maggiori informazioni, si veda il paragrafo Suonare con i pattern.
7. Tasto Pattern: premere questo tasto per entrare in modalità Pattern. Premere contemporaneamente questo tasto e il tasto Tempo per utilizzare il Drum Coach incorporato. Per maggiori informazioni, si vedano i paragrafi Suonare con i pattern e Utilizzo del Drum Coach incorporato.
8. Tempo: premere questo tasto per entrare in modalità Tempo, quindi servirsi dei tasti – e + per regolare il tempo. Premere contemporaneamente questo tasto e il tasto Pattern per utilizzare il Drum Coach incorporato. Per maggiori informazioni, si vedano i paragrafi Utilizzo del metronomo (Click) e Utilizzo del Drum Coach incorporato.
9. Tasti 1-5/Variation: premere uno qualsiasi di questi tasti per entrare in modalità kit e selezionare un kit. Quando si utilizza il Drum Coach incorporato, è possibile servirsi di questi tasti per selezionare un esercizio. Per maggiori informazioni, si vedano i paragrafi Utilizzo dei kit e Utilizzo del Drum Coach incorporato.
Pannello posteriore 1. Jack di alimentazione: servirsi di un
adattatore di alimentazione (in dotazione, 9 V, 500 mA, polo centrale positivo) per collegare questo jack alla presa di corrente.
2. Connettore per il fascio di cavi: collegare il fascio di cavi in dotazione a questo livello e collegare i cavi del fascio ai trigger del kit (pad batteria, pad piatti e pedali).
3. Uscite Main: servirsi di cavi standard mono da 1/4" (non in dotazione) per collegare queste uscite al monitor, all'amplificatore o alsistema PA. Regolare il livello del volume servendosi della manopola Volume a livello del pannello superiore.
4. Uscita cuffie: collegare a questa uscita cuffie stereo standard da 1/8". Regolare il livello del volume servendosi della manopola Volume a livello del pannello superiore.
5. Ingresso Aux: servirsi di un cavo stereo da 1/8" (non in dotazione) per collegare un dispositivo audio esterno (smartphone, lettore CD, ecc.) a questo ingresso.
6. Porta USB: servirsi di un cavo USB standard (non in dotazione) per collegare il computer a questa porta per inviare e ricevere messaggi MIDI da e verso il computer. Per maggiori informazioni, si veda il paragrafo Utilizzo del MIDI .
PHONES OUTPUTAUX IN USBL/MONOR
14 5 3
2
3 6
SLOW GOOD FAST
1 2 3 4 5 VARIATION
PATTERN
VOLUME
COACH
TEMPO
START/STOPCLICK
1
9 9 9 9 9 9
2 3
45 6 7 8
4

29
Utilizzo del modulo Utilizzo dei kit Selezionare un Kit
Per selezionare uno dei 10 Kit preset del modulo, procedere in uno dei seguenti modi:
• Con il tasto Variation acceso rosso, premere il tasto 1, 2, 3, 4 o 5 per selezionare il Kit 1, 2, 3, 4 o 5 (rispettivamente).
• Con il tasto Variation acceso verde, premere il tasto 1, 2, 3, 4 o 5 per selezionare il Kit 6, 7, 8, 9 o 10 (rispettivamente).
Il numero di Kit compare a display. Una volta selezionato un Kit, è possibile selezionarne altri ripetendo uno dei passaggi di cui sopra o servendosi dei tasti – e +. Regolazione del volume dei kit
Per regolare il volume di ciascun kit, separatamente:
1. Procedere in uno dei seguenti modi:
• Con il tasto Variation acceso rosso, premere due volte il tasto 1, 2, 3, 4 o 5 per selezionare il Kit 1, 2, 3, 4 o 5 (rispettivamente).
• Con il tasto Variation acceso verde, premere due volte il tasto 1, 2, 3, 4 o 5 per selezionare il Kit 6, 7, 8, 9 o 10 (rispettivamente).
2. A display comparirà il simbolo L ("livello") e il livello di volume (00 – 32). Servirsi dei tasti – o + per impostare il livello del volume del kit. (Il livello di volume predefinito è 28.)
3. Attendere per 4 secondi. Il modulo batteria salverà automaticamente il nuovo valore. Suonare a tempo con i pattern Selezionare e riprodurre un pattern
Per selezionare uno dei 30 pattern predefiniti
1. Premere il tasto Pattern per entrare in modalità pattern. Il LED del tasto si accende e a display compare il numero di pattern corrente.
2. Servirsi dei tasti – o + per selezionare un pattern. (Per scorrere rapidamente lungo la lista è possibile tenere premuto il tasto – o + .)
3. Premere il tasto Start/Stop per avviare la riproduzione del Pattern.
4. Suonare col pattern!
5. Premere il tasto Start/Stop per fermare la riproduzione del Pattern. Regolazione del volume del pattern
Per regolare il volume di ciascun pattern, separatamente:
1. Premere due volte il tasto Pattern.
2. A display comparirà il livello di volume (00 – 32). Servirsi dei tasti – o + per impostare il livello del volume del pattern. (Il livello di volume predefinito è 25.)
1 2 3 4 5 VARIATION
PATTERN
1 2 3 4 5 VARIATION
START/STOP
PATTERN

30
Uso del metronomo (Click) Per aiutarsi a tenere il tempo durante gli esercizi con il Drum Coach incorporato o con i pattern, è possibile utilizzare il metronomo incorporato ("click"). È possibile cambiare il tempo (velocità), il volume, il suono e la divisione metrica del tempo tenuta dal metronomo. Accensione e spegnimento del metronomo
Per accendere o spegnere il metronomo premere il tasto Click. Regolazione del tempo del metronomo
Per regolare il tempo (velocità) del metronomo:
1. Premere il tasto Tempo.
2. A display compare il tempo corrente (30 – 280) in BPM ("battiti al minuto"). Servirsi dei tasti – o + per impostare il nuovo tempo.
3. Attendere per 4 secondi. Il modulo batteria salverà automaticamente il nuovo valore.
Regolazione del volume del metronomo
Per regolare il volume del metronomo:
1. Premere due volte il tasto Click.
2. A display comparirà il simbolo L ("livello") e il livello di volume (00 – 32). Servirsi dei tasti – o + per impostare il livello del volume del metronomo. (Il livello di volume predefinito è 25.)
3. Attendere per 4 secondi. Il modulo batteria salverà automaticamente il nuovo valore.
Modifica del suono del metronomo
Per cambiare il suono del ticchettio del metronomo:
1. Premere contemporaneamente il tasto Click e il tasto 1.
2. A display comparirà la scritta CL ("click") e il numero del suono (CL1 – CL5). Servirsi dei tasti – o + per impostare il suono del metronomo.
• CL1: Chime e click (predefinito)
• CL2: Clave
• CL3: Side-stick
• CL4: Campana
• CL5: Voce
3. Attendere per 4 secondi. Il modulo batteria salverà automaticamente il nuovo valore. Modifica della divisione metrica del tempo del metronomo
Per cambiare la divisione metrica del tempo del metronomo
1. Premere contemporaneamente il tasto Click e il tasto 2.
2. Il display mostrerà la divisione metrica corrente: Servirsi dei tasti – o + per selezionare una divisione metrica. 1/2, 2/2, 3/4, 4/4 o 6/8.
3. Attendere per 4 secondi. Il modulo batteria salverà automaticamente il nuovo valore.
CLICK
TEMPO
CLICK
CLICK
1
CLICK2

31
Modifica dell'intervallo del metronomo Per modificare la divisione in note del metronomo (il valore della nota che misura con ciascun clic): 1. Premere contemporaneamente il tasto Click e il tasto 3. 2. Il display mostrerà l'intervallo corrente. Servirsi dei tasti – o + per selezionare
un nuovo intervallo. 2 (minima), 3 (terzina), 4 (semiminima), 6 (sestina), 8 (croma) o 16 (semicroma). (L'intervallo predefinito è 4.)
3. Attendere per 4 secondi. Il modulo batteria salverà automaticamente il nuovo valore.
Utilizzo del Drum Coach incorporato Il Drum Coach incorporato contiene cinque diversi esercizi per aiutare a sviluppare e migliorare il senso del tempo, la precisione e la resistenza: Beat Check, Gradual Up/Down, Rhythm Change Up, Follow Me e Drum Mute. Per utilizzare il Drum Coach incorporato, premere contemporaneamente il tasto Pattern e il tasto Tempo. Quindi premere il tasto 1, 2, 3, 4 o 5 corrispondente all'esercizio che si desidera effettuare. A display comparirà l'esercizio selezionato.
1. Beat Check (bCH) 2. Gradual Up/Down (GUd) 3. Rhythm Change Up (C-U) 4. Follow Me (FLo) 5. Drum Mute (d-U)
Utilizzo della funzione Beat Check Questo esercizio valuta il senso del ritmo e la precisione con la quale si suona a tempo col metronomo. Per utilizzare il Beat Check: 1. Premere il tasto Pattern e il tasto Tempo
contemporaneamente, quindi premere il tasto 1. 2. Impostare divisione metrica del tempo e intervallo del
metronomo (descritte nella sezione Utilizzo del metronomo (Click)). 3. Premere il tasto Start/Stop per iniziare. 4. Battere i pad a tempo con il metronomo. I sei LED a livello dei tasti 1-5/Variation indicano il
livello di precisione raggiunto (quanto si è "a tempo").
• Quando si è perfettamente a tempo, si accendono i tasti 3 e 4.
• Quando si è leggermente fuori tempo, si accendono i tasti 2 o 5.
• Quando si è fuori tempo, si accendono i tasti 1 o Variation.
• Quando si è completamente fuori tempo, non si accende alcun tasto. 5. Premere il tasto Start/Stop per fermarsi. Utilizzo della funzione Gradual Up/Down La funzione Gradual Up/Down valuta quanto velocemente si è in grado di suonare, pur mantenendo un tempo preciso. Per utilizzare la funzione Gradual Up/Down: 1. Premere il tasto Pattern e il tasto Tempo
contemporaneamente, quindi premere il tasto 2.
2. Impostare divisione metrica del tempo e intervallo del metronomo (descritte nella sezione Utilizzo del metronomo (Click)).
3. Premere il tasto Start/Stop.
CLICK
3
START/STOP
SLOW GOOD FAST
1 2 3 4 5 VARIATION
PATTERN
COACH
TEMPO
1
PATTERN
COACH
TEMPO
2
START/STOP

32
4. Procedere in uno dei seguenti modi:
• Premere il tasto 1 per selezionare la Modalità G-1. In questa modalità, il tempo diminuisce o aumenta automaticamente di 5 BPM ogni 4 misure, a seconda della precisione.
• Premere il tasto 2 per selezionare la Modalità G-2. In questa modalità, il tempo diminuisce o aumenta automaticamente di 1 BPM ogni misura. (Il tempo iniziale è l'impostazione corrente del metronomo.)
5. Battere i pad a tempo con il metronomo. I sei LED a livello dei tasti 1-5/Variation indicano il livello di precisione raggiunto (quanto si è "a tempo").
• Quando si è perfettamente a tempo, si accendono i tasti 3 e 4.
• Quando si è leggermente fuori tempo, si accendono i tasti 2 o 5.
• Quando si è fuori tempo, si accendono i tasti 1 o Variation.
• Quando si è completamente fuori tempo, non si accende alcun tasto.
6. Premere il tasto Start/Stop per fermarsi. Utilizzo della funzione Rhythm Change Up (cambio di ritmo) La funzione Rhythm Change Up aiuta a esercitarsi nel cambiamento di ritmo mantenendo un tempo preciso. Per utilizzare la funzione Rhythm Change Up: 1. Premere il tasto Pattern e il tasto Tempo
contemporaneamente, quindi premere il tasto 3. 2. Premere il tasto Start/Stop. 3. Premere il tasto 1, 2 o 3 oppure utilizzare i tasti – e + per selezionare una progressione
ritmica, come illustrato qui di seguito:
P-1:
P-2:
P-3: 4. Premere il tasto Start/Stop per iniziare. 5. Battere i pad al ritmo selezionato (vedi sopra) e a tempo con il metronomo (il tempo iniziale è
l'impostazione corrente del metronomo). I sei LED a livello dei tasti 1-5/Variation indicano il livello di precisione raggiunto (quanto si è "a tempo").
• Quando si è perfettamente a tempo, si accendono i tasti 3 e 4.
• Quando si è leggermente fuori tempo, si accendono i tasti 2 o 5.
• Quando si è fuori tempo, si accendono i tasti 1 o Variation.
• Quando si è completamente fuori tempo, non si accende alcun tasto.
Premere il tasto Start/Stop per fermarsi. A display compare il punteggio ottenuto:
• 0 – 29: OK
• 30 – 59: Buono
• 60 – 79: Molto buono
• 80 – 100: Ottimo
1
2
SLOW GOOD FAST
1 2 3 4 5 VARIATION
START/STOP
1 2 3
PATTERN
COACH
TEMPO
3
SLOW GOOD FAST
1 2 3 4 5 VARIATION

33
Utilizzo della funzione Follow Me La funzione Follow Me aiuta a fare pratica identificando le varie percussioni in base al suono e memorizzando i ritmi di batteria che impiegano l'intero set batteria. In questo esercizio, un loop di batteria si ripete, alternando tra (1) il pattern di batteria stesso e (2) una traccia di metronomo della stessa durata, durante la quale si suona il pattern di batteria. Per utilizzare Follow Me: 1. Premere il tasto Pattern e il tasto Tempo
contemporaneamente, quindi premere il tasto 4. 2. Premere il tasto Start/Stop. 3. Servirsi dei tasti – e + pr selezionare il pattern di batteria col quale si
desidera suonare. 4. Premere il tasto Start/Stop per iniziare. 5. Quando si sente il pattern di batteria, provare
a imparare quali pad vengono suonati e quando. Durante la traccia di metronomo che segue, riprodurre lo stesso pattern di batteria a tempo col metronomo. Come riferimento, il display mostrerà il beat corrente. I sei LED a livello dei tasti 1-5/Variation indicano il livello di precisione raggiunto.
6. Premere il tasto Start/Stop per fermarsi. Utilizzo della funzione Drum Mute La funzione Drum Mute consente di silenziare determinate parti di vari pattern di batteria, consentendo di suonare liberamente e di creare parti personalizzate nel resto del pattern di batteria. Per utilizzare il Drum Mute: 1. Premere il tasto Pattern e il tasto Tempo
contemporaneamente, quindi premere il tasto 5. 2. Premere il tasto Start/Stop. 3. Servirsi dei tasti – e + pr selezionare il pattern di batteria col quale si
desidera suonare. 4. Premere uno o più dei tasti 1-5/Variation per selezionare il suono o i
suoni che si desidera silenziare:
• 1: Grancassa
• 2: Rullante
• 3: Hi-hat
• 4: Tom
• 5: Piatti crash e ride
• Variation: Percussioni 5. Premere il tasto Start/Stop per iniziare. 6. Suonare liberamente al tempo del pattern di batteria che si sente. Il pattern di batteria non
includerà alcuno dei suoni silenziati nella Fase 4, consentendo di creare la propria parte personalizzata.
7. Premere il tasto Start/Stop per fermarsi.
Spegnimento automatico Per risparmiare energia, il modulo batteria si spegnerà automaticamente dopo 30 minuti di inattività. Se non occorre questa funzione, è possibile disabilitarla spegnendo il modulo batteria e tenendo premuto il tasto Start/Stop al momento di riaccenderlo. PoF compare a display a conferma dello spegnimento della funzione. Nota bene: dopo lo spegnimento, questa funzione sarà nuovamente abilitata. Ripetere la procedura di cui sopra per disattivarla ogni volta che si accende il modulo.
PATTERN
COACH
TEMPO
4
START/STOP
SLOW GOOD FAST
1 2 3 4 5 VARIATION
START/STOP
PATTERN
COACH
TEMPO
5

34
Utilizzo del MIDI Informazioni sul MIDI Il MIDI (Musical Instrument Digital Interface) è il metodo standard in cui determinati dispositivi musicali elettronici possono comunicare tra di loro. Quando due dispositivi MIDI sono collegati, possono inviare/ricevere "messaggi", "dati" o "informazioni" MIDI tramite un cavo MIDI a 5 poli o un cavo standard USB (a seconda delle porte disponibili sui dispositivi stessi). Nel caso del modulo DM Lite, è possibile collegare la sua porta USB ad una porta USB del computer tramite un cavo USB standard (venduto separatamente). Tutti i messaggi MIDI viaggeranno da e verso il computer tramite questo collegamento. Ciò consente di fare una di due cose:
• Servirsi di un set batteria elettronico collegato al modulo batteria per attivare suoni su un dispositivo MIDI esterno (ad es. un sequenziatore, il computer se si utilizzano software in grado di ricevere note MIDI, ecc.). Si veda Attivazione di suoni su un dispositivo MIDI esterno più avanti in questo paragrafo.
• Servirsi di un dispositivo MIDI esterno per attivare suoni a livello del modulo batteria. Si veda Utilizzo del modulo batteria come modulo audio più avanti in questo paragrafo.
Attivazione di suoni su un dispositivo MIDI esterno
PHONES OUTPUTAUX IN USBL/MONOR
MIDI INVOL MIDI OUT R L R L USB
1. Servendosi di un cavo USB standard (non in dotazione), collegare la porta USB del modulo batteria ad una porta USB del computer.
2. Se si attivano suoni in un software, saltare al passaggio successivo.
Se si attivano suoni in un dispositivo MIDI esterno, assicurarsi che il dispositivo sia collegato al computer (o direttamente tramite USB o tramite un'interfaccia USB-MIDI).
3. Impostare la traccia attiva del software MIDI sul Canale 10 e iniziare a registrare. 4. Suona il tuo set batteria elettronico! I dati MIDI verranno inviati al computer, sequenziatore ecc. Si
veda il paragrafo Attivazione di note MIDI dell'Appendice di questo manuale per un elenco delle note MIDI inviate da ciascun trigger.
5. Ferma la registrazione. Utilizzo del modulo batteria come modulo audio
PHONES OUTPUTAUX IN USBL/MONOR
MIDI INVOL MIDI OUT R L R L USB
1. Servendosi di un cavo USB standard (non in dotazione), collegare la porta USB del modulo batteria ad una porta USB del computer.
2. Se si utilizza un software per suonare il modulo batteria, saltare al passaggio successivo.
Se si utilizza un dispositivo MIDI esterno per suonare il modulo batteria, assicurarsi che il dispositivo sia collegato al computer (o direttamente tramite USB o tramite un'interfaccia USB-MIDI).
3. Impostare la traccia attiva per il software MIDI, il sequenziatore, ecc. sul canale desiderato (1-16).
Nota bene: il canale 10 del modulo batteria è riservato ai suoni di batteria. 4. Riprodurre il sequenziatore o l'altro dispositivo esterno per sentire i suoni interni del modulo batteria.
5. Si vedano i paragrafi Preset e General MIDI (GM) dell'Appendice del presente manuale per un elenco dei suoni disponibili.
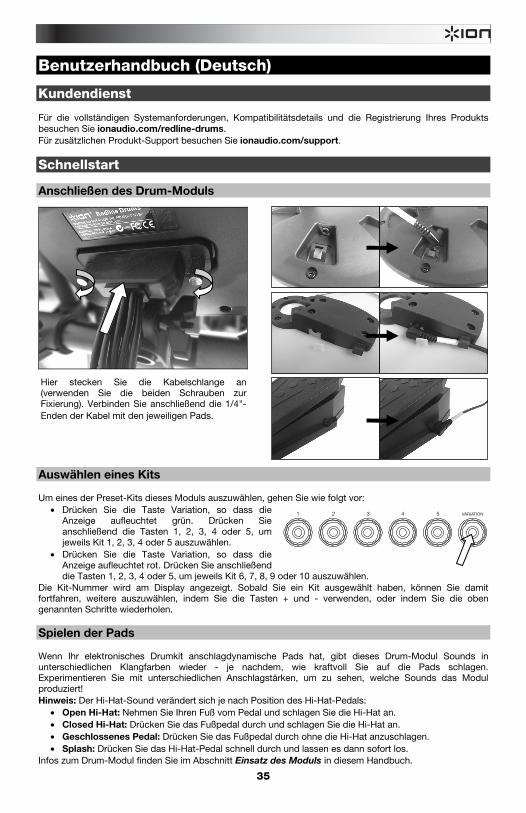
35
Benutzerhandbuch (Deutsch)
Kundendienst Für die vollständigen Systemanforderungen, Kompatibilitätsdetails und die Registrierung Ihres Produkts besuchen Sie ionaudio.com/redline-drums. Für zusätzlichen Produkt-Support besuchen Sie ionaudio.com/support.
Schnellstart Anschließen des Drum-Moduls
Auswählen eines Kits Um eines der Preset-Kits dieses Moduls auszuwählen, gehen Sie wie folgt vor:
• Drücken Sie die Taste Variation, so dass die Anzeige aufleuchtet grün. Drücken Sie anschließend die Tasten 1, 2, 3, 4 oder 5, um jeweils Kit 1, 2, 3, 4 oder 5 auszuwählen.
• Drücken Sie die Taste Variation, so dass die Anzeige aufleuchtet rot. Drücken Sie anschließend die Tasten 1, 2, 3, 4 oder 5, um jeweils Kit 6, 7, 8, 9 oder 10 auszuwählen.
Die Kit-Nummer wird am Display angezeigt. Sobald Sie ein Kit ausgewählt haben, können Sie damit fortfahren, weitere auszuwählen, indem Sie die Tasten + und - verwenden, oder indem Sie die oben genannten Schritte wiederholen. Spielen der Pads Wenn Ihr elektronisches Drumkit anschlagdynamische Pads hat, gibt dieses Drum-Modul Sounds in unterschiedlichen Klangfarben wieder - je nachdem, wie kraftvoll Sie auf die Pads schlagen. Experimentieren Sie mit unterschiedlichen Anschlagstärken, um zu sehen, welche Sounds das Modul produziert! Hinweis: Der Hi-Hat-Sound verändert sich je nach Position des Hi-Hat-Pedals:
• Open Hi-Hat: Nehmen Sie Ihren Fuß vom Pedal und schlagen Sie die Hi-Hat an. • Closed Hi-Hat: Drücken Sie das Fußpedal durch und schlagen Sie die Hi-Hat an. • Geschlossenes Pedal: Drücken Sie das Fußpedal durch ohne die Hi-Hat anzuschlagen. • Splash: Drücken Sie das Hi-Hat-Pedal schnell durch und lassen es dann sofort los.
Infos zum Drum-Modul finden Sie im Abschnitt Einsatz des Moduls in diesem Handbuch.
1 2 3 4 5 VARIATION
Hier stecken Sie die Kabelschlange an (verwenden Sie die beiden Schrauben zur Fixierung). Verbinden Sie anschließend die 1/4"-Enden der Kabel mit den jeweiligen Pads.

36
Funktionen
Vorderseite 1. Netzschalter: Drücken Sie diese Taste, um das
Drum-Modul einzuschalten. Halten Sie diese Taste 2 Sekunden lang gedrückt, um das Drum-Modul auszuschalten.
2. Display: Dieser Bereich zeigt Werte und Text zu Funktionen und Betrieb Ihres Drum-Moduls an.
3. Lautstärkeregler: Drehen Sie diesen Regler, um die Lautstärke der Hauptausgänge und des Kopfhörerausgangs einzustellen.
4. - / +: Drücken Sie eine dieser Tasten, um den am Display angezeigten Wert zu verringern oder zu erhöhen.
5. Klick-Taste: Drücken Sie diese Taste, um das Metronom (den "Klick") ein- oder auszuschalten. Siehe Abschnitt Einstellen des Metronoms (Klick) für weitere Informationen.
6. Start-/Stopp-Taste: Drücken Sie diese Taste, um die Wiedergabe einer Vorlage zu starten oder zu stoppen. Lesen Sie den Abschnitt Begleiten von Vorlagen für weitere Informationen.
7. Vorlagetaste: Drücken Sie diese Taste, um in den Vorlage-Modus zu gelangen. Drücken Sie diese Taste und die Tempo-Taste gleichzeitig, um den integrierten Drum-Coach zu verwenden. Lesen Sie die Abschnitte Begleiten von Vorlagen und Verwenden des integrierten Drum-Coach für weitere Informationen.
8. Tempo: Drücken Sie diese Taste, um in den Tempo-Modus zu gelangen und verwenden Sie die Tasten - und +, um das Tempo einzustellen. Drücken Sie diese Taste und die Vorlage-Taste gleichzeitig, um den integrierten Drum-Coach zu verwenden. Siehe Einstellen des Metronoms (Klick) und Verwenden des integrierten Drum-Coach für weitere Informationen.
9. 1-5/Variationstasten: Drücken Sie eine dieser Tasten, um den Kit-Modus aufzurufen und ein Kit auszuwählen. Wenn Sie den integrierten Drum-Coach verwenden, können Sie über diese Tasten eine Übung auswählen. Lesen Sie die Abschnitte Verwenden von Kits und Verwendung des integrierten Drum-Coach für weitere Informationen.
Rückseite 1. Netzeingangsbuchse: Verwenden Sie ein
Netzteil (im Lieferumfang enthalten, 9 V, 500 mA, mittlerer Pin mit positiver Polarität), um diese Buchse mit einer Steckdose zu verbinden.
2. Kabelschlangenanschluss: Hier können Sie Ihre Kabelschlange (im Lieferumfang enthalten) anschließen. Verbinden Sie die Kabel mit den Triggers (Drum-Pads, Becken-Pads und Pedale) Ihres Kits.
3. Hauptausgänge: Verwenden Sie handelsübliche 1/4"-Monokabel (separat erhältlich), um diese Ausgänge mit Monitor, Verstärker oder PA-System zu verbinden. Stellen Sie die Lautstärke mit dem Lautstärkeregler auf der Oberseite ein.
4. Kopfhörerausgang: Schließen Sie handelsübliche 1/8" Stereo-Kopfhörer an diesen Ausgang an. Stellen Sie die Lautstärke mit dem Lautstärkeregler auf der Oberseite ein.
5. Aux In: Verwenden Sie ein 1/8" Stereo-Kabel (nicht im Lieferumfang enthalten), um ein externes Audiogerät (Smartphone, CD-Player etc.) an diesen Eingang anzuschließen.
6. USB-Anschluss: Verwenden Sie ein handelsübliches USB-Kabel (separat erhältlich), um Ihren Computer hier anzuschließen, damit MIDI-Nachrichten an und von Ihrem Computer übertragen werden können. Lesen Sie den Abschnitt Verwenden von MIDI für weitere Informationen.
PHONES OUTPUTAUX IN USBL/MONOR
14 5 3
2
3 6
SLOW GOOD FAST
1 2 3 4 5 VARIATION
PATTERN
VOLUME
COACH
TEMPO
START/STOPCLICK
1
9 9 9 9 9 9
2 3
45 6 7 8
4

37
Einsatz des Moduls Verwenden von Kits Auswählen eines Kits Um eines der Preset-Kits dieses Moduls auszuwählen, gehen Sie wie folgt vor:
• Drücken Sie die Tasten 1, 2, 3, 4 oder 5, um jeweils Kit 1, 2, 3, 4 oder 5 auszuwählen, wenn die Variationstaste leuchtet rot.
• Drücken Sie die Tasten 1, 2, 3, 4 oder 5, um jeweils Kit 6, 7, 8, 9 oder 10 auszuwählen, wenn die Variationstaste leuchtet grün.
Die Kit-Nummer wird am Display angezeigt. Sobald Sie ein Kit ausgewählt haben, können Sie damit fortfahren, weitere auszuwählen, indem Sie die Tasten + und - verwenden, oder indem Sie die oben genannten Schritte wiederholen. Einstellen der Lautstärke Ihres Kits Um die Lautstärke für jedes einzelne Kit einzustellen, 1. Führen Sie einen der folgenden Schritte aus:
• Drücken Sie zweimal die Tasten 1, 2, 3, 4 oder 5, um jeweils Kit 1, 2, 3, 4 oder 5 auszuwählen, wenn die Variationstaste leuchtet rot.
• Drücken Sie zweimal die Tasten 1, 2, 3, 4 oder 5, um jeweils Kit 1, 2, 3, 4 oder 5 auszuwählen, wenn die Variationstaste leuchtet grün.
2. Das Display zeigt L ("Level") und die Lautstärke an (00 - 32). Verwenden Sie die Tasten - oder +, um die Lautstärke der Kits einzustellen. (Die Standardlautstärke ist 28.)
3. Warten Sie 4 Sekunden. Das Drum-Modul wird die neuen Einstellungen automatisch speichern.
Begleiten von Vorlagen Auswählen und Abspielen einer Vorlage So wählen Sie eine der 30 voreingestellten Vorlagen: 1. Drücken Sie die Vorlagetaste, um in den Vorlage-Modus zu gelangen. Die LED der
Taste leuchtet auf und das Display zeigt die aktuelle Vorlagennummer an.
2. Verwenden Sie die Tasten - oder +, um eine Vorlage zu wählen. (Sie können die Tasten - oder + gedrückt halten, um schnell durch die Liste zu blättern.)
3. Drücken Sie die Start-/Stopp-Taste, um die Wiedergabe der Vorlage zu starten. 4. Spielen Sie die Begleitung zur Vorlage! 5. Drücken Sie die Start-/Stopp-Taste, um die Wiedergabe der Vorlage zu stoppen. Lautstärkeregelung der Vorlage Um die Lautstärke für jede einzelne Vorlage einzustellen, 1. Drücken Sie zweimal auf die Vorlagetaste. 2. Das Display zeigt die Lautstärke an (00 - 32). Verwenden Sie die Tasten -
oder +, um die Lautstärke der Vorlagen einzustellen. (Die Standardlautstärke ist 25.)
1 2 3 4 5 VARIATION
PATTERN
1 2 3 4 5 VARIATION
START/STOP
PATTERN

38
Einstellen des Metronoms (Klick) Sie können das integrierte Metronom ("den Klick") verwenden, um Ihnen dabei zu helfen, im Takt zu bleiben, wenn Sie mit dem integrierten Drum-Coach oder den Vorlagen üben. Sie können Tempo (Geschwindigkeit), Lautstärke, Klang und Taktart des Metronoms ändern. Ein- und Ausschalten des Metronoms
Um das Metronom ein- oder auszuschalten, drücken Sie die Klick-Taste. Einstellen des Metronom-Tempos
So stellen Sie das Tempo (Geschwindigkeit) des Metronoms ein:
1. Drücken Sie die Tempo-Taste.
2. Das Display zeigt das aktuelle Tempo (30 - 280) in BPM ("Schlägen pro Minute") an. Verwenden Sie die Tasten - oder +, um das neue Tempo einzustellen.
3. Warten Sie 4 Sekunden. Das Drum-Modul wird die neuen Einstellungen automatisch speichern.
Einstellen der Metronomlautstärke
So stellen Sie die Lautstärke des Metronoms ein:
1. Drücken Sie zwei Mal auf die Klick-Taste.
2. Das Display zeigt L ("Level") und die Lautstärke an (00 - 32). Verwenden Sie die Tasten - oder +, um die Lautstärke des Metronoms einzustellen. (Die Standardlautstärke ist 25.)
3. Warten Sie 4 Sekunden. Das Drum-Modul wird die neuen Einstellungen automatisch speichern.
Ändern des Metronom-Klicks
So ändern Sie das "Klick"-Geräusch des Metronoms:
1. Drücken Sie gleichzeitig auf die Klick-Taste und die Taste 1.
2. Das Display zeigt CL ("Klick") und die Nummer des Sounds (CL1 – CL5). Verwenden Sie die Tasten - oder +, um den Metronom-Klick einzustellen:
• CL1: Glockenspiel und Klick (Standardeinstellung)
• CL2: Klangstäbe
• CL3: Side-Stick
• CL4: Kuhglocke
• CL5: Stimme
3. Warten Sie 4 Sekunden. Das Drum-Modul wird die neuen Einstellungen automatisch speichern.
Ändern der Metronomtaktart
So ändern Sie die Taktart des Metronoms:
1. Drücken Sie gleichzeitig die Klick-Taste und die Taste 2.
2. Das Display zeigt die aktuelle Taktart. Verwenden Sie die Tasten - oder +, um eine Taktart zu wählen: 1/2, 2/2, 3/4, 4/4 oder 6/8.
3. Warten Sie 4 Sekunden. Das Drum-Modul wird die neuen Einstellungen automatisch speichern.
CLICK
TEMPO
CLICK
CLICK
1
CLICK2

39
Ändern des Metronomintervalls So ändern Sie die Notenaufteilung des Metronoms (den Notenwert, der jedem Klick zugewiesen wird): 1. Drücken Sie gleichzeitig auf die Klick-Taste und die Taste 3. 2. Das Display zeigt das aktuelle Intervall. Verwenden Sie die Tasten - oder +,
um ein neues Intervall zu wählen: 2 (halbe Note), 3 (Triole), 4 (Viertelnote), 6 (Sextole), 8 (Achtelnote) oder 16 (Sechzehntelnote). (Der Standardwert ist 4.)
3. Warten Sie 4 Sekunden. Das Drum-Modul wird die neuen Einstellungen automatisch speichern.
Verwendung des integrierten Drum-Coach Der integrierte Drum-Coach enthält fünf verschiedene Übungen, um Ihnen bei der Verbesserung und Entwicklung des Rhythmusgefühls, der Genauigkeit und Ausdauer zu helfen: Genauigkeit, Gradueller Tempowechsel, Rhythmuswechsel, Nachspielen und Stummschalten.
Um den integrierten Drum-Coach zu verwenden, drücken Sie die Vorlagetaste und die Tempo-Taste gleichzeitig. Drücken Sie anschließend eine der Tasten 1, 2, 3, 4 oder 5 - je nachdem welche Übung Sie versuchen möchten. Das Display zeigt an, welche Übung Sie ausgewählt haben.
1. Genauigkeit (bCH) 2. Gradueller Tempowechsel (GUd) 3. Rhythmuswechsel (C-U) 4. Nachspielen(FLo) 5. Stummschalten(d-U)
Genauigkeit Diese Übung bewertet Ihr Taktgefühl und Ihre Genauigkeit beim Begleiten des Metronoms. So beginnen Sie mit der Übung "Genauigkeit": 1. Halten Sie die Vorlagetaste und die Tempo-Taste
gleichzeitig gedrückt und drücken anschließend die Taste 1.
2. Legen Sie die Taktart des Metronoms und das Intervall fest (Beschreibung im Abschnitt Einstellen des Metronoms (Klick)).
3. Drücken Sie die Start-/Stopp-Taste, um zu beginnen. 4. Schlagen Sie die Pads im Takt des Metronoms an. Die sechs LEDs der 1-5/Variationstasten
zeigen an, wie "taktgenau" Sie spielen.
• Wenn Sie genau im Takt spielen, leuchten die Tasten 3 und 4 auf.
• Wenn Sie nicht ganz genau im Takt sind, leuchten die Tasten 2 und 5 auf.
• Wenn Sie nicht im Takt spielen, leuchten die Variationstaste und die Taste 1 auf.
• Wenn Sie völlig aus dem Takt spielen, leuchten keine Tasten auf. 5. Drücken Sie die Start-/Stopp-Taste, um zu stoppen.
Gradueller Tempowechsel Beim graduellen Tempowechsel wird bewertet, wie schnell Sie spielen können ohne aus dem Takt zu kommen. So starten Sie die Übung "Gradueller Tempowechsel": 1. Halten Sie die Vorlagetaste und die Tempo-Taste
gleichzeitig gedrückt und drücken anschließend die Taste 2.
2. Legen Sie die Taktart des Metronoms und das Intervall fest (im Abschnitt Einstellen des Metronoms (Klick) beschrieben).
3. Drücken Sie die Start-/Stopp-Taste.
CLICK
3
START/STOP
SLOW GOOD FAST
1 2 3 4 5 VARIATION
PATTERN
COACH
TEMPO
1
PATTERN
COACH
TEMPO
2
START/STOP

40
4. Führen Sie einen der folgenden Schritte aus:
• Drücken Sie die Taste 1, um den G-1-Modus zu wählen. In diesem Modus wird das Tempo - abhängig von der Genauigkeit Ihres Spiels - alle 4 Takte automatisch um 5 BPM reduziert oder erhöht.
• Drücken Sie die Taste 2, um den G-2 Modus auszuwählen. In diesem Modus wird das Tempo bei jedem Takt automatisch um 1 BPM reduziert oder erhöht. (Das Ausgangstempo entspricht der aktuellen Metronomeinstellung.)
5. Schlagen Sie die Pads im Takt des Metronoms an. Die sechs LEDs der 1-5/Variationstasten zeigen an, wie "taktgenau" Sie spielen.
• Wenn Sie genau im Takt spielen, leuchten die Tasten 3 und 4 auf.
• Wenn Sie nicht ganz genau im Takt sind, leuchten die Tasten 2 und 5 auf.
• Wenn Sie nicht im Takt spielen, leuchten die Variationstaste und die Taste 1 auf.
• Wenn Sie völlig aus dem Takt spielen, leuchten keine Tasten auf. 6. Drücken Sie die Start-/Stopp-Taste, um zu stoppen. Rhythmuswechsel Rhythmuswechsel hilft Ihnen dabei auch bei wechselnden Rhythmen im Takt zu bleiben. So starten Sie die Übung "Rhythmuswechsel": 1. Halten Sie die Vorlagetaste und die Tempo-Taste
gleichzeitig gedrückt und drücken anschließend die Taste 3.
2. Drücken Sie die Start-/Stopp-Taste. 3. Drücken Sie die Taste 1, 2 oder 3 - oder verwenden Sie die Tasten - und +, um einen
rhythmischen Verlauf (wie unten angegeben) auszuwählen:
P-1:
P-2:
P-3: 4. Drücken Sie die Start-/Stopp-Taste, um zu beginnen. 5. Schlagen Sie im (oben) gewählten Rhythmus und in Übereinstimmung mit dem Metronom auf
die Pads (das Ausgangstempo entspricht der aktuellen Metronomeinstellung). Die sechs LEDs der 1-5/Variationstasten zeigen an, wie "taktgenau" Sie spielen.
• Wenn Sie genau im Takt spielen, leuchten die Tasten 3 und 4 auf.
• Wenn Sie nicht ganz genau im Takt sind, leuchten die Tasten 2 und 5 auf.
• Wenn Sie nicht im Takt spielen, leuchten die Variationstaste und die Taste 1 auf.
• Wenn Sie völlig aus dem Takt spielen, leuchten keine Tasten auf. Drücken Sie die Start-/Stopp-Taste, um zu stoppen. Das Display zeigt Ihre Punkteanzahl:
• 0-29: OK
• 30-59: Gut
• 60-79: Sehr gut
• 80-100: Ausgezeichnet
1
2
SLOW GOOD FAST
1 2 3 4 5 VARIATION
START/STOP
1 2 3
PATTERN
COACH
TEMPO
3
SLOW GOOD FAST
1 2 3 4 5 VARIATION

41
Nachspielen Nachspielen hilft Ihnen dabei, verschiedene Drums herauszuhören und sich Rhythmen einzuprägen, die das gesamte Drum-Kit verwenden. In dieser Übung wird ein Drum-Loop wiederholt, wobei zwischen (1) dem Schlagzeugrhythmus selbst und (2) einer Metronom-Spur in der gleichen Länge alterniert wird, bei der Sie den eben gehörten Schlagzeugrhythmus selbst nachspielen. So starten Sie die Übung "Nachspielen": 1. Halten Sie die Vorlagetaste und die Tempo-Taste
gleichzeitig gedrückt und drücken anschließend die Taste 4.
2. Drücken Sie die Start-/Stopp-Taste. 3. Verwenden Sie die Tasten - und +, um den gewünschten
Schlagzeugrhythmus auszuwählen. 4. Drücken Sie die Start-/Stopp-Taste, um zu beginnen. 5. Wenn Sie den Schlagzeugrhythmus hören,
versuchen Sie herauszuhören, welche Pads wann gespielt werden. Versuchen Sie, den eben gehörten Schlagzeugrhythmus zum nun folgenden Metronom-Track zu spielen. Das Display zeigt den aktuellen Takt als Referenz. Die sechs LEDs der 1-5/Variationstasten zeigen an, wie genau Sie spielen.
6. Drücken Sie die Start-/Stopp-Taste, um zu stoppen. Stummschalten Bei dieser Übung können Sie bestimmte Teile der verschiedenen Schlagzeugrhythmen stumm schalten, so dass Sie frei spielen und ihre eigenen Rhythmen zu den restlichen Rhythmuselementen spielen können. So starten Sie die Übung "Stummschalten": 1. Halten Sie die Vorlagetaste und die Tempo-Taste
gleichzeitig gedrückt und drücken anschließend die Taste 5.
2. Drücken Sie die Start-/Stopp-Taste. 3. Verwenden Sie die Tasten - und +, um den gewünschten
Schlagzeugrhythmus auszuwählen. 4. Drücken Sie eine oder mehrere der 1-5/Variationstasten, um den Sound/die Sounds, den/die
Sie stumm schalten möchten, auszuwählen: • 1: Bassdrum • 2: Snare Drum • 3: Hi-Hat • 4: Toms • 5: Crash und Ride-Becken • Variation: Percussion
5. Drücken Sie die Start-/Stopp-Taste, um zu beginnen. 6. Begleiten Sie den nun wiedergegebenen Schlagzeugrhythmus mit einem beliebigen Rhythmus.
Der Schlagzeugrhythmus enthält keine der Sounds, die Sie in Schritt 4 stumm geschaltet haben, damit Sie Ihren eigenen Rhythmus kreieren können.
7. Drücken Sie die Start-/Stopp-Taste, um zu stoppen. Automatisches Ausschalten Um Energie zu sparen, schaltet sich das Drum-Modul automatisch nach 30 Minuten ohne Aktivität ab. Wenn Sie diese Funktion nicht benötigen, können Sie sie deaktivieren, indem Sie das Drum-Modul ausschalten und anschließend die Start-/Stopp-Taste beim Einschalten gedrückt halten. Auf dem Display wird PoF angezeigt, um zu bestätigen, dass die Funktion deaktiviert ist. Hinweis: Nach dem Ausschalten wird diese Funktion erneut aktiviert. Wiederholen Sie den oben beschriebenen Vorgang bei jedem Einschalten des Moduls, um die Funktion zu deaktivieren.
PATTERN
COACH
TEMPO
4
START/STOP
SLOW GOOD FAST
1 2 3 4 5 VARIATION
START/STOP
PATTERN
COACH
TEMPO
5

42
Verwendung von MIDI Über MIDI MIDI (Musical Instrument Digital Interface) ist ein Standard, mit dem bestimmte elektronische Musikgeräte miteinander kommunizieren können. Wenn zwei MIDI-Geräte verbunden sind, können sie MIDI-"Nachrichten", "Daten" oder "Informationen" über ein 5-poliges MIDI-Kabel oder ein Standard-USB-Kabel senden bzw. empfangen (je nach verfügbaren Geräte-Ports). Sie können den USB-Anschluss des DM Lite-Moduls über ein Standard-USB-Kabel (separat erhältlich) mit einem USB-Anschluss auf Ihrem Computer verbinden. Alle MIDI-Nachrichten werden über diese Verbindung an Ihren Computer gesendet bzw. empfangen. So können Sie zwischen den folgenden zwei Möglichkeiten wählen:
• Verwenden Sie ein elektronisches Drumkit, das mit dem Drum-Modul verbunden ist, um Sounds auf einem externen MIDI-Gerät zu triggern (z.B. einem Sequenzer Ihres Computers, wenn Sie Software verwenden, die MIDI-Noten empfangen kann und Ähnliches.). Lesen Sie den folgenden Abschnitt Triggern von Sounds auf externen MIDI-Geräten.
• Verwenden Sie ein externes MIDI-Gerät, um Sounds am Drum-Modul zu spielen. Lesen Sie den folgenden Abschnitt Verwendung des Drum-Moduls als Sound-Modul.
Triggern von Sounds auf externen MIDI-Geräten
PHONES OUTPUTAUX IN USBL/MONOR
MIDI INVOL MIDI OUT R L R L USB
1. Verbinden Sie den USB-Anschluss des Drum-Moduls über ein Standard-USB-Kabel (separat erhältlich) mit einem USB-Anschluss Ihres Computers.
2. Wenn Sie Sounds in einer Software triggern, überspringen Sie den nächsten Schritt. Wenn Sie Sounds in einem externen MIDI-Gerät triggern, stellen Sie sicher, dass das Gerät an Ihren Computer angeschlossen ist (entweder direkt über USB oder über eine USB-MIDI-Schnittstelle).
3. Setzen Sie den aktiven Track Ihrer MIDI-Software, Ihres Sequenzers usw. auf Kanal 10 und starten die Aufnahme.
4. Spielen Sie Ihr elektronisches Drum-Kit! Die MIDI-Daten werden an Ihren Computer, Sequenzer usw. gesendet Lesen Sie den Abschnitt MIDI-Noten triggern im Anhang dieses Handbuchs, um eine Liste der MIDI-Noten zu sehen, die der jeweilige Trigger sendet.
5. Beenden Sie die Aufnahme. Verwendung des Drum-Moduls als Sound-Modul
PHONES OUTPUTAUX IN USBL/MONOR
MIDI INVOL MIDI OUT R L R L USB
1. Verbinden Sie den USB-Anschluss des Drum-Moduls über ein Standard-USB-Kabel (separat
erhältlich) mit einem USB-Anschluss Ihres Computers. 2. Wenn Sie Software verwenden, um die Sounds des Drum-Moduls zu spielen, überspringen Sie
den nächsten Schritt. Wenn Sie ein externes MIDI-Gerät für die Wiedergabe der Drum-Modul Sounds verwenden, stellen Sie sicher, dass das Gerät an Ihren Computer angeschlossen ist (entweder direkt über USB oder über eine USB-MIDI-Schnittstelle).
3. Stellen Sie den aktiven Track Ihrer MIDI-Software, Ihres Sequenzers usw. auf den gewünschten Kanal (1-16). Hinweis: Kanal 10 des Drum-Moduls ist den Drumsounds vorbehalten.
4. Spielen Sie Ihren Sequenzer oder anderes externes Gerät, um die internen Sounds des Drum-Moduls zu hören.
5. Lesen Sie die Abschnitte Presets und General MIDI (GM) im Anhang dieses Handbuchs, um die Listen der verfügbaren Sounds zu sehen.

43
Appendix (English) Trigger MIDI Notes
Trigger MIDI Note Trigger MIDI Note Trigger MIDI Note Kick 36 Tom 3 43 Hi-Hat (closed) 44 Snare 38 Crash 49 Splash 21 Tom 1 48 Ride 51 Tom 2 45 Hi-Hat (open) 46
Presets Kits
Number Preset Kit Number Preset Kit Number Preset Kit 1 Acoustic 5 808 9 Indian 2 Funk 6 909 10 Percussion2 3 Jazz Brushes 7 FX Mix 4 Rock 8 Marimba
Patterns
Number Preset Kit Number Preset Kit Number Preset Kit 1 Fusion1 11 Fusion2 21 Rock 2 Dance Funk 12 R&B 22 Pop Funk 3 Modern Pop 13 Latin Rock 23 Big Band1 4 Hip Hop 14 Latin Dance 24 Latin Jazz 5 Dance 15 Funk1 25 Swing 6 Classic Rock 16 Fusion3 26 Funky Blues 7 68 Ballad 17 Pop Shuffle 27 Funk2 8 CountryPop 18 Mambo 28 Samba 9 Pop Ballad 19 Pop Bossa 29 Big Band2 10 Break Beat 20 34 Jazz 30 NuJazz Funk
General MIDI (GM) Kits
Note Number Standard 1 (Bank 0) Room (Bank 8) Rock (Bank 16) 27 (D#1) High Q
28 (E1) Slap
29 (F1) Scratch Push
30 (F#1) Scratch Pull
31 (G1) Sticks
32 (G#1) Square Click
33 (A1) Metronome Click
34 (A#1) Metronome Bell
35 (B2) Acoustic Bass Drum Room Bass Drum 1 Rock Bass Drum 1
36 (C2) Standard 1 Bass Drum Room Bass Drum 2 Rock Bass Drum 2
37 (C#2) Side Stick

44
Kits (continued)
Note Number Standard 1 (Bank 0) Room (Bank 8) Rock (Bank 16) 38 (D2) Standard 1 Snare Room Snare Rock Snare
39 (D#2) Hand Clap
40 (E2) Standard 1 Snare Rim Room Snare Rim Rock Snare Rim
41 (F2) Standard 1 Tom 6 Room Tom 6 Rock Tom 6
42 (F#2) Standard 1 Hi-hat Close Room Hi-hat Close Rock Hi-hat Close
43 (G2) Standard 1 Tom 5 Room Tom 5 Rock Tom 5
44 (G#2) Standard 1 Hi-hat Pedal Room Hi-hat Pedal Rock Hi-hat Pedal
45 (A2) Standard 1 Tom 4 Room Tom 4 Rock Tom 4
46 (A#2) Standard 1 Hi-hat Open Room Hi-hat Open Rock Hi-hat Open
47 (B3) Standard 1 Hi-hat Open Room Hi-hat Open Rock Hi-hat Open
48 (C3) Standard 1 Tom 3 Room Tom 3 Rock Tom 3
49 (C#3) Standard 1 Crash 1 Room Crash 1 Rock Crash 1
50 (D3) Standard 1 Tom 1 Room Tom 1 Rock Tom 1
51 (D#3) Standard 1 Ride Room Ride Rock Ride
52 (E3) Chinese Cymbal 1
53 (F3) Ride Bell Room Ride Bell Rock Ride Bell
54 (F#3) Tambourine
55 (G3) Splash Cymbal Room Splash Cymbal Rock Splash Cymbal
56 (G#3) Standard 1 Cowbell Room Cowbell Rock Cowbell
57 (A3) Standard 1 Crash 2 Room Crash 2 Rock Crash 2
58 (A#3) Vibra-slap
59 (B3) Ride Cymbal
60 (C4) Hi Bongo
61 (C#4) Low Bongo
62 (D4) Mute Hi Conga
63 (D#4) Open Hi Conga
64 (E4) Low Conga
65 (F4) High Timbale
66 (F#4) Low Timbale
67 (G4) High Agogo
68 (G#4) Low Agogo
69 (A4) Cabasa
70 (A#4) Maracas
71 (B4) Short Whistle
72 (C5) Long Whistle
73 (C#5) Short Guiro
74 (D5) Long Guiro
75 (D#5) Claves
76 (E5) Hi Wood Block
77 (F5) Low Wood Block
78 (F#5) Mute Cuica

45
Kits (continued)
Note Number Standard 1 (Bank 0) Room (Bank 8) Rock (Bank 16) 79 (G5) Open Cuica
80 (G#5) Mute Triangle
81 (A5) Open Triangle
82 (A#5) Shaker
83 (B5) Jingle Bell
84 (C6) Bell Tree
85 (C#6) Castanets
86 (D6) Mute Surdo
87 (D#6) Open Surdo
Note Number Electronic (Bank 24) Brush (Bank 40) 27 (D#1)
28 (E1)
29 (F1)
30 (F#1)
31 (G1)
32 (G#1)
33 (A1)
34 (A#1)
35 (B2) Electronic Bass Drum 1 Brush Bass Drum 1
36 (C2) Electronic Bass Drum 2 Brush Bass Drum 2
37 (C#2)
38 (D2) Electronic Snare Brush Snare
39 (D#2)
40 (E2) Electronic Snare Rim Brush Snare Rim
41 (F2) Electronic Tom 6 Brush Tom 6
42 (F#2) Electronic Hi-hat Close
43 (G2) Electronic Tom 5 Brush Tom 5
44 (G#2) Electronic Hi-hat Pedal
45 (A2) Electronic Tom 4 Brush Tom 4
46 (A#2) Electronic Hi-hat Open
47 (B3) Electronic Tom 3 Brush Tom 3
48 (C3) Electronic Tom 2 Brush Tom 2
49 (C#3) Brush Crash 1
50 (D3) Electronic Tom 1 Brush Tom 1
51 (D#3) Brush Ride
52 (E3)
53 (F3)
54 (F#3)
55 (G3)
56 (G#3)
57 (A3) Brush Crash 2
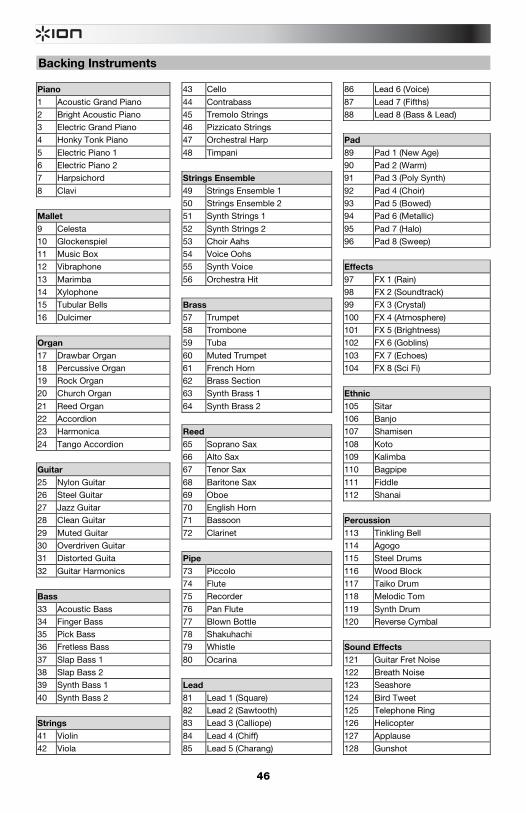
46
Backing Instruments Piano 43 Cello 86 Lead 6 (Voice)
1 Acoustic Grand Piano 44 Contrabass 87 Lead 7 (Fifths)
2 Bright Acoustic Piano 45 Tremolo Strings 88 Lead 8 (Bass & Lead)
3 Electric Grand Piano 46 Pizzicato Strings
4 Honky Tonk Piano 47 Orchestral Harp Pad
5 Electric Piano 1 48 Timpani 89 Pad 1 (New Age)
6 Electric Piano 2 90 Pad 2 (Warm)
7 Harpsichord Strings Ensemble 91 Pad 3 (Poly Synth)
8 Clavi 49 Strings Ensemble 1 92 Pad 4 (Choir)
50 Strings Ensemble 2 93 Pad 5 (Bowed)
Mallet 51 Synth Strings 1 94 Pad 6 (Metallic)
9 Celesta 52 Synth Strings 2 95 Pad 7 (Halo)
10 Glockenspiel 53 Choir Aahs 96 Pad 8 (Sweep)
11 Music Box 54 Voice Oohs
12 Vibraphone 55 Synth Voice Effects
13 Marimba 56 Orchestra Hit 97 FX 1 (Rain)
14 Xylophone 98 FX 2 (Soundtrack)
15 Tubular Bells Brass 99 FX 3 (Crystal)
16 Dulcimer 57 Trumpet 100 FX 4 (Atmosphere)
58 Trombone 101 FX 5 (Brightness)
Organ 59 Tuba 102 FX 6 (Goblins)
17 Drawbar Organ 60 Muted Trumpet 103 FX 7 (Echoes)
18 Percussive Organ 61 French Horn 104 FX 8 (Sci Fi)
19 Rock Organ 62 Brass Section
20 Church Organ 63 Synth Brass 1 Ethnic
21 Reed Organ 64 Synth Brass 2 105 Sitar
22 Accordion 106 Banjo
23 Harmonica Reed 107 Shamisen
24 Tango Accordion 65 Soprano Sax 108 Koto
66 Alto Sax 109 Kalimba
Guitar 67 Tenor Sax 110 Bagpipe
25 Nylon Guitar 68 Baritone Sax 111 Fiddle
26 Steel Guitar 69 Oboe 112 Shanai
27 Jazz Guitar 70 English Horn
28 Clean Guitar 71 Bassoon Percussion
29 Muted Guitar 72 Clarinet 113 Tinkling Bell
30 Overdriven Guitar 114 Agogo
31 Distorted Guita Pipe 115 Steel Drums
32 Guitar Harmonics 73 Piccolo 116 Wood Block
74 Flute 117 Taiko Drum
Bass 75 Recorder 118 Melodic Tom
33 Acoustic Bass 76 Pan Flute 119 Synth Drum 34 Finger Bass 77 Blown Bottle 120 Reverse Cymbal
35 Pick Bass 78 Shakuhachi
36 Fretless Bass 79 Whistle Sound Effects
37 Slap Bass 1 80 Ocarina 121 Guitar Fret Noise
38 Slap Bass 2 122 Breath Noise
39 Synth Bass 1 Lead 123 Seashore
40 Synth Bass 2 81 Lead 1 (Square) 124 Bird Tweet
82 Lead 2 (Sawtooth) 125 Telephone Ring
Strings 83 Lead 3 (Calliope) 126 Helicopter
41 Violin 84 Lead 4 (Chiff) 127 Applause
42 Viola 85 Lead 5 (Charang) 128 Gunshot

47
Technical Specifications
Kits 10 preset kits; 5 General MIDI (GM) kits
Sequencer 30 Patterns; 12 "Follow Me" patterns
Resolution 192 ticks per quarter note
Maximum Polyphony 64
Display 3-digit LED
Tempo 30 – 280 BPM
Connectors 25-pin trigger input jack (for cable snake)
1/8" TRS headphone output
1/4" TS main outputs (right and left/mono)
1/8" TRS auxiliary input
USB port (MIDI)
Power jack
Power 9 V, 500 mA, center-positive
Dimensions (width x height x depth; sound module only)
5.8" x 7.2" x 4.4"
147 mm x 183 mm x 112 mm
Weight (sound module only)
1.1 lbs.
0.5 kg
* Specifications are subject to change without notice.
