recruiting solutions - ndsu
TRANSCRIPT


Recruiting Solutions


Recruiting SolutionsRecruiting Solutions is comprised of two modules in the PeopleSoft system. Candidate Gateway (where candidates go to look and apply for jobs) and Talent Acquisition Manager (the internal HR module for recruiters, hiring supervisors, and others to create, post, interview and hire candidates). The goal of the project is to streamline and make process improvements. The system-wide NDUS implementation of Recruiting Solutions will integrate with the current Peoplesoft HRMS. It is designed to create a better candidate experience and improve efficiencies for employee onboarding.

Advantages
• Will speed up the hiring process as information goes right into PeopleSoft
• Will improve efficiencies in employee onboarding
• Will provide cost savings
• Has look and feel of PeopleSoft

Student/Temp Hires
Student and Temp Hires will need to be posted in both Recruiting Solutions and CareerLink.
Note:
• Recommend posting position in Recruiting Solutions first and then post in CareerLink. The posting in CareerLink will need to have the Recruiting Solutions position link to allow candidates to apply.

Recruiting Process Overview
Note: The screening process will remain the same as current process.

Recruiting Process Overview
Create Job Openings Users create job openings; defining qualifications, creating questionnaires, establishing screening rules, creating posting content, and identifying the hiring team.
Post Job Openings Users post jobs to Candidate Gateway, Campus websites, external job
boards, and social media sites.Enter Applicant Data Applicants apply for job openings through Candidate Gateway
Screen Applicants Users run screening processes to calculate applicants’ qualification scores.
Route Applicants Users send applicant information to interested parties and solicit feedback
on next steps.Interview Applicants Users schedule interviews and solicit feedback from interviewers.
Make Offer Users prepare offers for the selected candidates.
Hire Applicants Users finalize the hiring of the selected candidates.


How do I access?You will access Recruiting Solutions through your PeopleSoft login. The Recruiting selection will be added once the system is live.


Recruiter View

Hiring Manager View

My Job Openings

My Applicants

Recruiting Activities

Applicant Lists

Recruiting Alerts

Approvals

Create a Job Opening
The first step in Recruiting Solutions is to create a job opening.

Primary Job Opening

Justification

Job OpeningJob Opening Type: Select Standard Requisition or Continuous Job Opening
Business Unit: Defaults to the Business Unit for the person creating the job opening.
Position Number: Enter Position Number you are filling. The system is designed to allow you to enter only the Position Number, the other fields will default in based on the Position Number
Job Family: Defaults from position number entered.
Department: Defaults from position number entered.
Job Code: Defaults from position number entered.
Recruiting Location: Defaults from position number entered. This is the location that will show up for applicants searching for jobs on Candidate Gateway.
Posting Title: Defaults from position number entered. If you would like the job posting title to be more descriptive of the position, you can make the change here. For Continuous Job Openings, this field is required when a Position or Job Code are not entered.

Job Opening• The Job Opening page appears populated with data from the
position selected on the Primary Job Opening Information page.
• The Job Opening page always displays the header information that was setup on the Primary Job Opening Information page.
*For Staff and Faculty positions, the Create Job Opening component is organized across different tabs or pages: Job Information, Job Posting, and Hiring Team.

Job Information
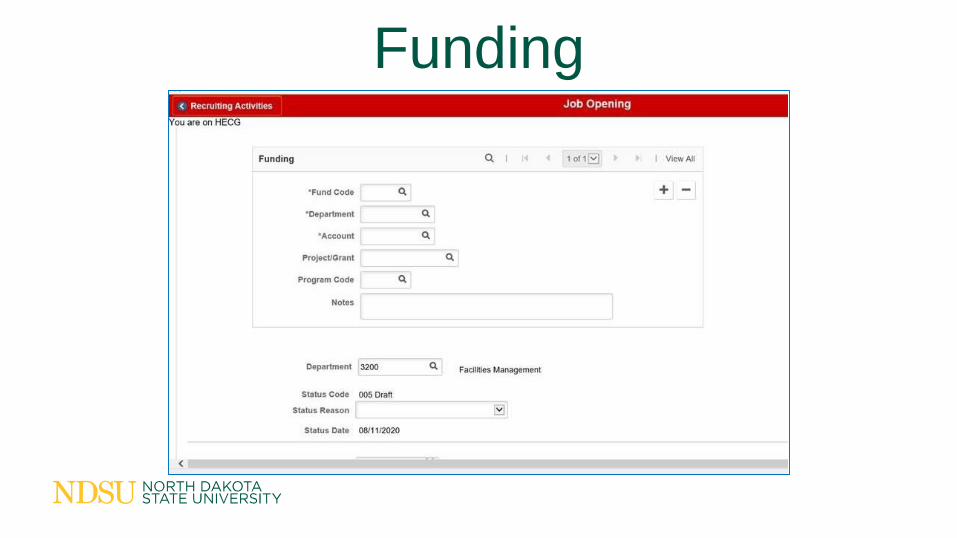
Funding
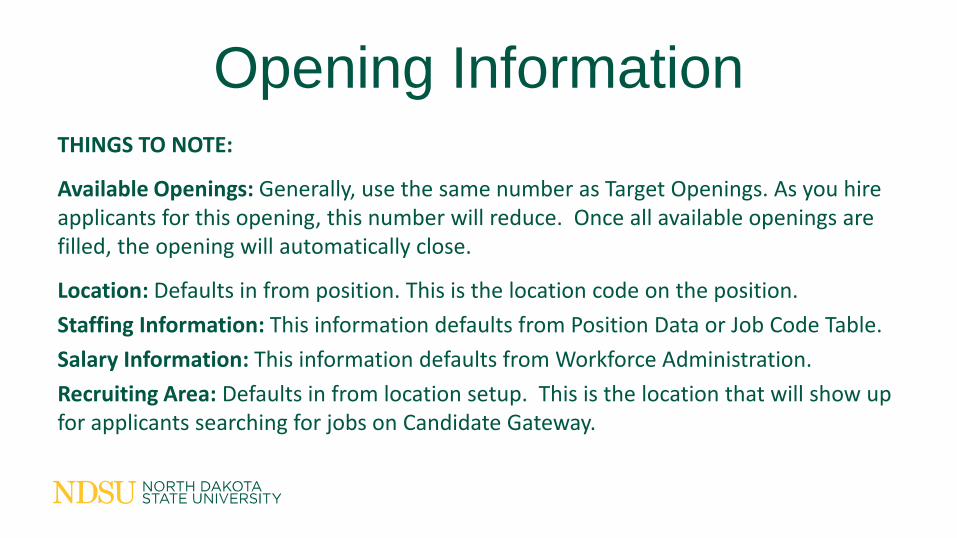
Opening InformationTHINGS TO NOTE:
Available Openings: Generally, use the same number as Target Openings. As you hire applicants for this opening, this number will reduce. Once all available openings are filled, the opening will automatically close.
Location: Defaults in from position. This is the location code on the position.
Staffing Information: This information defaults from Position Data or Job Code Table.
Salary Information: This information defaults from Workforce Administration.
Recruiting Area: Defaults in from location setup. This is the location that will show up for applicants searching for jobs on Candidate Gateway.

Job Posting

Posting Information


Job Postings
• Integrates with Higher Ed Jobs
• Positions will also be posted to:
– Job Service
– Indeed
– JobsHQ

Hiring Team

ApprovalsThe Approval workflow chain will appear displaying the steps that are defined on the Approval Setup for the Institution and Job Type.
Here the user can add Ad Hoc approvers into the workflow by clicking the green plus-sign icon.

Student Job Opening

Student Job Opening

Activity & Attachments
From the Activity & Attachments tab you can view the history of the Job Opening status, add and view Notes, Attachments, and Expenses related to the Job Opening.

Job History & Notes

Attachments & Add Expenses

Search Job OpeningsThere are a variety of methods for finding Job Openings in the system. Each method operates differently and displays Job Openings search results differently.

Search Results
The search results will return only Job Openings that are associated with the user.

Search Job OpeningsYou can also search using the following:
• Browse Job Openings
• My Job Openings
– Can personalize filters to change results list

Search ApplicantsThere are a variety of methods for finding Applicants and Applications in the system. Each method operates differently and displays Applicants and Applicationsearch results differently.

Search Results
NOTE: The search results return only Applicants that are attached to job openings where you are either the originator or part of the hiring team.

Search ResultsYou can also search using the following:
• Browse Applicants
– Narrow down your results by using the Faceted Filters
Search ResultsYou can also search using the following:
• Search Applications

Search Applications

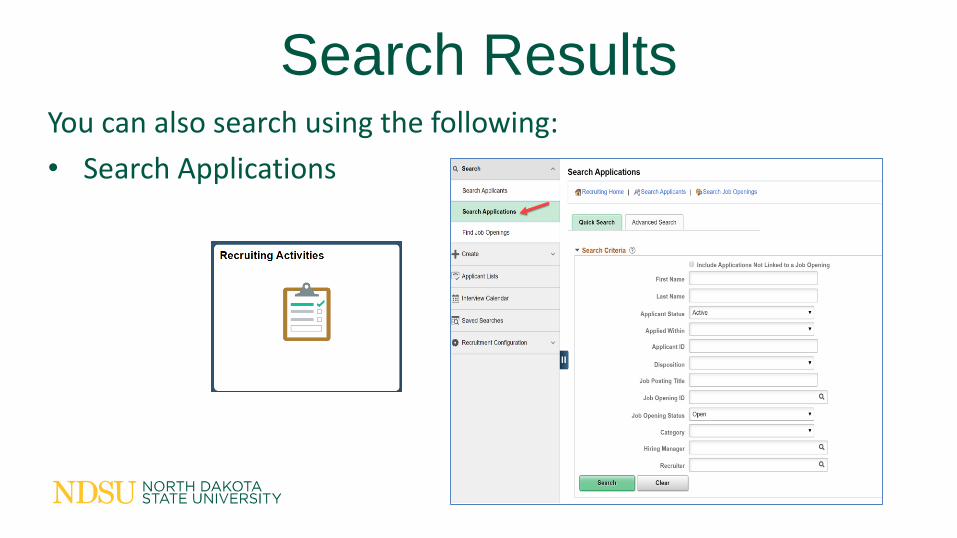
Search ResultsYou can also search using the following:
• My Applicants

Manage Job Opening
From your My Job Openings list, select a Job Opening with Applicants applied. In the Applicants column you will see the number of Applicants who have applied. The Manager Job Opening page will appear.

Applicant Information
• During the application process, applicants will be able to opt into different notifications.
• Text notifications are available as an option.
• They can select the type of notifications they would like to receive during the applicant registration process, the application submission, and during the job offer process.

Applicants

View ApplicantFrom the Manage Job Opening – Applicants grid you can access the Applicant Information

Manage Job OpeningYou can view the following:
• Manage Applicant
• Applicant Data
• References
• Notes
• Applicant note
• Expenses
• History

View ResumeFrom the Manage Job Opening – Applicants grid you can view the Resume
Note: You can also access the Resume, as well as Cover Letter, and other Attachment documents from the Manage Application page.

Student Work Study Verification
The Work Study Verification information displayed is pulled in real-time from the Campus Solutions system.

RoutingRouting is the action of sending applicant information to recipients who are asked to provide input on the next step to take for the applicant.

Route Applicants

Preview Notification and Routing Status

Interview SchedulingRECRUITERS CAN: APPLICANTS CAN:
Identify Interviewers Select from available Interview Sessions
Create Interview Series Notify the Recruiter if they are not available for the available interview sessions
Create individual Interview Sessions View their scheduled interviews
Identify Applicants to Invite to select from the available Interview Sessions
Manually Assign an Applicant to and Interview Session
View and manage scheduled interviews
Manage Interview Evaluations
Please note that you are not required to use this feature, it is optional. This feature will not sync to your Outlook calendar.

Job Opening – Hiring Team

Schedule Interview
Begin the Schedule
Interview process from the
Manage Job Opening page
by selecting applicants and
using the Group Action –
Schedule Interview option.

Create Series & Sessions

On the Sessions page, manage the selected applicants, and manage sessions.

Invite ApplicantsOnce you have created a sufficient
number of sessions for the series, you
can invite the applicants to select a
session. Typically, the
recommendation is to create a greater
number of sessions than applicants.
This gives all applicants multiple
session options to choose from.

Schedule InterviewsTo: If an individual applicant is invited, their name will appear. If multiple applicants are invited, “All Unscheduled Applicants” will display.Subject: The subject of the email that the invited applicants will receive is the text “Invitation to participate in an upcoming interview – Job ID xxxxx – (Series title)”Additional message to include in invitation: Enter any additional information that you want to communicate to the applicants in the invitation email.

Once an applicant has selected an interview session through Candidate Gateway, or has been assigned to an interview session manually, their name will appear in the Display Name column for the session on the Sessions page.
The applicant’s disposition status will be updated to Interview, and scheduled interview record will be created. The applicant will receive a notification confirming their scheduled interview, and a notification will appear for the applicant in Candidate Gateway.

Manage Scheduled Interviews

Manage InterviewsUse the Manage Interview page to view and edit scheduled interviews; and to manage interview evaluations.

The Interview Schedule page can be used to view an interview that was scheduled by the applicant selecting a session, or by the recruiter assigning a session to the applicant. When an interview is scheduled using one of these methods, the page is pre-populated with the interview schedule details.
As an alternative, the Interview Schedule page can be used to set up an interview manually.

Interview Evaluations
After you have gathered feedback using interview evaluations, use the Final Recommendation field to enter a recommendation for the next step in the recruiting process. Until you make a final recommendation, the value in the Final Recommendation field is "Interview."


Send CorrespondenceThroughout the recruiting process you have the ability to communicate with applicants through the Send Correspondence action.
Correspondences can be initiated in three different forms:• Email - An email with message text that you manually
enter.• Email with Letter Template - An email with message
text that the system generates based on a template that you select.
• Letter - A letter that the system generates based on a template that you select.
Note: When you send a correspondence, the system automatically creates an Applicant Note recording the correspondence.

Use the Send Correspondence page to send ad hoc letters and emails to applicants. For free-form emails, use the Contact Method of Email.


Applicant Correspondence

Sterling Background Check
Initiate and monitor Sterling Background Checks for an Applicant from within PeopleSoft. To initiate or view an existing Background Check, use the Applicant Action of Sterling Background Check.
Note: Process will remain the same as current process.

Making an OfferCreate and manage job offers on the Prepare Job Offer page. To access this page, use the Prepare Job Offer action.
Prepare Job OfferUse the Prepare Job Offer page to create and manage a job offer. The steps for preparing a Job Offer include:1. Create the initial Offer Details and submit for
Approval.2. Once Approvals are complete, create the Offer
Letter, and add Offer Attachments.3. Post the Job Offer to the Applicant’s Candidate
Gateway notifications.
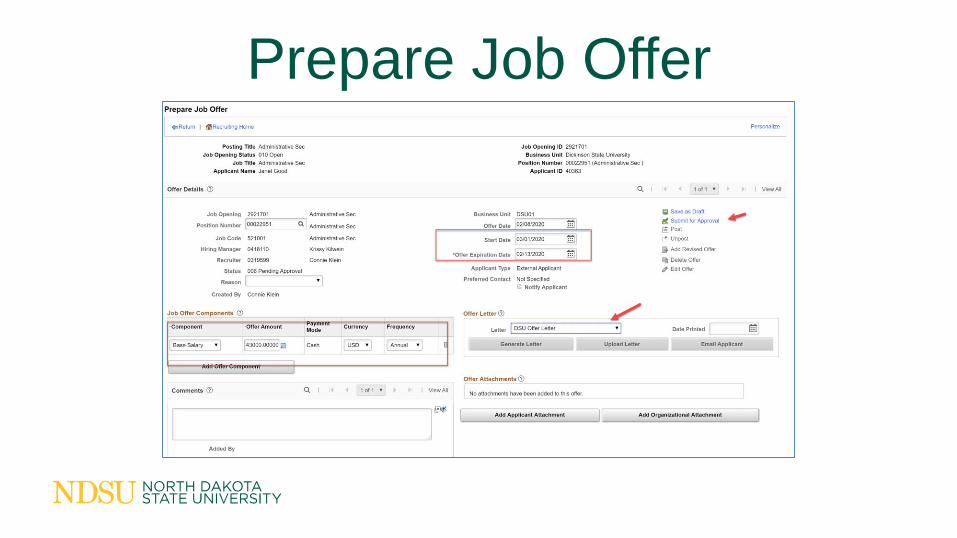
Prepare Job Offer
Approvals
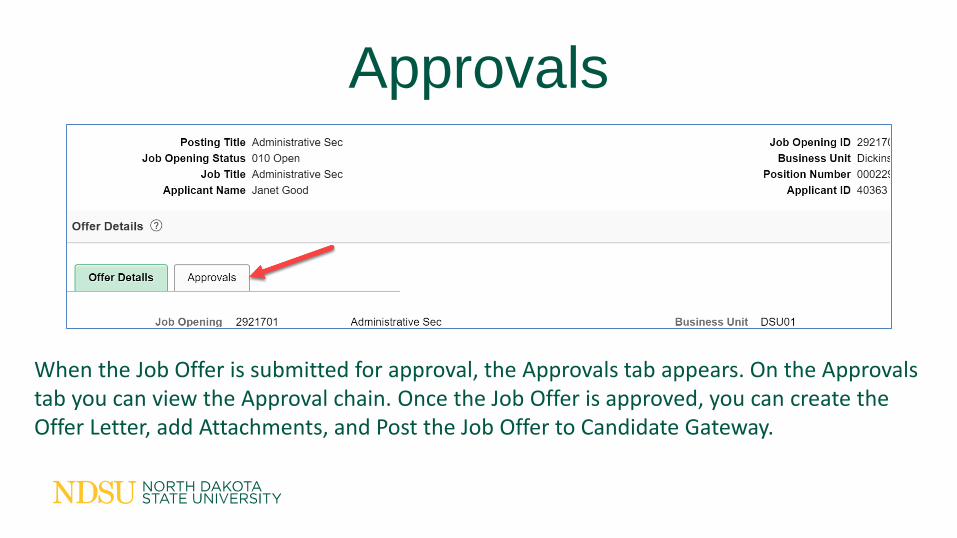
When the Job Offer is submitted for approval, the Approvals tab appears. On the Approvals tab you can view the Approval chain. Once the Job Offer is approved, you can create the Offer Letter, add Attachments, and Post the Job Offer to Candidate Gateway.

Offer Letter & Attachments

Post Job Offer
To Post the Job Offer to Candidate Gateway, select Notify Applicant, and click on the Post action icon. The Post Online Job Offer page appears.

Post Online Job Offer
Review the offer details on this page, then click the Submit button to post the offer.
When the offer is posted, the system generates a Candidate Gateway notification, sends an email to notify the applicant of the job offer, and creates a contact note.

When a Job Offer is Accepted,
the applicant’s Disposition
status updates to Accepted.
For Job Openings where the
applicant will fill the remaining
opening, the other applicants
are updated to Hold.
Job Offer Acceptance


Prepare to Hire

Onboarding
After previous steps are completed and the hire is processed, onboarding begins.
The onboarding process will have some changes. More information will become available as we transition to Recruiting Solutions.


Thank you!