real world adobe indesign cs ©2004 olav martin kvern and ...creativepro.com › wp-content ›...
TRANSCRIPT
chapter 6. where text meets graphics 365
Tables
Ole sees tables everywhere. He thinks they’re the most common method of presenting text. This quirk is probably due to the time he spent typesetting a magazine devoted to horse racing (and its infamous “stud listing”), but he can be forgiven—tables really are everywhere. Looked at the business or sports section of a newspaper lately? Or a data sheet for that nifty new computer you want to buy? Or a calendar?
Tables are everywhere because they’re a great way to present infor-mation that falls naturally into a set sequence of categories. If tables are so useful, why are they universally hated and despised by desk-top publishing users? Since the dawn of the page layout era, creating tables has been a bother—programs that supported tables (Microsoft Word, FrameMaker, and Ventura Publisher, for example) didn’t have the typesetting and color management features graphic arts profes-sionals expect; popular page layout programs (such as PageMaker and QuarkXPress) lacked tools for tabular composition. Plug-ins and stand-alone table-editing programs attempted to provide the feature, but, frankly, never worked very well.
The desktop publishing field has been waiting for someone to “do tables right” in a page layout program.
InDesign can create and edit tables, or import tables from Word, Excel, or XML. How good is this feature? It’s not perfect, but it’s more than good enough to alleviate most of the pain of working with tables in a layout.
Table Anatomy Tables are a matrix; a grid made up of rows (horizontal subdivisions) and columns (vertical subdivisions). The area defined by the inter-section of a given row and column is called a cell. InDesign has a complete vocabulary of terms for the various parts of rows, columns, and cells, which we’ve attempted to explain in Figure 6-10.
Understanding InDesign Tables
Now that we’ve got the terminology out of the way, but before we dive into the details of working with tables in InDesign, there are a few conceptual points we’d like to make, as follows.
▶ Tables exist inside text frames. There is no “Table tool”—you create a text frame and then add a table to it, or convert text in the text frame to a table.
▶ From the point of view of the text frame (or story), a table acts like a single character (albeit a potentially very large one). Another way to look at a table is to think of it as a special type

366 real world adobe indesign cs
of inline frame. Like a character, a table changes position as you add or delete text preceding it in its parent story; like an inline frame, you can’t apply character formatting (point size, font, or leading) to the character containing the table.
▶ Like text, tables can flow from column to column, text frame to text frame, and from page to page. Table header and footer rows can automatically repeat when the table breaks across multiple text objects. An individual table row cannot be broken from one text frame to another or from one column to another.
▶ Table cells are something akin to text frames: they can contain text, which can contain inline graphics, text frames, or tables. Any and all of InDesign’s typesetting features can be used on the text in a table cell, including character and paragraph styles, indents, tab stops, and character formatting.
▶ Table cells can automatically expand (vertically) to display their content.
▶ Tables are not only for formatting tabular data—they’re useful for a number of other things. Want to put a box around a paragraph? Convert the paragraph to a single-cell table. Want to compose paragraphs “side by side”? Use a two-column table (note that this can be one way to create hanging side heads). The
Heading row made up of merged cells
Rotated merged cells make up these side headings.
Cell Row
Table border
These cells have been filled with a tint.
Column
The basics
A somewhat more complex example
figure 6-0What’s That Called?

chapter 6. where text meets graphics 367
number of possible uses are, as the cliché goes, “limited only by your imagination” and/or good sense/taste. But we’re getting ahead of ourselves, as usual.
Creating a Table
There are (at least) four ways to create a table.
▶ “From scratch.” Click the Text tool inside an existing text frame, then choose Insert Table from the Table menu. InDesign dis-plays the Insert Table dialog box. Enter the number of rows and columns you want in the corresponding fields and click the OK button. InDesign creates the table (see Figure 6-11).
figure 6-Creating a Table “From Scratch”
Click the Text tool in a text frame.
Choose Insert Table from the Table menu (or press
Command-Option-T/ Ctrl-Alt-T).
InDesign displays the Insert Table dialog box. Enter the number of rows and columns you want and click OK.
InDesign inserts the table into the text frame.
Once you’ve created a table using this approach, you can add text or graphics to the table the same way you would add text to any text frame—click the Text tool inside a cell, then enter text, or paste text or graphics, or place text or graphics into the cell.
▶ Converting Text to a Table. To turn a range of text into a table, select the text and choose Convert Text to Table from the Table Menu. InDesign displays the Convert Text to Table dialog box. Select the delimiter characters you want to use, and specify the number of columns, if necessary (InDesign will only display this field when it cannot determine the number of columns in the
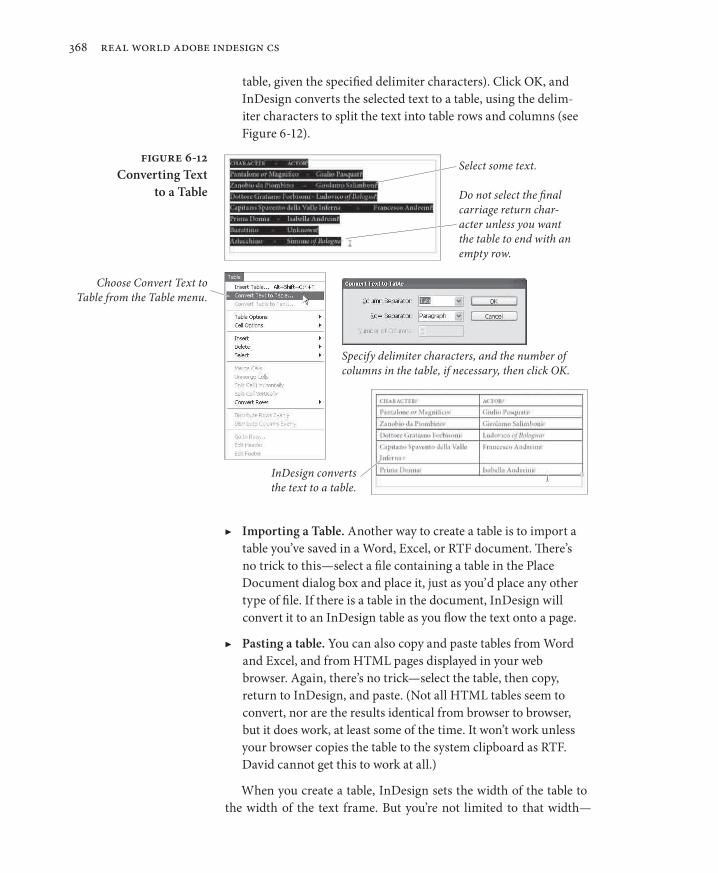
368 real world adobe indesign cs
table, given the specified delimiter characters). Click OK, and InDesign converts the selected text to a table, using the delim-iter characters to split the text into table rows and columns (see Figure 6-12).
figure 6-2Converting Text
to a Table
Select some text.
Choose Convert Text to Table from the Table menu.
InDesign converts the text to a table.
Do not select the final carriage return char-acter unless you want the table to end with an empty row.
Specify delimiter characters, and the number of columns in the table, if necessary, then click OK.
▶ Importing a Table. Another way to create a table is to import a table you’ve saved in a Word, Excel, or RTF document. There’s no trick to this—select a file containing a table in the Place Document dialog box and place it, just as you’d place any other type of file. If there is a table in the document, InDesign will convert it to an InDesign table as you flow the text onto a page.
▶ Pasting a table. You can also copy and paste tables from Word and Excel, and from HTML pages displayed in your web browser. Again, there’s no trick—select the table, then copy, return to InDesign, and paste. (Not all HTML tables seem to convert, nor are the results identical from browser to browser, but it does work, at least some of the time. It won’t work unless your browser copies the table to the system clipboard as RTF. David cannot get this to work at all.)
When you create a table, InDesign sets the width of the table to the width of the text frame. But you’re not limited to that width—

chapter 6. where text meets graphics 369
InDesign tables can be narrower or wider than their containing text frame. As you’d expect, tables take on the alignment of the para-graph containing them (though the text inside the table can be of any alignment). To change the position of the table in (or relative to) the text frame, change the paragraph alignment.
Overset Cells Sometimes, when you create or edit a table, you’ll see a red dot in one or more of the cells in the table (see Figure 6-13). This means that the content of the cell (the text or graphic inside the cell) has become overset—it’s exactly the same as having overset text in a text frame. What can you do? Either resize the cell or set the cell to automatically expand (as described later in this chapter).
figure 6-3Overset Cell
The dot (you have to imagine it in red) indicates that the cell content is overset.
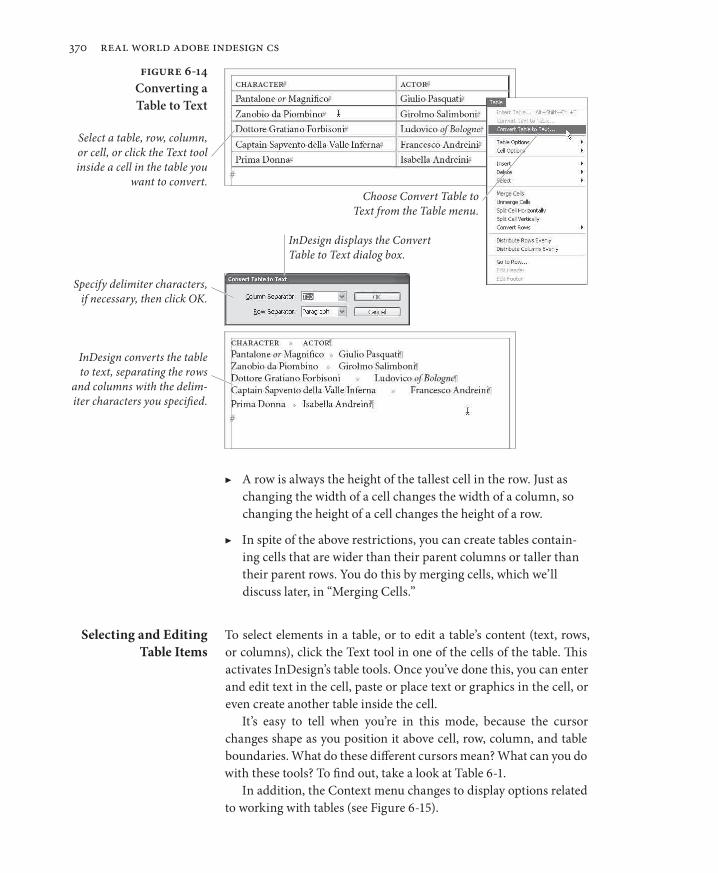
Converting Tables to Text
To convert a table to text, follow these steps (see Figure 6-14).
1. Select the table, or a cell, row, or column in the table, or click the Text tool anywhere inside the table.
2. Choose Convert Table to Text from the Table menu. InDesign displays the Convert Table to Text dialog box.
3. Enter the delimiter characters you want to use, if necessary, then click the OK button. InDesign converts the table to text.
Editing Tables
Once you’ve created a table, you can’t just sit and admire it (as tempt-ing as that might be for longtime page layout users); you’ve got to do something with it.
Before we talk about that, though, we’d better lay down a few ground rules about cells, rows, and columns.
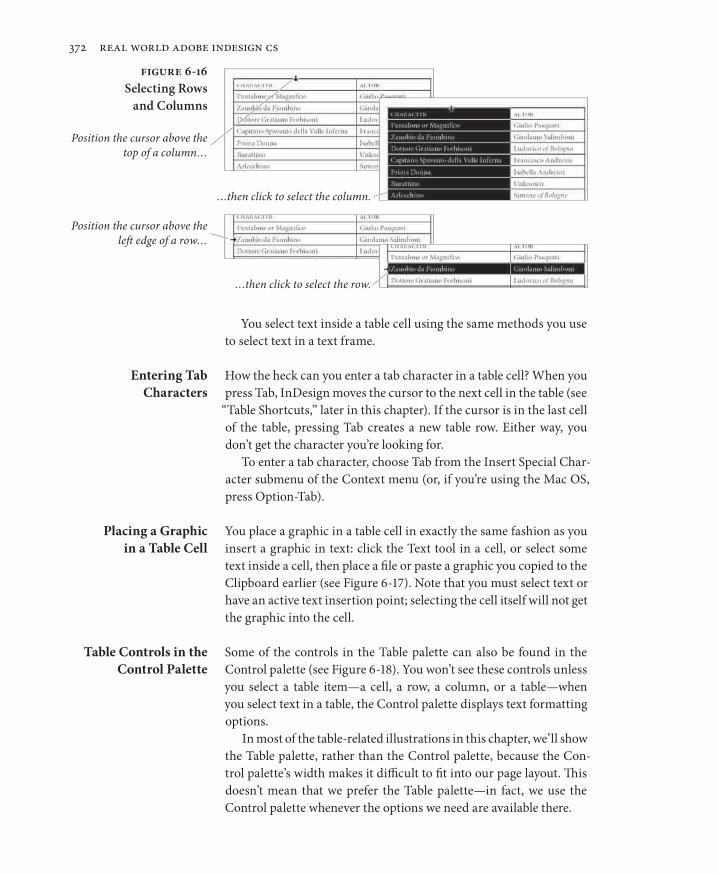
▶ A column is always the width of the widest cell in the column. When you change the width of a cell, you’re really changing the width of the column containing the cell.
370 real world adobe indesign cs
▶ A row is always the height of the tallest cell in the row. Just as changing the width of a cell changes the width of a column, so changing the height of a cell changes the height of a row.
▶ In spite of the above restrictions, you can create tables contain-ing cells that are wider than their parent columns or taller than their parent rows. You do this by merging cells, which we’ll discuss later, in “Merging Cells.”
Selecting and Editing Table Items
To select elements in a table, or to edit a table’s content (text, rows, or columns), click the Text tool in one of the cells of the table. This activates InDesign’s table tools. Once you’ve done this, you can enter and edit text in the cell, paste or place text or graphics in the cell, or even create another table inside the cell.
It’s easy to tell when you’re in this mode, because the cursor changes shape as you position it above cell, row, column, and table boundaries. What do these different cursors mean? What can you do with these tools? To find out, take a look at Table 6-1.
In addition, the Context menu changes to display options related to working with tables (see Figure 6-15).
figure 6-4Converting a Table to Text
Select a table, row, column, or cell, or click the Text tool inside a cell in the table you
want to convert.Choose Convert Table to
Text from the Table menu.
InDesign converts the table to text, separating the rows
and columns with the delim-iter characters you specified.
Specify delimiter characters, if necessary, then click OK.
InDesign displays the Convert Table to Text dialog box.

chapter 6. where text meets graphics 37
figure 6-5Context Menu Options
for Working with Tables
When you select an item in a table (a cell, a row, a column, or the entire table), the Context menu changes again to offer options for working with the selected item.
When you click the Text tool in a table cell, or select text
in a table cell, InDesign adds options to the Context menu.
table 6-Table Editing Cursors
When you see: Your cursor is: And you can:
Above the top-left corner of the table
Click to select the table.
Above the left edge of a row
Click to select the row.
Above the top of a column
Click to select the column.
Above the right or left edge of a cell
Drag to resize the column containing the cell.
Above the top or bottom of a cell
Drag to resize the row containing the cell.
To select a range of cells, drag the text cursor through them. You cannot select noncontiguous cells. Note that dragging the cursor through multiple cells selects all of the text in the cells, regardless of the starting or ending position of the cursor.
To select a row, position the cursor above the left edge of the first cell in the row, then click; for a column, move the cursor above the top of the first cell in the column, then click (see Figure 6-16).
372 real world adobe indesign cs
You select text inside a table cell using the same methods you use to select text in a text frame.
Entering Tab Characters
How the heck can you enter a tab character in a table cell? When you press Tab, InDesign moves the cursor to the next cell in the table (see
“Table Shortcuts,” later in this chapter). If the cursor is in the last cell of the table, pressing Tab creates a new table row. Either way, you don’t get the character you’re looking for.
To enter a tab character, choose Tab from the Insert Special Char-acter submenu of the Context menu (or, if you’re using the Mac OS, press Option-Tab).
Placing a Graphic in a Table Cell
You place a graphic in a table cell in exactly the same fashion as you insert a graphic in text: click the Text tool in a cell, or select some text inside a cell, then place a file or paste a graphic you copied to the Clipboard earlier (see Figure 6-17). Note that you must select text or have an active text insertion point; selecting the cell itself will not get the graphic into the cell.
Table Controls in the Control Palette
Some of the controls in the Table palette can also be found in the Control palette (see Figure 6-18). You won’t see these controls unless you select a table item—a cell, a row, a column, or a table—when you select text in a table, the Control palette displays text formatting options.
In most of the table-related illustrations in this chapter, we’ll show the Table palette, rather than the Control palette, because the Con-trol palette’s width makes it difficult to fit into our page layout. This doesn’t mean that we prefer the Table palette—in fact, we use the Control palette whenever the options we need are available there.
figure 6-6Selecting Rows
and Columns
Position the cursor above the left edge of a row…
Position the cursor above the top of a column…
…then click to select the column.
…then click to select the row.

chapter 6. where text meets graphics 373
figure 6-7Placing a Graphic
in a Cell
Click the Text tool inside a table cell.
Place or paste a graphic into the cell.
Adding Table Headers and Footers
InDesign tables can include header and footer rows, which can repeat as the table breaks across text frames, text columns, or pages. You can add header and footer rows when you create the table, or you can add them to existing tables, or you can convert table body rows to header or footer rows.
▶ If you’re using the Insert Table command to create a table, you can use the Header Rows and Footer Rows fields in the Insert Table dialog box to specify the number of header or footer rows as you create the table.
figure 6-8Table Controls in the
Control Palette Click this button to display the Table, Character, and Paragraph
palettes.
When you select a cell, row, column, or table, InDesign
adds table options to the Control palette.
The Control palette menu changes to provide access to
further table controls.

374 real world adobe indesign cs
▶ If you want to add header and/or footer rows to an existing table, select a cell in the table (or a row, or a column, or the table itself) and choose Headers and Footers from the Table Options sub-menu of the Context menu. InDesign displays the Headers and Footers panel of the Table Options dialog box. Enter the number of header and/or footer rows you want, specify the repeat prop-erties of the header/footer rows, and click OK to apply the rows to the table (see Figure 6-19).
figure 6-9Adding a Header Row
Select a cell, then choose Headers and Footers from
the Table Options submenu of the Context menu.
Enter the number of header rows you want, then define
the rate at which the rows should repeat.
InDesign adds the header rows. Enter the header text.
Format the header rows. In this example, we’ve merged the cells of the
first header row.
Click OK to apply the header rows.

chapter 6. where text meets graphics 375
▶ To convert an existing row to a header row, select the row (it must be the first row in the table) and choose Convert to Header Row from the Context menu (see Figure 6-20). To convert mul-tiple table body rows to header rows, select the rows—again, the first row in the table must be included in the selection (if it’s not, the option won’t appear on the Context menu). Converting a row (or rows) to a footer row (or rows) works the same way—select the last row (or rows) in the table and choose Convert to Footer Row from the Context menu.
figure 6-20Converting a Table Body
Row into a Header Row
Editing Header and Footer Rows
The first header and footer rows can be edited just as you’d edit any other row—the only difference is that the changes that you make are applied to all instances of the header or footer throughout the table. Subsequent header/footer rows, however, will defy your efforts to get the cursor into them (InDesign coyly displays a lock icon when you move the cursor over the row).
Select the first row in the table, then choose Convert
to Header Rows from the Context menu.
InDesign converts the selected row to a header row.
If the table spans multiple text frames or text columns,
the header row will appear at the top of each table sec-tion. (You can turn this off,
if you like, using the Headers and Footers panel of the
Table Options dialog box.)
376 real world adobe indesign cs
InDesign provides a pair of shortcuts, however, that will take you back to the first header or footer row—Edit Header and Edit Footer on the Context menu.
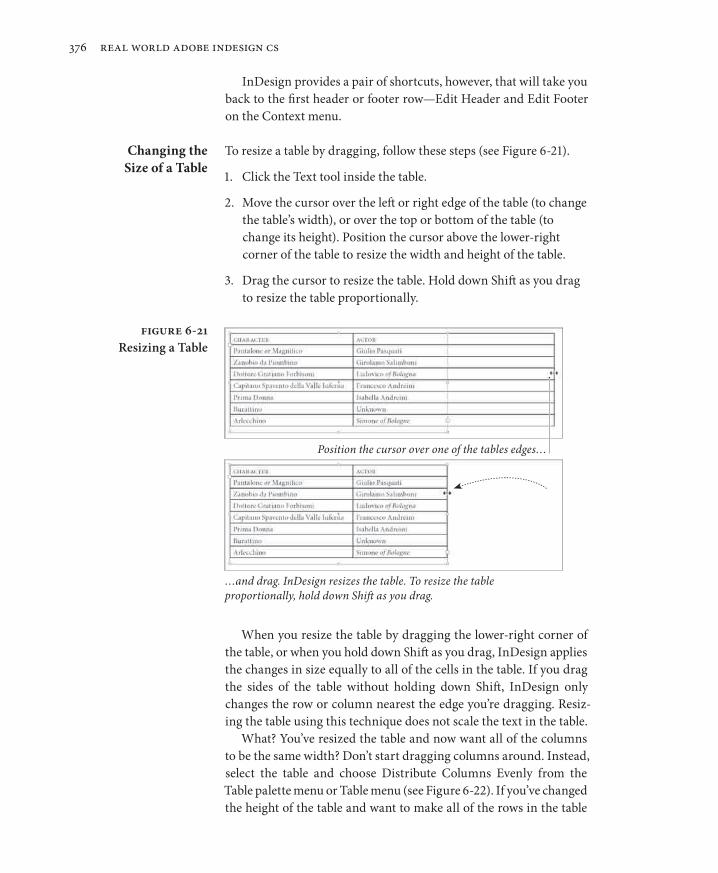
Changing the Size of a Table
To resize a table by dragging, follow these steps (see Figure 6-21).
1. Click the Text tool inside the table.
2. Move the cursor over the left or right edge of the table (to change the table’s width), or over the top or bottom of the table (to change its height). Position the cursor above the lower-right corner of the table to resize the width and height of the table.
3. Drag the cursor to resize the table. Hold down Shift as you drag to resize the table proportionally.
figure 6-2Resizing a Table
Position the cursor over one of the tables edges…
…and drag. InDesign resizes the table. To resize the table proportionally, hold down Shift as you drag.
When you resize the table by dragging the lower-right corner of the table, or when you hold down Shift as you drag, InDesign applies the changes in size equally to all of the cells in the table. If you drag the sides of the table without holding down Shift, InDesign only changes the row or column nearest the edge you’re dragging. Resiz-ing the table using this technique does not scale the text in the table.
What? You’ve resized the table and now want all of the columns to be the same width? Don’t start dragging columns around. Instead, select the table and choose Distribute Columns Evenly from the Table palette menu or Table menu (see Figure 6-22). If you’ve changed the height of the table and want to make all of the rows in the table

chapter 6. where text meets graphics 377
figure 6-22Distributing
Columns Evenly
Select the columns you want to make equal in width. In
this example, we’ve selected the entire table.
InDesign makes the selected columns equal in width.
Choose Distribute Columns Evenly from the Context menu or Table menu.
the same height, select the table and choose Distribute Rows Evenly (again, from the Table menu or from the Table palette menu).
Changing the Size of Rows and Columns
To change the height of a row or the width of a column by dragging, follow these steps (see Figure 6-23).
1. Click the Text tool inside a cell.
2. Move the cursor over the top or bottom of the cell to change the height of the row containing the cell, or over the left or right of the cell to change the column width.
3. Drag the cursor up or down to resize a row, or right or left to resize a column.
To change the height of a row or the width of a column using the Table palette, follow these steps (see Figure 6-24).
1. Click the Text tool inside a cell.
2. Adjust the values in the Row Height and Column Width fields (you can type values in the fields, or use the arrow buttons asso-ciated with the fields to “nudge” the height or width up or down).
To change the height of a row or the width of a column using the Cell Options dialog box follow these steps (see Figure 6-25).
1. Select a cell, a row, a column, or the entire table.

378 real world adobe indesign cs
2. Choose Rows and Columns from the Cell Options submenu of the Context menu (or from the Table menu). InDesign displays the Cell Options dialog box.
3. Enter a new value in the Row Height field to change the height of the row, or in the Column Width field to change the width of a column.
figure 6-24Changing Column
Width Using the Table Palette
Select a column (or any cell in a column)…
…then enter a new value in the Column Width field. Press Return/Enter to apply the new column width.
figure 6-23Changing Row
Height by DraggingPosition the cursor above a cell border.
Drag the cursor up or down to resize the row.
You can also use the corresponding fields in the
Control palette to change column width. To get them
to appear, select a cell or column.

chapter 6. where text meets graphics 379
Adding Rows Or Columns
If you’re entering text in a table, and have reached the cell of the last row, you can add a row by simply pressing Tab—InDesign assumes that this means that you want to add a row to the table. If you need to add rows inside an existing table, it’s a little bit more complicated.
To add a row or a series of rows to a table, follow these steps (see Figure 6-26).
1. Click the Text tool in a cell in a row that is above or below the point at which you want to add the new rows.
2. Choose Row from the Insert submenu of the Context menu. InDesign displays the Insert Row(s) dialog box.
3. Enter the number of Rows you want to add in the Number field, and choose the Above or Below option to tell InDesign where to put the rows (relative to the selected row).
4. Click the OK button. InDesign adds the empty rows.
figure 6-25Changing Column
Width Using the Cell Options Dialog Box
Select a column (or any cell in a column)…
…and choose Rows and Columns from the Cell Options sub-menu of the Context menu.
Enter a new value in the Column Width field and
click OK to apply the new column width.
InDesign changes the width of the selected column.
InDesign displays the Cell Options dialog box.

380 real world adobe indesign cs
figure 6-26Adding Rows
Click the Text tool in a cell, then choose Row from the Insert submenu of the Context menu.
Enter the number of rows you want to add to the table, and specify whether you want them added above or below the selected row. Click
the OK button to add the row or rows.
New rows added below selected row.
To add a column or a series of columns to a table, follow these steps (see Figure 6-27).
1. Click the Text tool in a cell in a column that is adjacent to the point at which you want to add the new columns.
2. Choose Column from the Insert submenu of the Context menu. InDesign displays the Insert Column(s) dialog box.
3. Enter the number of Columns you want to add in the Number field, then choose the Left or Right option to tell InDesign where to put the rows (relative to the selected row).
4. Click the OK button. InDesign adds the empty columns.
You can also add a row or column by dragging. To do so, follow these steps (see Figure 6-28).
1. Click the Text tool in a cell.
2. To add a column, position the cursor over the left or right side of the cell; to add a row, position the cursor above the top or bottom of the cell.

chapter 6. where text meets graphics 38
figure 6-27Adding a Column
Click the Text tool in a cell (or select text in a cell).
Choose Column from the Insert submenu of the Context menu.
Enter the number of columns you want to add, and specify
the location (to the right or left of the selected column) at which you want to add them.
Click the OK button to add the columns.
InDesign adds the columns to the table.
3. Hold down the mouse button, then press Option/Alt and drag. InDesign adds a row or column to the table.
To add a row to a table using the Table palette, follow these steps (see Figure 6-29).
1. Click the Text tool in a cell.
2. Display the Table palette (press Shift-F9) if it isn’t already visible, then change the value displayed in the Rows field or the Columns field.
When you add a row using this technique, the new row appears below the row you selected; when you add a column, the new column appears to the right of the selected column.
figure 6-28Adding a Column
by Dragging
Postion the cursor over a column edge. Hold down the mouse button, then press Option/Alt and drag.
Stop dragging, and InDesign adds a column to the table.
382 real world adobe indesign cs
figure 6-29Adding a Row Using
the Table Palette
Click the Text tool in a cell (or select text in a cell).
Enter a new number of rows in the Rows field of the Table palette.
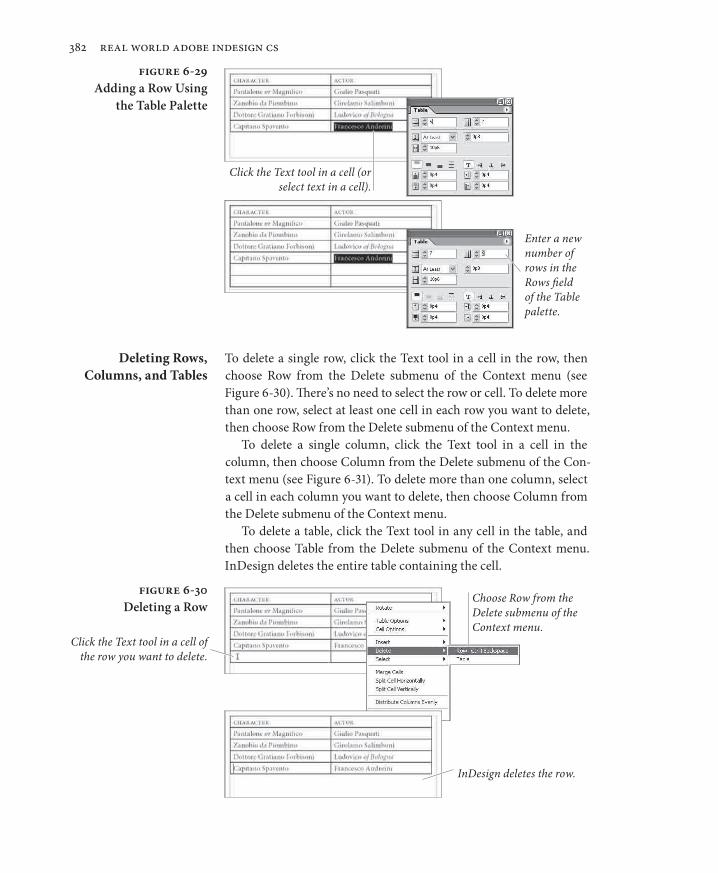
figure 6-30Deleting a Row
Click the Text tool in a cell of the row you want to delete.
Choose Row from the Delete submenu of the Context menu.
InDesign deletes the row.
Deleting Rows, Columns, and Tables
To delete a single row, click the Text tool in a cell in the row, then choose Row from the Delete submenu of the Context menu (see Figure 6-30). There’s no need to select the row or cell. To delete more than one row, select at least one cell in each row you want to delete, then choose Row from the Delete submenu of the Context menu.
To delete a single column, click the Text tool in a cell in the column, then choose Column from the Delete submenu of the Con-text menu (see Figure 6-31). To delete more than one column, select a cell in each column you want to delete, then choose Column from the Delete submenu of the Context menu.
To delete a table, click the Text tool in any cell in the table, and then choose Table from the Delete submenu of the Context menu. InDesign deletes the entire table containing the cell.
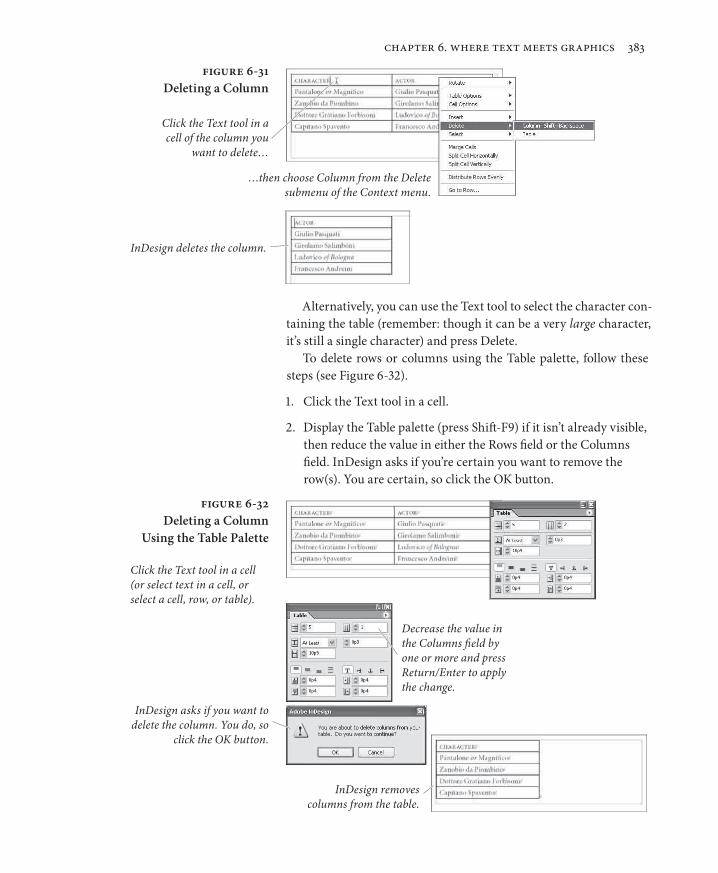
chapter 6. where text meets graphics 383
figure 6-3Deleting a Column
InDesign deletes the column.
Alternatively, you can use the Text tool to select the character con-taining the table (remember: though it can be a very large character, it’s still a single character) and press Delete.
To delete rows or columns using the Table palette, follow these steps (see Figure 6-32).
1. Click the Text tool in a cell.
2. Display the Table palette (press Shift-F9) if it isn’t already visible, then reduce the value in either the Rows field or the Columns field. InDesign asks if you’re certain you want to remove the row(s). You are certain, so click the OK button.
figure 6-32Deleting a Column
Using the Table Palette
Click the Text tool in a cell (or select text in a cell, or select a cell, row, or table).
Decrease the value in the Columns field by one or more and press Return/Enter to apply the change.
InDesign asks if you want to delete the column. You do, so
click the OK button.
InDesign removes columns from the table.
…then choose Column from the Delete submenu of the Context menu.
Click the Text tool in a cell of the column you
want to delete…

384 real world adobe indesign cs
Merging and Unmerging Table Cells
To merge a series of selected table cells into a single cell, select the cells and choose Merge Cells from the Context menu or Table menu (see Figure 6-33). The text and graphics in the selected cells are placed in the new merged cell.
To unmerge a cell that has been created by merging cells, select the cell and choose Unmerge Cells from the Context menu or Table menu. Note that unmerging a merged cell is very different from split-ting the cell, which only divides the cell in half along its horizontal or vertical axis. Unmerging a cell actually returns the cells in the merged cell to their original geometry, though it does not restore their original content.
figure 6-33Merging Cells
figure 6-34Splitting a Cell
Select a range of cells.
Choose Merge Cells from the Context menu
(or Table menu).
InDesign merges the cells. Any content in the merged cells is retained in the new cell.
Select a cell (this can be any cell; it need not be a
cell created by merging other cells).
Choose one of the Split Cell options from the Context
menu (or Table menu).
InDesign splits the cell into two cells.
Splitting Table Cells To split a cell, select the cell and choose Split Cell Horizontally or Split Cell Vertically from the Context menu (see Figure 6-34).
If you have selected an entire column of cells, you won’t see the Split Cell Horizontally option; if you’ve selected a row of cells, InDesign turns off the Split Cell Vertically option.
Rotating Table Cells Cells in an InDesign table can be rotated in 90-degree increments (see Figure 6-35). To rotate a cell, select the cell and then choose one of the options (0, 90, 180, 270) on the Rotate submenu of the Context menu (or click the corresponding button in the Table palette).
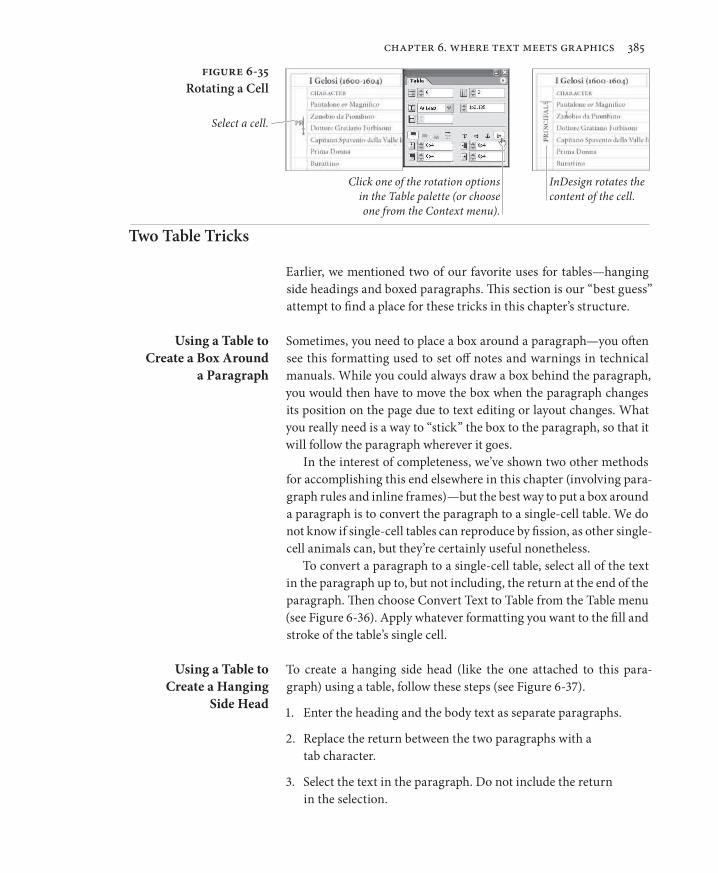
chapter 6. where text meets graphics 385
figure 6-35Rotating a Cell
Select a cell.
Click one of the rotation options in the Table palette (or choose one from the Context menu).
InDesign rotates the content of the cell.
Two Table Tricks
Earlier, we mentioned two of our favorite uses for tables—hanging side headings and boxed paragraphs. This section is our “best guess” attempt to find a place for these tricks in this chapter’s structure.
Using a Table to Create a Box Around
a Paragraph
Sometimes, you need to place a box around a paragraph—you often see this formatting used to set off notes and warnings in technical manuals. While you could always draw a box behind the paragraph, you would then have to move the box when the paragraph changes its position on the page due to text editing or layout changes. What you really need is a way to “stick” the box to the paragraph, so that it will follow the paragraph wherever it goes.
In the interest of completeness, we’ve shown two other methods for accomplishing this end elsewhere in this chapter (involving para-graph rules and inline frames)—but the best way to put a box around a paragraph is to convert the paragraph to a single-cell table. We do not know if single-cell tables can reproduce by fission, as other single-cell animals can, but they’re certainly useful nonetheless.
To convert a paragraph to a single-cell table, select all of the text in the paragraph up to, but not including, the return at the end of the paragraph. Then choose Convert Text to Table from the Table menu (see Figure 6-36). Apply whatever formatting you want to the fill and stroke of the table’s single cell.
Using a Table to Create a Hanging
Side Head
To create a hanging side head (like the one attached to this para-graph) using a table, follow these steps (see Figure 6-37).
1. Enter the heading and the body text as separate paragraphs.
2. Replace the return between the two paragraphs with a tab character.
3. Select the text in the paragraph. Do not include the return in the selection.

386 real world adobe indesign cs
figure 6-36Placing a Box
Around a Paragraph (Table Method)
Select the text of the paragraph, leaving
the return character unselected.
Choose Convert Text to Table from the Table menu.
InDesign creates a table containing a single cell.
Apply formatting to the table.
4. Choose Convert Text to Table from the Table menu.
5. Format the table.
Table Shortcuts
As you might expect, InDesign has a number of keyboard short-cuts related to working with tables (see Table 6-2). Note that there are some very cool shortcuts that, by default, have no key assigned to them. Go to Row, in particular, is worth sacrificing an existing default shortcut for.
Formatting Tables
Earlier, we mentioned that table cells are similar to InDesign text frames—and we now want to point out that that similarity extends to the realm of formatting, as well. Table cells can be filled using any fill you could apply to a frame, and can use all of the strokes in InDesign’s Stroke palette (including custom stroke styles).
InDesign displays the Convert Text to Table dialog box. Click the OK button.

chapter 6. where text meets graphics 387
figure 6-37Creating a
Hanging Side Head (Table Method)
In this example, the heading that will become the hanging side head is aligned right.
Select the return at the end of the heading and
replace it with a tab. This makes the two
paragraphs run together.
Choose Convert Text to Table from the
Table menu.
InDesign converts the selected text to a
two-column table.
Select the the text of the paragraph, leaving the return unselected.
InDesign applies the (boring) default table formatting, so
you’ll probably need to format the table to fit your layout.
To format table cells, however, you don’t (usually) use the same controls you use to format text frames, rectangles, ellipses, or other page items. Instead, you use a special set of table formatting controls, most of which you’ll find in the Table Options (see Figure 6-38) and Cell Options dialog boxes (see Figure 6-39).
InDesign displays the Convert Text to Table dialog box. Click the OK button.

388 real world adobe indesign cs
table 6-2Table Shortcuts
Function Shortcut
Diagonal Lines Options not defined
Rows and Columns Options not defined
Strokes and Fills Options not defined
Text Options Command-Option-B/Ctrl-Alt-B*
Convert Table to Text not defined
Convert Text to Table not defined
Delete Column Shift-Backspace*
Delete Row Command-Backspace/ Ctrl-Backspace*
Delete Table not defined
Distribute Columns Evenly not defined
Distribute Rows Evenly not defined
Go to Row not defined
Insert Table Command-Shift-Option-T/ Ctrl-Alt-Shift-T
Insert Column Command-Option-9/Ctrl-Alt-9*
Insert Row Command-9/Ctrl-9*
Merge Cells not defined
Next Cell Tab
Previous Cell Shift-Tab
Select Cell Command-/(slash)/ Ctrl-/ (slash) or Esc*
Select Column Command-Option-3/Ctrl-Alt-3*
Select Row Command-3/Ctrl-3*
Select Table Command-Option-A/Ctrl-Alt-A
Split Cell Horizontally not defined
Split Cell Vertically not defined
Alternating Column Strokes not defined
Alternating Fills not defined
Alternating Row Strokes not defined
Table Setup Command-Option-T/Ctrl-Alt-T*
* This command is only active when you have an active text insertion point in a text frame or table cell.

chapter 6. where text meets graphics 389
figure 6-38Table Options
The Row Strokes, Column Strokes, and Fills panels all feature an Alternat-
ing Pattern pop-up menu, which gives you a way
to make the correspond-ing formatting vary in a predetermined fashion.
When you choose one of the Alternating Pat-tern options, you can use the First and Next fields to define the pattern of alternation.
The Skip First and Skip Last fields give you a way to exclude certain table features (header
and footer cells, for example) from the alternating pattern of formatting.
To open the Table Options dialog box, select a cell and choose one of the items on the Table Options submenu of the Context menu (or Table menu).

390 real world adobe indesign cs
figure 6-39Cell Options
To open the Cell Options dialog box, select a cell and choose one of the items on the Cell Options submenu of the Context menu (or Table menu).
The options in the Text panel control the way that InDesign composes text in the cell—they’re very similar to the options in the Text Frame Options dialog box.
Use the Strokes and Fills panel to set the formatting
of the selected cells.
If you have more than one cell selected, the stroke proxy changes to include row and column strokes.
The stroke proxy gives you a way to specify which cell borders are affected by the formatting.
The controls in the Rows and Columns panel set the number of rows and columns in the table and
their height/width. As most of these controls are duplicated in the Table palette, the main reason
you’ll need to come here is the Keep Options section, especially Keep with Next Row, which you can use to
force a row to the next page or text frame.
Diagonal lines are often used to fill in empty cells in some table designs—the Diagonal Lines panel, as you’d expect, provides for-matting options for this feature.

chapter 6. where text meets graphics 39
Table Cell Strokes and Fills
Before we start talking about table formatting, it’s important that you understand that applying a stroke to a column is exactly the same as applying a stroke to the left and right edges of all of the cells in that column. There are not separate stroke properties for rows and col-umns. If you change the stroke property of a column, the strokes on the corresponding cell borders in the column also change. The same is true for table border strokes—these properties apply to the outside edges of the cells at the top, right, bottom, and left edges of the table.
Applying Strokes to Cells. InDesign offers a number of different ways to set the fill or stroke of a cell. You can set the stroke weight using the Stroke palette, or the Strokes and Fills panel of the Cell Options dialog box, or from the table controls in the Control pal-ette. You can set the fill of a cell using the Swatches palette, the Color palette, or the Strokes and Fills panel of the Cell Options dialog box. This is not a complete listing of the different methods you can use to format cells, but we think you get the idea.
When you want to apply a stroke to all of the borders of a cell or cells, follow these steps (see Figure 6-40).
1. Select a range of cells.
figure 6-40Applying a Stroke
to All Cell Borders
Click the Text tool in the table, then choose Table
from the Select submenu of the Options menu.
Enter a stroke weight in the Weight field of the Control palette, or choose a stroke weight from
the associated pop-up menu.
You can apply any stroke style to the stroke of a table cell, including dotted, dashed, and striped strokes you’ve defined.
InDesign applies the stroke to the cell
borders of the table.
There are many ways to apply cell formatting; we
usually use the options in the Control palette.
392 real world adobe indesign cs
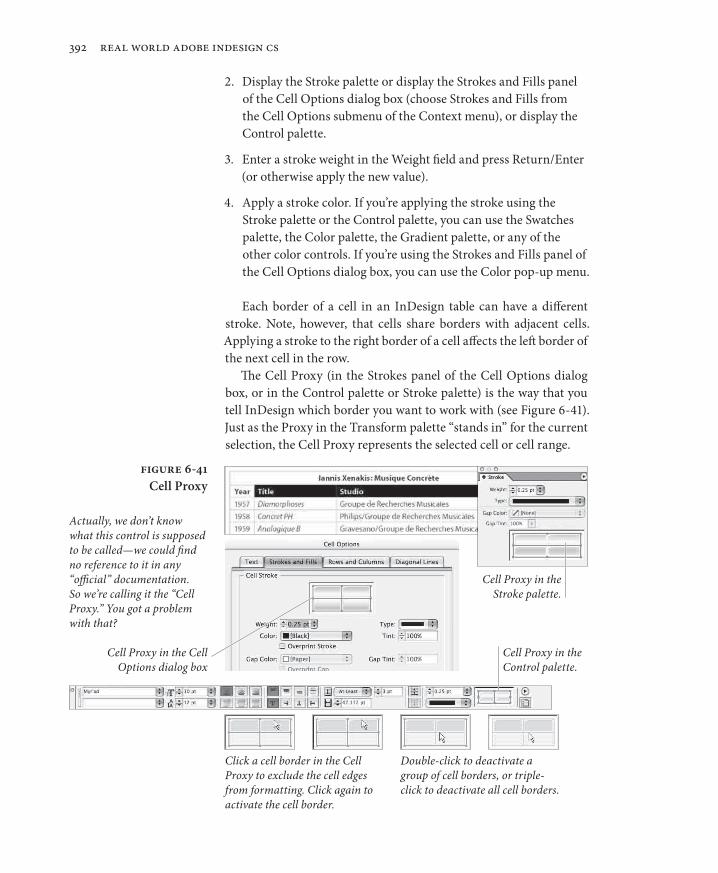
2. Display the Stroke palette or display the Strokes and Fills panel of the Cell Options dialog box (choose Strokes and Fills from the Cell Options submenu of the Context menu), or display the Control palette.
3. Enter a stroke weight in the Weight field and press Return/Enter (or otherwise apply the new value).
4. Apply a stroke color. If you’re applying the stroke using the Stroke palette or the Control palette, you can use the Swatches palette, the Color palette, the Gradient palette, or any of the other color controls. If you’re using the Strokes and Fills panel of the Cell Options dialog box, you can use the Color pop-up menu.
Each border of a cell in an InDesign table can have a different stroke. Note, however, that cells share borders with adjacent cells. Applying a stroke to the right border of a cell affects the left border of the next cell in the row.
The Cell Proxy (in the Strokes panel of the Cell Options dialog box, or in the Control palette or Stroke palette) is the way that you tell InDesign which border you want to work with (see Figure 6-41). Just as the Proxy in the Transform palette “stands in” for the current selection, the Cell Proxy represents the selected cell or cell range.
figure 6-4Cell Proxy
Cell Proxy in the Stroke palette.
Cell Proxy in the Cell Options dialog box
Click a cell border in the Cell Proxy to exclude the cell edges from formatting. Click again to activate the cell border.
Double-click to deactivate a group of cell borders, or triple-click to deactivate all cell borders.
Actually, we don’t know what this control is supposed to be called—we could find no reference to it in any “official” documentation. So we’re calling it the “Cell Proxy.” You got a problem with that?
Cell Proxy in the Control palette.

chapter 6. where text meets graphics 393
figure 6-42Applying a Stroke to
Selected Cell Borders
In this example, we want to remove the strokes around the outside edges (top, left, and right) of the first row in the table, but we don’t want to remove the stroke at the bottom of the row. To do this, we use the Cell Proxy in the Stroke palette.
Select the cell you want to format.
InDesign displays the Cell Proxy in the Stroke palette.
Click the cell border you want to protect from
formatting.
Apply the stroke.
The top, left, and right borders of the first row have
been set to zero point strokes, but the bottom border of
the row retains its original stroke weight.
When the borders in the Cell Proxy are highlighted (in light blue), changes you make to the stroke color or stroke weight will affect the corresponding cell borders. To prevent formatting from affecting a cell border, click the corresponding active border in the Cell Proxy. To make an inactive border active again, click it again.
If you want to apply a stroke to some, but not all, of the borders of a cell, follow these steps (see Figure 6-42).
1. Select the cell or range of cells you want to format.
2. Display the Stroke palette or display the Strokes and Fills panel of the Cell Options dialog box (choose Strokes and Fills from the Cell Options submenu of the Context menu).
3. Use the Cell Proxy to select the cell borders you want to format.
4. Apply stroke formatting using the Strokes and Fills panel of the Cell Options dialog box, or the Stroke and Swatches palettes.

394 real world adobe indesign cs
Applying Fills to Cells. To apply a fill to a cell, follow these steps (see Figure 6-43).
1. Select a cell or a range of cells.
2. Display the Strokes and Fills panel of the Cell Options dialog box (to display this panel, choose Strokes and Fills from the Cell Options submenu of the Context menu).
3. Choose a color swatch from the Color pop-up menu, and enter a tint value in the Tint field, if necessary. Note that you can also set the fill to overprint using the Overprint option.
4. Click the OK button to close the dialog box and apply the fill to the selected cells.
figure 6-43Applying a Fill to a Cell
(Dialog Box Method)
Select a cell or series of cells.
Choose Strokes and Fills from the Cell Options submenu of
the Context menu.
Specify fill options in the Strokes and Fills panel of the Cell Options dialog box. Click the OK button to apply your changes.
InDesign applies the fill to the selected cells.

chapter 6. where text meets graphics 395
figure 6-44Applying a Fill to a Cell
(Palette Method)
Click the Fill selec-tor at the top of the
Swatches palette (if it’s not already active).
Select a cell or a range of cells.
Click a swatch.
InDesign applies the fill to the selected cells.
Alternatively, you can apply a fill to a cell using the Swatches palette or Color palette (see Figure 6-44).
1. Select a cell or range of cells.
2. Click the Fill selector at the top of the Swatches palette or Color palette to make it active (if it’s not already active).
3. Click the swatch (if you’re using the Swatches palette) or define a color (if you’re using the Color palette) to apply it to the back-ground of the cell.
Applying Gradients to Table Cells. You can apply a gradient to the fill and stroke of a cell, but the results might not be what you’d expect (see Figure 6-45).
1. Select the cells.
2. Display the Gradient palette, if it’s not already visible.
3. Click in the Gradient Ramp to apply a gradient to the selected cells. Adjust the gradient settings to define the type, color, and angle of the gradient (as discussed in Chapter 5, “Drawing”).

396 real world adobe indesign cs
figure 6-45Applying a
Gradient to a Cell Select a cell.
Display the Gradient palette and click the Gradient Ramp
to apply a gradient fill.
Note that InDesign positions the start and end of the gradient (in this example, the center point of a radial gradient) based on the width and height of the entire table—not the width of the cell itself.
Center point of a radial gradient applied to the cell.
Note that the gradient is based on the width and height of the table, rather than on the selected cell or cells. This may or may not give you the effect you’re looking for. To gain more control over the start/end points of the gradient, create and fill a rectangle, then paste the rectangle into the cell.
Applying Diagonal Lines. To apply diagonal lines to a cell, use the options in the Diagonal Lines panel of the Cell Options dialog box (see Figure 6-46).
1. Select a cell, row, column, or table (table border strokes apply to the entire table, so you need only select part of the table).
2. Display the Diagonal Lines panel of the Cell Options dialog box (choose Diagonal Lines from the Cell Options submenu of the Context menu).
3. Turn on one of the diagonal lines options. Choose a stroke weight, stroke type, color, and tint. If you want the diagonal lines to overprint, turn on the Overprint option. If you want the diagonal lines to appear in front of the table, turn on the Draw in Front option.
4. Click the OK button to apply the diagonal lines.

chapter 6. where text meets graphics 397
figure 6-46Applying Diagonal
Lines to a Cell
Select a cell. Choose Diagonal Lines from the Cell Options submenu of
the Context menu.
Turn on one of the diagonal lines options and specify the format-ting of the lines.
InDesign applies the diagonal lines to the cell.
In this example table, a diagonal line in a cell indicates that the seats in that section are no longer available. TimeTravelTickets has run out of seats for the November 11, 1882, premiere of “Iolanthe,” so we have to apply diagonal lines to the corresponding cell.
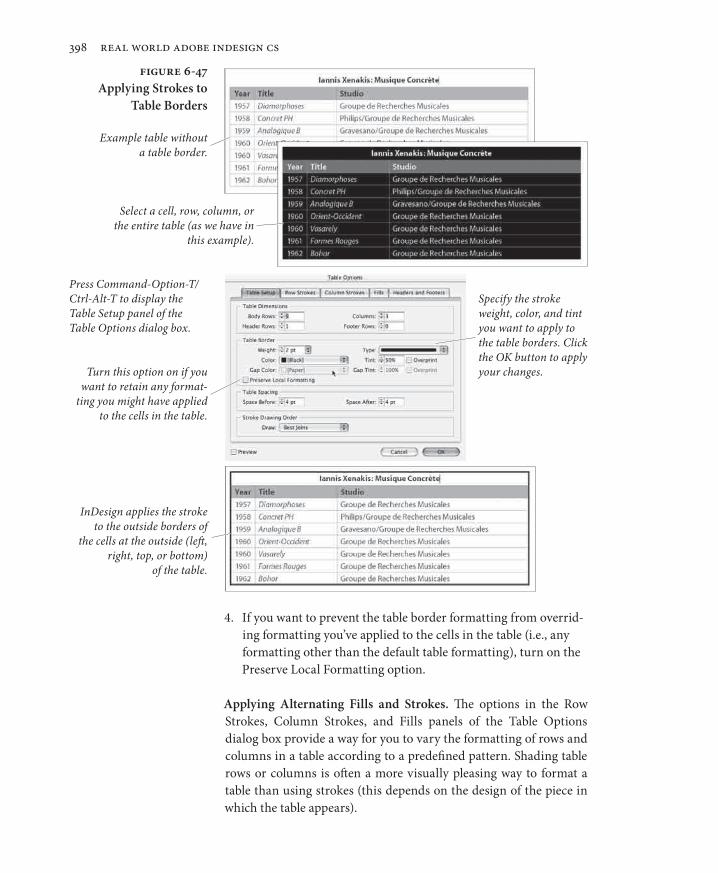
Formatting Table Borders. To apply a stroke to the edges of a table, use the options in the Table Border section of the Table Setup panel of the Table Options dialog box (see Figure 6-47).
1. Select a cell, row, column, or table (table border strokes apply to the entire table, so you need only select part of the table).
2. Display the Table Setup panel of the Table Options dialog box (press Command-Option-T/Ctrl-Alt-T).
3. Choose a stroke weight, stroke type, color, and tint. If you want the stroke to overprint, turn on the Overprint option.
398 real world adobe indesign cs
figure 6-47Applying Strokes to
Table Borders
Select a cell, row, column, or the entire table (as we have in
this example).
Press Command-Option-T/ Ctrl-Alt-T to display the Table Setup panel of the Table Options dialog box.
Specify the stroke weight, color, and tint you want to apply to the table borders. Click the OK button to apply your changes.Turn this option on if you
want to retain any format-ting you might have applied
to the cells in the table.
InDesign applies the stroke to the outside borders of
the cells at the outside (left, right, top, or bottom)
of the table.
Example table without a table border.
4. If you want to prevent the table border formatting from overrid-ing formatting you’ve applied to the cells in the table (i.e., any formatting other than the default table formatting), turn on the Preserve Local Formatting option.
Applying Alternating Fills and Strokes. The options in the Row Strokes, Column Strokes, and Fills panels of the Table Options dialog box provide a way for you to vary the formatting of rows and columns in a table according to a predefined pattern. Shading table rows or columns is often a more visually pleasing way to format a table than using strokes (this depends on the design of the piece in which the table appears).

chapter 6. where text meets graphics 399
All of these panels work the same way—you select a pattern from the Alternating Pattern menu, and then you specify the formatting applied by that pattern. If the pattern you’ve chosen is None, InDesign does not alternate the corresponding fill or stroke properties in the table. Otherwise, InDesign applies one of two formats to the rows and columns in the table. Formatting you apply using alternating fills or strokes overrides any cell formatting you’ve already applied to the cells in the table (this has no effect on text formatting).
To apply an alternating fill or stroke pattern to a table, follow these steps (see Figure 6-48).
1. Select a cell, row, column, or table (this formatting applies to the entire table, regardless of the selection, so do whatever is easiest for you).
figure 6-48Applying
Alternating Fills
Select a cell.
Choose Alternating Fills from the Table Options submenu of the Context menu.
Select a pattern from the Alternating Pattern pop-up menu, then specify the formatting you want to apply.
Note that we’ve directed our alternating pattern to skip
the first two rows in the table (to avoid the table header
row and title).
InDesign applies the alternating fill pattern to
the rows in the table.

400 real world adobe indesign cs
2. Display the panel of the Table Options dialog box that cor-responds to the attribute you want to work with (i.e., Row Strokes, Column Strokes, or Fills). You might want to turn on the Preview option—it can help you understand the effect of the formatting options.
3. Choose an option from the Alternating Pattern pop-up menu.
4. Choose a color for the alternating pattern (until you do this, you probably won’t see any changes to the table, even if you have turned on the Preview option).
5. If you want the alternating pattern to ignore rows at the begin-ning or end of the table (for alternating row strokes) or at the left or right edges of the column (if you’re working with alternating column strokes), enter the number of cells in the Skip First and Skip Last fields.
It should be clear that quite complex alternating formatting can be applied using these options. We don’t mean to avoid the topic, but the only real way to learn how the different alternating formatting features work is to experiment with the settings. So create an exam-ple table, open the Table Options dialog box, turn on the Preview option, and play!
Text Wrap
Any independent object in an InDesign publication can have a text wrap—a boundary that repels text—applied to it. Wrapping text around an object is something like the opposite of flowing text inside a text frame. When you flow text inside a frame, you want text to stay inside a path; when you apply a text wrap, you want to keep it out. To set the text wrap for an object, follow these steps (see Figure 6-49).
1. Select an object—any frame or group—on an InDesign page.
2. Display the Text Wrap palette, if it’s not already visible (press Command-Option-W/Ctrl-Alt-W).
3. Click one of the Text Wrap buttons in the Text Wrap palette. InDesign displays the text wrap boundary around the selected object, and pushes any text falling inside the text wrap boundary to the outside of the boundary. If you applied the text wrap to a text frame, the text in that frame is unaffected by the text wrap boundary.