rds - rolling steel doors · welcome to version 4 of the rds - rolling door spring calculator. ......
TRANSCRIPT

RDSFor
Windows
TORSION SPRING
CALCULATORFor ROLLING DOORS
Version 4
REFERENCE MANUAL

TABLE OF CONTENTS
TABLE OF CONTENTS i
INTRODUCTION iii
CREATING THE WORKING COPY iv
INSTALLATION v
GETTING STARTED vi
CHAPTER 1 - TORSION SPRING CALCULATION 1-1
CHAPTER 2 -CONVERT AN EXISTING SPRING 2-1
CHAPTER 3 - MODIFY SYSTEM CONFIGURATION 3-1
CHAPTER 4 - DOOR SPECIFICATIONS 4-1
CHAPTER 5 - COMPANY PROFILE 5-1
CHAPTER 6 - SPRING INFORMATION 6-1
APPENDIX A -GLOSSARY OF TERMS A-1

INTRODUCTION
Welcome to version 4 of the RDS - Rolling Door Spring Calculator. Rolling door torsion springs are very hard to calculate. The user must understand that a perfect counterbalance will never be achieved in rolling doors. It is possible to obtain a balance at the floor and in the open position, but a negative balance effect will occur during mid-range operation.
We strongly suggest that you read this manual at least once and keep it in a safe place for easy reference whenever the need arises. This manual is written with the inexperienced operator in mind.

Microsoft and Microsoft Windows are registered trademarks of Microsoft Corporation. All other product names are copyright and registered trademarks or trade names of their respective owners.
This document describes proprietary software developed byRolling Steel Industries, Inc.. Any attempt to copy or use this document
without the express permission of Rolling Steel Industries, Inc. is forbidden.
The software described herein is constantly being enhancedand altered by Rolling Steel Industries, Inc.. This document may
contain errors or omissions and may not describe the mostcurrent version of the software. Rolling Steel Industries, Inc. is not
responsible for any loss, financial or otherwise, broughtabout by the use of this document.

INSTALLATION
In order to run RDS, you must first install it from the distribution diskette or CD. To run the installation program, follow the steps below.
• Click the “Start” button from the task bar.• Choose “Run” from the Start menu.• If you are installing RDS from a diskette; type “a:\setup” without the quotes
and press the Enter key or click the OK button.• If you are installing RDS from a CD; type “d:\setup” (where d: is the letter of
your CD-Rom drive) without the quotes and press the Enter key or click the OK button.
The installation screen will be displayed.
Select the language you wish to work with and then click the Next button.
The next screen will prompt you to select the drive and the sub-directory where you wish to install the RDS program.
The final screen will allow you to change, if you wish, the program folder which will be created.
Once you answer the questions, the installation program will then take over and install the program.

GETTING STARTED
To start the program, select the “Rolling Door Spring Calculator” icon from the “Programs” menu or from the desktop by double clicking the icon. After a few seconds, the RDS title screen will appear. After reading the copyright notice, press the Enter key or click the OK button to continue.
CHAPTER 1TORSION SPRING CALCULATION
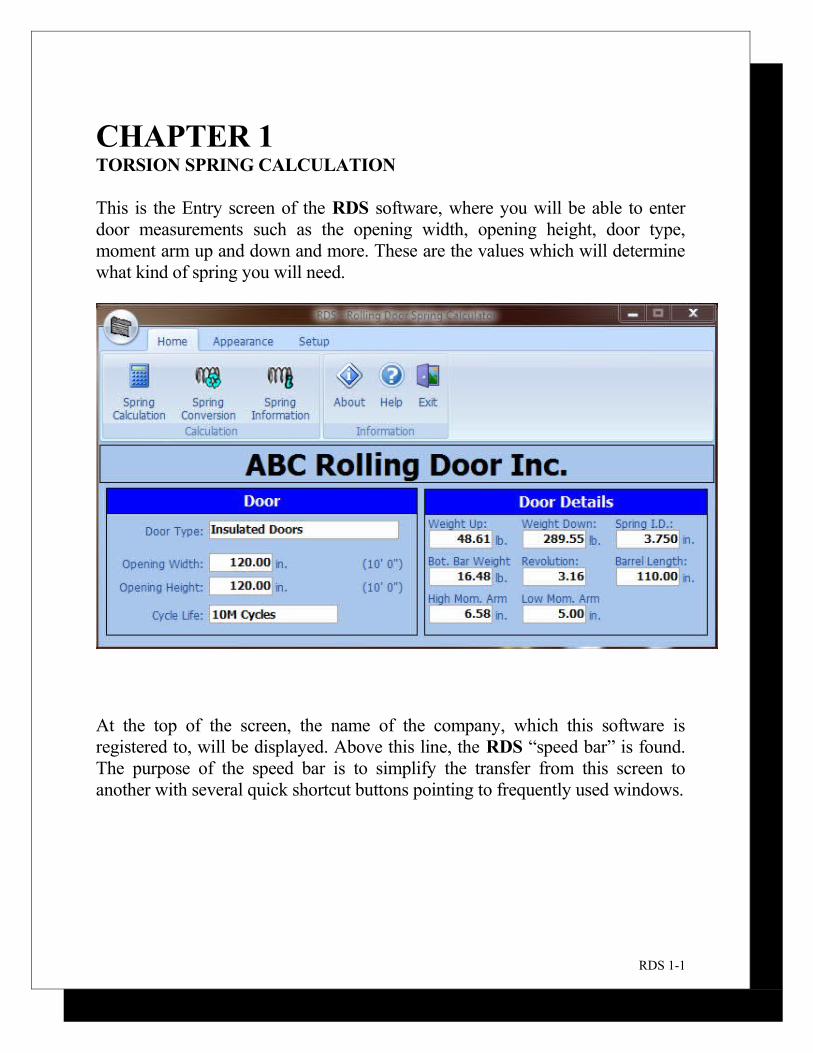
This is the Entry screen of the RDS software, where you will be able to enter door measurements such as the opening width, opening height, door type, moment arm up and down and more. These are the values which will determine what kind of spring you will need.
At the top of the screen, the name of the company, which this software is registered to, will be displayed. Above this line, the RDS “speed bar” is found. The purpose of the speed bar is to simplify the transfer from this screen to another with several quick shortcut buttons pointing to frequently used windows.
RDS 1-1

Home Tab:
Spring Calculation - Clicking this button calculates springs according to the measurements entered on the Entry and Configuration screens and displays the calculation dialog screen.
Spring Conversion - Click this button to convert existing springs to new springs. For more information refer to Chapter 2.
Spring Information – Click this button to view detailed information of a spring. For more information refer to Chapter 6.
About RDS - Display the “About” dialog screen, where you will find various information about this program.
Help - Displays the help screen.
Exit - Closes the Entry screen and exits RDS.
RDS 1-2

Setup Tab:
Company Profile – Click this button to enter your company information such as address and telephone number. For more information refer to Chapter 5.
System Configuration – Click this button to display the system configuration screen, where you may customize the RDS program to your liking. For more information refer to Chapter 3.
Door Specification – Click this button to maintain standard door types. For more information refer to Chapter 4.
Default Wire Types
Default Wire Sizes
The door specification fields are placed below the speed buttons. Use the TAB key to move between input fields or click in with the mouse. The opening width, height and the door type must be filled in; otherwise the calculations will not be processed.
RDS 1-3

If you wish to exit the RDS program, click on the Exit speed button shown in the picture above or press the ALT and F4 keys simultaneously.
RDS 1-4

Here are the fields found on the Entry screen:
Door Type: Select the door type from the drop down list. The selection will affect the door weight, low moment arm, high moment arm, weight up and down, the total revolution of the barrel and consequently the calculations displayed in the results screen. You may add a new type of door or modify the default values of an existing door at the door specification screen. If the "Non-Standard" door type is selected, the user must enter all the necessary fields manually.Door Width: If the imperial unit is selected, enter the door width in inches. If the metric system is selected, enter the door width in millimeters. You can also enter decimal places for 1/2" (0.5), 5/8" (0.625), etc.Door Height: Enter the door height in inches or in millimeters depending on the unit system selected. You can also enter decimal places for 1/2" (0.5), 5/8" (0.625), etc.Life Expectancy: Select the life expectancy you wish to design the torsion springs for. The RDS program will default to 10M (10000 cycles) which is a minimum. You may choose from any of the other options presented in the drop down list.
The type of the door you have selected will decide the necessary information to calculate the springs, such as low moment arm and high moment arm, door weight at open (Weight Up) and closed (Weight Down) position. The values can be entered at the “Door Specification Screen”. If a non-standard door type is selected, the user must enter all the fields required manually in order to calculate the springs. If any other door type other than "non-standard door" is selected, the calculated fields according to the door type and the sizes entered will be displayed at the right side of the screen and no modification will be allowed.
Weight Up: This is the weight of the door when it is opened. The amount calculated depends on the selected door type and consequently the details entered in the door specifications screen. The formula below will be used to calculate the weight up for non standard door types. Weight Up = Curtain Weight * Curtain Width * Open Curtain Length + 2 *
End Lock Weight * Open Curtain Length + Bottom Bar Weight.
RDS 1-5

The necessary values for the above formula can be entered in the door specification screen.
Weight Down: This is the weight of the door when it is closed. The amount calculated depends on the selected door type and consequently the details entered in the door specifications screen. The formula below will be used to calculate the weight up for non standard door types.
Weight Down = Curtain Weight * Curtain Width * (Open Curtain Length + Opening Height) + 2 * End Lock Weight * (Open Curtain Length + Opening Height) + Bottom Bar Weight
Bottom Bar Weight: Total bottom bar weight. The amount calculated depends on the selected door type and consequently the details entered in the door specifications screen.
Low Moment Arm: Curtain radius when the door is closed.
High Moment Arm: Curtain radius when the door is opened.Revolutions of Barrel: Revolutions of the barrel to open the door completely.Spring I.D.: Select the spring I.D. for the barrel used.
After entering this information, you may proceed with the calculation by clicking the Calculator Speed Button. You can also access to this command by simply pressing the F2 key. The window shown on the next page should appear after using any of these methods.
Now you have the RDS processing torsion spring selections according to the door specifications you have entered. You may calculate any other springs in the “Your Selection” section by filling the input fields with other spring(s), booster(s), or mixed spring(s) specifications.
Notice that the information at the top of the screen is reminding you of what you had entered for the door specifications. It is good practice to check this information often when you calculate a new torsion spring. If you see an error, you can select the Exit button, which will bring you back to the door specification screen and you may change or correct any entry you wish.
RDS 1-6

Also, notice the information supplied with each spring. First, the total weight of the spring(s) are displayed, which can be very useful to an installer. Next, you have the number of turns the spring(s) are good for. This number MUST always be higher than the TOTAL TURNS (if you wish to maintain the lifetime expectancy of your design) which is displayed in the second line of this screen. And lastly, you have the "FIT REMARKS" telling you if the spring(s) will indeed fit or not along with the actual life expectancy of the spring. In the “Your Selection” section, the information supplied with each spring is normally written in blue when the specifications you have entered are compatible. When they are not compatible, this information will be displayed in red. You may want to reconsider and modify the quantity or the dimensions you have entered to fix any incompatibility.
RDS 1-7

There are four buttons on this screen.
REPORT - If you wish to have a hard copy of the results, select the “Report” button. The RDS will display the report dialog box, where you may enter your client name, address and the order number. Once it is completed you have three choices: you may view the results and then print them, print directly to a printer or discard the report entirely.
SET-UP - If you wish to change the set-up of your system, click this button. For more details, refer chapter 4 of this manual. Any changes such as wire type or language will have immediate effect on this screen.
HELP - This button will display the help screen.
EXIT - This button will allow you to return to Entry Screen.
Abbreviations used on this screen are as follows:I.D. Inside Diameter.W.D.R. Wire Diameter RoundW.D.S. Wire Diameter Square
RDS 1-8

CHAPTER 2CONVERT AN EXISTING SPRING
This is the part of the RDS program which deals in converting an existing torsion spring into a new and unique one.
Click on the “Spring Conversion” speed button. The window shown below should appear on your screen.
The RDS program allows for complete flexibility to all the conditions that you may encounter. You may try to design the new spring by either changing the inside diameter or the wire diameter, or both of them. You may also convert square wire springs to round wire ones. This is very advantageous when you wish to replace existing door spring(s) with a new one, which is readily available in your inventory.
All you have to do is enter the quantity, wire type and the dimensions of the existing spring(s) followed by the quantity, wire type and the dimensions (except the length) of the springs you wish to replace with.
Notice the information supplied on your screen. You have the weight of both spring assemblies which may be used to invoice your client. You also have the number of turns that both spring assemblies are designed for. If the new spring
RDS 2-1

you entered is not as strong as the existing spring, the status bar of the new springs will be displayed in red. However you will not be able to tell the amount of reserve or life expectancy of each spring assembly, since door specifications are not included in this application. The “Spring Conversion” module is strictly designed to allow for redesigning and changing existing springs to new springs. It must be noted that it is solely the user's responsibility to assure that the new spring will meet all requirements. Such requirements are number of turns the new spring is good for and the fit.
The three buttons shown on the screen are as follows:
REPORT - If you wish to have a hard copy of the results, click the “Report” button. The RDS will display the report dialog box, where you may enter your client name, address and the order number. Once it is completed you have three choices: you may view the results and then print them, print directly to a printer or discard the report entirely.
HELP - This button will display the help screen.
EXIT - This button will allow you to return to the Entry screen.
RDS 2-2
CHAPTER 3MODIFY SYSTEM CONFIGURATION
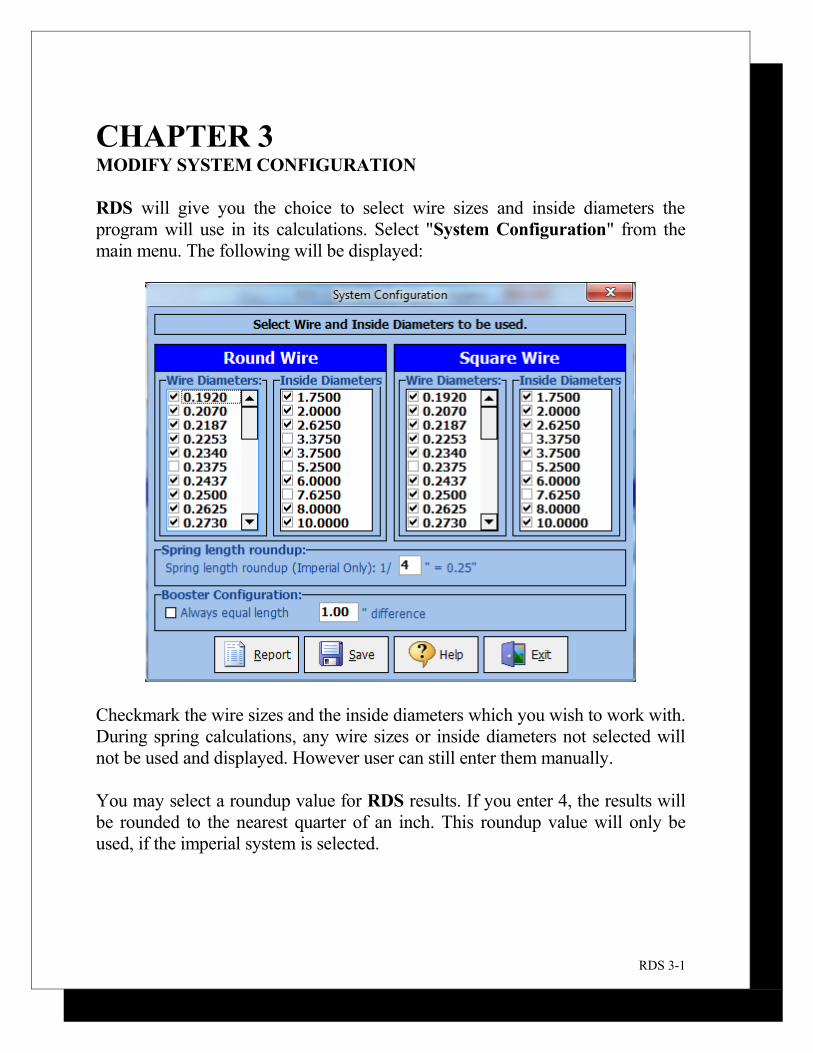
RDS will give you the choice to select wire sizes and inside diameters the program will use in its calculations. Select "System Configuration" from the main menu. The following will be displayed:
Checkmark the wire sizes and the inside diameters which you wish to work with. During spring calculations, any wire sizes or inside diameters not selected will not be used and displayed. However user can still enter them manually.
You may select a roundup value for RDS results. If you enter 4, the results will be rounded to the nearest quarter of an inch. This roundup value will only be used, if the imperial system is selected.
RDS 3-1

The five buttons on this screen are as follows:
SAVE – Click the save button or press the Alt-S to save the changes you made to this screen.
REPORT - If you wish to have a hard copy of this screen, select “Report” button. The RDS will prompt you to prepare the printer. If your printer is ready to receive the printout, press the OK button to continue.
HELP - This button will display the help screen.
EXIT - This button will allow you to return to the Entry Screen.
RDS 3-2

RDS 3-1
CHAPTER 4DOOR SPECIFICATIONS
Calculating springs for a rolling door is more difficult and complex than to calculate springs for an overhead door. RDS will try to simplify this chore by introducing this screen where the user will enter necessary information needed to calculate the springs for rolling doors.
Once you click the "Add" button, the RDS will display next available door number. First, enter a distinguished description, which will define this door type. The first five fields are required to calculate the weights when the door is in the open (Weight Up) and closed (Weight Down) position.
First field is the amount of overlap (in inches) for this specific type of door. The second field is the hanging curtain length (in inches) when the door is in open position. This is value D in the diagram on the following page. Third
RDS 4-1

field is the curtain weight (in lbs.) per square foot. The fourth field is the end lock weight (in lbs.) per linear foot and the fifth field is the bottom bar weight (in lbs.) per linear foot.
The low moment arm and the rise values are required to calculate the high moment arm and the revolutions of barrel values. Once you enter the low moment arm and the rise of the curtain, click the "Calculate" button. The software will calculate the high moment arm and revolution of barrel for opening heights from 3' to 50'. If you wish, you may revise these values. The rise of a curtain is the amount change of the moment arm when the barrel turns complete one turn. This
value usually is a bit smaller then the thickness of the slats used. Low Moment arm is value C in the diagram.
Our experience on rolling door spring calculation leads us to introduce a friction factor for big steel doors in order to calculate proper high moment arms. This technique gives us better results than the conventional methods. The RDS recommends using 50.00% friction factor on doors higher then 9 ft., and no friction factor for the smaller doors. If you use the friction factor, you must supply the distance between the centerline of the guide and the shaft. This is value B in the diagram.
The difference between the barrel width and the door width is required to determine whether the spring(s) calculated fits in the barrel. Spring ID is required for calculation purposes.
Once these values are all entered properly, click the "Save" button.
You must repeat this procedure for every door type and slat and barrel combinations. If you use a different design for a specific type of door (such as a different barrel or end locks) you must enter each type as a different entry. For example for a steel rolling door, 3" and 6" barrel must have separate entries.
RDS 4 -2

RDS 3-3
If one of these entries is not needed, you may delete by clicking the "Delete" button. After you delete an entry, the numbers of the following entries will be changed. For example if you delete second entry, the door number three will be two, four will be three and the same applies the rest of the entries.
RDS 4-3
RDS 3-1
CHAPTER 5COMPANY PROFILE
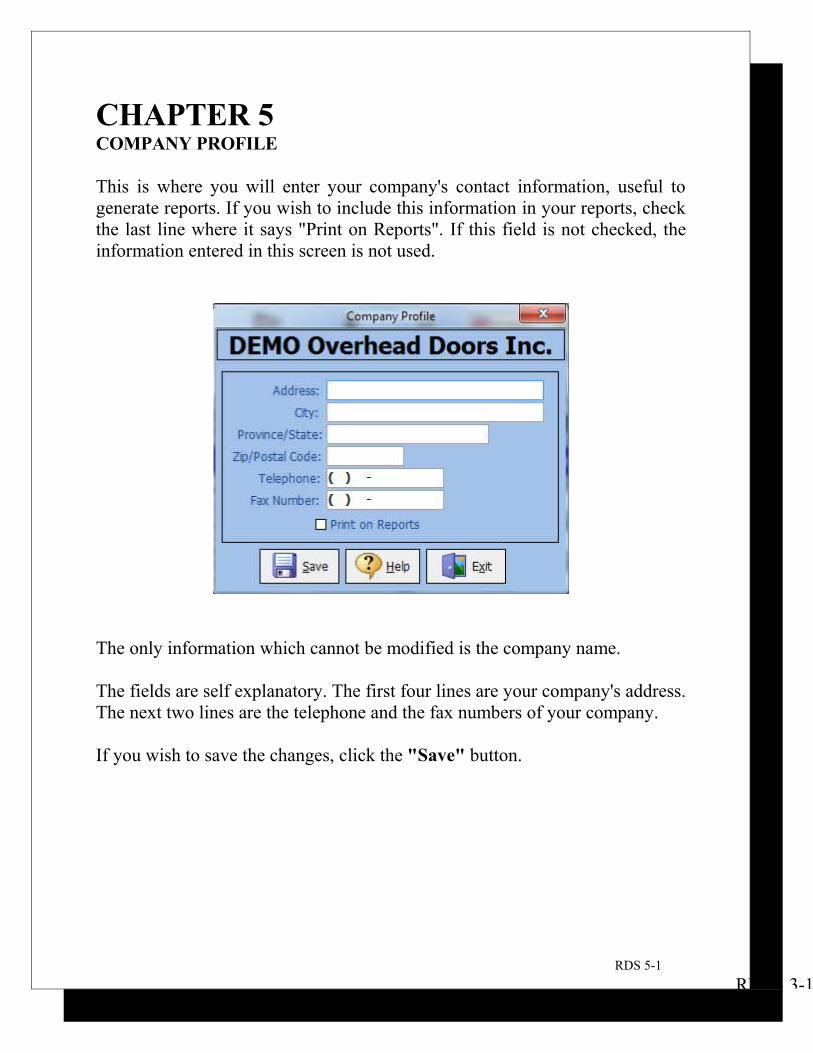
This is where you will enter your company's contact information, useful to generate reports. If you wish to include this information in your reports, check the last line where it says "Print on Reports". If this field is not checked, the information entered in this screen is not used.
The only information which cannot be modified is the company name.
The fields are self explanatory. The first four lines are your company's address. The next two lines are the telephone and the fax numbers of your company.
If you wish to save the changes, click the "Save" button.
RDS 5-1

RDS 3-1
CHAPTER 6SPRING INFORMATION
Another feature of RDS is to provide the user detailed information about the torsion springs which you may find in a drum supplier's spring chart manual. This screen will also provide the same information for any odd size of spring you may encounter.
Once the type and the dimensions of the spring are entered, RDS will provide the following information:
• Spring Weight• Total Coils• Active Coils• Spring IPPT• Turns for 10M Cycles.• Turns for 15M Cycles.• Turns for 25M Cycles.• Turns for 50M Cycles.
RDS 6-1

• Turns for 100M Cycles.
RDS A -2

RDS 3-1
APPENDIX AGLOSSARY OF TERMS
BOOSTER SPRINGS: An assembly of torsion springs consisting of one spring inside the other. Used in situations where regular (single) torsion springs calculated are too long for proper fit or where life-cycle expected cannot be achieved otherwise.
INTERIOR DIAMETER: The diameter of a torsion spring taken from the inside of the coil.
INDEX RATIO: The relative diameter ratio between the wire size and the coil diameter. For torsion springs used on overhead doors, the ideal would be an index ratio of at least 8 to 1. However, some are used with a ratio as low as 6 to 1 with reasonably satisfactory results.
IPPT: Abbreviation for Inch Pounds Per Turn. The Torque rate of a spring, indicating the number of inch pounds of Torque delivered to the shaft for each turn a spring is wound by the installer.
MULTIPLIERS: Factors developed for the individual drum that allows the IPPT rate of the springs to be determined by multiplying the total door weight by such a factor.
TOTAL DOOR WEIGHT: This is the weight of the door sections; all hardware mounted on the sections, glass (if any) paint and any other material or objects to be balanced with the door.
TOTAL TURNS: The number of turns required to open the door to its fully opened position plus the number of initial turns given.
WIRE DIAMETER: The diameter of the steel wire by which the torsion spring is made up from.
RDS A-1