randell blast chiller operator's manual
TRANSCRIPT

10/10/2017 PP MNL0016 rev C
OPERATOR’S MANUAL This manual provides information on installation, operating, maintenance, trouble shooting & replacement parts for
BLAST CHILLER BC-3HEB BC-3 BC-5 BC-5E BC-10 BC-10E BC-20
NOTIFY CARIER OF DAMAGE AT ONCE. It is the responsibility of the consignee to inspect the container upon receipt of same and to determine the possibility of any damage, including concealed damage. Unified Brands suggests that if you are suspicious of damage to make a notation on the delivery receipt. It will be the responsibility of the consignee to file a claim with the carrier. We recommend that you do so at once.
525 South Coldwater Road • Weidman, MI 48893 888-994-7636 • Fax 888-864-7636 • unifiedbrands.net


unifiedbrands.net 3
Table of Contents
page 3………………………………….………Table of Contents page 4……………………………………Parts & Service Hotline page 4………………………………...…Serial Number Location page 5-7……………………………….Randell Limited Warranty page 8…………………………………………Unit Specifications page 9-10......……………………………..……...Unit Installation page 11-21………………………………………...Unit Operation page 22………………………………………Control Parameters page 23…………………………………...……Quick Start Guide page 24……………………………………………..…Flash Drive page 24-25……………………..………Preventive Maintenance page 26…....………………………………..……Troubleshooting page 27-29..…………………………………Electrical Diagrams page 30-31…………………………….……..Replacement Parts
Congratulations on your recent purchase of Randell brand food service equipment, and welcome to the growing family of satisfied Unified Brands customers. Our reputation for superior products is the result of consistent quality craftsmanship. From the earliest stages of product design to successive steps in fabrication and assembly, rigid standards of excellence are maintained by out staff of designers, engineers, and skilled employees. Only the finest heavy-duty materials and parts are used in the production of Randell brand equipment. This means that each unit, given proper maintenance will provide years of trouble free service to its owner.

4 888-994-7636
In addition, all Randell food service brand equipment is backed by some of the best warranties in the food service industry and by our professional staff of service technicians. Retain this manual for future reference. NOTICE: Due to a continuous program of product improvement, Randell reserves the right to make changes in design and specifications without prior notice. NOTICE: Please read the entire manual carefully before installation. If certain recommended procedures are not followed, warranty claims will be denied.
MODEL NUMBER _________________________
SERIAL NUMBER _________________________
INSTALLATION DATE _____________________
The serial number is located on the interior rear wall of the Blast Chiller. The serial number for BC-3 models is located behind the front ventilation panel of the machine compartment.
800-621-8560 Randell Service and Parts Hotline

unifiedbrands.net 5
Unified Brands believes strongly in the products it builds and backs them with the best warranty in the industry. Standard with every unit comes the peace of mind that this unit has been thoroughly engineered, properly tested and manufactured to excruciating tolerances, by a manufacturer with over 100 years of industry presence. On top of that front end commitment, Unified Brands has a dedicated staff of certified technicians that monitor our own technical service hotline at 1-800-621-8560 to assist you with any questions or concerns that may arise after delivery of your new Randell equipment. PARTS WARRANTY 1. One year parts replacement of any and all parts that are found defective in material or workmanship of the Randell equipment. Unified Brands warrants all component parts of manufactured new equipment to be free of defects in material or workmanship, and that the equipment meets or exceeds reasonable industry standards of performance for a period of one year from the date of shipment from any Unified Brands factory, assembly plant, or warehouse facility. NOTE: Warranties are effective from date of shipment, with a thirty day window to allow for shipment, installation and set-up. In the event equipment was shipped to a site other than the final installation site, Unified Brands will warranty for a period of three months following installation, with proof of starting date, up to a maximum of fifteen months from the date of purchase. 2. Free ground freight of customer specified location for all in warranty parts within continental U.S. Component part warranty does not cover glass breakage or gasket replacement. Randell covers all shipping cost related to component part warranty sent at regular ground rates (UPS, USPS). Freight or postage incurred for any express or specialty methods of shipping are the responsibility of the customer. LABOR COVERAGE In the unlikely event a Randell unit fails due to defects in materials or workmanship within the first ninety days, Unified Brands agrees to pay the contracted labor rate performed by an Authorized Service Agent (ASA). Any work performed by a non-ASA will not be honored by Unified Brands. A complete listing of current ASAs can be found on the Randell page of our web site: www.unifiedbrands.net. Warranties are effective from date of shipment, with a thirty day window to allow for shipment, installation and setup. Where equipment is shipped to any site other than final installation, Unified Brands will honor the labor warranty for a period of ninety days following installation with proof of starting date, up to a maximum of six months from date of purchase.
Warranty Policies
6 888-994-7636
Temperature adjustments are not covered under warranty, due to the wide range of ambient conditions. For warranty inquiries call our Field Service Department at: 1-800-621-8560. WHEN OPTIONAL 5 YEAR COMPRESSOR WARRANTY APPLIES
1. Provide reimbursement to an ASA for the cost of locally obtained replacement compressor in exchange for the return of the defective compressor sent back freight prepaid. Note: Unified Brands does limit amount of reimbursement allowed and does require bill from local supply house where compressor was obtained (customer should not pay servicing agent up front for compressor).
2. Provide repair at the manufacturing facility by requiring that the defective unit be sent back to Unified Brands freight prepaid. Perform repair at the expense of Unified Brands and ship the item back to the customer freight collect.
3. Furnish complete condensing unit freight collect in exchange for the return of the defective compressor sent back freight prepaid. (Decisions on whether or not to send complete condensing units will be made by a Unified Brands in-house service technician).
WHEN OPTIONAL LABOR EXTENSION POLICY APPLIES Unified Brands will provide reimbursement of labor invoiced to an ASA for any customer that has an optional labor extension of our standard warranty. (Contracted rates do apply) Unified Brands offers both 1 and 2 year extensions on Randell equipment. Labor extensions begin at the end of our standard warranty and extend out 9 months to 1 calendar year or 21 months to 2 calendar years from date of purchase. Please contact Randell technical service hotline at 1-800-621-8560 for details and any question on Authorized Service Agents (ASA). WHEN EXPORT WARRANTIES APPLY
1. Randell covers all non-electrical components under the same guidelines as our standard domestic policy.
2. All electrical components operated on 60 cycle power are covered under our standard domestic policy.
3. All electrical components operated on 50 cycle power are covered for 90 days from shipment only.
4. Extended warranty options are not available from the factory.
ITEMS NOT COVERED UNDER WARRANTY
1. Maintenance type of repairs such as condenser cleaning, temperature adjustments, clogged drains and unit leveling.
2. Unified Brands does not cover gaskets under warranty. Gaskets are a maintenance type component that are subject to daily wear and tear and are the responsibility of the owner of the equipment. Because of the unlimited number of customer related circumstances that can cause gasket failure all gasket replacement issues are considered non-warranty. Unified Brands recommends thorough cleaning of gaskets on a weekly basis with a mild dish soap and warm water. With proper care Randell gaskets can last up to two years, at which time we

unifiedbrands.net 7
recommend replacement of all gaskets on the equipment for the best possible performance.
NOTICE: FOOD LOSS IS NOT COVERED UNDER WARRANTY
3. Repairs caused by abuse such as broken glass, freight damage, or
scratches and dents. 4. Electrical component failure due to water damage from cleaning
procedures. DAMAGES All crating conforms to general motor carrier specifications. To avoid concealed damage, we recommend inspection of every carton upon receipt. In the event the item shows rough handling or visible damage to minimize liability, a full inspection is necessary upon arrival. Appearance of damage will require removing the crate in the presence of the driver. A notation must be placed on the freight bill and signed for by the truck driver at the time of delivery. Any and all freight damage that occurs to a Randell piece of equipment as a result of carrier handling is not considered under warranty, and is not covered under warranty guidelines. Any freight damage incurred during shipping needs to have a freight claim filed by the receiver with the shipping carrier. Consignee is responsible for filing of freight claims when a clear delivery receipt is signed. Claims for damages must be filed immediately (within 10 days) by the consignee with the freight carrier and all cartons and merchandise must be retained for inspection. RETURNED GOODS Authorization for return must first be obtained from Unified Brands before returning any merchandise. Any returned goods shipment lacking the return authorization number will be refused, all additional freight costs to be borne by the returning party. Returned equipment must be shipped in original carton, freight prepaid and received in good conditions. Any returned merchandise is subject to a minimum handling charge (consult factory for rate). INSTALLATION Equipment installation is the responsibility of the dealer and/or their customer. Unified Brands requires all equipment to be professionally installed. Any failures that are the result of improper installation will not be covered by Unified Brands. *FOOTNOTES IN REFERENCE TO PARAGRAPHS ABOVE 1. Herein called Randell. 2. NET means list price less discount, warranty, labor policy, freight, Randell delivery and other miscellaneous charges. CASH DISCOUNTS WILL BE CALCULATED ON NET ONLY.
8 888-994-7636
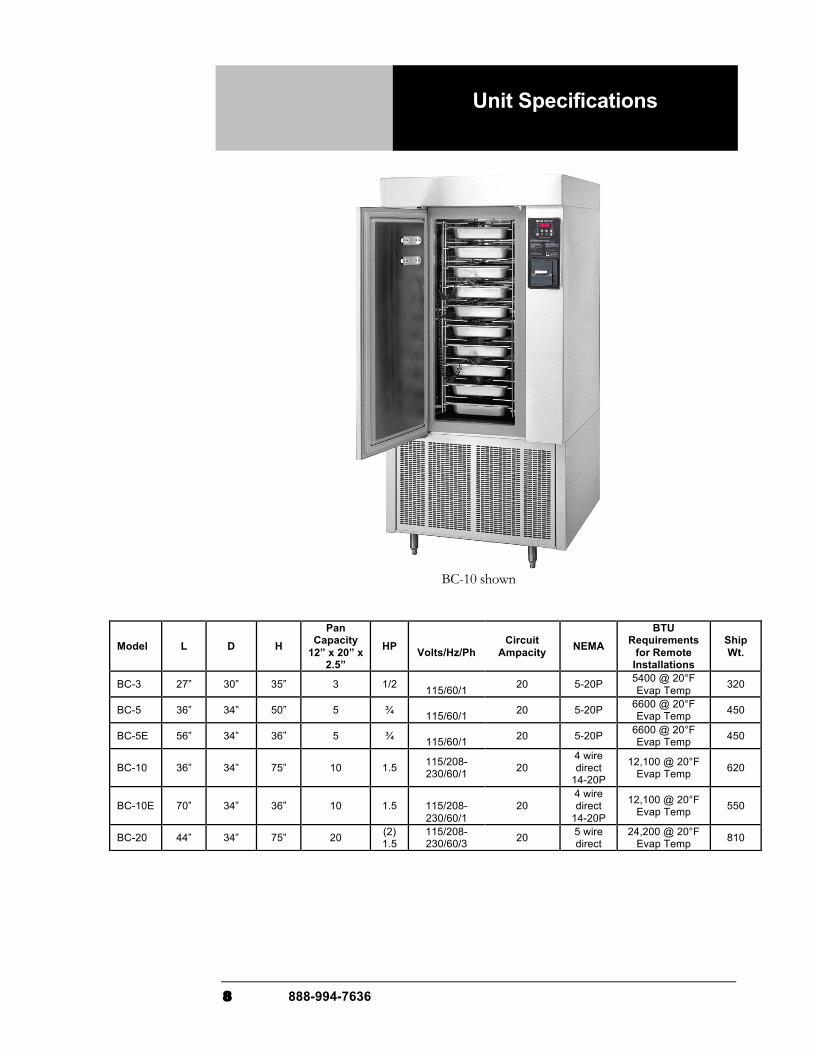
Unit Specifications
BC-10 shown
Model L D H Pan
Capacity 12” x 20” x
2.5”
HP
Volts/Hz/Ph Circuit
Ampacity NEMA BTU
Requirements for Remote
Installations
Ship Wt.
BC-3 27” 30” 35” 3 1/2 115/60/1 20 5-20P 5400 @ 20°F
Evap Temp 320
BC-5 36” 34” 50” 5 ¾ 115/60/1 20 5-20P 6600 @ 20°F
Evap Temp 450
BC-5E 56” 34” 36” 5 ¾ 115/60/1 20 5-20P 6600 @ 20°F
Evap Temp 450
BC-10 36” 34” 75” 10 1.5 115/208-230/60/1 20
4 wire direct
14-20P
12,100 @ 20°F Evap Temp 620
BC-10E 70” 34” 36” 10 1.5
115/208-230/60/1
20 4 wire direct
14-20P
12,100 @ 20°F Evap Temp 550
BC-20 44” 34” 75” 20 (2) 1.5
115/208-230/60/3 20 5 wire
direct 24,200 @ 20°F
Evap Temp 810

unifiedbrands.net 9
Unit Installation
SELECTING A LOCATION FOR YOUR NEW UNIT The following conditions should be considered when selecting a location for your unit:
1. Floor Load: The area on which the unit will rest must be level, free of vibration, and suitably strong enough to support the combined weights of the unit plus the maximum product load weight. All casters or legs must be in contact with the floor to support the weight. Legs have adjustable feet that can be raised or lowered. Casters may require shims in order for the caster to be in contact with the floor. NOTE: If there is a question pertaining to weight load limits, consult the factory at 1-800-621-8560.
2. Clearance: There must be a combined total of at least 3” clearance on all sides of the unit.
3. Ventilation: The air cooled self contained unit requires a sufficient amount of cool clean air. Avoid surrounding your blast chiller around other heat generating equipment and out of direct sunlight. Also, avoid locating in an unheated room or where the room temperature may drop below 55° F (13°C) or about 86°F (32°C).
INSTALLATION CHECKLIST After the final location has been determined, refer to the following checklist prior to start-up:
1. Check all exposed refrigeration lines to ensure that they are not kinked, dented, or rubbing together.
2. Check that the condenser and evaporator fans rotate freely without striking any stationary members.
3. Turn on control once unit has been plugged in or properly wired direct (see page 15)
4. Allow unit time to cool down to holding temperature. (See page 10 for Unit Operation).
5. Refer to the front of this manual for serial number location. Please record this information in your manual on page 3 now. It will be necessary when ordering replacement parts or requesting warranty service.
6. Confirm that the unit is holding temperature. 7. Allow your unit to operate for approximately 30 minutes before putting
in food to allow interior of unit to cool down to storage temperature. NOTE: All motors are oiled and sealed.
NOTE: FAILURE TO FOLLOW INSTALLATION GUIDELINES AND RECOMMENDATIONS MAY VOID THE WARRANTY ON YOUR UNIT.

10 888-994-7636
Unit Installation con’t.
ELECTRICAL SUPPLY: The wiring should be done by a qualified electrician in accordance with local electrical codes. A properly wired and grounded outlet will assure proper operation. Please consult the data tag attached to the compressor to ascertain the correct electrical requirements. Supply voltage and amperage requirements are located on the serial number tag located on the rear interior wall. .
NOTE: It is important that a voltage reading be made at the compressor motor electrical connections, while the unit is in operation to verify the correct voltage required by the compressor is being supplied. Low or high voltage can detrimentally affect operation and thereby void its warranty. NOTE: it is important that your unit has its own dedicated line. Condensing units are designed to operate with a voltage fluctuation of plus or minus 10% of the voltage indicated on the unit data tag. Burn out of a condensing unit due to exceeding voltage limits will void the warranty.
unifiedbrands.net 11
Unit Operation
The Randell BC series blast chillers are designed for rapid chilling through the danger zone down to 40 or below in approximately 90 minutes. The exact chill time will vary depending on product type. The door must be in closed position to activate switch at top of door before any cooling cycle will begin. 1. Introduction The control software for the BC Control Unit is based on a “Real-Time Operating System and is capable of simultaneously running a chiller operation while at the same time accepting/displaying user information from the control panel such as chiller preset adjustments. This document provides an overview of the current controller features. 2. Status LED Indicator Conventions
a. Safe/Temp LED indicators (Probes 1 through 4, and Air) i. Flashing – Indicated probe currently displayed and used for set point control or a temperature alarm indication. ii. Solid – Indicated probe has reached the “Safe” set point or purposely selected for display monitoring. iii. Solid Momentary – Indicated probe’s temperature currently displayed. b. Mode LED Indicators i. Solid – Identifies the selected mode that will be run if the Start/Stop Key is depressed. ii. Flashing – The indicated mode is in operation.
3. Powering Up Unit
a. The unit once connected to AC power will turn on for a short period. An LED illumination test will be performed, followed by the display of the software version number. The unit will then blank the display and go into a standby mode. The unit will remain in a standby until the On/Off key is depressed. b. Depressing the On/Off key will cause the unit to become active and enter the Idle mode. Refer to Idle Mode operation below.
4. Powering Down Unit a. The unit may be returned to the low power standby state by depressing the On/Off
12 888-994-7636
key. The display will then go blank while powered down. The unit may be restarted
as indicated above. Note: the unit can only be powered down while in the Idle Mode.
5. Chill Mode Operation a. The controller can run one of four possible chill modes, by either manual selection or automatically depending on certain prior conditions. This is explained more fully below: i. Idle Mode
1. This mode is automatically started when the On key is depressed. 2. This mode is returned to automatically when any chill modes have been stopped. 3. Operation:
a. When the controller enters the Idle Mode, the display will showthe text “IdLE,” briefly on the segmented display, followed by the display of the air temperature. b. The unit will pre-chill the cabinet to the Product Temperature Set Point (PtSP). The Air temperature will be displayed and will be accompanied by a flashing Air status LED indicator. Once Air temperature reaches the set point temperature, the Air status LED indicator will illuminate solid, meaning the air temperature is at or below the “Safe” temperature. Any food probe inside the cabinet will be validated in a similar fashion should their individual temperature readings reach the “Safe” temperature. c. In the event any food probe reaches a temperature greater than the Temperature Alarm (tALn) preset, the display will flash the offending probe temperature while toggling the corresponding status LED indicator. Refer to the Auto Mode section for further details on the Temperature Alarm feature. d. During this mode, the Fan relay is on and the Compressor Relay is activated “On” when Air temperature is above Product Temperature Set Point (PtSP) + Product On/Off Differential (PdiF) and “Off” when Air temperature is below Product Temperature Set Point (PtSP) - Product On/Off Differential (PdiF). Note: Since no mode has actually been selected, no mode LED’s will be illuminated.
ii. Auto Mode 1. Can be manually selected by pressing the Mode key once (illuminating the Auto LED) and started by pressing the Start key. 2. Can also be directly started by just pressing the Start key when no

unifiedbrands.net 13
mode LED’s are illuminated. 3. Will start automatically from Idle or Hold mode if the following conditions are met:
a. The Temperature Alarm (tALn) preset is set to “Auto” (Auto Start) and, b. The time since start of the Idle Mode is greater than the Auto Alarm Time (tALt) preset time and, c. One of the product probes is greater than the Auto Alarm Temperature (tALu) preset value. Note: If the Temperature Alarm (tALn) preset is set to “On” rather than “Auto” then an alarm will sound when the time since start of the Idle Mode exceeds the Auto Alarm Time (tALt), prompting the user to press the Start key to begin the Auto chill cycle.
4. Operation: a. After the mode is initiated by one of the above methods, the display will show the text “Auto,” briefly on the segmented display, followed by the display of the warmest temperature. The Auto LED will flash indicating that it is in the Auto mode. b. The Auto Mode seeks to cool the warmest product probe temperature until it reaches the Product Temperature Set Point (PtSP) preset. c. As each food probe reaches Set Point, the corresponding “Safe” indicator (Green LED for food probes, Red LED for Air temperature probe) will be illuminated. The display will show the warmest probe temperature as denoted by a flashing LED. Under varying load conditions, it is possible that one food probe will cool faster than another will. An alarm feature called Low Temperature Alarm (LoAL) preset can be set to detect such occurrences and alert the user that a particular food product is chilled to set point and can be removed. If enabled, should any product probe temperature drop below set point while the warmest probe is above set point, an audible alarm will sound three times and the display will toggle between the warmest and coolest probe temperatures for a period of 10 seconds. The display will then show the warmest probe temperature for a period of 50 seconds. This audible alarm and display sequence repeats every 60 seconds and continues until the coolest probe is removed/unplugged or put into warm food product, or the cycle has ended. d. Once all product probes reach Set Point temperature, the Auto Mode chill cycle will end, and an alarm will sound and the display will read “End” for approximately 10 seconds. The chiller will then run the Hold mode that
14 888-994-7636
retains product temperature according to Set Point Conditions. During this mode of operation, the Hold LED will flash. Note: Under certain settings, an Auto Defrost cycle may run at the end of this chill cycle just before the Hold cycle begins. During Hold mode, the display reading will default to Air Temperature. Once every minute, this reading will be briefly interrupted by the message “HOLd” for two seconds followed by an indication of the “time since the end” (of the chill cycle) for two seconds. e. Depressing the Stop key at any time will cease operation of the current mode and return the operation of the controller back to the Idle Mode. f. During this mode, the Fan relay is on and the Compressor Relay is activated “On” when the warmest product temperature (or air temperature, if no product probes detected) is above Product Temperature Set Point (PtSP) + Product On/Off Differential (PdiF) and “Off” when the warmest product temperature is below Product Temperature Set Point (PtSP) - Product On/Off Differential (PdiF).
iii. Manual Mode 1. Can be manually selected by pressing the Mode key twice (illuminating the Man LED), adjusting the time with the Up/Down arrow keys and then started by pressing the Start key. 2. Note: Manual Mode is the default mode if no product probes are present. During this case, an attempt to start the Auto Mode by either manual selection or directly as described above will result in the manual mode LED illuminating and the default time being displayed. From this point, the time may be adjusted using the Up/Down arrow keys and the mode started by pressing the Start key as described in point 1 above. 3. Operation:
a. After the Start key is pressed (or if defaulted to), the display will show the text “nnAn,” briefly on the segmented display. The Manual LED will flash indicating that it is in the Manual mode. The display will then show the timer value and begin to count down. b. The Manual Mode is a timed cycle that runs according to either the Manual Mode Timer Default (nntd) preset value, or the manually adjusted timer value before the cycle was initiated. c. During timed operation, the Fan relay is on and the Compressor Relay is activated “On” when Air temperature is above Air Temperature Set Point (AtSP) + Air On/Off Differential (AdiF) and “Off” when Air temperature is below Air Temperature Set Point (AtSP) - Air On/Off Differential (AdiF).

unifiedbrands.net 15
d. Once the warmest probe reaches product set point temperature, a ringing alarm will alert the user. e. Once the timer elapses, an alarm will sound and the display will read “End” for approximately 10 seconds. The unit will then run the Hold mode which retains product temperature according to Product Set Point Conditions, i.e., the Compressor Relay is activated “On” when warmest product temperature is above Product Temperature Set Point (PtSP) + Product On/Off Differential (PdiF) and “Off” when the warmest product temperature is below Product Temperature Set Point (PtSP) - Product On/Off Differential (PdiF). If no product probes exist, set point temperature control is based on the air temperature. If selected, an Auto Defrost cycle may run at the end of this chill cycle just before the Hold cycle begins. During Hold mode, the display reading will default to Air Temperature. Once every minute, this reading will be briefly interrupted by the message “HOLd” for two seconds followed by an indication of the “time since the end” (of the chill cycle) for two seconds. Depressing the Stop key at any time will cease operation of the current mode and return the operation of the controller back to the Idle Mode.
iv. Defrost Mode 1. This mode is manually selected by depressing the Mode key three times (illuminating the Def LED) and is started by depressing the Start key. 2. The defrost mode will also be activated at the end of a chill cycle automatically if one of the following three conditions are met:
a. The Auto Defrost (AdEF) preset is set to “On” or, b. The Air Temperature Set Point (AtSP) preset value is below 0 Fahrenheit or, c. The Product Temperature Set Point (PtSP) preset value is below 34 degrees Fahrenheit.
3. Operation: a. After the Start key is pressed, or is initiated after an Auto or Manual chill cycle, the Defrost LED will flash indicating that it is in the Defrost mode. During Defrost, the display reading will default to Air Temperature. Once every minute, this reading will be briefly interrupted by the message “dEF” for two seconds followed by an indication of the coil temperature for two seconds. b. The Defrost Cycle will run until one of the following conditions are met: i. The defrost temperature probe reaches the Defrost Temperature Set Point (dtSP) preset value. ii. The time since starting the defrost cycle exceeds the

16 888-994-7636
Defrost Timer (dtin) preset value. c. When the Defrost Cycle ends, the following may occur: i. If this cycle was initiated by an Auto or Manual chill cycle, it will begin a Hold mode. ii. If this cycle was manually started, it will begin the Idle Mode. d. Depressing the Stop key at any time will cease operation of the current mode and return the operation of the controller back to the Idle Mode. e. During this cycle, the Defrost Relay is “On.” f. During this cycle, the state of the Fan Relay will be “On” or “Off” according to the Fan Defrost (FdEF) preset.
6. Viewing Product Probe, Air and Defrost Temperatures a. Each Product Probe temperature as well as Air and Defrost temperatures can be monitored on the segmented display while the controller is running in any chill mode simply by depressing the SEL key. Temperatures are read in sequential order and are advanced to the next temperature reading with each press of the SEL key. The display will return back to the previous display mode approximately ten (10) seconds after the last SEL key depress.
7. Adjusting Controller Presets a. The BC-5 controller features seventeen (17) preset parameters (refer to Table 1) that are used to govern chiller operation. Each preset is user-adjustable and can be changed at any time the controller is activated. b. Presets are accessed via a user-friendly Menu as follows:
i. Depress the Up Arrow and the Select keys simultaneously. ii. The text “PrSt” will display for a brief period, followed by the text of the first preset and its value in a toggling manner. iii. Advancing to the next preset is performed using the Up Arrow key. Depressing the Down Arrow key will show the previous preset, and so on.
c. Changing a preset is performed as follows: i. While in the preset menu, select the particular preset to change as described above. ii. Depress the Select key and using the Up and Down Arrow keys, change the preset value. iii. Depress the Select key to save the preset. iv. Repeat step “i” through “iii” above to change additional presets. v. Depress the Stop key to exit the preset menu. vi. Note: After approximately one minute of keypad inactivity, the Preset Menu will automatically be exited.
8. Setting the Clock/Calendar a. The BC-5 features an onboard, battery backed real-time clock (RTC) for time stamping chill cycle events. In order for the BC-5 to properly log these events, various parameters of the onboard clock calendar must first be set (Refer to Table 2). Note: Upon turning on the unit for the

unifiedbrands.net 17
first time, the controller will prompt the user to set the RTC as it will automatically select and display the clock calendar menu. b. Setting RTC parameters is performed using a clock calendar menu that is similar to the preset menu:
i. Depress the Down Arrow and the Select keys simultaneously. ii. The text “Cloc” & “CLdr” will be momentarily displayed, followed by the first clock /calendar parameter, time in hours: minutes format. iii. Advancing to the next RTC parameter is performed using the Up Arrow key. Depressing the Down Arrow key will show the previous parameter, and so on.
Note: Upon powering up the controller for the first time, the clock calendar menu will be selected automatically to prompt the user to set the RTC. c. Changing an RTC parameter is performed as follows:
i. While in the RTC menu, select the particular parameter to set as described above. ii. Depress the Select key and using the Up and Down Arrow keys, change the value. Depressing and holding either the Up or Down Arrow key will cause the particular setting to increment or decrement in value at a faster rate. iii. Depress the Select key to save the preset. iv. Repeat step “i” through “iii” above to modify other RTC settings. v. Depress the Stop key to exit the preset menu. vi. Note: After approximately one minute of keypad inactivity, the Clock/Calendar Menu will automatically be exited.
9. Alarms a. Door Ajar: If the door on the chiller unit has been left open for 60 seconds or more, an alarm will sound and the segmented display will show the text “door,” “AJAr” in an alternating fashion. During this alarm condition, the compressor solenoid and fan will also be deactivated. This alarm sound and display sequence will continue until such time the door switch is in the “closed” state by completely closing the door thus allowing the chiller to resume normal operation. b. Probe Sensor Failure: If either the Air temperature or Defrost temperature probes were to fail, the alarm will sound to prompt the user to take immediate action. The display will indicate the offending probe as “Air” or “Def” alternating with “Prb.” Note: If all alarms were to occur simultaneously, the display message priority is handled in the following order: Air Probe, Defrost Probe and Door Ajar.
10. Print/Log History a. The BC Controller is capable of logging chiller environmental parameters for tracking food product chill performance and safety monitoring purposes. All chill data is time stamped according to the RTC settings and stored into nonvolatile data memory for subsequent retrieval via printer or USB flash drive.

18 888-994-7636
b. Overview of Print/Log Operation: i. Data logging begins after an Auto or Manual “Timed” chill mode is initiated, either manually or automatically. ii. Chill data is acquired periodically and stored into log memory every five minutes. Data may also be stored immediately upon detection of specific Log Events. iii. “Live”chill information can be simultaneously obtained at the printer output, if enabled (Preset Prnt = On). iv. A “History” of chill cycle information can also be printed by depressing the Print Key and selecting one of two history formats using the Up or Down Key: Last (for last chill cycle) or 24hr (last 24 hours worth of chill cycles). Depressing the Print Key a second time selects the format and begins the print process. Pressing the Print Key two times cancels the print log process. v. Several Print Log filter options are available that allow specific log events to be printed. This filter works while printing Live during a Chill operation or when printing a History of prior chill information.
c. Log Data Specification i. The log memory consists of a nonvolatile storage device capable of holding 1489 records, equivalent to approximately 5 days worth of chill performance history. Each individual record consists of ten (10) data members:
1. Timestamp - Date, Time, and Time of day 2. Event – The specific incident that results in a log record to be created. Further details on the supported Event types are covered in the Log Events section. 3. Mode – The type of chill mode in operation: Auto or Timed. 4. Cycle – The cycle in operation for the selected mode: Chill, Defrost, or Hold. 5. Probe Temperatures – Temperature values measured in degrees Fahrenheit for each of the six (6) supported sensor inputs: Product Probes 1 through 4, the Air probe and the Defrost Probe.
ii. Log Events 1. Chiller parameters are typically “Sampled” and recorded into log memory once every five minutes. However, this process can also be triggered by specific controller events. These events and their significance are described below:
a. Start (*START*) – Denotes the start of a chill cycle. b. End (*END*) – Denotes the end of a chill cycle.

unifiedbrands.net 19
c. Critical Time (*Critical-Time*) – Indicates the point in a chill process where the probe temperature passes through predefined temperature thresholds: i. 140F ii. 40F d. Power Restored (*POWER_RESTORED*) – Denotes the point where the chill process begins once power is restored from a previous power fault condition. e. Sample (*Sample*) – Periodic Time Stamp interval fixed at one sample every five (5) minutes. f. Set Point (*SET_POINT*) - Indicates the point where the warmest food probe has reached product set point temperature. g. Timer End (*Timer_End*) – Denotes the end of the timed chill cycle in manual mode. h. Begin Defrost (*Begin_Defrost*) – Denotes that a defrost cycle has been initiated at the end of a chill cycle. i. Begin Hold (*Begin_Hold*) - Denotes that a hold cycle is initiated after a chill cycle. j. Resume Hold (*Resume_Hold*) - Denotes that a hold cycle is being resumed after a defrost cycle. k. Door Alarm (*Door_Alarm*) - Indicates the point in which the door alarm was activated. L. Air Probe Alarm *Air_Prb_Alarm* - Indicates the point in time that the air probe malfunctioned. m. Defrost Probe Alarm *Def_Prb_Alarm* - Indicates the point in time that the defrost probe malfunctioned.
d. Printer Output i. The printer output can be used to obtain a hard copy of selected chiller parameter information. Chiller information can be printed in two ways:
1. Live Print - If the Printer Preset Prnt is set to “On” chiller information will be periodically printed during chiller operation. Live Print is normally disabled (Prnt = “Off”) to save paper. Note: The Print LED indicator will be illuminated when “Live” print is enabled. 2. Log Dump (Post Chill) - A history of chill data can be sent to the printer output at any time, even during the operation of a chill cycle. Printing a log is performed by depressing the Print key and selecting one of two print formats from a Print Menu as indicated by the
20 888-994-7636
segmented display: a. Last - Last Chill Cycle b. 24hr - Last 24 hours worth of Chill Cycles Depressing the Print key once more after the format selection is made will begin the print log process. During this time the Print LED will flash and the printer will begin to display log information in chronological order. Depressing the Print key two times consecutively will cancel a print dump that is in progress.
ii. Filter Options - There are four (4) print filters that can be applied to retrieve the specific Log Events described above while printing “live” or “log dump” (post chill) information. This filter option is selected using the preset Pfil, and is described below:
1. CCOn – Prints data associated with the events *START*, *END*, *POWER_INTERRUPT*, *DOOR_OPEN*, *Air_Prb_Alarm*, and *Def_Prb_Alarm*, 2. CCCT – Prints CCOn events plus the *Critical-Time* events. 3. C5nn – Prints CCOn events plus all *Sample* 5 minute interval time stamp events. 4. 5-15 – Prints CCOn events and *Sample* 5 minute interval time stamp events during Chill Cycle, or *Sample* 15 minute interval time stamp events during Hold Cycle, plus Begin_Hold* and *Resume_Hold* events.
11. USB Flash Drive a. Data stored from previous blast chiller operations can be retrieved from the nonvolatile memory and sent to a USB flash drive. This makes for a convenient method to transfer blast chiller data to a personal computer. Data is written into a file on the flash drive in a comma elimited form that is suitable for text and spreadsheet applications. A data transfer to a USB drive is initiated as follows:
i. With the unit powered off, depress the print key to enter the USB menu. ii. Use the up and down keys to add or subtract from the displayed number of records to be retrieved from memory. iii. Transfer of the displayed number of records is begun when the select key is depressed. iv. The menu will be exited and the unit returned back to power off mode when the transfer is completed. v. Exit USB menu at any time by depressing Start/Stop.
12. Product Probe Calibration a. Each product probe can be individually compensated plus or minus 2 degrees Fahrenheit from its “raw” temperature reading using the following procedure:

unifiedbrands.net 21
i. With the unit powered off, depress the On/Off after depressing and holding the Select key to enter the product probe calibration menu. ii. Using the select key, scroll through each probe as indicated by Select LED indicators. iii. Use the up down arrows to add or subtract from the displayed probe reading. The displayed reading will reflect the raw reading plus the offset. iv. Exit menu by depressing Start/Stop. v. Note: 1. Missing probes will be displayed as “OPEn”. 2. Shorted probes or wires will be displayed as “SHrt” 3. Recalibration will be necessary if probes are interchanged or replaced.

22 888-994-7636
Control Parameters
Table 1: Preset Parameters Preset
# Parameter Name Displayed Abbrev. Default Range
1 Air Temp Set Point AtSP -0 °F -20 °F to +40 °F 2 Air On/Off Differential AdiF 2 °F 1 °F to 5 °F
3 Product Temperature
Set Point PtSP 38 °F 0 °F to +40 °F
4 Product On/Off
Differential PdiF 2 °F 1 °F to 5 °F
5 Manual Mode Timer
Default nntd 105
(1:45) 1 to 240 minutes
6 Auto Defrost (after chill
cycle) AdEF On Off/On
7 Defrost Temperature
Set Point dtSP 42 °F 32 °F to 60 °F
8 Defrost Time Duration ddur 30
minutes 1 to 60 minutes
9 Daily Defrost Initial
Time dint 2 (AM) 0 to 23 (hours in 24 hr
format)
10 Daily Defrost Frequency dFrq
1 (every 24 hrs.) 0 to 4 defrosts per day
11 Fan Defrost FdEF On Off/On 12 Printer Enable Prnt Off Off/On 13 Printing Filter Option Pfil CCon CCOn/CCCt/ C5nn/5-15
14 Auto Temp Alarm tALn
Auto (Auto start)
Off/On/Auto start Off/(Alarm)/(Auto Start)
15 Auto Alarm Temp
Value tALu 60 °F 40 °F – 70 °F
16 Auto Alarm Time tALt 1
minutes 1 – 20 minutes 17 Low Temp Alarm LoAL On Off/On
Table 2: Clock/Calendar Parameters
RTC Setting
Displayed Abbrev. Default Range
Time TinE 12:00 Mode Dependent Mode NodE 12hr 12hr/24hr
Ante/Post Meridiem A-P AM
AM/PM (12-hr mode) N/A (24-hr mode)
Year YEAr 2002 2000 – 2099 Month Mth 01 01-12 Date DAtE 01 Month/Year* Dependent
* L E A P - Y E A R C O R R E C T I O N

unifiedbrands.net 23
Quick Start Guide
NOTE: This Quick Start Guide is for a reference on performing the Auto and Manual mode functions of your Randell Blast Chiller. All set up and installation guidelines must be followed before performing any cooling functions. AUTO MODE BLAST CHILLING CYCLE
1) TURN MAIN POWER SWITCH IN MECHANICAL HOUSING TO “ON” POSITION.
2) PRESS “ON” BUTTON ONCE. UNIT WILL START UP AND CHILL TO 38°F.
3) PLACE PRODUCT IN PAN(S). PLACE PANS IN RACKS INSIDE THE UNIT. INSERT FOOD PROBE IN PRODUCT CENTER AND CLOSE DOOR.
4) PRESS “START/STOP” BUTTON ONCE. NOW IN AUTO MODE. UNIT WILL BLAST CHILL UNTIL THE WARMEST FOOD PROBE REACHES 39° F.
5) PRESS “START/STOP” BUTTON ONCE MORE. REMOVE PROBE(S) AND PUT PRODUCT IN A HOLDING COOLER AT 41° OR LESS.
MANUAL MODE BLAST CHILLING CYCLE 1) PRESS “ON” BUTTON ONCE. UNIT WILL START UP AND CHILL TO
38°F 2) PRESS “SELECT”. MAN LED WILL LIGHT UP. 3) PRESS “START/STOP”. UNIT WILL RUN FOR SELECTED TIME. 4) PRESS “START/STOP” BUTTON. UNIT WILL RETURN TO IDLE
POSITION AND HOLD AT 38°F. NOTE: UNIT MUST ALWAYS BE IN THE IDLE MODE BEFORE THE “ON/OFF” BUTTON CAN BE USED TO TURN UNIT OFF
24 888-994-7636
Flash Drive Download quick
reference guide (BC-3HEB only)
1. After a full cycle has completed and unit is in idle mode the unit is
turned off on the control panel. 2. Install the flash drive at port located above the control and press the
“PRINT” key. 3. The display will show "USb". The "UP" and "Down" keys select the
number of records while the display shows the value. 4. The "Select" key starts the download. 5. The green light on the USB port will illuminate during the download,
once flashing has stopped, remove the flash drive. 6. Press the “ON/OFF” key on the control to start the blast chiller back up. 7. Install the flash drive into a USB port on any PC and the windows box
appears with the list of files on the flash drive. 8. Double click the file to open and the data is opened up into Windows
Notepad. Note: The information can also be opened in WordPad and Excel.
Preventive Maintenance
Unified Brands strongly suggests a preventive maintenance program which would include the following Monthly procedures:
1. Cleaning of all condenser coils. Condenser coils are a critical component in the life of the compressor and must remain clean to assure proper air flow and heat transfer. Failure to maintain this heat transfer will affect unit performance and eventually destroy the compressor. Clean the condenser coils with coil cleaner and/or a vacuum, cleaner and brush.
NOTE: Brush coil in direction of fins, normally vertically as to not damage or restrict air from passing through condenser. 2. Clean fan blade on the condensing unit. 3. Clean and disinfect drains with a solution of warm water and mild detergent. 4. Clean and disinfect drain lines and evaporator pan with a solution of warm water and mild detergent. 5. Clean all gaskets on a weekly if not daily basis with a solution of warm water and a mild detergent to extend gasket life. NOTE: DO NOT USE SHARP UTENSILS. RECOMMENDED CLEANERS FOR YOUR STAINLESS STEEL INCLUDE THE FOLLOWING:

unifiedbrands.net 25
Preventive Maintenance (cont.)
JOB CLEANING AGENT COMMENTS
Routine cleaning Soap, ammonia, detergent Medallion Apply with a sponge or cloth
Fingerprints and smears Arcal 20, Lac-O-Nu, Ecoshine Provides a barrier film Stubborn stains and discoloration
Cameo, Talc, Zud, First Impression
Rub in the direction of the polish lines
Greasy and fatty acids, blood, burnt-on foods
Easy-Off, Degrease It, Oven Aid
Excellent removal on all finishes
Grease and Oil Any good commercial detergent Apply with a sponge or cloth
Restoration/Preservation Benefit, Super Sheen Good idea monthly
Reference: Nickel Development Institute, Diversey Lever, Savin, Ecolab, NAFEM.
NOTE: Do not use steel pads, wire brushes, scrapers, or chloride cleaners to clean your stainless steel. CAUTION: DO NOT USE ABRASIVE CLEANING SOLVENTS, AND NEVER USE HYDROCHLORIC ACID (MURIATIC ACID) ON STAINLESS STEEL. NOTE: Do not pressure wash equipment as damage to electrical components may result.
Proper maintenance of equipment is the ultimate necessity in preventing costly repairs. By evaluating each unit on a regular schedule, you can often catch and repair minor problems before they completely disable the unit and become burdensome on your entire operation.
For more information on preventive maintenance, consult your local service company, factory ASA, or CFESA member. Most repair companies offer this service at very reasonable rates to allow you the time you need to run your business along with the peace of mind that all your equipment will last throughout its expected life. These services often offer guarantees as well as the flexibility in scheduling or maintenance for your convenience.
Unified Brands believes strongly in the products it manufactures and backs those products with one of the best warranties in the industry. We believe with the proper maintenance and use, you will realize a profitable return on your investment and years of satisfied service.

26 888-994-7636
Trouble Shooting Guide
SYMPTOM POSSIBLE CAUSE PROCEDURE Unit doesn't pre-chill 1. No power to unit 1. Check power source 2. Switch on 2. Check power switch 3. Compressor overheated 3. Clean condenser coil 4. Condenser fan faulty 4. Service condenser fan 5. Overload protector faulty 5. Test overload 6. Compressor relay faulty 6. Test relay 7. Compressor faulty 7. Call ASA for service AUTO mode ends but product is not at temp
1. Probe location 1. Relocate probe to center of pan 2. Compressor faulty 2. Call ASA for service
AUTO mode ends and product is frozen
1. Probe location 1. Relocate probe to center of pan
2. Probe calibration 2. Refer to Product Probe Calibration - page 24
3. Probe faulty 3. Replace probe Unit doesn’t defrost 1. Defrost setting incorrect 1. Check control parameters Moisture around drawer or frame 1. Gasket not sealing 1. Adjust gasket 2. Gasket torn 2. Replace gasket Ice in drain pan or water in bottom of unit or floor 1. Drain tube clogged 1. Clean drain 2. Unit not level 2. Adjust leveling leg/shim casters
Unit noisy 1. Unit not level 1. Adjust leveling leg/shim casters
2. Compressor mountings loose or hardened.
2. Tighten or replace compressor mountings
3. Condenser fan damaged or hitting fan shroud 3. Inspect condenser fan
4. Evaporator fan damaged or hitting fan shroud 4. Inspect evaporator fan
5. Mechanical compartment louver rattling
5. Bend or align tabs to reduce noise. Replace if necessary.
unifiedbrands.net 27
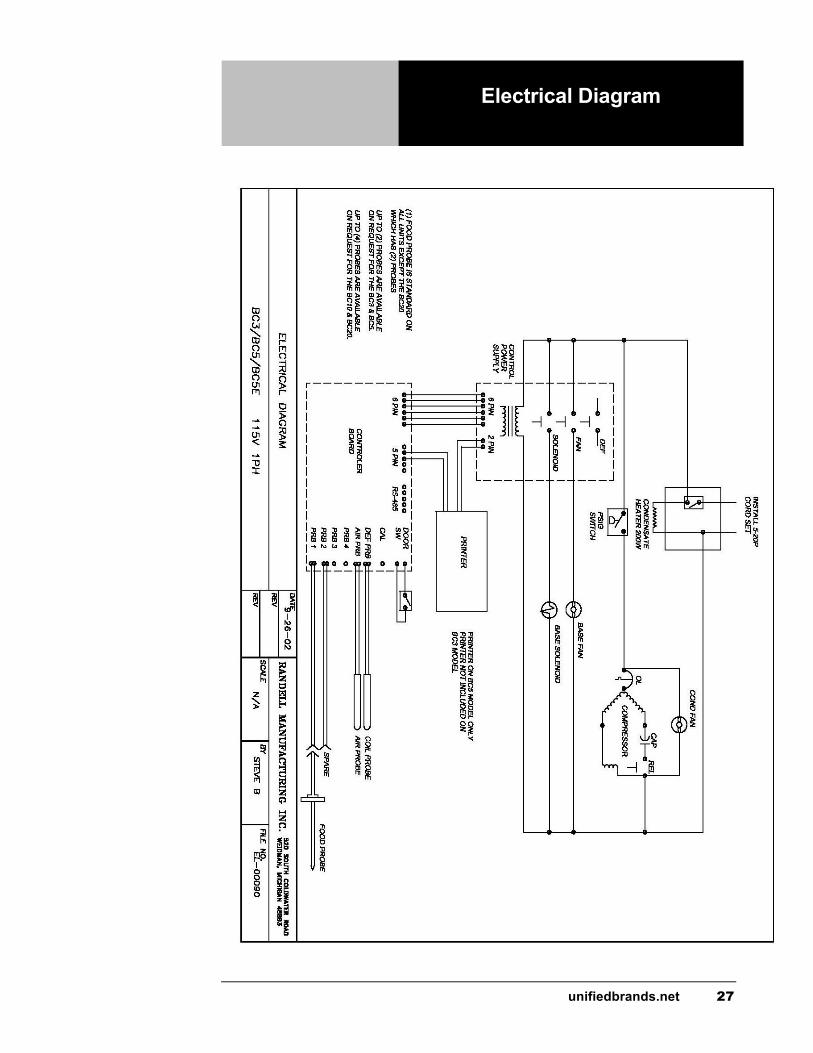
Electrical Diagram

28 888-994-7636
Electrical Diagram (cont.)

unifiedbrands.net 29
Electrical Diagram (cont.)
30 888-994-7636
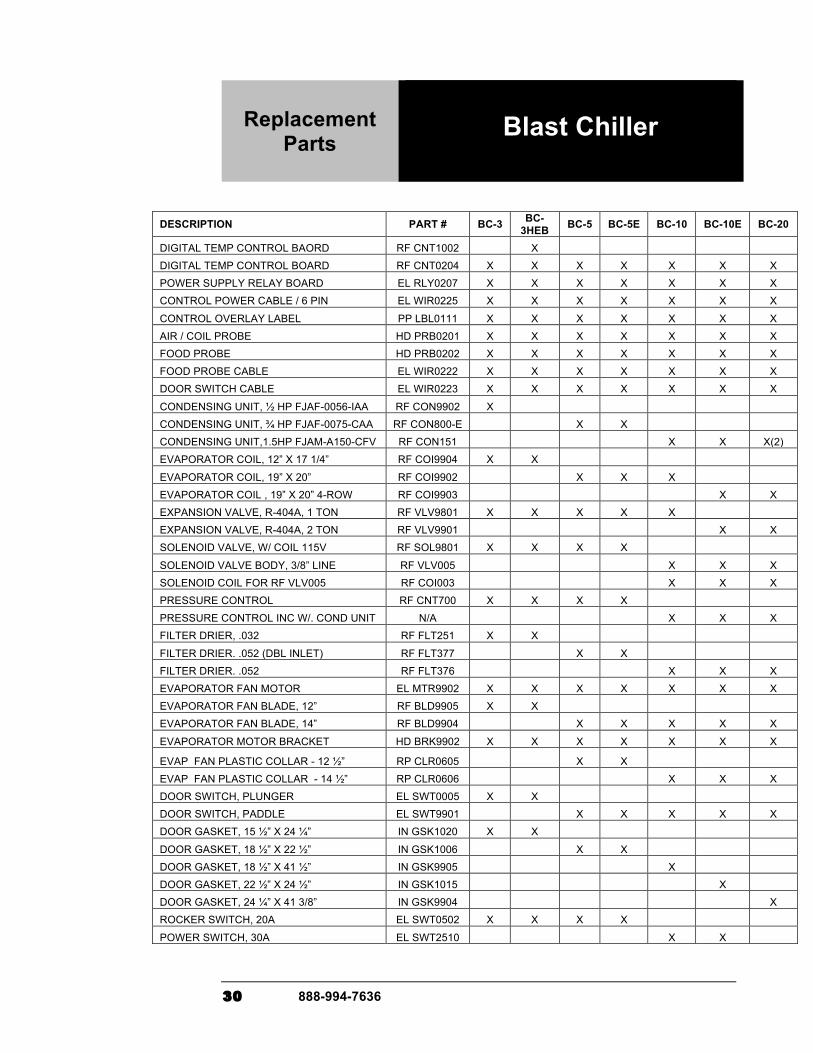
Replacement Parts
Blast Chiller
DESCRIPTION PART # BC-3 BC-3HEB BC-5 BC-5E BC-10 BC-10E BC-20
DIGITAL TEMP CONTROL BAORD RF CNT1002 X
DIGITAL TEMP CONTROL BOARD RF CNT0204 X X X X X X X
POWER SUPPLY RELAY BOARD EL RLY0207 X X X X X X X
CONTROL POWER CABLE / 6 PIN EL WIR0225 X X X X X X X
CONTROL OVERLAY LABEL PP LBL0111 X X X X X X X
AIR / COIL PROBE HD PRB0201 X X X X X X X
FOOD PROBE HD PRB0202 X X X X X X X
FOOD PROBE CABLE EL WIR0222 X X X X X X X
DOOR SWITCH CABLE EL WIR0223 X X X X X X X
CONDENSING UNIT, ½ HP FJAF-0056-IAA RF CON9902 X
CONDENSING UNIT, ¾ HP FJAF-0075-CAA RF CON800-E X X
CONDENSING UNIT,1.5HP FJAM-A150-CFV RF CON151 X X X(2)
EVAPORATOR COIL, 12” X 17 1/4” RF COI9904 X X
EVAPORATOR COIL, 19” X 20” RF COI9902 X X X
EVAPORATOR COIL , 19” X 20” 4-ROW RF COI9903 X X
EXPANSION VALVE, R-404A, 1 TON RF VLV9801 X X X X X
EXPANSION VALVE, R-404A, 2 TON RF VLV9901 X X
SOLENOID VALVE, W/ COIL 115V RF SOL9801 X X X X
SOLENOID VALVE BODY, 3/8” LINE RF VLV005 X X X
SOLENOID COIL FOR RF VLV005 RF COI003 X X X
PRESSURE CONTROL RF CNT700 X X X X
PRESSURE CONTROL INC W/. COND UNIT N/A X X X
FILTER DRIER, .032 RF FLT251 X X
FILTER DRIER. .052 (DBL INLET) RF FLT377 X X
FILTER DRIER. .052 RF FLT376 X X X
EVAPORATOR FAN MOTOR EL MTR9902 X X X X X X X
EVAPORATOR FAN BLADE, 12” RF BLD9905 X X
EVAPORATOR FAN BLADE, 14” RF BLD9904 X X X X X
EVAPORATOR MOTOR BRACKET HD BRK9902 X X X X X X X
EVAP FAN PLASTIC COLLAR - 12 ½” RP CLR0605 X X
EVAP FAN PLASTIC COLLAR - 14 ½” RP CLR0606 X X X
DOOR SWITCH, PLUNGER EL SWT0005 X X
DOOR SWITCH, PADDLE EL SWT9901 X X X X X
DOOR GASKET, 15 ½” X 24 ¼” IN GSK1020 X X
DOOR GASKET, 18 ½” X 22 ½” IN GSK1006 X X
DOOR GASKET, 18 ½” X 41 ½” IN GSK9905 X
DOOR GASKET, 22 ½” X 24 ½” IN GSK1015 X
DOOR GASKET, 24 ¼” X 41 3/8” IN GSK9904 X
ROCKER SWITCH, 20A EL SWT0502 X X X X
POWER SWITCH, 30A EL SWT2510 X X
unifiedbrands.net 31
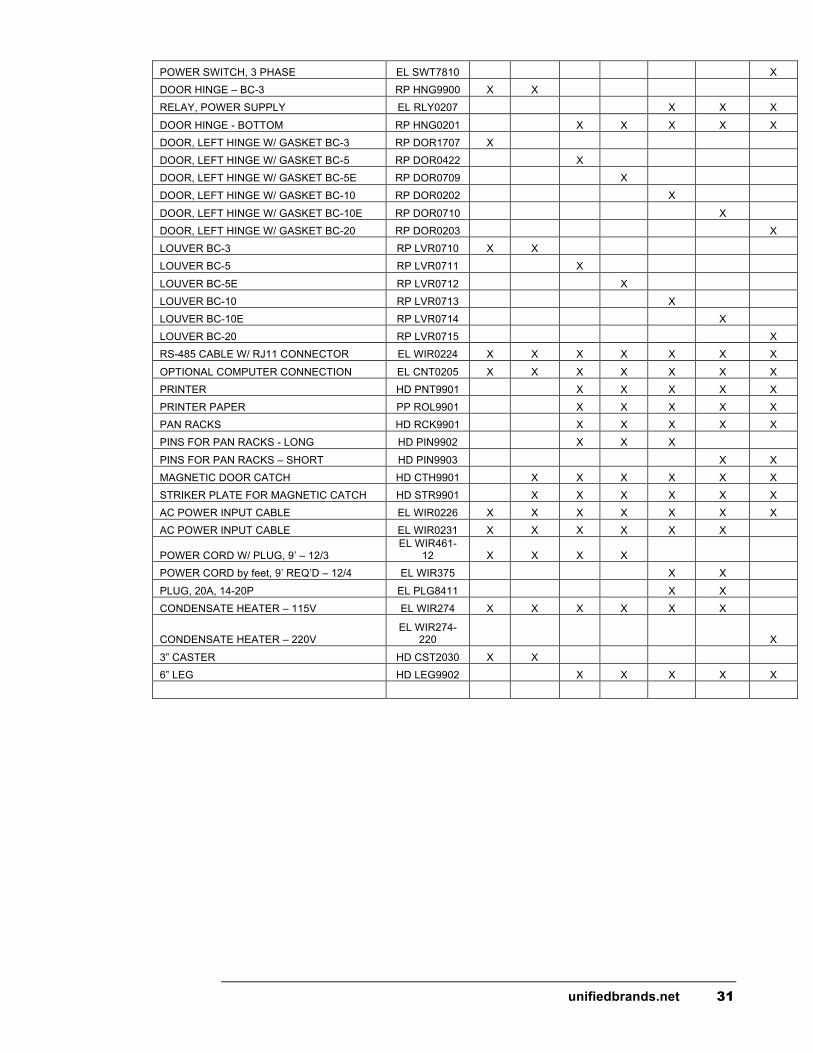
POWER SWITCH, 3 PHASE EL SWT7810 X
DOOR HINGE – BC-3 RP HNG9900 X X
RELAY, POWER SUPPLY EL RLY0207 X X X
DOOR HINGE - BOTTOM RP HNG0201 X X X X X
DOOR, LEFT HINGE W/ GASKET BC-3 RP DOR1707 X
DOOR, LEFT HINGE W/ GASKET BC-5 RP DOR0422 X
DOOR, LEFT HINGE W/ GASKET BC-5E RP DOR0709 X
DOOR, LEFT HINGE W/ GASKET BC-10 RP DOR0202 X
DOOR, LEFT HINGE W/ GASKET BC-10E RP DOR0710 X
DOOR, LEFT HINGE W/ GASKET BC-20 RP DOR0203 X
LOUVER BC-3 RP LVR0710 X X
LOUVER BC-5 RP LVR0711 X
LOUVER BC-5E RP LVR0712 X
LOUVER BC-10 RP LVR0713 X
LOUVER BC-10E RP LVR0714 X
LOUVER BC-20 RP LVR0715 X
RS-485 CABLE W/ RJ11 CONNECTOR EL WIR0224 X X X X X X X
OPTIONAL COMPUTER CONNECTION EL CNT0205 X X X X X X X
PRINTER HD PNT9901 X X X X X
PRINTER PAPER PP ROL9901 X X X X X
PAN RACKS HD RCK9901 X X X X X
PINS FOR PAN RACKS - LONG HD PIN9902 X X X
PINS FOR PAN RACKS – SHORT HD PIN9903 X X
MAGNETIC DOOR CATCH HD CTH9901 X X X X X X
STRIKER PLATE FOR MAGNETIC CATCH HD STR9901 X X X X X X
AC POWER INPUT CABLE EL WIR0226 X X X X X X X
AC POWER INPUT CABLE EL WIR0231 X X X X X X
POWER CORD W/ PLUG, 9’ – 12/3 EL WIR461-
12 X X X X
POWER CORD by feet, 9’ REQ’D – 12/4 EL WIR375 X X
PLUG, 20A, 14-20P EL PLG8411 X X
CONDENSATE HEATER – 115V EL WIR274 X X X X X X
CONDENSATE HEATER – 220V EL WIR274-
220 X
3” CASTER HD CST2030 X X
6” LEG HD LEG9902 X X X X X