radio projects
DESCRIPTION
A quick guide to starting up a Radio Project.TRANSCRIPT

Creating a Radio Project
Although you record using Audacity in the Recording Studio, we actually edit Radio Projects using Adobe Premiere like a Video Project. Much like a Video Project, you need your own folder for all of your file storage on the D: Drive; so go to My Computer>Video Files [D:] then right click in the open space and select New>Folder. Make sure you drag all of your project files; audio files, sound effects and samples into this folder BEFORE you even create your Premiere Project – this is to make sure you save your project in the correct location – ON THE D: DRIVE.
So secondly, we’ll open Adobe Premiere.
Here we save the “Location” as our D: Drive folder where all our source files and clips are, name the project appropriately then press OK.
The next menu-screen is vital in the next step of your project.
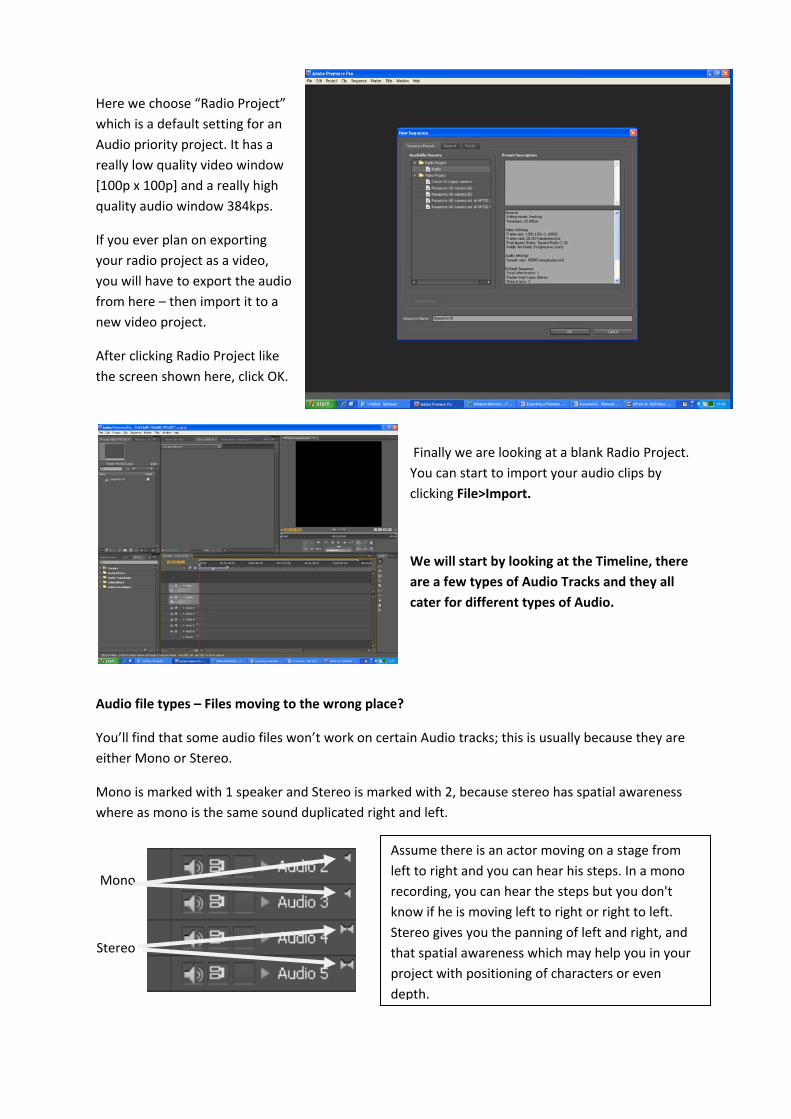
Here we choose “Radio Project” which is a default setting for an Audio priority project. It has a really low quality video window [100p x 100p] and a really high quality audio window 384kps.
If you ever plan on exporting your radio project as a video, you will have to export the audio from here – then import it to a new video project.
After clicking Radio Project like the screen shown here, click OK.
Finally we are looking at a blank Radio Project. You can start to import your audio clips by clicking File>Import.
We will start by looking at the Timeline, there are a few types of Audio Tracks and they all cater for different types of Audio.
Audio file types – Files moving to the wrong place?
You’ll find that some audio files won’t work on certain Audio tracks; this is usually because they are either Mono or Stereo.
Mono is marked with 1 speaker and Stereo is marked with 2, because stereo has spatial awareness where as mono is the same sound duplicated right and left.
Mono
Stereo
Assume there is an actor moving on a stage from left to right and you can hear his steps. In a mono recording, you can hear the steps but you don't know if he is moving left to right or right to left. Stereo gives you the panning of left and right, and that spatial awareness which may help you in your project with positioning of characters or even depth.

...bearing this in mind, at some point you’ll try and place audio files onto the wrong audio track, and they’ll jump around and fly off to a different one – this is because they are not compatible with the audio track you are putting them on. So if you try and place a Stereo file on “Audio1” [a Mono track], it will automatically move like so...
Notice how it jumped over Audio 1, 2 and 3 because they were all Mono tracks – so it MUST have been a Stereo audio file.
This is perfectly ok, just be careful with it when you are bringing in new clips because you may accidently delete clips you don’t want to, or think that it isn’t working – this is a very common error among students.
Renaming Audio Tracks/Adding Extra Audio Tracks
To help in organising your work, you can label all of your Audio Tracks and also add additional tracks should you need them. We do this by right clicking on any of the Audio Tracks and selecting the option we require.
Common Audio Track titles are “Backing Track”, “Narrator”, “Sound Effects” etc. If you stick to your own system, you’ll always know where everything is.

Changing your View
If you need to adjust the view of your project to make editing easier – you can drop down each channel to view your files as waveforms by clicking this arrow.
You can also zoom in and out by using these pyramid icons at the base of your Sequence Window.
Fading in/Fading Out & Cross-Fading
In the Effects Window [found either by clicking the Effects tab, or if this isn’t visible go to Window>Effects] you can add different effects to your individual audio files, but more importantly,
you can also access Audio Transitions. These transitions are different ways of fading in or out the volume of your Audio File, which means you can not only fade in/out at the beginning and end of your project, but you can fade into and out from other audio files during your project. Simply drag and drop “Constant Power” from the Effects Window onto the beginning or end of an audio clip, and it will automatically fade your clip in volume. This will be visible with this
These purple boxes can be stretched longer and shorter, depending on how long you wish to fade for.

Cutting clips up and editing
By double clicking on your chosen clip, you will automatically open up the Source Window.
By using the Player-Head for positioning, and the Open and Close Bracket tools, you can pick out particular sections of clips and cut out sections you want to miss out.
So when you’ve which part of the clip you wish to use, you can then drag and drop it on the timeline – obviously whether is a stereo or mono clip will determine which Audio Tracks you are allowed to use or not use.
You can cut clips further still using the Razor Tool, just like video editing.