public speaking guidebook sample · pdf file190 part threedeveloping presentation skills the...
TRANSCRIPT

ALLYN & BACON/LONGMAN www.ablongman.com
PUBLIC SPEAKING GUIDEBOOK© 2008
Suzanne OsbornMichael OsbornRandall Osborn
ISBN-13: 978-0-205-56392-0ISBN-10: 0-205-56392-9
S A M P L E C H A P T E RThe pages of this Sample Chapter may have slight variations in final published form.
SA
MP
LE
CH
AP
TE
R
Visit www.ablongman.com/replocator to contact your local Allyn & Bacon/Longman representative.

189
10 Using Presentation Aids
Seeing . . . most of all the senses, makes us know andbrings to light many differences between things.
A R I S T O T L E
P R E V I E W
Why This Chapter Matters
Speakers who use presentation aids often appear more professional, better prepared,more credible, more interesting, more concrete, and more persuasive than speakerswho do not use such aids.1 However, the reverse also can be true. If your aid is sloppy,poorly prepared, or inaccurate, your credibility will suffer. Use the advice in this chap-ter to make presentation aids work to your advantage.
What’s in This Chapter
The Pros and Cons of Presentation AidsTypes of Presentation AidsPresentation MediaPreparing Presentation AidsUsing Presentation AidsPreparing Basic PowerPoint Materials
Using presentation aids is not new, even to beginning speakers. The first publicspeeches you ever gave probably involved “show-and-tell.” You may havebrought an object you were going to talk about—a new toy, something youmade, the family pet, your little brother. The presentation aid helped you explainor describe your subject. Presentation aids in later speeches may go far beyondshow-and-tell in sophistication, but they still serve much the same purpose.
In this chapter, we describe the types of presentation aids available to you,identify the ways they can be used in speeches, offer suggestions for preparingthem, and present guidelines for their use. At the end of this chapter, we includea tutorial to help you prepare basic PowerPoint materials.
342450_ch_10.qxd 3/12/07 11:02 AM Page 189

190 Part Three Developing Presentation Skills
The Pros and Cons of Presentation Aids
Presentation aids help connect your audience with your message. When prop-erly prepared and used, they can help speeches in many different ways. But ifthey are used improperly, they can become a liability.
Advantages of Presentation Aids
The strength of presentation aids results from a certain weakness of words ascommunication tools. Words can have powerful effects, but they are essentiallyabstract. That is, they call up ideas of things rather than refer directly to whatyou can touch, see, hear, or feel. Presentation aids can overcome this weaknessby giving your audience direct sensory contact with your message:
■ Presentation aids aid understanding. It is easier to give directions if youcan trace the route on a map.
■ Presentation aids make your speech memorable. Your audience mayremember a photograph of a hungry child longer than they wouldstatistics on poverty.
■ Presentation aids establish the authenticity of your words. People believewhat they see more than what they hear.
■ Effective presentation aids enhance credibility. They tell the audience youput extra effort into preparing your speech.
■ Presentation aids add variety to a speech. Variety creates interest andhelps sustain or recapture attention.
Disadvantages of Presentation Aids
Presentation aids also have the potential to harm your speech. Recognizingpotential problems can help you avoid them or lessen their impact:
■ Presentation aids may distract your listeners. Your words and ideas,not your presentation aids, should always be the focus of your speech.
■ Presentation aids can distract you. If you haven’t rehearsed using youraid, you might get caught up with what you are doing and lose trackof what you are saying.
■ Presentation aids can interfere with eye contact with listeners.Display aids so you don’t have to look at them the entire time youuse them.
■ Poor presentation aids can damage your credibility. If you are artisticallychallenged, use all the tools available to create an attractive and effectivepresentation aid.
■ Presentation aids put you at the mercy of equipment. Be sure you knowwhat equipment is available and how to use it. Have a backup plan incase of glitches.
342450_ch_10.qxd 3/12/07 11:02 AM Page 190

Chapter 10 Using Presentation Aids 191
Types of Presentation Aids
The number and types of presentation aids are limited only by your imagina-tion. Examples include people, objects and models, graphics, and pictures.
People
When you speak, your appearance, gestures, and facial expressions add a non-verbal component to your message. You become a presentation aid in thespeech. Be sure that the way you look complements, rather than contradicts,what you say. If you will be speaking about camping and wilderness adventures,blue jeans and a flannel shirt could be appropriate. If you are a nurse discussinga medical topic, your uniform might enhance your credibility. If you are talkingabout how to dress for an employment interview, wear professional attire.
You may also use other people to demonstrate things that are difficult todescribe in words. One of our students used two classmates to demonstratethe positioning of rugger players as he described the game played in his nativeSri Lanka. The use of actual people was more effective than sketches wouldhave been.
If you plan to use other people to illustrate ideas in your speech, make surethey are willing to help you. Rehearse your presentation with them. As youspeak, have them come forward on cue, participate in the demonstration, andthen quickly sit down.
Objects and Models
Objects or models are often essential in speeches of demonstration. Any objectyou use must be large enough for everyone in the audience to see without strain-ing yet small enough to handle easily. If an object is too large, too small, too rare,or simply unavailable, a scale model may be used as a presentation aid.
Inanimate objects work better than living things, which you can’t always con-trol. Never use objects that are dangerous, illegal, or potentially offensive—suchas guns, drugs, or pornography—in classroom speeches. Even replicas of suchmaterials can cause problems. One of our students pulled a realistic-looking“toy” semiautomatic weapon from beneath the lectern during the introductionof a speech on gun control. Several audience members became so upset thatthey could not concentrate on his message. If you have questions about theappropriateness of an object, check with your instructor.
Do not display an object or model throughout your speech. If you do, listen-ers may focus on your presentation aid rather than on your message. For the bestresults, keep the object or model out of sight until it’s time to use it; then put itback out of sight as you continue your speech. If you will be using more than oneobject, display them one at a time. Hide them after you finish showing them.
342450_ch_10.qxd 3/12/07 11:02 AM Page 191

192 Part Three Developing Presentation Skills
F I G U R E 1 0 . 1 Map of Yellowstone Park
Grand Canyon Area
OldFaithful
MammothHot Spring
FishingBridge
Visitor’sCenter
Yellowstone Park
Also, don’t clutter up a speech with too many presentation aids. One studentbrought six objects to illustrate materials used in the Montessori method ofpreschool education. She lined them up on the desk before beginning her speech.Listeners were so curious about what the things were that they paid more atten-tion to the objects than they did to the speaker. Don’t let yourself be upstaged byyour presentation aid.
Graphics
Graphics are visual representations of information and include line drawings,graphs, charts, and textual materials. Because graphics will be displayed foronly a short time during your speech, they must be instantly clear.
342450_ch_10.qxd 3/12/07 11:02 AM Page 192

Chapter 10 Using Presentation Aids 193
Line Drawings. Line drawings such as sketches or maps may be drawn byhand or generated on a computer. Sketches offer simplified representations ofwhat you are describing. If you don’t draw well, search children’s coloringbooks for line drawings that you can trace. Make the sketch first on paper;then enlarge it or transfer it onto a transparency with a copier. You can alsomake sketches using clip art or a drawing program on a computer.
Maps are particularly useful for speeches based on spatial relationships.Commercially prepared maps contain too much detail to use as presentationaids. The best maps are those that you make specifically for your speech. Youcan keep these simple, relevant to your purpose and uncluttered so that the au-dience can put locations and distances into perspective. The map in Figure 10.1shows the route between major attractions at Yellowstone National Park.
Graphs. Mrs. Robert A. Taft, wife of a prominent senator, once commented,“I always find that statistics are hard to swallow and impossible to digest. Theonly one I can ever remember is that if all the people who go to sleep in churchwere laid end to end, they would be a lot more comfortable.”2 Many peopleshare Mrs. Taft’s feelings about statistics. Masses of numbers presented orallycan be overwhelming. However, a well-designed graph can make statistical in-formation easier for listeners to understand. The three most commonly usedtypes of graphs are the pie graph, the bar graph, and the line graph. Figure 10.2illustrates these types of graphs.
A pie graph shows the size of a subject’s parts in relation to one another andto the whole. The “pie” represents the whole, and the “slices” represent theparts. The segments, or slices, are percentages of the whole and must add up to100. The most effective pie graphs have five or fewer segments. A bar graphuses vertical or horizontal bars to show comparisons between two or moreitems or groups. The bars should be clearly distinguished by color or pattern.A line graph shows changes across time and is useful for illustrating growth ordecline. When you plot more than one line on a graph, use different colors. Toavoid confusing listeners, have no more than three lines on a graph.
Charts. Charts provide visual summaries of relationships that are not them-selves visible. An effective chart should be easy to read from a distance andsimple enough to understand instantly. When charts are loaded with too muchinformation, they defeat their own purpose by encouraging the audience toread them rather than listen.
One frequently used type of chart is a flow chart. A flow chart can show thesteps in a process, the hierarchy of an organization, or the branches of a fam-ily tree. The flow chart in Figure 10.3 illustrates the major steps in the prepa-ration of a speech. Note the double-ended arrows in this chart, which suggestthat a speaker works back and forth between the steps.
Textual Graphics. Textual graphics are lists of words, phrases, or numbers.The most frequently used textual graphics contain bulleted lists such as that
342450_ch_10.qxd 3/12/07 11:02 AM Page 193

194 Part Three Developing Presentation Skills
shown in Figure 10.4. When you make a bulleted list, begin with a title, andthen place the material under it. Keep the graphic simple. Use intense colorswith good contrast. Have no more than six lines of information and no morethan six words to a line.
F I G U R E 1 0 . 2 Sample Graphs
1st year Sophomores
Donations of Blood by Classes
Olympic Shot Put Distances
Juniors Seniors
Student Affairs Office, 1996
Sports Almanac, 1995
Related
Stranger
Unknown/ unsolved
Acquainted
Murder/Victim Relationships
Information Please Almanac, 1995
400
80
76
72
68
64
Feet 60
56
52
48
44
401948 1956 1964
Year1972 1980 1988
360
320
280
240
200
160
120
80
40
0
Bar Graph
Line Graph
Pie Chart
Men
Women
342450_ch_10.qxd 3/12/07 11:02 AM Page 194

Chapter 10 Using Presentation Aids 195
You can also use textual graphics to present numerical information. Keep itsimple. Use no more than three columns and five rows of numbers. Figure 10.5illustrates a simple numerical graph.
Pictures. A good photograph can authenticate a point in a way that wordsalone cannot. Suppose that a speaker makes this statement: “If today’s climateconditions continue, the glaciers in Glacier National Park will be gone in thirty
F I G U R E 1 0 . 3 Flow Chart: Major Steps in the Preparation of a Speech
Analyze situationand audience factors
Select and focus your topic
Determineyour purpose
Develop yourpreliminary outline
Researchyour topic
Check the adequacyof your preparation
Prepare yourformal outline
Practice yourpresentation
Major Steps in Speech Preparation
342450_ch_10.qxd 3/12/07 11:02 AM Page 195

196 Part Three Developing Presentation Skills
years.” This could be more dramatic and convincing if the speaker showedphotographs to reveal the loss of glaciers that has already taken place (seeFigure 10.6).
Although a picture may sometimes be worth more than a thousand words, it’salso true that using pictures requires special equipment. Small photographs aredifficult for audiences to see, and passing pictures around during a presentation
F I G U R E 1 0 . 4 Sample Bulleted List
Using Presentation Aids
• Helps you seem better prepared
• Helps you seem more professional
• Makes your message more persuasive
• Helps listeners understand complex material
Presentations/3M, 2000.
F I G U R E 1 0 . 5 Numerical Graph
$1,000 – 8%INVESTMENT GROWTH
5 years10 years15 years20 years
$1,469$2,159$3,172$4,666
Berger, Feathering Your Nest, 1995.
342450_ch_10.qxd 3/12/07 11:02 AM Page 196

Chapter 10 Using Presentation Aids 197
F I G U R E 1 0 . 6 Photos of Glacier National Park
can be distracting. To get the most from pictures used as presentation aids:
■ Enlarge snapshots on a copier to eleven by seventeen inches or larger.■ Mount pictures on poster board.■ Use digital photographs in PowerPoint projections.■ Turn photographs into transparencies with a computer.■ Select pictures that are relevant to your speech.■ Show pictures to illustrate a point; then put them out of sight.
Presentation Media
There are many different ways to display your presentation aids. Presentationmedia include flip charts, posters, handouts, chalk or marker boards, trans-parencies, videotapes, and audiotapes. Newer options include computerized pre-sentations such as PowerPoint that can incorporate slides, pictures, and sound.
342450_ch_10.qxd 3/12/07 11:02 AM Page 197

198 Part Three Developing Presentation Skills
Flip Charts
A flip chart is a large, unlined tablet. Most flip charts are newsprint pads thatmeasure about two feet wide by three feet high. They are placed on an easel sothat each page can be flipped over the top when you are done with it.
Flip charts are convenient, inexpensive, and adaptable to many settings.Business meetings, decision-making groups, and organizational training ses-sions often use flip charts along with more sophisticated presentation tools.Since they’re designed to be used spontaneously, they are especially usefulwhen subjects come up in a meeting that should be written down.
Although flip charts are useful in meetings, they don’t work well as presen-tation aids in speeches. They often look sloppy and may suggest that a speakerdid not allot enough time to prepare a polished presentation aid. Writing on aflip chart also forces you to speak with your back to the audience. This loss ofaudience contact can offset any gain from using the charts.
Nonetheless, you should learn how to handle this resource. When using flipcharts, keep each page as simple as possible. Use wide-point felt markers instrong colors. Print or write legibly in large letters. Keep the content short andsimple. If the ink bleeds through the paper, as it is prone to do, flip over an-other sheet before you begin writing again.
Poster Boards
Use poster boards to display sketches, maps, charts, graphs, or textual graph-ics. In an average-size room with a small audience, posters about fourteen byseventeen inches work well and are easier to handle than larger posters.
Posters are a flexible tool. They can be used for a sequence of charts, withone idea or graphic per board. You can place them face down on the lectern ortable and display them as you refer to them. You can also use the back of aposter as a “cheat sheet” that cues you to the next point in your presentation.Be sure to number the posters on the back so that they stay in sequence.
Keep posters simple and neat. Use large letters in strong colors that are easyto read. Print legibly, or use stick-on letters. Leave a lot of white space. Rehearseyour speech using the posters so that you can integrate them smoothly into yourpresentation.
Handouts
Handouts are useful when your subject is complex or your message contains agreat deal of statistical information. When your speech is over, listeners willhave something to remind them of your message.
Handouts can also be a major distraction. Audiences tend to read themrather than listen, so it is best to make them available after you have finishedspeaking. Do not distribute handouts during your speech. Pass them out beforeyour speech only when it is absolutely necessary for listeners to refer to themas you speak.
342450_ch_10.qxd 3/12/07 11:02 AM Page 198

Chapter 10 Using Presentation Aids 199
Chalk and Marker Boards
A chalk or marker board is available in most classrooms and corporate con-ference rooms. Like flip charts, these boards are best used for spontaneousillustrations and demonstrations.
Even when you’ve prepared your speech carefully, there may be times whenyou look at your listeners and realize that some of them do not understand you.In response, you can write a few words on the board or draw a simple diagramto reduce audience confusion. When using chalk or marker boards:
■ Clear the board before you begin.■ Write large so those at the back of the room can read the material.■ Print legibly.■ Use only for items that take a few seconds to write or draw. ■ Erase the board after you finish.
Above all, avoid the impression that you’re using chalk or marker boardsbecause you did not take the time to prepare anything else.
Videos and Audios
Videos are especially useful for transporting an audience to the scene of theaction. For some topics, well-prepared videos can be more effective than anyother type of presentation aid. A student at Northwest Mississippi CommunityCollege who was a firefighter used video in an informative speech on fire haz-ards in the home. He was able to show long shots of a room and then zoom inon various hazards as he talked about them.3 He prepared the video withoutsound so that his words explained the images.
As effective and dramatic as videos may be, this medium presents somespecial problems:
■ Moving images attract more attention than words, so they can upstage you.■ Videotape editing requires special training and equipment.■ Video clips can consume much of your speaking time.
To solve these problems, transfer taped material onto CDs, which are sim-pler and easier to handle. The transfer can be done on most personal comput-ers with a DVD/CD burner. Limit the amount of video you use. In a shortspeech, keep video clips under thirty seconds long.
Audio segments on tapes, CDs, or MP3 files can also be useful as presenta-tion aids. If you wanted to describe the alarm cries of various animals or thesongs of different birds, such recordings could be essential. If you are in doubtabout the wisdom or practicality of using audio clips, consult your instructor.
Projections
Projections, either transparencies or slides, allow audiences to see graphics orphotographs easily, especially when audiences are large or spread out in a large
342450_ch_10.qxd 3/12/07 11:02 AM Page 199

200 Part Three Developing Presentation Skills
room. Since slides and transparencies look more professional than posters orflip charts, business speakers often prefer them.
When using photographic slides and a traditional carousel projector, theroom usually has to be darkened. Unfortunately, this means that the illumi-nated screen becomes the center of attention instead of you. Transparencies areeasier to use than slides: you don’t have to darken the room when you showthem. They are simple to make, inexpensive, and adaptable. Another advan-tage is that you can write on a transparency while it is being shown, therebyadding flexibility and spontaneity to your presentation. You can use a pencil asa pointer to direct listeners’ attention to features you want to emphasize.
The major disadvantage of transparencies and slides is that often you mustspeak from where the equipment is located, so you may have to stand behindor in the middle of the audience to run the projector. This means you’ll betalking to the backs of some people. If you do not have remote control equip-ment, your best solution may be to have a classmate change the projections orslides on cue. Practice with your assistant to coordinate the slides with yourwords.
Most transparencies and slides are now prepared on personal computers.You can buy transparency sheets to use with most printers. To prepare trans-parencies and slides:
■ Follow the guidelines in this chapter for sketches, maps, graphs, charts,and textual graphics. Limit the amount of text to a maximum of six lines,with six words per line.
■ Check the equipment ahead of time, and become familiar with its opera-tion. You may need a long extension cord to position the equipmentwhere you want it.
■ Practice using the equipment as you rehearse your speech. ■ Don’t use too many slides or transparencies in a short speech.
Remember that a presentation aid should complement your words, notcompete with or replace them.
Computer-Assisted Presentations
Most personal computers are packaged with software, such as PowerPoint,that allows you to prepare and present slides and transparencies. Materialsproduced on computers are usually neater and more accurate than thosedrawn by hand.
When using a computer to develop presentation aids, be careful not to getso caught up with the glitz and glitter that you lose sight of the fact that it isyour message that is most important. It is better to be subtle than sensational.
Remember that using technology in your presentation does not excuse youfrom the usual requirements for speaking. If your computer-generated aidsdraw more attention than your ideas, the technology may be a hindrance morethan a help.
342450_ch_10.qxd 3/12/07 11:02 AM Page 200
Chapter 10 Using Presentation Aids 201
PowerPoint Presentations
More than 90 percent of all computerized presentations in the United Statesare created by using the PowerPoint program.4 PowerPoint is easy to use. Thesoftware contains templates and comes with a step-by-step tutorial. If you needto add a slide to the program, you can insert new material quickly and easily,and you can even change a slide during your presentation.
PowerPoint is also frequently misused. A poor PowerPoint presentationmay actually annoy your listeners, do little to enhance their understanding,and damage your credibility. A recent survey identified the major complaintspeople have about PowerPoint presentations:
1. Reading slides instead of discussing material2. Using text that is too small3. Writing full sentences instead of bulleted points4. Using colors that make slides hard to read5. Using moving text or graphics6. Adding annoying sounds7. Projecting material that is too complex5
These are all problems a speaker can control:
■ Don’t put your speech outline on PowerPoint slides and then read it tothe audience.
■ Be sure the material is easy to read. Use a large, plain font, and selectcolors that provide good contrast, such as light on dark or dark on light.Avoid shaded backgrounds.
■ Keep your materials simple. Limit the amount of information on a slide.
■ Use bulleted points, not full sentences.■ Don’t try to project complex charts or graphs. Simplify them or use a
different type of presentation aid.■ Avoid overly dramatic techniques such as flying text and startling sound
effects.
Figure 10.7 shows both good and poor PowerPoint slides.
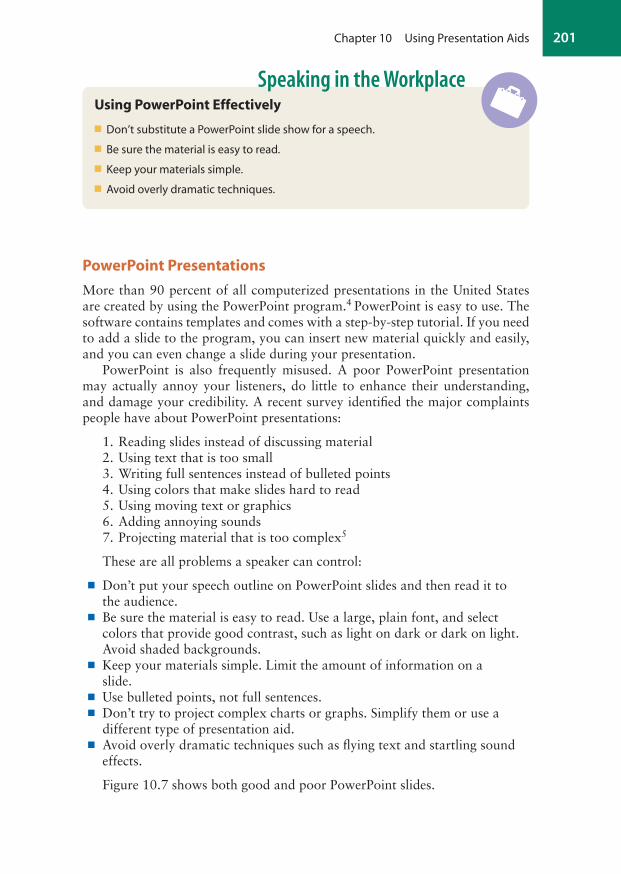
Speaking in the WorkplaceUsing PowerPoint Effectively
■ Don’t substitute a PowerPoint slide show for a speech.
■ Be sure the material is easy to read.
■ Keep your materials simple.
■ Avoid overly dramatic techniques.
W
342450_ch_10.qxd 3/12/07 11:02 AM Page 201

202 Part Three Developing Presentation Skills
F I G U R E 1 0 . 7 Good Versus Poor PowerPoint Slides
This . . .
NOT This . . .
Preparing PowerPoint Slides
• Keep it simple
• Six by six
• Plain fonts
• Light on dark
• Dark on light
• Run spellchecker
PREPARING POWERPOINT SLIDES
It is good to keep your slides very simple and to limit the amount of material you put on a slide so that you use only things that are relevant to your message. You should be consistent in terms of the colors you use for your backgrounds and the colors you use for your words.
If you want your slides to be easy to read you should avoid strongly patterned backgrounds because they make the words harder to read.
Avoid using red letters because they tend to bleed into the background.
USE UPPERCASE AND LOWERCASE LETTERS BECAUSE ALL CAPITALS ARE MORE DIFFICULT TO READ.
Use large fonts so that people in the back of the room can read them easily.
Be sure you have good contrast between your words and the background, which means you should use light letters on dark backgrounds and dark letters on light backgrounds.
Try to avoid have mistakes in grammer and spelling!
342450_ch_10.qxd 3/12/07 11:02 AM Page 202

Chapter 10 Using Presentation Aids 203
Preparing Presentation Aids
Effective presentation aids are carefully thought out and planned to fit yourmessage. Regardless of the type of media you use to produce them, create pre-sentation aids based on accepted principles of design and color.
Principles of Design
Look at your aids from the perspective of an audience member, and see if theymeet the following criteria: simplicity, visibility, emphasis, and balance.
Simplicity. Charts, slides, graphs, maps, and posters will be displayed foronly a short time during your speech. Therefore, their meaning must be in-stantly clear. Don’t try to cram too much information into a single presentationaid. Cluttered aids distract listeners. Instead, focus your visuals on a singleidea. If you need to illustrate additional ideas, prepare a sequence of aids.Apply the KISS principle—Keep It Simple, Sweetheart!
Visibility. The size of a presentation aid must be appropriate to the setting inwhich it is used. Large aids are cumbersome to handle and may overwhelm lis-teners in a small room. Similarly, a small aid will not be effective in a large room.In classrooms that hold up to forty students, poster boards work fairly well. Ina larger room and with a larger audience, projection equipment will be needed.
Design your visuals so that listeners in the back of the room can see themwithout straining. If listeners must labor to see what you are talking about,your aid will be more of a hindrance than a help. When preparing a posterboard for speeches in standard classrooms, make your titles about three incheshigh and other text at least an inch and a half high.
If you generate slides or transparencies on a computer, use a large font.Computer text is typically sized in points (pt). As a general guideline, use thefollowing sizes:
Transparencies Slides HandoutsTitle 36 pt 24 pt 18 ptSubtitles 24 pt 18 pt 14 ptOther text 18 pt 14 pt 12 pt
Use a plain font such as Arial or Franklin Gothic. Avoid script or decorative fonts.
Emphasis. Design your presentation aids to immediately draw your listeners’eyes to what you want to illustrate. The map of Yellowstone Park on page 192eliminates all information except what the speaker wishes to stress. Had thespeaker added pictures of bears to indicate grizzly habitats and drawings offish to show trout streams, the presentation aid might have been decorative,but it also would have been distracting. When in doubt, leave details out. Letyour words provide the elaboration.
Balance. Balanced presentation aids are pleasing to the eye. You achieve bal-ance when you position materials so that they form a consistent pattern and
342450_ch_10.qxd 3/12/07 11:02 AM Page 203

204 Part Three Developing Presentation Skills
help listeners focus on the message. White space is important. You should leavea margin of at least two inches at the top and bottom of a standard two- bythree-foot poster board. Side margins should be about one and a half incheswide. On computer-generated slides, leave blank space at both the top and bot-tom and have equal-sized side margins.
Principles of Color
As many of the illustrations in this chapter show, color adds impact to presen-tation aids and holds attention better than black-and-white visuals. To get themost benefit from the use of color, apply the following guidelines.
Use Color to Emphasize Meaning. A speech about crop damage from adrought might use a map showing the least affected areas in green, moderatelydamaged areas in orange, and severely affected areas in brown. The naturalcolors would reinforce the message.
Use Color to Create Moods. For many Americans, blue suggests power,authority, and stability (blue chip, blue ribbon, royal blue). The color green isassociated with both money (greenbacks) and environmental concerns (Green-peace). Red signals excitement or crisis (in the red, red ink, “I saw red”). Redline graphs tracing the rise in cases of AIDS would help convey the urgency ofthe problem.
Use Text That Contrasts with the Background. With poster board, use awhite- or cream-colored background, and print the text in strong primary col-ors such as red, blue, and green for contrast. Colors like pastel pink, light blue,and pale yellow or those with a grayish tinge may not be strong enough forgood graphic emphasis in any type of presentation aid.
When preparing projections, avoid red letters on a light background becausered tends to “bleed,” making the words blurry and difficult to read. Also, a whitebackground can create glare when it is projected. A cream- or ivory-coloredbackground may be used with dark letters. A strong primary-colored back-ground with white letters can be attractive and readable.
A final word of caution concerning colors. When you prepare presentationaids on a computer, the colors on your monitor will differ from the colorswhen they are projected on a transparency or slide. Run a sample, and projectit to see how the colors will actually look to an audience. If the results are notwhat you expected, try other colors until you are satisfied.
Making Presentation Aids
To make handmade charts, graphs, or other presentation aids, begin with arough draft that allows you to see how your aid will look when it is finished. Ifyou are making a poster, prepare your draft on newsprint or butcher paper of thesame size. With a light pencil, mark off the margins to frame your aid. Divideyour planning sheet into four equal sections to balance the placement of mater-ial. Then use a wide-tipped felt marker to sketch in your design and words.
342450_ch_10.qxd 3/12/07 11:02 AM Page 204

Chapter 10 Using Presentation Aids 205
Now step back and inspect your presentation aid from about the same dis-tance as the back row of your audience. Can you read it without straining? Iseverything spelled correctly? Is your eye drawn to what is most important?Have you positioned your material so that it looks good? Does the poster lookbalanced?
Once you are satisfied with your rough draft, construct the final product. Ifyou are artistically challenged, use stencils or stick-on letters and numbers. Ifyou use computer-generated graphics, experiment with several different designs.
Speaker’s Notes 10.1 provides a checklist to use for preparing presentationaids.
Using Presentation Aids
Practice using your presentation aids as you rehearse your speech. Integratethem into your presentation with transitions such as, “As we can see on thischart . . .” Check out the room where you will be speaking. Gather what youwill need to display your presentation aids. For example, if you’re using posterboard, you may need an easel or masking tape to display your aid. Think abouthow you will conceal your aid before and after you use it.
Check any electronic equipment you will use (slide projector, overhead pro-jector, VCR, computer) in advance of your presentation. Make sure that thisequipment works and that you can use it properly. If you are bringing in com-puter materials on a CD, be sure they are compatible with the equipment in theroom. For your peace of mind, have a backup plan in case anything goes wrong.
When referring to your presentation aid, never stand directly in front of it.Stand to the side of it and maintain eye contact with listeners. Don’t talk toyour aid; talk with your audience. As you mention something on the aid, pointto what you are talking about. Don’t leave your audience searching for whatyou are describing.
Don’t use too many presentation aids in one speech. As a general guideline,use no more than four aids for a six-minute presentation and no more than six
Speaker’s Notes 10.1Checklist for Preparing Presentation Aids
My presentation aid is as simple as I can make it.
My aid draws the eye to what I want to emphasize.
My aid has adequate margins.
My aid can be read from the back of the room.
My aid has effective color contrast.
My aid is free of spelling and grammatical errors.
T
342450_ch_10.qxd 3/12/07 11:02 AM Page 205

206 Part Three Developing Presentation Skills
aids for a ten-minute presentation. Otherwise, your speech may become just avoice-over for a slide show. Remember that your presentation aids should en-hance your verbal message, not replace it. Speaker’s Notes 10.2 summarizesthe dos and don’ts of using presentation aids.
Ethical Considerations
Presentation aids can enlighten a message, but they can also be misleading. Forexample, consider the bar graphs in Figure 10.8. Both graphs are intended toshow the recent growth in the percentage of women partners in major ac-counting firms. In bar graph A, the increase looks like a large gain, but in bar
Speaker’s Notes 10.2Using Presentation Aids
Do Don’t
Practice using your presentation aid. Try to wing it using your presentation aid.
Display aids only when referring to them. Leave aids in full view during speech.Stand to the side of an aid when using it. Stand in front of the aid when using it.Point to what you are talking about. Leave listeners searching for what is
important.Deliver your speech to your audience. Deliver your speech to your
presentation aid.Limit the number of aids in your speech. Become a voice-over for a slide show.
T
F I G U R E 1 0 . 8 Misleading Bar Graph and Same Material Presented So It’s Not Misleading
7
6
5
4
3
2
1
01995 1997 1999 2001
Wall Street Journal, 2001
100908070605040302010
01995 1997 1999 2001
Wall Street Journal, 2001
Graph A Graph B
Women Partners in Accounting Firms
342450_ch_10.qxd 3/12/07 11:02 AM Page 206

Chapter 10 Using Presentation Aids 207
graph B, the gains appear much smaller.6 Which do you think represents themore accurate portrayal of the information?
Other ethical issues involve the use of films, tapes, and digital materials inpresentations, and these concerns have been around for decades. The famousCivil War photographer Matthew Brady rearranged bodies on the battlefield toenhance the impact of his pictures. Eighty years later, another American warphotographer carefully staged the now celebrated photograph of marinesplanting the flag at Iwo Jima.7 Fifty years after that, Time magazine electroni-cally manipulated a cover photograph of O. J. Simpson to “darken it and achievea brooding, menacing quality.”8
On the one hand, these famous images are fabrications: they pretend to bewhat they are not. On the other, they bring home reality more forcefully. Arethese photographic manipulations unethical—or simply artistic?
Keep ethical considerations in mind as you plan and prepare presentationaids. The guidelines in the Ethics Alert above should help keep you on track.
Ethics Alert! The Ethical Use of Presentation Aids
■ Prepare charts and graphs that do not distort information.
■ Never manipulate visual images to deceive your audience.
■ If you alter an image, let the audience know you have done so.
■ Cite the source of data you present in a graph.
@��InterConnections.LearnMore
Communicate Using Technology
http://www.communicateusingtechnology.com/powerpointarticles.htmContains a variety of how-to articles for technology-enhanced presentations, with good, prac-tical advice for beginning or advanced speakers who wish to improve their presentations.Developed and maintained by Dave Paradi, communicating with technology consultant.
Virtual Presentation Assistant
http://www.ku.edu/~coms/virtual_assistant/vpa/vpa.htmThis web site offers concise guidelines for developing and using visual aids in presentations.Developed and maintained by the Communication Studies Department of the University ofKansas.
342450_ch_10.qxd 3/12/07 11:02 AM Page 207

208 Part Three Developing Presentation Skills
Microsoft PowerPoint
http://office.microsoft.com/en-us/FX010857971033.aspxMicrosoft PowerPoint home page; contains links to tips, tricks, how-to articles, and other onlinecourse materials.
PowerPoint in the Classroom
http://www.actden.com/pp/A simple online tutorial that walks you through the basics of preparing a PowerPoint presenta-tion, incorporating all the bells and whistles. A good resource for the technophobic student.
. . .
* Experiment with the Strategies in This Chapter
Review the material on the advantages and disadvantages of using the presentationaids presented in this chapter. Choose either (1) the major benefit that you would liketo gain by using presentation aids or (2) the main pitfall that you would like to avoid.Summarize in the space below what you want to emphasize:
Next, choose a strategy from this chapter that will best help you gain the benefit oravoid the pitfall you just described. Summarize that strategy in the space below,including when and how you intend to use it.
After using the strategy described above, reflect on how well it worked for you. Con-sider how you could modify this strategy to make it more effective for you in the
342450_ch_10.qxd 3/12/07 11:02 AM Page 208

Chapter 10 Using Presentation Aids 209
future. Or if you have an idea for a totally new strategy, summarize your idea here anddescribe how you intend to use it.
Notes
1. See the studies conducted by WhartonBusiness School’s Applied Research Centerand the Management Information ServicesDepartment of the University of Arizona,cited by Robert L. Lindstrom, “ThePresentation Power of Multimedia,” Salesand Marketing Management (Sept. 1994):51, and by Donal Meilachl, “Even theOdds with Visual Presentations,” Inc.Annual (1994): 1–7.
2. Cited in Laurence J. Peter, Peter’sQuotations: Ideas for Our Time (NewYork: Bantam, 1979), p. 478.
3. Our thanks for this example go to ProfessorMary Katherine McHenry, NorthwestMississippi Community College, Senatobia,Mississippi.
4. Ricky Telg and Tracy Irani, “Getting theMost Out of PowerPoint,” AgriculturalEducation Magazine, Apr. 2001, p. 11.
5. Dave Paradi, “Survey Shows How to StopAnnoying Audiences with Bad PowerPoint,”survey conducted Sept. 2003.http://www.communicateusingtechnology.com/articles/pptsurvey_article.htm(14 Mar. 2004).
6. Lee Berton, “Deloitte Wants More Womenfor Top Posts in Accounting,” Wall StreetJournal, 28 Feb. 1993, p. B1.
7. Cornelia Brunner, “Teaching VisualLiteracy,” Electronic Learning(Nov.–Dec. 1994): 16.
8. Arthur Goldsmith, “Digitally AlteredPhotography: The New Image Makers,”Britannica Book of the Year: 1995(Chicago: Encyclopaedia Britannica, 1995),p. 135.
342450_ch_10.qxd 3/12/07 11:02 AM Page 209

210 Part Three Developing Presentation Skills
P R E PA R I N G B A S I C P O W E R P O I N T M AT E R I A L S
This tutorial will help you prepare a simple slide or series of slides for usein your speeches using Microsoft’s software for PowerPoint 2000 orPowerPoint 2002. Because of the planned obsolescence of software pro-
grams, the materials that follow may not be exactly the same as what you willsee on your computer screen. But while programs change from version to ver-sion, the general directions remain similar.
We begin with a series of cautions. First, don’t develop your slide(s) untilafter you have prepared your speech. Second, include information and mater-ial on your slide(s) only when it adds to your oral message. Third, don’t simplycopy your speech outline onto slides and then read them to the audience.
Begin preparing your slide(s) by opening the PowerPoint program on yourcomputer. You can access this by using the “Start” button in the bottom left cor-ner of the screen, then opening Programs, and clicking on PowerPoint. The firstscreen that will be displayed contains three options for creating a PowerPointpresentation: an AutoContent Wizard, a Design Template format, and a BlankPresentation option.
The AutoContent Wizard provides a fixed set of templates and formats. Itguides you through the process by asking questions about the type of presen-tation you plan to make. Although this may sound like an easy way to developyour slide(s), it is probably not the best approach for learning the basics ofpreparing such materials. Most of the presentation options in the AutoContent
Screenshot(s) reprinted by permission of Microsoft® Corporation.
342450_ch_10.qxd 3/12/07 11:02 AM Page 210

Chapter 10 Using Presentation Aids 211
Wizard do not match the typical public speaking class assignments. They aredesigned to prepare “slide shows”—often with sound and animated graphics—not to prepare presentation aids for speeches.
The Design Template format provides a large selection of slide back-grounds on which you can type your text. Each template can be viewed on theright of your screen by clicking the button next to the template name. Many ofthese backgrounds are attractive, but some of them are “busy.” Busy back-grounds can distract listeners. Slides with shaded backgrounds often makesome of the text difficult to read.
342450_ch_10.qxd 3/12/07 11:02 AM Page 211

212 Part Three Developing Presentation Skills
The Blank Presentation option allows you to control everything that goeson your slide(s). Consequently, you should prepare your slide(s) using either avery simple background from the Design Template format or build them fromscratch using the Blank Presentation option. Our instructions will take youthrough working with the Blank Presentation option, but they are applicableto the Design Template format as well.
No matter which option you choose, the Office Assistant will appear as anicon (usually an animated paper clip) on your screen. If you get confused orcan’t remember how to do something, simply click on the icon and a box willappear. Type a question in the space provided, click the “Search” command,and the Office Assistant will provide an answer.
When you choose the Blank Presentation option, the next screen thatcomes up on your monitor will provide slide layout options.
On this screen, you can choose from a title page, a bulleted list, and a varietyof chart, graph, and clip art options. Select the bulleted list by clicking on theicon showing a bulleted list. Now the working box on your screen will show aslide with the appropriate layout.
342450_ch_10.qxd 3/12/07 11:02 AM Page 212

Chapter 10 Using Presentation Aids 213
Decide what background color you want for your slides. Remember, if youchoose a light background, you must use dark text to provide the contrast nec-essary for your slide(s) to be easily read. Also keep in mind that white back-grounds are prone to glare. If you want a light background for your slide(s),choose a pale cream or ivory. If you choose a dark background, you will need touse a light text color for clear definition. To add background color to your slide,pull down the Format menu from your top toolbar, and click on Background.
To find the color you want to use as the background for your slide(s), click thearrow for the blank pull-down box at the bottom of the menu. Select the “MoreColors” command, which will display the entire color spectrum available.
342450_ch_10.qxd 3/12/07 11:02 AM Page 213

214 Part Three Developing Presentation Skills
Choose your background color, then click “Apply to All.” Each slide you pre-pare for this presentation will have the same background. We have selected arich royal blue as a background color.
342450_ch_10.qxd 3/12/07 11:02 AM Page 214

Chapter 10 Using Presentation Aids 215
Before you begin typing material onto your slide, you must select the fontstyle and color for the text on your slide. Return to the Format menu on yourtop toolbar. Open this and click Font. Choose a simple, easy-to-read font.Some good choices include Arial, Century Gothic, Courier, and Times NewRoman. Avoid any font that has the word narrow in its name: it will be hardto read when projected in a slide. Don’t use script or decorative fonts such asDauphin and GoudyHandtooled, which are also difficult to read.
Next, select a font color that contrast with the background of your slide.We have chosen white text for use on the blue background.
Now you can begin adding text to your slide. Type the title of your slide inthe title box and the text in the text box.
342450_ch_10.qxd 3/12/07 11:03 AM Page 215

216 Part Three Developing Presentation Skills
Don’t try to cram too much material into a slide. For a bulleted list, you shouldhave no more than six lines or bullets, and no more than six words to a line. Donot write out your bulleted points as full sentences. They will be too long andwill draw attention away from your spoken words as listeners read them. If youhave too much material to meet the six-by-six guidelines, consider making aseries of slides.
To make additional slides for your presentation, go to the “New Slide”command on the top toolbar on your screen. The “Layout Options” box willopen, and you can then choose the layout you want for this slide.
When you will use more than one slide in your presentation, be sure thatthe slides are visually consistent with one another. Each slide should have thesame background and the same color scheme. The slides should use the samefonts, the same type of bullets for multiple bulleted lists, and the same type ofspacing between words and lines.
If you prepare a slide and decide you want a different layout, open theCommon Tasks menu, click on Slide Layout, and then select the layout youwant. When you have completed all of your slides, save them in a folder on yourdesktop and make a backup copy on a disk. Once you have prepared the slides,you can open them from this folder and edit them by changing colors or text.
You can preview your complete presentation by using the Slide Sorter viewfrom the View menu on the toolbar. This screen shows you all the slides in yourpresentation. Use the slide sorter to rearrange the order of your slides. Tochange the order of your slides, click on the slide, then drag it to where youwant it positioned.
342450_ch_10.qxd 3/12/07 11:03 AM Page 216

Chapter 10 Using Presentation Aids 217
With Microsoft’s Excel program, you can prepare charts and graphs onyour computer and import them into your PowerPoint slides. You can also im-port clip art and pictures to add variety to your presentation.
Once you have prepared all of your materials, your next step is to open theSlide Show menu on your toolbar. This allows you to view your presentationon your computer monitor. For a speech before an audience, select the ManualTiming option so that you can control the appearance of slides by left-clickingyour mouse. Show a slide only when you refer to it in a speech. You can make thescreen go black between slides by hitting the “b” on your computer keyboard.
If you need immediate help while preparing and previewing your Power-Point presentation, click on the Office Assistant. For additional information andinstructions for more advanced presentations with clip art, transitions, and ani-mation, consult one of the online resources listed in InterConnections 11.1,“PowerPoint Presentations.”
342450_ch_10.qxd 3/12/07 11:03 AM Page 217