ptg100 precision test gauge - amazon s3 precision digital pressure gauge - instruction manual 1...
TRANSCRIPT

PTG100 Precision Test Gauge
User Manual
PD1007 Rev B
03/28/2014
Palmer Instruments Inc.
234 Old Weaverville Road
Asheville, NC 28804
Toll Free: 800-421-2853
Phone: 828-658-3131
Fax: 828-658-0728
Email: [email protected]
PTG100 Precision Digital Pressure Gauge - Instruction Manual
1
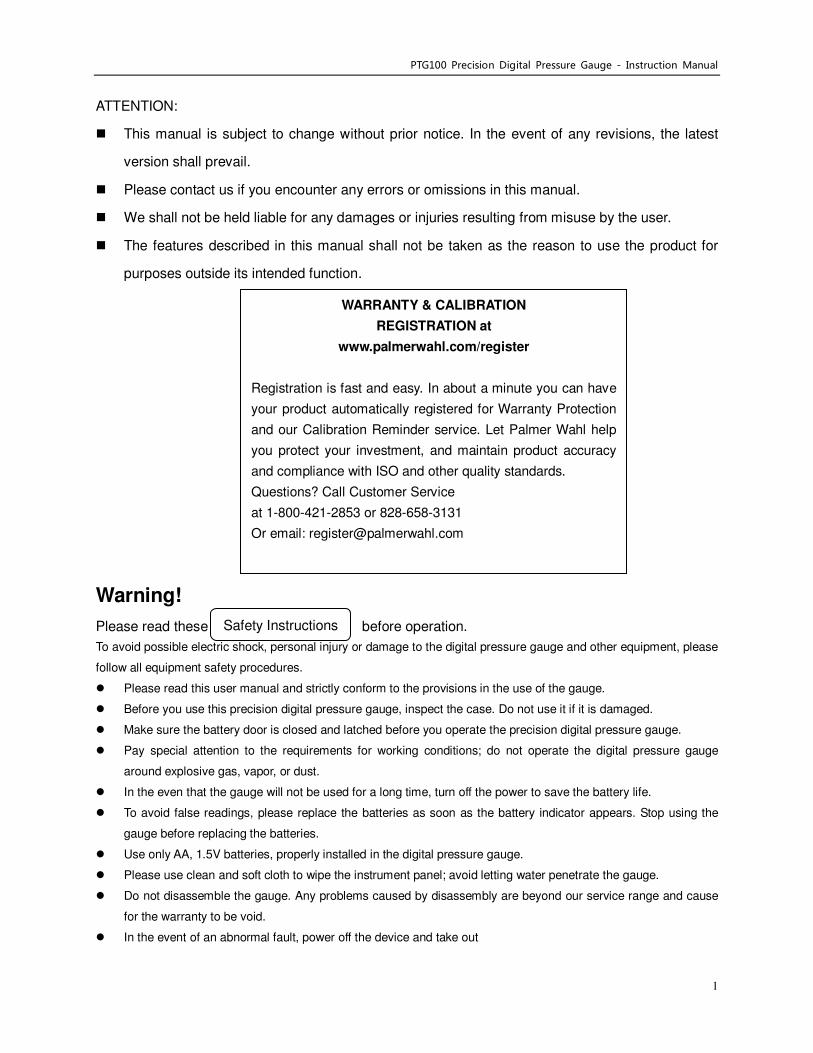
ATTENTION:
� This manual is subject to change without prior notice. In the event of any revisions, the latest
version shall prevail.
� Please contact us if you encounter any errors or omissions in this manual.
� We shall not be held liable for any damages or injuries resulting from misuse by the user.
� The features described in this manual shall not be taken as the reason to use the product for
purposes outside its intended function.
Warning!
Please read these before operation.
To avoid possible electric shock, personal injury or damage to the digital pressure gauge and other equipment, please
follow all equipment safety procedures.
� Please read this user manual and strictly conform to the provisions in the use of the gauge.
� Before you use this precision digital pressure gauge, inspect the case. Do not use it if it is damaged.
� Make sure the battery door is closed and latched before you operate the precision digital pressure gauge.
� Pay special attention to the requirements for working conditions; do not operate the digital pressure gauge
around explosive gas, vapor, or dust.
� In the even that the gauge will not be used for a long time, turn off the power to save the battery life.
� To avoid false readings, please replace the batteries as soon as the battery indicator appears. Stop using the
gauge before replacing the batteries.
� Use only AA, 1.5V batteries, properly installed in the digital pressure gauge.
� Please use clean and soft cloth to wipe the instrument panel; avoid letting water penetrate the gauge.
� Do not disassemble the gauge. Any problems caused by disassembly are beyond our service range and cause
for the warranty to be void.
� In the event of an abnormal fault, power off the device and take out
Safety Instructions
WARRANTY & CALIBRATION
REGISTRATION at
www.palmerwahl.com/register
Registration is fast and easy. In about a minute you can have
your product automatically registered for Warranty Protection
and our Calibration Reminder service. Let Palmer Wahl help
you protect your investment, and maintain product accuracy
and compliance with ISO and other quality standards.
Questions? Call Customer Service
at 1-800-421-2853 or 828-658-3131
Or email: [email protected]
PTG100 Precision Digital Pressure Gauge -Instruction Manual
2
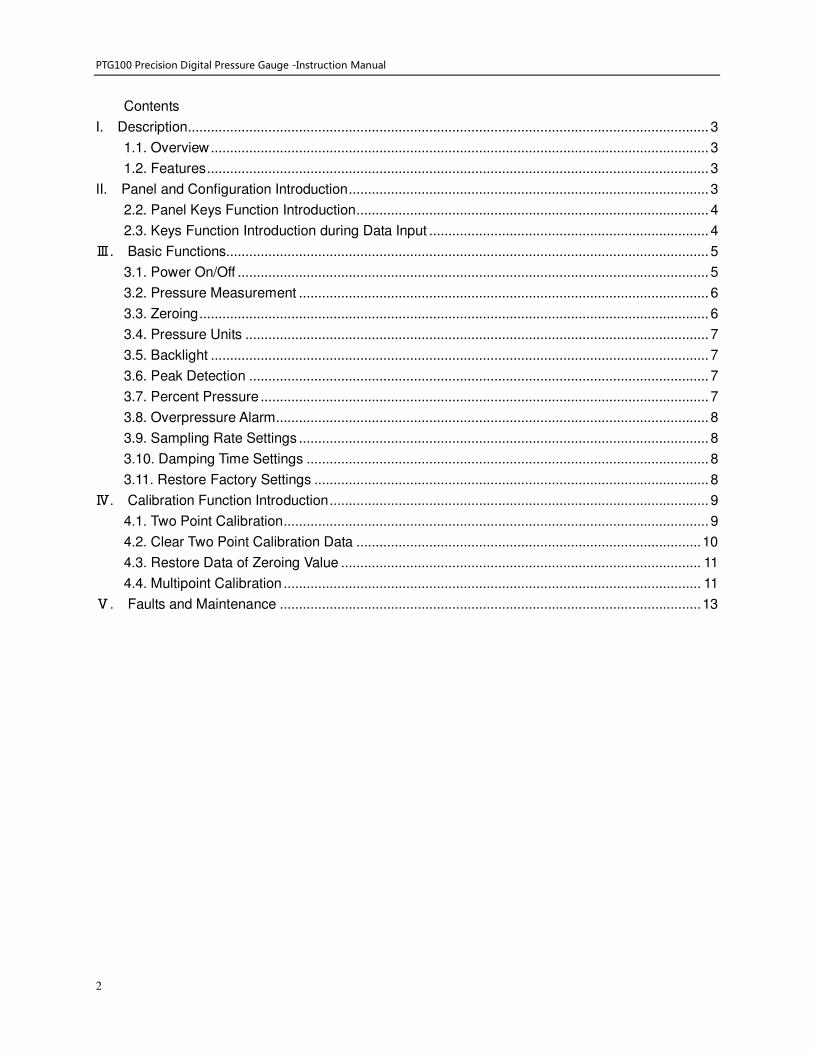
Contents
I. Description ........................................................................................................................................ 3
1.1. Overview .................................................................................................................................. 3
1.2. Features ................................................................................................................................... 3
II. Panel and Configuration Introduction .............................................................................................. 3
2.2. Panel Keys Function Introduction ............................................................................................ 4
2.3. Keys Function Introduction during Data Input ......................................................................... 4
Ⅲ. Basic Functions.............................................................................................................................. 5
3.1. Power On/Off ........................................................................................................................... 5
3.2. Pressure Measurement ........................................................................................................... 6
3.3. Zeroing ..................................................................................................................................... 6
3.4. Pressure Units ......................................................................................................................... 7
3.5. Backlight .................................................................................................................................. 7
3.6. Peak Detection ........................................................................................................................ 7
3.7. Percent Pressure ..................................................................................................................... 7
3.8. Overpressure Alarm ................................................................................................................. 8
3.9. Sampling Rate Settings ........................................................................................................... 8
3.10. Damping Time Settings ......................................................................................................... 8
3.11. Restore Factory Settings ....................................................................................................... 8
Ⅳ. Calibration Function Introduction ................................................................................................... 9
4.1. Two Point Calibration ............................................................................................................... 9
4.2. Clear Two Point Calibration Data .......................................................................................... 10
4.3. Restore Data of Zeroing Value .............................................................................................. 11
4.4. Multipoint Calibration ............................................................................................................. 11
Ⅴ. Faults and Maintenance .............................................................................................................. 13

PTG100 Precision Digital Pressure Gauge - Instruction Manual
3
I. Description
1.1. Overview
The PTG100 is a high precision single-range precision digital pressure gauge. It is composed of
high precision measuring chips, a battery circuit, and a high precision pressure sensor. The pressure
gauge can be used for real time measuring and calibrating of a general pressure gauge, e.g., pointer
pressure gauges, pressure sensors, etc.
1.2. Features
� Engineer Units: Pa, kPa, MPa, mmH2O, mmHg, bar, mbar, kgf, or psi;
� Display: LCD with white backlight, 6-digit display;
� Overpressure Warning: The screen will display “Fail” if pressure reaches over 110% of full
scale;
� Measuring Speed: User settable, factory default is 3 times/sec
� Working Time: up to 10,000 hours (3 times per second); if battery power is very low, the
PTG100 will power off automatically.
� Working Conditions: Temperature: -10℃ - 50℃
� Temperature Compensation: 0℃ - 50℃
� Storage Temperature: -20℃ - 70℃
� Power Source: 3 × AA Batteries
� Communication: RS232 port
� Dimensions: Φ100mm×37mm, total height is132mm
� Weight: 0.45kg
� Pressure Connection: ¼” NPT
� Re-calibration Interval: One year (recommended)
II. Panel and Configuration Introduction
2.1. PTG100 Precision Digital Pressure Gauge Front Panel (See figure-1)
Figure-1 PTG100 Precision Digital Pressure Gauge Front Panel

PTG100 Precision Digital Pressure Gauge -Instruction Manual
4
2.2. Panel Keys Function Introduction
Press and hold. The PTG100 will show the measuring range, and will show pressure
value after releasing it. PTG100 has been equipped with batteries, and is ready for use.
PTG100 will retain the previous unit set by the user. The next time the gauge is turned on, it will
continue to work in the former mode and pressure unit.
Press this key to select the next pressure unit. Continue to press it to switch between the set
unit of the gauge (Pa, kPa, MPa, mmH2O, mmHg, bar, mbar, kgf, psi)
Press this key to turn on the backlight. After the backlight setting time of 5 seconds
(selectable) has passed, the backlight will turn off automatically.
Press this key to enter the menu operations
Press this key for clearing the current displayed pressure value (which is regarded as zero
drift value). After zeroing, the gauge will keep the status even if powered down and turned back
on. Please allow PTG100 process connection to be open to the atmosphere during zeroing.
2.3. Keys Function Introduction during Data Input
A. Confirm to modify the data
B. Confirm key for no display menu modification.
C. Data circulation key, the data circle from 0~9
D. Enter into data modification
When the user uses the keys to carry out the related operations, the LCD will remind the user to input
or modify certain parameters. The user can carry out the operation according to the following steps:
(1) Under the status of the front LCD in display, press , and the first character of the data
will blink.
(2) If there is no need to modify the blinking value, please skip to step ⑶.
If it is required to modify the blinking value, press and select the desired value. The

PTG100 Precision Digital Pressure Gauge - Instruction Manual
5
numbers will increase between 0 and 9. Please skip to step(3)after modifying the blinking
character.
Note: when the decimal point digit blinks, press to clear the prior decimal point. After adjustment,
please skip to step(3).
(3)Press again to make the next digit blink.
(4) Repeat step ⑵ and ⑶ till the last digit modification completed.
(5)Press to save the modified data.
2.4. Key Functions during Menu Operation
A. Return to Previous Menu
B. Confirm the menu without data modification
C. Enter the next menu
D. Enter the menu
ⅢⅢⅢⅢ. Basic Functions
3.1. Power On/Off
PTG100 Precision Digital Pressure Gauge -Instruction Manual
6
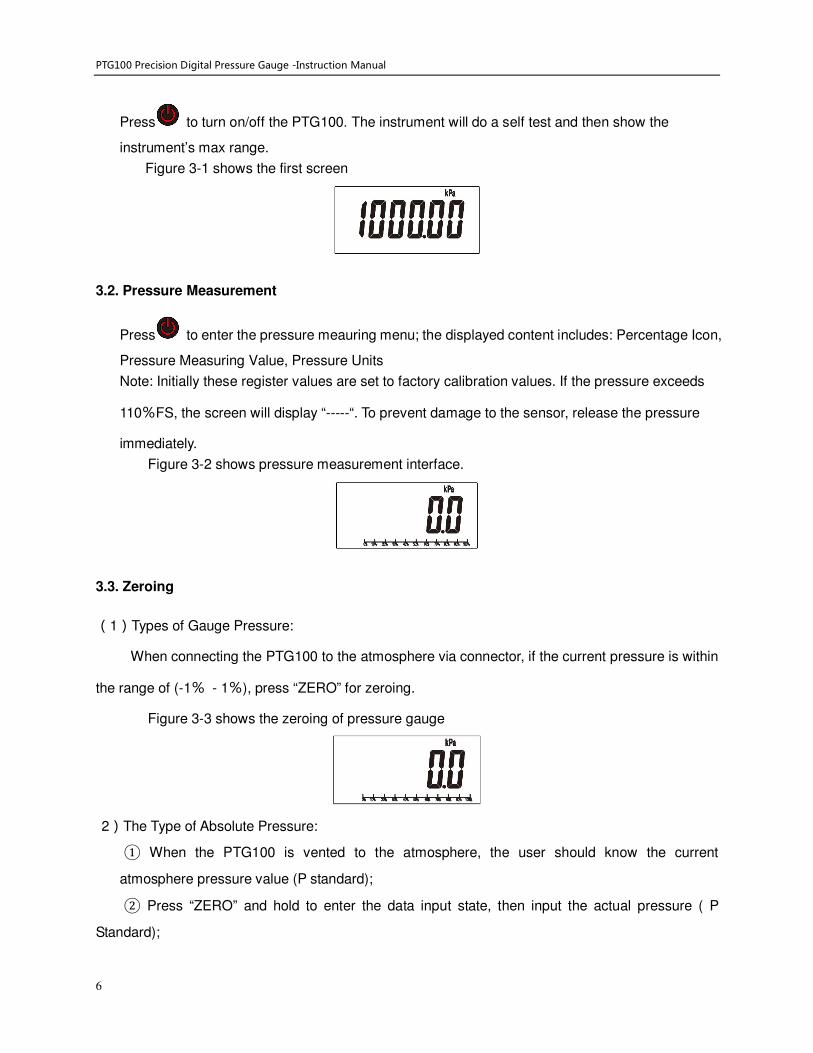
Press to turn on/off the PTG100. The instrument will do a self test and then show the
instrument’s max range.
Figure 3-1 shows the first screen
3.2. Pressure Measurement
Press to enter the pressure meauring menu; the displayed content includes: Percentage Icon,
Pressure Measuring Value, Pressure Units
Note: Initially these register values are set to factory calibration values. If the pressure exceeds
110%FS, the screen will display “-----“. To prevent damage to the sensor, release the pressure
immediately.
Figure 3-2 shows pressure measurement interface.
3.3. Zeroing
(1)Types of Gauge Pressure:
When connecting the PTG100 to the atmosphere via connector, if the current pressure is within
the range of (-1% - 1%), press “ZERO” for zeroing.
Figure 3-3 shows the zeroing of pressure gauge
2)The Type of Absolute Pressure:
① When the PTG100 is vented to the atmosphere, the user should know the current
atmosphere pressure value (P standard);
② Press “ZERO” and hold to enter the data input state, then input the actual pressure ( P
Standard);

PTG100 Precision Digital Pressure Gauge - Instruction Manual
7
③ In the pressure measure menu, the measured pressure will change to ( P Standard). Now, the
zeroing process is finished.
3.4. Pressure Units
Press “UNIT” to view and select among the pressure units. The order is Pa, kPa, MPa, mmH2O,
mmHg, bar, mbar, kgf, and psi. Conversions between pressure units is shown in table 3-4-1.
Pa kPa MPa mmH2O mmHg bar mbar Kgf/cm² psi
1000 1 0.001 102.047 7.50061 0.01 10 0.010197 0.1450377
Table 3-4-1: Pressure units’ conversion relation
Figure 3-4 shows the method to switch the different pressure units.
3.5. Backlight
Press “LIGHT” key to turn on/off the backlight. Selectable time is from 5 seconds to 10 seconds.
Figure 3-5 backlight time of display setting is 5 seconds
3.6. Peak Detection
Figure 3-6 displays the max. /min. recorded peak value
3.7. Percent Pressure
◆ % indicator: shows the current pressure percentage;
◆ Scale graph: 0% - 100%, the minimum scale is 10%;
Example: For a PTG100 set with a scale of (0 – 1,000) kPa, if the current pressure value is
100kPa, the percent indicator is 10%, as figure 3-7

PTG100 Precision Digital Pressure Gauge -Instruction Manual
8
Figure 3-7
3.8. Overpressure Alarm
When the current pressure is beyond the range of high/low limit, the whole screen will show as
figure 3-8 to warn the user to adjust the pressure.
Figure 3-8
3.9. Sampling Rate Settings
Sampling rate is selectable between 1 and 10 seconds; the default is three samples per second;
if setting is 5 seconds, then the rate is three samples in five seconds.
Figure 3-9 displays that the sampling rate is 1 second.
Figure 3-9
3.10. Damping Time Settings
The default damping time of PTG100 is 0 second; user can set the time according to their
requirements (0~32 seconds selectable). See figure 3-10, where the default damping is 0 second.
Figure 3-10
3.11. Restore Factory Settings
If there is any incorrect data entered by the user, the gauge factory settings can be restored via
following steps:
1) Under measuring status, press “CONFIG” twice, then press “LIGHT” four times to enter the
status of restore factory setting.

PTG100 Precision Digital Pressure Gauge - Instruction Manual
9
2) Press “CONFIG” once and input the password 12345.0;
3) Press “UNIT” to restore the factory backup data;
4) Press “UNIT” three times to return to the measuring interface.
ⅣⅣⅣⅣ. Calibration Function Introduction
Calibration Conditions: Environment: Temperature: 20℃±2℃. Relative humidity: (45 - 75)%.
Atmosphere pressure: (86 to 106) kPa.
Calibration Equipment: Use standard pressure equipment(with an accuracy rating higher
than 0.025%FS)to perform the calibration.
Warning: User must have knowledge of standard pressure equipment and the PTG100
digital pressure gauge. Normally, two point calibrations can meet the accuracy requirements.
If multipoint calibration is required, perform the calibration without modifying the standard
pressure value of multipoint calibration.
4.1. Two Point Calibration
4.1.1 Low Point Calibration
1) A pressure source with an accuracy higher than 0.025%FS is necessary for performing
pressure module calibration;
2) Under measuring status, press “CONFIG” once to enter the configuring status:
3) Press“LIGHT”once to enter the status of two point calibration;
4) Press “CONFIG” once to enter the low point calibration menu; pressurize the standard

PTG100 Precision Digital Pressure Gauge -Instruction Manual
10
device to the standard value according to the display value of the LCD. For example: if it is 0
kPa, then the standard device will be 0 kPa; if it is -100kPa, the standard device will be
-100kPa.
5) Press “CONFIG” once to enter the status of low point calibration; the first digit will blink.
6) Wait until the pressure reading is stable;
7) Press “UNIT” to save the low point calibration data.
4.1.2 High Point Calibration
1) After low point calibration, press “ZERO” to enter the status of high point calibration.
2) Press “CONFIG” once to enter the high point modification status. Pressurize the standard
device to the standard value according to the display value of the LCD. For example, if the
LCD shows 100 kPa, then the standard device pressure will be 100 kPa.
3) Wait till the pressure is stable;
4) Press “UNIT” to save the high point calibration data.
4.2. Clear Two Point Calibration Data
1) If user finds that the error of measuring data is too much after two point calibration, they can
clear the two point calibration data via the function of “Clearing Two Point Calibration Data”.
2) Press “CONFIG” once, press “ZERO” once to enter the two point calibration menu directly;
3) Press “CONFIG” once, then press “ZERO” twice to enter the two point calibration clearing
menu. The C_ZS at the lower left corner will blink.
4) Press “ZERO” once, and C_ZS stops blinking. The two point calibration data will be

PTG100 Precision Digital Pressure Gauge - Instruction Manual
11
cleared.
5) Press “UNIT” twice to return back the measuring interface.
4.3. Restore Data of Zeroing Value
1) If user finds that the error of the displayed reading is too much after two point calibration,
they can clear the two point calibration data via the function of “Clearing Two Point
Calibration Data”
2) Press “CONFIG” once, then press “ZERO” once to enter the two point calibration menu
directly.
3) Press “CONFIG” once, press “ZERO” twice to enter the two point calibration clearing menu,
and the C_ZS at the low left quarter will blink.
4) Press “ZERO” once, C_ZS stops blinking, and the two point calibration data will be cleared.
5) Press “UNIT” twice to return back to the measuring interface.
4.4. Multipoint Calibration
1) Under measuring status, press “CONFIG” once to enter the configuring status:
2) Press “LIGHT” twice to enter the interface of multipoint calibration:
3) Press“CONFIG”once to enter the pressure calibration point interface. As the instrument
calibration has been carried out with specific temperature compensation, the calibration
point is not allowed to be modified:
4) Press“LIGHT” to enter the first point pressure calibration interface:

PTG100 Precision Digital Pressure Gauge -Instruction Manual
12
5) Press “CONFIG” once and the first digit will blink. Pressurize the standard device to
standard pressure value according to the LCD display pressure value, and wait until the
pressure is stable:
6) Press “UNIT” once to save the first point calibration data.
7) Press “LIGHT” once to enter the second pressure calibration interface:
8) Press “CONFIG” once and the first digit will blink. Pressurize the standard device to the
standard pressure value according to the LCD displayed pressure value, and wait till the
pressure is stable. For example, the LCD displays 100 kPa, the standard device will be 100
kPa;
9) Press “UINT” once to save the second point calibration data;
10) Repeat the above-mentioned steps until all pressure calibration points have been
calibrated.
11) Press “UNIT” twice to return to the measuring interface.
PTG100 Precision Digital Pressure Gauge - Instruction Manual
13
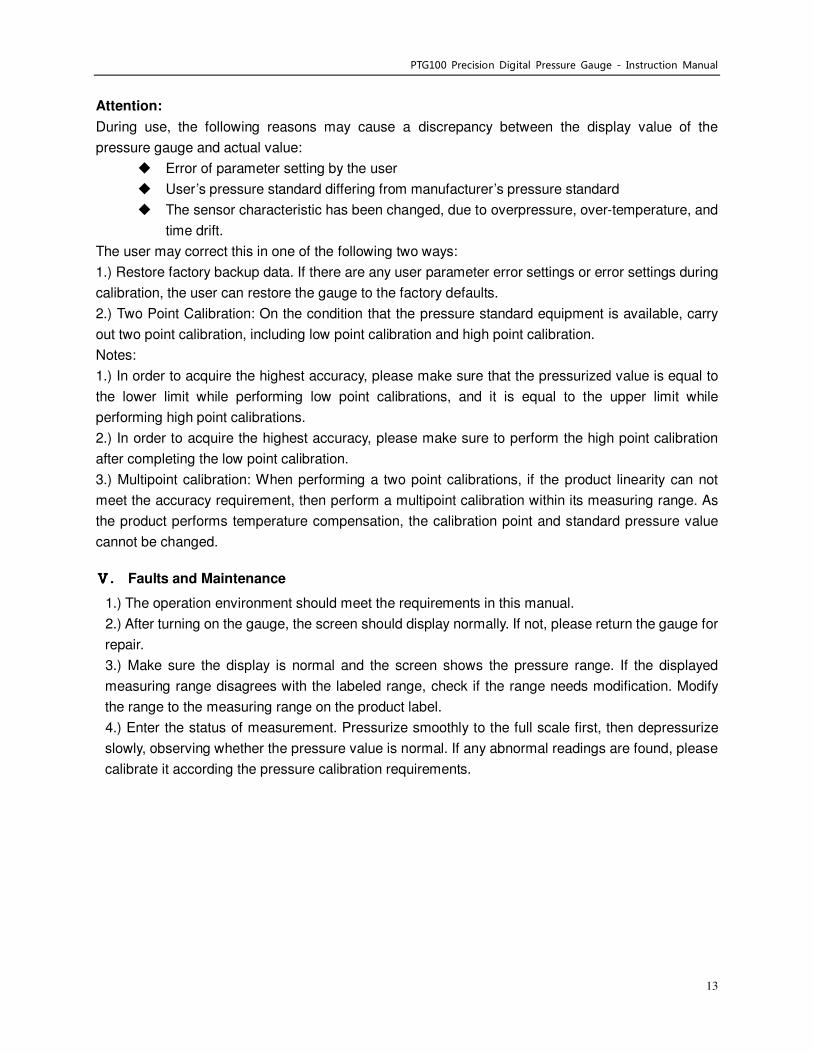
Attention:
During use, the following reasons may cause a discrepancy between the display value of the
pressure gauge and actual value:
� Error of parameter setting by the user
� User’s pressure standard differing from manufacturer’s pressure standard
� The sensor characteristic has been changed, due to overpressure, over-temperature, and
time drift.
The user may correct this in one of the following two ways:
1.) Restore factory backup data. If there are any user parameter error settings or error settings during
calibration, the user can restore the gauge to the factory defaults.
2.) Two Point Calibration: On the condition that the pressure standard equipment is available, carry
out two point calibration, including low point calibration and high point calibration.
Notes:
1.) In order to acquire the highest accuracy, please make sure that the pressurized value is equal to
the lower limit while performing low point calibrations, and it is equal to the upper limit while
performing high point calibrations.
2.) In order to acquire the highest accuracy, please make sure to perform the high point calibration
after completing the low point calibration.
3.) Multipoint calibration: When performing a two point calibrations, if the product linearity can not
meet the accuracy requirement, then perform a multipoint calibration within its measuring range. As
the product performs temperature compensation, the calibration point and standard pressure value
cannot be changed.
ⅤⅤⅤⅤ. Faults and Maintenance
1.) The operation environment should meet the requirements in this manual.
2.) After turning on the gauge, the screen should display normally. If not, please return the gauge for
repair.
3.) Make sure the display is normal and the screen shows the pressure range. If the displayed
measuring range disagrees with the labeled range, check if the range needs modification. Modify
the range to the measuring range on the product label.
4.) Enter the status of measurement. Pressurize smoothly to the full scale first, then depressurize
slowly, observing whether the pressure value is normal. If any abnormal readings are found, please
calibrate it according the pressure calibration requirements.

PTG100 Precision Digital Pressure Gauge -Instruction Manual
14
234 Old Weaverville Road, Asheville, NC 28804
Toll Free: 800-421-2853 • Phone: 828-658-3131 • Fax: 828-658-0728
www.palmerwahl.com