prtg data pump data pump user manual.pdf · prtg data pump user manual corp-it 1/23/2020 v 1...
TRANSCRIPT
PRTG DATA PUMP USER MANUAL
CORP-IT 1/23/2020
V 1
Abstract The purpose of this document is to describe the prerequisites, to configure and to use the
PRTG Data Pump application.

PRTG Data Pump
CORP-IT
+41 445 860 187 Langfeldstrasse 53, 8500 Frauenfeld, Switzerland [email protected] 1/23/2020
Switzerland www.corp-it.ch Page 2 of 18
TABLE OF CONTENTS
1 WELCOME TO PRTG DATA PUMP .......................................................................................... 4
2 INSTALLING THE PRTG DATA PUMP ..................................................................................... 5
2.1 PREREQUISITES ................................................................................................................... 5
2.1.1 SQL Server Express ....................................................................................................... 5
2.1.2 .NET Framework 4.7 ...................................................................................................... 6
2.2 MAIN INSTALLATION .............................................................................................................. 7
3 CONFIGURING THE PRTG DATA PUMP ................................................................................. 9
3.1 TARGET DATABASES ............................................................................................................. 9
3.2 PRTG SERVERS ................................................................................................................ 11
3.3 FILTERS ............................................................................................................................ 12
3.4 PROFILES .......................................................................................................................... 13
3.5 PROFILE ACTIVITY .............................................................................................................. 16
3.6 LICENSING ......................................................................................................................... 17

PRTG Data Pump
CORP-IT
+41 445 860 187 Langfeldstrasse 53, 8500 Frauenfeld, Switzerland [email protected] 1/23/2020
Switzerland www.corp-it.ch Page 3 of 18
TABLE OF FIGURES FIGURE 1 - PRTG DATA PUMP .............................................................................................................. 4
FIGURE 2 - PREREQUISITES WINDOW ..................................................................................................... 5
FIGURE 3 - SQL SERVER SETUP ........................................................................................................... 6
FIGURE 4 - EULA ................................................................................................................................ 7
FIGURE 5 - SERVER SETUP ................................................................................................................... 7
FIGURE 6 - INSTALLATION SUCCESSFUL .................................................................................................. 8
FIGURE 7 - ADD TARGET DATABASE ...................................................................................................... 9
FIGURE 8 - CONFIGURE TARGET DATABASE.......................................................................................... 10
FIGURE 9 - ADD PRTG SERVER .......................................................................................................... 11
FIGURE 10 - CONFIGURE PRTG SERVER ............................................................................................. 11
FIGURE 11 - CREATE FILTER ............................................................................................................... 12
FIGURE 12 - FILTER BY TAGS .............................................................................................................. 12
FIGURE 13 - FILTER BY NAME.............................................................................................................. 12
FIGURE 14 - PROFILES ....................................................................................................................... 13
FIGURE 15 - ADD PROFILE .................................................................................................................. 13
FIGURE 16 - PROFILE MENU ............................................................................................................... 14
FIGURE 17 - EDIT TARGET DATANASE / FILTERS ................................................................................... 14
FIGURE 18 - START DATA COLLECTION ................................................................................................ 15
FIGURE 19 - DATA COLLECTION COMPLETED ........................................................................................ 15
FIGURE 20 - DATABASE DIAGRAM ........................................................................................................ 16
FIGURE 21 - PROFILE ACTIVITY ........................................................................................................... 16
FIGURE 22 - ABOUT BUTTON ............................................................................................................... 17
FIGURE 23 - ABOUT MENU .................................................................................................................. 17
FIGURE 24 - ACTIVATE LICENSE .......................................................................................................... 18
FIGURE 25 - DEACTIVATE LICENSE ...................................................................................................... 18
PRTG Data Pump
CORP-IT
+41 445 860 187 Langfeldstrasse 53, 8500 Frauenfeld, Switzerland [email protected] 1/23/2020
Switzerland www.corp-it.ch Page 4 of 18
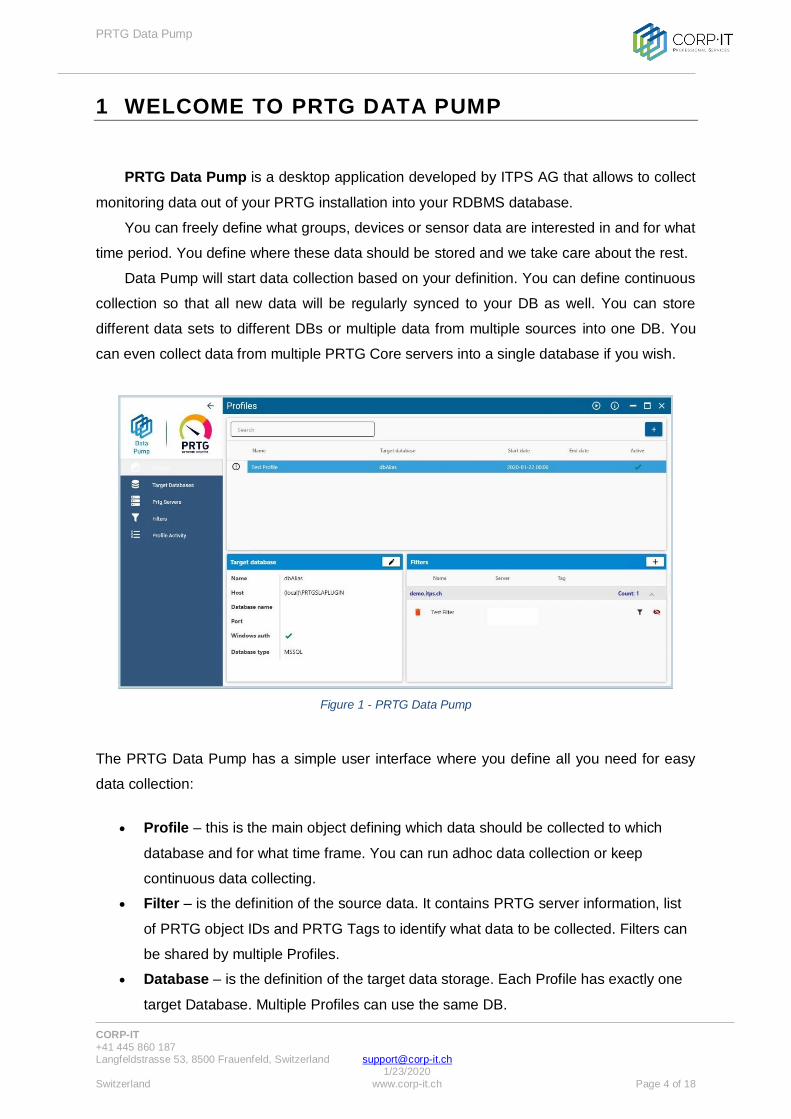
1 WELCOME TO PRTG DATA PUMP
PRTG Data Pump is a desktop application developed by ITPS AG that allows to collect
monitoring data out of your PRTG installation into your RDBMS database.
You can freely define what groups, devices or sensor data are interested in and for what
time period. You define where these data should be stored and we take care about the rest.
Data Pump will start data collection based on your definition. You can define continuous
collection so that all new data will be regularly synced to your DB as well. You can store
different data sets to different DBs or multiple data from multiple sources into one DB. You
can even collect data from multiple PRTG Core servers into a single database if you wish.
Figure 1 - PRTG Data Pump
The PRTG Data Pump has a simple user interface where you define all you need for easy
data collection:
Profile – this is the main object defining which data should be collected to which
database and for what time frame. You can run adhoc data collection or keep
continuous data collecting.
Filter – is the definition of the source data. It contains PRTG server information, list
of PRTG object IDs and PRTG Tags to identify what data to be collected. Filters can
be shared by multiple Profiles.
Database – is the definition of the target data storage. Each Profile has exactly one
target Database. Multiple Profiles can use the same DB.

PRTG Data Pump
CORP-IT
+41 445 860 187 Langfeldstrasse 53, 8500 Frauenfeld, Switzerland [email protected] 1/23/2020
Switzerland www.corp-it.ch Page 5 of 18
2 INSTALLING THE PRTG DATA PUMP
2.1 Prerequisites
When you click on next, the second window will appear, containing information about
the prerequisites.
When a driver is missing, it will be checked by default. Otherwise, it will be unchecked
and will appear as already installed.
Figure 2 - Prerequisites Window
2.1.1 SQL Server Express
PRTG Data Pump requires a MSSQL database. If you already have a SQL instance
available where you want to place this database, you can deselect SQL Server Express and
choose existing SQL Instance in later step.
If you do not have any MSSQL Instance (2012 SP1 and newer), you can choose to
install the free version of MSSQL Express locally on your PRTG server or you can manually
install this product on any other system in your environment reachable from PRTG server.
PRTG Data Pump
CORP-IT
+41 445 860 187 Langfeldstrasse 53, 8500 Frauenfeld, Switzerland [email protected] 1/23/2020
Switzerland www.corp-it.ch Page 6 of 18
You need sysadmin role (or dbcreator and securityadmin roles) on the SQL server for
the installation phase. MSSQL database need to be accessible from the Data Pump
installation.
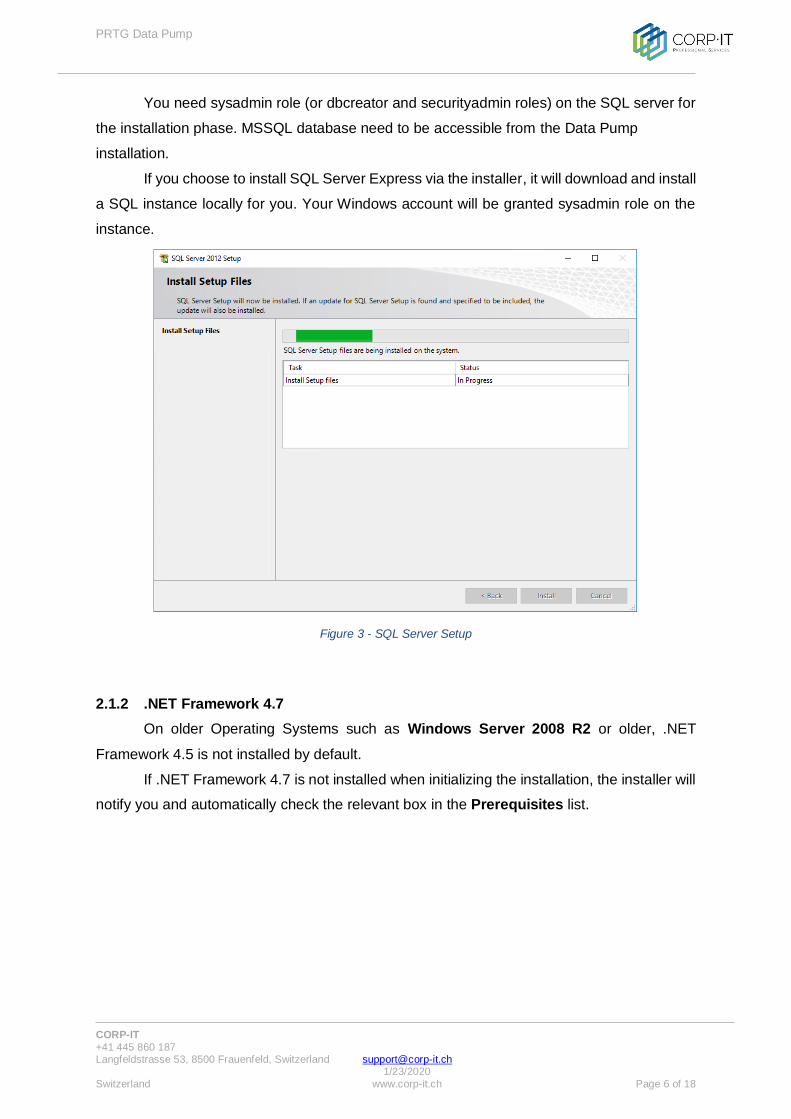
If you choose to install SQL Server Express via the installer, it will download and install
a SQL instance locally for you. Your Windows account will be granted sysadmin role on the
instance.
Figure 3 - SQL Server Setup
2.1.2 .NET Framework 4.7
On older Operating Systems such as Windows Server 2008 R2 or older, .NET
Framework 4.5 is not installed by default.
If .NET Framework 4.7 is not installed when initializing the installation, the installer will
notify you and automatically check the relevant box in the Prerequisites list.

PRTG Data Pump
CORP-IT
+41 445 860 187 Langfeldstrasse 53, 8500 Frauenfeld, Switzerland [email protected] 1/23/2020
Switzerland www.corp-it.ch Page 7 of 18
2.2 Main Installation
After all the prerequisites are installed, a window such as in Figure 14 will appear. To
start the main installation, you must check I agree to the License terms and condition and
click on Next and then Install, to begin the installation.
Figure 4 - EULA
Afterwards, the Configure SQL Server Connection window will appear as shown in
Figure 15. You will need to specify the Database Server where it will store the information.
The format used is SERVER\INSTANCE. If no SQL Server is specified, it will default to the
local installation, as in the following image:
Figure 5 - Server Setup

PRTG Data Pump
CORP-IT
+41 445 860 187 Langfeldstrasse 53, 8500 Frauenfeld, Switzerland [email protected] 1/23/2020
Switzerland www.corp-it.ch Page 8 of 18
After the installation finishes, you will receive a confirmation message.
Figure 6 - Installation successful

PRTG Data Pump
CORP-IT
+41 445 860 187 Langfeldstrasse 53, 8500 Frauenfeld, Switzerland [email protected] 1/23/2020
Switzerland www.corp-it.ch Page 9 of 18
3 CONFIGURING THE PRTG DATA PUMP
After opening the application for the first time, you will need to configure the following:
- Target Databases
- PRTG Servers
- Filters
- Profiles
3.1 Target Databases
To add a new Target Database, you will need to select the “Add” option in the upper
right corner of the page.
Figure 7 - Add Target Database
You will, then, need to configure the new Target Database as follows:

PRTG Data Pump
CORP-IT
+41 445 860 187 Langfeldstrasse 53, 8500 Frauenfeld, Switzerland [email protected] 1/23/2020
Switzerland www.corp-it.ch Page 10 of 18
Figure 8 - Configure Target Database
- Database Type: Can be MSSQL or Oracle
- Name: The Alias of the new database
- Host: The host that you will use to store the Data Pump data
o The format used is SERVER\INSTANCE
o If it uses a local installation of SQL, you can use (local)\INSTANCE
- Database Name: The database where the application will store the data
o If left empty, it will create a database named PRTG_Data Pump_Collection
- Port: The port that is needed for the connection to the host (where applicable)
- Authentication: It can be SQL Authentication or Windows Authentication
- Username/Password: Used for SQL Authentication

PRTG Data Pump
CORP-IT
+41 445 860 187 Langfeldstrasse 53, 8500 Frauenfeld, Switzerland [email protected] 1/23/2020
Switzerland www.corp-it.ch Page 11 of 18
3.2 PRTG Servers
The next step will be to configure one or more PRTG connections.
You will first need to select the “Add” option:
Figure 9 - Add PRTG Server
To configure the PRTG Server, you will need to provide the following information:
Figure 10 - Configure PRTG Server
- Protocol: Choose between HTTP and HTTPS protocol.
- Port: TCP Port for the PRTG Server
- URL: The URL for your PRTG Server
- Username: PRTG Username
- Password: PRTG Password

PRTG Data Pump
CORP-IT
+41 445 860 187 Langfeldstrasse 53, 8500 Frauenfeld, Switzerland [email protected] 1/23/2020
Switzerland www.corp-it.ch Page 12 of 18
- Use passhash: Use this option if you are using the Hosted by Paessler version of
PRTG
3.3 Filters
You can now select for which sensors you want to retrieve the data.
From the Filters tab, you will need to select the PRTG server, type a name and select
the sensors, after which you will need to click the Add button in the upper right corner.
Figure 11 - Create Filter
When searching for the sensors, you have two options:
- Filter by Tags:
Figure 12 - Filter by Tags
- Filter by name:
Figure 13 - Filter by Name
PRTG Data Pump
CORP-IT
+41 445 860 187 Langfeldstrasse 53, 8500 Frauenfeld, Switzerland [email protected] 1/23/2020
Switzerland www.corp-it.ch Page 13 of 18
3.4 Profiles
Please note that you can create a profile only after the Target Databases, PRTG Servers
and Filters were created.
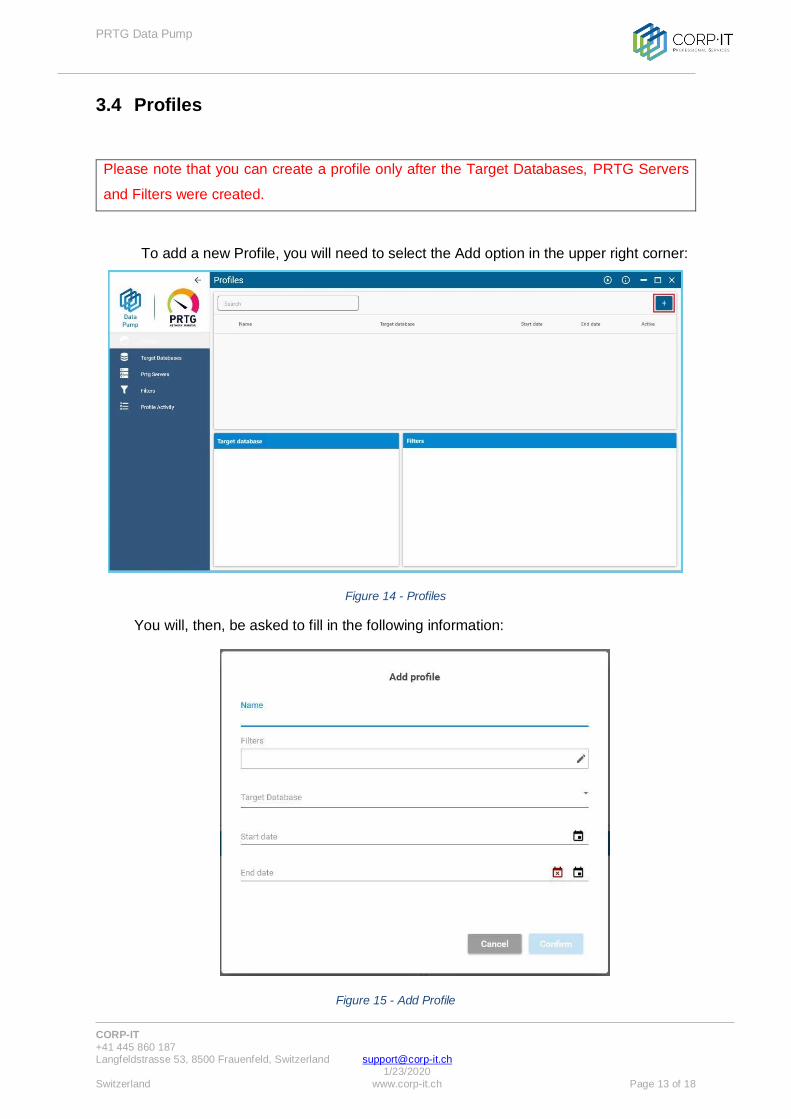
To add a new Profile, you will need to select the Add option in the upper right corner:
Figure 14 - Profiles
You will, then, be asked to fill in the following information:
Figure 15 - Add Profile

PRTG Data Pump
CORP-IT
+41 445 860 187 Langfeldstrasse 53, 8500 Frauenfeld, Switzerland [email protected] 1/23/2020
Switzerland www.corp-it.ch Page 14 of 18
- Name: The name of the newly created profile
- Filters: Select one of the previously created filters
- Target Database: Select one of the previously configured databases
- Start date / End date: Values used to define when the data collecting starts and
when it ends. Leave the End date empty if there is no finish date.
Profiles can also be reconfigured after created, form the profile menu:
Figure 16 - Profile Menu
From this menu, you can:
- Edit the previously created profile
- Delete the profile
- Collect data for each individual profile
- Set a profile as inactive
- Go to the activity history for that particular profile
From the Profiles menu, you can also edit the Target database and Add/Edit the
Filters:
Figure 17 - Edit Target Datanase / Filters

PRTG Data Pump
CORP-IT
+41 445 860 187 Langfeldstrasse 53, 8500 Frauenfeld, Switzerland [email protected] 1/23/2020
Switzerland www.corp-it.ch Page 15 of 18
After the profile has been configured, you will need to start the data collection.
This can be done from the profile menu for each individual profile or from the button at the top
of the window for all the profiles:
Figure 18 - Start Data Collection
After it finishes collecting the data, you will receive a confirmation message:
Figure 19 - Data Collection Completed
The information is stored in the database tables under the following format:

PRTG Data Pump
CORP-IT
+41 445 860 187 Langfeldstrasse 53, 8500 Frauenfeld, Switzerland [email protected] 1/23/2020
Switzerland www.corp-it.ch Page 16 of 18
Figure 20 - Database Diagram
3.5 Profile Activity
Here, you can see the activity history of the profiles:
Figure 21 - Profile Activity

PRTG Data Pump
CORP-IT
+41 445 860 187 Langfeldstrasse 53, 8500 Frauenfeld, Switzerland [email protected] 1/23/2020
Switzerland www.corp-it.ch Page 17 of 18
3.6 Licensing
Licensing is managed from the About menu, which can be accessed from the following
icon, at the top of the window:
Figure 22 - About Button
From the About menu, you can Activate or Deactivate a license:
Figure 23 - About Menu
When requesting a License key, you will need to provide the Machine ID, which can
be found in the Activate License menu, by clicking on the Activate button:
PRTG Data Pump
CORP-IT
+41 445 860 187 Langfeldstrasse 53, 8500 Frauenfeld, Switzerland [email protected] 1/23/2020
Switzerland www.corp-it.ch Page 18 of 18
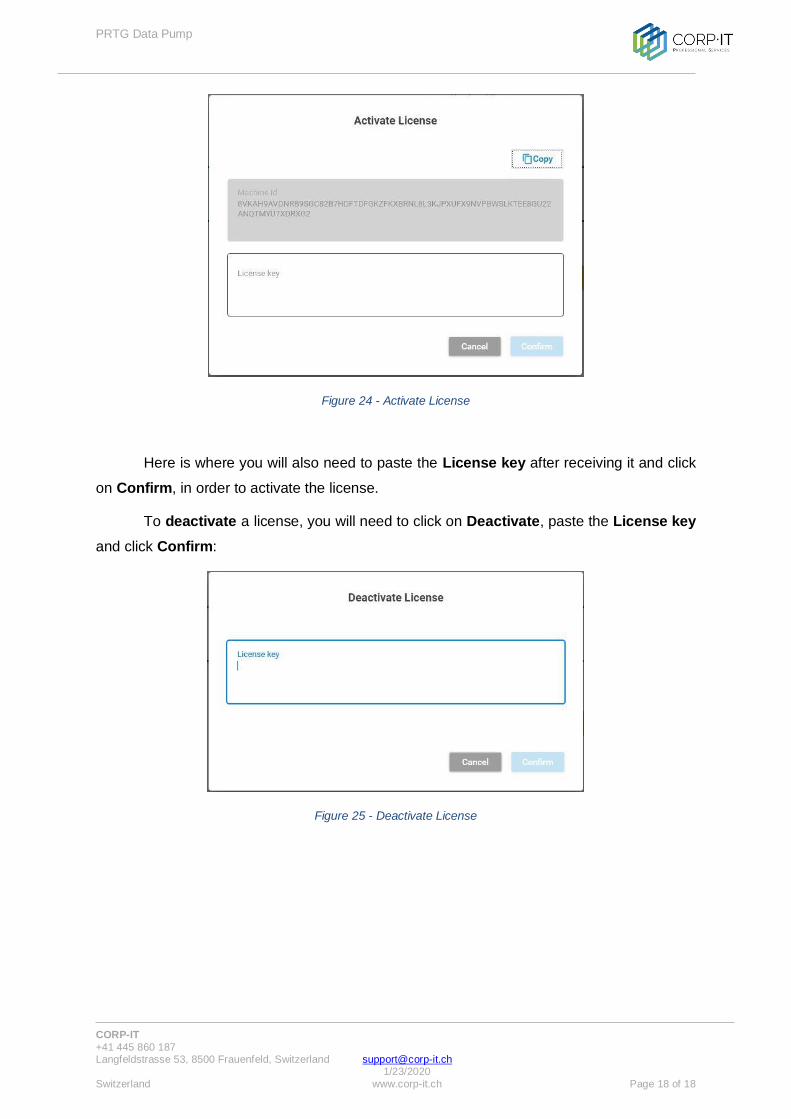
Figure 24 - Activate License
Here is where you will also need to paste the License key after receiving it and click
on Confirm, in order to activate the license.
To deactivate a license, you will need to click on Deactivate, paste the License key
and click Confirm:
Figure 25 - Deactivate License