”programming teaches you how to think”
TRANSCRIPT
”Programming teaches you how to think”Steve Jobs
Authors: Zuzanna Olechno, Katarzyna Dardzińska, Aleksandra Gmerek, Bogumiła Kowalik
Technical consultants: Maciej Kopczyński, Beata Rogalska, Fundacja Rozwoju Społeczeństwa Informacyjnego
Illustrators: Patryk Tabaka, Arkadiusz Płatek
Technical supervisors: Marcin Joka, Krzysztof Dziemiańczuk
Polish edition: Białystok 2018
© 2018 Photon Entertainment . All right reserved.
No part of this book may be reproduced or transmitted in any form or by any means, electronic or mechanical, including photocopying, recording, or by an information storage and retrieval system – except by a reviewer who may quote brief passages in a review to be printed in a magazine or newspaper – without permission in writing from the publisher.

Dear Teacher!
We have prepared a set of lesson plans for conducting classes with the Photon robot so that you can get the most out of the lessons with your pupils. These lesson plans are designed based on the guidelines of the core curriculum introduced by the Ministry of Education.
This publication consists of three levels: A, B and C. Each of them is tailored to the age and skills of the children at each grade. There are 10 lesson plans for each level. Each teaches you how to conduct and develop your own lessons using the robots.
To control Photon, you will need the Photon EDU application, which can be downloaded for free from the GooglePlay store (on Android mobile devices) and the AppStore (on iOS mobile devices). The application was developed to work with a large group of children.
Special codes included in this publication give access only to the necessary functions used in a given scenario. In each lesson, we learn more about the robot’s capabilities, which means that Photon is developing together with your pupils.
Cooperating with teachers from all over the world, we are constantly trying to broaden the database of lesson plans. If you would like to share your ideas on using Photon at school or in kindergarten, please contact us by e-mail at [email protected] (in English or Polish). All additional lesson plans will be available on our website www.photonrobot.com in the Education tab.
We wish you fruitful play with Photon and lots of smiles on your children’s faces!
The Photon team
PRINTABLE PDF ATTACHMENTS AVAILABLE AT: www.photonrobot.com/lesson_plans/
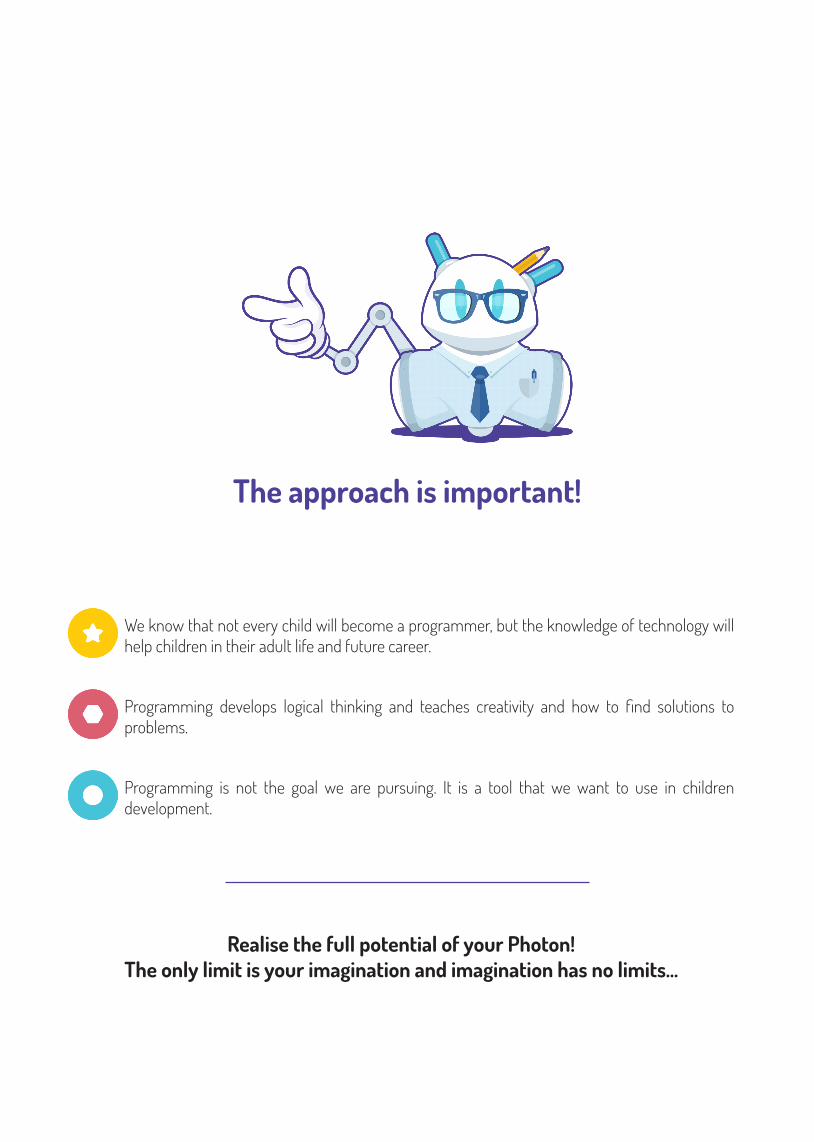
The approach is important!
Realise the full potential of your Photon!The only limit is your imagination and imagination has no limits...
We know that not every child will become a programmer, but the knowledge of technology will help children in their adult life and future career.
Programming develops logical thinking and teaches creativity and how to find solutions to problems.
Programming is not the goal we are pursuing. It is a tool that we want to use in children development.

1. Light sensor
Photon can distinguish between light and dark!
2. Touch sensor
Touch Photon’s forehead and it will feel it..
3. Range sensor
Photon detects obstacles up to 100 centimetres away!
4. Comunication with other robots
Photon is able to communicate with other Photons.
5. Distance measure
Photon measures the distance travelled in centimetres.
6. Angle measure
Photon can also rotate with very high accuracy.
7. Magnetic attachments
Additional accessories increase its abilities.
8. LED backlit eyes and antennae
Photon can change the colour of its eyes and antennas,
independently!
9. Speaker
Photon communicates in its own, emotional way.
10. Sound sensor
Reacts to loud sounds such as clapping, stomping or shouting..
11. Surface contrast sensors
Using four contrast sensors, Photon detects the colour of surface
it moves on..
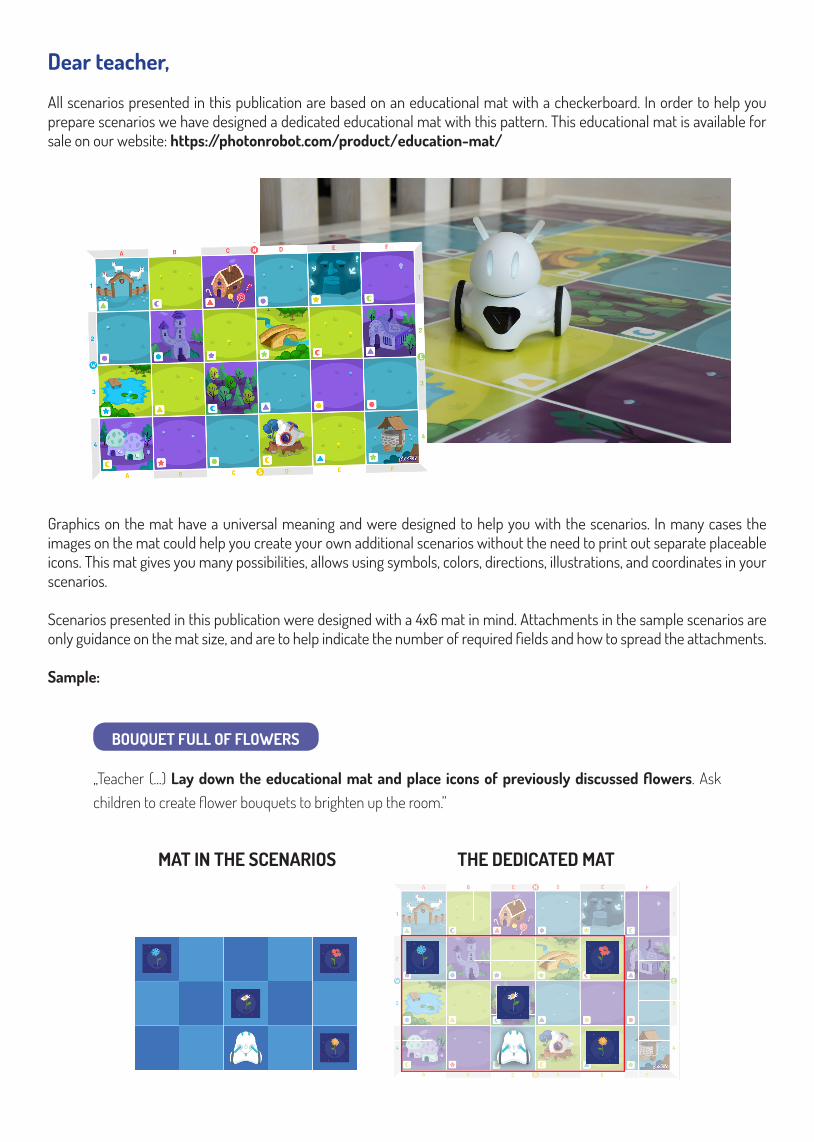
Dear teacher,
All scenarios presented in this publication are based on an educational mat with a checkerboard. In order to help you prepare scenarios we have designed a dedicated educational mat with this pattern. This educational mat is available for sale on our website: https://photonrobot.com/product/education-mat/
Graphics on the mat have a universal meaning and were designed to help you with the scenarios. In many cases the images on the mat could help you create your own additional scenarios without the need to print out separate placeable icons. This mat gives you many possibilities, allows using symbols, colors, directions, illustrations, and coordinates in your scenarios.
Scenarios presented in this publication were designed with a 4x6 mat in mind. Attachments in the sample scenarios are only guidance on the mat size, and are to help indicate the number of required fields and how to spread the attachments.
Sample:
MAT IN THE SCENARIOS THE DEDICATED MAT
„Teacher (...) Lay down the educational mat and place icons of previously discussed flowers. Ask children to create flower bouquets to brighten up the room.”
BOUQUET FULL OF FLOWERS

B

Level B is targeted at 2nd and 3rd grade of primary school. It was developed based on programming interfaces: Photon
Badge and Photon Blocks.
At this stage, children practise spatial imagination, learn designing and route planning, and analyse problems so that they
can create optimal solutions. In addition, pupils will learn how Photon can interact with the environment, which makes
controlling the robot more advanced and autonomous.
Good luck!
ACCESS CODE - LEVEL B:

ACCESS CODE - PHOTON BLOCKS:
Activities based on Photon Blocks were developed with children who are able to read. By stacking up colourful instruction blocks, children at this stage of development are able to understand what “configurability” or “complex operations” means.
Presented activities help the children to develop: • Analytical skills,• Ability to design complex program sequences and
use sensors,• Ability to detect errors at an early stage,• Skills to optimise created programs.
Main ScreenThe concept of programming is simplified to moving blocks of instructions and arranging them in a sequence below the first block “Start”.
MovementThis category contains blocks necessary to program the robot’s movements.
ActionsThis category contains blocks that allow the children to change the colour of Photon’s ears (antennae) and eyes, and to have it make sounds.
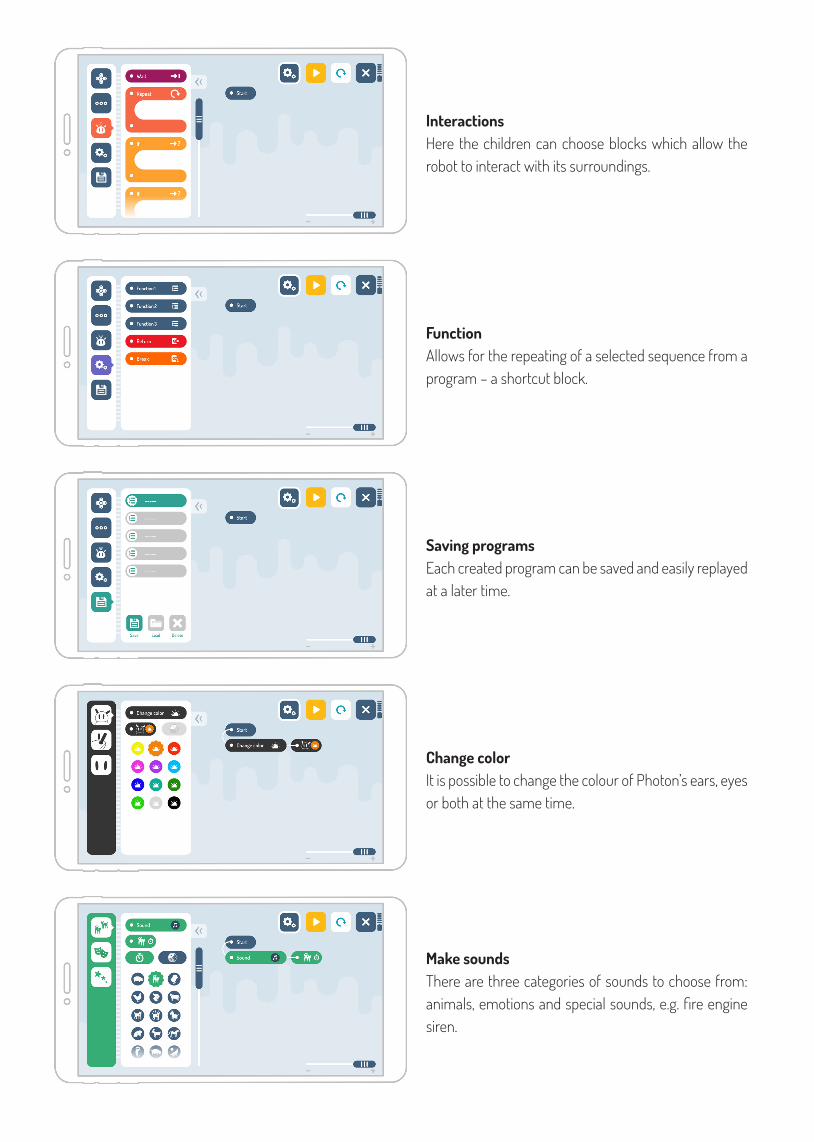
InteractionsHere the children can choose blocks which allow the robot to interact with its surroundings.
Saving programsEach created program can be saved and easily replayed at a later time.
FunctionAllows for the repeating of a selected sequence from a program – a shortcut block.
Change colorIt is possible to change the colour of Photon’s ears, eyes or both at the same time.
Make soundsThere are three categories of sounds to choose from: animals, emotions and special sounds, e.g. fire engine siren.

WaitThe “Wait” block allows the children to program the robot to wait for a specific external action, i.e. patting on the head, turning off lights, loud sound. If the “Wait” block is used, Photon performs all the tasks put directly below this block.
RepeatThe “Repeat” block allows the children to repeat any activity assigned to a given block a certain number of times. For instance, Photon can replay a chosen sound 6 times.
IfThe “If” block is responsible for checking whether a given interaction has taken place. If yes, the robot executes instructions assigned to a given block. If no interaction is detected, Photon skips this action and carries on.

Subject: Favorite holiday memories with Photon
Aims:• To raise awareness of being part of the group,• To consolidate courtesy phrases,• To learn about the differences between animals, • To practice patience in waiting for child’s own turn.
Educational aids:• Photon the Robot,• Tablet,• Animal colouring pages.
Sample scenario:
Prepare animal colouring pages. Each child should draw a random picture, colour the animal in the picture with a colour of their choice, and then describe each body part of the animal: nose, eyes, ears, belly, etc. Ask the children to take Photon out of the box. Ask selected children to compare Photon’s appearance with the animals they have coloured.The most important thing is that the children spot and describe as many differences/similarities as possible, e.g. “My dog has a nose and the robot does not.”
Ask the children to sit down in a circle. They will have to control the robot, introduce themselves and describe their best holiday memory. Show them how to control the robot. Then, give the tablet to the first selected child, who must lead the robot to a chosen person.The chosen child has to present themselves to Photon and describe a holiday memory. Then the tablet goes to the next pupil, who repeats the earlier step. The game lasts until Photon meets all the children in the group.At the end the game, you might say: “The robot came to us from a galaxy which is far, far away ... and is very tired now, and needs to rest.”Everybody from the group says goodbye to the robot. They can pat it, hug it or just wave good-bye.
To end the lesson, hand out graphics in the form of Photon contours for the children to colour. They must colour the robot so it looks like any animal they choose.
INTRODUCTION
PROGRAMMING
CONCLUSION
1

Attachments:
Printable pdf attachments available at: www.photonrobot.com/lesson_plans/
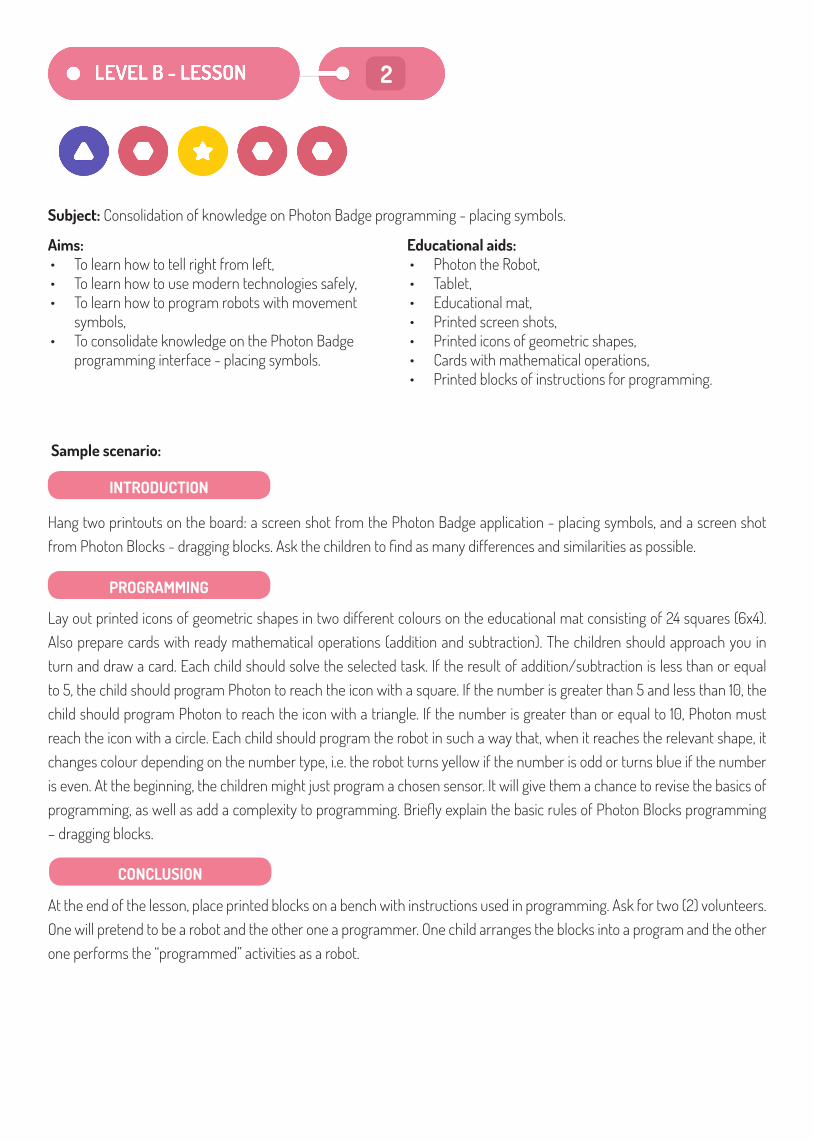
Subject: Consolidation of knowledge on Photon Badge programming - placing symbols.
Aims:• To learn how to tell right from left,• To learn how to use modern technologies safely,• To learn how to program robots with movement
symbols,• To consolidate knowledge on the Photon Badge
programming interface - placing symbols.
Educational aids:• Photon the Robot,• Tablet,• Educational mat,• Printed screen shots,• Printed icons of geometric shapes,• Cards with mathematical operations,• Printed blocks of instructions for programming.
Sample scenario:
Hang two printouts on the board: a screen shot from the Photon Badge application - placing symbols, and a screen shot from Photon Blocks - dragging blocks. Ask the children to find as many differences and similarities as possible.
Lay out printed icons of geometric shapes in two different colours on the educational mat consisting of 24 squares (6x4). Also prepare cards with ready mathematical operations (addition and subtraction). The children should approach you in turn and draw a card. Each child should solve the selected task. If the result of addition/subtraction is less than or equal to 5, the child should program Photon to reach the icon with a square. If the number is greater than 5 and less than 10, the child should program Photon to reach the icon with a triangle. If the number is greater than or equal to 10, Photon must reach the icon with a circle. Each child should program the robot in such a way that, when it reaches the relevant shape, it changes colour depending on the number type, i.e. the robot turns yellow if the number is odd or turns blue if the number is even. At the beginning, the children might just program a chosen sensor. It will give them a chance to revise the basics of programming, as well as add a complexity to programming. Briefly explain the basic rules of Photon Blocks programming – dragging blocks.
At the end of the lesson, place printed blocks on a bench with instructions used in programming. Ask for two (2) volunteers. One will pretend to be a robot and the other one a programmer. One child arranges the blocks into a program and the other one performs the “programmed” activities as a robot.
INTRODUCTION
PROGRAMMING
CONCLUSION
2
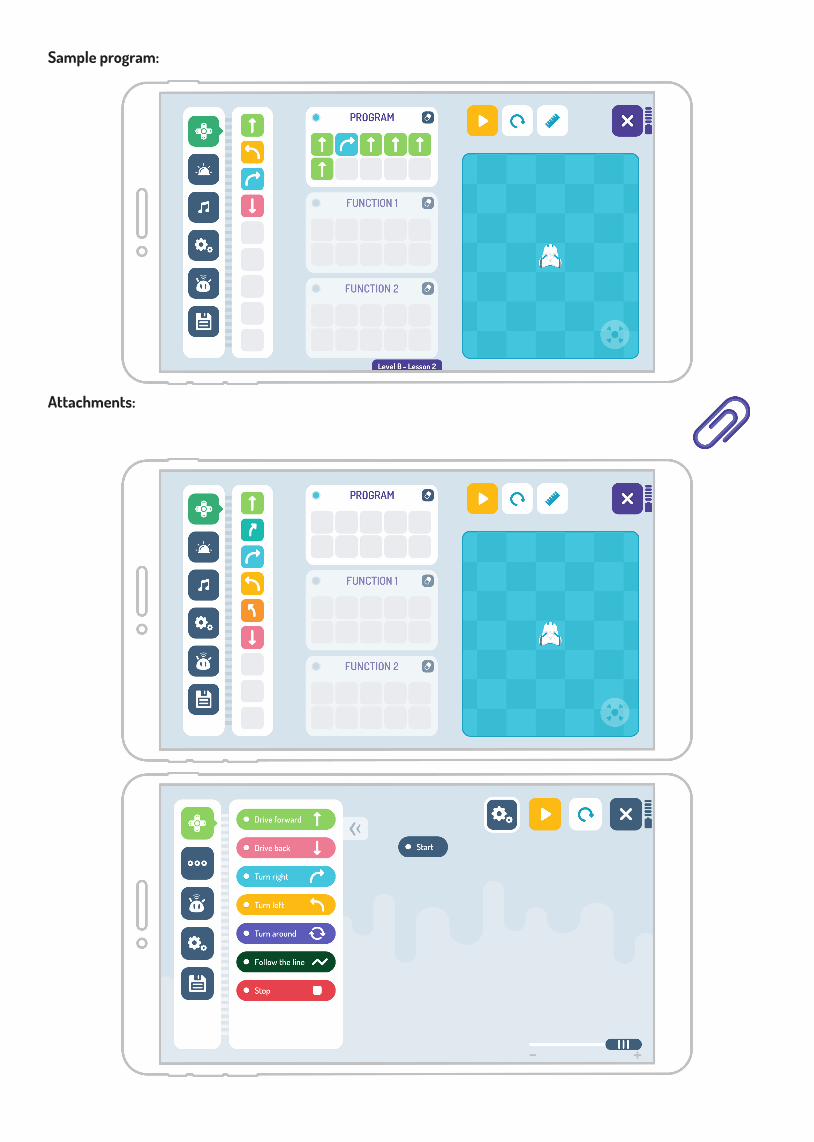
Sample program:
Attachments:
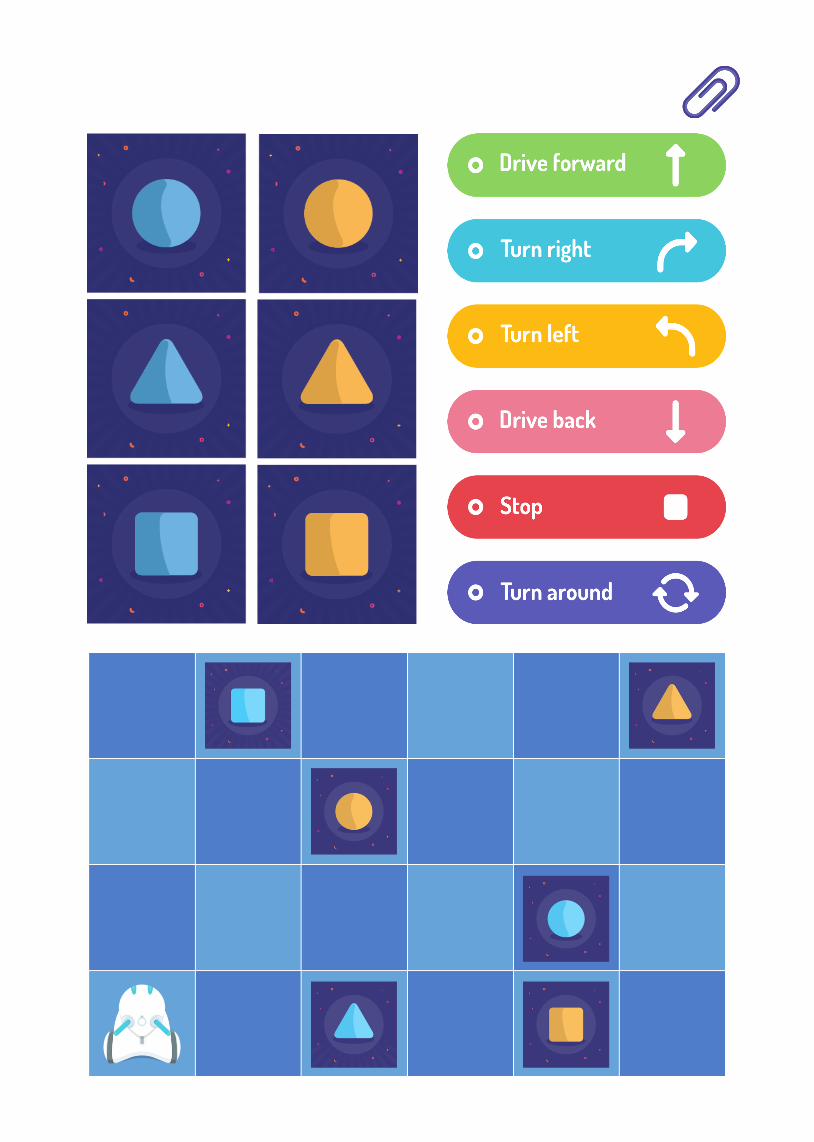
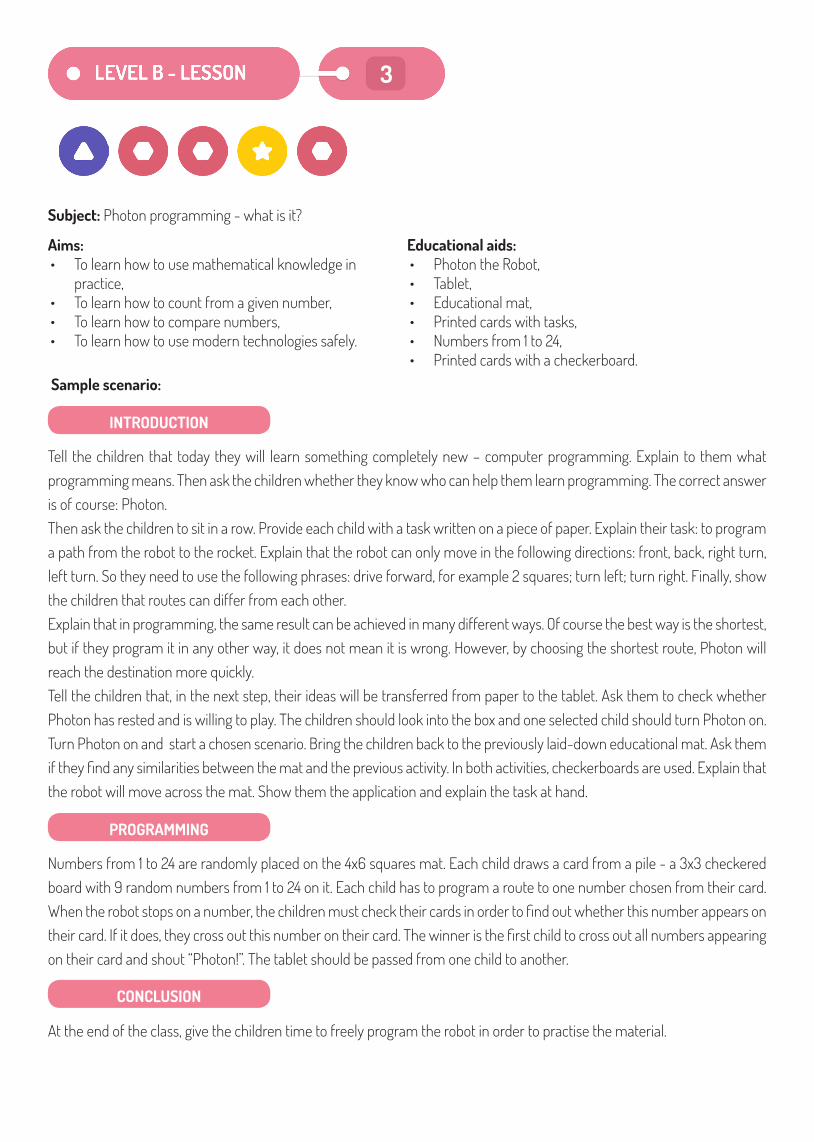
Subject: Photon programming - what is it?
Aims:• To learn how to use mathematical knowledge in
practice,• To learn how to count from a given number,• To learn how to compare numbers,• To learn how to use modern technologies safely.
Educational aids:• Photon the Robot,• Tablet,• Educational mat,• Printed cards with tasks,• Numbers from 1 to 24,• Printed cards with a checkerboard.
Sample scenario:
Tell the children that today they will learn something completely new – computer programming. Explain to them what programming means. Then ask the children whether they know who can help them learn programming. The correct answer is of course: Photon. Then ask the children to sit in a row. Provide each child with a task written on a piece of paper. Explain their task: to program a path from the robot to the rocket. Explain that the robot can only move in the following directions: front, back, right turn, left turn. So they need to use the following phrases: drive forward, for example 2 squares; turn left; turn right. Finally, show the children that routes can differ from each other. Explain that in programming, the same result can be achieved in many different ways. Of course the best way is the shortest, but if they program it in any other way, it does not mean it is wrong. However, by choosing the shortest route, Photon will reach the destination more quickly. Tell the children that, in the next step, their ideas will be transferred from paper to the tablet. Ask them to check whether Photon has rested and is willing to play. The children should look into the box and one selected child should turn Photon on. Turn Photon on and start a chosen scenario. Bring the children back to the previously laid-down educational mat. Ask them if they find any similarities between the mat and the previous activity. In both activities, checkerboards are used. Explain that the robot will move across the mat. Show them the application and explain the task at hand.
Numbers from 1 to 24 are randomly placed on the 4x6 squares mat. Each child draws a card from a pile - a 3x3 checkered board with 9 random numbers from 1 to 24 on it. Each child has to program a route to one number chosen from their card. When the robot stops on a number, the children must check their cards in order to find out whether this number appears on their card. If it does, they cross out this number on their card. The winner is the first child to cross out all numbers appearing on their card and shout “Photon!”. The tablet should be passed from one child to another.
At the end of the class, give the children time to freely program the robot in order to practise the material.
INTRODUCTION
PROGRAMMING
CONCLUSION
3

Attachments:

22 7 15
13 21 3
9 19 16

Subject: Coloring numbers with Photon.
Aims:• To learn how to put numbers into groups and sort
them in increasing/decreasing order,• To understand such mathematical concepts as: a
number increased by 7 or decreased by 10,• To learn how to use modern technologies safely,• To practice generalization of concepts,• To practice mental addition.
Educational aids:• Photon the Robot,• Tablet,• Educational mat,• Printed images with numbers,• Cards with mathematical operations (addition).
Sample scenario:
Show the children 2 images. On the blue pape r, there are even numbers and, on the yellow paper, there are odd numbers. Ask the children whether they know what types of numbers are on picture 1 and picture 2. If the children answer correctly, show them higher numbers, for example 52, 73, 45, and ask them to identify them as even or odd. Finally, attach cards with numbers to the board. Switch on the robot and ask the children whether they know if Photon can learn new colours. Ask the children to find, in the room, items in pink or turquoise. Then, selected children should approach the robot and show objects in one of these two colours. When the children are showing their findings, you should program the robot to change colour according to the colour being shown.
Next, tell the children that today Photon will learn how to count and recognise even and odd numbers. Spread out the 6x4 squares mat. Place the cards with mathematical operations on the mat. Explain that the robot has learned new colours today and show them how the colour-changing function works in the application on the tablet. The children’s task will be to program the robot in such a way that, when it moves across the mat, it changes colour. The colour depends on whether the result of the mathematical operation is an even or odd number. Even numbers should change the colour to pink and odd numbers should change the colour to turquoise.
Finally, the children, working all together, should program the robot’s path to the box.
INTRODUCTION
PROGRAMMING
4
CONCLUSION
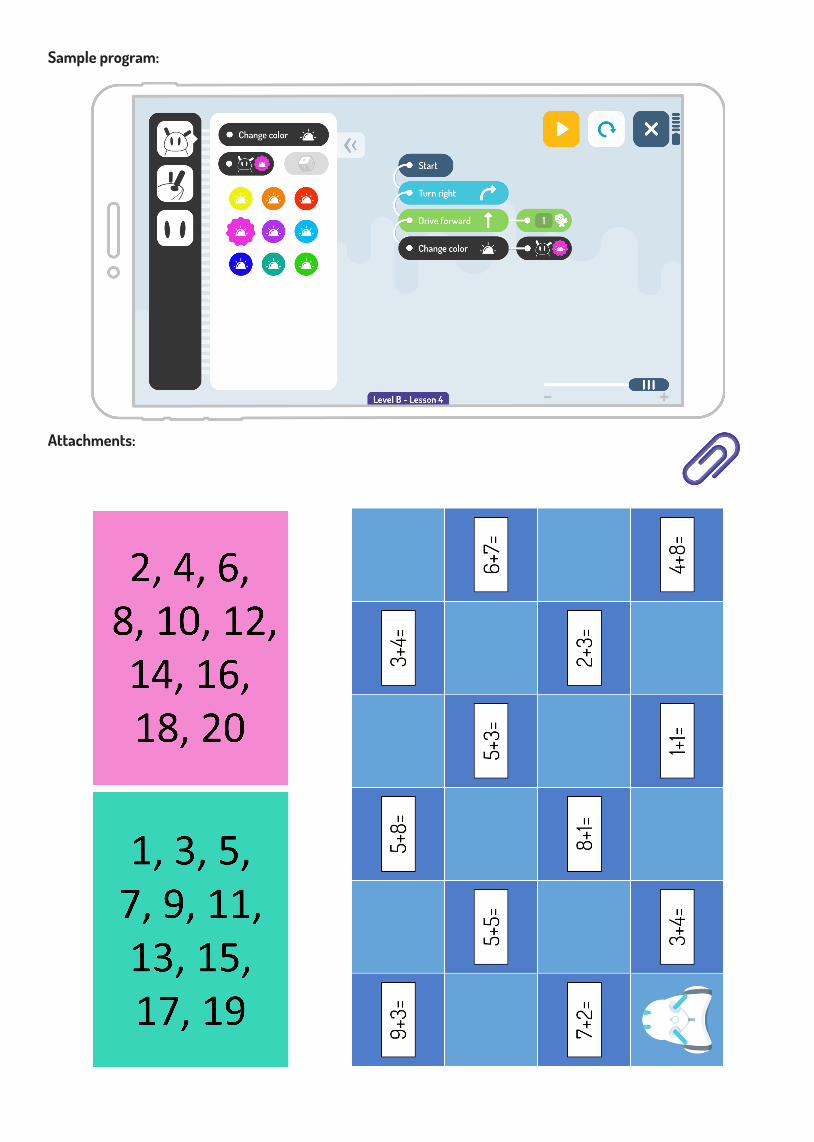
Sample program:
Attachments:
Subject: Photon learns emotions
Aims:• To learn how to describe emotions,• To learn how to express emotions through facial
expressions,• To learn nonverbal communication,• To learn how to use modern technologies safely.
Educational aids:• Photon the Robot,• Tablet, • Educational mat,• Printed cards with emotion icons,• Printed cards with face contours,• Situational pictures related to different emotions.
Sample scenario:
Ask the children if they know any emotions and to name those they know. Then pull out cards with different facial expressions/emotions and ask the children to name them. Next ask them to show these emotions on their faces. Provide each child with the cards with four (4) face contours. Read them a short story and ask them to draw a facial expression that fits the story on face #1. Repeat this task with 3 more stories. Ask the children if robots can express emotions. Tell the class that Photon can express emotions with sounds. Choose four children and give them icons expressing different emotions. The children’s task is to teach the robot specific feelings. When a child shows one of the icons to the robot, you should program the robot to make a sound according to the emotion on the icon shown.
On the educational mat place emoticons and situational pictures (children can prepare such pictures themselves). The children’s task is to make the robot drive from an emoticon to the appropriate situational picture. Then the children should build sentences referring to the graphics that Photon approaches, e.g. “John is excited because it is his birthday”.
Then the children should answer the following questions: • What do we do when someone is sad?• What does it mean when someone expresses their approval?• What do we do when someone is disgusted?The Children say goodbye to the robot and walk it to the box.
INTRODUCTION
PROGRAMMING
5
CONCLUSION
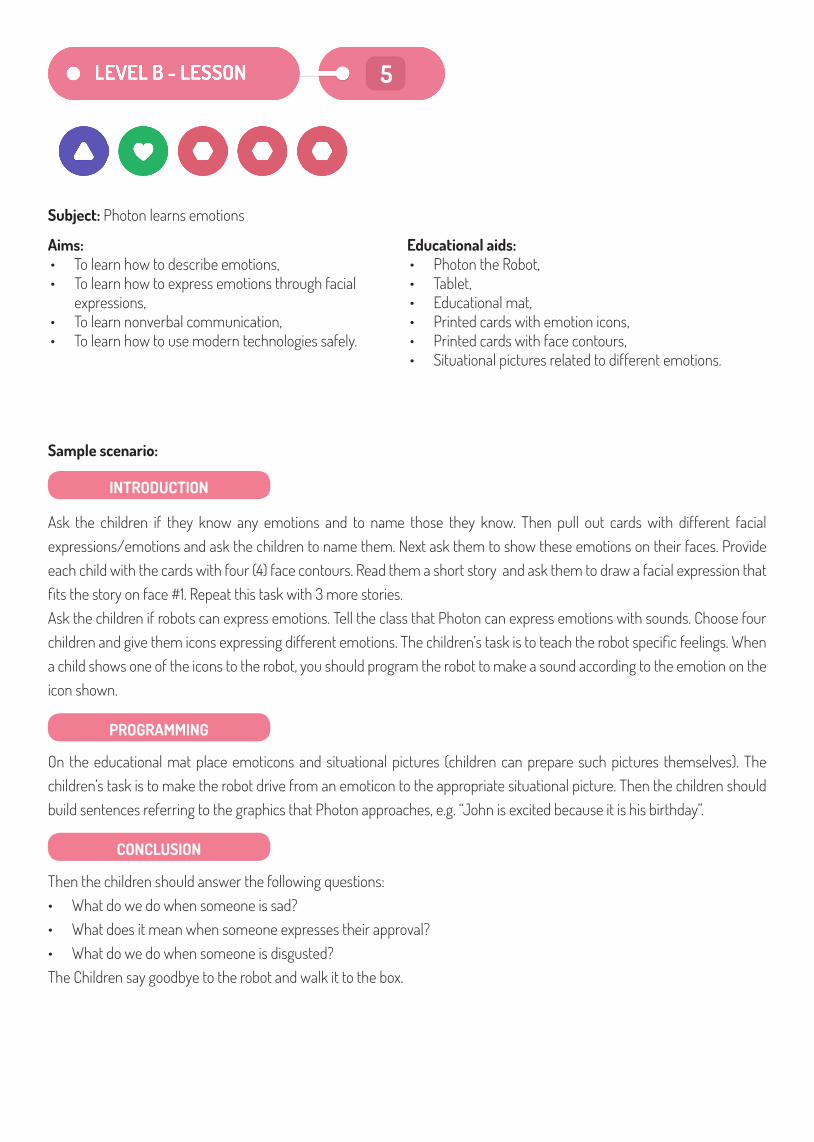
Sample program: A route to an emoticon:
A route from an emoticon to a situational picture:
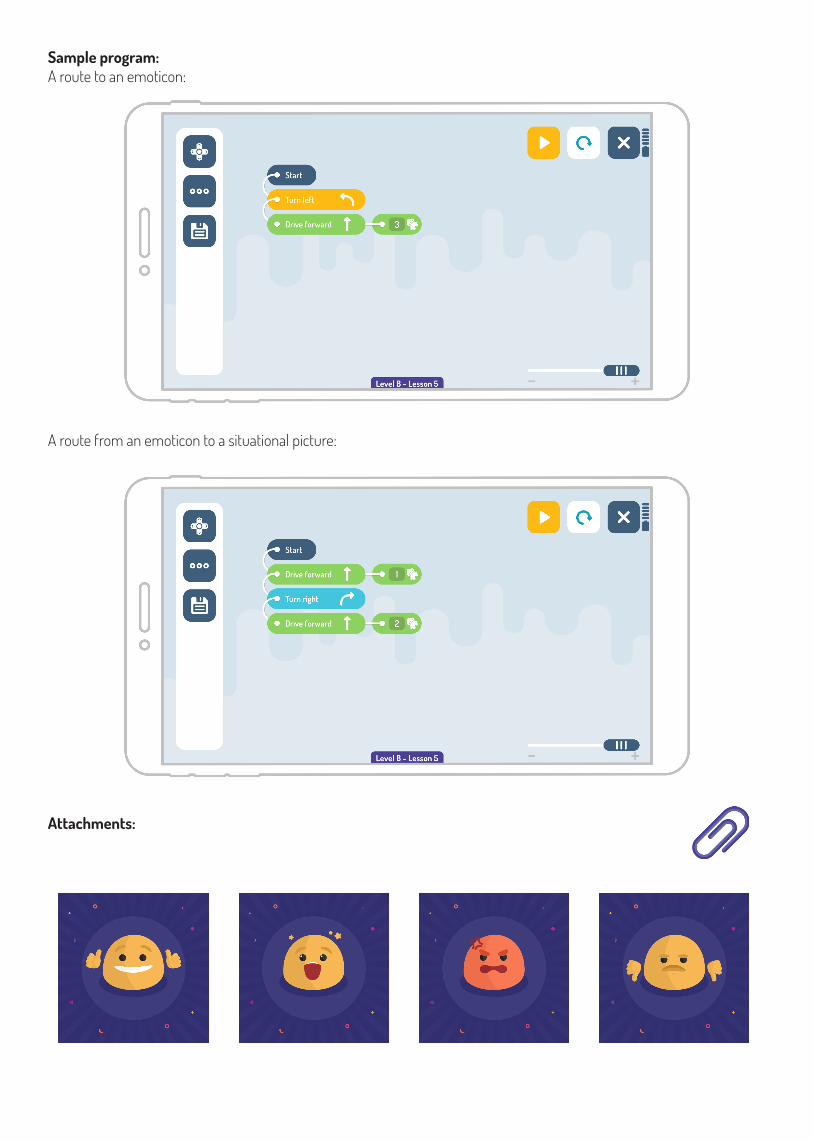
Attachments:
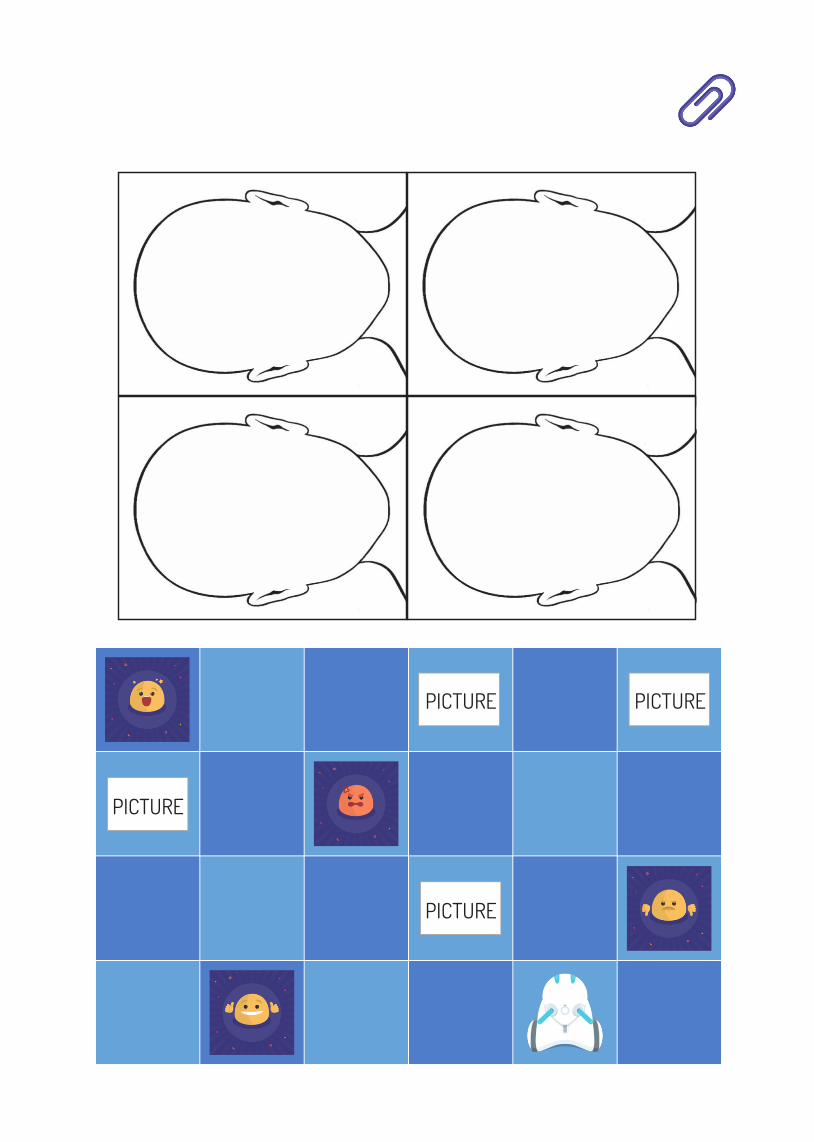
PICTURE
PICTURE PICTURE
PICTURE
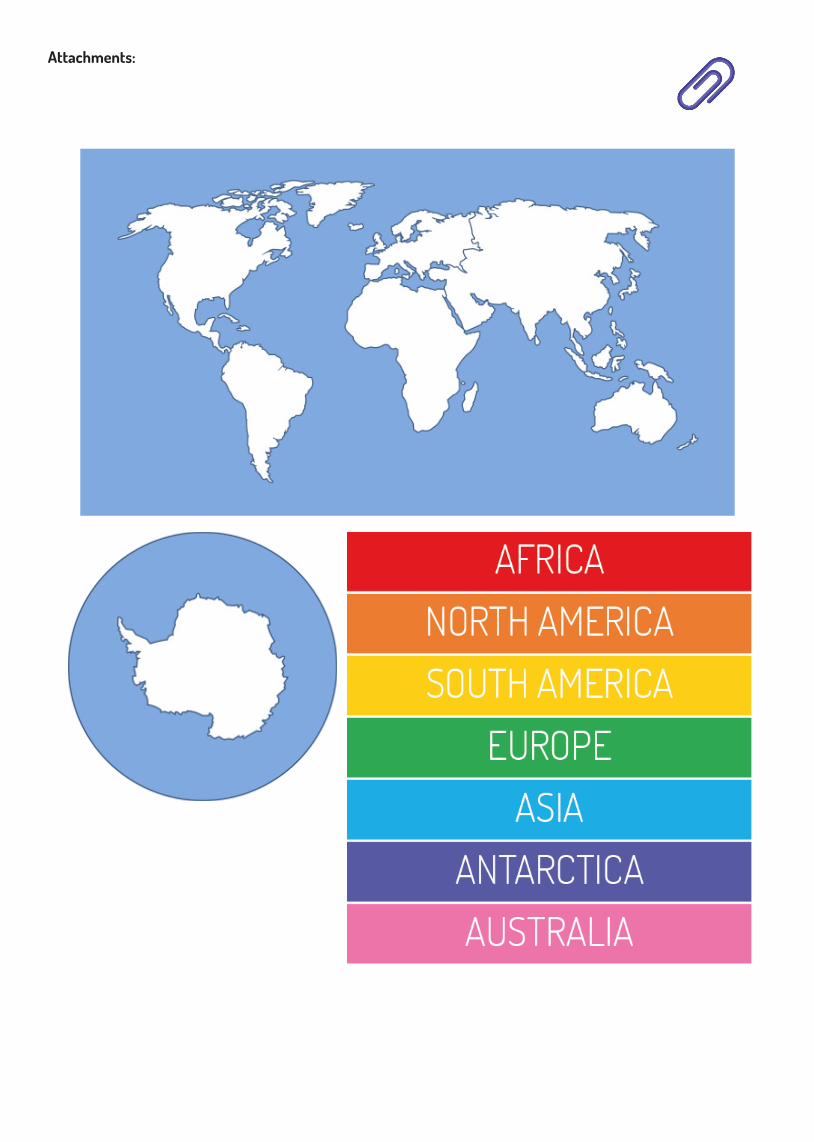
Subject: Photon meets the continents of the world Aims:• To learn how to use modern technologies safely, • To identify on a physical map of the world its key
continents, • To learn how to use the physical map.
Educational aids:• Photon the Robot,• Tablet,• Educational mat,• Printed map,• Printed cards with the names of continents,• Cards with contours of continents.
Sample scenario:
Provide the children with sheets with a map of the world. Ask the children to try to identify and name continents on the map (hung in the classroom).Attach the names of the continents on the board. The names of the continents are written in different colours. Ask the children to read aloud the list of continents together with their assigned colour, e.g. Asia - blue, Europe – green, etc.
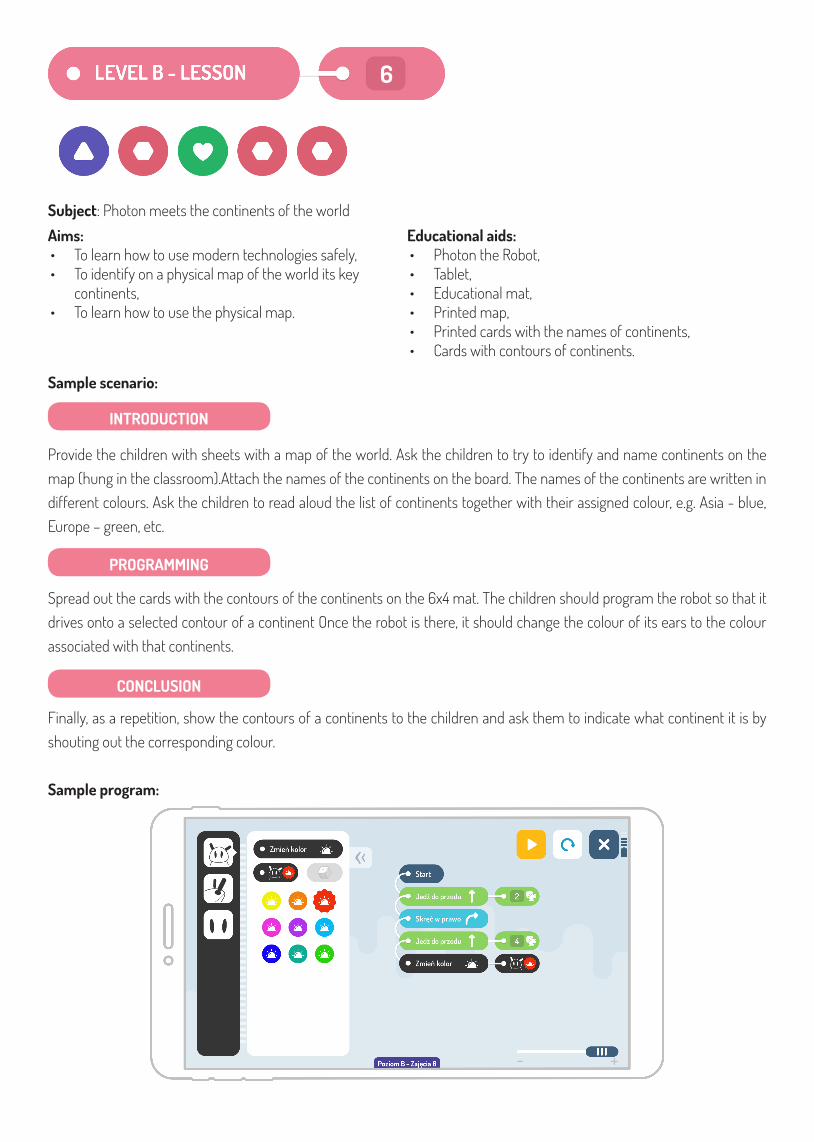
Spread out the cards with the contours of the continents on the 6x4 mat. The children should program the robot so that it drives onto a selected contour of a continent Once the robot is there, it should change the colour of its ears to the colour associated with that continents.
Finally, as a repetition, show the contours of a continents to the children and ask them to indicate what continent it is by shouting out the corresponding colour.
Sample program:
INTRODUCTION
PROGRAMMING
6
CONCLUSION
Attachments:


Subject: Colorful four seasons with Photon.
Aims:• To understand signs of the four seasons,• To learn how to use modern technologies safely,• To learn how to recognize changes taking place in
nature,• To develop the imagination.
Educational aids:• Photon the Robot,• Tablet,• A4 sheets of white paper,• Black marker or black insulation tape,• A4 sheets of heavyweight drawing paper.
Sample scenario:
Ask the children to name all four seasons. Provide the children with A4 sheets of white paper (one for each child). On their sheets, the children should draw a thick line with a black marker or stick black tape (e.g. electrical tape) to it. It should create a straight centred line across the whole length of the sheet.Finally, ask the children to put all sheets of paper on the floor in order to create a continuous black guiding line. Next, you should place 4 sheets of heavyweight drawing paper equally spaced out along the line. Choose 8 children from the class and divide them into 2 groups of four (4). Tell one group to prepare 4 cards with the names of the four seasons and the other group to prepare 4 cards with the first days of seasons, i.e. first day of spring, summer, autumn and winter. Ask the rest of the class to prepare symbols associated with the selected seasons. This activity requires that the children match the name cards of the seasons with the correct dates and place them on the A4 sheet prepared by you. The order of the seasons must be correct. Then tell the children preparing the symbols of the seasons to place them next to the appropriate dates.
Ask the children to put Photon at the beginning of the line and program it one by one in such a way that it moves along the line. In places where it stops (white sheets of drawing paper placed by you), the robot should change its colour to the one associated with this given season. By voting (raising hands), the children should decide which seasons they like best and which ones are their least favourite. Let them program Photon so that it makes a sound of joy when passing by favourite seasons and a sound of sadness next to disliked seasons.
Note: The black guiding line should be thick, approximately 1 cm wide and as black as possible. The best effect is achieved by sticking a black insulating tape on sheets of paper. This paper should be white.
INTRODUCTION
PROGRAMMING
7
!
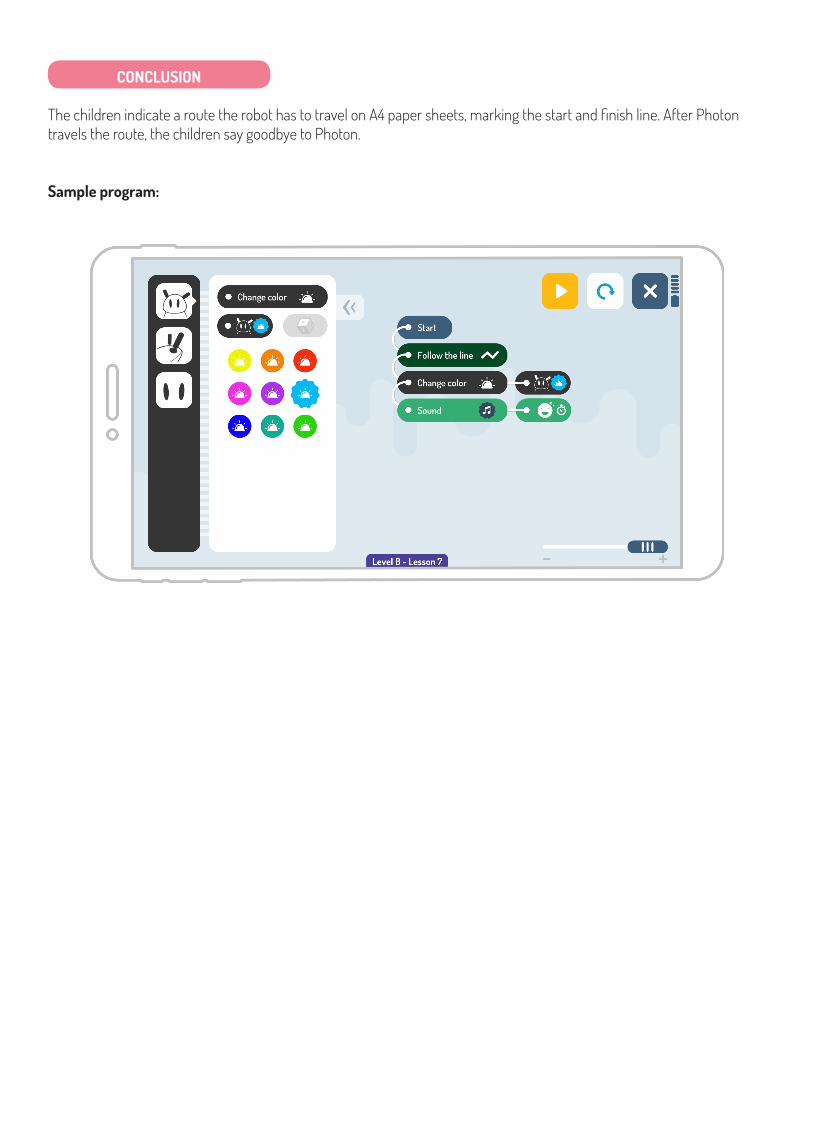
The children indicate a route the robot has to travel on A4 paper sheets, marking the start and finish line. After Photon travels the route, the children say goodbye to Photon.
Sample program:
CONCLUSION

Sample scenario:
Ask the children if they know how long one (1) metre is. Then ask them how long 100 cm is. The children should notice that they are both the same length.Ask the children to stand in a row. Use the tape measure to find out the height of each child. Ask each child to write down their height on a piece of paper and to sign it with their name.Finally, ask the children to arrange their pieces of papers in order from the shortest to the tallest. Take the robot and ask two selected children to take measurements of Photon – its height, width and length. Present three different images of boxes together with their dimensions (a box too small to fit Photon, a box perfect for Photon and a box too large for Photon). Given that the children know Photon’s dimensions, ask them to choose the right box to pack the robot.
Turn Photon on and explain the rules of the next activity. Prepare pieces of paper with sample distances on them, e.g. 50 cm, 70 cm, etc. (max. 100 cm). Divide the children into teams of two (2). Ask each team to approach you and choose one piece of paper. Then, put the robot on the floor. Each team has to extend a piece of string, away from the robot to a length written on their chosen piece of paper. The difficulty is that they have to visually estimate this distance. Then one child from the team should program the robot in such a way that the robot waits for an obstacle which is closer than the distance written on the piece of paper. When the robot encounters an obstacle, it makes a sound of joy. One child from the team should switch the robot on. The second child from the same team should place an obstacle (box, A4 sheet of paper or other large object) further away than the extended end of the piece of string. The same child slowly moves the obstacle closer to the robot. When the robot makes a sound of joy, it means that this is the exact distance written on the piece of paper. The children should compare it with the piece of string initially extended on the floor to see how well they estimated the distance.
The closing exercise: At a distance of your choice, put a box in front of the robot, e.g. 80 cm. Ask the children to guess this distance. Then measure this distance with a tape measure in front of everyone. The child with the closest answer is the winner. If time permits, the winner receives the chance to create a program of their choice and pack Photon into the box.
CONCLUSION
Subject: Measuring distances with Photon.
Aims:• To learn how to use modern technologies safely,• To get to know measuring devices,• To learn how to take measurements and read them
out,• To get to know the measurement units,• To learn about methods of taking measurements in
the past.
Educational aids:• Photon the Robot,• Tablet,• Measurement tape,• Drawings of boxes with dimensions,• Piece of string,• Obstacles, e.g. a box.
INTRODUCTION
PROGRAMMING
8

Sample program: The first step:
The second step:
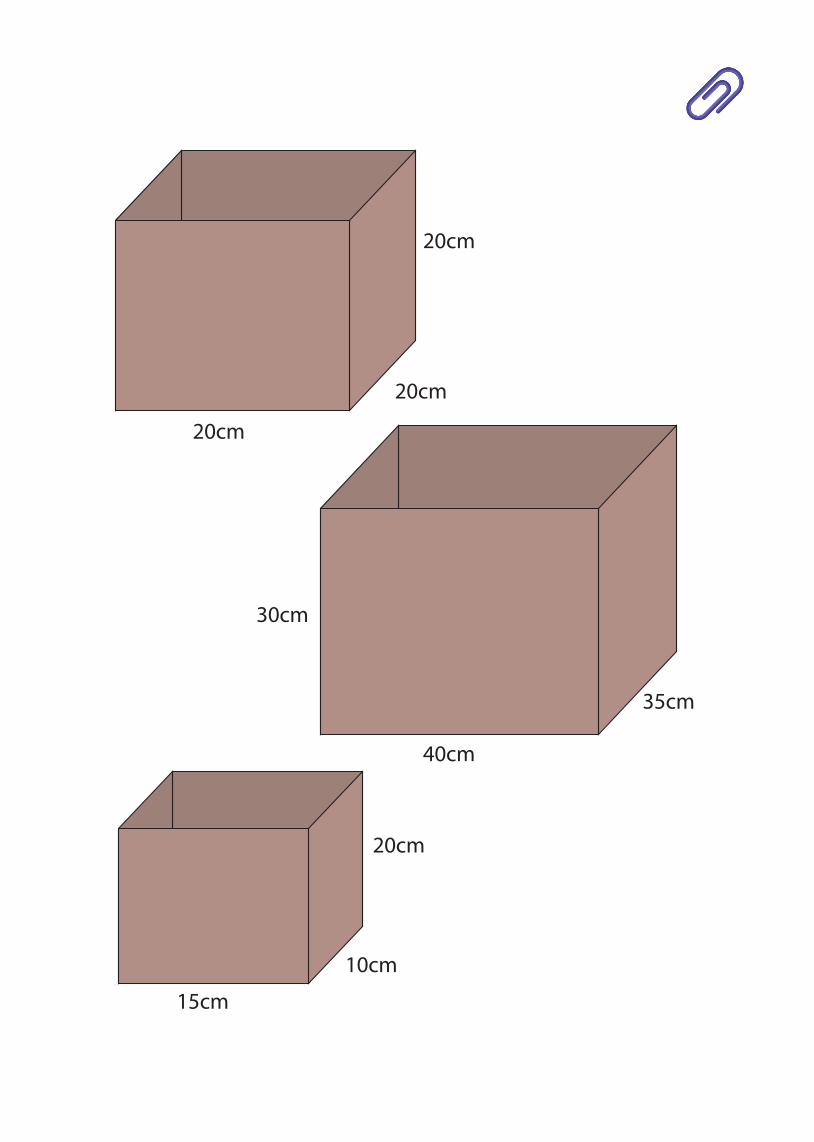
20cm
20cm
40cm
20cm
35cm
30cm
15cm
10cm
20cm

Subject: Please repeat 3 times - Photon’s new skills.
Aims:• To learn how to use modern technologies safely ,• To introduce the concept of a function in
programming,• To consolidate knowledge on shapes,• To introduce the concept of iteration-repetition.
Educational aids:• Photon the Robot,• Tablet,• Strips of paper cut to equal length.
Sample scenario:
Draw four geometrical shapes on the board: a square, a rectangle, a triangle and a circle. Ask the children to name all the shapes. Provide the children with strips of paper cut to equal lengths. Ask them to create a square, a triangle and a rectangle out of these strips. Once the children complete their task, ask them to notice that all the strips have the same length, exactly as the movements of Photon.
Take Photon out of the box and pair up the children. Explain that each pair will now draw a geometric shape and will need to recreate it by programming Photon. One child from the pair should program the robot using the directional cards, for example: drive forward 40 cm, turn left, drive forward 40 cm, turn left, drive forward 40 cm, turn left, drive forward 40 cm, turn left. The second child from the pair has to shorten the program using the Repeat block, i.e. find instructions which are repeated in the program, put these instructions into a block of instructions and decide how many times the robot should repeat this step. The other teams should repeat this exercise with other geometric shapes.
Note: The circle is programmed with „turn left” or „turn right” blocks.
Finally, place Photon’s box on the floor. Ask one of the children to program the robot in such a way that it travels around the box on a square path and at the end makes a sound of joy. At the end of the lesson, put the robot back into the box.
9
!CONCLUSION
INTRODUCTION
PROGRAMMING

Sample program: Triangle:
Attachments:

Subject: Wait! But what if? - conditionals in Photon.
Aims:• To learn how to use modern technologies safely,• To introduce the concept of cause and effect,• To learn conditional statements: „if” or „wait”.
Educational aids:• Photon the Robot,• Tablet,• Printed programming blocks (from scenario #2).
Sample scenario:
Tell the children that today they will teach Photon new things, the endless possibilities of the “if” and “wait” blocks. Using an example, explain how the “if” and “wait” blocks work.
• “IF” block: A mother said to her daughter: “On your way back from school please visit your aunt Jane. If she is at home, ask her for this new cake recipe.”
If aunt Jane is at home, the girl takes the recipe and goes home. If aunt Jane is not at home, the girl goes straight back home.
• “WAIT” block: A mother said to her daughter: “On your way back from school please visit your aunt. Wait until she comes back from work and ask her for the new cake recipe.”
The girl goes to her aunt’s place and waits for her to return from work, then takes the recipe and returns home.
The children will compare functions of these two blocks using a robot. Please attach the following programming instructions to the board: Repeat: 3 times (drive forward 25 cm, if/wait, sound, turn left).The children’s task is to test each sensor available in the “If” block and each sensor available in the “Wait” block, using the programming instructions provided by you. Pair up the children in the class. One child in each pair should create a program and the other one activate Photon’s sensors, for example by patting, etc. The children should create alternate programs, one pair using the block “wait” for sound, the next pair using the block “if” for sound, etc.
At the end, children have time to create their own program based on the „Wait” and „If” blocks.
10
CONCLUSION
INTRODUCTION
PROGRAMMING
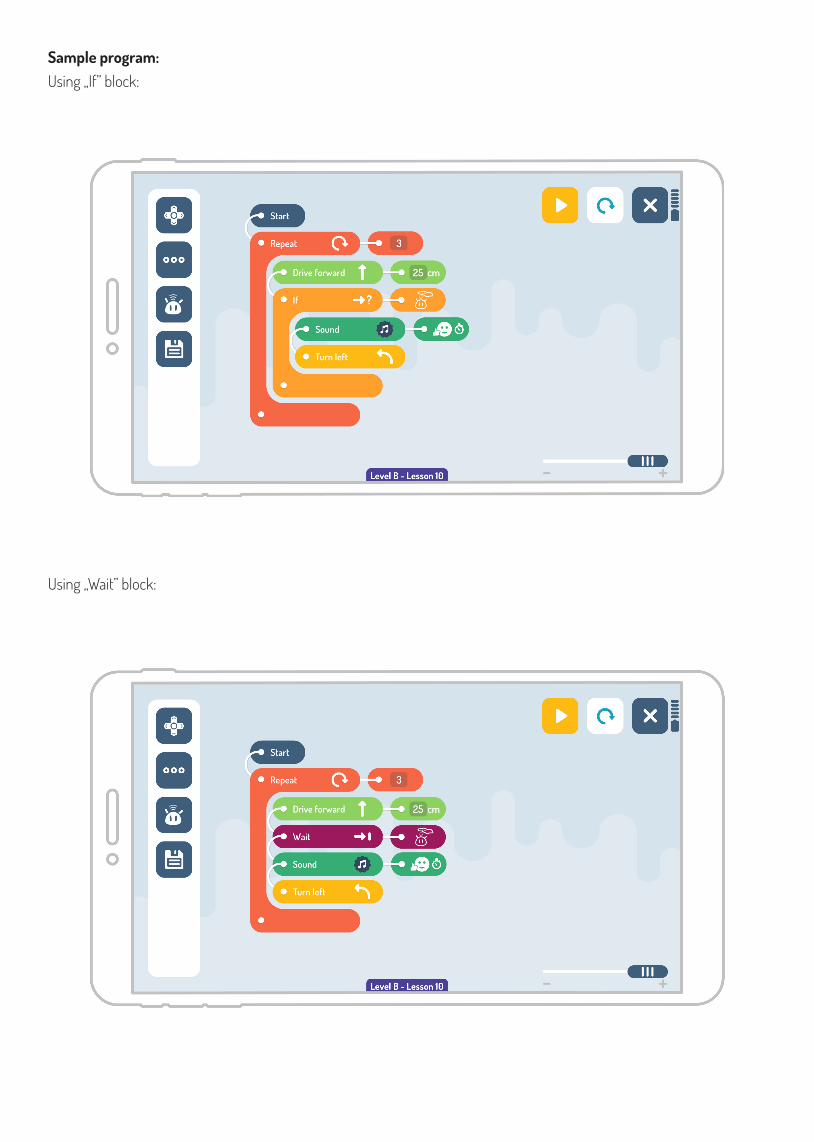
Sample program: Using „If” block:
Using „Wait” block:
Thank you for learning together!
www.photonrobot.com