professional digital two-way radios mototrbotm …
TRANSCRIPT

USER GUIDEGUIDE DE L’UTILISATEURfr-CA
en
PROFESSIONAL DIGITAL TWO-WAY RADIOS
MOTOTRBOTM
XPRTM 2500ALPHANUMERIC DISPLAY MOBILE
source-nag.fm Page 1 Wednesday, September 3, 2014 11:21 AM

source-nag.fm Page 2 Wednesday, September 3, 2014 11:21 AM

Declaratio
n o
f Co
nfo
rmity
i
Declaration of Conformity
This declaration is applicable to your radio only if your radio is labeled with the FCC logo shown below.
DECLARATION OF CONFORMITYPer FCC CFR 47 Part 2 Section 2.1077(a)
Responsible Party Name: Motorola Solutions, Inc.Address: 1303 East Algonquin Road, Schaumburg, IL 60196-1078, U.S.A.Phone Number: 1-800-927-2744Hereby declares that the product:
Model Name: XPR 2500conforms to the following regulations:
FCC Part 15, subpart B, section 15.107(a), 15.107(d) and section 15.109(a)Class B Digital Device
As a personal computer peripheral, this device complies with Part 15 of the FCC Rules. This device complies with Industry Canada licence-exempt RSS standard(s). Operation is subject to the following two conditions:
1. This device may not cause harmful interference, and 2. This device must accept any interference received, including interference that may cause undesired operation.
English
Dec
lara
tio
n o
f C
on
form
ity
En
ii
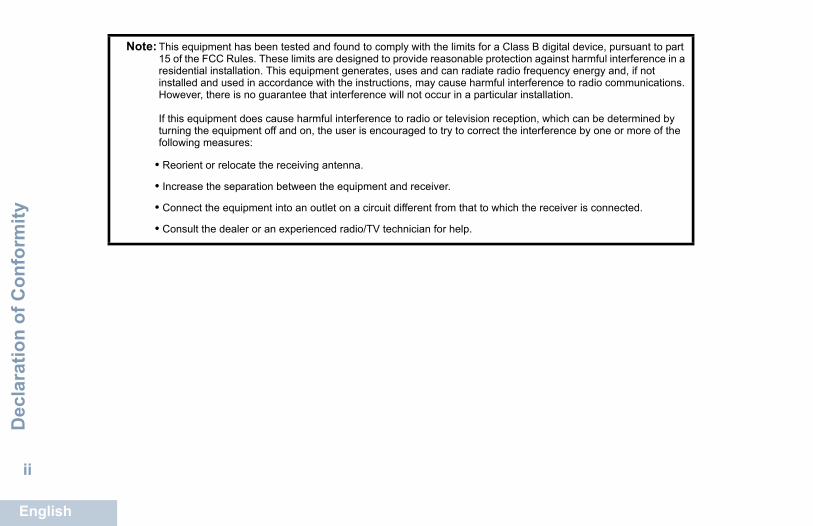
Note: This equipment has been tested and found to comply with the limits for a Class B digital device, pursuant to part 15 of the FCC Rules. These limits are designed to provide reasonable protection against harmful interference in a residential installation. This equipment generates, uses and can radiate radio frequency energy and, if not installed and used in accordance with the instructions, may cause harmful interference to radio communications. However, there is no guarantee that interference will not occur in a particular installation.
If this equipment does cause harmful interference to radio or television reception, which can be determined by turning the equipment off and on, the user is encouraged to try to correct the interference by one or more of the following measures:
• Reorient or relocate the receiving antenna.
• Increase the separation between the equipment and receiver.
• Connect the equipment into an outlet on a circuit different from that to which the receiver is connected.
• Consult the dealer or an experienced radio/TV technician for help.
glish

Co
nten
ts
i
ContentsThis User Guide contains all the information you need to use the MOTOTRBO XPR 2500 Mobile Radios.
Declaration of Conformity . . . . . . . . . . . . . . . . . . . . . i
Important Safety Information . . . . . . . . . . . . . . . . . viRF Energy Exposure and Product Safety Guide for Mobile Two-Way Radios . . . . . . . . . . . .vi
Software Version . . . . . . . . . . . . . . . . . . . . . . . . . . . vi
Computer Software Copyrights . . . . . . . . . . . . . . . vii . . . . . . . . . . . . . . . . . . . . . . . . . . . . . . . . . . . . . . . vii
Getting Started . . . . . . . . . . . . . . . . . . . . . . . . . . . . . . 1How to Use This User Guide . . . . . . . . . . . . . . . . . . 1What Your Dealer/System Administrator Can Tell You . . . . . . . . . . . . . . . . . . . . . . . . . . . . . . . 2Powering Up the Radio . . . . . . . . . . . . . . . . . . . . . . . 2Adjusting the Volume . . . . . . . . . . . . . . . . . . . . . . . . 3
Identifying Radio Controls . . . . . . . . . . . . . . . . . . . . 3Radio Controls . . . . . . . . . . . . . . . . . . . . . . . . . . . . . 4Programmable Buttons . . . . . . . . . . . . . . . . . . . . . . . 4
Assignable Radio Functions . . . . . . . . . . . . . . . . . 5Assignable Settings or Utility Functions . . . . . . . . . 6
Accessing the Programmed Functions . . . . . . . . . . . 7
Push-To-Talk (PTT) Button . . . . . . . . . . . . . . . . . . . . 7Switching Between Conventional Analog and Digital Mode . . . . . . . . . . . . . . . . . . . . . . 8IP Site Connect . . . . . . . . . . . . . . . . . . . . . . . . . . . . 8Capacity Plus . . . . . . . . . . . . . . . . . . . . . . . . . . . . . . 9Linked Capacity Plus . . . . . . . . . . . . . . . . . . . . . . . . 9
Identifying Status Indicators . . . . . . . . . . . . . . . . . . 10Display Icons . . . . . . . . . . . . . . . . . . . . . . . . . . . . . . 11Call Icons . . . . . . . . . . . . . . . . . . . . . . . . . . . . . . . . 12Mini Notice Icons . . . . . . . . . . . . . . . . . . . . . . . . . . . 12Sent Item Icons . . . . . . . . . . . . . . . . . . . . . . . . . . . 13LED Indicators . . . . . . . . . . . . . . . . . . . . . . . . . . . . 13Indicator Tones . . . . . . . . . . . . . . . . . . . . . . . . . . . . 14Audio Tones . . . . . . . . . . . . . . . . . . . . . . . . . . . . . . 14
Receiving and Making Calls . . . . . . . . . . . . . . . . . . 15Selecting a Zone . . . . . . . . . . . . . . . . . . . . . . . . . . . 15Selecting a Channel . . . . . . . . . . . . . . . . . . . . . . . . 16Receiving and Responding to a Radio Call . . . . . . 16
Receiving and Responding to a Group Call . . . . . 17Receiving and Responding to a Private Call . . . 17Receiving an All Call . . . . . . . . . . . . . . . . . . . . . . 18Receiving and Responding to a Selective Call . . 18Receiving and Responding to a Phone Call . . . . 19
Phone Call as Private Call . . . . . . . . . . . . . . . . 19Phone Call as Group Call . . . . . . . . . . . . . . . . . 19
English

Co
nte
nts
En
ii
Phone Call as All Call . . . . . . . . . . . . . . . . . . . 20Making a Radio Call . . . . . . . . . . . . . . . . . . . . . . . . 20
Making a Group Call . . . . . . . . . . . . . . . . . . . . . . 21Making a Private Call . . . . . . . . . . . . . . . . . . . . . 21Making an All Call . . . . . . . . . . . . . . . . . . . . . . . . 22Making a Selective Call . . . . . . . . . . . . . . . . . . . . 23Making a Phone Call . . . . . . . . . . . . . . . . . . . . . 23
Stopping a Radio Call . . . . . . . . . . . . . . . . . . . . . . 24Talkaround . . . . . . . . . . . . . . . . . . . . . . . . . . . . . . . 25Permanent Monitor . . . . . . . . . . . . . . . . . . . . . . . . . 26
Advanced Features . . . . . . . . . . . . . . . . . . . . . . . . . 27Radio Check . . . . . . . . . . . . . . . . . . . . . . . . . . . . . 27
Sending a Radio Check . . . . . . . . . . . . . . . . . . . 27Remote Monitor . . . . . . . . . . . . . . . . . . . . . . . . . . . 28
Initiating Remote Monitor . . . . . . . . . . . . . . . . . . 28Stopping Remote Monitor . . . . . . . . . . . . . . . . . . 29
Scan Lists . . . . . . . . . . . . . . . . . . . . . . . . . . . . . . . . 30Viewing an Entry in the Scan List . . . . . . . . . . . . 30Editing the Scan List . . . . . . . . . . . . . . . . . . . . . . 30
Adding a New Entry to the Scan List . . . . . . . . 30Deleting an Entry from the Scan List . . . . . . . . 31Setting and Editing Priority for an Entry in the Scan List . . . . . . . . . . . . . . . . . . . . . . . . . . . . . 31
Scan . . . . . . . . . . . . . . . . . . . . . . . . . . . . . . . . . . . . 32Starting and Stopping Scan . . . . . . . . . . . . . . . . 32
Responding to a Transmission During a Scan . . 33Deleting a Nuisance Channel . . . . . . . . . . . . . . . 33Restoring a Nuisance Channel . . . . . . . . . . . . . . 34
Vote Scan . . . . . . . . . . . . . . . . . . . . . . . . . . . . . . . 34 Contacts Settings . . . . . . . . . . . . . . . . . . . . . . . . . 34
Making a Group Call from Contacts . . . . . . . . . . 35Making a Private Call from Contacts . . . . . . . . . 35Assigning an Entry to a Programmable Number Key . . . . . . . . . . . . . . . . . . . . . . . . . . . . 36Removing the Association between Entry and Programmable Number Key . . . . . . . . . . . . . . . 37
Setting Default Contact . . . . . . . . . . . . . . . . . . 37Adding a New Contact . . . . . . . . . . . . . . . . . . . 38
Call Indicator Settings . . . . . . . . . . . . . . . . . . . . . . 38Activating or Deactivating Call Ringers for Call Alerts . . . . . . . . . . . . . . . . . . . . . . . . . . . . . . 38Activating or Deactivating Call Ringers for Private Calls . . . . . . . . . . . . . . . . . . . . . . . . . . . . 39Activating or Deactivating Call Ringers for Selective Call . . . . . . . . . . . . . . . . . . . . . . . . . 39Escalating Alarm Tone Volume . . . . . . . . . . . . . . 40
Call Log Features . . . . . . . . . . . . . . . . . . . . . . . . . 41Viewing Recent Calls . . . . . . . . . . . . . . . . . . . . . 41Deleting a Call from a Call List . . . . . . . . . . . . . . 41Deleting All Calls from a Call List . . . . . . . . . . . . 42
Call Alert Operation . . . . . . . . . . . . . . . . . . . . . . . . 42
glish

Co
nten
ts
iii
Receiving and Responding to a Call Alert . . . . . . 42Making a Call Alert from the Contacts List . . . . . . 43Making a Call Alert with the One Touch Access Button . . . . . . . . . . . . . . . . . . . . . . . . . . . 43
Emergency Operation . . . . . . . . . . . . . . . . . . . . . . . 44Receiving an Emergency Alarm . . . . . . . . . . . . . 44Responding to an Emergency Alarm . . . . . . . . . . 45Sending an Emergency Alarm . . . . . . . . . . . . . . . 45Sending an Emergency Alarm with Call . . . . . . . 46Sending an Emergency Alarm with Voice to Follow . . . . . . . . . . . . . . . . . . . . . . . . . . 47Reinitiating an Emergency Mode . . . . . . . . . . . . . 48Exiting Emergency Mode . . . . . . . . . . . . . . . . . . . 48
Text Messaging Features . . . . . . . . . . . . . . . . . . . 49Sending a Quick Text Message . . . . . . . . . . . . . . 49Sending a Quick Text Message with the One Touch Access Button . . . . . . . . . . . . . . . . . . 49Managing Fail-to-Send Text Messages . . . . . . . . 50
Resending a Text Message . . . . . . . . . . . . . . . 50Forwarding a Text Message . . . . . . . . . . . . . . . 50
Managing Sent Text Messages . . . . . . . . . . . . . . 51Viewing a Sent Text Message . . . . . . . . . . . . . 51Sending a Sent Text Message . . . . . . . . . . . . . 51Deleting All Sent Text Messages from Sent Items . . . . . . . . . . . . . . . . . . . . . . . . . . . . 53
Receiving a Text Message . . . . . . . . . . . . . . . . . 53
Reading a Text Message . . . . . . . . . . . . . . . . . . . 53Managing Received Text Messages . . . . . . . . . . 54
Viewing a Text Message from the Inbox . . . . . 54Replying to a Text Message with Quick Text . . 55Deleting a Text Message from the Inbox . . . . . 55Deleting All Text Messages from the Inbox . . . 56
Analog Message Encode . . . . . . . . . . . . . . . . . . . . 56Sending MDC Message Encode to Dispatcher . . 56Sending 5-Tone Message Encode to Contact . . . 57
Analog Status Update . . . . . . . . . . . . . . . . . . . . . . . 57Sending Status Update to Predefined Contact . . 57
Privacy . . . . . . . . . . . . . . . . . . . . . . . . . . . . . . . . . . 58Analog Scrambling . . . . . . . . . . . . . . . . . . . . . . . . . 59
Turning Analog Scrambling On or Off . . . . . . . . . 59Setting the Analog Scrambling Codes . . . . . . . . . 60
Multi-Site Controls . . . . . . . . . . . . . . . . . . . . . . . . . 60Starting an Automatic Site Search . . . . . . . . . . . . 60Stopping an Automatic Site Search . . . . . . . . . . . 61Starting a Manual Site Search . . . . . . . . . . . . . . . 62
Security . . . . . . . . . . . . . . . . . . . . . . . . . . . . . . . . . 62Radio Disable . . . . . . . . . . . . . . . . . . . . . . . . . . . 62Radio Enable . . . . . . . . . . . . . . . . . . . . . . . . . . . . 63
Lone Worker . . . . . . . . . . . . . . . . . . . . . . . . . . . . . . 64 Notification List . . . . . . . . . . . . . . . . . . . . . . . . . . . . 65
Accessing the Notification List . . . . . . . . . . . . . . . 65Auto-Range Transponder System (ARTS) . . . . . . . 65
English
Co
nte
nts
En
iv
Over-the-Air Programming (OTAP) . . . . . . . . . . . . 66Utilities . . . . . . . . . . . . . . . . . . . . . . . . . . . . . . . . . . 66
Turning the Radio Tones/Alerts On or Off . . . . . 66Setting the Tone Alert Volume Offset Level . . . . 67Turning the Talk Permit Tone On or Off . . . . . . . 67Turning the Power Up Alert Tone On or Off . . . . 68Setting the Power Level . . . . . . . . . . . . . . . . . . . 68Adjusting the Display Brightness . . . . . . . . . . . . 69Turning Horns/Lights On or Off . . . . . . . . . . . . . . 69Setting the Squelch Level . . . . . . . . . . . . . . . . . 70Turning the LED Indicators On or Off . . . . . . . . . 70Language . . . . . . . . . . . . . . . . . . . . . . . . . . . . . . 71Turning the Voice Operating Transmission (VOX) Feature On or Off . . . . . . . . . . . . . . . . . . . 71Voice Announcement . . . . . . . . . . . . . . . . . . . . . 72Analog Mic AGC (Mic AGC-A) . . . . . . . . . . . . . . 73Digital Mic AGC (Mic AGC-D) . . . . . . . . . . . . . . . 73Intelligent Audio . . . . . . . . . . . . . . . . . . . . . . . . . 74Turning Trill Enhancement On or Off . . . . . . . . . 74Setting the Audio Ambience . . . . . . . . . . . . . . . . 75Setting the Audio Profiles . . . . . . . . . . . . . . . . . . 75Accessing General Radio Information . . . . . . . . 76
Checking the Radio Alias and ID . . . . . . . . . . 76Checking the Firmware Version and Codeplug Version . . . . . . . . . . . . . . . . . . . . . . 76Software Update . . . . . . . . . . . . . . . . . . . . . . . 77
Site Information . . . . . . . . . . . . . . . . . . . . . . . . 77
Keypad Microphone Features . . . . . . . . . . . . . . . . 78Using the Keypad . . . . . . . . . . . . . . . . . . . . . . . . . . 79
Turning Keypad Tones On or Off . . . . . . . . . . . . 80Additional Advanced Features . . . . . . . . . . . . . . . . 80
Selecting a Zone by Alias Search . . . . . . . . . . . . 80Initiating a Radio Check by Manual Dial . . . . . . 81Initiating Remote Monitor by Manual Dial . . . . . 81Making a Private Call by Manual Dial . . . . . . . . 82Making a Phone Call by Manual Dial . . . . . . . . . 83Making a Phone Call with the One Touch Access Button . . . . . . . . . . . . . . . . . . . . . . . . . . 84Making a Group, Private or All Call with the Programmable Number Key . . . . . . . . . . . . . . . 86Making a Phone Call with the Programmable Phone Button . . . . . . . . . . . . . . . . . . . . . . . . . . . . . . . . . 87Making a Group, Private or Phone or All Call by Alias Search . . . . . . . . . . . . . . . . . . . . . . . . . 90Viewing an Entry in the Scan List by Alias Search 91Editing the Scan List by Alias Search . . . . . . . . . 92
Adding a New Entry to the Scan List . . . . . . . . 92Deleting an Entry from the Scan List . . . . . . . . 92Setting and Editing Priority for an Entry in the Scan List . . . . . . . . . . . . . . . . . . . . . . . . 93
Storing an Alias or ID from a Call List . . . . . . . . . 94Making a Call Alert by Manual Dial . . . . . . . . . . 94
glish
Co
nten
ts
v
RSSI Values . . . . . . . . . . . . . . . . . . . . . . . . . . . . 95Text Messaging . . . . . . . . . . . . . . . . . . . . . . . . . . . 95
Forwarding a Text Message by Manual Dial . . 95Dual Tone Multi Frequency (DTMF) . . . . . . . . . . . . 96Security . . . . . . . . . . . . . . . . . . . . . . . . . . . . . . . . . 96
Radio Disable via Manual Dial . . . . . . . . . . . . . . . 96Radio Enable via Manual Dial . . . . . . . . . . . . . . . 97
Password Lock Features . . . . . . . . . . . . . . . . . . . . 97Accessing the Radio from Password . . . . . . . . . . 97Unlocking the Radio from Locked State . . . . . . . 98Turning the Password Lock On or Off . . . . . . . . . 98Changing the Password . . . . . . . . . . . . . . . . . . . . 99
Front Panel Configuration (FPC) . . . . . . . . . . . . . 100Entering FPC Mode . . . . . . . . . . . . . . . . . . . . . . 100Editing FPC Mode Parameters . . . . . . . . . . . . . 100
Accessories . . . . . . . . . . . . . . . . . . . . . . . . . . . . . . 101Antennas . . . . . . . . . . . . . . . . . . . . . . . . . . . . . . . . 101Audio . . . . . . . . . . . . . . . . . . . . . . . . . . . . . . . . . . . 101Cables . . . . . . . . . . . . . . . . . . . . . . . . . . . . . . . . . . 102Mounting Kits . . . . . . . . . . . . . . . . . . . . . . . . . . . . 102Miscellaneous Accessories . . . . . . . . . . . . . . . . . . 102
Appendix: Maritime Radio Use in the VHF Frequency Range . . . . . . . . . . . . . . . . . . . 103
Special Channel Assignments . . . . . . . . . . . . . . . 103Emergency Channel . . . . . . . . . . . . . . . . . . . . . 103
Non-Commercial Call Channel . . . . . . . . . . . . . 103Operating Frequency Requirements . . . . . . . . . . . 104
Limited Warranty . . . . . . . . . . . . . . . . . . . . . . . . . . 106
English

Imp
ort
ant
Saf
ety
Info
rmat
ion
En
vi
Important Safety Information
RF Energy Exposure and Product Safety Guide for Mobile Two-Way Radios
ATTENTION!
This radio is restricted to Occupational use only. Before using the radio, read the RF Energy Exposure and Product Safety Guide for Mobile Two-Way Radios which contains important operating instructions for safe usage and RF energy awareness and control for Compliance with applicable standards and Regulations.
For a list of Motorola-approved antennas and other accessories, visit the following website: http://www.motorolasolutions.com
Any modification to this device, not expressly authorized by Motorola, may void the user’s authority to operate this device.
Under Industry Canada regulations, this radio transmitter may only operate using an antenna of a type and maximum (or lesser) gain approved for the transmitter by Industry Canada. To reduce potential radio interference to other users, the antenna type and its gain should be so chosen that the equivalent isotropically radiated power (e.i.r.p.) is not more than that necessary for successful communication.
This radio transmitter has been approved by Industry Canada to operate with Motorola-approved antenna with the maximum permissible gain and required antenna impedance for each antenna type indicated. Antenna types not included in this list, having a gain greater than the maximum gain indicated for that type, are strictly prohibited for use with this device.
Software Version
All the features described in the following sections are supported by the radio's software version R02.40.00.
See Checking the Firmware Version and Codeplug Version on page 76 to determine your radio's software version.
Please check with your dealer or system administrator for more details of all the features supported.
glish

Co
mp
uter S
oftw
are Co
pyrig
hts
vii
Computer Software Copyrights
The Motorola products described in this manual may include copyrighted Motorola computer programs stored in semiconductor memories or other media. Laws in the United States and other countries preserve for Motorola certain exclusive rights for copyrighted computer programs including, but not limited to, the exclusive right to copy or reproduce in any form the copyrighted computer program. Accordingly, any copyrighted Motorola computer programs contained in the Motorola products described in this manual may not be copied, reproduced, modified, reverse-engineered, or distributed in any manner without the express written permission of Motorola. Furthermore, the purchase of Motorola products shall not be deemed to grant either directly or by implication, estoppel, or otherwise, any license under the copyrights, patents or patent applications of Motorola, except for the normal non-exclusive license to use that arises by operation of law in the sale of a product.
The AMBE+2TM voice coding Technology embodied in this product is protected by intellectual property rights including patent rights, copyrights and trade secrets of Digital Voice Systems, Inc.
This voice coding Technology is licensed solely for use within this Communications Equipment. The user of this Technology is explicitly prohibited from attempting to decompile, reverse engineer, or disassemble the Object Code, or in any other way convert the Object Code into a human-readable form.
U.S. Pat. Nos. #5,870,405, #5,826,222, #5,754,974, #5,701,390, #5,715,365, #5,649,050, #5,630,011, #5,581,656, #5,517,511, #5,491,772, #5,247,579, #5,226,084 and #5,195,166.
Open Source Software Legal Notices
This Motorola Product contains Open Source Software. For more information regarding licenses, acknowledgements, required copyright notices, and other usage terms, refer to the Documentation for this Motorola Product at:
https://businessonline.motorolasolutions.com
English

Co
mp
ute
r S
oft
war
e C
op
yrig
hts
En
viii
Notes
glish

Gettin
g S
tarted
1
Getting Started
Take a moment to review the following:How to Use This User Guide. . . . . . . . . . . . . . . . . . . . . page 1What Your Dealer/System Administrator
Can Tell You. . . . . . . . . . . . . . . . . . . . . . . . . . . . . . . . page 2Powering Up the Radio . . . . . . . . . . . . . . . . . . . . . . . . . page 2Adjusting the Volume. . . . . . . . . . . . . . . . . . . . . . . . . . . page 3
How to Use This User Guide
This User Guide covers the basic operation of the MOTOTRBO Mobiles.
However, your dealer or system administrator may have customized your radio for your specific needs. Check with your dealer or system administrator for more information.
Throughout this publication, the icons below are used to indicate features supported in either the conventional Analog mode or conventional Digital mode:
For features that are available in both Analog and Digital modes, no icon is shown.For features that are available in a conventional multi-site mode, see IP Site Connect on page 8 for more information.Selected features are available in the single-site trunking mode, Capacity Plus. See Capacity Plus on page 9 for more information.Selected features are also available in the multi-site trunking mode, Linked Capacity Plus. See Linked Capacity Plus on page 9 for more information.
Indicates a conventional Analog Mode-Only feature.
Indicates a conventional Digital Mode-Only feature.
English

Get
tin
g S
tart
ed
En
2
What Your Dealer/System Administrator Can Tell You
You can consult your dealer or system administrator about the following:
• Is your radio programmed with any preset conventional channels?
• Which buttons have been programmed to access other features?
• What optional accessories may suit your needs?
• What are the best radio usage practices for effective communication?
• What maintenance procedures will help promote longer radio life?
Powering Up the Radio
Press the On/Off Button briefly. You see MOTOTRBO (TM) on the radio’s display momentarily, followed by a welcome message or welcome image.
The green LED lights up and the Home screen lights up.
A brief tone sounds, indicating that the power up test is successful.
NOTE: There is no power up tone if the radio tones/alerts function is disabled (see Turning the Radio Tones/Alerts On or Off on page 66).
If your radio does not power up, contact your dealer.
To turn off the radio, press and hold the On/Off Button until you see Powering Down on the radio’s display.
NOTE: If the radio is locked up and unresponsive to button presses, press and hold the On/Off Button for at least 7 seconds. This will force a radio reset.
On/Off Button
glish

Iden
tifying
Rad
io C
on
trols
3
Your radio may take up to 7 seconds to completely turn off.
Adjusting the Volume
To increase the volume, press the volume “ + ” button.
To decrease the volume, press the volume “ – ” button.
Your radio can be programmed to have a minimum volume offset where the volume level cannot be lowered past the programmed minimum volume. Check with your dealer or system administrator for more information.
Identifying Radio Controls
Take a moment to review the following:Radio Controls . . . . . . . . . . . . . . . . . . . . . . . . . . . . . . . .page 4Programmable Buttons . . . . . . . . . . . . . . . . . . . . . . . . .page 4Accessing the Programmed Functions . . . . . . . . . . . . .page 7Push-To-Talk (PTT) Button. . . . . . . . . . . . . . . . . . . . . . .page 7Switching Between Conventional Analog and
Digital Mode . . . . . . . . . . . . . . . . . . . . . . . . . . . . . . . .page 8IP Site Connect . . . . . . . . . . . . . . . . . . . . . . . . . . . . . . .page 8Capacity Plus . . . . . . . . . . . . . . . . . . . . . . . . . . . . . . . . .page 9Linked Capacity Plus . . . . . . . . . . . . . . . . . . . . . . . . . . .page 9
Volume Up/Down Button
English
Iden
tify
ing
Rad
io C
on
tro
ls
En
4
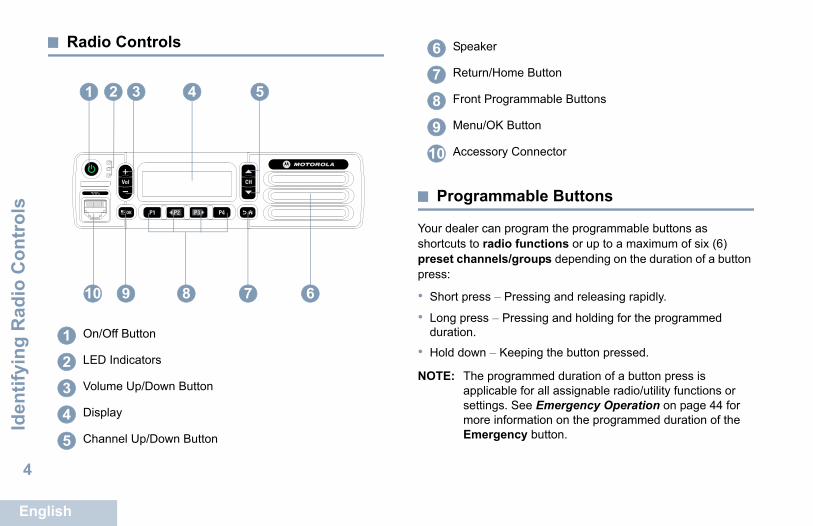
Radio Controls
Programmable Buttons
Your dealer can program the programmable buttons as shortcuts to radio functions or up to a maximum of six (6) preset channels/groups depending on the duration of a button press:
• Short press – Pressing and releasing rapidly.
• Long press – Pressing and holding for the programmed duration.
• Hold down – Keeping the button pressed.
NOTE: The programmed duration of a button press is applicable for all assignable radio/utility functions or settings. See Emergency Operation on page 44 for more information on the programmed duration of the Emergency button.
On/Off Button
LED Indicators
Volume Up/Down Button
Display
Channel Up/Down Button
1 2
6
43
9 78
5
10
1
2
3
4
5
Speaker
Return/Home Button
Front Programmable Buttons
Menu/OK Button
Accessory Connector
6
7
8
9
10
glish

Iden
tifying
Rad
io C
on
trols
5
Assignable Radio Functions
Analog Scrambling – Toggles analog scrambling on or off.
Audio Ambience – Allows the user to select an environment the radio is operating in.
Audio Profiles – Allows the user to select the preferred audio profile.
Contacts – Provides direct access to the contacts list.
Call Alert – Provides direct access to the contacts list for you to select a contact to whom a Call Alert can be sent.
Call Log – Selects the call log list.
Emergency – Depending on the programming, initiates or cancels an Emergency alarm or call.
Intelligent Audio On/Off – Toggles Intelligent Audio on or off.
Manual Dial – Depending on the programming, initiates a Private or Phone call by keying in any subscriber ID or phone number.
Manual Site Roam*‡ – Starts the manual site search.
Monitor – Monitors a selected channel for activity.
Notifications – Provides direct access to the Notifications List.
Nuisance Channel Delete*‡ – Temporarily removes an unwanted channel, except for the Selected Channel, from the scan list. The Selected Channel refers to the user’s selected zone/channel combination from which scan is initiated.
One Touch Access – Directly initiates a predefined Private, Phone or Group Call or a Call Alert or a Quick Text message.
Permanent Monitor*‡ – Monitors a selected channel for all radio traffic until function is disabled.
Phone – Provides direct access to the Phone Contacts list.
Privacy – Toggles privacy on or off.
Radio Alias and ID – Provides radio alias and ID.
Radio Check – Determines if a radio is active in a system.
Radio Enable – Allows a target radio to be remotely enabled.
Radio Disable – Allows a target radio to be remotely disabled.
* Not applicable in Capacity Plus‡ Not applicable in Linked Capacity Plus
English

Iden
tify
ing
Rad
io C
on
tro
ls
En
6
Remote Monitor – Turns on the microphone of a target radio without it giving any indicators.
Repeater/Talkaround*‡ – Toggles between using a repeater and communicating directly with another radio.
Scan*‡ – Toggles scan on or off.
Site Info* – Displays current Linked Capacity Plus site name and ID. Plays site announcement voice messages for the current site (this function is unavailable when Voice Announcement is disabled).
Site Lock On/Off* – Toggles the automatic site roam on or off.
Status – Selects the status list menu.
Text Message – Selects the text message menu.
Transmit Interrupt Remote Dekey – Stops the transmission of a remote monitored radio without giving any indicators, or an ongoing interruptible call to free the channel.
Trill Enhancement On/Off – Toggles trill enhancement on or off.
Voice Announcement for Channel – Plays zone and channel announcement voice messages for the current channel. This function is unavailable when Voice Announcement is disabled.
Voice Announcement On/Off – Toggles Voice Announcement on or off.
Voice Operating Transmission (VOX) – Toggles VOX on or off.
Zone Toggle – Allows radio to switch between zones.
Assignable Settings or Utility Functions
All Tones/Alerts – Toggles all tones and alerts on or off.
Analog Scrambling Codes – Toggles scrambling codes between 3.29KHz and 3.39KHz.
Backlight – Adjusts the brightness level.
Channel Up/Down – Depending on the programming, changes channel to previous or next channel.
Power Level – Toggles transmit power level between high and low.
Squelch – Toggles squelch level between tight and normal.
* Not applicable in Capacity Plus‡ Not applicable in Linked Capacity Plus
glish

Iden
tifying
Rad
io C
on
trols
7
Accessing the Programmed Functions
You can access various radio functions through one of the following ways:
• A short or long press of the relevant programmable buttons.
OR
• Use the Menu Navigation Buttons as follows:
1 To access the menu, press the g button. Press the
appropriate Left/ Right Navigation button (b or c ) to access the menu functions.
2 To select a function or enter a sub-menu, press the g button.
3 To go back one menu level, or to return to the previous
screen, press the e button. Long press the e button to return to the Home screen.
The Menu Navigation Buttons are also available on a keypad microphone (see Using the Keypad on page 79).
NOTE: Your radio automatically exits the menu after a period of inactivity and returns to your Home screen.
Push-To-Talk (PTT) Button
The PTT button on the side of the microphone serves two basic purposes:
• While a call is in progress, the PTT button allows the radio to transmit to other radios in the call.
Press and hold down PTT button to talk. Release the PTT button to listen.
The microphone is activated when the PTT button is pressed.• While a call is not in progress, the PTT button is used to make
a new call (see Making a Radio Call on page 20).
If the Talk Permit Tone (see Turning the Talk Permit Tone On
or Off on page 67) or the PTT Sidetone is enabled, wait
until the short alert tone ends before talking.
During a call, if the Channel Free Indication feature is
enabled on your radio (programmed by your dealer), you hear a short alert tone the moment the target radio (the radio that is receiving your call) releases the PTT button, indicating the channel is free for you to respond.
You will also hear a continuous talk prohibit tone, if your
call is interrupted, indicating that you should release the
PTT Button
English

Iden
tify
ing
Rad
io C
on
tro
ls
En
8
PTT button, for example when the radio receives an Emergency Call.
Switching Between Conventional Analog and Digital Mode
Each channel in your radio can be configured as a conventional analog or conventional digital channel.
To switch between an analog or a digital channel, use the Channel Up or Channel Down buttons
When switching from digital to analog mode, certain features are unavailable. Icons for the digital features (such as Messages) reflect this change by appearing ‘grayed out’. Disabled features are hidden in the menu.
Your radio also has features available in both analog and digital mode. However, the minor differences in the way each feature works does NOT affect the performance of your radio.NOTE: Your radio also switches between digital and analog
modes during a dual mode scan (see Scan on page 32).
To use the Left/ Right Navigation buttons, while in the
Home Screen of the required Zone, press b or c to select the required channel.
To use the programmed Channel Up or Channel Down buttons, while in the Home Screen of the required Zone, press Channel Up or Channel Down to select the required channel.
IP Site Connect
This feature allows your radio to extend conventional communication beyond the reach of a single site, by connecting to different available sites which are connected via an Internet Protocol (IP) network.
When the radio moves out of range from one site and into the range of another, it connects to the new site's repeater to send or receive calls/data transmissions. Depending on your settings, this is done automatically or manually.
If the radio is set to do this automatically, it scans through all available sites when the signal from the current site is weak or when the radio is unable to detect any signal from the current site. It then locks on to the repeater with the strongest Received Signal Strength Indicator (RSSI) value.
In a manual site search, the radio searches for the next site in the roam list that is currently in range (but which may not have the strongest signal) and locks on to it.
Channel Up/ Down Button
glish

Iden
tifying
Rad
io C
on
trols
9
NOTE: Each channel can only have either Scan or Roam enabled, not both at the same time.
Channels with this feature enabled can be added to a particular roam list. The radio searches the channel(s) in the roam list during the automatic roam operation to locate the best site.
A roam list supports a maximum of 16 channels (including the Selected Channel).
NOTE: You cannot manually add or delete an entry to the roam list. Check with your dealer or system administrator for more information.
Capacity Plus
Capacity Plus is a single-site trunking configuration of the MOTOTRBO radio system, which uses a pool of channels to support hundreds of users and up to 254 Groups. This feature allows your radio to efficiently utilize the available number of programmed channels while in Repeater Mode.
Icons of features not applicable to Capacity Plus are not available in the menu. You hear a negative indicator tone if you try to access a feature not applicable to Capacity Plus via a programmable button press.
Your radio also has features that are available in conventional digital mode, IP Site Connect, Capacity Plus and Linked Capacity Plus. However, the minor differences in the way each feature works does NOT affect the performance of your radio.
Check with your dealer or system administrator for more information on this configuration.
Linked Capacity Plus
Linked Capacity Plus is a multi-site multi-channel trunking configuration of the MOTOTRBO radio system, combining the best of both Capacity Plus and IP Site Connect configurations.
Linked Capacity Plus allows your radio to extend trunking communication beyond the reach of a single site, by connecting to different available sites which are connected via an Internet Protocol (IP) network. It also provides an increase in capacity by efficiently utilizing the combined available number of programmed channels supported by each of the available sites.
When the radio moves out of range from one site and into the range of another, it connects to the new site's repeater to send or receive calls/data transmissions. Depending on your settings, this is done automatically or manually.
If the radio is set to do this automatically, it scans through all available sites when the signal from the current site is weak or when the radio is unable to detect any signal from the current site. It then locks on to the repeater with the strongest Received Signal Strength Indicator (RSSI) value.
In a manual site search, the radio searches for the next site in the roam list that is currently in range (but which may not have the strongest signal) and locks on to it.
English

Iden
tify
ing
Sta
tus
Ind
icat
ors
En
10
Any channel with Linked Capacity Plus enabled can be added to a particular roam list. The radio searches these channels during the automatic roam operation to locate the best site.
NOTE: You cannot manually add or delete an entry to the roam list. Check with your dealer or system administrator for more information.
Similar to Capacity Plus, icons of features not applicable to Linked Capacity Plus are not available in the menu. You hear a negative indicator tone if you try to access a feature not applicable to Linked Capacity Plus via a programmable button press.
Check with your dealer or system administrator for more information on this configuration.
Identifying Status Indicators
Your radio indicates its operational status through the following:Display Icons . . . . . . . . . . . . . . . . . . . . . . . . . . . . . . . . page 11Call Icons . . . . . . . . . . . . . . . . . . . . . . . . . . . . . . . . . . . page 12Mini Notice Icons . . . . . . . . . . . . . . . . . . . . . . . . . . . . . page 12Sent Item Icons . . . . . . . . . . . . . . . . . . . . . . . . . . . . . . page 13LED Indicators . . . . . . . . . . . . . . . . . . . . . . . . . . . . . . . page 13Audio Tones . . . . . . . . . . . . . . . . . . . . . . . . . . . . . . . . . page 14Indicator Tones . . . . . . . . . . . . . . . . . . . . . . . . . . . . . . page 14
glish

Iden
tifying
Statu
s Ind
icators
11
Display Icons
The liquid crystal display (LCD) of your radio shows the radio status, text entries, and menu entries.
The following are icons that appear on the status bar at the top of the radio’s display. Icons are displayed on the status bar, arranged left-to-right, in order of appearance/usage and are channel specific.
Received Signal Strength Indicator (RSSI)
The number of bars displayed represents the radio signal strength. Four bars indicate the strongest signal. This icon is only displayed while receiving.
Emergency
Radio is in Emergency mode.
High Volume Data
Radio is receiving high volume data and channel is busy.
Notification
Notification List has one or more missed events.
Scan*‡
Scan feature is enabled.
* Not applicable in Capacity Plus‡ Not applicable in Linked Capacity Plus
Scan – Priority 1*‡
Radio detects activity on channel/group designated as Priority 1).
Scan – Priority 2*‡
Radio detects activity on channel/group designated as Priority 2.
Vote Scan
Vote scan feature is enabled.
Monitor
Selected channel is being monitored.
Talkaround*‡
In the absence of a repeater, radio is currently configured for direct radio to radio communication.
Site Roaming*
The site roaming feature is enabled.
Secure
The Privacy feature is enabled.
Unsecure
The Privacy feature is disabled.
Over-the-Air Programming Delay Timer
Indicates time left before automatic restart of radio.
English

Iden
tify
ing
Sta
tus
Ind
icat
ors
En
12
Call Icons
The following icons appear on the radio’s display during a call. These icons also appear in the Contacts list to indicate alias or ID type.
Mini Notice Icons
The following icons appear momentarily on the radio’s display after an action to perform task is taken.
Tones Disable
Tones are turned off.
Power High
Radio is set at High power.
Private Call
Indicates a Private Call in progress. In the Contacts list, it indicates a subscriber alias (name) or ID (number).Group Call/All Call
Indicates a Group Call or All Call in progress. In the Contacts list, it indicates a group alias (name) or ID (number).Phone Call as Private Call
Indicates a Phone Call as Private Call in progress. In the Contacts list, it indicates a phone alias (name) or ID (number).Phone Call as Group/All Call
Indicates a Phone Call as Group/All Call in progress. In the Contacts list, it indicates a group alias (name) or ID (number).
Successful Transmission (Positive)
Successful action taken.
Failed Transmission (Negative)
Failed action taken.
Transmission in Progress (Transitional)
Transmitting. This dynamic icon is seen before indication for Successful Transmission or Failed Transmission.
glish
Iden
tifying
Statu
s Ind
icators
13
Sent Item Icons
The following icons appear in the Sent Items folder.
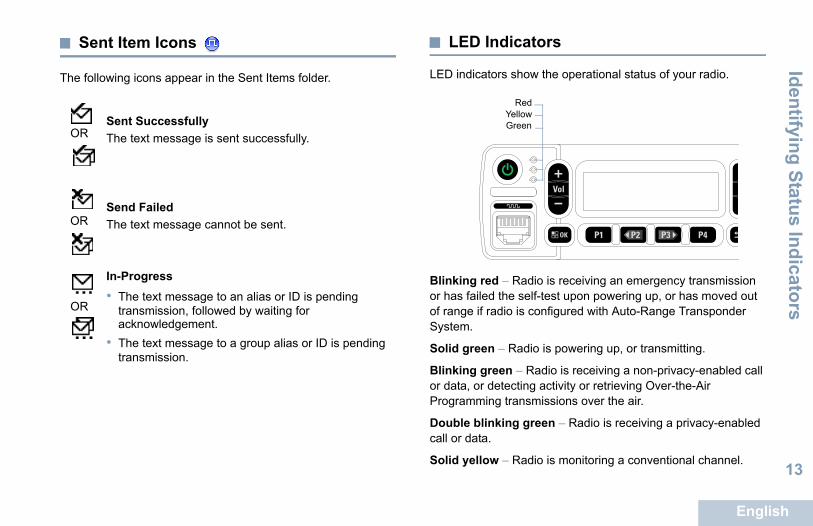
LED Indicators
LED indicators show the operational status of your radio.
Blinking red – Radio is receiving an emergency transmission or has failed the self-test upon powering up, or has moved out of range if radio is configured with Auto-Range Transponder System.
Solid green – Radio is powering up, or transmitting.
Blinking green – Radio is receiving a non-privacy-enabled call or data, or detecting activity or retrieving Over-the-Air Programming transmissions over the air.
Double blinking green – Radio is receiving a privacy-enabled call or data.
Solid yellow – Radio is monitoring a conventional channel.
Sent Successfully
The text message is sent successfully.
Send Failed
The text message cannot be sent.
In-Progress
• The text message to an alias or ID is pending transmission, followed by waiting for acknowledgement.
• The text message to a group alias or ID is pending transmission.
OR
OR
OR
RedYellowGreen
English

Iden
tify
ing
Sta
tus
Ind
icat
ors
En
14
Blinking yellow – Radio is scanning for activity or receiving a Call Alert, or all local Linked Capacity Plus channels are busy.
Double blinking yellow – Radio is no longer connected to the repeater while in Capacity Plus or Linked Capacity Plus, all Capacity Plus channels or Linked Capacity Plus channels are currently busy, Auto Roaming is enabled, radio is actively searching for a new site. Also indicates radio has yet to respond to a group call alert, or radio is locked.
While in conventional mode, when the green LED blinks, it indicates the radio detects activity over the air. Due to the nature of the digital protocol, this activity may or may not affect the radio's programmed channel.
NOTE: For Capacity Plus and Linked Capacity Plus, there is no LED indication when the radio is detecting activity over the air.
Indicator Tones
High pitched tone Low pitched tone
Audio Tones
Alert tones provide you with audible indications of the radio’s status or the radio’s response to data received.
Positive Indicator Tone
Negative Indicator Tone
Continuous Tone A monotone sound. Sounds continuously until termination.
Periodic Tone Sounds periodically depending on the duration set by the radio. Tone starts, stops, and repeats itself.
Repetitive Tone A single tone that repeats itself until it is terminated by the user.
Momentary Tone Sounds only once for a short period of time defined by the radio.
glish

Receivin
g an
d M
aking
Calls
15
Receiving and Making Calls
Once you understand how your MOTOTRBO Mobile is configured, you are ready to use your radio.
Use this navigation guide to familiarize yourself with the basic Call features:Selecting a Zone . . . . . . . . . . . . . . . . . . . . . . . . . . . . . page 15Selecting a Channel . . . . . . . . . . . . . . . . . . . . . . . . . . page 16Receiving and Responding to a Radio Call . . . . . . . . . page 16Making a Radio Call . . . . . . . . . . . . . . . . . . . . . . . . . . page 20Stopping a Radio Call . . . . . . . . . . . . . . . . . . . . . . . . . page 24Talkaround. . . . . . . . . . . . . . . . . . . . . . . . . . . . . . . . . . page 25Permanent Monitor . . . . . . . . . . . . . . . . . . . . . . . . . . . page 26
Selecting a Zone
A zone is a group of channels. Your radio supports up to 128 channels and 25 zones, with a maximum of 128 channels per zone.
Use the following procedure to select a zone.
Procedure:Press the programmed Zone button and proceed to Step 3. ORFollow the procedure below.
1 g to access the menu.
2 b or c to Zone and press g to select.
3 The current zone is displayed and indicated by a .
4 b or c to the required zone and press g to select.
5 The display shows <Zone> Selected momentarily and returns to the selected zone screen.
NOTE: You can also select a zone by alias search on a keypad microphone. See Selecting a Zone by Alias Search on page 80.
English

Rec
eivi
ng
an
d M
akin
g C
alls
En
16
Selecting a Channel
Transmissions are sent and received on a channel. Depending on your radio's configuration, each channel may have been programmed differently to support different groups of users or supplied with different features. After selecting the required zone, select the channel you require to transmit or receive on.
Procedure:
Select a channel by using the Channel Up/ Down buttons.
• Left/Right Navigation buttons, OR
• Channel Up/Down buttons, OR
• The programmed Channel Up or Channel Down buttons
See Selecting a Zone on page 15 for more information on selecting your required zone.
See Switching Between Conventional Analog and Digital Mode on page 8 for information about Channel Up/ Down buttons.
Receiving and Responding to a Radio Call
Once the channel, subscriber alias or ID, or group alias or ID is displayed, you can proceed to receive and respond to calls.
The green LED lights up while the radio is transmitting and blinks when the radio is receiving.
NOTE: The green LED lights up while the radio is transmitting and double blinks when the radio is receiving a privacy-enabled call.
To unscramble a privacy-enabled call, your radio must have the same Privacy Key, or the same Key Value and Key ID (programmed by your dealer) as the transmitting radio (the radio you are receiving the call from).
See Privacy on page 58 for more information.
GreenLED
glish

Receivin
g an
d M
aking
Calls
17
Receiving and Responding to a Group Call
To receive a call made to a group of users, your radio must be configured as part of that group.
Procedure:When you receive a Group Call (while on the Home screen):
1 The green LED blinks.
2 The caller ID information appears in the top right corner. The first text line displays the Group Call icon and the group call alias. Your radio unmutes and the incoming call sounds through the radio's speaker.
3 If the Channel Free Indication feature is enabled, you hear a short alert tone the moment the transmitting radio releases the PTT button, indicating the channel is free for you to respond.Press the PTT button to respond to the call.OR
If the Voice Interrupt feature is enabled, press the PTT button to stop the current call from the transmitting radio and free the channel for you to talk/respond.
4 The green LED lights up.
5 Wait for the Talk Permit Tone to finish (if enabled) and speak clearly into the microphone.OR
Wait for the PTT Sidetone to finish (if enabled) and speak clearly into the microphone.
6 Release the PTT button to listen.
7 If there is no voice activity for a predetermined period of time, the call ends.
See Making a Group Call on page 21 for details on making a Group Call.
Receiving and Responding to a Private Call
A Private Call is a call from an individual radio to another individual radio.
Procedure:When you receive a Private Call:
1 The green LED blinks.
2 The first text line shows the Private Call icon and the caller alias. Your radio unmutes and the incoming call sounds through the radio's speaker.
3 If the Channel Free Indication feature is enabled, you hear a short alert tone the moment the transmitting radio releases the PTT button, indicating the channel is free for you to respond.Press the PTT button to respond to the call.OR
If the Voice Interrupt feature is enabled, press the PTT
English

Rec
eivi
ng
an
d M
akin
g C
alls
En
18
button to stop the current call from the transmitting radio and free the channel for you to talk/respond.
4 The green LED lights up.
5 Wait for the Talk Permit Tone to finish (if enabled) and speak clearly into the microphone.
6 Release the PTT button to listen.
7 If there is no voice activity for a predetermined period of time, the call ends.
8 The display shows Call Ended.
See Making a Private Call on page 21 for details on making a Private Call.
Receiving an All Call
An All Call is a call from an individual radio to every radio on the channel. It is used to make important announcements requiring the user’s full attention.
Procedure:When you receive an All Call:
1 A tone sounds and the green LED blinks.
2 The caller ID information appears in the top right corner. The first text line displays the Group Call icon and All Call. Your radio unmutes and the incoming call sounds through the radio's speaker.
3 Once the All Call ends, the radio returns to the previous screen before receiving the call. An All Call does not wait for a predetermined period of time before ending.
If the Channel Free Indication feature is enabled, you hear a short alert tone the moment the transmitting radio releases the PTT button, indicating the channel is now available for use.
You cannot respond to an All Call.
See Making an All Call on page 22 for details on making an All Call.
NOTE: The radio stops receiving the All Call if you switch to a different channel while receiving the call.During an All Call, you are not able to continue with any menu navigation or editing until the call ends.
Receiving and Responding to a Selective Call
A Selective Call is a call from an individual radio to another individual radio. It is a Private Call on an analog system.
Procedure:When you receive a Selective Call:
1 The green LED blinks.
2 The first text line shows the Private Call icon. The radio displays Selective Call or Alert with Call. Your radio unmutes and the incoming call sounds through the radio's speaker.
glish

Receivin
g an
d M
aking
Calls
19
3 Press the PTT button to respond to the call.
4 The green LED lights up.
5 Wait for the Talk Permit Tone to finish (if enabled) and speak clearly into the microphone.
6 Release the PTT button to listen.
7 If there is no voice activity for a predetermined period of time, the call ends.
8 The display shows Call Ended.
NOTE: See Making a Selective Call on page 23 for details on making a Selective Call.
Receiving and Responding to a Phone Call
NOTE: If Phone Call capability is enabled, you are able to respond to a Phone Call. Check with your dealer or system administrator for more information on this configuration.
Phone Call as Private Call
Procedure:When you receive a Phone Call as a Private Call:
1 The Phone Call icon appears in the top right corner. The display shows the caller alias or Phone Call.
2 Press the PTT button to talk and release it to listen.
3 Press e to end the call.The display shows Ending Phone Call.
4 If successful:A tone sounds and the display shows Call Ended. ORIf unsuccessful:Your radio returns to the Phone Call screen. Repeat Step 3 or wait for the telephone user to end the call.
If Phone Call capability is not enabled in your radio, the display shows Unavailable and your radio mutes the call. Your radio returns to the previous screen when the call ends.
Phone Call as Group Call
Procedure:When you receive a Phone Call as a Group Call:
1 The Phone Group Call icon appears in the top right corner. The display shows the group alias and Phone Call.
2 Press the PTT button to talk and release it to listen.
3 Press e to end the call.The display shows Ending Phone Call.
4 If successful:A tone sounds and the display shows Call Ended. OR
English

Rec
eivi
ng
an
d M
akin
g C
alls
En
20
If unsuccessful:Your radio returns to the Phone Call screen. Repeat Step 3 or wait for the telephone user to end the call.
If Phone Call capability is not enabled in your radio, the display shows Unavailable and your radio mutes the call. Your radio returns to the previous screen when the call ends.
Phone Call as All Call
Procedure:When you receive a Phone Call as an All Call:
1 The Phone Call icon appears in the top right corner. The display shows All Call and Phone Call.
2 Press the PTT button to talk and release it to listen.
3 Press e to end the call.The display shows Ending Phone Call.
4 If successful:A tone sounds and the display shows All Call and Call Ended. ORIf unsuccessful:Your radio returns to the Phone Call screen. Repeat Step 3 to end the call.
If Phone Call capability is not enabled in your radio, the display shows Unavailable and your radio mutes the call. Your radio returns to the previous screen when the call ends.
NOTE: When you receive a Phone Call as an All Call, you can respond to the call or end the call, only if an All Call type is assigned to the channel.
Making a Radio Call
After selecting your channel, you can select a subscriber alias or ID, or group alias or ID by using:
• The Contacts list (see Contacts Settings on page 34)
• A programmed One Touch Access button
• The programmed number keys – This method is for Group, Private and All Calls only and is used with the keypad microphone (see Making a Group, Private or All Call with
the Programmable Number Key on page 86).
• Manual Dial (via Contacts) – This method is for Private Calls and Phone Calls only and is dialed using a keypad microphone (see Making a Private Call by Manual Dial on page 82, Making a Phone Call by Manual Dial on page 83)
• A programmable button – This method is for Phone Calls only (see Making a Private Call by Manual Dial on page 82)
NOTE: Your radio must have the Privacy feature enabled on the channel to send a privacy-enabled transmission. Only target radios with the same Privacy Key as your
glish

Receivin
g an
d M
aking
Calls
21
radio are able to unscramble the transmission.See Privacy on page 58 for more information.
The One Touch Access feature allows you to make a Group or Private Call to a predefined ID easily. This feature can be assigned to a short or long programmable button press.You can ONLY have one ID assigned to a One Touch Access button. Your radio can have multiple One Touch Access buttons programmed.
Making a Group Call
To make a call to a group of users, your radio must be configured as part of that group.
Procedure:
1 Select the channel with the active group alias or ID. See Selecting a Channel on page 16.ORPress the programmed One Touch Access button.
2 Press the PTT button to make the call. The green LED lights up. he first text line shows the Group Call icon and the group call alias.
3 Wait for the Talk Permit Tone to finish (if enabled) and speak clearly into the microphone.OR
Wait for the PTT Sidetone to finish (if enabled) and speak clearly into the microphone.
4 Release the PTT button to listen. When the target radio responds, the green LED blinks. You see the Group Call icon, the group alias or ID, and transmitting radio alias or ID on your display.
5 If the Channel Free Indication feature is enabled, you hear a short alert tone the moment the target radio releases the PTT button, indicating the channel is free for you to respond. Press the PTT button to respond.ORIf there is no voice activity for a predetermined period of time, the call ends.
6 Radio returns to the screen you were on prior to initiating the call.
You can also make a Group Call via Contacts (see Making a Group Call from Contacts on page 35).
Making a Private Call
While you can receive and/or respond to a Private Call initiated by an authorized individual radio, your radio must be programmed for you to initiate a Private Call.
There are two types of Private Calls. The first type, where a radio presence check is performed prior to setting up the call, while the other sets up the call immediately.
English
Rec
eivi
ng
an
d M
akin
g C
alls
En
22
Only one of these call types can be programmed to your radio by your dealer.
You hear a negative indicator tone, when you make a Private Call via the Menu, Call Log, Contacts list, One Touch Access button, the programmed number keys, Left/ Right Navigation button, the Volume Up/Down Button or the Channel Up/Down button if this feature is not enabled.
Use the Call Alert features to contact an individual radio. See Call Alert Operation on page 42 for more information.
Procedure:
1 Select the channel with the active subscriber alias or ID. See Selecting a Channel on page 16.ORPress the programmed One Touch Access button.
2 Press the PTT button to make the call. The green LED lights up. The display shows the Private Call icon, with the subscriber alias alternating with Calling.
3 Wait for the Talk Permit Tone to finish (if enabled) and speak clearly into the microphone.
4 Release the PTT button to listen. When the target radio responds, the green LED blinks.
5 If the Channel Free Indication feature is enabled, you hear a short alert tone the moment the target radio releases the PTT button, indicating the channel is free for you to respond. Press the PTT button to respond.
ORIf there is no voice activity for a predetermined period of time, the call ends.
6 The display shows Call Ended.
You can also make a Private Call via Contacts (see Making a Private Call from Contacts on page 35), manually dial a Private Call (see Making a Private Call by Manual Dial on page 82) or perform a quick alphanumeric search for the required target alias via a keypad entry (see Making a Group, Private or Phone or All Call by Alias Search on page 90).
Making an All Call
This feature allows you to transmit to all users on the channel. Your radio must be programmed to allow you to use this feature.
Procedure:
1 Select the channel with the active All Call group alias or ID. See Selecting a Channel on page 16.
2 Press the PTT button to make the call. The green LED lights up. The display shows the Group Call icon and All Call.
3 Wait for the Talk Permit Tone to finish (if enabled) and speak clearly into the microphone.OR
Wait for the PTT Sidetone to finish (if enabled) and speak clearly into the microphone.
glish

Receivin
g an
d M
aking
Calls
23
Users on the channel cannot respond to an All Call.
Making a Selective Call
Just like a Private Call, while you can receive and/or respond to a Selective Call initiated by an authorized individual radio, your radio must be programmed for you to initiate a Selective Call.
Procedure:
1 Select the channel with the active subscriber alias or ID. See Selecting a Channel on page 16.
2 Press the PTT button to make the call. The green LED lights up. The display shows the Private Call icon and the subscriber alias.
3 Wait for the Talk Permit Tone to finish (if enabled) and speak clearly into the microphone.
4 Release the PTT button to listen. When the target radio responds, the green LED blinks.
5 If there is no voice activity for a predetermined period of time, the call ends.
6 You hear a short tone. The display shows Call Ended.
Making a Phone Call
1 Press the programmed Phone button to enter into the Phone Entry list.
b or c to the required subscriber radio alias or ID, and
press g to select.ORPress the programmed One Touch Access button.
2 If the access code was not preconfigured, the display shows Access Code:.
Enter the access code and press g to proceed.
3 Press the PTT button to make the call. The green LED lights up. The Phone Call icon appears in the top right corner. The first text line shows the subscriber radio alias. The second text line displays the call status.
4 If successful:The DTMF tone sounds. You hear the dialing tone of the telephone user. The first text line shows the subscriber radio alias. The Phone Call icon remains in the top right corner. ORIf unsuccessful:A tone sounds and the display shows Phone Call Failed. Your radio returns to the Access Code input screen.If the access code was preconfigured in the Contacts list, the radio returns to the screen you were on prior to initiating the call.
5 Press the PTT button to talk and release it to listen. To enter extra digits, if requested by the Phone Call:
English
Rec
eivi
ng
an
d M
akin
g C
alls
En
24
Enter the extra digits using the keypad and press g to proceed. The DTMF tone sounds and the radio returns to the previous screen.
6 Press e to end the call.If de-access code was not preconfigured in the Contacts list, the display shows De-Access Code:. Enter the de-access
code and press g to proceed. The radio returns to the previous screen.ORPress One Touch Access button. The DTMF tone sounds. If the entry for the One Touch Access button is empty, a negative indicator tone sounds.
7 The DTMF tone sounds and the display shows Ending Phone Call.
8 If successful:A tone sounds and the display shows Call Ended. ORIf unsuccessful:Your radio returns to the Phone Call screen. Repeat Steps 6 and 7 or wait for the telephone user to end the call.
When the telephone user ends the call, a tone sounds and the display shows Call Ended.
If the call ends while you are entering the extra digits requested by the Phone Call, your radio returns to the screen you were on prior to initiating the call.
During channel access, press e to dismiss the call attempt and a tone sounds.
During the call, when you press One Touch Access button with the deaccess code preconfigured or enter the deaccess code as the input for extra digits, your radio attempts to end the call.
The access or deaccess code cannot be more than 10 characters.
Stopping a Radio Call
This feature allows you to stop an ongoing Group or Private Call to free the channel for transmission. For example, when a radio experiences a “stuck microphone” condition where the PTT button is inadvertently pressed by the user.
Your radio must be programmed to allow you to use this feature.
NOTE: Check with your dealer or system administrator for more information on this configuration.
glish

Receivin
g an
d M
aking
Calls
25
Procedure:
While on the required channel:
1 Press the programmed Transmit Interrupt Remote Dekey button.
2 The display shows Remote Dekey.
3 Wait for acknowledgment.
4 The radio sounds a positive indicator tone and the display shows Remote Dekey Success, indicating that the channel is now free.ORThe radio sounds a negative indicator tone and the display shows Remote Dekey Failed.
On the interrupted radio, the display shows Call Interrupted, and the radio sounds a negative indicator tone until you release the PTT button, if it is transmitting an interruptible call that is stopped via this feature.
Talkaround
You can continue to communicate when your repeater is not operating, or when your radio is out of the repeater’s range but within talking range of other radios. This is called “talkaround”.
NOTE: This feature is not applicable in Capacity Plus and Linked Capacity Plus.
Procedure:Press the programmed Repeater/Talkaround button to toggle between talkaround and repeater modes.ORFollow the procedure below.
1 g to access the menu.
2 b or c to Utilities and press g to select.
3 b or c to Radio Settings and press g to select.
4 b or c to Talkaround and press g to select.
5 Press g to enable Talkaround. The display shows beside Enabled.OR
Press g to disable Talkaround. The disappears from beside Enabled.
6 The screen automatically returns to the previous menu.
The Talkaround setting is retained even after powering down.
English

Rec
eivi
ng
an
d M
akin
g C
alls
En
26
Permanent Monitor
Use the Permanent Monitor feature to continuously monitor a selected channel for activity.
NOTE: This feature is not applicable in Capacity Plus and Linked Capacity Plus.
Procedure:
1 Press the programmed Permanent Monitor button.
2 Radio sounds an alert tone, the yellow LED lights up, and the display shows Permanent Monitor On. The monitor icon appears on the status bar.
3 Press the programmed Permanent Monitor button to exit Permanent Monitor mode.
4 Radio sounds an alert tone, the yellow LED turns off, and display shows Permanent Monitor Off.
glish

Ad
vanced
Featu
res
27
Advanced Features
Use this navigation guide to learn more about advanced features available with your radio:Radio Check . . . . . . . . . . . . . . . . . . . . . . . . . . . . . . . . page 27Remote Monitor . . . . . . . . . . . . . . . . . . . . . . . . . . . . . . page 28Scan Lists . . . . . . . . . . . . . . . . . . . . . . . . . . . . . . . . . . page 30Scan . . . . . . . . . . . . . . . . . . . . . . . . . . . . . . . . . . . . . . page 32Vote Scan . . . . . . . . . . . . . . . . . . . . . . . . . . . . . . . . . . page 34Contacts Settings . . . . . . . . . . . . . . . . . . . . . . . . . . . . page 34Call Indicator Settings . . . . . . . . . . . . . . . . . . . . . . . . . page 38Call Log Features . . . . . . . . . . . . . . . . . . . . . . . . . . . . page 41Call Alert Operation . . . . . . . . . . . . . . . . . . . . . . . . . . . page 42Emergency Operation . . . . . . . . . . . . . . . . . . . . . . . . . page 44Analog Status Update . . . . . . . . . . . . . . . . . . . . . . . . . page 57Privacy. . . . . . . . . . . . . . . . . . . . . . . . . . . . . . . . . . . . . page 58Analog Scrambling . . . . . . . . . . . . . . . . . . . . . . . . . . . page 59Multi-Site Controls . . . . . . . . . . . . . . . . . . . . . . . . . . . . page 60Security . . . . . . . . . . . . . . . . . . . . . . . . . . . . . . . . . . . . page 62Lone Worker . . . . . . . . . . . . . . . . . . . . . . . . . . . . . . . . page 64Notification List . . . . . . . . . . . . . . . . . . . . . . . . . . . . . . page 65Auto-Range Transponder System (ARTS) . . . . . . . . . page 65Over-the-Air Programming (OTAP) . . . . . . . . . . . . . . . page 66Utilities. . . . . . . . . . . . . . . . . . . . . . . . . . . . . . . . . . . . . page 66
Radio Check
If enabled, this feature allows you to determine if another radio is active in a system without disturbing the user of that radio. No audible or visual notification is shown on the target radio.
This feature is only applicable for subscriber aliases or IDs.
Sending a Radio Check
Procedure: Use the programmed Radio Check button.
1 Press the programmed Radio Check button.
2 b or c to the required subscriber alias or ID and press
g to select.
3 The display shows transitional mini notice, indicating the request is in progress. The green LED lights up.
4 Wait for acknowledgement.
5 If successful, a positive indicator tone sounds and the display shows positive mini notice. ORIf unsuccessful, a negative indicator tone sounds and the display shows negative mini notice.
6 Radio returns to the subscriber alias or ID screen.
English
Ad
van
ced
Fea
ture
s
En
28
OR
Procedure: Use the menu.
1 g to access the menu.
2 b or c to Contacts and press g to select.
3 b or c to the required subscriber alias or ID and press
g to select.
4 b or c to Radio Check and press g to select.
5 The display shows transitional mini notice, indicating the request is in progress. The green LED lights up.
6 Wait for acknowledgement.
7 If successful, a positive indicator tone sounds and the display shows positive mini notice. ORIf unsuccessful, a negative indicator tone sounds and the display shows negative mini notice.
8 Radio returns to the subscriber alias or ID screen.
If the g button is pressed when the radio is waiting for
acknowledgement, a tone sounds, and the radio terminates all retries and exits Radio Check mode.
You can also initiate Radio Check via manual dial (see Initiating a Radio Check by Manual Dial on page 81).
Remote Monitor
Use the Remote Monitor feature to turn on the microphone of a target radio (subscriber IDs only). No audible or visual indication is given to the target radio. You can use this feature to monitor, remotely, any audible activity surrounding the target radio.
Your radio must be programmed to allow you to use this feature.
Initiating Remote Monitor
Procedure: Use the programmed Remote Monitor button.
1 Press the programmed Remote Monitor button.
2 b or c to the required subscriber alias or ID and press
g to select.
3 The display shows transitional mini notice, indicating the request is in progress. The green LED lights up.
glish

Ad
vanced
Featu
res
29
4 Wait for acknowledgment.
5 If successful, a positive indicator tone sounds and the display shows positive mini notice. Your radio starts playing audio from the monitored radio for a programmed duration and display shows Rem. Monitor. Once the timer expires, the radio sounds an alert tone and the LED turns off.ORIf unsuccessful, a negative indicator tone sounds and the display shows negative mini notice.
OR
Procedure: Use the menu.
1 g to access the menu.
2 b or c to Contacts and press g to select.
3 b or c to the required subscriber alias or ID and press
g to select.
4 b or c to Remote Mon. and press g to select.
5 The display shows transitional mini notice, indicating the request is in progress. The green LED lights up.
6 Wait for acknowledgment.
7 If successful, a positive indicator tone sounds and the display shows positive mini notice. Your radio starts playing audio from the monitored radio for a programmed duration and display shows Rem. Monitor. Once the timer expires, the radio sounds an alert tone and the LED turns off.ORIf unsuccessful, the radio sounds a negative indicator tone the display shows negative mini notice.
You can also manually select a target radio address (see Initiating Remote Monitor by Manual Dial on page 81).
Stopping Remote Monitor
Remote Monitor automatically stops after a programmed duration or when there is any user operation on the target radio.
Procedure:
1 Press the programmed Transmit Interrupt Remote Dekey button.
2 The display shows transitional mini notice, indicating the request is in progress. The green LED lights up.
3 Wait for acknowledgment.
English
Ad
van
ced
Fea
ture
s
En
30
4 If successful, a positive indicator tone sounds and the display shows positive mini notice.ORIf unsuccessful, a negative indicator tone sounds and the display shows negative mini notice.
Scan Lists
Scan lists are created and assigned to individual channels/groups. Your radio scans for voice activity by cycling through the channel/group sequence specified in the scan list for the current channel/group.
Your radio can support up to 250 scan lists, with a maximum of 16 members in a list. Each scan list supports a mixture of both analog and digital entries.
You can add, delete, or prioritize channels by editing a scan list.
You can attach a new scan list to your radio via Front Panel Programming.
NOTE: This feature is not applicable in Capacity Plus and Linked Capacity Plus.
Viewing an Entry in the Scan List
Procedure:
1 g to access the menu.
2 b or c to Scan and press g to select.
3 b or c to View/Edit List and press g to select.
4 Use b or c to view each member on the list.
The priority icon appears left of the member’s alias, if set, to indicate whether the member is on a Priority 1 or Priority 2 channel list. You cannot have multiple Priority 1 or Priority 2 channels in a scan list.
There is no priority icon if priority is set to None.
Editing the Scan List
Adding a New Entry to the Scan List
Procedure:
1 g to access the menu.
2 b or c to Scan and press g to select.
glish
Ad
vanced
Featu
res
31
3 b or c to View/Edit List and press g to select.
4 b or c to Add Member and press g to select.
5 b or c to the required alias or ID and press g to select.
6 b or c to the required priority level and press g to select.
7 The display shows positive mini notice, followed immediately by Add Another?.
8 b or c to Yes and press g to select, to add another entry, and repeat Steps 5 and 6.OR
b or c to No and press g to select to save the current list.
Deleting an Entry from the Scan List
Procedure:
1 g to access the menu.
2 b or c to Scan and press g to select.
3 b or c to View/Edit List and press g to select.
4 b or c to the required alias or ID and press g to select.
5 b or c to Delete and press g to select.
6 At Delete Entry?, b or c to Yes and press g to select, to delete the entry. The display shows positive mini notice. OR
b or c to No and press g to select to return to the previous screen.
7 Repeat Steps 4 to 6 to delete other entries.
After deleting all required aliases or IDs, long press e to
return to the Home screen.
Setting and Editing Priority for an Entry in the Scan List
Procedure:
1 g to access the menu.
2 b or c to Scan and press g to select.
English
Ad
van
ced
Fea
ture
s
En
32
3 b or c to View/Edit List and press g to select.
4 b or c to the required alias or ID and press g to select.
5 b or c to Edit Priority and press g to select.
6 b or c to the required priority level and press g to select.
7 The display shows positive mini notice before returning to the previous screen.
8 The priority icon appears left of the member’s name.
There is no priority icon if priority is set to None.
Scan
When you start a scan, your radio cycles through the programmed scan list for the current channel looking for voice activity.
The yellow LED blinks and the scan icon appears on the status bar.
During a dual mode scan, if you are on a digital channel, and your radio locks onto an analog channel, it automatically
switches from digital mode to analog mode for the duration of the call. This is also true for the reverse.
There are two ways of initiating scan:
• Main Channel Scan (Manual): Your radio scans all the channels/groups in your scan list. On entering scan, your radio may – depending on the settings – automatically start on the last scanned “active” channel/group or on the channel where scan was initiated.
• Auto Scan (Automatic): Your radio automatically starts scanning when you select a channel/group that has Auto Scan enabled.
NOTE: This feature is not applicable in Capacity Plus and Linked Capacity Plus.
Starting and Stopping Scan
Procedure: Press the programmed Scan button to start or stop Scan. OR Follow the procedure below.
1 Use the Left/ Right Navigation buttons to select a channel programmed with a scan list.
2 g to access the menu.
3 b or c to Scan and press g to select.
glish
Ad
vanced
Featu
res
33
4 b or c to Turn On and press g to select.OR
b or c to Turn Off and press g to select.
5 The display shows Scan On when scan is enabled. The yellow LED blinks and the scan icon appears. ORThe display shows Scan Off if scan is disabled. The scan icon disappears.
While scanning, the radio can only accept data (e.g. location or PC data) if received on its Selected Channel.
Responding to a Transmission During a Scan
During scanning, your radio stops on a channel/group where activity is detected. The radio stays on that channel for a programmed time period known as “hang time”.
Procedure:
1 If the Channel Free Indication feature is enabled, you hear a short alert tone the moment the transmitting radio releases the PTT button, indicating the channel is free for you to respond.
2 Press the PTT button during hang time. The green LED lights up.
3 Wait for the Talk Permit Tone to finish (if enabled) and speak clearly into the microphone.
OR
Wait for the PTT Sidetone to finish (if enabled) and speak clearly into the microphone.
4 Release the PTT button to listen.
5 If you do not respond within the hang time, the radio returns to scanning other channels/groups.
Deleting a Nuisance Channel
If a channel continually generates unwanted calls or noise (termed a “nuisance” channel), you can temporarily remove the unwanted channel from the scan list.
This capability does not apply to the channel designated as the Selected Channel.
Procedure:
1 When your radio “locks on to” an unwanted or nuisance channel, press the programmed Nuisance Channel Delete button until you hear a tone.
2 Release the Nuisance Channel Delete button. The nuisance channel is deleted.
Deleting a “nuisance” channel is only possible through the programmed Nuisance Channel Delete button. This feature is not accessible through the menu.
English

Ad
van
ced
Fea
ture
s
En
34
Restoring a Nuisance Channel
Procedure: To restore the deleted nuisance channel, do one of the following:
• Turn the radio off and then power it on again, OR
• Stop and restart a scan via the programmed Scan button or menu, OR
• Change the channel via the Channel Up/Down buttons.
Vote Scan
Vote Scan provides you with wide area coverage in areas where there are multiple base stations transmitting identical information on different analog channels.
Your radio scans analog channels of multiple base stations and performs a voting process to select the strongest received signal. Once that is established, your radio unmutes to transmissions from that base station.
The yellow LED blinks and the vote scan icon appears on the status bar.
To respond to a transmission during a Vote Scan, follow the same procedures as Responding to a Transmission During a Scan on page 33.
Contacts Settings
Contacts provides “address-book” capabilities on your radio. Each entry corresponds to an alias or ID that you use to initiate a call.
Each entry, depending on context, associates with one of five types of calls: Group Call, Private Call, All Call, PC Call or Dispatch Call.
PC Call and Dispatch Call are data-related. They are only available with the applications. Refer to the data applications documentation for further details.
NOTE: If the Privacy feature is enabled on a channel, you can make privacy-enabled Group Call, Private Call, and All Call on that channel. Only target radios with the same Privacy Key OR the same Key Value and Key ID as your radio are able to unscramble the transmission. See Privacy on page 58 for more information.
Additionally, Contacts menu allows you to assign each entry to a programmable number key or more on a keypad microphone. If an entry is assigned to a number key, your radio can perform a
quick dial on the entry.
Your radio supports two Contacts lists, one for Analog contacts and one for Digital contacts, with a a maximum of 500 members for each Contacts list.
glish

Ad
vanced
Featu
res
35
Each entry within Contacts displays the following information:• Call Type
• Call Alias
• Call ID
NOTE: You can add, or edit subscriber IDs for the Digital Contacts list. Deleting subscriber IDs can only be performed by your dealer.
For the Analog Contacts list, you can only view the subscriber IDs, edit the subscriber IDs, and initiate a Call Alert. Adding and deleting capabilities can only be performed by your dealer.
Making a Group Call from Contacts
Procedure:
1 g to access the menu.
2 b or c to Contacts and press g to select.The entries are alphabetically sorted.
3 b or c to the required group alias or ID.
4 Press the PTT button to make the call. The green LED lights up.
5 Wait for the Talk Permit Tone to finish (if enabled) and speak clearly into the microphone.
OR
Wait for the PTT Sidetone to finish (if enabled) and speak clearly into the microphone.
6 Release the PTT button to listen. When any user in the group responds, the green LED blinks. You see the Group Call icon, the group alias or ID, and that user’s alias or ID on your display.
7 If the Channel Free Indication feature is enabled, you hear a short alert tone the moment the target radio releases the PTT button, indicating the channel is free for you to respond. Press the PTT button to respond.ORIf there is no voice activity for a programmed period of time, the call ends.
Making a Private Call from Contacts
Procedure:
1 g to access the menu.
2 b or c to Contacts and press g to select.The entries are alphabetically sorted.
3 b or c to the required subscriber alias or ID.
English

Ad
van
ced
Fea
ture
s
En
36
4 Press the PTT button to make the call. The green LED lights up. The display shows the destination alias.
5 Wait for the Talk Permit Tone to finish (if enabled) and speak clearly into the microphone.
6 Release the PTT button to listen. When the target radio responds, the green LED blinks and the display shows the transmitting user's alias or ID.
7 If the Channel Free Indication feature is enabled, you hear a short alert tone the moment the target radio releases the PTT button, indicating the channel is free for you to respond. Press the PTT button to respond.ORIf there is no voice activity for a programmed period of time, the call ends.
8 You hear a short tone. The display shows Call Ended.
NOTE: If you release the PTT button while the radio is setting up the call, it exits without any indication and returns to the previous screen.
Your radio may be programmed to perform a radio presence check prior to setting up the Private Call. If the target radio is not available, you hear a short tone and see negative mini notice on the display.
The radio returns to the menu prior to initiating the radio presence check.
Assigning an Entry to a Programmable
Number Key
Procedure:
1 g to access the menu.
2 b or c to Contacts and press g to select. The entries are alphabetically sorted.
3 b or c to the required alias or ID and press g to select.
4 b or c to Program Key and press g to select.
5 b or c to the desired number key and press g to select.ORIf the number key is currently assigned to another entry, the display shows The Key is Already Used and then, the first line of the display shows Overwrite?.
b or c to Yes and press g to select.
6 The display shows Contact Saved and a positive mini notice.
NOTE: Each entry can be associated to different number keys. You see a checkmark before each number key that is
glish

Ad
vanced
Featu
res
37
assigned to an entry. If the checkmark is before Empty, you have not assign a number key to the entry.
If a number key is assigned to an entry in a particular mode, this feature is not supported when you long press the number key in another mode.
See Making a Group, Private or All Call with the Programmable Number Key on page 86 for details on making a Group, Private or All Call with the programmed number keys.
Removing the Association between Entry and
Programmable Number Key
Procedure:
Long press the programmed number key to the required alias or
ID, press g to select, and proceed to Step 4.ORFollow the procedure below.
1 g to access the menu.
2 b or c to Contacts and press g to select. The entries are alphabetically sorted.
3 b or c to the required alias or ID and press g to select.
4 b or c to Program Key and press g to select.
5 b or c to Empty and press g to select.
6 The first line of the display shows Clear from all keys.
7 b or c to Yes and press g to select.
8 The display shows Contact Saved and a positive mini notice.
9 The screen automatically returns to the previous menu.
NOTE: When an entry is deleted, the association between the entry and its programmed number key(s) is removed.
Setting Default Contact
Procedure:
Follow the procedure below.
1 g to access the menu.
2 b or c to Contacts and press g to select.
3 b or c to the required alias or ID and press g to select.
English

Ad
van
ced
Fea
ture
s
En
38
4 b or c to Set as Default and press g to select.
5 The radio sounds a positive indicator tone and the display shows positive mini notice.
6 A appears beside the selected default alias or ID.
Adding a New Contact
Procedure:
Follow the procedure below.
1 g to access the menu.
2 b or c to Contacts and press g to select.
3 b or c to New Contact and press g to select.
4 Use the keypad to enter the contact number and press g to confirm.
5 Use the keypad to enter the contact name and press g to confirm.
6 b or c to the required ringer type and press g to select.
7 The radio sounds a positive indicator tone and the display shows positive mini notice.
Call Indicator Settings
Activating or Deactivating Call Ringers for
Call Alerts
You can select, or turn on or off ringing tones for a received Call Alert.
Procedure:
1 g to access the menu.
2 b or c to Utilities and press g to select.
3 b or c to Radio Settings and press g to select.
4 b or c to Tones/Alerts and press g to select.
5 b or c to Call Ringers and press g to select.
6 b or c to Call Alert and press g to select. The current tone is indicated by a .
glish
Ad
vanced
Featu
res
39
7 b or c to the required tone and press g to select. appears beside selected tone.OR
b or c to the Off and press g to select.
8 Press g to disable the Call Alert ringing tones. The display shows beside Off.OR
Press g to enable the Call Alert ringing tones. The disappears from beside Off.
Activating or Deactivating Call Ringers for
Private Calls
You can turn on or off the ringing tones for a received Private Call.
Procedure:
1 g to access the menu.
2 b or c to Utilities and press g to select.
3 b or c to Radio Settings and press g to select.
4 b or c to Tones/Alerts and press g to select.
5 b or c to Call Ringers and press g to select.
6 b or c to Private Call.
7 b or c to On to enable to enable Private Call ringing tones. The display shows beside On.OR
b or c to Off to disable Private Call ringing tones. The display shows beside Off.
Activating or Deactivating Call Ringers
for Selective Call
You can select, or turn on or off ringing tones for a received Selective Call.
Procedure:
1 g to access the menu.
2 b or c to Utilities and press g to select.
3 b or c to Radio Settings and press g to select.
4 b or c to Tones/Alerts and press g to select.
English

Ad
van
ced
Fea
ture
s
En
40
5 b or c to Call Ringers and press g to select.
6 b or c to Selective Call and press g to select. The current tone is indicated by a .
7 b or c to the required tone and press g to select. appears beside selected tone.OR
b or c to the Off and press g to select.
8 Press g to disable the Selective Call ringing tones. The display shows beside Off.OR
Press g to enable the Selective Call ringing tones. The disappears from beside Off.
Escalating Alarm Tone Volume
You can program your radio to continually alert you when a radio call remains unanswered. This is done by automatically increasing the alarm tone volume over time. This feature is known as Escalert.
Procedure:
1 g to access the menu.
2 b or c to Utilities and press g to select.
3 b or c to Radio Settings and press g to select.
4 b or c to Tones/Alerts and press g to select.
5 b or c to Escalert.
6 b or c to On to enable Escalert. The display shows beside On.OR
b or c to Off to disable Escalert. The display shows beside Off.
glish
Ad
vanced
Featu
res
41
Call Log Features
Your radio keeps track of all recent outgoing, answered, and missed Private Calls. Use the call log feature to view and manage recent calls.
You can perform the following tasks in each of your call lists:
• Store alias or ID to Contacts (See Storing an Alias or ID from a Call List on page 94)
• Delete Call
• Delete All Calls
• View Details
Viewing Recent Calls
The lists are Missed, Answered, and Outgoing.
Procedure:
1 g to access the menu.
2 b or c to Call Log and press g to select.
3 b or c to preferred list and press g to select.
4 The display shows the most recent entry.
5 b or c to view the list.
Press the PTT button to start a Private Call with the current selected alias or ID.
Deleting a Call from a Call List
Procedure:
1 g to access the menu.
2 b or c to Call Log and press g to select.
3 b or c to the required list and press g to select.
4 b or c to the required alias or ID and press g to select.
5 b or c to Delete and press g to select.
6 Press g to select Yes to delete the entry. The display shows positive mini notice.OR
b or c to No to return to the previous screen.
When you select a call list and it contains no entries, the display shows List Empty, and sounds a low tone if Keypad Tones are turned on (see Turning Keypad Tones On or Off on page 80).
English

Ad
van
ced
Fea
ture
s
En
42
Deleting All Calls from a Call List
Procedure:
1 g to access the menu.
2 b or c to Call Log and press g to select.
3 b or c to the required list and press g to select.
4 b or c to the required alias or ID and press g to select.
5 b or c to Delete All and press g to select.
6 Press g to select Yes to delete all entries. The display shows positive mini notice.OR
b or c to No to return to the previous screen.
Viewing Details from a Call List
Procedure:
1 g to access the menu.
2 b or c to Call Log and press g to select.
3 b or c to the required list and press g to select.
4 b or c to the required alias or ID and press g to select.
5 b or c to View Details and press g to select. Display shows details.
Call Alert Operation
Call Alert paging enables you to alert a specific radio user to call you back when they are able to do so.
This feature is applicable for subscriber aliases or IDs only and is accessible through the menu via Contacts or manual dial.
Receiving and Responding to a Call Alert
When you receive a Call Alert page, you see the notification list listing a Call Alert with the alias or ID of the calling radio on the display.
Procedure:
1 You hear a repetitive tone. The yellow LED blinks.
2 Press the PTT button while the display still shows the Call Alert in the Notification List to respond with a Private Call.OR
glish

Ad
vanced
Featu
res
43
Press g to exit the Notification List. The alert is moved to the Missed Call Log.
See Notification List on page 65 for details about the Notification List.
See Call Log Features on page 41 for details about the Missed Call List.
Making a Call Alert from the Contacts List
Procedure:
1 g to access the menu.
2 b or c to Contacts and press g to select.
3 b or c to the required subscriber alias or ID and press
g to select.
4 b or c to Call Alert and press g to select.
5 The display shows Call Alert and the subscriber alias or ID, indicating that the Call Alert has been sent.
6 The green LED lights up when your radio is sending the Call Alert.
7 If the Call Alert acknowledgement is received, the display shows positive mini notice.ORIf the Call Alert acknowledgement is not received, the display shows negative mini notice.
You can also send a Call Alert by manually dialing the subscriber ID (see Making a Call Alert by Manual Dial on page 94).
Making a Call Alert with the One Touch Access Button
Procedure:
1 Press the programmed One Touch Access button to make a Call Alert to the predefined alias or ID.
2 The display shows Call Alert and the subscriber alias or ID, indicating that the Call Alert has been sent.
3 The green LED lights up when your radio is sending the Call Alert.
4 If the Call Alert acknowledgement is received, the display shows positive mini notice.ORIf the Call Alert acknowledgement is not received, the display shows negative mini notice.
English
Ad
van
ced
Fea
ture
s
En
44
Emergency Operation
An Emergency Alarm is used to indicate a critical situation. You are able to initiate an Emergency at any time on any screen display even when there is activity on the current channel.
Your dealer can set the duration of a button press for the programmed Emergency button, except for long press, which is similar with all other buttons:
• Short press – Between 0.05 seconds and 0.75 seconds
• Long press – Between 1.00 second and 3.75 seconds
The Emergency button is assigned with the Emergency On/ Off feature. Check with your dealer for the assigned operation of the Emergency button.
If short press the Emergency button is assigned to turn on the Emergency mode, then long press the Emergency button is assigned to exit the Emergency mode.
If long press the Emergency button is assigned to turn on the Emergency mode, then short press the Emergency button is assigned to exit the Emergency mode.
Your radio supports three Emergency Alarms:
• Emergency Alarm
• Emergency Alarm with Call
• Emergency Alarm with Voice to Follow
In addition, each alarm has the following types:
• Regular – Radio transmits an alarm signal and shows audio and/or visual indicators.
• Silent – Radio transmits an alarm signal without any audio or visual indicators. Radio receives calls without any sound through the radio’s speaker, until you press the PTT button to initiate the call.
• Silent with Voice – Radio transmits an alarm signal without any audio or visual indicators, but allow incoming calls to sound through the radio’s speaker.
Only one of the Emergency Alarms above can be assigned to the programmed Emergency button or the Emergency footswitch.
Receiving an Emergency Alarm
Procedure:
1 The emergency icon appears, a tone sounds, the red LED blinks, and the radio displays the Alarm List if there is more than one alarm listed. The emergency caller aliases are
listed. b or c to the required alias and press g to view more details.
Press g again to view your action options.ORThe emergency icon appears, a tone sounds, the red LED blinks, and the radio displays the emergency caller alias
glish

Ad
vanced
Featu
res
45
Press g to view more details. Press g again to view your action options.
2 Press g and select Yes to exit the Alarm List.
To revisit the Alarm List, press g to access the menu and select Alarm List.
Responding to an Emergency Alarm
Procedure:
When receiving an Emergency Alarm:
1 In the Alarm List, b or c to the required alias.
2 If the Channel Free Indication feature is enabled, you hear a short alert tone the moment the transmitting radio releases the PTT button, indicating the channel is free for you to respond.
3 Press PTT button to transmit non-emergency voice to the same group that the Emergency Alarm was targeted to. The green LED lights up. Your radio remains in the Emergency mode.
4 Wait for the Talk Permit Tone to finish (if enabled) and speak clearly into the microphone.OR
Wait for the PTT Sidetone to finish (if enabled) and speak clearly into the microphone.
5 Release the PTT button to listen. When the emergency initiating radio responds, the green LED blinks. You see the Group Call icon, the group alias or ID, and transmitting radio alias or ID on your display.
6 Your radio displays the Alarm List.
Emergency voice can only be transmitted by the emergency initiating radio. All other radios (including the emergency receiving radio) transmit non-emergency voice.
Sending an Emergency Alarm
This feature allows you to send an Emergency Alarm, a non-voice signal, which triggers an alert indication on a group of radios.
Procedure:
1 Press the programmed Emergency On button or the Emergency footswitch.
2 The display shows Tx Alarm and the destination alias. The green LED lights up and the Emergency icon appears.OR
English

Ad
van
ced
Fea
ture
s
En
46
The display shows Tx Telegram and the destination alias. The green LED lights up and the Emergency icon appears.
3 When an Emergency Alarm acknowledgment is received, the Emergency tone sounds and the green LED blinks. The display shows Alarm Sent.ORIf your radio does not receive an Emergency Alarm acknowledgement, and after all retries have been exhausted, a tone sounds and the display shows Alarm Failed.
4 Radio exits the Emergency Alarm mode and returns to the Home screen.
If your radio is set to Silent, it does not display any audio or visual indicators during Emergency mode.
Sending an Emergency Alarm with Call
This feature allows you to send an Emergency Alarm to a group of radios. Upon acknowledgement by a radio within the group, the group of radios can communicate over a programmed Emergency channel.
Procedure:
1 Press the programmed Emergency On button or the Emergency footswitch.
2 The display shows Tx Alarm and the destination alias. The green LED lights up and the Emergency icon appears.OR
The display shows Tx Telegram and the destination alias. The green LED lights up and the Emergency icon appears.
3 When an Emergency Alarm acknowledgment is received, the Emergency tone sounds and the green LED blinks. The display shows Alarm Sent.
4 Your radio enters the emergency call mode when the display shows Emergency and the destination group alias.
5 Press PTT button to make the call. The green LED lights up and the group icon appears on the display.
6 Wait for the Talk Permit Tone to finish (if enabled) and speak clearly into the microphone.OR
Wait for the PTT Sidetone to finish (if enabled) and speak clearly into the microphone.
7 Release the PTT button to listen.When you receive a group call, the display shows the caller alias and group alias.
8 When the channel is free for you to respond, a short alert
tone sounds ( if the Channel Free Indication feature is enabled). Press the PTT button to respond.OR
glish
Ad
vanced
Featu
res
47
Once your call ends, press Emergency Off button to exit the Emergency mode.
9 The radio returns to the Home screen.
If your radio is set to Silent, it does not display any audio or visual indicators during Emergency mode, or allow any received calls to sound through the radio’s speaker, until you press the PTT button to initiate the call.
If your radio is set to Silent with Voice, it does not display any audio or visual indicators during Emergency mode, but allow incoming calls to sound through the radio’s speaker. The indicators only appear once you press the PTT button to initiate, or respond to, the call.
Sending an Emergency Alarm with Voice to Follow
This feature allows you to send an Emergency Alarm to a group of radios. Your radio’s microphone is automatically activated, allowing you to communicate with the group of radios without pressing the PTT button.
This activated microphone state is also known as “hot mic”.
NOTE: Some accessories may not support “hot mic”. Check with your dealer or system administrator for more information.
If your radio has Emergency Cycle Mode enabled, repetitions of hot mic and receiving period are made for a programmed duration.
NOTE: During Emergency Cycle Mode, received calls sound through the radio’s speaker.
If you press the PTT button during the programmed receiving period, you will hear a prohibit tone, indicating that you should release the PTT button. The radio ignores the PTT press and remains in Emergency mode.
NOTE: If you press the PTT button during hot mic, and continue to press it after the hot mic duration expires, the radio continues to transmit until you release the PTT button.
Procedure:
1 Press the programmed Emergency On button or the Emergency footswitch.
2 The display shows Tx Alarm and the destination alias. The green LED lights up and the Emergency icon appears.OR
The display shows Tx Telegram and the destination alias. The green LED lights up and the Emergency icon appears.
3 Once the display shows Alarm Sent, speak clearly into the microphone. When hot mic has been enabled, the radio automatically transmits without a PTT press until the hot mic
English

Ad
van
ced
Fea
ture
s
En
48
duration expires.While transmitting, the green LED lights up and the Emergency icon appears.
4 The radio automatically stops transmitting when:Once the cycling duration between hot mic and receiving calls expires, if Emergency Cycle Mode is enabled.OROnce the hot mic duration expires, if Emergency Cycle Mode is disabled.
5 To transmit again, press the PTT button.ORPress the programmed Emergency Off button to exit the Emergency mode.
6 The radio returns to the Home screen.
If your radio is set to Silent, it does not display any audio or visual indicators during Emergency mode, or allow any received calls to sound through the radio’s speaker, until the programmed hot mic transmission period is over, and you press the PTT button.
If your radio is set to Silent with Voice, it does not display any audio or visual indicators during Emergency mode when you are making the call with hot mic, but allow sound through the radio’s speaker when the target radio responds after the programmed hot mic transmission period is over. The indicators only appear when you press the PTT button.
NOTE: If the Emergency Alarm request fails, the radio does not retry to send the request, and enters the hot mic state directly.
Reinitiating an Emergency Mode
NOTE: This feature is only applicable to the radio sending the Emergency Alarm.
There are two instances where this can happen:
• You change the channel while the radio is in Emergency mode. This exits the Emergency mode. If Emergency Alarm is enabled on this new channel, the radio reinitiates Emergency.
• You press the programmed Emergency On button during an Emergency initiation/transmission state. This causes the radio to exit this state, and to reinitiate Emergency.
Exiting Emergency Mode
NOTE: This feature is only applicable to the radio sending the Emergency Alarm.
Your radio exits Emergency mode when one of the following occurs:
• Emergency Alarm acknowledgement is received (for Emergency Alarm only), OR
• An Emergency Exit Telegram is received, OR
• All retries to send the alarm have been exhausted, OR
glish

Ad
vanced
Featu
res
49
• The Emergency Off button is pressed, OR
• Turn the radio off and then power it on again if your radio has been programmed to remain on the Emergency Revert channel even after acknowledgement is received.
NOTE: If your radio is powered off, it exits the Emergency mode. The radio does not reinitiate the Emergency mode automatically when it is turned on again.
If you change channels when your radio is in Emergency mode to a channel that has no emergency system configured, No Emergency is shown on your display.
Text Messaging Features
Your radio is able to receive data, for example a text message, from another radio or an e-mail application.
Sending a Quick Text Message
Your radio supports a maximum of 50 Quick Text messages as programmed by your dealer.
Text Message button and proceed to Step 3.OR Follow the procedure below.
1 g to access the menu.
2 b or c to Messages and press g to select.
3 b or c to Quick Text and press g to select.
4 b or c to the required Quick Text and press g to select.
5 b or c to the required alias or ID and press g to select.
6 The display shows transitional mini notice, confirming your message is being sent.
7 If the message is sent, a tone sounds and the display shows positive mini notice.ORIf the message is not sent, a low tone sounds and the display shows negative mini notice.
If the text message fails to send, the radio returns you to the Resend option screen (see Managing Fail-to-Send Text Messages on page 50).
Sending a Quick Text Message with the One Touch Access Button
1 Press the programmed One Touch Access button to send a predefined Quick Text message to a predefined alias or ID.
English

Ad
van
ced
Fea
ture
s
En
50
2 The display shows transitional mini notice, confirming your message is being sent.
3 If the message is sent, a tone sounds and the display shows positive mini notice.ORIf the message is not sent, a low tone sounds and the display shows negative mini notice.
If the text message fails to send, the radio returns you to the Resend option screen (see Managing Fail-to-Send Text Messages on page 50).
Managing Fail-to-Send Text Messages
You can select one of the following options while at the Resend option screen:
• Resend
• Forward
NOTE: If the channel type (i.e. conventional digital) is not a match, you can only edit and forward a Fail-to-Send message.
Resending a Text Message
Procedure:
1 Press g to resend the same message to the same subscriber radio/group alias or ID.
2 If the message is sent successfully, a tone sounds and the display shows positive mini notice.ORIf the message cannot be sent, the display shows negative mini notice.
Forwarding a Text Message
Select Forward to send the message to another subscriber radio/group alias or ID.
Procedure:
1 b or c to Forward and press g to select.
2 b or c to the required alias or ID and press g to select.
3 The display shows transitional mini notice, confirming your message is being sent.
4 If the message is sent, a tone sounds and the display shows positive mini notice.OR
glish
Ad
vanced
Featu
res
51
If the message is not sent, a low tone sounds and the display shows negative mini notice.
You can also manually select a target radio address (see Forwarding a Text Message by Manual Dial on page 95).
Managing Sent Text Messages
Once a message is sent to another radio, it is saved in Sent Items. The most recent sent text message is always added to the top of the Sent Items list.
The Sent Items folder is capable of storing a maximum of thirty (30) last sent messages. When the folder is full, the next sent text message automatically replaces the oldest text message in the folder.
NOTE: Long press e at any time to return to the Home screen.
Viewing a Sent Text Message
Procedure:Press the programmed Text Message button and proceed to Step 3.ORFollow the procedure below.
1 g to access the menu.
2 b or c to Messages and press g to select.
3 b or c to Sent Items and press g to select.
4 b or c to the required message and press g to select.A subject line may be shown if the message is from an e-mail application.
The icon beside each message indicates the status of the message (see Sent Item Icons on page 13).
Sending a Sent Text Message
You can select one of the following options while viewing a sent text message:
• Resend
• Forward
NOTE: If the channel type (i.e. conventional digital or Capacity Plus or Linked Capacity Plus) is not a match, you can only edit, forward, or delete a Sent message.
Procedure:
1 Press g again while viewing the message.
2 b or c to Resend and press g to select.
English
Ad
van
ced
Fea
ture
s
En
52
3 The display shows transitional mini notice, confirming that the same message is being sent to the same target radio.
4 If the message is sent, a tone sounds and the display shows positive mini notice.ORIf the message is not sent, a low tone sounds and the display shows negative mini notice.
If the text message fails to send, the radio returns you to the
Resend option screen. Press g to resend the message to the
same subscriber radio/group alias or ID.
NOTE: Changing the volume, and pressing any button, except
for g , b or c , returns you to the message.
The radio exits the Resend option screen if you press the PTT button to initiate a Private or Group Call, or to respond to a Group Call. It also exits the screen when the radio receives a text message, an emergency call or alarm, or a call alert.
The display returns to the Resend option screen if you press the PTT button to respond to a Private Call (except if the radio is displaying the Missed Call screen), and at the end of an All Call.
Press b or c to access the Forward or Delete option
screen:
• Select Forward to send the selected text message to another target radio (see Forwarding a Text Message on page 50). You can also manually select a target radio address using a keypad microphone (see Forwarding a Text Message by Manual Dial on page 95).
• Delete to delete the text message.
NOTE: If you exit the message sending screen while the message is being sent, the radio updates the status of the message in the Sent Items folder without providing any indication in the display or via sound.
If the radio changes mode or powers down before the status of the message in Sent Items is updated, the radio cannot complete any In-Progress messages and automatically marks it with a Send Failed icon.
The radio supports a maximum of five (5) In-Progress messages at one time. During this period, the radio cannot send any new message and automatically marks it with a Send Failed icon.
glish

Ad
vanced
Featu
res
53
Deleting All Sent Text Messages from Sent Items
Procedure:Press the programmed Text Message button and proceed to Step 3.ORFollow the procedure below.
1 g to access the menu.
2 b or c to Messages and press g to select.
3 b or c to Sent Items and press g to select.
4 b or c to Delete All and press g to select.
5 b or c to Yes and press g to select. The display shows positive mini noticeOR
b or c to No and press g to return to the previous screen.
When you select Sent Items and it contains no text messages, the display shows List Empty, and sounds a low tone if Keypad Tones are turned on (see Turning Keypad Tones On or Off on page 80).
Receiving a Text Message
When your radio receives a message, the display shows the Notification List with the alias or ID of the sender and the message icon.
You can select one of the following options when receiving a text message:
• Read
• Read Later
• Delete
NOTE: The radio exits the Text Message alert screen and sets up a Private or Group Call to the sender of the message if the PTT button is pressed when the radio is displaying the alert screen.
Reading a Text Message
Procedure:
1 b or c to Read and press g to select.
2 Selected message in the Inbox opens.A subject line may be shown if the message is from an e-mail application.
English
Ad
van
ced
Fea
ture
s
En
54
3 Press e to return to the Inbox.OR
Press g to reply, forward, or delete the text message.
Press b or c to access the Read Later or Delete option
screen:
• Select Read Later to return to the screen you were on prior to receiving the text message.
• Select Delete to delete the text message.
Managing Received Text Messages
Use the Inbox to manage your text messages. The Inbox is capable of storing a maximum of 30 messages.
Your radio supports the following options for text messages:
• Reply (via Quick Text)
• Forward
• Delete
• Delete All
NOTE: If the channel type (i.e. conventional digital or Capacity Plus or Linked Capacity Plus) is not a match, you can only forward, delete, or delete all Received messages.
Text messages in the Inbox are sorted according to the most recently received.
NOTE: Long press e at any time to return to the Home screen.
Viewing a Text Message from the Inbox
Procedure:
1 g to access the menu.
2 b or c to Messages and press g to select.
3 b or c to Inbox and press g to select.
4 b or c to view the messages.A subject line may be shown if the message is from an e-mail application.
5 Press g to select the current message, and press g again to reply, forward, or delete that message.OR
Long press e to return to the Home screen.
glish

Ad
vanced
Featu
res
55
Replying to a Text Message with Quick Text
Procedure: Press the programmed Text Message button and proceed to Step 3.OR Follow the procedure below.
1 g to access the menu.
2 b or c to Messages and press g to select.
3 b or c to Inbox and press g to select.
4 b or c to the required message and press g to select.A subject line may be shown if the message is from an e-mail application.
5 Press g once more to access the sub-menu.
6 b or c to Reply and press g to select.
7 b or c to Quick Reply and press g to select.
8 b or c to the required message and press g to select.
9 The display shows transitional mini notice, confirming your message is being sent.
10 If the message is sent successfully, a tone sounds and the display shows positive mini notice.ORIf the message cannot be sent, the display shows negative mini notice.
If the text message fails to send, the radio returns you to the Resend option screen (see Managing Fail-to-Send Text Messages on page 50).
Deleting a Text Message from the Inbox
Procedure: Press the programmed Text Message button and proceed to Step 3.OR Follow the procedure below.
1 g to access the menu.
2 b or c to Messages and press g to select.
3 b or c to Inbox and press g to select.
4 b or c to the required message and press g to select.
English

Ad
van
ced
Fea
ture
s
En
56
A subject line may be shown if the message is from an e-mail application.
5 Press g once more to access the sub-menu.
6 b or c to Delete and press g to select.
7 b or c to Yes and press g to select.
8 The display shows positive mini notice.
9 The screen returns to the Inbox.
Deleting All Text Messages from the Inbox
Procedure:Press the programmed Text Message button and proceed to Step 3.OR Follow the procedure below.
1 g to access the menu.
2 b or c to Messages and press g to select.
3 b or c to Inbox and press g to select.
4 b or c to Delete All and press g to select.
5 b or c to Yes and press g to select.
6 The display shows positive mini notice.
When you select the Inbox and it contains no text messages, the display shows List Empty, and sounds a low tone if Keypad Tones are turned on (see Turning Keypad Tones On or Off on page 80).
NOTE: Additional text messaging features are available with a keypad-enabled microphone. Refer to Text Messaging on page 95 for more details.
Analog Message Encode
Your radio is able to send preprogrammed messages from the Message list to a radio alias or to the dispatcher.
Sending MDC Message Encode to Dispatcher
Procedure:
1 g to access the menu.
2 b or c to Message and press g to select.
3 b or c to Quick Text and press g to select.
glish

Ad
vanced
Featu
res
57
4 b or c to the required message. Press g to send.
5 The display shows transitional mini notice, confirming your message is being sent.
6 If the message is sent, a tone sounds and the display shows positive mini notice. ORIf the message is not sent, a low tone sounds and the display shows negative mini notice.
Sending 5-Tone Message Encode to Contact
Procedure:
1 g to access the menu.
2 b or c to Message and press g to select.
3 b or c to Quick Text and press g to select.
4 b or c to the required message. Press g to select.
5 b or c to the required contact. Press g to select.
6 The display shows transitional mini notice, confirming your message is being sent.
7 If the message is sent, a tone sounds and the display shows positive mini notice.
ORIf the message is not sent, a low tone sounds and the display shows negative mini notice.
NOTE: Check with your dealer or system administrator for more information on this configuration.
Analog Status Update
Your radio is able to send preprogrammed messages from the Status List indicating your current activity to the dispatcher.
The last acknowledged message is kept at the top of the Status List. The other messages are arranged in alphanumeric order.
Sending Status Update to Predefined Contact
Procedure:
1 g to access the menu.
2 b or c to Status and press g to select.
3 b or c to the required status. Press g to select.
4 b or c to Set as Default. Press g to send the status update.
English

Ad
van
ced
Fea
ture
s
En
58
5 The display shows transitional mini notice, confirming your status update is being sent.
If the status update is acknowledged, a tone sounds and the display shows positive mini notice. A appears beside the acknowledged status.ORIf the status update is not acknowledged, a low tone sounds and the display shows negative mini notice. A remains beside the previous status.
Privacy
If enabled, this feature helps to prevent eavesdropping by unauthorized users on a channel by the use of a software-based scrambling solution. The signaling and user identification portions of a transmission are not scrambled.
Your radio must have privacy enabled on the channel to send a privacy-enabled transmission, although this is not a necessary requirement for receiving a transmission. While on a privacy-enabled channel, the radio is still able to receive clear (unscrambled) transmissions.
Your radio supports two types of privacy:
• Basic Privacy
• Enhanced Privacy. (Check with your dealer or system administrator for more information on this configuration.)
Only ONE of the privacy types above can be assigned to the radio.
To unscramble a privacy-enabled call or data transmission, your radio must be programmed to have the same Privacy Key (for Basic Privacy), OR the same Key Value and Key ID (for Enhanced Privacy) as the transmitting radio.
If your radio receives a scrambled call that is of a different Privacy Key, OR a different Key Value and Key ID, you will either hear a garbled transmission (Basic Privacy) or nothing at all (Enhanced Privacy).
The green LED lights up while the radio is transmitting and double blinks when the radio is receiving an ongoing privacy-enabled transmission.
Some radio models may not offer this Privacy feature. Check with your dealer or system administrator for more information. Procedure:Press the programmed Privacy button to toggle privacy on or off.OR Follow the procedure below.
1 g to access the menu.
2 b or c to Utilities and press g to select.
3 b or c to Radio Settings and press g to select.
glish
Ad
vanced
Featu
res
59
4 b or c to Privacy.
5 b or c to On to enable Privacy. The display shows beside On.OR
b or c to Off to disable Privacy. The display shows beside Off.
If the radio has a privacy type assigned, the secure or unsecure icon appears on the status bar, except when the radio is sending or receiving an Emergency call or alarm.
Analog Scrambling
Analog Scrambling is an analog-only feature designed to prevent eavesdropping by unauthorized users on a channel by the use of a software-based scrambling solution. The signaling and user identification portions of a transmission are not scrambled.
Your radio must have analog scrambling enabled on the channel to send and receive an analog scrambling-enabled transmission. While on an analog scrambling-enabled channel, the radio is NOT able to receive clear (unscrambled) transmissions.
Your radio supports TWO analog scrambling codes that can be toggled via the programmable button.
Turning Analog Scrambling On or Off
Procedure:Press the programmed Analog Scrambling button to enable or disable this function.ORFollow the procedure below.
1 g to access the menu.
2 b or c to Utilities and press g to select.
3 b or c to Radio Settings and press g to select.
4 b or c to Scramble
5 Press g to enable Privacy. The display shows beside Enabled.OR
Press g to disable Privacy. The disappears from beside Enabled.
English
Ad
van
ced
Fea
ture
s
En
60
Setting the Analog Scrambling Codes
Procedure:Press the programmed Analog Scrambling button to enable or disable this function.ORFollow the procedure below.
1 g to access the menu.
2 b or c to Utilities and press g to select.
3 b or c to Radio Settings and press g to select.
4 b or c to Scramble.
5 b or c to the required code and press g to select.
Multi-Site Controls
These features are applicable when your current radio channel is part of an IP Site Connect or Linked Capacity Plus configuration.
See IP Site Connect on page 8 and Linked Capacity Plus on page 9 for more details about these configurations.
NOTE: Check with your dealer or system administrator for more information on this configuration.
Starting an Automatic Site Search
NOTE: The radio only scans for a new site if the current signal is weak or when the radio is unable to detect any signal from the current site. If the RSSI value is strong, the radio remains on the current site.
Procedure: Press the programmed Site Lock On/Off button.
1 A tone sounds and the display shows Site Unlocked.
2 The yellow LED blinks rapidly when the radio is actively searching for a new site, and turns off once the radio locks on to a site.
3 The display shows the channel alias and the site roaming icon appears.
OR
Procedure: Use the menu.
1 g to access the menu.
2 b or c to Utilities and press g to select.
glish

Ad
vanced
Featu
res
61
3 b or c to Radio Settings and press g to select.
4 b or c to Site Roaming and press g to select.
5 b or c to Unlock Site and press g to select. A tone sounds and the display shows Site Unlocked.
6 The radio returns to the Home screen. The display shows the channel alias and the site roaming icon appears.
7 The yellow LED blinks rapidly when the radio is actively searching for a new site, and turns off once the radio locks on to a site.
The radio also performs an automatic site search (site is unlocked) during a PTT button press or data transmission if the current channel, a multi-site channel with an attached roam list, is out of range.
Stopping an Automatic Site Search
When the radio is actively searching for a new site:
Procedure: Press the programmed Site Lock On/Off button.
1 A tone sounds and the display shows Site Locked.
2 The LED turns off and the display shows the channel alias.
OR
Procedure: Use the menu.
1 g to access the menu.
2 b or c to Utilities and press g to select.
3 b or c to Radio Settings and press g to select.
4 b or c to Site Roaming and press g to select.
5 b or c to Lock Site State.
6 Press g to lock site. The display shows beside Enabled.OR
Press g to unlock site. The disappears from beside Enabled.
7 The LED turns off and the radio returns to the Home screen. The display shows the channel alias.
English
Ad
van
ced
Fea
ture
s
En
62
Starting a Manual Site Search
Procedure: Press the programmed Manual Site Roam button and proceed to Step 6.ORFollow the procedure below.
1 g to access the menu.
2 b or c to Utilities and press g to select.
3 b or c to Radio Settings and press g to select.
4 b or c to Site Roaming and press g to select.
5 b or c to Active Search and press g to select.
6 A tone sounds and the display shows Finding Site.The green LED blinks.
7 If a new site is found, a tone sounds and the LED turns off. The display shows Site <Alias> Found. ORIf there is no available site within range, a tone sounds and the LED turns off. The display shows Out of Range.ORIf a new site is within range, but the radio is unable to
connect to it, a tone sounds and the LED turns off. The display shows Channel Busy.
8 The radio returns to the Home screen.
Security
You can enable or disable any radio in the system. For example, you might want to disable a stolen radio, to prevent the thief from using it, and enable that radio, when it is recovered.
NOTE: Performing Radio Disable and Enable is limited to radios with these functions enabled.
Radio Disable
Procedure: Use the programmed Radio Disable button.
1 Press the programmed Radio Disable button.
2 b or c to the required subscriber alias or ID and press
g to select.
3 The display shows transitional mini notice, indicating the request is in progress. The green LED blinks.
4 Wait for acknowledgment.
glish

Ad
vanced
Featu
res
63
5 If successful, a positive indicator tone sounds and the display shows positive mini notice.ORIf unsuccessful, a negative indicator tone sounds and the display shows negative mini notice.
OR
Procedure: Use the menu.
1 g to access the menu.
2 b or c to Contacts and press g to select. The entries are alphabetically sorted.
3 b or c to the required subscriber alias or ID and press
g to select.
4 b or c to Radio Disable and press g to select.
5 The display shows transitional mini notice, indicating the request is in progress. The green LED blinks.
6 Wait for acknowledgment.
7 If successful, a positive indicator tone sounds and the display shows positive mini notice.OR
If unsuccessful, a negative indicator tone sounds and the display shows negative mini notice.
Do not press e during the Radio Disable operation as you will
not get an acknowledgement message.
You can also access this feature using manual dial (see Radio Disable via Manual Dial on page 96).
Radio Enable
Procedure: Use the programmed Radio Enable button.
1 Press the programmed Radio Enable button.
2 b or c to the required subscriber alias or ID and press
g to select.
3 The display shows Radio Enable and the subscriber alias or ID. The green LED lights up.
4 Wait for acknowledgment.
5 If successful, the radio sounds a positive indicator tone and the display shows positive mini notice.ORIf unsuccessful, the radio sounds a negative indicator tone and the display shows negative mini notice.
English
Ad
van
ced
Fea
ture
s
En
64
OR
Procedure: Use the menu.
1 g to access the menu.
2 b or c to Contacts and press g to select. The entries are alphabetically sorted.
3 b or c to the required subscriber alias or ID and press
g to select.
4 b or c to Radio Enable and press g to select. The green LED blinks.
5 The display shows Radio Enable and the subscriber alias or ID. The green LED lights up.
6 Wait for acknowledgment.
7 If successful, a tone sounds and the display shows Radio Enable Successful.ORIf not successful, a tone sounds and the display shows Radio Enable Failed.
Do not press e during the Radio Enable operation as you will
not get an acknowledgement message.
You can also access this feature using manual dial (see Radio Enable via Manual Dial on page 97).
Lone Worker
This feature prompts an emergency to be raised if there is no user activity, such as any radio button press or activation of the channel selector, for a predefined time.
Following no user activity for a programmed duration, the radio pre-warns the user via an audio indicator once the inactivity timer expires.
If there is still no acknowledgment by the user before the predefined reminder timer expires, the radio initiates an Emergency Alarm.
Only one of the following Emergency Alarms is assigned to this feature:
• Emergency Alarm
• Emergency Alarm with Call
• Emergency Alarm with Voice to Follow
The radio remains in the emergency state allowing voice messages to proceed until action is taken. See Emergency Operation on page 44 on ways to exit Emergency.
glish
Ad
vanced
Featu
res
65
NOTE: This feature is limited to radios with this function enabled. Check with your dealer or system administrator for more information.
Notification List
Your radio has a Notification List that collects all your “unread” events on the channel, such as missed calls and call alerts.
The Notification icon appears on the status bar when the Notification List has one or more events.
The list supports a maximum of forty (40) unread events. When it is full, the next event automatically replaces the oldest event.
After the events are read, they are removed from the Notification List.
NOTE: Your radio suspends Scan when the Notification List is displayed. Scanning resumes when your radio exits the
Notification List. Press e to exit the Notification List or wait for the menu timer to expire.
Accessing the Notification List
Procedure:
Press the programmed Notifications button.ORFollow the procedure below.
1 g to access the menu.
2 b or c to Notification and press g to select.
3 b or c to the required event and press g to select.
Long press e to return to the Home screen.
Auto-Range Transponder System (ARTS)
ARTS is an analog-only feature designed to inform you when your radio is out-of-range of other ARTS-equipped radios.
ARTS-equipped radios transmit or receive signals periodically to confirm that they are within range of each other. Your dealer can program your radio to transmit or receive the ARTS signal.
English

Ad
van
ced
Fea
ture
s
En
66
Your radio provides indications of states as follows:
• First-Time Alert – A tone sounds and the display shows In Range after the channel alias.
• ARTS-in-Range Alert – A tone sounds, if programmed, and the display shows In Range after the channel alias.
• ARTS-Out-of-Range Alert – A tone sounds, the LED rapidly blinks red, and the display alternates between Out of Range and the home screen.
Over-the-Air Programming (OTAP)
Your radio can be updated by your dealer remotely, via OTAP, without needing to be physically connected. Additionally, some settings can also be configured via OTAP.
While undergoing OTAP, the LED blinks green.
NOTE: When the radio is receiving high volume data, the High Volume Data icon appears and channel is busy. A PTT button press at this time may cause a negative tone to sound.
Once the programming is complete, depending on your radio’s configuration:
• A tone sounds, the display shows Updating Restarting, and your radio restarts (powers off and on again).
• Select between Restart Now or Postpone. Selecting Postpone allows your radio to return to the previous display,
with an OTAP Timer icon visible, for a period of time before the automatic restart occurs.
Upon power up after the automatic restart occurs, the display shows Sw Update Completed if the OTAP update is successful or Sw Update Failed if the OTAP update is unsuccessful.
See Software Update on page 77 for your updated software version.
Utilities
Turning the Radio Tones/Alerts On or Off
You can enable and disable all radio tones and alerts (except for the incoming Emergency alert tone) if needed.
Procedure: Press the programmed All Tones/Alerts button to toggle all tones on or off.ORFollow the procedure below.
1 g to access the menu.
2 b or c to Utilities and press g to select.
3 b or c to Radio Settings and press g to select.
glish

Ad
vanced
Featu
res
67
4 b or c to Tones/Alerts and press g to select.
5 b or c to All Tones and press g to select.
6 b or c to On to enable All Tones. The display shows beside On.OR
b or c to Off to disable All Tones. The display shows beside Off.
Setting the Tone Alert Volume Offset Level
You can adjust the Tone Alert Volume Offset level if needed. This feature adjusts the volume of the tones/alerts, allowing it to be higher or lower than the voice volume.
Procedure:
1 g to access the menu.
2 b or c to Utilities and press g to select.
3 b or c to Radio Settings and press g to select.
4 b or c to Tones/Alerts and press g to select.
5 b or c to Vol. Offset and press g to select.
6 b or c to the required volume value. The radio sounds a feedback tone with each corresponding volume value.
7 Press g to keep the required displayed volume value.ORRepeat Step 6 to select another volume value.OR
e to exit without changing the current volume offset settings.
Turning the Talk Permit Tone On or Off
You can enable and disable the Talk Permit Tone if needed.
Procedure:
1 g to access the menu.
2 b or c to Utilities and press g to select.
3 b or c to Radio Settings and press g to select.
4 b or c to Tones/Alerts and press g to select.
5 b or c to Talk Permit and press g to select.
English
Ad
van
ced
Fea
ture
s
En
68
6 b or c to On to enable Talk Permit Tone. The display shows beside On.OR
b or c to Off to disable Talk Permit Tone. The display shows beside Off.
Turning the Power Up Alert Tone On or Off
You can enable and disable the Power Up Alert Tone if needed.
Procedure:
1 g to access the menu.
2 b or c to Utilities and press g to select.
3 b or c to Radio Settings and press g to select.
4 b or c to Tones/Alerts and press g to select.
5 b or c to Power Up and press g to select.
6 b or c to On to enable Power Up Tone. The display shows beside On.OR
b or c to Off to disable Power Up Tone. The display shows beside Off.
Setting the Power Level
You can customize your radio’s power setting to high or low for each channel.
Settings: High enables communication with radios located at a considerable distance from you. Low enables communication with radios in closer proximity.
Procedure: Press the programmed Power Level button to toggle transmit power level between high and low. ORFollow the procedure below.
1 g to access the menu.
2 b or c to Utilities and press g to select.
3 b or c to Radio Settings and press g to select.
4 b or c to Power and press g to select.
glish

Ad
vanced
Featu
res
69
5 b or c to the required setting and press g to select. appears beside selected setting.
6 Screen returns to the previous menu.
Long press e to return to the Home screen. The power level
icon is visible.
Adjusting the Display Brightness
You can adjust radio’s display brightness as needed.
Procedure: Press the programmed Brightness button and proceed to Step 5.ORFollow the procedure below.
1 g to access the menu.
2 b or c to Utilities and press g to select.
3 b or c to Radio Settings and press g to select.
4 b or c to Brightness and press g to select.
5 The display shows a progress bar.
Decrease display brightness by pressing b or increase
the display brightness by pressing c .
Press g to confirm your entry.
Turning Horns/Lights On or Off
Your radio is able to notify you of an incoming call via the horns and lights feature. When activated, an incoming call sounds your vehicle's horn and turns on its lights.
This feature needs to be installed through your radio’s rear accessory connector by your dealer.
Procedure:Press the programmed Horns/Lights button to toggle horns and lights feature on or off.ORFollow the procedure below.
1 g to access the menu.
2 b or c to Utilities and press g to select.
3 b or c to Radio Settings and press g to select.
English

Ad
van
ced
Fea
ture
s
En
70
4 b or c to Horns/Lights and press g to select.
5 b or c to Turn On to enable Horns/Lights The display shows beside Turn On.OR
b or c to Turn Off to disable Horns/Lights The display shows beside Turn Off.
Setting the Squelch Level
You can adjust your radio's squelch level to filter out unwanted calls with low signal strength or channels that have a higher than normal background noise.
Settings: Normal is the default. Tight filters out (unwanted) calls and/or background noise. However, calls from remote locations may also be filtered out.
Procedure: Press the programmed Squelch button to toggle squelch level between normal and tight.ORFollow the procedure below.
1 g to access the menu.
2 b or c to Utilities and press g to select.
3 b or c to Radio Settings and press g to select.
4 b or c to Squelch and press g to select.
5 The display shows Tight and Normal.
b or c to the required setting and press g to enable. appears besides selected setting.
6 Screen returns to the previous menu.
Turning the LED Indicators On or Off
You can enable and disable the LED Indicators if needed.
Procedure:
1 g to access the menu.
2 b or c to Utilities and press g to select.
3 b or c to Radio Settings and press g to select.
glish

Ad
vanced
Featu
res
71
4 b or c to LED Indicator and press g to select.
5 b or c to On to enable LED Indicator. The display shows beside On.OR
b or c to Off to disable LED Indicator. The display shows beside Off.
Language
You can set your radio display to be in your required language.
Procedure:
1 g to access the menu.
2 b or c to Utilities and press g to select.
3 b or c to Language and press g to select.
4 b or c to the required language and press g to enable. appears beside selected language.
Turning the Voice Operating Transmission (VOX) Feature On or Off
This feature allows you to initiate a hands-free voice activated call on a programmed channel. The radio automatically transmits, for a programmed period, whenever the microphone on the VOX-capable accessory detects voice. The microphone source must be preconfigured and the VOX-capable accessory attached to the preconfigured port.
NOTE: You may need to turn off the radio and power it up again after detaching the VOX-capable microphone from it to allow the radio to switch to another valid accessory.
Pressing the PTT button during radio operation disables VOX. To re-enable VOX, do one of the following:
• Turn the radio off and power it on again, OR
• Change the channel via the Channel Up/Down buttons, OR
• Follow the procedure below.
NOTE: Turning this feature on or off is limited to radios with this function enabled. Check with your dealer or system administrator for more information.
English
Ad
van
ced
Fea
ture
s
En
72
Procedure: Press the programmed VOX button to toggle the feature on or off.ORFollow the procedure below.
1 g to access the menu.
2 b or c to Utilities and press g to select.
3 b or c to Radio Settings and press g to select.
4 b or c to VOX and press g to select.
5 b or c to On to enable VOX. The display shows beside On.OR
b or c to Off to disable VOX. The display shows beside Off.
If the Talk Permit Tone feature is enabled (see Turning the Talk Permit Tone On or Off on page 67), use a trigger word to initiate the call. Wait for the Talk Permit Tone to finish before speaking clearly into the microphone.
Voice Announcement
This feature enables the radio to audibly indicate the current Zone or Channel the user has just assigned, or programmable button press. This audio indicator can be customized per customer requirements. This is typically useful when the user is in a difficult condition to read the content shown on the display.
Use the following features to toggle Voice Announcement on or off.
Procedure:
Press the programmed Voice Announcement button. ORFollow the procedure below.
1 g to access the menu.
2 b or c to Utilities and press g to select.
3 b or c to Voice Announcement.
4 b or c to On to enable Voice Announcement. The display shows beside On.OR
b or c to Off to disable Voice Announcement. The display shows beside Off.
glish
Ad
vanced
Featu
res
73
Analog Mic AGC (Mic AGC-A)
This feature controls the your radio's microphone gain automatically while transmitting on an analog system. It suppresses loud audio or boosts soft audio to a preset value in order to provide a consistent level of audio.
Procedure:
1 g to access the menu.
2 b or c to Utilities and press g to select.
3 b or c to Radio Settings and press g to select.
4 b or c to Mic AGC-A.
5 b or c to On to enable Analog Mic AGC. The display shows beside On.OR
b or c to Off to disable Analog Mic AGC. The display shows beside Off.
Digital Mic AGC (Mic AGC-D)
This feature controls the your radio's microphone gain automatically while transmitting on an digital system. It suppresses loud audio or boosts soft audio to a preset value in order to provide a consistent level of audio.
Procedure:
1 g to access the menu.
2 b or c to Utilities and press g to select.
3 b or c to Radio Settings and press g to select.
4 b or c to Mic AGC-D.
5 b or c to On to enable Digital Mic AGC. The display shows beside On.OR
b or c to Off to disable Digital Mic AGC. The display shows beside Off.
English

Ad
van
ced
Fea
ture
s
En
74
Intelligent Audio
Your radio automatically adjusts its audio volume to overcome current background noise in the environment, inclusive of both stationary and non-stationary noise sources. This feature is a Receive-only feature and does not affect Transmit audio.
Use the following features to toggle Intelligent Audio on or off.
Procedure:
Press the programmed Intelligent Audio button to toggle the feature on or off. ORFollow the procedure below.
1 g to access the menu.
2 b or c to Utilities and press g to select.
3 b or c to Radio Settings and press g to select.
4 b or c to Intelligent Audio.
5 b or c to On to enable Intelligent Audio. The display shows beside On.OR
b or c to Off to disable Intelligent Audio. The display shows beside Off.
Turning Trill Enhancement On or Off
You can enable this feature when you are speaking in a language that contains many words with alveolar trill (rolling “R”) pronunciations.
Use the following features to toggle Trill Enhancement on or off.
Procedure:
Press the programmed Trill Enhancement On/Off button.ORFollow the procedure below.
1 g to access the menu.
2 b or c to Utilities and press g to select.
3 b or c to Radio Settings and press g to select.
4 b or c to Trill Enhance and press g to select.
5 b or c to On to enable Trill Enhancement. The display shows beside On.OR
b or c to Off to disable Trill Enhancement. The display shows beside Off.
glish
Ad
vanced
Featu
res
75
Setting the Audio Ambience
You can customize your radio’s audio ambience according to your environment.
Default enables the default factory settings.
Loud enables Noise Suppressor and increases speaker loudness for use in noisy surroundings.
Work Group enables AF Suppressor and disables AGC for use when a group of radios are near to each other.
Procedure:
1 g to access the menu.
2 b or c to Utilities and press g to select.
3 b or c to Radio Settings and press g to select.
4 b or c to Audio Ambience and press g to select.
5 b or c to the required setting and press g to select. appears beside selected setting.
Setting the Audio Profiles
You can customize your radio’s audio profiles according to your preference.
Default disables the previously selected audio profile and the radio’s audio profile returns to normal.
Level 1, Level 2, and Level 3 are audio profiles intended to compensate for noise-induced hearing loss that is typical for adults in their 40’s, 50’s, and 60’s or over.
Treble Boost, Mid Boost, and Bass Boost are for a tinnier sound, a more nasal sound, and a deeper sound.
Procedure:
1 g to access the menu.
2 b or c to Utilities and press g to select.
3 b or c to Radio Settings and press g to select.
4 b or c to Audio Profiles and press g to select.
5 b or c to the required setting and press g to select. appears beside selected setting.
English

Ad
van
ced
Fea
ture
s
En
76
Accessing General Radio Information
Your radio contains information on the following:
• Radio Alias and ID
• Firmware and Codeplug Versions
• Software Update
• Site Information
NOTE: Press e at any time to return to the previous screen
or long press e to return to the Home screen. The radio exits the current screen once the inactivity timer expires.
Checking the Radio Alias and ID
Displays the ID of your radio.
Procedure:Press the programmed Radio Alias and ID button to check your radio alias and ID. You hear a positive indicator tone.ORFollow the procedure below.
1 g to access the menu.
2 b or c to Utilities and press g to select.
3 b or c to Radio Info and press g to select.
4 b or c to My Number and press g to select.
5 The first line of the display shows the radio alias. The second line of the display shows the radio ID.
You can also press the programmed Radio Alias and ID button to return to the previous screen.
Checking the Firmware Version and Codeplug Version
Displays the firmware and codeplug versions on your radio.
Procedure:
1 g to access the menu.
2 b or c to Utilities and press g to select.
3 b or c to Radio Info and press g to select.
4 b or c to Versions and press g to select.
The display shows the current firmware and codeplug versions.
glish
Ad
vanced
Featu
res
77
Software Update
Displays the date and time of the latest software update carried out via Over-the-Air Programming (OTAP).
Procedure:
1 g to access the menu.
2 b or c to Utilities and press g to select.
3 b or c to Radio Info and press g to select.
4 b or c to SW Update and press g to select.
5 The display shows the date and time of the latest software update.
See Over-the-Air Programming (OTAP) on page 66 for details on OTAP.
NOTE: Software Update menu is only available after at least one successful OTAP session.
Site Information
Displays the current Linked Capacity Plus site name your radio is on.
Procedure:
1 g to access the menu.
2 b or c to Utilities and press g to select.
3 b or c to Radio Info and press g to select.
4 b or c to Site Info and press g to select.
5 The display shows the current Linked Capacity Plus site name.
See Linked Capacity Plus on page 9 for details on Linked Capacity Plus.
English

Key
pad
Mic
rop
ho
ne
Fea
ture
s
En
78
Keypad Microphone Features
The following additional features for your radio are available with a keypad-enabled microphone:Using the Keypad . . . . . . . . . . . . . . . . . . . . . . . . . . . . page 79Additional Advanced Features . . . . . . . . . . . . . . . . . . page 80Dual Tone Multi Frequency (DTMF) . . . . . . . . . . . . . . page 96Security . . . . . . . . . . . . . . . . . . . . . . . . . . . . . . . . . . . . page 96Password Lock Features. . . . . . . . . . . . . . . . . . . . . . . page 97Front Panel Configuration (FPC). . . . . . . . . . . . . . . . page 100
glish

Keyp
ad M
icrop
ho
ne F
eatures
79
Using the Keypad
You can use the alphanumeric keypad on the 4-Way Navigation Keypad Microphone (Motorola part number PMMN4089_) to access your radio’s features. You can use the keypad to enter subscriber aliases or IDs. Many characters require that you press a key multiple times. The table below shows the number of times a key needs to be pressed to generate the required character.
Number of Times Key is Pressed
Key 1 2 3 4 5 6 7 8 9 10 11 12 13
1 . , ? ! @ & ‘ % - : * #
A B C 2
D E F 3
G H I 4
J K L 5
M N O 6
P Q R S 7
T U V 8
W X Y Z 9
0 NOTE: Press to enter “0” and long press to activate the CAPS lock. Another long press to turn off the CAPS lock.
* or del NOTE: Press during text entry to delete the character. Press during numeric entry to enter a “*”.
# or space NOTE: Press during text entry to insert a space. Press during numeric entry to enter a “#”.
1234567890*#
English

Key
pad
Mic
rop
ho
ne
Fea
ture
s
En
80
Turning Keypad Tones On or Off
You can enable and disable Keypad Tones if needed.
Procedure:
1 g to access the menu.
2 b or c to Utilities and press g to select.
3 b or c to Radio Settings and press g to select.
4 b or c to Tones/Alerts and press g to select.
5 b or c to Keypad Tones and press g to select.
6 b or c to On to enable Keypad Tones. The display shows beside On.OR
b or c to Off to disable Keypad Tones. The display shows beside Off.
Additional Advanced Features
Selecting a Zone by Alias Search
Procedure:
1 g to access the menu.
2 b or c to Zone and press g to select.
3 The current zone is displayed and indicated by a .
4 b or c to the required zone and proceed to Step 7.ORKey in the first character of the required zone.
5 A blinking cursor appears.Use the keypad to type the required zone.
Press # to move one space to the right.
Press * to delete any unwanted characters.
Long press 0 to toggle between lower case and upper case.
6 The first line of the display shows the characters you keyed in. The next lines of the display show the shortlisted search results.The alias search is case-insensitive. If there are two or more
glish
Keyp
ad M
icrop
ho
ne F
eatures
81
zones with the same name, the radio displays the zone that is listed first in the zone list.
7 Press g to select.
8 The display shows <Zone> Selected momentarily and returns to the selected zone screen.
Initiating a Radio Check by Manual Dial
Procedure:
1 g to access the menu.
2 b or c to Contacts and press g to select.
3 b or c to Manual Dial and press g to select.
4 b or c to Radio Number and press g to select.
5 If there was previously dialed ID, the ID appears along with a blinking cursor. Use the keypad to edit the ID.
Press g to select.OR
Key in the subscriber alias or ID and press g .
6 b or c to Radio Check and press g to select.
7 The display shows transitional mini notice, indicating the request is in progress. The green LED lights up.
8 Wait for acknowledgement.
9 If successful, a positive indicator tone sounds and the display shows positive mini notice. ORIf unsuccessful, a negative indicator tone sounds and the display shows negative mini notice.
10 Radio returns to the subscriber alias or ID screen.
If the e button is pressed when the radio is waiting for
acknowledgement, a tone sounds, and the radio terminates all retries and exits Radio Check mode.
Initiating Remote Monitor by Manual Dial
Procedure:
1 g to access the menu.
2 b or c to Contacts and press g to select.
3 b or c to Manual Dial and press g to select.
4 b or c to Radio Number and press g to select.
English
Key
pad
Mic
rop
ho
ne
Fea
ture
s
En
82
5 If there was previously dialed ID, the ID appears along with
a blinking cursor. Use the keypad to edit the ID. Press g to select.OR
Key in the subscriber alias or ID and press g .
6 b or c to Remote Mon. and press g to select.
7 The display shows transitional mini notice, indicating the request is in progress. The green LED lights up.
8 Wait for acknowledgment.
9 If successful, a positive indicator tone sounds and the display shows positive mini notice. Your radio starts playing audio from the monitored radio for a programmed duration and display shows Rem. Monitor. Once the timer expires, the radio sounds an alert tone and the LED turns off.ORIf unsuccessful, the radio sounds a negative indicator tone the display shows negative mini notice.
Making a Private Call by Manual Dial
Procedure:
1 g to access the menu.
2 b or c to Contacts and press g to select.The entries are alphabetically sorted.
3 b or c to Manual Dial and press g to select.
4 b or c to Radio Number and press g to select.
5 If there is a previously dialed subscriber ID, the ID appears along with a blinking cursor. Use the keypad to edit the subscriber ID. ORUse the keypad to enter a new subscriber ID.
6 Press the PTT button to make the call. The green LED lights up. The display shows the destination alias.
7 Wait for the Talk Permit Tone to finish (if enabled) and speak clearly into the microphone.
8 Release the PTT button to listen. When the target radio responds, the green LED blinks.
9 If the Channel Free Indication feature is enabled, you hear a short alert tone the moment the target radio releases the PTT button, indicating the channel is free for you to respond.
glish

Keyp
ad M
icrop
ho
ne F
eatures
83
Press the PTT button to respond.ORIf there is no voice activity for a programmed period of time, the call ends.
10 The display shows Call Ended.
Making a Phone Call by Manual Dial
NOTE: Check with your dealer or system administrator for more information on this configuration.
Procedure:
1 g to access the menu.
2 b or c to Contacts and press g to select.The entries are alphabetically sorted.
3 b or c to Manual Dial and press g to select.
4 b or c to Phone Number and press g to select.
5 The display shows Number:. The second line of the display shows a blinking cursor. Use the keypad to enter a
telephone number and press g to proceed.If the access code was not preconfigured in the Contacts list, the first line of the display shows Access Code:. The
second line of the display shows a blinking cursor. Enter the
access code and press g to proceed.
6 The green LED lights up. The Phone Call icon appears in the top right corner. The first text line shows the subscriber radio alias. The second text line displays the call status.
7 If successful:The DTMF tone sounds. You hear the dialing tone of the telephone user. The first text line shows the subscriber radio alias. The Phone Call icon remains in the top right corner.ORIf unsuccessful:A tone sounds and the display shows Phone Call Failed. Your radio returns to the Access Code input screen.If the access code was preconfigured in the Contacts list, the radio returns to the screen you were on prior to initiating the call.
8 Press the PTT button to talk and release it to listen. To enter extra digits, if requested by the Phone Call:Enter the extra digits using the keypad microphone and
press g to proceed. The DTMF tone sounds and the radio returns to the previous screen.
9 Press e to end the call.If deaccess code was not preconfigured in the Contacts list, the first line of the display shows De-Access Code:. The second line of the display shows a blinking cursor. Enter the
English
Key
pad
Mic
rop
ho
ne
Fea
ture
s
En
84
deaccess code and press g to proceed. The radio returns to the previous screen.ORPress One Touch Access button. The DTMF tone sounds. If the entry for the One Touch Access button is empty, a negative indicator tone sounds.
10 The DTMF tone sounds and the display shows Ending Phone Call.
11 If successful:A tone sounds and the display shows Call Ended. Your radio returns to the Phone Call screen.ORIf unsuccessful:Your radio returns to the Phone Call screen. Repeat Steps 9 and 10 or wait for the telephone user to end the call.
When you press PTT button while in the Phone Contacts screen, a tone sounds and the display shows Press OK to Place Phone Call.
When the telephone user ends the call, a tone sounds and the display shows Call Ended.
If the call ends while you are entering the extra digits requested by the Phone Call, your radio returns to the screen you were on prior to initiating the call.
NOTE: During channel access, press e to dismiss the call attempt and a tone sounds.
During the call, when you press One Touch Access button with the deaccess code preconfigured or enter the deaccess code as the input for extra digits, your radio attempts to end the call.
During channel access and access/deaccess code or extra digits transmission, your radio responds to On/Off button, Volume Up/Down button, and Channel Up/Down button only. A tone sounds for every invalid input.
The access or deaccess code cannot be more than 10 characters.
Making a Phone Call with the One Touch
Access Button
NOTE: Check with your dealer or system administrator for more information on this configuration.
Procedure:
1 Press the programmed One Touch Access button to make a Phone Call to the predefined alias or ID.If the entry for the One Touch Access button is empty, a negative indicator tone sounds.If the access code was not preconfigured in the Contacts
glish

Keyp
ad M
icrop
ho
ne F
eatures
85
list, the first line of the display shows Access Code:. The second line of the display shows a blinking cursor. Enter the
access code and press g to proceed.
2 The green LED lights up. The Phone Call icon appears in the top right corner. The first text line shows the subscriber radio alias. The second text line displays the call status.
3 If successful:The DTMF tone sounds. You hear the dialing tone of the telephone user. The first text line shows the subscriber radio alias. The Phone Call icon remains in the top right corner.ORIf unsuccessful:A tone sounds and the display shows Phone Call Failed. Your radio returns to the Access Code input screen.If the access code was preconfigured in the Contacts list, the radio returns to the screen you were on prior to initiating the call.
4 Press the PTT button to talk and release it to listen. To enter extra digits, if requested by the Phone Call:
Enter the extra digits using the keypad and press g to proceed. The DTMF tone sounds and the radio returns to the previous screen.
5 Press e to end the call.If deaccess code was not preconfigured in the Contacts list, the first line of the display shows De-Access Code:. The
second line of the display shows a blinking cursor. Enter the
deaccess code and press g to proceed. The radio returns to the previous screen.ORPress One Touch Access button. The DTMF tone sounds. If the entry for the One Touch Access button is empty, a negative indicator tone sounds.
6 The DTMF tone sounds and the display shows Ending Phone Call.
7 If successful:A tone sounds and the display shows Call Ended. Your radio returns to the Phone Call screen.ORIf unsuccessful:Your radio returns to the Phone Call screen. Repeat Step 5 or wait for the telephone user to end the call.
When the telephone user ends the call, a tone sounds and the display shows Phone Call Ended.
If the call ends while you are entering the extra digits requested by the Phone Call, your radio returns to the screen you were on prior to initiating the call.
NOTE: During channel access, press e to dismiss the call attempt and a tone sounds.
During the call, when you press One Touch Access
English

Key
pad
Mic
rop
ho
ne
Fea
ture
s
En
86
button with the deaccess code preconfigured or enter the deaccess code as the input for extra digits, your radio attempts to end the call.
During channel access and access/deaccess code or extra digits transmission, your radio responds to On/Off button, Volume Up/Down button, and Channel Up/Down button only. A tone sounds for every invalid input.
The access or deaccess code cannot be more than 10 characters.
Making a Group, Private or All Call with the
Programmable Number Key
The Programmable Number Key feature allows you to make a Group, Private or All Call to a predefined alias or ID easily. This feature can be assigned to all the available number keys on a keypad microphone.
You can ONLY have one alias or ID assigned to a number key, but you can have more than one number key associated to an alias or ID.Procedure:When you are on the Home screen:
1 Long press the programmed number key to make a Group, Private or All Call to the predefined alias or ID.
If the number key is not associated to an entry, a negative indicator tone sounds.
2 Press the PTT button to make the call. The green LED lights up. The Group/Private Call icon appears in the top right corner. The first text line shows the caller alias. The second text line displays either the call status for a Private Call or All Call for All Call.
3 Wait for the Talk Permit Tone to finish (if enabled) and speak clearly into the microphone.
4 Release the PTT button to listen. When the target radio responds, the green LED blinks. The display shows the destination alias.
5 If the Channel Free Indication feature is enabled, you hear a short alert tone the moment the target radio releases the PTT button, indicating the channel is free for you to respond. Press the PTT button to respond.ORIf there is no voice activity for a predetermined period of time, the call ends.
6 Radio returns to the screen you were on prior to initiating the call.
For a Private Call, you hear a short tone when the call ends.
NOTE: See Assigning an Entry to a Programmable Number Key on page 36 for details on assigning an entry to a number key on the keypad.
glish

Keyp
ad M
icrop
ho
ne F
eatures
87
Making a Phone Call with the Programmable
Phone Button
Procedure:
1 Press the programmed Phone button to enter into the Phone Entry list.
2 b or c to the required subscriber radio alias or ID, and
press g to select.If the access code was not preconfigured in the Contacts list, the first line of the display shows Access Code:. The second line of the display shows a blinking cursor. Enter the
access code and press g to proceed.
3 The first line of the display shows Calling. The second line of the display shows the subscriber radio alias or ID, and the Phone Call icon.
4 If successful:The DTMF tone sounds. You hear the dialing tone of the telephone user. The first line of the display shows the subscriber alias or ID, and the RSSI icon. The second line of the display shows Phone Call and the Phone Call icon.ORIf unsuccessful:A tone sounds and the display shows Phone Call Failed. Your radio returns to the Access Code input screen.If the access code was preconfigured in the Contacts list,
the radio returns to the screen you were on prior to initiating the call.
5 Press the PTT button to talk and release it to listen. The RSSI icon disappears during transmission.To enter extra digits, if requested by the Phone Call:The first line of the display shows Extra Digits:. The second line of the display shows a blinking cursor. Enter the
extra digits using the keypad and press g to proceed. The DTMF tone sounds and the radio returns to the previous screen.ORPress One Touch Access button. The DTMF tone sounds. If the entry for the One Touch Access button is empty, a negative indicator tone sounds.
6 Press e to end the call.If deaccess code was not preconfigured in the Contacts list, the first line of the display shows De-Access Code:. The second line of the display shows a blinking cursor. Enter the
deaccess code and press g to proceed. The radio returns to the previous screen.
7 The DTMF tone sounds and the display shows Ending Phone Call.
English

Key
pad
Mic
rop
ho
ne
Fea
ture
s
En
88
8 If successful:A tone sounds and the display shows Phone Call Ended. Your radio returns to the screen you were on prior to initiating the call.ORIf unsuccessful:Your radio returns to the Phone Call screen. Repeat Steps 6 and 7 or wait for the telephone user to end the call.
When you press PTT button while in the Phone Contacts screen, a tone sounds and the display shows Press OK to Place Phone Call.
When the telephone user ends the call, a tone sounds and the display shows Phone Call Ended.
If the call ends while you are entering the extra digits requested by the Phone Call, your radio returns to the screen you were on prior to initiating the call.
NOTE: During channel access, press e to dismiss the call attempt and a tone sounds.
During the call, when you press One Touch Access button with the deaccess code preconfigured or enter the deaccess code as the input for extra digits, your radio attempts to end the call.
During channel access and access/deaccess code or extra digits transmission, your radio responds to On/
Off button, Volume On/Off button, and Channel Up/Down button only. A tone sounds for every invalid input.
The access or deaccess code cannot be more than 10 characters.
Making a Phone Call from Contacts
NOTE: Check with your dealer or system administrator for more information on this configuration.
Procedure:
1 g to access the menu.
2 b or c to Contacts and press g to select.The entries are alphabetically sorted.
3 b or c to the required subscriber radio alias or ID.OR
b or c to Manual Dial and press g to select.
b or c to Phone Number and press g to select.The first line of the display shows Phone Number:. The second line of the display shows a blinking cursor. Use the keypad to enter a telephone number.
glish

Keyp
ad M
icrop
ho
ne F
eatures
89
4 Press g to select.If the entry selected is empty, a negative indicator tone sounds and the display shows Phone Call Invalid #.
5 b or c to Call Phone and press g to select.If the access code was not preconfigured in the Contacts list, the first line of the display shows Access Code:. The second line of the display shows a blinking cursor. Enter the
access code and press g to proceed.
6 The first line of the display shows Calling. The second line of the display shows the subscriber radio alias or ID, and the Phone Call icon.
7 If successful:The DTMF tone sounds. You hear the dialing tone of the telephone user. The first line of the display shows the subscriber radio alias or ID, and the RSSI icon. The second line of the display shows Phone Call and the Phone Call icon.ORIf unsuccessful:A tone sounds and the display shows Phone Call Failed. Your radio returns to the Access Code input screen.If the access code was preconfigured in the Contacts list, the radio returns to the screen you were on prior to initiating the call.
8 Press the PTT button to talk and release it to listen. The RSSI icon disappears during transmission.To enter extra digits, if requested by the Phone Call:The first line of the display shows Extra Digits:. The second line of the display shows a blinking cursor. Enter the
extra digits using the keypad and press g to proceed. The DTMF tone sounds and the radio returns to the previous screen.ORPress One Touch Access button. The DTMF tone sounds. If the entry for the One Touch Access button is empty, a negative indicator tone sounds.
9 Press e to end the call.If deaccess code was not preconfigured in the Contacts list, the first line of the display shows De-Access Code:. The second line of the display shows a blinking cursor. Enter the
deaccess code and press g to proceed. The radio returns to the previous screen.
10 The DTMF tone sounds and the display shows Ending Phone Call.
11 If successful:A tone sounds and the display shows Phone Call Ended. Your radio returns to the Call Phone screen.ORIf unsuccessful:
English

Key
pad
Mic
rop
ho
ne
Fea
ture
s
En
90
Your radio returns to the Phone Call screen. Repeat Steps 9 and 10 or wait for the telephone user to end the call.
When you press PTT button while in the Phone Contacts screen, a negative indicator tone sounds and the display shows Press OK to Place Phone Call.
When the telephone user ends the call, a tone sounds and the display shows Phone Call Ended.
If the call ends while you are entering the extra digits requested by the Phone Call, your radio returns to the screen you were on prior to initiating the call.
NOTE: During channel access, press e to dismiss the call attempt and a negative indicator tone sounds. Your radio returns to the Call Phone screen.
During the call, when you press One Touch Access button with the deaccess code preconfigured or enter the deaccess code as the input for extra digits, your radio attempts to end the call.
During channel access and access/deaccess code or extra digits transmission, your radio responds to On/Off button, Volume Up/Down button, and Channel Up/Down button only. A tone sounds for every invalid input.
The access or deaccess code cannot be more than 10 characters.
Making a Group, Private or Phone or All Call
by Alias Search
You can also use alias or alphanumeric search to retrieve the required subscriber alias.
This feature is only applicable while in Contacts.
Procedure:
1 g to access the menu.
2 b or c to Contacts and press g to select. The entries are alphabetically sorted.
3 Key in the first character of the required alias.
4 A blinking cursor appears.Use the keypad to type the required zone.
Press # to move one space to the right.
Press * to delete any unwanted characters.
Long press 0 to toggle between lower case and upper case.
glish
Keyp
ad M
icrop
ho
ne F
eatures
91
5 The first line of the display shows the characters you keyed in. The next lines of the display show the shortlisted search results.The alias search is case-insensitive. If there are two or more aliases with the same name, the radio displays the alias that is listed first in the Contacts list.
6 Press the PTT button to make the call. The green LED lights up. The first line displays the target radio’s ID. The second line displays the call type and the Call icon.
7 Wait for the Talk Permit Tone to finish (if enabled) and speak clearly into the microphone
8 Release the PTT button to listen. When the target radio responds, the green LED blinks. The display shows the destination alias.
9 If the Channel Free Indication feature is enabled, you hear a short alert tone the moment the target radio releases the PTT button, indicating the channel is free for you to respond. Press the PTT button to respond.ORIf there is no voice activity for a programmed period of time, the call ends.
10 You hear a short tone. The display shows Call Ended.
NOTE: Press e button or g to exit alias search.
Viewing an Entry in the Scan List by Alias Search
Procedure:
1 g to access the menu.
2 b or c to Scan and press g to select.
3 b or c to Scan List and press g to select.
4 Key in the first character of the required alias.
5 A blinking cursor appears.Use the keypad to type the required zone.
Press # to move one space to the right.
Press * to delete any unwanted characters.
Long press 0 to toggle between lower case and upper case.
6 The first line of the display shows the characters you keyed in. The next lines of the display show the shortlisted search results.
The alias search is case-insensitive. If there are two or more entries with the same name, the radio displays the entry that is listed first in the scan list.
English

Key
pad
Mic
rop
ho
ne
Fea
ture
s
En
92
Editing the Scan List by Alias Search
Adding a New Entry to the Scan List
Procedure:
1 g to access the menu.
2 b or c to Scan and press g to select.
3 b or c to Scan List and press g to select.
4 b or c to Add Member and press g to select.
5 Key in the first character of the required alias.
6 A blinking cursor appears.Use the keypad to type the required zone.
Press # to move one space to the right.
Press * to delete any unwanted characters.
Long press 0 to toggle between lower case and upper case.
7 The first line of the display shows the characters you keyed in. The next lines of the display show the shortlisted search results.The alias search is case-insensitive. If there are two or more
aliases with the same name, the radio displays the alias that is listed first in the list.
8 Press g to select.
9 b or c to the required priority level and press g to select.
10 The display shows positive mini notice, followed immediately by Add Another?.
11 b or c to Yes and press g to select, to add another entry, and repeat Steps 5 to 9.OR
b or c to No and press g to select to save the current list.
Deleting an Entry from the Scan List
Procedure:
1 g to access the menu.
2 b or c to Scan and press g to select.
3 b or c to Scan List and press g to select.
4 Key in the first character of the required alias.
glish

Keyp
ad M
icrop
ho
ne F
eatures
93
5 A blinking cursor appears.Use the keypad to type the required zone.
Press # to move one space to the right.
Press * to delete any unwanted characters.
Long press 0 to toggle between lower case and upper case.
6 The first line of the display shows the characters you keyed in. The next lines of the display show the shortlisted search results.The alias search is case-insensitive. If there are two or more entries with the same name, the radio displays the entry that is listed first in the scan list.
7 Press g to select.
8 b or c to Delete and press g to select.
9 At Delete Entry?, b or c to Yes and press g to select, to delete the entry. The display shows positive mini notice. OR
b or c to No and press g to select to return to the previous screen.
10 Repeat Steps 4 to 9 to delete other entries.
After deleting all required aliases or IDs, long press e to return to the Home screen.
Setting and Editing Priority for an Entry in the Scan List
Procedure:
1 g to access the menu.
2 b or c to Scan and press g to select.
3 b or c to Scan List and press g to select.
4 Key in the first character of the required alias.
5 A blinking cursor appears.Use the keypad to type the required zone.
Press # to move one space to the right.
Press * to delete any unwanted characters.
Long press 0 to toggle between lower case and upper case.
6 The first line of the display shows the characters you keyed in. The next lines of the display show the shortlisted search results.The alias search is case-insensitive. If there are two or more
English
Key
pad
Mic
rop
ho
ne
Fea
ture
s
En
94
entries with the same name, the radio displays the entry that is listed first in the scan list.
7 Press g to select.
8 b or c to Edit Priority and press g to select.
9 b or c to the required priority level and press g to select.
10 The display shows positive mini notice before returning to the previous screen.
11 The priority icon appears left of the member’s name.
There is no priority icon if priority is set to None.
Storing an Alias or ID from a Call List
Procedure:
1 g to access the menu.
2 b or c to Call Log and press g to select.
3 b or c to the required list and press g to select.
4 b or c to the required alias or ID and press g to select.
5 b or c to Store and press g to select.
6 A blinking cursor appears. If needed, key in the alias for that
ID and press g .
7 The display shows positive mini notice.
You can also store an ID without an alias.
Making a Call Alert by Manual Dial
Procedure:
1 g to access the menu.
2 b or c to Contacts and press g to select.
3 b or c to Manual Dial and press g to select.
4 A blinking cursor appears. Enter the subscriber ID you want
to send the Call Alert to and press g .
5 b or c to Call Alert and press g to select.
6 The display shows Call Alert and the subscriber alias or ID, indicating that the Call Alert has been sent.
glish

Keyp
ad M
icrop
ho
ne F
eatures
95
7 The green LED lights up when your radio is sending the Call Alert.
8 If the Call Alert acknowledgement is received, the display shows positive mini notice.ORIf the Call Alert acknowledgement is not received, the display shows negative mini notice.
RSSI Values
Your radio shows the Received Signal Strength Indicator (RSSI) icon at the top of your display. This feature allows you to view the RSSI values.Procedure:When you are on the Home screen:
1 Press e three times and long press e , all within 8 seconds.
2 The display shows the current RSSI values.
Long press the e button to return to the Home screen.
See Display Icons on page 11 for details on the RSSI icon.
Text Messaging
The maximum length of characters for a text message, including the subject line (seen when receiving message from an e-mail application), is 140, whereas to receive would be a maximum of 280 characters.
The radio exits the current screen once the inactivity timer expires. Any text message in the writing/editing screen is automatically saved to the Drafts folder.
NOTE: Long press e at any time to return to the Home screen.
Forwarding a Text Message by Manual Dial
Select Forward to send the message to another subscriber radio/group alias or ID.
Procedure:
1 b or c to Forward and press g to select.
2 b or c to Manual Dial and press g to select. The first line of the display shows Radio Number:.
Key in the subscriber radio ID and press g .
3 The display shows transitional mini notice, confirming your message is being sent.
English
Key
pad
Mic
rop
ho
ne
Fea
ture
s
En
96
4 If the message is sent, a tone sounds and the display shows positive mini notice.ORIf the message is not sent, a low tone sounds and the display shows negative mini notice.
Dual Tone Multi Frequency (DTMF)
The Dual Tone Multi Frequency (DTMF) feature allows the radio to operate in a radio system with an interface to telephone systems.
Procedure:
To initiate a DTMF call.
1 Press and hold the PTT button.
2 Enter the desired number, * or #.
You can turn off the DTMF tone by disabling all radio tones and alerts (see Turning the Radio Tones/Alerts On or Off on page 66).
Security
Radio Disable via Manual Dial
Procedure:
1 g to access the menu.
2 b or c to Contacts and press g to select. The entries are alphabetically sorted.
3 b or c to Manual Dial and press g to select.
b or c to Private Call and press g to select.The first line of the display shows Radio Number:.
Key in the subscriber ID and press g .
4 b or c to Radio Disable and press g to select.
5 The display shows transitional mini notice, indicating the request is in progress. The green LED blinks.
6 Wait for acknowledgment.
glish

Keyp
ad M
icrop
ho
ne F
eatures
97
7 If successful, a positive indicator tone sounds and the display shows positive mini notice.ORIf unsuccessful, a negative indicator tone sounds and the display shows negative mini notice.
Do not press e during the Radio Disable operation as you
will not get an acknowledgement message.
Radio Enable via Manual Dial
Procedure:
1 g to access the menu.
2 b or c to Contacts and press g to select. The entries are alphabetically sorted.
3 b or c to Manual Dial and press g to select.
b or c to Private Call and press g to select.The first line of the display shows Radio Number:.
Key in the subscriber ID and press g .
4 b or c to Radio Enable and press g to select.
5 The display shows Radio Enable and the subscriber alias or ID. The green LED lights up.
6 Wait for acknowledgment.
7 If successful, the radio sounds a positive indicator tone and the display shows positive mini notice.ORIf unsuccessful, the radio sounds a negative indicator tone and the display shows negative mini notice.
Do not press e during the Radio Enable operation as you will
not get an acknowledgement message.
Password Lock Features
If enabled, this feature allows you to access your radio via password upon powering up. You can use a keypad microphone or Left/ Right Navigation buttons to enter password.
Accessing the Radio from Password
Procedure:Power up the radio.
1 You hear a continuous tone.
2 Enter your current four-digit password via keypad microphone.
The display shows ●●●●. Press g to proceed.OR
English

Key
pad
Mic
rop
ho
ne
Fea
ture
s
En
98
Enter your current four-digit password. Press b or c to
edit each digit’s numeric value and g to enter the selected
digit and move to the next digit. Each digit changes to ●.
Press g to confirm your selection. You hear a positive indicator tone for every digit pressed.
3 If the password is correct:Your radio proceeds to power up. See Powering Up the Radio on page 2.ORIf the password is incorrect:The display shows Wrong Password. Repeat Step 2.ORAfter the third incorrect password, the display shows Wrong Password and then, shows Radio Locked. A tone sounds and the yellow LED double blinks.
Your radio enters into locked state for 15 minutes, and responds to inputs from On/Off button.
NOTE: The radio is unable to receive any call, including emergency calls, in locked state.
The use of Emergency footswitch cancels out password input to access the radio.
Unlocking the Radio from Locked State
Procedure:Wait for 15 minutes. Repeat Steps 1 to 3 in Accessing the Radio from Password on page 97.ORPower up the radio, if you have powered down the radio during locked state:
1 A tone sounds and the yellow LED double blinks. The display shows Radio Locked.
2 Wait for 15 minutes. Repeat Accessing the Radio from Password on page 97.
Your radio restarts the 15 minutes timer for locked state when you power up.
Turning the Password Lock On or Off
Procedure:
1 g to access the menu.
2 b or c to Utilities and press g to select.
3 b or c to Radio Settings and press g to select.
4 b or c to Passwd Lock and press g to select.
glish

Keyp
ad M
icrop
ho
ne F
eatures
99
5 Enter a four-digit password. See Step 2 in Accessing the Radio from Password on page 97.
6 If the password is correct:
b or c to Turn On to enable Password Lock. The display shows beside Turn On.OR
b or c to Turn Off to disable Password Lock. The display shows beside Turn Off.ORIf the password is incorrect:The display shows Wrong Password and automatically returns to the previous menu.
Changing the Password
Procedure:
1 g to access the menu.
2 b or c to Utilities and press g to select.
3 b or c to Radio Settings and press g to select.
4 b or c to Passwd Lock and press g to select.
5 Enter your current four-digit password via keypad microphone.See Step 2 in Accessing the Radio from Password on page 97.
6 If the password is correct:
b or c to Change PWD and press g to select.ORIf the password is incorrect:The display shows Wrong Password and automatically returns to the previous menu.
7 Enter a new four-digit password via keypad microphone.See Step 2 in Accessing the Radio from Password on page 97.
8 Re-enter the new four-digit password. See Step 2 in Accessing the Radio from Password on page 97.
9 If both of the new password inputs match:The display shows Password Changed.ORIf both of the new password inputs do not match:The display shows Passwords Do Not Match.
10 The screen automatically returns to the previous menu.
English

Key
pad
Mic
rop
ho
ne
Fea
ture
s
En
100
Front Panel Configuration (FPC)
Your radio is able to customize certain feature parameters to enhance the use of your radio.
Entering FPC Mode
Procedure:
1 g to access the menu.
2 b or c to Utilities and press g to select.
3 b or c to Program Radio and press g to select.
NOTE: Long press e at any time to return to the Home screen.
Editing FPC Mode Parameters
Use the following buttons as required while navigating through the feature parameters.
b or c – Scroll through options, increase/decrease values, or navigate vertically
g – Select the option or enter a sub-menu
e – Short-press to return to previous menu or to exit the selection screen. Long-press to return to Home screen.
glish
Accesso
ries
01
1Accessories
Your radio is compatible with the accessories listed in this chapter. Contact your dealer for details.Antennas . . . . . . . . . . . . . . . . . . . . . . . . . . . . . . . . . . page 101Audio . . . . . . . . . . . . . . . . . . . . . . . . . . . . . . . . . . . . . page 101Cables . . . . . . . . . . . . . . . . . . . . . . . . . . . . . . . . . . . . page 102Mounting Kits. . . . . . . . . . . . . . . . . . . . . . . . . . . . . . . page 102Miscellaneous Accessories . . . . . . . . . . . . . . . . . . . . page 102
Antennas
• VHF, 136 – 144 MHz, 1/4 Wave Roof Mount, Mini-U (HAD4006_)
• VHF, 144 – 150.8 MHz, 1/4 Wave Roof Mount, Mini-U (HAD4007_)
• VHF, 150.8 – 162 MHz, 1/4 Wave Roof Mount, Mini-U (HAD4008_)
• VHF, 162 – 174 MHz, 1/4 Wave Roof Mount, Mini-U (HAD4009_)
• VHF, 132 – 174 MHz, 3.0 dB Gain, Through-Hole Mount, Mini-U (HAD4022_)
• UHF, 403 – 430 MHz, 1/4 Wave Roof Mount, Mini-U (HAE4002_)
• UHF, 450 – 470 MHz, 1/4 Wave Roof Mount, Mini-U (HAE4003_)
• UHF, 406 – 420 MHz, 3.5 dB Gain Roof Mount, Mini-U (HAE4010_)
• UHF, 450 – 470 MHz, 3.5 dB Gain Roof Mount, Mini-U (HAE4011_)
• UHF, 403 – 527 MHz, 2dB Gain, Through-hole Mount, Mini-U (HAE6022_)
• UHF, 445 – 470 MHz, 5 dB Gain Roof Mount, Mini-U (RAE4004_RB)
Audio
• Visor Microphone (Omni-Direction) (GMMN4065_)
• Microphone Hang-up Clip (requires installation) (HLN9073_)
• Microphone Hang-up Clip (Universal – no installation required) (HLN9414_)
• External Speaker 7.5 W (HSN8145_)
• Telephone Style Handset (Includes hang up cup) (PMLN6481_)
• Enhanced Keypad Microphone (PMMN4089_)
English

Acc
esso
ries
En
102
• Compact Microphone with clip (PMMN4090_)
• Heavy Duty Microphone (PMMN4091_)
• External Speaker 13 W (RSN4001_)
Cables
• Speaker Extension Cable (GMKN4084_)
• Mobile Power Cable 10 FT, 14 AWG, 15A (HKN4137_)
• Mobile Power Cable 10 FT, 12 AWG, 20A (HKN4191_)
• Mobile Power Cable 20 FT, 10 AWG, 20A (HKN4192_)
• Ignition Switch Cable (HKN9327_R)
• Back 16 Pin MAP Universal Cable (PMKN4151_)
Mounting Kits
• Trunnion Wing Screw M5x0.8x9.9 mm (03012045001)
• DIN Mount (FTN6083_)
• Low Profile Trunnion Kit (RLN6466_)
• High Profile Trunnion Kit (RLN6467_)
• Key Lock Trunnion Kit (RLN6468_)
Miscellaneous Accessories
• Rear Accessory Connector Seal with Connector and Pins (GMBN1021_)
• 16 Pin MAP Connector Kit (HLN9457_)
• Connector Extender – 20 Pieces (PMLN5620_)
• External PTT with Emergency Footswitch (RLN4836_R)
• Footswitch with Remote PTT (RLN4856_)
• Pushbutton with Remote PTT (RLN4857_)
glish

Ap
pe
nd
ix: M
aritime
Ra
dio
Us
e in
the V
HF
Freq
uen
cy R
an
ge
03
1Appendix: Maritime Radio Use in the VHF Frequency Range
Take a moment to review the following:Special Channel Assignments . . . . . . . . . . . . . . . . . . page 103Operating Frequency Requirements . . . . . . . . . . . . . page 104
Special Channel Assignments
Emergency Channel
If you are in imminent and grave danger at sea and require emergency assistance, use VHF Channel 16 to send a distress call to nearby vessels and the United States Coast Guard. Transmit the following information, in this order:
1 “MAYDAY, MAYDAY, MAYDAY.”
2 “THIS IS _____________________, CALL SIGN __________.”State the name of the vessel in distress 3 times, followed by the call sign or other identification of the vessel, stated 3 times.
3 Repeat “MAYDAY” and the name of the vessel.
4 “WE ARE LOCATED AT _______________________.” State the position of the vessel in distress, using any information that will help responders to locate you, e.g.:• latitude and longitude• bearing (state whether you are using true or magnetic north)• distance to a well-known landmark• vessel course, speed or destination
5 State the nature of the distress.6 Specify what kind of assistance you need.7 State the number of persons on board and the number
needing medical attention, if any.8 Mention any other information that would be helpful to
responders, such as type of vessel, vessel length and/or tonnage, hull color, etc.
9 “OVER.”10 Wait for a response.11 If you do not receive an immediate response, remain by the
radio and repeat the transmission at intervals until you receive a response. Be prepared to follow any instructions given to you.
Non-Commercial Call Channel
For non-commercial transmissions, such as fishing reports, rendezvous arrangements, repair scheduling, or berthing information, use VHF Channel 9.
English

Ap
pen
dix
: M
ari
tim
e R
ad
io U
se
in t
he
VH
F F
req
uen
cy
Ra
ng
e
En
104
Operating Frequency Requirements
A radio designated for shipboard use must comply with Federal Communications Commission Rule Part 80 as follows:
• on ships subject to Part II of Title III of the Communications Act, the radio must be capable of operating on the 156.800 MHz frequency
• on ships subject to the Safety Convention, the radio must be capable of operating:
• in the simplex mode on the ship station transmitting frequencies specified in the 156.025 – 157.425 MHz frequency band, and• in the semiduplex mode on the two frequency channels specified in the table below.
NOTE: Simplex channels 3, 21, 23, 61, 64, 81, 82, and 83 cannot be lawfully used by the general public in US waters.
Additional information about operating requirements in the Maritime Services can be obtained from the full text of FCC Rule Part 80 and from the US Coast Guard.
Table A-1: VHF Marine Channel List
Channel Number
Frequency (MHz)
Transmit Receive
1 156.050 160.650
2 156.100 160.700* 156.150 160.7504 156.200 160.8005 156.250 160.8506 156.300 –7 156.350 160.9508 156.400 –9 156.450 156.45010 156.500 156.50011 156.550 156.55012 156.600 156.600
13** 156.650 156.65014 156.700 156.700
15** 156.750 156.75016 156.800 156.800
17** 156.850 156.85018 156.900 161.50019 156.950 161.55020 157.000 161.600* 157.050 161.650
22 157.100 161.700* 157.150 161.750
Table A-1: VHF Marine Channel List (Continued)
Channel Number
Frequency (MHz)
Transmit Receive
glish
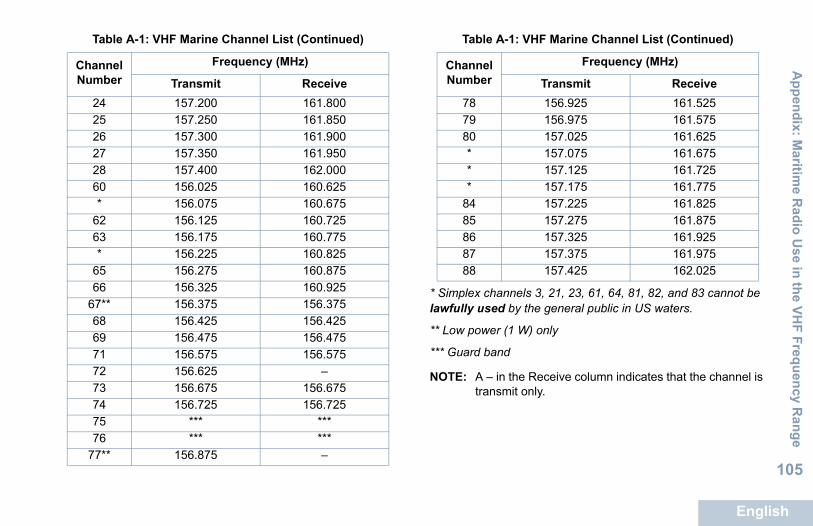
Ap
pe
nd
ix: M
aritime
Ra
dio
Us
e in
the V
HF
Freq
uen
cy R
an
ge
05
1* Simplex channels 3, 21, 23, 61, 64, 81, 82, and 83 cannot be lawfully used by the general public in US waters.
** Low power (1 W) only
*** Guard band
NOTE: A – in the Receive column indicates that the channel is transmit only.
24 157.200 161.80025 157.250 161.85026 157.300 161.90027 157.350 161.95028 157.400 162.00060 156.025 160.625* 156.075 160.675
62 156.125 160.72563 156.175 160.775* 156.225 160.825
65 156.275 160.87566 156.325 160.925
67** 156.375 156.37568 156.425 156.42569 156.475 156.47571 156.575 156.57572 156.625 –73 156.675 156.67574 156.725 156.72575 *** ***76 *** ***
77** 156.875 –
Table A-1: VHF Marine Channel List (Continued)
Channel Number
Frequency (MHz)
Transmit Receive
78 156.925 161.52579 156.975 161.57580 157.025 161.625* 157.075 161.675* 157.125 161.725* 157.175 161.775
84 157.225 161.82585 157.275 161.87586 157.325 161.92587 157.375 161.97588 157.425 162.025
Table A-1: VHF Marine Channel List (Continued)
Channel Number
Frequency (MHz)
Transmit Receive
English

Lim
ited
War
ran
ty
En
106
Limited Warranty
MOTOROLA COMMUNICATION PRODUCTS
I. WHAT THIS WARRANTY COVERS AND FOR HOW LONG:
MOTOROLA SOLUTIONS INC. (“MOTOROLA”) warrants the MOTOROLA manufactured Communication Products listed below (“Product”) against defects in material and workmanship under normal use and service for a period of time from the date of purchase as scheduled below:
MOTOROLA, at its option, will at no charge either repair the Product (with new or reconditioned parts), replace it (with a new or reconditioned Product), or refund the purchase price of the Product during the warranty period provided it is returned in accordance with the terms of this warranty. Replaced parts or boards are warranted for the balance of the original applicable warranty period. All replaced parts of Product shall become the property of MOTOROLA.
This express limited warranty is extended by MOTOROLA to the original end user purchaser only and is not assignable or transferable to any other party. This is the complete warranty for the Product manufactured by MOTOROLA. MOTOROLA assumes no
obligations or liability for additions or modifications to this warranty unless made in writing and signed by an officer of MOTOROLA.
Unless made in a separate agreement between MOTOROLA and the original end user purchaser, MOTOROLA does not warrant the installation, maintenance or service of the Product.
MOTOROLA cannot be responsible in any way for any ancillary equipment not furnished by MOTOROLA which is attached to or used in connection with the Product, or for operation of the Product with any ancillary equipment, and all such equipment is expressly excluded from this warranty. Because each system which may use the Product is unique, MOTOROLA disclaims liability for range, coverage, or operation of the system as a whole under this warranty.
II. GENERAL PROVISIONS:
This warranty sets forth the full extent of MOTOROLA'S responsibilities regarding the Product. Repair, replacement or refund of the purchase price, at MOTOROLA’s option, is the exclusive remedy. THIS WARRANTY IS GIVEN IN LIEU OF ALL OTHER EXPRESS WARRANTIES. IMPLIED WARRANTIES, INCLUDING WITHOUT LIMITATION, IMPLIED WARRANTIES OF MERCHANTABILITY AND FITNESS FOR A PARTICULAR PURPOSE, ARE LIMITED TO THE DURATION OF THIS LIMITED WARRANTY. IN NO EVENT SHALL MOTOROLA BE LIABLE FOR DAMAGES IN EXCESS OF THE PURCHASE PRICE OF THE PRODUCT, FOR ANY LOSS OF USE, LOSS OF TIME, INCONVENIENCE, COMMERCIAL LOSS, LOST PROFITS OR SAVINGS OR OTHER INCIDENTAL, SPECIAL OR CONSEQUENTIAL DAMAGES ARISING OUT OF THE USE OR
XPR 2500 Mobile Radios Two (2) Years
Product Accessories One (1) Year
glish

Lim
ited W
arranty
07
1INABILITY TO USE SUCH PRODUCT, TO THE FULL EXTENT SUCH MAY BE DISCLAIMED BY LAW.
III. STATE LAW RIGHTS:
SOME STATES DO NOT ALLOW THE EXCLUSION OR LIMITATION OF INCIDENTAL OR CONSEQUENTIAL DAMAGES OR LIMITATION ON HOW LONG AN IMPLIED WARRANTY LASTS, SO THE ABOVE LIMITATION OR EXCLUSIONS MAY NOT APPLY.
This warranty gives specific legal rights, and there may be other rights which may vary from state to state.
IV. HOW TO GET WARRANTY SERVICE:
You must provide proof of purchase (bearing the date of purchase and Product item serial number) in order to receive warranty service and, also, deliver or send the Product item, transportation and insurance prepaid, to an authorized warranty service location. Warranty service will be provided by MOTOROLA through one of its authorized warranty service locations. If you first contact the company which sold you the Product (e.g., dealer or communication service provider), it can facilitate your obtaining warranty service. You can also call MOTOROLA at 1-800-927-2744 US/Canada.
V. WHAT THIS WARRANTY DOES NOT COVER:A) Defects or damage resulting from use of the Product in other
than its normal and customary manner.B) Defects or damage from misuse, accident, water, or neglect.
C)Defects or damage from improper testing, operation, maintenance, installation, alteration, modification, or adjustment.
D)Breakage or damage to antennas unless caused directly by defects in material workmanship.
E) A Product subjected to unauthorized Product modifications, disassembles or repairs (including, without limitation, the addition to the Product of non-MOTOROLA supplied equipment) which adversely affect performance of the Product or interfere with MOTOROLA's normal warranty inspection and testing of the Product to verify any warranty claim.
F) Product which has had the serial number removed or made illegible.
G)Rechargeable batteries if:(1) any of the seals on the battery enclosure of cells are broken or show evidence of tampering.(2) the damage or defect is caused by charging or using the battery in equipment or service other than the Product for which it is specified.
H)Freight costs to the repair depot.I) A Product which, due to illegal or unauthorized alteration of the
software/firmware in the Product, does not function in accordance with MOTOROLA’s published specifications or the FCC certification labeling in effect for the Product at the time the Product was initially distributed from MOTOROLA.
J) Scratches or other cosmetic damage to Product surfaces that does not affect the operation of the Product.
K) Normal and customary wear and tear.
English

Lim
ited
War
ran
ty
En
108
VI. PATENT AND SOFTWARE PROVISIONS:
MOTOROLA will defend, at its own expense, any suit brought against the end user purchaser to the extent that it is based on a claim that the Product or parts infringe a United States patent, and MOTOROLA will pay those costs and damages finally awarded against the end user purchaser in any such suit which are attributable to any such claim, but such defense and payments are conditioned on the following:A) that MOTOROLA will be notified promptly in writing by such
purchaser of any notice of such claim;B) that MOTOROLA will have sole control of the defense of such
suit and all negotiations for its settlement or compromise; andC)should the Product or parts become, or in MOTOROLA’s opinion
be likely to become, the subject of a claim of infringement of a United States patent, that such purchaser will permit MOTOROLA, at its option and expense, either to procure for such purchaser the right to continue using the Product or parts or to replace or modify the same so that it becomes non-infringing or to grant such purchaser a credit for the Product or parts as depreciated and accept its return. The depreciation will be an equal amount per year over the lifetime of the Product or parts as established by MOTOROLA.
MOTOROLA will have no liability with respect to any claim of patent infringement which is based upon the combination of the Product or parts furnished hereunder with software, apparatus or devices not furnished by MOTOROLA, nor will MOTOROLA have any liability for the use of ancillary equipment or software not furnished by MOTOROLA which is attached to or used in connection with the Product. The foregoing states the entire liability of MOTOROLA with respect to infringement of patents by the Product or any parts thereof.
Laws in the United States and other countries preserve for MOTOROLA certain exclusive rights for copyrighted MOTOROLA software such as the exclusive rights to reproduce in copies and distribute copies of such MOTOROLA software. MOTOROLA software may be used in only the Product in which the software was originally embodied and such software in such Product may not be replaced, copied, distributed, modified in any way, or used to produce any derivative thereof. No other use including, without limitation, alteration, modification, reproduction, distribution, or reverse engineering of such MOTOROLA software or exercise of rights in such MOTOROLA software is permitted. No license is granted by implication, estoppel or otherwise under MOTOROLA patent rights or copyrights.
VII. GOVERNING LAW:
This Warranty is governed by the laws of the State of Illinois, U.S.A.
glish
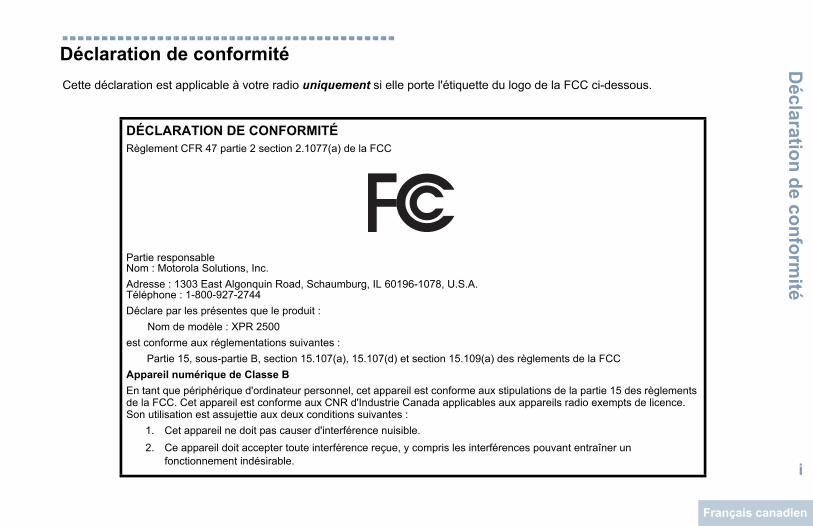
Déclaratio
n d
e con
form
ité
i
Déclaration de conformité
Cette déclaration est applicable à votre radio uniquement si elle porte l'étiquette du logo de la FCC ci-dessous.
DÉCLARATION DE CONFORMITÉRèglement CFR 47 partie 2 section 2.1077(a) de la FCC
Partie responsable Nom : Motorola Solutions, Inc.Adresse : 1303 East Algonquin Road, Schaumburg, IL 60196-1078, U.S.A.Téléphone : 1-800-927-2744Déclare par les présentes que le produit :
Nom de modèle : XPR 2500est conforme aux réglementations suivantes :
Partie 15, sous-partie B, section 15.107(a), 15.107(d) et section 15.109(a) des règlements de la FCCAppareil numérique de Classe B
En tant que périphérique d'ordinateur personnel, cet appareil est conforme aux stipulations de la partie 15 des règlements de la FCC. Cet appareil est conforme aux CNR d'Industrie Canada applicables aux appareils radio exempts de licence. Son utilisation est assujettie aux deux conditions suivantes :
1. Cet appareil ne doit pas causer d'interférence nuisible. 2. Ce appareil doit accepter toute interférence reçue, y compris les interférences pouvant entraîner un
fonctionnement indésirable.
Français canadien

Déc
lara
tio
n d
e co
nfo
rmit
é
ii
Franç
Remarque : Ce matériel a fait l'objet de tests et a été déclaré conforme aux limites établies pour un appareil numérique de classe B, comme il est stipulé à la section 15 des règlements de la FCC. Ces limites sont fixées afin d'offrir une protection suffisante contre des interférences nuisibles dans une installation résidentielle. Ce matériel génère, utilise et peut émettre de l'énergie radiofréquence et, s'il n'est pas installé ni utilisé conformément aux instructions, il peut provoquer un brouillage nuisible aux communications radio. Cependant, on ne peut garantir qu'il n'y aura aucune interférence dans une installation particulière.
Si cet appareil cause une interférence nuisible de la réception de la radio ou de la télévision, ce qui peut être déterminé en éteignant et en allumant l'appareil, vous êtes encouragé à remédier à la situation en prenant une ou plusieurs des mesures suivantes :
• Réorienter ou déplacer l'antenne réceptrice.
• Augmenter la distance entre l'équipement et le récepteur.
• Brancher l'appareil sur une autre prise sur un circuit secteur différent de celui du récepteur.
• Consulter un revendeur ou un technicien radio/télévision chevronné pour obtenir de l'aide.
ais canadien

Table d
es matières
iii
Table des matièresCe guide de l'utilisateur contient toute l'information dont vous avez besoin pour utiliser les radios mobiles numériques MOTOTRBO XPR 2500.
Déclaration de conformité . . . . . . . . . . . . . . . . . . . . . i
Consignes de sécurité importantes . . . . . . . . . . . . ixRadios bidirectionnelles mobiles : exposition aux radiofréquences et sécurité du produit . . . . . .ix
Version logicielle . . . . . . . . . . . . . . . . . . . . . . . . . . . ix
Droit d'auteur et copie du logiciel . . . . . . . . . . . . . . x
Pour commencer . . . . . . . . . . . . . . . . . . . . . . . . . . . . 1Comment se servir du présent guide de l'utilisateur . . . . . . . . . . . . . . . . . . . . . . . . . . . . . . . . . 1Ce que le détaillant ou l'administrateur de système peut vous expliquer . . . . . . . . . . . . . . . . . . 2Mise en marche de la radio . . . . . . . . . . . . . . . . . . . . 2Réglage du volume . . . . . . . . . . . . . . . . . . . . . . . . . . 3
Identification des commandes de la radio . . . . . . . . 4Commandes de la radio . . . . . . . . . . . . . . . . . . . . . . 4Touches programmables . . . . . . . . . . . . . . . . . . . . . 5
Fonctions attribuables de la radio . . . . . . . . . . . . . 5Réglages ou fonctions attribuables . . . . . . . . . . . . 7
Accès aux fonctions programmées . . . . . . . . . . . . . . 7
Bouton d'émission (PTT) . . . . . . . . . . . . . . . . . . . . . . 8Sélection des modes analogique et numérique conventionnels . . . . . . . . . . . . . . . . . . . . . . . . . . . . . 8Sites IP interconnectés . . . . . . . . . . . . . . . . . . . . . . 9Capacity Plus . . . . . . . . . . . . . . . . . . . . . . . . . . . . . 10Linked Capacity Plus . . . . . . . . . . . . . . . . . . . . . . . 10
Description des indicateurs d'état . . . . . . . . . . . . . 11Icônes d'affichage . . . . . . . . . . . . . . . . . . . . . . . . . . 12Icônes d'appels . . . . . . . . . . . . . . . . . . . . . . . . . . . . 13Icônes d'avertissement . . . . . . . . . . . . . . . . . . . . . . 13Icônes des messages envoyés . . . . . . . . . . . . . . . 14Voyants DEL . . . . . . . . . . . . . . . . . . . . . . . . . . . . . . 14Tonalités d'avertissement . . . . . . . . . . . . . . . . . . . . 15Tonalités audio . . . . . . . . . . . . . . . . . . . . . . . . . . . . 15
Réception et acheminement d'appels . . . . . . . . . . 16Sélection d'une zone . . . . . . . . . . . . . . . . . . . . . . . . 16Sélectionner un canal . . . . . . . . . . . . . . . . . . . . . . . 17Réception et réponse à un appel . . . . . . . . . . . . . . 17
Recevoir un appel de groupe et y répondre . . . . 18Recevoir un appel individuel et y répondre . . . . . 18Recevoir un appel général . . . . . . . . . . . . . . . . . . 19Recevoir un appel sélectif et y répondre . . . . . . . 20Recevoir un appel téléphonique et y répondre . . . 20
Appel téléphonique en tant qu'appel individuel . . . . . . . . . . . . . . . . . . . . . . . . . . . . . . 20
Français canadien
Tab
le d
es m
atiè
res
iv
Franç
Appel téléphonique en tant qu’appel de groupe . . . . . . . . . . . . . . . . . . . . . . . . . . . . . 21Appel téléphonique en tant qu’appel général . . . . . . . . . . . . . . . . . . . . . . . . . . . . . . . 21
Faire un appel radio . . . . . . . . . . . . . . . . . . . . . . . . 22Pour passer un appel de groupe . . . . . . . . . . . . . 23Passer un appel privé . . . . . . . . . . . . . . . . . . . . 24Passer un appel général . . . . . . . . . . . . . . . . . . . 25Acheminement d'un appel sélectif . . . . . . . . . . . 25Faire un appel téléphonique . . . . . . . . . . . . . . . 26
Interrompre un appel radio . . . . . . . . . . . . . . . . . . 27Mode direct . . . . . . . . . . . . . . . . . . . . . . . . . . . . . . . 28Écoute permanente . . . . . . . . . . . . . . . . . . . . . . . . 28
Fonctions avancées . . . . . . . . . . . . . . . . . . . . . . . . 29Vérification de la radio . . . . . . . . . . . . . . . . . . . . . . 29
Envoyer une vérification radio . . . . . . . . . . . . . . . 29Écoute de bruits ambiants . . . . . . . . . . . . . . . . . . . 30
Lancer la fonction Écoute ambiance . . . . . . . . . . 31Arrêter la fonction Écoute de bruits ambiants . . . 32
Listes de balayage . . . . . . . . . . . . . . . . . . . . . . . . . 32Consulter une entrée de la Liste de balayage . . 32Modifier la Liste de balayage . . . . . . . . . . . . . . . 33
Ajouter une entrée à la Liste de balayage . . . . 33Supprimer une entrée de la Liste de balayage . . . . . . . . . . . . . . . . . . . . . . . . . . . . . 34
Régler et modifier l'ordre de priorité d'une entrée de la liste de balayage . . . . . . . . . . . . . 34
Balayage . . . . . . . . . . . . . . . . . . . . . . . . . . . . . . . . 35Démarrer et arrêter le balayage . . . . . . . . . . . . . 35Répondre à une transmission pendant un balayage . . . . . . . . . . . . . . . . . . . . . . . . . . . . 36Supprimer un canal nuisible . . . . . . . . . . . . . . . . 36Restaurer un canal nuisible . . . . . . . . . . . . . . . . 37
Vote Scan (Balayage par vote) . . . . . . . . . . . . . . . 37Réglages des contacts . . . . . . . . . . . . . . . . . . . . . . 37
Passer un appel de groupe à partir des contacts . . . . . . . . . . . . . . . . . . . . . . . . . . . . . . . . 38Faire un appel privé à partir des contacts . . . . . 39Associer une entrée à une touche numérique programmable . . . . . . . . . . . . . . . . . . . . . . . . . . 40Annuler l'association entre une entrée et une touche numérique programmable . . . . . . . 40
Régler le contact par défaut . . . . . . . . . . . . . . 41Ajout d'un nouveau contact . . . . . . . . . . . . . . . 42
Réglages de l'indicateur d'appel . . . . . . . . . . . . . . 42Activation ou désactivation des sonneries d'appel des avertissements d'appel . . . . . . . . . . 42Activer ou désactiver les sonneries d'appel des appels privés . . . . . . . . . . . . . . . . . . . . . . . . . . . 43Activer ou désactiver les sonneries d'appel pour les appels sélectifs . . . . . . . . . . . . . . . . . . . 44
ais canadien
Table d
es matières
v
Augmenter le volume de la tonalité d'alarme . . . . 44Fonctions du Journal des appels . . . . . . . . . . . . . 45
Affichage des derniers appels . . . . . . . . . . . . . . . 45Supprimer un appel d'une liste d'appels . . . . . . . 46Supprimer tous les appels d'une liste d'appel . . . 46
Fonction Avertissement d'appel . . . . . . . . . . . . . . . 47Recevoir un avertissement d'appel et y répondre . . . . . . . . . . . . . . . . . . . . . . . . . . . . . . . 47Envoyer un avertissement d'appel à partir de la liste des contacts . . . . . . . . . . . . . . . . . . . . . . . 48Envoyer un avertissement d'appel au moyen de la touche d'accès direct . . . . . . . . . . . . . . . . . . . . . . 48
Fonction d'urgence . . . . . . . . . . . . . . . . . . . . . . . . . 49Recevoir une alarme d'urgence . . . . . . . . . . . . . . 50Répondre à une alarme d'urgence . . . . . . . . . . . 50Envoyer une alarme d'urgence . . . . . . . . . . . . . . 51Envoyer une alarme d'urgence avec appel . . . . . 51Envoyer une alarme d'urgence suivie d'un appel vocal . . . . . . . . . . . . . . . . . . . . . . . . . . . . . . 52Réactiver le mode d'urgence . . . . . . . . . . . . . . . . 54Quitter le mode d'urgence . . . . . . . . . . . . . . . . . . 54
Fonctions de messagerie texte . . . . . . . . . . . . . . . 55Envoyer un message texte rapide . . . . . . . . . . . . 55Envoyer un message texte rapide au moyen de la touche d’accès direct . . . . . . . . . . . . . . . . . . . . . . 55Gérer les échecs d'envoi de message texte . . . . 56
Renvoyer un message texte . . . . . . . . . . . . . . . 56Transférer un message texte . . . . . . . . . . . . . . 56
Gérer les messages texte envoyés . . . . . . . . . . . 57Afficher un message texte envoyé . . . . . . . . . . 57Envoi d'un message texte envoyé . . . . . . . . . . 57Supprimer tous les messages envoyés du dossier des messages envoyés . . . . . . . . . 59
Recevoir un message texte . . . . . . . . . . . . . . . . . 59Lire un message texte . . . . . . . . . . . . . . . . . . . . . 60Gérer les messages texte reçus . . . . . . . . . . . . . 60
Afficher un message texte à partir de la boîte de réception . . . . . . . . . . . . . . . . . . . . . . . . . . . . . . 61Répondre à un message texte par un texte rapide . . . . . . . . . . . . . . . . . . . . . . . . . . . . 61Supprimer un message texte de la boîte de réception . . . . . . . . . . . . . . . . . . . . . . . . . . . . . . 62Supprimer tous les messages texte de la boîte de réception . . . . . . . . . . . . . . . . . . . . . . . 62
Encoder un message analogique . . . . . . . . . . . . . . 63Envoyer un message MDC encodé au répartiteur . . . . . . . . . . . . . . . . . . . . . . . . . . . . . . 63Envoyer un message encodé à cinq tonalités au contact . . . . . . . . . . . . . . . . . . . . . . . . . . . . . . . . . 64
Mettre à jour l'état analogique . . . . . . . . . . . . . . . . . 64Envoyer une mise à jour d'état à un contact prédéfini . . . . . . . . . . . . . . . . . . . . . . . . . . . . . . . . 64
Cryptage . . . . . . . . . . . . . . . . . . . . . . . . . . . . . . . . 65
Français canadien
Tab
le d
es m
atiè
res
vi
Franç
Brouillage analogique . . . . . . . . . . . . . . . . . . . . . . 66Activer ou désactiver le brouillage analogique . . 66Définir les codes de brouillage analogique . . . . . 67
Réglages multisite . . . . . . . . . . . . . . . . . . . . . . . . . 67Lancer une recherche automatique de site . . . . . 67Arrêter la recherche automatique de site . . . . . . 68Lancer une recherche de site manuelle . . . . . . . 69
Sécurité . . . . . . . . . . . . . . . . . . . . . . . . . . . . . . . . . 70Désactiver la radio . . . . . . . . . . . . . . . . . . . . . . . 70Activer la radio . . . . . . . . . . . . . . . . . . . . . . . . . . 71
Travailleur solitaire . . . . . . . . . . . . . . . . . . . . . . . . . 72 Liste de notification . . . . . . . . . . . . . . . . . . . . . . . . 73
Accéder à la liste de notifications . . . . . . . . . . . . 73ARTS (Auto-Range Transponder System) . . . . . . . 74Programmation par radiocommunication (OTAP) . . . 74Utilitaires . . . . . . . . . . . . . . . . . . . . . . . . . . . . . . . . . 75
Activer ou désactiver les tonalités et les avertissements de la radio . . . . . . . . . . . . . . . . . 75Régler l'écart de volume des tonalités d'avertissement . . . . . . . . . . . . . . . . . . . . . . . . . 75Activer ou désactiver la tonalité d'autorisation . . 76Activer ou désactiver la tonalité d'alerte de mise sous tension . . . . . . . . . . . . . . . . . . . . . . . . 77Régler le niveau de puissance . . . . . . . . . . . . . . 77Régler la luminosité de l'écran . . . . . . . . . . . . . . 78Activer ou désactiver Avert./phares . . . . . . . . . . 78
Régler le niveau Squelch (silencieux) . . . . . . . . 79Activer ou désactiver les voyants DEL . . . . . . . . 80Langue . . . . . . . . . . . . . . . . . . . . . . . . . . . . . . . . 80Activer ou désactiver la fonction de transmission vocale (VOX) . . . . . . . . . . . . . . . . . . . . . . . . . . . . 81Annonce vocale . . . . . . . . . . . . . . . . . . . . . . . . . 82CGA Mic. analogique (Mic. CGA-A) . . . . . . . . . . 83Contrôle de gain automatique de microphone numérique (Mic. CGA-D) . . . . . . . . . . . . . . . . . . 83Audio intelligent . . . . . . . . . . . . . . . . . . . . . . . . . 84Activer ou désactiver l'amélioration de la vibration . . . . . . . . . . . . . . . . . . . . . . . . . . . . . . . 84Réglage de l'ambiance audio . . . . . . . . . . . . . . . 85Définition des profils audio . . . . . . . . . . . . . . . . . 85Accès aux renseignements généraux sur la radio . . . . . . . . . . . . . . . . . . . . . . . . . . . . . . . . 86
Vérifier l'alias et l'ID de la radio . . . . . . . . . . . . 87Vérifier les versions du micrologiciel et de la fiche de code . . . . . . . . . . . . . . . . . . . . . . 87Mise à jour du logiciel . . . . . . . . . . . . . . . . . . . 88Information sur le site . . . . . . . . . . . . . . . . . . . 88
Fonctions du microphone à clavier . . . . . . . . . . . 89Utilisation du clavier . . . . . . . . . . . . . . . . . . . . . . . . 90
Activer ou désactiver les tonalités du clavier . . . 91Autres fonctions avancées . . . . . . . . . . . . . . . . . . . 91
Sélection d'une zone à l'aide de la
ais canadien

Table d
es matières
vii
recherche d'alias . . . . . . . . . . . . . . . . . . . . . . . . . 91Exécution d'une vérification radio à l'aide de la numérotation manuelle . . . . . . . . . . . . . . . . . . . 92Exécution de la fonction Écoute ambiance à l'aide de la numérotation manuelle . . . . . . . . . . 93Pour passer un appel individuel à l'aide de la numérotation manuelle . . . . . . . . . . . . . . . . . . . . 93Pour faire un appel téléphonique à l'aide de la numérotation manuelle . . . . . . . . . . . . . . . . . . . 94Faire un appel au moyen de la touche d'accès direct . . . . . . . . . . . . . . . . . . . . . . . . . . . . . . . . . . 96Faire un appel de groupe, privé ou général à l'aide de la touche numérique programmable . 98Faire un appel téléphonique à l'aide de la touche programmable . . . . . . . . . . . . . . . . . . . . . 99Pour faire un appel de groupe, individuel ou téléphonique ou général à l'aide de la recherche d'alias . . . . . . . . . . . . . . . . . . . . . . . . . . . . . . . . 103Consulter une entrée de la liste de balayage à l'aide de la recherche d'alias . . . . . . . . . . . . . . 104Modification de la liste de balayage à l'aide de la recherche d'alias . . . . . . . . . . . . . . . . . . . . . . . . 105
Ajouter une entrée à la Liste de balayage . . . 105Supprimer une entrée de la Liste de balayage . . . . . . . . . . . . . . . . . . . . . . . . . . . . . 106Régler et modifier l'ordre de priorité d'une entrée de la liste de balayage . . . . . . . . 106
Enregistrer un alias ou un ID de la liste d'appel . . . . . . . . . . . . . . . . . . . . . . . . . . . . . . . . 107Envoi d'un avertissement d'appel à l'aide de la numérotation manuelle . . . . . . . . . . . . . . . . . . 108Valeurs RSSI . . . . . . . . . . . . . . . . . . . . . . . . . . . 108
Messagerie texte . . . . . . . . . . . . . . . . . . . . . . . . . 109Transfert d'un message texte à l'aide de la numérotation manuelle . . . . . . . . . . . . . . . . . . 109
Multifréquence à deux tonalités (DTMF) . . . . . . . . 109Sécurité . . . . . . . . . . . . . . . . . . . . . . . . . . . . . . . . 110
Désactivation de la radio à l'aide de la numérotation manuelle . . . . . . . . . . . . . . . . . . . 110Activation de la radio à l'aide de la numérotation manuelle . . . . . . . . . . . . . . . . . . . . . . . . . . . . . . 110
Fonctions de verrouillage par mot de passe . . . . . 111Accéder à la radio à l'aide d'un mot de passe . . 111Déverrouiller la radio . . . . . . . . . . . . . . . . . . . . . 112Activer ou désactiver le verrouillage par mot de passe . . . . . . . . . . . . . . . . . . . . . . . . . . . . . . 112Changer le mot de passe . . . . . . . . . . . . . . . . . . 113
Configuration du panneau avant (FPC) . . . . . . . . 114Entrée en mode FPC . . . . . . . . . . . . . . . . . . . . . 114Modifier les paramètres du mode FPC . . . . . . . 114
Accessoires . . . . . . . . . . . . . . . . . . . . . . . . . . . . . . 115Antennes . . . . . . . . . . . . . . . . . . . . . . . . . . . . . . . . 115Audio . . . . . . . . . . . . . . . . . . . . . . . . . . . . . . . . . . . 115
Français canadien

Tab
le d
es m
atiè
res
viii
Franç
Câbles . . . . . . . . . . . . . . . . . . . . . . . . . . . . . . . . . 116Trousses de montage . . . . . . . . . . . . . . . . . . . . . . 116Accessoires divers . . . . . . . . . . . . . . . . . . . . . . . . 116
Annexe : Utilisation de la radio maritime dans la gamme de fréquence VHF . . . . . . . . . . . . . . . . . . 117
Assignations des canaux spéciaux . . . . . . . . . . . 117Canal d'urgence . . . . . . . . . . . . . . . . . . . . . . . . 117Canal d'appel non commercial . . . . . . . . . . . . . 118
Exigences relatives à la fréquence de fonctionnement . . . . . . . . . . . . . . . . . . . . . . . . . . . 118
Garantie limitée . . . . . . . . . . . . . . . . . . . . . . . . . . . 120
ais canadien

Co
nsig
nes d
e sécurité im
po
rtantes
ix
Consignes de sécurité importantes
Radios bidirectionnelles mobiles : exposition aux radiofréquences et sécurité du produit
ATTENTION!
Cette radio ne doit être utilisée qu'à des fins professionnelles. Avant d'utiliser la radio, lisez le guide Radios bidirectionnelles portatives : exposition aux radiofréquences et sécurité du produit, qui contient d'importantes instructions de fonctionnement pour une utilisation sécuritaire et des informations sur l'exposition aux fréquences radioélectriques, dans le but d’assurer votre conformité aux normes et règlements en vigueur.
Visitez le site Web suivant pour obtenir la liste des antennes et autres accessoires approuvés par Motorola : http://www.motorolasolutions.com
Toute modification effectuée à cet appareil sans l'autorisation explicite de Motorola peut annuler l'autorisation d'utiliser cet appareil.
Selon la réglementation d'Industrie Canada, cet émetteur radio ne peut être utilisé qu'avec une antenne dont le type et le gain maximal (ou minimal) sont approuvés par Industrie Canada pour cet émetteur. Afin de limiter les interférences radio pour les autres utilisateurs, le type et le gain de l'antenne doivent être choisis de façon à ce que la puissance isotrope rayonnée équivalente (P.I.R.E.) ne soit pas plus forte qu'il ne le faut pour établir la communication.
Cet émetteur radio a été approuvé par Industrie Canada pour utilisation avec une antenne approuvée par Motorola offrant le gain maximal autorisé et l'impédance requise pour le type d'antenne indiqué. Il est strictement interdit d'utiliser avec cet appareil tout type d'antenne ne figurant pas dans cette liste et présentant un gain supérieur au maximum indiqué pour le type.
Version logicielle
Toutes les fonctions décrites dans les sections suivantes sont prises en charge par la version logicielle R02.40.00 de la radio.
Consultez la section Vérifier les versions du micrologiciel et de la fiche de code à la page 87 pour connaître la version logicielle de votre radio.
Adressez-vous à votre détaillant ou à votre administrateur de système pour en savoir davantage sur les fonctions prises en charge.
Français canadien

Dro
it d
'au
teu
r et
co
pie
du
log
icie
l
x
Franç
Droit d'auteur et copie du logiciel
Les produits Motorola décrits dans ce manuel peuvent inclure des logiciels Motorola protégés en vertu de la loi sur le droit d'auteur enregistrés dans des mémoires à semi-conducteurs ou dans d'autres supports. Les lois du Canada, des États-Unis et d'autres pays protègent, au nom de Motorola, certains droits exclusifs visant les logiciels, y compris, mais sans s'y limiter, les droits exclusifs de copie et de reproduction sous toute forme que ce soit des logiciels protégés par la loi sur le droit d'auteur. Par conséquent, la loi sur le droit d'auteur protégeant tous les logiciels inclus avec les produits décrits dans ce manuel interdit toute copie, reproduction, modification, ingénierie à rebours ou distribution de ces logiciels sans l'autorisation écrite expresse de Motorola. De plus, l'achat de produits Motorola ne peut être considéré comme une transaction octroyant directement, par inférence, estoppel ou autrement une licence en vertu des droits d'auteur, des droits de brevets ou d'une demande de brevet de Motorola, à l'exception d'une licence d'utilisation normale et non exclusive prévue par la loi lors de la vente d'un produit.
La technologie de codage vocal AMBE+2MC incluse dans ce produit est protégée par les droits de propriété intellectuelle, notamment les droits de brevet, les droits d'auteur et les secrets industriels de Digital Voice Systems, Inc.
Cette technologie de codage vocal n'est concédée sous licence que pour une utilisation avec cet équipement de télécommunications. Il est explicitement interdit à tout utilisateur de cette technologie de tenter de décompiler, de faire l'ingénierie à rebours ou de désassembler le code exécutable, ou encore de convertir de toute autre manière le code exécutable dans un format lisible par l'utilisateur.
Numéros de brevets américains n° 5,870,405, n° 5,826,222, n° 5,754,974, n° 5,701,390, n° 5,715,365, n° 5,649,050, n° 5,630,011, n° 5,581,656, n° 5,517,511, n° 5,491,772, n° 5,247,579, n° 5,226,084 et n° 5,195,166.
Informations juridiques relatives aux logiciels libres
Ce produit Motorola contient des logiciels libres. Pour obtenir plus de renseignements au sujet des licences, des attestations, des avis de droits d'auteur requis et d'autres conditions d'utilisation, reportez-vous à la documentation concernant ce produit Motorola à l'adresse suivante :
https://businessonline.motorolasolutions.com
ais canadien
Po
ur co
mm
encer
1
Pour commencer
Veuillez prendre quelques instants pour lire les renseignements suivants :Comment se servir du présent guide de l'utilisateur . . . page 1Ce que le détaillant ou l'administrateur de système peut vous expliquer . . . . . . . . . . . . . . . . . . . . . . . . . . . . . . . . . . . . page 2Mise en marche de la radio . . . . . . . . . . . . . . . . . . . . . . page 2Réglage du volume . . . . . . . . . . . . . . . . . . . . . . . . . . . . page 3
Comment se servir du présent guide de l'utilisateur
Le présent guide de l'utilisateur traite du fonctionnement de base des appareils mobiles MOTOTRBO.
Cependant, votre détaillant ou l'administrateur de votre système peut avoir personnalisé votre radio en fonction de vos besoins particuliers. Pour obtenir des renseignements supplémentaires, adressez-vous à votre détaillant ou à votre administrateur de système.
Dans le présent document, les icônes ci-dessous sont utilisées pour signaler les fonctions prises en charge en mode analogique classique ou en mode numérique classique :
Les fonctions offertes en mode analogique et en mode numérique ne sont accompagnées d'aucune icône.Pour obtenir plus de renseignements sur les fonctions offertes en mode multisite classique, consultez la section Sites IP interconnectés à la page 9.Certaines fonctions sont offertes dans le mode de partage de canaux à site unique, Capacity Plus. Pour plus d'informations à ce sujet, consultez la section Capacity Plus à la page 10.
Indique une fonction propre au mode analogique classique seulement.
Indique une fonction propre au mode numérique classique seulement.
Français canadien

Po
ur
com
men
cer
2
Franç
Certaines fonctions sont aussi offertes dans le mode de partage de canaux multisite Linked Capacity Plus. Pour plus d'informations à ce sujet, consultez la section Linked Capacity Plus à la page 10.
Ce que le détaillant ou l'administrateur de système peut vous expliquer
Adressez-vous à votre détaillant ou à votre administrateur de système pour savoir :
• si des canaux classiques ont été préréglés sur votre radio;
• quelles touches sont programmées pour accéder à d'autres fonctions;
• quels accessoires optionnels pourraient vous être utiles;
• quelles sont les meilleures pratiques liées à l'utilisation de la radio pour une communication efficace;
• quelles techniques d'entretien peuvent prolonger la durée de vie de la radio.
Mise en marche de la radio
Appuyez brièvement sur la touche Marche/Arrêt. Vous verrez MOTOTRBO(MC) s'afficher quelques instants sur l'écran de la radio, suivi d'une image ou d'un message de bienvenue.
Le voyant DEL vert s'allume et l'écran d'accueil s'active.
Vous entendrez une courte tonalité, qui indique que le test de mise sous tension a réussi.
REMARQUE : Il n'y a pas de tonalité de mise sous tension si la fonction des tonalités/avertissements de la radio est désactivée (voir Activer ou désactiver les tonalités et les avertissements de la radio à la page 75).
Communiquez avec le détaillant si votre radio ne se met pas sous tension.
Bouton Marche/Arrêt
ais canadien

Po
ur co
mm
encer
3
Pour éteindre la radio, appuyez sur le bouton Marche/Arrêt jusqu'à ce que Mise hors tension s'affiche à l'écran de la radio.
REMARQUE : Si la radio est verrouillée et ne répond pas aux commandes des boutons, maintenez enfoncé le bouton Marche/Arrêt pendant au moins sept secondes. Cela forcera la réinitialisation de la radio.
Il peut s'écouler jusqu'à 7 secondes avant que votre radio soit complètement hors tension.
Réglage du volume
Pour augmenter le volume, appuyez sur le bouton de volume « + ».
Pour réduire le volume, appuyez sur le bouton de volume « – ».
Vous pouvez programmer un écart de volume minimal afin d'empêcher le réglage du volume à un niveau plus faible que le niveau minimum programmé. Pour obtenir des renseignements supplémentaires, adressez-vous à votre détaillant ou à votre administrateur de système.
Bouton de réglage du volume
Français canadien
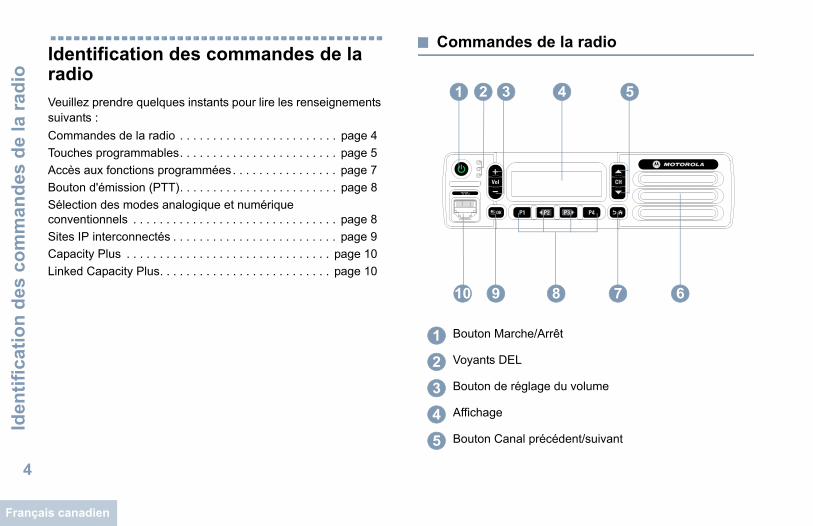
Iden
tifi
cati
on
des
co
mm
and
es d
e la
rad
io
4
Franç
Identification des commandes de la radio
Veuillez prendre quelques instants pour lire les renseignements suivants :Commandes de la radio . . . . . . . . . . . . . . . . . . . . . . . . page 4Touches programmables. . . . . . . . . . . . . . . . . . . . . . . . page 5Accès aux fonctions programmées. . . . . . . . . . . . . . . . page 7Bouton d'émission (PTT). . . . . . . . . . . . . . . . . . . . . . . . page 8Sélection des modes analogique et numérique conventionnels . . . . . . . . . . . . . . . . . . . . . . . . . . . . . . . page 8Sites IP interconnectés . . . . . . . . . . . . . . . . . . . . . . . . . page 9Capacity Plus . . . . . . . . . . . . . . . . . . . . . . . . . . . . . . . page 10Linked Capacity Plus. . . . . . . . . . . . . . . . . . . . . . . . . . page 10
Commandes de la radio
Bouton Marche/Arrêt
Voyants DEL
Bouton de réglage du volume
Affichage
Bouton Canal précédent/suivant
1 2
6
43
9 78
5
10
1
2
3
4
5
ais canadien
Iden
tification
des co
mm
and
es de la rad
io
5
Touches programmables
Votre détaillant peut programmer les boutons pour en faire des raccourcis permettant d'accéder aux fonctions de la radio ou à un maximum de six (6) canaux/groupes préréglés selon la durée pendant laquelle vous appuyez sur un bouton :
• Appuyer brièvement – Appuyer et relâcher rapidement.
• Appuyer longtemps – Appuyer et maintenir enfoncé pendant la durée programmée.
• Maintenir enfoncé – Maintenir le bouton enfoncé sans le relâcher.
REMARQUE : La durée programmée pour la pression d'un bouton peut s'appliquer à tous les réglages et à toutes les fonctions attribuables de la radio. Pour en savoir plus sur la durée de programmation pour la touche Urgence, consultez la section Fonction d'urgence à la page 49.
Fonctions attribuables de la radio
Brouillage analogique – Permet d'activer ou désactiver le brouillage analogique.
Profils audio – Permet à l'utilisateur de sélectionner le profil audio préféré.
Ambiance audio – Permet à l'utilisateur de sélectionner l'environnement dans lequel la radio est utilisée.
Contacts – Permet l'accès direct à la liste des contacts.
Avert. d'appel – Permet l'accès direct à la liste des contacts de la radio afin de sélectionner le destinataire d'un avertissement d'appel.
Journal des appels – Permet d'ouvrir le journal des appels.
Urgence – Selon la programmation choisie, déclenche ou annule une alarme ou un appel d'urgence.
Act./désact. audio intelligent – Permet d'alterner entre l'activation et la désactivation de la fonction Audio intelligent.
Num. manuelle – Selon la programmation choisie, permet de faire un appel privé ou un appel téléphonique en entrant un ID d'abonné ou un numéro de téléphone.
Itinér. site man.*‡ – Démarre une recherche de site manuelle.
Écoute – Surveille l'activité du canal sélectionné.
Haut-parleur
Bouton Retour/Accueil
Boutons programmables du panneau avant
Touche Menu/OK
Connecteur accessoire
6
7
8
9
10
Français canadien
Iden
tifi
cati
on
des
co
mm
and
es d
e la
rad
io
6
Franç
Notifications – Permet l'accès direct à la liste des notifications.
Suppr. canal nuisible*‡ – Permet de retirer temporairement un canal nuisible de la liste de balayage, sauf le canal sélectionné. Le canal sélectionné est la combinaison de zone et de canal choisie par l'utilisateur à partir de laquelle le balayage est effectué.
Accès direct – Lance un appel prédéfini privé, un appel téléphonique ou de groupe ou un avertissement d'appel ou un message texte rapide.
Écoute permanente*‡ – Surveille le trafic radio d'un canal sélectionné jusqu'à ce que la fonction soit désactivée.
Contacts – Permet l’accès direct à la liste des contacts.
Crypt. – Permet d'activer et de désactiver la fonction de cryptage.
Alias et ID radio – Fournit l'alias ou l'ID de la radio.
Vérif. radio – Détermine si la radio est activée dans un système.
Activer radio – Permet d'activer une radio cible à distance.
Désactiver radio – Permet de désactiver une radio cible à distance.
Écoute ambiance – Active le microphone d'une radio cible sans indication.
Rptr/Direct*‡ – Bascule entre le mode Répéteur et le mode Direct pour les communications avec une autre radio.
Balayage*‡ – Permet d’activer et de désactiver la fonction de balayage.
Info site Info* – Affiche le nom et l'ID du site Linked Capacity Plus. Transmet les messages vocaux pour le site actuel (cette fonction n'est pas disponible lorsque l'Annonce vocale est désactivée).
Verrou. site act./désact.* – Permet d'activer et de désactiver l'itinérance de site automatique.
État – Permet de sélectionner le menu de la liste d'états.
Message texte – Sélectionne le menu de la messagerie texte.
Interruption de transmission – Interrompt la transmission, sans indication, d’une radio distante ou d’un appel interruptible afin de libérer le canal.
Amélioration de la vibration act./dés. – Permet d'activer et de désactiver l'amélioration de la vibration.
Annonces vocales pour canal – Transmet des messages vocaux pour une zone et un canal sur le canal sélectionné. Cette fonction n'est pas accessible si les annonces vocales ne sont pas activées.* Ne s'applique pas à Capacity Plus
‡ Ne s'applique pas à Linked Capacity Plus
ais canadien

Iden
tification
des co
mm
and
es de la rad
io
7
Annonce voc. act./désact. – Permet d'activer et de désactiver les annonces vocales.
Transmission vocale (VOX) – Permet d'activer et de désactiver la transmission vocale.
Bascul. Zone – Permet à la radio de basculer entre les zones.
Réglages ou fonctions attribuables
Toutes Tnltés/Avert. – Permet d'activer et de désactiver les tonalités et les avertissements.
Codes de brouillage analogique – Permet de basculer entre les codes de brouillage analogique de 3,29 KHz et 3,39 KHz.
Rétroéclairage – Permet de régler l'intensité du rétroéclairage.
Canal précédent/suivant – Selon la programmation, passe au canal précédent ou suivant.
Niveau de puissance – Bascule entre les niveaux de puissance élevé et bas.
Silencieux – Alterne le niveau du silencieux entre les modes Filtré et Normal.
Accès aux fonctions programmées
Vous pouvez accéder aux diverses fonctions de la radio à l'aide de l'une de ces méthodes :
• Exercez une pression longue ou brève sur la touche programmable pertinente.
OU
• Utilisation des touches de navigation, comme suit :
1 Pour accéder au menu, appuyez sur le bouton g . Appuyez sur le bouton de navigation gauche/droite
approprié (b ou c ) pour accéder aux fonctions du menu.
2 Appuyez sur g pour sélectionner une fonction ou entrer dans un sous-menu.
3 Pour revenir au menu ou à l'écran précédent, appuyez sur
e . Maintenez enfoncée la touche e pour revenir à l'écran d'accueil.
Le microphone du clavier présente aussi des touches de navigation de menu (reportez-vous à la section Utilisation du clavier à la page 90).
REMARQUE : La radio quitte automatiquement le menu et revient à l'écran d'accueil après une période d'inactivité.
* Ne s'applique pas à Capacity Plus‡ Ne s'applique pas à Linked Capacity Plus
Français canadien

Iden
tifi
cati
on
des
co
mm
and
es d
e la
rad
io
8
Franç
Bouton d'émission (PTT)
Le bouton PTT situé sur le côté du microphone a deux fonctions principales :• Le bouton PTT permet à la
radio de transmettre un message aux autres radios pendant un appel.
Pour parler, maintenez le bouton PTT enfoncé. Relâchez le bouton PTT pour écouter.
Lorsque vous appuyez sur le bouton PTT, le microphone se met sous tension.
• Lorsque vous n’êtes pas déjà en cours d’appel, vous pouvez vous servir du bouton PTT pour faire un nouvel appel (référez-vous à la section Faire un appel radio à la page 22).
Si la tonalité d'autorisation (reportez-vous à la section Activer ou désactiver la tonalité d'autorisation à la page 76) ou l'effet
local PTT est activé, attendez la fin de la brève tonalité pour parler.
Pendant un appel, si l'indicateur Canal libre est activé (programmé par le détaillant), une courte tonalité d'avertissement retentit lorsque l'utilisateur de la radio cible (la radio qui reçoit la transmission) relâche le bouton PTT, vous indiquant que le canal est libre et que vous pouvez répondre.
La tonalité continue d'un signal d'interdiction se fait
entendre si votre appel est interrompu, pour vous indiquer que vous devriez relâcher la touche PTT, par exemple si la radio reçoit un appel d'urgence.
Sélection des modes analogique et numérique conventionnels
Vous pouvez configurer chaque canal de la radio de manière analogique classique ou numérique classique.
Pour basculer entre un canal analogique et un canal numérique, utilisez le bouton Canal précédent ou Canal suivant.
Certaines fonctions ne sont pas disponibles lorsque vous basculez du mode numérique au mode analogique. Les icônes des fonctions numériques (par exemple, Messages) indiquent ce changement en s'affichant en caractères estompés. Les fonctions désactivées sont masquées dans le menu.
Certaines fonctions de la radio sont accessibles en mode analogique et numérique. Toutefois, les différences mineures de fonctionnement ne nuisent PAS à la performance de la radio.
Bouton PTT
Bouton Canal précédent/suivant
ais canadien

Iden
tification
des co
mm
and
es de la rad
io
9
REMARQUE : La radio peut aussi alterner entre les modes analogique et numérique pendant le balayage bimode (reportez-vous à la section Balayage à la page 35).
Pour utiliser les touches de navigation gauche/droite à l'écran d'accueil de la zone
voulue, appuyez sur b ou c pour sélectionner le canal voulu.
Pour utiliser les touches programmées Canal précédent ou Canal suivant à l'écran d'accueil de la zone voulue, appuyez sur Canal précédent ou Canal suivant pour sélectionner le canal voulu.
Sites IP interconnectés
Cette fonction permet à votre appareil radio de fonctionner au-delà de la zone de couverture d'un site unique en se connectant à différents sites accessibles par l'intermédiaire d'un réseau IP (Internet Protocol).
Lorsque la radio quitte la zone de couverture d'un site et entre dans celle d'un autre site, elle se connecte au relais du nouveau site pour envoyer et recevoir les appels ou les transmissions de données. Selon la configuration choisie, cette opération se fait de façon automatique ou manuelle.
Si la radio est configurée en mode automatique, elle détecte tous les sites accessibles lorsque le signal du site actuel est faible ou lorsqu'elle ne reçoit aucun signal de ce site. Elle se verrouille alors sur le relais du site dont la valeur RSSI (Received Signal Strength Indicator – indicateur d'intensité de réception du signal) est la plus élevée.
Lors d'une recherche manuelle, la radio recherche le premier site actuellement à portée dans la liste des sites disponibles en itinérance (qui ne présente pas nécessairement le signal le plus puissant) et s'y connecte.
REMARQUE : Pour chaque canal, seule l'option Balayage ou Itinérance peut être activée, mais non les deux en même temps.
Les canaux pour lesquels cette fonctionnalité est activée peuvent être ajoutés à une liste d'itinérance particulière. En mode de recherche automatique en itinérance, la radio recherche le ou les canaux dans la liste d'itinérance afin de déterminer le meilleur site.
Une liste d'itinérance peut contenir un maximum de 16 canaux (y compris le canal sélectionné).
REMARQUE : Il est impossible d'ajouter ou de supprimer manuellement une entrée dans la liste d'itinérance. Pour obtenir des renseignements supplémentaires, adressez-vous à votre détaillant ou à votre administrateur de système.
Français canadien
Iden
tifi
cati
on
des
co
mm
and
es d
e la
rad
io
10
Franç
Capacity Plus
Capacity Plus est une configuration de partage de canaux à site unique du système radio MOTOTRBO qui prend en charge des centaines d'utilisateurs et un maximum de 254 groupes à l'aide d'un bassin de canaux. Ainsi, votre radio peut utiliser efficacement tous les canaux programmés disponibles en mode Répéteur.
Quand vous choisissez cette configuration, les icônes des fonctions qui ne sont pas offertes en mode Capacity Plus ne sont pas disponibles dans le menu. Une tonalité d'échec retentit lorsque vous tentez d'accéder à une fonction qui n'est pas accessible en mode Capacity Plus à l'aide d'une touche programmable.
Certaines fonctions de la radio sont accessibles en mode numérique classique, en mode Sites IP interconnectés, en mode Capacity Plus et en mode Linked Capacity Plus. Toutefois, les différences mineures de fonctionnement ne nuisent PAS à la performance de la radio.
Pour obtenir davantage de renseignements au sujet de cette configuration, adressez-vous à votre détaillant ou à votre administrateur de système.
Linked Capacity Plus
Linked Capacity Plus est une configuration de partage de canaux multisite du système radio MOTOTRBO alliant les principaux avantages des configurations Capacity Plus et Sites IP interconnectés.
Linked Capacity Plus permet à votre appareil radio de fonctionner au-delà de la zone de couverture d'un site unique en se connectant à différents sites accessibles par l'intermédiaire d'un réseau IP (Internet Protocol). Cette fonction permet également d'accroître la capacité en utilisant efficacement le nombre disponible combiné de canaux programmés pris en charge par chacun des sites disponibles.
Lorsque la radio quitte la zone de couverture d'un site et entre dans celle d'un autre site, elle se connecte au relais du nouveau site pour envoyer et recevoir les appels ou les transmissions de données. Selon la configuration choisie, cette opération se fait de façon automatique ou manuelle.
Si la radio est configurée en mode automatique, elle détecte tous les sites accessibles lorsque le signal du site actuel est faible ou lorsqu'elle ne reçoit aucun signal de ce site. Elle se verrouille alors sur le relais du site dont la valeur RSSI (Received Signal Strength Indicator – indicateur d'intensité de réception du signal) est la plus élevée.
Lors d'une recherche manuelle, la radio recherche le premier site actuellement à portée dans la liste des sites disponibles en itinérance (qui ne présente pas nécessairement le signal le plus puissant) et s'y connecte.
ais canadien

Descrip
tion
des in
dicateu
rs d'état
11
Les canaux pour lesquels la configuration Linked Capacity Plus est activée peuvent être ajoutés à une liste d'itinérance particulière. En mode de recherche automatique en itinérance, la radio recherche ces canaux afin d'identifier le meilleur site.
REMARQUE : Il est impossible d'ajouter ou de supprimer manuellement une entrée dans la liste d'itinérance. Pour obtenir des renseignements supplémentaires, adressez-vous à votre détaillant ou à votre administrateur de système.
Tout comme pour Capacity Plus, les icônes des fonctions qui ne sont pas offertes en mode Linked Capacity Plus ne sont pas disponibles dans le menu. Une tonalité d'échec retentit lorsque vous tentez d'accéder à une fonction qui n'est pas accessible en mode Linked Capacity Plus à l'aide d'une touche programmable.
Pour obtenir davantage de renseignements au sujet de cette configuration, adressez-vous à votre détaillant ou à votre administrateur de système.
Description des indicateurs d'état
Vous pouvez connaître l'état de fonctionnement de votre radio à l'aide d'une des méthodes suivantes :Icônes d'affichage . . . . . . . . . . . . . . . . . . . . . . . . . . . .page 12Icônes d'appels . . . . . . . . . . . . . . . . . . . . . . . . . . . . . .page 13Icônes d'avertissement. . . . . . . . . . . . . . . . . . . . . . . . .page 13Icônes des messages envoyés . . . . . . . . . . . . . . . . . .page 14Voyants DEL . . . . . . . . . . . . . . . . . . . . . . . . . . . . . . . .page 14Tonalités audio . . . . . . . . . . . . . . . . . . . . . . . . . . . . . . .page 15Tonalités d'avertissement . . . . . . . . . . . . . . . . . . . . . . .page 15
Français canadien

Des
crip
tio
n d
es in
dic
ateu
rs d
'éta
t
12
Franç
Icônes d'affichage
L'affichage à cristaux liquides (ACL) présente l'état de la radio, les entrées de texte et des menus.
Vous trouverez ci-dessous les icônes s'affichant dans la barre d'état qui apparaît au haut de l'écran. Les icônes s'affichent dans la barre d'état, de gauche à droite, en ordre d'apparition et d'utilisation et en fonction des canaux.
Indicateur de puissance de signal reçu (RSSI)
Le nombre de barres représente l'intensité du signal radio. L'affichage de quatre barres indique une intensité de signal maximale. Cette icône ne s'affiche qu'en mode de réception.
Urgence
La radio est en mode d'urgence.
Données à volume élevé
La radio reçoit des données à volume élevé et le canal est occupé.
Notification
La liste de notifications comprend au moins un événement manqué.
Balayage*‡
La fonction de balayage est activée.
* Ne s'applique pas à Capacity Plus‡ Ne s'applique pas à Linked Capacity Plus
Balayage – Priorité 1*‡
La radio détecte de l'activité sur le canal ou le groupe de canaux Priorité 1.
Balayage – Priorité 2*‡
La radio détecte de l'activité sur le canal ou le groupe de canaux Priorité 2.
Balayage par vote
La fonction de balayage par vote est activée.
Moniteur
Le canal sélectionné est surveillé.
Mode Direct*‡
En l'absence d'un répéteur, la radio est configurée pour la communication directe radio à radio.
Itinérance de site*
La fonction d'itinérance de site est activée.
Sécurisé
La fonction Cryptage est activée.
Non sécurisée
La fonction Cryptage est désactivée.
Retardateur de programmation par radiocommunication
Indique le temps restant avant le redémarrage automatique de la radio.
ais canadien

Descrip
tion
des in
dicateu
rs d'état
13
Icônes d'appels
Vous trouverez ci-dessous les icônes s'affichant à l'écran de la radio pendant un appel. Ces icônes apparaissent également dans la liste de contacts pour indiquer le type d'alias ou d'ID.
Icônes d'avertissement
Les icônes décrites ci-dessous s'affichent momentanément à l'écran de la radio lors de l'exécution d'une tâche.
Désactivation des tonalités
Les tonalités sont désactivées.
Puissance haute
La puissance de la radio est réglée à Haute.
Appel individuel
Cette icône s'affiche lorsqu'un appel individuel est en cours. Dans la liste de contacts, elle indique l'alias (nom) ou l'ID (numéro) de l'abonné.Appel groupe/Appel général
Cette icône s'affiche lorsqu'un appel de groupe ou un appel général est en cours. Dans la liste de contacts, elle indique l'alias (nom) ou l'ID (numéro) du groupe.Appel téléphonique en tant qu'appel individuel
Indique un appel téléphonique comme étant un Appel individuel en cours. Dans la liste de contacts, elle indique l'alias (nom) ou l'ID (numéro) du téléphone.
Faire un appel de groupe/général
Indique un appel téléphonique comme étant un Appel de groupe/général en cours. Dans la liste de contacts, elle indique l'alias (nom) ou l'ID (numéro) du groupe.
Transmission réussie (positif)
L'action exécutée a réussi.
Echec de transmission (négatif)
L'action exécutée n'a pas réussi.
Transmission en cours (transitoire)
Transmission en cours. Cette icône dynamique apparaît avant l'indication de réussite ou d'échec de la transmission.
Français canadien
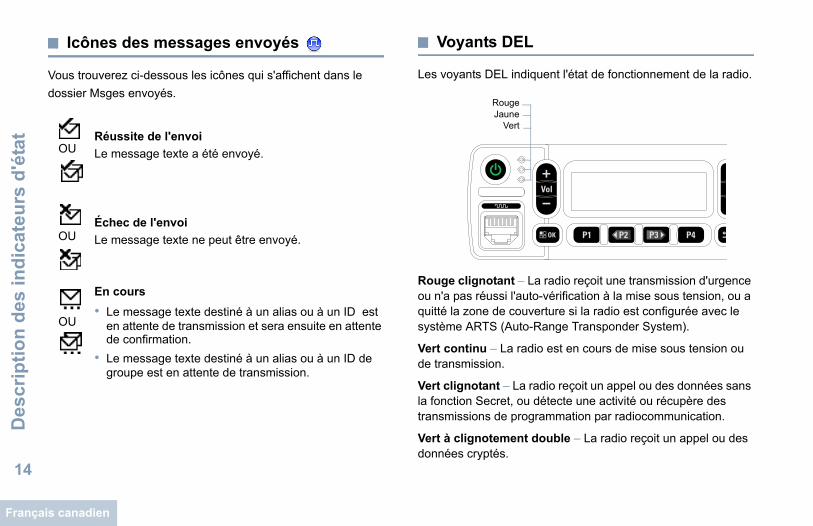
Des
crip
tio
n d
es in
dic
ateu
rs d
'éta
t
14
Franç
Icônes des messages envoyés
Vous trouverez ci-dessous les icônes qui s'affichent dans le dossier Msges envoyés.
Voyants DEL
Les voyants DEL indiquent l'état de fonctionnement de la radio.
Rouge clignotant – La radio reçoit une transmission d'urgence ou n'a pas réussi l'auto-vérification à la mise sous tension, ou a quitté la zone de couverture si la radio est configurée avec le système ARTS (Auto-Range Transponder System).
Vert continu – La radio est en cours de mise sous tension ou de transmission.
Vert clignotant – La radio reçoit un appel ou des données sans la fonction Secret, ou détecte une activité ou récupère des transmissions de programmation par radiocommunication.
Vert à clignotement double – La radio reçoit un appel ou des données cryptés.
Réussite de l'envoi
Le message texte a été envoyé.
Échec de l'envoi
Le message texte ne peut être envoyé.
En cours
• Le message texte destiné à un alias ou à un ID est en attente de transmission et sera ensuite en attente de confirmation.
• Le message texte destiné à un alias ou à un ID de groupe est en attente de transmission.
OU
OU
OU
RougeJaune
Vert
ais canadien
Descrip
tion
des in
dicateu
rs d'état
15
Jaune continu – La radio surveille un canal classique.
Jaune clignotant – La radio effectue un balayage pour détecter de l'activité ou reçoit un avertissement d'appel ou tous les canaux Linked Capacity Plus locaux sont occupés.
Jaune à clignotement double – La radio n'est plus connectée au répéteur durant l'utilisation de la fonction Capacity Plus ou Linked Capacity Plus, tous les canaux Capacity Plus ou Linked Capacity Plus sont occupés, la fonction d'itinérance automatique est activée ou la radio recherche activement un nouveau site. Il peut aussi indiquer qu'un avertissement d'appel de groupe est en attente de réponse ou que la radio est verrouillée.
En mode classique, le voyant DEL vert clignotant indique que la radio détecte de l'activité de liaison radio. En raison de la nature du protocole relatif aux données numériques, cette activité pourrait avoir une influence sur les canaux programmés de la radio.
REMARQUE : En mode Capacity Plus et Linked Capacity Plus, le voyant DEL ne s'allume pas si la radio détecte de l'activité de liaison radio.
Tonalités d'avertissement
Tonalité aiguë Tonalité grave
Tonalités audio
Les tonalités d'avertissement vous informent de manière audible de l'état de la radio ou de la réception de données.
Tonalité de réussite
Tonalité d'échec
Tonalité continue La radio émet un signal monophonique. Il retentit de manière continue jusqu'à ce qu'il cesse.
Tonalité périodique Le signal sonore retentit de manière périodique en fonction des réglages de la radio. Il démarre, s'arrête, puis reprend.
Tonalité répétitive Le signal sonore unique retentit et se répète jusqu'à ce que l'utilisateur y mette fin.
Tonalité temporaire Le signal sonore retentit une fois pendant une courte période, selon les réglages de la radio.
Français canadien

Réc
epti
on
et
ach
emin
emen
t d
'ap
pel
s
16
Franç
Réception et acheminement d'appels
Lorsque vous aurez bien compris la configuration de votre dispositif MOTOTRBO mobile, vous serez prêt à utiliser votre radio.
Utilisez ce guide de navigation pour vous familiariser avec les fonctions d'appel de base :Sélection d'une zone. . . . . . . . . . . . . . . . . . . . . . . . . . page 16Sélectionner un canal . . . . . . . . . . . . . . . . . . . . . . . . . page 17Réception et réponse à un appel . . . . . . . . . . . . . . . . page 17Faire un appel radio . . . . . . . . . . . . . . . . . . . . . . . . . . page 22Interrompre un appel radio . . . . . . . . . . . . . . . . . . . . . page 27Mode direct . . . . . . . . . . . . . . . . . . . . . . . . . . . . . . . . . page 28Écoute permanente. . . . . . . . . . . . . . . . . . . . . . . . . . . page 28
Sélection d'une zone
Une zone est un groupe de canaux. Votre radio prend en charge jusqu'à 128 canaux et 25 zones, chacune pouvant comprendre un maximum de 128 canaux.
Procédez comme suit pour sélectionner une zone.
Procédure :Appuyez sur la touche programmée Zone et passez à l'étape 3. OUProcédez comme suit.
1 g pour accéder au menu.
2 b ou c jusqu'à Zone, puis appuyez sur g pour sélectionner l'option.
3 La zone sélectionnée est affichée et indiquée par l'icône .
4 b ou c jusqu'à la zone voulue, puis appuyez sur g pour la sélectionner.
5 L'écran affiche <Zone> sélectionnée pendant un moment et revient à l'écran de la zone sélectionnée.
REMARQUE : Vous pouvez également sélectionner une zone par recherche d'alias sur un microphone à clavier. Consultez la section Sélection d'une zone à l'aide de la recherche d'alias à la page 91.
ais canadien
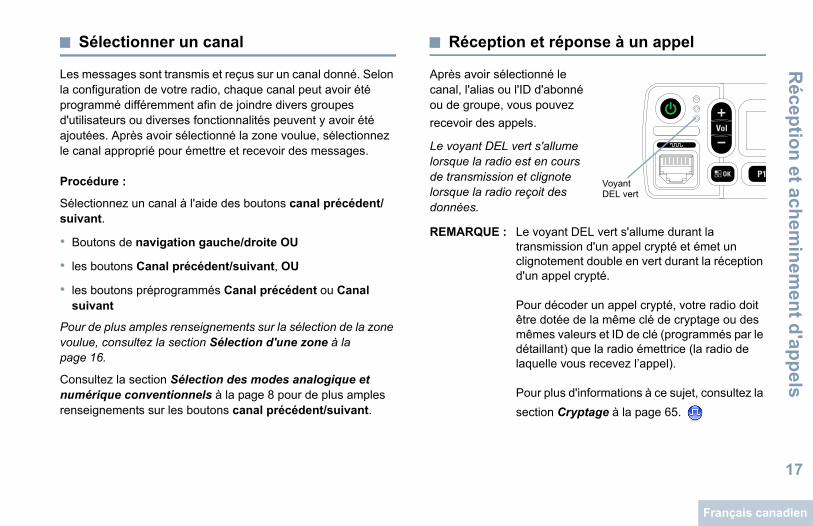
Récep
tion
et achem
inem
ent d
'app
els
17
Sélectionner un canal
Les messages sont transmis et reçus sur un canal donné. Selon la configuration de votre radio, chaque canal peut avoir été programmé différemment afin de joindre divers groupes d'utilisateurs ou diverses fonctionnalités peuvent y avoir été ajoutées. Après avoir sélectionné la zone voulue, sélectionnez le canal approprié pour émettre et recevoir des messages.
Procédure :
Sélectionnez un canal à l'aide des boutons canal précédent/suivant.
• Boutons de navigation gauche/droite OU
• les boutons Canal précédent/suivant, OU
• les boutons préprogrammés Canal précédent ou Canal suivant
Pour de plus amples renseignements sur la sélection de la zone voulue, consultez la section Sélection d'une zone à la page 16.
Consultez la section Sélection des modes analogique et numérique conventionnels à la page 8 pour de plus amples renseignements sur les boutons canal précédent/suivant.
Réception et réponse à un appel
Après avoir sélectionné le canal, l'alias ou l'ID d'abonné ou de groupe, vous pouvez recevoir des appels.
Le voyant DEL vert s'allume lorsque la radio est en cours de transmission et clignote lorsque la radio reçoit des données.
REMARQUE : Le voyant DEL vert s'allume durant la transmission d'un appel crypté et émet un clignotement double en vert durant la réception d'un appel crypté.
Pour décoder un appel crypté, votre radio doit être dotée de la même clé de cryptage ou des mêmes valeurs et ID de clé (programmés par le détaillant) que la radio émettrice (la radio de laquelle vous recevez l’appel).
Pour plus d'informations à ce sujet, consultez la section Cryptage à la page 65.
Voyant DEL vert
Français canadien
Réc
epti
on
et
ach
emin
emen
t d
'ap
pel
s
18
Franç
Recevoir un appel de groupe et y répondre
Pour être en mesure de recevoir un appel destiné à un groupe d'utilisateurs, votre radio doit avoir été préalablement définie comme partie intégrante de ce groupe.
Procédure :Si vous recevez un appel de groupe (à partir de l’écran d’accueil) :
1 Le voyant DEL vert clignote.
2 L'information sur l'ID de l'appelant s'affiche dans le coin supérieur droit. La première ligne de texte affiche l'icône d'appel de groupe et l'alias de l'appel de groupe. Votre radio désactive la sourdine et l'appel entrant se fait entendre sur le haut-parleur.
3 Si l'indicateur Canal libre est activé, une courte tonalité d'avertissement se fait entendre lorsque l'utilisateur de la radio émettrice cesse d'appuyer sur le bouton PTT, vous indiquant que le canal est libre et que vous pouvez répondre.Pour prendre l'appel, appuyez sur le bouton PTT.OU
Si la fonction Interruption vocale est activée, appuyez sur le bouton PTT pour mettre fin à l'appel en cours sur la radio qui émet la transmission et libérer le canal afin de vous permettre de répondre.
4 Le voyant DEL s'allume en vert.
5 Attendez la fin de la tonalité d'autorisation de parler (si elle est activée) et parlez clairement dans le microphone.OU
Attendez la fin de l'effet local PTT (s'il est activé) et parlez clairement dans le microphone.
6 Relâchez le bouton PTT pour écouter.
7 S'il n'y a aucune activité vocale pendant une durée préprogrammée, l'appel prend fin.
Pour en savoir davantage sur la fonction d'appel de groupe, consultez la section Pour passer un appel de groupe à la page 23.
Recevoir un appel individuel et y répondre
Un appel privé est un appel effectué à partir d'une radio individuelle vers une autre radio individuelle.
Procédure :Si vous recevez un appel privé :
1 Le voyant DEL vert clignote.
2 La première ligne de texte affiche l'icône d'appel privé et l'alias de l'appelant. Votre radio désactive la sourdine et l'appel entrant se fait entendre sur le haut-parleur.
ais canadien
Récep
tion
et achem
inem
ent d
'app
els
19
3 Si l'indicateur Canal libre est activé, une courte tonalité d'avertissement se fait entendre lorsque l'utilisateur de la radio émettrice cesse d'appuyer sur le bouton PTT, vous indiquant que le canal est libre et que vous pouvez répondre.Pour prendre l'appel, appuyez sur le bouton PTT.OU
Si la fonction Interruption vocale est activée, appuyez sur le bouton PTT pour mettre fin à l'appel en cours sur la radio qui émet la transmission et libérer le canal afin de vous permettre de répondre.
4 Le voyant DEL s'allume en vert.
5 Attendez la fin de la tonalité d'autorisation de parler (si elle est activée) et parlez clairement dans le microphone.
6 Relâchez le bouton PTT pour écouter.
7 S'il n'y a aucune activité vocale pendant une durée préprogrammée, l'appel prend fin.
8 L'écran affiche Appel terminé.
Pour en savoir davantage sur la fonction d'appel privé, consultez la section Passer un appel privé à la page 24.
Recevoir un appel général
Un appel général est un appel effectué à partir d'une radio individuelle et destiné à toutes les radios présentes sur le canal. On l'utilise surtout pour faire une annonce importante exigeant toute l'attention des utilisateurs.
Procédure :Lorsque vous recevez un appel général :
1 Une tonalité retentit et le voyant DEL vert clignote.
2 L'information sur l'ID de l'appelant s'affiche dans le coin supérieur droit. La première ligne de texte affiche l'icône d'appel de groupe et Appel général. Votre radio désactive la sourdine et l'appel entrant se fait entendre sur le haut-parleur.
3 Une fois que l'appel général est terminé, la radio revient à l’écran où elle était avant de recevoir l’appel. Les appels généraux n'attendent pas pendant un temps prédéterminé avant de se terminer.
Si l'indicateur Canal libre est activé, une courte tonalité d'avertissement se fait entendre lorsque l'utilisateur de la radio à l'origine de la transmission cesse d'appuyer sur le bouton PTT, vous indiquant que le canal est maintenant libre.
Vous ne pouvez pas répondre à un appel général.
Pour en savoir davantage sur la fonction d'appel général, consultez la section Passer un appel général à la page 25.
Français canadien
Réc
epti
on
et
ach
emin
emen
t d
'ap
pel
s
20
Franç
REMARQUE : La radio interrompt la réception de l'appel général si vous changez de canal pendant l'appel.Pendant un appel général, vous ne pouvez pas naviguer ni faire de changements tant que l'appel est en cours.
Recevoir un appel sélectif et y répondre
Un appel sélectif est un appel effectué à partir d'une radio individuelle vers une autre radio individuelle. Il s'agit d'un appel privé effectué en mode analogique.
Procédure :Si vous recevez un appel sélectif :
1 Le voyant DEL vert clignote.
2 L'icône de l'appel privé s'affiche sur la première ligne de l'écran. La radio affiche Appel sélectif ou Avert. & appel. Votre radio désactive la sourdine et l'appel entrant se fait entendre sur le haut-parleur.
3 Pour prendre l'appel, appuyez sur le bouton PTT.
4 Le voyant DEL s'allume en vert.
5 Attendez la fin de la tonalité d'autorisation de parler (si elle est activée) et parlez clairement dans le microphone.
6 Relâchez le bouton PTT pour écouter.
7 S'il n'y a aucune activité vocale pendant une durée préprogrammée, l'appel prend fin.
8 L'écran affiche Appel terminé.
REMARQUE : Consultez la section Acheminement d'un appel sélectif à la page 25 pour en savoir davantage sur la fonction d'appel sélectif.
Recevoir un appel téléphonique et y répondre
REMARQUE : Si la fonction d'appel téléphonique est activée, vous pouvez répondre à un appel téléphonique. Pour obtenir davantage de renseignements au sujet de cette configuration, adressez-vous à votre détaillant ou à votre administrateur de système.
Appel téléphonique en tant qu'appel individuel
Procédure :Si vous recevez un appel téléphonique en tant qu’appel privé :
1 L'icône d'appel téléphonique s'affiche dans le coin supérieur droit de l'écran. L'écran affiche l'alias de l'appelant ou Appel tél.
2 Appuyez sur la touche PTT pour parler et relâchez la touche pour écouter.
3 Appuyez sur e pour mettre fin à l'appel.L'écran affiche Fin Appel tél..
ais canadien
Récep
tion
et achem
inem
ent d
'app
els
21
4 En cas de réussite :Une tonalité se fait entendre et l'écran affiche le message Appel terminé. OUEn cas d'échec :Votre radio retourne à l’écran d’appel téléphonique. Répétez l'étape 3 ou attendez que l'utilisateur du téléphone mette fin à l'appel.
Si la fonctionnalité d'appel téléphonique n'est pas activée, l'écran affiche Indisponible, et votre radio met les appels en sourdine. Lorsque l'appel prend fin, la radio revient à l'écran où vous étiez avant de faire l'appel.
Appel téléphonique en tant qu’appel de groupe
Procédure :Si vous recevez un appel téléphonique en tant qu’appel de groupe :
1 L'icône d'appel de groupe s'affiche dans le coin supérieur droit de l'écran. L'écran affiche l'alias du groupe et Appel tél.
2 Appuyez sur la touche PTT pour parler et relâchez la touche pour écouter.
3 Appuyez sur e pour mettre fin à l'appel.L'écran affiche Fin Appel tél..
4 En cas de réussite :Une tonalité se fait entendre et l'écran affiche le message Appel terminé. OUEn cas d'échec :Votre radio retourne à l’écran d’appel téléphonique. Répétez l'étape 3 ou attendez que l'utilisateur du téléphone mette fin à l'appel.
Si la fonctionnalité d'appel téléphonique n'est pas activée, l'écran affiche Indisponible, et votre radio met les appels en sourdine. Lorsque l'appel prend fin, la radio revient à l'écran où vous étiez avant de faire l'appel.
Appel téléphonique en tant qu’appel général
Procédure :Si vous recevez un appel téléphonique en tant qu’appel général :
1 L'icône d'appel téléphonique s'affiche dans le coin supérieur droit de l'écran. L'écran affiche Appel général et Appel tél.
2 Appuyez sur la touche PTT pour parler et relâchez la touche pour écouter.
3 Appuyez sur e pour mettre fin à l'appel.L'écran affiche Fin Appel tél..
Français canadien
Réc
epti
on
et
ach
emin
emen
t d
'ap
pel
s
22
Franç
4 En cas de réussite :Une tonalité retentit et l'écran affiche Appel général et Appel terminé. OUEn cas d'échec :Votre radio retourne à l’écran d’appel téléphonique. Répétez l'étape 3 pour terminer l'appel.
Si la fonctionnalité d'appel téléphonique n'est pas activée, l'écran affiche Indisponible, et votre radio met l'appel en sourdine. Lorsque l'appel prend fin, la radio revient à l'écran où vous étiez avant de faire l'appel.
REMARQUE : Lorsque vous recevez un appel général, vous ne pouvez y répondre ou y mettre fin que si un type général est attribué au canal.
Faire un appel radio
Après avoir sélectionné un canal, vous pouvez choisir un alias ou un ID d'abonné ou de groupe à l'aide des éléments suivants :
• La liste de contacts (consultez la section Réglages des contacts à la page 37)
• Une touche programmée d'accès direct
• Touches numériques programmées – Cette méthode ne peut être utilisée que pour faire un appel de groupe, un appel privé ou un appel général et nécessite le microphone à clavier (reportez-vous à la section Faire un appel de groupe, privé ou général à l'aide de la touche numérique programmable à la page 98).
• Num. manuelle (par l'intermédiaire de la liste des contacts) – Cette méthode est destinée aux appels privés et aux appels téléphoniques seulement et la composition utilise le clavier (consultez les sections Pour passer un appel individuel à l'aide de la numérotation manuelle à la page page 93 et Pour faire un appel téléphonique à l'aide de la
numérotation manuelle à la page 94)
• Une touche programmable – Cette méthode ne s'applique qu'aux appels téléphoniques seulement (reportez-vous à la section Pour passer un appel individuel à l'aide de la numérotation manuelle à la page 93).
ais canadien
Récep
tion
et achem
inem
ent d
'app
els
23
REMARQUE : La fonction de cryptage de votre radio doit être activée pour que ce canal soit en mesure d'envoyer des transmissions cryptées. Seule une radio cible dotée de la même clé de cryptage que votre radio peut décoder la transmission.Pour plus d'informations à ce sujet, consultez la section Cryptage à la page 65.
La fonction d'accès direct vous permet de faire aisément un appel de groupe ou un appel privé à un ID prédéfini. Vous pouvez attribuer cette fonction à une touche programmable avec une brève ou une longue pression. Vous pouvez UNIQUEMENT attribuer un ID à une touche d'accès direct. Vous pouvez programmer plusieurs touches d'accès direct sur la radio.
Pour passer un appel de groupe
Pour être en mesure de passer un appel à un groupe d'utilisateurs, votre radio doit avoir été préalablement définie comme partie intégrante de ce groupe.
Procédure :
1 Sélectionnez le canal qui correspond à l'alias ou à l'ID de groupe en surbrillance. Consultez la section Sélectionner un canal à la page 17.OUAppuyez sur la touche d'accès direct programmée.
2 Pour passer l'appel, appuyez sur le bouton de conversation PTT. Le voyant vert s'allume. La première ligne de texte affiche l'icône d'appel de groupe et l'alias de l'appel de groupe.
3 Attendez la fin de la tonalité d'autorisation de parler (si elle est activée) et parlez clairement dans le microphone.OU
Attendez la fin de l'effet local PTT (s'il est activé) et parlez clairement dans le microphone.
4 Relâchez le bouton PTT pour écouter. Lorsque la radio cible répond, le voyant DEL clignote en vert. L'icône d'appel de groupe, l'alias ou l'ID du groupe ainsi que l'alias ou l'ID de la radio à l'origine de la transmission s'affichent à l'écran.
5 Si l'indicateur Canal libre est activé, une courte tonalité d'avertissement retentit lorsque l'utilisateur de la radio cible relâche le bouton PTT, vous indiquant que le canal est libre et que vous pouvez répondre. Pour répondre, appuyez sur le bouton PTT.OUS'il n'y a aucune activité vocale pendant une durée prédéfinie, l'appel prend fin.
6 La radio revient à l'écran où vous étiez avant de faire l'appel.
Vous pouvez également faire un appel de groupe par l'intermédiaire de la liste des contacts (reportez-vous à la section Passer un appel de groupe à partir des contacts à la page 38).
Français canadien
Réc
epti
on
et
ach
emin
emen
t d
'ap
pel
s
24
Franç
Passer un appel privé
Bien que vous puissiez recevoir un appel individuel effectué par une radio individuelle autorisée et y répondre, votre radio doit avoir été préalablement programmée pour vous permettre de passer un appel individuel.
Il existe deux types d'appels individuels. Le premier type d'appel requiert une vérification de présence radio avant d'établir l'appel, alors que le second transmet l'appel immédiatement.
Un seul de ces types d'appels peut être programmé dans votre radio par votre détaillant.
Une tonalité d'échec se fait entendre lorsque vous faites un appel privé à partir du menu, du journal des appels, de la liste de contacts, de la touche d'accès direct, des touches numériques programmées, de la touche de navigation gauche/droite , de la touche de réglage du volume ou de la touche canal précédent/suivant si cette fonction n'est pas activée.
Servez-vous des fonctions d'avertissement d'appel pour communiquer avec une radio individuelle. Pour plus d'informations à ce sujet, consultez la section Fonction Avertissement d'appel à la page 47.
Procédure :
1 Sélectionnez le canal qui correspond à l'alias ou à l'ID d'abonné en surbrillance. Consultez la section Sélectionner un canal à la page 17.OUAppuyez sur la touche d'accès direct programmée.
2 Pour passer l'appel, appuyez sur le bouton de conversation PTT. Le voyant DEL s'allume en vert. L'écran affiche l'icône d'appel privé, et l'alias de l'abonné alterne avec Appel.
3 Attendez la fin de la tonalité d'autorisation de parler (si elle est activée) et parlez clairement dans le microphone.
4 Relâchez le bouton PTT pour écouter. Lorsque la radio cible répond, le voyant DEL clignote en vert.
5 Si l'indicateur Canal libre est activé, une courte tonalité d'avertissement retentit lorsque l'utilisateur de la radio cible relâche le bouton PTT, vous indiquant que le canal est libre et que vous pouvez répondre. Pour répondre, appuyez sur le bouton PTT.OUS'il n'y a aucune activité vocale pendant une durée prédéfinie, l'appel prend fin.
6 L'écran affiche Appel terminé.
ais canadien

Récep
tion
et achem
inem
ent d
'app
els
25
Vous pouvez aussi faire un appel privé au moyen des contacts (consultez la section Faire un appel privé à partir des contacts à la page 39), composer le numéro d'un appel privé manuellement (consultez la section Pour passer un appel individuel à l'aide de la numérotation manuelle à la page 93) ou effectuer une recherche alphanumérique rapide pour trouver l'alias cible en passant par le clavier (consultez la section Pour faire un appel de groupe, individuel ou téléphonique ou général à l'aide de la recherche d'alias à la page 103).
Passer un appel général
Cette fonction vous permet de transmettre un appel à tous les utilisateurs sur le canal. Votre radio doit être programmée de manière à vous permettre d'utiliser cette fonction.
Procédure :
1 Sélectionnez le canal qui correspond à l'alias ou à l'ID de groupe Appel général en surbrillance. Consultez la section Sélectionner un canal à la page 17.
2 Pour passer l'appel, appuyez sur le bouton de conversation PTT. Le voyant DEL s'allume en vert. L'écran affiche l'icône d'appel de groupe et Appel général.
3 Attendez la fin de la tonalité d'autorisation de parler (si elle est activée) et parlez clairement dans le microphone.OU
Attendez la fin de l'effet local PTT (s'il est activé) et parlez clairement dans le microphone.
Les utilisateurs du canal ne peuvent pas répondre à l'appel général.
Acheminement d'un appel sélectif
De la même manière que pour l'appel individuel, même si vous pouvez recevoir un appel sélectif effectué par une radio individuelle autorisée et y répondre, votre radio doit avoir été préalablement programmée pour vous permettre de passer un appel sélectif.
Procédure :
1 Sélectionnez le canal qui correspond à l'alias ou à l'ID d'abonné en surbrillance. Consultez la section Sélectionner un canal à la page 17.
2 Pour passer l'appel, appuyez sur le bouton de conversation PTT. Le voyant DEL s'allume en vert. L'écran affiche l'icône d'appel privé et l'alias de l'abonné.
3 Attendez la fin de la tonalité d'autorisation de parler (si elle est activée) et parlez clairement dans le microphone.
4 Relâchez le bouton PTT pour écouter. Lorsque la radio cible répond, le voyant DEL clignote en vert.
5 S'il n'y a aucune activité vocale pendant une durée préprogrammée, l'appel prend fin.
6 Une courte tonalité retentit. L'écran affiche Appel terminé.
Français canadien
Réc
epti
on
et
ach
emin
emen
t d
'ap
pel
s
26
Franç
Faire un appel téléphonique
1 Appuyez sur la touche programmée Téléphone pour accéder au répertoire téléphonique.
b ou c jusqu'à la radio ou l'ID d'abonné requis, puis
appuyez sur g pour sélectionner l'option.OUAppuyez sur la touche d'accès direct programmée.
2 Si le code d'accès n'a pas été préconfiguré, l'écran affiche Code d'accès :.
Entrez le code d'accès et appuyez ensuite sur g pour continuer.
3 Pour passer l'appel, appuyez sur le bouton de conversation PTT. Le voyant DEL s'allume en vert. L'icône d'appel téléphonique s'affiche dans le coin supérieur droit de l'écran. L'alias de la radio d'abonné s'affiche sur la première ligne de l'écran. L'état de l'appel s'affiche sur la deuxième ligne de l'écran.
4 En cas de réussite :La tonalité DTMF se fait entendre. Vous entendrez la tonalité de composition du téléphone de l'utilisateur. L'alias de la radio d'abonné s'affiche sur la première ligne de l'écran. L'icône d'appel téléphonique s'affiche dans le coin supérieur droit de l'écran. OU
En cas d'échec :Une tonalité se fait entendre et l'écran affiche le message Appel tél. échoué. Votre radio retourne à l’écran de code d’accès.Si le code d’accès est préconfiguré dans la liste de contacts, la radio revient à l’écran affiché avant la tentative d’appel.
5 Appuyez sur la touche PTT pour parler et relâchez la touche pour écouter. Pour entrer d'autres chiffres, si demandé durant l'appel :
Entrez les autres chiffres au clavier, puis appuyez sur g pour continuer. La tonalité DTMF se fait entendre et la radio revient à l'écran précédent.
6 Appuyez sur e pour mettre fin à l'appel.Si le code de non-accès n'est pas préconfiguré dans la liste de contacts, l'écran affiche le message Code de libération :. Entrez le code de libération et appuyez
ensuite sur g pour continuer. La radio revient à l'écran précédent.OUAppuyez sur la touche d'accès direct. La tonalité DTMF se fait entendre. Si la touche d'accès direct n'est pas programmée, une tonalité d'échec se fait entendre.
7 La tonalité DTMF se fait entendre et l’écran affiche Fin Appel tél..
ais canadien
Récep
tion
et achem
inem
ent d
'app
els
27
8 En cas de réussite :Une tonalité se fait entendre et l'écran affiche le message Appel terminé. OUEn cas d'échec :Votre radio retourne à l’écran d’appel téléphonique. Répétez les étapes 6 et 7 ou attendez que l'utilisateur du téléphone ait terminé l'appel.
Lorsque l'utilisateur a terminé d'utiliser le téléphone, une tonalité de réussite se fait entendre et l'écran affiche le message Appel terminé.
Si l'appel se termine pendant que vous entrez les autres chiffres demandés par l'appel téléphonique, la radio revient à l'écran affiché avant la tentative d'appel.
Pendant un accès à un canal, appuyez sur e pour mettre fin à la tentative d’appel (une tonalité se fait entendre).
Pendant l’appel, lorsque vous appuyez sur la touche d’accès direct, si le code de non-accès est préconfiguré ou si vous entrez le code de non-accès en entrée pour les autres chiffres, la radio tentera de mettre fin à l’appel.
Le code d’accès ou de non-accès ne peut dépasser 10 caractères.
Interrompre un appel radio
La fonction vous permet de mettre fin à un appel de groupe ou à un appel privé afin de libérer le canal pour une transmission. Par exemple, lorsque le microphone de la radio est bloqué ou que le bouton PTT a été enfoncé par inadvertance.
Votre radio doit être programmée de manière à vous permettre d'utiliser cette fonction.
REMARQUE : Pour obtenir davantage de renseignements au sujet de cette configuration, adressez-vous à votre détaillant ou à votre administrateur de système.
Procédure :
Pendant que vous êtes sur le canal voulu :
1 Appuyez sur la touche programmée Interruption de transmission.
2 L'écran affiche Interruption.
3 Attendez la confirmation.
4 Une tonalité de réussite retentit et l'écran affiche Interruption réussie, vous indiquant que le canal est maintenant libre.OUUne tonalité d'échec retentit et l'écran affiche Interruption échouée.
Français canadien
Réc
epti
on
et
ach
emin
emen
t d
'ap
pel
s
28
Franç
L'écran de la radio sur laquelle la transmission a été interrompue affiche Appel interrompu, une tonalité d'échec retentit jusqu'à ce que vous lâchiez le bouton PTT, si l'appel en cours était interruptible et a été interrompu.
Mode direct
Vous pouvez continuer de communiquer lorsque votre répéteur ne fonctionne pas ou lorsque la radio est hors de la portée du répéteur, mais demeure à la portée des autres radios. Il s'agit du mode « direct ».
REMARQUE : Cette fonction n'est pas offerte en mode Capacity Plus et Linked Capacity Plus.
Procédure :Appuyez sur la touche préprogrammée Rptr/Direct pour alterner entre les modes Répéteur et Direct.OUProcédez comme suit.
1 g pour accéder au menu.
2 b ou c jusqu'à Config/Infos, puis appuyez sur g pour sélectionner l'option.
3 b ou c jusqu'à Config. radio, puis appuyez sur g pour sélectionner l'option.
4 b ou c jusqu'à Mode direct, puis appuyez sur g pour sélectionner l'option.
5 Appuyez sur g pour activer le mode direct. L'écran affiche l'icône à côté du message Activé.OU
Appuyez sur g pour désactiver le mode Direct. L'icône ne s'affiche plus à côté de Activé.
6 L'écran revient automatiquement au menu précédent.
Ce réglage demeure activé même après la mise hors tension.
Écoute permanente
Servez-vous de la fonction d'écoute permanente pour surveiller l'activité d'un canal de manière continue.
REMARQUE : Cette fonction n'est pas offerte en mode Capacity Plus et Linked Capacity Plus.
Procédure :
1 Appuyez sur la touche programmée Écoute permanente.
2 Une tonalité d'avertissement retentit, le voyant DEL jaune s'allume et l'écran affiche Écoute perma. Activée. L'icône d'écoute s'affiche dans la barre d'état.
3 Appuyez sur la touche programmée Écoute permanente pour quitter le mode de surveillance permanente.
4 Une tonalité d'avertissement retentit, le voyant DEL jaune s'éteint et l'écran affiche Écoute Perma. désact.
ais canadien
Fo
nctio
ns avan
cées
29
Fonctions avancées
Utilisez ce guide de navigation pour en savoir plus sur les fonctions avancées de votre radio :Vérification de la radio . . . . . . . . . . . . . . . . . . . . . . . . . page 29Écoute de bruits ambiants . . . . . . . . . . . . . . . . . . . . . . page 30Listes de balayage . . . . . . . . . . . . . . . . . . . . . . . . . . . page 32Balayage . . . . . . . . . . . . . . . . . . . . . . . . . . . . . . . . . . . page 35Vote Scan (Balayage par vote) . . . . . . . . . . . . . . . . . . page 37Réglages des contacts . . . . . . . . . . . . . . . . . . . . . . . . page 37Réglages de l'indicateur d'appel . . . . . . . . . . . . . . . . . page 42Fonctions du Journal des appels. . . . . . . . . . . . . . . . . page 45Fonction Avertissement d'appel . . . . . . . . . . . . . . . . . page 47Fonction d'urgence . . . . . . . . . . . . . . . . . . . . . . . . . . . page 49Mettre à jour l'état analogique . . . . . . . . . . . . . . . . . . . page 64Cryptage . . . . . . . . . . . . . . . . . . . . . . . . . . . . . . . . . . . page 65Brouillage analogique . . . . . . . . . . . . . . . . . . . . . . . . . page 66Réglages multisite . . . . . . . . . . . . . . . . . . . . . . . . . . . . page 67Sécurité . . . . . . . . . . . . . . . . . . . . . . . . . . . . . . . . . . . . page 70Travailleur solitaire . . . . . . . . . . . . . . . . . . . . . . . . . . . page 72Liste de notification . . . . . . . . . . . . . . . . . . . . . . . . . . . page 73ARTS (Auto-Range Transponder System) . . . . . . . . . page 74Programmation par radiocommunication (OTAP) . . . . page 74Utilitaires . . . . . . . . . . . . . . . . . . . . . . . . . . . . . . . . . . . page 75
Vérification de la radio
Lorsqu'activée, la fonction Vérif. radio vous permet de déterminer si une autre radio est en fonction au sein d'un système, sans importuner l'utilisateur de cette radio. Aucune notification sonore ou visuelle ne se manifeste sur la radio cible.
Cette fonction n'est offerte que pour les alias ou ID d'abonné.
Envoyer une vérification radio
Procédure : Utilisez la touche programmée Vérif. radio.
1 Appuyez sur la touche programmée Vérif. radio.
2 b ou c jusqu'à l'alias ou l'ID d'abonné requis, puis
appuyez sur g pour sélectionner l'option.
3 L'écran affiche un bref avis indiquant que l'exécution de la requête est en cours. Le voyant DEL s'allume en vert.
4 Attendez la confirmation.
5 En cas de réussite, une tonalité de réussite se fait entendre et l'écran affiche un bref avis de réussite. OUEn cas d'échec, une tonalité d'échec se fait entendre et l'écran affiche un bref avis d'échec.
6 La radio revient à l'écran d'alias ou d'ID d'abonné.
Français canadien
Fo
nct
ion
s av
ancé
es
30
Franç
OU
Procédure : Utilisez le menu.
1 g pour accéder au menu.
2 b ou c jusqu'à Répertoire, puis appuyez sur g pour sélectionner l'option.
3 b ou c jusqu'à l'alias ou l'ID d'abonné requis, puis
appuyez sur g pour sélectionner l'option.
4 b ou c jusqu'à Vérif. radio, puis appuyez sur g pour sélectionner l'option.
5 L'écran affiche un bref avis indiquant que l'exécution de la requête est en cours. Le voyant DEL s'allume en vert.
6 Attendez la confirmation.
7 En cas de réussite, une tonalité de réussite se fait entendre et l'écran affiche un bref avis de réussite. OUEn cas d'échec, une tonalité d'échec se fait entendre et l'écran affiche un bref avis d'échec.
8 La radio revient à l'écran d'alias ou d'ID d'abonné.
Si vous appuyez sur le bouton g pendant l'attente de
confirmation, une tonalité retentit, puis la radio met fin aux tentatives et quitte le mode de vérification de radio.
Vous pouvez également lancer la vérification de radio par numérotation manuelle (consultez la section Exécution d'une vérification radio à l'aide de la numérotation manuelle, à la page 92).
Écoute de bruits ambiants
Utilisez la fonction Écoute ambiance pour activer le microphone d'une radio cible (ID d'abonné seulement). Aucune notification sonore ou visuelle ne se manifeste sur la radio cible. Vous pouvez utiliser cette fonction pour écouter à distance toute activité audible entourant la radio cible.
Votre radio doit être programmée de manière à vous permettre d'utiliser cette fonction.
ais canadien
Fo
nctio
ns avan
cées
31
Lancer la fonction Écoute ambiance
Procédure : Utilisez la touche programmée Écoute amb.
1 Appuyez sur la touche programmée Écoute amb.
2 b ou c jusqu'à l'alias ou l'ID d'abonné requis, puis
appuyez sur g pour sélectionner l'option.
3 L'écran affiche un bref avis indiquant que l'exécution de la requête est en cours. Le voyant DEL s'allume en vert.
4 Attendez la confirmation.
5 En cas de réussite, une tonalité de réussite se fait entendre et l'écran affiche un bref avis de réussite. Votre radio fait entendre l'audio provenant de la radio écoutée pendant une durée programmée, et l'écran affiche Écoute amb..Lorsque la minuterie s'arrête, la radio fait entendre une tonalité d'avertissement et le voyant DEL s'éteint.OUEn cas d'échec, une tonalité d'échec se fait entendre et l'écran affiche un bref avis d'échec.
OU
Procédure : Utilisez le menu.
1 g pour accéder au menu.
2 b ou c jusqu'à Répertoire, puis appuyez sur g pour sélectionner l'option.
3 b ou c jusqu'à l'alias ou l'ID d'abonné requis, puis
appuyez sur g pour sélectionner l'option.
4 b ou c jusqu'à Écoute amb., puis appuyez sur g pour sélectionner l'option.
5 L'écran affiche un bref avis indiquant que l'exécution de la requête est en cours. Le voyant DEL s'allume en vert.
6 Attendez la confirmation.
7 En cas de réussite, une tonalité de réussite se fait entendre et l'écran affiche un bref avis de réussite. Votre radio fait entendre l'audio provenant de la radio écoutée pendant une durée programmée, et l'écran affiche Écoute amb..Lorsque la minuterie s'arrête, la radio fait entendre une tonalité d'avertissement et le voyant DEL s'éteint.OUEn cas d'échec, une tonalité d'échec se fait entendre et l'écran affiche un bref avis d'échec.
Français canadien

Fo
nct
ion
s av
ancé
es
32
Franç
Vous pouvez également sélectionner manuellement l'adresse de la radio cible (consultez la section Exécution de la fonction Écoute ambiance à l'aide de la numérotation manuelle, à la page 93).
Arrêter la fonction Écoute de bruits ambiants
La fonction Écoute de bruits ambiants s'arrête automatiquement après une durée programmée ou dès qu'une fonction de la radio cible est utilisée.
Procédure :
1 Appuyez sur la touche programmée Interruption de transmission.
2 L'écran affiche un bref avis indiquant que l'exécution de la requête est en cours. Le voyant DEL s'allume en vert.
3 Attendez la confirmation.
4 En cas de réussite, une tonalité de réussite se fait entendre et l'écran affiche un bref avis de réussite.OUEn cas d'échec, une tonalité d'échec se fait entendre et l'écran affiche un bref avis d'échec.
Listes de balayage
Les listes de balayage sont créées et attribuées à des canaux ou à des groupes. Votre radio recherche l'activité vocale en passant par le cycle complet de la séquence de canaux et de groupes définie dans la liste de balayage du canal ou du groupe actuel.
Votre radio prend en charge jusqu'à 250 listes de balayage, chacune pouvant comprendre jusqu'à 16 membres. Chaque liste de balayage peut comprendre des entrées analogiques et des entrées numériques.
Lorsque vous modifiez une liste de balayage, vous pouvez ajouter ou supprimer des canaux ou en établir l'ordre de priorité.
Il vous est également possible de joindre une nouvelle liste de balayage à l'aide de la fonction de programmation du clavier.
REMARQUE : Cette fonction n'est pas offerte en mode Capacity Plus et Linked Capacity Plus.
Consulter une entrée de la Liste de balayage
Procédure :
1 g pour accéder au menu.
2 b ou c jusqu'à Balayage, puis appuyez sur g pour sélectionner l'option.
ais canadien
Fo
nctio
ns avan
cées
33
3 b ou c jusqu'à Voir/Modif liste, puis appuyez sur
g pour sélectionner l'option.
4 Pour afficher chacun des membres de la liste, appuyez sur
b ou c .
L'icône de priorité s'affiche à gauche de l'alias du membre, s'il est défini, pour indiquer si le membre fait partie d'une liste de canaux de Priorité 1 ou de Priorité 2. Vous ne pouvez pas avoir plusieurs canaux de Priorité 1 ou de Priorité 2 dans une liste de balayage.
Aucune icône de priorité ne s'affiche si le réglage de la priorité est Aucun.
Modifier la Liste de balayage
Ajouter une entrée à la Liste de balayage
Procédure :
1 g pour accéder au menu.
2 b ou c jusqu'à Balayage, puis appuyez sur g pour sélectionner l'option.
3 b ou c jusqu'à Voir/Modif liste, puis appuyez sur
g pour sélectionner l'option.
4 b ou c jusqu'à Aj. membre, puis appuyez sur g pour sélectionner l'option.
5 b ou c jusqu'à l'alias ou l'ID requis, puis appuyez sur
g pour sélectionner l'option.
6 b ou c jusqu'au niveau de priorité voulu, puis appuyez
sur g pour le sélectionner.
7 L'écran affiche un bref avis de réussite, immédiatement suivi du message Ajouter autre?.
8 b ou c jusqu'à Oui, puis appuyez sur g pour sélectionner l’option, ajouter une autre entrée, puis répétez les étapes 5 et 6.OU
b ou c jusqu'à Non, puis appuyez sur g pour sauvegarder la liste actuelle.
Français canadien
Fo
nct
ion
s av
ancé
es
34
Franç
Supprimer une entrée de la Liste de balayage
Procédure :
1 g pour accéder au menu.
2 b ou c jusqu'à Balayage, puis appuyez sur g pour sélectionner l'option.
3 b ou c jusqu'à Voir/Modif liste, puis appuyez sur
g pour sélectionner l'option.
4 b ou c jusqu'à l'alias ou l'ID requis, puis appuyez sur
g pour sélectionner l'option.
5 b ou c jusqu'à Supprimer, puis appuyez sur g pour sélectionner l'option.
6 Lorsque le message Supprimer l'entrée?, b ou c
jusqu'à Oui, puis appuyez sur g pour supprimer l'entrée. L'écran affiche un bref avis de réussite. OU
b ou c jusqu'à Non, puis appuyez sur g pour revenir à l'écran précédent.
7 Répétez les étapes 4 à 6 pour supprimer d'autres entrées.
Après avoir supprimé les alias et ID requis, maintenez enfoncée
la touche e pour revenir à l'écran d'accueil.
Régler et modifier l'ordre de priorité d'une entrée de la liste de balayage
Procédure :
1 g pour accéder au menu.
2 b ou c jusqu'à Balayage, puis appuyez sur g pour sélectionner l'option.
3 b ou c jusqu'à Voir/Modif liste, puis appuyez sur
g pour sélectionner l'option.
4 b ou c jusqu'à l'alias ou l'ID requis, puis appuyez sur
g pour sélectionner l'option.
5 b ou c jusqu'à Modif. priorité, puis appuyez sur
g pour sélectionner l'option.
6 b ou c jusqu'au niveau de priorité voulu, puis appuyez
sur g pour le sélectionner.
ais canadien
Fo
nctio
ns avan
cées
35
7 L'écran affiche un bref avis de réussite avant de revenir à l'écran précédent.
8 L'icône de priorité s'affiche à gauche du nom du membre.
Aucune icône de priorité ne s'affiche si le réglage de la priorité est Aucun.
Balayage
Lorsque vous démarrez un balayage, votre radio recherche des activités vocales en passant par le cycle complet de la liste de balayage du canal actuel.
Le voyant DEL jaune clignote et l'icône de balayage s'affiche dans la barre d'état.
Pendant un balayage bimode, si vous employez un canal numérique et si votre radio capte un canal analogique, votre radio passe automatiquement du mode numérique au mode analogique pendant la durée de la communication. L'inverse est également vrai.
Il y a deux façons de démarrer un balayage :
• Balayage des canaux principal (Manuel) : votre radio effectue le scan de tous les canaux et de tous les groupes de votre liste de scan. Au démarrage du balayage, votre radio peut, selon les réglages définis, commencer automatiquement par le dernier canal ou groupe actif lors du dernier balayage ou par le canal à partir duquel le balayage a été lancé.
• Balayage auto (automatique) : Votre radio démarre automatiquement le scan lorsque vous sélectionnez un canal ou un groupe pour lequel la fonction Scan auto est activée.
REMARQUE : Cette fonction n'est pas offerte en mode Capacity Plus et Linked Capacity Plus.
Démarrer et arrêter le balayage
Procédure : Appuyez sur la touche programmée Balayage pour démarrer ou arrêter le balayage. OU Procédez comme suit.
1 Servez-vous des boutons de navigation gauche/droite pour choisir un canal pour lequel une liste de balayage a été programmée.
2 g pour accéder au menu.
3 b ou c jusqu'à Balayage, puis appuyez sur g pour sélectionner l'option.
4 b ou c jusqu'à Allumer, puis appuyez sur g pour sélectionner l'option.OU
b ou c jusqu'à Eteindre, puis appuyez sur g pour sélectionner l'option.
Français canadien

Fo
nct
ion
s av
ancé
es
36
Franç
5 L'écran affiche le message Scan activé. lorsque le balayage est activé. Le voyant DEL jaune clignote et l'icône de balayage s'affiche. OUL'écran affiche Scan désactivé si le balayage est désactivé. L'icône de balayage disparaît.
Pendant un balayage, la radio ne peut accepter des données (par ex., emplacement, données PC) que si elles sont reçues sur le canal sélectionné.
Répondre à une transmission pendant un balayage
Lorsqu'elle exécute un balayage, votre radio s'arrête sur un canal ou un groupe si elle y détecte de l'activité. La radio demeure sur ce canal pendant une durée programmée, la « période d'attente ».
Procédure :
1 Si l'indicateur Canal libre est activé, une courte tonalité d'avertissement se fait entendre lorsque l'utilisateur de la radio émettrice cesse d'appuyer sur le bouton PTT, vous indiquant que le canal est libre et que vous pouvez répondre.
2 Appuyez sur le bouton PTT pendant la période d'attente. Le voyant DEL s'allume en vert.
3 Attendez la fin de la tonalité d'autorisation de parler (si elle est activée) et parlez clairement dans le microphone.OU
Attendez la fin de l'effet local PTT (s'il est activé) et parlez clairement dans le microphone.
4 Relâchez le bouton PTT pour écouter.
5 Si vous ne répondez pas avant que la période d'attente soit écoulée, la radio reprend le balayage des autres canaux ou des autres groupes.
Supprimer un canal nuisible
Si un canal émet continuellement des appels indésirables ou du bruit (canal « nuisible »), vous pouvez éliminer temporairement ce canal indésirable de la liste de balayage.
Cette possibilité n'existe pas pour le canal employé comme canal sélectionné.
Procédure :
1 Lorsque votre radio capte un canal indésirable ou nuisible, appuyez sur la touche programmée Suppr. nuisible jusqu'à ce qu'une tonalité se fasse entendre.
2 Relâchez la touche Suppr. nuisible. Le canal nuisible est supprimé.
ais canadien
Fo
nctio
ns avan
cées
37
La suppression d'un canal nuisible est possible uniquement au moyen de la touche programmée Suppr. nuisible. Cette fonction n'est pas offerte dans le menu.
Restaurer un canal nuisible
Procédure : Pour restaurer le canal nuisible supprimé, effectuez l'une des opérations suivantes :
• Éteignez la radio, puis rallumez-la. OU
• Arrêtez et redémarrez un balayage au moyen de la touche programmée Balayage ou du menu. OU
• Changez de canal à l'aide des boutons Canal précédent/suivant.
Vote Scan (Balayage par vote)
Le balayage par vote vous permet d'obtenir une zone de couverture étendue là où plusieurs stations de base transmettent des données identiques sur différents canaux analogiques.
Votre radio effectue le balayage des canaux analogiques de plusieurs stations de base et sélectionne le signal reçu le plus fort. Une fois la sélection déterminée, la radio désactive la sourdine des transmissions de cette station de base.
Le voyant DEL jaune clignote et l'icône de balayage par vote s'affiche dans la barre d'état.
Pour répondre à une transmission pendant un balayage par vote, suivez les étapes décrites dans la section Répondre à une transmission pendant un balayage à la page 36.
Réglages des contacts
La fonction Contacts constitue le carnet d'adresses de votre radio. Chaque entrée est associée à un alias ou à un ID que vous utilisez pour passer un appel.
Chaque entrée, selon le contexte, est associée à l'un des cinq types d'appel suivants : appel de groupe, appel individuel, appel général, appel PC ou appel dispatch.
Les appels PC et les appels dispatch. sont des appels de données. Ils ne sont disponibles qu'avec les applications. Pour plus de détails, reportez-vous à la documentation sur les applications de données.
REMARQUE : Si la fonction Cryptage est activée sur un canal, vous pouvez faire des appels cryptés de type groupe, privé ou général sur ce canal. Seule une radio cible dotée de la même clé de cryptage OU des mêmes valeurs et ID de clé que votre radio peut décoder la transmission. Pour plus d'informations à ce sujet, consultez la section Cryptage à la page 65.
Français canadien
Fo
nct
ion
s av
ancé
es
38
Franç
De plus, le menu Contacts vous permet d'attribuer à chaque entrée une ou plusieurs touches numériques programmables sur un microphone à clavier. Si une touche numérique est attribuée à une entrée, votre radio peut exécuter la composition
rapide de l'entrée.
Votre radio prend en charge deux listes de contacts, l'une pour les contacts analogiques et l'autre pour les contacts numériques, chaque liste pouvant compter au maximum 500 membres.
Chaque entrée des contacts affiche les renseignements suivants :• Type d'appel
• Alias d'appel
• ID d’appel
REMARQUE : Vous pouvez ajouter ou modifier des ID d'abonné dans la liste des contacts numériques. La suppression des ID d’abonné ne peut être effectuée que par votre détaillant.
Vous pouvez afficher et modifier les ID d’abonné de la liste des contacts analogiques et lancer un avertissement d’appel. L'ajout et la suppression ne peuvent être effectués que par votre détaillant.
Passer un appel de groupe à partir des contacts
Procédure :
1 g pour accéder au menu.
2 b ou c jusqu'à Répertoire, puis appuyez sur g pour sélectionner l'option. Les entrées sont classées dans l'ordre alphabétique.
3 b ou c jusqu'à l'alias ou l'ID de groupe requis.
4 Pour passer l'appel, appuyez sur le bouton de conversation PTT. Le voyant DEL s'allume en vert.
5 Attendez la fin de la tonalité d'autorisation de parler (si elle est activée) et parlez clairement dans le microphone.OU
Attendez la fin de l'effet local PTT (s'il est activé) et parlez clairement dans le microphone.
6 Relâchez le bouton PTT pour écouter. Lorsqu'un utilisateur du groupe répond, le voyant DEL vert clignote. L'icône d'appel de groupe, l'alias ou l'ID du groupe ainsi que l'alias ou l'ID de cet utilisateur s'affichent à l'écran.
ais canadien
Fo
nctio
ns avan
cées
39
7 Si l'indicateur Canal libre est activé, une courte tonalité d'avertissement retentit lorsque l'utilisateur de la radio cible relâche le bouton PTT, vous indiquant que le canal est libre et que vous pouvez répondre. Pour répondre, appuyez sur le bouton PTT.OUS'il n'y a aucune activité vocale pendant une durée programmée, l'appel prend fin.
Faire un appel privé à partir des contacts
Procédure :
1 g pour accéder au menu.
2 b ou c jusqu'à Répertoire, puis appuyez sur g pour sélectionner l'option. Les entrées sont classées dans l'ordre alphabétique.
3 b ou c jusqu'à l'alias ou l'ID d'abonné requis.
4 Pour passer l'appel, appuyez sur le bouton de conversation PTT. Le voyant DEL s'allume en vert. L'écran affiche l'alias de destination.
5 Attendez la fin de la tonalité d'autorisation de parler (si elle est activée) et parlez clairement dans le microphone.
6 Relâchez le bouton PTT pour écouter. Lorsque l'utilisateur de la radio cible répond, le voyant DEL vert clignote et l'écran affiche l'alias ou l'ID de l'utilisateur qui effectue la transmission.
7 Si l'indicateur Canal libre est activé, une courte tonalité d'avertissement retentit lorsque l'utilisateur de la radio cible relâche le bouton PTT, vous indiquant que le canal est libre et que vous pouvez répondre. Pour répondre, appuyez sur le bouton PTT.OUS'il n'y a aucune activité vocale pendant une durée programmée, l'appel prend fin.
8 Une courte tonalité retentit. L'écran affiche Appel terminé.
REMARQUE : Si vous cessez d'appuyer sur le bouton PTT pendant que la radio établit l'appel, la radio quitte l'opération sans autre avertissement et revient à l'écran précédent.
Votre radio peut être programmée de manière à effectuer une vérification de présence radio avant d’établir l’appel individuel. Si la radio cible n’est pas disponible, une courte tonalité se fait entendre et un bref avis d’échec s’affiche à l’écran.
La radio revient au menu affiché avant la tentative de vérification de présence radio.
Français canadien

Fo
nct
ion
s av
ancé
es
40
Franç
Associer une entrée à une touche numérique
programmable
Procédure :
1 g pour accéder au menu.
2 b ou c jusqu'à Répertoire, puis appuyez sur g pour sélectionner l'option. Les entrées sont classées alphabétiquement.
3 b ou c jusqu'à l'alias ou l'ID requis, puis appuyez sur
g pour sélectionner l'option.
4 b ou c jusqu'à Touche progr., puis appuyez sur g pour sélectionner l'option.
5 b ou c jusqu'à la touche numérique souhaitée, puis
appuyez sur g pour la sélectionner.OUSi la touche numérique est actuellement attribuée à une autre entrée, l'écran affiche le message La clé est déjà utilisée, puis la première ligne de l'écran affiche Remplacer?.
b ou c jusqu'à Oui, puis appuyez sur g pour sélectionner l'option.
6 L'écran affiche Contact enregistré et un bref avis de réussite.
REMARQUE : Différentes touches numériques peuvent être attribuées à chaque entrée. Une coche précède chaque touche numérique attribuée à une entrée. Si la coche précède le mot Vide, aucune touche numérique n'a été attribuée à l'entrée.
Si une touche numérique a été attribuée à une entrée dans un mode particulier, la fonction n’est pas prise en charge lorsque vous appuyez longuement sur la touche numérique dans un autre mode.
Consultez la section Faire un appel de groupe, privé ou général à l'aide de la touche numérique programmable à la page 98 pour plus de détails sur la façon de faire un appel de groupe, privé ou général au moyen des touches numériques programmées.
Annuler l'association entre une entrée et une
touche numérique programmable
Procédure :
Maintenez enfoncée la touche numérique programmée jusqu'à
l'alias ou l'ID requis, appuyez sur g pour le sélectionner, puis passez à l'étape 4.
ais canadien

Fo
nctio
ns avan
cées
41
OUProcédez comme suit.
1 g pour accéder au menu.
2 b ou c jusqu'à Répertoire, puis appuyez sur g pour sélectionner l'option. Les entrées sont classées alphabétiquement.
3 b ou c jusqu'à l'alias ou l'ID requis, puis appuyez sur
g pour sélectionner l'option.
4 b ou c jusqu'à Touche progr., puis appuyez sur g pour sélectionner l'option.
5 b ou c jusqu'à Vide, puis appuyez sur g pour sélectionner l'option.
6 La première ligne de l'écran affiche le message Effacer toutes clés.
7 b ou c jusqu'à Oui, puis appuyez sur g pour sélectionner l'option.
8 L'écran affiche Contact enregistré et un bref avis de réussite.
9 L'écran revient automatiquement au menu précédent.
REMARQUE : Lorsqu'une entrée est supprimée, l'association entre l'entrée et les touches numériques programmées est supprimée.
Régler le contact par défaut
Procédure :
Procédez comme suit.
1 g pour accéder au menu.
2 b ou c jusqu'à Répertoire, puis appuyez sur g pour sélectionner l'option.
3 b ou c jusqu'à l'alias ou l'ID requis, puis appuyez sur
g pour sélectionner l'option.
4 b ou c jusqu'à Définir défaut, puis appuyez sur
g pour sélectionner l'option.
5 La radio fait entendre une tonalité de réussite et l'écran affiche un bref avis de réussite.
6 L'icône s'affiche à côté de l'alias ou de l'ID par défaut sélectionné.
Français canadien

Fo
nct
ion
s av
ancé
es
42
Franç
Ajout d'un nouveau contact
Procédure :
Procédez comme suit.
1 g pour accéder au menu.
2 b ou c jusqu'à Répertoire, puis appuyez sur g pour sélectionner l'option.
3 b ou c jusqu'à nveau contact, puis appuyez sur g pour sélectionner l'option.
4 Utilisez le clavier pour entrer le numéro du contact et
appuyez sur g pour confirmer.
5 Utilisez le clavier pour entrer le nom du contact et appuyez
sur g pour confirmer.
6 b ou c jusqu'au type de sonnerie voulu, puis appuyez
sur g pour le sélectionner.
7 La radio fait entendre une tonalité de réussite et l'écran affiche un bref avis de réussite.
Réglages de l'indicateur d'appel
Activation ou désactivation des sonneries d'appel
des avertissements d'appel
Vous pouvez sélectionner, activer ou désactiver les sonneries des avertissements d'appel que vous recevez.
Procédure :
1 g pour accéder au menu.
2 b ou c jusqu'à Config/Infos, puis appuyez sur g pour sélectionner l'option.
3 b ou c jusqu'à Config. radio, puis appuyez sur g pour sélectionner l'option.
4 b ou c jusqu'à Tnltés/Avert., puis appuyez sur g pour sélectionner l'option.
5 b ou c jusqu'à Sonn. d’appels, puis appuyez sur g pour sélectionner l'option.
6 b ou c jusqu'à Avert. d'appel, puis appuyez sur
g pour sélectionner l'option. La tonalité sélectionnée est indiquée par l'icône .
ais canadien

Fo
nctio
ns avan
cées
43
7 b ou c jusqu'à la tonalité requise, puis appuyez sur
g pour la sélectionner. L'icône s'affiche à côté de la tonalité sélectionnée.OU
b ou c jusqu'à Arrêt, puis appuyez sur g pour sélectionner l'option.
8 Appuyez sur g pour désactiver les sonneries d'avertissement d'appel. L'écran affiche l'icône à côté du message Arrêt.OU
Appuyez sur g pour activer les sonneries d'avertissement d'appel. L'icône ne s'affiche plus à côté de Arrêt.
Activer ou désactiver les sonneries d'appel des
appels privés
Vous pouvez activer ou désactiver les sonneries des appels individuels que vous recevez.
Procédure :
1 g pour accéder au menu.
2 b ou c jusqu'à Config/Infos, puis appuyez sur g pour sélectionner l'option.
3 b ou c jusqu'à Config. radio, puis appuyez sur g pour sélectionner l'option.
4 b ou c jusqu'à Tnltés/Avert., puis appuyez sur g pour sélectionner l'option.
5 b ou c jusqu'à Sonn. d’appels, puis appuyez sur g pour sélectionner l'option.
6 b ou c jusqu'à Appel indiv.
7 b ou c jusqu'à Activé pour activer les sonneries d'appel privé. L'écran affiche l'icône à côté du message Activé.OU
b ou c jusqu'à Arrêt pour désactiver les sonneries d'appel privé. L'écran affiche l'icône à côté du message Arrêt.
Français canadien

Fo
nct
ion
s av
ancé
es
44
Franç
Activer ou désactiver les sonneries d'appel pour
les appels sélectifs
Vous pouvez sélectionner, activer ou désactiver les sonneries des appels sélectifs que vous recevez.
Procédure :
1 g pour accéder au menu.
2 b ou c jusqu'à Config/Infos, puis appuyez sur g pour sélectionner l'option.
3 b ou c jusqu'à Config. radio, puis appuyez sur g pour sélectionner l'option.
4 b ou c jusqu'à Tnltés/Avert., puis appuyez sur g pour sélectionner l'option.
5 b ou c jusqu'à Sonn. d’appels, puis appuyez sur g pour sélectionner l'option.
6 b ou c jusqu'à Appel sélectif, puis appuyez sur
g pour sélectionner l'option. La tonalité sélectionnée est indiquée par l'icône .
7 b ou c jusqu'à la tonalité requise, puis appuyez sur
g pour la sélectionner. L'icône s'affiche à côté de la tonalité sélectionnée.OU
b ou c jusqu'à Arrêt, puis appuyez sur g pour sélectionner l'option.
8 Appuyez sur g pour désactiver les sonneries d'appel sélectif. L'écran affiche l'icône à côté du message Arrêt.OU
Appuyez sur g pour activer les sonneries d'appel sélectif. L'icône ne s'affiche plus à côté de Arrêt.
Augmenter le volume de la tonalité d'alarme
Vous pouvez programmer la radio pour émettre une alarme continue lorsqu'un appel radio reste sans réponse. Le volume de la tonalité d'alarme augmente alors graduellement. Cette fonction porte le nom d'avertissement croissant.
Procédure :
1 g pour accéder au menu.
2 b ou c jusqu'à Config/Infos, puis appuyez sur g pour sélectionner l'option.
ais canadien

Fo
nctio
ns avan
cées
45
3 b ou c jusqu'à Config. radio, puis appuyez sur g pour sélectionner l'option.
4 b ou c jusqu'à Tnltés/Avert., puis appuyez sur g pour sélectionner l'option.
5 b ou c jusqu'à Avert.crois.
6 b ou c jusqu'à Activé pour activer l'avertissement croissant. L'écran affiche l'icône à côté du message Activé.OU
b ou c jusqu'à Arrêt pour désactiver l'avertissement croissant. L'écran affiche l'icône à côté du message Arrêt.
Fonctions du Journal des appels
Votre radio fait le suivi des appels individuels que vous avez faits, que vous avez reçus et que vous avez manqués récemment. Utilisez le journal des appels pour afficher et gérer les derniers appels.
Dans chacune des listes d'appels, vous pouvez exécuter les tâches suivantes :
• Enregistrer un alias ou un ID dans les contacts (voir la section Enregistrer un alias ou un ID de la liste d'appel à la page 107)
• Supprimer un appel
• Supprimer tous les appels
• Afficher les détails
Affichage des derniers appels
Les listes offertes sont : Manqués, Répondus et Sortants.
Procédure :
1 g pour accéder au menu.
2 b ou c jusqu'à Appels, puis appuyez sur g pour sélectionner l'option.
3 b ou c jusqu'à la liste favorite, puis appuyez sur g pour sélectionner l'option.
4 L'écran affiche l'entrée la plus récente.
5 b ou c pour afficher la liste.
Appuyez sur le bouton PTT pour passer un appel individuel à l'alias ou l'ID sélectionné.
Français canadien
Fo
nct
ion
s av
ancé
es
46
Franç
Supprimer un appel d'une liste d'appels
Procédure :
1 g pour accéder au menu.
2 b ou c jusqu'à Appels, puis appuyez sur g pour sélectionner l'option.
3 b ou c jusqu'à la liste voulue, puis appuyez sur g pour sélectionner l'option.
4 b ou c jusqu'à l'alias ou l'ID requis, puis appuyez sur
g pour sélectionner l'option.
5 b ou c jusqu'à Supprimer, puis appuyez sur g pour sélectionner l'option.
6 Appuyez sur g pour sélectionner Oui et supprimer l'entrée. L'écran affiche un bref avis de réussite.OU
b ou c jusqu'à Non pour revenir à l'écran précédent.
Lorsque vous sélectionnez une liste et qu'elle ne contient aucune entrée, l'écran affiche le message Liste vide et une tonalité grave se fait entendre si les tonalités du clavier sont activées (consultez la section Activer ou désactiver les tonalités du clavier à la page 91).
Supprimer tous les appels d'une liste d'appel
Procédure :
1 g pour accéder au menu.
2 b ou c jusqu'à Appels, puis appuyez sur g pour sélectionner l'option.
3 b ou c jusqu'à la liste voulue, puis appuyez sur g pour sélectionner l'option.
4 b ou c jusqu'à l'alias ou l'ID requis, puis appuyez sur
g pour sélectionner l'option.
5 b ou c jusqu'à Supprimer tout, puis appuyez sur g pour sélectionner l'option.
6 Appuyez sur g pour sélectionner Oui et supprimer toutes les entrées. L'écran affiche un bref avis de réussite.OU
b ou c jusqu'à Non pour revenir à l'écran précédent.
ais canadien

Fo
nctio
ns avan
cées
47
Afficher les détails d'une liste d'appels
Procédure :
1 g pour accéder au menu.
2 b ou c jusqu'à Appels, puis appuyez sur g pour sélectionner l'option.
3 b ou c jusqu'à la liste voulue, puis appuyez sur g pour la sélectionner.
4 b ou c jusqu'à l'alias ou l'ID requis, puis appuyez sur
g pour sélectionner l'option.
5 b ou c jusqu'à Voir détails, puis appuyez sur g pour sélectionner l'option. L'écran affiche les détails.
Fonction Avertissement d'appel
L'envoi d'un avertissement d'appel vous permet de faire savoir à un utilisateur de radio particulier que vous souhaitez qu'il vous rappelle lorsqu'il lui sera possible de le faire.
Cette fonction n'est offerte que pour les alias ou les ID d'abonné et est accessible par l'intermédiaire du menu des contacts ou la numérotation manuelle.
Recevoir un avertissement d'appel et y répondre
Lorsque vous recevez un avertissement d'appel, vous voyez l'avertissement dans la liste de notifications à l'écran accompagné de l'alias ou de l'ID de la radio de l'appelant.
Procédure :
1 Une tonalité répétitive se fait entendre. Le voyant DEL jaune clignote.
2 Appuyez sur le bouton PTT pendant que l'écran affiche l'avertissement d'appel dans la liste de notification pour répondre par un appel individuel.OU
Appuyez sur g pour quitter la liste de notification. L'alerte est déplacée vers le journal des appels manqués.
Consultez la section Liste de notification à la page 73 pour plus de détails sur la liste de notification.
Français canadien
Fo
nct
ion
s av
ancé
es
48
Franç
Consultez la section Fonctions du Journal des appels à la page 45 pour plus de détails au sujet de la liste des appels manqués.
Envoyer un avertissement d'appel à partir de la liste des contacts
Procédure :
1 g pour accéder au menu.
2 b ou c jusqu'à Répertoire, puis appuyez sur g pour sélectionner l'option.
3 b ou c jusqu'à l'alias ou l'ID d'abonné requis, puis
appuyez sur g pour sélectionner l'option.
4 b ou c jusqu'à Avert. d'appel, puis appuyez sur
g pour sélectionner l'option.
5 L'écran affiche Avert. d'appel ainsi que l'alias ou l'ID d'abonné pour vous aviser que l'avertissement a été envoyé.
6 Le voyant DEL vert s'allume pendant l'envoi de l'avertissement d'appel.
7 Si la radio reçoit la confirmation de l’avis d’appel, l’écran affiche un bref avis de réussite.OUSinon, l’écran affiche un bref avis d’échec.
Vous pouvez aussi envoyer un avertissement d'appel en composant manuellement l'ID d'abonné du destinataire (consultez la section Envoi d'un avertissement d'appel à l'aide de la numérotation manuelle à la page 108).
Envoyer un avertissement d'appel au moyen de la touche d'accès direct
Procédure :
1 Appuyez sur la touche programmée Accès direct pour envoyer un avertissement d'appel à l'alias ou à l'ID prédéfini.
2 L'écran affiche Avert. d'appel ainsi que l'alias ou l'ID d'abonné pour vous aviser que l'avertissement a été envoyé.
3 Le voyant DEL vert s'allume pendant l'envoi de l'avertissement d'appel.
4 Si la radio reçoit la confirmation de l’avis d’appel, l’écran affiche un bref avis de réussite.OUSinon, l’écran affiche un bref avis d’échec.
ais canadien

Fo
nctio
ns avan
cées
49
Fonction d'urgence
Une alarme d'urgence est employée pour signaler une situation critique. Vous pouvez signaler une urgence en tout temps, à partir de n'importe quel écran, même si de l'activité se déroule sur le canal actuel.
Votre détaillant peut définir la durée d'appui sur la touche Urgence programmée, sauf l'appui prolongé, qui est semblable à celui de tous les autres boutons.
• Appui bref – De 0,05 à 0,75 seconde
• Appui prolongé – De 1 à 3,75 secondes
La fonction Urg. act./dés. est attribuée à la touche Urgence. Vérifiez auprès de votre détaillant le fonctionnement de la touche Urgence.
Si l'appui bref sur la touche Urgence permet d'activer le mode d'urgence, alors l'appui prolongé sur la touche Urgence permet de quitter le mode d'urgence.
Si l'appui prolongé sur la touche Urgence permet d'activer le mode d'urgence, alors l'appui bref sur la touche Urgence permet de quitter le mode d'urgence.
Votre radio prend en charge trois alarmes d'urgence :
• Alarme d'urgence
• Alarme d'urgence avec appel
• Alarme d'urgence suivie d'un appel vocal
De plus, chaque alarme comprend les types suivants :
• Normal – La radio transmet un signal d'alarme et active des indicateurs sonores ou visuels.
• Silencieux – La radio transmet un signal d'alarme sans indicateurs sonores ou visuels. La radio reçoit les appels sans qu'aucun son ne soit produit par le haut-parleur, jusqu'à ce que vous appuyiez sur le bouton PTT pour faire l'appel.
• Silencieux avec voix – La radio transmet un signal d'alarme sans indicateurs sonores ou visuels, mais permet aux appels entrants de se faire entendre sur le haut-parleur.
Une seule des alarmes d'urgence ci-dessus peut être associée à la touche d'urgence programmée ou à l'interrupteur d'urgence au pied.
Français canadien

Fo
nct
ion
s av
ancé
es
50
Franç
Recevoir une alarme d'urgence
Procédure :
1 L'icône d'urgence s'affiche, une tonalité se fait entendre, le voyant DEL rouge clignote et la radio affiche la liste des alarmes si plus d'une alarme est donnée. Les alias des émetteurs des appels d'urgence sont donnés dans la liste.
b ou c jusqu'à l'alias requis, puis appuyez sur g pour afficher plus de détails.
Appuyez de nouveau sur g pour afficher les options qui s'offrent à vous.OUL'icône d'urgence s'affiche, une tonalité se fait entendre, le voyant DEL rouge clignote et la radio affiche l'alias de
l'émetteur de l'appel d'urgence. Appuyez sur g pour
afficher plus de détails. Appuyez de nouveau sur g pour afficher les options qui s'offrent à vous.
2 Appuyez sur g , puis sélectionnez Oui pour quitter la liste des alarmes. Pour consulter de nouveau la liste des alarmes, appuyez
sur g pour accéder au menu, puis sélectionnez Liste Alarmes.
Répondre à une alarme d'urgence
Procédure :
Lorsque vous recevez une alarme d'urgence :
1 Dans la liste des alarmes, b ou c jusqu'à l'alias requis.
2 Si l'indicateur Canal libre est activé, une courte tonalité d'avertissement se fait entendre lorsque l'utilisateur de la radio émettrice cesse d'appuyer sur le bouton PTT, vous indiquant que le canal est libre et que vous pouvez répondre.
3 Appuyez sur le bouton PTT pour transmettre un message vocal sans urgence au groupe ciblé par l'alarme d'urgence. Le voyant DEL s'allume en vert. Votre radio demeure en mode d'urgence.
4 Attendez la fin de la tonalité d'autorisation de parler (si elle est activée) et parlez clairement dans le microphone.OU
Attendez la fin de l'effet local PTT (s'il est activé) et parlez clairement dans le microphone.
5 Relâchez le bouton PTT pour écouter. Lorsque la radio à l'origine de la transmission d'urgence répond, le voyant DEL vert clignote. L'icône d'appel de groupe, l'alias ou l'ID du groupe ainsi que l'alias ou l'ID de la radio à l'origine de la transmission s'affichent à l'écran.
6 Votre radio affiche la liste des alarmes.
ais canadien
Fo
nctio
ns avan
cées
51
La voix d'urgence ne peut être transmise que par la radio à l'origine de la transmission d'urgence. Toutes les autres radios (y compris la radio réceptrice de la transmission d'urgence) transmettent la voix sans urgence.
Envoyer une alarme d'urgence
Cette fonction vous permet d'envoyer une alarme d'urgence (un signal sans voix) qui déclenche une indication d'alerte sur un groupe de radios.
Procédure :
1 Appuyez sur la touche programmée Urgence activée ou sur l'interrupteur d'urgence au pied.
2 L'écran affiche le message Alarme Tx et l'alias de destination. Le voyant DEL vert s'allume et l'icône d'urgence s'affiche.OU
L'écran affiche le message Télégram Tx et l'alias de destination. Le voyant DEL vert s'allume et l'icône d'urgence s'affiche.
3 Une fois l'accusé de réception de l'alarme d'urgence reçu, la tonalité d'urgence se fait entendre et le voyant DEL vert clignote. L'écran affiche le message Alarme envoy.OUSi votre radio ne reçoit pas d'accusé de réception de l'alarme d'urgence, une fois toutes les tentatives effectuées, une tonalité se fait entendre et l'écran affiche le message Échec Alarme.
4 La radio quitte le mode d'alarme d'urgence et revient à l'écran d'accueil.
Si votre radio est réglée à Silencieux, aucune indication sonore ou visuelle ne se manifeste en mode d'urgence.
Envoyer une alarme d'urgence avec appel
Cette fonction vous permet d'envoyer une alarme d'urgence à un groupe de radios. Lorsqu'une radio du groupe accuse réception de l'alarme d'urgence, le groupe de radios peut communiquer sur un canal d'urgence programmé.
Procédure :
1 Appuyez sur la touche programmée Urgence activée ou sur l'interrupteur d'urgence au pied.
2 L'écran affiche le message Alarme Tx et l'alias de destination. Le voyant DEL vert s'allume et l'icône d'urgence s'affiche.OU
L'écran affiche le message Télégram Tx et l'alias de destination. Le voyant DEL vert s'allume et l'icône d'urgence s'affiche.
3 Une fois l'accusé de réception de l'alarme d'urgence reçu, la tonalité d'urgence se fait entendre et le voyant DEL vert clignote. L'écran affiche le message Alarme envoy.
Français canadien
Fo
nct
ion
s av
ancé
es
52
Franç
4 Votre radio passe au mode d'appel d'urgence lorsque l'écran affiche le message Urgence et l'alias du groupe de destination.
5 Appuyez sur le bouton PTT pour passer l'appel. Le voyant DEL vert s'allume et l'icône du groupe s'affiche à l'écran.
6 Attendez la fin de la tonalité d'autorisation de parler (si elle est activée) et parlez clairement dans le microphone.OU
Attendez la fin de l'effet local PTT (s'il est activé) et parlez clairement dans le microphone.
7 Relâchez le bouton PTT pour écouter.Lorsque vous recevez un appel de groupe, l’écran affiche l’alias de l’appelant et l’alias du groupe.
8 Lorsque le canal est libre et que vous pouvez répondre, une
brève tonalité d'alerte se fait entendre ( si l'indicateur Canal libre est activé). Pour répondre, appuyez sur le bouton PTT.OUUne fois l'appel terminé, appuyez sur le bouton Urgence désact. pour quitter le mode d'urgence.
9 La radio revient à l'écran d'accueil.
Si votre radio est réglée à Silencieux, aucune indication sonore ou visuelle ne se manifeste en mode d'urgence et aucun appel reçu ne se fait entendre par le haut-parleur jusqu'à ce que vous appuyiez sur le bouton PTT pour établir la communication.
Si votre radio est réglée à Silencieux avec voix, aucune indication sonore ou visuelle ne se manifeste en mode d'urgence, mais les appels reçus se font entendre par le haut-parleur. Les indicateurs ne se manifestent que lorsque vous appuyez sur le bouton PTT pour faire ou recevoir l'appel.
Envoyer une alarme d'urgence suivie d'un appel vocal
Cette fonction vous permet d'envoyer une alarme d'urgence à un groupe de radios. Le microphone de votre radio est automatiquement activé, vous permettant de communiquer avec le groupe de radios sans avoir à appuyer sur le bouton PTT.
Cet état de microphone activé est aussi appelé « microphone branché ».
REMARQUE : Certains accessoires ne prennent pas en charge la fonction « microphone branché ». Pour obtenir des renseignements supplémentaires, adressez-vous à votre détaillant ou à votre administrateur de système.
Si le mode de cycle d'urgence de votre radio est activé, les répétitions de microphone branché et de période de réception s'appliquent pendant la durée programmée.
REMARQUE : Pendant le mode de cycle d'urgence, le son des appels reçus est diffusé sur le haut-parleur de la radio.
ais canadien

Fo
nctio
ns avan
cées
53
Si vous appuyez sur le bouton PTT pendant la période de réception programmée, une tonalité d'interdiction se fait entendre, indiquant que vous devez libérer le bouton PTT. La radio ne tient pas compte de l'appui sur le bouton PTT et demeure en mode d'urgence.
REMARQUE : Si vous appuyez sur le bouton PTT pendant la période de microphone branché programmée et si vous maintenez le bouton enfoncé après l'expiration de la durée de microphone branché, la radio continue de transmettre jusqu'à ce que vous relâchiez le bouton PTT.
Procédure :
1 Appuyez sur la touche programmée Urgence activée ou sur l'interrupteur d'urgence au pied.
2 L'écran affiche le message Alarme Tx et l'alias de destination. Le voyant DEL vert s'allume et l'icône d'urgence s'affiche.OU
L'écran affiche le message Télégram Tx et l'alias de destination. Le voyant DEL vert s'allume et l'icône d'urgence s'affiche.
3 Lorsque l'écran affiche le message Alarme envoy., parlez clairement dans le micro. Lorsque la fonction de microphone branché est activée, la radio transmet automatiquement sans appui sur le bouton PTT jusqu'à l'expiration de la durée de microphone branché.
Pendant la transmission, le voyant DEL vert s'allume et l'icône d'urgence s'affiche.
4 La radio cesse automatiquement de transmettre dans les cas suivants :La durée du cycle entre microphone branché et réception d’appels arrive à son terme, si le mode Cycle d’urgence est activé.OULa durée de microphone branché arrive à son terme, si le mode Cycle d’urgence est désactivé.
5 Pour transmettre de nouveau, appuyez sur le bouton PTT.OUAppuyez sur la touche programmée Urgence désact. pour quitter le mode d'urgence.
6 La radio revient à l'écran d'accueil.
Si votre radio est réglée à Silencieux, aucune indication sonore ou visuelle ne se manifeste en mode d'urgence et aucun appel reçu ne se fait entendre par le haut-parleur jusqu'à ce que la durée de microphone branché programmée soit écoulée et que vous appuyiez sur le bouton PTT.
Si votre radio est réglée à Silencieux avec voix, aucune indication sonore ou visuelle ne se manifeste en mode d'urgence lorsque vous faites un appel avec microphone branché, mais le son est diffusé par le haut-parleur lorsque la radio cible répond, une fois la durée de microphone branché programmée écoulée. Les indicateurs ne se manifestent que lorsque vous appuyez sur le bouton PTT.
Français canadien
Fo
nct
ion
s av
ancé
es
54
Franç
REMARQUE : Si la demande d'alarme d'urgence échoue, la radio ne fait pas d'autre tentative et passe directement à l'état de microphone branché.
Réactiver le mode d'urgence
REMARQUE : Cette fonction n'est offerte que sur la radio qui envoie l'alarme d'urgence.
La fonction peut être activée dans les deux cas suivants :
• Vous changez le canal pendant que la radio est en mode d'urgence. La radio quitte alors le mode d'urgence. Si l'alarme d'urgence est activée sur le nouveau canal, la radio réactive le mode d'urgence.
• Vous appuyez sur la touche programmée Urg. act. pendant que la radio est dans un état d'activation du mode d'urgence ou de transmission d'urgence. La radio quitte alors cet état et réactive le mode d'urgence.
Quitter le mode d'urgence
REMARQUE : Cette fonction n'est offerte que sur la radio qui envoie l'alarme d'urgence.
Votre radio quitte le mode d'urgence lorsque l'un des événements suivants se produit :
• L'accusé de réception de l'alarme d'urgence est reçu (dans le cas de l'alarme d'urgence seulement), OU
• Un télégramme de sortie de l'état d'urgence est reçu, OU
• Toutes les tentatives d'envoi de l'alarme ont été effectuées, OU
• Le bouton Urg. dés. est enfoncé, OU
• Vous éteignez la radio, puis la rallumez, si votre radio a été programmée pour demeurer sur le canal d'inversion d'urgence même après la réception de la confirmation.
REMARQUE : Si la radio est mise hors tension, elle quitte le mode d'urgence. La radio ne réactive pas automatiquement le mode d’urgence lorsqu’elle est remise sous tension.
Si vous changez de canal pendant que la radio est en mode d'urgence et que vous passez à un canal pour lequel aucun système d'urgence n'a été configuré, le message Sans urgence s'affiche à l'écran.
ais canadien
Fo
nctio
ns avan
cées
55
Fonctions de messagerie texte
Votre radio peut recevoir des données, par exemple un message texte, en provenance d'une autre radio ou d'une application de courriel.
Envoyer un message texte rapide
Votre radio prend en charge un maximum de 50 messages texte rapides, selon la programmation effectuée par votre détaillant.
Appuyez sur la touche Message texte et passez à l'étape 3.OU Procédez comme suit.
1 g pour accéder au menu.
2 b ou c jusqu'à Messages, puis appuyez sur g pour sélectionner l'option.
3 b ou c jusqu'à Txt rapide puis appuyez sur g pour sélectionner l'option.
4 b ou c jusqu'au texte rapide voulu, puis appuyez sur
g pour le sélectionner.
5 b ou c jusqu'à l'alias ou l'ID requis, puis appuyez sur
g pour sélectionner l'option.
6 L'écran affiche un bref avis indiquant que l'envoi du message est en cours.
7 Si l'envoi du message réussit, une tonalité de réussite se fait entendre et l'écran affiche un bref avis de réussite.OUSinon, une tonalité grave se fait entendre et l'écran affiche un bref avis d'échec.
En cas d'échec de l'envoi du message texte, l'écran d'option Renvoyer s'affiche (consultez la section Gérer les échecs d'envoi de message texte à la page 56).
Envoyer un message texte rapide au moyen de la touche d’accès direct
1 Appuyez sur la touche programmée Accès direct pour envoyer un message texte rapide prédéfini à un alias ou à un ID prédéfini.
2 L'écran affiche un bref avis indiquant que l'envoi du message est en cours.
3 Si l'envoi du message réussit, une tonalité de réussite se fait entendre et l'écran affiche un bref avis de réussite.OUSinon, une tonalité grave se fait entendre et l'écran affiche un bref avis d'échec.
Français canadien

Fo
nct
ion
s av
ancé
es
56
Franç
En cas d'échec de l'envoi du message texte, l'écran d'option Renvoyer s'affiche (consultez la section Gérer les échecs d'envoi de message texte à la page 56).
Gérer les échecs d'envoi de message texte
Vous pouvez sélectionner l'une des options suivantes dans l'écran Renvoyer :
• Renvoyer
• Transférer
REMARQUE : Si le type de canal (c.-à-d. numérique classique) ne correspond pas, vous pouvez uniquement modifier et transférer un message dont l’envoi a échoué.
Renvoyer un message texte
Procédure :
1 Appuyez sur g pour renvoyer le même message au même alias ou ID de radio d'abonné ou de groupe.
2 Lorsque le message est envoyé, une tonalité de réussite se fait entendre et l'écran affiche un bref avis de réussite.OUSi le message ne peut pas être envoyé, l'écran affiche un bref avis d'échec.
Transférer un message texte
Sélectionnez Transférer pour envoyer le message à un autre alias ou ID de radio d'abonné ou de groupe.
Procédure :
1 b ou c jusqu'à Transférer, puis appuyez sur g pour sélectionner l'option.
2 b ou c jusqu'à l'alias ou l'ID requis, puis appuyez sur
g pour sélectionner l'option.
3 L'écran affiche un bref avis indiquant que l'envoi du message est en cours.
4 Si l'envoi du message réussit, une tonalité de réussite se fait entendre et l'écran affiche un bref avis de réussite.OUSinon, une tonalité grave se fait entendre et l'écran affiche un bref avis d'échec.
Vous pouvez également sélectionner manuellement l'adresse de la radio cible (consultez la section Transfert d'un message texte à l'aide de la numérotation manuelle, à la page 109).
ais canadien

Fo
nctio
ns avan
cées
57
Gérer les messages texte envoyés
Une fois qu'un message texte est envoyé vers une autre radio, il est enregistré dans les messages envoyés. Le dernier message texte envoyé s'affiche toujours en haut de la liste des messages envoyés.
Le dossier des messages envoyés peut contenir au maximum les 30 derniers messages envoyés. Une fois le dossier plein, le prochain message envoyé remplace automatiquement le plus ancien message enregistré dans le dossier.
REMARQUE : Vous pouvez revenir à l'écran d'accueil à tout
moment en maintenant la touche e enfoncée.
Afficher un message texte envoyé
Procédure :Appuyez sur la touche programmée Message texte et passez à l'étape 3.OUProcédez comme suit.
1 g pour accéder au menu.
2 b ou c jusqu'à Messages, puis appuyez sur g pour sélectionner l'option.
3 b ou c jusqu'à Msges envoyés, puis appuyez sur g pour sélectionner l'option.
4 b ou c jusqu'au message voulu, puis appuyez sur g pour le sélectionner.La ligne d'objet pourrait s'afficher si le message provient d'une application de courriel.
L'icône affichée à côté de chaque message indique l'état du message (consultez la section Icônes des messages envoyés à la page 14).
Envoi d'un message texte envoyé
Vous pouvez sélectionner l'une des options suivantes lorsque vous consultez un message texte envoyé :
• Renvoyer
• Transférer
REMARQUE : Si le type de canal (c.-à-d. numérique classique, Capacity Plus ou Linked Capacity Plus) ne correspond pas, vous pouvez uniquement modifier, transférer ou supprimer un message envoyé.
Procédure :
1 Pendant que vous visualisez le message, appuyez de
nouveau sur g .
2 b ou c jusqu'à Renvoyer, puis appuyez sur g pour sélectionner l'option.
Français canadien

Fo
nct
ion
s av
ancé
es
58
Franç
3 L'écran affiche un bref avis indiquant que le même message est envoyé à la même radio cible.
4 Si l'envoi du message réussit, une tonalité de réussite se fait entendre et l'écran affiche un bref avis de réussite.OUSinon, une tonalité grave se fait entendre et l'écran affiche un bref avis d'échec.
Si l'envoi du message texte échoue, la radio affiche de nouveau
l'écran de l'option Renvoyer. Appuyez sur g pour renvoyer le
message au même alias ou ID de radio d'abonné ou de groupe.
REMARQUE : Le fait de modifier le volume ou d'appuyer sur
une touche quelconque (sauf g , b ou c fait revenir l'affichage au message.
La radio quitte l'écran d'option Renvoyer si vous appuyez sur le bouton PTT pour passer un appel individuel ou de groupe ou pour répondre à un appel de groupe. Elle quitte également cet écran si elle reçoit un message texte, un appel ou une alarme d'urgence ou un avertissement d'appel.
L'affichage revient à l'écran de l'option Renvoyer si vous appuyez sur le bouton PTT pour répondre à un appel individuel (sauf si la radio affiche l'écran Appel manqué), et à la fin d'un appel général.
Appuyez sur b ou c pour accéder à l’écran d’option
Transférer ou Supprimer :
• Sélectionnez Transférer pour envoyer le message texte sélectionné à une autre radio cible (consultez la section Transférer un message texte à la page 56). Vous pouvez également sélectionner manuellement l'adresse de la radio cible au moyen d'un microphone à clavier (consultez la section Transfert d'un message texte à l'aide de la numérotation manuelle à la page 109).
• Sélectionnez Supprimer pour supprimer le message texte.
REMARQUE : Si vous quittez l'écran d'envoi de message pendant que l'envoi du message est en cours, la radio met à jour l'état du message dans le dossier des messages envoyés sans fournir d'indication sonore ou visuelle.
Si la radio change de mode ou est mise hors tension avant que l'état du message ne soit mis à jour dans le dossier des messages envoyés, la radio ne peut terminer l'envoi du message en cours et marque automatiquement celui-ci d'une icône d'échec de l'envoi.
La radio prend en charge un maximum de cinq envois de message en cours à la fois. Pendant ce temps, la radio ne peut envoyer aucun autre message et marque automatiquement les nouveaux messages de l'icône d'échec de l'envoi.
ais canadien

Fo
nctio
ns avan
cées
59
Supprimer tous les messages envoyés du dossier des messages envoyés
Procédure :Appuyez sur la touche programmée Message texte et passez à l'étape 3.OUProcédez comme suit.
1 g pour accéder au menu.
2 b ou c jusqu'à Messages, puis appuyez sur g pour sélectionner l'option.
3 b ou c jusqu'à Msges envoyés, puis appuyez sur
g pour sélectionner l'option.
4 b ou c jusqu'à Supprimer tout, puis appuyez sur
g pour sélectionner l'option.
5 b ou c jusqu'à Oui, puis appuyez sur g pour sélectionner l'option. L'écran affiche un bref avis de réussiteOU
b ou c jusqu'à Non, puis appuyez sur g pour revenir à l'écran précédent.
Lorsque vous sélectionnez le dossier des messages envoyés et qu'il ne contient aucun message texte, l'écran affiche le message Liste vide et une tonalité grave se fait entendre si les tonalités du clavier sont activées (consultez la section Activer ou désactiver les tonalités du clavier à la page 91).
Recevoir un message texte
Lorsque votre radio reçoit un message, l'écran affiche la liste de notification comprenant l'alias ou l'ID de l'expéditeur et l'icône de message.
Vous pouvez sélectionner l'une des options suivantes lorsque vous recevez un message texte :
• Lecture
• Lire plus tard
• Supprimer
REMARQUE : La radio quitte l'écran d'alerte de message texte et achemine un appel privé ou de groupe à l'expéditeur du message si le bouton PTT est enfoncé pendant que la radio affiche l'écran d'alerte.
Français canadien

Fo
nct
ion
s av
ancé
es
60
Franç
Lire un message texte
Procédure :
1 b ou c jusqu'à Lire, puis appuyez sur g pour sélectionner l'option.
2 Le message sélectionné dans la boîte de réception s'ouvre.La ligne d'objet pourrait s'afficher si le message provient d'une application de courriel.
3 Appuyez sur e pour revenir à la boîte de réception.OU
Appuyez sur g pour répondre au message texte, le transférer ou le supprimer.
Appuyez sur b ou c pour accéder à l'écran d'option Lire
plus tard ou Supprimer :
• Sélectionnez Lire plus tard pour revenir à l'écran affiché avant la réception du message texte.
• Sélectionnez Supprimer pour supprimer le message texte.
Gérer les messages texte reçus
Utilisez la boîte de réception pour gérer vos messages texte. La boîte de réception peut contenir au maximum 30 messages.
Votre radio prend en charge les options de messagerie texte suivantes :
• Répondre (par texte rapide)
• Transférer
• Supprimer
• Supprimer tout
REMARQUE : Si le type de canal (c.-à-d. numérique classique, Capacity Plus ou Linked Capacity Plus) ne correspond pas, vous pouvez uniquement modifier, transférer ou supprimer un message envoyé.
Les messages texte de la boîte de réception sont classés du plus récent au plus ancien.
REMARQUE : Vous pouvez revenir à l'écran d'accueil à tout
moment en maintenant la touche e enfoncée.
ais canadien

Fo
nctio
ns avan
cées
61
Afficher un message texte à partir de la boîte de réception
Procédure :
1 g pour accéder au menu.
2 b ou c jusqu'à Messages, puis appuyez sur g pour sélectionner l'option.
3 b ou c jusqu'à Boîte récept., puis appuyez sur g pour sélectionner l'option.
4 b ou c pour afficher les messages.La ligne d'objet pourrait s'afficher si le message provient d'une application de courriel.
5 Appuyez sur g pour sélectionner le message actuel, puis
appuyez de nouveau sur g pour y répondre, le transférer ou le supprimer.OU
Maintenez enfoncée la touche e pour revenir à l'écran d'accueil.
Répondre à un message texte par un texte rapide
Procédure : Appuyez sur la touche programmée Message texte et passez à l'étape 3.OUProcédez comme suit.
1 g pour accéder au menu.
2 b ou c jusqu'à Messages, puis appuyez sur g pour sélectionner l'option.
3 b ou c jusqu'à Boîte récept., puis appuyez sur g pour sélectionner l'option.
4 b ou c jusqu'au message voulu, puis appuyez sur g pour le sélectionner.La ligne d'objet pourrait s'afficher si le message provient d'une application de courriel.
5 Appuyez de nouveau sur g pour accéder au sous-menu.
6 b ou c jusqu'à Répondre, puis appuyez sur g pour sélectionner l'option.
7 b ou c jusqu'à Réponse rapide, puis appuyez sur g pour sélectionner l'option.
Français canadien

Fo
nct
ion
s av
ancé
es
62
Franç
8 b ou c jusqu'au message voulu, puis appuyez sur g pour le sélectionner.
9 L'écran affiche un bref avis indiquant que l'envoi du message est en cours.
10 Lorsque le message est envoyé, une tonalité de réussite se fait entendre et l'écran affiche un bref avis de réussite.OUSi le message ne peut pas être envoyé, l'écran affiche un bref avis d'échec.
En cas d'échec de l'envoi du message texte, l'écran d'option Renvoyer s'affiche (consultez la section Gérer les échecs d'envoi de message texte à la page 56).
Supprimer un message texte de la boîte de réception
Procédure : Appuyez sur la touche programmée Message texte et passez à l'étape 3.OUProcédez comme suit.
1 g pour accéder au menu.
2 b ou c jusqu'à Messages, puis appuyez sur g pour sélectionner l'option.
3 b ou c jusqu'à Boîte récept., puis appuyez sur g pour sélectionner l'option.
4 b ou c jusqu'au message voulu, puis appuyez sur g pour le sélectionner.La ligne d'objet pourrait s'afficher si le message provient d'une application de courriel.
5 Appuyez de nouveau sur g pour accéder au sous-menu.
6 b ou c jusqu'à Supprimer, puis appuyez sur g pour sélectionner l'option.
7 b ou c jusqu'à Oui, puis appuyez sur g pour sélectionner l'option.
8 L'écran affiche un bref avis de réussite.
9 L'écran revient à la boîte de réception.
Supprimer tous les messages texte de la boîte de réception
Procédure :Appuyez sur la touche programmée Message texte et passez à l'étape 3.
ais canadien

Fo
nctio
ns avan
cées
63
OUProcédez comme suit.
1 g pour accéder au menu.
2 b ou c jusqu'à Messages, puis appuyez sur g pour sélectionner l'option.
3 b ou c jusqu'à Boîte récept., puis appuyez sur g pour sélectionner l'option.
4 b ou c jusqu'à Supprimer tout, puis appuyez sur g pour sélectionner l'option.
5 b ou c jusqu'à Oui, puis appuyez sur g pour sélectionner l'option.
6 L'écran affiche un bref avis de réussite.
Lorsque vous sélectionnez la boîte de réception ne contenant aucun message texte, l'écran indique Liste vide et une tonalité grave se fait entendre si les tonalités du clavier sont activées (voir Activer ou désactiver les tonalités du clavier à la page 91).
REMARQUE : D'autres fonctions de messagerie texte sont offertes si vous utilisez un microphone à clavier. Pour plus de détails à ce sujet, consultez la section Messagerie texte, à la page 109.
Encoder un message analogique
Votre radio peut envoyer des messages programmés à partir de la liste des messages à un alias radio ou au répartiteur.
Envoyer un message MDC encodé au répartiteur
Procédure :
1 g pour accéder au menu.
2 b ou c jusqu'à Message, puis appuyez sur g pour sélectionner l'option.
3 b ou c jusqu'à Txt rapide, puis appuyez sur g pour sélectionner l'option.
4 b ou c pour afficher le message voulu. Appuyez sur
g pour l'envoyer.
5 L'écran affiche un bref avis indiquant que l'envoi du message est en cours.
6 Si l'envoi du message réussit, une tonalité de réussite se fait entendre et l'écran affiche un bref avis de réussite. OUSinon, une tonalité grave se fait entendre et l'écran affiche un bref avis d'échec.
Français canadien

Fo
nct
ion
s av
ancé
es
64
Franç
Envoyer un message encodé à cinq tonalités au contact
Procédure :
1 g pour accéder au menu.
2 b ou c jusqu'à Message, puis appuyez sur g pour sélectionner l'option.
3 b ou c jusqu'à Txt rapidepuis appuyez sur g pour sélectionner l'option.
4 b ou c pour afficher le message voulu. Appuyez sur
g pour sélectionner l'option.
5 b ou c jusqu'au contact désiré. Appuyez sur g pour sélectionner l'option.
6 L'écran affiche un bref avis indiquant que l'envoi du message est en cours.
7 Si l'envoi du message réussit, une tonalité de réussite se fait entendre et l'écran affiche un bref avis de réussite. OUSinon, une tonalité grave se fait entendre et l'écran affiche un bref avis d'échec.
REMARQUE : Pour obtenir davantage de renseignements au sujet de cette configuration, adressez-vous à votre détaillant ou à votre administrateur de système.
Mettre à jour l'état analogique
Votre radio peut envoyer des messages programmés à partir de la liste d'état indiquant votre activité en cours au répartiteur.
Le dernier message ayant obtenu un accusé de réception s'affiche au sommet de la liste des états. Les autres messages sont classés en ordre alphanumérique.
Envoyer une mise à jour d'état à un contact prédéfini
Procédure :
1 g pour accéder au menu.
2 b ou c jusqu'à État, puis appuyez sur g pour sélectionner l'option.
3 b ou c jusqu'à l'état désiré. Appuyez sur g pour sélectionner l'option.
4 b ou c jusqu'à Définir défaut. Appuyez sur g pour envoyer la mise à jour d'état.
ais canadien

Fo
nctio
ns avan
cées
65
5 L'écran affiche un bref avis indiquant que l'envoi de la mise à jour d'état est en cours.
Si la mise à jour d'état est reçue, une tonalité de réussite se fait entendre et l'écran affiche un bref avis de réussite. L'icône s'affiche à côté de l'état pour lequel un accusé de réception a été reçu.OUSi personne n’accuse réception de la mise à jour d’état, une tonalité grave se fait entendre et l’écran affiche un bref avis d’échec. L'icône demeure affichée à côté de l'état précédent.
Cryptage
Si elle est activée, cette fonction fait appel à une solution de brouillage logiciel pour prévenir l'écoute d'un canal par des utilisateurs non autorisés. Les parties de la transmission correspondant au signal et à l'identification de l'utilisateur ne sont pas brouillées.
Sur votre radio, la fonction de cryptage doit être activée sur le canal pour envoyer une transmission cryptée; l'activation de la fonction n'est cependant pas nécessaire à la réception d'une telle transmission. Pendant qu'un canal crypté est sélectionné, la radio continue d'être en mesure de recevoir des transmissions non brouillées.
Votre radio prend en charge deux types de cryptage :
• Cryptage de base
• Cryptage amélioré. (Pour obtenir davantage de renseignements au sujet de cette configuration, adressez-vous à votre détaillant ou à votre administrateur de système.)
Seulement UN des types de cryptage ci-dessus peut être attribué à la radio.
Pour décoder un appel ou une transmission de données crypté, votre radio doit être programmée de manière à avoir la même clé de cryptage (cryptage de base) OU la même valeur et le même ID de clé (cryptage amélioré) que la radio à l'origine de la transmission.
Si votre radio reçoit un appel brouillé correspondant à une clé de cryptage différente OU à une valeur et à un ID de clé différents, vous entendrez une transmission brouillée (cryptage de base) ou vous n'entendrez rien du tout (cryptage amélioré).
Le voyant DEL vert s'allume pendant que la radio envoie une transmission cryptée et émet un double clignotement lorsque la radio reçoit une transmission cryptée.
Certains modèles de radio n'offrent pas cette fonction de cryptage. Pour obtenir des renseignements supplémentaires, adressez-vous à votre détaillant ou à votre administrateur de système. Procédure :Appuyez sur la touche programmée Cryptage pour activer ou désactiver la fonction.
Français canadien

Fo
nct
ion
s av
ancé
es
66
Franç
OU Procédez comme suit.
1 g pour accéder au menu.
2 b ou c jusqu'à Config/Infos, puis appuyez sur g pour sélectionner l'option.
3 b ou c jusqu'à Config. radio, puis appuyez sur g pour sélectionner l'option.
4 b ou c jusqu'à Crypt.
5 b ou c jusqu'à Activé pour activer le cryptage. L'écran affiche l'icône à côté du message Activé.OU
b ou c jusqu'à Arrêt pour désactiver le cryptage. L'écran affiche l'icône à côté du message Arrêt.
Si un type de cryptage a été attribué à la radio, l'icône de transmission sécurisée ou non s'affiche dans la barre d'état, sauf lorsque la radio envoie ou reçoit un appel ou une alarme d'urgence.
Brouillage analogique
Le brouillage analogique est une fonctionnalité uniquement analogique qui fait appel à une solution de brouillage logiciel pour prévenir l’écoute d’un canal par des utilisateurs non autorisés. Les parties de la transmission correspondant au signal et à l'identification de l'utilisateur ne sont pas brouillées.
La fonction de brouillage analogique doit être activée sur le canal de la radio pour que celle-ci puisse envoyer et recevoir des transmissions avec brouillage analogique. Lorsqu'un canal avec brouillage analogique est sélectionné, la radio NE PEUT PAS recevoir des transmissions non brouillées.
Votre radio prend en charge DEUX codes de brouillage analogique qui peuvent être sélectionnés à l'aide du bouton programmable.
Activer ou désactiver le brouillage analogique
Procédure :Appuyez sur le bouton programmé Brouillage analogique pour activer ou désactiver cette fonction.OUProcédez comme suit.
1 g pour accéder au menu.
2 b ou c jusqu'à Config/Infos, puis appuyez sur g pour sélectionner l'option.
ais canadien

Fo
nctio
ns avan
cées
67
3 b ou c jusqu'à Config. radio, puis appuyez sur g pour sélectionner l'option.
4 b ou c jusqu'à Brouillage.
5 Appuyez sur g pour activer le cryptage. L'écran affiche l'icône à côté du message Activé.OU
Appuyez sur g pour désactiver le cryptage. L'icône ne s'affiche plus à côté de Activé.
Définir les codes de brouillage analogique
Procédure :Appuyez sur le bouton programmé Brouillage analogique pour activer ou désactiver cette fonction.OUProcédez comme suit.
1 g pour accéder au menu.
2 b ou c jusqu'à Config/Infos, puis appuyez sur g pour sélectionner l'option.
3 b ou c jusqu'à Config. radio, puis appuyez sur g pour sélectionner l'option.
4 b ou c jusqu'à Brouillage.
5 b ou c jusqu'au code voulu, puis appuyez sur g pour sélectionner l'option.
Réglages multisite
Ces fonctions peuvent être utilisées lorsque votre canal de radio actuel fait partie d'une configuration Sites IP interconnectés ou Linked Capacity Plus.
Consultez la section Sites IP interconnectés, à la page 9, et la section Linked Capacity Plus, à la page 10, pour plus de détails au sujet de ces configurations.
REMARQUE : Pour obtenir davantage de renseignements au sujet de cette configuration, adressez-vous à votre détaillant ou à votre administrateur de système.
Lancer une recherche automatique de site
REMARQUE : La radio recherche un nouveau site uniquement si le signal du site actuel est faible ou si elle ne reçoit aucun signal de ce site. Si la valeur RSSI est assez forte, la radio demeure connectée au site actuel.
Français canadien

Fo
nct
ion
s av
ancé
es
68
Franç
Procédure : Appuyez sur la touche programmée Verr. Site act./désact.
1 Une tonalité se fait entendre et l'écran affiche Site déverrouillé.
2 Le voyant DEL jaune clignote rapidement lorsque la radio recherche un nouveau site et s'éteint une fois le site trouvé.
3 L'écran affiche alors l'alias du canal et l'icône d'itinérance de site apparaît.
OU
Procédure : Utilisez le menu.
1 g pour accéder au menu.
2 b ou c jusqu'à Config/Infos, puis appuyez sur g pour sélectionner l'option.
3 b ou c jusqu'à Config. radio, puis appuyez sur g pour sélectionner l'option.
4 b ou c jusqu'à Chgmt site, puis appuyez sur g pour sélectionner l'option.
5 b ou c jusqu'à Déverr. site, puis appuyez sur g pour sélectionner l'option. Une tonalité se fait entendre et l'écran affiche Site déverrouillé.
6 La radio revient à l'écran d'accueil. L'écran affiche alors l'alias du canal et l'icône d'itinérance de site apparaît.
7 Le voyant DEL jaune clignote rapidement lorsque la radio recherche un nouveau site et s'éteint une fois le site trouvé.
La radio exécute également une recherche automatique de site (site déverrouillé) pendant l'appui sur la touche PTT ou la transmission de données si le canal sélectionné, un canal multisite auquel est jointe une liste d'itinérance, est hors de portée.
Arrêter la recherche automatique de site
Pendant que la radio recherche un nouveau site :
Procédure : Appuyez sur la touche programmée Verr. Site act./désact.
1 Une tonalité se fait entendre et l'écran affiche Site verrouillé.
2 Le voyant DEL s'éteint et l'écran affiche l'alias du canal.
ais canadien
Fo
nctio
ns avan
cées
69
OU
Procédure : Utilisez le menu.
1 g pour accéder au menu.
2 b ou c jusqu'à Config/Infos, puis appuyez sur g pour sélectionner l'option.
3 b ou c jusqu'à Config. radio, puis appuyez sur g pour sélectionner l'option.
4 b ou c jusqu'à Chgmt site, puis appuyez sur g pour sélectionner l'option.
5 b ou c jusqu'à État verr. site.
6 Appuyez sur g pour verrouiller le site. L'écran affiche l'icône à côté du message Activé.OU
Appuyez sur g pour déverrouiller le site. L'icône ne s'affiche plus à côté de Activé.
7 Le voyant DEL s'éteint et la radio revient à l'écran d'accueil. L'écran affiche l'alias du canal.
Lancer une recherche de site manuelle
Procédure : Appuyez sur la touche programmée Itinérance man. et passez à l'étape 6.OUProcédez comme suit.
1 g pour accéder au menu.
2 b ou c jusqu'à Config/Infos, puis appuyez sur g pour sélectionner l'option.
3 b ou c jusqu'à Config. radio, puis appuyez sur g pour sélectionner l'option.
4 b ou c jusqu'à Chgmt site, puis appuyez sur g pour sélectionner l'option.
5 b ou c jusqu'à Recher. active, puis appuyez sur
g pour sélectionner l'option.
6 Une tonalité se fait entendre et l'écran affiche Recherche de site.Le voyant DEL vert clignote.
Français canadien
Fo
nct
ion
s av
ancé
es
70
Franç
7 Si un nouveau site est trouvé, une tonalité se fait entendre et le voyant DEL s'éteint. L'écran affiche le message Site <Alias> trouvé. OUSi aucun site ne se trouve à portée, une tonalité se fait entendre et le voyant DEL s'éteint. L'écran affiche le message Hors de portée.OUSi un nouveau site se trouve à portée et si la radio n’arrive pas à s’y connecter, une tonalité se fait entendre et le voyant DEL s’éteint. L'écran affiche le message Canal occupé.
8 La radio revient à l'écran d'accueil.
Sécurité
Vous pouvez activer ou désactiver n'importe quelle radio du système. Par exemple, vous pourriez vouloir désactiver une radio volée pour empêcher le voleur de s'en servir, puis la réactiver une fois qu'elle est de nouveau en votre possession.
REMARQUE : L'exécution des fonctions Désactiver radio et Activer radio est limitée aux radios sur lesquelles ces fonctions sont activées.
Désactiver la radio
Procédure : Utilisez la touche programmée Désac radio.
1 Appuyez sur la touche programmée Désac radio.
2 b ou c jusqu'à l'alias ou l'ID d'abonné requis, puis
appuyez sur g pour sélectionner l'option.
3 L'écran affiche un bref avis indiquant que l'exécution de la requête est en cours. Le voyant DEL vert clignote.
4 Attendez la confirmation.
5 En cas de réussite, une tonalité de réussite se fait entendre et l'écran affiche un bref avis de réussite.OUEn cas d'échec, une tonalité d'échec se fait entendre et l'écran affiche un bref avis d'échec.
OU
Procédure : Utilisez le menu.
1 g pour accéder au menu.
2 b ou c jusqu'à Répertoire, puis appuyez sur g pour sélectionner l'option. Les entrées sont classées alphabétiquement.
ais canadien
Fo
nctio
ns avan
cées
71
3 b ou c jusqu'à l'alias ou l'ID d'abonné requis, puis
appuyez sur g pour sélectionner l'option.
4 b ou c jusqu'à Désac radio, puis appuyez sur g pour sélectionner l'option.
5 L'écran affiche un bref avis indiquant que l'exécution de la requête est en cours. Le voyant DEL vert clignote.
6 Attendez la confirmation.
7 En cas de réussite, une tonalité de réussite se fait entendre et l'écran affiche un bref avis de réussite.OUEn cas d'échec, une tonalité d'échec se fait entendre et l'écran affiche un bref avis d'échec.
N'appuyez pas sur e pendant le processus de désactivation
de la radio, car vous ne recevrez pas de message de confirmation.
Vous pouvez également accéder à cette fonction par numérotation manuelle (consultez la section Désactivation de la radio à l'aide de la numérotation manuelle, à la page 110).
Activer la radio
Procédure : Utilisez la touche programmée Activer radio.
1 Appuyez sur la touche programmée Activer radio.
2 b ou c jusqu'à l'alias ou l'ID d'abonné requis, puis
appuyez sur g pour sélectionner l'option.
3 L'écran affiche Activer radio ainsi que l'alias ou l'ID d'abonné. Le voyant DEL s'allume en vert.
4 Attendez la confirmation.
5 En cas de réussite, une tonalité de réussite retentit et l'écran affiche un bref avis de réussite.OUEn cas d'échec, une tonalité d'échec se fait entendre et l'écran affiche un bref avis d'échec.
OU
Procédure : Utilisez le menu.
1 g pour accéder au menu.
2 b ou c jusqu'à Répertoire, puis appuyez sur g pour sélectionner l'option. Les entrées sont classées alphabétiquement.
Français canadien

Fo
nct
ion
s av
ancé
es
72
Franç
3 b ou c jusqu'à l'alias ou l'ID d'abonné requis, puis
appuyez sur g pour sélectionner l'option.
4 b ou c jusqu'à Activer radio, puis appuyez sur
g pour sélectionner l'option. Le voyant DEL vert clignote.
5 L'écran affiche Activer radio ainsi que l'alias ou l'ID d'abonné. Le voyant DEL s'allume en vert.
6 Attendez la confirmation.
7 En cas de réussite, une tonalité de réussite se fait entendre et l'écran affiche le message Activer radio réussi.OUEn cas d'échec, une tonalité d'échec se fait entendre et l'écran affiche le message Activer radio échoué.
N'appuyez pas sur e pendant le processus d'activation de la
radio, car vous ne recevrez pas de message de confirmation.
Vous pouvez également accéder à cette fonction par numérotation manuelle (consultez la section Activation de la radio à l'aide de la numérotation manuelle, à la page 110).
Travailleur solitaire
Cette fonction déclenche le mode d'urgence s'il n'y a aucun signe d'activité par l'utilisateur, tel qu'appuyer sur une quelconque touche de la radio ou activer le sélecteur de canal, pendant une durée prédéfinie.
Si aucune activité n'est détectée pendant la durée prédéfinie, la radio avertit l'utilisateur de l'expiration du délai d'inactivité au moyen d'un signal sonore.
Si l'utilisateur ne donne aucune réponse à l'avertissement avant l'expiration du délai prédéfini subséquent, la radio active une alarme d'urgence.
Seulement une des alarmes d'urgence suivantes est associée à cette fonction :
• Alarme d'urgence
• Alarme d'urgence avec appel
• Alarme d'urgence suivie d'un appel vocal
La radio demeure dans l'état d'urgence, permettant la transmission des messages vocaux, jusqu'à ce qu'une action soit exécutée. Consultez la section Fonction d'urgence à la page 49 pour plus de détails sur les façons de quitter le mode d'urgence.
ais canadien

Fo
nctio
ns avan
cées
73
REMARQUE : L'exécution de cette fonction est limitée aux radios sur lesquelles la fonction est activée. Pour obtenir des renseignements supplémentaires, adressez-vous à votre détaillant ou à votre administrateur de système.
Liste de notification
Votre radio comprend une liste de notification qui rassemble tous les événements « non lus » sur le canal, par exemple les appels manqués et les avertissements d'appel.
L'icône de notification s'affiche dans la barre d'état lorsque la liste de notifications présente au moins un événement.
La liste prend en charge au maximum 40 événements non lus. Une fois la liste pleine, le prochain événement remplace automatiquement l'événement le plus ancien.
Une fois les événements consultés (lus), ils sont retirés de la liste de notifications.
REMARQUE : Votre radio interrompt le balayage lorsque la liste de notification est affichée. Le balayage reprend lorsque la radio quitte la liste de
notification. Appuyez sur e pour quitter la liste de notification ou attendez que la minuterie du menu arrive à son terme.
Accéder à la liste de notifications
Procédure :
Appuyez sur la touche programmée Notifications.OUProcédez comme suit.
1 g pour accéder au menu.
2 b ou c jusqu'à Notification, puis appuyez sur g pour sélectionner l'option.
3 b ou c jusqu'à l'événement voulu, puis appuyez sur
g pour le sélectionner.
Maintenez enfoncée la touche e pour revenir à l'écran
d'accueil.
Français canadien
Fo
nct
ion
s av
ancé
es
74
Franç
ARTS (Auto-Range Transponder System)
ARTS est une fonctionnalité analogique seulement conçue pour vous informer quand votre radio est hors de portée des autres radios dotées du système ARTS.
Les radios dotées du système ARTS transmettent ou reçoivent périodiquement des signaux pour confirmer qu'elles se trouvent à portée l'une de l'autre. Votre détaillant peut programmer votre radio pour qu'elle transmette ou reçoive le signal ARTS.
Votre radio fournit des indications d'état comme suit :
• First-Time Alert (Alerte de première utilisation) – Une tonalité se fait entendre et l'écran affiche A portée à côté de l'alias de canal.
• ARTS-in-Range Alert (Alerte ARTS à portée) – Une tonalité se fait entendre, si elle est programmée, et l'écran affiche A portée à côté de l'alias de canal.
• ARTS-Out-of-Range Alert (Alerte ARTS hors de portée) – Une tonalité se fait entendre, le voyant DEL clignote rapidement en rouge et l'écran affiche en alternance Hors de portée et l'écran d'accueil.
Programmation par radiocommunication (OTAP)
Votre radio peut être mise à jour par votre détaillant à distance, par le biais d'OTAP, sans nécessiter une connexion physique. De plus, certains paramètres peuvent être configurés par le biais de la programmation par radiocommunication.
Pendant la programmation par radiocommunication, la DEL clignote en vert.
REMARQUE : Quand la radio reçoit un fort volume de données, l'icône Données à volume élevé apparaît et le canal est occupé. Si vous appuyez sur le bouton PTT pendant ce temps, vous pourriez entendre une tonalité d'échec.
Lorsque la programmation est terminée, selon la configuration de votre radio :
• Une tonalité retentit, l'écran affiche Actualisation Redémarrage, et votre radio redémarre (mise hors tension, puis sous tension de nouveau).
• Sélectionnez Redémarrer ou Retarder. Sélectionner Retarder permet à votre radio de retourner à l'écran précédent, avec une icône de minuteur OTAP visible, pendant un certain temps avant que le démarrage automatique se produise.
ais canadien

Fo
nctio
ns avan
cées
75
Lors de la mise sous tension après le redémarrage automatique, l'écran affiche MàJ logiciel terminée si la mise à jour de la programmation par radiocommunication a réussi ou MàJ logiciel échouée si la mise à jour a échoué.
Consultez la section Mise à jour du logiciel à la page 88 pour votre version logicielle mise à jour.
Utilitaires
Activer ou désactiver les tonalités et les avertissements de la radio
Vous pouvez activer ou désactiver toutes les tonalités et tous les avertissements de la radio (sauf la tonalité d’avertissement d’urgence entrant), au besoin.
Procédure : Appuyez sur la touche programmée Toutes tnltés/avert. pour activer ou désactiver toutes les tonalités.OUProcédez comme suit.
1 g pour accéder au menu.
2 b ou c jusqu'à Config/Infos, puis appuyez sur g pour sélectionner l'option.
3 b ou c jusqu'à Config. radio, puis appuyez sur g pour sélectionner l'option.
4 b ou c jusqu'à Tnltés/Avert., puis appuyez sur g pour sélectionner l'option.
5 b ou c jusqu'à Toutes Tnltés, puis appuyez sur g pour sélectionner l'option.
6 b ou c jusqu'à Activé pour activer toutes les tonalités. L'écran affiche l'icône à côté du message Activé.OU
b ou c jusqu'à Arrêt pour désactiver toutes les tonalités. L'écran affiche l'icône à côté du message Arrêt.
Régler l'écart de volume des tonalités
d'avertissement
Vous pouvez régler l'écart de volume des tonalités d'avertissement au besoin. Cette fonction permet de régler le niveau sonore des tonalités et des avertissements de manière à ce qu'il soit plus élevé ou moins élevé que celui de la voix.
Français canadien
Fo
nct
ion
s av
ancé
es
76
Franç
Procédure :
1 g pour accéder au menu.
2 b ou c jusqu'à Config/Infos, puis appuyez sur g pour sélectionner l'option.
3 b ou c jusqu'à Config. radio, puis appuyez sur g pour sélectionner l'option.
4 b ou c jusqu'à Tnltés/Avert., puis appuyez sur g pour sélectionner l'option.
5 b ou c jusqu'à Écart vol., puis appuyez sur g pour sélectionner l'option.
6 b ou c jusqu'au réglage de volume souhaité. La radio émet une tonalité correspondant à chaque réglage de volume.
7 Appuyez sur g pour conserver le réglage de volume affiché.OURépétez l'étape 6 pour sélectionner un autre réglage de volume.OU
e pour quitter sans modifier les réglages actuels de l'écart de volume.
Activer ou désactiver la tonalité d'autorisation
Vous pouvez activer ou désactiver la tonalité d'autorisation de parler, au besoin.
Procédure :
1 g pour accéder au menu.
2 b ou c jusqu'à Config/Infos, puis appuyez sur g pour sélectionner l'option.
3 b ou c jusqu'à Config. radio, puis appuyez sur g pour sélectionner l'option.
4 b ou c jusqu'à Tnltés/Avert., puis appuyez sur g pour sélectionner l'option.
5 b ou c jusqu'à Tnlté Autoris., puis appuyez sur
g pour sélectionner l'option.
6 b ou c jusqu'à Activé pour activer la tonalité d'autorisation de parler. L'écran affiche l'icône à côté du message Activé.OU
b ou c jusqu'à Arrêt pour désactiver la tonalité d'autorisation de parler. L'écran affiche l'icône à côté du message Arrêt.
ais canadien

Fo
nctio
ns avan
cées
77
Activer ou désactiver la tonalité d'alerte de mise sous tension
Vous pouvez activer ou désactiver la tonalité d'alerte de mise sous tension au besoin.
Procédure :
1 g pour accéder au menu.
2 b ou c jusqu'à Config/Infos, puis appuyez sur g pour sélectionner l'option.
3 b ou c jusqu'à Config. radio, puis appuyez sur g pour sélectionner l'option.
4 b ou c jusqu'à Tnltés/Avert., puis appuyez sur g pour sélectionner l'option.
5 b ou c jusqu'à Mise s. tension, puis appuyez sur
g pour sélectionner l'option.
6 b ou c jusqu'à Activé pour activer la tonalité de mise sous tension. L'écran affiche l'icône à côté du message Activé.OU
b ou c jusqu'à Arrêt pour désactiver la tonalité de mise sous tension. L'écran affiche l'icône à côté du message Arrêt.
Régler le niveau de puissance
Vous pouvez personnaliser le niveau de puissance de votre radio en réglant celui-ci à élevé ou bas pour chaque canal.
Réglages : Élevé permet la communication avec des radios considérablement éloignées. Bas permet la communication avec des radios situées à proximité.
Procédure : Appuyez sur la touche programmée Niveau de puissance pour alterner entre un niveau de puissance élevé ou bas. OUProcédez comme suit.
1 g pour accéder au menu.
2 b ou c jusqu'à Config/Infos, puis appuyez sur g pour sélectionner l'option.
3 b ou c jusqu'à Config. radio, puis appuyez sur g pour sélectionner l'option.
Français canadien
Fo
nct
ion
s av
ancé
es
78
Franç
4 b ou c jusqu'à Puissance, puis appuyez sur g pour sélectionner l'option.
5 b ou c jusqu'au réglage requis, puis appuyez sur g pour le sélectionner.L'icône s'affiche à côté du réglage sélectionné.
6 L'écran revient au menu précédent.
Maintenez enfoncée la touche e pour revenir à l'écran
d'accueil. L'icône de niveau de puissance est visible.
Régler la luminosité de l'écran
Vous pouvez régler la luminosité de l'écran au besoin.
Procédure : Appuyez sur la touche programmée Luminosité et passez à l'étape 5.OUProcédez comme suit.
1 g pour accéder au menu.
2 b ou c jusqu'à Config/Infos, puis appuyez sur g pour sélectionner l'option.
3 b ou c jusqu'à Config. radio, puis appuyez sur g pour sélectionner l'option.
4 b ou c jusqu'à Luminosité, puis appuyez sur g pour sélectionner l'option.
5 L'écran affiche une barre de progression.
Réduisez la luminosité de l'écran en appuyant sur b ou
augmentez la luminosité en appuyant sur c .
Appuyez sur g pour confirmer l'entrée.
Activer ou désactiver Avert./phares
Votre radio peut vous aviser d'un appel entrant en actionnant l'avertisseur et les phares. Lorsque cette fonction est activée, les appels entrants font s'activer l'avertisseur et les phares de votre véhicule.
Cette fonction passe par le connecteur d'accessoire arrière de votre radio et doit être installée par votre détaillant.
Procédure :Appuyez sur la touche programmée Avert./phares pour activer ou désactiver la fonction Avert./phares.
ais canadien
Fo
nctio
ns avan
cées
79
OUProcédez comme suit.
1 g pour accéder au menu.
2 b ou c jusqu'à Config/Infos, puis appuyez sur g pour sélectionner l'option.
3 b ou c jusqu'à Config. radio, puis appuyez sur g pour sélectionner l'option.
4 b ou c jusqu'à Avert./phares, puis appuyez sur g pour sélectionner l'option.
5 b ou c jusqu'à Allumer pour activer le klaxon et les phares. L'écran affiche à côté de Allumer.OU
b ou c jusqu'à Eteindre pour désactiver le klaxon et les phares. L'écran affiche à côté de Eteindre.
Régler le niveau Squelch (silencieux)
Vous pouvez régler le niveau du silencieux de votre radio de manière à filtrer les appels indésirables à faible intensité de signal ou les canaux caractérisés par un bruit de fond anormalement élevé.
Réglages : Normal correspond au réglage par défaut. Filtré élimine les appels (indésirables) ou le bruit de fond. Cependant, les appels provenant d'emplacements distants risquent alors d'être également éliminés.
Procédure : Appuyez sur la touche préprogrammée Silencieux pour alterner entre le réglage filtré et le réglage normal.OUProcédez comme suit.
1 g pour accéder au menu.
2 b ou c jusqu'à Config/Infos, puis appuyez sur g pour sélectionner l'option.
3 b ou c jusqu'à Config. radio, puis appuyez sur g pour sélectionner l'option.
4 b ou c jusqu'à Squelch, puis appuyez sur g pour sélectionner l'option.
5 L'écran affiche Filtré et Normal.
b ou c jusqu'au réglage voulu, puis appuyez sur g pour l'activer. L'icône s'affiche à côté du réglage sélectionné.
6 L'écran revient au menu précédent.
Français canadien
Fo
nct
ion
s av
ancé
es
80
Franç
Activer ou désactiver les voyants DEL
Vous pouvez activer ou désactiver les voyants DEL, au besoin.
Procédure :
1 g pour accéder au menu.
2 b ou c jusqu'à Config/Infos, puis appuyez sur g pour sélectionner l'option.
3 b ou c jusqu'à Config. radio, puis appuyez sur g pour sélectionner l'option.
4 b ou c jusqu'à Voyant LED, puis appuyez sur g pour sélectionner l'option.
5 b ou c jusqu'à Activé pour activer le voyant DEL. L'écran affiche l'icône à côté du message Activé.OU
b ou c jusqu'à Arrêt pour désactiver le voyant DEL. L'écran affiche l'icône à côté du message Arrêt.
Langue
Vous pouvez configurer la langue d'affichage de votre radio.
Procédure :
1 g pour accéder au menu.
2 b ou c jusqu'à Config/Infos, puis appuyez sur g pour sélectionner l'option.
3 b ou c jusqu'à Langue, puis appuyez sur g pour sélectionner l'option.
4 b ou c jusqu'à la langue voulue, puis appuyez sur g pour l'activer. L'icône s'affiche à côté de la langue sélectionnée.
ais canadien

Fo
nctio
ns avan
cées
81
Activer ou désactiver la fonction de transmission vocale (VOX)
Cette fonction vous permet d'établir une communication vocale en mode mains libres sur un canal programmé. La radio transmet automatiquement, pendant une période programmée, dès que le microphone de l'accessoire VOX détecte une voix. La source du microphone doit être préconfigurée et l'accessoire VOX branché au port préconfiguré.
REMARQUE : Vous devrez peut-être éteindre et rallumer la radio après en avoir déconnecté le microphone VOX afin de permettre à la radio de faire le transfert vers un autre accessoire valide.
Une pression sur le bouton PTT pendant l'utilisation de la radio désactive la fonction VOX. Pour la réactiver, exécutez l'une des opérations suivantes :
• Éteignez la radio, puis rallumez-la, OU
• Changez de canal à l'aide des boutons Canal précédent/suivant, OU
• Procédez comme suit.
REMARQUE : L'activation ou la désactivation de cette fonction est limitée aux radios sur lesquelles la fonction associée est activée. Pour obtenir des renseignements supplémentaires, adressez-vous à votre détaillant ou à votre administrateur de système.
Français canadien

Fo
nct
ion
s av
ancé
es
82
Franç
Procédure : Appuyez sur la touche programmée VOX pour activer ou désactiver la fonction.OUProcédez comme suit.
1 g pour accéder au menu.
2 b ou c jusqu'à Config/Infos, puis appuyez sur g pour sélectionner l'option.
3 b ou c jusqu'à Config. radio, puis appuyez sur g pour sélectionner l'option.
4 b ou c jusqu'à VOX, puis appuyez sur g pour sélectionner l'option.
5 b ou c jusqu'à Activé pour activer la fonction VOX. L'écran affiche l'icône à côté du message Activé.OU
b ou c jusqu'à Arrêt pour désactiver la fonction VOX. L'écran affiche l'icône à côté du message Arrêt.
Si la fonction de tonalité d'autorisation est activée (consultez la section Activer ou désactiver la tonalité d'autorisation à la page 76), utilisez un mot déclencheur pour faire l'appel. Attendez la fin de la tonalité d'autorisation de parler, puis parlez clairement dans le microphone.
Annonce vocale
Cette fonction permet à la radio de faire entendre la zone ou le canal que l'utilisateur vient d'attribuer, ou de signaler l'appui sur une touche programmable. L'indicateur audio peut être personnalisé en fonction des exigences du client. Cette option est particulièrement utile lorsqu'il est difficile de lire le contenu affiché à l'écran.
Utilisez les fonctions suivantes pour activer ou désactiver l'annonce vocale.
Procédure :
Appuyez sur la touche programmée Annonce vocale. OUProcédez comme suit.
1 g pour accéder au menu.
2 b ou c jusqu'à Config/Infos, puis appuyez sur g pour sélectionner l'option.
3 b ou c jusqu'à Annonce vocale.
4 b ou c jusqu'à Activé pour activer l'annonce vocale. L'écran affiche l'icône à côté du message Activé.OU
b ou c jusqu'à Arrêt pour désactiver l'annonce vocale. L'écran affiche l'icône à côté du message Arrêt.
ais canadien

Fo
nctio
ns avan
cées
83
CGA Mic. analogique (Mic. CGA-A)
Cette fonction gère automatiquement le gain du microphone de votre radio pendant la transmission sur un système analogique. La fonction élimine l'audio fort ou augmente l'audio faible en fonction d'une valeur prédéterminée afin d'assurer un niveau audio uniforme.
Procédure :
1 g pour accéder au menu.
2 b ou c jusqu'à Config/Infos, puis appuyez sur g pour sélectionner l'option.
3 b ou c jusqu'à Config. radio, puis appuyez sur g pour sélectionner l'option.
4 b ou c jusqu'à Mic. CGA-A.
5 b ou c jusqu'à Activé pour activer la fonction CGA Mic. analogique. L'écran affiche l'icône à côté du message Activé.OU
b ou c jusqu'à Arrêt pour désactiver la fonction CGA Mic. analogique. L'écran affiche l'icône à côté du message Arrêt.
Contrôle de gain automatique de microphone numérique (Mic. CGA-D)
Cette fonction gère automatiquement le gain du microphone de votre radio pendant la transmission sur un système numérique. La fonction élimine l'audio fort ou augmente l'audio faible en fonction d'une valeur prédéterminée afin d'assurer un niveau audio uniforme.
Procédure :
1 g pour accéder au menu.
2 b ou c jusqu'à Config/Infos, puis appuyez sur g pour sélectionner l'option.
3 b ou c jusqu'à Config. radio, puis appuyez sur g pour sélectionner l'option.
4 b ou c jusqu'à Mic. CGA-D.
5 b ou c jusqu'à Activé pour activer la fonction CGA Mic. numérique. L'écran affiche l'icône à côté du message Activé.OU
b ou c jusqu'à Arrêt pour désactiver la fonction CGA Mic. numérique. L'écran affiche l'icône à côté du message Arrêt.
Français canadien

Fo
nct
ion
s av
ancé
es
84
Franç
Audio intelligent
Votre radio règle automatiquement le volume audio pour compenser le bruit de fond actuel dans l'environnement, y compris les sources de bruit mobiles et immobiles. Cette fonction est une fonction de réception uniquement et ne touche pas l'audio de transmission.
Utilisez les fonctions suivantes pour activer ou désactiver l'audio intelligent.
Procédure :
Appuyez sur la touche programmée Audio intelligent pour activer ou désactiver la fonction Audio intelligent. OUProcédez comme suit.
1 g pour accéder au menu.
2 b ou c jusqu'à Config/Infos, puis appuyez sur g pour sélectionner l'option.
3 b ou c jusqu'à Config. radio, puis appuyez sur g pour sélectionner l'option.
4 b ou c jusqu'à Audio intelligent.
5 b ou c jusqu'à Activé pour activer l'audio intelligent. L'écran affiche l'icône à côté du message Activé.OU
b ou c jusqu'à Arrêt pour désactiver l'audio intelligent. L'écran affiche l'icône à côté du message Arrêt.
Activer ou désactiver l'amélioration de la vibration
Vous pouvez activer cette fonction lorsque vous parlez une langue qui contient beaucoup de prononciations alvéolaires vibrantes (« R » roulés).
Utilisez les fonctions suivantes pour activer ou désactiver l'amélioration de la vibration.
Procédure :
Appuyez sur la touche programmée Amélioration de la vibration act./dés.OUProcédez comme suit.
1 g pour accéder au menu.
2 b ou c jusqu'à Config./Infos, puis appuyez sur
g pour sélectionner l'option.
ais canadien
Fo
nctio
ns avan
cées
85
3 b ou c jusqu'à Config. radio, puis appuyez sur g pour sélectionner l'option.
4 b ou c jusqu'à Amél. trille, puis appuyez sur g pour sélectionner l'option.
5 b ou c jusqu'à Activé pour activer l'amélioration de la vibration. L'écran affiche l'icône à côté du message Activé.OU
b ou c jusqu'à Arrêt pour désactiver l'amélioration de la vibration. L'écran affiche l'icône à côté du message Arrêt.
Réglage de l'ambiance audio
Vous pouvez personnaliser l'ambiance audio de votre radio en fonction de votre environnement.
Par défaut permet d'activer les paramètres d'origine par défaut.
Fort – Active la suppression du bruit et augmente le volume du haut-parleur pour une utilisation dans un environnement bruyant.
Groupe de travail permet d'activer la réduction du bruit et de désactiver l'AGC pour utilisation lorsqu'un groupe de radios sont à proximité les unes des autres.
Procédure :
1 g pour accéder au menu.
2 b ou c jusqu'à Config./Infos, puis appuyez sur
g pour sélectionner l'option.
3 b ou c jusqu'à Config. radio, puis appuyez sur g pour sélectionner l'option.
4 b ou c jusqu'à Ambiance audio, puis appuyez sur g pour sélectionner l'option.
5 b ou c jusqu'au paramètre voulu, puis appuyez sur g pour le sélectionner. L'icône s'affiche à côté du réglage sélectionné.
Définition des profils audio
Vous pouvez personnaliser les profils audio de votre radio selon vos préférences.
L'option Par défaut désactive le profil audio sélectionné précédemment et le profil audio de la radio revient au mode normal.
Niveau 1, niveau 2 et Niveau 3 sont des profils audio destinés à compenser la perte auditive causée par le bruit qui est typique pour les adultes dans la quarantaine, la cinquantaine, la soixantaine ou plus.
Français canadien

Fo
nct
ion
s av
ancé
es
86
Franç
Ampli. aigus, Ampli. médiums et Ampli. basses produisent respectivement un son plus métallique, plus nasillard et plus profond.
Procédure :
1 g pour accéder au menu.
2 b ou c jusqu'à Config./Infos, puis appuyez sur
g pour sélectionner l'option.
3 b ou c jusqu'à Config. radio, puis appuyez sur g pour sélectionner l'option.
4 b ou c jusqu'à Profils audio, puis appuyez sur g pour sélectionner l'option.
5 b ou c jusqu'au paramètre voulu, puis appuyez sur g pour le sélectionner. L'icône s'affiche à côté du réglage sélectionné.
Accès aux renseignements généraux sur la radio
Votre radio contient des renseignements sur les éléments suivants :
• Alias et ID de la radio
• Versions du micrologiciel et de la fiche de codes
• Mise à jour du logiciel
• Information sur le site
REMARQUE : Appuyez sur e en tout temps pour revenir à l'écran précédent ou maintenez enfoncée la
touche e pour revenir à l'écran d'accueil. Lorsqu'il n'y a aucune activité pendant une durée prédéfinie, la radio quitte l'écran en cours.
ais canadien
Fo
nctio
ns avan
cées
87
Vérifier l'alias et l'ID de la radio
Affiche l'ID de votre radio.
Procédure :Appuyez sur la touche programmée Alias et ID de la radio pour vérifier l’alias et l’ID de votre radio. Une tonalité de réussite se fait entendre.OUProcédez comme suit.
1 g pour accéder au menu.
2 b ou c jusqu'à Config/Infos, puis appuyez sur g pour sélectionner l'option.
3 b ou c jusqu'à Infos radio, puis appuyez sur g pour sélectionner l'option.
4 b ou c jusqu'à Mon numéro, puis appuyez sur g pour sélectionner l'option.
5 La première ligne de l'écran affiche l'alias de la radio. La deuxième ligne de l'écran affiche l'ID de la radio.
Vous pouvez également appuyer sur la touche programmée Alias et ID de la radio pour revenir à l'écran précédent.
Vérifier les versions du micrologiciel et de la fiche de code
Affiche les versions du micrologiciel et de la fiche de code sur votre radio.
Procédure :
1 g pour accéder au menu.
2 b ou c jusqu'à Config/Infos, puis appuyez sur g pour sélectionner l'option.
3 b ou c jusqu'à Infos radio, puis appuyez sur g pour sélectionner l'option.
4 b ou c jusqu'à Versions, puis appuyez sur g pour sélectionner l'option.
L'écran affiche la version actuelle du micrologiciel et celle de la fiche de code.
Français canadien
Fo
nct
ion
s av
ancé
es
88
Franç
Mise à jour du logiciel
Affiche la date et l'heure de la dernière mise à jour logicielle effectuée par le biais de la Programmation par radiocommunication (OTAP).
Procédure :
1 g pour accéder au menu.
2 b ou c jusqu'à Config/Infos, puis appuyez sur g pour sélectionner l'option.
3 b ou c jusqu'à Infos radio, puis appuyez sur g pour sélectionner l'option.
4 b ou c jusqu'à MàJ logiciel, puis appuyez sur g pour sélectionner l'option.
5 L'écran affiche la date et l'heure de la dernière mise à jour logicielle.
Pour de plus amples renseignements sur le système OTAP, consultez la section Programmation par radiocommunication (OTAP) à la page 74.
REMARQUE : Le menu de mise à jour logicielle est uniquement disponible après au moins une session OTAP réussie.
Information sur le site
Affiche le nom du site Linked Capacity Plus courant sur lequel se trouve votre radio.
Procédure :
1 g pour accéder au menu.
2 b ou c jusqu'à Config/Infos, puis appuyez sur g pour sélectionner l'option.
3 b ou c jusqu'à Infos radio, puis appuyez sur g pour sélectionner l'option.
4 b ou c jusqu'à Info site, puis appuyez sur g pour sélectionner l'option.
5 L'écran affiche le nom du site Linked Capacity Plus courant.
Consultez la section Linked Capacity Plus à la page 10 pour les détails sur Linked Capacity Plus.
ais canadien
Fo
nctio
ns d
u m
icrop
ho
ne à clavier
89
Fonctions du microphone à clavier
Les fonctions supplémentaires de votre radio énumérées ci-dessous peuvent être utilisées à l'aide d'un microphone à clavier :Utilisation du clavier. . . . . . . . . . . . . . . . . . . . . . . . . . . page 90Autres fonctions avancées . . . . . . . . . . . . . . . . . . . . . page 91Multifréquence à deux tonalités (DTMF) . . . . . . . . . . page 109Sécurité . . . . . . . . . . . . . . . . . . . . . . . . . . . . . . . . . . . page 110Fonctions de verrouillage par mot de passe . . . . . . . page 111Configuration du panneau avant (FPC). . . . . . . . . . . page 114
Français canadien
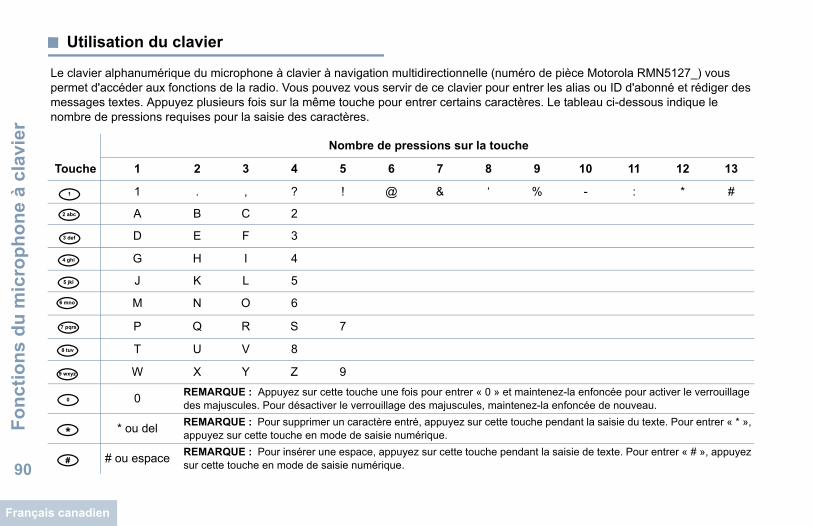
Fo
nct
ion
s d
u m
icro
ph
on
e à
clav
ier
90
Franç
Utilisation du clavier
Le clavier alphanumérique du microphone à clavier à navigation multidirectionnelle (numéro de pièce Motorola RMN5127_) vous permet d'accéder aux fonctions de la radio. Vous pouvez vous servir de ce clavier pour entrer les alias ou ID d'abonné et rédiger des messages textes. Appuyez plusieurs fois sur la même touche pour entrer certains caractères. Le tableau ci-dessous indique le nombre de pressions requises pour la saisie des caractères.
Nombre de pressions sur la touche
Touche 1 2 3 4 5 6 7 8 9 10 11 12 13
1 . , ? ! @ & ‘ % - : * #
A B C 2
D E F 3
G H I 4
J K L 5
M N O 6
P Q R S 7
T U V 8
W X Y Z 9
0 REMARQUE : Appuyez sur cette touche une fois pour entrer « 0 » et maintenez-la enfoncée pour activer le verrouillage des majuscules. Pour désactiver le verrouillage des majuscules, maintenez-la enfoncée de nouveau.
* ou del REMARQUE : Pour supprimer un caractère entré, appuyez sur cette touche pendant la saisie du texte. Pour entrer « * », appuyez sur cette touche en mode de saisie numérique.
# ou espace REMARQUE : Pour insérer une espace, appuyez sur cette touche pendant la saisie de texte. Pour entrer « # », appuyez sur cette touche en mode de saisie numérique.
1234567890*#
ais canadien

Fo
nctio
ns d
u m
icrop
ho
ne à clavier
91
Activer ou désactiver les tonalités du clavier
Vous pouvez activer ou désactiver les tonalités du clavier, au besoin.
Procédure :
1 g pour accéder au menu.
2 b ou c jusqu'à Config/Infos, puis appuyez sur g pour sélectionner l'option.
3 b ou c jusqu'à Config. radio, puis appuyez sur g pour sélectionner l'option.
4 b ou c jusqu'à Tnltés/Avert., puis appuyez sur g pour sélectionner l'option.
5 b ou c jusqu'à Tnlté clavier, puis
appuyez sur g pour sélectionner l'option.
6 b ou c jusqu'à Activé pour activer les tonalités du clavier. L'écran affiche l'icône à côté du message Activé.OU
b ou c jusqu'à Arrêt pour désactiver les tonalités du clavier. L'écran affiche l'icône à côté du message Arrêt.
Autres fonctions avancées
Sélection d'une zone à l'aide de la recherche d'alias
Procédure :
1 g pour accéder au menu.
2 b ou c jusqu'à Zone, puis appuyez sur g pour sélectionner l'option.
3 La zone sélectionnée est affichée et indiquée par l'icône .
4 b ou c jusqu'à la zone voulue, puis passez à l'étape 7.OUEntrez le premier caractère de la zone voulue.
5 Un curseur clignotant apparaît.Utilisez le clavier pour entrer la zone voulue.
Appuyez sur # pour déplacer le curseur d'une espace vers la droite.
Appuyez sur * pour supprimer les caractères inutiles.
Maintenez votre doigt sur 0 pour alterner entre les minuscules et les majuscules.
Français canadien
Fo
nct
ion
s d
u m
icro
ph
on
e à
clav
ier
92
Franç
6 La première ligne de l'écran affiche les caractères que vous avez entrés. Les lignes suivantes présentent les résultats de recherche sélectionnés.La recherche d'alias n'est pas sensible à la casse. Si deux zones ou plus portent le même nom, la radio affiche la zone figurant en premier dans la liste de zones.
7 Appuyez sur g pour sélectionner l'option.
8 L'écran affiche <Zone> sélectionnée pendant un moment et revient à l'écran de la zone sélectionnée.
Exécution d'une vérification radio à l'aide de la
numérotation manuelle
Procédure :
1 g pour accéder au menu.
2 b ou c jusqu'à Répertoire, puis appuyez sur g pour sélectionner l'option.
3 b ou c jusqu'à Num. manuelle, puis appuyez sur g pour sélectionner l'option.
4 b ou c jusqu'à Numéro radio, puis appuyez sur
g pour sélectionner l'option.
5 Si l’ID a été composé précédemment, il s’affiche et le curseur clignote. Utilisez le clavier pour modifier l'ID.
Appuyez sur g pour sélectionner l'option.OU
Entrez l'alias ou l'ID d'abonné, puis appuyez sur g .
6 b ou c jusqu'à Vérif. radio, puis appuyez sur
g pour sélectionner l'option.
7 L'écran affiche un bref avis indiquant que l'exécution de la requête est en cours. Le voyant DEL s'allume en vert.
8 Attendez la confirmation.
9 En cas de réussite, une tonalité de réussite se fait entendre et l'écran affiche un bref avis de réussite. OUEn cas d'échec, une tonalité d'échec se fait entendre et l'écran affiche un bref avis d'échec.
10 La radio revient à l'écran d'alias ou d'ID d'abonné.
Si vous appuyez sur le bouton e pendant l'attente de
confirmation, une tonalité retentit, puis la radio met fin aux tentatives et quitte le mode de vérification de radio.
ais canadien
Fo
nctio
ns d
u m
icrop
ho
ne à clavier
93
Exécution de la fonction Écoute ambiance à l'aide
de la numérotation manuelle
Procédure :
1 g pour accéder au menu.
2 b ou c jusqu'à Répertoire, puis appuyez sur g pour sélectionner l'option.
3 b ou c jusqu'à Num. manuelle, puis appuyez sur g pour sélectionner l'option.
4 b ou c jusqu'à Numéro radio, puis appuyez sur g pour sélectionner l'option.
5 Si l’ID a été composé précédemment, il s’affiche et le curseur clignote. Utilisez le clavier pour modifier l'ID.
Appuyez sur g pour sélectionner l'option.OU
Entrez l'alias ou l'ID d'abonné, puis appuyez sur g .
6 b ou c jusqu'à Écoute amb., puis appuyez sur g pour sélectionner l'option.
7 L'écran affiche un bref avis indiquant que l'exécution de la requête est en cours. Le voyant DEL s'allume en vert.
8 Attendez la confirmation.
9 En cas de réussite, une tonalité de réussite se fait entendre et l'écran affiche un bref avis de réussite. Votre radio fait entendre l'audio provenant de la radio écoutée pendant une durée programmée, et l'écran affiche Écoute amb..Lorsque la minuterie s'arrête, la radio fait entendre une tonalité d'avertissement et le voyant DEL s'éteint.OUEn cas d'échec, une tonalité d'échec se fait entendre et l'écran affiche un bref avis d'échec.
Pour passer un appel individuel à l'aide de la
numérotation manuelle
Procédure :
1 g pour accéder au menu.
2 b ou c jusqu'à Répertoire, puis appuyez sur g pour sélectionner l'option. Les entrées sont classées dans l'ordre alphabétique.
3 b ou c jusqu'à Num. manuelle, puis appuyez sur g pour sélectionner l'option.
4 b ou c jusqu'à Numéro radio, puis appuyez sur g pour sélectionner l'option.
Français canadien
Fo
nct
ion
s d
u m
icro
ph
on
e à
clav
ier
94
Franç
5 Si un ID d'abonné a été composé précédemment, il s'affiche et le curseur clignote. Utilisez le clavier pour modifier l'ID d'abonné. OUUtilisez le clavier pour entrer un nouvel ID d'abonné.
6 Pour passer l'appel, appuyez sur le bouton de conversation PTT. Le voyant DEL s'allume en vert. L'écran affiche l'alias de destination.
7 Attendez la fin de la tonalité d'autorisation de parler (si elle est activée) et parlez clairement dans le microphone.
8 Relâchez le bouton PTT pour écouter. Lorsque la radio cible répond, le voyant DEL clignote en vert.
9 Si l'indicateur Canal libre est activé, une courte tonalité d'avertissement retentit lorsque l'utilisateur de la radio cible relâche le bouton PTT, vous indiquant que le canal est libre et que vous pouvez répondre. Pour répondre, appuyez sur le bouton PTT.OUS'il n'y a aucune activité vocale pendant une durée programmée, l'appel prend fin.
10 L'écran affiche Appel terminé.
Pour faire un appel téléphonique à l'aide de la
numérotation manuelle
REMARQUE : Pour obtenir davantage de renseignements au sujet de cette configuration, adressez-vous à votre détaillant ou à votre administrateur de système.
Procédure :
1 g pour accéder au menu.
2 b ou c jusqu'à Répertoire, puis appuyez sur g pour sélectionner l'option. Les entrées sont classées dans l'ordre alphabétique.
3 b ou c jusqu'à Num. manuelle, puis appuyez sur g pour sélectionner l'option.
4 b ou c jusqu'à No. téléphone, puis appuyez sur g pour sélectionner l'option.
ais canadien

Fo
nctio
ns d
u m
icrop
ho
ne à clavier
95
5 L'écran affiche Numéro :. La deuxième ligne de l'écran affiche un curseur clignotant. Utilisez le clavier pour entrer le
numéro de téléphone et appuyez sur g pour confirmer.Si le code d'accès n'est pas préconfiguré dans la liste de contacts, la première ligne de l'écran indique Code d'accès :. La deuxième ligne de l’écran affiche un curseur
clignotant. Entrez le code d'accès et appuyez ensuite sur g pour continuer.
6 Le voyant DEL s'allume en vert. L'icône d'appel téléphonique s'affiche dans le coin supérieur droit de l'écran. L'alias de la radio d'abonné s'affiche sur la première ligne de l'écran. L'état de l'appel s'affiche sur la deuxième ligne de l'écran.
7 En cas de réussite :La tonalité DTMF se fait entendre. Vous entendrez la tonalité de composition du téléphone de l'utilisateur. L'alias de la radio d'abonné s'affiche sur la première ligne de l'écran. L'icône d'appel téléphonique s'affiche dans le coin supérieur droit de l'écran.OUEn cas d'échec :Une tonalité se fait entendre et l'écran affiche le message Appel tél. échoué. Votre radio retourne à l’écran de code d’accès.Si le code d’accès est préconfiguré dans la liste de contacts, la radio revient à l’écran affiché avant la tentative d’appel.
8 Appuyez sur la touche PTT pour parler et relâchez la touche pour écouter. Pour entrer d'autres chiffres, si demandé durant l'appel :Entrez les autres chiffres avec le microphone à clavier, puis
appuyez sur g pour continuer. La tonalité DTMF se fait entendre et la radio revient à l'écran précédent.
9 Appuyez sur e pour mettre fin à l'appel.Si le code d'accès n'est pas préconfiguré dans la liste de contacts, la première ligne de l'écran indique Code de libération:. La deuxième ligne de l'écran affiche un curseur clignotant. Entrez le code de libération, puis appuyez
sur g pour continuer. La radio revient à l'écran précédent.OUAppuyez sur la touche d'accès direct. La tonalité DTMF se fait entendre. Si la touche d'accès direct n'est pas programmée, une tonalité d'échec se fait entendre.
10 La tonalité DTMF se fait entendre et l’écran affiche Fin appel tél..
11 En cas de réussite :Une tonalité se fait entendre et l'écran affiche le message Appel terminé. Votre radio retourne à l’écran d’appel téléphonique.OUEn cas d'échec :Votre radio retourne à l’écran d’appel téléphonique. Répétez les étapes 9 et 10 ou attendez que l'utilisateur du téléphone ait terminé l'appel.
Français canadien

Fo
nct
ion
s d
u m
icro
ph
on
e à
clav
ier
96
Franç
Quand vous appuyez sur la touche PTT à l’écran Contacts tél, une tonalité se fait entendre et l’écran affiche le message App. OK pour placer appel.
Lorsque l'utilisateur a terminé d'utiliser le téléphone, une tonalité de réussite se fait entendre et l'écran affiche le message Appel terminé.
Si l'appel se termine pendant que vous entrez les autres chiffres demandés par l'appel téléphonique, la radio revient à l'écran affiché avant la tentative d'appel.
REMARQUE : Pendant un accès à un canal, appuyez sur e pour mettre fin à la tentative d’appel (une tonalité se fait entendre).
Pendant l’appel, lorsque vous appuyez sur la touche d’accès direct, si le code de non-accès est préconfiguré ou si vous entrez le code de non-accès en entrée pour les autres chiffres, la radio tentera de mettre fin à l’appel.
Pendant un accès à un canal, à un code d’accès ou de non-accès, ou encore lors d’une transmission d’autres chiffres, seul les boutons Marche/Arrêt, Réglage du volume et le sélecteur de canal sont actifs. Une tonalité se fait entendre pour toutes les entrées non valides.
Le code d’accès ou de non-accès ne peut dépasser 10 caractères.
Faire un appel au moyen de la touche d'accès
direct
REMARQUE : Pour obtenir davantage de renseignements au sujet de cette configuration, adressez-vous à votre détaillant ou à votre administrateur de système.
Procédure :
1 Appuyez sur la touche programmée Accès direct pour envoyer un appel téléphonique à l'alias ou à l'ID prédéfini.Si la touche d'accès direct n'est pas programmée, une tonalité d'échec se fait entendre.Si le code d'accès n'est pas préconfiguré dans la liste de contacts, la première ligne de l'écran indique Code d’accès :. La deuxième ligne de l'écran affiche un curseur
clignotant. Entrez le code d'accès et appuyez ensuite sur g pour continuer.
2 Le voyant DEL s'allume en vert. L'icône d'appel téléphonique s'affiche dans le coin supérieur droit de l'écran. L'alias de la radio d'abonné s'affiche sur la première ligne de l'écran. L'état de l'appel s'affiche sur la deuxième ligne de l'écran.
ais canadien
Fo
nctio
ns d
u m
icrop
ho
ne à clavier
97
3 En cas de réussite :La tonalité DTMF se fait entendre. Vous entendrez la tonalité de composition du téléphone de l'utilisateur. L'alias de la radio d'abonné s'affiche sur la première ligne de l'écran. L'icône d'appel téléphonique s'affiche dans le coin supérieur droit de l'écran.OUEn cas d'échec :Une tonalité se fait entendre et l'écran affiche le message Appel tél. échoué. Votre radio retourne à l’écran de code d’accès.Si le code d’accès est préconfiguré dans la liste de contacts, la radio revient à l’écran affiché avant la tentative d’appel.
4 Appuyez sur la touche PTT pour parler et relâchez la touche pour écouter. Pour entrer d'autres chiffres, si demandé durant l'appel :
Entrez les autres chiffres au clavier, puis appuyez sur g pour continuer. La tonalité DTMF se fait entendre et la radio revient à l'écran précédent.
5 Appuyez sur e pour mettre fin à l'appel.Si le code d'accès n'est pas préconfiguré dans la liste de contacts, la première ligne de l'écran indique Code de libération:. La deuxième ligne de l’écran affiche un curseur clignotant. Entrez le code de libération, puis
appuyez sur g pour continuer. La radio revient à l'écran précédent.
OUAppuyez sur la touche d'accès direct. La tonalité DTMF se fait entendre. Si la touche d'accès direct n'est pas programmée, une tonalité d'échec se fait entendre.
6 La tonalité DTMF se fait entendre et l’écran affiche Fin appel tél..
7 En cas de réussite :Une tonalité se fait entendre et l'écran affiche le message Appel terminé. Votre radio retourne à l’écran d’appel téléphonique.OUEn cas d'échec :Votre radio retourne à l’écran d’appel téléphonique. Répétez l'étape 5 ou attendez que l'utilisateur du téléphone mette fin à l'appel.
Lorsque l'utilisateur a terminé d'utiliser le téléphone, une tonalité se fait entendre et l'écran affiche le message Appel tél. terminé.
Si l'appel se termine pendant que vous entrez les autres chiffres demandés par l'appel téléphonique, la radio revient à l'écran affiché avant la tentative d'appel.
Français canadien

Fo
nct
ion
s d
u m
icro
ph
on
e à
clav
ier
98
Franç
REMARQUE : Pendant un accès à un canal, appuyez sur
e pour mettre fin à la tentative d’appel (une tonalité se fait entendre).
Pendant l’appel, lorsque vous appuyez sur la touche d’accès direct, si le code de non-accès est préconfiguré ou si vous entrez le code de non-accès en entrée pour les autres chiffres, la radio tentera de mettre fin à l’appel.
Pendant un accès à un canal, à un code d’accès ou de non-accès, ou encore lors d’une transmission d’autres chiffres, seul les boutons Marche/Arrêt, Réglage du volume et le sélecteur de canal sont actifs. Une tonalité se fait entendre pour toutes les entrées non valides.
Le code d’accès ou de non-accès ne peut dépasser 10 caractères.
Faire un appel de groupe, privé ou général à l'aide
de la touche numérique programmable
Les touches numériques programmables vous permettent de faire un appel de groupe, un appel privé ou un appel général à un alias ou à un ID prédéfini. Toutes les touches numériques du clavier du microphone peuvent être utilisées à cette fin.
Vous ne pouvez attribuer qu'UN SEUL alias ou ID à une touche numérique, mais vous pouvez attribuer plus d'une touche numérique à un alias ou à un ID.Procédure :À l’écran d’accueil :
1 Maintenez enfoncée la touche numérique programmable pour faire un appel de groupe, un appel privé ou un appel général à l'alias ou à l'ID prédéfini.Si la touche numérique n’a pas été attribuée à une entrée, vous entendrez une tonalité d’échec.
2 Pour passer l'appel, appuyez sur le bouton de conversation PTT. Le voyant DEL s'allume en vert. L’icône Appel Groupe/Privé s’affiche dans le coin supérieur droit de l’écran. L'alias de l'appelant s'affiche sur la première ligne de l'écran. La deuxième ligne affiche l'état de l'appel privé ou Appel général pour l'appel général.
3 Attendez la fin de la tonalité d'autorisation de parler (si elle est activée) et parlez clairement dans le microphone.
ais canadien

Fo
nctio
ns d
u m
icrop
ho
ne à clavier
99
4 Relâchez le bouton PTT pour écouter. Lorsque la radio cible répond, le voyant DEL clignote en vert. L'écran affiche l'alias de destination.
5 Si l'indicateur Canal libre est activé, une courte tonalité d'avertissement retentit lorsque l'utilisateur de la radio cible relâche le bouton PTT, vous indiquant que le canal est libre et que vous pouvez répondre. Pour répondre, appuyez sur le bouton PTT.OUS'il n'y a aucune activité vocale pendant une durée préprogrammée, l'appel prend fin.
6 La radio revient à l'écran où vous étiez avant de faire l'appel.
Lorsque l'appel privé se termine, une courte tonalité retentit.
REMARQUE : Pour en savoir davantage sur la programmation des touches numériques du clavier, consultez la section Associer une entrée à une touche numérique programmable à la page 40.
Faire un appel téléphonique à l'aide de la touche
programmable
Procédure :
1 Appuyez sur la touche programmée Téléphone pour accéder au répertoire téléphonique.
2 b ou c jusqu'à l'alias ou l'ID d'abonné requis, puis
appuyez sur g pour sélectionner l'option.Si le code d'accès n'est pas préconfiguré dans la liste de contacts, la première ligne de l'écran indique Code d'accès :. La deuxième ligne de l'écran affiche un curseur
clignotant. Entrez le code d'accès et appuyez ensuite sur g pour continuer.
3 La première ligne de l'écran affiche le message Appel. La deuxième ligne de l'écran affiche l'alias ou l'ID de la radio d'abonné et l'icône d'appel téléphonique.
4 En cas de réussite :La tonalité DTMF se fait entendre. Vous entendrez la tonalité de composition du téléphone de l'utilisateur. La première ligne de l'écran affiche l'alias ou l'ID d'abonné et l'icône RSSI. La deuxième ligne de l’écran affiche Appel tél. et l’icône d’appel téléphonique.OUEn cas d'échec :Une tonalité se fait entendre et l'écran affiche le message Appel tél. échoué. Votre radio retourne à l’écran de code d’accès.Si le code d’accès est préconfiguré dans la liste de contacts, la radio revient à l’écran affiché avant la tentative d’appel.
Français canadien

Fo
nct
ion
s d
u m
icro
ph
on
e à
clav
ier
100
Franç
5 Appuyez sur la touche PTT pour parler et relâchez la touche pour écouter. L’icône RSSI disparaît lors de la transmission.Pour entrer d'autres chiffres, si demandé durant l'appel :La première ligne de l’écran affiche le message Chiffres suppl.:. La deuxième ligne de l'écran affiche un curseur clignotant. Entrez les autres chiffres au clavier, puis appuyez
sur g pour continuer. La tonalité DTMF se fait entendre et la radio revient à l'écran précédent.OUAppuyez sur la touche d'accès direct. La tonalité DTMF se fait entendre. Si la touche d'accès direct n'est pas programmée, une tonalité d'échec se fait entendre.
6 Appuyez sur e pour mettre fin à l'appel.Si le code d'accès n'est pas préconfiguré dans la liste de contacts, la première ligne de l'écran indique Code de libération:. La deuxième ligne de l'écran affiche un curseur clignotant. Entrez le code de libération, puis
appuyez sur g pour continuer. La radio revient à l'écran précédent.
7 La tonalité DTMF se fait entendre et l’écran affiche Fin appel tél..
8 En cas de réussite :Une tonalité de réussite se fait entendre et l’écran affiche le message Appel tél. terminé. La radio revient à l'écran affiché avant la tentative d'appel.OU
En cas d'échec :Votre radio retourne à l’écran d’appel téléphonique. Répétez les étapes 6 et 7 ou attendez que l'utilisateur du téléphone ait terminé l'appel.
Quand vous appuyez sur la touche PTT à l’écran Contacts tél, une tonalité se fait entendre et l’écran affiche le message App. OK pour placer appel.
Lorsque l'utilisateur a terminé d'utiliser le téléphone, une tonalité se fait entendre et l'écran affiche le message Appel tél. terminé.
Si l'appel se termine pendant que vous entrez les autres chiffres demandés par l'appel téléphonique, la radio revient à l'écran affiché avant la tentative d'appel.
REMARQUE : Pendant un accès à un canal, appuyez sur e pour mettre fin à la tentative d’appel (une tonalité se fait entendre).
Pendant l’appel, lorsque vous appuyez sur la touche d’accès direct, si le code de non-accès est préconfiguré ou si vous entrez le code de non-accès en entrée pour les autres chiffres, la radio tentera de mettre fin à l’appel.
ais canadien
Fo
nctio
ns d
u m
icrop
ho
ne à clavier
01
1Pendant un accès à un canal, à un code d’accès ou de non-accès, ou encore lors d’une transmission d’autres chiffres, seul les boutons Marche/Arrêt, Réglage du volume et le sélecteur de canal sont actifs. Une tonalité se fait entendre pour toutes les entrées non valides.
Le code d’accès ou de non-accès ne peut dépasser 10 caractères.
Faire un appel à partir des contacts
REMARQUE : Pour obtenir davantage de renseignements au sujet de cette configuration, adressez-vous à votre détaillant ou à votre administrateur de système.
Procédure :
1 g pour accéder au menu.
2 b ou c jusqu'à Répertoire, puis appuyez sur g pour sélectionner l'option. Les entrées sont classées dans l'ordre alphabétique.
3 b ou c jusqu'à l'alias ou l'ID de la radio d'abonné requis.OU
b ou c jusqu’à Num. manuelle, puis appuyez sur g pour sélectionner l’option.
b ou c jusqu’à No. téléphone, puis appuyez sur g pour sélectionner l’option.La première ligne de l’écran affiche le message No. téléphone :. La deuxième ligne de l'écran affiche un curseur clignotant. Utilisez le clavier pour entrer un numéro de téléphone.
4 Appuyez sur g pour sélectionner l'option.Si l'entrée sélectionnée est vide, une tonalité d'indication négative se fait entendre et l'écran indique No. Tél. Invalide.
5 b ou c jusqu'à Appeler tél., puis appuyez sur g pour sélectionner l'option.Si le code d'accès n'est pas préconfiguré dans la liste de contacts, la première ligne de l'écran indique Code d'accès :. La deuxième ligne de l'écran affiche un curseur
clignotant. Entrez le code d'accès et appuyez ensuite sur g pour continuer.
6 La première ligne de l'écran affiche le message Appel. La deuxième ligne de l'écran affiche l'alias ou l'ID de la radio d'abonné et l'icône d'appel téléphonique.
Français canadien

Fo
nct
ion
s d
u m
icro
ph
on
e à
clav
ier
102
Franç
7 En cas de réussite :La tonalité DTMF se fait entendre. Vous entendrez la tonalité de composition du téléphone de l'utilisateur. La première ligne de l'écran affiche l'alias ou l'ID de la radio d'abonné et l'icône RSSI. La deuxième ligne de l’écran affiche Appel tél. et l’icône d’appel téléphonique.OUEn cas d'échec :Une tonalité se fait entendre et l'écran affiche le message Appel tél. échoué. Votre radio retourne à l’écran de code d’accès.Si le code d’accès est préconfiguré dans la liste de contacts, la radio revient à l’écran affiché avant la tentative d’appel.
8 Appuyez sur la touche PTT pour parler et relâchez la touche pour écouter. L’icône RSSI disparaît lors de la transmission.Pour entrer d'autres chiffres, si demandé durant l'appel :La première ligne de l’écran affiche le message Chiffres suppl.:. La deuxième ligne de l'écran affiche un curseur clignotant. Entrez les autres chiffres au clavier, puis appuyez
sur g pour continuer. La tonalité DTMF se fait entendre et la radio revient à l'écran précédent.OUAppuyez sur la touche d'accès direct. La tonalité DTMF se fait entendre. Si la touche d'accès direct n'est pas programmée, une tonalité d'échec se fait entendre.
9 Appuyez sur e pour mettre fin à l'appel.Si le code d'accès n'est pas préconfiguré dans la liste de contacts, la première ligne de l'écran indique Code de libération:. La deuxième ligne de l'écran affiche un curseur clignotant. Entrez le code de libération, puis
appuyez sur g pour continuer. La radio revient à l'écran précédent.
10 La tonalité DTMF se fait entendre et l’écran affiche Fin appel tél..
11 En cas de réussite :Une tonalité de réussite se fait entendre et l’écran affiche le message Appel tél. terminé. Votre radio retourne à l'écran d’appel téléphonique.OUEn cas d'échec :Votre radio retourne à l’écran d’appel téléphonique. Répétez les étapes 9 et 10 ou attendez que l'utilisateur du téléphone ait terminé l'appel.
Quand vous appuyez sur la touche PTT lorsque vous êtes dans l'écran de contacts, une tonalité de réussite se fait entendre et l'écran affiche le message App. OK pour placer appel.
Lorsque l'utilisateur a terminé d'utiliser le téléphone, une tonalité se fait entendre et l'écran affiche le message Appel tél. terminé.
ais canadien
Fo
nctio
ns d
u m
icrop
ho
ne à clavier
03
1Si l'appel se termine pendant que vous entrez les autres chiffres demandés par l'appel téléphonique, la radio revient à l'écran affiché avant la tentative d'appel.
REMARQUE : Pendant un accès à un canal, appuyez sur e pour mettre fin à la tentative d'appel (une tonalité d'échec se fait entendre). Votre radio retourne à l'écran d’appel téléphonique.
Pendant l’appel, lorsque vous appuyez sur la touche d’accès direct, si le code de non-accès est préconfiguré ou si vous entrez le code de non-accès en entrée pour les autres chiffres, la radio tentera de mettre fin à l’appel.
Pendant un accès à un canal, à un code d’accès ou de non-accès, ou encore lors d’une transmission d’autres chiffres, seul les boutons Marche/Arrêt, Réglage du volume et le sélecteur de canal sont actifs. Une tonalité se fait entendre pour toutes les entrées non valides.
Le code d’accès ou de non-accès ne peut dépasser 10 caractères.
Pour faire un appel de groupe, individuel ou téléphonique ou général à l'aide de la recherche
d'alias
Vous pouvez également utiliser un alias ou une recherche alphanumérique pour récupérer l'alias d'un abonné.
Cette fonction n'est accessible qu'au moyen de la liste des contacts.
Procédure :
1 g pour accéder au menu.
2 b ou c jusqu'à Répertoire, puis appuyez sur g pour sélectionner l'option. Les entrées sont classées alphabétiquement.
3 Entrez le premier caractère de l'alias requis.
4 Un curseur clignotant apparaît.Utilisez le clavier pour entrer la zone voulue.
Appuyez sur # pour déplacer le curseur d'une espace vers la droite.
Appuyez sur * pour supprimer les caractères inutiles.
Maintenez votre doigt sur 0 pour alterner entre les minuscules et les majuscules.
Français canadien

Fo
nct
ion
s d
u m
icro
ph
on
e à
clav
ier
104
Franç
5 La première ligne de l'écran affiche les caractères que vous avez entrés. Les lignes suivantes présentent les résultats de recherche sélectionnés.La recherche d'alias n'est pas sensible à la casse. Si deux alias ou plus portent le même nom, la radio affiche l'alias figurant en premier dans la liste de contacts.
6 Pour passer l'appel, appuyez sur le bouton de conversation PTT. Le voyant DEL s'allume en vert. L'ID de la radio cible s'affiche sur la première ligne. La deuxième ligne affiche le type d'appel et l'icône Appel.
7 Attendez la fin de la tonalité d'autorisation de conversation (si elle est activée) et parlez clairement dans le microphone.
8 Relâchez le bouton PTT pour écouter. Lorsque la radio cible répond, le voyant DEL clignote en vert. L'écran affiche l'alias de destination.
9 Si l'indicateur Canal libre est activé, une courte tonalité d'avertissement retentit lorsque l'utilisateur de la radio cible relâche le bouton PTT, vous indiquant que le canal est libre et que vous pouvez répondre. Pour répondre, appuyez sur le bouton PTT.OUS'il n'y a aucune activité vocale pendant une durée programmée, l'appel prend fin.
10 Une courte tonalité retentit. L'écran affiche Appel terminé.
REMARQUE : Appuyez sur e ou sur g pour quitter l'écran de recherche d'alias.
Consulter une entrée de la liste de balayage à l'aide de la recherche d'alias
Procédure :
1 g pour accéder au menu.
2 b ou c jusqu'à Balayage, puis appuyez sur g pour sélectionner l'option.
3 b ou c jusqu'à Liste de balayage, puis appuyez
sur g pour sélectionner l'option.
4 Entrez le premier caractère de l'alias requis.
5 Un curseur clignotant apparaît.Utilisez le clavier pour entrer la zone voulue.
Appuyez sur # pour déplacer le curseur d'une espace vers la droite.
Appuyez sur * pour supprimer les caractères inutiles.
Maintenez votre doigt sur 0 pour alterner entre les minuscules et les majuscules.
ais canadien
Fo
nctio
ns d
u m
icrop
ho
ne à clavier
05
16 La première ligne de l'écran affiche les caractères que vous avez entrés. Les lignes suivantes présentent les résultats de recherche sélectionnés.
La recherche d'alias n'est pas sensible à la casse. Si deux entrées ou plus portent le même nom, la radio affiche l'entrée figurant en premier dans la liste de balayage.
Modification de la liste de balayage à l'aide de la recherche d'alias
Ajouter une entrée à la Liste de balayage
Procédure :
1 g pour accéder au menu.
2 b ou c jusqu'à Balayage, puis appuyez sur g pour sélectionner l'option.
3 b ou c jusqu'à Liste de balayage, puis appuyez
sur g pour sélectionner l'option.
4 b ou c jusqu'à Aj. membre, puis appuyez sur g pour sélectionner l'option.
5 Entrez le premier caractère de l'alias requis.
6 Un curseur clignotant apparaît.Utilisez le clavier pour entrer la zone voulue.
Appuyez sur # pour déplacer le curseur d'une espace vers la droite.
Appuyez sur * pour supprimer les caractères inutiles.
Maintenez votre doigt sur 0 pour alterner entre les minuscules et les majuscules.
7 La première ligne de l'écran affiche les caractères que vous avez entrés. Les lignes suivantes présentent les résultats de recherche sélectionnés.La recherche d'alias n'est pas sensible à la casse. Si deux alias ou plus portent le même nom, la radio affiche l'alias figurant en premier dans la liste.
8 Appuyez sur g pour sélectionner l'option.
9 b ou c jusqu'au niveau de priorité voulu, puis appuyez
sur g pour le sélectionner.
10 L'écran affiche un bref avis de réussite, immédiatement suivi du message Ajouter autre?.
11 b ou c jusqu’à Oui, puis appuyez sur g pour sélectionner l’option, ajouter une autre entrée, puis répétez les étapes 5 à 9.OU
b ou c jusqu’à Non, puis appuyez sur g pour sauvegarder la liste actuelle.
Français canadien

Fo
nct
ion
s d
u m
icro
ph
on
e à
clav
ier
106
Franç
Supprimer une entrée de la Liste de balayage
Procédure :
1 g pour accéder au menu.
2 b ou c jusqu'à Balayage, puis appuyez sur g pour sélectionner l'option.
3 b ou c jusqu'à Liste de balayage, puis appuyez
sur g pour sélectionner l'option.
4 Entrez le premier caractère de l'alias requis.
5 Un curseur clignotant apparaît.Utilisez le clavier pour entrer la zone voulue.
Appuyez sur # pour déplacer le curseur d'une espace vers la droite.
Appuyez sur * pour supprimer les caractères inutiles.
Maintenez votre doigt sur 0 pour alterner entre les minuscules et les majuscules.
6 La première ligne de l'écran affiche les caractères que vous avez entrés. Les lignes suivantes présentent les résultats de recherche sélectionnés.La recherche d'alias n'est pas sensible à la casse. Si deux entrées ou plus portent le même nom, la radio affiche l'entrée figurant en premier dans la liste de balayage.
7 Appuyez sur g pour sélectionner l'option.
8 b ou c jusqu'à Supprimer, puis appuyez sur g pour sélectionner l'option.
9 Lorsque le message Supprimer l'entrée?, b ou c
jusqu'à Oui, puis appuyez sur g pour supprimer l'entrée. L'écran affiche un bref avis de réussite. OU
b ou c jusqu'à Non, puis appuyez sur g pour revenir à l'écran précédent.
10 Répétez les étapes 4 à 9 pour supprimer d'autres entrées.
Après avoir supprimé les alias et ID requis, maintenez enfoncée
la touche e pour revenir à l'écran d'accueil.
Régler et modifier l'ordre de priorité d'une entrée de la liste de balayage
Procédure :
1 g pour accéder au menu.
2 b ou c jusqu'à Balayage, puis appuyez sur g pour sélectionner l'option.
ais canadien

Fo
nctio
ns d
u m
icrop
ho
ne à clavier
07
13 b ou c jusqu'à Liste de balayage, puis appuyez
sur g pour sélectionner l'option.
4 Entrez le premier caractère de l'alias requis.
5 Un curseur clignotant apparaît.Utilisez le clavier pour entrer la zone voulue.
Appuyez sur # pour déplacer le curseur d'une espace vers la droite.
Appuyez sur * pour supprimer les caractères inutiles.
Maintenez votre doigt sur 0 pour alterner entre les minuscules et les majuscules.
6 La première ligne de l'écran affiche les caractères que vous avez entrés. Les lignes suivantes présentent les résultats de recherche sélectionnés.La recherche d'alias n'est pas sensible à la casse. Si deux entrées ou plus portent le même nom, la radio affiche l'entrée figurant en premier dans la liste de balayage.
7 Appuyez sur g pour sélectionner l'option.
8 b ou c jusqu'à Modif. priorité, puis appuyez sur
g pour sélectionner l'option.
9 b ou c jusqu'au niveau de priorité voulu, puis appuyez
sur g pour le sélectionner.
10 L'écran affiche un bref avis de réussite avant de revenir à l'écran précédent.
11 L'icône de priorité s'affiche à gauche du nom du membre.
Aucune icône de priorité ne s'affiche si le réglage de la priorité est Aucun.
Enregistrer un alias ou un ID de la liste d'appel
Procédure :
1 g pour accéder au menu.
2 b ou c jusqu'à Appels, puis appuyez sur g pour sélectionner l'option.
3 b ou c jusqu'à la liste voulue, puis appuyez sur g pour sélectionner l'option.
4 b ou c jusqu'à l'alias ou l'ID requis, puis appuyez sur
g pour sélectionner l'option.
5 b ou c jusqu'à Stocker, puis appuyez sur g pour sélectionner l'option.
6 Un curseur clignotant apparaît. Au besoin, entrez l'alias ou
l'ID d'abonné et appuyez sur g .
Français canadien

Fo
nct
ion
s d
u m
icro
ph
on
e à
clav
ier
108
Franç
7 L'écran affiche un bref avis de réussite.
Vous pouvez également enregistrer un ID sans un alias.
Envoi d'un avertissement d'appel à l'aide de la
numérotation manuelle
Procédure :
1 g pour accéder au menu.
2 b ou c jusqu'à Répertoire, puis appuyez sur g pour sélectionner l'option.
3 b ou c jusqu'à Num. manuelle, puis appuyez sur g pour sélectionner l'option.
4 Un curseur clignotant apparaît. Entrez l'ID de l'abonné auquel vous souhaitez envoyer un avertissement et
appuyez sur g .
5 b ou c jusqu'à Avert. d'appel, puis appuyez sur g pour sélectionner l'option.
6 L'écran affiche Avert. d'appel ainsi que l'alias ou l'ID d'abonné pour vous aviser que l'avertissement a été envoyé.
7 Le voyant DEL vert s'allume pendant l'envoi de l'avertissement d'appel.
8 Si la radio reçoit la confirmation de l’avis d’appel, l’écran affiche un bref avis de réussite.OUSinon, l’écran affiche un bref avis d’échec.
Valeurs RSSI
Votre radio affiche l'icône RSSI (indicateur de puissance du signal reçu) en haut de votre écran. Cette fonction vous permet d'afficher les valeurs RSSI.Procédure :À l’écran d’accueil :
1 Appuyez sur e trois fois, puis maintenez votre doigt sur
e , tout cela en 8 secondes.
2 L'écran affiche les valeurs RSSI courantes.
Maintenez enfoncée la touche e pour revenir à l'écran d'accueil.
Consultez la section Icônes d'affichage à la page 12 pour des détails sur l'icône RSSI.
ais canadien

Fo
nctio
ns d
u m
icrop
ho
ne à clavier
09
1Messagerie texte
Les messages texte que vous envoyez peuvent compter au maximum 140 caractères, y compris la ligne d'objet (qui s'affiche lorsque vous recevez un message provenant d'une application de courriel), tandis que les messages que vous recevez peuvent compter au maximum 280 caractères.
Lorsqu'il n'y a aucune activité pendant une durée prédéfinie, la radio quitte l'écran en cours. Si vous étiez en train de composer ou de modifier un message texte, il est automatiquement sauvegardé dans le dossier Brouillons.
REMARQUE : Vous pouvez revenir à l'écran d'accueil à tout
moment en maintenant la touche e enfoncée.
Transfert d'un message texte à l'aide de la numérotation manuelle
Sélectionnez Transférer pour envoyer le message à un autre alias ou ID de radio d'abonné ou de groupe.
Procédure :
1 b ou c jusqu'à Transférer, puis appuyez sur g pour sélectionner l'option.
2 b ou c jusqu'à Num. manuelle, puis appuyez
sur g pour sélectionner l'option. La première ligne de l'écran affiche le message Numéro radio :.
Entrez l'ID de la radio d'abonné et appuyez sur g .
3 L'écran affiche un bref avis indiquant que l'envoi du message est en cours.
4 Si l'envoi du message réussit, une tonalité de réussite se fait entendre et l'écran affiche un bref avis de réussite.OUSinon, une tonalité grave se fait entendre et l'écran affiche un bref avis d'échec.
Multifréquence à deux tonalités (DTMF)
La fonction Multifréquence à deux tonalités (DTMF) permet d'utiliser un système radio doté d'une interface de système téléphonique.
Procédure :
Pour faire un appel DTMF :
1 Maintenez le bouton de transmission PTT enfoncé.
2 Entrez le numéro et appuyez sur * ou sur #.
Français canadien

Fo
nct
ion
s d
u m
icro
ph
on
e à
clav
ier
110
Franç
Vous pouvez désactiver la tonalité DTMF en désactivant toutes les tonalités et alertes de la radio (voir la section Activer ou désactiver les tonalités et les avertissements de la radio à la page 75).
Sécurité
Désactivation de la radio à l'aide de la numérotation manuelle
Procédure :
1 g pour accéder au menu.
2 b ou c jusqu'à Répertoire, puis appuyez sur g pour sélectionner l'option. Les entrées sont classées alphabétiquement.
3 b ou c jusqu’à Num. manuelle, puis appuyez sur g pour sélectionner l’option.
b ou c jusqu’à Appel indiv., puis appuyez sur g pour sélectionner l’option.La première ligne de l'écran affiche le message Numéro radio :.
Entrez l'ID d'abonné et appuyez sur g .
4 b ou c jusqu'à Désac radio, puis appuyez sur g pour sélectionner l'option.
5 L'écran affiche un bref avis indiquant que l'exécution de la requête est en cours. Le voyant DEL vert clignote.
6 Attendez la confirmation.
7 En cas de réussite, une tonalité de réussite se fait entendre et l'écran affiche un bref avis de réussite.OUEn cas d'échec, une tonalité d'échec se fait entendre et l'écran affiche un bref avis d'échec.
N'appuyez pas sur e pendant le processus de désactivation
de la radio, car vous ne recevrez pas de message de confirmation.
Activation de la radio à l'aide de la numérotation manuelle
Procédure :
1 g pour accéder au menu.
2 b ou c jusqu'à Répertoire, puis appuyez sur g pour sélectionner l'option. Les entrées sont classées alphabétiquement.
ais canadien
Fo
nctio
ns d
u m
icrop
ho
ne à clavier
11
13 b ou c jusqu’à Num. manuelle, puis appuyez sur g pour sélectionner l’option.
b ou c jusqu’à Appel indiv., puis appuyez sur g pour sélectionner l’option.La première ligne de l'écran affiche le message Numéro radio :.
Entrez l'ID d'abonné et appuyez sur g .
4 b ou c jusqu'à Activer radio, puis appuyez sur g pour sélectionner l'option.
5 L'écran affiche Activer radio ainsi que l'alias ou l'ID d'abonné. Le voyant DEL s'allume en vert.
6 Attendez la confirmation.
7 En cas de réussite, une tonalité de réussite retentit et l'écran affiche un bref avis de réussite.OUEn cas d'échec, une tonalité d'échec se fait entendre et l'écran affiche un bref avis d'échec.
N'appuyez pas sur e pendant le processus d'activation de la
radio, car vous ne recevrez pas de message de confirmation.
Fonctions de verrouillage par mot de passe
Lorsqu'elle est activée, cette fonction vous permet d'accéder à la radio au moyen d'un mot de passe à la mise sous tension. Vous pouvez utiliser un microphone à clavier ou les touches de navigation gauche/droite pour entrer le mot de passe.
Accéder à la radio à l'aide d'un mot de passe
Procédure :Allumez la radio.
1 Une tonalité continue retentit.
2 Entrez votre mot de passe actuel à quatre chiffres au microphone à clavier.
L'écran affiche ●●●●. Appuyez sur g pour continuer.OU
Entrez votre mot de passe à quatre chiffres. Appuyez sur b ou c pour modifier la valeur numérique de chaque
chiffre, puis sur g pour entrer le chiffre sélectionné et aller
au prochain chiffre. Chaque chiffre change pour ●. Appuyez
sur g pour confirmer la sélection. Vous entendrez une tonalité de réussite chaque fois que vous appuyez sur un chiffre.
Français canadien

Fo
nct
ion
s d
u m
icro
ph
on
e à
clav
ier
112
Franç
3 Si le mot de passe est correct :La radio se met sous tension. Consultez la section Mise en marche de la radio à la page 2.OUSi le mot de passe est incorrect :L'écran affiche Mot de passe erroné. Répétez l’étape 2.OUAprès une troisième tentative incorrecte, l’écran affiche Mot de passe erroné, puis Radio verrouillée. Une tonalité retentit et le voyant DEL jaune clignote deux fois.
La radio se met en état de verrouillage pendant 15 minutes et réagit uniquement aux commandes de mise sous tension.
REMARQUE : Lorsqu'elle est verrouillée, la radio ne peut recevoir aucun appel, y compris les appels d'urgence.
L'utilisation de l'interrupteur d'urgence au pied permet d'accéder à la radio sans devoir entrer un mot de passe.
Déverrouiller la radio
Procédure :Patientez 15 minutes. Répétez les étapes 1 à 3 de la section Accéder à la radio à l'aide d'un mot de passe, à la page 111.OU
Mettez la radio sous tension, si vous l’aviez éteinte lorsqu’elle s’est verrouillée :
1 Une tonalité retentit et le voyant DEL jaune clignote deux fois. L'écran affiche Radio verrouillée.
2 Patientez 15 minutes. Répétez les étapes décrites dans la section Accéder à la radio à l'aide d'un mot de passe à la page 111.
La radio redémarre la minuterie de 15 minutes pour l'état de verrouillage à la mise sous tension.
Activer ou désactiver le verrouillage par mot de passe
Procédure :
1 g pour accéder au menu.
2 b ou c jusqu'à Config/Infos, puis appuyez sur g pour sélectionner l'option.
3 b ou c jusqu'à Config. radio, puis appuyez sur g pour sélectionner l'option.
4 b ou c jusqu'à Verrou MdP, puis appuyez sur g pour sélectionner l'option.
5 Entrez un mot de passe à quatre chiffres. Référez-vous à l'étape 2 décrite dans la section Accéder à la radio à l'aide d'un mot de passe à la page 111.
ais canadien

Fo
nctio
ns d
u m
icrop
ho
ne à clavier
13
16 Si le mot de passe est correct :
b ou c jusqu'à Activer pour autoriser le verrouillage par mot de passe. L'écran affiche à côté de Activer.OU
b ou c jusqu'à Arrêt pour désactiver le verrouillage par mot de passe. L'écran affiche à côté de Arrêt.OUSi le mot de passe est incorrect :L'écran affiche Mot de passe erroné et revient automatiquement au menu précédent.
Changer le mot de passe
Procédure :
1 g pour accéder au menu.
2 b ou c jusqu'à Config/Infos, puis appuyez sur g pour sélectionner l'option.
3 b ou c jusqu'à Config. radio, puis appuyez sur g pour sélectionner l'option.
4 b ou c jusqu'à Verrou MdP, puis appuyez sur g pour sélectionner l'option.
5 Entrez votre mot de passe actuel à quatre chiffres au microphone à clavier.Référez-vous à l'étape 2 décrite dans la section Accéder à la radio à l'aide d'un mot de passe à la page 111.
6 Si le mot de passe est correct :
b ou c jusqu'à Changer MdP, puis appuyez sur g pour sélectionner l'option.OUSi le mot de passe est incorrect :L'écran affiche Mot de passe erroné et revient automatiquement au menu précédent.
7 Entrez un nouveau mot de passe à quatre chiffres au microphone à clavier.Référez-vous à l'étape 2 décrite dans la section Accéder à la radio à l'aide d'un mot de passe à la page 111.
8 Entrez de nouveau votre mot de passe à quatre chiffres. Référez-vous à l'étape 2 décrite dans la section Accéder à la radio à l'aide d'un mot de passe à la page 111.
9 Si les deux mots de passe entrés sont identiques :L'écran affiche Mot de passe changé.OUSi les deux mots de passe saisis ne correspondent pas :L'écran affiche Mots de passe incorrects.
10 L'écran revient automatiquement au menu précédent.
Français canadien
Fo
nct
ion
s d
u m
icro
ph
on
e à
clav
ier
114
Franç
Configuration du panneau avant (FPC)
Il est possible de personnaliser certains paramètres des fonctions afin d'améliorer l'utilisation de votre radio.
Entrée en mode FPC
Procédure :
1 g pour accéder au menu.
2 b ou c jusqu'à Config/Infos, puis appuyez sur g pour sélectionner l'option.
3 b ou c jusqu'à Program. radio, puis appuyez sur
g pour sélectionner l'option.
REMARQUE : Vous pouvez revenir à l'écran d'accueil à tout
moment en maintenant la touche e enfoncée.
Modifier les paramètres du mode FPC
Utilisez les touches suivantes au besoin pendant la navigation dans les paramètres.
b ou c – Pour parcourir les options, augmenter ou réduire les valeurs ou naviguer verticalement
g – Pour sélectionner l'option ou entrer dans un sous-menu
e – Appuyez brièvement pour revenir au menu précédent ou quitter l'écran de sélection. Maintenez cette touche enfoncée pour revenir à l'écran d'accueil.
ais canadien

Accesso
ires
15
1Accessoires
Votre radio est compatible avec les accessoires figurant dans ce chapitre. Pour en savoir davantage à ce sujet, communiquez avec le détaillant.Antennes . . . . . . . . . . . . . . . . . . . . . . . . . . . . . . . . . . page 115Audio . . . . . . . . . . . . . . . . . . . . . . . . . . . . . . . . . . . . . page 115Câbles . . . . . . . . . . . . . . . . . . . . . . . . . . . . . . . . . . . . page 116Trousses de montage . . . . . . . . . . . . . . . . . . . . . . . . page 116Accessoires divers. . . . . . . . . . . . . . . . . . . . . . . . . . . page 116
Antennes
• Antenne de toit 1/4 d'onde, VHF, 136 – 144 MHz, Mini-U (HAD4006_)
• Antenne de toit 1/4 d'onde, VHF, 144 – 150,8 MHz, Mini-U (HAD4007_)
• Antenne de toit 1/4 d'onde, VHF, 150,8 – 162 MHz, Mini-U (HAD4008_)
• Antenne de toit 1/4 d'onde, VHF, 162 – 174 MHz, Mini-U (HAD4009_)
• VHF, 132 – 174 MHz, gain de 3,0 dB, montage par insertion, Mini-U (HAD4022_)
• Antenne de toit 1/4 d'onde, UHF, 403 – 430 MHz, Mini-U (HAD4002_)
• Antenne de toit 1/4 d'onde, UHF, 450 – 470 MHz, Mini-U (HAD4003_)
• Antenne de toit, UHF, 406 – 420 MHz, gain de 3,5 dB, Mini-U (HAE4010_)
• Antenne de toit, UHF, 450 – 470 MHz, gain de 3,5 dB, Mini-U (HAE4011_)
• Antenne de toit, UHF, 403 – 527 MHz, gain de 2 dB, Mini-U (HAE6022_)
• Antenne de toit, UHF, 445 – 470 MHz, gain de 5 dB, Mini-U (RAE4004_RB)
Audio
• Microphone de pare-soleil (omnidirectionnel) (GMMN4065_)
• Clip de fixation de microphone (exige une installation) (HLN9073_)
• Clip de fixation de microphone (universel – aucune installation requise) (HLN9414_)
• Haut-parleur externe 7,5 W (HSN8145_)
• Combiné style téléphone (comprend le réceptacle) (PMLN6481_)
• Microphone à clavier évolué (PMMN4089_)
Français canadien

Acc
esso
ires
116
Franç
• Microphone compact avec pince (PMMN4090_)
• Microphone pour service intensif (PMMN4091_)
• Haut-parleur externe 13 W (RSN4001_)
Câbles
• Câble d'extension pour haut-parleur (GMKN4084_)
• Câble d'alimentation de radio mobile de 3 m (10 pi), calibre 14, 15A (HKN4137_)
• Câble d'alimentation de radio mobile de 3 m (10 pi), calibre 12, 20A (HKN4191_)
• Câble d'alimentation de radio mobile de 3 m (20 pi), calibre 10, 20A (HKN4192_)
• Câble d'interrupteur d'allumage (HKN9327_R)
• Câble universel MAP arrière à 16 broches (PMKN4151_)
Trousses de montage
• Vis à oreilles à tourillons M5x0.8 x 9,9 mm (03012045001)
• Montage DIN (FTN6083_)
• Matériel de fixation par tourillons à profil bas (RLN6466_)
• Matériel de fixation par tourillons à profil haut (RLN6467_)
• Matériel de fixation par tourillons à verrouillage (RLN6468_)
Accessoires divers
• Sceau de connexion d'accessoire arrière avec connecteur et broches (GMBN1021_)
• Trousse de connecteur MAP 16 broches (HLN9457_)
• Extension de connexion – 20 pièces (PMLN5620_)
• Interrupteur au pied avec PTT externe (RLN4836_R)
• Interrupteur au pied avec PTT distant (RLN4856_)
• Bouton-poussoir avec PTT distant (RLN4857_)
ais canadien

An
ne
xe : U
tilisatio
n d
e la
rad
io m
aritim
e da
ns la
gam
me d
e
fréq
uen
ce V
HF
17
1Annexe : Utilisation de la radio maritime dans la gamme de fréquence VHF
Veuillez prendre quelques instants pour lire les renseignements suivants :Assignations des canaux spéciaux . . . . . . . . . . . . . . page 117Exigences relatives à la fréquence de fonctionnement . . . . . . . . . . . . . . . . . . . . . . . . . . . . . page 118
Assignations des canaux spéciaux
Canal d'urgence
Si vous êtes exposé à un danger grave et imminent en mer et avez besoin d'une aide d'urgence, utilisez le canal VHF 16 pour lancer un appel de détresse aux navires qui se trouvent à proximité et à la Garde côtière. Transmettez les renseignements suivants dans cet ordre :
1 « MAYDAY, MAYDAY, MAYDAY. »
2 « ICI _____________________, INDICATIF D'APPEL __________. »Dites le nom du navire en détresse trois fois, suivi de l'indicatif d'appel ou d'une autre identification du navire, en l'énonçant trois fois.
3 Répétez « MAYDAY » et le nom du navire.
4 « NOTRE POSITION EST _______________________. » Indiquez la position du navire en détresse à l'aide d'informations qui pourraient aider les répondants à vous localiser, p. ex. :• la latitude et la longitude;• le relèvement (dites si vous utilisez le nord géographique
ou magnétique);• votre distance d'un point de repère connu;• la route, la vitesse ou la destination du navire.
5 Énoncez la nature de la situation de détresse.6 Précisez l'aide dont vous avez besoin.7 Indiquez le nombre de personnes à bord du navire et
nécessitant une assistance médicale, le cas échéant.8 Mentionnez toute autre information pouvant être utile aux
répondants, comme le type de navire, sa longueur ou son tonnage, la couleur de la coque, etc.
9 « TERMINÉ. »10 Attendez une réponse.11 Si vous ne recevez pas de réponse immédiate, restez près
de la radio et répétez votre transmission à intervalles jusqu'à ce que l'on vous réponde. Soyez prêt à suivre les instructions qui vous seront données.
Français canadien

An
nex
e :
Uti
lis
ati
on
de
la
ra
dio
ma
riti
me
da
ns
la g
amm
e d
e
fré
qu
en
ce V
HF
118
Franç
Canal d'appel non commercial
Pour transmettre des messages non commerciaux, comme des rapports de pêche, des arrangements de rendez-vous, des planifications de réparation ou des informations d'accostage, utilisez le canal VHF 9.
Exigences relatives à la fréquence de fonctionnement
Toute radio conçue pour la navigation doit être conforme à la section 80 des règlements de la Commission fédérale des communications (FCC), comme suit :
• sur les navires soumis à la section II du titre III de la Loi sur les communications (Communications Act) des États-Unis, la radio doit pouvoir fonctionner sur la fréquence 156,800 MHz;
• sur les navires soumis à la Convention de sécurité, la radio doit pouvoir fonctionner
• en mode simplex sur le poste du navire qui transmet les fréquences précisées sur la bande de fréquences 156,025 – 157,425 MHz, et
• en mode semi-duplex sur les deux canaux de fréquence précisés dans le tableau ci-dessous.
REMARQUE : Les canaux simplex 3, 21, 23, 61, 64, 81, 82 et 83 ne peuvent être utilisés légalement par le grand public dans les eaux américaines.
Pour obtenir davantage de renseignements sur les exigences de fonctionnement des Services maritimes, consultez la version intégrale de la section 80 des règlements de la FCC ou communiquez avec la Garde côtière américaine.
Tableau A-1 : Liste des canaux de la bande maritime VHF
Numéro de canal
Fréquence (MHz)
Transmission Réception
1 156,050 160,6502 156,100 160,700* 156,150 160,7504 156,200 160,8005 156,250 160,8506 156,300 –7 156,350 160,9508 156,400 –9 156,450 156,45010 156,500 156,50011 156,550 156,55012 156,600 156,600
13** 156,650 156,65014 156,700 156,700
15** 156,750 156,75016 156,800 156,800
17** 156,850 156,85018 156,900 161,500
ais canadien

An
ne
xe : U
tilisatio
n d
e la
rad
io m
aritim
e da
ns la
gam
me d
e
fréq
uen
ce V
HF
19
1* Les canaux simplex 3, 21, 23, 61, 64, 81, 82, et 83 ne peuvent être utilisés légalement par le grand public dans les eaux américaines.
** Faible puissance (1 W) seulement
*** Bande de garde
REMARQUE : Un – dans la colonne Réception indique qu'il s'agit d'un canal de transmission seulement.
19 156,950 161,55020 157,000 161,600* 157,050 161,650
22 157,100 161,700* 157,150 161,750
24 157,200 161,80025 157,250 161,85026 157,300 161,90027 157,350 161,95028 157,400 162,00060 156,025 160,625* 156,075 160,675
62 156,125 160,72563 156,175 160,775* 156,225 160,825
65 156,275 160,87566 156,325 160,925
67** 156,375 156,37568 156,425 156,42569 156,475 156,47571 156,575 156,57572 156,625 –73 156,675 156,675
Tableau A-1 : Liste des canaux de la bande maritime VHF (suite)
Numéro de canal
Fréquence (MHz)
Transmission Réception
74 156,725 156,72575 *** ***76 *** ***
77** 156,875 –78 156,925 161,52579 156,975 161,57580 157,025 161,625* 157,075 161,675* 157,125 161,725* 157,175 161,775
84 157,225 161,82585 157,275 161,87586 157,325 161,92587 157,375 161,97588 157,425 162,025
Tableau A-1 : Liste des canaux de la bande maritime VHF (suite)
Numéro de canal
Fréquence (MHz)
Transmission Réception
Français canadien

Gar
anti
e lim
itée
120
Franç
Garantie limitée
PRODUITS DE TÉLÉCOMMUNICATIONS MOTOROLA
I. PROTECTION ASSURÉE PAR LA PRÉSENTE GARANTIE ET DURÉE DE CELLE-CI :
MOTOROLA SOLUTIONS, INC. (« MOTOROLA ») garantit les produits de télécommunications identifiés ci-dessous (le « Produit ») fabriqués par MOTOROLA contre tout défaut de matériel ou de fabrication dans des conditions normales d'utilisation et d'entretien, pour une période suivant la date d'achat, tel qu'il est stipulé ci-dessous.
À sa discrétion, MOTOROLA réparera sans frais le Produit (avec des pièces neuves ou remises à neuf), le remplacera (par un produit neuf ou remis à neuf) ou remboursera le prix d'achat du Produit durant la période de garantie, à condition que le Produit soit retourné au lieu d'achat conformément aux modalités de la présente garantie. Les pièces et les cartes remplacées sont garanties pour le reste de la période de garantie d'origine. Toute pièce remplacée du Produit devient la propriété de MOTOROLA.
Cette garantie limitée expresse est accordée par MOTOROLA à l'acheteur ou à l'utilisateur final d'origine seulement et ne peut être ni transférée ni cédée à un tiers. La présente garantie constitue la garantie complète du Produit fabriqué par MOTOROLA. MOTOROLA n'assume aucune obligation ni responsabilité pour un quelconque ajout ou modification apportés à la présente garantie, à moins d'être en présence d'un document écrit signé par un cadre supérieur de MOTOROLA.
Sauf dans le cadre d'une entente distincte conclue entre MOTOROLA et l'acheteur ou l'utilisateur final d'origine, MOTOROLA ne garantit pas l'installation, l'entretien, ni la réparation du Produit.
MOTOROLA se dégage de toute responsabilité à l'égard de tout équipement ou accessoire qui n'est pas fourni par MOTOROLA et qui est branché sur le Produit ou utilisé conjointement avec celui-ci, ainsi qu'à l'égard du fonctionnement du Produit utilisé conjointement avec tout équipement ou accessoire, et tous les équipements de cette nature sont expressément exclus de la présente garantie. Compte tenu du caractère unique de chaque système pouvant utiliser le Produit, MOTOROLA se dégage de toute responsabilité à l'égard de la portée, de la diffusion et du fonctionnement du système.
Radios mobiles XPR 2500 Deux (2) ans
Accessoires de produit Un (1) an
ais canadien

Garan
tie limitée
21
1II. CONDITIONS GÉNÉRALES :
La présente garantie précise l'entière responsabilité de MOTOROLA à l'égard du Produit. À la discrétion de MOTOROLA, la réparation du Produit, son remplacement ou le remboursement de son prix d'achat constituent le seul recours. CETTE GARANTIE EST DONNÉE À LA PLACE DE TOUTE AUTRE GARANTIE EXPRESSE. TOUTES LES GARANTIES IMPLICITES, COMPRENANT, SANS LIMITATION, LES GARANTIES IMPLICITES DE QUALITÉ MARCHANDE ET D'ADAPTATION À UN USAGE PARTICULIER, SONT LIMITÉES À LA PÉRIODE DÉFINIE PAR CETTE GARANTIE LIMITÉE. DANS LA MESURE AUTORISÉE PAR LA LOI, MOTOROLA NE POURRA EN AUCUN CAS ÊTRE TENUE RESPONSABLE DE DOMMAGES DONT LA VALEUR DÉPASSE LE PRIX D'ACHAT DU PRODUIT, NI À L'ÉGARD DES PERTES DE JOUISSANCE, DES PERTES DE TEMPS, DES DÉRANGEMENTS, DES PERTES COMMERCIALES, DES PERTES DE PROFIT OU D'ÉCONOMIES, NI RELATIVEMENT À TOUT AUTRE DOMMAGE ACCESSOIRE, SPÉCIAL OU INDIRECT RÉSULTANT DE L'UTILISATION OU DE L'INCAPACITÉ D'UTILISER CE PRODUIT.
III. DROITS PRÉVUS PAR LES LOIS PROVINCIALES :
CERTAINES PROVINCES NE PERMETTENT AUCUNE EXCLUSION NI LIMITATION QUANT AUX DOMMAGES CONSÉCUTIFS OU INDIRECTS, NI AUCUNE LIMITE SUR LA DURÉE D'UNE GARANTIE IMPLICITE, DE SORTE QUE LES LIMITES OU EXCLUSIONS MENTIONNÉES PLUS HAUT PEUVENT NE PAS S'APPLIQUER DANS VOTRE CAS.
La présente garantie confère des droits juridiques précis et il est possible que vous jouissiez d'autres droits, selon votre province de résidence.
IV. ENTRETIEN COUVERT PAR LA GARANTIE :
Pour que la réparation soit couverte par la garantie, vous devez fournir une preuve d'achat (portant la date d'achat et le numéro de série du Produit). De plus, vous devez livrer ou expédier le Produit, en payant d'avance les frais de transport et d'assurance, à un centre de service homologué. Les réparations sous garantie seront effectuées par MOTOROLA à l'un de ses centres de service homologués. Dans certains cas, il est plus facile d'obtenir les réparations couvertes par la garantie en s'adressant d'abord à l'entreprise qui vous a vendu le Produit (c'est-à-dire le détaillant ou votre fournisseur de services de télécommunication). Vous pouvez également appeler MOTOROLA au 1 800 927-2744 aux États-Unis et au Canada.
V. CE QUI N'EST PAS COUVERT PAR LA PRÉSENTE GARANTIE :
A) Les défauts ou bris résultant d'une utilisation autre que normale ou habituelle du Produit.
B) Les défauts ou bris causés par une mauvaise utilisation, un accident, l'eau ou la négligence.
C) Les défauts ou bris résultant d'un essai, d'une utilisation, d'un entretien, d'une installation, d'une modification ou d'un réglage fautifs.
D) Les bris ou dommages causés aux antennes, sauf s'ils sont le résultat direct d'un défaut de matériel ou de fabrication.
Français canadien
Gar
anti
e lim
itée
122
Franç
E) Un Produit soumis à des modifications, des réparations ou un démontage non autorisés (y compris, sans s'y limiter, l'ajout au Produit d'un équipement quelconque non fourni par MOTOROLA) et qui ont un effet négatif sur le rendement du Produit ou qui nuisent à l'inspection ou à l'essai normal sous garantie du Produit par MOTOROLA en cas de réclamation.
F) Tout Produit dont le numéro de série a été enlevé ou rendu illisible.
G) Les batteries rechargeables si :(1) l'un des sceaux situés sur l'enveloppe de protection de la batterie a été brisé ou montre des traces évidentes d'altération;(2) le dommage ou défaut est provoqué par la charge ou l'utilisation de la batterie dans un appareil ou pour un service autre que le Produit pour lequel elle est spécifiée.
H) Les frais d'expédition au centre de réparation.I) Tout produit qui, à cause de modifications illégales ou interdites
apportées au logiciel ou au micrologiciel du Produit, ne fonctionne pas conformément aux spécifications énoncées par MOTOROLA ou sur l'étiquette de conformité de la FCC en vigueur pour ce Produit lorsque le Produit a été initialement distribué par MOTOROLA.
J) Les égratignures et autres dommages superficiels qui ne nuisent pas au fonctionnement du Produit.
K) L'usure et le vieillissement normaux et habituels.
VI. DISPOSITIONS RELATIVES AUX BREVETS ET AUX LOGICIELS :
MOTOROLA défendra à ses frais toute poursuite menée en justice contre l'acheteur dans la mesure où la poursuite revendique que le Produit ou certaines de ses pièces enfreignent un brevet des États-Unis et MOTOROLA paiera les frais et dommages finalement accordés au détriment de l'acheteur dans toute poursuite judiciaire attribuable à une quelconque revendication de cette nature, une telle défense et un tel paiement étant soumis aux conditions suivantes :A) MOTOROLA doit être promptement avisée par écrit par
l'acheteur ou l'usager de tout avis se rapportant à une telle plainte;
B) MOTOROLA mènera comme elle l'entend sa défense contre une telle poursuite, de même que toute négociation en vue de tout règlement ou compromis;
C) Si le Produit ou les pièces devaient faire l'objet, ou de l'avis de MOTOROLA, pourraient vraisemblablement faire l'objet d'une poursuite pour contrefaçon d'un brevet américain ou canadien, l'acheteur ou l'usager accordera le droit à MOTOROLA, à la discrétion et aux frais de cette dernière, soit de procurer à l'acheteur ou à l'usager le droit de continuer d'utiliser le Produit ou les pièces, soit de remplacer ou de modifier ces derniers de manière à ce qu'ils n'enfreignent plus le brevet, soit d'accorder à l'acheteur ou à l'usager un crédit équivalent à la valeur dépréciée du Produit ou des pièces et d'accepter de reprendre ceux-ci. La dépréciation représentera un montant égal pour chaque année de durée de vie utile du Produit ou des pièces, tel que déterminé par MOTOROLA.
ais canadien

Garan
tie limitée
23
1MOTOROLA se dégage de toute responsabilité à l'égard de toute poursuite pour contrefaçon de brevet fondée sur une adaptation du Produit ou des pièces mentionnées dans la présente à un logiciel, un appareil ou un équipement non fourni par MOTOROLA. MOTOROLA se dégage également de toute responsabilité à l'égard de tout équipement ou logiciel qui n'est pas fourni par MOTOROLA et qui est rattaché au Produit ou utilisé conjointement avec ce dernier. Ce qui précède énonce l'entière responsabilité de MOTOROLA pour la contrefaçon de brevets relative au Produit ou à toute pièce de ce dernier.
Les lois au Canada, aux États-Unis et dans d'autres pays protègent au nom de MOTOROLA certains droits exclusifs visant les logiciels, comme de reproduire des copies et de distribuer des copies desdits logiciels MOTOROLA. Les logiciels MOTOROLA ne peuvent être utilisés qu'avec les Produits à l'intérieur desquels ils étaient installés à l'origine. Il est interdit de remplacer, de copier, de distribuer, de modifier d'aucune façon et d'utiliser le logiciel à l'intérieur du Produit en vue de fabriquer un quelconque produit dérivé. Aucune autre utilisation, y compris sans s'y limiter, l'altération, la modification, la reproduction, la distribution ou l'ingénierie à rebours, d'un quelconque logiciel MOTOROLA n'est permise. Aucune licence n'est accordée pour inférence, estoppel ou autre en vertu des droits de brevets ou des droits d'auteur de MOTOROLA ou de tiers.
VII. LOI APPLICABLE :
Cette garantie est régie par les lois de l'état de l'Illinois, É.-U.
Français canadien

Gar
anti
e lim
itée
124
Franç
Remarques
ais canadien

BackCover_HalfLetter_P299C.fm Page 1 Friday, November 28, 2014 1:38 PM

BackCover_HalfLetter_P299C.fm Page 2 Friday, November 28, 2014 1:38 PM
Motorola Solutions, Inc.1303 East Algonquin RoadSchaumburg, Illinois 60196 U.S.A.
MOTOROLA, MOTO, MOTOROLA SOLUTIONS and the Stylized M logo are trademarks or registered trademarks of Motorola Trademark Holdings, LLC and are used under license.All other trademarks are the property of their respective owners. © 2013, 2014 Motorola Solutions, Inc. All rights reserved.December 2014.
MOTOROLA, MOTO, MOTOROLA SOLUTIONS et le sigle M stylisé sont desmarques de commerce ou des marques déposées de Motorola TrademarkHoldings, LLC et sont utilisées sous licence.Toutes les autres marques de commerce sont la propriété de leurs titulairesrespectifs.© 2013, 2014 Motorola Solutions, Inc. Tous droits réservés.décembre 2014
www.motorolasolutions.com/mototrbo
*68009613001*68009613001-BB