product data sheet v206-t2 trim to suit v606-is / v606-ais
TRANSCRIPT
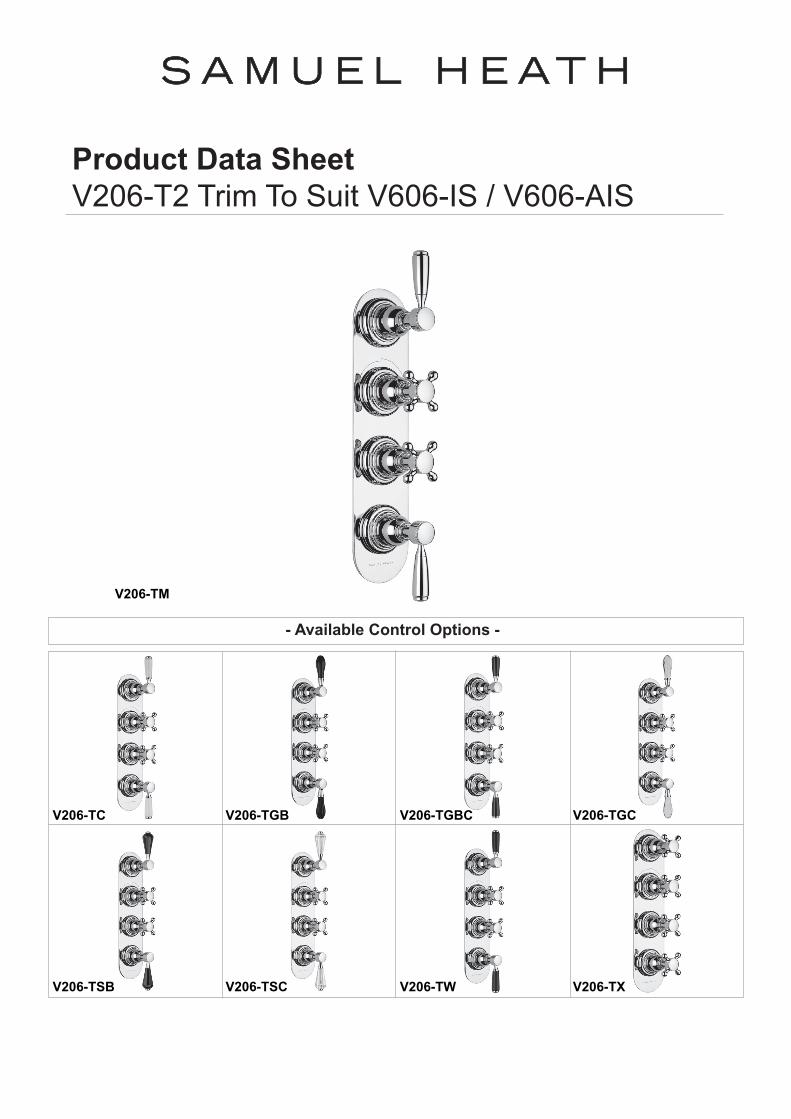
Product Data SheetV206-T2 Trim To Suit V606-IS / V606-AIS
- Available Control Options -
V206-TC V206-TGB V206-TGBC V206-TGC
V206-TSB V206-TSC V206-TW V206-TX
V206-TM
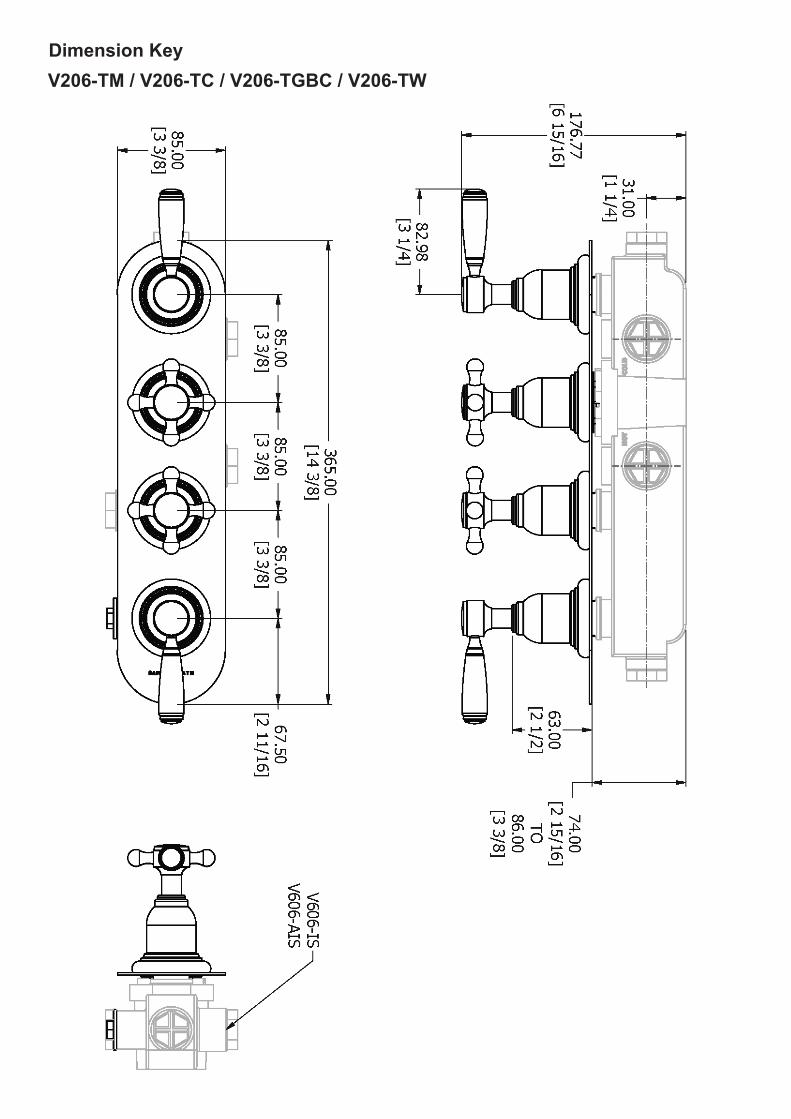
Dimension KeyV206-TM / V206-TC / V206-TGBC / V206-TW

Dimension KeyV206-TGB / V206-TGC
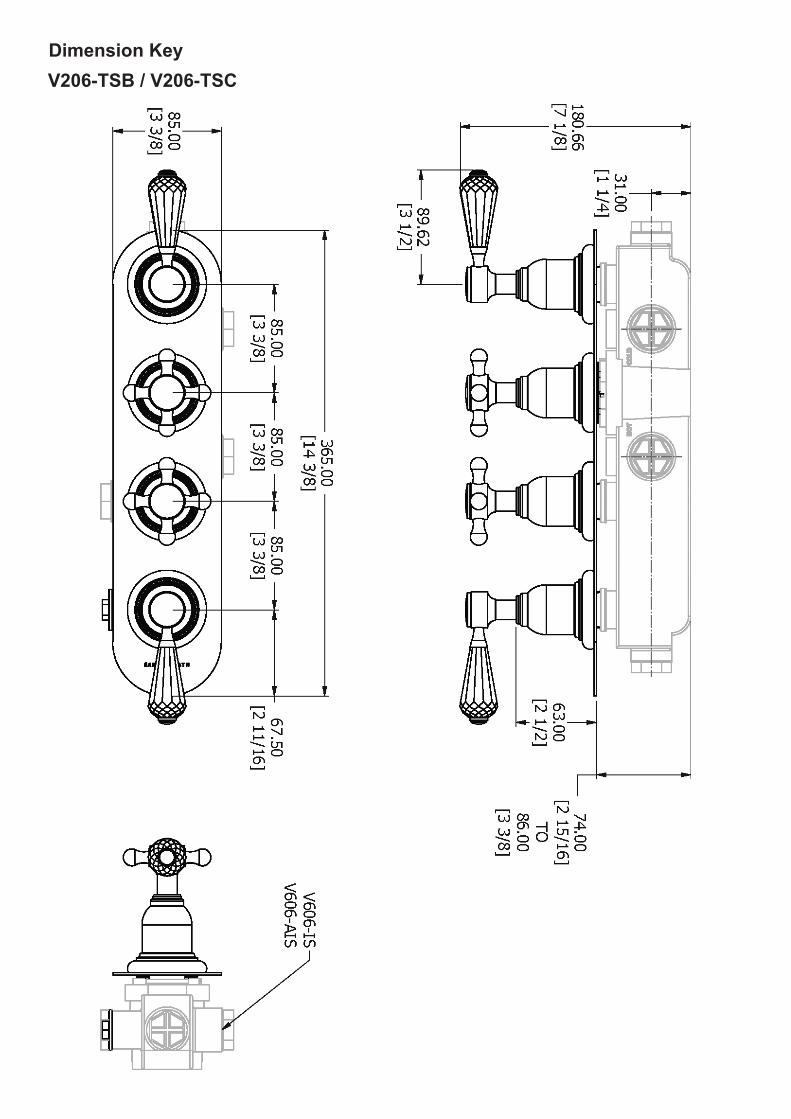
Dimension KeyV206-TSB / V206-TSC
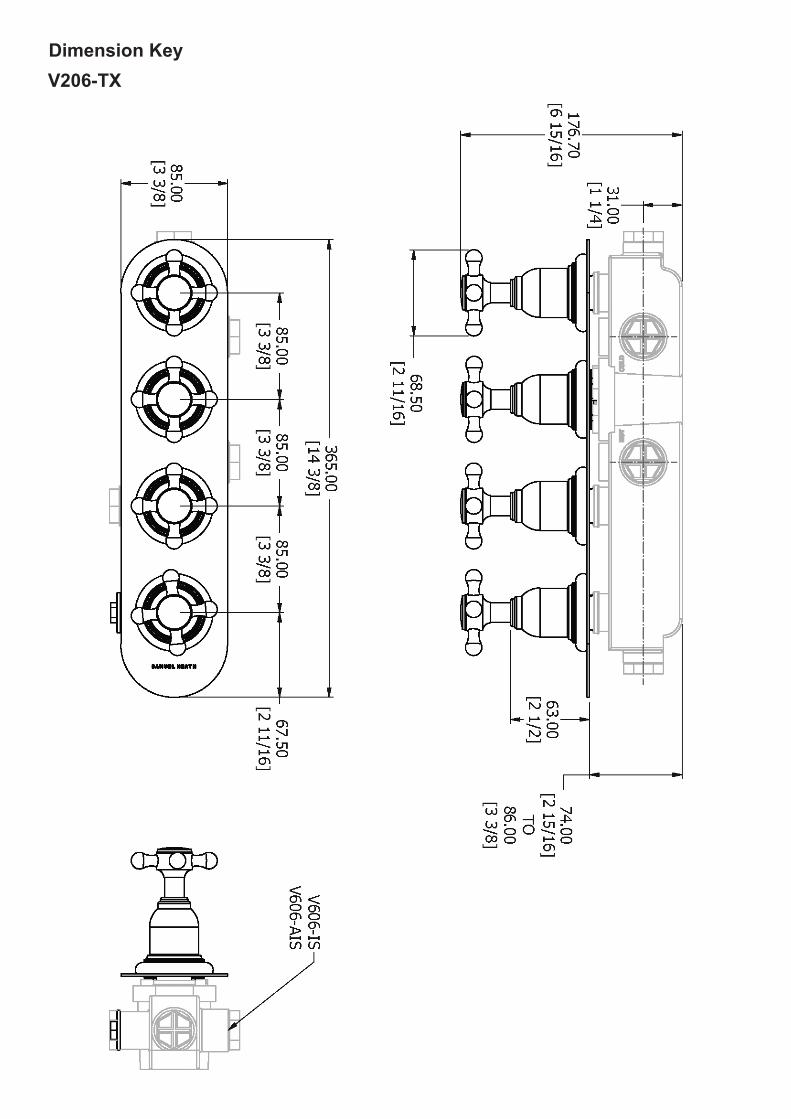
Dimension KeyV206-TX
12
34
5
6
7
8
9
10
12
13
1415
16
1718
11
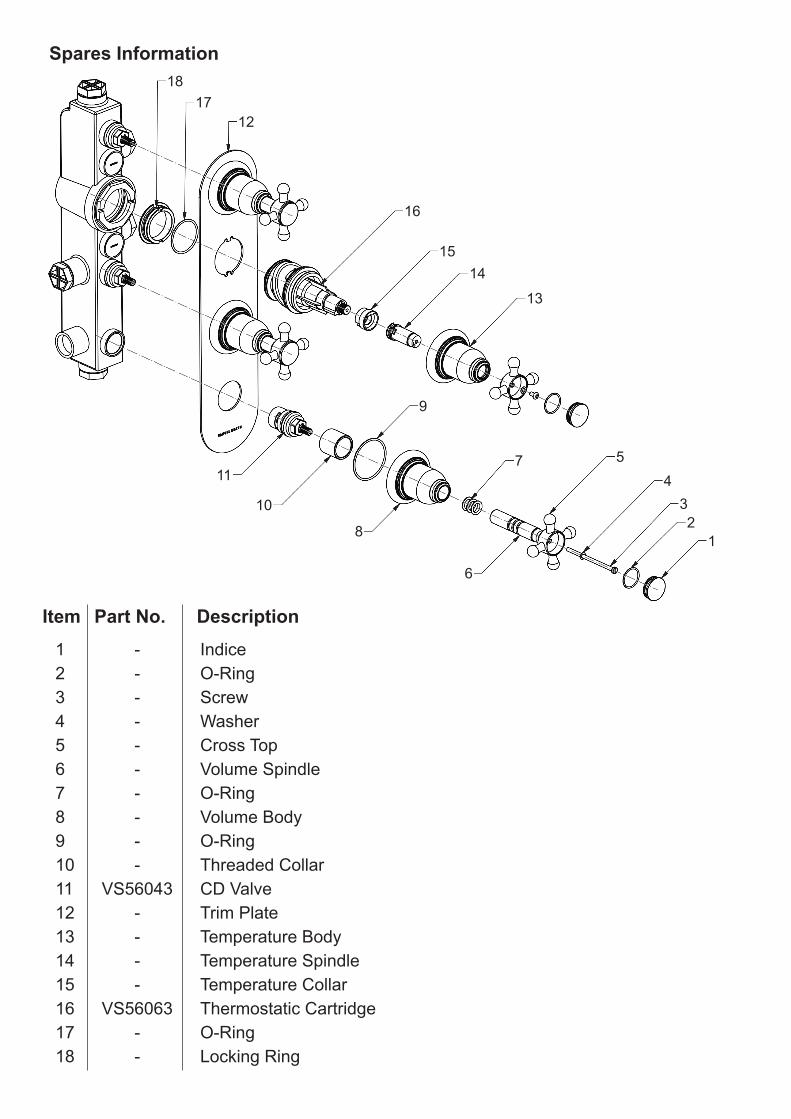
Spares Information
Item Part No. Description----------
VS56043----
VS56063--
IndiceO-RingScrewWasherCross TopVolume SpindleO-RingVolume BodyO-Ring Threaded CollarCD ValveTrim PlateTemperature BodyTemperature SpindleTemperature CollarThermostatic CartridgeO-RingLocking Ring
123456789101112131415161718
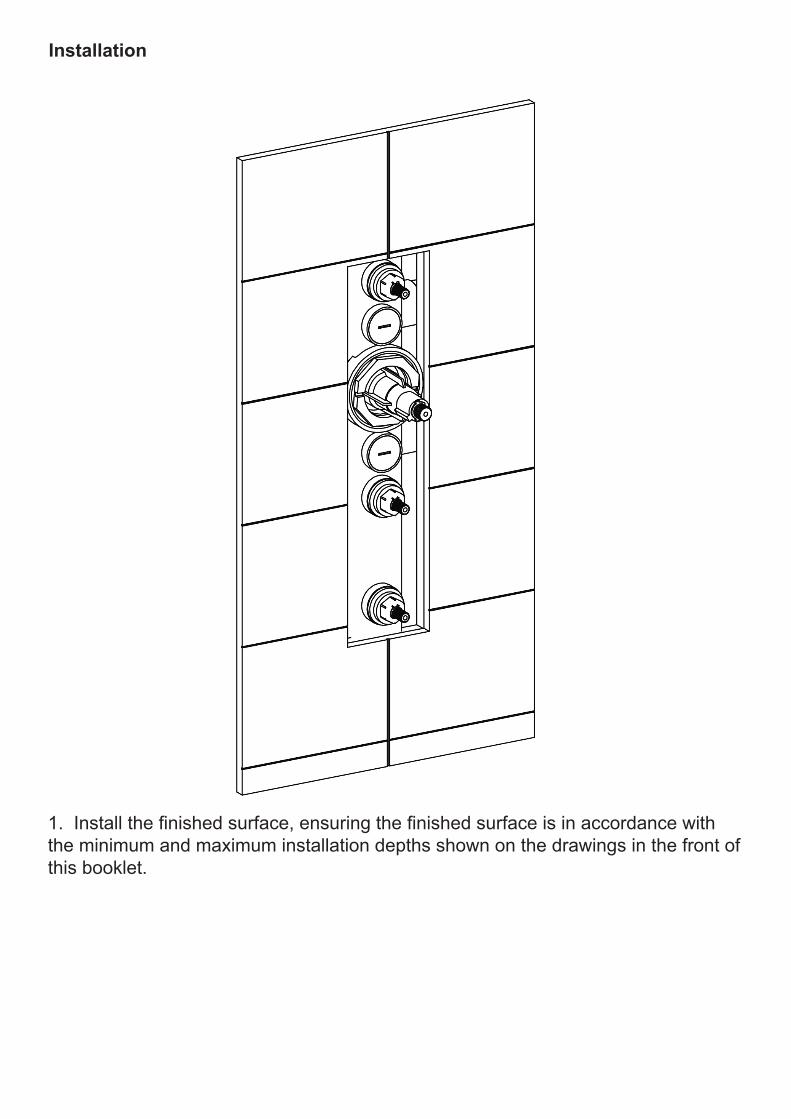
1. Install the finished surface, ensuring the finished surface is in accordance with the minimum and maximum installation depths shown on the drawings in the front of this booklet.
Installation
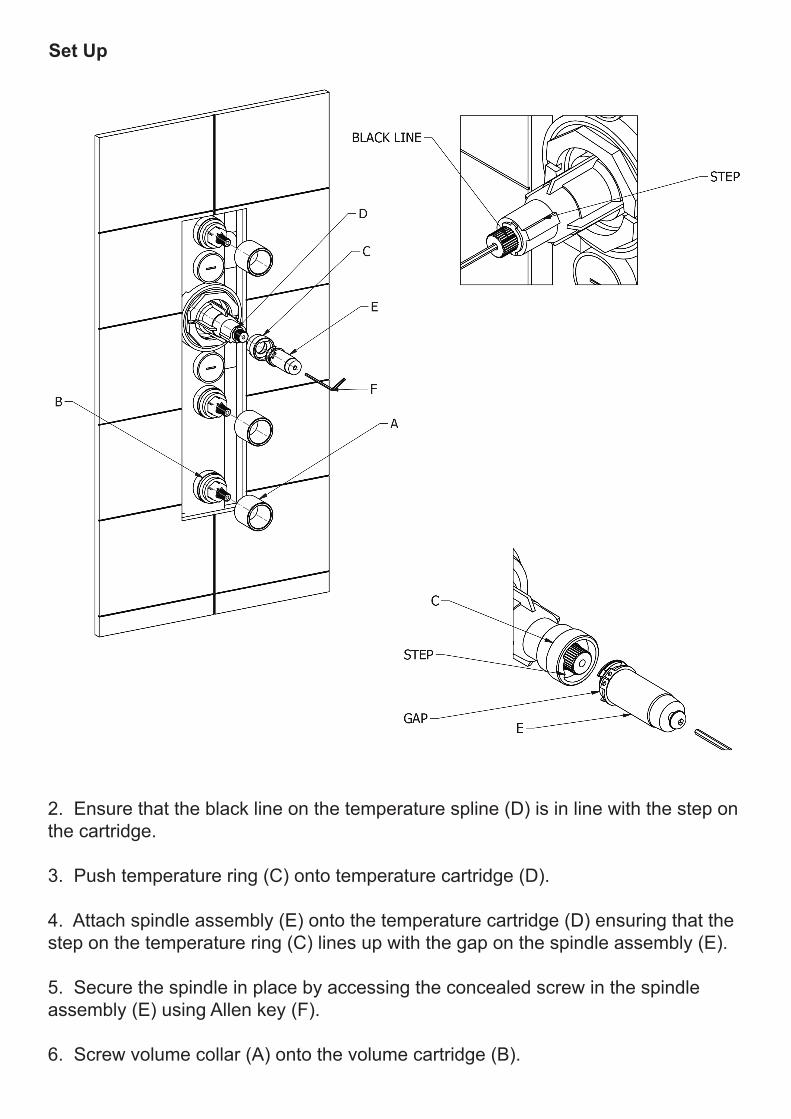
Set Up
2. Ensure that the black line on the temperature spline (D) is in line with the step on the cartridge.
3. Push temperature ring (C) onto temperature cartridge (D).
4. Attach spindle assembly (E) onto the temperature cartridge (D) ensuring that the step on the temperature ring (C) lines up with the gap on the spindle assembly (E).
5. Secure the spindle in place by accessing the concealed screw in the spindle assembly (E) using Allen key (F).
6. Screw volume collar (A) onto the volume cartridge (B).

7. Apply a bead of silicon sealant to the wall where the trim plate assembly (G) will sit.
8. Push trim plate assembly (G) onto the installed shower.
9. Clamp the trim plate assembly in place by screwing the volume bodies (H) onto volume collars (A).
10. Assemble spindles (I), washers (J) and screws (K).
Set Up
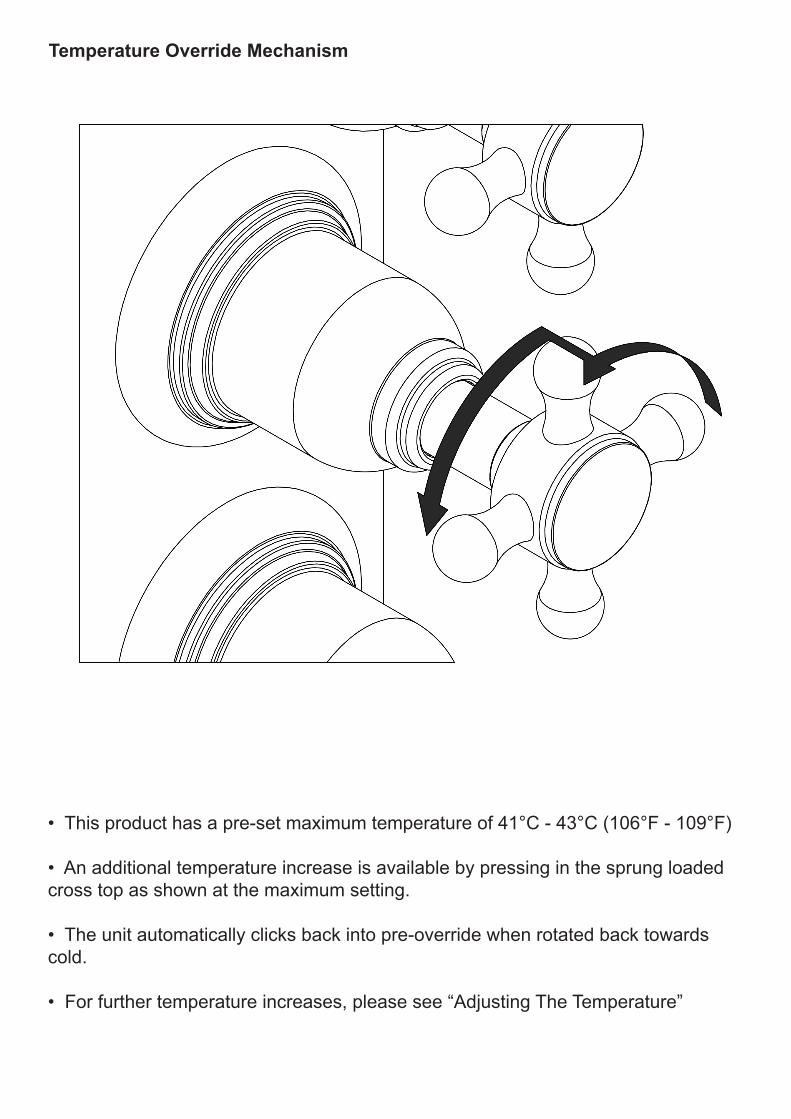
Temperature Override Mechanism
• This product has a pre-set maximum temperature of 41°C - 43°C (106°F - 109°F)
• An additional temperature increase is available by pressing in the sprung loaded cross top as shown at the maximum setting.
• The unit automatically clicks back into pre-override when rotated back towards cold.
• For further temperature increases, please see “Adjusting The Temperature”
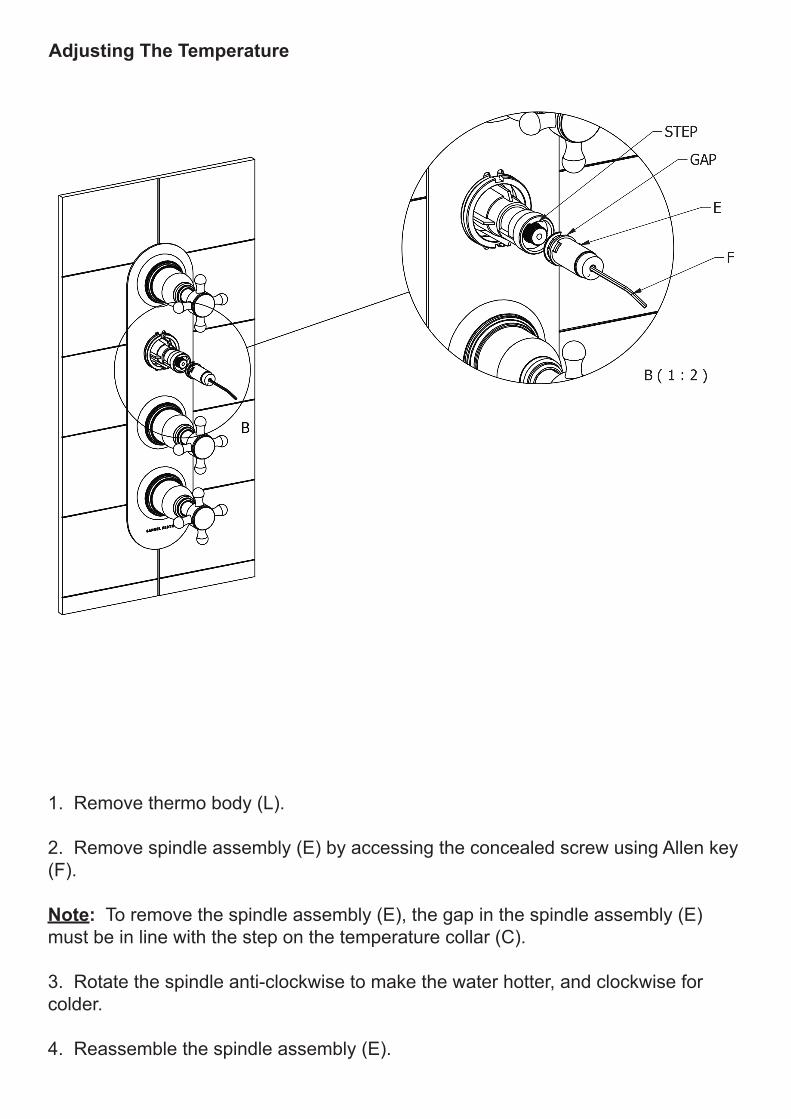
Adjusting The Temperature
1. Remove thermo body (L).
2. Remove spindle assembly (E) by accessing the concealed screw using Allen key (F).
Note: To remove the spindle assembly (E), the gap in the spindle assembly (E) must be in line with the step on the temperature collar (C).
3. Rotate the spindle anti-clockwise to make the water hotter, and clockwise for colder.
4. Reassemble the spindle assembly (E).
Issue: B8-40445-T
Head Office and Customer ServiceLeopold StreetBirminghamEnglandB12 0UJT: +44 (0)121 766 4200F: +44 (0)121 772 3334
US Customer [email protected] I.D. No. 58-1504682www.samuel-heath.com
IMPORTANT NOTES1. Installation should be carried out by a competent engineer, in accordance with water regulations.2. Before installation, ensure supply pipes are flushed clean. Debris or loose particles will affect the efficiency of the ceramic disc cartridge.3. For mixer taps, it is recommended that hot & cold pressures are equally balanced.4. To help maintain the high quality finish, please clean with a soft damp cloth. Do not use abrasive polish or cleaners. Stains may be removed using undiluted washing up liquid.5. Ceramic cartridges in hard water areas. To prolong the lifespan and reduce servicing periods of your Samuel Heath tap we recommend that a suitable water softener be fitted. Consult your installer/designer for details.6. Please note that as with all tap and shower ware it will be necessary from time to time for the products to be serviced, this should be carried out by a qualified Plumbing Engineer.
NOTES IMPORTANTES1. L’installation doit être faite par un ingénieur qualifié, selon les réglements du Service Eau.2. Avant l’installation, il faut s’assurer que les tuyaux d’approvisionnement sont complètement purgés. Les déchets flottants auront un effet détrimentaire sur l’efficacité de la cartouche céramique.3. Il est recommandé que les pressions de l’eau chaude et eau froide des mitigeurs et mélangeurs soient maintenues à un niveau égal.4. Pour conserver la finition de haute qualité, nettoyer avec un chiffon doux et humide. N’employer jamais de la cire et des produits abrasifs. Les tâches peuvent être enlevées à l’aide de liquide vaisselle pur.5. Cartouches en céramique dans les régions à eau calcaire. Pour prolonger la durée et réduire l’entretien de votre robinetterie Samuel Heath, nous recommandons d’utiliser un adoucisseur d’eau convenable. Veuillez consulter votre installateur/fournisseur pour plus de renseignements.6. Veuillez noter qu’un entretien sera nécessaire de temps en temps et doit être effectué par un installateur qualifié.
WICHTIGE HINWEISE1. Installation sollte durch einen kompetenten Fachmann und nach den üblichen Vorschriften ausgeführt werden.2. Vor Installation Wasserleitung gründlich durchspülen. Verschmutzung wird die Funktion der Kartusche erheblich einschränken.3. Für Mischbatterien ist es wichtig, daß Wasser mit gleichem Druck eingefuhrt wird.4. Um den optimalen Zustand dieses Produktes zu erhalten, wischen Sie es bitte nur mit einem feuchten, weichen Lappen ab. Auf keinen Fall Scheuermittel verwenden. Flecken lassen sich mit unverdünntem Geschirrspülmittel entfernen.5. Keramikkartuschen in Hartwasserbereichen. Um die Lebensdauer zu verlängern und Wartungszeiten zu reduzieren empfiehlt Samuel Heath den Einsatz eines geeigneten Wasserenthärters. Fragen Sie Ihren Installateur/Designer um Rat.6. Bitte merken Sie, dass alle Armaturen ab und zu eine Wartung brauchen. Diese soll durch einen kompetenten Installateur ausgeführt werden.
ATENCION1. La instalación se debe realizar por un fontanero.2. Antes de la instalación, deben pulgar las tuberias dejándo correr el agua por las tuberias para que arrastren los residuos de montaje/obra, con el motivo de que no afecte la eficacia del cartucho de ceramica.3. Para grupo baño/ducha se recomienda que las presiones del agua caliente y frio sean equilibradas.4. Para ayudar a mantener el acabado de este producto, limpiar con un paño húmedo suave. No se debe emplear productos abrasivos de baño. Las manchas se pueden quitar empleándo liquido lava-vajillas puro.5. Cartuchos cerámicos en áreas de aguas duras . Para prolongar su vida útil y reducir los periodos de reparación de su grifo Samuel Heath recomendamos la instalación de un descalcificador de agua. Consulte a su instalador para más detalles.6. Igual que con todo tipo de griferia y duchas, de vez en cuando será necesario llevar a cabo una revisión al producto; esto deberia ser realizado por un fontanero calificado.
ATTENZIONE1. L’impianto deve essere montato da personale tecnico in conformità alle vigenti leggi.2. Prima dell’installazione assicurarsi che le tubature dell’ aqua siano pulite. Detriti o residui di lavorazione compromettono l’efficenza del cartuccio.3. Per i gruppi, si raccomanda che le pressioni acqua calda e acqua fredda siano ugualmente bilanciate.4. Per mantenere la finizione di ottima qualità, pulire con un panno soffice e inumidito. Non usare creme lucidanti e materiali abrasivi. Le macchie potranno essere tolte usando del detersivo per piatti puro.5. Come con tutti i tipi di rubinetti e docce, di volta in volta è necessario effettuare una revisione al prodotto; questo dovrebbe essere fatto da un idraulico qualificato.