pro tools avid interplay client guide -...
TRANSCRIPT

Pro Tools Avid Interplay Guide® ® ®
Version 11.0

Legal Notices
© 2013 Avid Technology, Inc., (“Avid”), all rights reserved.This guide may not be duplicated in whole or in part withoutthe written consent of Avid.
003, 192 Digital I/O, 192 I/O, 96 I/O, 96i I/O, Adrenaline,AirSpeed, ALEX, Alienbrain, AME, AniMatte, Archive,Archive II, Assistant Station, AudioPages, AudioStation,AutoLoop, AutoSync, Avid, Avid Active, Avid AdvancedResponse, Avid DNA, Avid DNxcel, Avid DNxHD, Avid DSAssist Station, Avid Ignite, Avid Liquid, Avid Media Engine,Avid Media Processor, Avid MEDIArray, Avid Mojo,Avid Remote Response, Avid Unity, Avid Unity ISIS,Avid VideoRAID, AvidRAID, AvidShare, AVIDstripe, AVX,Beat Detective, Beauty Without The Bandwidth,Beyond Reality, BF Essentials, Bomb Factory, Bruno, C|24,CaptureManager, ChromaCurve, ChromaWheel,Cineractive Engine, Cineractive Player, Cineractive Viewer,Color Conductor, Command|8, Control|24, Cosmonaut Voice,CountDown, d2, d3, DAE, D-Command, D-Control, Deko,DekoCast, D-Fi, D-fx, Digi 002, Digi 003, DigiBase,Digidesign, Digidesign Audio Engine, DigidesignDevelopment Partners, Digidesign Intelligent NoiseReduction, Digidesign TDM Bus, DigiLink, DigiMeter,DigiPanner, DigiProNet, DigiRack, DigiSerial, DigiSnake,DigiSystem, Digital Choreography, Digital NonlinearAccelerator, DigiTest, DigiTranslator, DigiWear, DINR,DNxchange, Do More, DPP-1, D-Show, DSP Manager,DS-StorageCalc, DV Toolkit, DVD Complete, D-Verb, Eleven,EM, Euphonix, EUCON, EveryPhase, Expander,ExpertRender, Fairchild, FastBreak, Fast Track, Film Cutter,FilmScribe, Flexevent, FluidMotion, Frame Chase, FXDeko,HD Core, HD Process, HDpack, Home-to-Hollywood,HyperSPACE, HyperSPACE HDCAM, iKnowledge, Impact,Improv, iNEWS, iNEWS Assign, iNEWS ControlAir, InGame,Instantwrite, Instinct, Intelligent Content Management,Intelligent Digital Actor Technology, IntelliRender, Intelli-Sat,Intelli-Sat Broadcasting Recording Manager, InterFX,Interplay, inTONE, Intraframe, iS Expander, iS9, iS18, iS23,iS36, ISIS, IsoSync, LaunchPad, LeaderPlus, LFX, Lightning,Link & Sync, ListSync, LKT-200, Lo-Fi, MachineControl,Magic Mask, Make Anything Hollywood,make manage move|media, Marquee, MassivePack,MassivePack Pro, Maxim, Mbox, Media Composer,MediaFlow, MediaLog, MediaMix, Media Reader,Media Recorder, MEDIArray, MediaServer, MediaShare,MetaFuze, MetaSync, MIDI I/O, Mix Rack, Moviestar,MultiShell, NaturalMatch, NewsCutter, NewsView,NewsVision, Nitris, NL3D, NLP, NSDOS, NSWIN, OMF,OMF Interchange, OMM, OnDVD, Open Media Framework,Open Media Management, Painterly Effects, Palladiium,Personal Q, PET, Podcast Factory, PowerSwap, PRE,ProControl, ProEncode, Profiler, Pro Tools, Pro Tools|HD,Pro Tools LE, Pro Tools M-Powered, Pro Transfer,QuickPunch, QuietDrive, Realtime Motion Synthesis,Recti-Fi, Reel Tape Delay, Reel Tape Flanger,Reel Tape Saturation, Reprise, Res Rocket Surfer, Reso,RetroLoop, Reverb One, ReVibe, Revolution, rS9, rS18,RTAS, Salesview, Sci-Fi, Scorch, ScriptSync,SecureProductionEnvironment, Shape-to-Shape,ShuttleCase, Sibelius, SimulPlay, SimulRecord,Slightly Rude Compressor, Smack!, Soft SampleCell,Soft-Clip Limiter, SoundReplacer, SPACE, SPACEShift,SpectraGraph, SpectraMatte, SteadyGlide, Streamfactory,Streamgenie, StreamRAID, SubCap, Sundance,
Sundance Digital, SurroundScope, Symphony, SYNC HD,SYNC I/O, Synchronic, SynchroScope, Syntax,TDM FlexCable, TechFlix, Tel-Ray, Thunder, TimeLiner,Titansync, Titan, TL Aggro, TL AutoPan, TL Drum Rehab,TL Everyphase, TL Fauxlder, TL In Tune, TL MasterMeter,TL Metro, TL Space, TL Utilities, tools for storytellers, Transit,TransJammer, Trillium Lane Labs, TruTouch, UnityRAID,Vari-Fi, Video the Web Way, VideoRAID, VideoSPACE,VTEM, Work-N-Play, Xdeck, X-Form, and XMON are eitherregistered trademarks or trademarks of Avid Technology, Inc.in the United States and/or other countries.
Bonjour, the Bonjour logo, and the Bonjour symbol aretrademarks of Apple Computer, Inc.
Thunderbolt and the Thunderbolt logo are trademarks of IntelCorporation in the U.S. and/or other countries.
This product may be protected by one or more U.S. and non-U.S. patents. Details are available at www.avid.com/patents.
Product features, specifications, system requirements, andavailability are subject to change without notice.
Guide Part Number 9329-65318-00 REV A 6/13

Chapter 1. Introduction . . . . . . . . . . . . . . . . . . . . . . . . . . . . . . . . . . . . . . . . . . . . . . . . . . . . . . . . . 1
Avid Interplay Capabilities . . . . . . . . . . . . . . . . . . . . . . . . . . . . . . . . . . . . . . . . . . . . . . . . . . 1
Pro Tools Interplay Clients . . . . . . . . . . . . . . . . . . . . . . . . . . . . . . . . . . . . . . . . . . . . . . . . . . 1
Components of an Interplay System . . . . . . . . . . . . . . . . . . . . . . . . . . . . . . . . . . . . . . . . . . . 2
System Requirements and Compatibility . . . . . . . . . . . . . . . . . . . . . . . . . . . . . . . . . . . . . . . . 2
About Avid Interplay Guides . . . . . . . . . . . . . . . . . . . . . . . . . . . . . . . . . . . . . . . . . . . . . . . . . 3
Conventions Used in This Guide. . . . . . . . . . . . . . . . . . . . . . . . . . . . . . . . . . . . . . . . . . . . . . 4
About www.avid.com . . . . . . . . . . . . . . . . . . . . . . . . . . . . . . . . . . . . . . . . . . . . . . . . . . . . . . 4
Chapter 2. Installing Pro Tools with Avid Interplay Support . . . . . . . . . . . . . . . . . . . . . . . . . . . 5
Overview of Setting Up Interplay for Checking In and Out from Pro Tools . . . . . . . . . . . . . . . . 5
Installing Interplay Access on a Pro Tools System . . . . . . . . . . . . . . . . . . . . . . . . . . . . . . . . . 5
Chapter 3. Configuring Interplay Administrator for Import and Export . . . . . . . . . . . . . . . . . . 7
Avid Interplay Administrator . . . . . . . . . . . . . . . . . . . . . . . . . . . . . . . . . . . . . . . . . . . . . . . . . 7
Launching Avid Interplay Administrator . . . . . . . . . . . . . . . . . . . . . . . . . . . . . . . . . . . . . . . . . 7
Configuring Editor Export Settings for Pro Tools . . . . . . . . . . . . . . . . . . . . . . . . . . . . . . . . . . 8
Configuring Pro Tools Import Settings . . . . . . . . . . . . . . . . . . . . . . . . . . . . . . . . . . . . . . . . . . 9
Configuring Pro Tools Export Settings. . . . . . . . . . . . . . . . . . . . . . . . . . . . . . . . . . . . . . . . . 11
Contents
Contents iii

iv
Chapter 4. Interplay Workflows for Pro Tools and Avid Video Editing Applications . . . . . . 15
Launching Avid Interplay Access on a Pro Tools Client . . . . . . . . . . . . . . . . . . . . . . . . . . . . 16
About the Pro Tools Check-In Folder . . . . . . . . . . . . . . . . . . . . . . . . . . . . . . . . . . . . . . . . . 17
Working With HD or SD Projects . . . . . . . . . . . . . . . . . . . . . . . . . . . . . . . . . . . . . . . . . . . . 17
Avid Interplay Sequence Interchange . . . . . . . . . . . . . . . . . . . . . . . . . . . . . . . . . . . . . . . . . 18
Checking In a Sequence to Interplay . . . . . . . . . . . . . . . . . . . . . . . . . . . . . . . . . . . . . . . . . 18
Importing a Sequence into Pro Tools from Interplay . . . . . . . . . . . . . . . . . . . . . . . . . . . . . . 21
Exporting Edited Audio Tracks to Interplay from Pro Tools . . . . . . . . . . . . . . . . . . . . . . . . . 24
Exporting Edited Audio Tracks to an Alternate Sequence . . . . . . . . . . . . . . . . . . . . . . . . . . 26
Importing Pro Tools Audio Files Back into the Avid Video Editing Application . . . . . . . . . . . . 28
Exporting a Sequence from Avid Interplay Access as an AAF Sequence to Any Volume . . . . 30
Version Control Between the Avid Video Editor and Pro Tools Editor . . . . . . . . . . . . . . . . . . 30
Pro Tools Avid Interplay Guide

Chapter 1: Introduction
This guide describes how to use an
Avid® Interplay® Production system to exchange
media between Avid video editing systems and
Pro Tools® audio editing and mixing systems.
Pro Tools HD software is required for use with In-
terplay (with or without Avid HDX or HD Native
audio hardware).
Avid Interplay CapabilitiesAvid Interplay is an asset management system that
lets Avid video editors and Pro Tools editors at a
single facility manage and work with the same me-
dia, as follows:
• Perform workflows on the same video media se-
quentially or simultaneously.
• Choose from multiple workflows for sharing
files.
• Monitor, manage, and track video sequences.
• Revert to previous versions of sequences.
• View and manage past history on individual se-
quences.
For a list of components that make up anInterplay Production system, see “Compo-nents of an Interplay System” on page 2.
Interplay Production is referred to as “Inter-play” elsewhere in this guide.
Pro Tools Interplay ClientsPro Tools editors can interact directly with the
Avid Interplay asset management system to:
• Check out sequences.
• Edit and mix within a Pro Tools session.
• Export the session and any new media back to
the sequence on Interplay.
• Send sequences directly to third-party playback
servers for live playback (Avid Interplay Web
Services, Interplay Transfer, and Pro Tools Send
to Playback option required).
Use the Interplay Access and Interplay Adminis-
trator applications to manage and share files di-
rectly with an Avid video editor.
Chapter 1: Introduction 1

2
Components of an Interplay SystemAn Avid Interplay system for use with Pro Tools
and Avid video applications comprises the follow-
ing components:
• An Avid ISIS® storage server (where all the me-
dia is stored)
• An Avid Interplay server, which manages the
metadata stored on the storage server.
• The following Interplay applications (which let
users interact directly with Interplay):
• Interplay Access
• Interplay Administrator
• The following software applications (which let
users check in or check out sequences from In-
terplay:
• Pro Tools HD software
• An Interplay-compatible Avid video editing
application (such as Avid Media Composer)
• The following software options are also required
to use the Send to Playback feature:
• Avid Interplay Transfer
• Avid Interplay Media Services
Avid ISIS Storage SystemsAvid ISIS 7000, ISIS 5000, and ISIS 200 provide
high-speed gigabit Ethernet-based network storage
systems for Avid workstations.
For detailed information on setting up thecomponents of an Avid Interplay environment,contact your Avid Interplay administrator.
Pro Tools Avid Interplay Guide
System Requirements and CompatibilityUsing the Pro Tools Interplay Option with an In-
terplay system requires the following;
• An Avid-qualified computer running a qualified
version of Mac OS or Windows
• Pro Tools HD software
• Avid HDX or HD Native hardware (optional)
• Avid video editing applications supported by
Avid Interplay 3.0 and higher
• Connection to an Avid MediaNetwork or ISIS
server
• Avid Interplay Installer
• Configured Avid ISIS Client Manager
Avid can only assure compatibility and provide
support for hardware and software it has tested and
approved.
For complete system requirements and a list of
qualified computers, operating systems, hard
drives, and third-party devices, visit:
www.avid.com/compatibility
Some features as described in this guiderequire Media Composer 6 or higher.

About Avid Interplay GuidesPDF versions of Avid Read Mes are installed auto-
matically with Avid Interplay software. tfrtwpHelp files are also installedpwith Avid InterplayAccess Manager and can be accessed from the
Help menus in the Interplay Access and Interplay
Administrator applications.
You can use any of the following guides as supple-
mentary information for this guide:
• Avid Interplay Best Practices Guide contains an
overview of Avid Interplay as well as task-ori-
ented instructions, conceptual information, and
reference material needed to use the Avid Inter-
play system, including detailed information on
configuring an Avid video editing application
(such as Media Composer) for use with an Avid
Interplay environment. It is intended for all In-
terplay users, from beginning to advanced.
• Avid Interplay Software Installation and Config-uration Guide explains overview installation
and configuration information for the Interplay
components on the Avid Interplay Installer
DVD. It is intended for Interplay administrators
who are upgrading or setting up an Avid Inter-
play system from scratch.
• Avid Interplay Access User’s Guide contains a
conceptual introduction to help users get started,
as well as detailed explanations about screen
views, commands, and processes. It is intended
for all Avid Interplay end users who need to im-
port, find, and access master clips, sequences,
and other assets in the Avid ISIS environment in
their daily work.
• Avid Interplay Engine and Avid Interplay Ar-chive Engine Administration Guide explains
how to install, configure, and maintain an Avid
Interplay system (server and clients, and all re-
lated system connections and user rights). It is
intended for all Avid Interplay administrators
who are responsible for these tasks.
• Avid Interplay Transfer Setup and User’s Guideexplains the setup and use of the Avid Interplay
Transfer software option, which is required
when using the Send to Playback feature with
Interplay.
• Avid Interplay Media Services Setup and User’sGuide offers information about Avid mediaservices that are required when using the Send
to Playback feature in Pro Tools with Interplay
required...
These guides and other Interplay guides are avail-
able on the Avid Interplay Online Library DVD
and on the Avid Knowledge Base. You can reach
the Knowledge Base by clicking Help >
Pro Tools Knowledge Base in Pro Tools, or by
visiting www.avid.com/onlinesupport. To view or
print PDF guides, you can use Adobe Reader.
Many Pro Tools-related guides and context-sensitive help can be accessed from the Helpmenu in Pro Tools.
Chapter 1: Introduction 3

4
Conventions Used in This GuidePro Tools guides use the following conventions to
indicate menu choices and key commands::
The names of Commands, Options, and Settings
that appear on-screen are in a different font.
The following symbols are used to highlight
important information:
Convention Action
File > Save Choose Save from the
File menu
Control+N Hold down the Control key
and press the N key
Control-click Hold down the Control key
and click the mouse button
Right-click Click with the right
mouse button
User Tips are helpful hints for getting themost from your system.
Important Notices include information thatcould affect your data or the performance ofyour system.
Shortcuts show you useful keyboard or mouseshortcuts.
Cross References point to related sections inthis guide and other Avid guides.
Pro Tools Avid Interplay Guide
About www.avid.comThe Avid website (www.avid.com) is your best
online source for information to help you get the
most out of your Pro Tools system. The following
are just a few of the services and features available.
Product Registration Register your purchase
online.
Support and Downloads Contact Avid Customer
Success (technical support); download software
updates and the latest online manuals; browse the
Compatibility documents for system requirements;
search the online Knowledge Base or join the
worldwide Pro Tools community on the User Con-
ference.
Training and Education Study on your own using
courses available online or find out how you can
learn in a classroom setting at a certified Pro Tools
training center.
Products and Developers Learn about Avid
products; download demo software or learn about
our Development Partners and their plug-ins, ap-
plications, and hardware.
News and Events Get the latest news from Avid or
sign up for a Pro Tools demo.

Chapter 2: Installing Pro Tools with Avid Interplay Support
Overview of Setting Up Interplay for Checking In and Out from Pro ToolsInstalling Pro Tools with Avid Interplay support
involves these steps, which are necessary to follow
in the exact order listed here:
1 Install your Pro Tools system (see the Pro ToolsInstallation Guide).
2 Install Interplay Access on your Pro Tools sys-
tem (see “Installing Interplay Access on a
Pro Tools System” on page 5).
3 Optional: Use Interplay Administrator (in-
stalled with Interplay Access) to configure the
default settings for export and import with Avid
Interplay (see Chapter 3, “Configuring Inter-
play Administrator for Import and Export”).
These instructions assume that an InterplayEngine and Interplay workgroup are config-ured and running correctly.
Installing Interplay Access on a Pro Tools SystemThis section describes how to install Avid Inter-
play Access on a Pro Tools system.
To install Interplay Access on a Mac-based
Pro Tools system:
1 Verify that your Pro Tools system is installed
before proceeding.
2 Do one of the following:
• Insert theAvid Interplay Installer USB drive into
your computer.
• Download the Avid Interplay Installer.
3 Locate and double-click the Install Interplay
Access icon.
4 Follow the on-screen instructions to complete
the installation process.
For more information, see the Install InterplayAccess Guide.
Chapter 2: Installing Pro Tools with Avid Interplay Support 5

6
To install Interplay Access on a Windows-based
Pro Tools system:
1 Verify that your Pro Tools system is installed
before proceeding.
2 Do one of the following:
• Insert theAvid Interplay Installer USB drive into
your computer.
• Download the Avid Interplay Installer.
3 If Auto-Run is enabled, the Interplay Produc-
tion Installer launches. Otherwise, locate and
double-click the autorun.exe.
4 In the Interplay Install window, click Clients.
The Interplay Install Client Support window ap-
pears.
5 Select Avid Interplay Access.
The next time you launch Pro Tools, the following
menu options are available:
• File > Import > Sequence from Avid Interplay
• File > Export > Selected Tracks to Sequence in
Avid Interplay
Pro Tools Avid Interplay Guide

Chapter 3: Configuring Interplay Administrator for Import and Export
Avid Interplay AdministratorThe Avid Interplay Administrator application is
installed with Avid Interplay Access. Use the In-
terplay Administrator to pre-configure Pro Tools
import and export settings for Interplay check-out
and check-in. You can also pre-configure the ex-
port to Pro Tools settings for Avid video editors
for check-in to Interplay.
The Avid Interplay Administrator application pro-
vides the following settings for Pro Tools clients:
• Editor Export Settings for Pro Tools
• Pro Tools Import Settings
• Pro Tools Export Settings
Configuring these settings is not required, but do-
ing so lets you establish a “template” of settings
that are automatically applied to sequences that are
exported from an Avid video editing application,
imported into Pro Tools, or exported from
Pro Tools.
Plug-ins in the Interplay Administrator application
Pro Tools Import SettingsPro Tools Import Settings
Editor Export Settings for Pro Tools
Pro Tools Export Settings
Chap
Launching Avid Interplay AdministratorBefore launching Avid Interplay Administrator, be
sure that your system is connected and configured
for use as a client on an Avid ISIS system.
To launch Avid Interplay Administrator:
1 (Optional) Launch the Avid ISIS Client Man-
ager and connect to the Avid ISIS Server Sys-
tem Directory that is configured for use with the
Avid Interplay server.
2 Launch Avid Interplay Administrator.
3 Select the appropriate Server and Database for
the project.
4 Enter your Username and Password.
5 Click Logon.
6 The Avid Interplay Administrator opens.
For more information, see the Pro Tools ISISClient Guide.
ter 3: Configuring Interplay Administrator for Import and Export 7

8
Configuring Editor Export Settings for Pro ToolsThe Editor Export Settings for Pro Tools establish the default settings used by Avid video editing applica-
tion when exporting a sequence to Interplay for Pro Tools.
Use Interplay Administrator to configure the default Avid Video Editor Export Settings for Pro Tools be-
fore exporting a sequence from the Avid video editing system. If you do not configure the Editor Export
Settings for Pro Tools in Interplay Administrator, the Avid Video editor can manually configure the export
settings for Pro Tools.
Interplay Administrator can establish export settings for the entire database or for particular folders. Set-
tings are automatically inherited from the parent folder or project, and can be explicitly modified by folder.
The Pro Tools editor can check out non-Pro Tools sequences from Interplay. However, the Avid videoeditor should typically check in sequences explicitly for Pro Tools, to ensure that all video effects arerendered.
Pro Tools Avid Interplay Guide
Interplay Administrator, Editor Export Settings for Pro Tools
To configure the Editor Export Settings for
Pro Tools:
1 In the Interplay Administrator window, double-
click the Editor Export Settings for Pro Tools.
2 Set the Editor Export settings to fit the nature of
your project. For more information, see “Editor
Export Settings” on page 9.
3 Click the Menu button to return to the Adminis-
trator window.
4 Click Apply.
Changes take effect for the Avid video edit-ing application the next time the editor logsinto the Interplay window. The editor mayhave to log out of the Interplay window andlog back in.

Editor Export SettingsThis section gives details on the settings available
in the Editor Export Settings window.
Video Details
Transcode Video Resolution The Avid video edit-
ing application uses this setting to perform a video
mixdown when the Video Mixdown option is se-
lected after the sequence is checked in to Interplay
for Pro Tools.
The application might also use the setting when
you perform a “link to existing media” export.
Audio Details
Audio Mixdown Specifies whether to include an
audio mixdown with each export. Available op-
tions are Mono, Stereo, and No Mixdown.
Convert Audio Sample Rate Specifies the audio
sample rate for the export. The Project option re-
fers to the current audio sample rate setting used in
the Avid project.
Convert Audio Bit Depth Specifies the audio bit
depth for the export. The Project option refers to
the current audio bit depth setting used in the Avid
project. (Dither will automatically be applied to
any audio with a converted bit depth.)
For more information, see “Checking In aSequence to Interplay” on page 18.
This setting is disabled when exporting multi-track audio.
Chap
If Editor Export Settings for Pro Tools Are Not ConfiguredIf the Editor Export Settings for Pro Tools plug-in
is not configured for a particular folder, the Avid
video editing application displays the Pro Tools
Export Settings dialog when a sequence is checked
in to Interplay for Pro Tools. The Avid video edi-
tor can specify the settings for that particular ex-
port in the dialog.
Configuring Pro Tools Import SettingsPro Tools Import Settings establish the default set-
tings for Pro Tools to use when importing a se-
quence from Interplay. These settings are corre-
spond to the settings used by Pro Tools in the
Import Session Data and the New Session dialogs.
To configure the Pro Tools Import Settings:
In the Interplay Administrator window, double-
click the Pro Tools Import Settings plug-in to
open it.
Settings are automatically inherited from the par-
ent folder or project, and can be explicitly modi-
fied by folder. You can also select an individual
folder and set specific values for that folder and its
subfolders.
If an administrator did not enter settings inthe Pro Tools folder or any parent folder, thePro Tools editor can modify those settings inthe New Session or Import Session Data dia-logs before import into Pro Tools.
ter 3: Configuring Interplay Administrator for Import and Export 9

10
Pro Tools Import SettingsThis section provides details on the settings available only in the Pro Tools Import Settings window in
Interplay Administrator. All other settings determine the corresponding settings for the Pro Tools Import
Session Data dialog.
See the Pro Tools Reference Guide for detailed information on settings shared with the Pro Tools Im-port Session Data and New Session dialogs.
Pro Tools Avid Interplay Guide
Interplay Administrator, Pro Tools Import Settings

Show Import Session Data Dialog on Import
This option lets you specify whether or not
Pro Tools will show the Import Session Data dia-
log when importing a sequence from Interplay.
Even if all the important settings have been pre-set
in the Pro Tools Import Settings for Interplay, it
can be useful for the Pro Tools user to be able to
change these settings before importing. In cases
where this behavior is desired, set this option to
Yes. In cases where that is not necessary or de-
sired, set this option to No.
Allow Import of non-PT Sequences
The Pro Tools editor can check out non-Pro Tools
sequences from Interplay. However, in many
cases, it makes sense for the Avid video editor to
check in sequences explicitly for Pro Tools, to en-
sure that all video effects are rendered.
Chap
In cases where the ability for Pro Tools users to
open standard sequences is desired, set this option
to Yes. In cases where you prefer to prevent
Pro Tools users from checking out standard se-
quences, set this option to No.
Configuring Pro Tools Export SettingsPro Tools Export Settings establish the default set-
tings for Pro Tools to use when exporting a se-
quence to Interplay. These settings correspond to
settings used by Pro Tools in the Export Options
dialog.
To configure the Pro Tools Export Settings:
In the Interplay Administrator window, double-
click the Pro Tools Export Settings plug-in to
open it.
Interplay Administrator, Pro Tools Export Settings
ter 3: Configuring Interplay Administrator for Import and Export 11

12
Export settings are automatically inherited from
the parent folder or project and can be explicitly
modified by folder. You can also select an individ-
ual folder and set specific values for that folder and
its subfolders.
Pro Tools Export SettingsThis section provides details on the settings avail-
able in the Pro Tools Export Settings window.
Add/Replace Tracks
This option lets you set the audio track creation be-
havior in cases when a Pro Tools user checks me-
dia back into Interplay.
Add Adds the edited audio tracks to the Pro Tools
sequence on the Interplay database. Choose this
option if you want to preserve the original audio in
the sequence.
Replace Replaces the old audio tracks in the
Pro Tools sequence with the edited audio tracks.
Choose this option if you do not want to preserve
the original audio in the sequence.
If the Pro Tools Export Settings are not con-figured, they can be set from within Pro Toolswhen checking media in to Interplay. Formore information, see “Exporting Edited Au-dio Tracks to Interplay from Pro Tools” onpage 24.
Pro Tools Avid Interplay Guide
Export Stereo, 5.1, and 7.1 Tracks as Multi-Channel
This option lets you choose the format used when
exporting multi-channel audio from Pro Tools to
Interplay. Enable the option to export multi-chan-
nel tracks as interleaved multi-channel audio files.
Disable the option to export multi-channel tracks
as groups of mono audio files, one for each chan-
nel.
Choose Media Destination
This option lets you specify the workspace that
media is saved to when a Pro Tools user checks
media back into Interplay.
Same as Source The default behavior, this option
specifies that new audio will be saved to the same
ISIS or MediaNetwork workspace that houses the
first clip on the sequence’s timeline.
Select Workspace Gives you the choice to save
the new audio to the root directory of a different
workspace, pending permissions. Choose the de-
sired workspace from the Destination Workspace
menu.
This setting is disabled when exporting exclu-sively mono audio, or when attempting to ex-port an unsupported surround audio format(such as LCRS, or 7.1 SDDS).

Send to Playback
Pro Tools lets you send final sequences directly to
a third-party playback server, for playout to air.
This requires the Pro Tools Interplay option, an
Avid Interplay Transfer System, and Avid Inter-
play Web Services.
Send to Playback Lets you choose whether or not
to send sequences to a third-party playback server.
Transfer Destination Lets you choose the Transfer
Destination for the transmitted sequence, from alist of available destinations.
Interplay Web Service IP Address Lets you spec-
ify the IP address of the Interplay Web Service
server you plan to send to.
Session/Sequence Start Time Mismatch
This option lets you choose the behavior Pro Tools
will follow when exporting tracks to a sequence
with a start time other than that of the current
Pro Tools session.
Adjust Resets the session start time to that of the
sequence.
Match Timecode Matches timecode values from
Pro Tools to Media Composer, and exports only
the duration of the original sequence.
Chap
ter 3: Configuring Interplay Administrator for Import and Export 13
14
Pro Tools Avid Interplay Guide
Chapter 4: Interplay Workflows for Pro Tools and Avid Video Editing Applications
Chapter 4: Interpl
Figure 1. Diagram of Avid Interplay system
Interplay server
(Interplay database)
ISIS
(media storage)Avid videoediting
Application
Avid machine
InterplayAccess
InterplayAdministrator
Pro Tools with thePro Tools
Interplay Option
Pro Tools machine
InterplayAccess
InterplayAdministrator
Administrator machine with Pro ToolsInterplay Option installed
(Pro Tools not required on this machine)
Interplay
Access
Interplay
Administrator
Media Composerwith theInterplay
Transfer
Server
Third-Party
Playback
Server
Servers for Send toPlayback(optional)
Video SatelliteOption
ay Workflows for Pro Tool
s a nd Avid Video Editing Applications 15
16
Launching Avid Interplay Access on a Pro Tools ClientBefore launching Avid Interplay Access, be sure that your Pro Tools system is connected and configured
for use as a client on an Avid ISIS system.
To launch Avid Interplay Access:
1 Launch the Avid ISIS Client Manager and connect to the Avid ISIS Server System Directory that is con-
figured for use with the Avid Interplay server.
2 Launch Avid Interplay Access.
3 Select the appropriate Server and Database for the project.
4 Enter your Username and Password.
5 Click Logon.
6 The Avid Interplay Access client opens.
For more information, see the Pro Tools ISIS Client Guide.
Pro Tools Avid Interplay Guide
Avid Interplay Access client

About the Pro Tools Check-In FolderBy default, the folder structure on the Interplay da-
tabase matches the folder structure within the Avid
video editing application. The Pro Tools editor can
check out non-Pro Tools sequences from Inter-
play.
However, in many cases, it makes sense for the
Avid video editor to check in sequences explicitly
for Pro Tools, to ensure that all video effects are
rendered.
When an Avid video editor checks in a sequence to
Interplay for Pro Tools, the Interplay database
stores two separate versions of the sequence:
• The original sequence. This is stored at the fol-
lowing location:
Projects\project_name\bin_names
• A special version of the sequence (known as the
Pro Tools sequence). This is stored in a sub-
folder called Pro Tools at the following location:
Projects\project_name\bin_name\Pro Tools
The Pro Tools editor will later check out the ver-
sion of the sequence residing in the Pro Tools
folder.
Avid Interplay Access folder structure
Projectsfolder
Projectsname
Binname
Pro Toolsfolder
Chapter 4: Interpl
Defining the Check-In Destination FolderThe Avid video editing application selects a check-
in destination folder according to its Interplay
Folder settings.
The Avid video editor can use the default settings
or change them by opening the Interplay Folder
Settings dialog from the Project window.
Working With HD or SD ProjectsPro Tools 11 lets you import and play HD or SD
Avid video media. Video can be displayed either
on the desktop or output to an external video mon-
itor with Mojo DX, Nitris DX, or an Avid ap-
proved third-party video peripheral.
In an Interplay configuration, video playback can
also be offloaded onto a second, synchronized
computer with Media Composer Video Satellite or
Satellite Link. This lets you maximize processing
power on the Pro Tools system while monitoring
HD or SD video on a video satellite system. Addi-
tionally, Media Composer Video Satellite can
open and play any Avid sequence without the need
to render video effects.
For more information on working with VideoSatellite, see the Pro Tools Reference Guide.
ay Workflows for Pro Tools and Avid Video Editing Applications 17

18
Avid Interplay Sequence InterchangeUse one of the following workflows, depending on
your system configuration, to pass a sequence be-
tween an Avid video editing application and
Pro Tools, using Avid Interplay.
If the project is in an HD or SD resolution and video
will be played back natively on the Pro Tools
system:
1 The Avid video editor checks in the project to
Interplay (either for Pro Tools or as a standard
check in to Interplay).
2 The Pro Tools editor imports the sequence from
Interplay.
3 The Pro Tools editor opens the sequence with
video, displaying video either on the desktop or
to an external monitor with Mojo DX, Nitris
DX, or a supported 3rd party video peripheral.
4 The Pro Tools editor exports edited and mixed
audio tracks back to the sequence residing on
the Interplay server. (Optional: the Pro Tools
editor uses Send to Playback to send the final
sequence to the playout server.)
5 If the sequence was not sent to playback, the
video editor imports audio tracks back into the
Avid video editing application.
If the project is in an HD or SD resolution and the
Pro Tools system is connected to a Media
Composer-based Video Satellite system:
1 The Avid video editor checks in the project to
Interplay (either for Pro Tools or as a standard
check in to Interplay).
2 The Pro Tools editor imports a sequence from
Interplay.
3 The Pro Tools editor opens the sequence with a
satellite video track, and opens the full sequence
on the Video Satellite system.
Pro Tools Avid Interplay Guide
4 The Pro Tools editor exports edited and mixed
audio tracks back to the sequence residing on
the Interplay server. (Optional: the Pro Tools
editor uses Send to Playback to send the final
sequence to the playout server.)
5 If the sequence was not sent to playback, the
video editor imports audio tracks back into the
Avid video editing application. (Alternately, the
audio editor can import the audio tracks into the
Media Composer Video Satellite.)
Checking In a Sequence to InterplayThis section describes how to use an Avid video
editing application to check in a sequence to Inter-
play, in either of the following ways:
• Check in a sequence to Interplay for Pro Tools
• Check in a standard sequence to Interplay
Checking In Sequences to Interplay for Pro Tools
The Pro Tools editor can check out non-Pro Tools
sequences from Interplay. However, in many
cases, it makes sense for the Avid video editor to
check in sequences explicitly for Pro Tools to en-
sure that all video effects are rendered.
To check in a sequence to Interplay for Pro Tools:
1 Navigate to the bin containing the sequence you
want to export.
2 Do one of the following:
• Select the sequence, and choose File > Check In
to Interplay for Pro Tools.
• Right-click the sequence, and choose Check In
to Interplay for Pro Tools.
3 If you have previously set the Editor Export Set-
tings for Pro Tools for the folder, select an op-
tion from Pro Tools Video Options dialog.

Link to existing video media When this option is
selected, video is never transcoded or copied. In-
stead, the original video media is always used.
This option is useful for Video Satellite users who
wish to import a satellite track (cuts only).
If the Render video effects box is checked, all
video effects will be rendered.
Transcode video Transcodes the video to the reso-
lution specified in the Pro Tools Export Settings
and renders all effects. This option is grayed out
when the project format is set to 720p or 1080. If
the media has already been transcoded, then it
won’t be transcoded again. If only some files re-
quire transcoding, only those files will be
transcoded.
New video mixdown Exports a video mixdown
using the video transcode resolution in the Editor
Export Settings or the Pro Tools Export Settings
dialog. The option is grayed out if the Project For-
mat is 720p or 1080.
4 Click OK to check in the sequence to Interplay.
Checking In Standard Sequences to Interplay
Pro Tools lets you check out normal sequences
from Interplay. In some cases, there may be orga-
nizational or practical reasons for the Avid video
editor to check in sequences especially for use by
Pro Tools users. If you would rather check in a
standard sequence, follow this procedure:
To check in a standard Avid sequence to Interplay:
1 Navigate to the bin containing the sequence you
want to export.
Effects rendered to a local drive will be off-line on the Pro Tools system. Make sure toconfigure the Media Creation settings so thateffects are rendered to a network volume ac-cessible to any Pro Tools users.
Chapter 4: Interpl
2 Do one of the following:
• Select the sequence, and choose File > Check In
to Interplay.
• Right-click the sequence, and choose Check In
to Interplay.
3 Click OK to check in the sequence to Interplay.
After Checking In a Sequence to InterplayThe system exports the sequence from the Avid
video editing application, and then checks in the
sequence to Interplay.
When checking in a sequence to Interplay for
Pro Tools, if the Interplay folder containing the ex-
ported sequence has been configured with video
and audio settings defined in Editor Export Set-
tings for Pro Tools, those settings are applied to
the sequence. These settings can apply to either the
entire database or to one or more folders, depend-
ing on how they are configured.
If your check in destination folder is a folder for
which settings have not been defined, the system
displays the Pro Tools Export Settings dialog so
the Avid video editor can specify the settings.
When an Avid video editor checks in a sequence to
Interplay, the system chooses a destination folder
in the Interplay database based on the current Inter-
play view settings, with the default destination
folder as follows:
Projects\project_name\bin_name
See “Editor Export Settings” on page 9.
ay Workflows for Pro Tools and Avid Video Editing Applications 19

20
Audio HandlesIn Media Composer, when a sequence is checked
in for Pro Tools, two-second handles are added to
all of the audio clips. If underlying audio is avail-
able, the starts and ends of the clips can then be
trimmed out by up to two seconds, using the Trim
tool in Pro Tools.
Exported Files in InterplayThe first time the Avid video editor checks in a
particular sequence to Interplay, the system per-
forms the following operations:
• Checks in the Avid sequence to the bin_namefolder.
• Creates the new exported sequence as defined
by the export settings that have been set in the
Interplay Administration tool or the Pro Tools
Export Settings dialog.
If the sequence was checked in to Interplay for Pro
Tools, the system also does the following:
• Creates a Pro Tools folder within the bin_namefolder.
• Checks in the files for the Pro Tools editor to the
Pro Tools folder.
• Checks in a Pro Tools sequence to the Pro Tools
folder.
Location of the Avid sequence and its associatedPro Tools directory
The sequence name matches the name in
the Avid video editing application bin
Pro Tools Avid Interplay Guide
Sequence Naming Conventions when Checking In to Interplay for Pro Tools
The first time a sequence is exported for Pro Tools,
the system appends the text “_forPT_1” to the se-
quence name in the Pro Tools folder. Each subse-
quent time the sequence is exported, the system in-
crementally appends the text “_forPT_2,”
“_forPT_3,” and so on to the sequence name.
The following illustration shows the contents of
the Pro Tools directory after the first export.
Managing “_forPT_x” SequencesWhenever a new version of a sequence that has
been previously checked in to Interplay for
Pro Tools is checked in by an Avid video editor,
the text “_forPT_x” is appended incrementally to
the sequence name.
Contents of Pro Tools directory (left pane) andsequence listed in that directory (right pane)
The red dots in the GUI indicate that the sys-tem has placed a reservation on the files toprevent unauthorized deletion for a fixed pe-riod of time. For more information, see theAvid Interplay Access User’s Guide.
Red dots “_forPT_1” appended to
the sequence name

In this example, a sequence called Wild_Light, has
been checked in for Pro Tools three times. An Ed-
itor then checks out Wild_Light_forPT_1, revises
it, and checks it in for Pro Tools again, thus creat-
ing Wild_Light_forPT_4.
For organizational efficiency, if you checkout a “forPT” file and make a change, con-sider changing the name to reflect thechanges. Otherwise, use the comments fieldduring the check in to clarify which sequencethis version was created from.
Wild_Light_forPT_1
Wild_Light_forPT_2
Wild_Light_forPT_3
Wild_Light_forPT_1
Wild_Light_forPT_2
Wild_Light_forPT_3
Wild_Light_forPT_4
Video Editor
Video Editor
check out
check in
Chapter 4: Interpl
Importing a Sequence into Pro Tools from InterplayThis section describes how to locate a sequence on
the Interplay database and import it into Pro Tools.
This section assumes that you have already config-
ured the Pro Tools Import settings in the Interplay
Administration tool.
If you do not establish Pro Tools Import Settings
before importing the sequence into Pro Tools, you
can select the appropriate values in the Import Ses-
sion Data dialog during the import process.
When importing a sequence from Interplay into
Pro Tools, you can import into a new or existing
session.
Importing a Sequence into Pro Tools from within Interplay
To check out the sequence and import it into
Pro Tools from within Avid Interplay Access:
1 Launch Avid Interplay Access.
2 Navigate to the folder containing the sequence
you want to import.
3 Right-click the sequence, and choose Import to
Pro Tools.
For more information, see “ConfiguringPro Tools Import Settings” on page 9.
For more detailed information on using theAvid Interplay Access browser, see the AvidInterplay Access User’s Guide.
“forPT” sequences can be found in a subfolder(of the main sequence) called “Pro Tools.”
ay Workflows for Pro Tools and Avid Video Editing Applications 21

22
Pro Tools Avid Interplay GuideAvid Interplay Access, Import to Pro Tools
4 If Pro Tools is already running, you are
prompted by the New Session dialog to create a
new session for the imported sequence. If
Pro Tools is not already running, it automati-
cally launches and presents the New Session di-
alog.
5 Configure the New Session dialog and click
OK.
6 Specify a location to save the new session,
name it, and click Save.
7 The Import Session Data dialog opens for the
imported sequence.
8 Configure the Import Session Data dialog as de-
sired and click OK.
9 The new session opens with the imported se-
quence and is ready for audio editing.
Importing a Sequence from Interplay from within Pro Tools
To check out the sequence and import it into
Pro Tools from within Pro Tools:
1 Launch Pro Tools.
2 If you want to import the sequence into an exist-
ing session, open that session.
3 Choose File > Import > Sequence from Avid In-
terplay. The Interplay Access window appears.

4 Navigate to the folder containing the sequence
you want to import.
5 Right-click the sequence, and choose Import to
Pro Tools.
6 Click OK.
7 If the New Session dialog appears, configure it
as desired and click OK. Then navigate to the
appropriate location either on local storage or
on a dedicated workspace on the network, and
click Save.
8 The Import Session Data dialog opens for the
imported sequence.
9 Configure the Import Session Data dialog as de-
sired and click OK.
“forPT” sequences can be found in a subfolder(of the main sequence) called “Pro Tools.”
This dialog does not appear if you are import-ing a sequence into an existing session.
Import Session Data dialog
Chapter 4: Interpl
Pro Tools imports the sequence, copies any media
(if the settings require copying), and displays the
imported sequence within the Pro Tools session.
Edit the audio from the imported sequence as de-
sired.
The Import Session Data dialog does not ap-pear if you configured the Pro Tools ImportSettings in the Avid Interplay Administrator.Pro Tools automatically uses those settingsto import the sequence (see “ConfiguringPro Tools Import Settings” on page 9).
If the sequence was linked to media files onunmounted volumes, the system provides awarning and asks you to mount those volumesbefore you proceed with copying or linking tomedia.
Sequence imported from Interplay into the Timeline
ay Workflows for Pro Tools and Avid Video Editing Applications 23
24
Exporting Edited Audio Tracks to Interplay from Pro ToolsAfter you edit the audio material from the se-
quence, you can export the audio tracks back into
the sequence in Interplay.
To export audio tracks from Pro Tools, and then
check in audio tracks to Interplay:
1 In Pro Tools, select the tracks that you want to
export into the Pro Tools sequence on Interplay.
2 Select File > Export > Selected Tracks to Se-
quence in Avid Interplay.
3 In the Export Comment dialog, type a comment
and click OK.
It is recommended that you provide com-pleted audio stems rather than audio trackswith edits.
If a newer version of the sequence you havebeen working on has been checked in by anAvid video editor, Pro Tools displays the NewVersion Exists dialog. This gives you the op-tion to import the new sequence and updateyour audio as needed, continue with your ex-port to the current sequence, or export di-rectly to an updated version of the sequence.For more info, see “Exporting Edited AudioTracks to an Alternate Sequence” onpage 26.
Export Comment dialog
Pro Tools Avid Interplay Guide
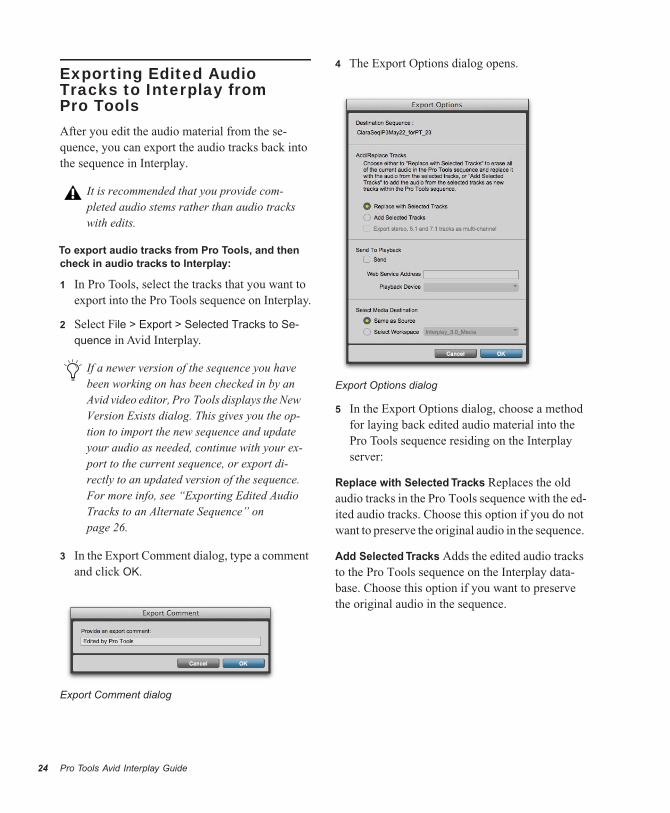
4 The Export Options dialog opens.
5 In the Export Options dialog, choose a method
for laying back edited audio material into the
Pro Tools sequence residing on the Interplay
server:
Replace with Selected Tracks Replaces the old
audio tracks in the Pro Tools sequence with the ed-
ited audio tracks. Choose this option if you do not
want to preserve the original audio in the sequence.
Add Selected Tracks Adds the edited audio tracks
to the Pro Tools sequence on the Interplay data-
base. Choose this option if you want to preserve
the original audio in the sequence.
Export Options dialog

Export Stereo, 5.1, and 7.1 Tracks as Multi-Chan-
nel This option lets you choose the format used
when exporting multi-channel audio from
Pro Tools to Interplay. Enable the option to export
multi-channel tracks as multi-channel tracks,
rather than splitting them to mono tracks. Disable
the option to export multi-channel tracks as groups
of mono tracks, one for each channel.
6 If you want to send the current sequence to a
third-party playback server, configure the set-
tings in the Send To Playback section of the Ex-
port Options dialog.
Send Lets you choose whether or not to send se-
quences to a third-party playback server.
Web Service Address Lets you specify the IP ad-
dress of the Interplay Web Service server you want
to connect to.
Playback Address Lets you choose the Transfer
Destination for the transmitted sequence, from a
list of available destinations.
This setting is disabled when exporting exclu-sively mono audio, or when attempting to ex-port an unsupported surround audio format(such as LCRS, or 7.1 SDDS).
Send to Playback requires an available Inter-play Transfer server (configured to performSend to Playback to the required destina-tions), Avid Interplay Web Services, and thePro Tools Send to Playback web service.
Send to Playback functions only when the Re-place With Selected Tracks option is enabled.
Chapter 4: Interpl
7 In the Select Media Destination section of the
Export Options dialog, choose the destination
for your new media from the following choices:
Same as Source The default behavior, this option
will save the new audio to the same Interplay
workspace that houses the first clip on the se-
quence’s timeline.
Select Workspace Gives you the choice to save
the new audio to the root directory of a different
workspace, pending permissions. Press the Select
Workspace button to open the Select Media Desti-
nation dialog, where the desired workspace can be
specified.
8 Click OK.
9 If the Pro Tools session start time is different
than the start time of the sequence you want to
export to, choose one of the following options
from the warning dialog that appears:
Cancel Stops the export operation.
Match Timecode Matches timecode values from
Pro Tools to Media Composer, and exports only
the duration of the original sequence. Any audio
outside of the sequence boundaries will be ex-
cluded.
Adjust Resets the session start time to that of the
sequence.
10 In the confirmation dialog, confirm your selec-
tion.
The sequence in the Avid Interplay database is
now ready to be checked out and imported by the
Avid video editor.
ay Workflows for Pro Tools and Avid Video Editing Applications 25

26
Send To Playback Error MessagesWhen using the Send To Playback feature, special
error messages are displayed when problems occur
that make sending to the playback server impossi-
ble. If one of these error messages is displayed, ref-
erence the error explanation to find the issue.
Offline Media There is offline media in the se-
quence.
Unrendered Effects There are unrendered effects
in the sequence.
Tape ID The sequence is missing a Tape ID. Enter
the correct Tape ID, or click Cancel to abort Send
To Playback.
Invalid Tape ID The Tape ID for the sequence is in-
valid. Press OK to open the Tape ID option, where
you can enter the correct Tape ID.
Playback Server Could Not Connect
The playback server is unavailable, due to not be-
ing started, or being blocked by a network firewall.
Invalid WebService Address or Connection
The Web Service IP address that has been entered
is unavailable. The Interplay connection may be
down, the IP address may be invalid, or the Web
Service may be offline.
To test your connection to the playbackserver, use an FTP client or command-lineFTP terminal program to attempt to list therequired files. If further assistance is neces-sary, contact your Interplay network admin-istrator.
Pro Tools Avid Interplay Guide
Exporting Edited Audio Tracks to an Alternate SequenceIn many post-production workflows, it’s common
for changes to be made to a sequence by the Avid
video editor while the Pro Tools editor is still
working on audio sourced from the previous ver-
sion.
In these cases, when the Pro Tools editor goes to
export audio tracks back to Interplay, Pro Tools
notifies the user that a new, alternate version of the
sequence exists, and offers several ways to handle
the issue.
To export edited audio tracks to Interplay when a
newer version of the sequence exists on interplay:
1 In Pro Tools, select the tracks that you want to
export into the new version of the Pro Tools se-
quence on Interplay.
2 Select File > Export > Selected Tracks to Se-
quence in Avid Interplay.
3 Choose one of the following options:
Interplay Folder Settings dialog

Import Latest Version into Current Session Can-
cels the current export action, and imports the new
sequence’s data into the current Pro Tools session.
This option is selected by default.
Export Selected Audio Tracks to Original Se-
quence Exports the selected audio tracks to the
original version of the sequence on Interplay. That
is the sequence that the Pro Tools session is cur-
rently associated with.
Export Selected Audio Tracks to Alternate Se-
quence Lets you choose an alternate version of the
sequence on Interplay to export to.
This option is most useful in situations wheretimeline-related elements have been changedin the sequence. In these cases, it’s importantto import the new sequence into Pro Toolsand make any necessary audio edits beforeexporting back to Interplay.
This option is most useful when multiple revi-sions of a sequence are being intentionallyretained and worked on separately.
This option is most useful in situations wherenon-sync-related elements have beenchanged, such as titles or color correction. Ifthe timing or order of elements in the se-quence have been changed, exporting audioback to the alternate sequence could causesync problems. In these cases, import the newsequence into Pro Tools and make any neces-sary audio edits before exporting back toInterplay.
Chapter 4: Interpl
4 Pro Tools will open the Select Alternate Se-
quence dialog, which displays all related ver-
sions of the current sequence. The newest
version is selected by default.
Do one of the following:
• If you want to export your audio to the newest
alternate version of the sequence, click OK.
• If you want to export your audio to an earlier al-
ternate version of the sequence, select it, and
press OK.
In cases where another Pro Tools editor onyour Interplay system has checked out theoriginal version of the sequence and has ex-ported edited tracks back to Interplay,Pro Tools will still bring up the New VersionExists dialog when you try to check in newaudio. However, the Export Tracks to Alter-nate Sequence option will be grayed out.
Select Alternate Sequence dialog
You can only export to one sequence at atime.
The current version of the sequence is shownin the list for reference, but is grayed out. Ifyou wish to export to the current version ofthe sequence, choose the Export Selected Au-dio Tracks to Original Sequence option in theNew Version Exists dialog.
ay Workflows for Pro Tools and Avid Video Editing Applications 27

28
Importing Pro Tools Audio Files Back into the Avid Video Editing ApplicationAfter you have checked out the completed audio
stems to the Pro Tools sequence on the Interplay
server, the Avid video editor imports the sequence
back into the Avid video editing application.
To import the sequence back into the Avid video
editing application:
1 In the Avid video editing application, open the
Interplay window and navigate to the location
of the checked in Pro Tools sequence.
2 Drag the sequence into the bin.
The Avid video editing application checks out the
sequence and imports it and its related files into the
bin.
3 The Avid video editor can do one of the
following:
• Add the new audio tracks into the original
sequence.
• Work with the imported sequence.
Depending on edits made in Pro Tools, youmight see several audio files with names con-taining the prefix “Sample accurate edit.”For more information, see “Frame-Rate Ac-curate Video Editing and Sample-Rate Accu-rate Audio Editing” on page 29.
Pro Tools Avid Interplay Guide
In this example, the Pro Tools audio tracks are
added into the original sequence.
4 Load the imported sequence into the Source
monitor.
5 Add the audio into the original sequence using
standard editing techniques.
6 Now the video editor can make any adjustments
to the sequence and do the following:
• Create a digital cut.
• Perform a Send to Playout operation.
• Check in the sequence to Interplay for Pro Tools
if the Pro Tools editor needs to work on the se-
quence again.
If you plan to check in the sequence to Inter-play for Pro Tools again, it may be simpler toimport the audio into the original sequence.Every time you export a sequence forPro Tools, the system appends the text“_forPT_x,” where x is the number of timesthe sequence has been exported. It can be-come confusing if several similar text stringsare appended to the name.
For more information, see the documentation(PDF or Help file) for your Avid video edit-ing application.

Frame-Rate Accurate Video Editing and Sample-Rate Accurate Audio EditingAfter a sequence has been exported back into Inter-
play from Pro Tools, a number of additional media
files appear in the Interplay window and in the bin.
Some have names containing the prefix Sample ac-curate edit. These are the additional media files
that Pro Tools creates to make sure that the Avid
video editing application receives frame-accurate
audio. Sample-accurate edit media files are visible
if you zoom in on portions of the imported audio in
the Timeline.
Avid video editing applications edit with frame ac-
curacy. This means that in a 30-fps project, the
Avid video editor can edit at 30 different locations
for every one second of video. Pro Tools edits with
sample rate accuracy. In a 48 kHz session, there
are potentially 48,000 locations to edit for every
second of audio.
When Pro Tools exports a sequence, it must ensure
that the audio media files line up on frame bound-
aries. To do this, it might have to split an existing
audio clip into three clips. For example, the fol-
lowing illustration shows a 5-frame video clip and
a corresponding audio clip. In Pro Tools, the audio
clips might not line up on video frame boundaries.
The original audio clip does not line up on video frameboundaries
1 Pro Tools
audio clip
5 frame
video clip
Chapter 4: Interpl
In order to export frame accurate audio clips,
Pro Tools splits the audio media on frame bound-
aries and fills any gaps with silence. The following
illustration shows the resulting audio clips that are
exported to the Avid video editing application.
To cut down on the number of sample accurate edit
files, the Pro Tools editor can perform a Bounce to
disk for each track (or a bus-record to an audio
track) rather than exporting tracks that contain all
of the audio edits.
Exported audio clips line up on video frameboundaries
3 exported
audio clips
5 frame
video clip
New audio clips with
padded silence
ay W
orkflows for Pro Too ls and Avid Video Editing Applications 29
30
Exporting a Sequence from Avid Interplay Access as an AAF Sequence to Any VolumeThis section describes how to export a sequence re-
siding on the Interplay server as an AAF file, and
save it to any volume.
This is especially useful if the Avid video editor
has checked in an updated version of a sequence
you are already working on in Pro Tools, and you
want to use a third-party re-conform tool to recon-
cile the edits between the different versions of that
sequence within your session.
To export a checked-in sequence as an AAF
sequence:
1 Launch the Avid ISIS Client Manager and con-
nect to the Avid ISIS Server System Directory
that is configured for use with the Avid Inter-
play server.
2 Launch Avid Interplay Access.
3 Navigate to the folder containing the sequence
that represents the same version of the sequence
you have already started working with in
Pro Tools.
4 Right-click this original sequence, and choose
Export Selected Sequence as AAF.
5 Navigate to a location on a volume where you
want to save the sequence. This should be a vol-
ume and location easily accessible from your
Pro Tools system. Click OK.
6 Navigate to the Access folder containing the
version of the same sequence that was most re-
cently checked in by the video editor.
7 Right-click this updated sequence, and choose
Export Selected Sequence as AAF.
8 Navigate to the same location where you saved
the original sequence, and click OK.
Pro Tools Avid Interplay Guide
9 Use a third-party post-production re-conform
tool to re-conform your Pro Tools session to the
new picture edit.
Version Control Between the Avid Video Editor and Pro Tools Editor
The First Round Trip Check InThe first time an Avid video editor checks in a se-
quence to Interplay, the following occurs:
• The system checks in the sequence to the corre-
sponding folder in Interplay (by default, the
Project\project_name\bin_name folder).
• If the video editor is checking in a “for
Pro Tools” sequence, the system creates a
Pro Tools folder in the same directory and
checks in the following file to that folder:
• Sequence_name_forPT_1
The Pro Tools editor checks out the sequence
called Sequence_name (or
Sequence_name_forPT_x, if the Avid video editor
checked in the sequence “for Pro Tools”).
After the Pro Tools editor completes the audio ed-
iting, they export selected tracks back into the se-
quence at the same location.
Pro Tools can check out non-Pro Tools se-quences from Interplay. However, in manycases, it makes sense for the Avid video editorto check in sequences explicitly for Pro Tools,to ensure that HD video is transcoded, andthat all video effects are rendered.

The following illustration shows the sequence in
Interplay Access. The sequence name does not
change when checked in to Interplay.
The following illustrations depict the sequence in
Avid Interplay Access after the Pro Tools editor
has done the following:
• Imported the Pro Tools sequence to a session in-
side Pro Tools
• Edited and mixed audio
• Exported selected tracks back to the Pro Tools
sequence on Interplay
Two versions of the sequence are now available.
Interplay Access folder list (left) and sequence (right)
Interplay Access folder list (left) and sequence (right)
Sequencechecked in from
Avidvideo editor
maintainsoriginal name
Main project folder
Sequence forPro Tools
editor
Pro Tools folder
Chapter 4: Interpl
To open the History window for a file in Interplay
Access:
Right-click the sequence, and choose Version
Control > History.
At this point, the Avid video editor can check out
sequence_name_forPT_1 and either edit the se-
quence directly or cut the audio back into the orig-
inal sequence. For more information, see “Import-
ing Pro Tools Audio Files Back into the Avid
Video Editing Application” on page 28.
Subsequent Check Ins from the Avid Video Editor and the Pro Tools EditorEach time the Avid video editor checks in a se-
quence to Interplay for Pro Tools, the following
occurs:
• The sequence_name sequence in the corre-
sponding bin folder in Interplay is updated with
a new version. The file name does not change.
• If the video editor is checking in a “for
Pro Tools” sequence, the system creates a new
file for the Pro Tools folder and changes the
_forPT_x portion of the name.
In the following example, the Avid video editor
does the following:
1 Checks out the sequence called se-quence_name_forPT_1, and cuts the new audio
into the original sequence.
2 Checks in the version of the sequence with the
updated audio files to Interplay without making
any additional changes.
Version History dialog
ay Workflows for Pro Tools and Avid Video Editing Applications 31

32
3 Makes additional changes to the video and
checks in the sequence back to Interplay so that
the Pro Tools editor can make additional audio
changes.
The following illustration shows the exported
video sequence in Interplay Access along with a
version history of the sequence. There are now
three versions of the sequence in Interplay.
The following illustration shows the sequences in
the Pro Tools folder after the sequence has been
checked in three times by the Avid video editor.
The illustration also shows the version history of
one of the sequences.
Version History dialog
Version history of one sequence
Two versions of the version
1 sequence checked in by
the Pro Tools editor
Three Pro Tools sequences,
one for each check in from
the Avid video editor
Pro Tools Avid Interplay Guide
Keeping Track of the VersionsAfter numerous check ins and check outs (even
with one sequence), it can be complicated to keep
track of the individual files in the sequence folders.
It is important that the Avid and Pro Tools users
communicate with each other regarding when files
are ready and which file should be worked on next.
Most of the time, you will want to work on the lat-
est version.
In order to speed up communication, you can use
the e-mail Messenger service available in Interplay
Access.
To send e-mail notification about a sequence:
1 Launch Avid Interplay Access, and navigate to
the sequence for which you want to send a noti-
fication.
2 Right-click the sequence and choose Messen-
ger > Send Link To.
The e-mail notification window appears with a link
to the sequence.
3 Fill in the information and click Send. The re-
cipient receives an e-mail message containing a
link to the file and any additional information.
Interplay Administrator can be used to en-able e-mail notification for Interplay (and setup individual users to receive these notifica-tions). For details, see the Avid Interplay En-gine and Avid Interplay Access Administra-tion Guide.
Messenger window

Avid2001 Junipero Serra Boulevard Daly City, CA 94014-3886 USA
Technical Support (USA)Visit the Online Support Center at www.avid.com/support
Product InformationFor company and product information, visit us on the web at www.avid.com