private image creation guide - docs.prod-cloud-ocb.orange
TRANSCRIPT

Bare Metal Server
Private Image Creation Guide
Date 2019-12-30

Contents
1 Overview....................................................................................................................................1
2 Preparing the Environment...................................................................................................6
3 Creating a Linux Image..........................................................................................................93.1 Preparing Required Hardware and Software................................................................................................................. 93.2 Creating a VM........................................................................................................................................................................ 113.3 Installing an OS on the VM............................................................................................................................................... 163.3.1 Overview...............................................................................................................................................................................163.3.2 OS Partitioning Recommendations............................................................................................................................. 173.3.3 SUSE 11 SP4........................................................................................................................................................................ 193.3.4 Ubuntu 16.04, Ubuntu 14.04, and Debian 8.6.........................................................................................................223.3.5 SUSE 12................................................................................................................................................................................. 273.3.6 CentOS 7.4 for ARM......................................................................................................................................................... 303.4 Modifying the Boot File (UEFI Boot Mode)................................................................................................................. 343.5 Configuring the VM Environment................................................................................................................................... 363.6 Installing Cloud-Init..............................................................................................................................................................433.6.1 Overview...............................................................................................................................................................................433.6.2 SUSE, Red Hat, CentOS, Oracle Linux, Ubuntu, Debian, and EulerOS 2.8 ARM..........................................433.6.3 EulerOS 2.2 and EulerOS 2.3......................................................................................................................................... 473.7 Configuring Cloud-Init.........................................................................................................................................................483.7.1 Configuring Cloud-Init 0.7.5.......................................................................................................................................... 483.7.2 Configuring Cloud-Init 0.7.6.......................................................................................................................................... 503.7.3 Configuring Cloud-Init 0.7.9.......................................................................................................................................... 513.7.4 Configuring Cloud-Init 17.1........................................................................................................................................... 523.7.5 Configuring Cloud-Init 18.2........................................................................................................................................... 543.8 Checking the Cloud-Init Status........................................................................................................................................ 553.8.1 SUSE 11 SP4........................................................................................................................................................................ 563.8.2 SUSE 12 SP1........................................................................................................................................................................ 563.8.3 SUSE 12 SP2, SUSE 12 SP3, Oracle Linux 7, Red Hat 7, CentOS 7................................................................... 573.8.4 EulerOS................................................................................................................................................................................. 583.8.5 Red Hat 6, CentOS 6, and Oracle Linux 6.................................................................................................................583.8.6 Ubuntu 16.04...................................................................................................................................................................... 593.8.7 Ubuntu 14.04...................................................................................................................................................................... 59
Bare Metal ServerPrivate Image Creation Guide Contents
2019-12-30 ii

3.9 Modifying the Hardware Device Driver That Boots the OS................................................................................... 603.10 (Optional) Installing the bms-network-config Software Package.................................................................... 673.11 (Optional) Installing the SDI Driver.............................................................................................................................693.12 (Optional) Installing the Hi1822 NIC Driver............................................................................................................. 703.13 (Optional) Installing the IB NIC Driver....................................................................................................................... 713.14 (Optional) Installing the V5 and TaiShan Server Driver....................................................................................... 733.14.1 Preparations...................................................................................................................................................................... 733.14.2 (Optional) Installing the V5 Server Onboard NIC Driver.................................................................................. 743.14.3 (Optional) Installing the mpt3 Driver......................................................................................................................743.14.4 (Optional) Installing the megaraid_sas Driver..................................................................................................... 753.15 (Optional) Installing the UltraPath.............................................................................................................................. 763.16 Performing Security Configurations............................................................................................................................. 763.17 Configuring Remote Login to a BMS...........................................................................................................................803.17.1 Oracle Linux 7.3, Oracle Linux 7.4, Red Hat 7, CentOS 7.2, CentOS 7.4, CentOS 7.5, and CentOS 7.6(x86)................................................................................................................................................................................................. 803.17.2 Oracle Linux 6, Red Hat 6, and CentOS 6 (x86).................................................................................................. 813.17.3 SUSE 11 SP4 (x86).......................................................................................................................................................... 813.17.4 CentOS 7 (ARM)..............................................................................................................................................................823.17.5 SUSE 12, CentOS 7.3, EulerOS, and Oracle Linux 7.2 (x86)............................................................................. 823.17.6 EulerOS (ARM)................................................................................................................................................................ 823.17.7 Ubuntu 16.04 (x86)........................................................................................................................................................ 833.17.8 Ubuntu 16.04 (ARM)..................................................................................................................................................... 833.17.9 Ubuntu 14.04 and Debian (x86)................................................................................................................................ 833.18 Configuring the Root Partition to Automatically Expand Disk Capacity.........................................................843.18.1 Scenarios............................................................................................................................................................................ 843.18.2 CentOS 6 and Red Hat 6.............................................................................................................................................. 843.18.3 CentOS 7, Red Hat 7, and Oracle Linux 7.............................................................................................................. 853.18.4 CentOS ARM or EulerOS ARM....................................................................................................................................853.18.5 EulerOS............................................................................................................................................................................... 863.18.6 SUSE.....................................................................................................................................................................................863.18.7 Debian................................................................................................................................................................................. 873.19 Deleting Files....................................................................................................................................................................... 87
4 Creating a Windows Image................................................................................................ 894.1 Preparing Required Hardware and Software.............................................................................................................. 894.2 Installing the V5 Server Drivers....................................................................................................................................... 914.2.1 Preparations........................................................................................................................................................................ 914.2.2 Installing the Chipset Driver.......................................................................................................................................... 924.2.3 (Optional) Installing the V5 Server Onboard NIC Driver.................................................................................... 954.2.4 (Optional) Installing the 3408 or 3508 RAID Card Driver...................................................................................964.2.5 Generate the ISO Image................................................................................................................................................. 964.3 Creating a VM........................................................................................................................................................................ 974.4 Configuring the VM Environment.................................................................................................................................102
Bare Metal ServerPrivate Image Creation Guide Contents
2019-12-30 iii

4.5 Installing Cloudbase-Init.................................................................................................................................................. 1034.5.1 Windows Server 2012 R2 and Windows Server 2016........................................................................................ 1034.5.2 Windows Server 1709.................................................................................................................................................... 1064.6 Installing the bms-network-config Software Package.......................................................................................... 1084.6.1 Windows Server 2012 R2 and Windows Server 2016........................................................................................ 1084.6.2 Windows Server 1709.................................................................................................................................................... 1094.7 (Optional) Installing the SDI Driver.............................................................................................................................1104.8 Setting Time Zone Calibration....................................................................................................................................... 1134.9 Setting Virtual Memory.................................................................................................................................................... 1144.10 (Optional) Enabling Automatic Windows Update............................................................................................... 1154.11 Configuring the SID......................................................................................................................................................... 116
5 Stopping the VM and Obtaining the Image................................................................. 119
6 Converting the Image Format..........................................................................................120
7 FAQ......................................................................................................................................... 1217.1 How Can I Handle the Issue That the Packets from the VLAN Subinterface of bond0 of a Linux BMSUse the MAC Address of bond0 as the Source MAC Address?.................................................................................. 1217.2 How Can I Handle the IP Link Interruption Caused by the Incorrect Bond Mode OccasionallyConfigured Using the wicked Module of SUSE 12 SP1?.............................................................................................. 1227.3 How Can I Set the Mode of Adjusting the BMS CPU Frequency?..................................................................... 1227.4 What Can I Do If Cloudbase-Init Is Stopped After a Windows BMS Is Provisioned?..................................1237.5 How Can I Activate a Windows BMS?.........................................................................................................................123
A Appendix............................................................................................................................... 125A.1 Configuring the SSH Service.......................................................................................................................................... 125A.2 Configuring the vsftpd Service...................................................................................................................................... 125A.3 Configuring the VNC Service..........................................................................................................................................125A.4 Mappings Between BMS Flavors and Drivers.......................................................................................................... 127
B Change History.................................................................................................................... 130
Bare Metal ServerPrivate Image Creation Guide Contents
2019-12-30 iv

1 Overview
If you want to use a private BMS image, you can use an external image file tocreate one. This document describes the private image creation procedure(including creating a VM and installing the OS, software, and drivers on the VM)and uses multiple OSs as examples to provide instructions for you to create aprivate image. You can also install software as needed to customize your privateimage.
After you have created a private image, you need to register it on the cloudplatform. For details, see Bare Metal Server User Guide. After successfulregistration, you can select this private image when applying for a BMS.
Image Creation ProcessFigure 1-1 shows the image creation process.
Bare Metal ServerPrivate Image Creation Guide 1 Overview
2019-12-30 1
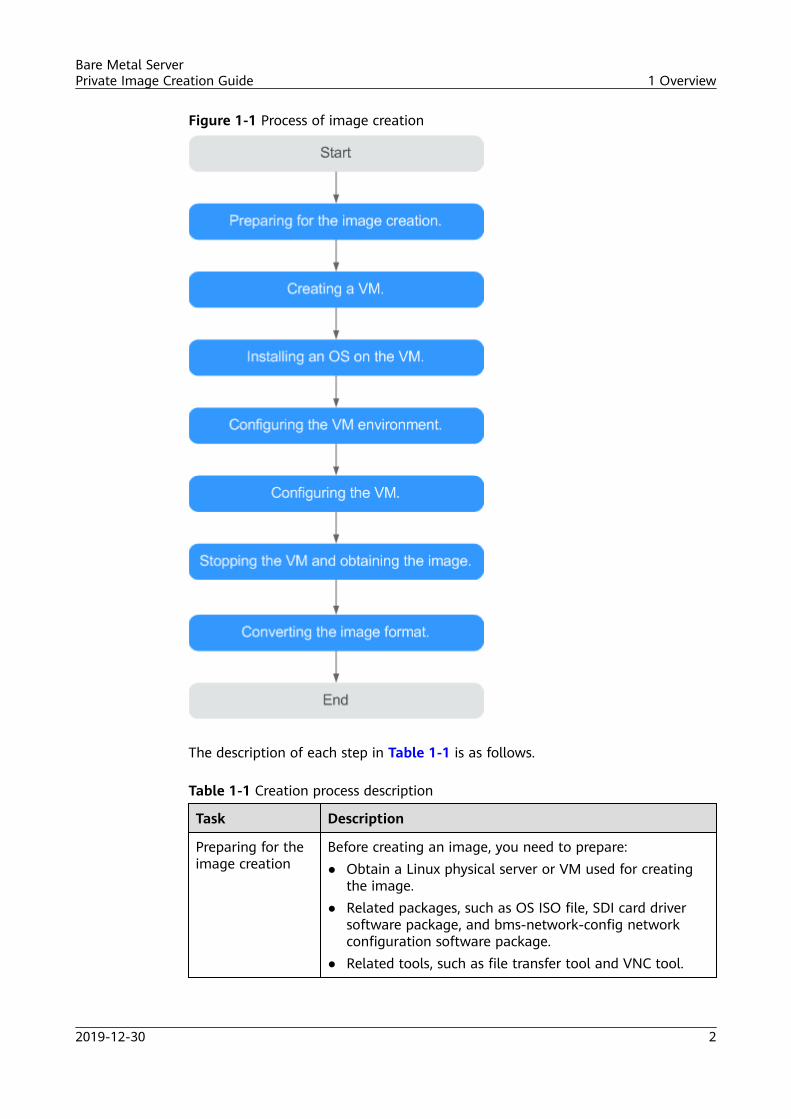
Figure 1-1 Process of image creation
The description of each step in Table 1-1 is as follows.
Table 1-1 Creation process description
Task Description
Preparing for theimage creation
Before creating an image, you need to prepare:● Obtain a Linux physical server or VM used for creating
the image.● Related packages, such as OS ISO file, SDI card driver
software package, and bms-network-config networkconfiguration software package.
● Related tools, such as file transfer tool and VNC tool.
Bare Metal ServerPrivate Image Creation Guide 1 Overview
2019-12-30 2
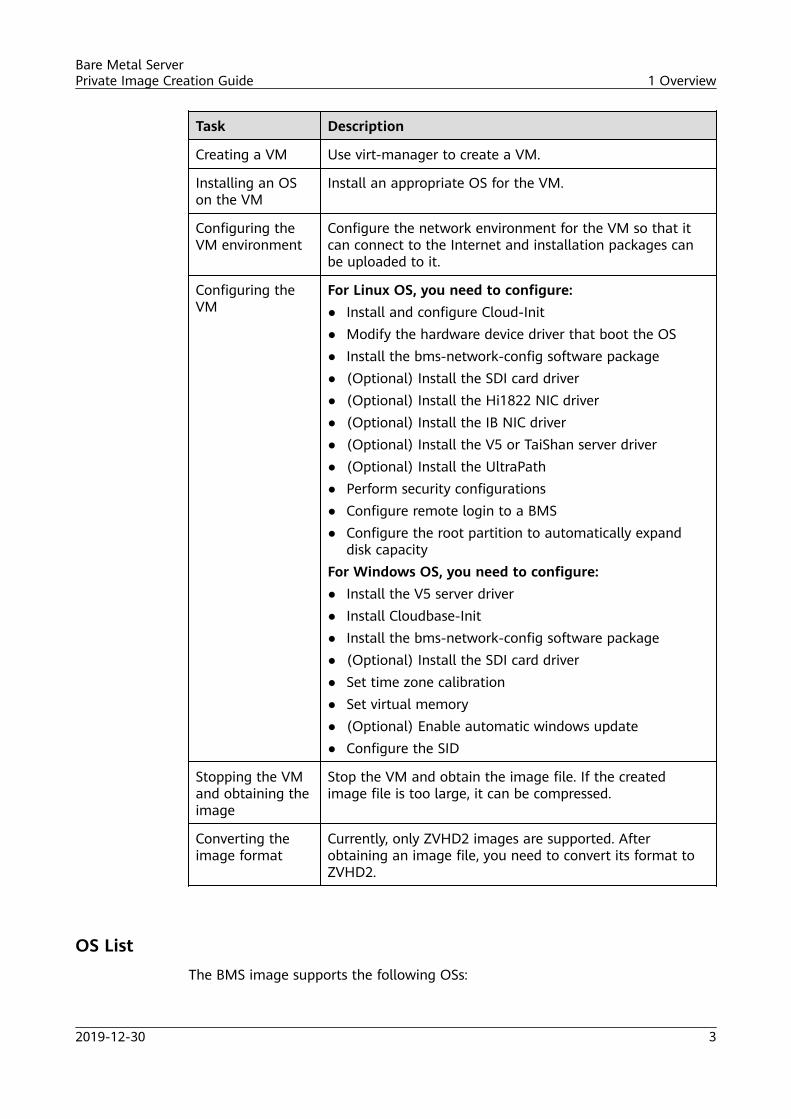
Task Description
Creating a VM Use virt-manager to create a VM.
Installing an OSon the VM
Install an appropriate OS for the VM.
Configuring theVM environment
Configure the network environment for the VM so that itcan connect to the Internet and installation packages canbe uploaded to it.
Configuring theVM
For Linux OS, you need to configure:● Install and configure Cloud-Init● Modify the hardware device driver that boot the OS● Install the bms-network-config software package● (Optional) Install the SDI card driver● (Optional) Install the Hi1822 NIC driver● (Optional) Install the IB NIC driver● (Optional) Install the V5 or TaiShan server driver● (Optional) Install the UltraPath● Perform security configurations● Configure remote login to a BMS● Configure the root partition to automatically expand
disk capacityFor Windows OS, you need to configure:● Install the V5 server driver● Install Cloudbase-Init● Install the bms-network-config software package● (Optional) Install the SDI card driver● Set time zone calibration● Set virtual memory● (Optional) Enable automatic windows update● Configure the SID
Stopping the VMand obtaining theimage
Stop the VM and obtain the image file. If the createdimage file is too large, it can be compressed.
Converting theimage format
Currently, only ZVHD2 images are supported. Afterobtaining an image file, you need to convert its format toZVHD2.
OS ListThe BMS image supports the following OSs:
Bare Metal ServerPrivate Image Creation Guide 1 Overview
2019-12-30 3
Table 1-2 Supported OSs (x86)
OS Type OS Version Kernel Version
RedHat Red Hat Linux Enterprise6.5 64-bit
2.6.32-431.el6.x86_64
Red Hat Linux Enterprise6.7 64-bit
2.6.32-573.el6.x86_64
Red Hat Linux Enterprise6.8 64-bit
2.6.32-642.el6.x86_64
Red Hat Linux Enterprise6.9 64-bit
2.6.32-696.e16.x86_64
Red Hat Linux Enterprise7.2 64-bit
3.10.0-327.e17.x86_64
Red Hat Linux Enterprise7.3 64-bit
3.10.0-514.el7.x86_64
Red Hat Linux Enterprise7.4 64-bit
3.10.0-693.e17.x86_64
Red Hat Linux Enterprise7.5 64-bit
3.10.0-862.el7.x86_64
SUSE SUSE Linux EnterpriseServer 11 SP4 64-bit
3.0.101-63-default
SUSE Linux EnterpriseServer 12 SP1 64-bit
3.12.49-11-default
SUSE Linux EnterpriseServer 12 SP2 64-bit
4.4.21-69-default
SUSE Linux EnterpriseServer 12 SP3 64-bit
4.4.73-5-default
Oracle Linux Oracle Linux Serverrelease 6.8 64-bit
4.1.12-37.4.1.e16uek.x86_64
Oracle Linux Serverrelease 6.9 64-bit
4.1.12-61.1.28.e16uek.x86_64
Oracle Linux Serverrelease 7.2 64-bit
3.10.0-327.e17.x86_64
Oracle Linux Serverrelease 7.3 64-bit
3.10.0-327.el7.x86_64 or4.1.12-61.1.18.e17uek.x86_64
Oracle Linux Serverrelease 7.4 64-bit
4.1.12-94.3.9.e17uek.x86_64
EulerOS EulerOS 2.2 64-bit 3.10.0-327.44.58.35.x86_64
EulerOS 2.3 64-bit 3.10.0-514.44.5.10.h142.x86_64
Bare Metal ServerPrivate Image Creation Guide 1 Overview
2019-12-30 4
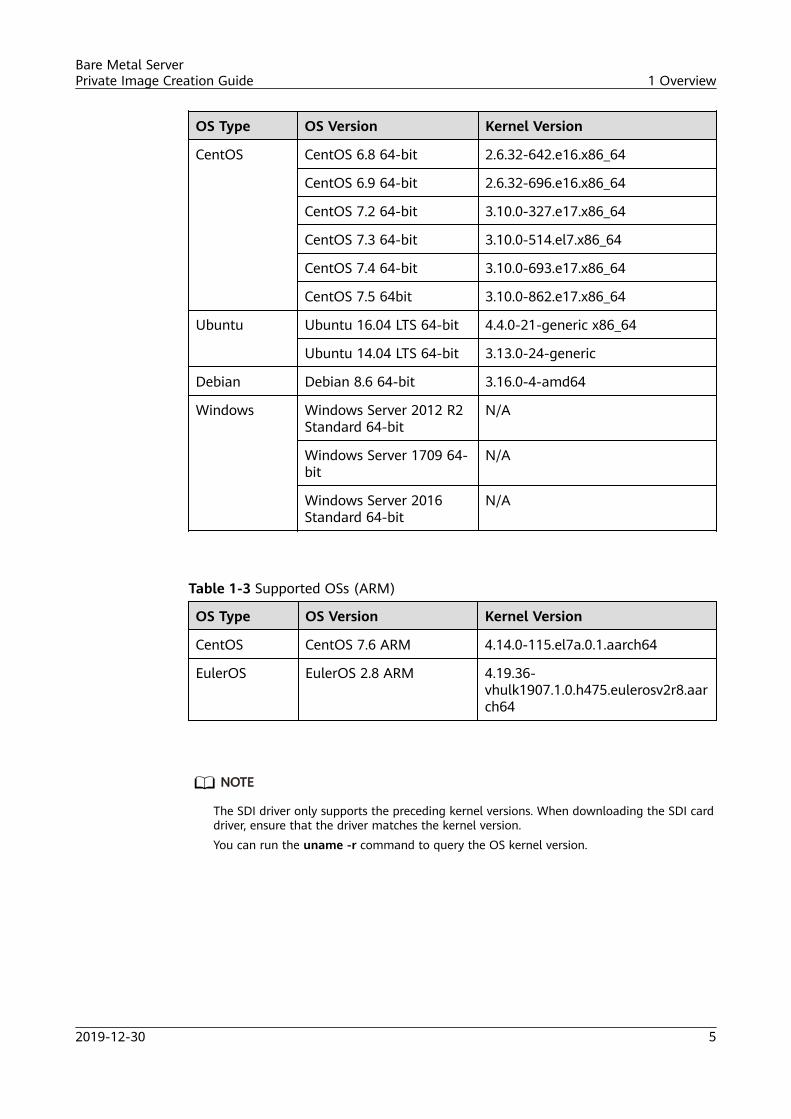
OS Type OS Version Kernel Version
CentOS CentOS 6.8 64-bit 2.6.32-642.e16.x86_64
CentOS 6.9 64-bit 2.6.32-696.e16.x86_64
CentOS 7.2 64-bit 3.10.0-327.e17.x86_64
CentOS 7.3 64-bit 3.10.0-514.el7.x86_64
CentOS 7.4 64-bit 3.10.0-693.e17.x86_64
CentOS 7.5 64bit 3.10.0-862.e17.x86_64
Ubuntu Ubuntu 16.04 LTS 64-bit 4.4.0-21-generic x86_64
Ubuntu 14.04 LTS 64-bit 3.13.0-24-generic
Debian Debian 8.6 64-bit 3.16.0-4-amd64
Windows Windows Server 2012 R2Standard 64-bit
N/A
Windows Server 1709 64-bit
N/A
Windows Server 2016Standard 64-bit
N/A
Table 1-3 Supported OSs (ARM)
OS Type OS Version Kernel Version
CentOS CentOS 7.6 ARM 4.14.0-115.el7a.0.1.aarch64
EulerOS EulerOS 2.8 ARM 4.19.36-vhulk1907.1.0.h475.eulerosv2r8.aarch64
NO TE
The SDI driver only supports the preceding kernel versions. When downloading the SDI carddriver, ensure that the driver matches the kernel version.You can run the uname -r command to query the OS kernel version.
Bare Metal ServerPrivate Image Creation Guide 1 Overview
2019-12-30 5
2 Preparing the Environment
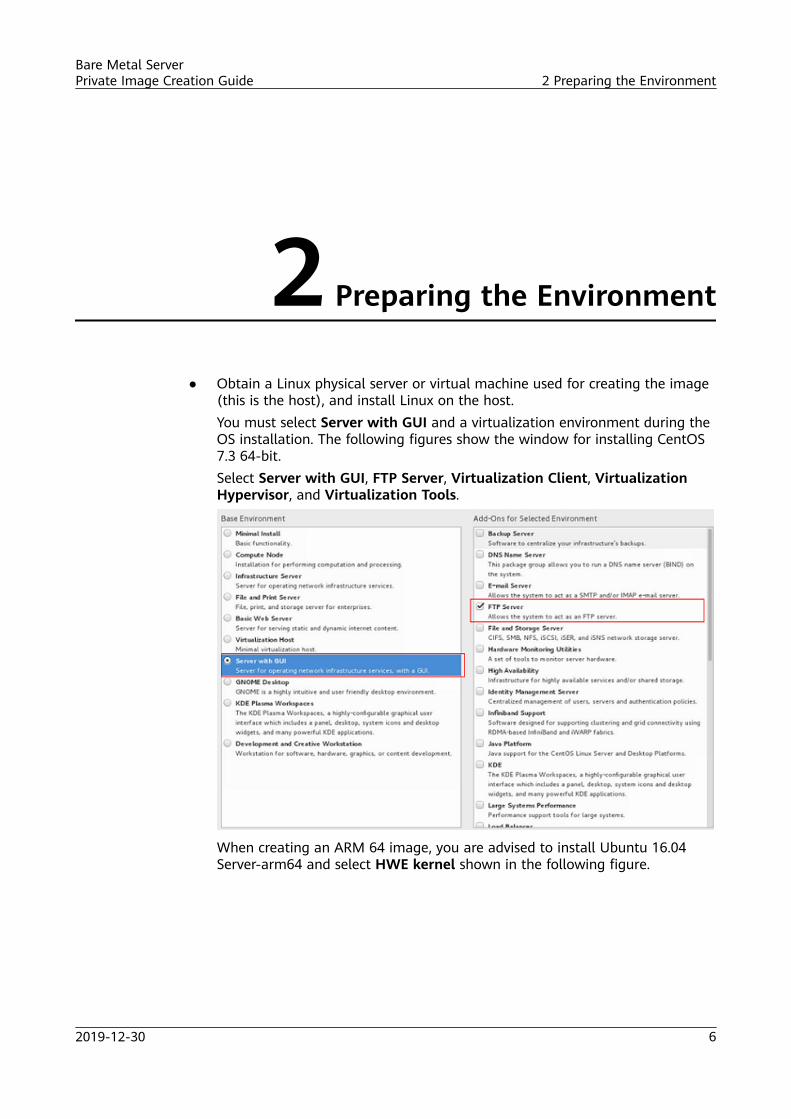
● Obtain a Linux physical server or virtual machine used for creating the image(this is the host), and install Linux on the host.You must select Server with GUI and a virtualization environment during theOS installation. The following figures show the window for installing CentOS7.3 64-bit.Select Server with GUI, FTP Server, Virtualization Client, VirtualizationHypervisor, and Virtualization Tools.
When creating an ARM 64 image, you are advised to install Ubuntu 16.04Server-arm64 and select HWE kernel shown in the following figure.
Bare Metal ServerPrivate Image Creation Guide 2 Preparing the Environment
2019-12-30 6

After the host OS is installed, run the following command to install theubuntu desktop and virtualization software, and restart the OS to make theinstallation take effect:
sudo apt-get update
sudo apt-get dist-upgrade
sudo apt-get install ubuntu-desktop
sudo apt-get install qemu
sudo apt-get install qemu-kvm
sudo apt-get install libvirt0
sudo apt-get install virt-manager
sudo apt-get install qemu-efi
● Configure the host network and remote connection.
a. The host must connect to the Internet so that you can install softwareonline on VMs through the host.
b. To connect to the host from a Windows PC, configure the remoteconnection.
● Enable the vsftpd, sshd, and VNC services and configure the services. Fordetails, see chapter Configuring the SSH Service, Configuring the vsftpdService and Configuring the VNC Service.
This enables you to remotely transmit software packages, ISO image files, andscripts to the host, and remotely connect to the host.
● For CentOS 7.x, run the following commands to disable the firewall so thatyou can log in to the host using VNC Viewer:
systemctl disable firewalld.service
systemctl stop firewalld.service
● Upload required files to the host.
After the configuration is complete, use the vsftp service to upload the filesrequired by VMs to the host. After this, the host environment configuration iscomplete. If you use Xftp to upload the files, click the icon shown in the redbox in the following figure after you log in to the host through Xshell usingSSH.
Bare Metal ServerPrivate Image Creation Guide 2 Preparing the Environment
2019-12-30 7

Bare Metal ServerPrivate Image Creation Guide 2 Preparing the Environment
2019-12-30 8

3 Creating a Linux Image
3.1 Preparing Required Hardware and SoftwareObtain a Linux physical server used for creating the image. This is the host.(prepare a x86 server for creating a x86 image and an ARM server for creating anARM image)
The host must have the followings installed:
● vsftpd service
● sshd service
● VNC service
● virt-manager tool
● KVM virtualization software
NO TE
You can download virt-manager from its official website or select it from the OS installationpackage.
Table 3-1 lists the required software. You need to confirm the drivers required forthe corresponding models and operating systems based on Mappings BetweenBMS Flavors and Drivers.
Table 3-1 Required software
Software Description How to Obtain
Host ISOimage
CentOS 7.x You are advised to obtain it fromthe official website.
OS ISO file ISO file used for creatingan image. The OSssupported by BMS imageare shown in Table 1-2and Table 1-3.
You are advised to obtain the ISOfile from the OS official website.
Bare Metal ServerPrivate Image Creation Guide 3 Creating a Linux Image
2019-12-30 9
Software Description How to Obtain
SDI card driversoftwarepackage
This plug-in is installedon the image so thatBMSs can have EVS disksattached and can startfrom EVS disks, whichenables quick BMSprovisioning.
https://support.huawei.com/enterprise/en/software/250607156-ESW2000158122
bms-network-config networkconfigurationsoftwarepackage
Used for automaticnetwork configuration
The software package is stored inthe OBS bucket. Contact theadministrator to obtain the pathof the OBS bucket.
Cloud-Init It is installed online.Ensure that the serverused for creating animage can connect to thenetwork.
You are advised to obtain it fromthe official website.
Hi1822 NICdriver
It is mandatory if theBMS uses the Hi1822NIC.
https://support.huawei.com/enterprise/en/software/250631875-ESW2000134264
IB NIC driver 100 Gbit/s Infiniband NICdriver
Log in at http://www.mellanox.com/page/products_dyn?product_family=26&mtag=linux_sw_drivers and click Download.
V5 serverdrivers
Drivers of the onboardNICs, RAID controllercards, and disks of a V5server
Log in at https://support.huawei.com/enterprise/en/servers/fusionserver-idriver-pid-21588909/software, locatethe latest version, and downloadthe driver package matching theimage OS.
TaiShan serverdriver
Drivers of NICs and RAIDcontroller cards
Log in at https://support.huawei.com/enterprise/en/servers/fusionserver-idriver-pid-21588909/software, locatethe latest version, select TaiShan,and download the driver packagematching the image OS.
Bare Metal ServerPrivate Image Creation Guide 3 Creating a Linux Image
2019-12-30 10
Software Description How to Obtain
UltraPath Multi-path softwarerequired for mountingthe FC storage to theHBA card
Log in at https://support.huawei.com/enterprise/en/cloud-storage/ultrapath-pid-8576127/softwareand obtain the required softwareand documents.
NO TE
During OS installation, ensure that you only select required software packages. If you installa large amount of software, the created image file will be too large.
The memory of the BMS must be at least 150 MB larger than that of the created image.Ensure that the created image meets this requirement.
Table 3-2 lists the required tools.
Table 3-2 Required tools
Tool Description How to Obtain
A tool forremote accessacross platforms
Used for accessing the host during imagecreation, such as Xshell
You are advisedto obtain it fromthe officialwebsite.
File transfer tool Used for transferring files to the VMduring image creation, such as Xftp
You are advisedto obtain it fromthe officialwebsite.
VNC tool Used for logging in to the VM duringimage creation, such as VNC ViewerNOTE
If VNC Viewer is the 5.3.2 version, chooseOptions > Expert > ColorLevel on the loginpage and set ColorLevel to rgb222.Otherwise, you may fail to connect to theremote OS.
You are advisedto obtain it fromthe officialwebsite.
3.2 Creating a VMUse virt-manager to create a VM. This section describes how to create an OracleLinux 6.8 VM. The methods of creating VMs running other OSs are similar.
1. Log in to the host, start the terminal, and run the virt-manager command.The virt-manager interface is displayed.
2. Download the required ISO image on the host or download the ISO imagelocally and use Xshell to upload it to the host.
Bare Metal ServerPrivate Image Creation Guide 3 Creating a Linux Image
2019-12-30 11
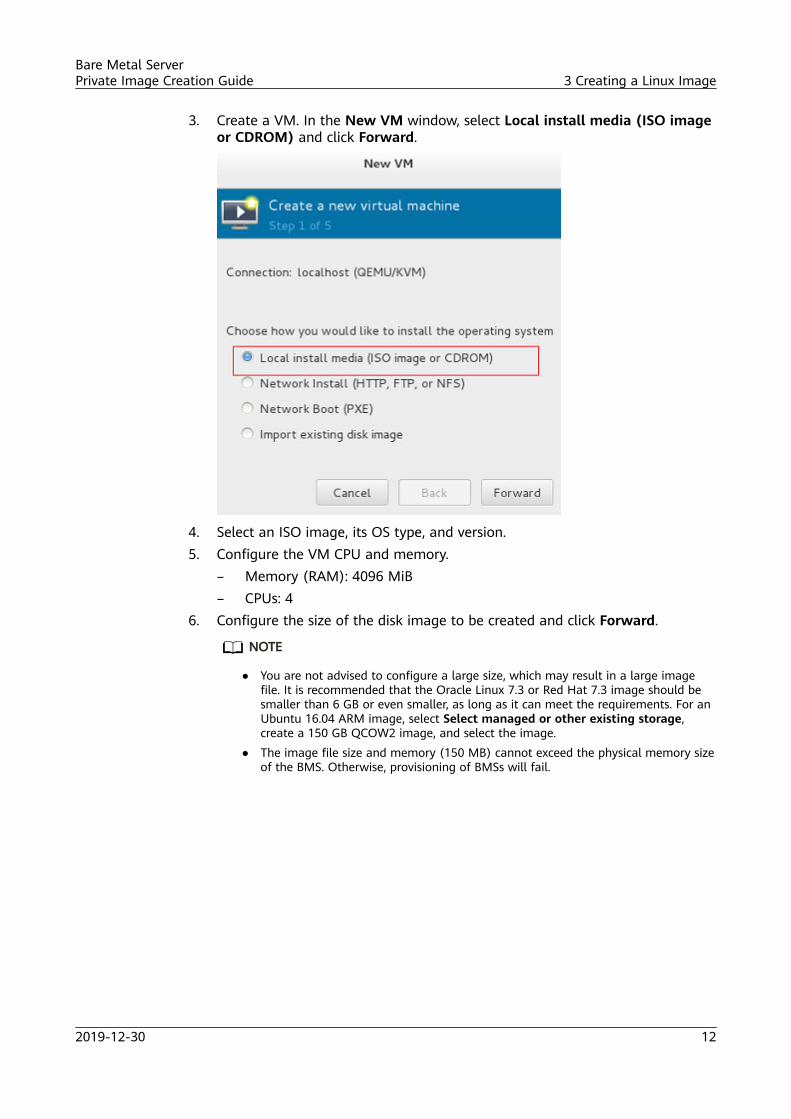
3. Create a VM. In the New VM window, select Local install media (ISO imageor CDROM) and click Forward.
4. Select an ISO image, its OS type, and version.5. Configure the VM CPU and memory.
– Memory (RAM): 4096 MiB– CPUs: 4
6. Configure the size of the disk image to be created and click Forward.
NO TE
● You are not advised to configure a large size, which may result in a large imagefile. It is recommended that the Oracle Linux 7.3 or Red Hat 7.3 image should besmaller than 6 GB or even smaller, as long as it can meet the requirements. For anUbuntu 16.04 ARM image, select Select managed or other existing storage,create a 150 GB QCOW2 image, and select the image.
● The image file size and memory (150 MB) cannot exceed the physical memory sizeof the BMS. Otherwise, provisioning of BMSs will fail.
Bare Metal ServerPrivate Image Creation Guide 3 Creating a Linux Image
2019-12-30 12

7. Click Manage and select a storage path, for example, /home/h.
Click , set Name (suffix .img is recommended so that the image can becompressed if it is large) and select raw (recommended) for Format.
Bare Metal ServerPrivate Image Creation Guide 3 Creating a Linux Image
2019-12-30 13

Click Finish. In the displayed storage volume list, select the created storagevolume and click Choose Volume.
8. Enter the name of the VM (such as oracle6.8) and select Customizeconfiguration before install. For an Ubuntu 16.04 ARM image, select NAT inAdvanced options.
Bare Metal ServerPrivate Image Creation Guide 3 Creating a Linux Image
2019-12-30 14

9. Configure the NIC, select e1000 (Gigabit network adapter), and click Apply.For an Ubuntu 16.04 ARM image, skip this step.
10. For a SUSE 12 image and KunLun server for the HANA solution, set the bootmode to UEFI. In the navigation pane on the left, choose Overview. In theright pane, select a UEFI mode for Firmware.
Bare Metal ServerPrivate Image Creation Guide 3 Creating a Linux Image
2019-12-30 15

11. Click Begin Installation.12. Wait for the VM to start and choose Installation. Configure the OS language
and time zone. Select the installation scenario based on requirements. SomeOSs, such as SUSE and CentOS 7.x, have physical servers, VMs, KVM and Xen.Select the required items based on service requirements and install an OS.
3.3 Installing an OS on the VM
3.3.1 OverviewInstall an appropriate OS for the VM. This section describes how to install SUSE 11SP4, Ubuntu 16.04, Ubuntu 14.04, Debian 8.6, and SUSE 12 because installingthese types of OSs requires some special configuration.
Bare Metal ServerPrivate Image Creation Guide 3 Creating a Linux Image
2019-12-30 16
NO TICE
● Creating a BMS BIOS image requires the MBR partition table format, and aprimary partition needs to be reserved for provisioning the BMS. After the BMSis provisioned, a 64 MB config drive partition is automatically generated. MBRsupports a maximum of four partitions, including both the primary andextended ones. Therefore, a maximum of three image primary partitions areallowed. Otherwise, the BMS provisioning will fail.
● To enable automatic disk capacity expansion, the root partition must be thelast partition and a standard one.
● If your services require a large number of partitions, you need to configure LVMpartitions based on extended partitions.
● After the OS supporting the UEFI boot mode is installed, perform theoperations in Modifying the Boot File (UEFI Boot Mode) to modify the bootfile before restarting the VM.
3.3.2 OS Partitioning Recommendations
Scenario I: The BMS Starts from BIOS
If the BMS starts from BIOS, a BIOS image is required, and the MBR partition tableformat is used. The recommended partitioning is as follows:
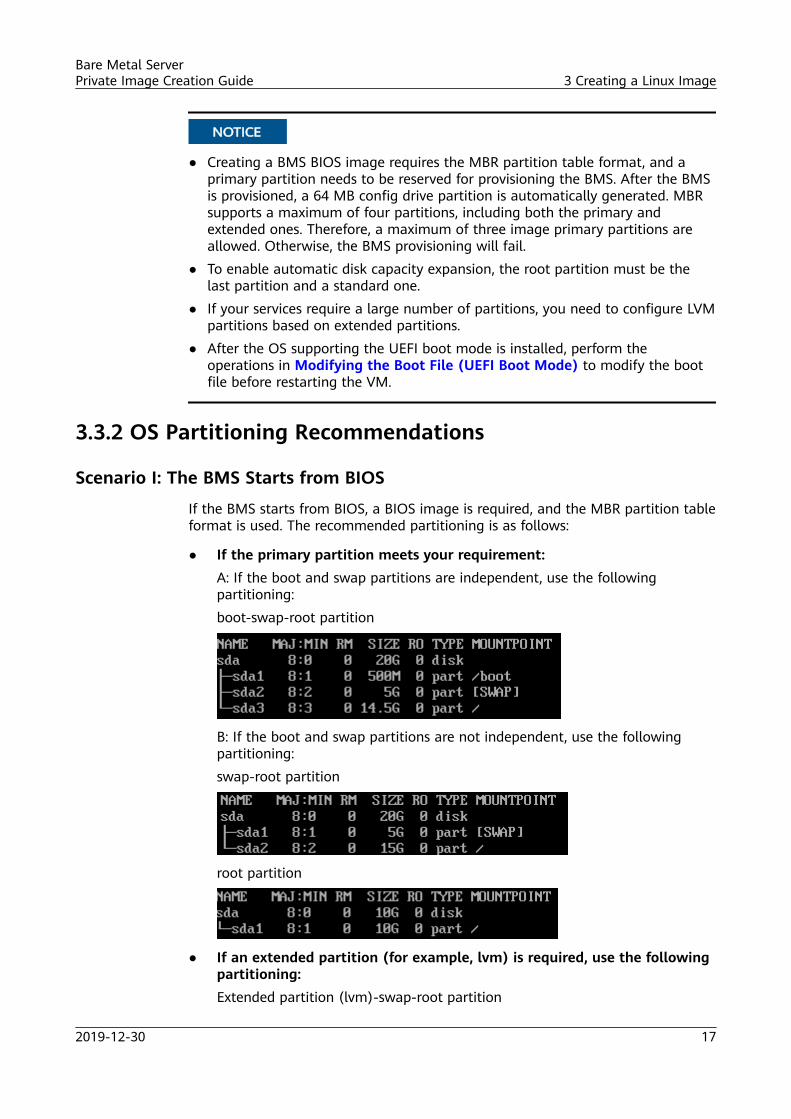
● If the primary partition meets your requirement:A: If the boot and swap partitions are independent, use the followingpartitioning:boot-swap-root partition
B: If the boot and swap partitions are not independent, use the followingpartitioning:swap-root partition
root partition
● If an extended partition (for example, lvm) is required, use the followingpartitioning:Extended partition (lvm)-swap-root partition
Bare Metal ServerPrivate Image Creation Guide 3 Creating a Linux Image
2019-12-30 17

Extended partition (lvm)-root partition
boot-extended partition (lvm)-root partition
Scenario II: The BMS Starts from UEFIIf the BMS starts from UEFI, a UEFI image is required, and the MBR partition tableformat is used if the BMS uses the x86 architecture. The boot_efi partition ismandatory, and the recommended partitioning is as follows:
● If the primary partition meets your requirement:A: If the swap partition is independent, use the following partitioning:boot_efi-swap-root partition
B: If the swap partition is not independent, use the following partitioning:boot_efi-root partition
● If an extended partition is required, use the following partitioning:boot_efi-extended partition (lvm)-root partition
Bare Metal ServerPrivate Image Creation Guide 3 Creating a Linux Image
2019-12-30 18

3.3.3 SUSE 11 SP41. On the Installation Settings page, click the Expert tab and choose Change >
Partitioning.
Create the swap partition.
a. On the Preparing Hard Disk page, select Custom Partitioning (forexperts) and click Next.
b. In the navigation pane on the left, choose Hard Disks and click AddPartition.
c. On the Add Partition on /dev/sda page, select Primary Partition andclick Next.
d. Select Custom Size, enter 10 GB, and click Next.
e. Set Formatting Options and Mounting Options, then click Finish.
Create the boot partition.
a. In the navigation pane on the left, choose Hard Disks and click AddPartition.
b. On the Add Partition on /dev/sda page, select Primary Partition andclick Next.
c. Select Custom Size, enter 5.00 GB, and click Next.
d. Set Formatting Options and Mounting Options, then click Finish.
Bare Metal ServerPrivate Image Creation Guide 3 Creating a Linux Image
2019-12-30 19

The swap and boot partitions are created successfully.2. Complete configurations (create volumes).
If the swap and boot volumes both use the LVM mode, perform the followingoperations to create volumes:
a. In the navigation pane on the left, choose Hard Disks and click AddPartition.
b. On the Add Partition on /dev/sda page, select Primary Partition andclick Next.
c. Select Custom Size, enter 14.99 GB, and click Next.d. Select Do not format partition and Do not mount partition, then click
Finish.e. In the navigation pane on the left, choose Volume Management, click
Add, and select Volume Group.f. Configure required parameters and click Finish.
Bare Metal ServerPrivate Image Creation Guide 3 Creating a Linux Image
2019-12-30 20

g. In the navigation pane on the left, choose Volume Management, clickAdd, and select Logical Volume.
h. Set Name to root and Type to Normal Volume, then click Next.
i. Enter 10.00 GB for Custom Size and click Next.
j. Set Formatting Options and Mounting Options, then click Finish.
The root volume is created. The following steps describe how to createthe swap volume:
k. In the navigation pane on the left, choose Volume Management, clickAdd, and select Logical Volume.
l. Set Name to swap and Type to Normal Volume, then click Next.
m. Select Maximum Size (4.99 GB) and click Next.
n. Set Formatting Options and Mounting Options, then click Finish.
Bare Metal ServerPrivate Image Creation Guide 3 Creating a Linux Image
2019-12-30 21
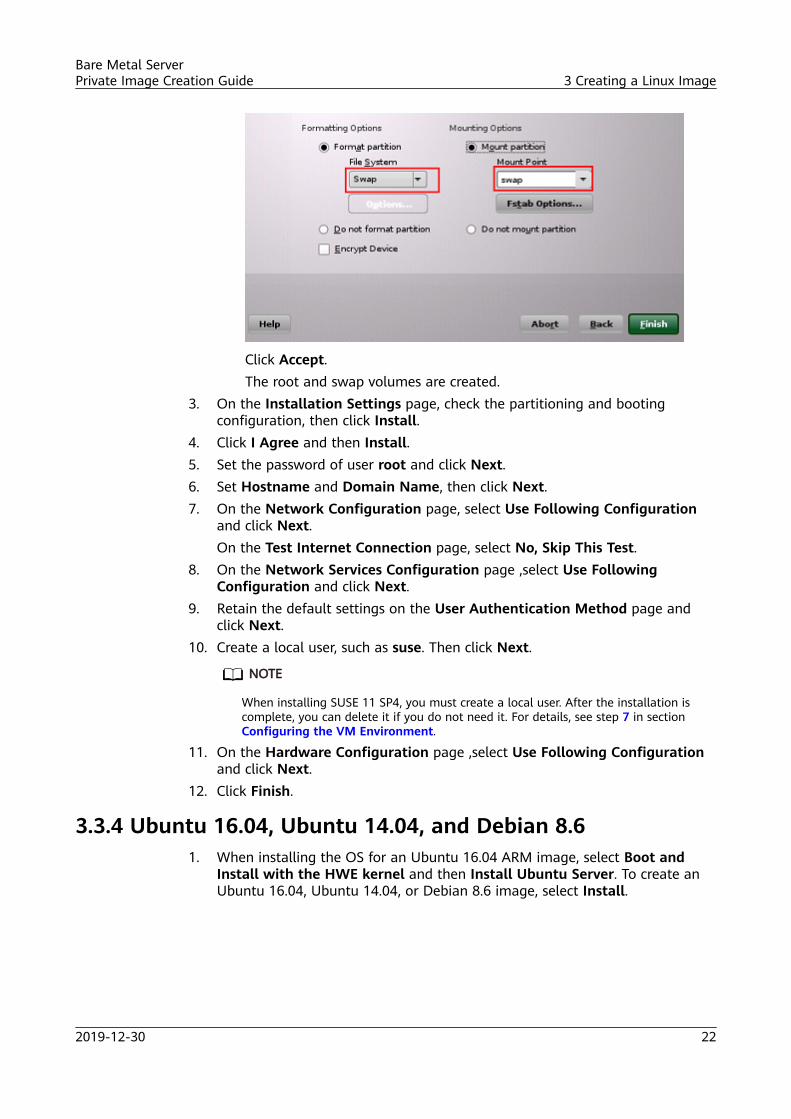
Click Accept.The root and swap volumes are created.
3. On the Installation Settings page, check the partitioning and bootingconfiguration, then click Install.
4. Click I Agree and then Install.5. Set the password of user root and click Next.6. Set Hostname and Domain Name, then click Next.7. On the Network Configuration page, select Use Following Configuration
and click Next.On the Test Internet Connection page, select No, Skip This Test.
8. On the Network Services Configuration page ,select Use FollowingConfiguration and click Next.
9. Retain the default settings on the User Authentication Method page andclick Next.
10. Create a local user, such as suse. Then click Next.
NO TE
When installing SUSE 11 SP4, you must create a local user. After the installation iscomplete, you can delete it if you do not need it. For details, see step 7 in sectionConfiguring the VM Environment.
11. On the Hardware Configuration page ,select Use Following Configurationand click Next.
12. Click Finish.
3.3.4 Ubuntu 16.04, Ubuntu 14.04, and Debian 8.61. When installing the OS for an Ubuntu 16.04 ARM image, select Boot and
Install with the HWE kernel and then Install Ubuntu Server. To create anUbuntu 16.04, Ubuntu 14.04, or Debian 8.6 image, select Install.
Bare Metal ServerPrivate Image Creation Guide 3 Creating a Linux Image
2019-12-30 22

2. When installing the Ubuntu 16.04 ARM image, select automatic partitioning.When installing the Ubuntu 16.04, Ubuntu 14.04, or Debian 8.6 image,perform the following steps to manually partition the VM disk duringinstallation:
Bare Metal ServerPrivate Image Creation Guide 3 Creating a Linux Image
2019-12-30 23

Bare Metal ServerPrivate Image Creation Guide 3 Creating a Linux Image
2019-12-30 24

*Select Primary rather than Logical, as shown in the following figure.
Bare Metal ServerPrivate Image Creation Guide 3 Creating a Linux Image
2019-12-30 25

The preceding figures show how to create the boot partition. The methods ofcreating the swap and / partitions are similar. The following figures show thepartitioning results (root partition is the last partition).
Install additional software:
Bare Metal ServerPrivate Image Creation Guide 3 Creating a Linux Image
2019-12-30 26

Install GRUB to your hard drive:
3.3.5 SUSE 121. Click Expert Partitioner before you start partitioning the disk.2. Select and right-click default partitions shown in the following figure and
select Delete.
Bare Metal ServerPrivate Image Creation Guide 3 Creating a Linux Image
2019-12-30 27
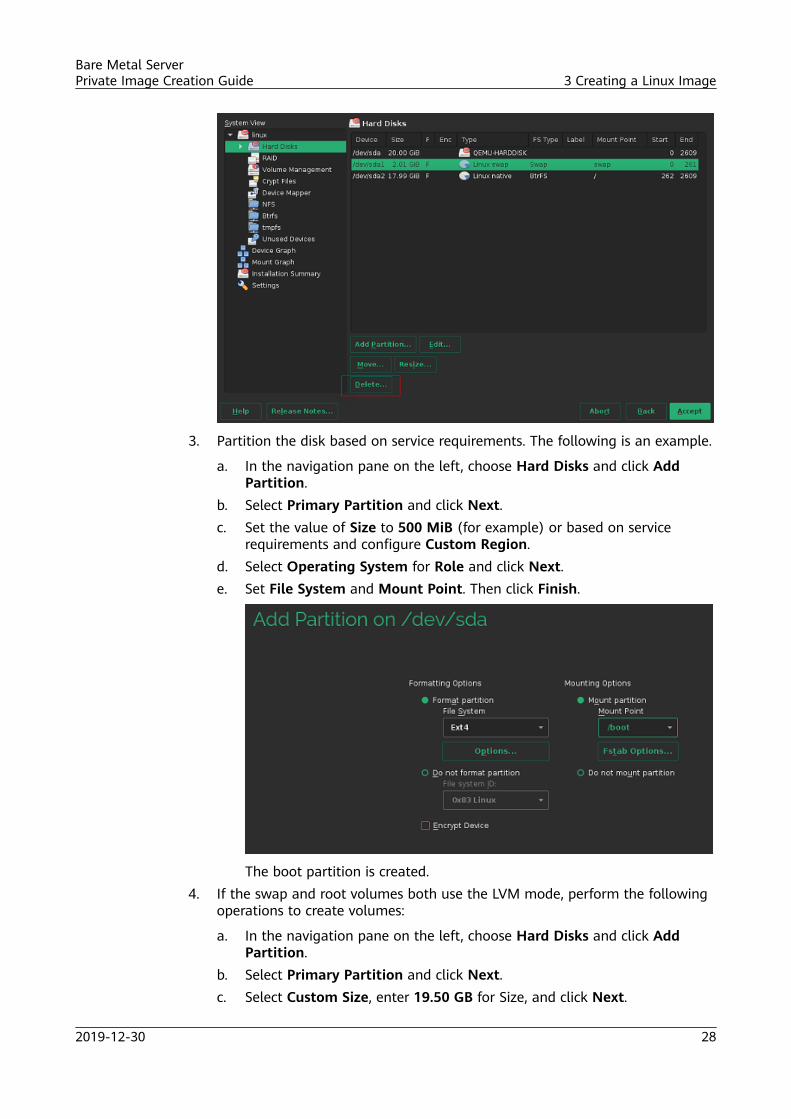
3. Partition the disk based on service requirements. The following is an example.
a. In the navigation pane on the left, choose Hard Disks and click AddPartition.
b. Select Primary Partition and click Next.c. Set the value of Size to 500 MiB (for example) or based on service
requirements and configure Custom Region.d. Select Operating System for Role and click Next.e. Set File System and Mount Point. Then click Finish.
The boot partition is created.4. If the swap and root volumes both use the LVM mode, perform the following
operations to create volumes:
a. In the navigation pane on the left, choose Hard Disks and click AddPartition.
b. Select Primary Partition and click Next.c. Select Custom Size, enter 19.50 GB for Size, and click Next.
Bare Metal ServerPrivate Image Creation Guide 3 Creating a Linux Image
2019-12-30 28

d. Select Operating System for Role and click Next.e. Set Formatting Options and click Finish.
f. In the navigation pane on the left, choose Volume Management, clickAdd, and select Volume Group.
g. Set parameters and click Add to add available physical volumes to theSelected Physical Volumes area.After configuration, click Finish.
h. In the navigation pane on the left, choose Volume Management, clickAdd, and select Logical Volume.
i. Set the logical volume name to swap and size to 5 GiB.j. Select Operating System for Role.k. Set Formatting Options and Mounting Options, then click Finish.l. Create the root volume in the similar way as the swap volume. Set the
logical volume name to root and size to 14.50 GiB.
Bare Metal ServerPrivate Image Creation Guide 3 Creating a Linux Image
2019-12-30 29

Set Formatting Options and Mounting Options, then click Finish.
Check the partitions and volumes.
The partitions and volumes are created successfully. Click Next to installthe OS as prompted.
3.3.6 CentOS 7.4 for ARM1. Select Install CentOS Linux AltArch 7.
Bare Metal ServerPrivate Image Creation Guide 3 Creating a Linux Image
2019-12-30 30

2. Install the OS as prompted.
3. Set the time zone.
Bare Metal ServerPrivate Image Creation Guide 3 Creating a Linux Image
2019-12-30 31

4. Select the software to be installed based on your requirements.
Bare Metal ServerPrivate Image Creation Guide 3 Creating a Linux Image
2019-12-30 32

5. Set the OS password.
6. Enter b and press Enter to start the installation.
Bare Metal ServerPrivate Image Creation Guide 3 Creating a Linux Image
2019-12-30 33

3.4 Modifying the Boot File (UEFI Boot Mode)In the UEFI boot mode, you must modify the boot file. Otherwise, BMSsprovisioned using the VM image may fail to start after they are forcibly restarted.
After the OS is installed, do not restart the VM immediately. Press Ctrl+Alt+F2 toenter the CLI and perform the operations in this section to modify the boot file.
ARM Image
Run the find / -name "boot/efi/EFI" command to locate the boot file path andreplace the ARM image boot file boot/efi/EFI/$os_version/grubaa64.efi withboot/efi/EFI/BOOT/BOOTAA64.EFI.
For example, for CentOS 7.4 whose $os_version is centos, replace boot/efi/EFI/BOOT/BOOTAA64.EFI with boot/efi/EFI/centos/grubaa64.efi.
The path of the ARM image boot file grubaa64.efi varies depending on the OS.Table 3-3 lists the file paths for different OSs.
Table 3-3 Paths of the ARM image boot file grubaa64.efi for different OSs
OS File Path
CentOS /boot/efi/EFI/centos/grubaa64.efi
EulerOS /boot/efi/EFI/euleros/grubaa64.efi
SUSE /boot/efi/EFI/sles/grubaa64.efi
Bare Metal ServerPrivate Image Creation Guide 3 Creating a Linux Image
2019-12-30 34

OS File Path
Ubuntu /boot/efi/EFI/ubuntu/grubaa64.efi
Red Hat /boot/efi/EFI/redhat/grubaa64.efi
x86 ImageRun the find / -name "boot/efi/EFI" command to locate the boot file path, forexample, /mnt/sysimage/boot/efi/EFI for EulerOS 2.5. Replace the x86 imageboot file /mnt/sysimage/boot/efi/EFI/BOOT/BOOTX64.EFI with /mnt/sysimage/boot/efi/EFI/$os_version/grubx64.efi.
For example, for EulerOS 2.5 whose $os_version is euleros, replace /mnt/sysimage/boot/efi/EFI/BOOT/BOOTX64.EFI with /mnt/sysimage/boot/efi/EFI/euleros/grubx64.efi.
The path of the x86 image boot file grubx64.efi varies depending on the OS.Table 3-4 lists the file paths for different OSs.
Table 3-4 Paths of the x86 image boot file grubx64.efi for different OSs
OS File Path
CentOS /mnt/sysimage/boot/efi/EFI/centos/grubx64.efi
EulerOS /mnt/sysimage/boot/efi/EFI/euleros/grubx64.efi
Bare Metal ServerPrivate Image Creation Guide 3 Creating a Linux Image
2019-12-30 35
OS File Path
SUSE /mnt/sysimage/boot/efi/EFI/sles/grubx64.efi
Ubuntu /mnt/sysimage/boot/efi/EFI/ubuntu/grubx64.efi
Red Hat /mnt/sysimage/boot/efi/EFI/redhat/grubx64.efi
3.5 Configuring the VM EnvironmentConfigure the network environment for the VM so that it can connect to theInternet and installation packages can be uploaded to it.
Prerequisites● The host can connect to the Internet.● You have connected to the host using a remote desktop tool such as VNC
Viewer.● The required installation package has been uploaded to the host.
Procedure1. Install Vim, dkms package, linux--headers-xxx-common, and linux-headers-
xxx-amd64 (this step is required only for Debian).
a. Install Vim.
i. Configure the apt source.Run the vi /etc/apt/sources.list command to add the apt source.The content to be added varies depending on the Debian version. Forexample, the content to be added for Debian 8.6 is as follows:deb http://mirrors.ustc.edu.cn/debian jessie main contrib non-freedeb-src http://mirrors.ustc.edu.cn/debian jessie main contrib non-freedeb http://mirrors.ustc.edu.cn/debian jessie-proposed-updates main contrib non-freedeb-src http://mirrors.ustc.edu.cn/debian jessie-proposed-updates main contrib non-freedeb http://mirrors.ustc.edu.cn/debian jessie-updates main contrib non-freedeb-src http://mirrors.ustc.edu.cn/debian jessie-updates main contrib non-free
Enter :wq! to save the file and run the apt update command.ii. Run the apt-get install vim command to install Vim.
b. Run the apt-get install dkms command to install the dkms package.c. Run the apt-get install linux--headers-xxx-common command to install
the linux--headers-xxx-common package.xxx indicates the kernel version. For example, for Debain 8.6 whose kernelversion is 3.16.0-4, run the apt-get install linux--headers-3.16.0-4-common command.
d. Run the apt-get install linux-headers-xxx-amd64 command to installthe linux-headers-xxx-amd64 package.
Bare Metal ServerPrivate Image Creation Guide 3 Creating a Linux Image
2019-12-30 36

xxx indicates the kernel version. For example, for Debain 8.6 whose kernelversion is 3.16.0-4, run the apt-get install linux-headers-3.16.0-4-amd64 command.
e. Delete the configuration items of the /etc/network/interfaces file.Run the vi /etc/network/interfaces command. If there is a configurationof eth0, delete the last two rows of configuration items....# The loopback network interfaceauto loiface lo inet loopback
# The primary network interface# The following are the configuration items that need to be deleted:allow-hotplug eth0iface eth0 inet dhcp
Enter :wq! to save the file.2. Configure the VM network.
Configure an available IP address for the VM so that it can communicate withthe host.
a. Run the following command on the VM to query the NIC name:ifconfig -a
b. Run the following command to check whether the NIC has obtained theIP address:ifconfigInformation similar to the following is displayed (xxx indicates the IPaddress automatically obtained and XX indicates the MAC address):eth0 Link encap:Ethernet HWaddr XX:XX:XX:XX:XX:XXinet addr:xxx.xxx.xxx.xxx Bcast:xxx.xxx.x.xxx Mask:xxx.xxx.xxx.xxx
c. If the NIC has not obtained the IP address, run the following command toenable the NIC to dynamically obtain the IP address (otherwise, skip thisstep):ifup NIC nameAn example is as follows:ifup eth0Information similar to the following is displayed:Determining IP information for eth0... doneYou can also run the following command:ifconfig eth0 upNo information is displayed.
3. Set the time parameter to prevent the BMS provision timeouts.– For Red Hat 7, EulerOS, CentOS 7, Oracle Linux 7, Ubuntu 16.04, SUSE 12
SP2, SUSE 12 SP3, and Debian run the following command:vi /etc/systemd/system.confRemove the number sign (#) before the DefaultTimeoutStartSec andDefaultTimeoutStopSec and change the time to 300s. The modifiedconfiguration file is as follows:#TimeSlackNSec=#DefaultTimerAccuracySec=1min
Bare Metal ServerPrivate Image Creation Guide 3 Creating a Linux Image
2019-12-30 37
#DefaultStandardOutput=journal#DefaultStandardError=inheritDefaultTimeoutStartSec=300sDefaultTimeoutStopSec=300s#DefaultRestartSec=100ms#DefaultStartLimitInterval=10s#DefaultStartLimitBurst=5#DefaultEnvironment=#DefaultCPUAccounting=no#DefaultBlockIOAccounting=no
4. Disable the VM firewall (the firewall prevents remote login using SSH andmust be disabled).– Run the following commands to disable the firewall of a Red Hat 7.0, Red
Hat 7.2, Red Hat 7.3, Red Hat 7.4, Oracle Linux 7, EulerOS, or CentOS 7VM:systemctl disable firewalld.servicesystemctl stop firewalld.serviceRun the systemctl status firewalld.service command to query the statusof the service.
– Run the following commands to disable the firewall of a Red Hat 6.7, RedHat 6.8, Red Hat 6.9, CentOS 6.8, CentOS 6.9, Oracle Linux 6.8, or OracleLinux 6.9 VM:chkconfig iptables offservice iptables stopRun the service iptables status command to query the status of theservice.[root@localhost ~]# service iptables statusiptables: Firewall is not running.
– Run the following commands to disable the firewall of a SUSE 12 VM:systemctl disable SuSEfirewall2.servicesystemctl stop SuSEfirewall2.serviceQuery the status of the service: service SuSEfirewall2 status
– Run the following command to disable the firewall of a SUSE 11 VM:rcSuSEfirewall2 stopRun the yast command and perform the following operations:Choose Security and Users > Firewall. Check whether Disable FirewallAutomatic Starting is displayed. If yes, click Cancel and then Quit. If no,click Next, Finish, and then Quit.
– Ubuntu 16.04, Ubuntu 14.04, or Debian has no firewall managementservice enabled by default, and you can download the firewallmanagement software ufw at https://packages.ubuntu.com/.The deb package is as follows (the version number is only for reference):ufw_0.35-0ubuntu2_all.debRun the following command to disable the firewall:ufw disable
5. Upgrade the wicked component (only required for SUSE 12 SP1).
a. Run the rpm -ivh --nodeps --force *rpm command to install the wickedsoftware package forcibly.
Bare Metal ServerPrivate Image Creation Guide 3 Creating a Linux Image
2019-12-30 38

b. Check the wicked software packages that have been installed.linux-locc:/home/fsp/Desktop # rpm -qa | grep wickwicked-service-0.6.28-1.1.x86_64libwicked-0-6-0.6.28-1.1.x86_64libwicked-0-6-0.6.40-28.6.1.x86_64wicked-0.6.28-1.1.x86_64wicked-service-0.6.40-28.6.1.x86_64wicked-0.6.40-28.6.1.x86_64
c. Uninstall wicked software packages of old versions.linux-locc:/home/fsp/Desktop # rpm -e wicked-service-0.6.28-1.1.x86_64linux-locc:/home/fsp/Desktop # rpm -e libwicked-0-6-0.6.28-1.1.x86_64linux-locc:/home/fsp/Desktop # rpm -e wicked-0.6.28-1.1.x86_64
6. Disable the network management tool of the VM (the network managementtool may conflict with the network-config configuration and must bedisabled).
NO TE
You do not need to perform this step for the VMs running SUSE 11 SP4, Ubuntu 16.04,or Ubuntu 14.04. Also, you do not need to perform this step for the VMs with SDI 3.0cards (integrating storage with networking) or SDI 2.2 iNICs because such VMs useNetworkManager to manage networks.
– Run the following commands to disable the network managementservice of a Red Hat 7, Oracle Linux 7, Debian, EulerOS, or CentOS 7 VM:systemctl disable NetworkManager.servicesystemctl stop NetworkManager.serviceQuery the status of the service: service NetworkManager.service status[root@localhost ~]# service NetworkManager.service statusedirecting to /bin/systemctl status NetworkManager.service NetworkManager.service - Network Manager Loaded: loaded (/usr/lib/systemd/system/NetworkManager.service disabled; vendor preset: enabled) Active: inactive (dead) since Mon 2017-11-13 19:06:18 CST; 1 min 17s ago
For EulerOS, disable the following services if they are running:Systemctl disable euleros-securitySystemctl disable NetworkManager-wait-online
– Run the following commands in turn to disable the networkmanagement service of a Red Hat 6.7, Red Hat 6.8, Red Hat 6.9, CentOS6.8, CentOS 6.9, Oracle Linux 6.8 or Oracle Linux 6.9 VM:
NO TE
If you choose to install the desktop when creating a Red Hat 6.7, Red Hat 6.8,Red Hat 6.9, CentOS 6.8, CentOS 6.9, Oracle Linux 6.8 or Oracle Linux 6.9 VM,you need to run the following command to disable the network service.Otherwise, do not run these commands.
service NetworkManager stopchkconfig NetworkManager off
– Run the following commands to disable the network managementservice of a SUSE 12 VM:systemctl disable wickedsystemctl stop wicked
7. (Optional) Delete the VM local user.
Bare Metal ServerPrivate Image Creation Guide 3 Creating a Linux Image
2019-12-30 39

When installing the VM, you need to create a local user. After the installationis complete, you can delete the local user by running the following command:userdel -rf xxxxxx is the name of the local user. The user is deleted successfully if the /homedirectory does not contain the folder of the user.
NO TE
If the user is not deleted, restart the VM, log in to it as user root, and run thecommand again.
8. (Optional) Modify DHCP configuration items.
NO TE
This operation is required for SUSE Linux. For other OSs, skip this step.
a. Open the command-line interface and run the su - root command toswitch to user root.
b. Run the vi /etc/sysconfig/network/dhcp command to open the targetconfiguration file using the vi editor.
c. Enter ?DHCLIENT_PRIMARY_DEVICE and press Enter to locate theconfiguration item.Press i to enter editing mode and set the value of this configuration itemto yes to enable DHCP to obtain the default gateway during start.Press Esc to exit editing mode.
NO TE
If the configuration file does not contain the DHCLIENT_PRIMARY_DEVICEconfiguration item, ignore it.
d. Enter ?DHCLIENT_SET_HOSTNAME and press Enter to locate theconfiguration item.Press i to enter editing mode and set the value of this configuration itemto no to prevent DHCP from modifying the hostname.Press Esc to exit the editing mode.
e. Enter ?DHCLIENT_USE_LAST_LEASE and press Enter to locate theconfiguration item.Press i to enter editing mode and set the value of this configuration itemto no to enable DHCP to obtain IP addresses continuously.Press Esc to exit the editing mode.
f. Enter ?DHCLIENT6_MODE and press Enter to locate the configurationitem.Press i to enter editing mode and set the value of this configuration itemto managed to enable DHCP to obtain IP addresses continuously.Press Esc to exit the editing mode.
g. Enter :wq and press Enter to save the change and exit.9. (Optional) For Ubuntu 14.04 or Debian, you need to set the timeout
parameter for the GRUB configuration file to prevent failure to access thesystem due to abnormal server power-off.
a. Use the vi editor to open /etc/default/grub and addGRUB_RECORDFAIL_TIMEOUT=10 after GRUB_CMDLINE_LINUX.
Bare Metal ServerPrivate Image Creation Guide 3 Creating a Linux Image
2019-12-30 40
GRUB_DEFAULT=0#GRUB_HIDDEN_TIMEOUT=0GRUB_HIDDEN_TIMEOUT_QUIET=trueGRUB_TIMEOUT=2GRUB_DISTRIBUTOR='lsb_release -i -s 2> /dev/null || echo Debian'GRUB_CMDLINE_LINUX_DEFAULT=""GRUB_CMDLINE_LINUX="console=tty0 console=ttyS0"GRUB_RECORDFAIL_TIMEOUT=10
b. Run the following command to update the configuration:grub-mkconfig -o /boot/grub/grub.cfg
10. Upload the required software package to the VM.– Method 1: If the VM can communicate with the host, run the scp
command to upload the software package to the VM.This method is recommended. You can query how to use it by runningthe scp -help command. An example command is as follows (thefollowing file name is an example):scp [email protected]:/home/fsp/network-config-1.0-1.x86_64.rpm /home
NO TE
In the command, fsp is the username, xxx.xxx.xxx.xxx is the host IP address,home/fsp is a customized directory, network-config-1.0-1.x86_64.rpm is thename of the file uploaded to the host, and /home is the VM directory.
– Method 2: If the VM can communicate with the host and you can log into the VM using Xshell, you can upload the package to the VM using xftp.
– Method 3: If the VM cannot communicate with the host, use the virtualCD-ROM drive to mount the software package.Step 1: Create an ISO file on the host.
▪ Run the mkdir /root/software command to create a directory.
▪ Place the network-config and SDI driver software packages in thecreated directory.
▪ Run the cd /root command and then the mkisofs -L -R -J -T -Vsystem-sp2 -o defindsoftware.iso /root/software command.
▪ Run the ll command. defindsoftware.iso shown in the commandoutput is the generated ISO image file.
Step 2: Use virt-manager to mount the ISO image.
i. On the VM, choose View > Details.ii. Click IDE CDROM 1 and click Connect in the right area. If a disk has
been mounted, click Disconnect.
Bare Metal ServerPrivate Image Creation Guide 3 Creating a Linux Image
2019-12-30 41
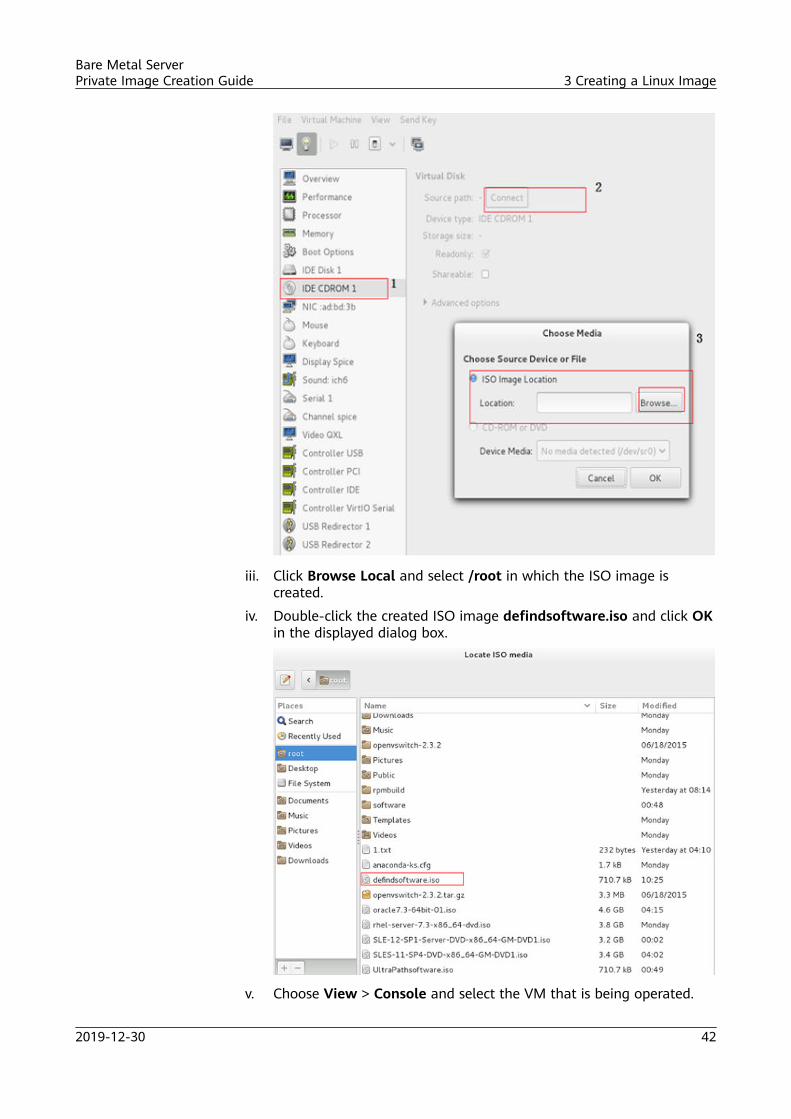
iii. Click Browse Local and select /root in which the ISO image iscreated.
iv. Double-click the created ISO image defindsoftware.iso and click OKin the displayed dialog box.
v. Choose View > Console and select the VM that is being operated.
Bare Metal ServerPrivate Image Creation Guide 3 Creating a Linux Image
2019-12-30 42
vi. Run the lsblk command to check whether the ISO image is mounted,such as to /run/media/suse/system-sp2.
vii. Run the cd /run/media/suse/system-sp2 command to copy the filesin the directory to another directory, such as /home. If the mountpoint has no file directory, you need to run the mount /dev/sr0 /home command to mount the ISO image file to the /home directory(for example).
3.6 Installing Cloud-Init
3.6.1 Overview
ScenariosCloud-Init is a VM or BMS initialization tool for setting the network, hostname,and hosts files for VMs or BMSs to be created using images. This tool can also beused to generate random passwords for these VMs if needed.
If you do not need to set these parameters or generate random passwords forVMs or BMSs created using images, Cloud-Init is not required. Cloud-Init hasrequirements on Linux versions and can only be installed from the Internet.Therefore, before making a Linux image, ensure that the Internet is accessible.
Prerequisites● You have logged in to the VM.● The host can connect to the Internet.● You have logged in to the host using VNC Viewer and install an OS on virt-
namager that has been started.
Procedure● The following procedure is only an example. You are advised to download the
Cloud-Init installation package from the official website. The version of Cloud-Init will be updated on the official website in real time. When installingCloud-Init, use the latest version from the official website.
● When modifying the /etc/cloud/cloud.cfg configuration file, ensure that itsformat is consistent with the provided example that conforms to the YAMLsyntax.
3.6.2 SUSE, Red Hat, CentOS, Oracle Linux, Ubuntu, Debian,and EulerOS 2.8 ARM
You can install Cloud-Init using either of the following methods: (Recommended)Install Cloud-Init Using the Official Installation Package and Install Cloud-InitUsing the Official Source Code Package and pip.
(Recommended) Install Cloud-Init Using the Official Installation PackageThe method of installing Cloud-Init on a VM varies depending on the OS. Performthe installation operations as user root.
Bare Metal ServerPrivate Image Creation Guide 3 Creating a Linux Image
2019-12-30 43

The following describes how to install Cloud-Init on VMs running SUSE Linux,CentOS, Debian, and Ubuntu. For other types of OS, install the required type ofCloud-Init. For example, you need to install coreos-cloudinit on ECSs runningCoreOS.
● SUSE LinuxPaths for obtaining the Cloud-Init installation package for SUSE Linuxhttp://ftp5.gwdg.de/pub/opensuse/repositories/Cloud:/Tools/http://download.opensuse.org/repositories/Cloud:/Tools/
NO TE
Select the required repo installation package in the provided paths.
Take SUSE Enterprise Linux Server 12 as an example. Perform the followingsteps to install Cloud-Init:
a. Run the following command to install the network installation source forSUSE Enterprise Linux Server 12:zypper ar http://ftp5.gwdg.de/pub/opensuse/repositories/Cloud:/Tools/SLE_12/Cloud:Tools.repo
b. Run the following command to update the network installation source:zypper refresh
c. Run the following command to install Cloud-Init:zypper install cloud-init
d. Run the following commands to enable Cloud-Init to automatically startupon system boot:
▪ SUSE 11chkconfig cloud-init-local on; chkconfig cloud-init on; chkconfigcloud-config on; chkconfig cloud-final onservice cloud-init-local status; service cloud-init status; servicecloud-config status; service cloud-final status
▪ SUSE 12 and openSUSE 12/13/42systemctl enable cloud-init-local.service cloud-init.service cloud-config.service cloud-final.servicesystemctl status cloud-init-local.service cloud-init.service cloud-config.service cloud-final.service
NO TICE
For SUSE and openSUSE, perform the following steps to disable dynamicchange of the VM name:1. Run the following command to open the dhcp file using the vi editor:
vi etc/sysconfig/network/dhcp2. Change the value of DHCLIENT_SET_HOSTNAME in the dhcp file to
no.
Bare Metal ServerPrivate Image Creation Guide 3 Creating a Linux Image
2019-12-30 44

● CentOSTable 3-5 lists the Cloud-Init installation paths for CentOS. Select the requiredinstallation package from the following addresses.
Table 3-5 Cloud-Init installation package addresses
OS Type Version How to Obtain
CentOS 6 32-bit https://dl.fedoraproject.org/pub/epel/6/i386/
6 64-bit https://dl.fedoraproject.org/pub/epel/6/x86_64/
7 64-bit https://dl.fedoraproject.org/pub/epel/7/x86_64/Packages/e/epel-release-7-12.noarch.rpm
Run the following commands to install Cloud-Init on a VM running CentOS6.5 64-bit (example):yum install https://dl.fedoraproject.org/pub/epel/6/x86_64/epel-release-xx-xx.noarch.rpmyum install cloud-init
NO TE
xx-xx indicates the version of Extra Packages for Enterprise Linux (EPEL) required bythe current OS.
● DebianBefore installing Cloud-Init, ensure that the network installation sourceaddress has been configured for the OS by checking whether the /etc/apt/sources.list file contains the installation source address of the softwarepackage. If the file does not contain the address, configure the address byfollowing the instructions on the Debian official website.Run the following commands to install Cloud-Init:apt-get updateapt-get install cloud-initAfter Cloud-Init is installed in the Debian OS, run the following commands toinstall the vlan and ifenslave services:apt-get install vlanapt-get install ifenslave
● UbuntuBefore installing Cloud-Init, ensure that the network installation sourceaddress has been configured for the OS by checking whether the /etc/apt/sources.list file contains the installation source address of the softwarepackage. If the file does not contain the address, configure the address byfollowing the instructions on the Ubuntu official website.Run the following commands to install Cloud-Init:apt-get update
Bare Metal ServerPrivate Image Creation Guide 3 Creating a Linux Image
2019-12-30 45

apt-get install cloud-initAfter Cloud-Init is installed in the Ubuntu OS, perform the followingoperations to install tools and services:
a. Install the ssh service.For an x86 image, run the following commands:apt-get install openssh-clientapt-get install openssh-serverFor an ARM64 image, run the following commands:apt install openssh-clientapt install openssh-server
b. Install the dkms tool.To ensure that SDI drivers can run properly, you need to install the dkmstool in the Ubuntu OS. Run the following command to install the tool:apt-get install dkmsThen, run the following command:vi /usr/sbin/dkmsGo to line 283 (press shift and : to enter the CLI mode. Then, type 283and press Enter) and modify this line as follows:invoke_command "$mkinitrd -f $initrd_dir/$initrd $1" "$mkinitrd" background
c. Install the vlan and ifenslave services.apt-get install vlanapt-get install ifenslave
d. Install the ifupdown service.apt-get install ifupdown
Install Cloud-Init Using the Official Source Code Package and pipThe following operations use Cloud-Init 0.7.9 as an example to describe how toinstall Cloud-Init.
1. Download the cloud-init-0.7.9.tar.gz source code package (version 0.7.9 isrecommended) and upload it to the /home/ directory of the VM.Download cloud-init-0.7.9.tar.gz from the following path:https://launchpad.net/cloud-init/trunk/0.7.9/+download/cloud-init-0.7.9.tar.gz
2. Create a pip.conf file in the ~/.pip/ directory and edit the following content:
NO TE
If the ~/.pip/ directory does not exist, run the mkdir ~/.pip command to create it.[global]index-url = https://<$mirror>/simple/trusted-host = <$mirror>
NO TE
Replace <$mirror> with a public network PyPI source.Public network PyPI source: https://pypi.python.org/
Bare Metal ServerPrivate Image Creation Guide 3 Creating a Linux Image
2019-12-30 46

3. Run the following command to install the downloaded Cloud-Init source codepackage (select --upgrade as required during installation):pip install [--upgrade] /home/cloud-init-0.7.9.tar.gz
4. Run the cloud-init -v command. Cloud-Init is installed successfully if thefollowing information is displayed:cloud-init 0.7.9
5. Enable Cloud-Init to automatically start upon system boot.– If the OS uses SysVinit to manage automatic start of services, run the
following commands:chkconfig --add cloud-init-local; chkconfig --add cloud-init; chkconfig--add cloud-config; chkconfig --add cloud-finalchkconfig cloud-init-local on; chkconfig cloud-init on; chkconfigcloud-config on; chkconfig cloud-final onservice cloud-init-local status; service cloud-init status; service cloud-config status; service cloud-final status
– If the OS uses Systemd to manage automatic start of services, run thefollowing commands:systemctl enable cloud-init-local.service cloud-init.service cloud-config.service cloud-final.servicesystemctl status cloud-init-local.service cloud-init.service cloud-config.service cloud-final.service
NO TICE
If you install Cloud-Init using the official source code package and pip, payattention to the following:1. Add user syslog to the adm group during the installation. If user syslog exists,
add it to the adm group. For some OSs (such as CentOS and SUSE), usersyslog may not exist. Run the following commands to create user syslog andadd it to the adm group:useradd sysloggroupadd adm
2. Change the value of distro in system_info in the /etc/cloud/cloud.cfg filebased on the OS release version, such as distro: ubuntu, distro: sles, distro:debian, and distro: fedora.
3.6.3 EulerOS 2.2 and EulerOS 2.31. Take EulerOS 2.2 as an example. Add the yum repository to the /etc/
yum.repo.d/EulerOS-base.repo file. The following is an example:[EulerOS-base]name=EulerOS-basebaseurl=http://developer.huawei.com/ict/site-euleros/euleros/repo/yum/2.2/os/x86_64/enabled=1gpgcheck=1gpgkey=http://developer.huawei.com/ict/site-euleros/euleros/repo/yum/2.2/os/RPM-GPG-KEY-EulerOS
Edit and save the file.2. Run the yum repolist command and then yum install cloud-init command
to install Cloud-Init 0.7.6.
Bare Metal ServerPrivate Image Creation Guide 3 Creating a Linux Image
2019-12-30 47

Dependent packages of Cloud-Init 0.7.6 will also be installed automatically.Installed: cloud-init.x86_64 0:0.7.6-2
Dependency Installed: PyYAML.x86_64 0:3.10-11 audit-libs-python.x86_64 0:2.4.1-5 checkpolicy.x86_64 0:2.1.12-6 libsemanage-python.x86_64 0:2.1.10-18 libyaml.x86_64 0:0.1.4-11 policycoreutils-python.x86_64 0:2.2.5-15.h1 python-IPy.noarch 0:0.75-6 python-backports.x86_64 0:1.0-8 python-backports-ssl_match_hostname.noarch 0:3.4.0.2-4 python-jsonpatch.noarch 0:1.2-2 python-jsonpointer.noarch 0:1.9-2 python-prettytable.noarch 0:0.7.2-1 python-requests.noarch 0:2.6.0-1 python-six.noarch 0:1.9.0-2 python-urllib3.noarch 0:1.10.2-2 setools-libs.x86_64 0:3.3.7-46
Complete!
3. To inject the password of user root, run the yum install selinux-policycommand to upgrade selinux-policy from h1 to h2.
4. Run the cloud-init -v command. If the command output contains the Cloud-Init version number, the installation is successful.
3.7 Configuring Cloud-InitConfigure the cloud.cfg file that defines the initialization tasks of Cloud-Init.
Modify the /etc/cloud/cloud.cfg configuration file to customize the functionconfiguration during BMS initialization using Cloud-Init. The following content isonly for reference.
3.7.1 Configuring Cloud-Init 0.7.51. Add the key-value pair no_ssh_fingerprints: true and ensure that it has a
blank row before and after it.no_ssh_fingerprints: true
2. Set the value of ssh_pwauth to false. This parameter specifies whether SSHpassword login is supported. If it is set to false, SSH password login isdisabled.ssh_pwauth: false
3. Add preserve_hostname: false.preserve_hostname: false
4. Use the number sign (#) to comment out the following fields:mount_default_fields: [~, ~, 'auto', 'defaults,nofail', '0', '2']resize_rootfs_tmp: /devssh_deletekeys: 0
5. Change the value of ssh_genkeytypes to ['rsa', 'dsa'].ssh_genkeytypes: ['rsa', 'dsa']
6. Change the value of syslog_fix_perms to root:root.syslog_fix_perms: root:root
7. Add the following content:network: config: disableddatasource_list: [ OpenStack ]
Bare Metal ServerPrivate Image Creation Guide 3 Creating a Linux Image
2019-12-30 48
NO TICE
For Ubuntu 14.04, do not add the following information:datasource_list: [ OpenStack ]
8. Add the following content after - final-message in cloud_final_modules:- power-state-change
9. Modify the content under system info as follows:system_info: default_user: name: linux //Username for logging in to the OS lock_passwd: True //True indicates that password login is disabled. In some OSs, 1 indicates that password login is disabled. gecos: redhat groups: [audio, cdrom, dialout, floppy] //(Optional) This parameter specifies the groups to which the user is added. The values must be groups that exist in the etc/group of the OS. sudo: ["ALL=(ALL) NOPASSWD:ALL"] //The user has all permissions of user root. shell: /bin/bash //The bash command is used to execute the shell script. distro: sles paths: cloud_dir: /var/lib/cloud/ templates_dir: /etc/cloud/templates/ upstart_dir: /etc/init/ ssh_svcname: sshd
The value of distro varies depending on the OS and can be sles, rhel,ubuntu, debian, or fedora.
10. (Optional) For Ubuntu 14.04, perform the following operations:a. Use the vi editor to open the /etc/init/cloud-init-local.conf
configuration file and modify the following configuration items:# cloud-init - the initial cloud-init job# crawls metadata service, emits cloud-configstart on mounted MOUNTPOINT=/ and mounted MOUNTPOINT=/run and stopped bms-network_config
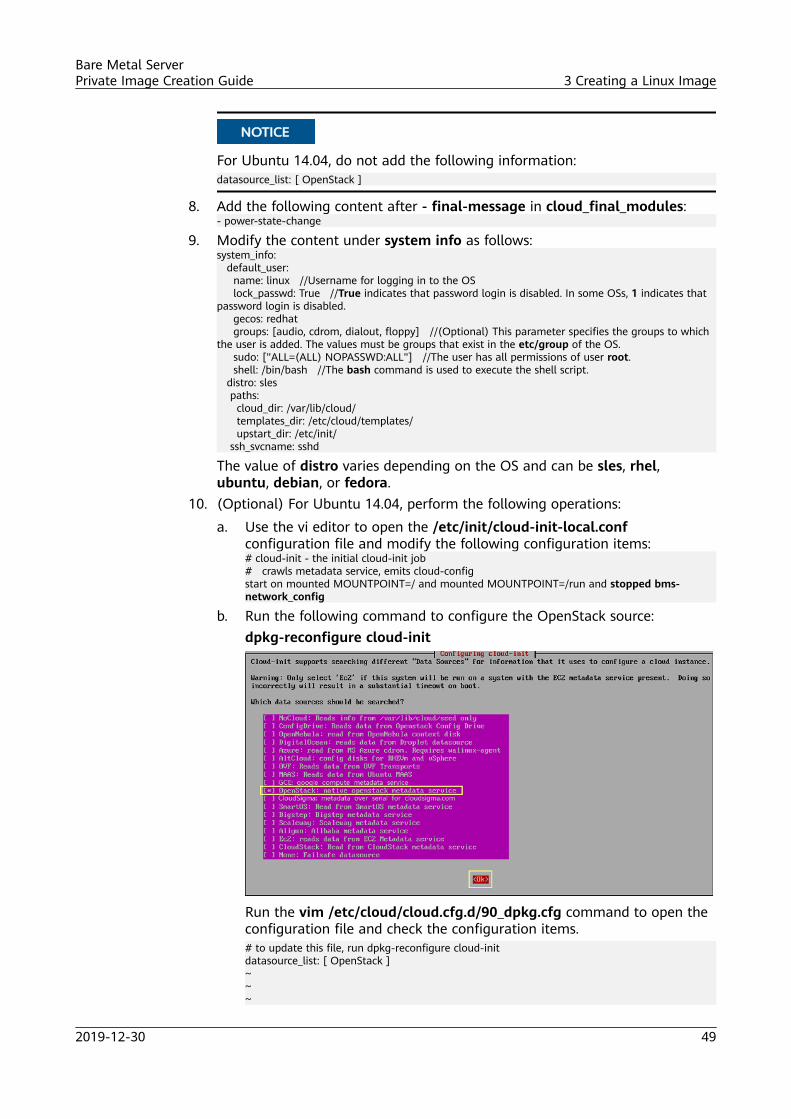
b. Run the following command to configure the OpenStack source:dpkg-reconfigure cloud-init
Run the vim /etc/cloud/cloud.cfg.d/90_dpkg.cfg command to open theconfiguration file and check the configuration items.# to update this file, run dpkg-reconfigure cloud-initdatasource_list: [ OpenStack ]~~~
Bare Metal ServerPrivate Image Creation Guide 3 Creating a Linux Image
2019-12-30 49
If the preceding information is displayed, the configuration is successful.
3.7.2 Configuring Cloud-Init 0.7.61. Add the key-value pair no_ssh_fingerprints: true and ensure that it has a
blank row before and after it.no_ssh_fingerprints: true
2. Change the value of users to default.users: - default
3. Modify the following content:disable_root: Truepreserve_hostname: falsesyslog_fix_perms: root:root
4. Add parameter ssh_pwauth. This parameter specifies whether SSH passwordlogin is enabled. If it is set to false, SSH password login is disabled.ssh_pwauth: false
5. Use the number sign (#) to comment out the following rows:mount_default_fields: [~, ~, 'auto', 'defaults', '0', '2']manual_cache_clean: true
6. Add the following content:network: config: disableddatasource_list: [ OpenStack ]
For SUSE 11 SP4, add the following information:growpart: mode: false
NO TICE
For Debian 8.6, do not add the following information:datasource_list: [ OpenStack ]
7. Add the following content after - final-message in cloud_final_modules:- power-state-change
8. Modify the content under system info as follows:system_info: distro: sles default_user: name: linux //Username for logging in to the OS lock_passwd: True //True indicates that password login is disabled. In some OSs, 1 indicates that password login is disabled. gecos: redhat groups: [adm, audio, cdrom, dialout, dip, floppy, lxd, netdev, plugdev, sudo, video] //(Optional) This parameter specifies the groups to which the user is added. The values must be groups that exist in the etc/group of the OS. sudo: ["ALL=(ALL) NOPASSWD:ALL"] //The user has all permissions of user root. shell: /bin/bash //The bash command is used to execute the shell script. paths: cloud_dir: /var/lib/cloud/ templates_dir: /etc/cloud/templates/ ssh_svcname: sshd
The value of distro varies depending on the OS and can be sles, rhel,ubuntu, debian, or fedora.
9. Use the number sign (#) to comment out the following row:ssh_genkeytypes: ['rsa', 'dsa']
Bare Metal ServerPrivate Image Creation Guide 3 Creating a Linux Image
2019-12-30 50
10. (Optional) For Debian 8.6, perform the following operations:
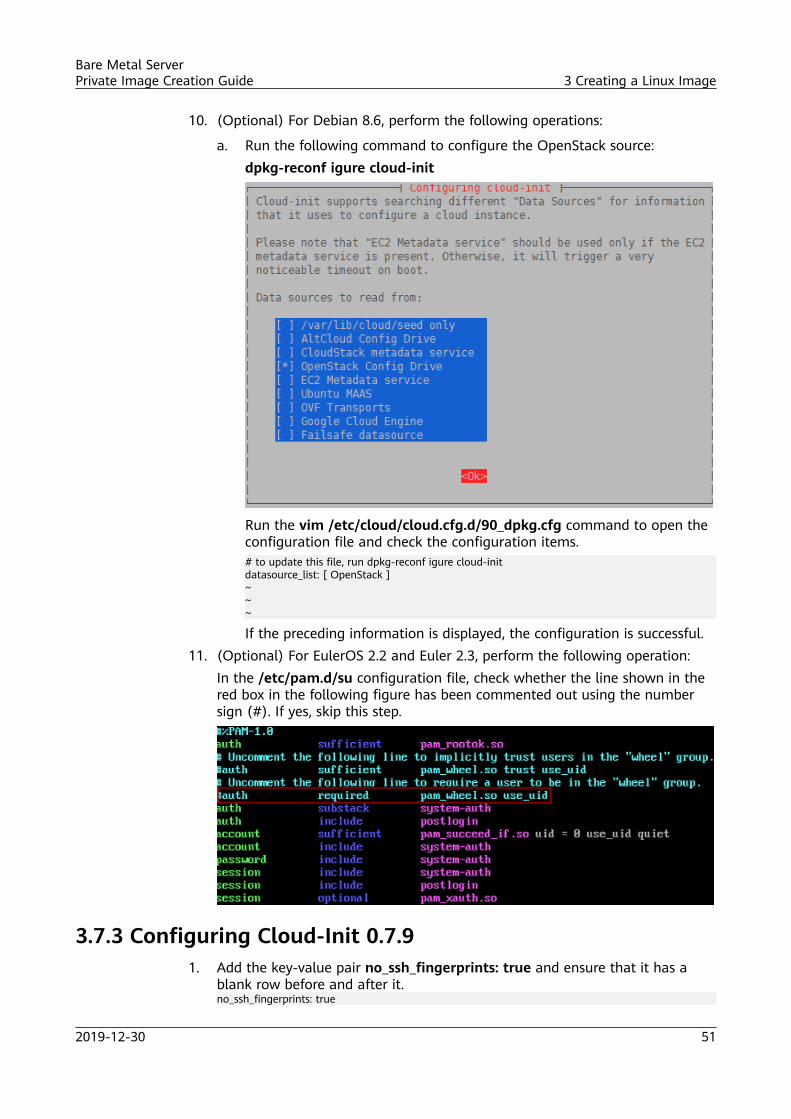
a. Run the following command to configure the OpenStack source:dpkg-reconf igure cloud-init
Run the vim /etc/cloud/cloud.cfg.d/90_dpkg.cfg command to open theconfiguration file and check the configuration items.# to update this file, run dpkg-reconf igure cloud-initdatasource_list: [ OpenStack ]~~~
If the preceding information is displayed, the configuration is successful.11. (Optional) For EulerOS 2.2 and Euler 2.3, perform the following operation:
In the /etc/pam.d/su configuration file, check whether the line shown in thered box in the following figure has been commented out using the numbersign (#). If yes, skip this step.
3.7.3 Configuring Cloud-Init 0.7.91. Add the key-value pair no_ssh_fingerprints: true and ensure that it has a
blank row before and after it.no_ssh_fingerprints: true
Bare Metal ServerPrivate Image Creation Guide 3 Creating a Linux Image
2019-12-30 51
2. Set the value of ssh_pwauth to false.ssh_pwauth: false
3. Add preserve_hostname: false.preserve_hostname: false
4. Use the number sign (#) to comment out the following fields:mount_default_fields: [~, ~, 'auto', 'defaults,nofail', '0', '2']resize_rootfs_tmp: /devssh_deletekeys: 0ssh_genkeytypes: ~syslog_fix_perms: ~
5. Change the value of ssh_genkeytypes to ['rsa', 'dsa'].ssh_genkeytypes: ['rsa', 'dsa']
6. Change the value of syslog_fix_perms to root:root.syslog_fix_perms: root:root
7. Add the following content:network: config: disableddatasource_list: [ OpenStack ]
8. Add the following content after - final-message in cloud_final_modules:- power-state-change
9. Modify the content under system info as follows:system_info: default_user: name: linux //Username for logging in to the OS lock_passwd: True //True indicates that password login is disabled. In some OSs, 1 indicates that password login is disabled. gecos: redhat groups: [adm, audio, cdrom, dialout, dip, floppy, lxd, netdev, plugdev, sudo, video] //(Optional) This parameter specifies the groups to which the user is added. The values must be groups that exist in the etc/group of the OS. sudo: ["ALL=(ALL) NOPASSWD:ALL"] //The user has all permissions of user root. shell: /bin/bash //The bash command is used to execute the shell script. distro: rhel paths: cloud_dir: /var/lib/cloud/ templates_dir: /etc/cloud/templates/ upstart_dir: /etc/init/ ssh_svcname: sshd
The value of distro varies depending on the OS and can be sles, rhel,ubuntu, debian, or fedora.
3.7.4 Configuring Cloud-Init 17.11. Add the key-value pair no_ssh_fingerprints: true and ensure that it has a
blank row before and after it.no_ssh_fingerprints: true
2. Change the value of users to default.users: - default
3. Change the value of disable_root to true. This parameter specifies whetherremote login over SSH as user root is enabled.disable_root: true
4. Add ssh_pwauth: false or ssh_pwauth: 0. This parameter specifies whetherremote login over SSH as user root is enabled.ssh_pwauth: false
5. Add the following content:network: config: disableddatasource_list: [ OpenStack ]
Bare Metal ServerPrivate Image Creation Guide 3 Creating a Linux Image
2019-12-30 52

NO TICE
For Ubuntu 16.04, do not add the following information:datasource_list: [ OpenStack ]
6. Add the following content after - final-message in cloud_final_modules:- power-state-change
7. Modify the content under system info as follows:system_info: distro: sles default_user: name: linux //Username for logging in to the OS lock_passwd: True //True indicates that password login is disabled. In some OSs, 1 indicates that password login is disabled. gecos: redhat groups: [adm, audio, cdrom, dialout, dip, floppy, lxd, netdev, plugdev, sudo, video] //(Optional) This parameter specifies the groups to which the user is added. The value must contain groups that exist in the etc/group of the OS. sudo: ["ALL=(ALL) NOPASSWD:ALL"] //The user has all permissions of user root. shell: /bin/bash //The bash command is used to execute the shell script. paths: cloud_dir: /var/lib/cloud/ templates_dir: /etc/cloud/templates/ ssh_svcname: sshd
The value of distro varies depending on the OS and can be sles, rhel,ubuntu, debian, or fedora.
8. (Optional) For SUSE 12 SP1 and SUSE 12 SP2, run the following command tomodify configuration item [Unit] in the /usr/lib/systemd/system/cloud-init-local.service configuration file:vi /usr/lib/systemd/system/cloud-init-local.serviceEnsure that the value of [Unit] is the same as the following:[Unit]Description=Initial cloud-init job (pre-networking)DefaultDependencies=noWants=network-pre.targetWants=local-fs.targetAfter=local-fs.targetBefore=network-pre.targetBefore=shutdown.targetBefore=basic.targetConflicts=shutdown.target# Other distros use Before=sysinit.target. There is not a clearly identified# reason for usage of basic.target instead.
9. (Optional) For Ubuntu 16.04, run the following command to configure theOpenStack source:dpkg-reconfigure cloud-init
Bare Metal ServerPrivate Image Creation Guide 3 Creating a Linux Image
2019-12-30 53

Run the vim /etc/cloud/cloud.cfg.d/90_dpkg.cfg command to open theconfiguration file and check the configuration items.# to update this file, run dpkg-reconfigure cloud-initdatasource_list: [ OpenStack ]~~~
If the preceding information is displayed, the configuration is successful.
3.7.5 Configuring Cloud-Init 18.21. Add the key-value pair no_ssh_fingerprints: true and ensure that it has a
blank row before and after it.no_ssh_fingerprints: true
2. Change the value of users to default.users: - default
3. Change the value of disable_root to true. This parameter specifies whetherremote login over SSH as user root is enabled.disable_root: true
4. Add the value of ssh_pwauth to false or 0. This parameter specifies whetherremote login over SSH as user root is enabled.ssh_pwauth: false
5. Add the following content:network: config: disabled
6. Add the following content after - final-message in cloud_final_modules:- power-state-change
7. Modify the content under system info as follows:system_info: distro: sles default_user: name: linux //Username for logging in to the OS lock_passwd: True //True indicates that password login is disabled. In some OSs, 1 indicates that password login is disabled. gecos: redhat groups: [adm, audio, cdrom, dialout, dip, floppy, lxd, netdev, plugdev, sudo, video] //(Optional) This parameter specifies the groups to which the user is added. The values must be groups that exist in the etc/group of the OS. sudo: ["ALL=(ALL) NOPASSWD:ALL"] //The user has all permissions of user root. shell: /bin/bash //The bash command is used to execute the shell script.
Bare Metal ServerPrivate Image Creation Guide 3 Creating a Linux Image
2019-12-30 54
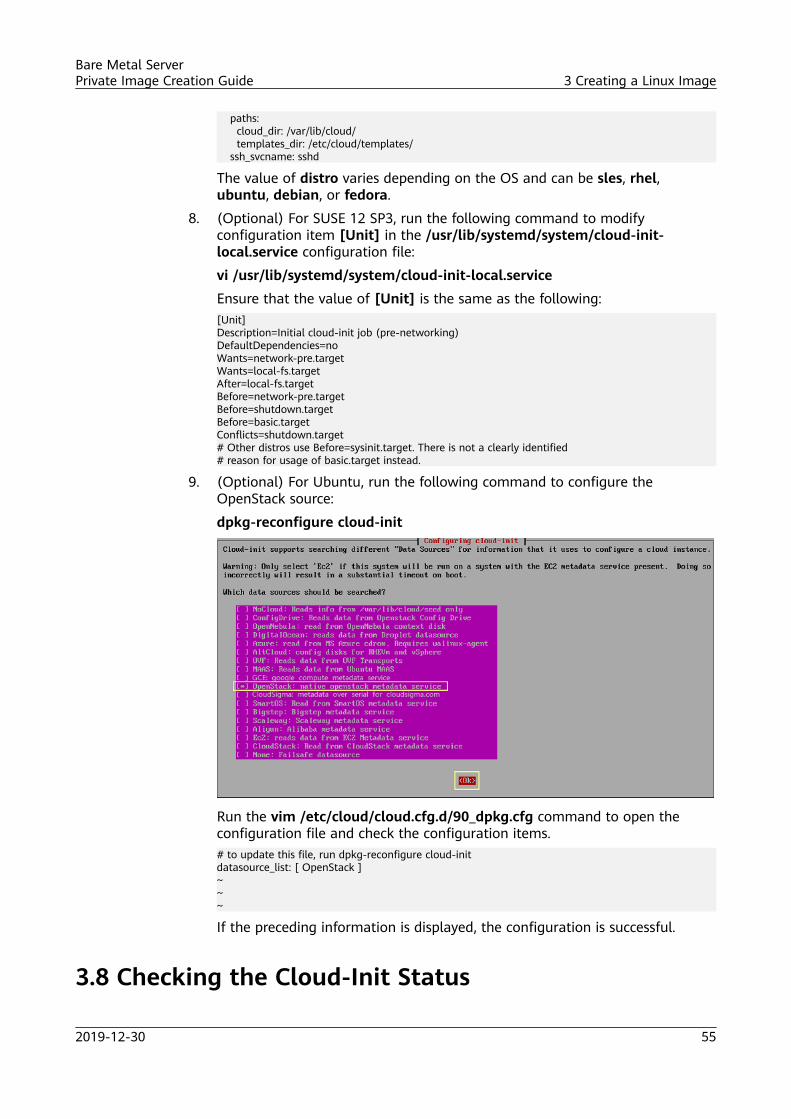
paths: cloud_dir: /var/lib/cloud/ templates_dir: /etc/cloud/templates/ ssh_svcname: sshd
The value of distro varies depending on the OS and can be sles, rhel,ubuntu, debian, or fedora.
8. (Optional) For SUSE 12 SP3, run the following command to modifyconfiguration item [Unit] in the /usr/lib/systemd/system/cloud-init-local.service configuration file:
vi /usr/lib/systemd/system/cloud-init-local.service
Ensure that the value of [Unit] is the same as the following:[Unit]Description=Initial cloud-init job (pre-networking)DefaultDependencies=noWants=network-pre.targetWants=local-fs.targetAfter=local-fs.targetBefore=network-pre.targetBefore=shutdown.targetBefore=basic.targetConflicts=shutdown.target# Other distros use Before=sysinit.target. There is not a clearly identified# reason for usage of basic.target instead.
9. (Optional) For Ubuntu, run the following command to configure theOpenStack source:
dpkg-reconfigure cloud-init
Run the vim /etc/cloud/cloud.cfg.d/90_dpkg.cfg command to open theconfiguration file and check the configuration items.# to update this file, run dpkg-reconfigure cloud-initdatasource_list: [ OpenStack ]~~~
If the preceding information is displayed, the configuration is successful.
3.8 Checking the Cloud-Init Status
Bare Metal ServerPrivate Image Creation Guide 3 Creating a Linux Image
2019-12-30 55

3.8.1 SUSE 11 SP41. Run the yast command and select System using up and down arrow keys.2. Press Tab and then select System Services (Runlevel).3. Press Enter.
The following figure is displayed, and the four services of Cloud-Init are allenabled. If a service does not start, configure it, as shown in the followingfigure.
3.8.2 SUSE 12 SP11. Check whether the automatic start of Cloud-Init has been configured
successfully:To query the Cloud-Init status, run the yast command and use up and downarrow keys to select System. Then press Tab and use up and down arrow keysto select System Manager.
Bare Metal ServerPrivate Image Creation Guide 3 Creating a Linux Image
2019-12-30 56

2. As shown in the preceding figure, the four services of Cloud-Init have started.Active indicates that the service has been enabled. If a service does not start,select it using up and down arrow keys, press Tab, and click Enable/Disableto configure it.
3.8.3 SUSE 12 SP2, SUSE 12 SP3, Oracle Linux 7, Red Hat 7,CentOS 7
1. Run the following commands to check whether the automatic start of Cloud-Init has been configured successfully:service cloud-init-local statusservice cloud-init statusservice cloud-config statusservice cloud-final status
2. If the command output contains enabled, the automatic start has beenconfigured.
Bare Metal ServerPrivate Image Creation Guide 3 Creating a Linux Image
2019-12-30 57

If Cloud-Init does not start, run the following commands to configure it:systemctl enable cloud-init-localsystemctl enable cloud-initsystemctl enable cloud-configsystemctl enable cloud-final
3.8.4 EulerOS1. Run the following commands to check whether the automatic start of Cloud-
Init has been configured successfully:service cloud-init-local statusservice cloud-init statusservice cloud-config statusservice cloud-final status
2. If command output contains enabled, Cloud-Init has been configuredsuccessfully.
If Cloud-Init does not start, run the following commands to configure it:systemctl enable cloud-init-localsystemctl enable cloud-initsystemctl enable cloud-configsystemctl enable cloud-final
3.8.5 Red Hat 6, CentOS 6, and Oracle Linux 61. Run the following command:
chkconfig --list | grep cloud
Bare Metal ServerPrivate Image Creation Guide 3 Creating a Linux Image
2019-12-30 58

If on is displayed in the red boxes in the following figure, the services havestarted.
2. If four services of Cloud Init have not started, run the following commands:chkconfig cloud-init onchkconfig cloud-init-local onchkconfig cloud-config onchkconfig cloud-final on
3.8.6 Ubuntu 16.041. Run the following commands:
systemctl status cloud-initsystemctl status cloud-init-localsystemctl status cloud-configsystemctl status cloud-finalIf enabled is displayed in the red boxes in the following figure, services havestarted.
2. If four services of Cloud-Init have not started, run the following commands:systemctl enable cloud-initsystemctl enable cloud-init-localsystemctl enable cloud-configsystemctl enable cloud-final
3.8.7 Ubuntu 14.04Run the following commands:
initctl status cloud-init
initctl status cloud-init-local
initctl status cloud-config
initctl status cloud-final
Bare Metal ServerPrivate Image Creation Guide 3 Creating a Linux Image
2019-12-30 59

If the Cloud-Init component installation information similar to that shown in thefollowing is displayed, the installation is successful.
[root@ubuntu:~]# initctl status cloud-initcloud-init stop/waiting[root@ubuntu:~]# initctl status cloud-init-localcloud-init-local stop/waiting[root@ubuntu:~]# initctl status cloud-configcloud-config stop/waiting[root@ubuntu:~]# initctl status cloud-finalcloud-final stop/waiting
3.9 Modifying the Hardware Device Driver That Bootsthe OS
Scenarios
This section describes how to modify the hardware device driver that is loadedduring OS startup.
Prerequisites
You have logged in to the VM.
Procedure1. Add or modify the configuration file.
– For Red Hat, Oracle Linux, EulerOS, SUSE 12, and CentOS, use the vieditor to open the /etc/dracut.conf file and change or add the value ofadd_drivers.As shown in the following, the value of add_drivers is the driver of theserver's RAID controller card.logfile=/var/log/dracut.log# fileloglvl=7......# additional kernel modules to the defaultadd_drivers+="ahci megaraid_sas mpt3sas mpt2sas"
– For Ubuntu 14.04 or Debian, use the vi editor to open the /etc/initramfs-tools/modules file and add ahci, megaraid_sas, mpt3sas, and mpt2sasdrivers (the format depends on the OS).# List of modules that you want to include in your initramfs.# They will be loaded at boot time in the order below.## Syntax: module_name [args ...]## You must run update-initramfs(8) to effect this change.## Examples:## raid1# sd_modahcimegaraid_sasmpt3sasmpt2sas
Bare Metal ServerPrivate Image Creation Guide 3 Creating a Linux Image
2019-12-30 60
– For Ubuntu 16.04, add the drivers to both the /etc/dracut.conf and /etc/initramfs-tools/modules files. Before editing the files, install requiredsoftware.
i. Run the following command to install dracut:apt-get install dracutAfter the installation is complete, add add_drivers+="ahcimegaraid_sas mpt3sas mpt2sas" to the end of the /etc/dracut.conffile by performing operations similar to those for Red Hat and OracleLinux 7.3.
ii. Run the following command to install initramfs-tools:apt-get install initramfs-toolsAfter the installation is complete, add the ahci, megaraid_sas,mpt3sas, and mpt2sas drivers to the end of the /etc/initramfs-tools/modules file by performing operations similar to those forUbuntu 14.04.
– For Ubuntu 16.04 for ARM, run the following commands to update thekernel and driver, and then restart the VM:sudo apt-get updatesudo apt-get dist-upgrade
– For SUSE 11 SP4, use the vi editor to open the/etc/sysconfig/kernel fileand change the value of INITRD_MODULES.As shown in the following, the value of INITRD_MODULES= is the driverof the server's RAID controller card....#INITRD_MODULES="ahci megaraid_sas mpt3sas mpt2sas"## Type: string(yes)...
NO TE
You can enter multiple RAID controller card drivers separated by spaces. The RAIDcontroller card driver name can be obtained from the purchased hardware device.Images support coexistence of multiple RAID controller card drivers, for example,mpt2sas, megaraid_sas, and mpt3sas. If the OS does not support a hardware driver, itmust be installed.
2. Update the kernel. For Ubuntu 16.04 for ARM, skip this step.For Rad Hat, Oracle Linux, EulerOS, SUSE 12, Ubuntu 16.04, and CentOS, runthe dracut -f command.– For Rad Hat, Oracle Linux, EulerOS, and CentOS, run the dracut -f
command.Wait for several seconds, if no command output is returned, the drivershave been loaded.
– For SUSE 12 SP1, run the dracut -f command and then observe the lastfew lines of the command output.In the command output, the following information is displayed:...Some kernel modules could not be includedThis is not necessarily an error:pcmcia
Bare Metal ServerPrivate Image Creation Guide 3 Creating a Linux Image
2019-12-30 61

sdhci_acpiswap
The drivers that are not loaded do not include the manually-added one,indicating that the RAID card driver has been loaded.
– For SUSE 12, run the dracut -f command. The kernel is updatedsuccessfully if information similar to the following is displayed.
– For Ubuntu 14.04, Ubuntu 16.04, or Debian, run the following commandto generate initrd:update-initramfs -uRun the following commands to check whether the ahci, megaraid_sas,mpt3sas, and mpt2sas drivers have been installed:lsinitramfs /boot/initrd.img-`uname -r` |grep ahcilsinitramfs /boot/initrd.img-`uname -r` |grep megaraid_saslsinitramfs /boot/initrd.img-`uname -r` |grep mpt3saslsinitramfs /boot/initrd.img-`uname -r` |grep mpt2sas
– For SUSE 11 SP4, run the mkinitrd command and check whether thevalues of Kernel Modules include the manually added driver.
Bare Metal ServerPrivate Image Creation Guide 3 Creating a Linux Image
2019-12-30 62

3. For SUSE 11 SP4, change the virtual disks in the VM file to physical disks. ForRed Hat, CentOS, Oracle Linux, SUSE 12, and EulerOS, skip this step. For SUSE11 SP4, perform the following steps:
NO TE
If the LVM partitioning mechanism is used, perform steps 3.a to 3.e to change thedrive letter mode.
a. In the /boot/grub directory, run the blkid command to check whetherthe disk partitions are normal.linux-a5d6:/boot/grub # blkid/dev/sda1: UUID="c23d47f8-ef1b-4c4e-9a3b-5ae138ef7184" TYPE="swap"/dev/sda2: UUID="27644978-e244-4a8c-996a-03119fdaff71" TYPE="ext3"
If some disk partitions do not have UUIDs, check whether the steps toinstall the VM OS are correct and reinstall the VM OS.
b. Use the vi editor to open the /boot/grub/menu.lst file, modify the OSboot parameters, and save the configuration. The following figures showthe original and modified /boot/grub/memu.lst files.Original menu.lst file:
Modified menu.lst file:
c. Use the vi editor to open the /boot/grub/device.map file. The followinginformation shows the original and modified /boot/grub/device.mapfile.
Bare Metal ServerPrivate Image Creation Guide 3 Creating a Linux Image
2019-12-30 63

Original device.map file:(hd0) /dev/disk/by-id/ata-QEMU_HARDDISK_QM00001~
Modified device.map file:(hd0) /dev/sda
d. Use the vi editor to open the /etc/fstab file. The following figures showthe original and modified /etc/fstab file.Original fstab file:
Modified fstab file:
e. Use the vi editor to open the /etc/mtab file, delete the row that containsthe CDROM of /dev/sr0, and save the configuration. The following figureshows the modified /etc/mtab file.Modified /etc/mtab file:
NO TE
If no /dev/sr0 configuration item exists, skip this step.
f. Use the vi editor to open the /etc/sysconfig/bootloader file. Thefollowing figures show the original and modified /etc/sysconfig/bootloader file.Original bootloader file:
Bare Metal ServerPrivate Image Creation Guide 3 Creating a Linux Image
2019-12-30 64

Modified bootloader file:
If SUSE 11 SP4 uses the LVM partitioning mechanism, perform the followingoperations to replace the virtual disks in the VM file with the actual physicaldisks:
a. In the /boot/grub directory, run the blkid command to check whetherthe disk partitions are normal.
If some disk partitions do not have UUIDs, check whether the steps toinstall the VM OS are correct and reinstall the VM OS.
b. Use the vi editor to open the /boot/grub/menu.lst file, modify the OSboot parameters, and save the configuration. The following figures showthe original and modified /boot/grub/memu.lst files.Original menu.lst file:
Bare Metal ServerPrivate Image Creation Guide 3 Creating a Linux Image
2019-12-30 65

Modified menu.lst file:
c. Use the vi editor to open the /boot/grub/device.map file. The followinginformation shows the original and modified /boot/grub/device.mapfile.Original device.map file:(hd0) /dev/disk/by-id/ata-QEMU_HARDDISK_QM00001
Modified device.map file:(hd0) /dev/sda~
d. Use the vi editor to open the /etc/fstab file. The following figures showthe original and modified /etc/fstab file.Original fstab file:
Modified fstab file:
e. Use the vi editor to open the /etc/sysconfig/bootloader file. Thefollowing figures show the original and modified /etc/sysconfig/bootloader file.Original bootloader file:
Modified bootloader file:
After the configuration is complete, run the mkinitrd command. If the valueof resume is not by-uuid, run the reboot and then mkinitrd command toensure that the value of resume is by-uuid.
Bare Metal ServerPrivate Image Creation Guide 3 Creating a Linux Image
2019-12-30 66
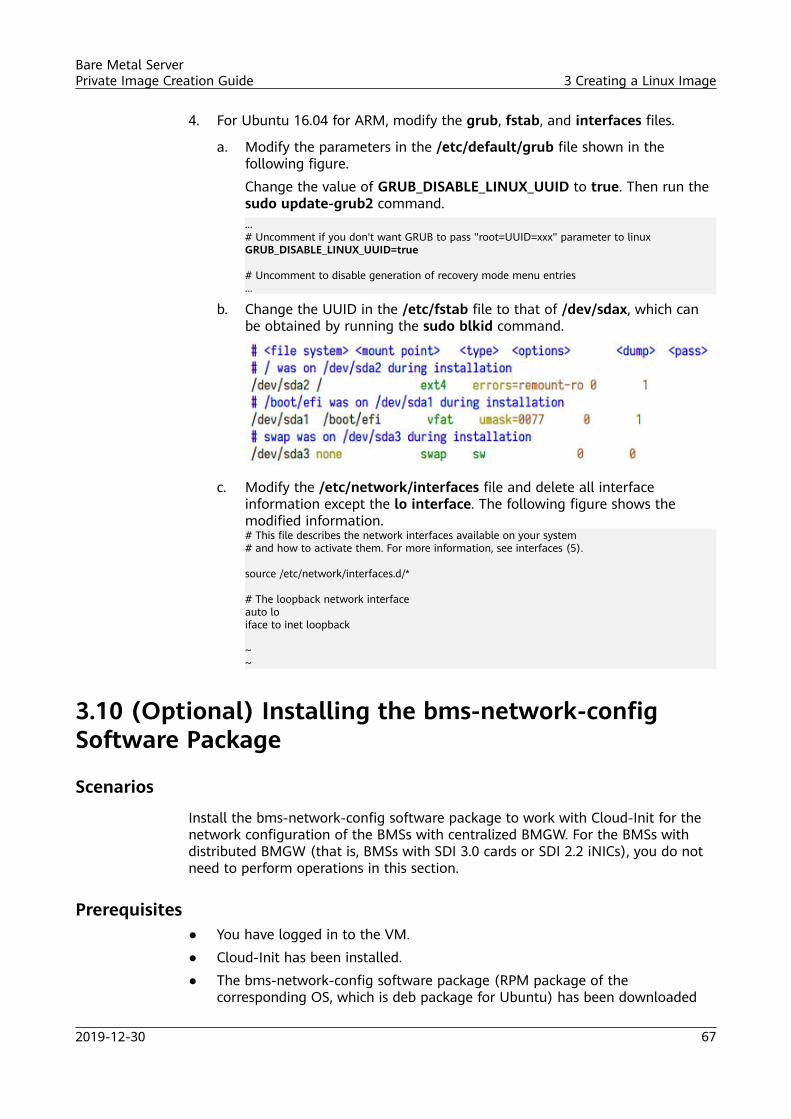
4. For Ubuntu 16.04 for ARM, modify the grub, fstab, and interfaces files.
a. Modify the parameters in the /etc/default/grub file shown in thefollowing figure.Change the value of GRUB_DISABLE_LINUX_UUID to true. Then run thesudo update-grub2 command....# Uncomment if you don't want GRUB to pass "root=UUID=xxx" parameter to linuxGRUB_DISABLE_LINUX_UUID=true
# Uncomment to disable generation of recovery mode menu entries...
b. Change the UUID in the /etc/fstab file to that of /dev/sdax, which canbe obtained by running the sudo blkid command.
c. Modify the /etc/network/interfaces file and delete all interfaceinformation except the lo interface. The following figure shows themodified information.# This file describes the network interfaces available on your system# and how to activate them. For more information, see interfaces (5).
source /etc/network/interfaces.d/*
# The loopback network interfaceauto loiface to inet loopback
~~
3.10 (Optional) Installing the bms-network-configSoftware Package
Scenarios
Install the bms-network-config software package to work with Cloud-Init for thenetwork configuration of the BMSs with centralized BMGW. For the BMSs withdistributed BMGW (that is, BMSs with SDI 3.0 cards or SDI 2.2 iNICs), you do notneed to perform operations in this section.
Prerequisites● You have logged in to the VM.● Cloud-Init has been installed.● The bms-network-config software package (RPM package of the
corresponding OS, which is deb package for Ubuntu) has been downloaded
Bare Metal ServerPrivate Image Creation Guide 3 Creating a Linux Image
2019-12-30 67

based on Preparing Required Hardware and Software and uploaded to theVM.
Procedure1. Enter the directory where the bms-network-config installation package is
stored and run the following command:rpm -ivh bms-network-config-1.0-7.centosRedhat7.x86_64.rpm[root@localhost r74]# rpm -ivh bms-network-config-1.0-7.centosRedhat7.x86_64.rpmPreparing... ############################### [100%] Updating / installing... 1:bms-network-config-1.0.7.centosRe############################### [100%]
NO TE
If the error shown in the following figure is displayed when you install bms-network-config for SUSE 12, run the rpm -ivh bms-network-config-1.0-9.suse12.x86_64.rpm--nodeps --force command.
Run the dpkg -i xxx command to install Ubuntu or Debian (xxx indicates thename of the deb package).root@ubuntu:~/file# dpkg -i bms-network-config-1.0.7.ubuntu1604-918.debSelecting previously unselected package bms-network-config.(Reading database ... 97630 files and directories currently installed.)Preparing to unpack bms-network-config-1.0.7.ubuntu1604-918.deb ...Unpacking bms-network-config (1.0) ...Setting up bms-network-config (1.0) ...root@ubuntu:~/file# dpkg -s bms-network-config
NO TE
Use the name of the rpm package at your site.
2. After the installation is complete, run the rpm -qa | grep bms-network-config command. The installation is successful if information similar thatshown in the following figure is displayed.[root@localhost r74]# rpm -qa | grep bmsbms-network-config-1.0.7.centosRedhat7.x86_64
For Ubuntu or Debian, run the dpkg -s bms-network-config command toquery the installation process.
3. Query the status of the bms-network-config service.– For Oracle Linux 7, Red Hat 7, CentOS 7, Ubuntu 16.04, SUSE 12, and
EulerOS, run the service bms-network-config status command to querythe status of the service. If the service is not at enabled status, run thesystemctl enable bms-network-config command to enable the service.[root@localhost r74]# service bms-network-config statusRedirecting to /bin/systemctl status bms-network-config.service bms-network-config.service - Network Config Loaded: loaded (/usr/lib/systemd/system/bms-network-config service; enabled vendor preset: disabled) Active: inactive (dead)
– For Red Hat 6, CentOS 6, SUSE 11 SP4, Oracle Linux 6.8 and Oracle Linux6.9, run the chkconfig --list | grep bms-network-config command toquery the status of the service. If the service is not at on status, run the chkconfig bms-network-config on command to enable the service.
Bare Metal ServerPrivate Image Creation Guide 3 Creating a Linux Image
2019-12-30 68

[root@localhost r69]# chkconfig --list | grep bmsbms-network-config 0:off 1:off 2:on 3:on 4:off 5:on 6:off
– For Ubuntu 14.04 or Debian, run the initctl status bms-network_configcommand to query the status of the service.root@ubuntu:~# initctl status bms-network_configbms-network_config stop/waiting
4. Check the startup dependencies between bms-network-config and otherservices.Run the systemctl cat bms-network-config command to check theconfiguration file and ensure that the file content is as follows:[Unit]Description=NetworkConfigDefaultDependencies=noAfter=dbus.serviceWants=dbus.serviceBefore=cloud-init-local.service network-pre.target
[Service]Type=oneshotExecStart=/usr/bin/bms-network_config rhelRemainAfterExit=yesTimeoutSec=0
[Install]WantedBy=multi-user.target
If the startup sequence is incorrect, use the vim /usr/lib/systemd/system/bms-network-config.service command to correct it.
3.11 (Optional) Installing the SDI Driver
Scenarios
Currently, there are three types of SDI cards: SDI storage cards, SDI 2.2 iNICs, andSDI 3.0 cards (integrating storage and networking). The front-end SDI driver plug-in is installed on the image so that BMSs with SDI storage cards or SDI 2.2 iNICscan have EVS disks attached or can support distributed BMGW. In other cases, youcan skip this section. ARM 64 and virtualization OSs such as ESXi do not supportSDI storage cards and SDI 2.2 iNICs, and the SDI driver does not need to beinstalled.
Prerequisites● You have logged in to the VM.● The SDI driver (scsi_ep_front) has been downloaded based on Preparing
Required Hardware and Software and uploaded to the VM.
NO TE
The scsi_ep_front must be version 1.0.13 or later.
Procedure
The following steps are only for reference. The command output for installing theSDI driver for images of different versions may vary.
Bare Metal ServerPrivate Image Creation Guide 3 Creating a Linux Image
2019-12-30 69
1. Enter the directory where the SDI driver installation package is stored and runthe following command:rpm -ivh kmod-scsi_ep_front-redhat_7.4_1.0.13-3.10.0_693.el7.redhat.x86_64.rpm
NO TE
The Ubuntu and Debian SDI driver uses the deb installation package. Run the dpkg -ixxx (xxx indicates the name of the SDI installation package) command to install theSDI driver.
2. After the installation is complete, run the rpm -qa | grep scsi command. Theinstallation is successful if information similar to the following is displayed:[root@localhost ~] rpm -qa | grep scsilsscsi-0.27-6.el7.x86_64kmod-scsi_ep_front-redhat_7.4_1.0.13-3.10.0_693.el7.redhat.x86_64
For Ubuntu 16.04, Ubuntu 14.04, and Debian, run the dkms status command.If installed is displayed, the installation is successful. Then run the update-initramfs -u command to update the driver in the kernel....root@ubuntu:~/file# dkms statusscsi_ep_front, 1.0.13, 4.4.0-21-generic, x86_64: installedscsi_ep_front, 1.0.13, 4.4.0-59-generic, x86_64: builtscsi_ep_front, 1.0.13, 4.4.0-96-generic, x86_64: installed
3. Run the following commands to check whether the SDI driver matches thekernel version:
a. Run the uname -r command to obtain the OS kernel version:[root@localhost r74]# uname -r3.10.0-693.el7.x86_64
The kernel version is 3.10.0-693.el7.x86_64.b. Run the find / -name "*front*.ko" command to check the SDI driver
matching the kernel version.[root@localhost r74]# find / -name "*front*.ko"/usr/lib/modules/3.10.0-693.el7.x86_64/extra/scsi_ep_front/scsi_ep_front.ko
3.12 (Optional) Installing the Hi1822 NIC Driver
ScenariosThis section describes how to install the Hi1822 NIC driver when the BMS requiresthe Hi1822 NIC. CentOS 7.6 is used as an example.
Prerequisites● You have logged in to the VM.● The Hi1822 NIC driver package and management software have been
uploaded to the VM.To obtain the Hi1822 NIC driver package and management software, performthe following operations:
a. Download the .zip package of the driver based on Preparing RequiredHardware and Software.
b. Obtain the required installation packages(IN500_solution_5.1.0.SPC201.zip is used as an example).
Bare Metal ServerPrivate Image Creation Guide 3 Creating a Linux Image
2019-12-30 70
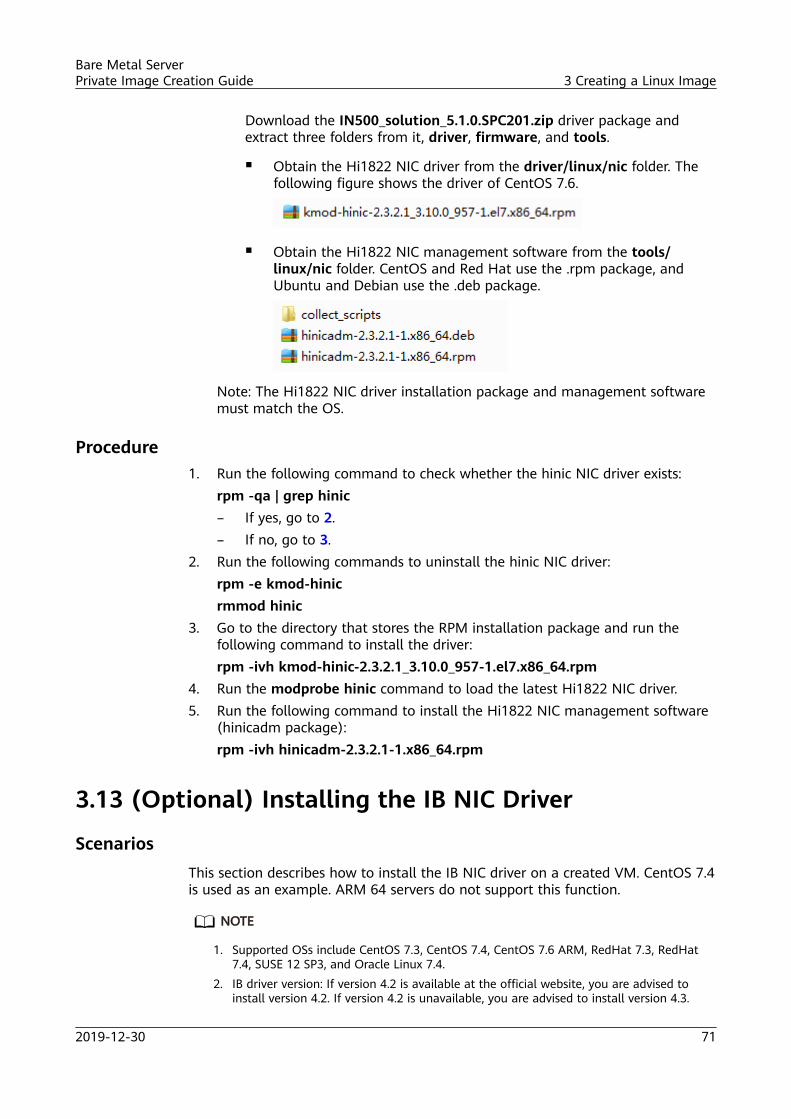
Download the IN500_solution_5.1.0.SPC201.zip driver package andextract three folders from it, driver, firmware, and tools.
▪ Obtain the Hi1822 NIC driver from the driver/linux/nic folder. Thefollowing figure shows the driver of CentOS 7.6.
▪ Obtain the Hi1822 NIC management software from the tools/linux/nic folder. CentOS and Red Hat use the .rpm package, andUbuntu and Debian use the .deb package.
Note: The Hi1822 NIC driver installation package and management softwaremust match the OS.
Procedure1. Run the following command to check whether the hinic NIC driver exists:
rpm -qa | grep hinic– If yes, go to 2.– If no, go to 3.
2. Run the following commands to uninstall the hinic NIC driver:rpm -e kmod-hinicrmmod hinic
3. Go to the directory that stores the RPM installation package and run thefollowing command to install the driver:rpm -ivh kmod-hinic-2.3.2.1_3.10.0_957-1.el7.x86_64.rpm
4. Run the modprobe hinic command to load the latest Hi1822 NIC driver.5. Run the following command to install the Hi1822 NIC management software
(hinicadm package):rpm -ivh hinicadm-2.3.2.1-1.x86_64.rpm
3.13 (Optional) Installing the IB NIC Driver
ScenariosThis section describes how to install the IB NIC driver on a created VM. CentOS 7.4is used as an example. ARM 64 servers do not support this function.
NO TE
1. Supported OSs include CentOS 7.3, CentOS 7.4, CentOS 7.6 ARM, RedHat 7.3, RedHat7.4, SUSE 12 SP3, and Oracle Linux 7.4.
2. IB driver version: If version 4.2 is available at the official website, you are advised toinstall version 4.2. If version 4.2 is unavailable, you are advised to install version 4.3.
Bare Metal ServerPrivate Image Creation Guide 3 Creating a Linux Image
2019-12-30 71
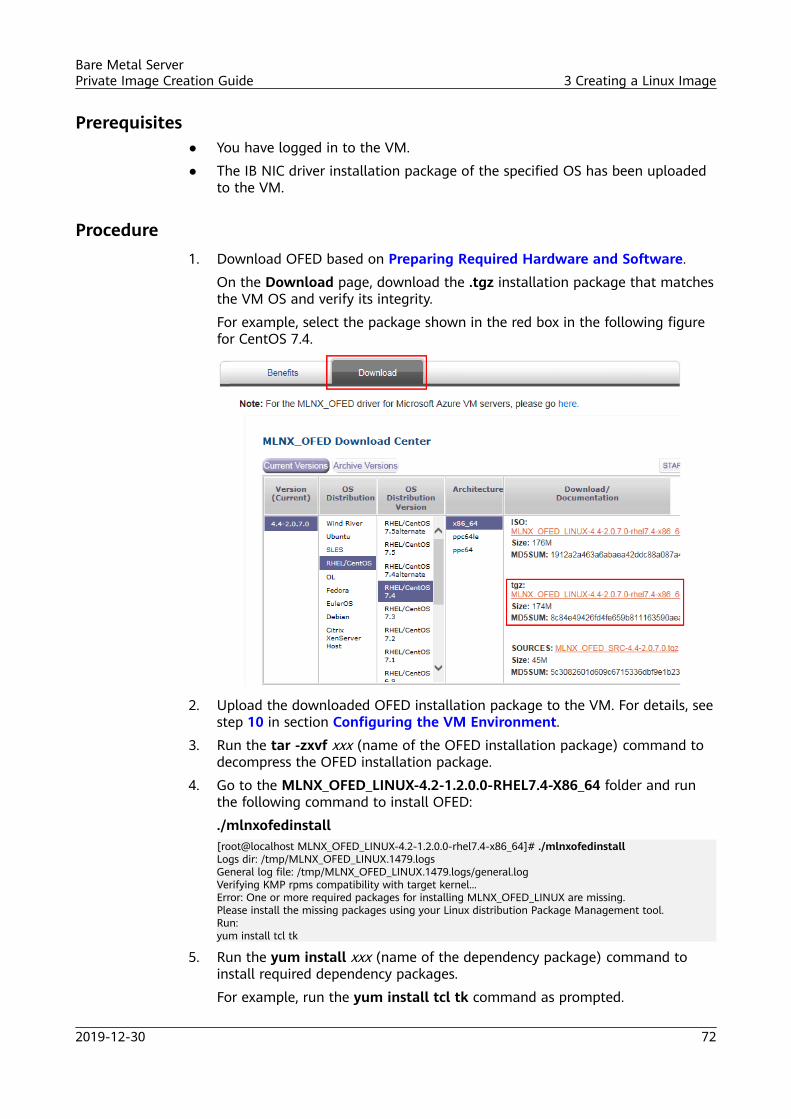
Prerequisites● You have logged in to the VM.
● The IB NIC driver installation package of the specified OS has been uploadedto the VM.
Procedure1. Download OFED based on Preparing Required Hardware and Software.
On the Download page, download the .tgz installation package that matchesthe VM OS and verify its integrity.
For example, select the package shown in the red box in the following figurefor CentOS 7.4.
2. Upload the downloaded OFED installation package to the VM. For details, seestep 10 in section Configuring the VM Environment.
3. Run the tar -zxvf xxx (name of the OFED installation package) command todecompress the OFED installation package.
4. Go to the MLNX_OFED_LINUX-4.2-1.2.0.0-RHEL7.4-X86_64 folder and runthe following command to install OFED:
./mlnxofedinstall[root@localhost MLNX_OFED_LINUX-4.2-1.2.0.0-rhel7.4-x86_64]# ./mlnxofedinstallLogs dir: /tmp/MLNX_OFED_LINUX.1479.logsGeneral log file: /tmp/MLNX_OFED_LINUX.1479.logs/general.logVerifying KMP rpms compatibility with target kernel...Error: One or more required packages for installing MLNX_OFED_LINUX are missing.Please install the missing packages using your Linux distribution Package Management tool.Run:yum install tcl tk
5. Run the yum install xxx (name of the dependency package) command toinstall required dependency packages.
For example, run the yum install tcl tk command as prompted.
Bare Metal ServerPrivate Image Creation Guide 3 Creating a Linux Image
2019-12-30 72
6. Run the ./mlnxofedinstall command.The installation is successful if information similar to the following isdisplayed:Installation finished successfully.
Preparing... ############################### [100%]Updating / installing... 1:mlnx-fw-updater-4.2-1.2.0.0 ############################### [100%]
Added 'RUN_FW_UPDATER_ONBOOT=no to /etc/infiniband/openib.conf...
7. Run the /etc/init.d/openibd restart command to load the driver.[root@localhost MLNX_OFED_LINUX-4.2-1.2.0.0-rhel7.4-x86_64]# /etc/init.d/openibd restartUploading HCA driver: [ OK ]Loading HCA driver and Access Layer: [ OK ]
3.14 (Optional) Installing the V5 and TaiShan ServerDriver
3.14.1 Preparations1. Download the .zip package of the driver based on Preparing Required
Hardware and Software.Examples:– CentOS 7.3: FusionServer iDriver-CentOS7.3-Driver-V007.zip– Red Hat Enterprise Linux 7.3: FusionServer iDriver-RHEL7.3-Driver-
V007.zip– Ubuntu 16.04: FusionServer iDriver-Ubuntu16.04-Driver-V006.zip– EulerOS 2.8 ARM: TaiShan EulerOS2.8-Driver-V101.zip– CentOS 7.6 ARM: TaiShan CentOS7.6-Driver-V101.zip
2. Obtain the installation package from the driver package. The drivers ofCentOS 7.3 V5 servers and those of EulerOS 2.8 ARM and CentOS 7.6 ARMTaiShan servers are described as follows:– For CentOS 7.3
Decompress the FusionServer iDriver-CentOS7.3-Driver-V007.zippackage to obtain the onboard_driver_CentOS7.3.iso file. Thendecompress the onboard_driver_CentOS7.3.iso file to obtain the NIC-X710_XL710_X722-CentOS7.3-i40e-2.4.6-1.x86_64.rpm,RAID-3008_3416IT-CentOS7.3-mpt3sas-23.00.00.00-1-x86_64.rpm andRAID-Brcm-CentOS7.3-megaraid_sas-07.706.07.00-1-x86_64.rpm files.The NIC-X710_XL710_X722-CentOS7.3-i40e-2.4.6-1.x86_64.rpm,RAID-3008_3416IT-CentOS7.3-mpt3sas-23.00.00.00-1-x86_64.rpm andRAID-Brcm-CentOS7.3-megaraid_sas-07.706.07.00-1-x86_64.rpm filesare used to install drivers for the V5 server onboard NIC, mpt3, andmegaraid_sas.
– For EulerOS 2.8 ARMDecompress the TaiShan EulerOS2.8-Driver-V101.zip package to obtainthe onboard_driver_EulerOS2.8.iso file. Then, decompressonboard_driver_EulerOS2.8.iso to obtain the NIC-IN200-EulerOS2.8-
Bare Metal ServerPrivate Image Creation Guide 3 Creating a Linux Image
2019-12-30 73

hinic-2.3.2.1-1-aarch64.rpm file, which is used to install the Hi1822 NICdriver. The driver has been installed in (Optional) Installing the Hi1822NIC Driver. Therefore, you can skip this step.
– For CentOS 7.6 ARMDecompress TaiShan CentOS7.6-Driver-V101.zip to obtain theonboard_driver_CentOS7.6.iso file. Then, decompressonboard_driver_CentOS7.6.iso to obtain the RAID-3508_3408iMR-CentOS7.6-megaraid_sas-07.709.08.00-1-aarch64.rpm and NIC-IN200-CentOS7.6-hinic-2.3.2.1-1-aarch64.rpm files, which are used to installthe megaraid_sas driver and the Hi1822 NIC driver. The Hi1822 NIC driverhas been installed in (Optional) Installing the Hi1822 NIC Driver.Therefore, you do not need to install it again.
3.14.2 (Optional) Installing the V5 Server Onboard NIC Driver
Scenarios
This section describes how to install the X722 NIC driver so that BMSs can beprovisioned on V5 servers. Skip this section for other types of servers.
NO TE
This section uses CentOS 7.3 as an example to describe how to install the V5 serveronboard NIC driver.
Procedure1. Upload the NIC-X710_XL710_X722-CentOS7.3-i40e-2.4.6-1.x86_64.rpm
package obtained in section Preparations to the VM. For details, see step 10in section Configuring the VM Environment.
2. Enter the directory where the .rpm package is stored and run the followingcommand to install the driver:rpm -ivh NIC-X710_XL710_X722-CentOS7.3-i40e-2.4.6-1.x86_64.rpm[root@localhost i40e]# rpm -ivh NIC-X710_XL710_X722-CentOS7.3-i40e-2.4.6-1.x86_64.rpmPreparing... ################################## [100%]Updating / installing... 1:i40e-2.4.6-1 ################################## [100%]original pci.ids saved in /usr/local/share/i40eUpdating initrd...Using dracut to update initrd...Successfully updated initrd.[root@localhost i40e]#
3. After the installation is complete, run the rpm -qa | grep i40e command. Theinstallation is successful if information similar to the following is displayed:i40e-2.4.6-1.x86_64
3.14.3 (Optional) Installing the mpt3 Driver
Procedure1. Upload the RAID-3008_3416IT-CentOS7.3-mpt3sas-23.00.00.00-1-
x86_64.rpm package obtained in section Preparations to the VM. For details,see step 10 in section Configuring the VM Environment.
Bare Metal ServerPrivate Image Creation Guide 3 Creating a Linux Image
2019-12-30 74

2. Install the mpt3 driver.
a. Enter the directory where the .rpm package is stored and run thefollowing command to install the driver:rpm -ivh RAID-3008_3416IT-CentOS7.3-mpt3sas-23.00.00.00-1-x86_64.rpm[root@localhost mpt3-82599]# rpm -ivh RAID-3008_3416IT-CentOS7.3-mpt3sas-23.00.00.00-1-x86_64.rpmPreparing... ################################## [100%]Updating / installing... 1:kmod-mpt3sas-23.00.00.00_el7.3-1 ################################## [100%][root@localhost mpt3-82599]#
b. Run the dracut -f command to update the kernel.3. After the installation is complete, run the rpm -qa | grep mpt3 command to
check whether the installation is successful.kmod-mpt3sas-23.00.00.00_el7.3-1.x86_64
3.14.4 (Optional) Installing the megaraid_sas Driver
ScenariosIf the server (such as the V5 server) uses the 3408 or 3508 RAID card, you need toinstall the megaraid_sas driver for the image.
Procedure1. Upload the RAID-Brcm-CentOS7.3-megaraid_sas-07.706.07.00-1-
x86_64.rpm package obtained in section Preparations to the VM. For details,see step 10 in section Configuring the VM Environment.
2. Install the megaraid_sas driver.
a. Enter the directory where the .rpm package is stored and run thefollowing command to install the driver:rpm -ivh RAID-Brcm-CentOS7.3-megaraid_sas-07.706.07.00-1-x86_64.rpm[root@localhost 3408]# rpm -ivh RAID-Brcm-CentOS7.3-megaraid_sas-07.706.07.00-1-x86_64.rpmPreparing... ###################################### [100%]Updating / installing... 1:kmod-megaraid_sas-07.706.07.00_el###################################### [100%][root@localhost 3408]#
b. Run the dracut -f command to update the kernel.3. After the installation is complete, run the rpm -qa | grep raid command to
check whether the installation is successful.kmod-megaraid_sas-07.706.07.00_el7.3-1.x86_64
Bare Metal ServerPrivate Image Creation Guide 3 Creating a Linux Image
2019-12-30 75

3.15 (Optional) Installing the UltraPath
ScenariosIn the scenario where the server needs to be equipped with an HBA card to mountthe FC storage volume, you need to refer to this section to install the UltraPathsoftware.
Procedure1. Install the UltraPath software by following the instructions in OceanStor
UltraPath for Linux xxx User Guide.
NO TE
Obtain the required software and documents based on Preparing Required Hardwareand Software.
2. After the installation is complete, run the reboot command to make theUltraPath software take effect.
3. Run the following command to check whether the UltraPath software versionis correct:upadmin show version
3.16 Performing Security Configurations
Modify SSH Configuration ItemsYou can configure permissions of users for logging in to a BMS based on the usertype. Select the type of the account for logging in to the BMS.
1. To improve the security of a BMS by disabling remote login to the BMS usinga password, configure the following parameters:– Check whether the /etc/cloud/cloud.cfg file contains parameter
ssh_pwauth and whether its value is false. If not, add value false to theparameter or change the parameter value to false so that a passwordcannot be used to log in to the BMS through Xshell.
– Check whether the /etc/ssh/sshd_config file contains parameterChallengeResponseAuthentication and whether its value is no. If not,add value no to the parameter or change the parameter value to no sothat a password cannot be entered using the keyboard inactive methodto log in to the BMS through Xshell.
2. To allow user root to log in remotely and enable SSH permissions of userroot, perform the following operations:
NO TICE
Allowing user root to log in to the BMS remotely has potential security risks.Exercise caution before performing the operations.
Bare Metal ServerPrivate Image Creation Guide 3 Creating a Linux Image
2019-12-30 76

a. Modify the Cloud-Init configuration file /etc/cloud/cloud.cfg.Take CentOS 6.7 for example. Modify the following parameters:users: - name: root lock_passwd: false disable_root: 0 ssh_pwauth: 1
▪ Set the value of lock_passwd to false, indicating that user passwordsare not locked.
▪ disable_root specifies whether remote login using SSH as user rootis disabled. Set its value to 0, indicating that remote login is enabled.(In the Cloud-Init configuration in some OSs, true indicates thatremote login is disabled and false indicates that remote login isenabled.)
▪ ssh_pwauth specifies whether login using the SSH password issupported. Set its value to 1, indicating that login using the SSHpassword is supported.
b. Run the following command to open /etc/ssh/sshd_config in the vieditor:vi /etc/ssh/sshd_configChange the value of PasswordAuthentication to yes, and change thevalue of UseDNS to no.
NO TE
● For SUSE and OpenSUSE, change the values of bothPasswordAuthentication and ChallengeResponseAuthentication to yes.
● For Ubuntu, change the value of PermitRootLogin to yes.
c. Modify the shadow file and lock the initial password of user root in theimage plate to prevent security risks:
i. Run the following command to open the /etc/shadow file in the vimeditor:vi /etc/shadowAdd !! to the hash value of the user root password. The modified filecontent is as follows:# cat /etc/shadow | grep root root:!!$6$SphQRPXu$Nvg6izXbhDPrcY3j1vRiHaQFVRpNiV3HD/bjDgnZrACOWPXwJahx78iaut1IigIUrwavVGSYQ1JOIw.rDlVh7.:17376:0:99999:7:::
ii. After the modification, press Esc and enter :wq to save and exit thefile.
NO TE
For Ubuntu, you must delete the user created during the OS installation. Forexample, if the created user is ubuntu, run the userdel -rf ubuntucommand.
Change Network Script PermissionsChange network script permissions to meet security requirements.
Bare Metal ServerPrivate Image Creation Guide 3 Creating a Linux Image
2019-12-30 77

1. Run the chmod 700 -R /opt/huawei/ command to change the permissions.
2. Run the ls -l /opt/huawei/ and ls -l /opt/huawei/* commands to check thepermissions.
(Optional) Modify Configuration Item /etc/motd
By modifying this configuration item, you can enable the system to remind usersof changing the password when they log in to the BMS for the first time. Thishelps enhance the BMS security. To modify this configuration item, perform thefollowing operations:
1. Run the following command to open /etc/motd in the vi editor orcreate /etc/motd:
vi /etc/motd
NO TE
/etc/motd is the directory that stores the prompts displayed after login to Linux.
2. Press i to enter editing mode and add the information to be displayed afteryou log in to the BMS to the end of the file.
3. Press Esc and enter :wq to save the change the exit.
Modify the Historical Record Configuration ItemNO TE
Modify the /etc/profile.d/history.sh configuration file. Add the date and time sequencingand set the number of historical records to 1000.
This is applicable to all OSs except EulerOS.
1. Run the following command to open /etc/profile.d/history.sh in the vi editor:
vi /etc/profile.d/history.sh
2. Press i to enter editing mode and add the following content to the file:export HISTTIMEFORMAT="%F %T `whoami` "export HISTSIZE=1000
3. Press Esc and enter :wq to save the change the exit.
Optimize the udev Configuration
Delete the /etc/udev/rule.d/70-persistent-net.rules configuration file.
Bare Metal ServerPrivate Image Creation Guide 3 Creating a Linux Image
2019-12-30 78
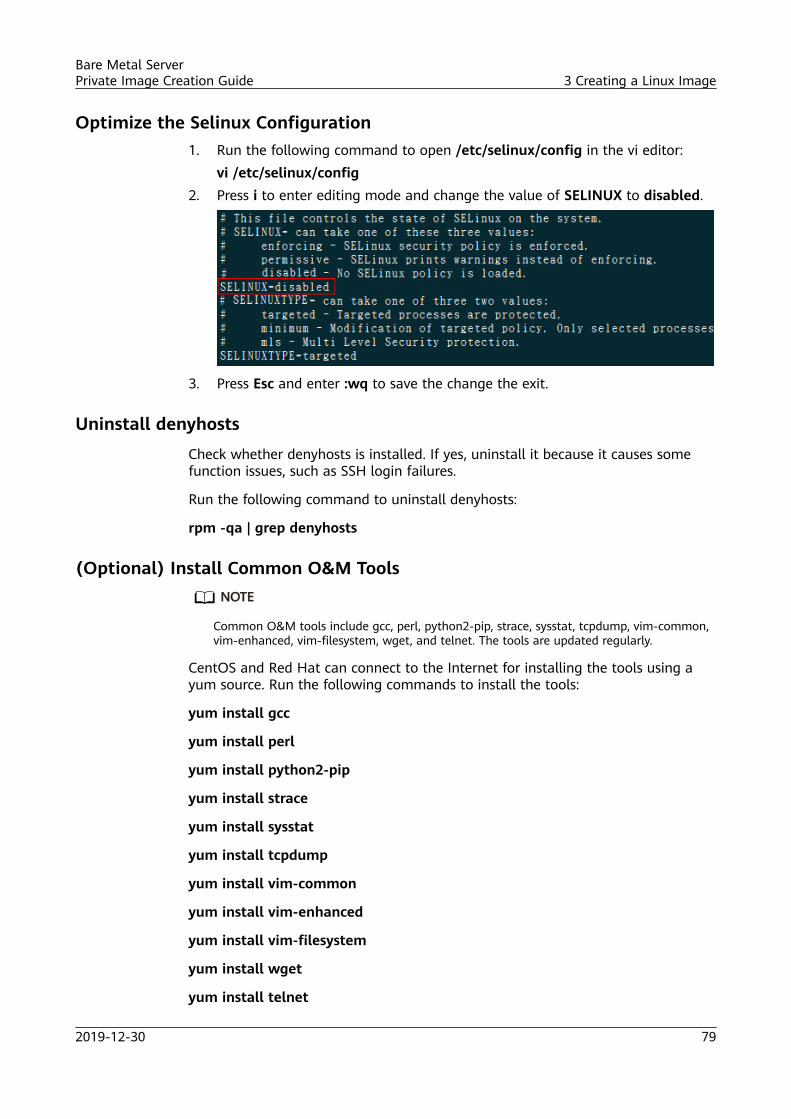
Optimize the Selinux Configuration1. Run the following command to open /etc/selinux/config in the vi editor:
vi /etc/selinux/config2. Press i to enter editing mode and change the value of SELINUX to disabled.
3. Press Esc and enter :wq to save the change the exit.
Uninstall denyhosts
Check whether denyhosts is installed. If yes, uninstall it because it causes somefunction issues, such as SSH login failures.
Run the following command to uninstall denyhosts:
rpm -qa | grep denyhosts
(Optional) Install Common O&M ToolsNO TE
Common O&M tools include gcc, perl, python2-pip, strace, sysstat, tcpdump, vim-common,vim-enhanced, vim-filesystem, wget, and telnet. The tools are updated regularly.
CentOS and Red Hat can connect to the Internet for installing the tools using ayum source. Run the following commands to install the tools:
yum install gcc
yum install perl
yum install python2-pip
yum install strace
yum install sysstat
yum install tcpdump
yum install vim-common
yum install vim-enhanced
yum install vim-filesystem
yum install wget
yum install telnet
Bare Metal ServerPrivate Image Creation Guide 3 Creating a Linux Image
2019-12-30 79

(Optional) Set the Password Validity Period1. Run the following command to query the password validity period:
vi /etc/login.defsThe value of parameter PASS_MAX_DAYS indicates the password validityperiod.
2. Run the following command to change the value of parameterPASS_MAX_DAYS:chage -M 99999 user_name99999 is the validity period of the password, and user_name is a system user.You are advised to set the password validity period as needed and change iton a regular basis.
3. Run vi /etc/login.defs to verify that the configuration has taken effect.
3.17 Configuring Remote Login to a BMSTo enable remote login to a BMS, you need to configure the OS to ensure that theOS can be displayed on the serial port. This section provides guidance for theadministrator on how to configure the serial port when creating a BMS image sothat tenants can log in to the BMS remotely. The configuration varies dependingon the OS.
3.17.1 Oracle Linux 7.3, Oracle Linux 7.4, Red Hat 7, CentOS7.2, CentOS 7.4, CentOS 7.5, and CentOS 7.6 (x86)
NO TE
This section uses the configuration files of CentOS 7.2 as an example. Configuration files ofother types of OSs may be different.
1. Use the vi editor to open the /etc/sysconfig/grub file and add console=tty0console=ttyS0 after GRUB_CMDLINE_LINUX.GRUB_TIMEOUT=5GRUB_DISTRIBUTOR="$(sed 's, release .*$,,g' /etc/system-release)"GRUB_DEFAULT=savedGRUB_DISABLE_SUBMENU=trueGRUB_TERMINAL_OUTPUT="console"GRUB_CMDLINE_LINUX="crashkernel=auto rhgb quiet console=tty0 console=ttyS0"GRUB_DISABLE_RECOVERY="true"~~
2. Run the following commands to update the configuration:stty -F /dev/ttyS0 speed 115200grub2-mkconfig -o /boot/grub2/grub.cfg
Bare Metal ServerPrivate Image Creation Guide 3 Creating a Linux Image
2019-12-30 80
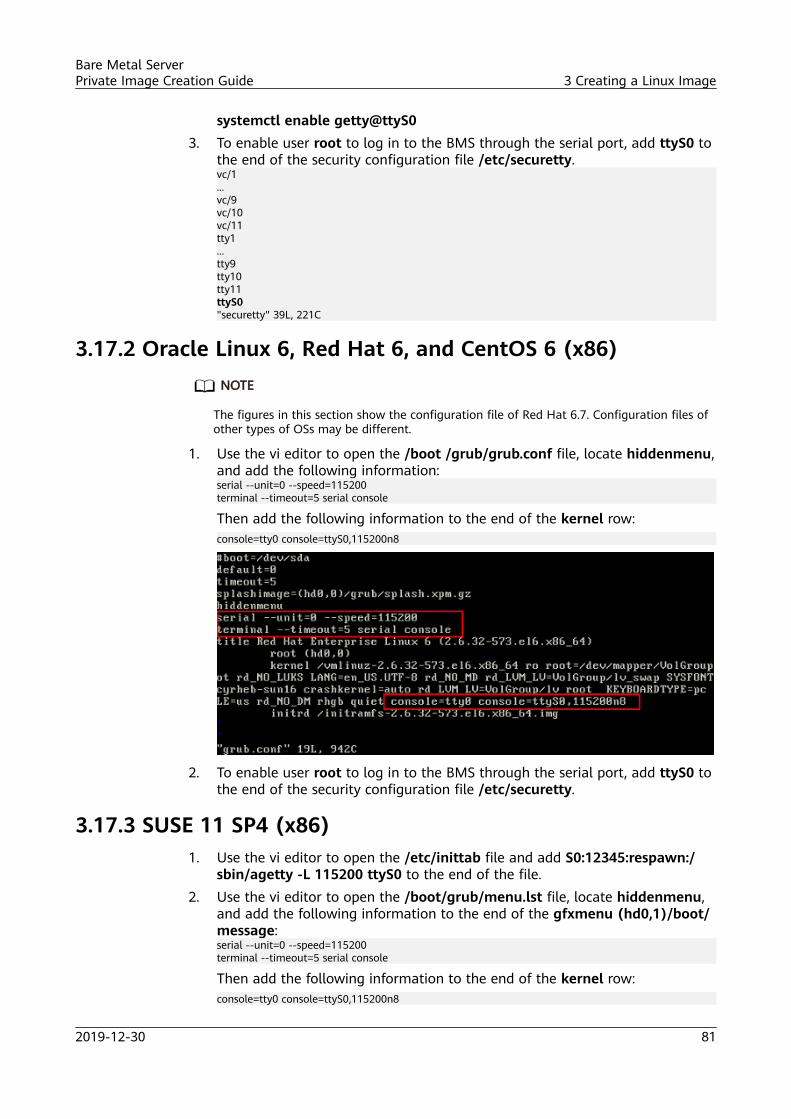
systemctl enable getty@ttyS03. To enable user root to log in to the BMS through the serial port, add ttyS0 to
the end of the security configuration file /etc/securetty.vc/1...vc/9vc/10vc/11tty1...tty9tty10tty11ttyS0"securetty" 39L, 221C
3.17.2 Oracle Linux 6, Red Hat 6, and CentOS 6 (x86)NO TE
The figures in this section show the configuration file of Red Hat 6.7. Configuration files ofother types of OSs may be different.
1. Use the vi editor to open the /boot /grub/grub.conf file, locate hiddenmenu,and add the following information:serial --unit=0 --speed=115200terminal --timeout=5 serial console
Then add the following information to the end of the kernel row:console=tty0 console=ttyS0,115200n8
2. To enable user root to log in to the BMS through the serial port, add ttyS0 tothe end of the security configuration file /etc/securetty.
3.17.3 SUSE 11 SP4 (x86)1. Use the vi editor to open the /etc/inittab file and add S0:12345:respawn:/
sbin/agetty -L 115200 ttyS0 to the end of the file.2. Use the vi editor to open the /boot/grub/menu.lst file, locate hiddenmenu,
and add the following information to the end of the gfxmenu (hd0,1)/boot/message:serial --unit=0 --speed=115200terminal --timeout=5 serial console
Then add the following information to the end of the kernel row:console=tty0 console=ttyS0,115200n8
Bare Metal ServerPrivate Image Creation Guide 3 Creating a Linux Image
2019-12-30 81

3. To enable user root to log in to the BMS through the serial port, add ttyS0 tothe end of the security configuration file /etc/securetty.
3.17.4 CentOS 7 (ARM)1. Use the vi editor to open the /boot/efi/EFI/centos file, locate the line linux /
vmlinuz-4.11.0-22.el7a.aarch64 root=/dev/mapper/cla-root rocrashkernel=auto rd.lvm.lv=cla/root rd.lvm.lv=cla/swapLANG=en_US.UTF-8, and add the following information to its end:console=tty0 console=ttyAMA0,115200
2. To enable login through the serial port as user root, check whether the /etc/securetty file contains ttyAMA0. If not, add it.
3.17.5 SUSE 12, CentOS 7.3, EulerOS, and Oracle Linux 7.2(x86)
NO TE
The configuration files in this section are based on SUSE 12 SP1. Configuration files of othertypes of OSs may be different.
1. Use the vi editor to open the /etc/default/grub file and add console=tty0console=ttyS0 after GRUB_CMDLINE_LINUX.
2. Run the following commands to update the configuration:stty -F /dev/ttyS0 speed 115200grub2-mkconfig -o /boot/grub2/grub.cfgsystemctl enable serial-getty@ttyS0
3. To enable user root to log in to the BMS through the serial port, add ttyS0 tothe end of the security configuration file /etc/securetty.
3.17.6 EulerOS (ARM)1. Use the vi editor to open the /boot/EFI/grub2/grub.cfg file, locate linux/
vmlinuz-4.1.43-vhulk1708.1.1.aarch64 root=/, and add the followinginformation:
Bare Metal ServerPrivate Image Creation Guide 3 Creating a Linux Image
2019-12-30 82
console=tty0 console=ttyAMA0,115200
2. To enable user root to log in to the BMS through the serial port, checkwhether ttyAMA0 is contained in the security configuration file /etc/securetty. If not, add it.
3.17.7 Ubuntu 16.04 (x86)1. Use the vi editor to open the /etc/default/grub file and add console=tty0
console=ttyS0 after GRUB_CMDLINE_LINUX.2. Run the following commands to update the configuration:
stty -F /dev/ttyS0 speed 115200grub-mkconfig -o /boot/grub/grub.cfg
3. Use the vi editor to open the /etc/rc.local file and add the following content:systemctl stop getty@ttyS0
4. To enable user root to log in to the BMS through the serial port, add ttyS0 tothe end of the security configuration file /etc/securetty.
3.17.8 Ubuntu 16.04 (ARM)1. Use the vi editor to open the /etc/default/grub file and modify the following
parameters:– GRUB_CMDLINE_LINUX: console=tty0 console=ttyAMA0,115200– GRUB_TERMINAL: serial– GRUB_SERIAL_COMMAND: serial --speed=115200 --unit=0 --word=8 --
parity=no --stop=1After modification, run the following command:sudo update-grub2
2. To enable user root to log in to the BMS through the serial port, add thefollowing information to the end of the security configuration file /etc/securetty.For x86, check whether the file contains ttyS0. If not, add it.For ARM 64, check whether the file contains ttyAMA0. If not, add it.
3.17.9 Ubuntu 14.04 and Debian (x86)1. Use the vi editor to open the /etc/default/grub file and add console=tty0
console=ttyS0 after GRUB_CMDLINE_LINUX.2. Run the following commands to update the configuration:
stty -F /dev/ttyS0 speed 115200grub-mkconfig -o /boot/grub/grub.cfg
3. Create /etc/init/ttyS0.conf and use the vi editor to modify its content asfollows:start on stopped rc RUNLEVEL=[12345]stop on runlevel [!12345]respawnexec /sbin/getty -L 115200 ttyS0 vt102
4. Run the following command to start ttyS0:sudo start ttyS0
Bare Metal ServerPrivate Image Creation Guide 3 Creating a Linux Image
2019-12-30 83
5. To enable user root to log in to the BMS through the serial port, add ttyS0 tothe end of the security configuration file /etc/securetty.
3.18 Configuring the Root Partition to AutomaticallyExpand Disk Capacity
3.18.1 ScenariosAfter the growpart package is installed for the image OS, the root partition of theBMS provisioned using the image can automatically expand disk capacity. SUSEOSs have growpart by default. However, the growpart version of SUSE 11 SP4 istoo late, and you must install growpart of an earlier version. Ubuntu OSs havegrowpart by default and the growpart version meets requirements.
3.18.2 CentOS 6 and Red Hat 6NO TE
For CentOS 6 and Red Hat 6, you must install three packages to enable the root partition toautomatically expand disk capacity: Cloud-Init, cloud-utils-growpart, and dracut-modules-growroot. Cloud-Init has been installed in section Installing Cloud-Init.
This section uses CentOS 6.9 as an example to describe how to install the packages. Theprocedure also applies to other OSs.
1. Check whether Cloud-Init, cloud-utils-growpart, and dracut-modules-growrootare installed. If not, perform subsequent operations in this section to installthem.[root@localhost ~]# rpm -qa | grep cloud-initcloud-init-0.7.5-10.el6.centos.2.x86_64[root@localhost ~]# rpm -qa | grep growpart[root@localhost ~]# rpm -qa | grep growroot[root@localhost ~]#
2. Download the cloud-utils-growpart package from https://dl.fedoraproject.org/pub/epel/6Server/x86_64/Packages/c/. Then upload itto the VM by following the instructions in chapter 10.
3. Run the following command to install the cloud-utils-growpart package:rpm -ivh cloud-utils-growpart-0.27-10.el6.x86_64.rpm[root@localhost redhat]# rpm -ivh cloud-utils-growpart-0.27-10.el6.x86_64.rpmPreparing... ############################### [100%] 1:cloud-utils-growpart ############################### [100%][root@localhost redhat]#
4. Install the dracut-modules-growroot package.
a. Run the following command:yum install -y http://dl.Fedoraproject.org/pub/epel/6/x86_64/epel-release-6-8.noarch.rpm
b. Run the yum install dracut-modules-growroot command to install thedracut-modules-growroot package online.If message Is this ok [y/N] is displayed, enter y.
c. After the installation is successful, run the dracut -f command to updatethe kernel.
Bare Metal ServerPrivate Image Creation Guide 3 Creating a Linux Image
2019-12-30 84

5. Run the commands in step 1 to check whether Cloud-Init, cloud-utils-growpart, and dracut-modules-growroot have been installed successfully.
3.18.3 CentOS 7, Red Hat 7, and Oracle Linux 7
NO TE
CentOS 7, Red Hat 7, and Oracle Linux 7 use the 3.10 kernel (later than 3.8), and thedracut-modules-growroot package is not required. You only need to install Cloud-Init andcloud-utils-growpart. Cloud-Init has been installed in section Installing Cloud-Init.
This section uses CentOS 7.3 as an example to describe how to install the packages. Theprocedure also applies to other OSs.
1. Check whether Cloud-Init and cloud-utils-growpart are installed. If not,perform subsequent operations in this section to install them.[root@localhost ~]# rpm -qa | grep cloud-initcloud-init-0.7.5-10.el7.centos.1.x86_64[root@localhost ~]# rpm -qa | grep growpart[root@localhost ~]#
2. Run the following command to install cloud-utils-growpart:
yum install cloud-utils-growpart
3. After the installation is complete, check whether the installation is successful.[root@localhost ~]# rpm -qa | grep growpartcloud-utils-growpart-0.29-2.el7.noarch
3.18.4 CentOS ARM or EulerOS ARM
NO TE
For CentOS ARM and EulerOS ARM, you must install three packages to enable the rootpartition to automatically expand disk capacity: Cloud-Init, cloud-utils-growpart, and gdisk.Cloud-Init has been installed in section Installing Cloud-Init.
This section uses CentOS 7.6 ARM as an example to describe how to install the packages.The procedure also applies to other OSs.
1. Check whether Cloud-Init and cloud-utils-growpart are installed. If not,perform subsequent operations in this section to install them.[root@localhost ~]# rpm -qa | grep cloud-initcloud-init-0.7.5-10.el7.centos.1.x86_64[root@localhost ~]# rpm -qa | grep growpart[root@localhost ~]#
2. Run the following command to install cloud-utils-growpart:
yum install cloud-utils-growpart
3. Check whether gdisk is installed.
rpm -qa | grep gdisk[root@localhost ~]# rpm -qa | grep gdisk[root@localhost ~]#
If not, run the yum install gdisk command to install the gdisk package.
4. After the installation is complete, check whether the installation is successful.[root@localhost ~]# rpm -qa | grep growpartcloud-utils-growpart-0.29-2.el7.noarch[root@localhost ~]# rpm -qa | grep gdiskgdisk-0.8.10-3.el7.x86_64
Bare Metal ServerPrivate Image Creation Guide 3 Creating a Linux Image
2019-12-30 85
3.18.5 EulerOSNO TE
For EulerOS, dracut-modules-growroot is not required and you only need to install Cloud-Init and cloud-utils-growpart. Cloud-Init has been installed in section Installing Cloud-Init.
1. Check whether Cloud-Init and cloud-utils-growpart are installed. If not,perform subsequent operations in this section to install them.[root@localhost ~]# rpm -qa | grep cloud-initcloud-init-0.7.6-3.x86_64[root@localhost ~]# rpm -qa | grep growpart[root@localhost ~]#
2. Download the cloud-utils-growpart package from http://developer.huawei.com/ict/site-euleros/euleros/repo/yum/2.2/os/x86_64/Packages/. Then upload it to the VM by following the instructions in chapter10.
3. Run the following command to install the cloud-utils-growpart package:rpm -ivh cloud-utils-growpart-0.27-10.x86_64.rpm[root@bms-eulor22 home]# rpm -ivh cloud-utils-growpart-0.27-10.x86_64.rpmPreparing... ############################### [100%] Updating / installing... 1:cloud-utils-growpart-0.27-10 ############################### [100%]
4. Run the command in step 1 to check whether the cloud-utils-growpartpackage has been installed.[root@localhost ~]# rpm -qa | grep growpartcloud-utils-growpart-0.27-10.x86_64
3.18.6 SUSENO TE
SUSE OSs have growpart by default. However, the growpart version of SUSE 11 SP4 is toolate, and you must install growpart of an earlier version.
1. Run the following commands to check whether Cloud-Init and cloud-utils-growpart are installed and check the version of cloud-utils-growpart.linux-dann:~ # rpm -qa | grep cloud-initcloud-init-0.7.6-32.8linux-dann:~ # rpm -qa | grep growpartgrowpart-0.29-7.1
2. Download the cloud-utils-growpart package from https://software.opensuse.org//download.html?project=home%3Agarloff%3AOTC%3Acloudinit&package=growpart. Then upload it to the VM byfollowing the instructions in section Installing Cloud-Init.
3. Run the following command to forcibly install the cloud-utils-growpartpackage:rpm -ivh growpart-0.27-1.1.noarch.rpm --forcelinux-dam:/home/bms/bms # rpm -ivh growpart-0.27-1.1.noarch.rpm --forcewarning: growpart-0.27-1.1.noarch.rpm: Header V3 RSA/SHA1 signature: NOKEY, key ID de665020Preparing... ############################### [100%] 1:growpart ############################### [100%]
4. After the installation is successful, upload the original cloud-utils-growpartversion.linux-dann:/home/bms/bms # rpm -e growpart-0.29-7.1linux-dann:/home/bms/bms #
Bare Metal ServerPrivate Image Creation Guide 3 Creating a Linux Image
2019-12-30 86

5. Delete configuration item growpart from the /etc/cloud/cloud.cfg file.Run the vi /etc/cloud/cloud.cfg command to delete configuration itemgrowpart shown in the following location.datasource_list: [ openstack ]growpart: mode: false# The modules that run in the 'init' stagecloud_init_modules: - migrator - bootcmd - write-files - growpart
3.18.7 DebianNO TE
To enable automatic disk expansion for Debian, you must install the growroot package.
1. Run the apt-get install cloud-initramfs-growroot command.2. Run the following command to check whether the installation is successful:
dpkg -l | grep cloud-initramfs-growrootThe installation is successful if information similar to the following isdisplayed:root@bms:/home/bzqd# dpkg -l | grep cloud-initramfs-growrootii cloud-initrramfs-growroot 0.18.debian5 all automatically resize the root partition on first boot
3.19 Deleting Files
Deleting Uploaded FilesDelete files that have been uploaded to the VM, such as the rpm softwarepackages of bms-network-config and the SDI driver.
Deleting Temporary Files● Run the following commands to delete temporary files:
rm -rf /var/log/cloud-init*rm -rf /var/lib/cloud/*rm -rf /var/log/network-config.log
● Run the following commands to delete the remaining configurationinformation:– For SUSE OS:
Check which files start with ifcfg under the /etc/sysconfig/network/folder, and delete files starting with ifcfg other than ifcfg-lo.The command to view the file: ll /etc/sysconfig/network/The command to delete the file: rm -rf /etc/sysconfig/network/ifcfgxxx
– For Red Hat, CentOS, Oracle and Euler OS:Check which files start with ifcfg under the /etc/sysconfig/network-scripts/ folder, and delete files starting with ifcfg other than ifcfg-lo.
Bare Metal ServerPrivate Image Creation Guide 3 Creating a Linux Image
2019-12-30 87

The command to view the file: ll /etc/sysconfig/network-scripts/The command to delete the file: rm -rf /etc/sysconfig/network-scripts/ifcfgxxx
– For Ubuntu OS: rm -rf /etc/network/interfaces.d/50-cloud-init.cfg● Run the following commands to delete historical operation records:
history -w;echo > /root/.bash_history;history -c;history -c;history -c;
Bare Metal ServerPrivate Image Creation Guide 3 Creating a Linux Image
2019-12-30 88

4 Creating a Windows Image
4.1 Preparing Required Hardware and SoftwareObtain a Linux physical server used for creating the image. This is the host.
The host must have the followings installed:
● vsftpd service● sshd service● VNC service● virt-manager tool● KVM virtualization software
NO TE
You can download virt-manager from its official website or select it from the OS installationpackage.
Table 4-1 lists the required software. You need to confirm the drivers required forthe corresponding models and operating systems based on Mappings BetweenBMS Flavors and Drivers.
Table 4-1 Required software
Software Description How to Obtain
Host ISOimage
CentOS 7.x You are advised to obtain it fromthe official website.
OS ISO file ISO file used for creatingan image. The OSssupported by BMS imageare shown in Table 1-2and Table 1-3.
You are advised to obtain the ISOfile from the OS official website.
Bare Metal ServerPrivate Image Creation Guide 4 Creating a Windows Image
2019-12-30 89
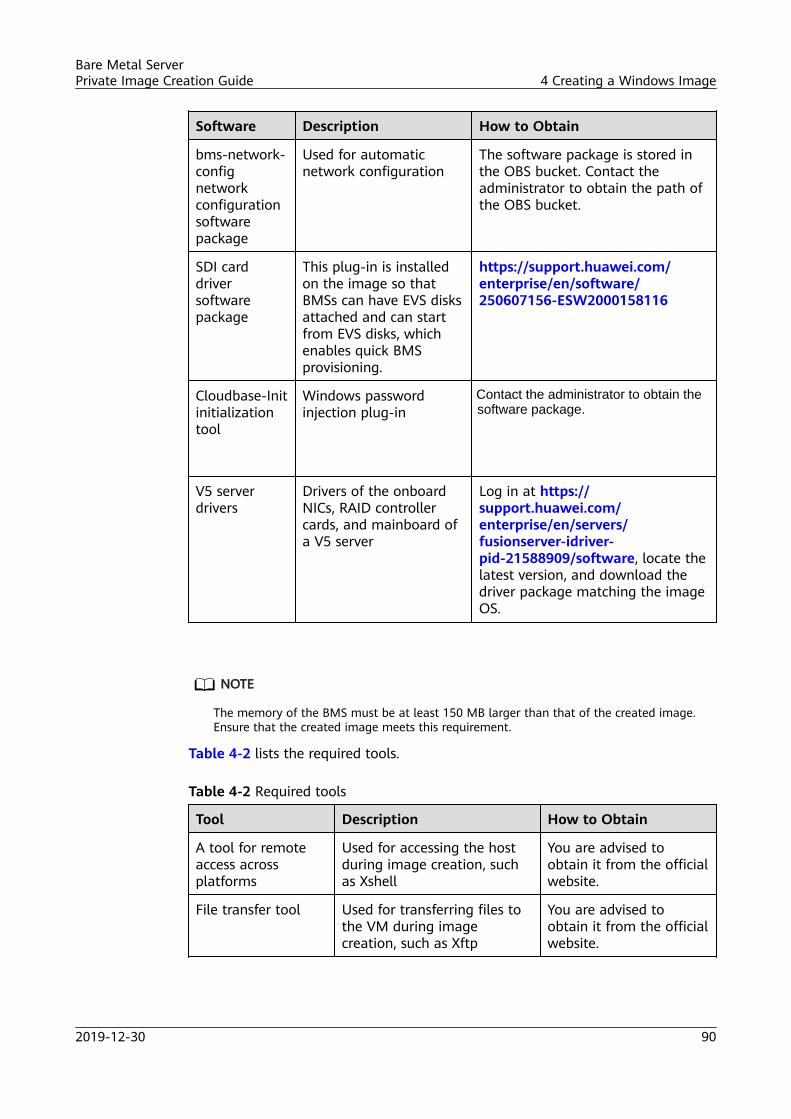
Software Description How to Obtain
bms-network-confignetworkconfigurationsoftwarepackage
Used for automaticnetwork configuration
The software package is stored inthe OBS bucket. Contact theadministrator to obtain the path ofthe OBS bucket.
SDI carddriversoftwarepackage
This plug-in is installedon the image so thatBMSs can have EVS disksattached and can startfrom EVS disks, whichenables quick BMSprovisioning.
https://support.huawei.com/enterprise/en/software/250607156-ESW2000158116
Cloudbase-Initinitializationtool
Windows passwordinjection plug-in
V5 serverdrivers
Drivers of the onboardNICs, RAID controllercards, and mainboard ofa V5 server
Log in at https://support.huawei.com/enterprise/en/servers/fusionserver-idriver-pid-21588909/software, locate thelatest version, and download thedriver package matching the imageOS.
NO TE
The memory of the BMS must be at least 150 MB larger than that of the created image.Ensure that the created image meets this requirement.
Table 4-2 lists the required tools.
Table 4-2 Required tools
Tool Description How to Obtain
A tool for remoteaccess acrossplatforms
Used for accessing the hostduring image creation, suchas Xshell
You are advised toobtain it from the officialwebsite.
File transfer tool Used for transferring files tothe VM during imagecreation, such as Xftp
You are advised toobtain it from the officialwebsite.
Bare Metal ServerPrivate Image Creation Guide 4 Creating a Windows Image
2019-12-30 90
Contact the administrator to obtain the software package.
Tool Description How to Obtain
VNC tool Used for logging in to the VMduring image creation, suchas VNC ViewerNOTE
If VNC Viewer is the 5.3.2version, choose Options >Expert > ColorLevel on thelogin page and set ColorLevelto rgb222. Otherwise, you mayfail to connect to the remoteOS.
You are advised toobtain it from the officialwebsite.
4.2 Installing the V5 Server Drivers
4.2.1 PreparationsInstalling Windows drivers requires hardware devices. Use Dism++ to inject driversinto the ISO image file for installation. This method is different from theinstallation methods of other software, and operations in this section must beperformed before those in section Creating a VM. After the drivers are injectedinto the ISO image file, use the ISO image file to install Cloudbase-Init and bms-network-config.
1. Prepare an ISO image file matching the Windows version on the localWindows jump server.
2. Install Dism++ on the local Windows jump server.3. Download the driver package on a local Windows jump server based on
Preparing Required Hardware and Software.Examples:– Windows Server 2012 R2: FusionServer iDriver-win2k12r2-Driver-
V013.zip– Windows Server 2016: FusionServer iDriver-win2k16-Driver-V013.zip
4. Decompress the downloaded .zip package and obtain the ISO driver file.– Windows Server 2012 R2: Decompress the FusionServer iDriver-
win2k12r2-Driver-V013.zip package and obtain theonboard_driver_win2k12r2.iso file.
– Windows Server 2016: Decompress the FusionServer iDriver-win2k16-Driver-V013.zip package and obtain the onboard_driver_win2k16.isofile.
Bare Metal ServerPrivate Image Creation Guide 4 Creating a Windows Image
2019-12-30 91

4.2.2 Installing the Chipset Driver
ScenariosChipset is a mainboard driver for Windows. If this driver is not installed, otherhardware drivers may be undermined in performance or even fail to workproperly.
NO TE
Chipset can only be installed for Windows Server 2012 R2 and Windows Server 2016. Thissection uses Windows Server 2016 as an example. You can install chipset for WindowsServer 2012 R2 using the same method.
Procedure1. Decompress onboard_driver_win2k16.iso in Preparations and obtain
SetupChipset.exe from the folder with chipset, for example,intel_chipset_XXX.
2. Convert the chipset installation package into a folder.
a. Click Start, enter cmd in Search programs and files, and press Enter.b. Enter the directory where the chipset installation package is installed, for
example, D:\windows2016\tmp.D:\windows2016\tmp>dir2018/04/08 17:25 <DIR> .2018/04/08 17:25 <DIR> ..2018/03/08 15:14 <DIR> drivers12018/03/08 11:28 3,525,008 SetupChipset.exe
D:\windows2016\tmp>
c. Run the following command to generate a folder named driver:.\SetupChipset.exe -extract driverD:\windows2016\tmp>.\SetupChipset.exe -extract driver
D:\windows2016\tmp>dir2018/04/08 17:32 <DIR> .2018/04/08 17:32 <DIR> ..2018/04/08 17:32 <DIR> driver2018/03/08 15:14 <DIR> drivers12018/03/08 11:28 3,525,008 SetupChipset.exe
D:\windows2016\tmp>
3. Decompress the Windows 2016 ISO image file in a folder.
Bare Metal ServerPrivate Image Creation Guide 4 Creating a Windows Image
2019-12-30 92
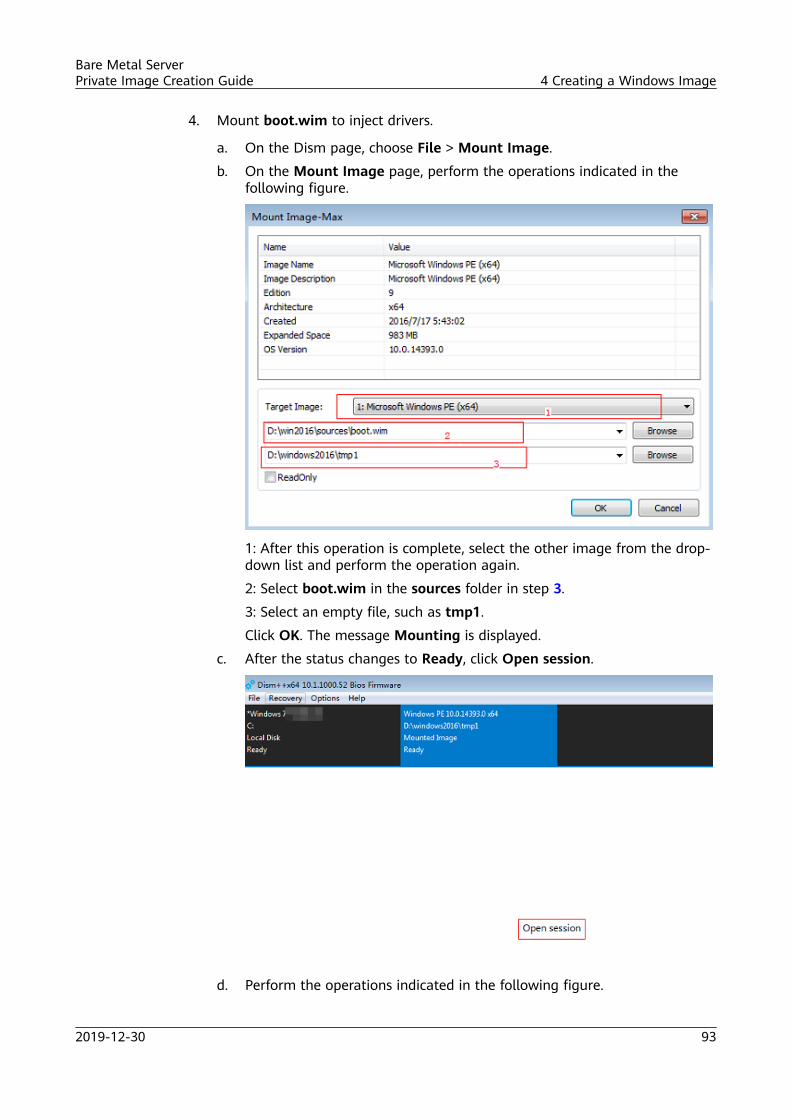
4. Mount boot.wim to inject drivers.
a. On the Dism page, choose File > Mount Image.
b. On the Mount Image page, perform the operations indicated in thefollowing figure.
1: After this operation is complete, select the other image from the drop-down list and perform the operation again.
2: Select boot.wim in the sources folder in step 3.
3: Select an empty file, such as tmp1.
Click OK. The message Mounting is displayed.
c. After the status changes to Ready, click Open session.
d. Perform the operations indicated in the following figure.
Bare Metal ServerPrivate Image Creation Guide 4 Creating a Windows Image
2019-12-30 93

1: In the navigation pane on the left, choose Drivers.2: Select Display in-box driver.3: Select System Equipment.4: Click Add.
e. Select the folder obtained in step 2.The following dialog box is displayed.
5. Save the added driver and unmount the image.
a. Choose File > Save Image. In the displayed dialog box, select Directsave.
b. Wait for the status to change from Saving to Ready.c. Choose File > Unmount Image.
6. Mount install.wim to inject drivers.
a. On the Dism page, choose File > Mount.b. On the Mount Image page, perform the operations indicated in the
following figure.
Bare Metal ServerPrivate Image Creation Guide 4 Creating a Windows Image
2019-12-30 94

1: By default, the Windows Server 2016 standard image is selected. Youcan also select other versions from the drop-down list as needed.2: Select install.wim in the sources folder in step 3.3: Select an empty file, such as tmp1.
c. After the status changes to Ready, click Open session.d. Add the driver based on steps 4.d to 4.e.
7. Save the added driver and unmount the image based on step 5.
4.2.3 (Optional) Installing the V5 Server Onboard NIC Driver
Scenarios
This section describes how to install the X722 NIC driver so that BMSs can beprovisioned on V5 servers. Skip this section for other types of servers.
NO TE
The V5 server driver can only be installed for Windows Server 2012 R2 and Windows Server2016. This section uses Windows Server 2016 as an example. You can install the V5 serverdriver for Windows Server 2012 R2 using the same method.
Procedure1. Decompress onboard_driver_win2k16.iso in Preparations and locate the
package or folder where the Intel NIC resides. If it is a package, for example,NIC-Intel-XXX, extract the PRO40GB\Winx64\NDIS64 folder from thepackage.
2. Mount the boot.wim image. For details, see step 4 in section Installing theChipset Driver.
3. Add the driver in the NDIS64 folder, save the change, and unmount theimage. For details, see step 5 in section Installing the Chipset Driver.
Bare Metal ServerPrivate Image Creation Guide 4 Creating a Windows Image
2019-12-30 95
4. Mount the install.wim image. For details, see step 6 in section Installing theChipset Driver.
4.2.4 (Optional) Installing the 3408 or 3508 RAID Card Driver
ScenariosThis section describes how to install the 3408 or 3508 RAID card driver so thatBMSs can be provisioned on 3408 or 3508 RAID card servers. Skip this section forother types of servers.
NO TE
The 3408 or 3508 RAID card driver can only be installed for Windows Server 2012 R2 andWindows Server 2016. This section uses Windows Server 2016 as an example. You caninstall the 3408 or 3508 RAID card driver for Windows Server 2012 R2 using the samemethod.
Procedure1. Decompress onboard_driver_win2k16.iso in Preparations and obtain the
folder whose name contains RAID and megasas, for example, RAID-Brcm-win2k16-megasas35-XXX.
2. Mount the boot.wim image. For details, see step 4 in section Installing theChipset Driver.
3. Add the driver in the 3408iMR_win2k16_x86_64_7.703.06.00 folder, save thechange, and unmount the image. For details, see step 5 in section Installingthe Chipset Driver.
4. Mount the install.wim image. For details, see step 6 in section Installing theChipset Driver.
4.2.5 Generate the ISO ImagePerform the following operations indicated in the following figure.
Bare Metal ServerPrivate Image Creation Guide 4 Creating a Windows Image
2019-12-30 96

1: Click Toolkit.
2: Select ISO Maker.
3: Select the directory where the original ISO image is decompressed.
4: Select the directory where the new ISO image is generated.
5: Click OK.
Follow-up OperationsCopy the generated Windows ISO image to the host for later use.
4.3 Creating a VMThis section describes how to create a Windows Server 2012 R2 VM using virt-manager. The methods of creating VMs running other types of OSs are similar tothis method. The following figures and steps are for reference only.
1. Log in to the server used to create an image and start virt-manager.[root@localhost Desktop]# virt-manager[root@localhost Desktop]#
2. Create a VM and select Local install media (ISO image or CDROM). ClickForward.
3. Select the ISO image file copied to the host in Follow-up Operations andselect the OS type and version.
Bare Metal ServerPrivate Image Creation Guide 4 Creating a Windows Image
2019-12-30 97

4. Configure the memory and CPUs of the VM Windows OS.– Memory (RAM): 4096 MiB– CPUs: 4
5. Configure the size of the disk image. Do not set a too large value. Otherwise,the generated image will be too large.
Bare Metal ServerPrivate Image Creation Guide 4 Creating a Windows Image
2019-12-30 98
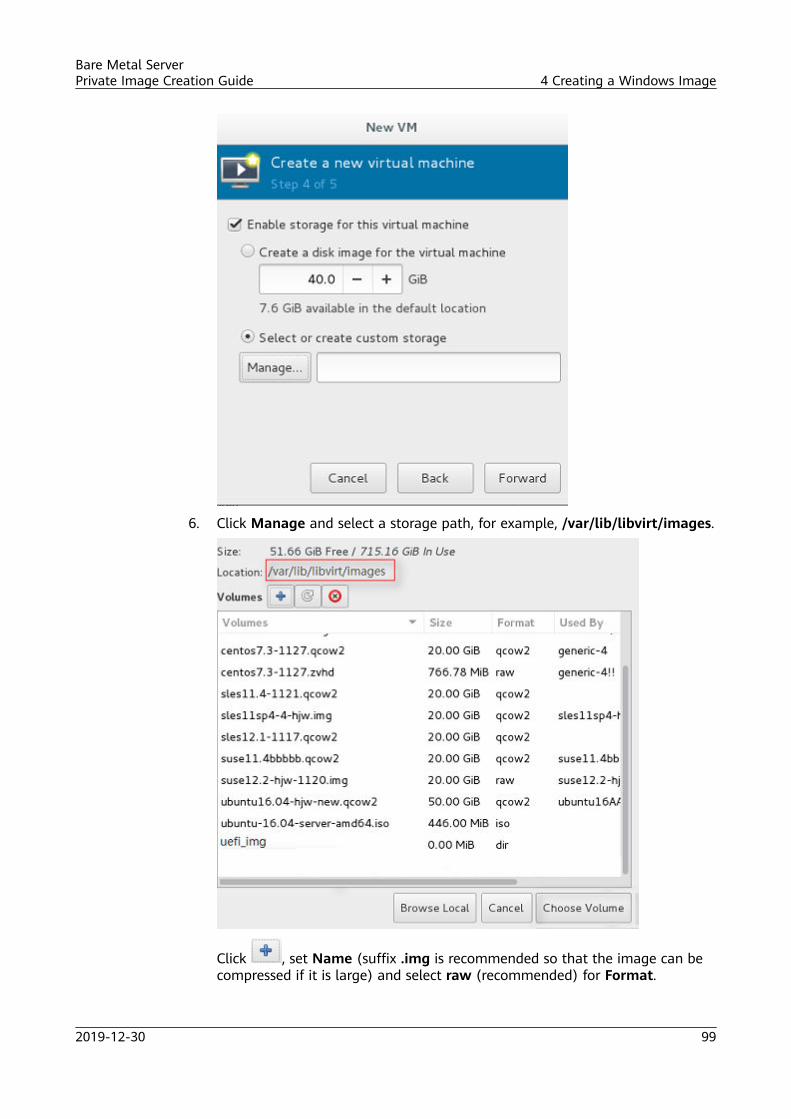
6. Click Manage and select a storage path, for example, /var/lib/libvirt/images.
Click , set Name (suffix .img is recommended so that the image can becompressed if it is large) and select raw (recommended) for Format.
Bare Metal ServerPrivate Image Creation Guide 4 Creating a Windows Image
2019-12-30 99

Click Finish. In the displayed storage volume list, select the created storagevolume and click Choose Volume.
7. Select Customize Configuration before install.
Bare Metal ServerPrivate Image Creation Guide 4 Creating a Windows Image
2019-12-30 100

8. Configure the NIC, select e1000 for Device model, and click Apply.
9. Click Begin Installation.
10. Install Windows.
Bare Metal ServerPrivate Image Creation Guide 4 Creating a Windows Image
2019-12-30 101
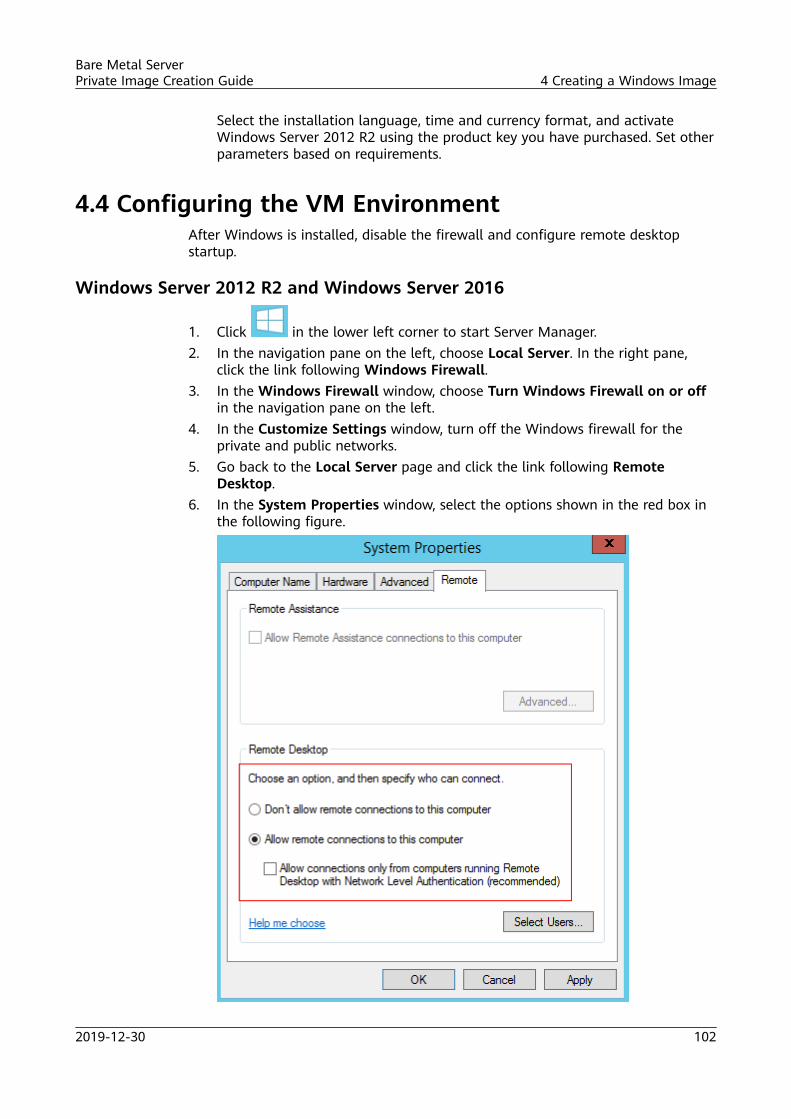
Select the installation language, time and currency format, and activateWindows Server 2012 R2 using the product key you have purchased. Set otherparameters based on requirements.
4.4 Configuring the VM EnvironmentAfter Windows is installed, disable the firewall and configure remote desktopstartup.
Windows Server 2012 R2 and Windows Server 2016
1. Click in the lower left corner to start Server Manager.2. In the navigation pane on the left, choose Local Server. In the right pane,
click the link following Windows Firewall.3. In the Windows Firewall window, choose Turn Windows Firewall on or off
in the navigation pane on the left.4. In the Customize Settings window, turn off the Windows firewall for the
private and public networks.5. Go back to the Local Server page and click the link following Remote
Desktop.6. In the System Properties window, select the options shown in the red box in
the following figure.
Bare Metal ServerPrivate Image Creation Guide 4 Creating a Windows Image
2019-12-30 102

7. Go back to the Local Server page and verify that the statuses of theproperties are those shown in the red box in the following figure
Windows Server 17091. Enter regedit in the command line to open the registry.2. Disable the firewall.
a. In the Registry Editor window, choose HKEY_LOCAL_MACHINE >SYSTEM > CurrentControlSet > Services > SharedAccess > Parameters> FirewallPolicy > StandardProfile and set EnableFirewall to 0.
b. Choose HKEY_LOCAL_MACHINE > SYSTEM > CurrentControlSet >Services > SharedAccess > Parameters > FirewallPolicy >DomainProfile and set EnableFirewall to 0.
c. Choose HKEY_LOCAL_MACHINE > SYSTEM > CurrentControlSet >Services > SharedAccess > Parameters > FirewallPolicy > PublicProfileand set EnableFirewall to 0.
3. Enable remote connections.In the Registry Editor window, choose HKEY_LOCAL_MACHINE > SYSTEM >CurrentControlSet > Control > Terminal Server and setfDenyTSConnections to 0.
4.5 Installing Cloudbase-Init
4.5.1 Windows Server 2012 R2 and Windows Server 20161. Download the Cloudbase-Init installation package based on Preparing
Required Hardware and Software.2. Upload the Cloudbase-Init installation package to the host and generate an
ISO image.
Bare Metal ServerPrivate Image Creation Guide 4 Creating a Windows Image
2019-12-30 103
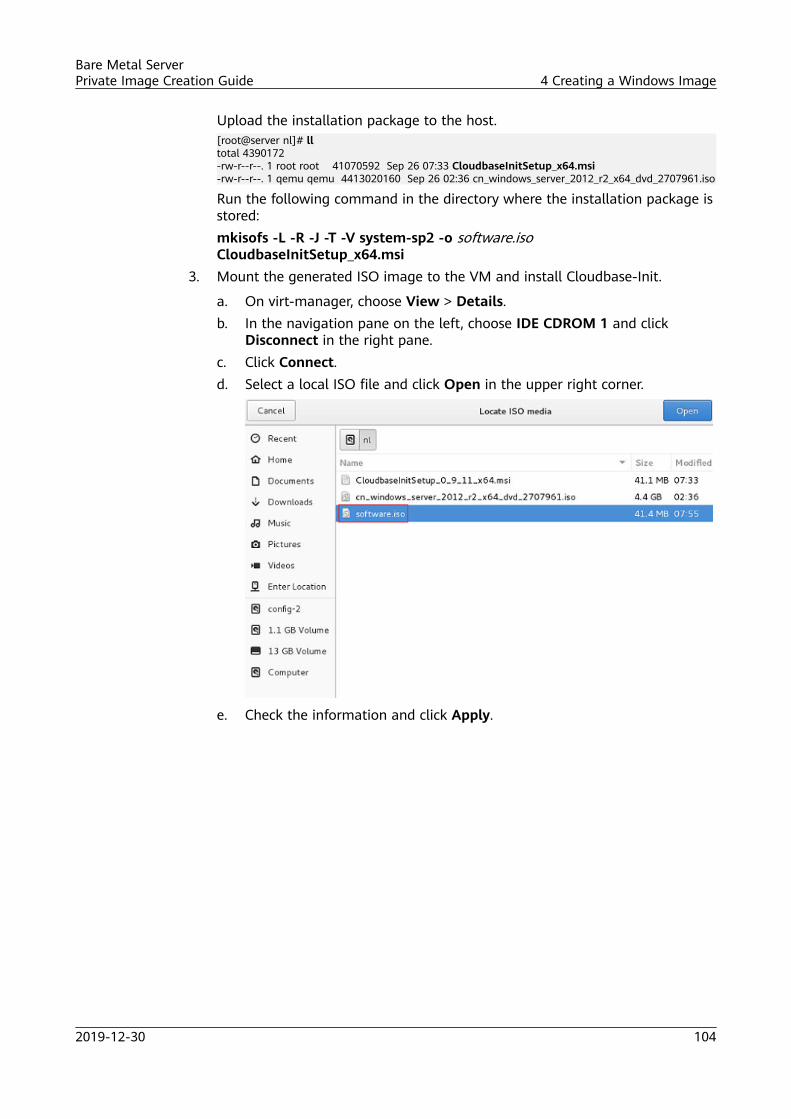
Upload the installation package to the host.[root@server nl]# lltotal 4390172-rw-r--r--. 1 root root 41070592 Sep 26 07:33 CloudbaseInitSetup_x64.msi-rw-r--r--. 1 qemu qemu 4413020160 Sep 26 02:36 cn_windows_server_2012_r2_x64_dvd_2707961.iso
Run the following command in the directory where the installation package isstored:mkisofs -L -R -J -T -V system-sp2 -o software.isoCloudbaseInitSetup_x64.msi
3. Mount the generated ISO image to the VM and install Cloudbase-Init.
a. On virt-manager, choose View > Details.b. In the navigation pane on the left, choose IDE CDROM 1 and click
Disconnect in the right pane.c. Click Connect.d. Select a local ISO file and click Open in the upper right corner.
e. Check the information and click Apply.
Bare Metal ServerPrivate Image Creation Guide 4 Creating a Windows Image
2019-12-30 104
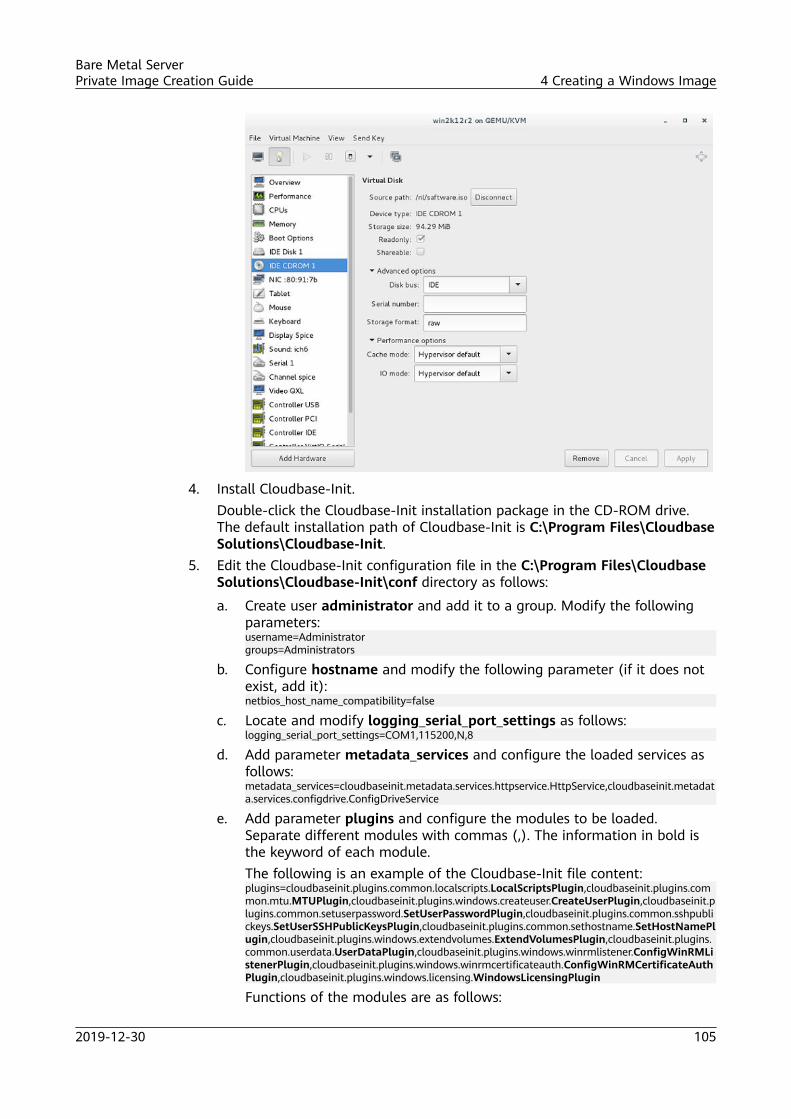
4. Install Cloudbase-Init.Double-click the Cloudbase-Init installation package in the CD-ROM drive.The default installation path of Cloudbase-Init is C:\Program Files\CloudbaseSolutions\Cloudbase-Init.
5. Edit the Cloudbase-Init configuration file in the C:\Program Files\CloudbaseSolutions\Cloudbase-Init\conf directory as follows:
a. Create user administrator and add it to a group. Modify the followingparameters:username=Administratorgroups=Administrators
b. Configure hostname and modify the following parameter (if it does notexist, add it):netbios_host_name_compatibility=false
c. Locate and modify logging_serial_port_settings as follows:logging_serial_port_settings=COM1,115200,N,8
d. Add parameter metadata_services and configure the loaded services asfollows:metadata_services=cloudbaseinit.metadata.services.httpservice.HttpService,cloudbaseinit.metadata.services.configdrive.ConfigDriveService
e. Add parameter plugins and configure the modules to be loaded.Separate different modules with commas (,). The information in bold isthe keyword of each module.The following is an example of the Cloudbase-Init file content:plugins=cloudbaseinit.plugins.common.localscripts.LocalScriptsPlugin,cloudbaseinit.plugins.common.mtu.MTUPlugin,cloudbaseinit.plugins.windows.createuser.CreateUserPlugin,cloudbaseinit.plugins.common.setuserpassword.SetUserPasswordPlugin,cloudbaseinit.plugins.common.sshpublickeys.SetUserSSHPublicKeysPlugin,cloudbaseinit.plugins.common.sethostname.SetHostNamePlugin,cloudbaseinit.plugins.windows.extendvolumes.ExtendVolumesPlugin,cloudbaseinit.plugins.common.userdata.UserDataPlugin,cloudbaseinit.plugins.windows.winrmlistener.ConfigWinRMListenerPlugin,cloudbaseinit.plugins.windows.winrmcertificateauth.ConfigWinRMCertificateAuthPlugin,cloudbaseinit.plugins.windows.licensing.WindowsLicensingPlugin
Functions of the modules are as follows:
Bare Metal ServerPrivate Image Creation Guide 4 Creating a Windows Image
2019-12-30 105
▪ LocalScriptsPlugin: sets the scripts.
▪ MTUPlugin: sets the MTU network ports.
▪ CreateUserPlugin: creates a user.
▪ SetUserPasswordPlugin: sets the password.
▪ SetUserSSHPublicKeysPlugin: sets the private key.
▪ SetHostNamePlugin: sets the hostname.
▪ ExtendVolumesPlugin: partitions the disks.
▪ UserDataPlugin: injects user data.
▪ ConfigWinRMListenerPlugin: sets listening to remote login.
▪ ConfigWinRMCertificateAuthPlugin: sets remote login without thepassword authentication.
▪ WindowsLicensingPlugin: activates window instances.
4.5.2 Windows Server 17091. Download the Cloudbase-Init installation package based on Preparing
Required Hardware and Software.2. Upload the Cloudbase-Init installation package to the host and generate an
ISO image.Upload the installation package to the host.[root@server nl]# lltotal 4390172-rw-r--r--. 1 root root 41070592 Sep 26 07:33 CloudbaseInitSetup_0_9_11_x64.msi-rw-r--r--. 1 qemu qemu 4413020160 Sep 26 02:36
Run the following command in the directory where the installation package isstored:mkisofs -L -R -J -T -V system-sp2 -o software.isoCloudbaseInitSetup_0_9_11_x64.msi
3. Mount the generated ISO image to the VM and install Cloudbase-Init.
a. On virt-manager, choose View > Details.b. In the navigation pane on the left, choose IDE CDROM 1 and click
Disconnect in the right pane.c. Click Connect.d. Select a local ISO file and click Open in the upper right corner.
Bare Metal ServerPrivate Image Creation Guide 4 Creating a Windows Image
2019-12-30 106

e. Check the information and click Apply.
4. Copy the CloudbaseInitSetup_0_9_11_x64.msi installation package to thedrive C: of the VM.
a. Enter the VM OS, click Start, enter cmd in the Search programs andfiles box, and press Enter to open the command-line interface.
b. Enter D: and press Enter.
c. Run the xcopy CloudbaseInitSetup_0_9_11_x64.msi C:\ command tocopy the CloudbaseInitSetup_0_9_11_x64.msi installation package tothe drive C: of the VM.
5. Install Cloudbase-Init.
a. Enter C: and press Enter to enter drive C:.
Bare Metal ServerPrivate Image Creation Guide 4 Creating a Windows Image
2019-12-30 107
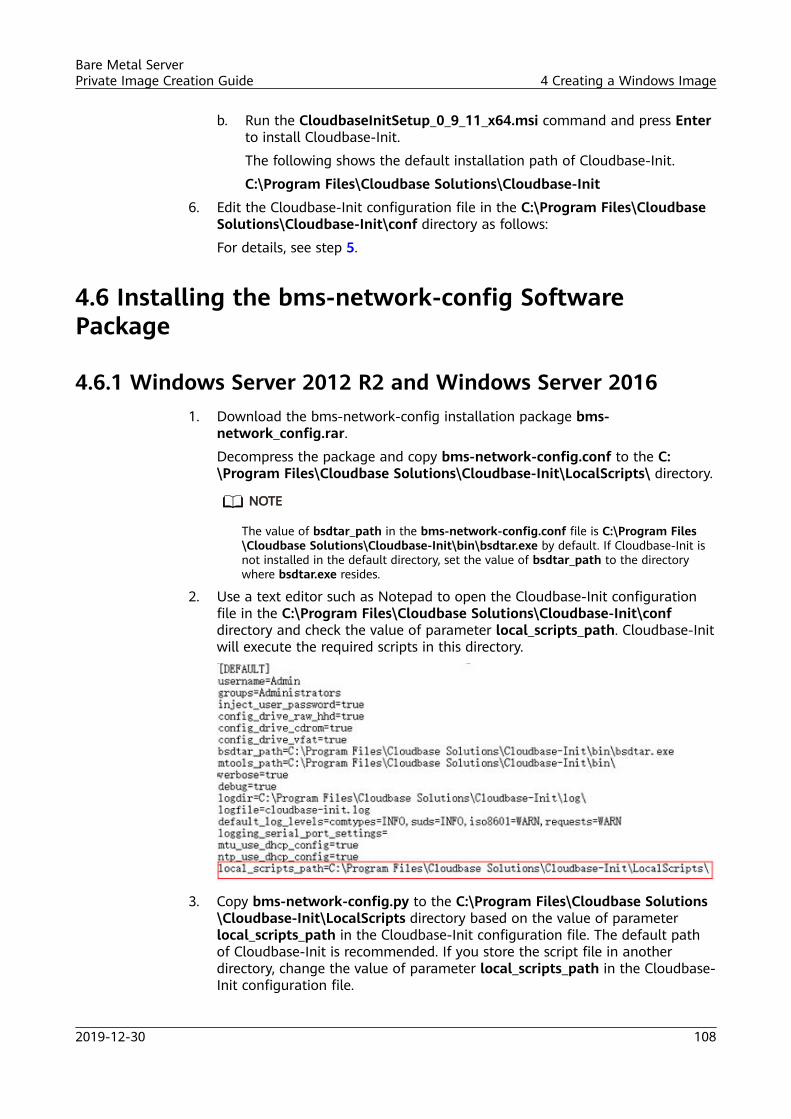
b. Run the CloudbaseInitSetup_0_9_11_x64.msi command and press Enterto install Cloudbase-Init.
The following shows the default installation path of Cloudbase-Init.
C:\Program Files\Cloudbase Solutions\Cloudbase-Init
6. Edit the Cloudbase-Init configuration file in the C:\Program Files\CloudbaseSolutions\Cloudbase-Init\conf directory as follows:
For details, see step 5.
4.6 Installing the bms-network-config SoftwarePackage
4.6.1 Windows Server 2012 R2 and Windows Server 20161. Download the bms-network-config installation package bms-
network_config.rar.
Decompress the package and copy bms-network-config.conf to the C:\Program Files\Cloudbase Solutions\Cloudbase-Init\LocalScripts\ directory.
NO TE
The value of bsdtar_path in the bms-network-config.conf file is C:\Program Files\Cloudbase Solutions\Cloudbase-Init\bin\bsdtar.exe by default. If Cloudbase-Init isnot installed in the default directory, set the value of bsdtar_path to the directorywhere bsdtar.exe resides.
2. Use a text editor such as Notepad to open the Cloudbase-Init configurationfile in the C:\Program Files\Cloudbase Solutions\Cloudbase-Init\confdirectory and check the value of parameter local_scripts_path. Cloudbase-Initwill execute the required scripts in this directory.
3. Copy bms-network-config.py to the C:\Program Files\Cloudbase Solutions\Cloudbase-Init\LocalScripts directory based on the value of parameterlocal_scripts_path in the Cloudbase-Init configuration file. The default pathof Cloudbase-Init is recommended. If you store the script file in anotherdirectory, change the value of parameter local_scripts_path in the Cloudbase-Init configuration file.
Bare Metal ServerPrivate Image Creation Guide 4 Creating a Windows Image
2019-12-30 108

4.6.2 Windows Server 1709Installing the bms-network-config Software Package
1. Download the bms-network-config installation package bms-network_config.rar.Decompress the package and copy bms-network-config.conf to the C:\Program Files\Cloudbase Solutions\Cloudbase-Init\LocalScripts\ directory.
a. Enter D: and press Enter.b. Run the xcopy bms-network-config.conf "C:\Program Files\Cloudbase
Solutions\Cloudbase-Init\LocalScripts"\ command.
NO TE
You can press Tab to complete the command.
NO TE
The value of bsdtar_path in the bms-network-config.conf file is C:\Program Files\Cloudbase Solutions\Cloudbase-Init\bin\bsdtar.exe by default. If Cloudbase-Init isnot installed in the default directory, set the value of bsdtar_path to the directorywhere bsdtar.exe resides.
2. Use a text editor such as Notepad to open the Cloudbase-Init configurationfile in the C:\Program Files\Cloudbase Solutions\Cloudbase-Init\confdirectory and check the value of parameter local_scripts_path. Cloudbase-Initwill execute the required scripts in this directory.
Bare Metal ServerPrivate Image Creation Guide 4 Creating a Windows Image
2019-12-30 109

3. Copy bms-network-config.py to the C:\Program Files\Cloudbase Solutions\Cloudbase-Init\LocalScripts directory based on the value of parameterlocal_scripts_path in the Cloudbase-Init configuration file (use the samemethod in step 1). The default path of Cloudbase-Init is recommended. If youstore the script file in another directory, change the value of parameterlocal_scripts_path in the Cloudbase-Init configuration file.
4.7 (Optional) Installing the SDI DriverThe front-end SDI driver plug-in is installed on the image so that BMSs can haveEVS disks attached and can start from EVS disks, which enables quick BMSprovisioning.
If you do not need EVS or the BMS does not have an SDI iNIC, you can skip thissection.
Prerequisites● You have logged in to the VM.● You have obtained the SDI driver (scsi_ep_front) based on (Optional)
Installing the SDI Driver and uploaded it to the VM.
NO TE
The scsi_ep_front must be version 2.0.2.12 or later.
● WDK has been installed.WDK download path: http://download.microsoft.com/download/4/E/0/4E07EAAD-E394-4EA8-B2B8-D46E46A409C5/wdk/wdksetup.exe
Procedure1. Obtain the device manager devcon.exe from the WDK directory C:\Program
Files (x86)\Windows Kits\10\Tools\x64 and place devcon.exe in the samedirectory as the SDI driver.
2. Locate the EpScsiAdaper installation information file and obtain the PCI ID.
Bare Metal ServerPrivate Image Creation Guide 4 Creating a Windows Image
2019-12-30 110
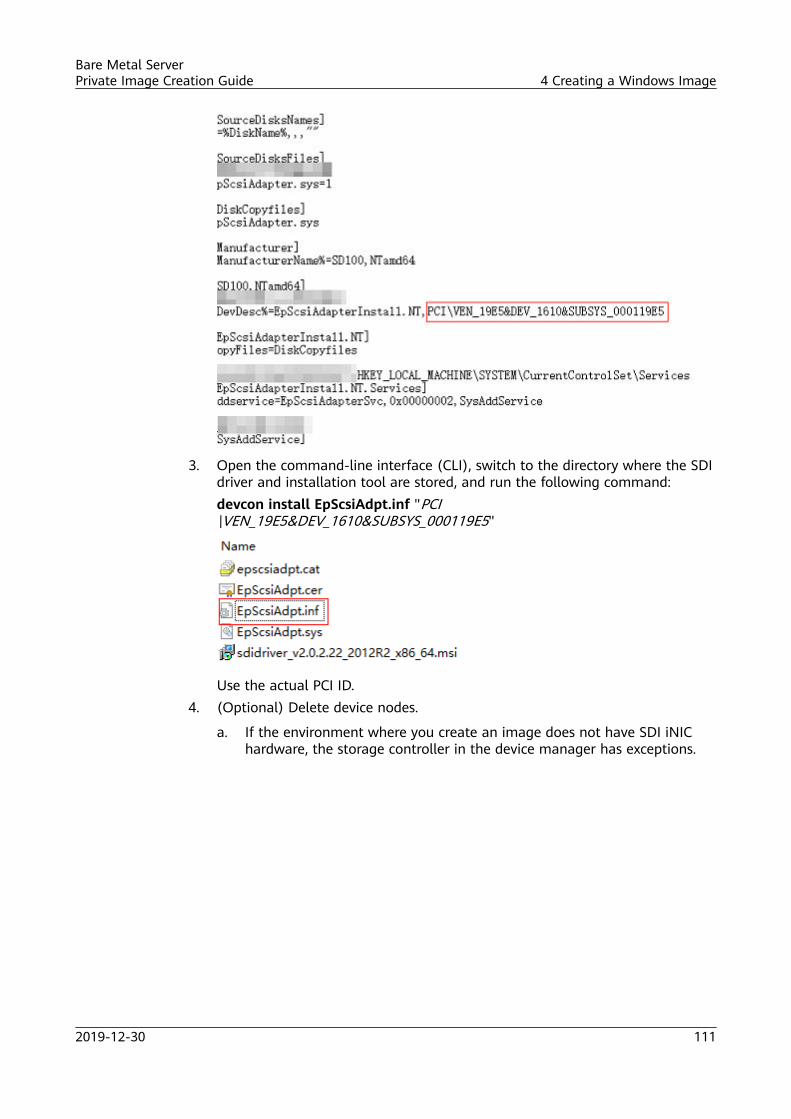
3. Open the command-line interface (CLI), switch to the directory where the SDIdriver and installation tool are stored, and run the following command:devcon install EpScsiAdpt.inf "PCI\VEN_19E5&DEV_1610&SUBSYS_000119E5"
Use the actual PCI ID.4. (Optional) Delete device nodes.
a. If the environment where you create an image does not have SDI iNIChardware, the storage controller in the device manager has exceptions.
Bare Metal ServerPrivate Image Creation Guide 4 Creating a Windows Image
2019-12-30 111

b. Open the CLI, switch to the directory where the SDI driver and devcon arestored, and delete abnormal device nodes.Run the devcon.exe find "PCI\VEN_19E5*" command to locate abnormaldevice nodes.Run the devcon.exe remove "@ROOT\SCSIADAPTER\0000" commandto delete the nodes.
c. Restart the OS.
Bare Metal ServerPrivate Image Creation Guide 4 Creating a Windows Image
2019-12-30 112

d. Check whether the exceptions in the storage controller are cleared.
4.8 Setting Time Zone CalibrationLinux uses the time of the motherboard CMOS chip as the Coordinated UniversalTime (UTC) and determines the system time based on the configured time zone.However, Windows uses the CMOS time as the system time directly withoutconverting it based on the time zone.
The following configuration is required:
1. Log in to the Windows VM.
2. Click in the lower left corner, select Windows PowerShell, enterregedit.exe, and press Enter to start Registry Editor.
3. In the displayed Registry Editor window, choose HKEY_LOCAL_MACHINE >SYSTEM > CurrentControlSet > Control > TimeZoneInformation.
4. In the right pane, right-click a blank area and choose New > DWORD (32-bit) Value to add a REG_DWORD code. Set its name to RealTimeIsUniversaland value to 1.
NO TE
If the image does not support mouse operation, right-click can be changed to pressthe menu key on the keyboard, and then use the keyboard to operate.
Bare Metal ServerPrivate Image Creation Guide 4 Creating a Windows Image
2019-12-30 113

4.9 Setting Virtual MemoryNO TE
Only Windows Server 2012 R2 and Windows Server 2016 need to set virtual memory.
The memory of the BMS is large, and automatically allocated virtual memory willtake up a lot of system disk space, affecting system performance. It isrecommended to turn off the virtual memory or set the ceiling during themirroring process. Specific operations are as follows:
1. Log in to the Windows VM.
2. Click in the lower left corner, right-click This PC, and select Properties.The System page is displayed.
3. In the navigation pane on the left, choose Advanced system settings.The System Properties dialog box is displayed. By default, it is under theAdvanced tab.
4. In the Performance area, click Settings.The Performance Options dialog box is displayed.
5. Click the Advanced tab and click Change in the Virtual memory area.The Virtual Memory dialog box is displayed.
Bare Metal ServerPrivate Image Creation Guide 4 Creating a Windows Image
2019-12-30 114

Figure 4-1 The Virtual Memory dialog box
6. Deselect Automatically manage paging file size for all drives.7. If you need to disable the virtual memory, select No paging file. If you need
to set an upper limit for the virtual memory, select Custom size. You areadvised to set the maximum size of the virtual memory to less than 2 GB.
8. Click Set. In the displayed dialog box, select Yes.9. Click OK.10. Restart the OS to complete the virtual memory settings.
4.10 (Optional) Enabling Automatic Windows UpdateWindows Server automatic update reminds you of downloading and installingimportant updates on your PC. By default, you need to manually configure thisfunction.
Windows Server 2012 R2 and Windows Server 20161. Log in to the Windows VM.
2. Click in the lower left corner and then Server Manager.3. In the navigation pane on the left, choose Local Server. In the right pane,
locate Windows Update and click the link that follows it.
Bare Metal ServerPrivate Image Creation Guide 4 Creating a Windows Image
2019-12-30 115

4. On the Windows Update page, click Install updates automatically.
NO TE
You can decide whether to enable this function. If you enable it, do not interrupt theWindows update during the process, which may take some time.
Windows Server 17091. Log in to the Windows VM.2. In the CLI, enter regedit to open the registry.3. Modify registry entries.
– In the Registry Editor window, choose HKEY_LOCAL_MACHINE >SOFTWARE > Policies > Microsoft > Windows > WindowsUpdate > AUand add the following information:[HKEY_LOCAL_MACHINE/SOFTWARE/Policies/Microsoft/Windows/WindowsUpdate/AU]"NoAutoUpdate"=dword:00000000"AUOptions"=dword:00000002"ScheduledInstallDay"=dword:00000000"UseWUServer"=dword:00000001
– In the Registry Editor window, choose HKEY_LOCAL_MACHINE >SOFTWARE > Policies > Microsoft > Windows > WindowsUpdate andadd the following information:[HKEY_LOCAL_MACHINE/SOFTWARE/Policies/Microsoft/Windows/WindowsUpdate]"WUServer"="http://wsus.neu.edu.cn""WUStatusServer"="http://wsus.neu.edu.cn""TargetGroupEnabled"=dword:00000001"TargetGroup"="reg"
4.11 Configuring the SID
NO TICE
This is the last step in the VM configuration. Due to the Cloudbase-Initmechanism, after the VM used to create an image is restarted, a randompassword is generated, and the VM cannot be logged in. Therefore, confirm theVM configuration before performing this step.
A Security Identifier (SID) is a unique value that identifies a user, group, orcomputer account. Currently, only Windows Server 2016 requires SID during imagecreation. For how to configure a SID for Windows Server 2012 R2, see the BareMetal Server User Guide.
1. Log in to the Windows VM.
2. Click in the lower left corner, choose Windows PowerShell, and runthe whoami /user command to query the SID.
Bare Metal ServerPrivate Image Creation Guide 4 Creating a Windows Image
2019-12-30 116
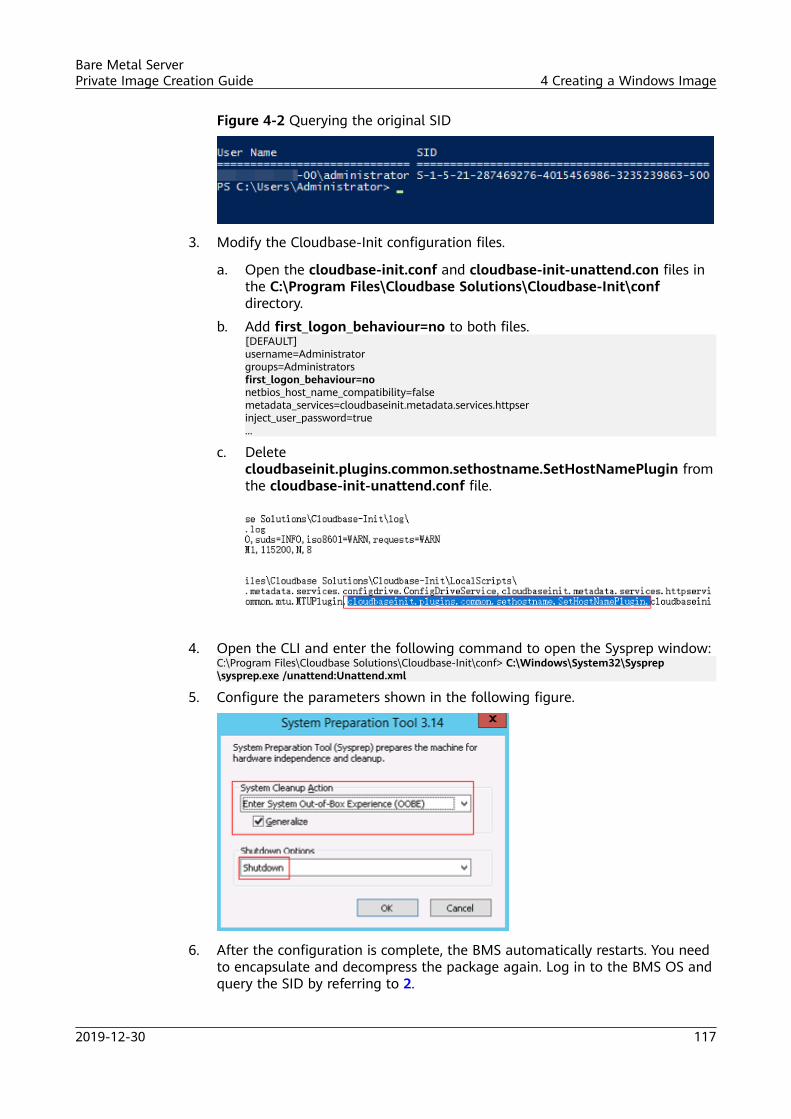
Figure 4-2 Querying the original SID
3. Modify the Cloudbase-Init configuration files.
a. Open the cloudbase-init.conf and cloudbase-init-unattend.con files inthe C:\Program Files\Cloudbase Solutions\Cloudbase-Init\confdirectory.
b. Add first_logon_behaviour=no to both files.[DEFAULT]username=Administratorgroups=Administratorsfirst_logon_behaviour=nonetbios_host_name_compatibility=falsemetadata_services=cloudbaseinit.metadata.services.httpserinject_user_password=true...
c. Deletecloudbaseinit.plugins.common.sethostname.SetHostNamePlugin fromthe cloudbase-init-unattend.conf file.
4. Open the CLI and enter the following command to open the Sysprep window:C:\Program Files\Cloudbase Solutions\Cloudbase-Init\conf> C:\Windows\System32\Sysprep\sysprep.exe /unattend:Unattend.xml
5. Configure the parameters shown in the following figure.
6. After the configuration is complete, the BMS automatically restarts. You needto encapsulate and decompress the package again. Log in to the BMS OS andquery the SID by referring to 2.
Bare Metal ServerPrivate Image Creation Guide 4 Creating a Windows Image
2019-12-30 117

Figure 4-3 Querying the new SID
As shown in the preceding figure, the SID has been changed successfully.
Bare Metal ServerPrivate Image Creation Guide 4 Creating a Windows Image
2019-12-30 118

5 Stopping the VM and Obtaining theImage
Stop the VM
You can run the sudo poweroff command in the OS to stop the VM. If it does notwork, on virt-manager, click Virtual Machine Manager, select the running VMshown in the red box in the following figure, right-click it, and click shutdown (ifthe VM cannot be stopped, you are advised to click Force Off).
Obtain the Image
If you select automatic creation of the image disk, the QCOW2 or IMG image fileis in the /var/lib/libvirt/images directory.
Figure 5-1 Image file (Linux OS)
If you select manual creation of the image disk, obtain the image file from thedirectory where it was created.
Compress the Image
If the created image file is too large, run the following command to compress it:
qemu-img convert -f raw -O qcow2 SourceFile FinallyFile.qcow2
SourceFile format can be .img or qcow2.
Bare Metal ServerPrivate Image Creation Guide 5 Stopping the VM and Obtaining the Image
2019-12-30 119
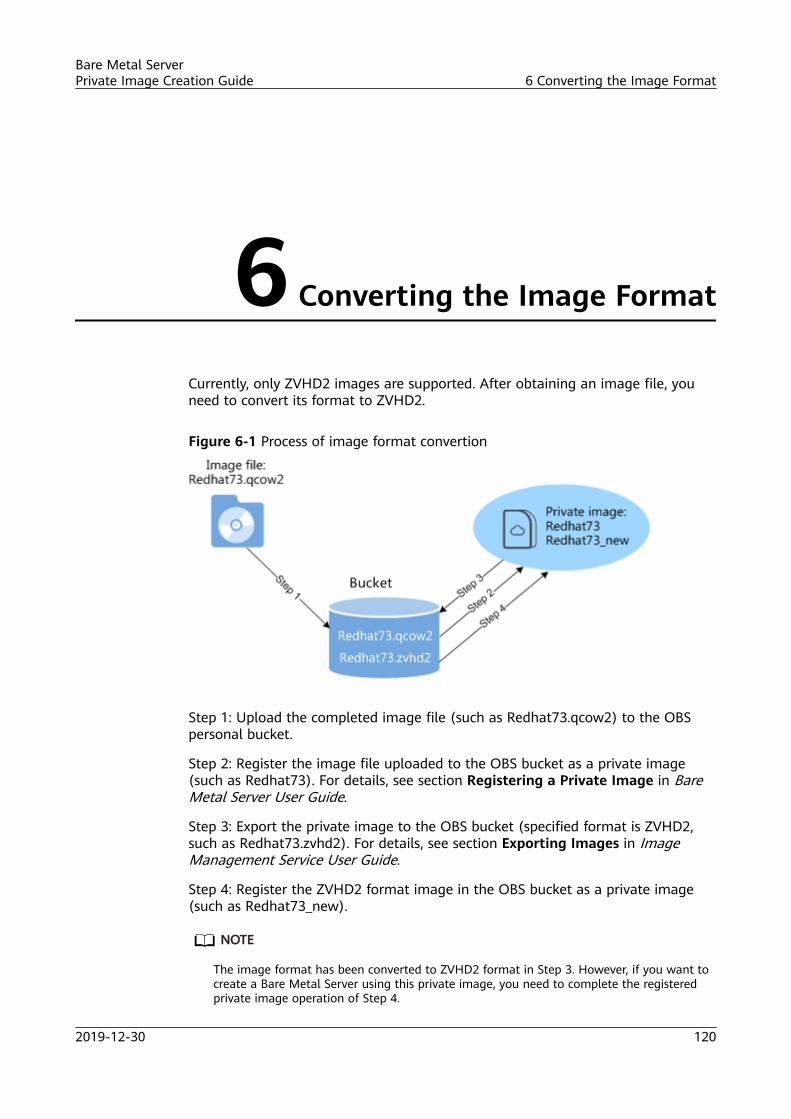
6 Converting the Image Format
Currently, only ZVHD2 images are supported. After obtaining an image file, youneed to convert its format to ZVHD2.
Figure 6-1 Process of image format convertion
Step 1: Upload the completed image file (such as Redhat73.qcow2) to the OBSpersonal bucket.
Step 2: Register the image file uploaded to the OBS bucket as a private image(such as Redhat73). For details, see section Registering a Private Image in BareMetal Server User Guide.
Step 3: Export the private image to the OBS bucket (specified format is ZVHD2,such as Redhat73.zvhd2). For details, see section Exporting Images in ImageManagement Service User Guide.
Step 4: Register the ZVHD2 format image in the OBS bucket as a private image(such as Redhat73_new).
NO TE
The image format has been converted to ZVHD2 format in Step 3. However, if you want tocreate a Bare Metal Server using this private image, you need to complete the registeredprivate image operation of Step 4.
Bare Metal ServerPrivate Image Creation Guide 6 Converting the Image Format
2019-12-30 120

7 FAQ
7.1 How Can I Handle the Issue That the Packets fromthe VLAN Subinterface of bond0 of a Linux BMS Usethe MAC Address of bond0 as the Source MAC Address?
This is a Linux kernel issue which makes the BMS extended NIC fail to ping the
Table 7-1 OSs and kernel versions
OS Kernel Version
Red Hat 7.2 3.10.0-327
Red Hat 7.3 3.10.0-514
Red Hat 7.4 3.10.0-693
CenOS 7.0 3.10.0-514
CentOS 7.2 3.10.0-327
CentOS 7.3 3.10.0-514
CentOS 7.4 3.10.0-693
EulerOS 2.2 3.10.0-327
Ubuntu 14.04 3.13.0-24
Bare Metal ServerPrivate Image Creation Guide 7 FAQ
2019-12-30 121
gateway. All the OSs listed in the following table have this issue. You need to obtain the
kernel patch matching the OS (such as Red Hat 7.3) from the OS vendor to rectify this issue.

7.2 How Can I Handle the IP Link Interruption Causedby the Incorrect Bond Mode Occasionally ConfiguredUsing the wicked Module of SUSE 12 SP1?
This is a known issue of the wicked module. You are advised to upgrade its versionto later than 0.6.40.28 to rectify this issue. You can download the wicked softwarepackage from https://software.opensuse.org/package/wicked.
7.3 How Can I Set the Mode of Adjusting the BMS CPUFrequency?
Common CPU frequency adjustment modes include performance, powersave,and ondemand. You can select an appropriate one based on the BMS scenario.
To set the CPU frequency adjustment mode to performance, perform the followingoperations:
● Red Hat 6Modify the following parameter in the /etc/sysconfig/cpuspeed file:GOVERNOR=performance
● Red Hat 7Modify the following parameter in the /etc/sysconfig/cpupower file:CPUPOWER_START_OPTS="frequency-set -g performance"
● Debian Gnu/Linux 8Modify the following parameter in the /etc/init.d/cpufrequtils file:GOVERNOR="performance"
NO TE
● If you do not have relevant software, run the yum install xxx (software name)command or download the RPM package to install the software.
● For Red Hat 6, to enable the intel_pstate driver to automatically load and make theconfigured parameters take effect upon OS startup, you can configure a script.1. Run the following command to create the intel_pstate.modules file:
vi /etc/sysconfig/modules/intel_pstate.modules2. Add the following content:
/sbin/modprobe intel_pstate > /dev/null 2>&1
3. Press Esc and enter :wq! to save the configuration.4. Run the following command to modify permissions of the file:
chmod 755 /etc/sysconfig/modules/intel_pstate.modules
Bare Metal ServerPrivate Image Creation Guide 7 FAQ
2019-12-30 122

7.4 What Can I Do If Cloudbase-Init Is Stopped After aWindows BMS Is Provisioned?
SymptomIf Cloudbase-Init is stopped after a Windows BMS is provisioned, and information"Failed to find trace ID description from Cloudbase-Init because the componenttriggering the trace is not installed or has been damaged. You can install orrecover the component." is displayed, you can reinstall Cloudbase-Init.
Solution1. Log in to the BMS using BMC and back up the conf file in the C:\Program
Files\Cloudbase Solutions\Cloudbase-Init\ directory and the files in theLocalScripts directory.
2. Download the required Cloudbase-Init installation package from the followingwebsite:https://cloudbase.it/cloudbase-init/#download
3. On the BMC host management page, click Remote Control.The remote control window is displayed.
4. In the upper toolbar, select Directory and click Browse.A dialog box is displayed.
5. Select the Cloudbase-Init installation package and click Connect to uploadthe installation package to the BMS. Then enter the CD-ROM drive to obtainthe installation package and install Cloudbase-Init.
6. Copy the files you backed up in step 1 to the Cloudbase-Init directory.7. Restart the BMS and check whether Cloudbase-Init runs properly.
7.5 How Can I Activate a Windows BMS?Perform the following operations to manually activate a Windows BMS:
1. Log in to the Windows BMS.2. Click Start, enter cmd in Search programs and files, and press Enter to open
the CLI.3. Run the following command to configure the IP address of the KMS server:
slmgr -skms 100.125.0.1034. Run the following command to check whether the BMS has been activated:
slmgr -atoIf error 0xC004F074 occurs, the BMS cannot be activated. In such an event, goto step 5.
5. Verify that the time in the BMS is the same as the standard time. If the timeis significantly different, the BMS cannot be activated.
6. Run the following command on the BMS to check whether the link betweenthe BMS and the KMS server port is reachable:
Bare Metal ServerPrivate Image Creation Guide 7 FAQ
2019-12-30 123

telnet 100.125.0.103 1688If the link is unreachable, port 1688 is not enabled on the BMS firewall. Youmust disable the firewall or enable port 1688 on the firewall. If the BMS hasany security software such as safedog, stop using it.
7. Run the following command to check whether the BMS has been activated:slmgr -ato
Bare Metal ServerPrivate Image Creation Guide 7 FAQ
2019-12-30 124
A Appendix
A.1 Configuring the SSH Service1. After Linux is installed on the host, open the Linux terminal and run the
following command to check the SSH service status:service sshd statusIn the command output, check whether the SSH service is enabled andwhether its status is active.– If the SSH service is not enabled, run the service enable sshd command.– If the SSH service status is not active, run the service sshd start
command.2. Modify the SSH service configuration file to enable user root to log in to the
host using SSH.Configuration file path: /etc/ssh/sshd_configSet the value of PermitRootLogin to yes.
A.2 Configuring the vsftpd Service1. After Linux is installed on the host, open the Linux terminal and run the
following command to check the vsftpd service status:service vsftpd statusIn the command output, check whether the vsftpd service is enabled andwhether its status is active.– If the vsftpd service is not enabled, run the service enable vsftpd
command.– If the vsftpd service status is not active, run the service vsftpd start
command.
A.3 Configuring the VNC Service1. Run the following command to check whether the VNC server is installed:
Bare Metal ServerPrivate Image Creation Guide A Appendix
2019-12-30 125

rpm -qa | grep tigervnc-server
The following information is displayed:tigervnc-server-1.1.0-5.e16.x86_64
If the VNC server is not installed, no command output is displayed or thecommand output shows that the VNC server is not installed. In this case, youneed to install the VNC server on the host. In many cases, this software is inthe ISO image file and you can use yum or Zypper to install it.
2. (Optional) Install tigervnc-server.
a. Run the lsblk command (the OS ISO file must be mounted to the BMCvirtual CD-ROM drive. If not, mount the ISO file in the same way as OSinstallation).
b. Locate the block device whose name is sr0 and type is rom, and checkwhether directories are mounted to the mount point. If no, run thefollowing command:
mount /dev/sr0 /mnt
c. Enter the /etc/yum.repos.d directory where the configuration is storedand back up all .repo files. Use vim to create a .repo file, for exampletiger.repo. The file contains the following content:[rhel-local]baseurl=file:///mnt enabled=1 gpgcheck=0
Save the file and run the following commands:
yum repolist
yum install tigervnc-server
3. Start the VNC service and run the following command:
vncserver
Configure the VNC login password of user root as prompted.
The command output contains the Log file is /root/.vnc/rhel:1.loginformation. 1 indicates that the current user is allocated the first VNCdesktop.
4. Run the following command to check whether the Xvnc process exists:
ps -ef | grep Xvnc
The process ID is 36069, port number used is 5901, and virtual desktopnumber is 1.
5. Run the following command check whether the VNC server is installed:
vncserver -list
Bare Metal ServerPrivate Image Creation Guide A Appendix
2019-12-30 126

The current user has three virtual desktops, 1, 5, and 2.6. On a local Windows PC, use VNC Viewer to connect to the VNC server and log
in to the host.When you install VNC Viewer for the first time, if the version of VNC Viewer is5.3.2, set ColorLevel to rgb222. To set it, choose Options > Expert >ColorLevel.
7. Run the following command to check whether the VNC server is installed:vncserver :6Run the vncserver -list command to check whether the virtual desktop isadded successfully. If information shown in the following figure is displayed,the virtual desktop 6 is added successfully.
A.4 Mappings Between BMS Flavors and DriversBMS Type Driver Type
BMSFlavor
OSType
ServerDriver
SDIDriver
Hi1822 NICDriver/ManagementComponent
IBDriver
GPUDriver
Multi-PathSoftware
bms-network-config
Bare Metal ServerPrivate Image Creation Guide A Appendix
2019-12-30 127

BMS Type Driver Type
S4series
Windows
V5serverdriver
Required
Notrequired
Notrequired
Notrequired
Required byserversequippedwithHBAcards
Required
CentOS/RedHat/Oracle
V5serverdriver
Required
Notrequired
Notrequired
Notrequired
Required byserversequippedwithHBAcards
Required
Ubuntu
V5serverdriver
Required
Notrequired
Notrequired
Notrequired
Required byserversequippedwithHBAcards
Required
SLES V5serverdriver
Required
Notrequired
Notrequired
Notrequired
Required byserversequippedwithHBAcards
Required
Debian
V5serverdriver
Required
Notrequired
Notrequired
Notrequired
Required byserversequippedwithHBAcards
Required
D2andI/O2series
Windows
V5serverdriver
Notrequired
Notrequired
Notrequired
Notrequired
Notrequired
Required
Bare Metal ServerPrivate Image Creation Guide A Appendix
2019-12-30 128

BMS Type Driver Type
CentOS/RedHat/Oracle
V5serverdriver
Notrequired
Notrequired
Notrequired
Notrequired
Notrequired
Required
Ubuntu
V5serverdriver
Notrequired
Notrequired
Notrequired
Notrequired
Notrequired
Required
SLES V5serverdriver
Notrequired
Notrequired
Notrequired
Notrequired
Notrequired
Required
Debian
V5serverdriver
Notrequired
Notrequired
Notrequired
Notrequired
Notrequired
Required
H2series
CentOS/RedHat/Oracle
V5serverdriver
Required
Notrequired
Required
Notrequired
Notrequired
Required
Ubuntu
V5serverdriver
Required
Notrequired
Required
Notrequired
Notrequired
Required
P3series
CentOS/RedHat/Oracle
V5serverdriver
Required
Required
Required
Required
Notrequired
Required
Ubuntu
V5serverdriver
Required
Required
Required
Required
Notrequired
Required
A/R/Kseries
CentOS/RedHat/Oracle
TaiShanserverdriver
Notrequired
Required
Notrequired
Notrequired
Notrequired
Required byserversequippedwithSDIcards
Bare Metal ServerPrivate Image Creation Guide A Appendix
2019-12-30 129
B Change History
Release Date Description
2019-12-30 This issue is the thirteenth official release.Added the following content:● SUSE, Red Hat, CentOS, Oracle Linux, Ubuntu,
Debian, and EulerOS 2.8 ARM● Mappings Between BMS Flavors and Drivers
2019-10-30 This issue is the twelfth official release.Added the following content:● OS Partitioning Recommendations● Modifying the Boot File (UEFI Boot Mode)● (Optional) Installing the Hi1822 NIC DriverModified the following content:● Optimized the procedure of creating a Windows
image.● Added and optimized constraints in Overview.● Optimized steps in (Optional) Installing the SDI
Driver.
2019-01-30 This issue is the eleventh official release.● Added operations to configure the OpenStack source
for Ubuntu OSs in Configuring Cloud-Init 17.1 andConfiguring Cloud-Init 18.2.
● Modified version dependencies for the scsi_ep_frontdriver package in (Optional) Installing the SDIDriver and (Optional) Installing the SDI Driver.
Bare Metal ServerPrivate Image Creation Guide B Change History
2019-12-30 130
Release Date Description
2018-11-30 This issue is the tenth official release.Added the following content:(Optional) Installing the mpt3 DriverModified the following content:● Added operations to create EulerOS 2.3 images.● Added the method of handling an error that occurs
during bms-network-config installation for SUSE 12in (Optional) Installing the bms-network-configSoftware Package.
2018-08-30 This issue is the ninth official release.Modified the following content:Optimized operations in section Preparing RequiredHardware and Software.
2018-07-30 This issue is the eighth official release.Modified the following content:Added image creation for Debian 8.6.
2018-05-30 This issue is the seventh official release.Modified the following content:Added the operations to set time parameters in sectionConfiguring the VM Environment.
2018-04-30 This issue is the sixth official release.Added the following content:● (Optional) Installing the V5 Server Onboard NIC
Driver● (Optional) Installing the megaraid_sas Driver● (Optional) Installing the UltraPath● Installing the V5 Server Drivers
2018-03-30 This issue is the fifth official release.Added the following content:● Configuring the Root Partition to Automatically
Expand Disk Capacity● (Optional) Installing the SDI Driver● Configuring the SIDModified the following content:Adjusted the outlines of sections Installing Cloud-Initand Configuring Cloud-Init.
2018-01-30 This issue is the fourth official release.Added the following content:How Can I Activate a Windows BMS?
Bare Metal ServerPrivate Image Creation Guide B Change History
2019-12-30 131

Release Date Description
2017-12-30 This issue is the third official release.Added the following content:CentOS 7.4 for ARM
2017-11-30 This issue is the second official release.Added the following content:● Setting Time Zone Calibration● Setting Virtual Memory● (Optional) Enabling Automatic Windows Update● Converting the Image FormatModified the following content:● Added the operations to upgrade the wicked
component and to delete the VM local user insection Configuring the VM Environment.
● Optimized operations in section Modifying theHardware Device Driver That Boots the OS.
2017-10-30 This issue is the first official release.
Bare Metal ServerPrivate Image Creation Guide B Change History
2019-12-30 132