premiere pro cc - latrobe.edu.au ·...
TRANSCRIPT
PREMIERE PRO CC EDIT GUIDE -‐ La Trobe University 2015 latrobe.edu.au
PREMIERE PRO CC (VERSION 2015.2)
EDITING GUIDE
(EDIT SUITES)
Version 3.3 (FEB 2016)

2
PREMIERE CC 2015.2 Editing Guide -‐ La Trobe University 2016
What do you want to do?
3
PREMIERE CC 2015.2 Editing Guide -‐ La Trobe University 2016
1. Back up SD card footage Pg. 5
2. Set up a new project
Pg.7
3. Import footage from an SD card Pg. 11
4. Import other media (mp3/jpeg/etc.) Pg. 13
5. Open an existing Premiere project Pg. 15
6. Basic editing Pg. 17
7. Adding Titles Pg. 21
8. Keyboard Shortcuts Pg. 25
9. Export your movie for ARCHIVE / TV STUDIO Pg. 27
10. Export your movie for YOUTUBE / VIMEO Pg. 31
11. Troubleshooting Pg. 35

4
PREMIERE CC 2015.2 Editing Guide -‐ La Trobe University 2016
5
PREMIERE CC 2015.2 Editing Guide -‐ La Trobe University 2016
1. Back Up SD Card Footage
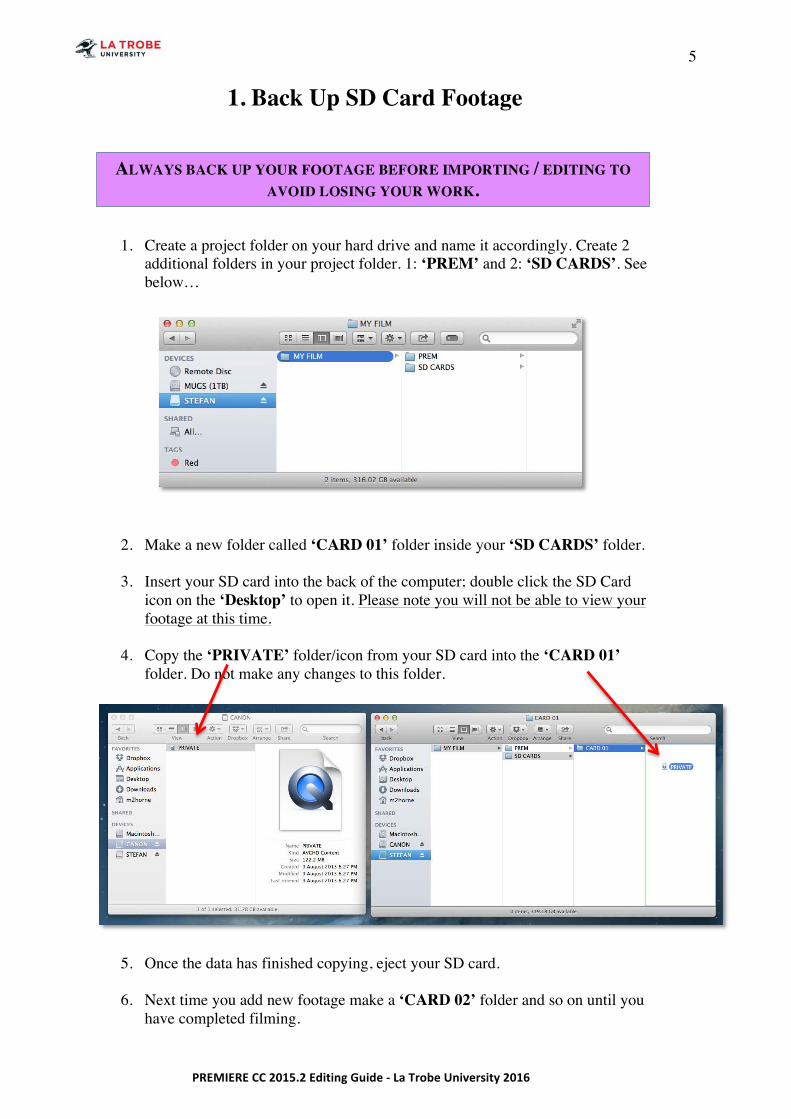
1. Create a project folder on your hard drive and name it accordingly. Create 2
additional folders in your project folder. 1: ‘PREM’ and 2: ‘SD CARDS’. See below…
2. Make a new folder called ‘CARD 01’ folder inside your ‘SD CARDS’ folder.
3. Insert your SD card into the back of the computer; double click the SD Card icon on the ‘Desktop’ to open it. Please note you will not be able to view your footage at this time.
4. Copy the ‘PRIVATE’ folder/icon from your SD card into the ‘CARD 01’
folder. Do not make any changes to this folder.
5. Once the data has finished copying, eject your SD card.
6. Next time you add new footage make a ‘CARD 02’ folder and so on until you have completed filming.
ALWAYS BACK UP YOUR FOOTAGE BEFORE IMPORTING / EDITING TO AVOID LOSING YOUR WORK.

6
PREMIERE CC 2015.2 Editing Guide -‐ La Trobe University 2016
7
PREMIERE CC 2015.2 Editing Guide -‐ La Trobe University 2016
2. Setting up a new Premiere Pro CC project.
1. Make sure you have created the folders on your hard drive as outlined in
‘Section 01 – Back Up SD card footage.’
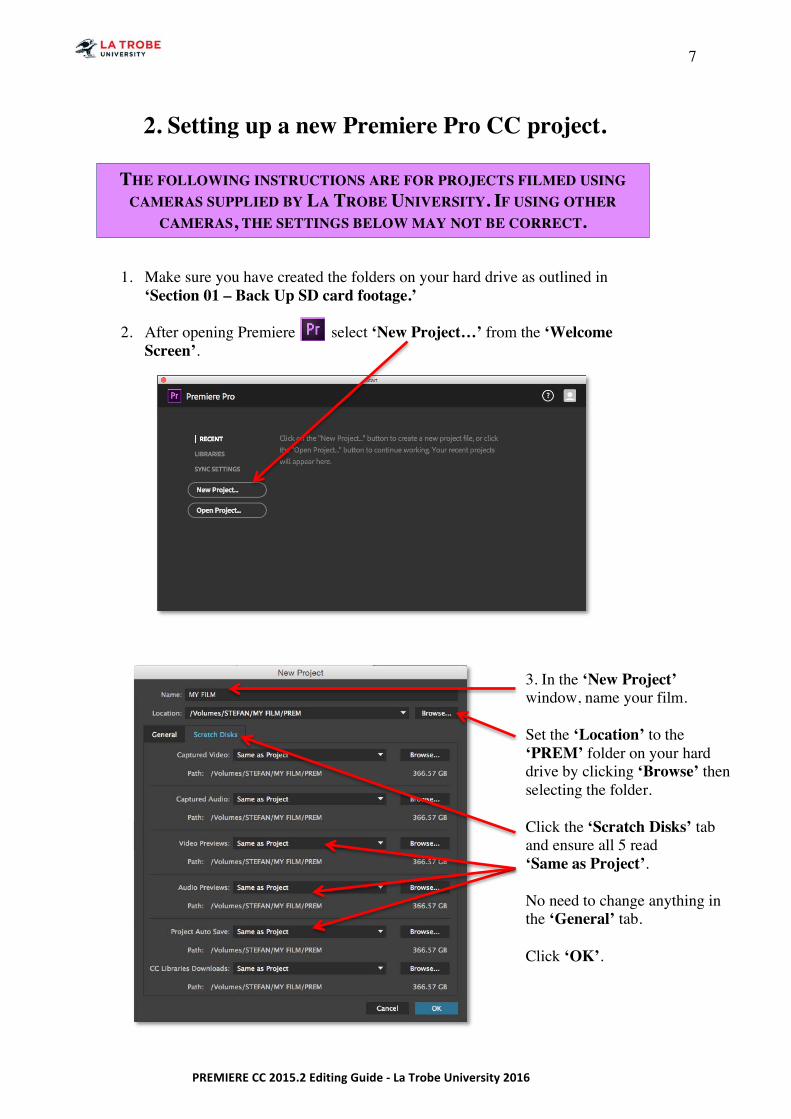
2. After opening Premiere select ‘New Project…’ from the ‘Welcome Screen’.
THE FOLLOWING INSTRUCTIONS ARE FOR PROJECTS FILMED USING CAMERAS SUPPLIED BY LA TROBE UNIVERSITY. IF USING OTHER
CAMERAS, THE SETTINGS BELOW MAY NOT BE CORRECT.
3. In the ‘New Project’ window, name your film. Set the ‘Location’ to the ‘PREM’ folder on your hard drive by clicking ‘Browse’ then selecting the folder. Click the ‘Scratch Disks’ tab and ensure all 5 read ‘Same as Project’. No need to change anything in the ‘General’ tab. Click ‘OK’.
8
PREMIERE CC 2015.2 Editing Guide -‐ La Trobe University 2016
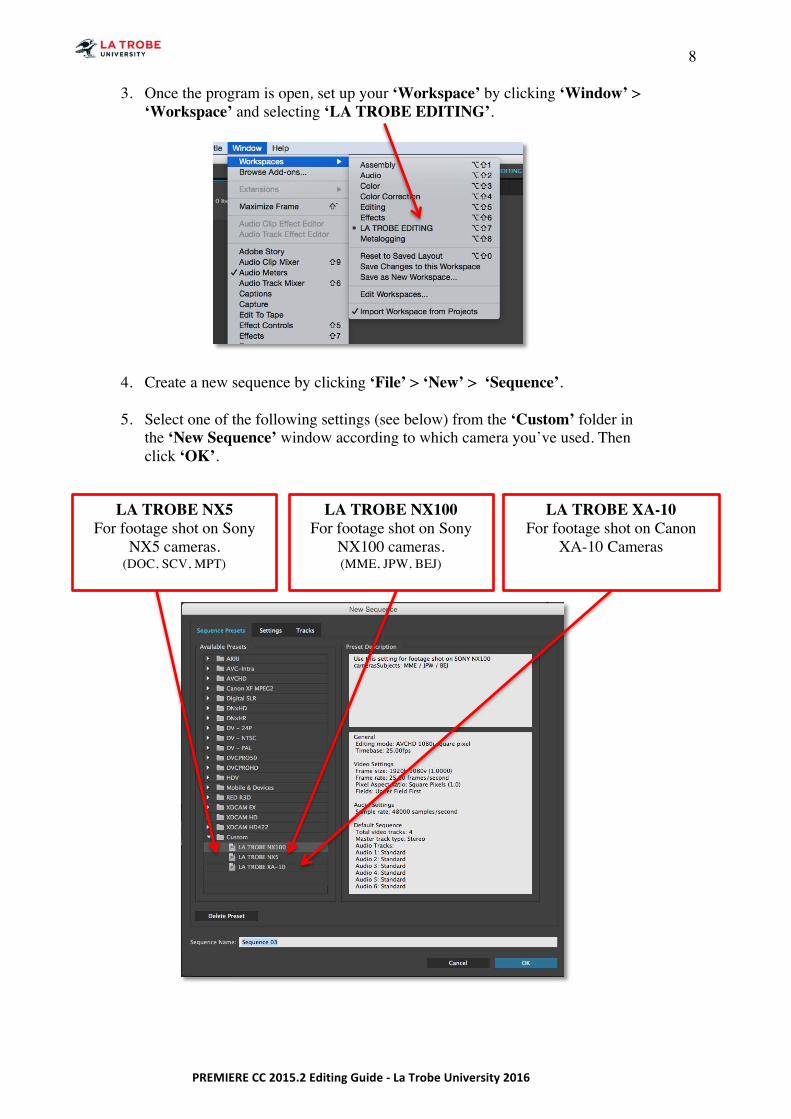
3. Once the program is open, set up your ‘Workspace’ by clicking ‘Window’ > ‘Workspace’ and selecting ‘LA TROBE EDITING’.
4. Create a new sequence by clicking ‘File’ > ‘New’ > ‘Sequence’.
5. Select one of the following settings (see below) from the ‘Custom’ folder in the ‘New Sequence’ window according to which camera you’ve used. Then click ‘OK’.
LA TROBE NX5 For footage shot on Sony
NX5 cameras. (DOC, SCV, MPT)
LA TROBE XA-10 For footage shot on Canon
XA-10 Cameras
LA TROBE NX100 For footage shot on Sony
NX100 cameras. (MME, JPW, BEJ)
9
PREMIERE CC 2015.2 Editing Guide -‐ La Trobe University 2016
6. Now you are ready to add footage to your project. Refer to ‘Section 3 – Importing Footage from an SD Card’.

10
PREMIERE CC 2015.2 Editing Guide -‐ La Trobe University 2016
11
PREMIERE CC 2015.2 Editing Guide -‐ La Trobe University 2016
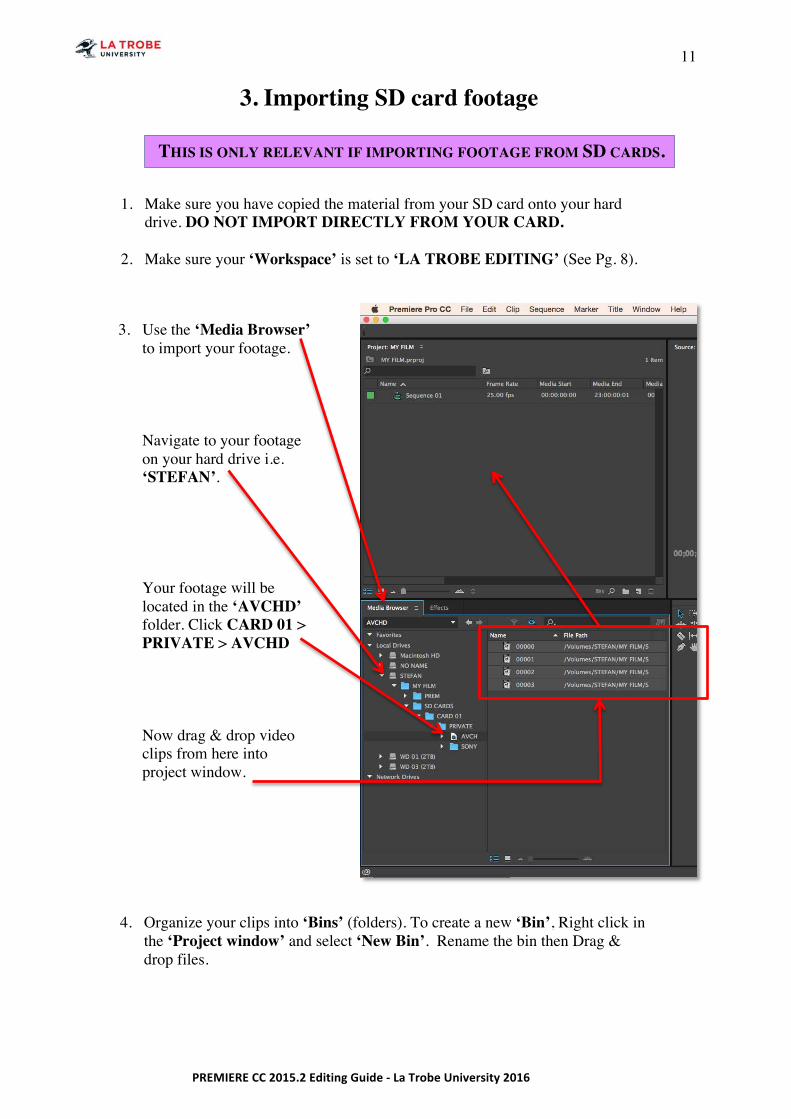
3. Importing SD card footage 1. Make sure you have copied the material from your SD card onto your hard
drive. DO NOT IMPORT DIRECTLY FROM YOUR CARD.
2. Make sure your ‘Workspace’ is set to ‘LA TROBE EDITING’ (See Pg. 8).
4. Organize your clips into ‘Bins’ (folders). To create a new ‘Bin’, Right click in the ‘Project window’ and select ‘New Bin’. Rename the bin then Drag & drop files.
THIS IS ONLY RELEVANT IF IMPORTING FOOTAGE FROM SD CARDS.
3. Use the ‘Media Browser’ to import your footage. Navigate to your footage on your hard drive i.e. ‘STEFAN’.
Your footage will be located in the ‘AVCHD’ folder. Click CARD 01 > PRIVATE > AVCHD Now drag & drop video clips from here into project window.
12
PREMIERE CC 2015.2 Editing Guide -‐ La Trobe University 2016
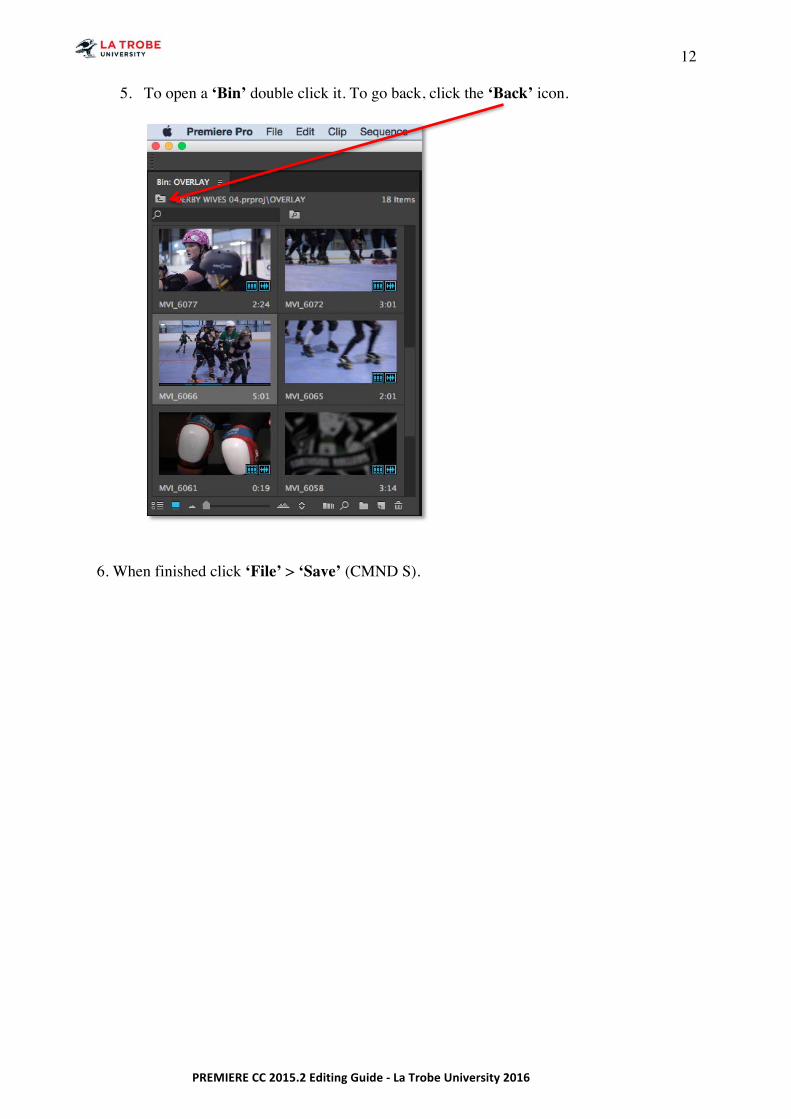
5. To open a ‘Bin’ double click it. To go back, click the ‘Back’ icon.
6. When finished click ‘File’ > ‘Save’ (CMND S).
13
PREMIERE CC 2015.2 Editing Guide -‐ La Trobe University 2016
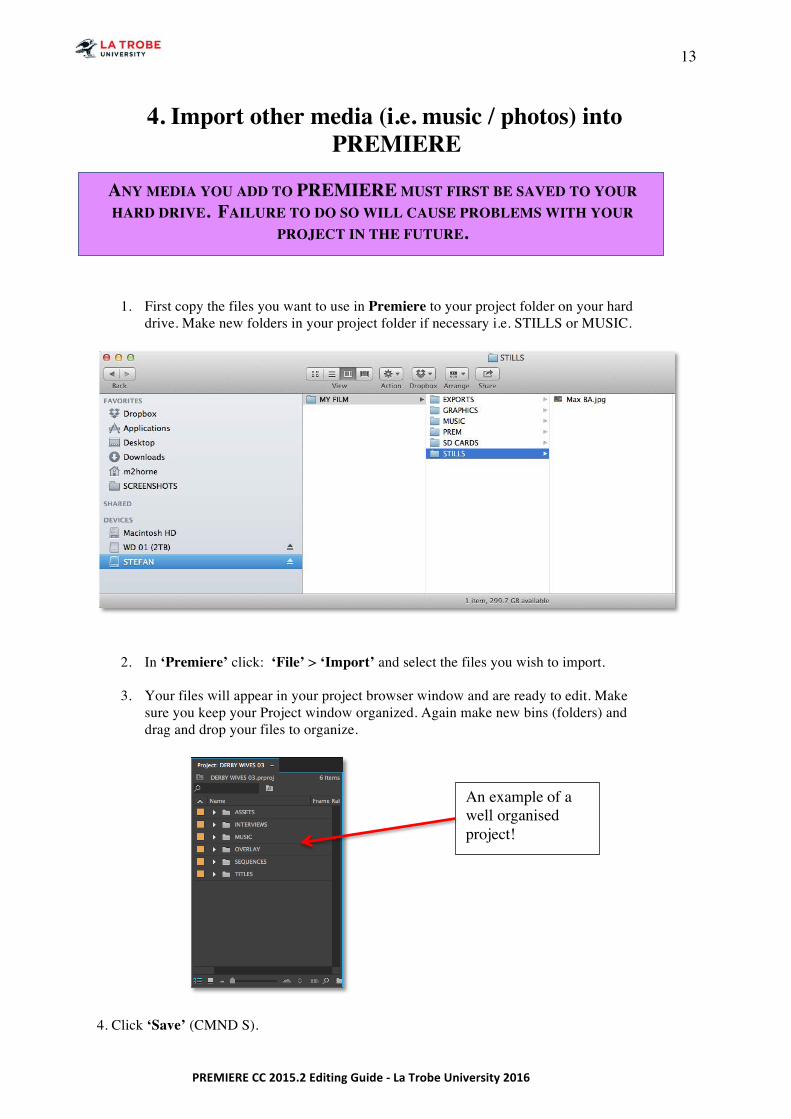
4. Import other media (i.e. music / photos) into
PREMIERE
ANY MEDIA YOU ADD TO PREMIERE MUST FIRST BE SAVED TO YOUR HARD DRIVE. FAILURE TO DO SO WILL CAUSE PROBLEMS WITH YOUR
PROJECT IN THE FUTURE.
1. First copy the files you want to use in Premiere to your project folder on your hard drive. Make new folders in your project folder if necessary i.e. STILLS or MUSIC.
2. In ‘Premiere’ click: ‘File’ > ‘Import’ and select the files you wish to import.
3. Your files will appear in your project browser window and are ready to edit. Make sure you keep your Project window organized. Again make new bins (folders) and drag and drop your files to organize.
4. Click ‘Save’ (CMND S).
An example of a well organised project!

14
PREMIERE CC 2015.2 Editing Guide -‐ La Trobe University 2016
15
PREMIERE CC 2015.2 Editing Guide -‐ La Trobe University 2016
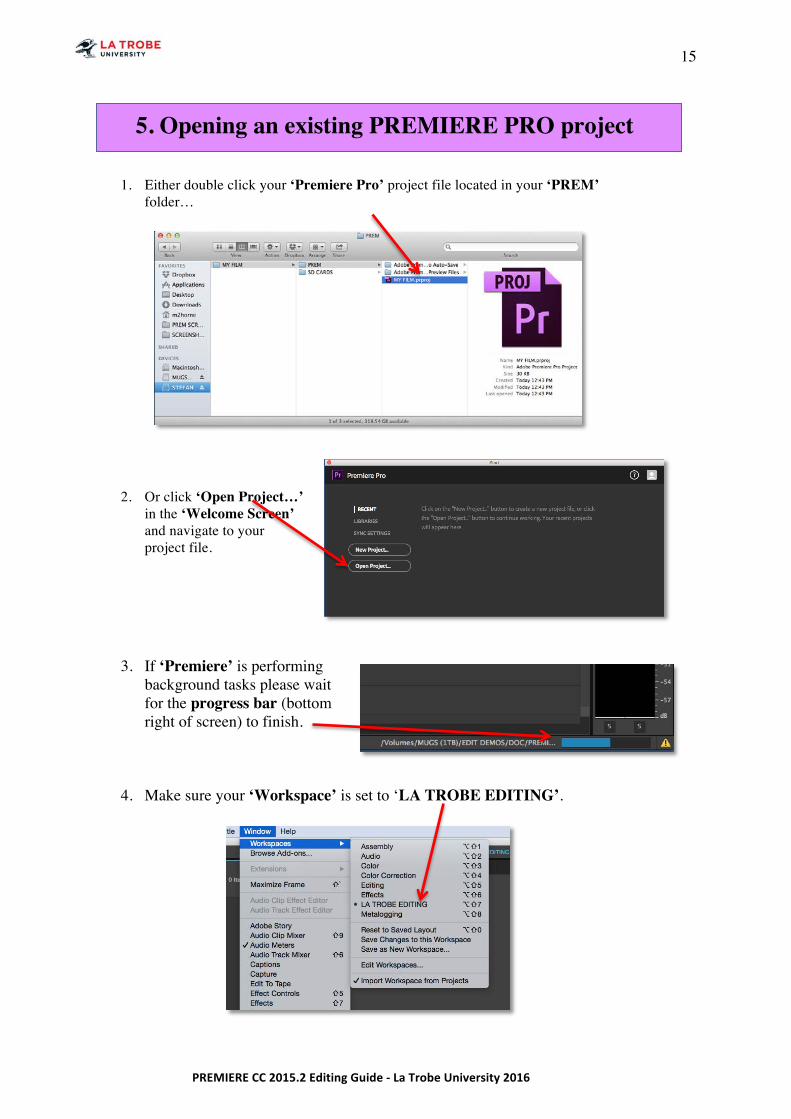
5. Opening an existing PREMIERE PRO project
1. Either double click your ‘Premiere Pro’ project file located in your ‘PREM’ folder…
2. Or click ‘Open Project…’ in the ‘Welcome Screen’ and navigate to your project file.
3. If ‘Premiere’ is performing background tasks please wait for the progress bar (bottom right of screen) to finish.
4. Make sure your ‘Workspace’ is set to ‘LA TROBE EDITING’.

16
PREMIERE CC 2015.2 Editing Guide -‐ La Trobe University 2016
17
PREMIERE CC 2015.2 Editing Guide -‐ La Trobe University 2016
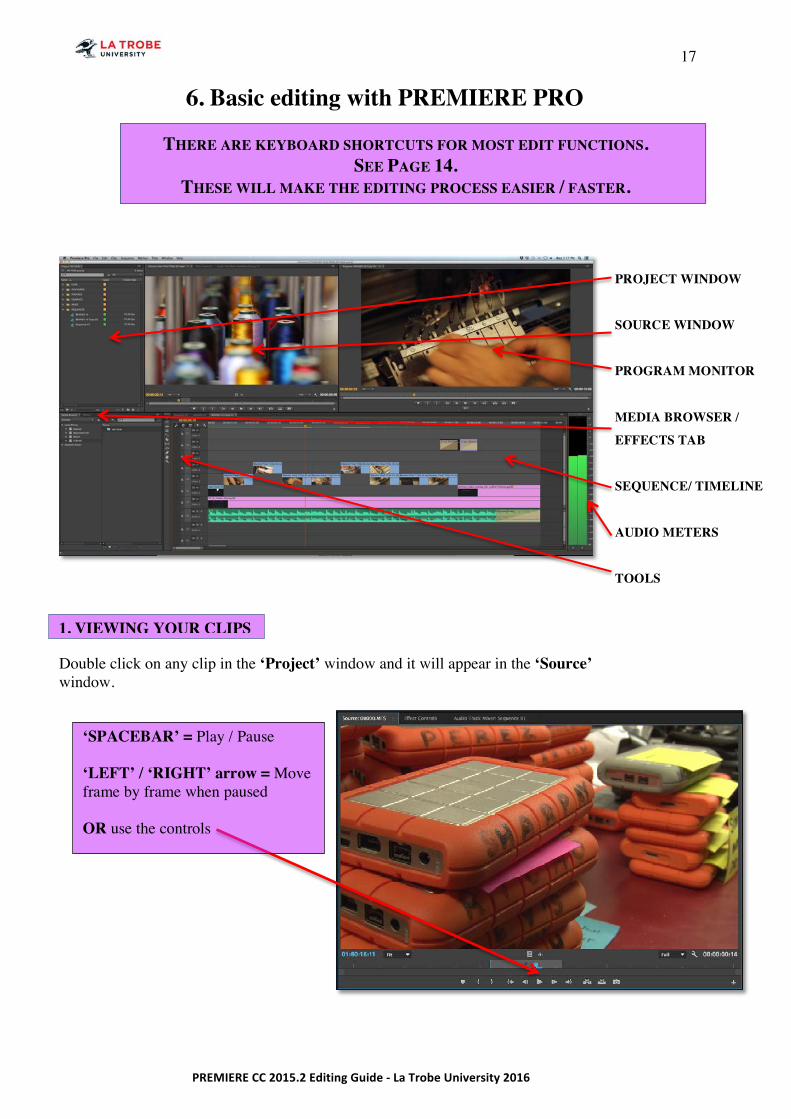
6. Basic editing with PREMIERE PRO
THERE ARE KEYBOARD SHORTCUTS FOR MOST EDIT FUNCTIONS. SEE PAGE 14.
THESE WILL MAKE THE EDITING PROCESS EASIER / FASTER.
Double click on any clip in the ‘Project’ window and it will appear in the ‘Source’ window.
PROJECT WINDOW
SOURCE WINDOW
PROGRAM MONITOR
MEDIA BROWSER /
EFFECTS TAB
SEQUENCE/ TIMELINE
AUDIO METERS
TOOLS
1. VIEWING YOUR CLIPS
‘SPACEBAR’ = Play / Pause ‘LEFT’ / ‘RIGHT’ arrow = Move frame by frame when paused OR use the controls
18
PREMIERE CC 2015.2 Editing Guide -‐ La Trobe University 2016
A) To add an entire clip, simply drag it from the ‘Project’ window onto the timeline.
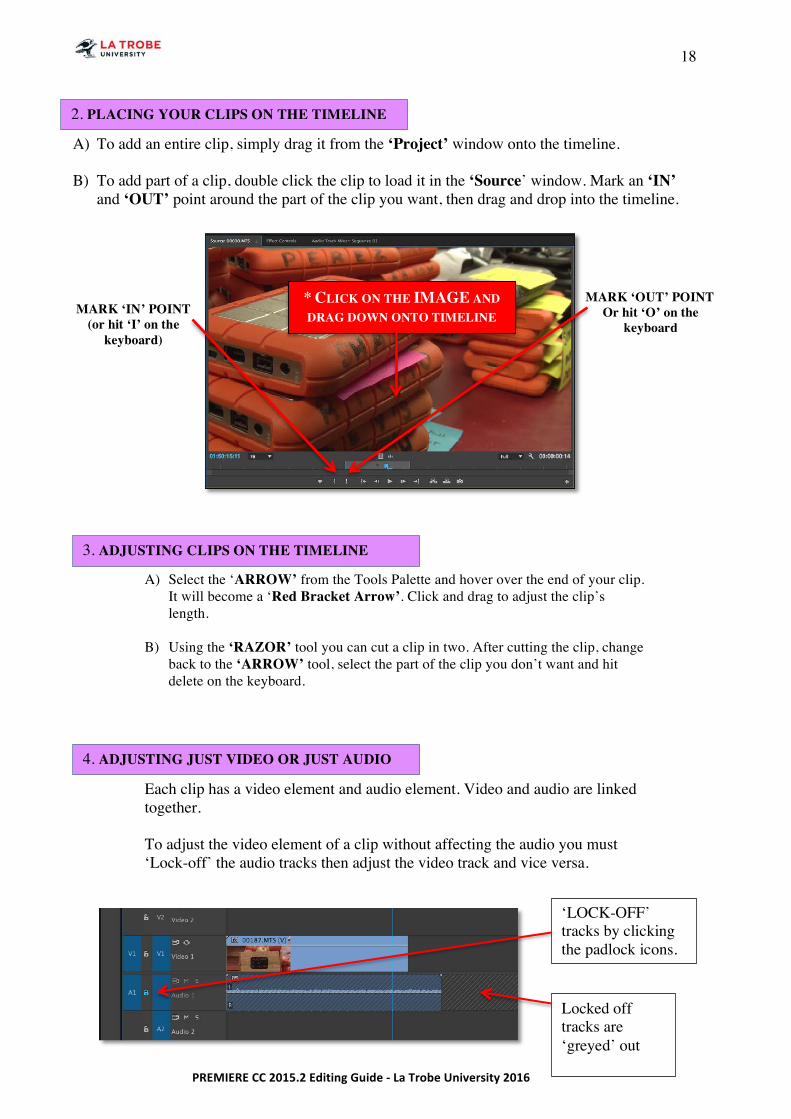
B) To add part of a clip, double click the clip to load it in the ‘Source’ window. Mark an ‘IN’ and ‘OUT’ point around the part of the clip you want, then drag and drop into the timeline.
A) Select the ‘ARROW’ from the Tools Palette and hover over the end of your clip. It will become a ‘Red Bracket Arrow’. Click and drag to adjust the clip’s length.
B) Using the ‘RAZOR’ tool you can cut a clip in two. After cutting the clip, change
back to the ‘ARROW’ tool, select the part of the clip you don’t want and hit delete on the keyboard.
Each clip has a video element and audio element. Video and audio are linked together. To adjust the video element of a clip without affecting the audio you must ‘Lock-off’ the audio tracks then adjust the video track and vice versa.
MARK ‘IN’ POINT (or hit ‘I’ on the
keyboard)
MARK ‘OUT’ POINT Or hit ‘O’ on the
keyboard
‘LOCK-OFF’ tracks by clicking the padlock icons.
Locked off tracks are ‘greyed’ out
* CLICK ON THE IMAGE AND DRAG DOWN ONTO TIMELINE
2. PLACING YOUR CLIPS ON THE TIMELINE
3. ADJUSTING CLIPS ON THE TIMELINE
4. ADJUSTING JUST VIDEO OR JUST AUDIO

19
PREMIERE CC 2015.2 Editing Guide -‐ La Trobe University 2016
To adjust the volume of a clip, drag the white ‘Volume Line’ up or down accordingly.
To adjust the levels of a section of Audio use the ‘Pen tool’ to create ‘keyframes’ along the ‘volume lines’, and then adjust.
N.B. If the ‘Volume Line’ and ‘Audio Waveforms’ are not visible you need to increase the height of the track.
Click HERE and drag up/down to adjust height.
Ideally your levels should be peaking between -12dB and -6dB
-6dB -12dB
5. ADJUST VOLUME OF A CLIP
20
PREMIERE CC 2015.2 Editing Guide -‐ La Trobe University 2016
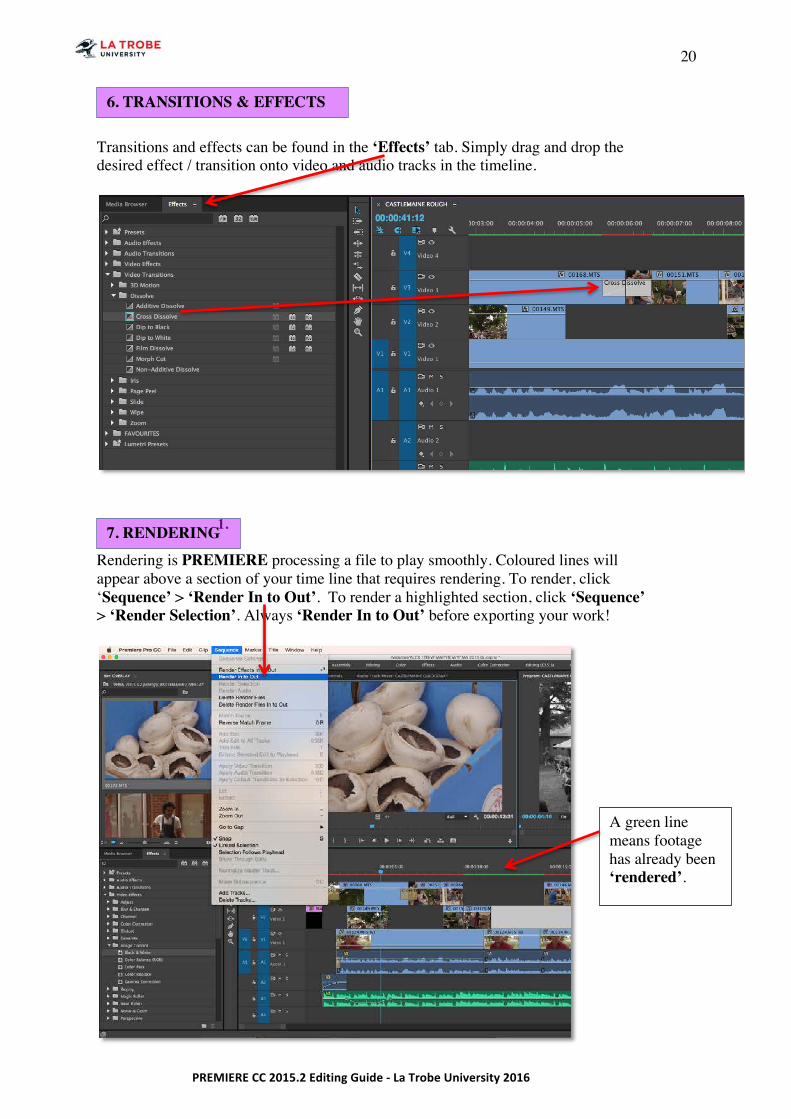
Transitions and effects can be found in the ‘Effects’ tab. Simply drag and drop the desired effect / transition onto video and audio tracks in the timeline.
1.
Rendering is PREMIERE processing a file to play smoothly. Coloured lines will appear above a section of your time line that requires rendering. To render, click ‘Sequence’ > ‘Render In to Out’. To render a highlighted section, click ‘Sequence’ > ‘Render Selection’. Always ‘Render In to Out’ before exporting your work!
A green line means footage has already been ‘rendered’.
6. TRANSITIONS & EFFECTS
7. RENDERING
21
PREMIERE CC 2015.2 Editing Guide -‐ La Trobe University 2016
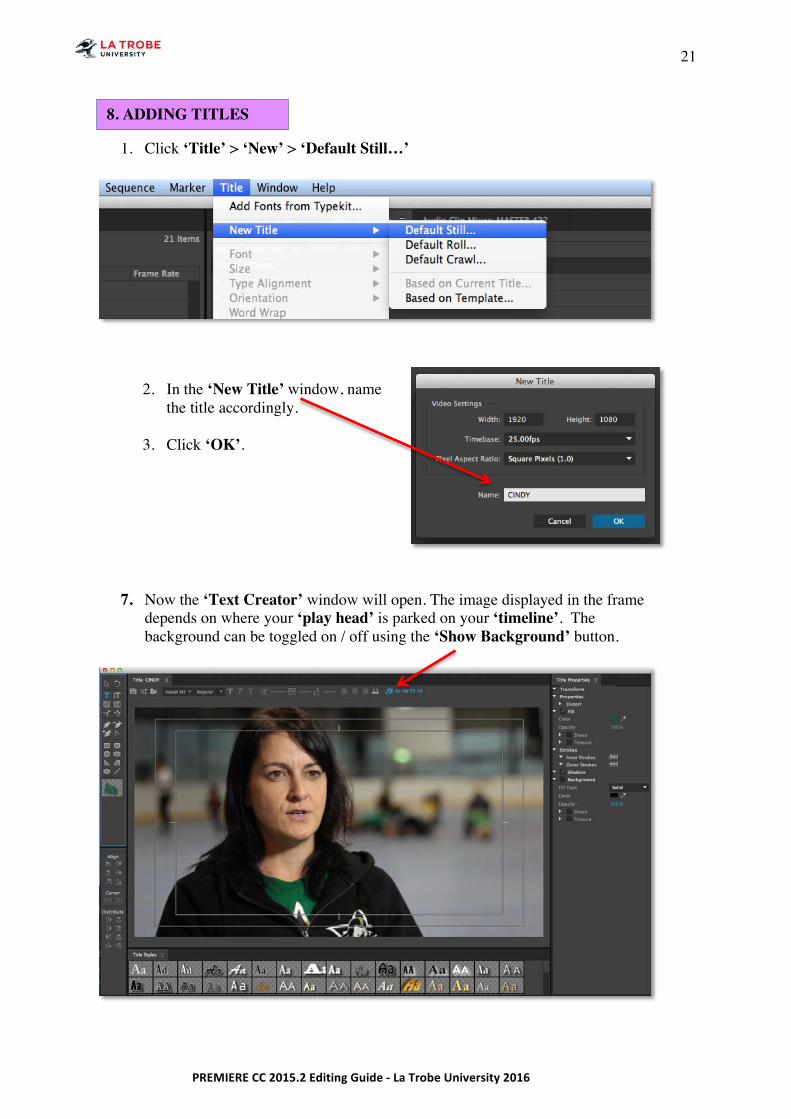
1. Click ‘Title’ > ‘New’ > ‘Default Still…’
7. Now the ‘Text Creator’ window will open. The image displayed in the frame depends on where your ‘play head’ is parked on your ‘timeline’. The background can be toggled on / off using the ‘Show Background’ button.
2. In the ‘New Title’ window, name the title accordingly.
3. Click ‘OK’.
8. ADDING TITLES
22
PREMIERE CC 2015.2 Editing Guide -‐ La Trobe University 2016
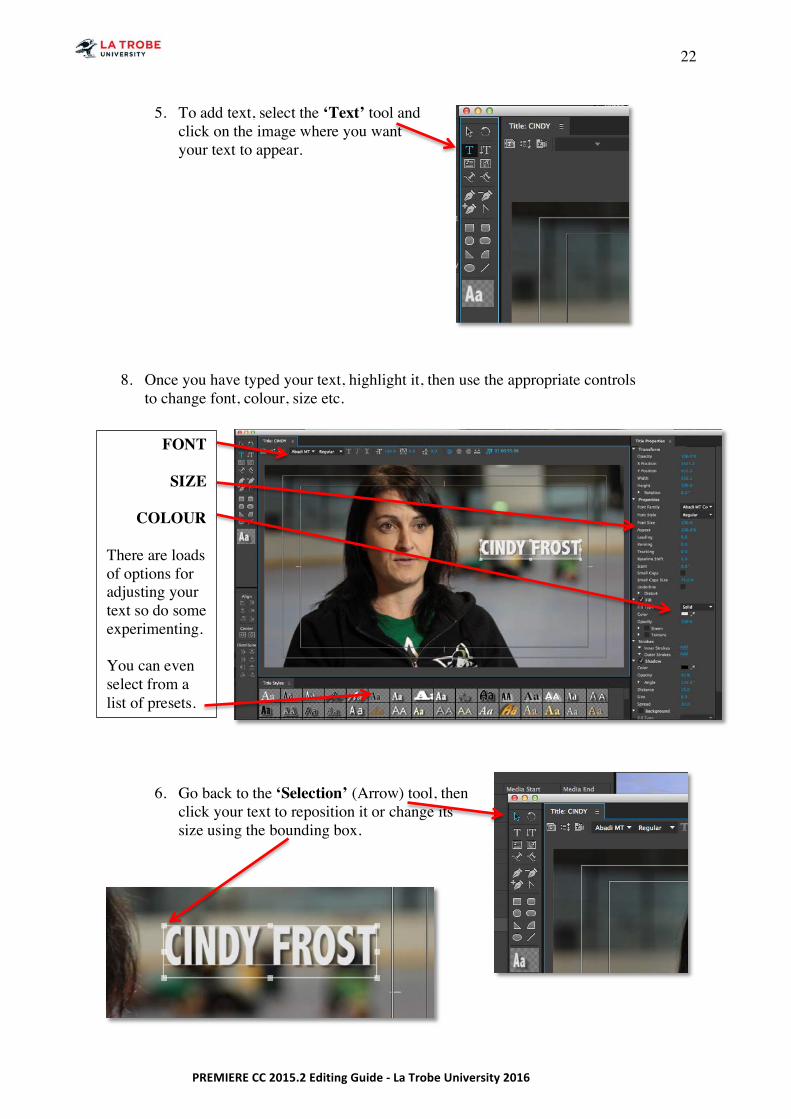
8. Once you have typed your text, highlight it, then use the appropriate controls to change font, colour, size etc.
5. To add text, select the ‘Text’ tool and click on the image where you want your text to appear.
FONT
SIZE
COLOUR There are loads of options for adjusting your text so do some experimenting. You can even select from a list of presets.
6. Go back to the ‘Selection’ (Arrow) tool, then click your text to reposition it or change its size using the bounding box.

23
PREMIERE CC 2015.2 Editing Guide -‐ La Trobe University 2016
9. You can also add shapes to your titles using the ‘Shape’ tools. You will need to right click the shape and select ‘Arrange’ > ‘Send to back’ in order for your text to appear on top.
7. When finished, close the ‘Text Creator’ window. Your title will now appear in your ‘Project’ window. Drag it down into your sequence above the desired video clip.
8. To make changes to a title simply double
click it to re-open the ‘Text Creator’ window.

24
PREMIERE CC 2015.2 Editing Guide -‐ La Trobe University 2016
25
PREMIERE CC 2015.2 Editing Guide -‐ La Trobe University 2016
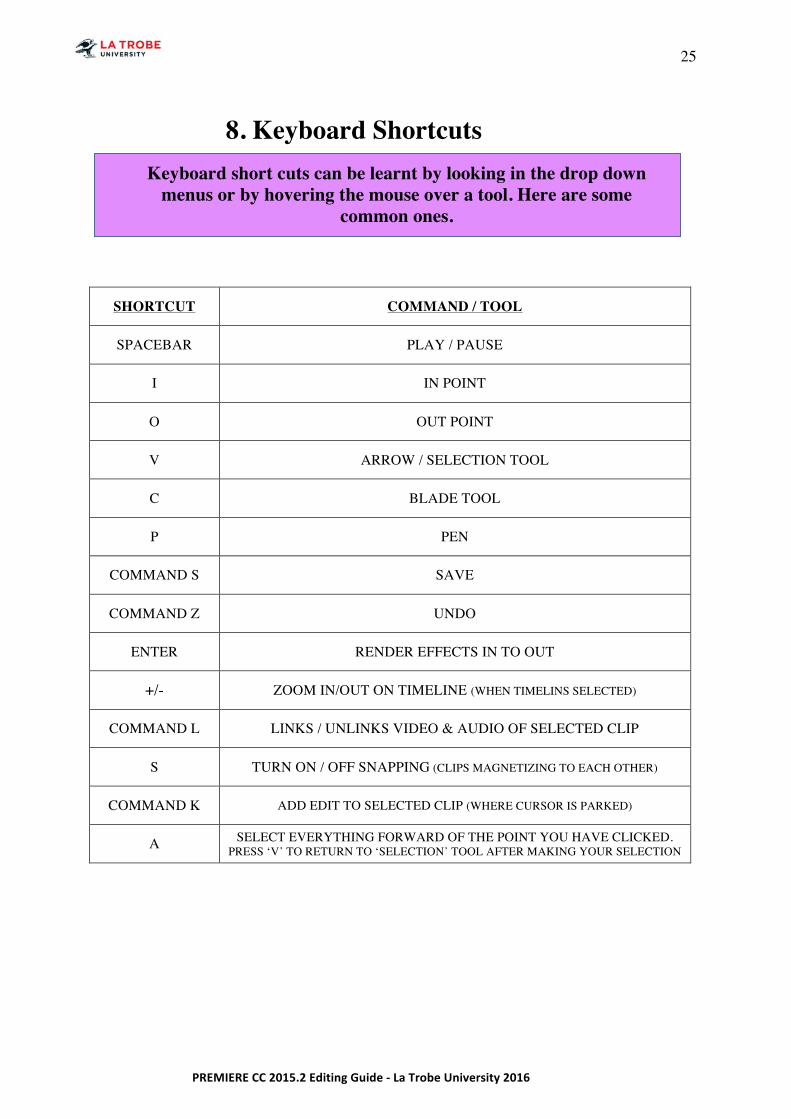
8. Keyboard Shortcuts
Keyboard short cuts can be learnt by looking in the drop down
menus or by hovering the mouse over a tool. Here are some common ones.
SHORTCUT COMMAND / TOOL
SPACEBAR PLAY / PAUSE
I IN POINT
O OUT POINT
V ARROW / SELECTION TOOL
C BLADE TOOL
P PEN
COMMAND S SAVE
COMMAND Z UNDO
ENTER RENDER EFFECTS IN TO OUT
+/- ZOOM IN/OUT ON TIMELINE (WHEN TIMELINS SELECTED)
COMMAND L LINKS / UNLINKS VIDEO & AUDIO OF SELECTED CLIP
S TURN ON / OFF SNAPPING (CLIPS MAGNETIZING TO EACH OTHER)
COMMAND K ADD EDIT TO SELECTED CLIP (WHERE CURSOR IS PARKED)
A SELECT EVERYTHING FORWARD OF THE POINT YOU HAVE CLICKED. PRESS ‘V’ TO RETURN TO ‘SELECTION’ TOOL AFTER MAKING YOUR SELECTION

26
PREMIERE CC 2015.2 Editing Guide -‐ La Trobe University 2016
27
PREMIERE CC 2015.2 Editing Guide -‐ La Trobe University 2016
2. Export your movie for ARCHIVE / TV STUDIO
USE THIS VERSION FOR ARCHIVAL PURPOSES. THIS WILL NOT BE SUITABLE TO UPLOAD TO YOUTUBE / VIMEO.
EXPORT USING THESE INSTUCTIONS IF YOUR FILM IS TO BE USED IN THE TV STUDIO
1. Render your sequence. ‘Sequence’ > ‘Render In To Out’
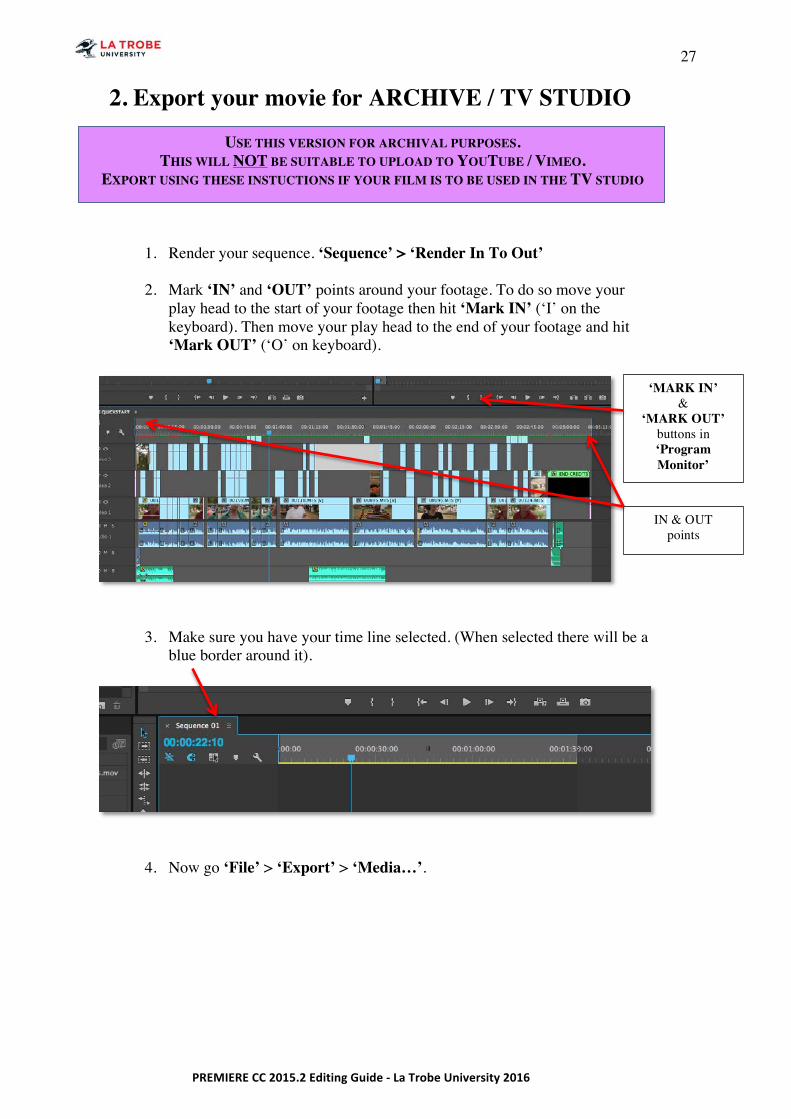
2. Mark ‘IN’ and ‘OUT’ points around your footage. To do so move your
play head to the start of your footage then hit ‘Mark IN’ (‘I’ on the keyboard). Then move your play head to the end of your footage and hit ‘Mark OUT’ (‘O’ on keyboard).
3. Make sure you have your time line selected. (When selected there will be a blue border around it).
4. Now go ‘File’ > ‘Export’ > ‘Media…’.
‘MARK IN’ &
‘MARK OUT’ buttons in ‘Program Monitor’
IN & OUT points
28
PREMIERE CC 2015.2 Editing Guide -‐ La Trobe University 2016
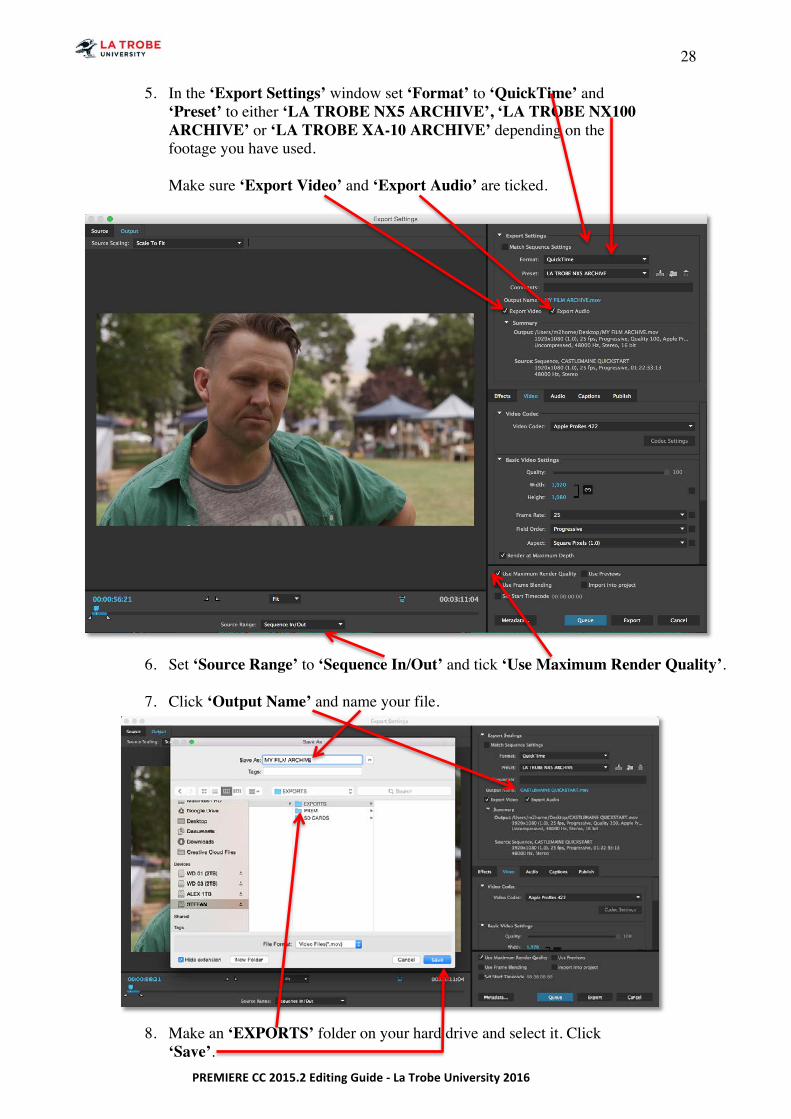
5. In the ‘Export Settings’ window set ‘Format’ to ‘QuickTime’ and ‘Preset’ to either ‘LA TROBE NX5 ARCHIVE’, ‘LA TROBE NX100 ARCHIVE’ or ‘LA TROBE XA-10 ARCHIVE’ depending on the footage you have used.
Make sure ‘Export Video’ and ‘Export Audio’ are ticked.
6. Set ‘Source Range’ to ‘Sequence In/Out’ and tick ‘Use Maximum Render Quality’.
7. Click ‘Output Name’ and name your file.
8. Make an ‘EXPORTS’ folder on your hard drive and select it. Click ‘Save’.
29
PREMIERE CC 2015.2 Editing Guide -‐ La Trobe University 2016
9. Click ‘Export’ and wait for your film to be exported.
10. Watch the export from start to finish to make sure it has exported
correctly.

30
PREMIERE CC 2015.2 Editing Guide -‐ La Trobe University 2016
31
PREMIERE CC 2015.2 Editing Guide -‐ La Trobe University 2016
3. Export your movie for uploading to YouTube/Vimeo
THIS WILL BE A COMPRESSED VERSION OF YOUR FILM – NOT A
FULL QUALITY VERSION!
1. Render your sequence. ‘Sequence’ > ‘Render In To Out’
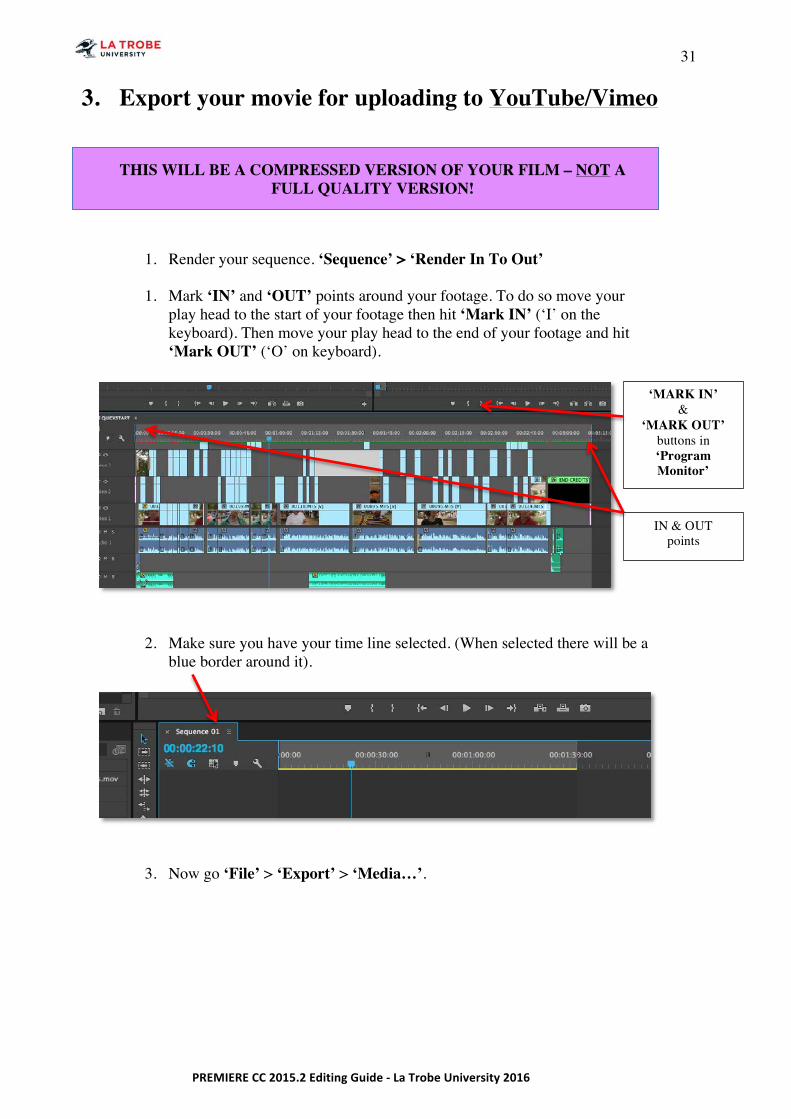
1. Mark ‘IN’ and ‘OUT’ points around your footage. To do so move your play head to the start of your footage then hit ‘Mark IN’ (‘I’ on the keyboard). Then move your play head to the end of your footage and hit ‘Mark OUT’ (‘O’ on keyboard).
2. Make sure you have your time line selected. (When selected there will be a blue border around it).
3. Now go ‘File’ > ‘Export’ > ‘Media…’.
‘MARK IN’ &
‘MARK OUT’ buttons in ‘Program Monitor’
IN & OUT points
32
PREMIERE CC 2015.2 Editing Guide -‐ La Trobe University 2016
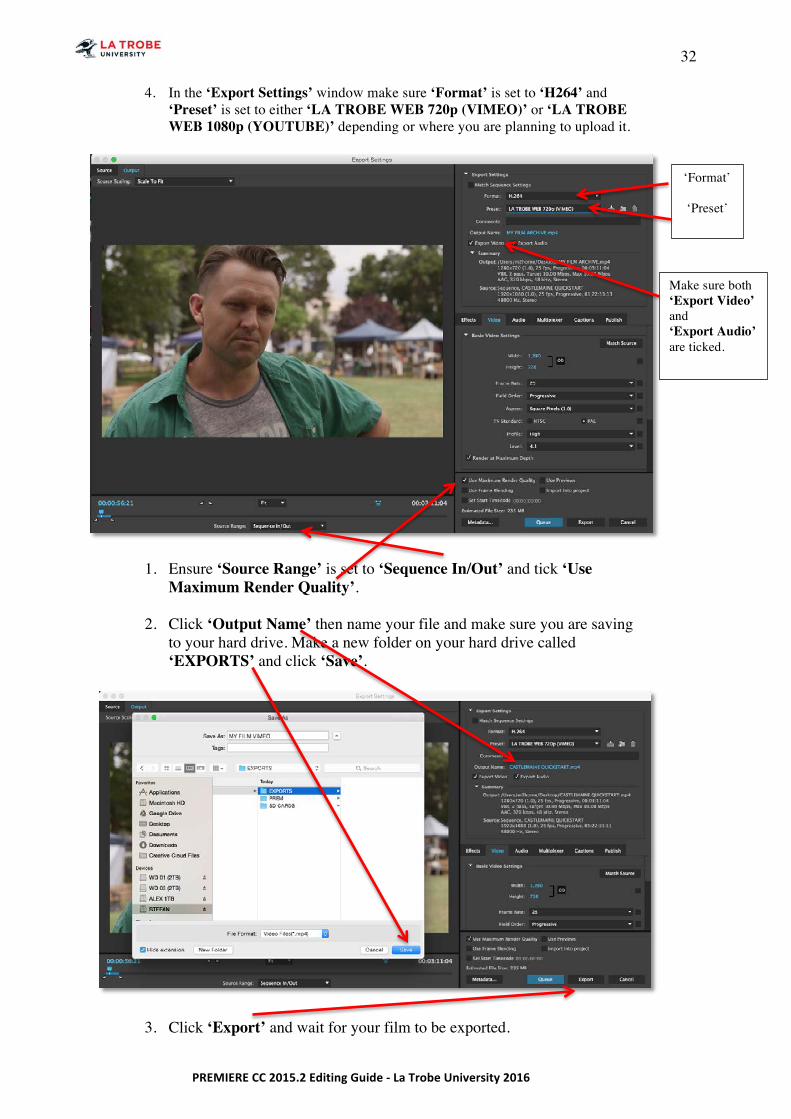
4. In the ‘Export Settings’ window make sure ‘Format’ is set to ‘H264’ and ‘Preset’ is set to either ‘LA TROBE WEB 720p (VIMEO)’ or ‘LA TROBE WEB 1080p (YOUTUBE)’ depending or where you are planning to upload it.
1. Ensure ‘Source Range’ is set to ‘Sequence In/Out’ and tick ‘Use Maximum Render Quality’.
2. Click ‘Output Name’ then name your file and make sure you are saving
to your hard drive. Make a new folder on your hard drive called ‘EXPORTS’ and click ‘Save’.
3. Click ‘Export’ and wait for your film to be exported.
‘Format’
‘Preset’
Make sure both ‘Export Video’ and ‘Export Audio’ are ticked.

33
PREMIERE CC 2015.2 Editing Guide -‐ La Trobe University 2016
4. Watch the export from start to finish to make sure it has exported correctly before you upload it.
5. After uploading it to YouTube / Vimeo, make sure you watch it again!!

34
PREMIERE CC 2015.2 Editing Guide -‐ La Trobe University 2016
35
PREMIERE CC 2015.2 Editing Guide -‐ La Trobe University 2016
4. Premiere Pro Troubleshooting
1. User-name not working at login:
If the computer is asking for your login details, simply ‘Restart’ and the computer should start up without needing login info. DO NOT LOGIN IN WITH YOUR OWN DETAILS.
2. Hard Drive is not showing up on desktop:
Disconnect your hard drive, restart the computer and reconnect your hard drive again.
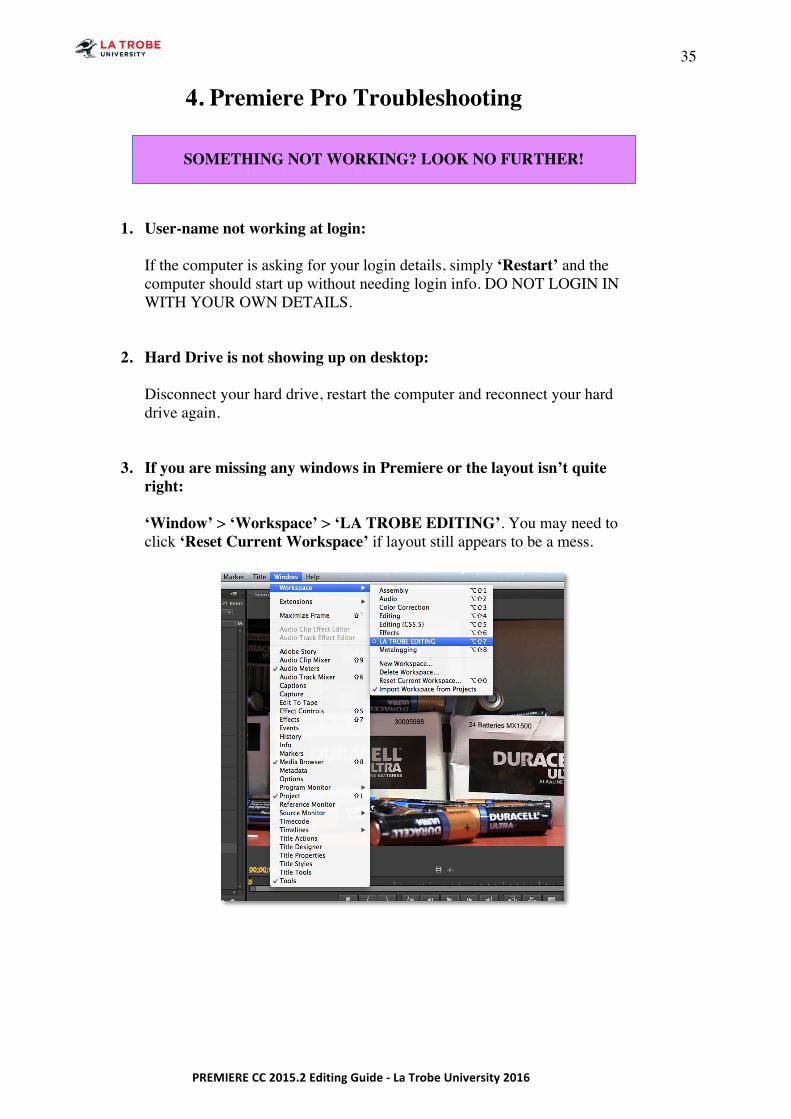
3. If you are missing any windows in Premiere or the layout isn’t quite right:
‘Window’ > ‘Workspace’ > ‘LA TROBE EDITING’. You may need to click ‘Reset Current Workspace’ if layout still appears to be a mess.
SOMETHING NOT WORKING? LOOK NO FURTHER!
36
PREMIERE CC 2015.2 Editing Guide -‐ La Trobe University 2016
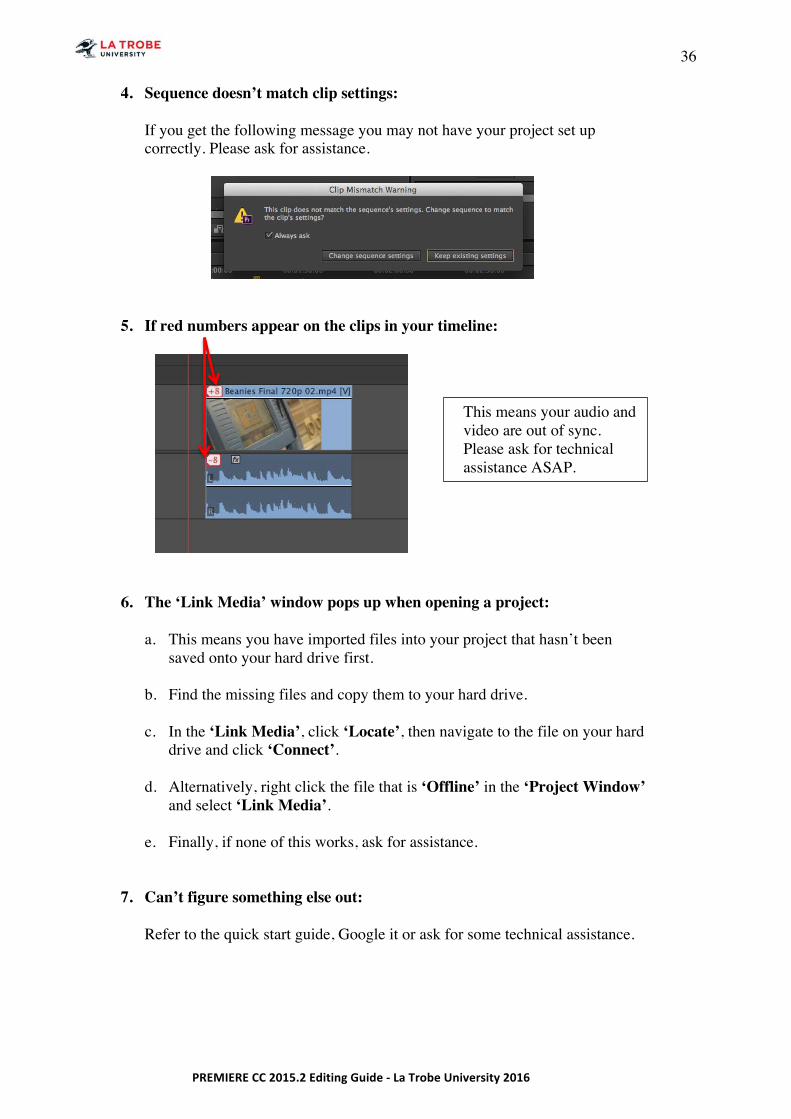
4. Sequence doesn’t match clip settings:
If you get the following message you may not have your project set up correctly. Please ask for assistance.
5. If red numbers appear on the clips in your timeline:
6. The ‘Link Media’ window pops up when opening a project:
a. This means you have imported files into your project that hasn’t been saved onto your hard drive first.
b. Find the missing files and copy them to your hard drive.
c. In the ‘Link Media’, click ‘Locate’, then navigate to the file on your hard
drive and click ‘Connect’.
d. Alternatively, right click the file that is ‘Offline’ in the ‘Project Window’ and select ‘Link Media’.
e. Finally, if none of this works, ask for assistance.
7. Can’t figure something else out:
Refer to the quick start guide, Google it or ask for some technical assistance.
This means your audio and video are out of sync. Please ask for technical assistance ASAP.