portal tutorial es
TRANSCRIPT

7/25/2019 Portal Tutorial Es
http://slidepdf.com/reader/full/portal-tutorial-es 1/58
Tutorial
8 www.wamp-forum.com
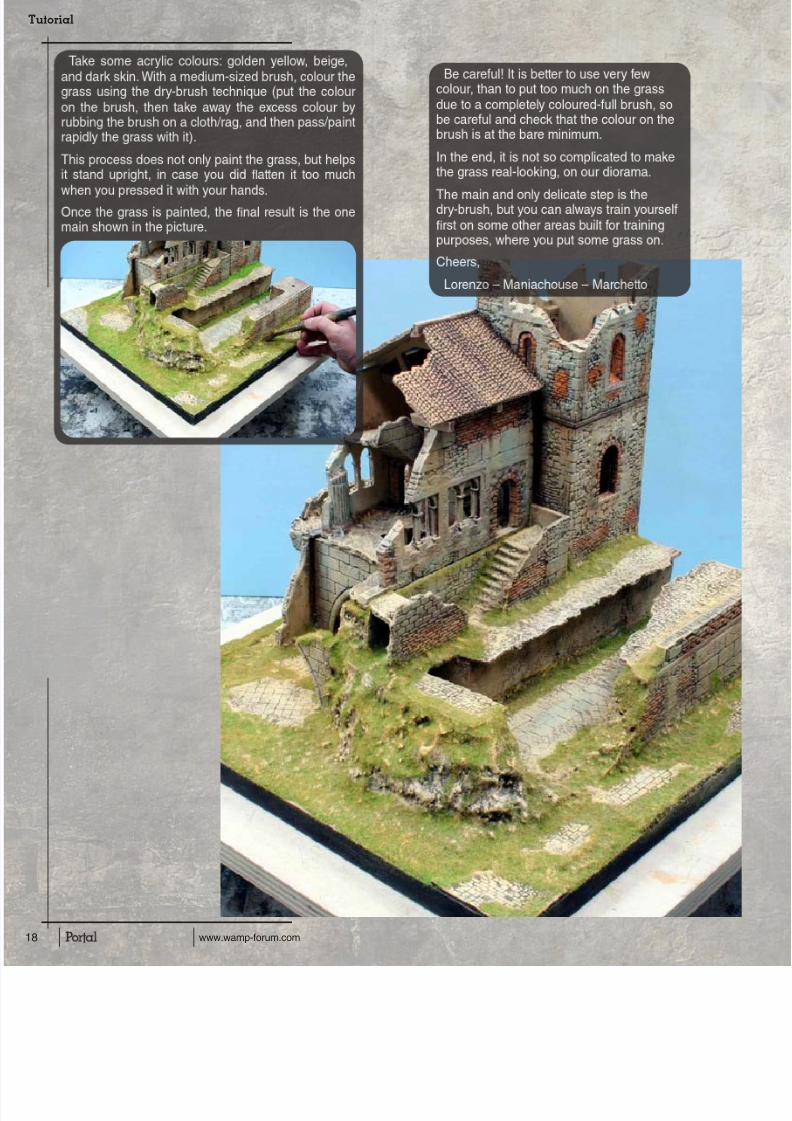
This quick tutorial will show you howyou can use real plants in your
bases and dioramas and open up a realtreasure trove of unusual materials thatadd interest and are free to use.
Tools and Materials needed:
» Plants
» Glycerin
» Absorbent paper (i.e. kitchen roll)
» Water
» Small containerFirst a couple of little pointers. Thistechnique can be used on any type ofplant but results can vary. Generallythe more ‘woody’ the plant the better.Normally once you cut a plant the cuttingwill begin to dry out losing its water,this kills it and destroys the structure.This process solves that problem by
Basing Techniques
How to use Real Plants in
your Miniature Bases
by
Darklord
replacing the lost water with glywhich acts like an embalming fluiretains the plants structure.
Results can vary even with the type of plant so I recommend yothis in advance of when you neeplants. I do batches every nowagain and keep them in my bitno special requirements. Some been in there for well over a yeaare still as good as new. If you dadvance like this then any plantit hasn’t worked on can be remThis prevents the risk of using pthen later finding they wither awit’s going to fail it will happen whours generally so after this your
Difficulty: Ver

7/25/2019 Portal Tutorial Es
http://slidepdf.com/reader/full/portal-tutorial-es 2/58www.wamp-forum.com
STEP 1
Collect some plants! I like to use mosses as they scale well and you can justpull them from the rock but try anything, small herbs like thyme can be good.For this tutorial I just popped in the garden and grabbed some moss - took meabout 1 minute and found a good variety.
STEP 2
For this stage you needsome Glycerin. It is
available from chemistsover the counter(its often used as achildren’s medicine) Itisn’t harmful and youneed no bio-hazard suitfor it!! It’s pretty cheap,the bottle pictured wasabout £1.20 and lasts anage. You will also needa small container andsome water.
You need to mix roughly1 part Glycerin to 10parts water in thecontainer. Give it a goodstir so its properly mixed. Next take your plants and dip them in the mixture,make sure they are well covered then remove and place on some kitchen rollor newspaper. This willsoak up the excess.Some plants you maywant to turn over after anhour to soak both sides.Then simply leave to dry(overnight if possible)
After 24 - 48 hoursmost plants that didn’tsucceed the process willhave wilted by now so you can discard these. The rest you are free to use. Ifyou do a batch every now and again then you will always have a stockpile atthe ready and any that are good by then will remain good.
STEP 3
Now the fun bit!! Stickthem on your bases andgive them a real wow!
Image4
Any questions feel freeto ask
15 Comments
Ulfgrimr16-07-2010
Lovely stuff Brett, been wondering hdone and now I know - many thanks.foliage go woody over time or doesit’s spring? and how paintable is it glycerin treatment has been applied?
Darklord16-07-2010
As long as the Glycerin ‘takes’ it shoupretty much as is, it does vary fromplant so I would experiment. Not paintable though - never tried it
shanerozzell16-07-2010
Superb tutorial Brett. I’m gonna do sweekend
Boris16-07-2010
Great timing! I’m planning on colwhole load for an IMP workshop - didabout the glycerin though - I’ve just dout in the past. I will pick some up incouple of days to prep for the woThanks DL!
shanerozzell16-07-2010
Ok, update.... I was gonna harvelittle plants this weekend so I sho
thread to my better third and she if I go anywhere near our back garscissors......... Well, tail-less wonder cthe conversation. So I can either waitbits from either my mums or my sistergather some.... Ninja-Style
MaGie16-07-2010
Thanks so much for a great tutoriaamazing, very realistic! Think I’m crawl around my garden for somI do wonder though... doesn’t the make the plants sticky?
NeatPete16-07-2010
Great tutorial Brett thank. The last timthis they still wilted. I’ll hae to try it other types of plants this time.
SkelettetS16-07-2010
great article, have to pick up someasap! :) many thanks!
Coneman
17-07-2010
Nice article
Ironically, last week I was talking to brother about the plants on his ww2 and he produced some largecontainers from his cupboard full omosses that he had collected and this same way, last night my friend cand handed me 2 containers full of itme to take what I wanted.
Jabberwocky17-07-2010
Fantastic article! I’ve been waitinexplanation on how this was done. Hcan get some moss to try this out on
Boris17-07-2010
My local Boots only stockhoney flavoured glycerine ansuspicious of me wanting it plaseen Fight Club, I know what heI told him I wanted it for modelling tosome moss - I don’t recommend any
taking this approach unless you liklike a complete weirdo!
Darklord17-07-2010
Originally Posted by MaGieThanks so much for a great tutoriaamazing, very realistic! Think I’m crawl around my garden for somI do wonder though... doesn’t the make the plants sticky?nope dry normally
Vern17-07-2010
Cheers Brett, top tutorial - now to gglycerine
NeatPete17-07-2010
Yeah I remember when I asked at t hstore they all gave me wierd looks.
figure out why and I couldn’t find it.ask again for someone to show meperson was all wierd about it and to
the section where they keep all the walked off. Akward!
Simon.W18-07-2010
Excellent tutorial DL with some veinformation. I have always wonderewas some other process involved ajust getting the foliage moss etc aknow, next to get some glycerin ana try.

7/25/2019 Portal Tutorial Es
http://slidepdf.com/reader/full/portal-tutorial-es 3/58
Review
8 www.wamp-forum.com
The theme of the base selection Ireceived to review, shown in the picture
above, is that of a war torn urbansetting with plenty of rubble coveredby concrete slabs to provide tenuousfooting for your troops. The rubble ismade up of pieces of sand and rock ofvarying size and the concrete slabs aregouged and fractured.
I can tell that these bases were castfrom drop molds because of a raisededge that runs along the edge of thebottom. This edge just barely keepsthem from sitting flat, so you may needto take the time to scrape away thisexcess resin. I also noticed places ona few of the bases where there wasnothing but flat base showing through-no sand or rocks were covering thearea, so you’ll need to decide if you’reokay with that or if you need to addsome material of your own.
The casting quality is good- I could notfind any air voids on the main concrete
slabs, but the textured grit was astory. Voids are very common in t
sandy and rocky areas that the srest on, especially where the roccome to a point. Because of theiand placement it would be nearlyimpossible to fix them with putty, means you’d either need to scrapthem with the tip of a hobby knifeleave them alone and hope your job covers them.
One thing I don’t like about thesebases, and this is my personal ois that they feel too neat. The conslabs are too geometric. Even the
gouges and fractures are nice, evstraight lines. They sit very nicelytop of the rocks and grit, but thereno real interplay between the twodifferent elements. Having a slabconcrete partially covered by sanhaving the edges of a big chunk asphalt crumbling to mix with thewould give the elements a sense
connection and more visual inter
Bases by BNS Miniatures
Manufacturer
BNS Miniatures
Price
25mm - £3 for 10
40mm - £3.50 for 5
60mm - £4.00
Material
Resin
Contact
www.bnsminiatures.co.uk
Quality 7.5
Assembly 7
Value 8
Overall Score
7.5
REVIEWED BY CREGAN TUR
I first became aware of BNS Miniatures when they provided som
their bases as prizes for the recent, and very successful, Little An
competition from WAMP. BNS stands for BigNastyShark, the screen nam
the small company’s owner and founder. His goal is to bring a new selectaffordable and interesting bases to the market.
QUALITY
» Uniquely designed pieces that would work
well for an urban themed army
» Very durable resin that’s easy to work with
ASSEMBLY » A high number of small, but prevalent air
voids in the casting
» A little shaving may be required to havethem sit perfectly flat
» Small areas of some bases are untextured
VALUE » Very competitive price; good value f
money
OVERALL
As a first offering from a new companbases are a very promising show BNS Miniatures has to offer. The pr
very competitive and the products ar
considering if you’re looking for themed

7/25/2019 Portal Tutorial Es
http://slidepdf.com/reader/full/portal-tutorial-es 4/58

7/25/2019 Portal Tutorial Es
http://slidepdf.com/reader/full/portal-tutorial-es 5/58
www.wamp-forum.com
STEP 5 STEP 6 STEP 7
STEP 8 STEP 9 STEP 10
This is another subtle step thatwill tone down the sharp contrastof the pure white and help the
colours blend better. Coat theentire base with a wash of Devlan
Mud and let it dry completely.Next, do another wash of Devlan
Mud, but this time only wash inthe recesses and cracks. We don’twant to tone down the flat part
of the asphalt any more than wealready have. Let the base sit to
the side until it is completely dry.
To sell the idea that this is a pieceof broken asphalt I’m going toadd a yellow dividing line. Using
masking tape, I block out a 1/8”strip of base where I will paint
the line. Be sure that you covereverything that you’re not painting
with masking tape to protect therest of the base.
Salt Masking is a process where
you add texture to a surface bygetting salt to adhere to it, paint
over the area, and then gentlyremove the salt so that they
undercoat shows through.
The first step is to spray thearea with hairspray until it getsa light sheen. Next, you’re goingto quickly sprinkle a pinch of seasalt over the area. It will mix withthe hairspray, which will act as anadhesive to keep the salt in place.Be very sparing in the amount ofsalt you use. Too much will ruinthe effect. You can always use anold brush or a toothpick to removesome salt crystals that are illplaced.You must allow the hairspray tocompletely dry before you moveon to the next step. I suggestwaiting at least 1 hour. One wayyou can tell if it’s completelydry is that the salt crystals aretranslucent when they’re wet, soif they’re opaque and white youknow they’re dry. Also take a smallwhiff- a heavy scent means it’sstill drying.
To be honest, an airbrush is the
best way to apply paint whenyou’re working with paint masking.
If you’re working with largesurfaces then it’s an absolute
necessity! But, since we’reworking with such a small space,we can get away with brushing
on the paint. We’re going to applythe Golden Yellow in several thin
coats for two reasons:
» Because we’re painting
yellow over black
» A thick coat of paint willmake it extremely difficultto remove the salt
Let the paint dry for at least an
hour before you move onto the
next step.
Removing the salt is a slow
process, so be patient with thisstep. You’re going to need a
medium stiffness brush and a tap.Hold the base under cool running
water and gently brush away thesalt. It should take you between7 to 10 minutes to remove all the
salt from beneath the yellow paint,so take your time. Once you’re
confident that all the salt has beenremoved you’re going to need to
set the base aside and let it dryout again. If you try to remove themasking tape now you risk pulling
the paint right off the base. Onceeverything is dry you can remove
the masking tape and admire yourhandiwork.
What’s that? Think we’re done?
Well you’re wrong! This base isgood as it is, but the next part
of this Step By Step will make itlook great! The key to creating
great bases is in the details andthe next part of this series willshow how we can add some great
details with static grass.
The bases featured areavailable from
www.bnsminiature.co.uk
Hinton - 32010
Very nicetutorial (so
far!).
Ulfgrimr - 09-2010
Excellenttutorial CTlooking forto part 2.
BNSminia- 30-09-20
Excellent mgreat work
Iain.
shanerozz30-09-201
Nice tutoriCT and anexcellentuse for samasking.
Vern - 32010
Nice one :
COMMEN

7/25/2019 Portal Tutorial Es
http://slidepdf.com/reader/full/portal-tutorial-es 6/58
Tutorial
0 www.wamp-forum.com
by
Darkmessiah
Tools you’ll need are
1. Fast setting (5 mins) clear epoxy glue2. Toothpicks (or an old bit of something for mixing with)3. Clear fishing line (2-4lbs)4. Blu-tac5. Some plastic to mix epoxy on (old blister packs will do)6. Stabby thing
Hi everyone! Well I was making
icicles for my GD entry and there’s a
few minutes of down time betweeneach stage which is plenty of time to
take some pictures! So here is a quick
tutorial on how I
make icicles.
PREPARATION STEP 1
Think about how many icicles you want then double number, this effect often has random results, so the myou do the more choice you’ll have and the better theend result will be. Cut your fishing line up into 4cm st(you need them long so their easier to handle), also out 2 small, equal blobs of your epoxy glue (you wonneeding much), mix them together for a minute or twyou can tell once its mixed as it will go cloudy

7/25/2019 Portal Tutorial Es
http://slidepdf.com/reader/full/portal-tutorial-es 7/58
www.wamp-forum.com
STEP 4
STEP 2 STEP 3
STEP 5
Smear a strip of blu-tac across a surface you can hangyour icicles from (I’ve used my shelf, you could use thetable edge or a plinth, anything that you can suspendyour icicles from without them touching anything. Nowdrag and twist your strips of fishing line through yourepoxy, make sure you pick up plenty of glue (you canalways remove some later on), then hang your icicles up.Try to make them long so you can cut a few up to makeshort icicles.
Now after a few minutes you will see the glue cometogether in small blobs, this is a good thing, it willgive us a random, natural feel, but it will be a little toopronounced. So after the glue has stopped being very
tacky, but before its set (usually around 3 mins) roll theepoxy end in between your fingers to smooth it out a little.The epoxy will lose some of its clarity and turn grey, thatis fine, icicles tend to be a little opaque and once the nextfew layers go on it will give us that effect. Let the glue seta full 5 minutes afterwards.
Pour yourself out some more glue and repeat step twbut when the glue starts to go into little blobs on the
icicles, instead of using your fingers to straighten theedges drag and twist the icicles across the plastic, thway you won’t loose the transparency of the glue. Youmay also want to do this stage a little quicker than thprevious stage because it will be easier to soften theedge with slightly softer glue.
Now, if you’re making icicles for a 28-32mm mini, unlessone of your icicles went wrong you shouldn’t needanother layer of epoxy, if you’re looking at 52mm or more,you may need a few more layers, otherwise, leave youricicles to set for around 10 minutes, they won’t have fully
set yet, they will still be flexible, that’s ok, it will make iteasier for us to position them later. Remove your iciclesfrom the blu-tac and make two cuts, one cut a straightline across the blob at the bottom of the fishing line, thiswill become the top of your icicle. Then make a diagonalcut across the thinnest point of your epoxy, or where theepoxy ends, this will become the bottom of your icicle. Youwill end up with a nice flat surface to glue your icicles anda nice sharp point that will make your icicles realistic.
Time to glue your icicles on! Have a look at some refepictures, look at where water may run off on your see how they bunch together naturally, I find bunchtwo or three look good, with a random one here and with a mix of sizes. I use normal super glue and a ptweezers to place them on the base, once they’re mix up some more epoxy and place a little around theto bond them to the base better and to help them bleto give a more natural feel. And that’s it! It usually around 20 minutes from beginning to end, everythincost you around £6-7 but it will last you for years!
Enjoy, John.
7/25/2019 Portal Tutorial Es
http://slidepdf.com/reader/full/portal-tutorial-es 8/58
www.wamp-forum.com
by
Cregan Tur
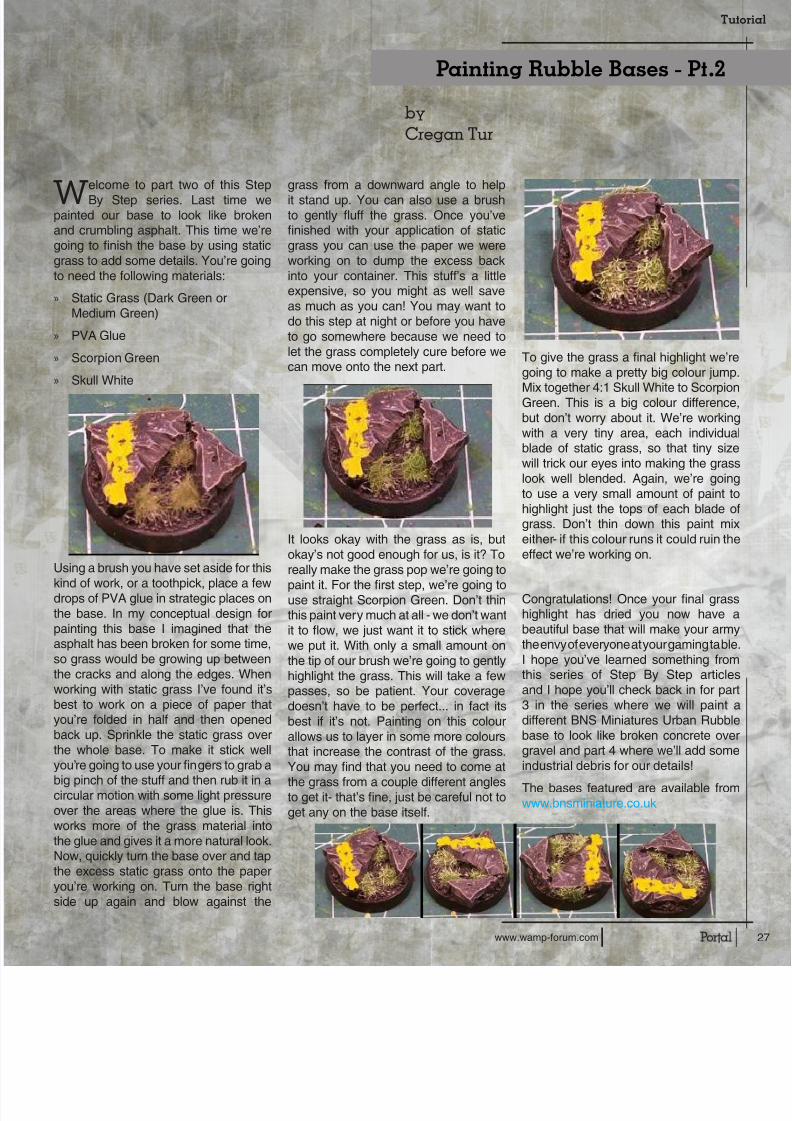
Painting Rubble Bases - Pt
Welcome to part two of this Step
By Step series. Last time wepainted our base to look like brokenand crumbling asphalt. This time we’regoing to finish the base by using staticgrass to add some details. You’re goingto need the following materials:
» Static Grass (Dark Green orMedium Green)
» PVA Glue
» Scorpion Green
» Skull White
Using a brush you have set aside for this
kind of work, or a toothpick, place a fewdrops of PVA glue in strategic places onthe base. In my conceptual design forpainting this base I imagined that theasphalt has been broken for some time,so grass would be growing up betweenthe cracks and along the edges. Whenworking with static grass I’ve found it’sbest to work on a piece of paper thatyou’re folded in half and then openedback up. Sprinkle the static grass overthe whole base. To make it stick wellyou’re going to use your fingers to grab a
big pinch of the stuff and then rub it in acircular motion with some light pressureover the areas where the glue is. Thisworks more of the grass material intothe glue and gives it a more natural look.Now, quickly turn the base over and tapthe excess static grass onto the paperyou’re working on. Turn the base rightside up again and blow against the
grass from a downward angle to help
it stand up. You can also use a brushto gently fluff the grass. Once you’vefinished with your application of staticgrass you can use the paper we wereworking on to dump the excess backinto your container. This stuff’s a littleexpensive, so you might as well saveas much as you can! You may want todo this step at night or before you haveto go somewhere because we need tolet the grass completely cure before wecan move onto the next part.
It looks okay with the grass as is, butokay’s not good enough for us, is it? Toreally make the grass pop we’re going to
paint it. For the first step, we’re going touse straight Scorpion Green. Don’t thinthis paint very much at all - we don’t wantit to flow, we just want it to stick wherewe put it. With only a small amount onthe tip of our brush we’re going to gentlyhighlight the grass. This will take a fewpasses, so be patient. Your coveragedoesn’t have to be perfect... in fact itsbest if it’s not. Painting on this colourallows us to layer in some more coloursthat increase the contrast of the grass.You may find that you need to come at
the grass from a couple different anglesto get it- that’s fine, just be careful not toget any on the base itself.
To give the grass a final highlighgoing to make a pretty big colou
Mix together 4:1 Skull White to ScGreen. This is a big colour diffebut don’t worry about it. We’re wwith a very tiny area, each indblade of static grass, so that tinwill trick our eyes into making thelook well blended. Again, we’reto use a very small amount of phighlight just the tops of each bgrass. Don’t thin down this paieither- if this colour runs it could reffect we’re working on.
Congratulations! Once your finahighlight has dried you now hbeautiful base that will make youthe envy of everyone at your gaminI hope you’ve learned somethinthis series of Step By Step aand I hope you’ll check back in f3 in the series where we will pdifferent BNS Miniatures Urban base to look like broken concretgravel and part 4 where we’ll addindustrial debris for our details!
The bases featured are availablwww.bnsminiature.co.uk

7/25/2019 Portal Tutorial Es
http://slidepdf.com/reader/full/portal-tutorial-es 9/58
Interview
4 www.wamp-forum.com
Hi everyone, I’d like to share with you an experiment I tried recently withopinion, great results. This will be my first tutorial so if you have any que
or uncertainties please let me know.
I really like the look of display bases, both in wood or painted black. Unfortumost of these bases are quite expensive. This is a solution for creating display bases that need to be painted.
Cheap & Easy Display Plinth
For this method you will need:
» mould for creating bon-bons (ormini muffins). You can use thesemany times.
» modelling plaster
» spatula
STEP 1:
Create yourself a good working area.Try to use a table that is horizontallylevel. Place your mold(s) on somewaste paper/plastic, because it gets alittle messy.
Because I need only few bases I cut themold in smaller parts. It also increasesworkability.
STEP 2:
Deposit the modelling plaster water as indicated on the packagme I add 2 parts plaster to 1 part
Leave this unmixed for abouminutes, then mix it to a creamy
STEP 3:
After mixing, pour the plaster inmould. You can do this in two waypic):
» Pour over the brim of the mouthe left in the picture)
» Pour to any desired height in mould
7/25/2019 Portal Tutorial Es
http://slidepdf.com/reader/full/portal-tutorial-es 10/58
www.wamp-forum.com
STEP 4:
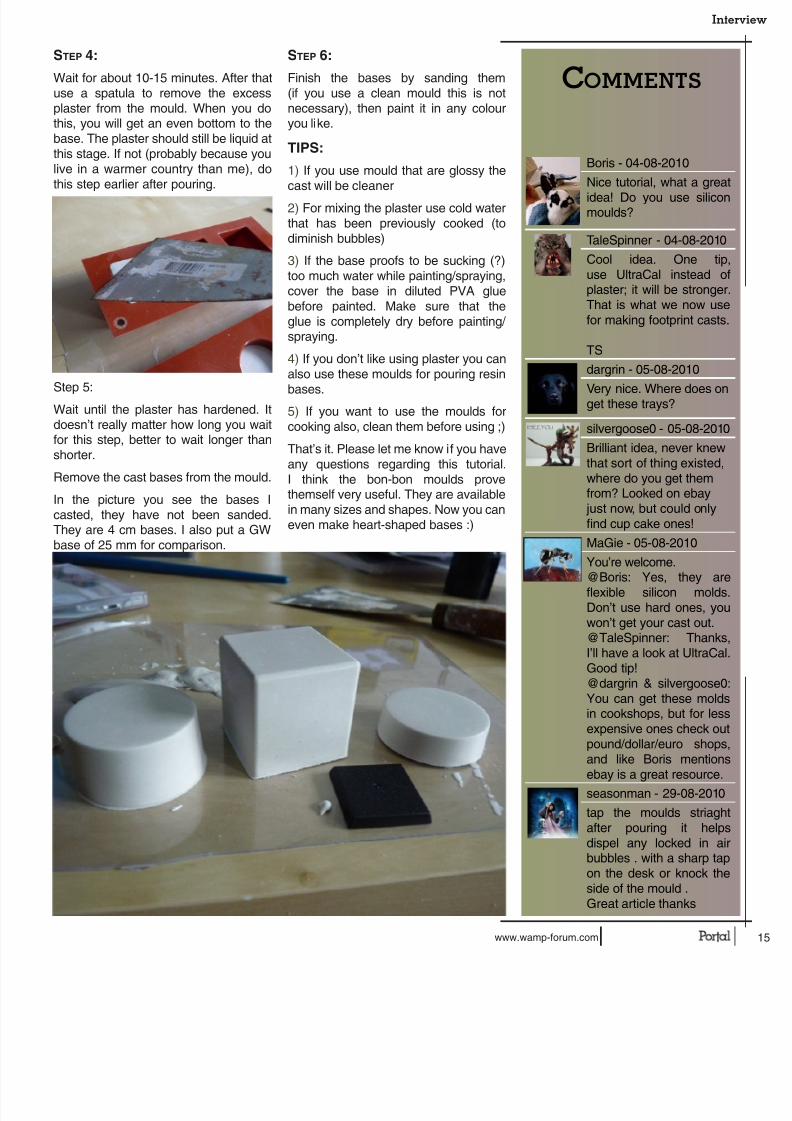
Wait for about 10-15 minutes. After thatuse a spatula to remove the excessplaster from the mould. When you dothis, you will get an even bottom to thebase. The plaster should still be liquid atthis stage. If not (probably because youlive in a warmer country than me), dothis step earlier after pouring.
Step 5:Wait until the plaster has hardened. Itdoesn’t really matter how long you waitfor this step, better to wait longer thanshorter.
Remove the cast bases from the mould.
In the picture you see the bases Icasted, they have not been sanded.They are 4 cm bases. I also put a GWbase of 25 mm for comparison.
STEP 6:
Finish the bases by sanding them(if you use a clean mould this is notnecessary), then paint it in any colouryou like.
TIPS:
1) If you use mould that are glossy thecast will be cleaner
2) For mixing the plaster use cold waterthat has been previously cooked (todiminish bubbles)
3) If the base proofs to be sucking (?)too much water while painting/spraying,cover the base in diluted PVA gluebefore painted. Make sure that theglue is completely dry before painting/ spraying.
4) If you don’t like using plaster you canalso use these moulds for pouring resin
bases.5) If you want to use the moulds forcooking also, clean them before using ;)
That’s it. Please let me know if you haveany questions regarding this tutorial.I think the bon-bon moulds provethemself very useful. They are availablein many sizes and shapes. Now you caneven make heart-shaped bases :)
Boris - 04-08-2010
Nice tutorial, what a
idea! Do you use smoulds?
TaleSpinner - 04-08-2
Cool idea. One use UltraCal insteaplaster; it will be stroThat is what we nowfor making footprint c
TS
dargrin - 05-08-2010
Very nice. Where doeget these trays?
silvergoose0 - 05-08-
Brilliant idea, never kthat sort of thing exiswhere do you get thefrom? Looked on eba just now, but could onfind cup cake ones!
MaGie - 05-08-2010
You’re welcome.@Boris: Yes, they
flexible silicon mDon’t use hard oneswon’t get your cast ou@TaleSpinner: ThaI’ll have a look at UltraGood tip!@dargrin & silvergooYou can get these min cookshops, but forexpensive ones checpound/dollar/euro shand like Boris menebay is a great resou
seasonman - 29-08-2
tap the moulds strafter pouring it hdispel any locked ibubbles . with a sharon the desk or knocside of the mould .Great article thanks
COMMENTS

7/25/2019 Portal Tutorial Es
http://slidepdf.com/reader/full/portal-tutorial-es 11/58
Tutorial
0 www.wamp-forum.com
by
Cregan Tur
STEP
STEP 3
STEP 6
STEP 2
STEP 5
STEP
STEP
For part 3 of this Step By Step project we’re going topaint a new base to look like concrete slabs lying
over crushed gravel. My colour choices and concept wereinfluenced by looking at the world around me as I go aboutmy day; for instance most of the concrete I encounter is an
off white with yellow or brown shadows and gravel has themost visual impact when it’s a smattering of rocks over dirt.We’re going to use these ideas to paint this base which wewill finish in the 4th and last instalment.
Before we begin you’re going to need the following materials or equivalents:
Painting Rubble Bases - Pt.3
1. Scorched Brown 3. Kommando Khaki 5. Badab Black 7. Bleached Bone
2. Graveyard Earth 4. Fortress Grey 6. Devlan Mud 8. Skull White
Start off by priming your base black. As
in the first installment, it’s fine to use ancolor of primer if you really want to, bu
you’d have to paint the black on byI’d suggest saving yourself the troubpriming black.
We’re going to start off painting only the gravelsections of the base because they’re the most
recessed. If we started with the slabs we’d runa greater risk of getting the wrong color onwhat we’ve already painted. Cover all of the
gravel in Scorched Brown.
Drybrushing in tight spaces can be tricky if youdon’t have the right kind of brush. I used an old
#1 brush. Just be sure you get all of the excessoff the bristles so you’re truly drybrushing andnot smearing the paint. Drybrush Graveyard
Earth over the gravel - be sure you hit all ofthe raised areas.
Once that’s dry, drybrush some KomKhaki on the areas that are raised the
You’re going to want to just barely drbristles over the base. This is acting aa highlight and separating the grave
the dirt. For this next step drybrush FGrey over only the areas of gravel whe
want to establish rocks. Once you’ve lpaint dry for a few minutes you can com
with a wash of Badab Black. Once thahas dried completely follow up with a wDevlan Mud.
This might be a good time to take a break
because you’ll have to let the washes drythoroughly before we can continue with thenext step. Once you’re sure the base is dry,
come back with Fortress Grey and highlightthe rocks you established earlier.
The gravel is done for now, so let’s move on to
the concrete. Start by painting the slabs withGraveyard Earth. It took 3 light coats for me toget nice, even coverage. Take your Bleached
Bone and drybrush it over the slabs. Use itto pick out all of the raised areas and hard
edges because concrete turns white whereit fractures. You’ll even need to do a little light
drybrushing in the gouges and recessed areasto sell the effect.
For our final step, drybrush Skull White o
concrete using light pressure to only pthe raised areas and as an extreme hon all of the hard edges. We’ll finish thi
in our next and last installment where wsome tones back into the concrete, add
details to finish the gravel, and use somto add extra detail.

7/25/2019 Portal Tutorial Es
http://slidepdf.com/reader/full/portal-tutorial-es 12/58
www.wamp-forum.com
STEP 3 STEP 4 STEP
Painting Rubble Bases - P
I found a tiny hole to have one wire originate
from. I placed the end with a bit of superglue,let it dry, bent the wire into a shape I liked, andglued the rest in place. I wanted the grouped setof wire to look different, so I wound it togetherand glued it between the large slabs. It’s okaythat the masking tape can be seen, as we’regoing to paint it to simulate a sheath over thewire. The wire has too much of a plastic sheento leave it unpainted, so I based each one witha different color: Dark Angel’s Green, Scab Red,and Chaos Black. I also painted the maskingtape black.
The base looks pretty good now, but this last
step will finish it off nicely. We’re going to use theremaining colors from our materials list to glaze
on some highlights.
Color Highlights
» Blood Red -> Scab Red
» Codex Grey -> Chaos Black
» Goblin Green -> Dark Angels Green
I’m going to try my best to describe glazing who don’t know what it is. You create a very d
of paint. One way to tell if it has enough watein is to dip a clean brush in your mix and theacross a paper towel. If it leaves a soft blushthen you’ve got a good mix.To glaze color onyou load your brush with a bit of the mix and thit on a paper towel to remove the moisture. Wbrush on your glaze you should see a soft color where your brush stroke is that should dquickly. If it leaves a lot of excess behind or then you’ve got too much on your brush. It’s take multiple coats to build up your glaze cthese results in smooth colour transitions. Ondone, you’ll have a great looking and very uniq
by
Cregan TurW
e’ve finally arrived at the last installment of this ststep series and we’ll be putting the finishing to
on the concrete and gravel style base we painted lasSo, grab your base and the following list of materials anget started.
1. Ogryn Flesh 6. Badab Black 11. Codex Grey
2. Skull White 7. Dark Angel’s Green 12. Blood Red
3. Shadow Grey 8. Chaos Black 13. Some wire- Iusing the wiring froold USB cable
4. Terracotta 9. Scab Red
5. Devlan Mud 10. Goblin Green
You’re going to need:
STEP 1 STEP
When we ended last time the concrete was a little too bright, so give theslabs a wash with Ogryn Flesh. Make sure you don’t overdo it- we just
want to darken the recesses and tone down the white a very tiny bit.
That’s everything for the concrete; now we’ll turn out attention to the gravel.
To add some more color and variety we’re going to pick out individualbits with different colors. For this base it was easy to make out individual
stones that I could paint. I used Skull White for quartz, Shadow Grey forsomething like crushed granite or another dark stone, and Terracotta forsome more color variation. Once you’re done picking out these details
give the gravel section a wash with Devlan Mud and then Badab Black.
To add some special details I’ve decided to have wiring curl oubeneath the concrete. Almost everyone has some old piece of elec
they can strip some wiring from. In my stash I have some old swire, phone wire, coaxial cable, and the plug from an old USB dev
be using the USB cable this time.
USB cables have 4 wires in them, but I had used 1 from this piece
but 3 is exactly what I need.
I cut the wires ½” long. I want two of them to remain together, so I w
the end with a bit of masking tape and cut away the excess tape need.
Base byCregan Tur
7/25/2019 Portal Tutorial Es
http://slidepdf.com/reader/full/portal-tutorial-es 13/58
Tutorial
0 www.wamp-forum.com
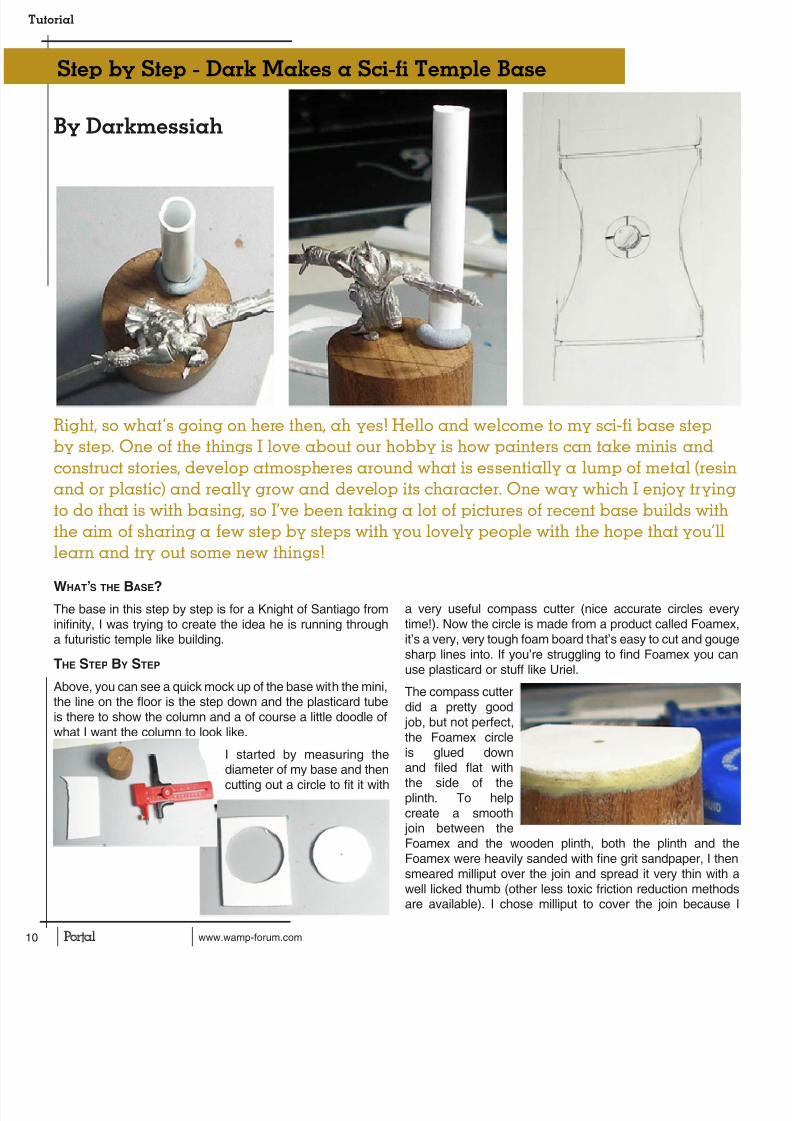
WHAT’S THE BASE?
The base in this step by step is for a Knight of Santiago frominifinity, I was trying to create the idea he is running througha futuristic temple like building.
THE STEP BY STEP
Above, you can see a quick mock up of the base with the mini,the line on the floor is the step down and the plasticard tubeis there to show the column and a of course a little doodle ofwhat I want the column to look like.
I started by measuring thediameter of my base and then
cutting out a circle to fit it with
a very useful compass cutter (nice accurate circlestime!). Now the circle is made from a product called Foit’s a very, very tough foam board that’s easy to cut andsharp lines into. If you’re struggling to find Foamex youse plasticard or stuff like Uriel.
The compass cutterdid a pretty good job, but not perfect,the Foamex circleis glued downand filed flat with
the side of theplinth. To helpcreate a smooth join between theFoamex and the wooden plinth, both the plinth aFoamex were heavily sanded with fine grit sandpapersmeared milliput over the join and spread it very thin well licked thumb (other less toxic friction reduction mare available). I chose milliput to cover the join bec
Right, so what’s going on here then, ah yes! Hello and welcome to my sci-fi base step
by step. One of the things I love about our hobby is how painters can take minis an
construct stories, develop atmospheres around what is essentially a lump of metal (r
and or plastic) and really grow and develop its character. One way which I enjoy try
to do that is with basing, so I’ve been taking a lot of pictures of recent base builds w
the aim of sharing a few step by steps with you lovely people with the hope that you
learn and try out some new things!
Step by Step - Dark Makes a Sci-fi Temple Base
By Darkmessiah

7/25/2019 Portal Tutorial Es
http://slidepdf.com/reader/full/portal-tutorial-es 14/58
www.wamp-forum.com
know I can spread it to a very thin layer and it’s fantastic tosand smooth. In the final picture you can see the front sectionI’ve removed for the step.
To speed up the process I used a putty oven, this heats theputty up so it cures quicker, I can get a full cure of milliput inabout 25 mins (compared with 2 hours+). As you can see it’sa lamp put over and inside a tin can (a Jean Paul Gaultier tincan to be precise), inside theirs a spray can top sat on Legobricks, the spray can top holds what am curing and the Lego
controls the height, obviously the closer to the bulb the hotterit is, the quicker it cures, it’s a very useful tool. Be careful withplastics, things like slotta bases will warp if left too long.
THE COLUMN
So now the columna lovely new tool I especially, a pipe cuttthe tube in, twist it rounget a nice clean straigmakes things so much So I’ve taken the otube I had, cut it in tw
slipped a smaller tubethe middle, if you’reand well stocked you’two tubes that fit petogether, unfortunately and had to plug the gasome milliput.
The column was left to the putty oven and I astarted on the step point, but to keep the sstep easy to read I’ll se
the column and stepYou can see in the pics I’ve scored the cin two places, this was
gently using the pipe cutter. You can also see I’ve smmilliput into the gap at the end of the large tube doto the smaller, middle tube, this created the curved adidn’t use any tools, just the old thumb. This was left to
Once cured I smeared more milliput from the edge curve on to the middle, smaller column, this was tmake the curve smoother, again the column was left tThen began the very long and boring process of spray
column black (why black? Because it makes it easy problem areas and areas that need more work, in thpicture you can clearly see that the line where the mmeets the tube) and sanding it back, spray it black, back. This was done several times until the column’swas VERY smooth. I’ve used an airbrush to apply thepaint, it sprays a nice thin layer that wont obscure deyou’re using a spray can to do this, be careful! Make suuse several thin layers of paint.

7/25/2019 Portal Tutorial Es
http://slidepdf.com/reader/full/portal-tutorial-es 15/58
Tutorial
2 www.wamp-forum.com
So, now on to the centre piece, I drilled a hole out, filled it withmilliput and left to cure. Once cured I lobbed one of my roundgrinding Dremel bits in to my pin vice and gently created theconcave half sphere the gem would sit in. Now the easiestway to make a gem is using ball bearings, you drill the hole,glue the ball in and Bob’s your uncle! Now if you like me andyou don’t have the right size ball bearing (or haven’t got the
patience to track down a place that sells the right size, buy‘em and wait a few days for them to arrive in the post) you canmake one out of green stuff. You take a blob of the ‘ald greenstuff, roll it in your fingers so it’s nice and smooth, place it into the palm of your hand and using the tip of your finger drawcircles with it, the tighter the circle the rounder the gem willbe. Now this is a great technique I use for making lots of smallgems, in this case, despite rolling around 20 of the bloodythings I couldn’t make a round enough ball (this says more
about my fussiness than the technique), so I just decsculpt one. It can take a lot of tweaking and messingto get it right, but if you’re comfortable sculpting haveif you’re not so comfortable, the GS ball technique wiif you put the time in, if you’re still struggling, go bassortment of different size ball bearings, they can buseful.
Small nicks and littlecorrections were made bypainting on some milliput juice, just take a damp ‘ald
brush and work the milliputuntil it breaks down intoa thick liquid (think kindayogurty thick), paint it on,let it cure and sand it likenormal milliput, this is agreat technique to smoothlarge areas of rough casts,such as cloaks and armour.

7/25/2019 Portal Tutorial Es
http://slidepdf.com/reader/full/portal-tutorial-es 16/58
www.wamp-forum.com
THE STEP
So with the column ‘finished’ I started work on the step, now I didn’thave a plan for the step, but I knew I wanted some curves, so lobbedsome milliput down, smoothed it out so it’s was nice and even and thenpushed some thick brass rod (1.5mm I think) along the step and madetwo half cylinder indentations, I came in with a Taper Clayshaper just toensure the lines were straight and to do a little smoothing. As you cansee in the last pic, the curves weren’t perfectly smooth or round but thegreat thing about milliput is that those corrections can be made easilyenough with some fine grit sandpaper.
The sanding begins anew! The back was just sanded smooth (600 gritsand paper), it was sprayed black like the column to bring out the faultsand then re-sanded until smooth. The steps I approached in the same
way, but I folded the sandpaper back on itself a few times to get a nicecurved edge so it would follow the contours of the sculpting I had alreadydone. In the last two pics you can see I’ve used the compass cutter tomake a circle around the column and marked lines out to score to createpulsing energy lines I’ll paint in later. The lines were first scored with ascalpel (or Xacto knife) and then widened with the compass point; I onlyused half the lines as I wanted to keep the base simple.

7/25/2019 Portal Tutorial Es
http://slidepdf.com/reader/full/portal-tutorial-es 17/58
Tutorial
4 www.wamp-forum.com
From their I decided I wanted to do a base with puenergy lines and glowing gems, typical anime sci-fi sgive the base a focal point I wanted to use a columnthe column does a few things, it allows me to control the viewer looks on first glance, in conjunction with ththey creates the top and bottom of a frame, a boundathe viewer isn’t allowed to look outside of, but is forlook in to the middle of. This effect is further exaggby fixing the middle of the column with a gem, the g
placed level with, to me, the most important parts mini and that’s his face and his sword. The columincreases the level of complexity to the piece, but is enough not to draw attention away from the mini, it alsa story element, columns are usually associated withimportant, powerful buildings, as a knight the mini mabe attacking or defending such a building. The curthe step also adds to the simple complexity,as does the circle and lines around thecolumn, once painted the energy lineson the floor will draw the viewers eye tothe column, then to the gem and thento important parts of the mini. Because
there’s so much focus on the minis faceand sword, if their painted to a highstandard they will distract the vieweraway from areas that may have littlemistakes or areas which may not beas strong, giving the impression thatthe mini is at a high standard then itactually is, this idea I picked up fromAlfonso Giraldes (banshee on CMoN),it’s an idea he has used on a lot of histrophy winning minis.
Bon Appetite!John
THE FINAL BASE
THE THEORY BEHIND THE BASE
I decided to lob the theory of the base at the end because it’sa lot of text and didn’t want people to have to wade throughthe heavy stuff before getting to the fun stuff, hopefully thiswill give you a little insight into how I approach my basesand show you that when I approach serious pieces a lot ofthought goes into how the base interacts with the mini andhow I try to use basing to enhance the mini I’m working on.
So, I was looking to get away from the sorta’ typical realisticsci-fi paintjob a lot of people paint infinity stuff with so Idecided to try and push it towards a more anime sci-fi style. Ihad a quick look for some inspiration and quickly found somereference pictures Tron and Zone of the Enders. Both pictureswere a good fit with the style I wanted and each had someelement of the mini in them.

7/25/2019 Portal Tutorial Es
http://slidepdf.com/reader/full/portal-tutorial-es 18/58
Tutorial
2 www.wamp-forum.com
Banelegions Kaastaruk Step by Step Tutorial Part Tw
By Darklord
This is the second part of my ste
step guide to painting and basi
Banelegions Kaastaruk . This pa
will focus on creating and paint
the base.
If you haven’t already seen how
painted the Minotaur you can re
it here: Kaastaruk Tutorial Part O
or download Portal Issue 13.
To create the base I used the following mate
» Wooden Plinth
» Natural Slate
» MiniNatur Tufts
» MiniNatur PoisonIvy
» Jewellery Chain
» Plastic Sword
» Natural Foliag
» Sand
» MDP Pigment
While this step by step uses a large displaymany of the basics can be used easily on stagaming bases without much issue.
Right time to get started.

7/25/2019 Portal Tutorial Es
http://slidepdf.com/reader/full/portal-tutorial-es 19/58
www.wamp-forum.com
Step 1
The first thing I want to do is create some depth to the baseand make it more visually interesting. I do this by adding anangle to the base top, simply by sawing diagonally across theplinth. Make sure you leave an area flat in one corner for theminiature itself to stand on. The cut doesn’t need to be neatas its covered up later anyway. I use a normal hand saw forthis.
Step 2
Next I want to create further angles into the gradient. I partly to create more angles (as land is rarely flat!) bplaces that I can affix the slate too. Again this can be rcut. I used a jewellers saw for this step as a hand salittle big but you can use various saws depending oyou have handy.
Step 3
I now take some pieces of slate and glue them onto theon the flat ledges I created in the previous step. Once take some Green Stuff and place it on the undersidesslate to help create a strong bond and also to smoosome of the rougher angles.
I also dry fitted the mini to the base at this point. I couple of flattish pieces of Green Stuff and place itwhere his feet will sit. I then gently press him into plahis feet will create an imprint in the green stuff. This sure he will have a perfect join between him and thewhen put in place. Make sure you don’t cover the prinon this green stuff with any ground covering!

7/25/2019 Portal Tutorial Es
http://slidepdf.com/reader/full/portal-tutorial-es 20/58
Tutorial
4 www.wamp-forum.com
Step 4
The next step is to start to dress the base a little. I add somedetails to help create more interest, nothing that wouldoverpower the base but enough to stop it looking to plain. Iwrap some jewellery chain (taken from an unwanted necklaceof the wife’s - ask first though!) and part of some plastic spearI found in my bit box. I also found a cart wheel and a swordso I added these in. I took care to make these look longabandoned and semi buried so chopped a little off them tohelp create this effect. Once this was done I applied somepva across the base excluding any area I wanted to remainshowing. I then sprinkled some sand onto this to create thebasic ground covering. I made sure some of this overlappedonto the chain and wheel to make them look part of thingsrather than just stuck on top!
Step 5
Now its time to get painting! I paint the earth startina GW Graveyard Earth basecoat then apply a wGW Devlan Mud. Next I brushwood more Graveyardfollowed by GW Khommando Khaki. The slate was pwith a basecoat of GW Space Wolves Grey then dry-bwith VMC Silver Grey. Several diluted coats of GW LevPurple were applied. The chain,sword and studs on thwheel were all painted with a GW Adeptus Battle Grethen I added Silver Grey to the mix (around 50/50 ratiworked the highlights up. I continued to add more Silveto the mix to get to the extreme highlights. The cartwas painted VMC Chocolate with a Devlan Mud wash highlighted with Chocolate then Khommando Khaki.
Step 6
The final step is to apply the last bits of dressing. Firstly I will usepigments (these particular ones are from MDP) to add in a little and colour interest on the base. I use some MDP Red Oxide andMexico Yellow on the metal areas to create a rusty effect. To apppigments I simply use an old brush to dab it onto the selected building it up until it looks right. I use MDP Burnt Umber on theconcentrating around the rocks. A little MDP Raw Sienna was also
here and there on the earth to create some contrast. On the rocks MDP Raw Umber to add a fine covering and to tint it towards the con the rest of the base. This helps create more unity and make it llittle more natural.
The final process was to add the foliage. I used some tufts and Ivy from MiniNatur as well as some natural mosses and lichen frogarden. The natural stuff needs to be treated with Glycerin first. If yoto do this I wrote an article on how to use real foliage on your base

7/25/2019 Portal Tutorial Es
http://slidepdf.com/reader/full/portal-tutorial-es 21/58
Tutorial
6 www.wamp-forum.com
How to Create Real-Looking Grass
Hi everyone
Let’s start with a first article
about one of the first secrets that
eludes many people who try
their chance in modelling; how
to realize the grass in a realistic
manner.
Tools of the trade: you will need a couple of
medium-sized brushes, some glue for wood
(vinavil), water, synthetic (fibre) grass, latex
gloves, and some acrylic colours.
How to start:
Once the model has been painted fully, you need to mwater and vinavil (80% vinavil, 20% water). This is duthe fact that the water will break the superficial tensiothe vinavil, thus preventing it from creating a thin layedry glue thatwould stickimmediatelyto the grass,which wouldprevent it toglue to yourdiorama ina suitablefashionafterwards.
7/25/2019 Portal Tutorial Es
http://slidepdf.com/reader/full/portal-tutorial-es 22/58
www.wamp-forum.com
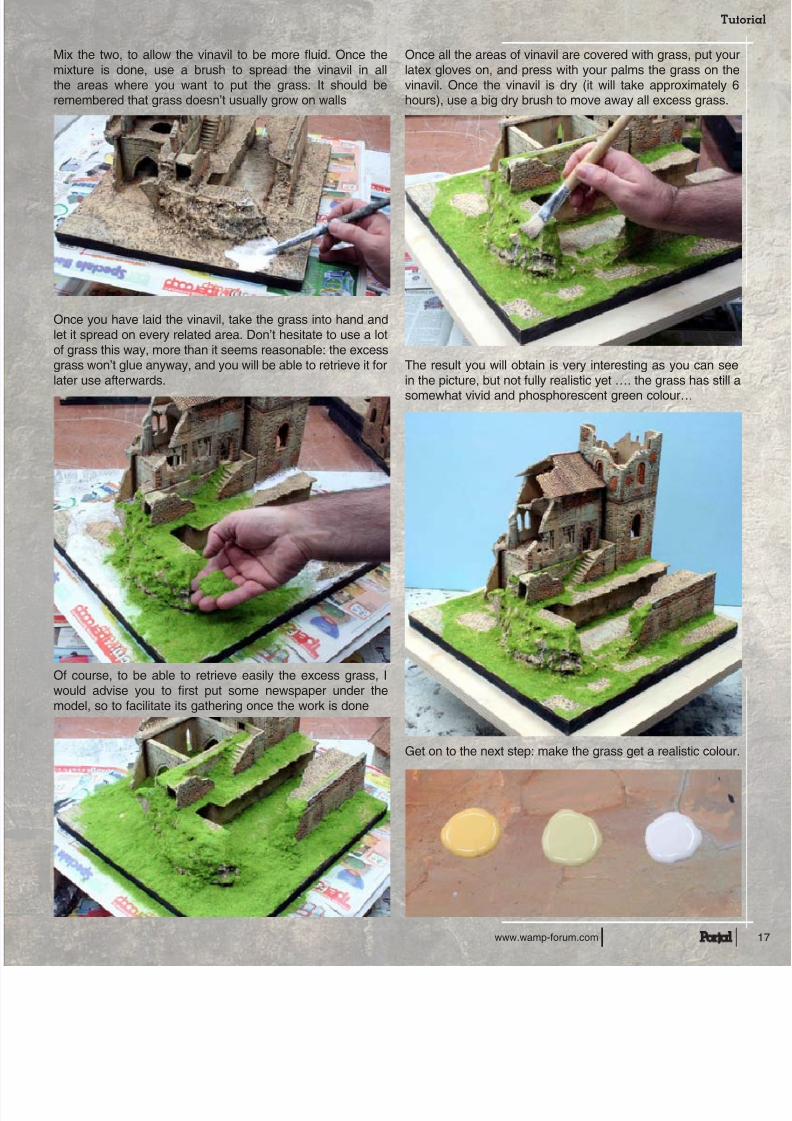
Mix the two, to allow the vinavil to be more fluid. Once themixture is done, use a brush to spread the vinavil in allthe areas where you want to put the grass. It should beremembered that grass doesn’t usually grow on walls
Once you have laid the vinavil, take the grass into hand andlet it spread on every related area. Don’t hesitate to use a lotof grass this way, more than it seems reasonable: the excessgrass won’t glue anyway, and you will be able to retrieve it forlater use afterwards.
Of course, to be able to retrieve easily the excess grass, Iwould advise you to first put some newspaper under themodel, so to facilitate its gathering once the work is done
Once all the areas of vinavil are covered with grass, platex gloves on, and press with your palms the grass vinavil. Once the vinavil is dry (it will take approximahours), use a big dry brush to move away all excess g
The result you will obtain is very interesting as you cain the picture, but not fully realistic yet …. the grass ha
somewhat vivid and phosphorescent green colour…
Get on to the next step: make the grass get a realistic
7/25/2019 Portal Tutorial Es
http://slidepdf.com/reader/full/portal-tutorial-es 23/58
Tutorial
8 www.wamp-forum.com

7/25/2019 Portal Tutorial Es
http://slidepdf.com/reader/full/portal-tutorial-es 24/58
Tutorial
6 www.wamp-forum.com
HOW TO REALIZE REAL-LOOKING BUSHES
Let’s first have an overview of the
diorama, fully completed withthe previous grass step, just before the
work with the bushes.
Tools of the trade needed:
Like for the grass, bushes do not
require a lot of material. You need
least 2 different types of green poone very thin and of clear colour,
the other more thick and darker. T
powders from Noch (used for trai
diorama) are a perfect choice.
Then, you need some lichens. Yo
find them too into the same mode
shops you can find the powder, b
also in floriculture centres (where
After showing you how to
realise real-looking grass, Iwill explain how to do the
same with bushes.
7/25/2019 Portal Tutorial Es
http://slidepdf.com/reader/full/portal-tutorial-es 25/58
www.wamp-forum.com
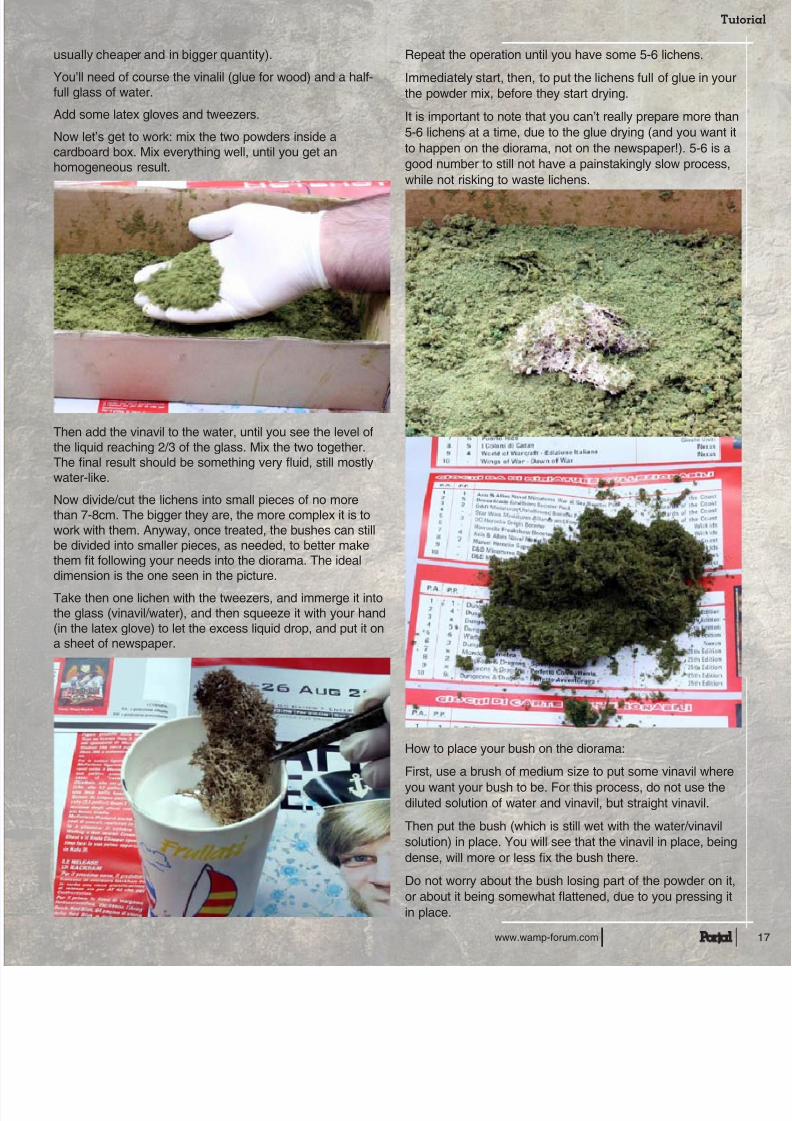
usually cheaper and in bigger quantity).
You’ll need of course the vinalil (glue for wood) and a half-full glass of water.
Add some latex gloves and tweezers.
Now let’s get to work: mix the two powders inside acardboard box. Mix everything well, until you get anhomogeneous result.
Then add the vinavil to the water, until you see the level ofthe liquid reaching 2/3 of the glass. Mix the two together.The final result should be something very fluid, still mostlywater-like.
Now divide/cut the lichens into small pieces of no morethan 7-8cm. The bigger they are, the more complex it is towork with them. Anyway, once treated, the bushes can stillbe divided into smaller pieces, as needed, to better makethem fit following your needs into the diorama. The idealdimension is the one seen in the picture.
Take then one lichen with the tweezers, and immerge it intothe glass (vinavil/water), and then squeeze it with your hand(in the latex glove) to let the excess liquid drop, and put it ona sheet of newspaper.
Repeat the operation until you have some 5-6 lichens
Immediately start, then, to put the lichens full of glue i
the powder mix, before they start drying.
It is important to note that you can’t really prepare mor
5-6 lichens at a time, due to the glue drying (and you w
to happen on the diorama, not on the newspaper!). 5-6
good number to still not have a painstakingly slow pro
while not risking to waste lichens.
How to place your bush on the diorama:
First, use a brush of medium size to put some vinavil w
you want your bush to be. For this process, do not usediluted solution of water and vinavil, but straight vinavi
Then put the bush (which is still wet with the water/vin
solution) in place. You will see that the vinavil in place,
dense, will more or less fix the bush there.
Do not worry about the bush losing part of the powde
or about it being somewhat flattened, due to you press
in place.

7/25/2019 Portal Tutorial Es
http://slidepdf.com/reader/full/portal-tutorial-es 26/58
7/25/2019 Portal Tutorial Es
http://slidepdf.com/reader/full/portal-tutorial-es 27/58
www.wamp-forum.com
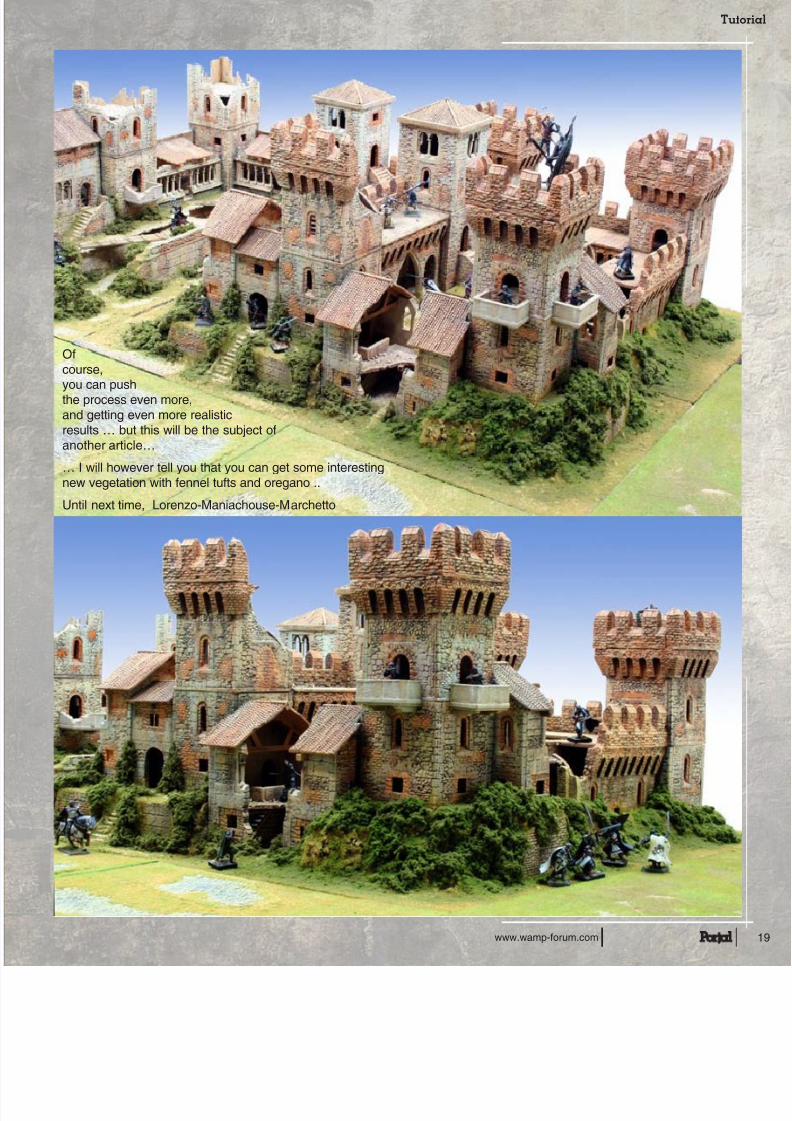
Ofcourse,you can pushthe process even more,and getting even more realisticresults … but this will be the subject ofanother article…
… I will however tell you that you can get some interestingnew vegetation with fennel tufts and oregano ..
Until next time, Lorenzo-Maniachouse-Marchetto

7/25/2019 Portal Tutorial Es
http://slidepdf.com/reader/full/portal-tutorial-es 28/58www.wamp-forum.com
By Manorhouse Worksho
For us modellers it opens
a wide range of possibilities torealise whatever we wish at a very
affordable price. You just need an
idea …
Hi everyone, This month I want to illustrate you the possibilthe high-density polystyrene and how to work with it.
This material is widely used in the building and delivery sand for us, modellers, it opens a wide range of possibilities to whatever we wish at a very affordable price. You just need an i
Let’s start with all the tools of the trade needed
The first 3 pictures on the next page show us various toomaterials that are often used with polystyrene. Like you cathose tools and materials are all cheap and simple, easily foubought in any do-it-yourself shopping centre. The most exptools are the jigsaw and the miniature drill with the flexiblebut even those are nowadays found at accessible prices, a20-30 $ a piece.
The tools having been shown, let’sabout this wonderful high-density polysand its thousand uses.
One of the simplest but also greatestis that it can substitute wood to create for your diorama, making the whole a lolighter but still very sturdy. This base hasthickness which can, once painted in bdark brown, act like a natural frame fodiorama, without needing to add anythin
How to work with
high-density polystyrene
T his month, those nice folks at
Manorhouse Workshop show us
how to use High Density Polystyrene,either for making gaming terrain or
scenery that helps us better show off
our painted miniatures better.

7/25/2019 Portal Tutorial Es
http://slidepdf.com/reader/full/portal-tutorial-es 29/5818 www.wamp-forum.com
so as long as the vinavil isn’t dry, they could exit their posit
continue working on the polystyrene sheets.
How to work with the polystyrene
I often use polystyrene sheets of 2cm thickness for the base, but
also for creating the geography (height) of the diorama’s landscape.
Polystyrene sheets can be used like you would use wooden slabs
… you can screw and nail them together easily, to create your
landscape. Also, you can use the classical vinavil (wooden glue)
for added reinforcement.
In the side picture you can see how the 2 sheets of polystyrene
have been glued first together, and then fixed with screws. You
can also use simple nails, but then, you need to push them into
the surface with your fingers, and not by pummelling them with a
hammer. When using nails, it is always better to push them into the
polystyrene diagonally and in different directions: this will help fixing
the panels together. Nails have the added problem of being smooth

7/25/2019 Portal Tutorial Es
http://slidepdf.com/reader/full/portal-tutorial-es 30/58www.wamp-forum.com
Polystyrene can be worked with in various ways. In this article
we’ll deal with a complex base for buildings.
I always start those bases by selecting and preparing the various
parts I need, by cutting them with a sharp and big cutter, which
allows me a clean and safe cut on the 2cm of thickness. Then I put
the various parts together and if necessary, I continue modifying
them as needed.
In fact, there are some particular operations that are best to do
once all parts are stuck together… As you can see in these pictures,
where the already assembled polystyrene is worked with a jigsaw,
cutter, and then with sand paper.
The high-density polystyrene can be really worked with a lot oftools and in a lot of ways.
So, like I said in the beginning, the limit is only our own fantasy, as
you will be able to see in a soon-to-appear series of articles about
this wonderful material.
In the next article, you will see how you can realize a very realistic
landscape using polystyrene sheets.
Cheers, Lorenzo “Maniachouse” Marchetto

7/25/2019 Portal Tutorial Es
http://slidepdf.com/reader/full/portal-tutorial-es 31/5820 www.wamp-forum.com
How to produce
A largescale sculpt
The technical aspect of mounting something this size and
weight in such a precarious manner will also be addressed
later on however weight is something that needs to be addressed
right from the start.
by CASSAR
A how to guide to producing a
scratch built large-scale sculpt
of your favourite mini, for the
purpose of this article I amgoing to do as step by step
on the ASSAULT MARINE.
One of the most important parts of any build “know w
want to achieve” and get it clear in your minds eye in wha
is best to proceed.)
I start the actual build by forming the major componen
an attempt to save we
Milliput I use anythiplastic aerosol lids to p
pipe to form the Torso
(basically you are left w
tubes), I do the same
legs but the hip/pelvis
has to be solid as th
main load bearing com
At this stage it doesn
what it looks like, it’s
One of the most important parts
of any build “know what you want to
achieve” and get it clear in your minds
eye in what order it is best to proceed.

7/25/2019 Portal Tutorial Es
http://slidepdf.com/reader/full/portal-tutorial-es 32/58www.wamp-forum.com
base foundations at this stage. I then pop the components near a
heat source it helps them harden (if you’ve been a bit lazy with the
mixing it will cure with heat, you should always do 50/50 mix and
make sure there are no visible streaks through the Milliput).
Once you are happy with the rough size and proportions it’s time to
get sanding with the big gun! This saves time and really with practice
you can really achieve razor sharp lines.
The shoulder pads are another “big” item that can be done quickly
and easily for this build. I used a full packet of Milliput standard
yellow grey to do the two pads and it’s important to knead the putty
completely, although if you do something like a Nurgle marine I’ve
found that not mixing it properly can give some fairly spectacularrotting effects. Once the putty’s prepped roll it into a sausage shape
and split it in two equal halves, this ensures the pads are the same
size. Roll the two into separate balls and leave them to cure for say
half an hour to three quarters of an hour, this stops the shoulder
pauldrons slumping out of shape. The easiest way I’ve found is to
shape the putty around my thumb and form the rough shape before
placing them on a piece of plasticard, I use plasticard to let most
of the putty components set on because you can bend it and the
pieces just pop off.
Once they set, usually 3-4 hours for rock hard, I then sand
down. All of the component parts of the “rough build” are don
or less in this manner.
The jet pack was a special request and took some consid
thought to plan out, weight saving measure being paramoun
The two pods where formed around two pieces of plast
(like the stuff under your sink, 1 inch I think). The Milliput faround the pipe had to be shaped like a barrel (for that retro
to form the body of the pods. The barrel shapes where then sa
the two exhaust ports were made by shaping the putty into
(I had to ensure that they fitted the bottom of the pod) then s
the end off and using a dremmel cutting wheel to cut groov
them. For the main body of the jet pack I used rods of Millip
sort of crucifix form then built up the outside cove using roll
sheets of putty. This was done in several stages allowing th
from each stage to fully set.
First of all tools of the trade, you’re going to need the following
as I’m not aware of another method for achieving the sharp edges
and smooth surfaces that these tools can produce.
Firstly the big gun, a bench sander, preferably with a vacuum
attachment as the dust from Milliput is extremely hazardous to
your well being (dust mask and glasses wouldn’t go amiss).
Second a Dremmel, one with the variable speed control and
the flexible pen attachment plus a large assortment of cutting
bits of different sizes and shapes for getting at all those diff
to reach places.
Then we come down to the manually operated stuff (elb
grease essential), needle files, sculpting tools and the larger
for the rougher shaping of the larger pieces.
Other essentials are various grades of sandpaper both nor
and wet‘n’dry, heavy duty solder wire and super glue and of cou
Milliput (I use standard yellow grey).
7/25/2019 Portal Tutorial Es
http://slidepdf.com/reader/full/portal-tutorial-es 33/5822 www.wamp-forum.com
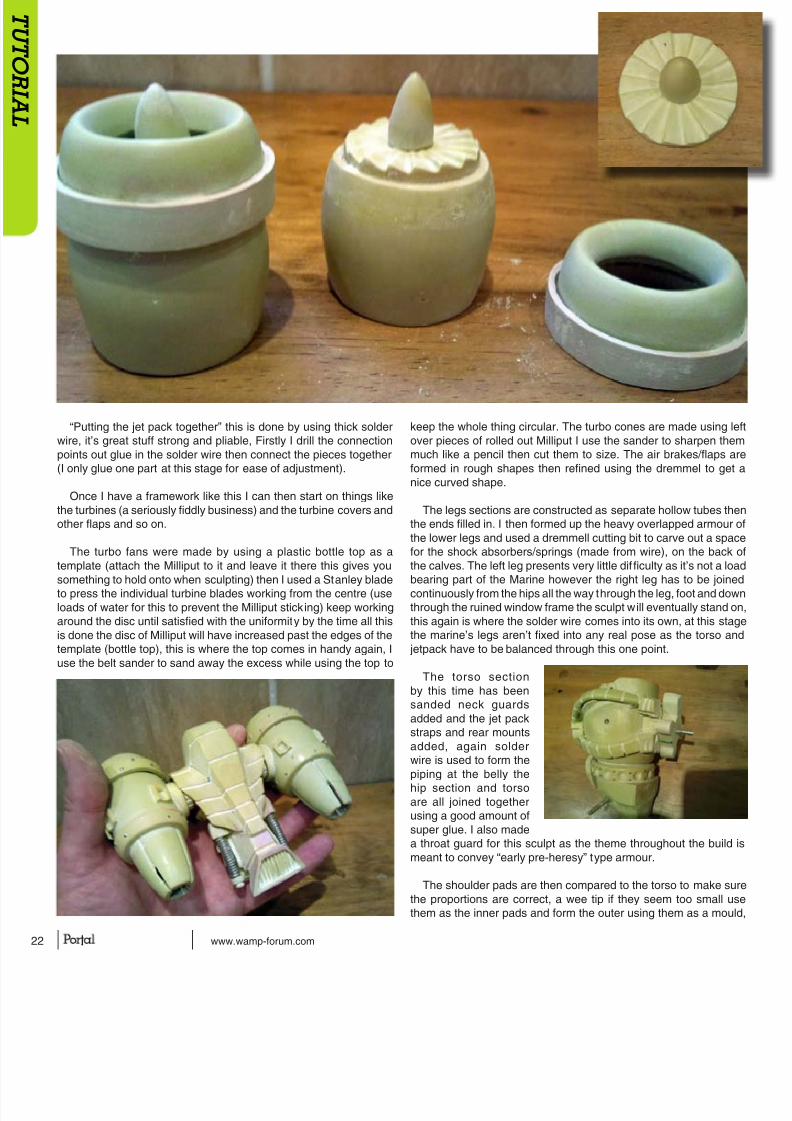
“Putting the jet pack together” this is done by using thick solder
wire, it’s great stuff strong and pliable, Firstly I drill the connection
points out glue in the solder wire then connect the pieces together
(I only glue one part at this stage for ease of adjustment).
Once I have a framework like this I can then start on things like
the turbines (a seriously fiddly business) and the turbine covers and
other flaps and so on.
The turbo fans were made by using a plastic bottle top as a
template (attach the Milliput to it and leave it there this gives you
something to hold onto when sculpting) then I used a Stanley blade
to press the individual turbine blades working from the centre (use
loads of water for this to prevent the Milliput sticking) keep working
around the disc until satisfied with the uniformity by the time all this
is done the disc of Milliput will have increased past the edges of the
template (bottle top), this is where the top comes in handy again, I
use the belt sander to sand away the excess while using the top to
keep the whole thing circular. The turbo cones are made
over pieces of rolled out Milliput I use the sander to sharp
much like a pencil then cut them to size. The air brakes/
formed in rough shapes then refined using the dremmel
nice curved shape.
The legs sections are constructed as separate hollow tu
the ends filled in. I then formed up the heavy overlapped a
the lower legs and used a dremmell cutting bit to carve out
for the shock absorbers/springs (made from wire), on the
the calves. The left leg presents very little dif ficulty as it’s n
bearing part of the Marine however the right leg has to b
continuously from the hips all the way through the leg, foot a
through the ruined window frame the sculpt will eventually
this again is where the solder wire comes into its own, at t
the marine’s legs aren’t fixed into any real pose as the to
jetpack have to be balanced through this one point.
The torso section
by this time has been
sanded neck guards
added and the jet pack
straps and rear mounts
added, again solder
wire is used to form the
piping at the belly the
hip section and torsoare all joined together
using a good amount of
super glue. I also made
a throat guard for this sculpt as the theme throughout the
meant to convey “early pre-heresy” type armour.
The shoulder pads are then compared to the torso to m
the proportions are correct, a wee tip if they seem too s
them as the inner pads and form the outer using them as

7/25/2019 Portal Tutorial Es
http://slidepdf.com/reader/full/portal-tutorial-es 34/58www.wamp-forum.com
careful they don’t stick there permanently. Once that’s done work
can start on the arms.
The shoulder pauldrons are then sanded in a sink full of Luke warm
water (get used to that it’s the only way to get the smooth finish) all
the visible components should be finished off in this manner before
adding details like plating decals etc (another tip. I use washing up
liquid with the wet’n’dry paper; it makes the water stick to the surface
longer and allows a finer finish).
Once this is done I then add the shoulder details, Chaptermarkings, etc. I find it easier to do them on a piece of plasticard
then transfer them onto the surface like a transfer this stops too much
damage being done to the sanded surface with sculpting tools etc.
Once the leg componen
joined together with the
wire they can be bent into p
(balanced) before using
amounts of Milliput around th
to fix them permanently in
Once these first fixings are
the joints can be filled out
more Milliput to make a goo
join between the componen
The ribbed joint effect is
using a cocktail stick in a br
action. Once that’s done I fi
using a paint brush and ple
water really smooths the
nicely.
The arms are done us
rough sausage of Millipu
into the required shape an
left to set once set I then
ribbed elbow joint before att
the armour proper to the
and forearm, once set, it’s b
the belt sander to get that
flat machined look, I als
the dremmel depending o
accessibility as the cutting tool can get right in to the elbows
The arms are then fixed into the shoulder pauldrons with
glue and fitted to the torso by means of... Yep you guessed it,
wire. Once I’m happy with the position I then fill in the gaps be
the pauldrons and the upper arm with more Milliput to secure
permanent fixing.
This is the stage when some more bling and detailing c
added, namely the strip/rivet plates and the rivet holes can be
out I use a dremmel bore hole drill (it’s thinner than regular dabout the diameter of a pin, which comes in handy later). On
holes are done I then use snipe nose pliers to hold a pin he
regular pliers to snip off the main body of the pin around 4mm
from the head (careful the pins can fly off in all directions).
apply a little super glue to the now considerably shorter pin
then seat it into a hole.
Other parts that I
can give tips for would
be the brush on the
helmet that’s formed
roughly then sanded
into shape then I apply
a thin layer of Milliputaround the core before
using a Stanley blade to
chop away gently until I
get the desired hair like
effect.
The base section is
formed by using about
one and a half packets
7/25/2019 Portal Tutorial Es
http://slidepdf.com/reader/full/portal-tutorial-es 35/5824 www.wamp-forum.com
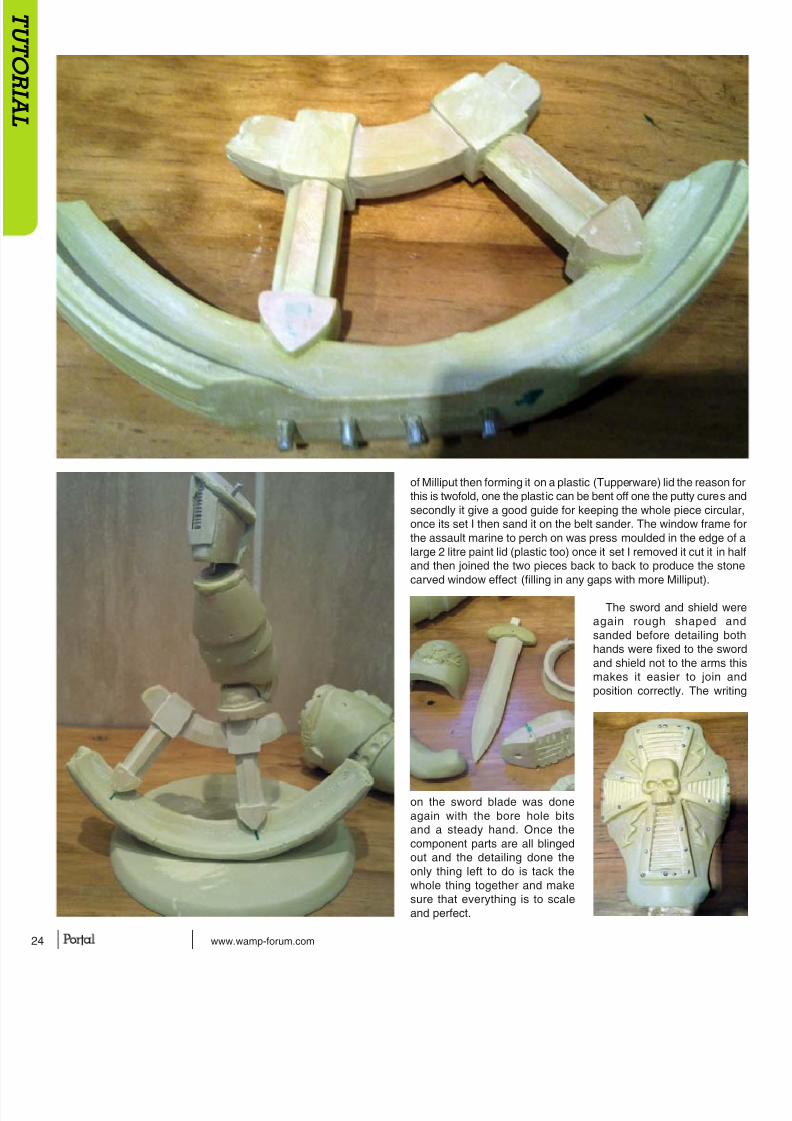
of Milliput then forming it on a plastic (Tupperware) lid the re
this is twofold, one the plastic can be bent off one the putty c
secondly it give a good guide for keeping the whole piece
once its set I then sand it on the belt sander. The window
the assault marine to perch on was press moulded in the e
large 2 litre paint lid (plastic too) once it set I removed it cu
and then joined the two pieces back to back to produce t
carved window effect (filling in any gaps with more Milliput
The sword and shi
again rough shap
sanded before detail
hands were fixed to th
and shield not to the a
makes it easier to j
position correctly. Th
on the sword blade was done
again with the bore hole bits
and a steady hand. Once the
component parts are all blinged
out and the detailing done the
only thing left to do is tack the
whole thing together and make
sure that everything is to scale
and perfect.

7/25/2019 Portal Tutorial Es
http://slidepdf.com/reader/full/portal-tutorial-es 36/5820 wampforum.com
UMS “Agram” was established in 2003. as an initiative of a few
enthusiasts for strategic tabletop wargames who wanted to gather
and enjoy their hobby and organize tournaments in strategic tabletop
wargames. As the number of members and the increase in attendance
of the international tournaments organized by UMS “Agram”, the need
for a large number of terrain soon became apparent. Therefore, the
Workshop for the making of terrain and painting miniatu
formed by the Association. In its ten-year existence, the W
has produced over two thousand pieces of terrain and sever
projects like Mordheim medieval monastery, a few Bloodbo
boards, a medieval town hall with an atrium, a City of Deat
board and Pirate’s Cove gaming board, to name but a few
Awesome TerrainOver the next few issues Portal, in
conjunction with UMS “Agram”
and Marko Paunovic (aka
Demonn) will be running a series
of tutorials about building terrain.
Taking you up through beginnertechniques through to advanced
stuff like adding lighting, lasers
and smoke machines (I kid you
not!) So to kick off this series
we’re giving you a heads up
introduction that explains what
you’ll need to complete the tasksahead.
by Marko Paunovic (aka Demon

7/25/2019 Portal Tutorial Es
http://slidepdf.com/reader/full/portal-tutorial-es 37/58wampforum.com
INTRODUCTION
These series of articles are all excerpts from a script I wrote
primarily for students of a program my club (UMS “Agram” – www.
ums-agram.hr/eng *) organizes as a part of the City of Zagreb’s
Prevention of unwanted behaviour of youth and minors project in
order to keep the kids off the street and give them some quality
after school time. The program and these articles are made for
both the beginners and advanced modelers.
It must be noted that this series of articles will deal with models
(ie terrain) for tabletop strategy games. In designing such terrain
one should take account of two mutually contradictory guidelines.
One is a sense of realism, while the second is playability. Increasing
the realism of terrain decreases its playability and vice versa.
Namely, if we take the example of a game like Warhammer 40,000
whose miniatures are roughly in scale 1:50, one smallish tower
100m high and with a base of 25x25m in this scale will be 2m high
and have a base of 0,5 x 0,5m, which is practically impossible to
place on tabletop. Therefore, attention has been focused only on
the playability, in other words that all the places on the terrain are
accessible to players (or their miniatures). Furthermore, during
the construction of terrain for tabletop strategy games, it is vital to
follow certain rules that the game itself sets (such as the number
of terrain at the gaming tables, the type of individual terrain and
their size, etc.).
Readers who are interested only in realistic terrain replica
one that does not engage in strategic tabletop games) do not
to immediately stop reading these articles because all the met
tools and materials are the same for both “types” of mode
They differ only in the geometric relationships between diff
dimensions.
Prior to the actual build, one should be very familiar wit
tools and materials used, especially their characteristics in mcontact. Thus, for example, high density polystyrene will be eat
any sprays or even oil paints, and it should be previously prote
Therefore, I strongly recommend that the modeller study wel
and what they work with before one starts the project planni
Planning is the second stage in the development of the m
As with other projects, planning is also important in terrain buil
It saves both time and money. Specifically, prior to making
models, it is wise to create a technical drawing or draft, prefera
scale. For it is then clear how much of this material should be
and how much of that. Then you can make a list of the neces
materials. After that, one can proceed with the purchas
materials. All materials (and tools for that matter) that are discu
in these articles are easily available in most hobby and DIY st
Then follows the actual construction of terrain.
Low Density Styrofoam
Inexpensive, easy to cut.
Easily damaged, the
ball-like structure can
be seen along the cut.
Dissolves in contact with
superglue and spray.
High density styrofoam
Inexpensive, easy to cut
and easily damaged.
Unlike low density
styrofoam, can be cut
without structure showing.
Also, dissolves in contact
with superglue and spray.
Balsa wood
Easily cut by scalpel,
lightweight, usually
comes in slats of different
thickness (width x
length: 10x100cm).
Thinner balsa has no
load bearing capability.
Wooden slats (linde
Smaller sizes are
easy to cut, good loa
bearing capacity, can
be pinned (drilled).
Larger dimensions
require sawing.
Cardboard
Easy to cut with sciss
No strength.
When wet bends a lo
Clay (air drying)
Easy to use when
sculpting or modeling
Air-drying clay does
crack during drying.
Heavy when set.

7/25/2019 Portal Tutorial Es
http://slidepdf.com/reader/full/portal-tutorial-es 38/5822 wampforum.com
Superglue
Instantly glues almost all
materials. Dangerous in
contact with the eyes /
mouth / nose. When glued
to the fingers - DO NOT pull!
Put the fingers under warm
water and gently crumble.
Dissolves polystyrene and not good for use on large areas because
of the evaporation fumes!
PVA glue
Dilutable in water,
inexpensive, glues
everything except metal.
Long drying time
(approximately 6 hours).
Cork
It comes in various
thicknesses, easily breaks
/ cuts, after painting has
a stone-like texture, can
be glued by PVA and
superglue and thinner
panels have no load bearing
capability so are to be
used only for decoration
Sand / Gravel
It is used for the texture,
smallest granulate (sand
for chinchillas) is good for
representing mortar, larger
granulates are good for
the earth, dirt and smaller
stones and rocks.
When Styrofoam is used, it is best to cover it with a layer of sand
glued by PVA for protection against dissolving by sprays or superglue.
Static grass
Displays the grass
in real life, comes in
various lengths, to be
glued with PVA.
Messy method. In order
to protect it, cover the
workplace with newspaper.
Foliage
For representing m
low bushes / foliag
leaves. To be glued
PVA glue. Can be
with superglue, als
MDF
For making bases
of the terrain.
Doesn’t bend easil
unless too much w
is used in PVA.
Has to be sawed.
Wire
For pining
For making wire
frames of the trees
Scalpel blade
Dangerous, shar
handled with ca
use, draw in the bla
through almost all m
Marker pen
For marking and dr
various materials.

7/25/2019 Portal Tutorial Es
http://slidepdf.com/reader/full/portal-tutorial-es 39/58wampforum.com
Rulers
For meassuring
and marking.
Files
For filing wooden and
surfaces.
Sanding paper
For sanding the styrofoam
or freshly sawed wooden
pieces.
Pinchers and tweez
For easier manipula
awkward parts.
Pliers
For bending and cutting the
wire.
Brushes
For painting those s
parts of terrain
precise).
Modeller’s saw (and other
saws)
For sawing (MDF or larger
wooden slats).
Large brushes
For painting/drybru
larger areas.
Pinvice
Handheld drill used for
pinning.
Scissors
For cutting (mostly
cardboard).
7/25/2019 Portal Tutorial Es
http://slidepdf.com/reader/full/portal-tutorial-es 40/5824 wampforum.com
Figure 1
On your piece of high density styrofoam draw an irregular
shape with a marker pen, which will form the shape of
your terrain (Figure 1).
Try to save as much of the material as possible. Take a scalpel
blade and perpendicular to the high density styrofoam surface pull
the blade of the knife to cut you base. When you cut it, it should
look like Figure 2.
Now cut the edges of your base at an angle around and then two
more times every time at a lower angle like in steps 1-3 in Figure 3.
Then smooth all the irregularities with sandpaper. Eventually, your
finished base should look like the example in Figure 4.
This concludes the manufacture of the base of the terrain.
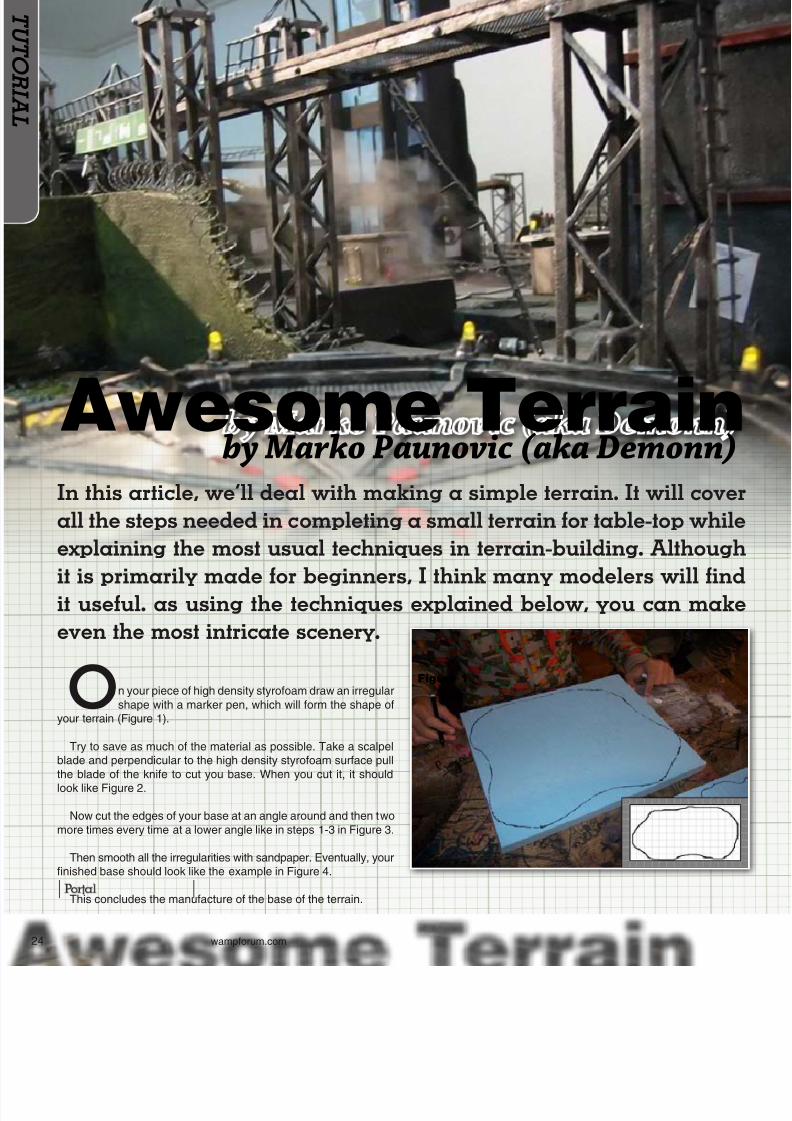
In this article, we’ll deal with making a simple terrain. It will c
all the steps needed in completing a small terrain for table-top w
explaining the most usual techniques in terrain-building. Altho
it is primarily made for beginners, I think many modelers will
it useful. as using the techniques explained below, you can m
even the most intricate scenery.
by Marko Paunovic (aka DemonAwesome Terrain

7/25/2019 Portal Tutorial Es
http://slidepdf.com/reader/full/portal-tutorial-es 41/58wampforum.com
Figure 2
Figure 3 Figure 4
Figure 5
Figure 6
Figure 7
Figure 8
Figure 9
Figure 10
Texturing
Spread the newspaper over your work surface. Then, over the
base of the terrain, apply the PVA glue with a brush (lightly soaked
in water). Once you have covered the entire base with the PVA glue
sprinkle sand or gravel as you wish.
Cor k , b r ok en
up into pieces to
represent the stone
road. If you use it,
you first paste it to
your base so the fine
sand can fill the gap
between the ‘’stone’’
tiles. (Figure 5)
Then draw a hole on
the front wall for the door,
and then using a scalpel
blade cut the hole out. To
make a window on the
collapsed walls, draw the
outlines of the windows
and cut as shown in
Figure 9.
Stab wire pins
in your walls from
below so tha t
protrude from the
walls on their lower
side. Then paste
using PVA glue your
walls to the selected
location on the base
of the terrain, and the
pins can be used for
connecting the walls
to make the hold
better (as in Figure
10). Make sure that
the pins do not break through the wall!
Once the walls are glued together, apply a thin layer of wa
down PVA glue and pour the chinchilla sand (finest gravel
could find) over it. It is great for emulating the texture of the m
façade.
Detailwork
Next come the basic details that you can put on your build
Larger sand,
for the grassy or
‘’ordinary’’ earthy
sections (Figure 6)
Fine sand - the
paths and roads, the
cliffs and mortar on
buildings (more on it
later) as in Figure 7.
Constructing a ruin/house
On your piece of balsa wood (5mm thick) draw the shape of the
walls (in this case a whole wall for the front and the two destroyed
walls as in figure 8). with a marker pen.

7/25/2019 Portal Tutorial Es
http://slidepdf.com/reader/full/portal-tutorial-es 42/5826 wampforum.com
Figure 11
Figure 12
Figure 13
Figure 14
Figure 15
Figure 16
Figure 17
order to bring some life into your structures such as window and
door frames, door and windows themselves.
Window frames
From a wooden slat 2x5mm cut two pieces of 2cm and two pieces
of 2,5 cm, and glue as shown in Figure 11.
Door Frame
From the same strip cut another piece of 3cm length and glue
over the hole for the door at the front of the building (Figure 11).
Doors and windows
To make the door (size as the hole for the door to your house) cut
one piece of 2.5 x4cm out of 2mm thick balsa wood and glue to the
front face of the building to look like an open door or glue it on the
floor so that it gives the impression of a demolished door.
For windows you need a piece of balsa 2x1, 5cm and glue it on
one side of the window.
When you’re done with both, take a ball pen (you will ruin your
ball pen so use an old one if handy) and draw on the balsa wood
along the wood grains to make the ‘’rack’’ that the window and the
door are comprised of (figure 12).
Creating r
tiles
On a p
cardboard
network of
squares (te
and ten c
should be
for a build lUse scissor
the cardbo
strips (following the
line), then cut each
strip into 10 pieces.
The last two strips
(or 20 pieces’’ tile’’)
additionally make a
cut to get chipped
tileas in figure 14.
Then you paste
tiles on the other two
pieces of cardboard
or thin balsa (1.5
mm), whic
previously
approximat
size as in f
and 16.
Use PVA
glue the ti
careful to g
chipped tile
the edges of
Note: start gluing
the tiles in rows from
the bottom of the
roof upwards with a
certain overlap like
in figure 17.
Construction o
fences
This section d
the construction
types of barriers
kni tted and w
fences.

7/25/2019 Portal Tutorial Es
http://slidepdf.com/reader/full/portal-tutorial-es 43/58wampforum.com
Figure 18
Figure 19
Figure 20Stone fence
From clay make fiftyish pebbles of approximately 1cm size. Allow
to dry. Then, paste in two or three lines in the shape of the wall as
shown in Figure 18
Wooden fence
Cut the pieces of slats 3x3, 4x4 or 5x5cm (depending on the size of
the fence) in lengths of 2-3cm. Stick (or just paste) them in the terrain
base at equal intervals (approximately 4-5cm). Out of 2x3 or 2x5cm
slats cut several pieces of 7cm in length, and this should be enough
to cover the length of the fence in two rows, as shown in Figure 19
Woven fences
It is similar to building the wooden one, but instead of square
take something round (eg sticks or toothpicks) and cut the
pieces of 3cm in length. Thrust them into the ground at a di
of 4-5cm to each other. Then take a large paper clip and stra
them with pliers (do not have to be perfectly straight.) Whe
have completed intertwine one at a clip around the vertical
(toothpick / kebabs): one around the left eye and another to th
then back to the left side, while the top line should start fro
opposite side like figure 20
Painting
Spread a new
or otherwise p
your work area
the black spra
spray the entire
(undercoat). Sp
a well-ventilated
Let the paint dry
When dry (abo
an hour later),
large brush pa
earthen part o
base in dark b
Use the dry
technique. The
a lighter shad
repeat.
Rocky parts
road or stone
paint using the
method just in s
of gray (but in th
still hover with w
For the walls
house, first pain

7/25/2019 Portal Tutorial Es
http://slidepdf.com/reader/full/portal-tutorial-es 44/5828 wampforum.com
21b. basecoat 21c. drybrush 21d. finished paint
22a. 5mm static grass
22b. 7mm static grass
22c. finely ground
Sponge/foliage
22d. tree
brown with a wet brush (Figure 21b - basecoat) and then drybrush light brown and
mixture of light brown and white to get the look of plaster (figure 21c).
The roof tiles should first be drybrushed brown and then a mixture of brown
adding more red with each successive layer until you end up with pure red.
At the end drybrush the details (doors, windows etc.) dark brown.
Flocking
Spread the newspaper to protect the work area. Over the would-be grassy pa
terrain put the PVA glue (with a brush). Then sprinkle the short static grass over
22a). Allow to dry for about ten minutes and then shake off the rest on the newsp
thus you can return the excess grass back in the bowl. In a few holes between th
stones on the road apply PVA glue with the smallest brush to creat a blob. Betw
fingers take the 7mm static grass to form a tuft and thrust it vertically in the PVA blo
22b). On several spots on the desired facade paste finely ground sponge like ivy us
(Figure 22c). Then paste the tree using superglue on the flat part of the field, an
few minutes go over the wood base with PVA and glue the short static grass (Fig
In the end, your finished terrain should look like figure 23.
If you have
questions regard
article or any sugg
about future
building topic
free to c
Marko v

7/25/2019 Portal Tutorial Es
http://slidepdf.com/reader/full/portal-tutorial-es 45/5840 wampforum.com
TUTORIAL
Awesome Terrain
First is an example of a small village house with a barn (figure 1).
Here we will not explain the basing of the terrain or how to texture it
since we mastered that part earlier. To create these buildings 10 x
25cm of 4mm or 5mm thick balsa wood is needed and 10 x 25cm of
1.5mm balsa wood for making roof. There will be enough thin balsa
for all the details that go on the terrain (windows, doors, etc.).
First draw on the thicker balsa all the walls as shown in Figure 2.
and cut the necessary parts. Repeat the same process for roofing,
but on the thinner balsa (figure 2). Then, on the walls of the barn
(Parts 5 and 6) and on the upper parts of the walls 1 and 2 draw
parallel lines with a pen to press the boards about every 5mm (as
previously done on the windows and doors) to make an appearance
of wooden boards.
In this article, we’ll go through two simple examples of buildings
which you do not need much time or materials (and consequen
money). With a little care and attention these pieces of terrain
be a very interesting solution for your gaming table.
Connect the walls as in figure 3. Once the walls are in pla
the roof (made of thin balsa) and glue the roof tiles with P
Texture all parts of the building that are not wooden, paste w
doors and any other decorations you want and thus ma
building part of your new terrain complete. The only thing
is to paint and flock it (as described in the previous article
wish, you can add a fence at your own discretion.
Small village house with a barn
by Marko Paunovic (aka Demon

7/25/2019 Portal Tutorial Es
http://slidepdf.com/reader/full/portal-tutorial-es 46/58wampforum.com
TUTORIA
Tower house
Next example is a tower house. All you need is a piece of
32,5 x10cm of 5mm thick balsa wood for walls and 10x15cm
of 1,5mm thick balsa wood for the roof and woodwork. As with
the first example, draw on the thicker balsa all the walls and cut it
accordingly (Figure 4.).
The walls 5, 6, 7 and 8 are supposed to be made out of wooden
beams while the other walls will have plaster on it. In order to make
the wooden walls use a pen as described in the previous example.
The wooden boards need to be horizontal. If you are not sure of the
direction of the boards, first connect the entire building (Figure 5.)
Then press in the beams.
Other models of manufacturing processes are the same as in the
previous examples, so therefore your terrain should look like:
Take a look at the notes on the figure 6!
For exercise you can make the frame of the wings of the windmill
from a 5x5mm slat of wood and glue it to one of the upper walls of
the tower.
For making these two examples you need:
• High density styrofoam 2cm thickness, 30x30cm
• Balsa wood 4mm or 5mm thickness, 10x25cm / 10x3
• Balsa wood 1,5mm thickness, 10x25mm / 10x15mm
• Card, around 25x25cm / 15x15cm
• Slate of cork 2mm thickness, 10x10cm
• Sand, 2 types of various sizes (one of them – sa
chinchillas)
• Various flocks, static grass (various length), Iceland
ground sponge, model trees
• PVA glue
• Superglue
• Clay (DAS recommended) or wooden slats for fences
Addition
There are various types of flock (Figure 8.). Some are natura
as twigs, seeds, plants or moss and even various kinds of
such as slate) and can be found in nature, while others are a
(like a sponge, static grass, fibers, etc.) and have to be boug

7/25/2019 Portal Tutorial Es
http://slidepdf.com/reader/full/portal-tutorial-es 47/5842 wampforum.com
TUTORIAL
There is no set rule in how and to what degree to use the flock.
What one should pay attention to is the time of year (if it’s winter,
then there is not much green vegetation except evergreen, etc.),
geographic location (if making desert terrain there will be no trees,
snow or a lot of greens ...), but one should also pay attention to the
colors you use - not to mix too much various coloration and that the
colours used do not clash with one another. The following are the
examples of harmonious flocking and some of the techniques in
handmade flock and vegetation making:
Reed / bulrush
DIY sedge
Sedge is made ??in the following way: put a little supergl
head of a pin and plunge it into the sand. Then take a piece
and paint it green. Cut thin sheets out of it. Then paint the st
sedge and attach the leaves with PVA glue. When everythi
just thrust it into your terrain and put a little PVA glue to ce
DIY Lilly pads
Lilies are made of two-component modeling mass (aka g
stuff) or, if not available, one can also use DAS clay. First
discus (3-5mm diameter) and cut out one slice. Paint it g
perhaps add a flower (which is also made out of paper)
pin through the middle of the lilly pad and use the same m
attaching it to your terrain as in sedge.
Ice is most easily obtained using PVA glue. First paint yo
surface (or make it from resin or otherwise ? more about
later article). Then pour the PVA glue to make a layer abou
thick. Allow to become almost translucent and apply anot
this time a very thin layer PVA glue and let everything dry (p
overnight).
7/25/2019 Portal Tutorial Es
http://slidepdf.com/reader/full/portal-tutorial-es 48/58wampforum.com
TUTORIA
Ice surface
Slate
Slate is very nice addition to your terrain. It gives a faithful replica
of the stone structure both painted and unpainted (just wash the dirt
away as it can prevent the glue from sticking to the stone). More
about this in another article.
When you are making cliffs, keep in mind that there are remnants
of the erosion at the foot of the cliff ranging from large boulders to
tiny pieces. Such attention to detail, gives a particular charm of a
terrain piece. In general, the details are what differentiates a high-
quality terrain/diorama from an average one.
Foot of the cliff
Moss
Particularly effective detail on the walls of old houses or ruin
moss. An easy way to show moss is ground sponge in various
and even brown tones. Also it serves especially well in conc
various irregularities occurred during the development of m
(such as the hole in the wall from rough cutting, sloppy paintjo
And finally there are some details left in the nature by man
as weapons, bags, impromptu fireplaces, etc.
Details

7/25/2019 Portal Tutorial Es
http://slidepdf.com/reader/full/portal-tutorial-es 49/5840 wampforum.com
TUTORIAL
Awesome Terrain
by Marko Paunovic (aka Demon
First example is a couple of Rohan houses for the Lord of the
Rings Strategy Battle Game. Note the characteristic crossbeams and
the roof made of straw. The buildings were made out of balsa wood
while the base is high density Styrofoam with engraved stonework.
The straw is made out of fake fur. I’m afraid a plush teddy-bear got
sacrificed for the purpose of building these terrain.
Extra DetailsT
his month we’ll continue where we left off last time. Building sim
bits and pieces for your scenery that can make the differe
They are easy to make and really make your piece pop.
Next is a sphynx for the Khemri desert table fopr the Wa
Fantasy Battles game. The whole base of the terrain and th
the sphynx itself is high density styrofoam, while only the h
hand modelled out of DAS (air-drying) clay. Also the torch
made out of LEGO bricks.

7/25/2019 Portal Tutorial Es
http://slidepdf.com/reader/full/portal-tutorial-es 50/58wampforum.com
TUTORIA
If you are making a ruined house, it’s always fun to leave some
broken furniture or other markings of former life. Note the former
occupant who died in his sleep. Such fun details can really add life
to your terrain pieces.
Pipings are a great way of enriching your Warhammer 40.000
table. For this terrain we used normal plastic piping for the plumbing
readily available at all D.I.Y. or home-improvement shops. The
walkways were made out of plastic mosquito nets.
Also, when doing different urban scenery, it’s always fun to play
with flock. By using regular shapes of various grass or flock types
(1), you can always create man made parks.
In this hey field there are several bits that make this piece
First, it ’s the hey. It’s made out of a normal doormat cut in the d
size. Second, the wheel of a cart (2), also a LEGO. Next it’s a
hobbit (1) hiding in the field and in the end it’s the scarecrow
made of a wooden slat and some GW Empire Militia parts with
static grass as straw.
“Agram Manor“ is a presentation piece and as such it n
to be loaded with detail. To name but a few: fire logs (2), si
lighting(3), door bell(4), a small bench (5), drain pipe (1), us
various flocks and static grass (6) etc. Also the house has
the making of which will be discussed a little later.
Here are some more examples of tabletop terrain with lo
cool bits and pieces:

7/25/2019 Portal Tutorial Es
http://slidepdf.com/reader/full/portal-tutorial-es 51/5842 wampforum.com
TUTORIAL
Normal and stained glass windows
Glass surfaces can be copied in several
ways. The first is just glass, but it must be
very thin which makes it very fragile. Next
option is Plexiglas which is quite expensive
if you want it very thin, and it is quite difficult
to obtain and shape. The only acceptable
solution remains - foil. So, ordinary windows
can be made out of foil which is easy to find
on the blister or various cardboard b
example Bburago model cars ...). J
to the desired size and shape leavi
space on either side for the glue) a
it in place of windows. If you want
glass, paint the foil using colours o
pen.

7/25/2019 Portal Tutorial Es
http://slidepdf.com/reader/full/portal-tutorial-es 52/58wampforum.com
TUTORIA
Stained glass windows can be made by printing a pattern on paper
(find the appropriate picture on the internet or paint it yourself) and
paste in place the window. This unfortunately has the disadvantage
– it is not transparent! The deficit is easily corrected by photocopying
the image on a foil for an overhead projector. Most of the photocopy
shops still hold these.
Stonework – using HD Styrofoam
In this part we discuss the stone structures, such as stone floors/
walls and types of rocky surfaces. Using real stones for the walls is
not an option because of his natural weight, so therefore we have
to use replacement materials. One of the more commonly usedmaterials (especially for the base-work on miniatures) is cork. If it is
carefully cut and cork is very similar to the texture of the stone. Also
used is the dry bark of a tree, which painted also gives quite a faithful
reproduction of stone. The problem with a bark is that it is relatively
difficult to shape and thus it’s quite dependant on its shape. This
brings us to the next material that can be used to represent stone
and rocks and is very easy to shape - the high density Styrofoam.
With careful treatment and texturing it can very accurately replicate
stone surfaces, especially on rocks (figure 1.).
figure 1.
Various forms of man made stone surfaces can also be co
high density Styrofoam. Just carefully engrave blocks of sto
the desired form by using a sharp object (ice-pick or a knife/s
blade) and then expand the pattern with a pencil. You can ge
different forms as shown in Figure 2.
figure 2.
Stone Walls
Here we describe the development of the massive stone
made out of HD Styrofoam. First imagine the shape of your w
draw it on the hard foam. Then cut out the shape of the wa
engrave the shapes of the stone blocks with a knife, then wid
grooves using a ballpoint pen (use an old one because this p
will break the pen).

7/25/2019 Portal Tutorial Es
http://slidepdf.com/reader/full/portal-tutorial-es 53/5844 wampforum.com
TUTORIAL
If you are building a ruin run a kn
along the surfaces that have been d
and press a real stone over the whol
of the wall thus getting authentic
stone surfaces.
Coat all the surfaces with dilu
glue to protect the HD styrofoam, a
the coating dries undercoat it bla
drybrush the entire surface Codex
Fortress Grey. In some parts you
some Graveyard Earth with lighte
Desert Yellow, and on the other, ad
Green Goblin.
Furthermore over some parts of
you can glue (using PVA glue) the g
green sponge that will mimic mos
flock is quite dark lighten it by dry
light green shade).
More examples

7/25/2019 Portal Tutorial Es
http://slidepdf.com/reader/full/portal-tutorial-es 54/58
WAMPED Special
6 www.wamp-forum.com
Industrial Terrain, 1st place
by marcineczek0

7/25/2019 Portal Tutorial Es
http://slidepdf.com/reader/full/portal-tutorial-es 55/58
WAMPE
www.wamp-forum.com
40k Nid Infested City, 2nd Placeby Kaine
Egyptian Processionalby Undave

7/25/2019 Portal Tutorial Es
http://slidepdf.com/reader/full/portal-tutorial-es 56/58
WAMPED Special
8 www.wamp-forum.com
Chaos shrine
by In Chigh
Powerslave
by Undave
7/25/2019 Portal Tutorial Es
http://slidepdf.com/reader/full/portal-tutorial-es 57/58
WAMPE
www.wamp-forum.com
Schloss Spinnenetz
by Undave
Snow Base
by DaveyBoy

7/25/2019 Portal Tutorial Es
http://slidepdf.com/reader/full/portal-tutorial-es 58/58
WAMPED Special
The Beast’s Dwellingby Belgian
Display base for 40k squad
by Sparks
The Cloud Tby Be