polypropylene - fpc · pdf filescrew type: single stage general purpose ... • increase...
TRANSCRIPT
Formolene® PolypropyleneInjection Molding Process Guidelines
Polypropylene
Injection Molding Process Guidelines
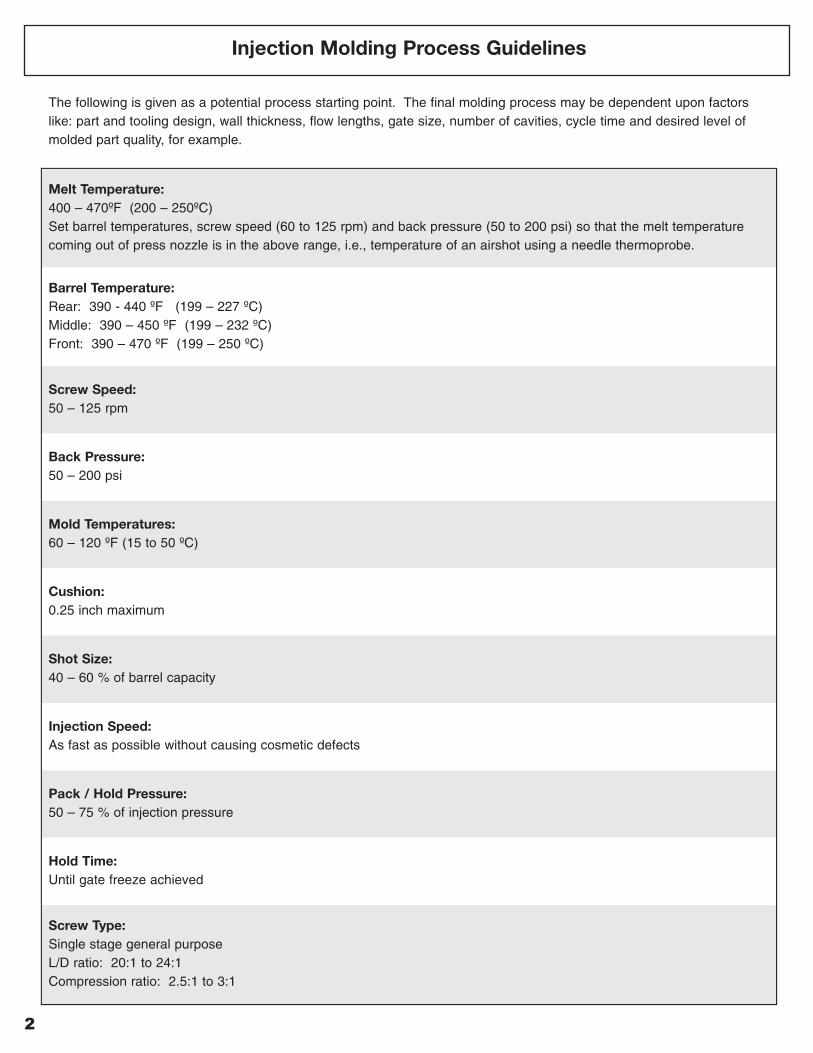
The following is given as a potential process starting point. The final molding process may be dependent upon factorslike: part and tooling design, wall thickness, flow lengths, gate size, number of cavities, cycle time and desired level ofmolded part quality, for example.
2
Melt Temperature: 400 – 470ºF (200 – 250ºC)Set barrel temperatures, screw speed (60 to 125 rpm) and back pressure (50 to 200 psi) so that the melt temperaturecoming out of press nozzle is in the above range, i.e., temperature of an airshot using a needle thermoprobe.
Barrel Temperature:Rear: 390 - 440 ºF (199 – 227 ºC)Middle: 390 – 450 ºF (199 – 232 ºC)Front: 390 – 470 ºF (199 – 250 ºC)
Screw Speed: 50 – 125 rpm
Back Pressure:50 – 200 psi
Mold Temperatures:60 – 120 ºF (15 to 50 ºC)
Cushion:0.25 inch maximum
Shot Size:40 – 60 % of barrel capacity
Injection Speed:As fast as possible without causing cosmetic defects
Pack / Hold Pressure:50 – 75 % of injection pressure
Hold Time:Until gate freeze achieved
Screw Type:Single stage general purposeL/D ratio: 20:1 to 24:1Compression ratio: 2.5:1 to 3:1
3
Injection Molding Process Guidelines
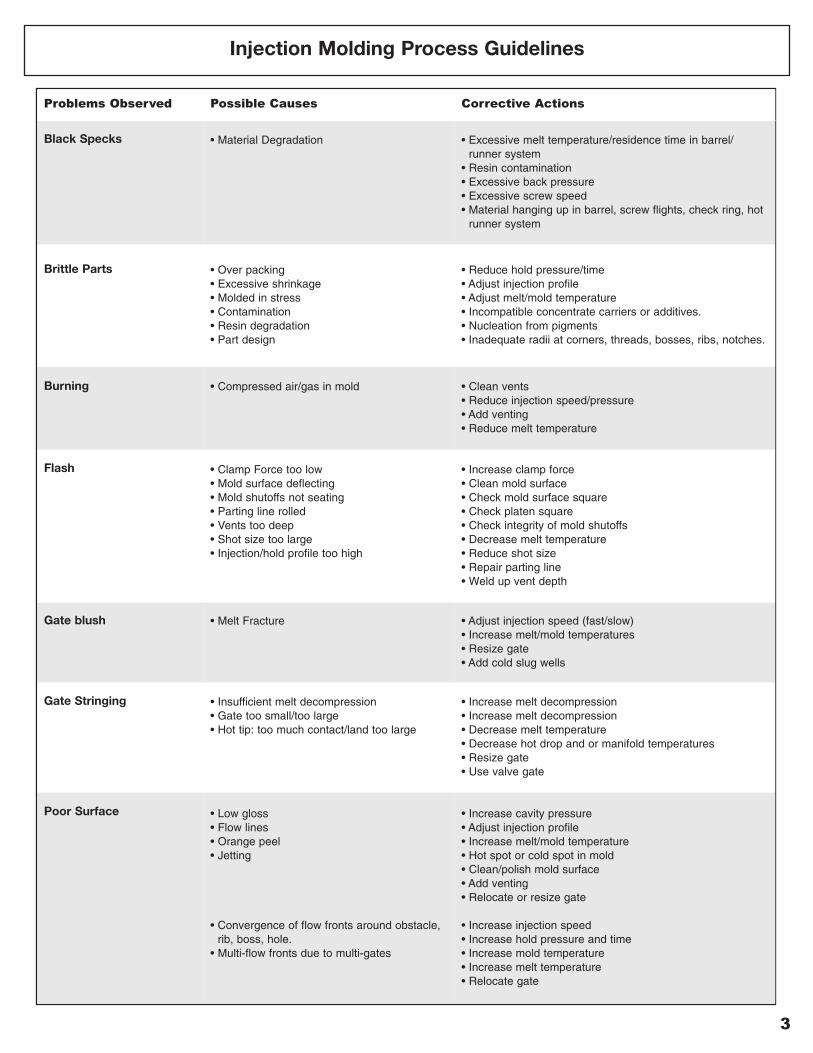
Problems Observed Possible Causes Corrective Actions
Black Specks • Material Degradation • Excessive melt temperature/residence time in barrel/runner system
• Resin contamination• Excessive back pressure• Excessive screw speed• Material hanging up in barrel, screw flights, check ring, hot
runner system
Brittle Parts • Over packing• Excessive shrinkage• Molded in stress• Contamination• Resin degradation• Part design
• Reduce hold pressure/time• Adjust injection profile• Adjust melt/mold temperature• Incompatible concentrate carriers or additives.• Nucleation from pigments• Inadequate radii at corners, threads, bosses, ribs, notches.
Burning • Compressed air/gas in mold • Clean vents• Reduce injection speed/pressure• Add venting• Reduce melt temperature
Flash • Clamp Force too low• Mold surface deflecting• Mold shutoffs not seating• Parting line rolled• Vents too deep• Shot size too large• Injection/hold profile too high
• Increase clamp force• Clean mold surface• Check mold surface square• Check platen square• Check integrity of mold shutoffs• Decrease melt temperature• Reduce shot size• Repair parting line• Weld up vent depth
Gate blush • Melt Fracture • Adjust injection speed (fast/slow)• Increase melt/mold temperatures• Resize gate• Add cold slug wells
Gate Stringing • Insufficient melt decompression• Gate too small/too large• Hot tip: too much contact/land too large
• Increase melt decompression• Increase melt decompression• Decrease melt temperature• Decrease hot drop and or manifold temperatures• Resize gate• Use valve gate
Poor Surface • Low gloss• Flow lines• Orange peel• Jetting
• Convergence of flow fronts around obstacle,rib, boss, hole.
• Multi-flow fronts due to multi-gates
• Increase cavity pressure• Adjust injection profile• Increase melt/mold temperature• Hot spot or cold spot in mold• Clean/polish mold surface• Add venting• Relocate or resize gate
• Increase injection speed• Increase hold pressure and time• Increase mold temperature• Increase melt temperature• Relocate gate

Problems Observed Possible Causes Corrective Actions
Short Shot • Underfilled part • Increase injection speed/pressure• Increase shot size• Increase hold pressure/time• Increase melt/mold temperature• Inconsistent cushion• Foreign matter clogging nozzle/gates• Melt flow variation in resin• Improper venting• Plugged gate, runner or vent• Undersized gates, runners or vents
Shrinkage • Volume decreases as plastic coolsand crystallizes
• Part underpacked
• Excessive Shrinkage – increase cavity pressure and hold time• Increase hold time• Decrease mold temperature• Decrease melt temperature• Verify consistent cushion• Wall thickness variation• Runner/gate too small
Sink Marks • Part is underfilled• Excessive shrikage in thicker
sections
• Increase shot size• Increase hold or cavity pressure• Increase hold time• Reduce fill rate• Decrease mold temperature• Decrease melt temperature• Maintain adequate cushion• Open gates• Reduce wall thickness of ribs/bosses• Relocate gate
Splay Silver streaks on parts – volatilesonsurface – out gassing, moisture,degraded material.
• Dry material• Too much heat – barrel, mold• Improper gate/runner size• Improve venting• Cracked check ring
Sticking in Mold • Over/under packed part• Excessive shrinkage• Tool design
• Under packing – see short shot• Over packing – reduce injection pressure• Reduce hold pressure• Sticking on cores – run faster cycle• Sticking on cavities – run slower cycle• Improper temperature balance in mold• Improve ejection• Remove undercuts, die lock conditions• Increase draft angles• Surface irregularities – improve surface polish• Highly polished surface (vacuum lock) – use courser polish to break
surface tension • Apply mold coating
Voids • Part underfilled • Excessive shrinkage• Wall thickness > 0.25 inch
• Short shot• Part too thick• Injection speed too fast• Poor venting• Verify cushion• Relocate gate
Warpage • Molded in stress• Non-uniform cooling• Shrinkage• Overpacking
• Part ejected too hot• Part ejected non-uniformly• Adjust mold/melt temperatures• Lower injection speed and/or pressure• Minimize hot spots in mold• Relocate gating to minimize flow lengths
Injection Molding Process Guidelines
©2006 Formosa Plastics Corporation, U.S.A. Revised June 2006