pocketlab and scratch stem coding challenge · pocketlab and scratch stem coding challenge with...
TRANSCRIPT
PocketLab and Scratch STEM Coding Challenge
With this kit you will learn how to use sensor data in a computer program. Scratch can read data wirelessly from the PocketLab sensors, and then use that data to perform tasks. This will give you an introduction to very useful programming concepts that are critical in today’s world: programming robotics, security systems, interactive games, self driving cars, and more. Not only are these skills needed in high demand careers, it is actually a lot of fun to have a program that uses external sensors. If you are familiar with Scratch already, you know that it is a wonderful environment for learning how to program, but the programs are limited to what you can type on the keyboard. By adding a PocketLab, Scratch becomes much more powerful you can make games that interact with your movement, or you can make an alarm system for your room, or you can make a real world simulator the possibilities are endless! Getting Started with Scratch If you have used Scratch before, skip this paragraph and go to the next section. If you are not familiar at all with the Scratch visual programming language, go to this link: https://scratch.mit.edu/ There are plenty of resources to get you started on how to use Scratch to create your first programs. One of the best ways to learn Scratch is to download a program and start taking it apart to learn how it works. There are thousands of free programs you can download from the Scratch site. What is the difference between Scratch and ScratchX?
We will be using ScratchX. It is the same programming language as Scratch, but it includes one key feature that we need, and that is to allow Scratch to talk to the outside world. Regular Scratch programming all stays within one browser window, and there is plenty of things you can do there. But if you want to add outside things to control, Scratch calls these “extensions”, and the version of Scratch that permits this is ScratchX. Starting ScratchX and PocketLab with one link Follow this link to open Pocketlab’s ScratchX program in a Chrome browser: http://scratchx.org/?url=https://roozeboom.github.io/pocketlabscratchx/pocketlab_extension.js#scratch Note: PocketLab ScratchX only works on PocketLab compatible Max OSX and Chromebook devices. When the PocketLab Web App is supported on Windows 10, it will also work on Windows 10 compatible devices. You should get two browser tabs that open up, one that looks like this:
And one that looks like this:
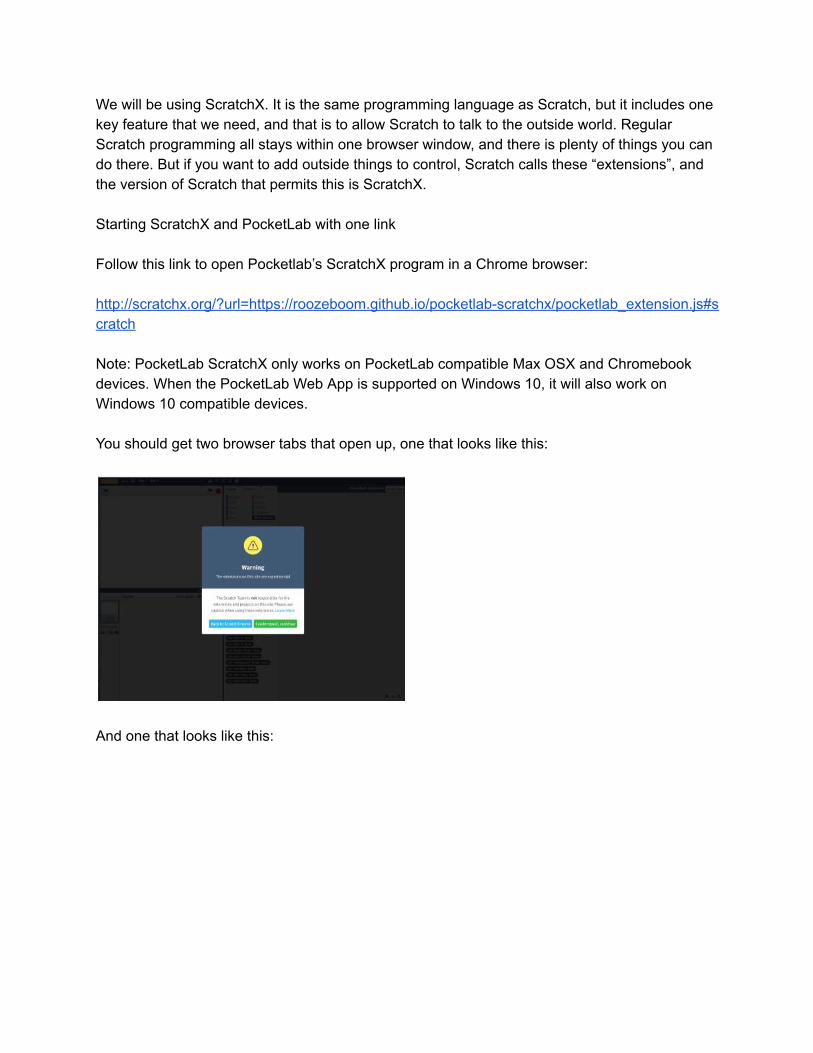
On the first tab that says “Warning The extensions on this site are experimental”, don’t worry that is the standard ScratchX warning screen telling you that you are in a special version of Scratch that can talk to the outside world through extensions, which is exactly what we want to do. Press “I understand, continue”, and you will see what looks like a normal Scratch window with one exception, right down the middle is a list of “Experimental Extensions”:
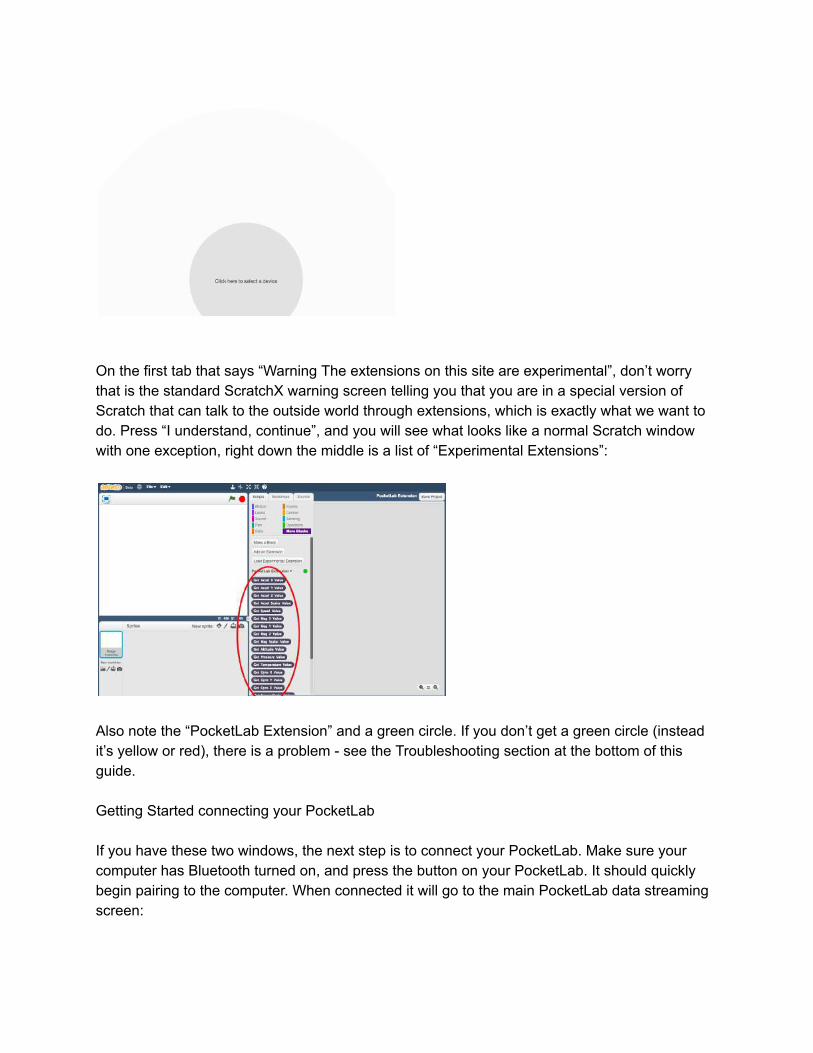
Also note the “PocketLab Extension” and a green circle. If you don’t get a green circle (instead it’s yellow or red), there is a problem see the Troubleshooting section at the bottom of this guide. Getting Started connecting your PocketLab If you have these two windows, the next step is to connect your PocketLab. Make sure your computer has Bluetooth turned on, and press the button on your PocketLab. It should quickly begin pairing to the computer. When connected it will go to the main PocketLab data streaming screen:
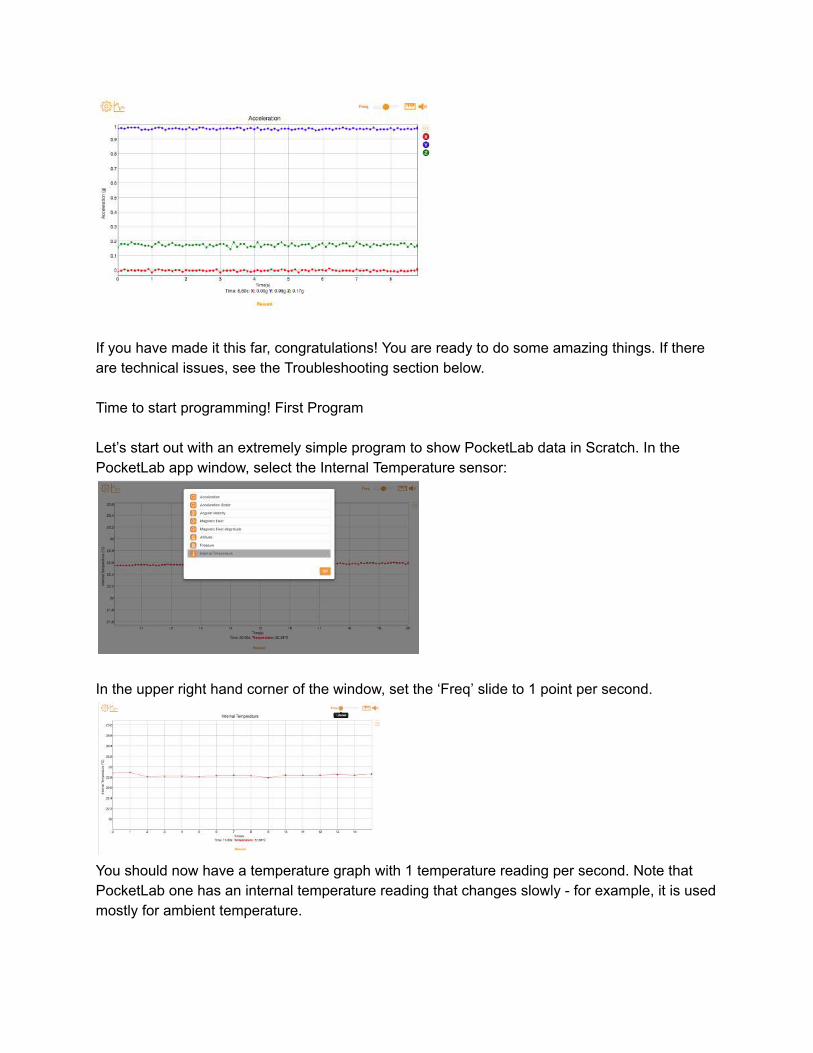
If you have made it this far, congratulations! You are ready to do some amazing things. If there are technical issues, see the Troubleshooting section below. Time to start programming! First Program Let’s start out with an extremely simple program to show PocketLab data in Scratch. In the PocketLab app window, select the Internal Temperature sensor:
In the upper right hand corner of the window, set the ‘Freq’ slide to 1 point per second.
You should now have a temperature graph with 1 temperature reading per second. Note that PocketLab one has an internal temperature reading that changes slowly for example, it is used mostly for ambient temperature.

Now go to the Scratch screen and code this simple program. When you click start (the green flag), the sprite should say the temperature, and continually update the temperature as it changes. If you switch back to the PocketLab window, the data that the sprite is saying should match the last point on the temperature graph.
You have now made a remote temperature sensor! You can put your PocketLab outside and then read the temperature while inside at your computer. You have now created your first program to read PocketLab data into Scratch. If you have gotten this far, you have done everything right and have both PocketLab and ScratchX installed properly and communicating. There is a troubleshooting guide below if you can’t get this to work. Activity Guide Outline The next few sections will be divided into a Basic and an Expert guide. If you really can’t wait and want to get right into a complicated program, just skip down to the Expert Guide section. If you want to learn step by step how to read, interpret and use sensor data in a programming environment, continue the Basic Guide. There will be examples for the accelerometer, gyroscope, magnetometer, and barometric pressure. Also, there are several more programs that you can look at online <link>. Basic Guide Any data that your PocketLab can measure can be used in a Scratch program. This section of the guide will start with the basics of using sensor data in computer programs. It will start with the Accelerometer which produces very useful data for programming.
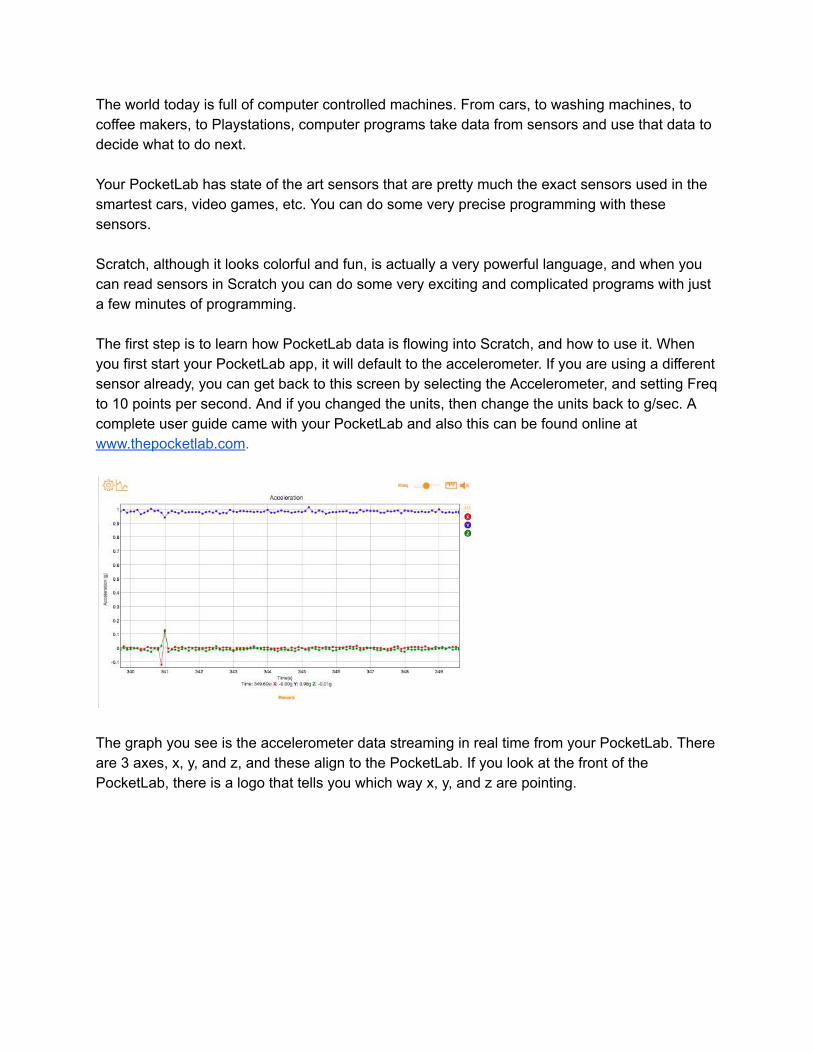
The world today is full of computer controlled machines. From cars, to washing machines, to coffee makers, to Playstations, computer programs take data from sensors and use that data to decide what to do next. Your PocketLab has state of the art sensors that are pretty much the exact sensors used in the smartest cars, video games, etc. You can do some very precise programming with these sensors. Scratch, although it looks colorful and fun, is actually a very powerful language, and when you can read sensors in Scratch you can do some very exciting and complicated programs with just a few minutes of programming. The first step is to learn how PocketLab data is flowing into Scratch, and how to use it. When you first start your PocketLab app, it will default to the accelerometer. If you are using a different sensor already, you can get back to this screen by selecting the Accelerometer, and setting Freq to 10 points per second. And if you changed the units, then change the units back to g/sec. A complete user guide came with your PocketLab and also this can be found online at www.thepocketlab.com .
The graph you see is the accelerometer data streaming in real time from your PocketLab. There are 3 axes, x, y, and z, and these align to the PocketLab. If you look at the front of the PocketLab, there is a logo that tells you which way x, y, and z are pointing.
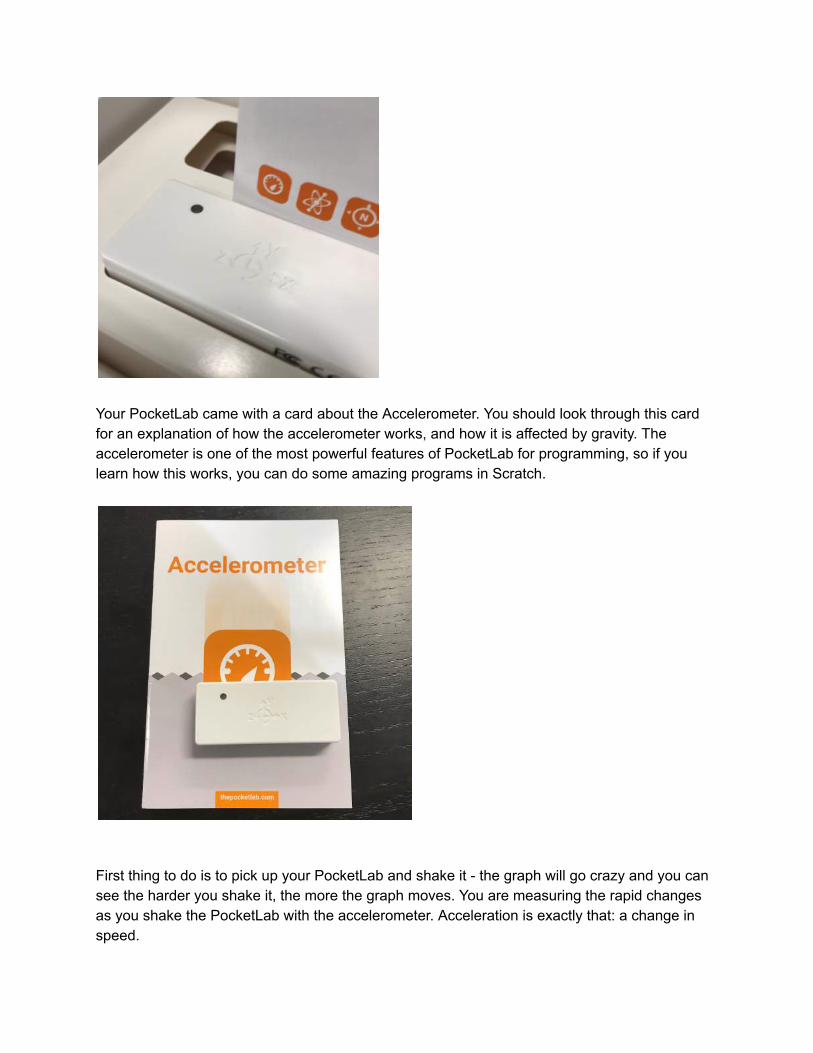
Your PocketLab came with a card about the Accelerometer. You should look through this card for an explanation of how the accelerometer works, and how it is affected by gravity. The accelerometer is one of the most powerful features of PocketLab for programming, so if you learn how this works, you can do some amazing programs in Scratch.
First thing to do is to pick up your PocketLab and shake it the graph will go crazy and you can see the harder you shake it, the more the graph moves. You are measuring the rapid changes as you shake the PocketLab with the accelerometer. Acceleration is exactly that: a change in speed.

Now set the PocketLab down on the table so it’s not moving. The graph lines should be flat and two lines are together at zero, and one line is at 1 or 1. Depending how you set the PocketLab down, you will see different lines at zero and 1 or 1. Now is a good time to look at the different colors of the graph lines. You will notice they are color coded: X is red Y is blue Z is green
Let’s try our first experiment: set the PocketLab down as in this picture:

Your graph will look like this:
Now turn the PocketLab over like this:
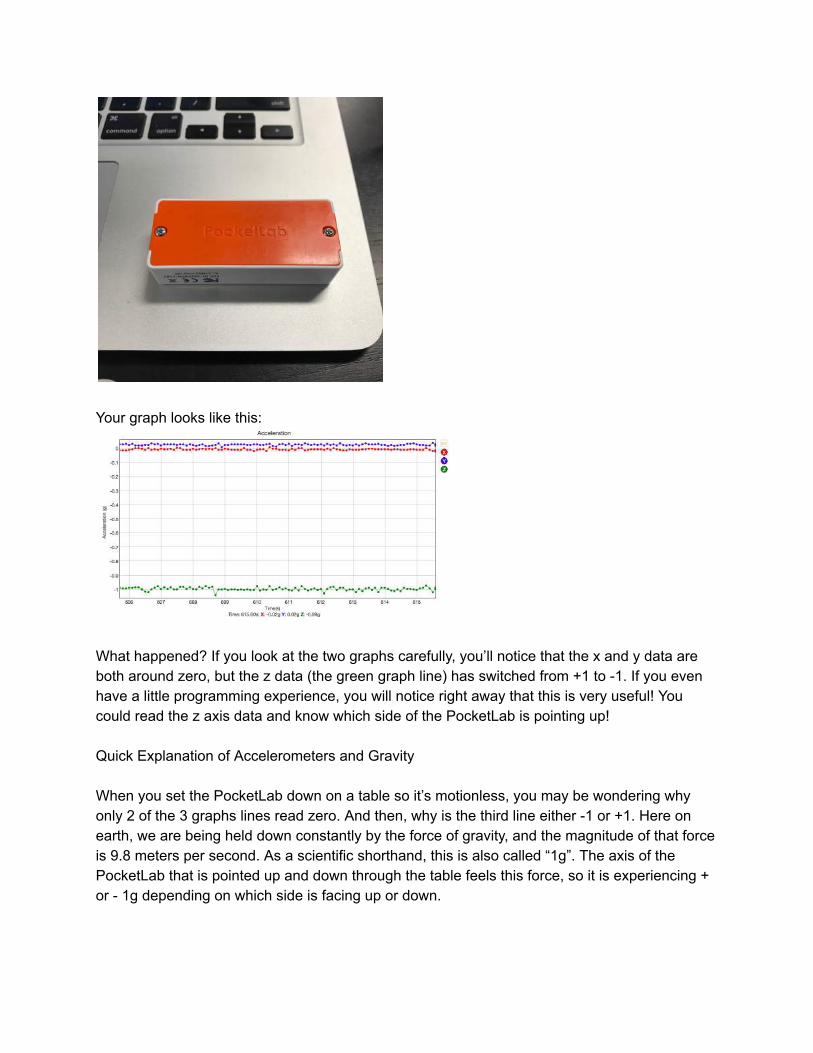
Your graph looks like this:
What happened? If you look at the two graphs carefully, you’ll notice that the x and y data are both around zero, but the z data (the green graph line) has switched from +1 to 1. If you even have a little programming experience, you will notice right away that this is very useful! You could read the z axis data and know which side of the PocketLab is pointing up! Quick Explanation of Accelerometers and Gravity When you set the PocketLab down on a table so it’s motionless, you may be wondering why only 2 of the 3 graphs lines read zero. And then, why is the third line either 1 or +1. Here on earth, we are being held down constantly by the force of gravity, and the magnitude of that force is 9.8 meters per second. As a scientific shorthand, this is also called “1g”. The axis of the PocketLab that is pointed up and down through the table feels this force, so it is experiencing + or 1g depending on which side is facing up or down.
The other two axes are not experiencing the force of gravity, so they are at zero. Note that there is a way to change the units on the graph to show meters per second instead of g, and if you click on the small ‘ruler’ icon in the upper right you will see this option. All the sensor have multiple units that you can select, and this is helpful to know because it will change how your program works. There may be times where it is easier to use one unit versus another (for example if you like your temperature in F rather than C). In the example that we will show, using g for units is convenient because computers (and computer programmers) like to think in terms of 1 and 0, so having 1g for gravity is convenient.
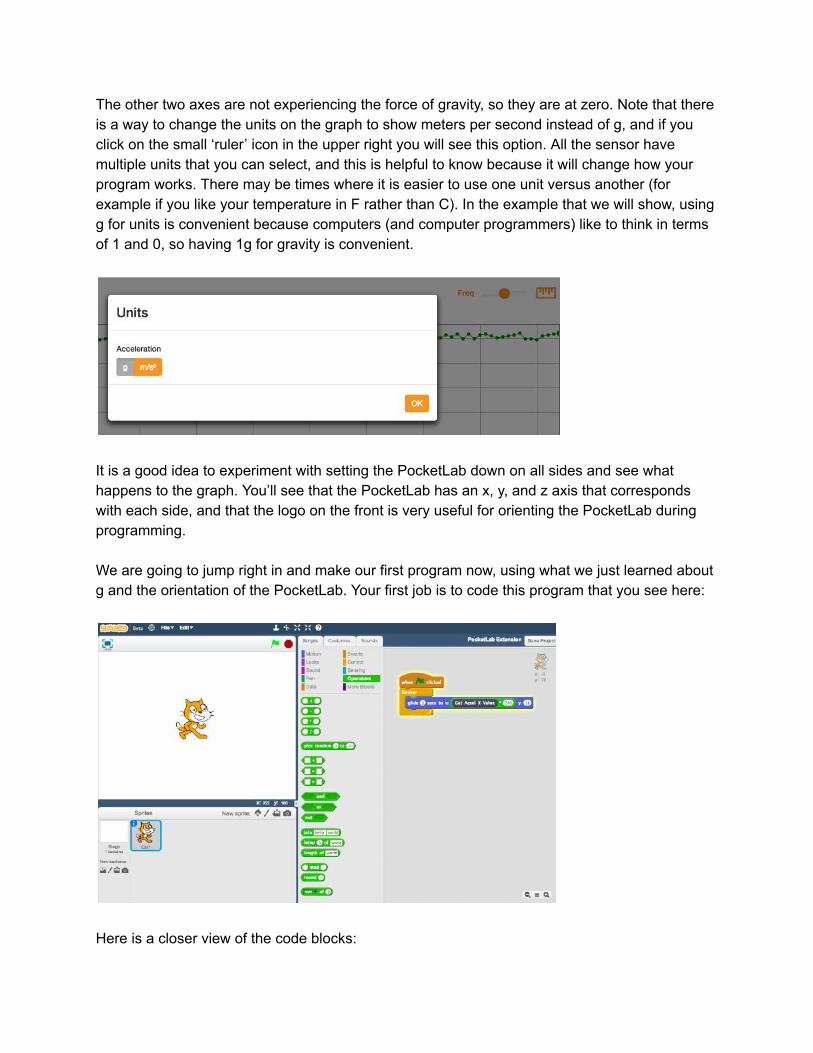
It is a good idea to experiment with setting the PocketLab down on all sides and see what happens to the graph. You’ll see that the PocketLab has an x, y, and z axis that corresponds with each side, and that the logo on the front is very useful for orienting the PocketLab during programming. We are going to jump right in and make our first program now, using what we just learned about g and the orientation of the PocketLab. Your first job is to code this program that you see here:
Here is a closer view of the code blocks:

Some helpful hints: Pick the sprite you want to use first by clicking the little character next to “New sprite:” (any sprite will work fine). The programming blocks are color coded, e.g., the blue ‘glide’ block is under motion. Press the green flag to go If your PocketLab is flat on the table, not much may happen. But if you tilt is slightly along the x axis, your sprite should start to move left and right! Tilt the PocketLab like this:
Did your sprite move across the screen to the right? It should have if not try tilting different directions. Take a look at the underlying PocketLab data. Switch to the PocketLab App screen. Tilt your PocketLab up a little less than half way. You should see a graph similar to this:
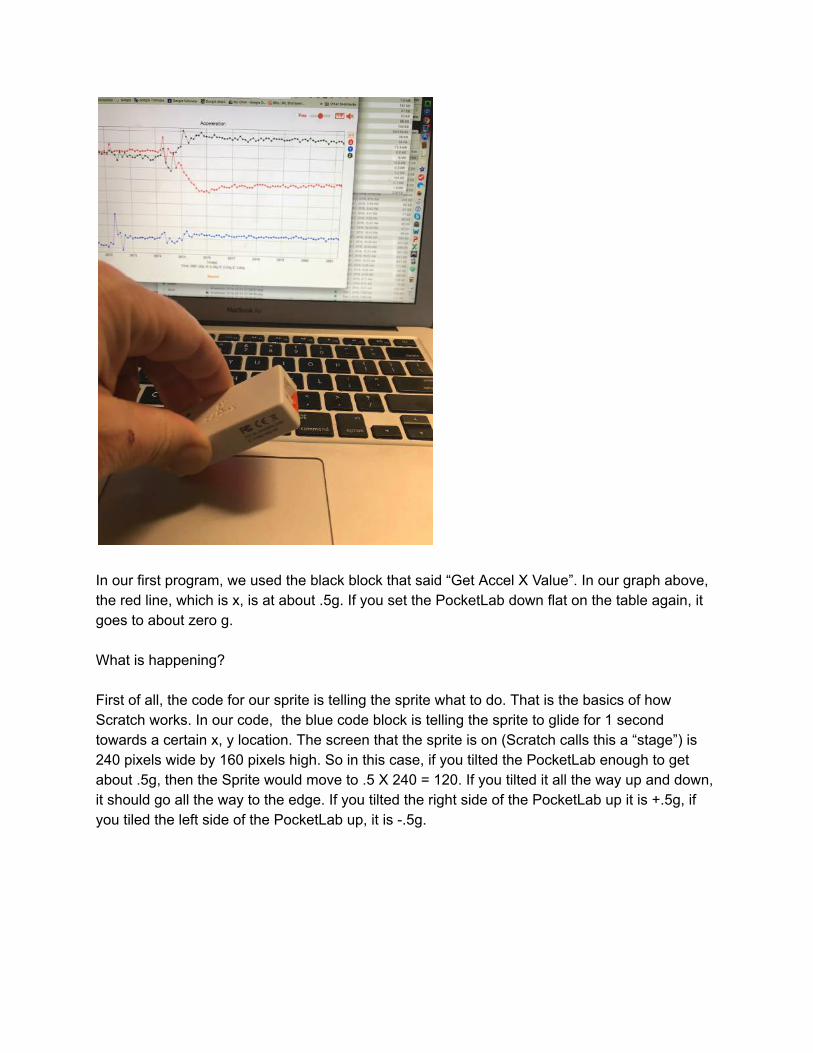
In our first program, we used the black block that said “Get Accel X Value”. In our graph above, the red line, which is x, is at about .5g. If you set the PocketLab down flat on the table again, it goes to about zero g. What is happening? First of all, the code for our sprite is telling the sprite what to do. That is the basics of how Scratch works. In our code, the blue code block is telling the sprite to glide for 1 second towards a certain x, y location. The screen that the sprite is on (Scratch calls this a “stage”) is 240 pixels wide by 160 pixels high. So in this case, if you tilted the PocketLab enough to get about .5g, then the Sprite would move to .5 X 240 = 120. If you tilted it all the way up and down, it should go all the way to the edge. If you tilted the right side of the PocketLab up it is +.5g, if you tiled the left side of the PocketLab up, it is .5g.

Let try to do the same for movement in the y direction. We can use the black block for Get Accel Y Value and multiply that by 160. The result looks like this:
Now if you tilt your PocketLab in both x and y directions, your sprite should be moving up, down, left, and right on the screen. Hopefully by now you can see the amazing potential. You have just made a simple wireless video game controller! You can play with this some more, for example, change the sign from 160 to 160 for the y direction and you will notice the sprite moves the opposite direction. You can also play around with the glide speed and try some other numbers, like 2, 10, 20, or even .2, .5 what happens? Which glide speed do you like the best? If you’ve made it this far, you are ready to jump into the Expert Guide. We are going to take our simple controller code blocks and make a really cool spaceship game. Time to start programming! Expert Guide Let’s just jump right in to it! Going to this link to open two browser windows, one for ScratchX and one for PocketLab: http://scratchx.org/?url=https://roozeboom.github.io/pocketlabscratchx/pocketlab_extension.js#scratch Go to this GitHub link and download the Space Blaster game <link>. Remember where you saved the file on your computer.

This is a ‘space blaster’ game, where you control the spaceship by tilting the PocketLab left, right, up, and down. It is using the same principle as the first code we wrote above, which uses the x and y axis accelerometer data to tell the sprite to move when you tilt the pocketlab. It also uses the z axes in a unique way to ‘shoot’ a projectile if you flip the PocketLab over quickly, the z axes changes polarity from + to , the code captures this and ‘shoots’ a ball. You have to be quick so that it doesn’t register on the x and y axes and make the spaceship move. It is a fun and challenging mechanic. To load and run the game: In the ScratchX window (after clicking “Continue”), go to File/Load Project, and load the Space Blaster game from where you saved it. Every time you reload the ScratchX program it will cause the PocketLab App window to refresh, and you may have to connect to your PocketLab again, it should just be one click in the PocketLab App window. Make sure the PocketLab is displaying the accelerometer data (x, y, and z axes). The default opening screen for PocketLab is the accelerometer set to g as units and a data rate of 10 points/sec. It is good to verify this, it will of course greatly affect the program. You can go to ScratchX and click on the flag to start the program. You should be able to use the PocketLab with the logo side facing up, and control the spaceship on the screen by tilting the PocketLab. The idea of the game is to avoid the planets! If you hit one, your spaceship will die. Your spaceship can “shoot” balls at the planets. You can do this by quickly flipping over the PocketLab upside down and then right back to rightside up. It has to be pretty fast, or it will trigger the y axes movement! This will shoot a ball and return to controlling the spaceship. (there is a video of this game here: <video link>) Note: As you may know if you have some programming experience, different computers have different processing power. This program is optimized to run well on an OSX Mac laptop. If you have more or less processing power, the program may be sluggish or hard to control. As you go through the program, look for settings that you can adjust, for example glide speed. It is good to change these anyway and see what happens to the program that is a very good way to learn how Scratch works. You can also adjust the data rate of your PocketLab on the PocketLab app window where it says “Freq”. Try various settings this is part of optimizing machine control. Let’s examine the program The main program controls the spaceship. Click on the Spaceship sprite:
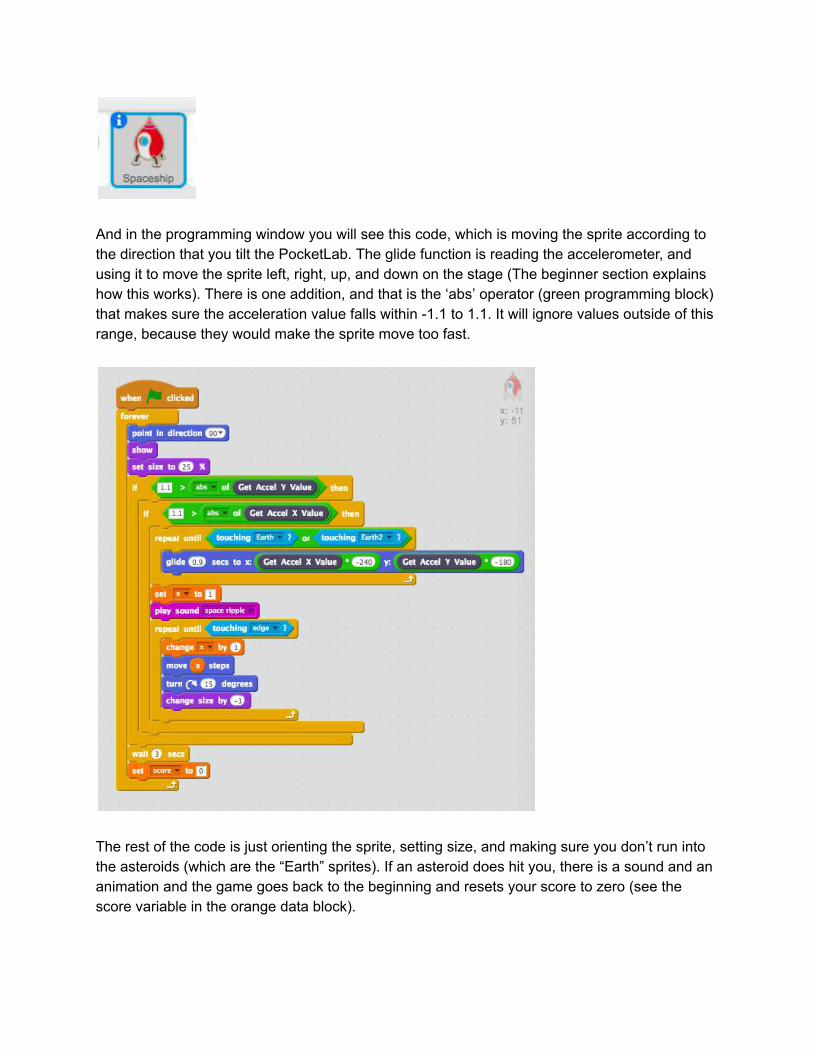
And in the programming window you will see this code, which is moving the sprite according to the direction that you tilt the PocketLab. The glide function is reading the accelerometer, and using it to move the sprite left, right, up, and down on the stage (The beginner section explains how this works). There is one addition, and that is the ‘abs’ operator (green programming block) that makes sure the acceleration value falls within 1.1 to 1.1. It will ignore values outside of this range, because they would make the sprite move too fast.
The rest of the code is just orienting the sprite, setting size, and making sure you don’t run into the asteroids (which are the “Earth” sprites). If an asteroid does hit you, there is a sound and an animation and the game goes back to the beginning and resets your score to zero (see the score variable in the orange data block).
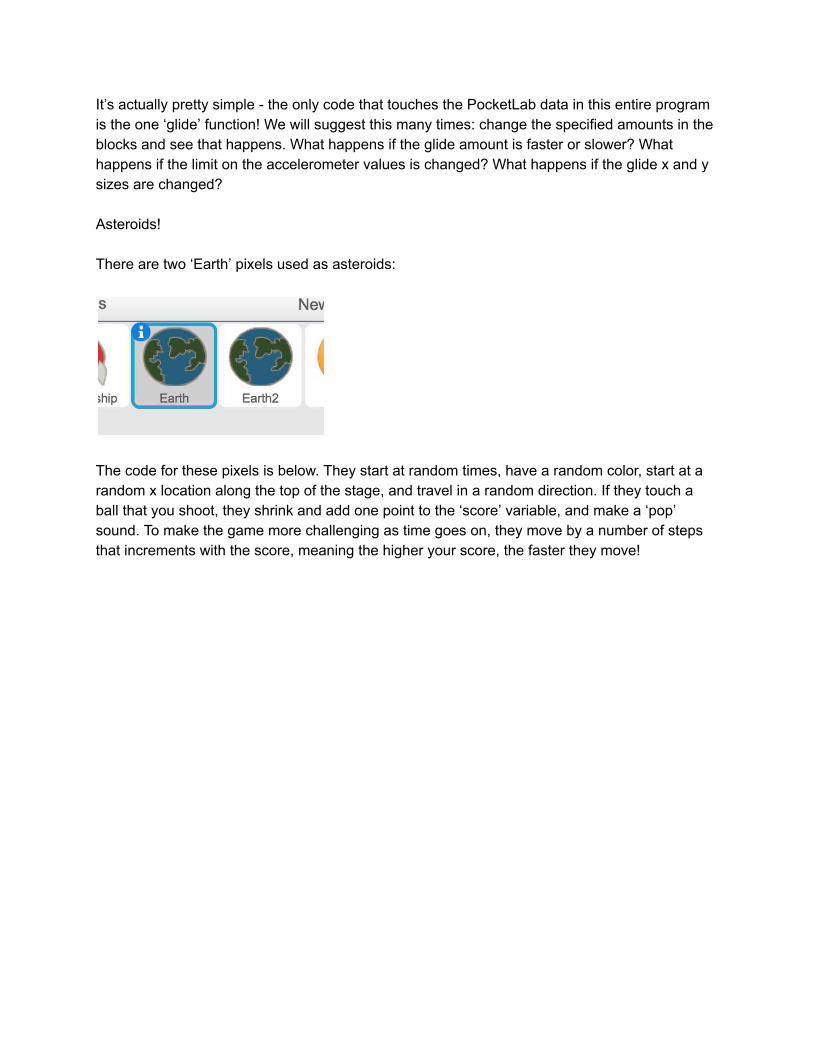
It’s actually pretty simple the only code that touches the PocketLab data in this entire program is the one ‘glide’ function! We will suggest this many times: change the specified amounts in the blocks and see that happens. What happens if the glide amount is faster or slower? What happens if the limit on the accelerometer values is changed? What happens if the glide x and y sizes are changed? Asteroids! There are two ‘Earth’ pixels used as asteroids:
The code for these pixels is below. They start at random times, have a random color, start at a random x location along the top of the stage, and travel in a random direction. If they touch a ball that you shoot, they shrink and add one point to the ‘score’ variable, and make a ‘pop’ sound. To make the game more challenging as time goes on, they move by a number of steps that increments with the score, meaning the higher your score, the faster they move!
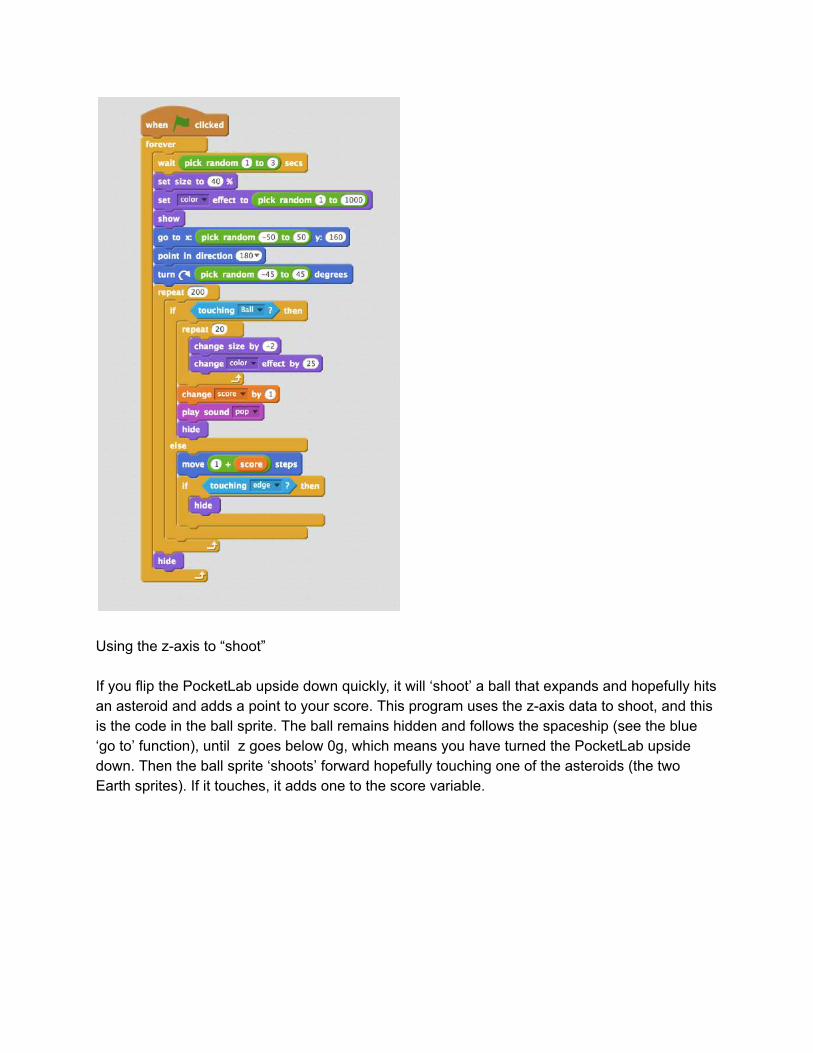
Using the zaxis to “shoot” If you flip the PocketLab upside down quickly, it will ‘shoot’ a ball that expands and hopefully hits an asteroid and adds a point to your score. This program uses the zaxis data to shoot, and this is the code in the ball sprite. The ball remains hidden and follows the spaceship (see the blue ‘go to’ function), until z goes below 0g, which means you have turned the PocketLab upside down. Then the ball sprite ‘shoots’ forward hopefully touching one of the asteroids (the two Earth sprites). If it touches, it adds one to the score variable.
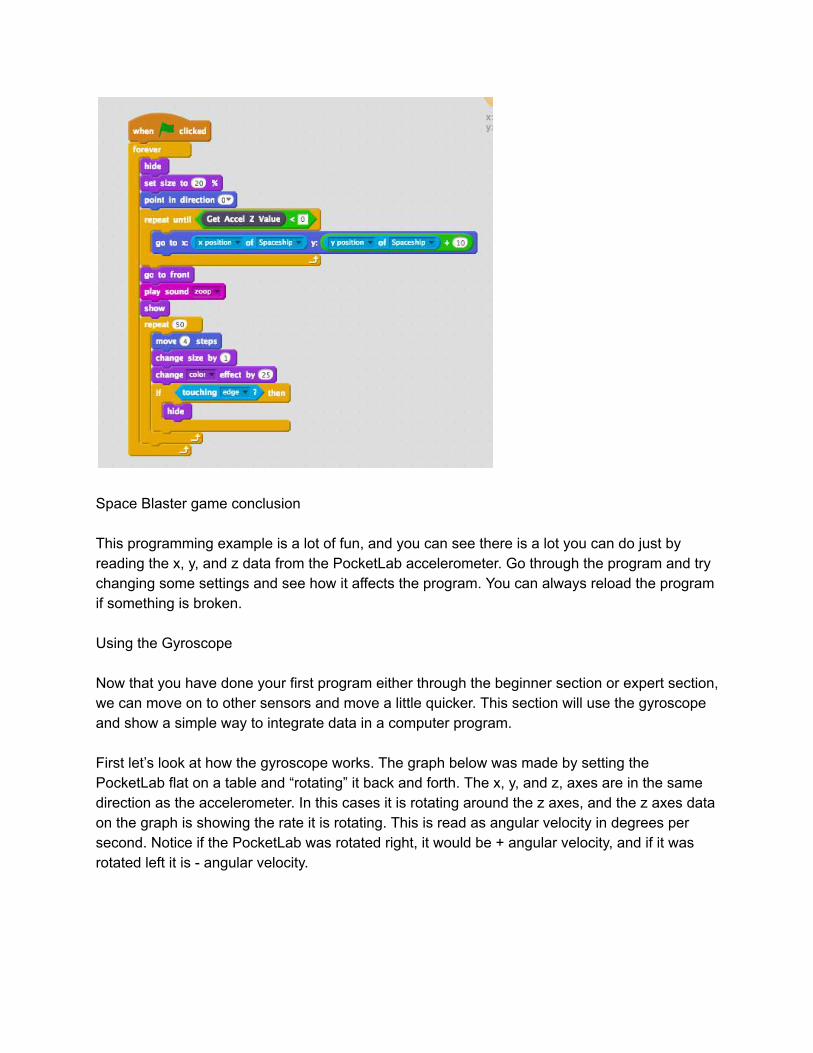
Space Blaster game conclusion This programming example is a lot of fun, and you can see there is a lot you can do just by reading the x, y, and z data from the PocketLab accelerometer. Go through the program and try changing some settings and see how it affects the program. You can always reload the program if something is broken. Using the Gyroscope Now that you have done your first program either through the beginner section or expert section, we can move on to other sensors and move a little quicker. This section will use the gyroscope and show a simple way to integrate data in a computer program. First let’s look at how the gyroscope works. The graph below was made by setting the PocketLab flat on a table and “rotating” it back and forth. The x, y, and z, axes are in the same direction as the accelerometer. In this cases it is rotating around the z axes, and the z axes data on the graph is showing the rate it is rotating. This is read as angular velocity in degrees per second. Notice if the PocketLab was rotated right, it would be + angular velocity, and if it was rotated left it is angular velocity.
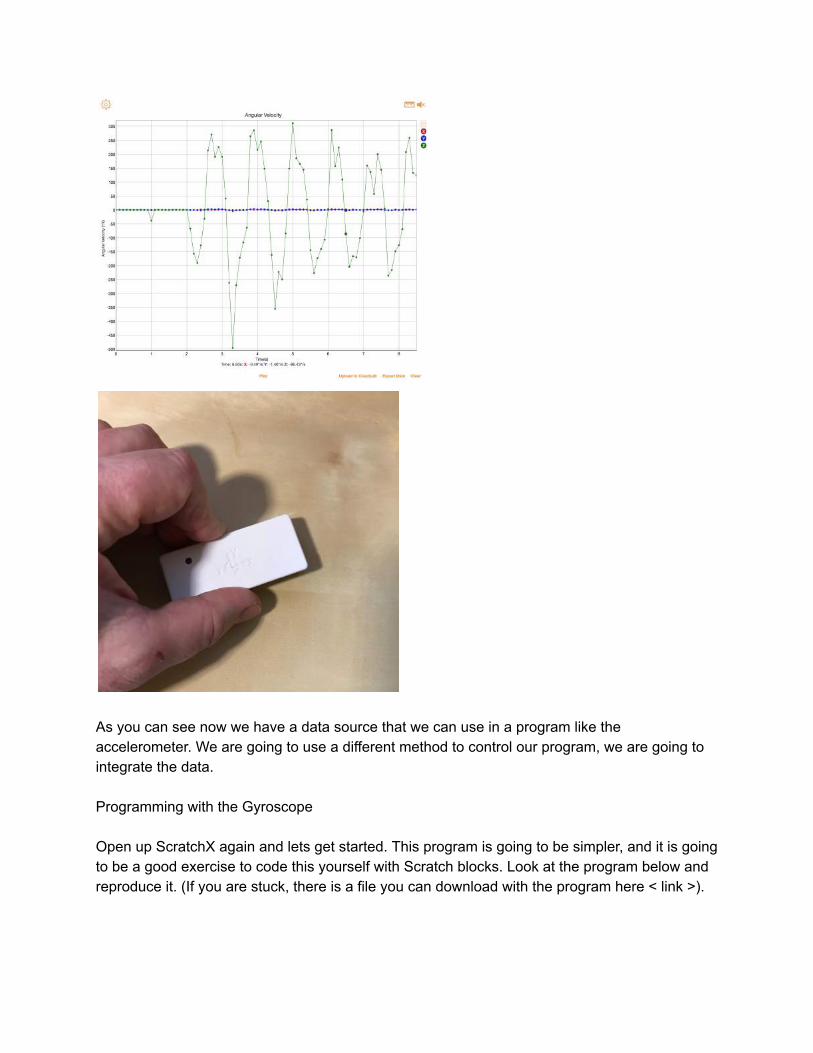
As you can see now we have a data source that we can use in a program like the accelerometer. We are going to use a different method to control our program, we are going to integrate the data. Programming with the Gyroscope Open up ScratchX again and lets get started. This program is going to be simpler, and it is going to be a good exercise to code this yourself with Scratch blocks. Look at the program below and reproduce it. (If you are stuck, there is a file you can download with the program here < link >).

Run the program, and set the PocketLab on a table with the white side and logo up, and rotate the PocketLab and see what happens to the ball. It should rotate left and right opposite of your hand movements. Notice that we are only reading the z axis gyroscope data, and there only needs to be two code blocks. The first one, ‘abs’ is causing the program to ignore any gyroscope readings less than 2 degrees per second. If you look at the graph below, you will notice that there is “noise” in the gyroscope. This is true of all sensors, no matter how good they are, there is always some degree of noise. An important programming concept is filtering, and in our case we are making a simple filter that ignores the noise. What happens if you take this out? What is the ball doing? The technical name for this is “drift”. Can you see why it is called drift?

Riemann Sum Integration The next concept we need to tackle is integration. Riemann sum integration sounds intimidating, but actually, it is one of the easiest ways to integrate. What is integration? We are finding the area underneath a curve. Before integration as an algebraic method was developed, a mathematician named Bernhard Reimann developed a way to do this using geometry, or shapes. Look at the curves below, and you can see the red rectangles fit under the curve. If we add the area of each rectangle, we will get the area under the curve. The smaller the rectangles, the better is our estimate of the area.

If we look at a close up of the gyroscope graph, we can see curves that we can integrate. When the PocketLab is rotated left and right, we get a curve that goes positive or negative as long as we continue moving the Pocketlab and then back to zero when we stop.
This small section of code below will perform a Riemann sum integration. In a simple sense, here is what Riemann sum integration is all about: The gyroscope data rate is set at 10 data points per second The gyroscope reads degrees per second Each time through the “forever” loop, the variable ‘Degrees’ is incremented by the gyroscope reading divided by 10 The sprite is pointed in the direction ‘Degrees’
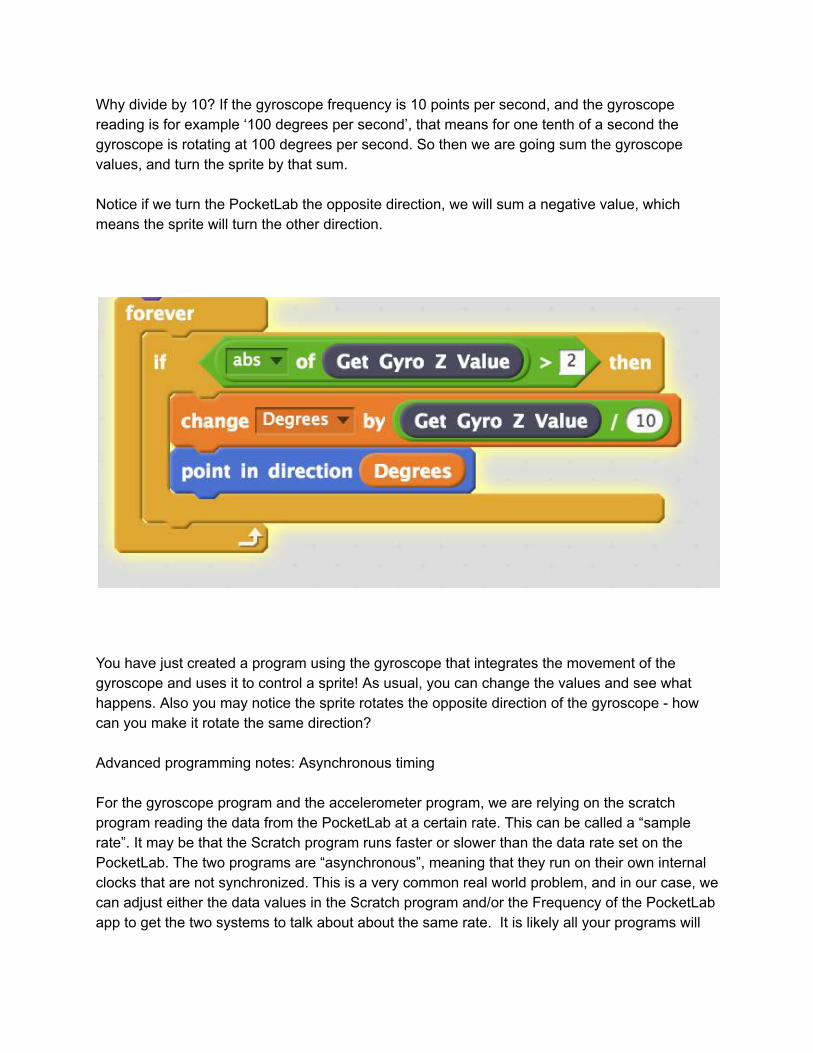
Why divide by 10? If the gyroscope frequency is 10 points per second, and the gyroscope reading is for example ‘100 degrees per second’, that means for one tenth of a second the gyroscope is rotating at 100 degrees per second. So then we are going sum the gyroscope values, and turn the sprite by that sum. Notice if we turn the PocketLab the opposite direction, we will sum a negative value, which means the sprite will turn the other direction.
You have just created a program using the gyroscope that integrates the movement of the gyroscope and uses it to control a sprite! As usual, you can change the values and see what happens. Also you may notice the sprite rotates the opposite direction of the gyroscope how can you make it rotate the same direction? Advanced programming notes: Asynchronous timing For the gyroscope program and the accelerometer program, we are relying on the scratch program reading the data from the PocketLab at a certain rate. This can be called a “sample rate”. It may be that the Scratch program runs faster or slower than the data rate set on the PocketLab. The two programs are “asynchronous”, meaning that they run on their own internal clocks that are not synchronized. This is a very common real world problem, and in our case, we can adjust either the data values in the Scratch program and/or the Frequency of the PocketLab app to get the two systems to talk about about the same rate. It is likely all your programs will
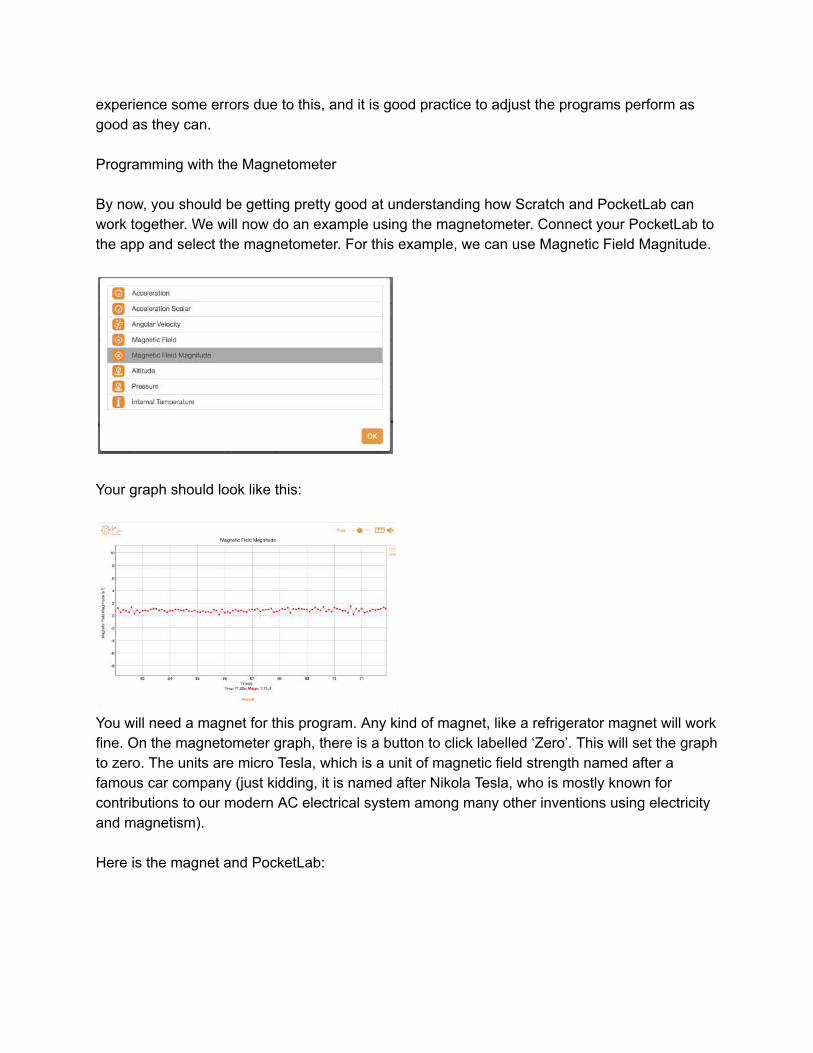
experience some errors due to this, and it is good practice to adjust the programs perform as good as they can. Programming with the Magnetometer By now, you should be getting pretty good at understanding how Scratch and PocketLab can work together. We will now do an example using the magnetometer. Connect your PocketLab to the app and select the magnetometer. For this example, we can use Magnetic Field Magnitude.
Your graph should look like this:
You will need a magnet for this program. Any kind of magnet, like a refrigerator magnet will work fine. On the magnetometer graph, there is a button to click labelled ‘Zero’. This will set the graph to zero. The units are micro Tesla, which is a unit of magnetic field strength named after a famous car company (just kidding, it is named after Nikola Tesla, who is mostly known for contributions to our modern AC electrical system among many other inventions using electricity and magnetism). Here is the magnet and PocketLab:

After pressing zero, bring the magnet close to the PocketLab, and you should notice a large change in the graph. The magnet I am using measures 200uT, so it has made the graph move from zero to 200 just by moving close to the magnet. We are going to use that change from zero to 200 to make a security system for a room. Tape the PocketLab to the top of a door, and tape the magnet on the door frame and close the door:
Create the code for this program in Scratch:

Zero your PocketLab graph, close the door, and run the Scratch program. Does the alarm go off when you open the door? If not, you should be able to troubleshoot this by now. How close is the magnet to the PocketLab when the door is closed? What does the magnetometer data say? How much does it change when you open the door? What value should go in the green block? For my program, I recorded the following graph. At about 4 seconds is when the door opened, and you can see the magnetometer value go from zero up to 56 and settle at 30 when the door is open. (The way to generate this graph is to click ‘Record’ in the PocketLab, open the door, then press ‘Stop’):
So a setting of 10 in the green operator block worked for my setting to detect whether the door was opened. Depending on the strength of your magnet and how close you tape the PocketLab to the door when closed, you may have to use a different number. This setting is referred to a “threshold”. When the magnetometer data goes above the threshold, it executes the code following the ‘then’ statement.

Last programming example: Barometric Pressure Let’s write one last program and use the pressure sensor in your PocketLab.
The barometric pressure sensor measures air pressure, and there are two functions. One is Altitude and the other is Pressure. Altitude is related to barometric pressure. The higher the altitude that you live, the lower the barometric pressure. This is because the column of air above you is smaller and therefore creates less pressure.
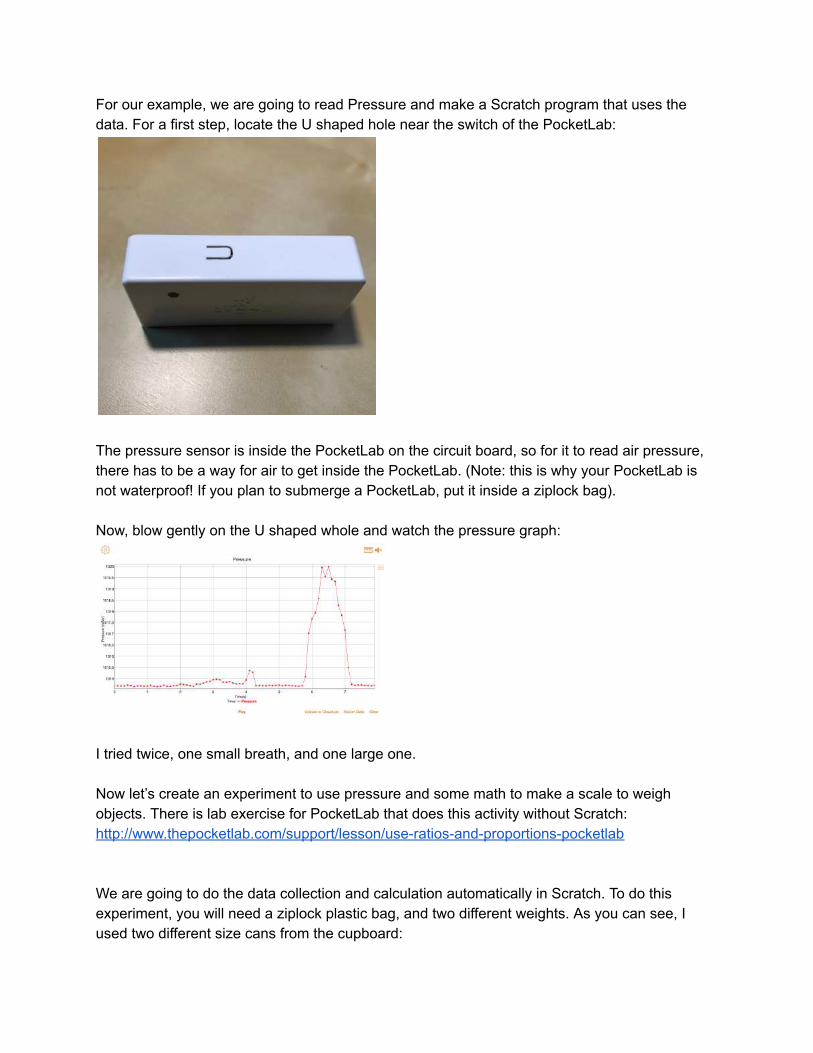
For our example, we are going to read Pressure and make a Scratch program that uses the data. For a first step, locate the U shaped hole near the switch of the PocketLab:
The pressure sensor is inside the PocketLab on the circuit board, so for it to read air pressure, there has to be a way for air to get inside the PocketLab. (Note: this is why your PocketLab is not waterproof! If you plan to submerge a PocketLab, put it inside a ziplock bag). Now, blow gently on the U shaped whole and watch the pressure graph:
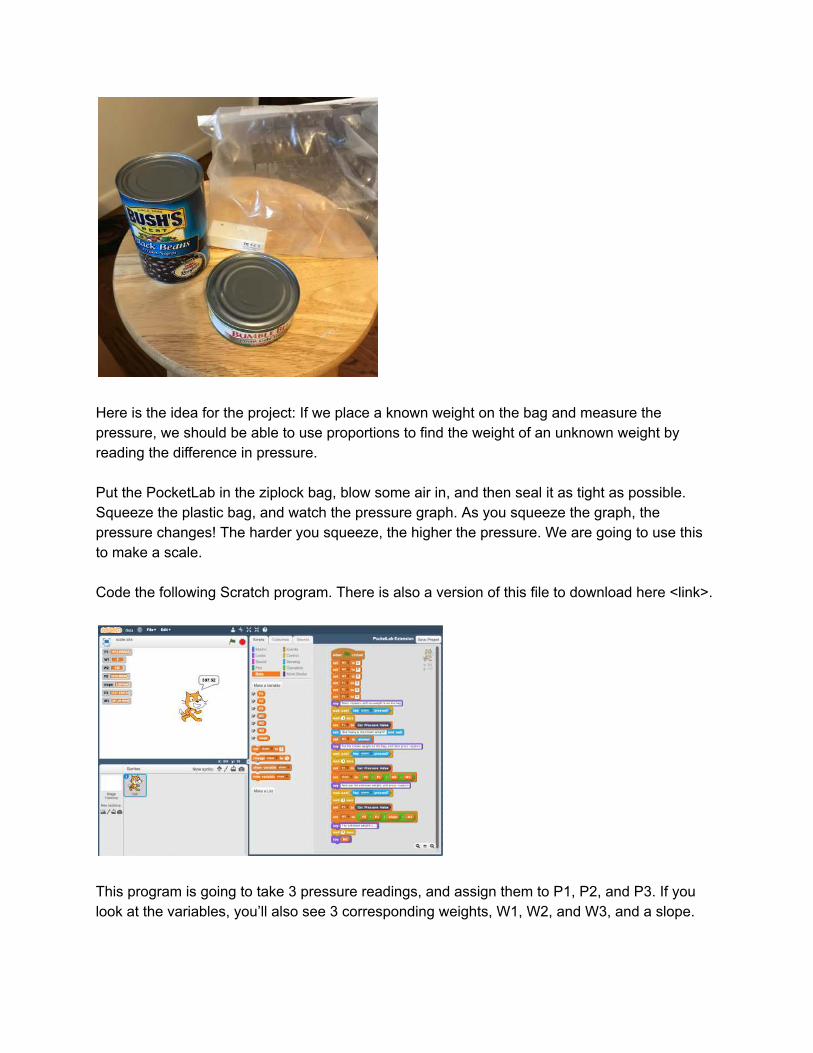
I tried twice, one small breath, and one large one. Now let’s create an experiment to use pressure and some math to make a scale to weigh objects. There is lab exercise for PocketLab that does this activity without Scratch: http://www.thepocketlab.com/support/lesson/useratiosandproportionspocketlab We are going to do the data collection and calculation automatically in Scratch. To do this experiment, you will need a ziplock plastic bag, and two different weights. As you can see, I used two different size cans from the cupboard:
Here is the idea for the project: If we place a known weight on the bag and measure the pressure, we should be able to use proportions to find the weight of an unknown weight by reading the difference in pressure. Put the PocketLab in the ziplock bag, blow some air in, and then seal it as tight as possible. Squeeze the plastic bag, and watch the pressure graph. As you squeeze the graph, the pressure changes! The harder you squeeze, the higher the pressure. We are going to use this to make a scale. Code the following Scratch program. There is also a version of this file to download here <link>.
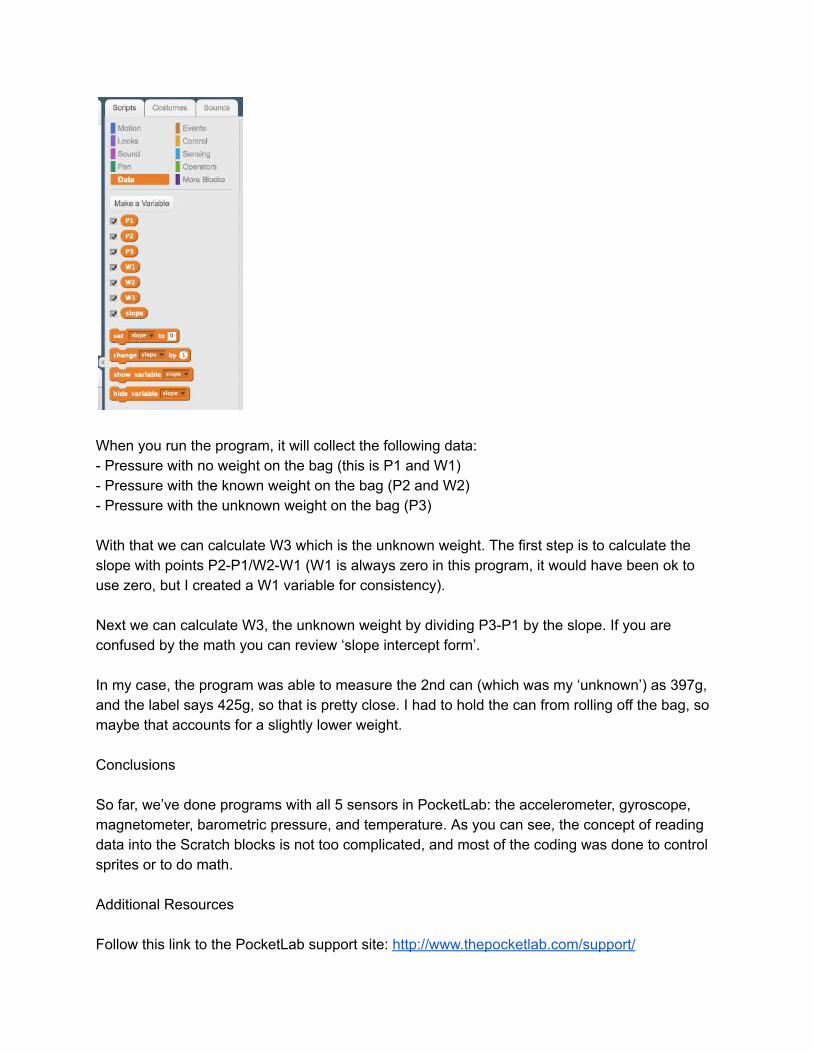
This program is going to take 3 pressure readings, and assign them to P1, P2, and P3. If you look at the variables, you’ll also see 3 corresponding weights, W1, W2, and W3, and a slope.
When you run the program, it will collect the following data: Pressure with no weight on the bag (this is P1 and W1) Pressure with the known weight on the bag (P2 and W2) Pressure with the unknown weight on the bag (P3) With that we can calculate W3 which is the unknown weight. The first step is to calculate the slope with points P2P1/W2W1 (W1 is always zero in this program, it would have been ok to use zero, but I created a W1 variable for consistency). Next we can calculate W3, the unknown weight by dividing P3P1 by the slope. If you are confused by the math you can review ‘slope intercept form’. In my case, the program was able to measure the 2nd can (which was my ‘unknown’) as 397g, and the label says 425g, so that is pretty close. I had to hold the can from rolling off the bag, so maybe that accounts for a slightly lower weight. Conclusions So far, we’ve done programs with all 5 sensors in PocketLab: the accelerometer, gyroscope, magnetometer, barometric pressure, and temperature. As you can see, the concept of reading data into the Scratch blocks is not too complicated, and most of the coding was done to control sprites or to do math. Additional Resources Follow this link to the PocketLab support site: http://www.thepocketlab.com/support/

Here you will find additional Scratch programs that you can download and run. Troubleshooting Follow this link to the PocketLab forum where there is a user’s guide and troubleshooting tips: http://www.thepocketlab.com/support/article/pocketlabscratchintegrationbeta For email support, you can contact support for PocketLab here: [email protected]