plato complete guide v1.1 - convert technologies · plato complete guide v1.1.1 entotem ltd. 4...
TRANSCRIPT
H O M E E N T E R T A I N M E N T R E -I M A G I N E D
Plato Complete Guide V1.1.1
Entotem Ltd Suite 3 Acorn Place Alfreton Road Derby: DE21 4AS
PLATO Complete Guide V1.1.1
Entotem Ltd. 1
PLATO Introduction
Congratulations on your purchase of PLATO!
PLATO is a highly capable product and will revolutionise the way you use entertainment
media in your home; consolidating all media access through one simple interface. This home
entertainment/media management system is designed and manufactured to the highest
specification and rigorously tested to ensure you enjoy many years of listening and viewing
pleasure.
Our vision is to bring harmony to your media. As such, its correct installation and operation
will have a major influence on the overall performance of your new set up. Please read the
contents of this manual thoroughly, as it will help you to understand your PLATO system
better.

PLATO Complete Guide V1.1.1
Entotem Ltd. 2
Contents
1. Before you begin ........................................................................................................................ 5
1.1. Safety First .................................................................................................................................. 5
1.1.1. Warnings and cautions ....................................................................................................... 5
1.1.2. Location of your Plato unit ................................................................................................. 6
1.1.3. Ventilation .......................................................................................................................... 6
1.1.4. Servicing ............................................................................................................................. 6
1.2. Unpacking your PLATO box ........................................................................................................ 7
1.3. Maintenance ............................................................................................................................... 7
2. Your PLATO Unit ......................................................................................................................... 8
2.1. Front Panel ................................................................................................................................. 9
2.2. Rear Panel ................................................................................................................................. 10
2.3. Connecting your PLATO ............................................................................................................ 11
2.3.1. Connecting to the mains supply....................................................................................... 11
2.3.2. Connecting your analogue inputs .................................................................................... 12
2.3.3. Connecting your digital inputs ......................................................................................... 12
2.3.4. Connecting to your Neutrik speakers .............................................................................. 13
2.3.5. Connecting to an external amplifier ................................................................................ 14
2.3.6. Connecting to a digital sound system .............................................................................. 14
2.3.7. Connecting to the internet directly via your home router .............................................. 15
2.3.8. Connecting to the internet via home plugs and mains wiring ......................................... 15
2.3.9. Connecting to your HDMI TV ........................................................................................... 16
2.3.10. Connecting to remote TVs and speakers ......................................................................... 16
2.4. Switching on your Plato unit and launching the Plato App ...................................................... 17
2.4.1. Switching off your Plato unit using the rear panel switch ............................................... 17
2.4.2. Switching off your Plato unit using the front panel on/off button .................................. 17
2.4.3. Switching on your Plato unit using the front panel On/Off button ................................. 17
3. The Plato Android App ............................................................................................................. 18
3.1. Using the touchscreen .............................................................................................................. 18
3.2. The Plato App Overview ........................................................................................................... 18
3.2.1. Selected Devices .............................................................................................................. 19
3.2.2. The Plato Main Drawer Feature Menu ............................................................................ 19
3.2.3. External Source ................................................................................................................ 20
3.2.4. Media Library ................................................................................................................... 20

PLATO Complete Guide V1.1.1
Entotem Ltd. 3
3.2.5. Internet Radio .................................................................................................................. 20
3.2.6. Playlist .............................................................................................................................. 20
3.2.7. Import/Export .................................................................................................................. 21
3.3. Exiting the Plato App ................................................................................................................ 22
3.4. Downloading the Plato Android app to your smartphone or tablet ........................................ 23
3.5. Updating your Plato App .......................................................................................................... 23
4. Configuring HDMI output options ............................................................................................ 24
5. Assigning external inputs .......................................................................................................... 25
5.1. Assigning a Turntable ............................................................................................................... 26
5.2. Assigning a CD Player ................................................................................................................ 27
5.3. Assigning other devices ............................................................................................................ 28
6. Configuring Inputs .................................................................................................................... 29
6.1. Generic Controls ....................................................................................................................... 29
6.2. Input Gain ................................................................................................................................. 29
6.3. Phono controls ......................................................................................................................... 30
6.3.1. MM/MC Select ................................................................................................................. 30
6.3.2. Input Resistance ............................................................................................................... 30
6.3.3. Input Capacitance ............................................................................................................ 30
6.3.4. Rumble Filter .................................................................................................................... 30
6.4. Record Controls ........................................................................................................................ 30
6.4.1. Record default setting ...................................................................................................... 30
6.4.2. Record Bit Depth .............................................................................................................. 31
6.4.3. Record Sample Rate ......................................................................................................... 31
7. Playing music from external inputs .......................................................................................... 32
8. Input Levels ............................................................................................................................... 34
8.1. Monitoring Input Levels ........................................................................................................... 34
8.2. Changing Input Gain settings. ................................................................................................... 35
9. Recording Music ....................................................................................................................... 36
10. Media Library ............................................................................................................................ 37
10.1. Playing music from your Library ............................................................................................... 37
10.2. The Play Queue ......................................................................................................................... 38
10.3. Now Playing in Media Library ................................................................................................... 39
10.4. Using Search ............................................................................................................................. 39
11. Internet Radio ........................................................................................................................... 40

PLATO Complete Guide V1.1.1
Entotem Ltd. 4
11.1. Saving radio stations to your PRESETS list ................................................................................ 41
11.2. Listening to your saved radio stations ...................................................................................... 42
12. Playlists ..................................................................................................................................... 43
12.1. To create a Playlist from the Media Library ............................................................................. 43
12.2. To add more songs to an existing Playlist ................................................................................ 44
12.3. To Play a Playlist ....................................................................................................................... 44
13. Import/Export ........................................................................................................................... 45
13.1. To copy movies to your Plato unit ............................................................................................ 46
14. Streaming audio and video ....................................................................................................... 47
14.1. Streaming music out to remote wireless speakers .................................................................. 47
14.2. Watching and streaming video ................................................................................................. 48
14.2.1. To watch video from your Media Library......................................................................... 48
15. Additional Menu ....................................................................................................................... 49
15.1. Set friendly name ..................................................................................................................... 49
15.2. Media rescan ............................................................................................................................ 50
15.3. Media browse config ................................................................................................................ 50
15.4. Set Standby Timer .................................................................................................................... 51
15.5. Set record cache size ................................................................................................................ 51
15.6. About info ................................................................................................................................. 51
15.7. Gracenote EULA ........................................................................................................................ 52
15.8. Debug........................................................................................................................................ 52
15.9. Exit ............................................................................................................................................ 52
16. Advanced Media Library editing options .................................................................................. 53
16.1. Editing Artwork ......................................................................................................................... 54
16.2. Adjust start/end points of a track ............................................................................................ 55
16.3. Creating a missing track............................................................................................................ 56
16.4. Merging a fragmented album ................................................................................................... 58

PLATO Complete Guide V1.1.1
Entotem Ltd. 5
1. Before you begin
This product is designed to comply with the legal provisions of EU Directives 2006/95/EC,
2004/108/EC and 2011/65/EU. The standards which have been applied are those which were
in force at the time of the introduction of this product. This product bears the CE mark
This product must be earthed. Please ensure that other equipment connected to it is earthed
according to the manufacturer’s instructions.
1.1. Safety First
1.1.1. Warnings and cautions
Your PLATO unit operates from a fixed supply voltage which is marked on a label below the
mains inlet on the rear panel. Before connecting the mains lead please check that your mains
supply corresponds to this label as below:
230V Products: Voltage Range 220V-240V AC, 50Hz.
If you move to another area with a different mains voltage please contact your local
distributor to have your product converted.
Use only the mains lead supplied to connect your PLATO to the mains power socket. The
mains lead supplied has a moulded IEC connector which plugs into the IEC power inlet on the
unit’s rear panel. Keep the mains lead away from heat sources. Do not place a heavy object
on the mains lead. Do not modify the mains lead. Do not overload the mains socket. Do not
use a poor fitting mains socket. Do not use a damaged mains lead.
This product must be earthed and must be connected to a MAINS socket outlet with a
protective earthing connection. This product includes a MAINS switch that is located on
the rear of the unit, see the diagram in section 2.2.
Please ensure that other equipment connected to Plato is earthed according to the
manufacturer’s instructions.
The PLATO unit incorporates a mains fuse that is located on the rear panel, next to the AC
switch. This must only be replaced by a fuse of the type and rating as described on the
rating label on the rear panel of the unit. If in any doubt, consult a qualified electrician.
If the PLATO unit is likely to be unattended for some time, unplug it from the mains supply.
Disconnect the PLATO unit from the mains supply before you connect or disconnect any
equipment from the unit’s rear panel. Make sure all electrical connections are properly
made.

PLATO Complete Guide V1.1.1
Entotem Ltd. 6
1.1.2. Location of your Plato unit
Your PLATO unit should be situated in a well ventilated area.
Your PLATO unit should be situated on a hard surface such as a strong shelf or open support
cabinet.
Your PLATO unit should not be situated in a closed cabinet.
Your PLATO should be kept away from sources of heat, dust, humidity and from direct
sunlight.
Ensure there is a minimum of 10cms (4 inches) of ‘free space’ all the way around the PLATO
unit.
Do not expose your PLATO to rain or moisture, this unit must not be exposed to dripping
or splashing water.
Do not place objects filled with liquid such as vases on top of or above the unit.
Never allow liquids or other objects to fall into the unit.
Your PLATO unit should not be placed directly on top of or underneath another unit.
Do not use your PLATO unit outdoors.
Your Plato unit is designed to be operated at an ambient temperature of 10C to 35C.
No naked flame sources, such as lighted candles should be placed on the unit.
1.1.3. Ventilation
Your PLATO unit includes slots and openings in the cabinet to provide ventilation. These
openings should not be blocked or covered.
Do not place your PLATO unit on soft furnishings, carpets or any other surface likely to
hinder normal ventilation.
Do not allow curtains, tablecloths newspapers or other similar items to block the ventilation
slots.
Never insert any items into the ventilation openings.
1.1.4. Servicing
This unit contains no user serviceable parts.
DO NOT attempt to service it yourself. Never remove any covers from the PLATO unit.
There are no user serviceable parts inside but there are high voltage live parts. Remember
that contact with AC mains can be lethal or can cause an electric shock.
Unauthorised servicing will render the warranty void. Refer all servicing to qualified service
personnel.

PLATO Complete Guide V1.1.1
Entotem Ltd. 7
1.2. Unpacking your PLATO box
Included in the packing of your PLATO system you will find:
Main Box
Plato Unit
1 x Mains lead
1 x HDMI Cable
Quick Start Guide (Includes Safety Instructions)
Optional Accessories Box (Based on Pre-Installation Check List and additional costed
requirements)
Neutrik Speaker Cables (customer to specify required length.)
Home Plug/s (customer to specify required type & number.)
Ethernet Cables (customer to specify required number & length.)
1.3. Maintenance
After disconnecting the PLATO unit from the mains supply, the casing and front panel may be
cleaned with a lightly dampened soft cloth or chamois leather. Avoid using abrasives or
solvents.

PLATO Complete Guide V1.1.1
Entotem Ltd. 8
2. Your PLATO Unit
PLATO integrates with traditional Hi-Fi components (CD player, Turntable, Tape Deck) via
analogue or digital inputs connected to the PLATO pre-amplifier, which can be accessed at
the rear of the unit. PLATO can connect to your home/office network and is therefore able to
access audio/video content that may exist on other uPnP (Universal Plug and Play) servers
connected ton that network.
The PLATO system elements are:
Integrated Pre-amplifier including:
• 4 Analogue Inputs
• 4 Digital Inputs
• 1 Analogue Output
• 2 Digital Outputs
Integrated Stereo Power Amplifier
Internal Hard Drive
Digital to Analogue Convertor Module (DAC)
Analogue to Digital Convertor Module (ADC)
A touch screen control panel (front panel)
Neutrik Audio Loud Speaker Connectors (rear panel)
A USB Interface (front panel)
Power on/off button (rear panel)
System start up/shut down button (front panel)
HDMI output, network connectivity, and USB interfaces for additional storage
Android PLATO Control App

PLATO Complete Guide V1.1.1
Entotem Ltd. 9
2.1. Front Panel
Item No Item Description
1 Android Display A touchscreen display and app controller to operate your Plato unit.
2 System On/Off Button To switch your Plato unit to standby mode.
3 USB Connector To connect a USB stick to transfer movies and other media files.

PLATO Complete Guide V1.1.1
Entotem Ltd. 10
2.2. Rear Panel
No Item Description
1 Mains Power Input To connect you power lead (supplied).
2 Mains Power Switch To switch on your unit.
3 Earth Point To earth external inputs (required for turntables, check with manufacturer’s details for other inputs).
4 Analogue Inputs 4 Analogue inputs. AUX/Phono reserved for a turntable.
5 Pre Amp To connect to external amplifier and speaker system.
6 Digital Inputs To connect 1 x Optical + 1 x Coaxial Digital Inputs.
7 Digital Outputs To connect to external digital systems.
8 Neutrik Speaker Outputs To connect to your speakers.
9 USB Connections To connect additional USB storage
10 HDMI Output To connect to TV.
11 Ethernet Network To connect your home router.
12 Debug Reserved.

PLATO Complete Guide V1.1.1
Entotem Ltd. 11
2.3. Connecting your PLATO
2.3.1. Connecting to the mains supply
You must not plug your Plato unit into the mains until you have connected your Plato unit
to the other equipment in your system.
Your Plato unit operates with 230V 50Hz mains supplies. Do not connect it to a DC or any
other supply.
Insert the 3-way connector on the supplied mains lead into the mains connector on the rear
panel of your Plato unit before you insert the plug into the mains supply.
Connect the plug on the other end of the mains lead into the mains socket outlet (and then
switch it on, if there is a switch by the mains wall socket).
The only way to disconnect your Plato unit from the mains is to remove the mains lead plug
from the mains socket. Therefore you must install your Plato unit near to the mains outlet
socket which should be easily accessible.
Whenever you disconnect your Plato unit from the main supply, always remove the mains
lead from the mains outlet socket before you remove the 3-way connector from the rear
panel of your Plato unit.
If you are in any doubt about the mains lead, its plug or its connection, consult a competent
electrician.

PLATO Complete Guide V1.1.1
Entotem Ltd. 12
2.3.2. Connecting your analogue inputs
You can connect many audio devices to your Plato system using either digital or analogue
inputs.
In the example shown below, a turntable, a CD player and a cassette player are connected
via the analogue inputs.
The input to the right on the rear panel is labelled ‘AUX/Phono’ and is reserved for a
turntable/record player input. If connecting a turntable to this input, you must also add an
earth connection from the turntable to the Plato unit.
2.3.3. Connecting your digital inputs
Some inputs may use digital instead of analogue inputs.
There are four digital input connectors on the rear panel of your Plato unit.
One is coaxial and three are optical. Select the appropriate connector for your digital input.
Note: Turntables
require additional earth
connection to earth
point on the Plato rear
panel.

PLATO Complete Guide V1.1.1
Entotem Ltd. 13
2.3.4. Connecting to your Neutrik speakers
This connection only applies to Plato models with an integrated power amplifier.
For models without this option, see following section 2.3.5: ‘Connecting to external
amplifier’.
For best results use equal length speaker cable for both left and right outputs
Neutrik cables are included with additional accessories pack.
Connect both left and right speaker to the rear of your Plato unit using the Neutrik
connector.
To connect, align the connector grooves and turn clockwise to lock in place.
The connection to your speaker will vary according to speaker type. See typical types of
speaker connections below.
PLATO Complete Guide V1.1.1
Entotem Ltd. 14
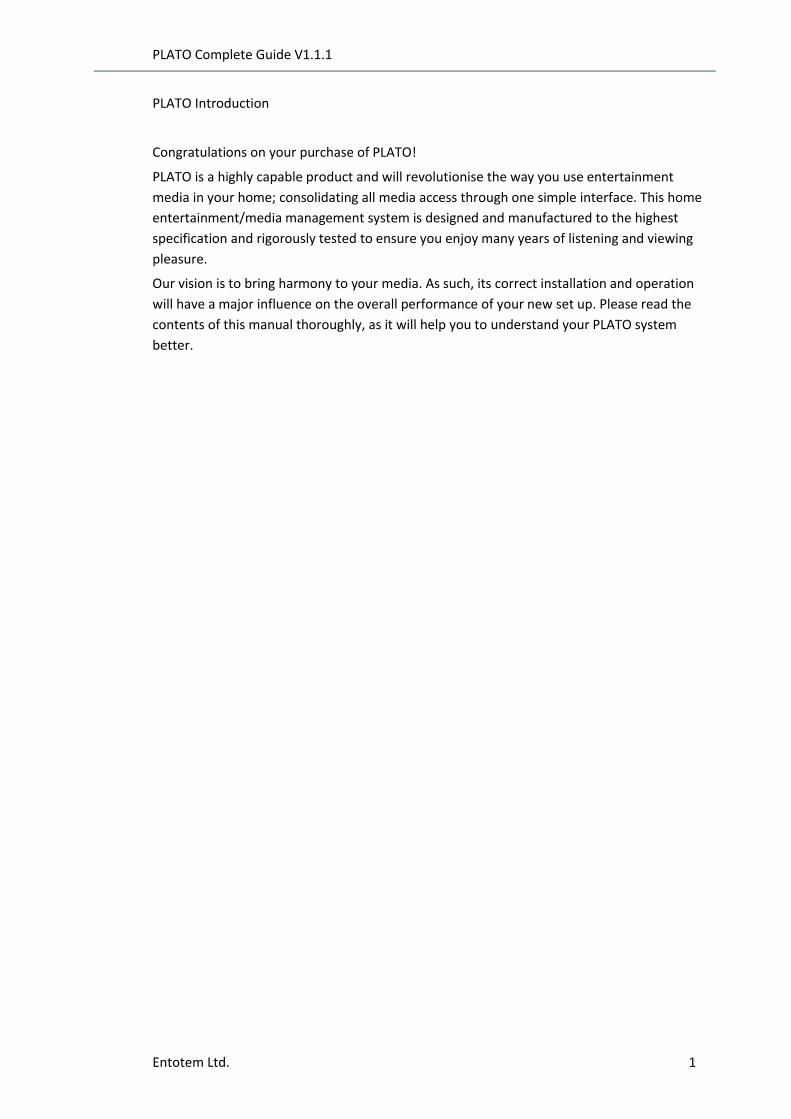
2.3.5. Connecting to an external amplifier
This applies for Plato models without the integrated power amplifier option.
Use Phono cables from the Pre Out connections on the rear of the Plato unit to connect to
an external amplifier and speaker system.
2.3.6. Connecting to a digital sound system
You can also connect directly to an external digital sound type system.
PLATO Complete Guide V1.1.1
Entotem Ltd. 15
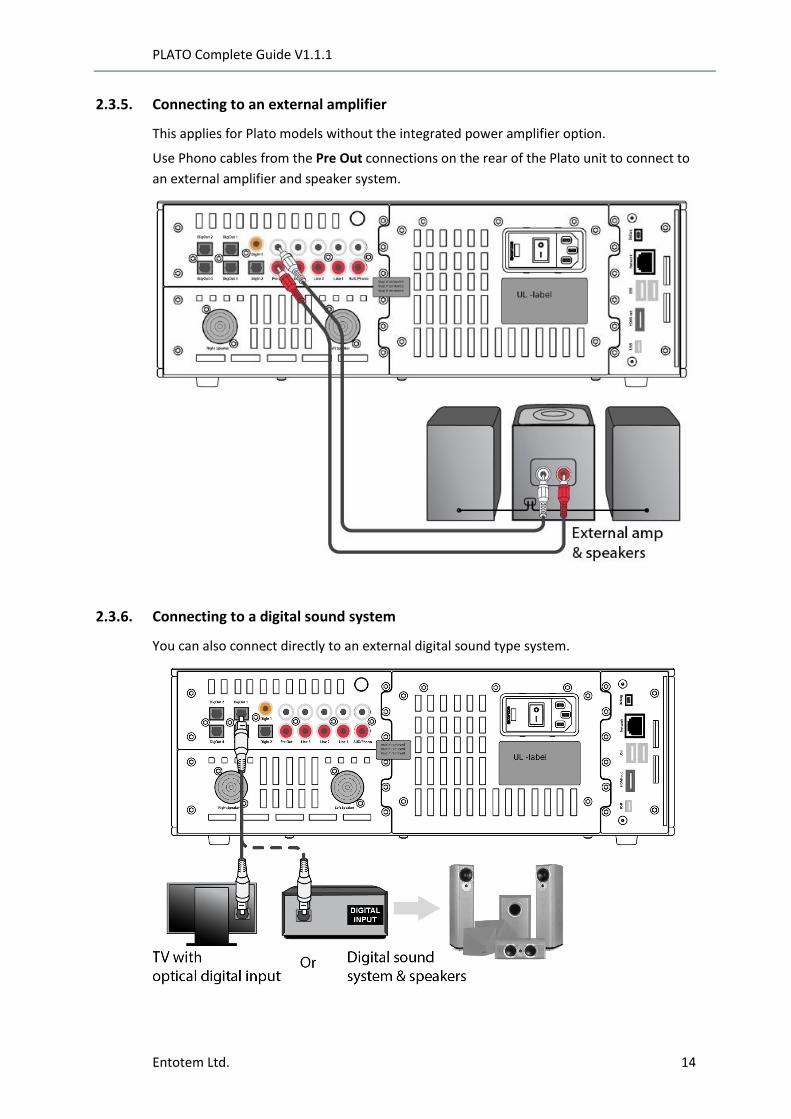
2.3.7. Connecting to the internet directly via your home router
To use all the functions of your Plato unit, an internet connection is required.
The best option is to connect directly to your home router via an Ethernet cable.
See connection diagram below. Note that your home router and its connections will vary
according to the specific router and type of internet connection.
2.3.8. Connecting to the internet via home plugs and mains wiring
If it is not possible to connect directly to your home router, you can use ‘Home Plug’
connectors. These allow Ethernet transmission through your mains wiring.
See connection diagram below for typical connection.
Always check information provided with your ‘Home Plug’ equipment.
PLATO Complete Guide V1.1.1
Entotem Ltd. 16
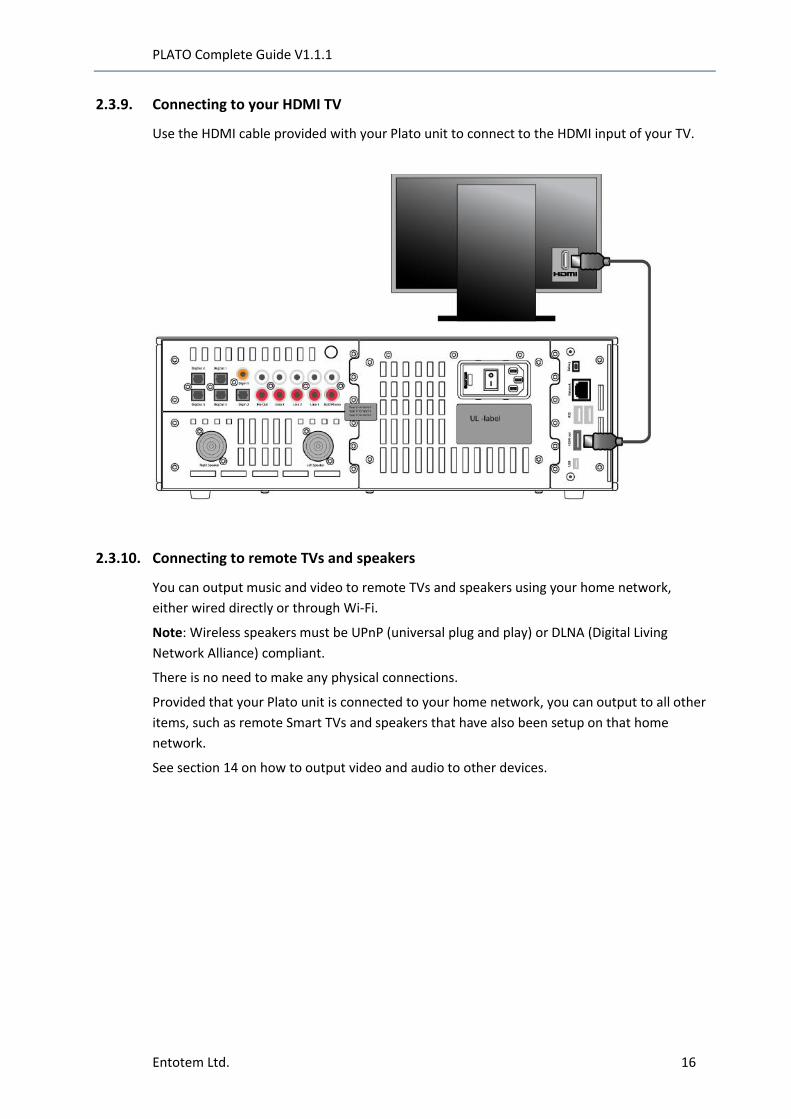
2.3.9. Connecting to your HDMI TV
Use the HDMI cable provided with your Plato unit to connect to the HDMI input of your TV.
2.3.10. Connecting to remote TVs and speakers
You can output music and video to remote TVs and speakers using your home network,
either wired directly or through Wi-Fi.
Note: Wireless speakers must be UPnP (universal plug and play) or DLNA (Digital Living
Network Alliance) compliant.
There is no need to make any physical connections.
Provided that your Plato unit is connected to your home network, you can output to all other
items, such as remote Smart TVs and speakers that have also been setup on that home
network.
See section 14 on how to output video and audio to other devices.
PLATO Complete Guide V1.1.1
Entotem Ltd. 17
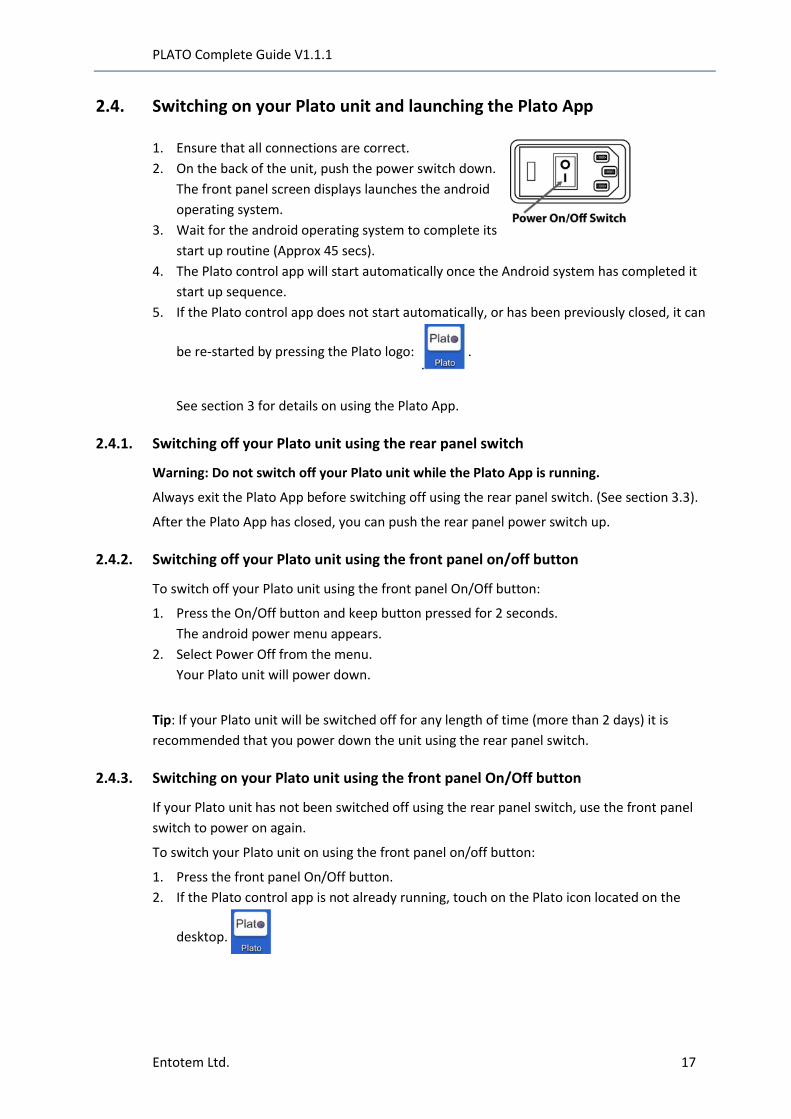
2.4. Switching on your Plato unit and launching the Plato App
1. Ensure that all connections are correct.
2. On the back of the unit, push the power switch down.
The front panel screen displays launches the android
operating system.
3. Wait for the android operating system to complete its
start up routine (Approx 45 secs).
4. The Plato control app will start automatically once the Android system has completed it
start up sequence.
5. If the Plato control app does not start automatically, or has been previously closed, it can
be re-started by pressing the Plato logo: .
.
See section 3 for details on using the Plato App.
2.4.1. Switching off your Plato unit using the rear panel switch
Warning: Do not switch off your Plato unit while the Plato App is running.
Always exit the Plato App before switching off using the rear panel switch. (See section 3.3).
After the Plato App has closed, you can push the rear panel power switch up.
2.4.2. Switching off your Plato unit using the front panel on/off button
To switch off your Plato unit using the front panel On/Off button:
1. Press the On/Off button and keep button pressed for 2 seconds.
The android power menu appears.
2. Select Power Off from the menu.
Your Plato unit will power down.
Tip: If your Plato unit will be switched off for any length of time (more than 2 days) it is
recommended that you power down the unit using the rear panel switch.
2.4.3. Switching on your Plato unit using the front panel On/Off button
If your Plato unit has not been switched off using the rear panel switch, use the front panel
switch to power on again.
To switch your Plato unit on using the front panel on/off button:
1. Press the front panel On/Off button.
2. If the Plato control app is not already running, touch on the Plato icon located on the
desktop.
PLATO Complete Guide V1.1.1
Entotem Ltd. 18
3. The Plato Android App
3.1. Using the touchscreen
Throughout this manual, specific terms are used that refer to actions used with the
touchscreen display.
Term Meaning Physical Action
Select To select an item or menu option Touch briefly on the item or menu on the touchscreen display.
Long Press To access additional options for that item or menu option
Touch and hold on the item or menu on the touchscreen display.
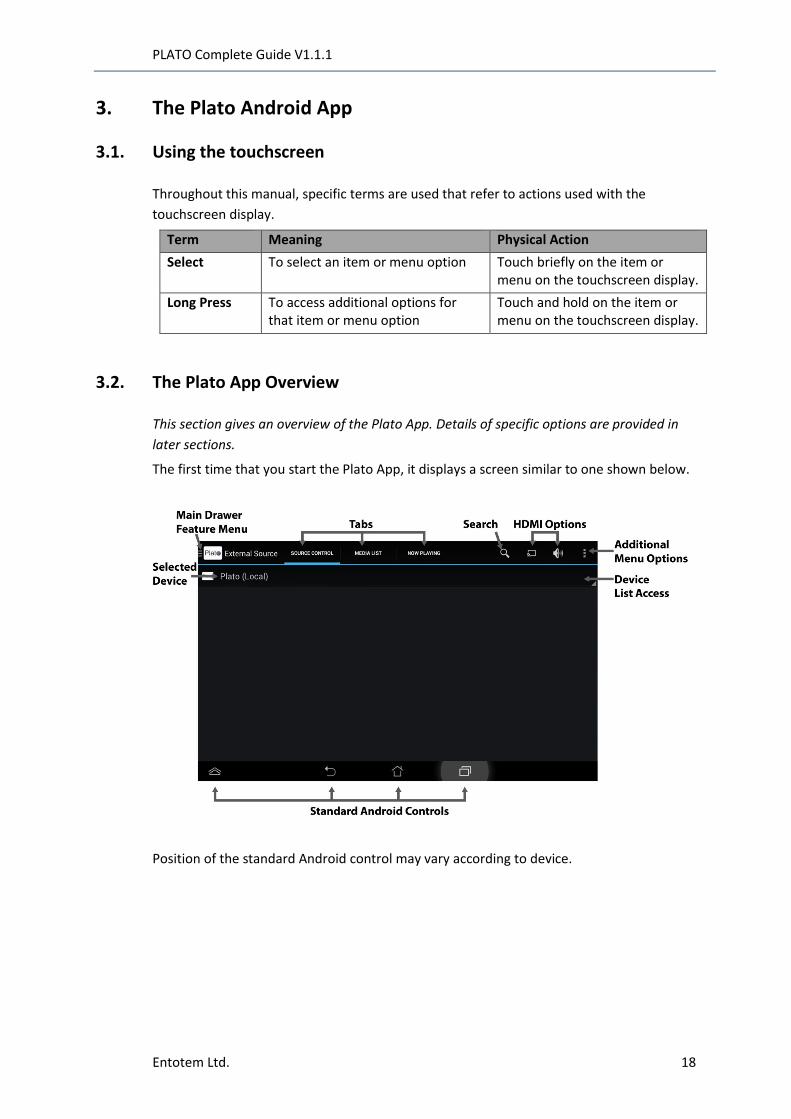
3.2. The Plato App Overview
This section gives an overview of the Plato App. Details of specific options are provided in
later sections.
The first time that you start the Plato App, it displays a screen similar to one shown below.
Position of the standard Android control may vary according to device.

PLATO Complete Guide V1.1.1
Entotem Ltd. 19
3.2.1. Selected Devices
Select anywhere in the Device List Access bar to display available devices.
After an initial scan of devices, the Plato App lists all UPnP devices available on the network
in the drop down list box. The list will show all UPnP servers or renderers available
depending on the TAB visible at the time. This may include remote speakers, TVs, other Plato
units, or tablets/smartphones/PCs that are running 3rd party UPnP services.
The device that is running the Plato App always has (Local) displayed after its name. By
default the Plato app assigns the name ‘Plato’ on startup, although it is possible (and indeed
preferable) to modify the name of each unit to make it easier to determine which device you
are connecting to.
Details on how to change this name, and to output music and video to other devices listed is
provided in later sections.
3.2.2. The Plato Main Drawer Feature Menu
Select the Plato logo in the top left hand corner of the display.
The Main Drawer Feature Menu is displayed.
The Main Feature Drawer provides access to Plato’s individual operations.
For each Feature the name of the tabs at the top of the screen may vary, although the
general tab structure is always the same.
Generally the left tab is for configuration, the middle tab is a history timeline, and the right
tab shows the current status. This is always labelled the NOW PLAYING tab, and shows what
is currently playing on the selected device, with media controls to allow play/pause/volume
control etc. Specific media controls may vary depending on which feature is selected.

PLATO Complete Guide V1.1.1
Entotem Ltd. 20
3.2.3. External Source
Use External Source to configure your inputs and then select an input to play music from.
The Tabs for External Source are:
SOURCE CONTROL
• Select and configure external pre-amplifier inputs on the selected device.
MEDIA LIST
• History of tracks that have been played or recorded on an external input.
NOW PLAYING
3.2.4. Media Library
Use Media Library to access your media files stored on the selected server.
The Tabs for Media Library are:
LIBRARY
• Browse all media on the selected device.
PLAY QUEUE
• A list of tracks that have either been played or are queued up to play.
NOW PLAYING
3.2.5. Internet Radio
Use Internet Radio to listen to online radio stations. You can save your favourite station as a
preset.
The Tabs for Internet Radio are:
STATIONS
• Browse all stations in different categories and genres. Use to find stations.
PRESETS
• Lists saved stations.
NOW PLAYING
3.2.6. Playlist
Use Playlist to access stored playlists on the selected device.
The Tabs for Playlists are:
PLAYLISTS
• Lists all your playlists stored on the selected device.
PLAYLIST
• Shows media items in selected playlist.
NOW PLAYING

PLATO Complete Guide V1.1.1
Entotem Ltd. 21
3.2.7. Import/Export
Use to import or export media files.
See section 13 for full details.
The Tabs for Import/Export are:
FILE MANAGER
• Lists folders to copy media to and from.
CONFIGURE
• Reserved for future use.
NOW PLAYING
PLATO Complete Guide V1.1.1
Entotem Ltd. 22
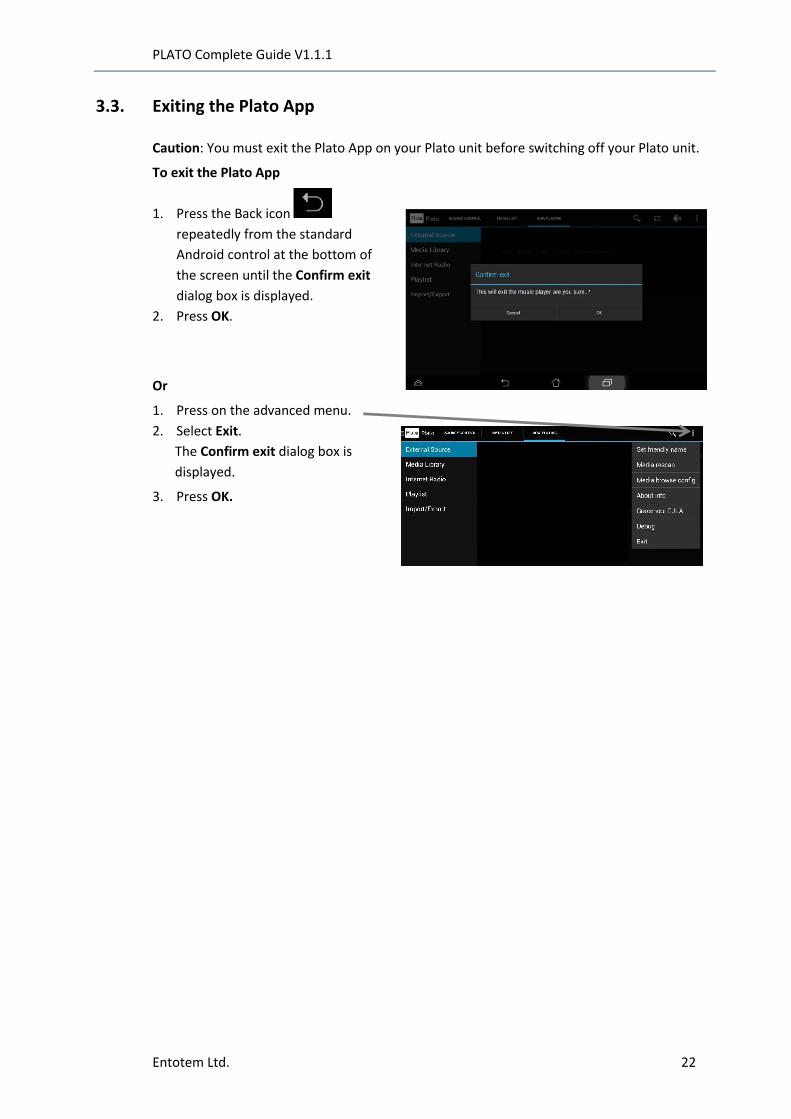
3.3. Exiting the Plato App
Caution: You must exit the Plato App on your Plato unit before switching off your Plato unit.
To exit the Plato App
1. Press the Back icon
repeatedly from the standard
Android control at the bottom of
the screen until the Confirm exit
dialog box is displayed.
2. Press OK.
Or
1. Press on the advanced menu.
2. Select Exit.
The Confirm exit dialog box is
displayed.
3. Press OK.
PLATO Complete Guide V1.1.1
Entotem Ltd. 23
3.4. Downloading the Plato Android app to your smartphone or tablet
You can use an android tablet or smartphone as a ‘remote controller’ for your Plato unit.
You can download the Plato App at www.entotem.com
This site contains the latest manuals, guides and application build versions (the Plato App)
To download the Plato App
1. Select the latest Plato App from the list.
This will have ‘(.apk)’ at the end to indicate that it is an Android application.
2. Select the attached ‘apk’ file.
The file downloads to your device.
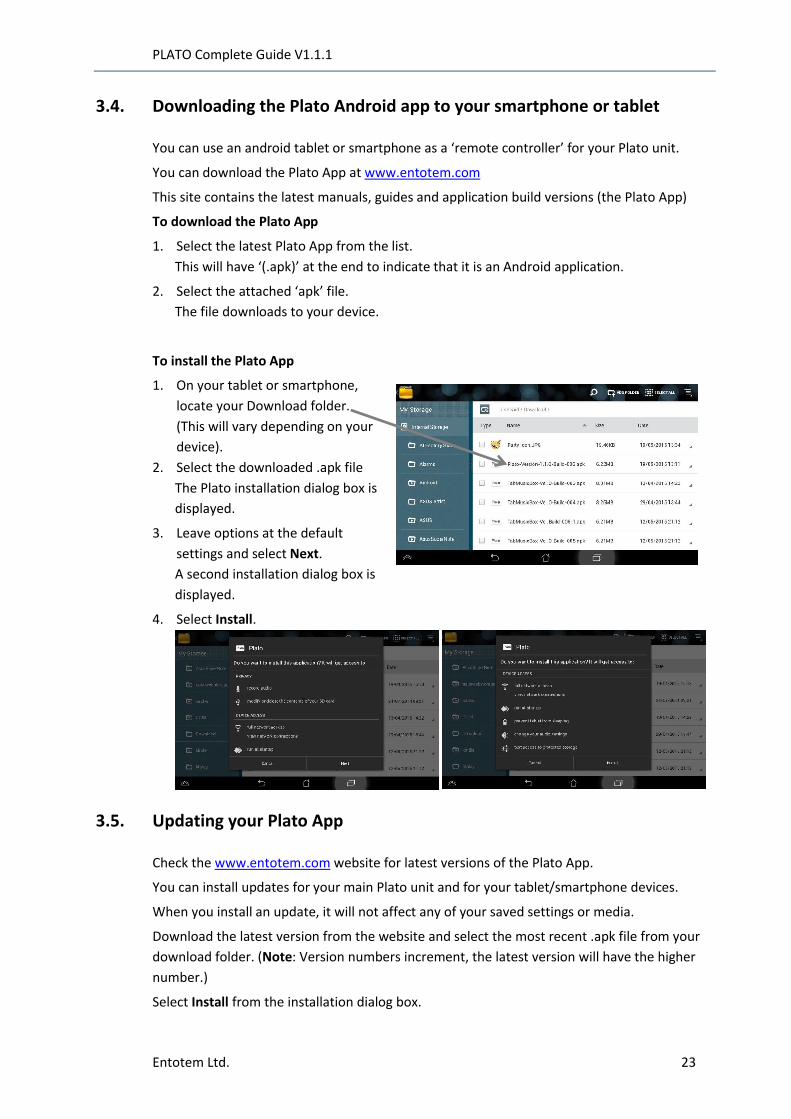
To install the Plato App
1. On your tablet or smartphone,
locate your Download folder.
(This will vary depending on your
device).
2. Select the downloaded .apk file
The Plato installation dialog box is
displayed.
3. Leave options at the default
settings and select Next.
A second installation dialog box is
displayed.
4. Select Install.
3.5. Updating your Plato App
Check the www.entotem.com website for latest versions of the Plato App.
You can install updates for your main Plato unit and for your tablet/smartphone devices.
When you install an update, it will not affect any of your saved settings or media.
Download the latest version from the website and select the most recent .apk file from your
download folder. (Note: Version numbers increment, the latest version will have the higher
number.)
Select Install from the installation dialog box.

PLATO Complete Guide V1.1.1
Entotem Ltd. 24
4. Configuring HDMI output options
There are two settings to configure audio and video data sent to the HDMI output.
This applies to your Plato device only (this option is not available on tablets/smartphones
running the Plato App).
Before changing these settings, check that your HDMI device is correctly connected to your
Plato unit. See section 2.3.9 for connection details.
There are two HDMI output icons on the top right of
the screen one for video and one for audio:
Before changing these settings, decide how you want to display the Plato screen information,
and where you want the sound output to come from when playing video output.
For HDMI video, you have the option to mirror the Plato touchscreen (including menu
controls) to the connected HDMI device, or to operate in video mode where only the video
data is sent to the connected HDMI device.
For audio you have the option to either route the audio through the Plato power amplifier to
the connected speakers, or route through the HDMI for playback on the connected HDMI
device.
To configure HDMI video outputs
1. Press on the HDMI Video icon.
The screen shown right is displayed.
2. Select Mirror on HDMI to have all
screen images from the Plato touch
screen display ‘mirrored’ on to the
HDMI TV.
Or
Select Video only on HDMI for the
HDMI TV to only display selected video
output (during playback of imported
movies and video clips).
To configure HDMI audio outputs
1. Press on the HDMI Audio icon.
The screen shown right is displayed.
2. Select route audio to HDMI to
mute the audio output from your Plato
speakers and direct audio to the
connected HDMI device.
Or
Select route audio to Speaker to use
the speakers connected to the rear
panel of your Plato unit.

PLATO Complete Guide V1.1.1
Entotem Ltd. 25
5. Assigning external inputs
To view your inputs, select External Source from the Main Drawer Feature Menu.
When you use your Plato unit for the first time, all the inputs are unassigned.
Before assigning the inputs, check that all the input devices (turntables, CD players etc.) are
connected correctly. Make a note of what device you have connected to a specific input.
If connecting a turntable, it must be connected to the ‘AUX/Phono’ input.
To assign and configure each input, Long Press (press and hold) the icon corresponding to
the input you would like to modify.
For each input you can assign a suitable icon and name. You can also make changes to the
configuration settings.
When you assign an input, there are also configuration menus and options for each input
device.
Tip. Do not change configuration settings until you have:
Checked any recommended settings provided for that specific device.
Played music through that input device and checked the gain levels.
See section 7 & section 8 for full details.
PLATO Complete Guide V1.1.1
Entotem Ltd. 26
5.1. Assigning a Turntable
The turntable must be connected to the AUX/Phono input.
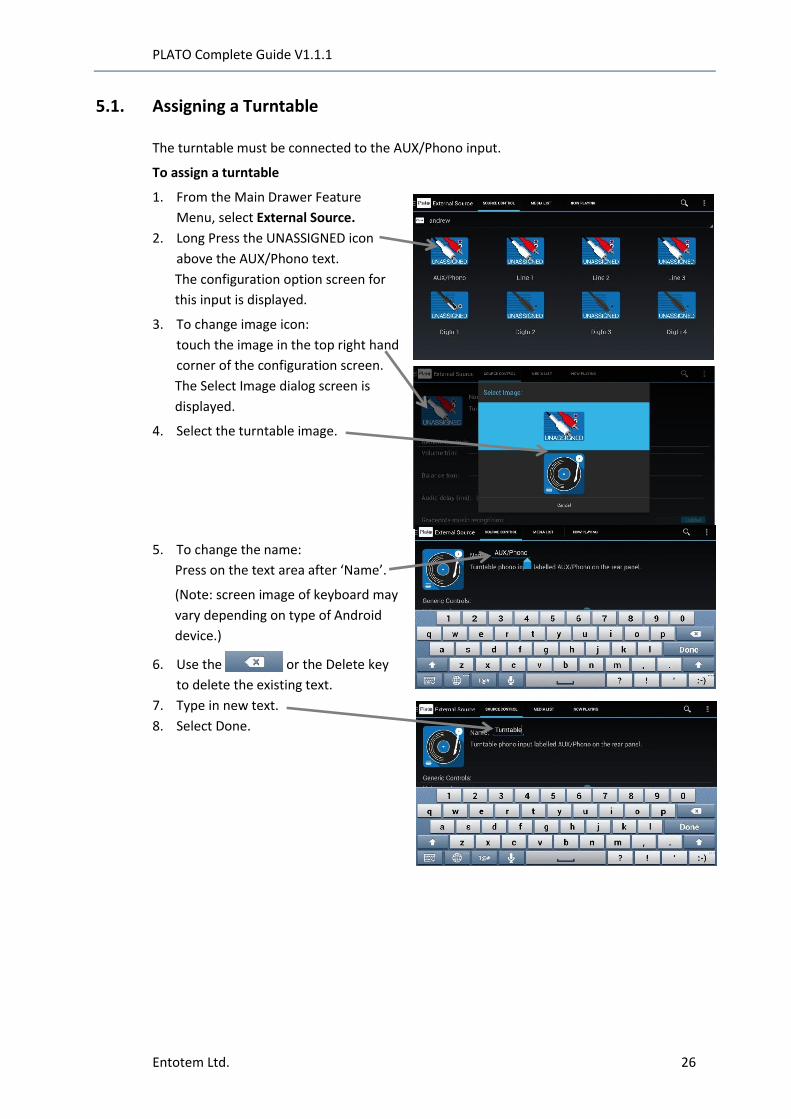
To assign a turntable
1. From the Main Drawer Feature
Menu, select External Source.
2. Long Press the UNASSIGNED icon
above the AUX/Phono text.
The configuration option screen for
this input is displayed.
3. To change image icon:
touch the image in the top right hand
corner of the configuration screen.
The Select Image dialog screen is
displayed.
4. Select the turntable image.
5. To change the name:
Press on the text area after ‘Name’.
(Note: screen image of keyboard may
vary depending on type of Android
device.)
6. Use the or the Delete key
to delete the existing text.
7. Type in new text.
8. Select Done.
PLATO Complete Guide V1.1.1
Entotem Ltd. 27
5.2. Assigning a CD Player
A CD player with analogue outputs can be connected to the Line 1, Line 2 or Line 3 input.
A CD player with digital outputs can be connected to either the coaxial or optical digital
input. Example below shows CD player connected to the Line 1 analogue input.
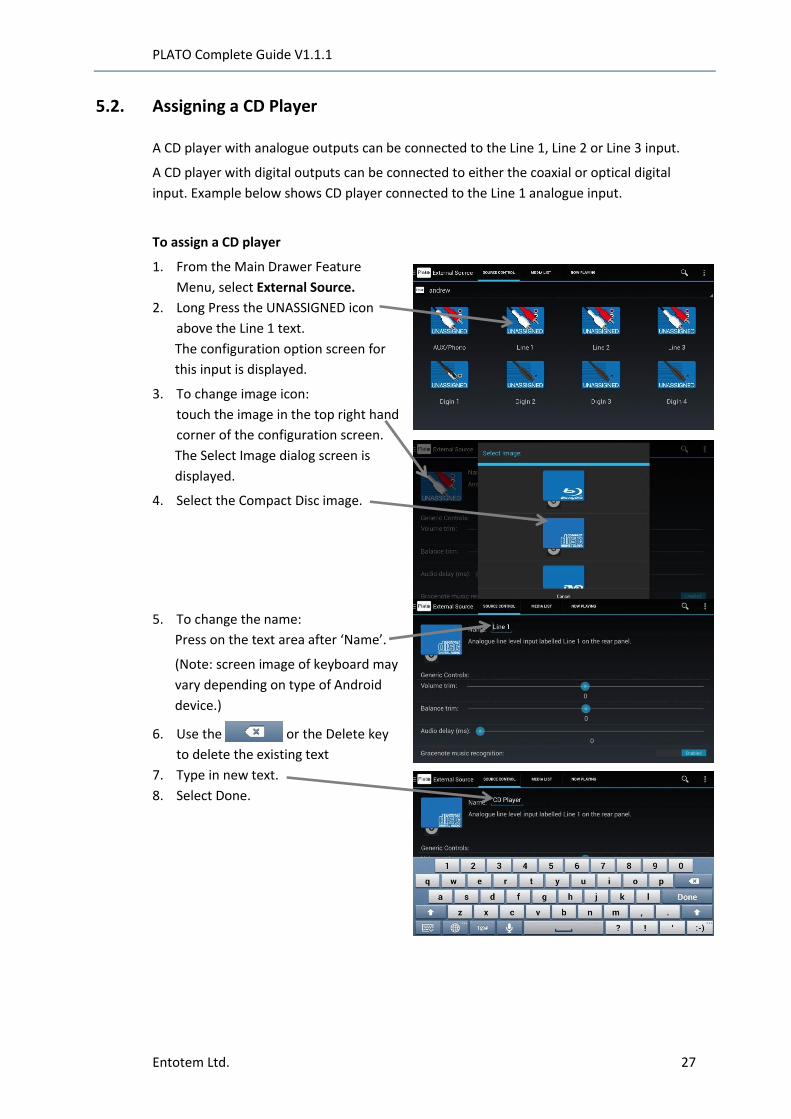
To assign a CD player
1. From the Main Drawer Feature
Menu, select External Source.
2. Long Press the UNASSIGNED icon
above the Line 1 text.
The configuration option screen for
this input is displayed.
3. To change image icon:
touch the image in the top right hand
corner of the configuration screen.
The Select Image dialog screen is
displayed.
4. Select the Compact Disc image.
5. To change the name:
Press on the text area after ‘Name’.
(Note: screen image of keyboard may
vary depending on type of Android
device.)
6. Use the or the Delete key
to delete the existing text
7. Type in new text.
8. Select Done.

PLATO Complete Guide V1.1.1
Entotem Ltd. 28
5.3. Assigning other devices
Continue to assign all your other input devices.
There are specific icons for all types of input devices that you can choose.
When finished, your will see all your configured devices displayed on your screen when you
select External Source from the Main Drawer Feature Menu.
A typical example is shown below.

PLATO Complete Guide V1.1.1
Entotem Ltd. 29
6. Configuring Inputs
6.1. Generic Controls
All input devices have the same generic controls. It is recommended to leave these settings
at their default values.
You have the option to change:
Volume trim: Applies a volume offset to this port, allows you to balance volume levels
across all the ports, adjusting for devices with differing output levels.
Balance trim: Adjusts left and right speaker balance for this port.
Audio delay: Applies a digital delay to the audio signal for lip-synching with external audio
processors.
Gracenote music recognition: can be Enable or Disabled. (Tip: leave as Enabled).
6.2. Input Gain
All input devices have a setting for Input Gain.
Before changing any Input Gain values, first play some music on the device and monitor the
gain levels before making any changes to the default settings.
See section 7 & section 8 for full details.

PLATO Complete Guide V1.1.1
Entotem Ltd. 30
6.3. Phono controls
There are additional settings that only apply to turntable input devices which must be
connected to the ‘AUX/Phono’ inputs.
Check with your turntable manufacturer’s details for appropriate setting for:
6.3.1. MM/MC Select
Choose MM for moving magnet or MC for moving coil cartridges.
6.3.2. Input Resistance
Input resistance is fixed at 47kR for MM sources, but selectable as 100R/200R for MC
sources.
6.3.3. Input Capacitance
Selectable as 100pf/200pF for MM and MC sources.
6.3.4. Rumble Filter
Applies a 14Hz cutoff frequency filter to reduce cone flap caused by warped records. Tip:
Disabling this filter may cause problems with silence detection during recording of this input
source.
6.4. Record Controls
The record controls provide some control over the digital recording for this input source.
6.4.1. Record default setting
Set to Enabled to activate recording whenever this source is selected. Leaving this set to
Disabled means recording must be started using the media controls on the Now Playing
screen.
PLATO Complete Guide V1.1.1
Entotem Ltd. 31
6.4.2. Record Bit Depth
Set the digital bit depth to 16/24 bits for all recordings on this source. 24 bit recordings will
give the best quality for analogue sources, but will also result in larger audio files.
6.4.3. Record Sample Rate
Select the required digital sampling rate for all recordings on this source. A higher sampling
rate will give the best quality, but will also result in larger audio files.

PLATO Complete Guide V1.1.1
Entotem Ltd. 32
7. Playing music from external inputs
Once all your music inputs and speaker or amplifier outputs have been connected and
assigned, you can easily start playing music from your complete collection of records, CDs,
cassette tapes or other media.
1. Select External Source from the
MAIN Plato menu.
2. Select a source by touching the
appropriate icon.
For example PHONO (your record
player), CD Player or Cassette
Player.
The selected input is highlighted.
In the example shown, this is the
CD Player.
3. Start playing music from the
selected source. For example press
‘Play’ on your cassette or CD player.
4. Select the NOW PLAYING tab to
display the screen below.
To adjust the volume, press and slide the Volume Control blue circle icon along the line until
the volume is at the desired level.
Plato’s music recognition software automatically detects the music being played and then
displays the appropriate ‘Album Cover Artwork’ plus the name of the song, album and artist
name. There will be a variable delay before this information appears depending on many
factors, such as the speed of the internet connection.

PLATO Complete Guide V1.1.1
Entotem Ltd. 33
The album artwork sometimes requires several attempts to return the correct image. This is
because the software takes into account consecutive tracks to ensure the correct album is
identified (‘Best of’ compilation albums can be very difficult in this respect). See section 0 to
change the Song Icon for saved/recorded music.
Note that Plato’s music recognition software requires an internet connection to return track
information.
If you want to record the selected music, check that Input Gain is centred to
approximately -6dB. See following section for details on how to adjust if required.

PLATO Complete Guide V1.1.1
Entotem Ltd. 34
8. Input Levels
8.1. Monitoring Input Levels
Now that you have your Plato system up and running, you can play music and save your
music collection to the internal Plato disk drive.
Tip: For optimum listening and recording quality, check that the peak gain levels do not peak
at over -6dB.
The input levels for both the left and right channels are displayed in the input level meter.
The input levels change as the music changes. The current input levels go higher when the
music is louder. The peak input level shows the highest input level reached during the
previous 20 seconds.
If the level peaks at 0dB, then the recording has been clipped, and this will lead to distortion
of the recorded track. This is shown by a red dot above the channel’s level meter. This clip
indicator dot stays visible until the Reset Clip button is pressed.
For optimum listening and recording quality, the level meters should be averaging at around
-6dB. This will ensure the full dynamic range of the ADC is achieved, without leading to
distortion due to clipping.
The peak input level will show spikes into yellow (-6 dB to -3 dB) and red (-3 dB to 0 dB)
regions to serve as a warning that clipping may be imminent, but no data will be lost until
clipping actually occurs.
If the levels are too low (too quiet) or are clipping, you should adjust the input gain up or
down using the appropriate ‘Source Configure’ controls to correct this, see section 8.2 on
advanced settings to make adjustments.
Peak input level
Current input level
PLATO Complete Guide V1.1.1
Entotem Ltd. 35
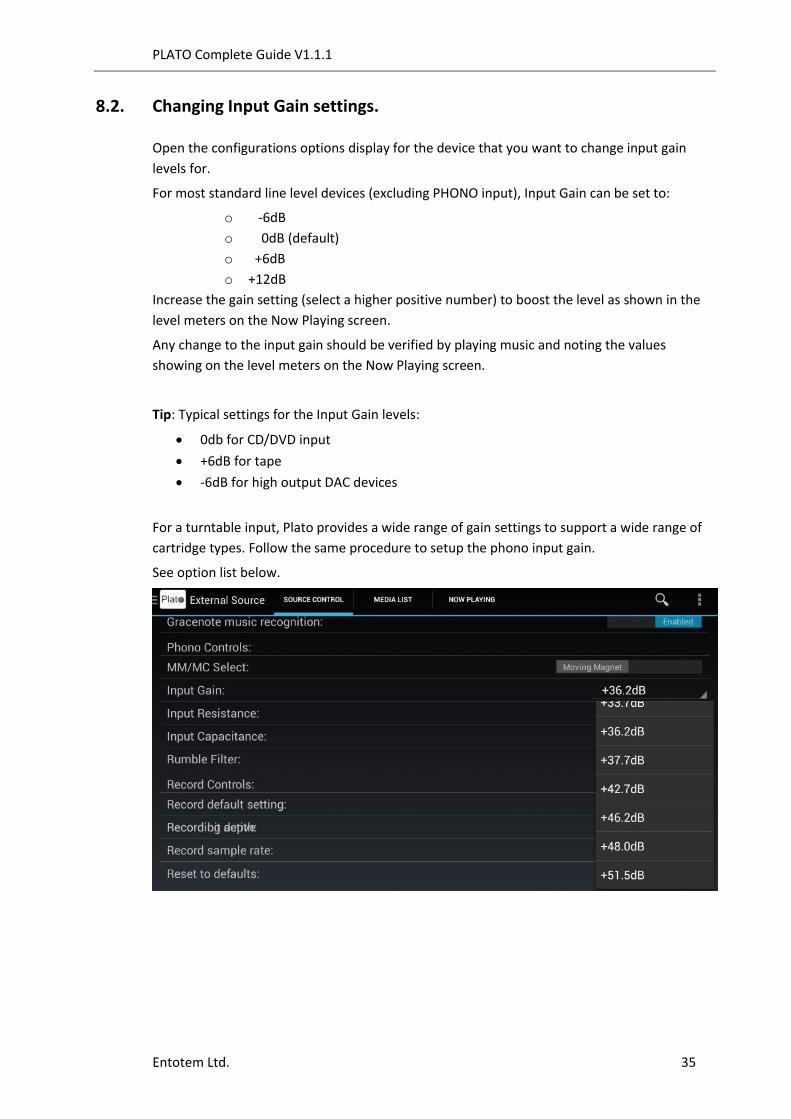
8.2. Changing Input Gain settings.
Open the configurations options display for the device that you want to change input gain
levels for.
For most standard line level devices (excluding PHONO input), Input Gain can be set to:
o -6dB
o 0dB (default)
o +6dB
o +12dB
Increase the gain setting (select a higher positive number) to boost the level as shown in the
level meters on the Now Playing screen.
Any change to the input gain should be verified by playing music and noting the values
showing on the level meters on the Now Playing screen.
Tip: Typical settings for the Input Gain levels:
0db for CD/DVD input
+6dB for tape
-6dB for high output DAC devices
For a turntable input, Plato provides a wide range of gain settings to support a wide range of
cartridge types. Follow the same procedure to setup the phono input gain.
See option list below.

PLATO Complete Guide V1.1.1
Entotem Ltd. 36
9. Recording Music
Once you are satisfied with the input level you can record your favourite music.
1. Select the music that
you want to record and
start playing it from the
external source.
2. Select the NOW
PLAYING screen.
3. Press the round red
Record button.
4. The red button changes
from being round to
square. This indicates
that Plato is recording
the music.
5. To stop recording, press
the red button again. It
changes back from
square to round.
If you forget to stop recording, Plato will automatically stop recording after approximately
3 minutes of silence.

PLATO Complete Guide V1.1.1
Entotem Ltd. 37
10. Media Library
Your Media Library includes all music that you have recorded, plus music, video and films
that you have imported.
You can view all your music by album or by artist by selecting the appropriate radio button
shown in the top right of the screen.
Video content is viewed by selecting the Video button.
10.1. Playing music from your Library
It is possible to descend the media hierarchy from artist-album-track by touching the
appropriate icon. At any point in the hierarchy you may also choose to play all the tracks
from that point in the hierarchy (e.g. all tracks by a certain artist, or all tracks on an album),
by long pressing the appropriate icon to show the ‘Play Now’ dialog box.
To listen to an album that you have recorded
or imported.
1. From the Main Drawer Feature Menu,
select Media Library.
2. Select Album in the option list in the top
right hand corner of the display.
3. Long Press your chosen album.
4. Select Play now from the listed options.
To listen to a specific song from an album.
You do not have to play a complete album
from the beginning.
Select your chosen album to display track list
of all the songs on the album.
You can then choose a specific song.
That song is then highlighted.
The song name is displayed in the Play option
list.
You can select:
Play now Inserts this track (or tracks) after the current playing track in the play queue, and begins to play the selected song immediately.
Play next Inserts this track (or tracks) after the current playing track, and begins playing once the current playing track has finished.
Add to queue Add this track (or tracks) to the end of the play queue.
Add to Playlist Adds the song to a play list. See section 12.
Edit Allows editing of META data tags on this track (or tracks).
See section 16 for details.

PLATO Complete Guide V1.1.1
Entotem Ltd. 38
10.2. The Play Queue
Select PLAY QUEUE tab to see what songs
have played and which are queued to
play.
For example, if you have selected an
album to play, you will see all the songs
on that album listed in order.
If you want to change the order of the
songs, or delete songs that you no longer
wish to play select Edit.
Select the song that you want to move in
the playing order or delete.
If you want to delete that song from the
play list, select the ‘trashcan’ icon to the
right of the song title.
If you want to change where the selected
song is played, you can drag the song up
or down the list to a new position.
First select the background of the track
you wish to move, its background colour
will change. Now slide your finger up or
down to alter the position in the list.
When you have finished making
changes to the Play Queue, select Done.
Whilst in Edit mode, you have the option
to clear the complete Play Queue by selecting Clear All in the top right hand corner of the
display.
When your selected music has started playing, you can go back and view your Media Library
to select more music to put into your Play Queue.
To save selections of music into Playlists, see section 12.

PLATO Complete Guide V1.1.1
Entotem Ltd. 39
10.3. Now Playing in Media Library
You can also modify the current playing track
from the Now Playing screen.
The media controls include scan
forward/backward controls to scroll through
the current track; and skip controls to move to
the previous/next track in the play queue.
You can also move forward and back within a
song using the Progress slider.
10.4. Using Search
You can search for songs, artists and albums using the search function in
the top right corner of the display.
Select the Search Function and type in the name, or part of a name of
artist, album or song title.
In example below ‘bach’. (Note search is not case sensitive).
The matches are displayed grouped as artist, album and track. You can then select any of the
matches to display the standard Play options.
Pause, forward, fast forward and back and fast back controls.

PLATO Complete Guide V1.1.1
Entotem Ltd. 40
11. Internet Radio
You can find almost any radio station from around the world, including internet only stations.
You can search by radio type, location or language.
Example below shows search to find BBC Radio 2.
The screens and menus displayed will vary depending on which options you choose.
1. Select Internet Radio 2. Select By Location
3. Select Europe 4. Select United Kingdom
5. Select Most Popular 6. Select Station
After a short delay, the selected radio station starts to play.

PLATO Complete Guide V1.1.1
Entotem Ltd. 41
The Plato screen automatically changes to display the NOW PLAYING tab and shows icon of
the selected radio station.
Press anywhere on the screen to bring up further options.
With the options displayed, you can change the volume, using the volume slider control, and
pause playing of the station.
11.1. Saving radio stations to your PRESETS list
When you find one of your favourite radio stations, you can save it to your PRESETS list. This
makes it very easy to find again.
1. Search again for the radio station
that you want to save.
2. Long Press (press and hold) the
selected station.
The Play now/Add to presets
option menu is displayed.
3. Select Add to presets.

PLATO Complete Guide V1.1.1
Entotem Ltd. 42
11.2. Listening to your saved radio stations
After you have saved at least one station into your PRESETS list, it is easy to find it again.
1. From the Features Drawer,
select Internet Radio.
2. Select PRESETS.
3. Select a radio station from the
displayed list.
PLATO Complete Guide V1.1.1
Entotem Ltd. 43
12. Playlists
You can create your own playlists. Typically these are selections of your favourite songs from
different albums. You can create Playlists:
From the Media Library
From the Play Queue
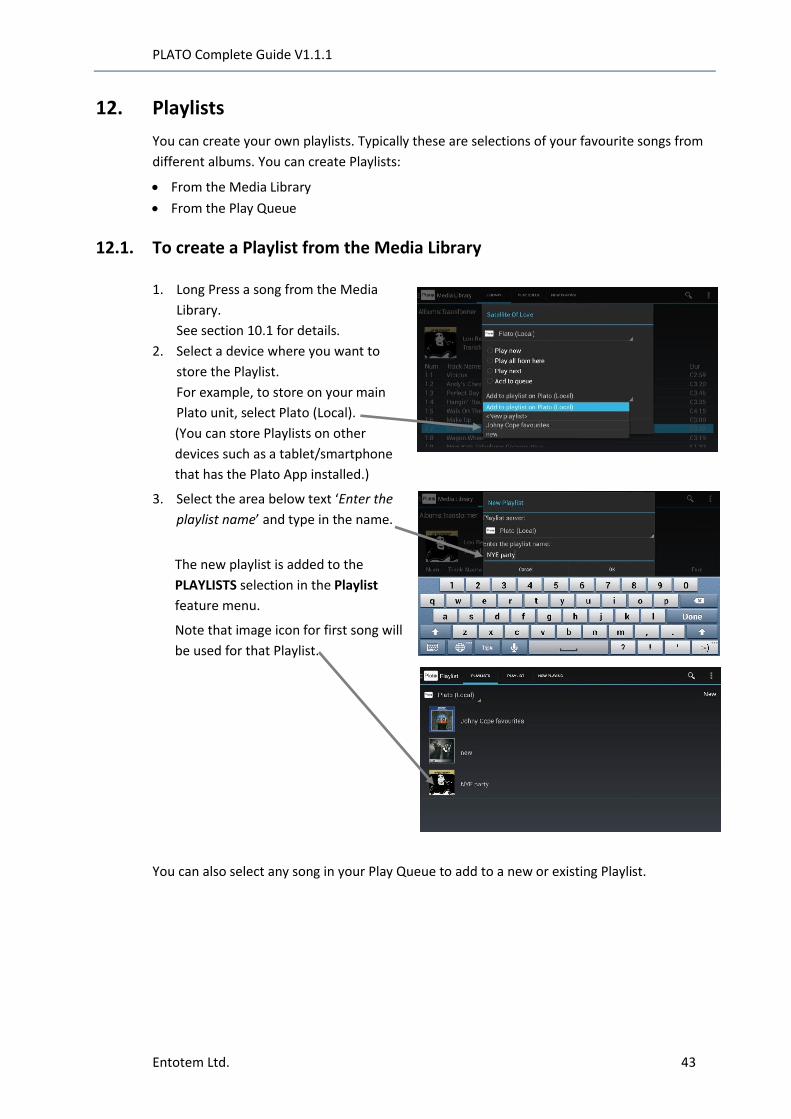
12.1. To create a Playlist from the Media Library
1. Long Press a song from the Media
Library.
See section 10.1 for details.
2. Select a device where you want to
store the Playlist.
For example, to store on your main
Plato unit, select Plato (Local).
(You can store Playlists on other
devices such as a tablet/smartphone
that has the Plato App installed.)
3. Select the area below text ‘Enter the
playlist name’ and type in the name.
The new playlist is added to the
PLAYLISTS selection in the Playlist
feature menu.
Note that image icon for first song will
be used for that Playlist.
You can also select any song in your Play Queue to add to a new or existing Playlist.

PLATO Complete Guide V1.1.1
Entotem Ltd. 44
12.2. To add more songs to an existing Playlist
1. Long Press another song from the
Media Library.
2. Select the device where the Playlist
is stored.
For example Plato (Local).
3. Select the Playlist that you want to
add the song to.
For example NYE party.
12.3. To Play a Playlist
1. From the Main Drawer Feature
Menu, select Playlist.
2. Select PLAYLISTS.
3. Choose a Playlist.
The selection of songs in the chosen
Playlist will now play.
As with an album in the Media
Library, you can either:
Long Press the Playlist and choose
to play or queue all the songs in the
playlist from the beginning,
Or
Select (short press) the Playlist to display the song list.
You can then select specific songs from the Playlist, to play or queue.

PLATO Complete Guide V1.1.1
Entotem Ltd. 45
13. Import/Export
The Import/Export Feature allows you to copy media files to and from your Plato unit.
Typically you use this to copy audio and video files to your Plato unit from a USB stick
connected to the USB connector on the front panel.
In the File Manager Tab, there are top level menus for
Home Returns the screen to display top level folders on your Plato unit.
Up Goes up one folder level.
Refresh Refreshes folder information.
Multi Allows you to select multiple files to copy.
USB Shows data stored to a USB device connected to front/rear panel.
Eject Select to eject a USB device before physically removing it from your Plato unit.
Long Press on any file or folder to display the Import/Export option dialog box.
Options are:
Copy Select file/folder to copy. Navigate to destination folder and press paste button from the menu bar. This is useful to copying files off of Plato.
Import Imports selected file/folder onto Plato. Plato will decide where to store the files and for music files, what to call them.
Details Details about the file/folder including size, date, etc.
Delete Deletes files from the disk and remove them from Plato databases. The media file will no longer appear in the Plato media library.

PLATO Complete Guide V1.1.1
Entotem Ltd. 46
13.1. To copy movies to your Plato unit
1. On a USB stick, create a folder and name folder ‘Movies’.
2. Copy files from your PC or laptop to the ‘Movies’ folder on the USB stick.
3. Insert USB memory device into USB port located on the front panel of Plato.
4. In the Main Drawer Feature Menu,
select Import/Export.
5. Check that you are in the
FILE MANAGER tab.
6. Select USB.
7. Long Press the folder ‘Movies’.
8. From the dialog box, select Import.
9. The import function will
automatically copy all data files, and
create all necessary database links.
PLATO Complete Guide V1.1.1
Entotem Ltd. 47
14. Streaming audio and video
You can use your Plato unit to stream music to wireless speaker, or video to a Smart TV in
other locations in your house.
You must first have wireless speakers or Smart TV configured on the same home network
that your Plato unit is connected to, either directly or via ‘home plug’ type devices. See
sections 2.3.7 & 2.3.8 for home network connection details.
Plato is capable of supporting multiple simultaneous streams to different devices, so you can
use Plato to supply audio/video streams to different rooms in the house.
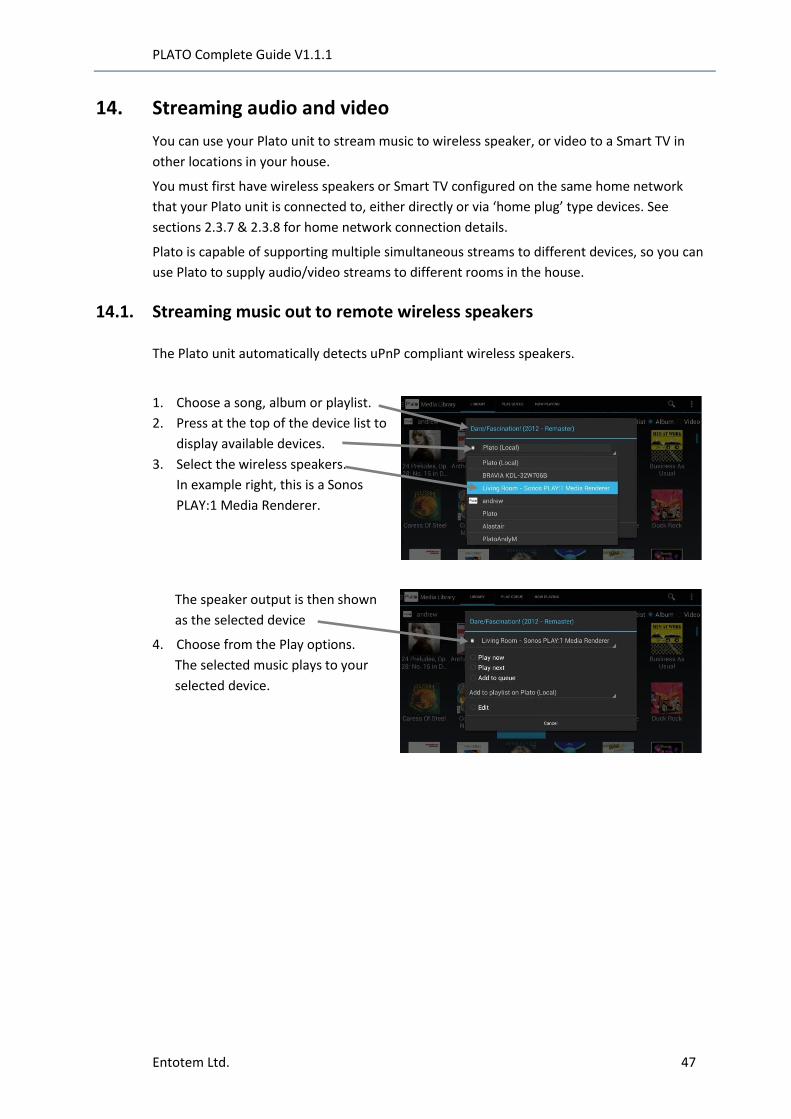
14.1. Streaming music out to remote wireless speakers
The Plato unit automatically detects uPnP compliant wireless speakers.
1. Choose a song, album or playlist.
2. Press at the top of the device list to
display available devices.
3. Select the wireless speakers.
In example right, this is a Sonos
PLAY:1 Media Renderer.
The speaker output is then shown
as the selected device
4. Choose from the Play options.
The selected music plays to your
selected device.

PLATO Complete Guide V1.1.1
Entotem Ltd. 48
14.2. Watching and streaming video
To watch video, you either:
a) Watch from the TV connected to the HDMI connection at the back of your Plato unit.
b) You can stream video to an external smart TV.
c) Watch video on a tablet/smartphone device running the Plato application.
Note: The external TV must be a
enabled TV and must be connected to your
router, or, a normal TV using a casting dongle (for example Miracast), connected to your
router.
14.2.1. To watch video from your Media Library
1. Select the Video radio button to
view available content.
2. Long Press a video to play from
your library or playlist.
3. Select the top device to display the
full drop down device list.
4. Select
Either
Your main Plato unit if you want to
watch on the HDMI TV connected
to your Plato unit,
Or
Any compatible TV/tablet
connected to your router to stream
to that external device.
5. Select Play now from the play
option to start watching the
selected video content on the
selected device.

PLATO Complete Guide V1.1.1
Entotem Ltd. 49
15. Additional Menu
To access additional menu options press the
icon on the top right of the screen.
15.1. Set friendly name
Select this option to change the name of your Plato unit, or tablet/smartphone running the
Plato application.
This could be useful if you have more than one Plato unit, or if you have the Plato App
downloaded onto several tablets or smartphones.
Select the option and type in new name.
Click OK when done.
You must reboot the Plato App for the new name to take effect.
Note that the text ‘(Local)’ will always be present after the name for the device that the Plato
app is running on.

PLATO Complete Guide V1.1.1
Entotem Ltd. 50
15.2. Media rescan
Use media rescan to fix internal META data tags which are usually generated during file the
import process. The scan runs as a background process, and will take a variable length of
time to finish (depending on how much media you have stored on your system).
During the scan the system may be less responsive than normal, due to the additional
overhead in performing the scanning functions.
The following message is displayed.
15.3. Media browse config
The uPnP browse method is configurable using this option. Efficient browse uses uPnP search
to return artist/album/video collections automatically for all uPnP servers which support
search.
uPnP browse provides an additional option to select classic directory based browsing.
Tip: this option should be set to Efficient Browse.
PLATO Complete Guide V1.1.1
Entotem Ltd. 51
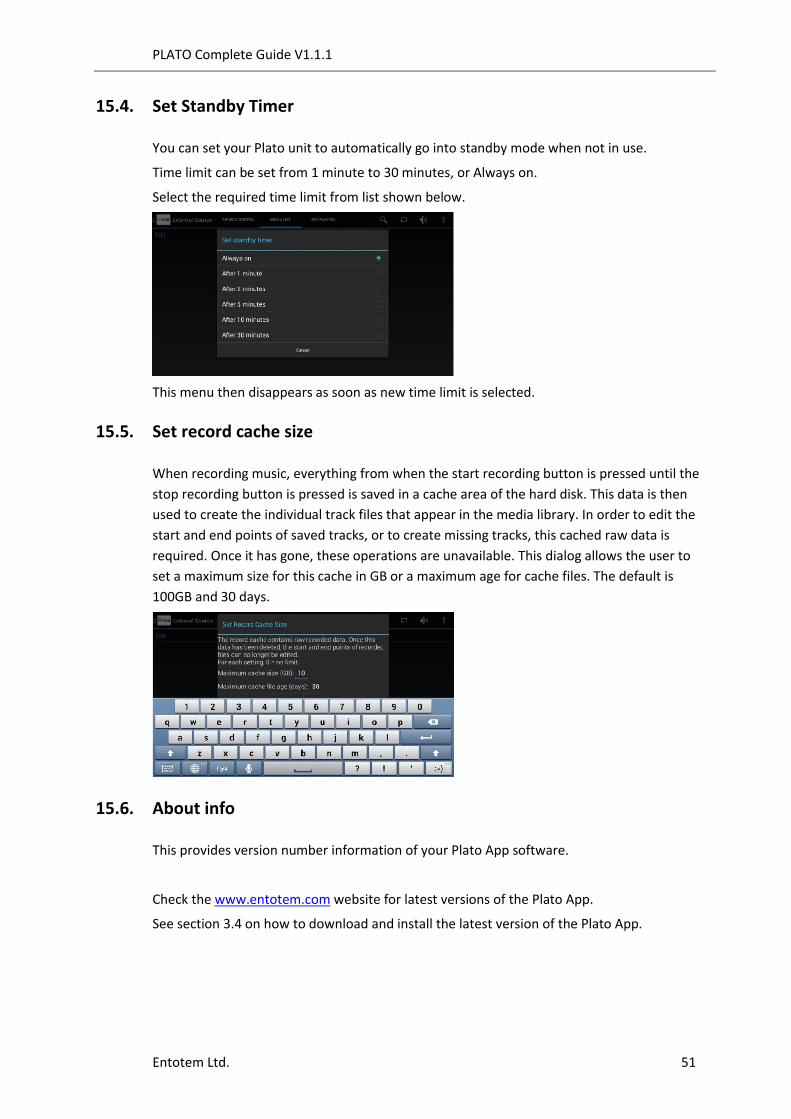
15.4. Set Standby Timer
You can set your Plato unit to automatically go into standby mode when not in use.
Time limit can be set from 1 minute to 30 minutes, or Always on.
Select the required time limit from list shown below.
This menu then disappears as soon as new time limit is selected.
15.5. Set record cache size
When recording music, everything from when the start recording button is pressed until the
stop recording button is pressed is saved in a cache area of the hard disk. This data is then
used to create the individual track files that appear in the media library. In order to edit the
start and end points of saved tracks, or to create missing tracks, this cached raw data is
required. Once it has gone, these operations are unavailable. This dialog allows the user to
set a maximum size for this cache in GB or a maximum age for cache files. The default is
100GB and 30 days.
15.6. About info
This provides version number information of your Plato App software.
Check the www.entotem.com website for latest versions of the Plato App.
See section 3.4 on how to download and install the latest version of the Plato App.

PLATO Complete Guide V1.1.1
Entotem Ltd. 52
15.7. Gracenote EULA
Gracenote End User License Agreement.
Click OK after reading agreement.
15.8. Debug
Log files can be useful to send to Entotem to improve the Plato App software.
To save logs, select this option, then select Collect log.
The log files are stored in a top level folder called DebugLogs. The Import/Export file
manager can be used to copy logs from here to a USB memory stick.
If the logs are no longer required, select Delete ALL logs.
15.9. Exit
Use to exit the Plato App. See section 3.3 for details.

PLATO Complete Guide V1.1.1
Entotem Ltd. 53
16. Advanced Media Library editing options
There are a variety of editing options available to modify META data tags in your Media
Library.
For all options, you must choose the Edit option for a song or album.
To access the edit menu for basic
editing of song or album details
1. Select the song/album to display
the Play option list
2. Select Edit.
Song/Album details are displayed.
You can select non-greyed out data and then use the Android keypad to change details.
Note: You can edit ALL tags if you selected a single track but only album specific tags if
you selected an album.
3. Select Save Tags after making any changes.

PLATO Complete Guide V1.1.1
Entotem Ltd. 54
16.1. Editing Artwork
Gracenote occasionally returns an incorrect album art thumbnail image. This can happen
when recording a ‘Greatest Hits’ or ‘Best of’ album, or if Gracenote is unable to determine
the track being played.
The following example shows changing a thumbnail image for Bob Marley’s greatest hits
‘Legends’ album.
1. Obtain the correct image
This requires you to use a web browser app on your Plato unit.
2. Use the selected web browser to search and download suitable image.
3. In the Media Library Long Press the incorrect thumbnail image.
4. Swap incorrect image for new one.

PLATO Complete Guide V1.1.1
Entotem Ltd. 55
5. Select Save Tags to keep new artwork.
16.2. Adjust start/end points of a track
In the event that Gracenote returns a track length that is different to what you have
recorded, you may want to edit the recorded audio file by trimming either the start or the
end points. This happens when Gracenote retrieves meta data from a track that has
appeared on numerous albums and then selects one that is different to the one you’re
actually recording.
Note: The ‘Edit Start/End of track’ button will only appear if the raw data is still in the record cache. If you
recorded the track a long time ago, or have recorded lots of other material in the meantime, this data may be
deleted and you won’t be able to edit these files anymore.
To edit the recorded track
1. Long Press the song to display the Play option menu and then select Edit.
2. Select Edit start/end of track.
The edit screen is displayed.
In this example, the window starts 3 min 30 sec into the recording and finishes 7 min 45 sec into the recording.
This window is sufficient to contain the track “I Predict a Riot”, which starts at 3 min 41 sec and finishes at 7 min 34 sec.
3. Select (Play) and then press Mark Start at the point you want the track to really start.
PLATO Complete Guide V1.1.1
Entotem Ltd. 56
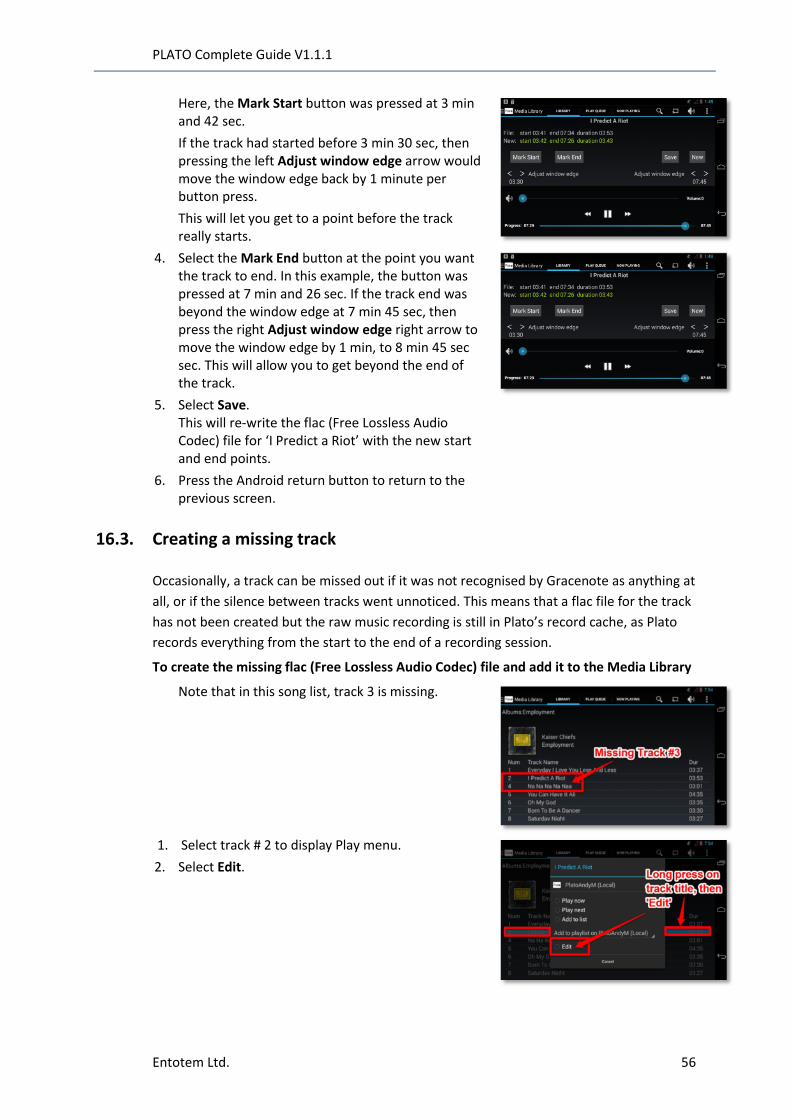
Here, the Mark Start button was pressed at 3 min and 42 sec.
If the track had started before 3 min 30 sec, then pressing the left Adjust window edge arrow would move the window edge back by 1 minute per button press.
This will let you get to a point before the track really starts.
4. Select the Mark End button at the point you want the track to end. In this example, the button was pressed at 7 min and 26 sec. If the track end was beyond the window edge at 7 min 45 sec, then press the right Adjust window edge right arrow to move the window edge by 1 min, to 8 min 45 sec sec. This will allow you to get beyond the end of the track.
5. Select Save. This will re-write the flac (Free Lossless Audio Codec) file for ‘I Predict a Riot’ with the new start and end points.
6. Press the Android return button to return to the previous screen.
16.3. Creating a missing track
Occasionally, a track can be missed out if it was not recognised by Gracenote as anything at
all, or if the silence between tracks went unnoticed. This means that a flac file for the track
has not been created but the raw music recording is still in Plato’s record cache, as Plato
records everything from the start to the end of a recording session.
To create the missing flac (Free Lossless Audio Codec) file and add it to the Media Library
Note that in this song list, track 3 is missing.
1. Select track # 2 to display Play menu.
2. Select Edit.
PLATO Complete Guide V1.1.1
Entotem Ltd. 57
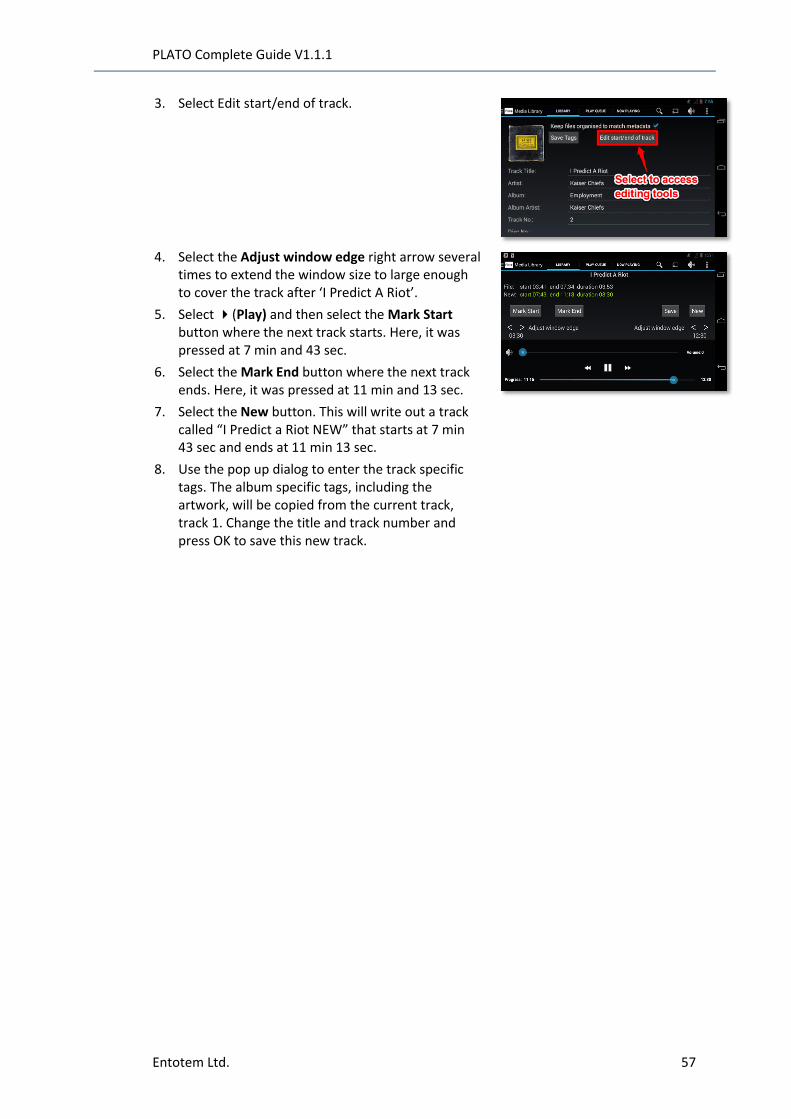
3. Select Edit start/end of track.
4. Select the Adjust window edge right arrow several times to extend the window size to large enough to cover the track after ‘I Predict A Riot’.
5. Select (Play) and then select the Mark Start button where the next track starts. Here, it was pressed at 7 min and 43 sec.
6. Select the Mark End button where the next track ends. Here, it was pressed at 11 min and 13 sec.
7. Select the New button. This will write out a track called “I Predict a Riot NEW” that starts at 7 min 43 sec and ends at 11 min 13 sec.
8. Use the pop up dialog to enter the track specific tags. The album specific tags, including the artwork, will be copied from the current track, track 1. Change the title and track number and press OK to save this new track.
PLATO Complete Guide V1.1.1
Entotem Ltd. 58
16.4. Merging a fragmented album
Equally, when recording a compilation or greatest hits album, Gracenote can sometimes
return incorrect artwork for individual tracks, thereby creating numerous album titles/covers
with only one or two tracks contained within them. This happens because some of these
songs may well have appeared on multiple albums over the years, so Gracenote can’t be
100% sure which album you are recording. Again, Plato has editing tools to help merge all
songs into a single album, as described below.
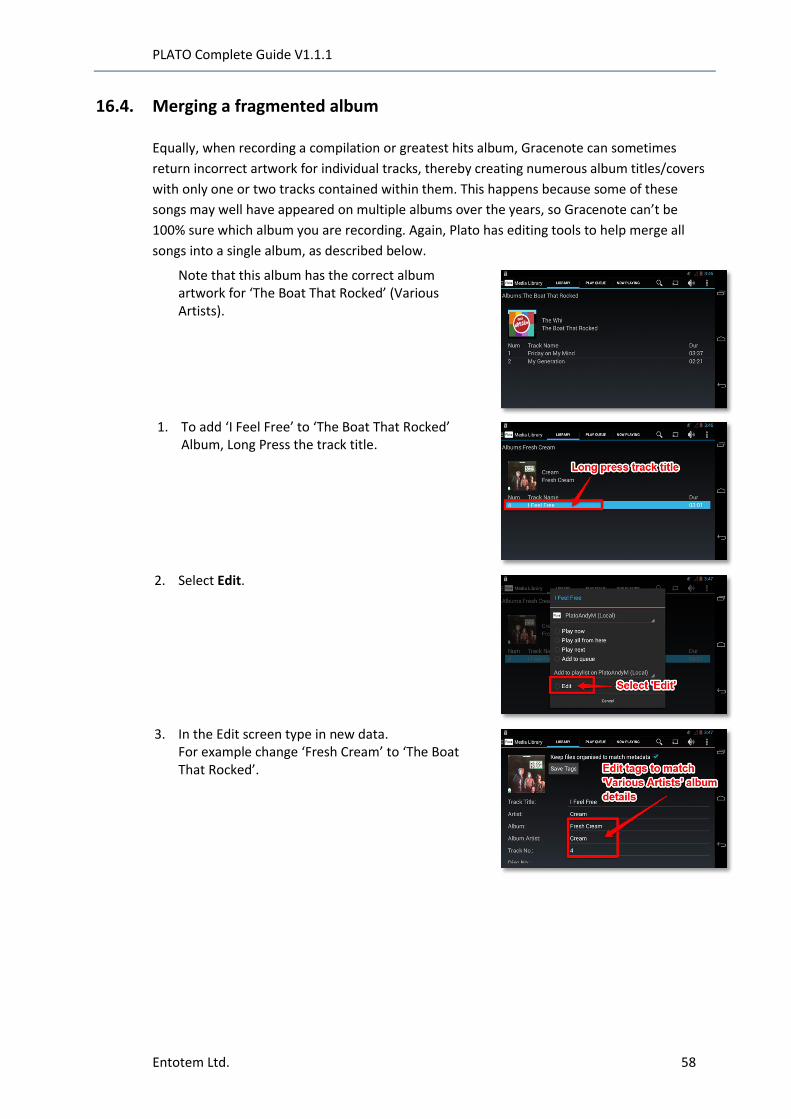
Note that this album has the correct album artwork for ‘The Boat That Rocked’ (Various Artists).
1. To add ‘I Feel Free’ to ‘The Boat That Rocked’ Album, Long Press the track title.
2. Select Edit.
3. In the Edit screen type in new data. For example change ‘Fresh Cream’ to ‘The Boat That Rocked’.

PLATO Complete Guide V1.1.1
Entotem Ltd. 59
4. Select Save Tags.
5. Go to the Media Library.
Note that the track list now includes added song.