pioneer ddj-sr quickstart guide
DESCRIPTION
Pioneer DDJ-SR Quickstart GuideTRANSCRIPT

QUICK-START GUIDEPIONEERDDJ-SR

Installation and SetupThe Pioneer DDJ-SR is a class compliant USB plug and play device for Mac, however requires drivers for Windows. You will find these on the installation CD provided with your Pioneer DDJ-SR.
NOTE: Please ensure you have the latest available drivers AND firmware up-dates, which may be required in order to be compatible with Serato DJ. Please go to http://serato.com/dj/support
1. Download and install the latest version of Serato DJ from http://serato.com/dj/downloads
2. Connect your Pioneer DDJ-SR to an available USB Port.3. Open Serato DJ.
NOTE: The Pioneer DDJ-SR does not require a Serato DJ license purchase.When you first download Serato DJ you will see an Online panel appear on the right hand side for you to manage your Serato DJ licenses and Expansion Packs.
Simply tick the box in the bottom right hand corner, then click on which will hide this panel. Serato DJ will remember these settings for when you next open the software.
# Pioneer DDJ-SR Control
1 Aux Level Adjust
2 Aux Input
3 Booth Level Adjust
4 Booth/Master Select Switch
5 Booth/Master Out 2 (RCA)
6 Master Out 1 (TRS)
7 USB
8 ON/OFF
9 Headphone Output (1/4” or 1/8”)
10 Headphone Output Adjust
11 Crossfader Reverse On/Off
12 Crossfader Curve Adjust
13 Mic Level Adjust
14 Mic Input (1/4")1
10
2
11
3
12
4
13
5
14
6 7 8
9

Controller
12
3
4
5
6
7
8 9 1010 1111 1212 1313 1414 1515 1616 1717 1818 1919 2020 2121 2222 2323
24
25
26
27
28
29
30
31
323334

# Pioneer DDJ-SR Control Function Shift Function
1 PERFORMANCE PADS Controls Performance Modes (SEE PERFORMANCE PADS)
2 PLAY/PAUSE Play/Pause track Stutter Play
3 CUE Add or Jump to Temporary Cue Jump to start of track (more than 2 Sec elapsed) Previous track (less than 2 sec elapsed)
4 SYNC Sync On Sync Off (Press twice to return to Absolute Pitch when in Relative Mode)
5 SHIFT SHIFT button is used with other buttons that have shift modifier functions
6 DECK BUTTONS Activates selected Deck
7 JOG MODE Toggles between Vinyl/Jog modes
8 FX ASSIGN Assigns FX UNIT to Decks 1 and 2 Assigns FX UNIT to Decks 3 and 4
9 ON (BUTTONS 1-3) Slot 1-3 Effect On/Off Slot 1-3 Select Effect
10 FX KNOBS (1-3) Adjust Slot 1-3 FX Parameter Slot 1-3 Select Effect
11 BEATS (knob) Adjust Beats Multiplier
12 TAP Tap to the desired FX tempo. To return to AUTO mode, press and hold Switch between Multi and Single FX modes
13 TEMPO FADER Adjust Tempo When in Sync mode, used to disable the Pitch Fader temporarily and change the zero position
14 EQ (knobs) Adjust HI, MID and LOW
15 LOAD Load selected track to Deck 1 (Press twice to Instant Double) Sorts Library by BPM
16 TRIM (knobs) Adjusts the individual channel output gain
17 BACK Toggles focus between library, crates and open panels Cycle View Modes
18 BROWSER Browses through currently focused area (library/crates/open panels) Click to move between library and crates
Switch between REC, FX and SP-6 panels when clicked
NOTE: The SHIFT button is used with other buttons that have shift modifier functions.

# Pioneer DDJ-SR Control Function Shift Function
19 LOAD PREPARE Press this to add a selected track to the list of tracks in the Prepare Panel
Cycle Files/Browse/Prepare/History
20 MASTER LEVEL Adjusts the master output’s audio level
21 LOAD Load selected track to Deck 3 (Press twice to Instant Double) Sorts library by Artist
22 HEADPHONES MIX Adjusts headphone output between cue and master
23 SLIP Activate Slip Mode
24 TEMPO FADER Adjust Tempo When in Sync mode, used to disable the Pitch Fader temporarily and change the zero position
25 KEYLOCK/TEMPO RESET
Enables Keylock/Hold for 1 second to reset BPM Cycle through available Tempo Range
26 TAP When in Pad Plus mode tap to set the desired Pad Plus FX tempo. To return to AUTO mode, press and hold
Pressing a pad after enabling HOLD will keep the pad effect triggered. Press the pad again to disable HOLD.
27 ON Enables Pad Plus mode
28 AUTO LOOP Autoloop On/Off Activated selected loop
29 1/2X/2X Halve Loop Length/Double Loop Length Adjusts Loop In/Out point positions
30 LOOP LENGTH DISPLAY
Displays loop length. When Pad Plus mode is enabled it displays effect length/timing.
31 PARAMETER1 Use these to set the Loop Roll, Slicer and Sampler parameters (SEE PERFORMANCE PADS)
A secondary parameter for Slicer Mode when using Peformance Pads.
32 CUE Cue selected channel / Mic Talk Over when Mic is connected Tap BPM of loaded track to selected deck
33 SAMPLER VOLUME Adjusts the Sampler Master Output
34 FILTER LP/HP filter combo adjust
NOTE: The SHIFT button is used with other buttons that have shift modifier functions.
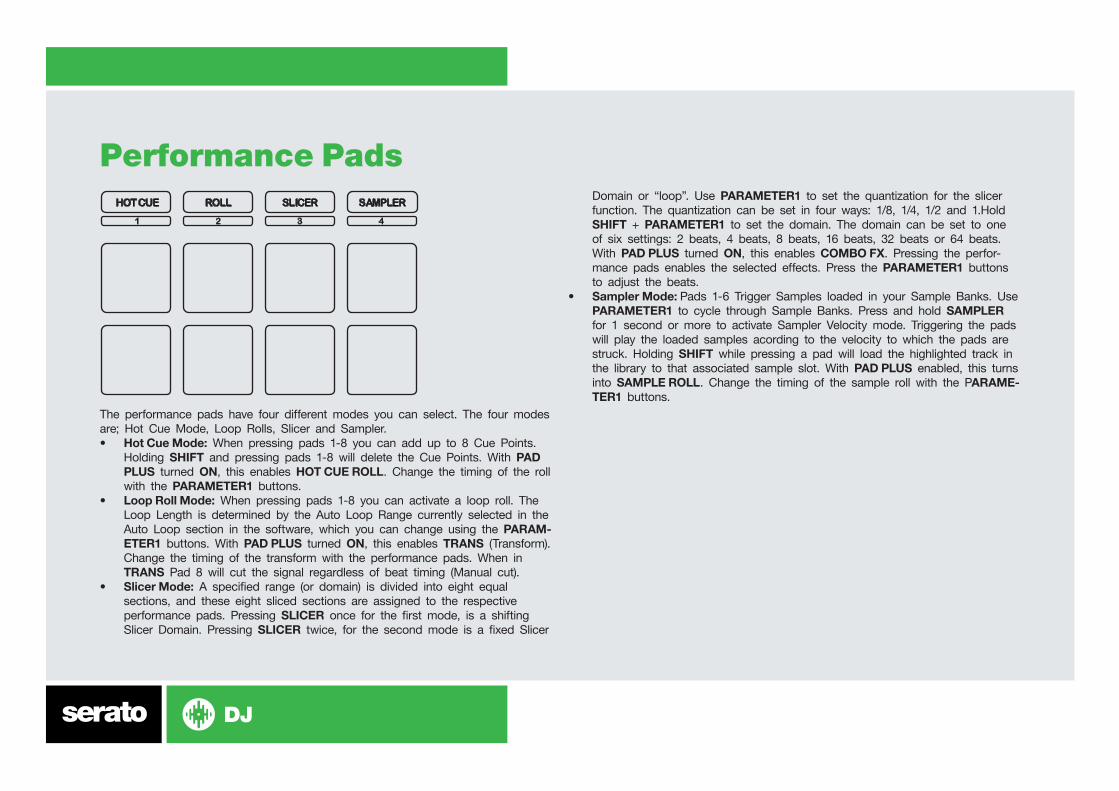
Performance Pads
The performance pads have four different modes you can select. The four modes are; Hot Cue Mode, Loop Rolls, Slicer and Sampler.• Hot Cue Mode: When pressing pads 1-8 you can add up to 8 Cue Points.
Holding SHIFT and pressing pads 1-8 will delete the Cue Points. With PAD PLUS turned ON, this enables HOT CUE ROLL. Change the timing of the roll with the PARAMETER1 buttons.
• Loop Roll Mode: When pressing pads 1-8 you can activate a loop roll. The Loop Length is determined by the Auto Loop Range currently selected in the Auto Loop section in the software, which you can change using the PARAM-ETER1 buttons. With PAD PLUS turned ON, this enables TRANS (Transform). Change the timing of the transform with the performance pads. When in TRANS Pad 8 will cut the signal regardless of beat timing (Manual cut).
• Slicer Mode: A specified range (or domain) is divided into eight equal sections, and these eight sliced sections are assigned to the respective performance pads. Pressing SLICER once for the first mode, is a shifting Slicer Domain. Pressing SLICER twice, for the second mode is a fixed Slicer
Domain or “loop”. Use PARAMETER1 to set the quantization for the slicer function. The quantization can be set in four ways: 1/8, 1/4, 1/2 and 1.Hold SHIFT + PARAMETER1 to set the domain. The domain can be set to one of six settings: 2 beats, 4 beats, 8 beats, 16 beats, 32 beats or 64 beats. With PAD PLUS turned ON, this enables COMBO FX. Pressing the perfor-mance pads enables the selected effects. Press the PARAMETER1 buttons to adjust the beats.
• Sampler Mode: Pads 1-6 Trigger Samples loaded in your Sample Banks. Use PARAMETER1 to cycle through Sample Banks. Press and hold SAMPLER for 1 second or more to activate Sampler Velocity mode. Triggering the pads will play the loaded samples acording to the velocity to which the pads are struck. Holding SHIFT while pressing a pad will load the highlighted track in the library to that associated sample slot. With PAD PLUS enabled, this turns into SAMPLE ROLL. Change the timing of the sample roll with the PARAME-TER1 buttons.
HOT CUE ROLL SLICER SAMPLER

LoopingYou have up to 8 loops per track in Serato DJ, and the choice between either manual or auto loops. You can choose whether you have 4 loops (and 4 cuepoints) showing on screen, or 8 loops. To switch between Manual and Auto Loop tabs, click (Manual) or (Auto) in the software. To store the currently active or most recently created loop, click in the loop tab in the software.
DJ-FXThe DJ-FX in Serato DJ are powered by iZotope™. Click the FX tab to open the FX panel. Select either 1, 2, 3, 4 or M to assign the selected effect bank to a deck or Master Output.There are two available modes in the DJ-FX. Single FX Mode allows you to select one effect per FX bank, and has multiple parameters that can be adjusted. Multi FX Mode allows you to select up to three effects per FX bank, and adjust only one pa-rameter, the FX Depth. The same effects available in Single FX mode are available in Multi FX mode, as well some additional presets.
You can select between the two FX modes by clicking either the Single FX mode button or Multi FX mode button
DDJ-SR control
Serato DJ function Shift
AUTO LOOP Autoloop On/Off Activate selected loop
2X Double Loop Length Loop Shift Right
1/2X Halve Loop Length Loop Shift Left
IN Set loop in point (Loop not a ctive)/Adjust loop in point (Loop active)
Saved Loop slot select
OUT Set loop out point (Loop in point set)/Adjust loop out point (Loop active)
Loop Exit (Loop active)/ Reloop (Loop not active)
DDJ-SR control
Single FX Mode Multi FX Mode Shift
ON (Button 1)
Effect On/Off Slot 1 Effect On/Off Slot 1 Select Effect
ON (Button 2)
Adjust FX Parameter 2 Slot 2 Effect On/Off Slot 2 Select Effect
ON (Button 3
Adjust FX Parameter 4 Slot 3 Effect On/Off Slot 3 Select Effect
FX KNOB 1
Adjust FX Parameter 1 Adjust Slot 1 FX Parameter
Slot 1 Select Effect
FX KNOB 2
Adjust FX Parameter 3 Adjust Slot 2 FX Parameter
Slot 2 Select Effect
FX KNOB 3
Adjust FX Parameter 5 Adjust Slot 3 FX Parameter
Slot 3 Select Effect
TAP Tap to the desired FX tempo. To return to AUTO mode, press and hold
Tap to the desired FX tempo. To return to AUTO mode, press and hold
Toggle between Single/Multi FX Modes
BEATS (knob)
Adjust Beats Multiplier Adjust Beats Multiplier
FX 1/2 Assigns FX UNIT to Decks 1 and 2
Assigns FX UNIT to Decks 1 and 2
Assigns FX UNIT to Decks 3 and 4

Serato VideoSerato Video is a software plugin for Serato Software which adds the ability to playback and mix video files, use effects and fader transitions with your Serato DJ Controller, an additional MIDI controller or your mouse/keyboard.
For more information on Serato Video go to http://serato.com/video
MIDIThe MIDI control feature in Serato DJ provides the ability to map Serato DJ software functions to MIDI controller functions such as keyboards, triggers, sliders, and knobs. Integrating MIDI controllers into your Serato DJ setup can improve live performance usability, such as hitting pads on a MIDI controller to trigger Loops and Cue Points.
For more information download the Serato DJ manual by going to http://sera-to.com/dj/downloads
NOTE: You can not MIDI Map your Pioneer DDJ-SR, you will need to connect an additional MIDI controller to use these MIDI functions
Using the Tool TipsClick on the icon to enable Tool Tips. This is located in between the MIDI and setup button in the top right hand corner of the screen. Tool Tips provide a handy way to learn the various features of Serato DJ.
Move the mouse over a section of the screen to bring up a context sensitive tool tip. Holding the mouse over the button with Tool Tips turned on will show you a list of all keyboard shortcuts.
For more information about how to use Serato DJ, please go to our website www.serato.com or refer to the Serato DJ Software Manual.
For more information on your controller, please refer to the hardware manual.
For further help, please contact [email protected] or go to www.serato.com/dj/support