photoshop manual - wordpress.com · photoshop manual 01 - basics - toolbars, options and panels...
TRANSCRIPT
Photoshop Manual01 - Basics - Toolbars, Options and Panels2017 1st edition
This Photoshop Manual is one of an introductory series specially written for the Arts and Humanities Students at UEA by the Media Suite Team.

UEA Media Suite - Introduction to Photoshop PAGE 2
UEA Media Suite - Introduction to Photoshop PAGE 3
OrientationAfter you have opened an image in Photoshop you will find the main toolbar on the left, the panels on the right and in the top bar above the canvas area, the options menu which changes according to what tool you have selected.
Main ToolbarThe main toolbar has a wide array of tools you can select and adjust. Many of them have a small fly-out menu with more tools for you to choose from. As soon as you select a tool from this left hand menu, you will notice that the options menu changes.
PanelsThe panels can be closed and then fly out once clicked - as above - or they can be brought into the open panel section, letting you customise what you most see or use.
LayersThe layers panel is one of the most important as Photoshop works on a layers system - always make sure you keep an eye on this!
If your layer has a lock icon on it, you won’t be able to edit that layer as it is locked. Double click the layer to activate it and make it editable.
Options MenuAs you select different tools from the left hand toolbar, this area will display different settings for that tool.
InfoThe info at the bottom helps us see how big our file is, and at what percentage we are viewing the work at, it can be customised to show other information from the right arrow.
Layer ControlThis small menu hiding at the bottom of the layers panel has great short-cuts to most used items for layers, such as new layer, new folder to group layers, add adjustment layers and special FX with preset styles like ‘Drop Shadow’ in.
The CanvasThe ‘Canvas’ is how we refer to the live area that we are working on, we can alter your canvas size -from the file settings - make it bigger or smaller dependent on what we are producing, but we cannot put anything outside of the canvas area, it would essentially be clipped off.
File MenuAs with all programs you have the file menu system toolbar at the top of the page.

UEA Media Suite - Introduction to Photoshop PAGE 4
UEA Media Suite - Introduction to Photoshop PAGE 5
FileAll of the usual items such as save and export are under the file menu, but you can also automate a batch process on many files at once from this menu.
Use Revert to go back to the last saved version of the file you are working on.
EditTransform items in the canvas with the variety of tools available and also the Purge tool which can speed up your machine as it deletes histories and clipboard content.
ImageChange the colour mode from RGB or CMYK to Grayscale/Duotone and adjust colours, invert or posterize them and alter the image/canvas size itself.
LayerThere are many different ways of altering a layer and controlling layers, such as Flatten, Lock and Group within Photoshop.
Use the rasterize option to convert smart layers/objects into pixel based items.
TypeOpen up the character panels, convert the type to pixels, and you can warp the text here whilst still keeping it editable.
Menu OrientationA closer look at the menus, this is also useful to see the short-cuts.

UEA Media Suite - Introduction to Photoshop PAGE 6
UEA Media Suite - Introduction to Photoshop PAGE 7
SelectYou can select layers, masks and alter edges of selections. Most important is the Deselect option, and inverse selection.
FilterThis is where all of those painting effects and image filters live, if you’re not sure what they do, use the Filter Gallery to see a preview representation of the final outcome.
3DThe 3D menu is one of the newer additions, but once you convert your image to 3D you will be able to work in a ‘pseudo’ 3D space. You can also bring in a pre-made 3D object that you can paint on.
ViewProofing, guides, rulers and control your zoom from this view menu.
WindowThe window menu is where you can get Photoshop to show or hide any of the palettes/panels or options, plus organise how your windows display if working with multiple files.
Menu OrientationA closer look at the menus, this also useful to see the short-cuts.

UEA Media Suite - Introduction to Photoshop PAGE 8
UEA Media Suite - Introduction to Photoshop PAGE 9
Select the eraser tool and change the settings from the menu that now appears at the top of the window to a smaller circle with soft edges (hardness).
Being careful, start to rub out the pixels that you don’t want, this can be a time consuming operation, but the result will be worth it. Keep zoomed in and use the spacebar to move around whilst working close-up.
Don’t try and delete too much in one movement, because if you make a mistake, you can always go a step back by using CMD & Z (undo).
Hair can be tricky, here we will need to change the opacity (in the top bar menu) on the eraser tool as well to make for a even more delicate result.
Once you have gone around the whole edge, it should be looking pretty good close-up, but once you zoom out, you will see how taking care on the clean up pays dividends at the end.
In my scene I think that the girl is too big, so using the
scale tool (Edit>Transform>scale) I’m going to shrink her slightly. Using the diagonal handles, and holding the shift key to constrain the proportions scale your item to better fit the new scene.
You can also move the position of your figure by clicking and dragging anywhere inside the active handles of the box. Press the enter key to confirm the transformation.
When you are happy with the size and position, it’s time to think about levels, and colour.
What we are trying to do is match the brightness and colour tone of the two images, to fool the viewer into thinking it is a real image.
Levels are a combination of brightness and contrast, press CMD & L to view the levels controller.
This graph is a histogram, plotting the black and white value for every pixel in the image. (0 is where all of the blacks in the image start from, 255 is for the whites). If you move the 0 point into the middle with the preview on you will see that more of the image turns black.
We can also see, with the visual histogram, if our image has a balanced range of contrast.
Small tweaks are usually best, unless you are going for quite a stylised effect.
You also have a lot of choices to alter colour in the Image>adjustments menu, but for my image I’m opting for the Hue/Saturation tool.
Putting the basics into action.Using some of the most popular tools, we are going to select, mask, transform, colour and overlay text using layers to composite two photos into a brand new image.
Find 2 images (I used pixabay.com) one to be used as a foreground focus, an object or person is best for this, and a background image, such as a landscape.
Open both images in Photoshop.
First we need to cut out the girl from her original background.
Let’s use the magic wand to easily select the sky, then add the Shift key to click on more areas until we’ve got a lot of the background selected, without selecting any of the colours within the girl.
Let’s switch to the Mask Mode to see how much we’ve selected.
The red area shows what we have actually selected.
Now let’s use the lasso tool to draw around and then delete as much of the unwanted areas as possible, you will get this Fill box selection option, but just use the background colour to remove the red areas.
This creates our loose selection.
Click on the Mask mode again to come out of mask mode.
Your image should now have a running marquee outlining your selection.
Don’t worry about any extra pixels outside of your figure as we will refine the edges when compositing the final image.
So far we have actually selected the background - which we don’t want - so we need to inverse our selection.
Now we have the girl selected we can press CTRL & X to cut the figure out of the background, then switch to your background image and CTRL & V to paste it into the new composite.
It should come into a new layer.
Firstly we are going to tidy up those messy edges.
Using the short-cut CMD & + we can zoom into the image to get a better look at those excess pixels.

UEA Media Suite - Introduction to Photoshop PAGE 10
UEA Media Suite - Introduction to Photoshop PAGE 11
I would like to make it just slightly less saturated in colour to make her blend in, so I’m just going to move the saturation slider down a few stops, if you move the saturation all the way to the left, it will turn black and white as you will have desaturated the colour in the image.
Don’t be afraid to play with different ways of altering the colour in the image, you can always return to an earlier stage by using the history tool, which keeps the last 50 steps saved. Simply double click to the previous stage you want to return to.
Adding TextSimply click on the text tool icon on the left hand toolbar and then click onto the canvas where you would like your text to be positioned.
As soon as you click you will see a new type layer appear in the layers menu, simple type in your preferred text and whilst your text is active, change the style, size and colour just as you would in any other programme using the character tool bar which has appeared above the canvas.
Once finished with the options you can now move and transform your text like any other object in Photoshop. To reactivate the character properties, just double click on the ‘T” in the type layer.
When you have got the text the right style, size and colour, let’s add a simple effect to the type layer.
In the layers panel at the bottom there is a small layers menu, here you will find the FX icon, click on this and highlight ‘Drop Shadow’, make sure you have
the type layer selected so that the effect is applied to the correct layer.
In the options for a simple shadow choose normal, 70% opacity and size of 5. Just for fun I’m going to choose a colour from the background image to be my shadow colour.
Click on the colour swatch to the right of the Blend Mode and either select a colour from the mixer or use the eyedropper tool to pick a colour from the photo.
This completes your first adventure in Photoshop, you’ve selected, cut and copied, refined edges using the eraser tools, transformed and colour balanced two images to make a new composite and added coloured text onto a separate layer with effects, well done!
Top TipsCrop Tool
Cropping in on your photos is an important artistic tool and a simple way to do that is to click on the crop tool and draw over the area you want to keep, you can also slightly adjust rotation if your image wasn’t quite straight.
Top Tip: You can also specify the exact dimensions you want your crop to be - very useful to set up photo sizes.
Selection Tools
There are a variety of selection tools, marquee, polygonal lasso, magic wand or quick selection, but all select an area of your canvas that you want to keep to work on or save from alteration.
Top Tip: Use Quick mask mode to visually see exactly what you have selected
Levels/Brightness
Changing levels and brightness is the most simple way to enhance your images in Photoshop, the graph in Levels shows you the distribution of the tones in your images and quickly shows brightness problems
Top Tip: Smaller tweaks are best in Levels.
HistoryThe history panel is a great tool, think of it as a supercharged undo, not only can you go back, step by step through filters or changes to the document that you might have applied, but you can take a copy of the document at any stage and open a new version in a new tab.
Top Tip: If 50 undo’s aren’t enough you can increase it to 1000 - but that’s the Photoshop maximum.
Repair
Photoshop retouching is a common practice to clean up or repair damaged images, use a combination of the clone tool, heal and patch to perfect your image, but be careful not to overdo it.
Top Tip: Red-eye reduction is a standard tool and is really quick to use.
LayersLayers are the most important feature in Photoshop, they can help you work non-destructively and try different creative outcomes with the same focus.
Top Tip: If something isn’t working as expected make sure you are working on the right layer!
Deselect CommandUse CMD, SHIFT & D to deselect objects, marquees or areas of your image.
Top Tip: Nothing working? Try a deselect command to make sure you have no stray pixels selected in your document that you can’t see.
UEA Media Suite - Introduction to Photoshop PAGE 12
UEA Media Suite - Introduction to Photoshop PAGE 13
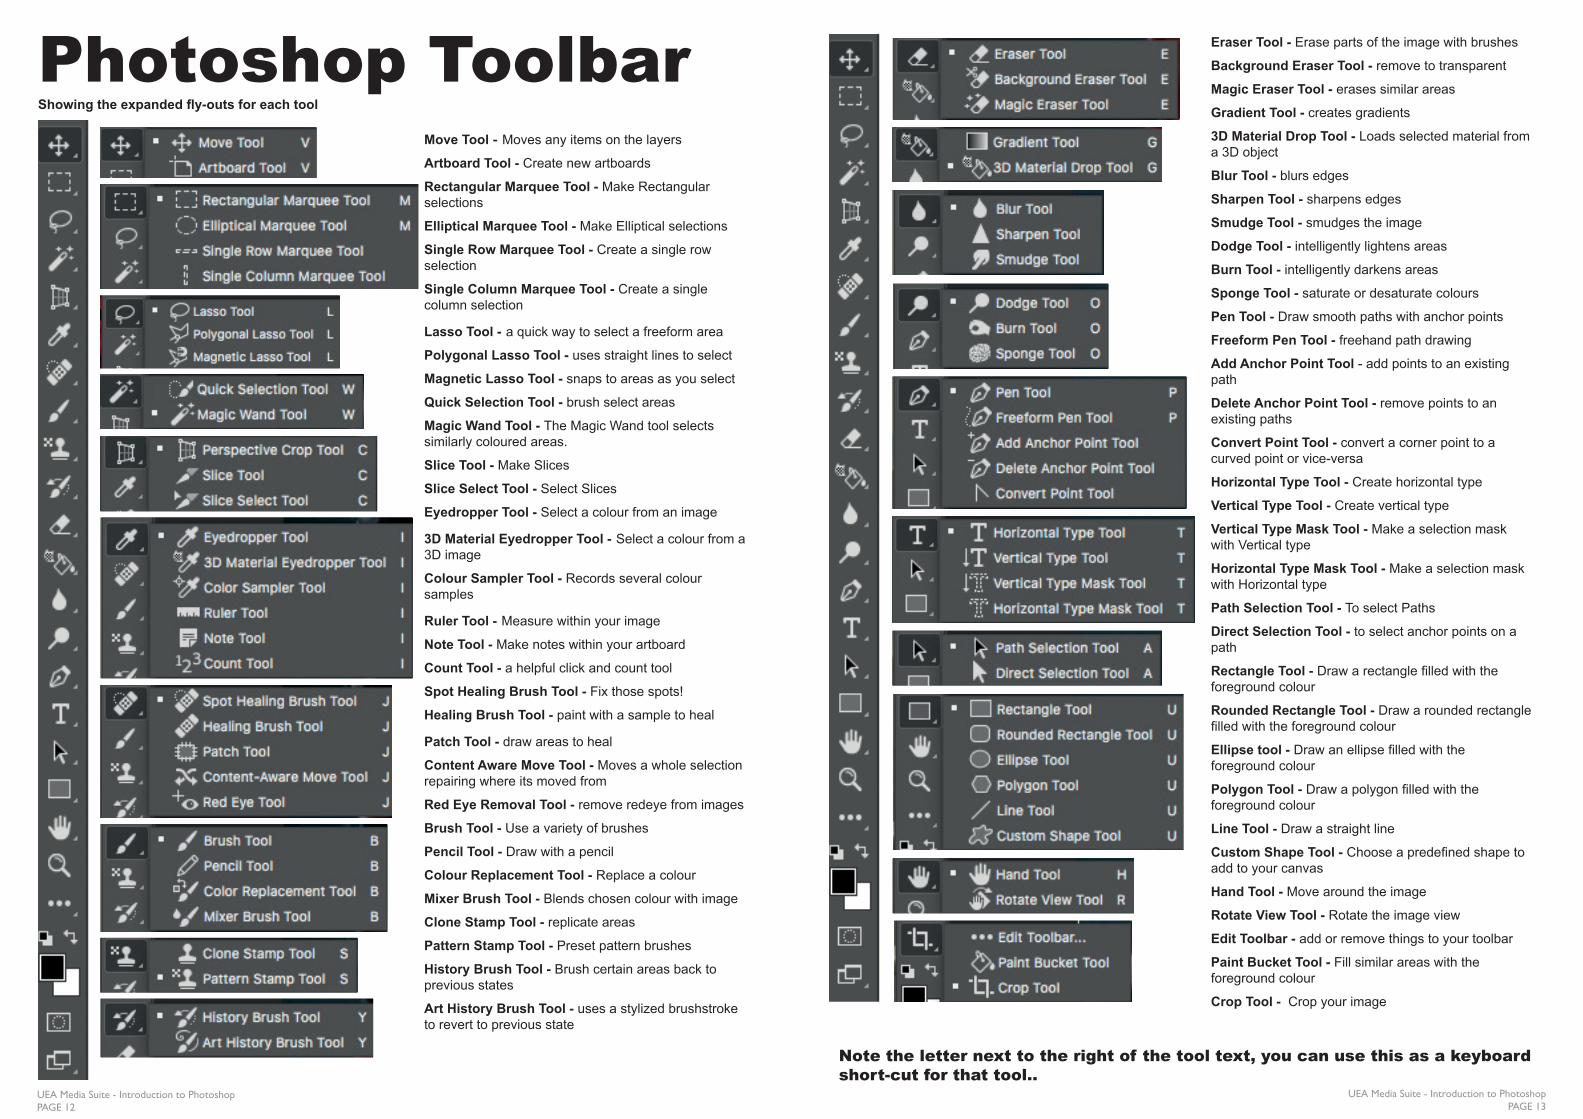
Photoshop ToolbarShowing the expanded fly-outs for each tool
Move Tool - Moves any items on the layers
Artboard Tool - Create new artboards
Rectangular Marquee Tool - Make Rectangular selections
Elliptical Marquee Tool - Make Elliptical selections
Single Row Marquee Tool - Create a single row selection
Single Column Marquee Tool - Create a single column selection
Lasso Tool - a quick way to select a freeform area
Polygonal Lasso Tool - uses straight lines to select
Magnetic Lasso Tool - snaps to areas as you select
Quick Selection Tool - brush select areas
Magic Wand Tool - The Magic Wand tool selects similarly coloured areas.
Slice Tool - Make Slices
Slice Select Tool - Select Slices
Eyedropper Tool - Select a colour from an image
3D Material Eyedropper Tool - Select a colour from a 3D image
Colour Sampler Tool - Records several colour samples
Ruler Tool - Measure within your image
Note Tool - Make notes within your artboard
Count Tool - a helpful click and count tool
Spot Healing Brush Tool - Fix those spots!
Healing Brush Tool - paint with a sample to heal
Patch Tool - draw areas to heal
Content Aware Move Tool - Moves a whole selection repairing where its moved from
Red Eye Removal Tool - remove redeye from images
Brush Tool - Use a variety of brushes
Pencil Tool - Draw with a pencil
Colour Replacement Tool - Replace a colour
Mixer Brush Tool - Blends chosen colour with image
Clone Stamp Tool - replicate areas
Pattern Stamp Tool - Preset pattern brushes
History Brush Tool - Brush certain areas back to previous states
Art History Brush Tool - uses a stylized brushstroke to revert to previous state
Eraser Tool - Erase parts of the image with brushes
Background Eraser Tool - remove to transparent
Magic Eraser Tool - erases similar areas
Gradient Tool - creates gradients
3D Material Drop Tool - Loads selected material from a 3D object
Blur Tool - blurs edges
Sharpen Tool - sharpens edges
Smudge Tool - smudges the image
Dodge Tool - intelligently lightens areas
Burn Tool - intelligently darkens areas
Sponge Tool - saturate or desaturate colours
Pen Tool - Draw smooth paths with anchor points
Freeform Pen Tool - freehand path drawing
Add Anchor Point Tool - add points to an existing path
Delete Anchor Point Tool - remove points to an existing paths
Convert Point Tool - convert a corner point to a curved point or vice-versa
Horizontal Type Tool - Create horizontal type
Vertical Type Tool - Create vertical type
Vertical Type Mask Tool - Make a selection mask with Vertical type
Horizontal Type Mask Tool - Make a selection mask with Horizontal type
Path Selection Tool - To select Paths
Direct Selection Tool - to select anchor points on a path
Rectangle Tool - Draw a rectangle filled with the foreground colour
Rounded Rectangle Tool - Draw a rounded rectangle filled with the foreground colour
Ellipse tool - Draw an ellipse filled with the foreground colour
Polygon Tool - Draw a polygon filled with the foreground colour
Line Tool - Draw a straight line
Custom Shape Tool - Choose a predefined shape to add to your canvas
Hand Tool - Move around the image
Rotate View Tool - Rotate the image view
Edit Toolbar - add or remove things to your toolbar
Paint Bucket Tool - Fill similar areas with the foreground colour
Crop Tool - Crop your image
Note the letter next to the right of the tool text, you can use this as a keyboard short-cut for that tool..

This Photoshop Manual is one of an introductory series specially written for the Arts and Humanities Students at UEA by the Media Suite Team.
The UEA Media Suite Faculty of Arts and Humanities
With State of the Art digitisation equipment the newly built Media Suite will allow researchers and postgraduate students to digitise, interpret and visualise materials using the recording studios, radio
drama studio, a twenty workstation teaching suite, a digitisation lab, a breakout room and nine dedicated edit suites and will become a high quality focal point for digital humanities research at UEA..