photoshop cs/cs2 action pack - automator actions for adobe photoshop
DESCRIPTION
A manual explaining how to use Action Pack version 3.0 to create Automator Actions for Adobe Photoshop CS/CS2TRANSCRIPT

Photoshop CS/CS2 Action PackAutomator Actions for Adobe Photoshop
version 3.0 by Ben Long
Entire contents ©2006, by Ben Long

Photoshop Action Pack �
IntroductionIf you’ve gotten as far as reading this document, then you’re probably already familiar with Automator, the workflow automation application that’s built-in to OS X 10.4. Automator can make short work of long tedious workflow problems, but while the stock installation includes a tremendous number of Automator Actions – the bits of code that allow Automator to control other programs – the basic installation does not include any support for Photoshop.
The Photoshop Action Pack is a collection of 85 Automator Actions for both Photoshop CS and CS2. Once installed, you’ll be able to control most of Photoshop’s core functions from within Automator.
This manual will explain the basics of Automator workflow building, and provides tutorials for some of the particulars of the Photoshop Action Pack. The function and parameters of each action are detailed in the final reference section.
The Photoshop Action Pack is free, and you’re welcome to distribute it to anyone else, as long as you distribute the whole package. Note that you are not allowed to post the Action Pack on the web, without express permission. However, feel free to link to the actions at this address:
www.completedigitalphotography.com/index.php?p=339
While I feel that these actions should be freely available, they are a lot of work to make and maintain. If you find them useful, I certainly wouldn’t scoff at a donation of any size and in just about any currency. You’ll find a Paypal button at the above address, which provides an easy way to send me cash!
I hope you find these actions useful.
AcknowledgementsAs with previous versions, Version 3 of the Photoshop Action Pack would not be what it is without the help of a lot of other people. As always, AppleScript Product Manager Sal Soghoian generously donated time and advice to help me solve any number of problems. While the press may trumpet the iPod as Apple’s salvation, it’s people like Sal that are the company’s most valuable assets. John Nack and Jeffrey Tranberry at Adobe also contributed a lot of time to help me get past a number of Photoshop-specific troubles. Adobe is a great example of a third-party company that “gets” the value of AppleScript.
This version is also greatly improved because of the many suggestions, ideas for actions, and bug reports that have been sent in by users. It’s been great to discover that there are so many people out there with good ideas, who are fun to talk to, and are willing to help debug. Thanks!
Photoshop Action Pack �
What’s New In Version 3.0While version 3 of the Action Pack does not include any major architectural changes, it does pack some new actions and features that users have been requesting since the first version. (If you’re upgrading from version 1 to 3, then you’ll find that the architecture introduced in version 2 will require you to build your workflows in a very different way from what you’re used to. You’ll need to read this manual very carefully to learn how the new system works.)
Raw Support. The Photoshop Action Pack can now open any of Photoshop’s supported Camera Raw formats. For more details, see page 11.
New Actions. The new Action Pack contains eleven new actions (more if you’re updating from the oldest versions). In version 3 you’ll find the following new actions: Add Layer, Add Empty Adjustment Layer, Add Graphic Watermark, Channel Mixer, Duplicate Current Layer, Paint Daubs, Photo Filter, Resize to File Size, Scale to by 10%, and Swap Colors. If you’re using CS2, you’ll also find Exposure and Reduce Noise.
New Features. Many actions in the version 3 Action Pack have altered or additional features. In addition to the new Raw support, version 3’s strongest new features are its additional save options and stronger facility for non-destructive editing.
• The Render action now includes a Close Without Saving option.• Save for Web and Save as EPS options have been added to the CS2
Render action. Save for Web allows you to save as JPEG or GIF (or both).
• Color Balance, Hue/Saturation, and the new Channel Mixer action all have an option to add their effects as Adjustment Layers rather than as destructive edits.
• Shadow/Highlight, Mono Gaussian Noise, and Bleach Bypass no longer require that you activate GUI Scripting before use.
• Smart Sharpen, Shadow/Highlight, and Unsharp Mask now provide an option to automatically add their effects to a duplicate layer that has its own Layer Mask. This effectively lets you add these effects non-destructively.
• Resize Canvas now offers a choice of background colors.• Mono Gaussian Noise now allows you to apply noise to a new
layer filled with color. Full control of blending mode and opacity is provided.
• Filter by IPTC now properly passes files when using the “Filter Immediately” option.
• All sizing actions now work properly with all unit types.
Bug Fixes. The Action Pack has seen many bug fixes, big and small. Most importantly, the Action Pack can now process files whose names contain international characters and any type of punctuation.

Photoshop Action Pack �
InstallationTo install the Photoshop Action Pack, double-click on the Photoshop Action Pack Installer. If you are upgrading from version 2.0 or earlier, which used a stand-alone Photoshop Action Pack document, then throw that document in the trash and empty the trash. If you have moved any individual actions from the Action Pack into your Library > Automator folder, then you should delete those actions.
Make certain that there are no copies of the previous Action Pack anywhere on your system, even in the trash. The presence of these files can greatly confuse Automator.
You can install both the Photoshop CS and CS2 Action Packs on your system at the same time. The two applications will appear as separate entries in Automator.
After installing, hold down the Option key when you launch Automator. This will force it to rebuild its library of actions.
Customizing Your InstallationIf you’d like to remove some actions from your Automator Library, (though I can’t understand why you would ever want to) delete them by hand from the Library > Automator folder.
UpgradingIf you’re upgrading from a previous version of the Photoshop Action Pack, then you should hold down the Option key while launching Automator after first installing the upgarade. This will force Automator to rebuild its library of installed actions.
If you’re upgrading from a version 1.x Action Pack, then you will definitely have to rebuild your existing workflows, both to accomodate the newer architecture – which requires that you do things a little differently – and because if a particular action has changed significantly, then workflows that use previous versions of that action may not function properly.
If you’re upgrading from the version 2.x Action Pack, and you find that your workflows are behaving strangely (or not at all) then try rebuilding them from scratch.
Check for UpdatesAll actions include a Check for Updates button which will take you to a web page that will let you know if you’re running the latest version. This

Photoshop Action Pack �
facility only checks for updates to the entire Action Pack, not for individual actions. The update page will tell you what’s new in the update.
Getting Started With AutomatorAutomator is an application included with OS X 10.4. With it, you can build “workflows” – simple scripts that can control any application that is AppleScriptable. (AppleScript is a scripting language that has been built-in to the Mac OS since around System 7.) You don’t need to know anything about AppleScript, or scripting in general, to use Automator, making it far easier then coding AppleScript by hand.
To control an application, you must first install special Automator Actions – small bits of code that allow Automator to perform a particular task in a specific application. Automator comes standard with a number of Actions for controlling many of OS X’s basic applications.
When you launch Automator (you’ll find it in your Applications folder) you’ll see an empty Workflow window. A Workflow is a collection of Actions that perform a specific set of operations.
In the Workflow window, the Library pane lists all of the applications for which you’ve installed Actions, along with some example workflows, and copies of any workflows that you’ve made.
Twirl open the arrow next to the Applications folder, and you’ll see a list of all of the applications that you have Actions for. If you followed the
FIGURE 1 To use Automator, you drag
Actions from the Actions library into the empty area of the
Workflow window.

Photoshop Action Pack �
installation steps in the previous section, you should see either Photoshop CS or Photoshop CS� listed.
When you click on an application in the Library pane, all of the actions available for that app are displayed in the Action pane. You create a workflow by dragging actions from the Action pane into the main workflow pane to the right. You can drag actions above, below, or in-between other actions, or you can double-click on an action in the Action pane to automatically add it to the bottom of the workflow.
Building a Simple Photoshop WorkflowLet’s begin by making a workflow that automatically resizes an image, converts it to grayscale, and saves it as a JPEG file.
1 Launch Automator.
2 In the Finder, open the Examples folder that was included with this document. Drag the files Bridge at Night.psd, Estonia Building.jpg, and Flying gull feet.psd into the large blank pane of the Automator workflow. Automator will automatically add a Get Specified Finder Items action to your workflow and include your images in that action. Get Specified Finder Items is a Finder action that allows you to select particular items in the Finder.
When building a workflow, you should think about the steps that you would take if you were performing the workflow by hand. Then find the action for each of those steps, and add it to your Automator workflow. If you were working “by hand” you would first select the images you wanted to work on, and then open. Our Get Specified Finder Action peforms the selection.
3 In the Library pane, click on Photoshop. Then double-click on Open in the Action pane to add the Open action directly below the Get Specified Finder Items action. (Figure 2)
FIGURE 2 Get Specified Finder Items lets
us select specific documents and folders to process. This list
of items is passed to the next Action in the workflow. It, in
turn, passes the list—or a modi-fied version of the list— on to
the next action.

Photoshop Action Pack �
Notice that the actions are linked together. In the lower-right corner of the Get Specified Finder Items is an arrow that says Files/Folders. This arrow is, in turn, linked to a corresponding arrow at the top of the Open dialog. Every Action is capable of receiving and passing on certain types of information. In this case, it’s a list of files.
After opening our images, we want the workflow to resize them. The Photoshop Action Pack provides two actions that can do this: Image Size, and Scale Image. We’re going to use Scale Image.
4 Click on the Scale Image action in your workflow and notice that a small description appears in the lower-left corner of the Workflow window. If you scroll down in the description, you’ll eventually see Input and Output. These entries list what the action can receive and pass on. Most actions are capable of receiving lists of files and folders.
5 Configure the Scale Image action: enter a length of 300 pixels, and a Resolution of 72. Each image will be scaled so that its longest axis is 300 pixels long. The short axis will be automatically scaled proportionally.
6 Now click on Change Mode in the Action pane to add a Change Mode Action to the end of your workflow. In the Change Mode action, change the To pop-up menu to Grayscale. Note that now Scale Image shows that it is passing Files/Folders on to the next action.
We’ve now configured all of the Photoshop actions that we want to perform. Because of the way the Photoshop Action Pack is designed,
A copy of this workflow is in-cluded in the Examples folder that came with the Photoshop
Action Pack. The workflow is called Example 1.
Photoshop Action Pack �
none of these Photoshop operations happen unless you add a Render action to the workflow. The Render action causes Photoshop to apply all of the operations that you’ve specified. Render also provides the opportunity to save your images.
7 Double-click to add a Render action to your workflow, then check the Save as JPEG box in the Render action. By default, each image will be saved with its original name in its original location.
8 Enter “Example” in the New Name field. Now, each document will be named Example followed by a sequential number. If you want, you can click the Destination button to select a new destination path.
Most of the rest of the options are the standard Photoshop JPEG save options.
If you were to add another Action after Render, the new action would receive the same list of images that were passed to Render. However, in a complex workflow, you might want to process the new images – the ones you’ve saved. Checking the Pass saved files checkbox will pass on the new files to the rest of your workflow.
9 Save your workflow by selecting File > Save, and then press the Run button in the upper right corner of the Workflow window. You should see the selected images open in Photoshop, turn gray, shrink, and then save. Automator will make a sound when it has finished, and the progress indicator at the bottom of the workflow window should say “Workflow executed successfully.” You should now have three new documents in the location you specified.
Odds are, you won’t need to always re-process these same images, but will want to run a workflow on different files at different times.
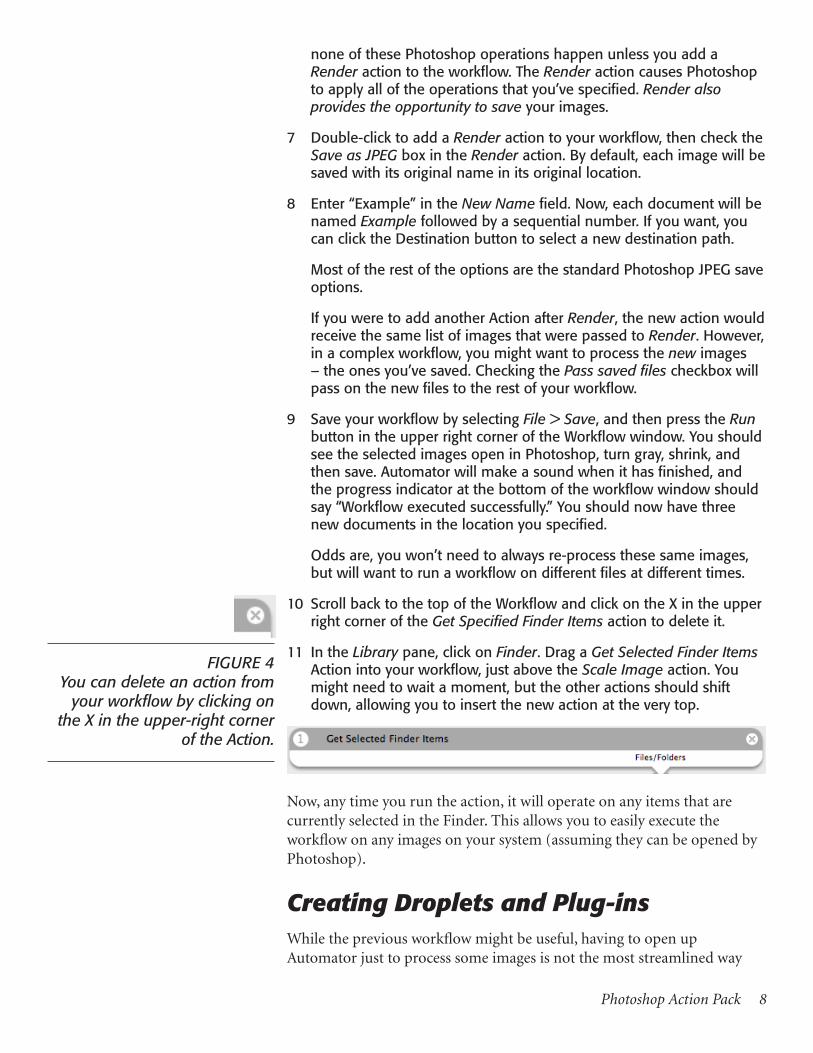
10 Scroll back to the top of the Workflow and click on the X in the upper right corner of the Get Specified Finder Items action to delete it.
11 In the Library pane, click on Finder. Drag a Get Selected Finder Items Action into your workflow, just above the Scale Image action. You might need to wait a moment, but the other actions should shift down, allowing you to insert the new action at the very top.
Now, any time you run the action, it will operate on any items that are currently selected in the Finder. This allows you to easily execute the workflow on any images on your system (assuming they can be opened by Photoshop).
Creating Droplets and Plug-insWhile the previous workflow might be useful, having to open up Automator just to process some images is not the most streamlined way
FIGURE 4 You can delete an action from
your workflow by clicking on the X in the upper-right corner
of the Action.

Photoshop Action Pack �
to work. Fortunately, Automator provides some other ways of triggering a workflow.
1 Choose File > Save as to save a new copy of your workflow. In the resulting dialog box, enter a new name, and change the File Format pop-up menu to Application. Choose a destination directory, then press Save. This will create a small applet that will perform your workflow. Just drag and drop any images onto this applet and they will automatically be grayscaled, resized, and saved as JPEGs.
2 If you’re not sure that you always want to convert to grayscale, open the Options section of the Change Mode action and check the Show Action When Run box. At runtime, the user will be presented with a Change Mode dialog box that will allow them to select the mode that they’d like to use. In this way, you can give the end-user a little control of your workflow.
Automator can also create special plug-ins for triggering Workflows in other ways. Choose File > Save as Plug-in, then enter a name and select the type of plug-in you’d like to create.
• Finder plug-ins can be triggered by ctrl-clicking on any item(s) in the Finder and then selecting the desired workflow from the resulting pop-up menu menu.
• Folder Actions turn your workflow into a standard Folder Action, allowing you to apply your workflow to any document placed in a particular folder.
• iCal Alarm lets you specify a workflows as a type of alarm in iCal, so that you can trigger workflows at particular times.
• Image Capture plug-ins give you a way to trigger workflows from within Apple’s Image Capture application.
• Print Workflow installs your workflow within the Print dialog box.• Scripts menu installs your workflow in the standard AppleScript
Scripts menu.
While you can easily pass workflows and applets around, a workflow will only run if the included actions are installed.
Learning moreTo learn more about how to create Folder Actions, iCal Alarms and other Automator niceities, consult Automator’s on-line Help menu. You should

Photoshop Action Pack 10
be able to find out most of what you need to know about a particular action by simply reading the description information that appears with each Action within Automator.
Using the Photoshop Action PackThe Photoshop Action Pack was designed to provide access to all of the Photoshop operations that you might want to automate. Obviously, painting and cloning and other “interactive” operations can’t be scripted, but otherwise, Photoshop’s scripting support is extremely robust, and you should find that most of what you’d want to automate is represented by these actions.
While most of the actions in the Action Pack are pretty straightforward, others were designed to facilitate certain types of workflow operations. In this section, you’ll see how to use the Action Pack to solve typical digital photo workflow problems. Even if you’re an experienced Automator user, it’s worth reading the following to see how some of these Actions were intended to be used. Detailed explanations of each action are provided in the next section.
Open and RenderWhen you run a workflow, Automator takes all of the objects that you’ve passed to the workflow and hands them to the next action. That action is performed on each object, and the results are passed to the next action. This creates some problems when working with large Photoshop documents, because it requires Photoshop to open all of the documents at the beginning of the workflow, or engage in an inefficient process of saving and re-opening every document for each action.
In version 1.x of the Photoshop Action Pack, you could try to work around these problems by using special Save and Close options at the end of certain actions, or by using the Batch Manager, a combination application/Automator action that would automatically divide your source batch of images into smaller batches.
With version 2, these hacks are no longer necessary thanks to an architecture that works a little differently. Now, after selecting your documents, you must explicitly open them using an Open command. You then add all of the Photoshop actions that you want. None of these actions actually cause anything to happen in Photoshop. Instead, they simply add themselves - and their parameters - to a list of operations that is stored in your Preferences folder. To actually apply the effects, you must use a Render action.
The Render action works through the list of edits that you’ve defined, and applies the full list to each document individually. This completely

Photoshop Action Pack 11
eliminates the problem of Automator opening every document with every action. Because all of the processing actually occurs in one single action, only one document at a time is opened.
However, you must remember to include the appropriate Open and Render commands. If you’re used to working with early versions of the Action Pack, it can be easy to forget these essential steps. If you skip an Open command, your workflow will still run, but will fail at the Render action. If you forget the Render action, then your workflow will run, but you won’t see any results in Photoshop.
By default, after the Render action executes, the file list that was originally passed to the Render action is passed on to the rest of the workflow. If you check the Pass Saved Files checkbox in the Render action, then the saved files will be passed on to the rest of the workflow. However, if you want to do anything in Photoshop with the images passed by the Render action, then you’ll need to issue another Open command.
In addition to Open, Open as Raw Data can be used to open files that were saved in Photoshop’s Raw Data format, (this is for Photoshop’s Raw Data format, not for Camera Raw files, which will be discussed later) while Use Currently Open Documents can be used to process images opened in Photoshop by other applications. Restore Original File List also serves to open files, and you’ll learn more about it in the section on filtering.
Saving
The Render action is also where you’ll perform all of your file saving operations. The Render action can be configured to save multiple versions of each document. Simply check the appropriate checkboxes and configure the filename and destination for each one. All of the standard saving options are provided for each format.
For more on the Render action, see page 60.
Working with Camera Raw filesVersion 3 of the Action Pack can open any Camera Raw format currently supported by Photoshop. To open a Raw file from an Automator workflow, just pass the name of the file to the Photoshop Open action, just as you would with any other Photoshop file type. When the Render action is executed, the Camera Raw file will be opened and processed.
When you open a raw file in Photoshop Camera Raw, you are normally presented with the Camera Raw interface, which allows you to configure the raw conversion parameters that you want for that particular image. When you’re finished configuring your parameters, you have the option of saving the converted image, opening it in Photoshop, or simply closing the document without doing any actual raw processing. No matter which option you choose, Camera Raw will write your parameters into a special configuration file. Any time you open the document, those parameters will

Photoshop Action Pack 1�
be read from the configuration file and your document will be processed accordingly.
Where the parameters are stored depends on how you have Camera Raw configured. By default, all parameters are stored in an internal camera raw database. With a simple preference change, you can tell Camera Raw to store raw parameters in separate “Sidecar XMP” files.
These are small text files that sit in the same directory as the raw file itself. The advantage of sidecar files is that they can travel with your document as you move it from computer to computer, archive it, or back it up.
When you open a Camera Raw file using the Photoshop Action Pack’s Open action, the image will be processed according to the parameters that have been stored for that file, whether they’re stored in the database, or sidecar XMP files. If no parameters are available, then the document will be processed using Camera Raw’s default raw processing algorithms.
There’s no way to configure raw conversion parameters from within an Automator workflow - and this is not a process you’d want to automate, since most images need custom adjustments. What Automator is good for, though, is starting the raw conversion process after you’ve already configured the parameters for your images.
For example, in Adobe Bridge, you might work your way through a batch of raw files, configuring the raw parameters for each one. Rather than opening or saving any of these images, though, you would simply press the Done button in Camera Raw.
This will write out your conversion parameters, without actually processing the image. When you’re ready to convert the images, you can add them to a workflow, and let Automator take care of converting them using Camera Raw. Raw processing can take a while, so this procedure is handy in that it allows you to defer all of your raw conversion until later.
Automator adds some additional advantages to your raw methodology. You can easily create an Automator workflow that opens and processes your raw files, (according to your pre-defined specs) saves each file as a full-res 16-bit Photoshop file, and then automatically creates a separate set of smaller, 8-bit JPEGs for immediate posting to a web gallery.
To save an opened raw file, you must specify a file type in the Render action – you cannot simply choose the Save option. This guarantees that you will never write over your original raw file.

Photoshop Action Pack 1�
Filtering DocumentsAutomator does not provide any logical operations. Like Photoshop’s built-in Actions mechanism, Automator can’t perform comparisons or branches. The Photoshop Action pack, though, provides a set of Filtering actions that allow you to filter a batch of documents based on image criteria.
With the filter actions, you can filter your documents by aspect ratio, bit depth, color mode, EXIF tags, file type, IPTC metadata, orientation, and size. You can also stack filters to create more complex filtering operations.
Say you have a web design that includes images with a 3:2 aspect ratio. You have a large batch of images and want to pull out only those with a 3:2 ratio, and prepare them for your design. The following workflow finds only images with a 3:2 aspect ratio, then resizes and saves them as JPEGs.
In the Render action, you would configure the Save as
JPEG option to save your files as JPEG images. (Due to space
concerns, we can’t show the entire Render action in this
manual. It’s rather large.)
A copy of this workflow is in-cluded in the Examples folder that came with the Photoshop
Action Pack. The workflow is called Example 2.

Photoshop Action Pack 1�
Saving and Restoring Lists of Files
The Open action also includes an option to Save a copy of file list. This stores the original unfiltered list of images. You can use the Restore Original File List action later in the workflow to reinstate the original batch of images.
Consider this fairly complex problem: we have a folder of 75 images of varying sizes, all of which have been converted to CMYK and are ready for print production. Unfortunately, the art director now wants to see a web gallery of JPEGs of the images, for final approval. Our images are at print rez, so they’ll need to be resized, in addition to being converted to 8-bit, RGB images.
For the web gallery, the images need to fit in a 400 x 400 pixel box, so we’ll use the Fit Image action. However, some of the images are smaller than 400 x 400 pixels. If we run them through a Fit Image action and resize them to 400 x 400 pixels, then they’ll actually be enlarged. What we want to do is to create a workflow that only applies the Fit Image action to images that are larger than 400 x 400 pixels (this is also in addition to the mode and bit depth changes). Here’s how it will work.
1 Begin by adding the images you want to process. This will automatically create a Get Specified Finder Items action. Next, add a Photoshop Open action, and check the Save a Copy of File List box.
2 Next, add a Filter by Size action to filter out the images that are larger than 400 pixels on a side.
Thanks to the filter, we’re now working only with the larger images in our batch. We’re ready to perform our basic conversions in Photoshop.
3 Add Change Mode, Change Bit Depth and Flatten actions.
A copy of this workflow is in-cluded in the Examples folder that came with the Photoshop
Action Pack. The workflow is called Example 3.

Photoshop Action Pack 1�
Our image is now ready to be resized before the new version is saved out to disk.
4 Add a Fit Image action to the end of the workflow and configure it as follows:
5 Add a Render command, and check the Save as JPEGs button to save JPEG copies of our rendered images. We want the new files to have the same names as their originals, to facilitate easier reference, so we leave the filename alone, and select a new destination for saving. (Because the Render action pane is so large, we’re only showing the Save as JPEG section here.)
That takes care of all of the images in our batch that needed to be resized - the ones over 400 pixels on either side. Now we want to

Photoshop Action Pack 1�
turn our attention to all of the images that were not passed by the Filter by Size action.
Remember that in the Open action, we checked the Save a copy of file list option. This stored a copy of the original batch of image document names. We can now use a Restore Original File List action to return to that original list of documents.
6 Place a Restore Original File List action immediately after the Render action. It will restore the list to its original state and open the files, so it serves the same function as an Open action.
7 In the Restore Original File List action, check the Inverse current filtering button which will restore to the opposite of what we filtered earlier. In other words, everything that wasn’t passed by our Filter by Size action will now be selected and passed to the next action.
This means we’re now operating on all images that are smaller than 400 pixels on either side. These images don’t need to be hit with a Fit Image action, but they do need all of the other image processing operations that we applied earlier.
8 Add Change Mode, Change Bit Depth, and Flatten Document actions, just like you did before.
9 Finally, we’ll add another Render action, which will render these effects on our second batch of images and save them with their original names, into the same folder that we saved the other images.
To recap: this workflow first filters the batch to find images larger than 400 x 400 pixels. It takes those images and does a mode change, bit depth change, and flatten operation, then resizes them using Fit Image, and saves them. It then restores to the inverse of the previous filter to select all of the documents that weren’t selected earlier, process them but doesn’t resize them, and then saves them. A copy of this workflow is included in the Examples folder that ships with the Photoshop Action Pack.
Using Filter Immediately
There will be times when you want to filter a batch of documents using the Photoshop Action Pack filters, but process the documents using a different application. For example, say you have a folder full of images and you want to move all of the images with a 4:3 aspect ratio into one folder, and all of the images with a 3:2 aspect ratio into another folder.
Note that the Inverse feature of the Store Original File List ac-
tion won’t work if you’ve nested filters, simply because there’s
no inverse of a nested filter operation.

Photoshop Action Pack 1�
Normally, all filter operations are actually performed by the Render action. However, in this case we don’t have any rendering to do, and so won’t be using a Render action.
All filters include a Filter immediately option which causes the filter action itself to filter the image. The results are then passed to the next item in the workflow. To create this workflow:
1 Begin by dragging the documents to be processed into the workflow to create a Get Specified Finder Items action.
2 Add an Open command. Check the Store a copy of file list option, to save a copy of the original batch.
3 Add a Filter by Aspect Ratio action, and configure it to find only the images in the batch that have a 4:3 aspect ratio. However, we want this filter operation to be performed immediately – rather than in a Render action – so check the Filter immediately checkbox.
Only images with a 4:3 aspect ratio will be passed on to the next action in the workflow.
4 Add a Move Finder Items action. You’ll find this by clicking on Finder in the Library pane. Configure the Move Finder Items action to copy the images into a special folder. We created a 4 to 3 Images folder to hold these images.

Photoshop Action Pack 1�
5 Now we’re ready to move the 3:2 images. We’ll use a Restore Original File List action to retrieve our original file batch.
We could use the Inverse current filtering option to restore to the files that weren’t selected by the previous filter. However, this batch of images might contain images that have other aspect ratios, so we’re going to restore the entire list and then filter it again
6 Add another Filter by Aspect Ratio action, but configure it to find 3:2 images. Again, check the Filter Immediately box.
7 To finish the action off, we simply add another Move Finder Items action, but this time configure it to save into our designated 3 to 2 folder.
If you’d rather copy these images, instead of moving them, you can use a Copy Finder Items action, also found in the Finder category.
Accessing Unsupported FeaturesWhile the Photoshop Action Pack gives you access to the majority of Photoshop’s core features, there might still be one or two things that you need to use from time to time that aren’t provided for. Fortunately, though Photoshop may not provide external scripting support for all of its features, you can use internal Photoshop actions to do just about anything.
Remember, for all of these examples, you must configure any file path parameters. This
workflow is included in Example 4 in the Sample
Workflows folder that came with this document.

Photoshop Action Pack 1�
The Photoshop Action Pack provides a Do Action action within Automator, which lets you trigger any Photoshop action that is currently defined.
So, if you need acess to a particular feature - such as a filter - that isn’t accesible with the Photoshop Action Pack, create an action within Photoshop to apply that filter, and then trigger that Photoshop action from the Automator Do Action action.
Becuase it’s just too confusing to write about both Automator actions for Photoshop and Photoshop’s internal actions at the same time, we’re going to stop here and move on to the next topic.
Photoshop Action Pack Tricks and IdeasMany of the actions included in the Photoshop Action Pack should have very obvious uses - resizing, changing mode and bit depth, adding noise filters, and so on are all pretty straightforward. But, several of the actions have been designed to facilitate a very particular way of working with Photoshop, and their utility may not be immediately obvious. To help you better understand why some of these actions have been included, here are some simple suggestions and tips for how to get more out of the Photoshop Action Pack.
• Createaworkflowtoprepareyourrawfilesforediting. Since the Action Pack now supports Photoshop Camera Raw files, you can easily batch process raw images using Automator. If you tend to make lots of additional edits after raw conversion, then you might want to make a workflow that automatically preps your raw files for additional editing. First, use an Open action to open the raw file, then use an Add Empty Adjustment Layer action to automatically add a Levels or Curves (or both) Adjustment Layer. These Adjustment Layers won’t actually have any adjustments defined, they’ll simply be empty and waiting for you to configure them as needed.
• Protectyourownership.If you’re preparing images for posting on the web, use an Edit IPTC Info action to add your copyright information to your images, then use an Add Watermark or Add

Photoshop Action Pack �0
Graphic Watermark action to add a personalized watermark to your images.
• UsePaint Daubstosharpenweb-resimages. While Photoshop’s Paint Daubs filter can be used to create interesting natural media effects, it also provides a very good sharpening effect if you apply it to low-res (less than 800 x 800 pixels) images. Configuring Paint Daubs with a Brush Size of 1 and Sharpness of 16 will usually yield very good sharpening results on small images.
• Worknon-destructively. Where supported, the Photoshop Action Pack allows you to apply edits as Adjustment Layers, rather than as destructive edits. For example, the Hue/Saturation, Color Balance, and Channel Mixer actions all provide an option for applying an Adjustment Layer rather than directly processing your image. While Photoshop does not provide Adjustment Layers for sharpening or adding noise, the Photoshop Action Pack sharpening and noise actions include an option that will automatically duplicate your source layer before applying any sharpening or noise reduction. These actions can also automatically add a Layer Mask. The result is a duplicate, sharpened or noised layer that can be easily composited with the underlying original layer, allowing you to create localized sharpening and noise effects.
For actions that don’t include this feature, you can create it by hand by first using the Duplicate Current Layer action to make a copy of the layer you want to edit. Then apply your additional actions to that duplicate layer. For more details, see the Duplicate Current Layer action on page 38.
• SavemultipleformatswithasingleRendercommand.Note that you can check as many save options as you want in the Render action. This means that you can create a single workflow that can write out multiple formats of every document that you process.
• Don’tforgettouseotherapplications.One of Automator’s biggest strengths is that automation is not limited to a particular application. You can freely mix Photoshop actions with actions from other programs. So, in a single workflow, you can process images in Photoshop, email the results using Mail, and upload other results to an FTP server using an FTP program such as Panic’s Transmit. Or, you can mix and match image processing functions from different Automator-capable image editors. So, you might use Automator to perform some actions in Photoshop, and others in another graphics application like iPhoto.
• Don’tforgetthePhotoshopHelpfile. This manual documents all of the actions included in the Photoshop Action Pack, and though parameter descriptions are included for each action, this document assumes some familiarity with the actual Photoshop feature that the action is driving. If you want to know more about what particular parameters and controls do, consult the Photoshop Help file for that command.

Photoshop Action Pack �1
Example WorkflowsIncluded in the Examples folder, you should find a folder of Sample Workflows. These provide some very simple examples of basic Photoshop workflows that you can create with Automator. Examining existing workflows is often a very good way to learn how to use particular actions.
The following example workflows are provided. You’ll need to have the appropriate Action Pack installed to view these workflows.
Example workflows
The example workflows shown earlier are provided in the Examples folder. To use these workflows, you’ll need to alter any parameters that reference a particular folder on your drive.
Prep for Printing
Often, when you come back from a shoot, particularly if you’ve simply been shooting snapshots, it’s nice to be able to quickly knock out some 4 x 6 inch prints. This workflow prepares a batch of images for 4 x 6” printing.
It first assigns the appropriate printer profile (obviously, this assumes you want to print on an Epson 2400; you can easily delete this action if you have a different printer), and then scales the image to 4 x 6” at 240 dpi. The Photoshop Action Pack provides several different resizing actions. In this case, Scale is a better option than Resize Image, because it works independently of orientation.
Next, the workflow performs an Auto Levels adjustment, and then applies an Unsharp Mask filter. Finally, it adds my copyright information to the document’s IPTC tags. Then the images are rendered and saved.
Prep for Web
A variation of Prep for Printing, this workflow prepares your images for posting on the web. It first uses a Fit Image action to fit the images into the chosen display size. Because Fit Image automatically adjusts itself for image orientation, this is the best way to resize to fit images with different orientations into a given size.
Next, it hits the images with Auto Levels and then some sharpening, and then applies a watermark and flattens the image. Finally, copyright information is added, and the image is rendered and saved as a JPEG file.
Note that in the Render the Save as JPEG Action is opting to “Pass saved files instead of originals.” This means that the rest of the workflow will operate on our processed, saved images, rather than the original batch. If you uncheck this box, then all of the original images will be passed to the rest of the workflow.

Photoshop Action Pack ��
The workflow next connects to a specific server, and then uses the Copy Finder Items action to copy our processed, saved files to a remote server. Obviously, these last two steps have to be configured for your particular server and destination directory.
Alternately, you could take the results of this action and pass them on to an FTP action that would automatically upload them to your server. The current version of Panic Software’s Transmit, an excellent FTP client, includes built-in Automator actions for transferring files. (www.panic.com)
Spotlight Example
Performing Spotlight searches within a workflow can save you a tremendous amount of hassle if you need to process images that are spread among many directories.
This example gathers up all of the images in our Pictures folder that have a .jpg extension. (This folder is just used for the sake of example. You might want to think twice before running this workflow, as there might be a lot of images in your Pictures folder, especially if your Pictures folder contains an iPhoto library.)
Those found images are passed on to the Filter From IPTC action which culls the images that have a particular author tag. With these two simple steps, we’ve found all of the JPEG files authored by a particular person. The resulting images are scaled and saved into a new location.
Other Examples
Check back to www.completedigitalphotography.com for more example workflows. I will post more as time allows. In the meantime, you can find more examples, actions, and Automator coverage at the following sites:
www.automator.us
www.automatorworld.com
www.automatoractions.com
www.apple.com/automator

Photoshop Action Pack ��
Photoshop Action PackAction Reference

Photoshop Action Pack ��
Add Layer
Adds a new layer to your document, above the currently selected layer. By default, Photoshop’s normal naming scheme is used. You can enter a custom name in the Name field.
Add Empty Adjustment Layer
Adds an empty Adjustment Layer above the currently selected layer. By default, Photoshop’s normal naming scheme is used, but you can override it by entering a custom name in the Name field.
Parameters
Name: The name of the new layer.
Layer Type: The type of Adjustment Layer to add - Levels, Curves, Color Balance, Brightness/Contrast, Hue/Saturation, Invert, Threshold, Posterize.

Photoshop Action Pack ��
Add Graphic Watermark
Superimposes an image file over the current image. Allows you to apply a Layer Style to the superimposed image, as well as change opacity and select a Transfer Mode. Because Photoshop does not currently provide any way to position a layer through scripting, the superimposed image is placed in the middle of the destination file. If you want the watermark to appear in a particular location then you will need to create it at the same size and resolution as your target files, and design the watermark accordingly.
Parameters
Choose Watermark Image: Allows you to select any Photoshop-compatible file to use as a watermark.
Apply Layer Style: Specify the name of an existing Photoshop Layer Style, and your watermark layer will have that style applied to it.
Opacity: Lets you change the opacity of the watermark layer.
Transfer Mode: Lets you select any standard Photoshop Transfer Mode for the watermark layer.
Flatten after adding watermark layer: Flattens the entire document after adding and configuring the watermark layer.

Photoshop Action Pack ��
Add Watermark
Adds a text watermark to your image. The watermark is created by adding a text layer which contains your watermark text in the size and color you specify. The apparent size of the text is based on the resolution of your original document. For very high-rez docs, it’s sometimes better to first change the resolution to something lower, add the watermark, and then change back to your original resolution. (See Resize Image for more on changing resolution.) For best-results, it’s a good idea to flatten your document before applying a watermark.
Parameters
Add file name: Let’s you add the file’s name to the watermark.
Apply Layer Style: Specify the name of an existing Photoshop Layer Style, and your watermark layer will have that style applied to it.
Position: Controls where the watermark will be placed.
Size: Size of the watermark.
Color: Color of the watermark. Available choices: red, green, blue, white, black, gray.
Opacity: Allows you to make the watermark semi transparent (or semi-opaque, if you’re that kind of person).
Transfer Mode: Applies a blending mode to the text layer.
Flatten after adding watermark layer: Flattens the final image after adding the watermark layer. You will not be able to edit the watermark after this step.

Photoshop Action Pack ��
Arbitrary Rotate
Allows you to rotate the entire image by the specified amount. This rotates the image canvas, meaning all layers will be rotated as well.
Parameters
Angle: The amount to rotate. Positive numbers rotate clockwise, negative numbers rotate counter-clockwise.
Assign Color Profile
Executes Photoshop’s Assign Color Profile command. For more on what this does, consult Photoshop’s Help file. This action automatically checks the mode of the image and applies the appropriate chosen profile.
Parameters
Don’t manage / Working profile / Custom profile: Causes the action to do nothing, assign the working profile, or assign the profile specified in the pop-up menus. Using the menus, you can specify your desired profiles for RGB, CMYK, or Grayscale images. The action will automatically pick the one that’s right for the mode of your document.

Photoshop Action Pack ��
Assign Custom Profile
Allows you to assign any ICC profile to the current batch of documents. The profile must be currently installed in the Library > ColorSync > Profiles folder. If the profile is not visible to Photoshop, then it won’t work with this action. To specify a profile you can either type its name into the profile field (it must be typed exactly as it appears in Photoshop’s Assign Profile dialog) or you can press the Choose Profile button and then navigate to the profile that you want to use. Note that some profile documents contain multiple profiles. So, for example, you might see a file that says “Acme Model T” rather than separate files for each profile provided by your Acme Model T printer. To specify a specific profile, you’ll need to type it in by hand.
Parameters
Profile: The currently installed profile that will be assigned to the current working batch of images..
Assign Epson 2200/2400 Profile
Allows you to assign one of the custom profiles included with the Epson Stylus Photo 2200 or Epson Stylus Photo R2400 printers.
Parameters
RGB Images: Epson’s profiles only work with RGB images. Pick the profile for your desired paper type from the menu. These are the standard, stock profiles that ship with the printers.

Photoshop Action Pack ��
Auto Contrast
Applies Photoshop’s Auto Contrast command. There are no customizable controls, it simply adjusts contrast based on the image’s histogram. If an image has layers, then the action is applied to the currently selected layer. Photoshop remembers the last-selected layer of a document from session to session.
Auto Levels
Applies Photoshop’s Auto Levels adjustment to the current layer. Photoshop remembers the last-selected layer of a document from session to session.
Bleach Bypass
Simulates the high-contrast, undersaturated look of a bleach bypass process. The bulk of this operation is performed using hard-coded image adjustments that have no parameters. The last step, however, applies a slight desaturation. You can adjust the amount of Desaturation using the Desaturation Amount field. If you prefer a more saturated look, you can deactivate the last step by checking the “Skip final desaturation step” checkbox. This action flattens any layers before executing.

Photoshop Action Pack �0
Parameters
Desaturation Amount: Enter an integer value from -100 to 100 to control the amount of desaturation that is applied at the very end of the operation. The default value is -37. Positive numbers will increase saturation.
Skip final desaturation step: Forces the operation to skip the final desaturation step.
Change Bit Depth
Changes the bit depth of the image to either 8 or 16-bit.
Parameters
Convert Image to: Allows you to select 8 or 16 bit.
Change Mode
Changes the color mode of the image.
Parameters
To: Allows you to select the desired color mode. Options provided are RGB, CMYK, L*A*B, grayscale, bitmap, indexed color.
Bleach Bypass before and after

Photoshop Action Pack �1
Change Pixel Aspect Ratio
Changes the pixel aspect ratio setting for the document. Consult Photoshop’s Help file for more on pixel aspect ratios.
Parameters
Change to pixel aspect ratio: Lets you select from Photoshop’s standard pixel aspect ratio choices: Square, D4/D16 Standard (.95), D1/DV PAL (1.066), D1/DV NTSC Widescreen (1.2), HDV Anamorphic (1.333), D1/DV PAL Widescreen (1.422), D4/D16 Anamorphic (1.9), Anamorphic 2:1 (2),
Change Resolution
Changes the resolution of the current image. If none is selected for resampling, then the document’s resolution is changed but print size remains the same. If a resampling method is chosen, then the document’s resolution is changed, the the document is resampled to preserve its print size at that resolution.
Parameters
Interpolation: Allows you to select the interpolation method that you want to use for the resampling. All of the standard Photoshop interpolation methods are provided.

Photoshop Action Pack ��
Channel Mixer
Applies Photoshop’s Channel Mixer effect. Currently, the Channel Mixer action can only output a grayscale image, making it really only useful for doing grayscale conversions. Consult Photoshop’s Help file for more information on the Channel Mixer controls.
Parameters
Output Channel: Lets you select the type of output you want. Currently only allows Grayscale output.
Source Channels: Specifies how the current color channels should be mixed.
Constant: Lets you apply an overall brightening or darkening to the resulting image.
Add as Adjustment Layer: Check to apply the effect as a standard Adjustment Layer, rather than as a destructive effect.
Clouds
Applies Photoshop’s Clouds filter. If an image has layers, then the action is applied to the currently selected layer. Photoshop remembers the last-selected layer of a document from session to session.

Photoshop Action Pack ��
Color Balance
Applies Photoshop’s Color Balance effect. Provides the same interface and features as Photoshop’s built-in Color Balance dialog and Adjustment Layer.
Parameters
Color sliders: Use the color sliders to define the color shift that you want to make.
Shadows/Midtones/Highlights: Lets you select which color range you want the sliders to adjust. You can define separate settings for each range.
Preserve Luminosity: Performs the color shift without altering the luminosity of the affected colors.
Add as Adjustment Layer: Adds the Color Balance effect as an Adjustment Layer rather than as a destructive effect.
Convert to Profile
Converts your document to the chosen color profile. See Photoshop’s Help facility for more on color profiles and color spaces. The profile must be currently installed in the Library > ColorSync > Profiles folder. To specify a profile you can either type its name into the profile field or you can press the Choose Profile button and then navigate to the profile that you want

Photoshop Action Pack ��
to use. Note that some profile documents contain multiple profiles. So, for example, you might see a file that says “Acme Model T” rather than separate files for each profile provided by your Acme Model T printer. To specify a specific profile, you’ll need to type it in by hand.
Parameters
Choose Profile: Allows you to select the profile document that you want to convert to. Alternately, you can enter a profile name by hand.
Intent: Allows you to select the rendering intent that you want to use for the conversion.
Blackpoint compensation: Performs black compensation during conversion.
Dithering: Allows dithering during conversion.
Copy Data to IPTC
Copies the specified file information to one of the document’s IPTC fields. If you are planning on renaming the file, this allows you to save the current name. This can be handy if you are concerned about losing track of the original camera-generated file name (camera-generated names can be a handy way of keeping track of the order in which a series of images were shot). By copying the original name to an IPTC field, you can retrive the name later, or reference it in any application that can read IPTC information.
Parameters
Copy: Allows you to select which document property you want to copy. Options are: File Name, Creation Date, Modification Date, Enclosing Folder.
To: Allows you to select the IPTC field that you’d like to copy the file’s current name into. Options are: Document Title, Author, Author Title, Description, Description Writer, Keywords, Headline, Instructions, Credit, Source.
Replace/Append: If replace is selected then the destination field is completely overwritten. If Append is selected, then the selected property is added to the current contents of the destination field.

Photoshop Action Pack ��
Restore saved name: Retrieves the contents of the IPTC field specified in the Copy name to field and then renames the file with that new name.
Crop
Crops and rotates the image according to the parameters specified. Unlike the Crop tool, this command does not let you crop to a size that is larger than the current canvas size.
Parameters:
Upper left corner X and Y: Specify the pixel coordinates of the new upper left corner (that is, where the upper left corner should be after the crop).
Lower right corner X and Y: Specify the pixel coordinates of the lower right corner (that is, where the lower right corner should be after the crop).
Angle: Specify an angle of rotation to use when cropping. The entire canvas will be rotated by this amount. This can be used for straightening an image, and you can use Photoshop’s measure tool to determine an angle to use for straightening. This is probably only useful if you have a batch of images that were all shot with the same off-axis tilt – perhaps your tripod wasn’t level, for example.

Photoshop Action Pack ��
Deinterlace
Executes Photoshop’s Deinterlace filter for removing interlacing artifacts from frames of video. Provides the standard Deinterlace parameters. If an image has layers, then the action is applied to the currently selected layer. Photoshop remembers the last-selected layer of a document from session to session.
Parameters
Eliminate: Lets you opt to eliminate either the odd or even fields.
Create new fields by: Lets you specify if you want new fields created by duplicating the existing fields, or by interpolation.
Desaturate
Completely desaturates the image, resulting in a grayscale file. Note that the document is not actually changed to grayscale mode.
Deselect
Deselects the selection in the current document.

Photoshop Action Pack ��
Despeckle
Runs Photoshop’s Despeckle filter. If an image has layers, then the action is applied to the currently selected layer. Photoshop remembers the last-selected layer of a document from session to session.
Diffusion
This operation flattens your existing document and then uses a multiple layer effect to create the look of a diffusion filter.
Parameters
Softness: Controls the strength of the diffusion effect.
Blur radius: Specifies how much blur “halo” will be present.
Flatten final: Lets you flatten the final image. If you leave this unchecked, then you can later deactivate the diffusion effect by hiding or deleting the new layers created by the action. You can also refine the effect by adjusting blending modes and opacity.
Do Action
Diffusion before and after

Photoshop Action Pack ��
Executes a Photoshop action. Enter the name of the Action and the Action Set that it’s a part of.
Parameters
Do Action: The name of the action that you want to execute.
From Set: The Action Set that contains your target action.
Use longer AppleEvent timeout: If the Photoshop action that you’re triggering takes a particularly long time to execute, then Automator or the Mac OS itself might throw an error saying that the “AppleEvent has times out” or something to that effect. In the simplest terms, this means that the AppleScript engine got tired of waiting for Photoshop to report back that it had finished the command that was sent. This option tells Automator to send the command with a longer timeout - in this case, half an hour. There’s no real risk to using this option, except that if an AppleScript problem occurs you won’t hear about it for 30 minutes.
Duplicate Current Layer
Duplicates the currently selected layer. You can configure the duplicate to have a Layer Mask that hides or reveals. With this action, you can duplicate a layer, give it a Layer Mask, then specify other actions that alter the duplicate layer. Later, you can paint into the Layer Mask to selectively apply the effects contained in the duplicate layer.
Parameters
Add layer mask to duplicate layer: Provides the option of adding a Layer Mask to the new, duplicate layer. You can specify whether you want the Layer Mask to reveal all (be filled with white) or hide all (be filled with black).
After duplicating: Lets you specify whether you want the original layer, or the new duplicate to be the currently selected layer after the duplicate is made. Defaults to selecting the Duplicate. Depending on what happens in the rest of your workflow, you may want to change this to Original.

Photoshop Action Pack ��
Dust and Scratches
Executes Photoshop’s Dust and Scratches filter. Provides the standard Dust and Scratches parameters. If an image has layers, then the action is applied to the currently selected layer. Photoshop remembers the last-selected layer of a document from session to session. To learn more about the Dust and Scratches parameters, consult the Photoshop Help file.
Edit IPTC Info
Allows you to edit the IPTC tags of a document. IPTC tags are a standard collection of metadata tags that provide a way to store ownership and

Photoshop Action Pack �0
authoring information, as well as keywords, captions, and more. IPTC tags can be read by most image editing and cataloging programs. Enter any or all fields that you’d like to modify, then choose to Replace or Append.
Parameters
Tag fields: The EXIF fields available for editing. All of these fields are accessible from within Photoshop, via the File Info command.
Replace/Append: Lets you select whether to replace existing tags, or add new ones. When replace is selected, all tags are changed to match what you’ve entered in the action. If you have left a field empty in the action, then that tag will be emptied in the document. Choosing Append replaces only those tags for which you’ve entered data in the action.
Exposure (CS2 only)
Applies Photoshop’s Exposure effect. Consult the Photoshop Help file for more info on the Exposure parameters.
Filter by Aspect Ratio
Allows you to filter the current batch of documents according to their aspect ratio. Only images that match the selected aspect ratio will be passed on to the rest of the workflow. For more on using filter actions, see page 13.

Photoshop Action Pack �1
Parameters
Aspect ratio choice: Allows you to select 4:3, 3:2, 16:9 or to enter your own aspect ratio. Custom ratios must be entered in decimal form.
Filter immediately: Filters immediately, instead of during the Render operation, allowing you to use this filter in combination with non-Photoshop-based actions. See page 16 for more information.
Filter by Bit Depth
Allows you to filter the current batch of documents according to their bit depth. Only images that match the selected bit depth will be passed on to the rest of the workflow. For more on using filter actions, see page 13.
Parameters
Pass on only documents whose bit depth is: Allows you to specify 8, 16, or 1-bit images.
Filter immediately: Filters immediately, instead of during the Render operation, allowing you to use this filter in combination with non-Photoshop-based actions. See page 16 for more information.
Filter by Color Mode
Allows you to filter the current batch of documents according to their color mode. Only images that match the selected color mode will be passed on to the rest of the workflow. For more on using filter actions, see page 12.

Photoshop Action Pack ��
Parameters
Color mode choice: Allows you to select RGB, CMYK, L*A*B, Grayscale, Bitmap, Indexed Color.
Filter immediately: Filters immediately, instead of during the Render operation, allowing you to use this filter in combination with non-Photoshop-based actions. See page 16 for more information.
Filter by EXIF
This filter allows you to filter your documents based on the EXIF tags embedded in your images. For example, you can use it to select all of the ISO 100 images from a batch of documents, or to filter out images shot on a particular day.
Unfortunately, there’s no standard for the formatting of EXIF data. Different cameras put tags in different orders, and might use different formats for some tag information such as date and time, focal length, and ISO. This action should be able to correctly identify the tags from most cameras, but it does not include any profile information for specific makes and models. As such, it’s important to experiment a bit with it to ensure that it can correctly read your camera’s EXIF tags before you commit it to processing huge batches of images. For more on using filter actions, see page 13.
Parameters
EXIF Fields: Enter your desired EXIF parameters. You can view the EXIF information of an image using the File Browser/Adobe Bridge, with the File Info command.
And/Or: If you want to filter images that match all of the specified EXIF fields, click the And button. The Or button will filter images that contain any of the specified EXIF fields.

Photoshop Action Pack ��
Filter immediately: Filters immediately, instead of during the Render operation, allowing you to use this filter in combination with non-Photoshop-based actions. See page 16 for more information.
Filter by File Type
Allows you to filter the current batch of documents according to their file type. Only images that match the selected file type will be passed on to the rest of the workflow. For more on using filter actions, see page 12.
Parameters
Pass on only images with file extension of: Any image that has the given file extension will be passed on to the rest of the workflow. This field is case sensitive, so be sure to enter the extension exactly as it appears in the document types you want to filter. Extensions do not have to be visible in the Finder for this action to work. If a file does not have an extension, then the action will check the file type of the document. This sometimes lets you filter files that don’t have proper extensions applied.
Filter immediately: Filters immediately, instead of during the Render operation, allowing you to use this filter in combination with non-Photoshop-based actions. See page 16 for more information.

Photoshop Action Pack ��
Filter by IPTC
Allows you to filter images based on their IPTC tags. IPTC tags are a standard collection of metadata tags that provide a way to store ownership and authoring information, as well as keywords, captions, printing instructions and more. IPTC tags can be read by most image editing and cataloging programs. You can edit an image’s IPTC tags using Photoshop’s File Info command, or the Edit IPTC action included in this collection.
For more on using filter actions, see page 13.
Parameters
Tag fields: Filter from IPTC allows you to filter based on the following IPTC fields: Document Title, Author, Author Title, Description, Description Writer, Keywords, Headline, Instructions, Copyright Status, Copyright Notice, Copywrite Info URL, City, State, Country, Category, Credit, and Source. All of these fields are accessible from within Photoshop, via the File Info command.

Photoshop Action Pack ��
And/Or: If you want to filter images that match all of the specified IPTC fields, click the And button. The Or button will filter images that contain any of the specified IPTC fields.
Filter immediately: Filters immediately, instead of during the Render operation, allowing you to use this filter in combination with non-Photoshop-based actions. See page 16 for more information.
Filter by Orientation
Filters images based on their orientation, either Landscape, or Portrait.
For more on using filter actions, see page 12.
Parameters
Pass on only documents whose orientation is: Landscape or portrait.
Filter immediately: Filters immediately, instead of during the Render operation, allowing you to use this filter in combination with non-Photoshop-based actions. See page 16 for more information.
Filter by Size
Allows you to filter the current batch of documents according to their size. Only images that match the selected size will be passed on to the rest of the workflow. For more on using filter actions, see page 12.

Photoshop Action Pack ��
Parameters
Pass on only images with size of X pixels on either side: Any image that has the given length on either its X or Y axis will be passed on.
Pass on only images with size of X horizontal pixels, Y vertical Pixels: Only images with both the specified X and Y dimensions will be passed on.
Filter immediately: Filters immediately, instead of during the Render operation, allowing you to use this filter in combination with non-Photoshop-based actions. See page 16 for more information.
Fit Image
Proportionally resizes an image to the largest size that will fit in the given dimensions. So, if you enter a width and height of 1,024 by 768 pixels, an image with dimensions of 3,504 by 2,336 pixels will be resized to 1,024 by 683, while an image with dimensions of 2,336 by 3,504 will be resized to 512 by 768 pixels.
Parameters
Width, Height: The pixel dimensions that you want to fit each image into.
Resample method: The resample method that will be used to perform the resizing operation.
Flatten Document
Flattens the document. This is the same as choosing Flatten from Photoshop’s Layers palette.
Photoshop Action Pack ��
Flip Canvas
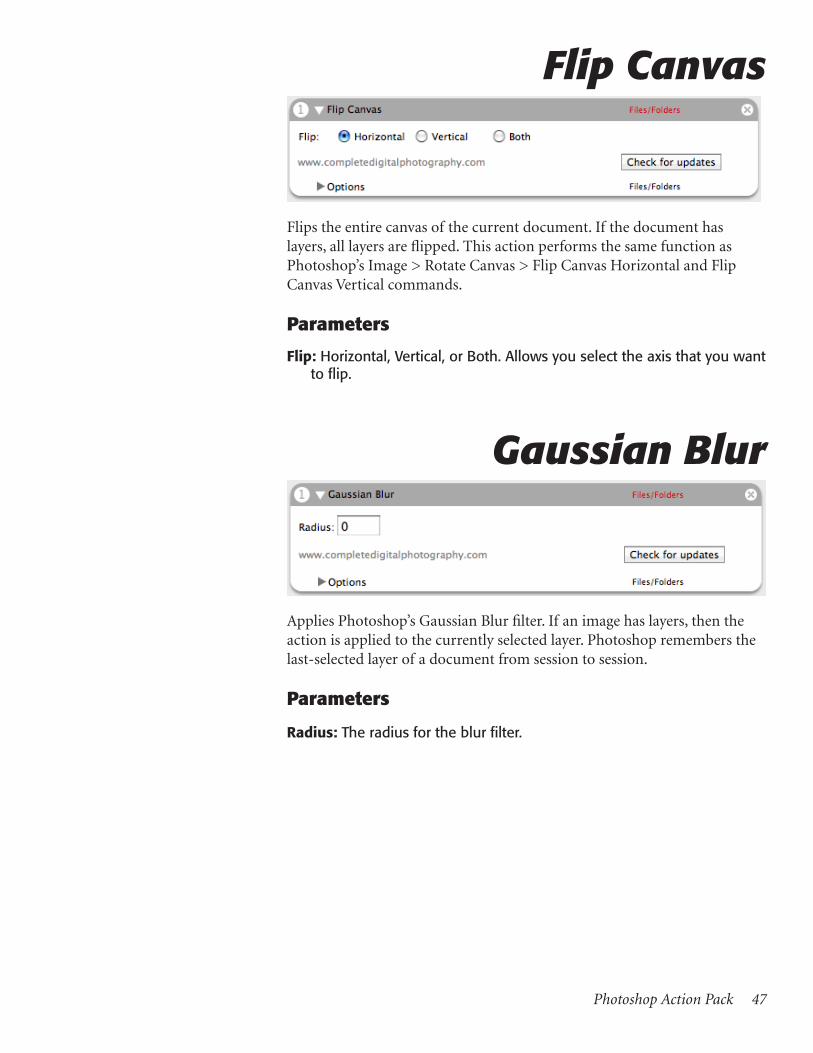
Flips the entire canvas of the current document. If the document has layers, all layers are flipped. This action performs the same function as Photoshop’s Image > Rotate Canvas > Flip Canvas Horizontal and Flip Canvas Vertical commands.
Parameters
Flip: Horizontal, Vertical, or Both. Allows you select the axis that you want to flip.
Gaussian Blur
Applies Photoshop’s Gaussian Blur filter. If an image has layers, then the action is applied to the currently selected layer. Photoshop remembers the last-selected layer of a document from session to session.
Parameters
Radius: The radius for the blur filter.

Photoshop Action Pack ��
Glass
Applies Photoshop’s Glass effect to the currently selected layer. Photoshop remembers layer selection from session to session. Consult the Photoshop Help file for more information on the Glass parameters.
HDR Merge
Allows you to merge images with identical compositions, but different exposures, into a high-dynamic range image that exceeds can exceed the dynamic range of a normal, single shot. The resulting high dynamic range (HDR) images will contain more detail in both its highlight and shadow areas than you can normally achieve with a single exposure.
Note that this action does not use the HDR features built in to Photoshop CS2. Rather, it uses a technique developed by Jook Leung. Jook created a very clever Photoshop Action for performing HDR merges, and you can read more about it and his HDR theory at these web sites:
http://360vr.com/HDRforDummies/

Photoshop Action Pack ��
By default, this action uses an internal version of Jook Leung’s merging routine. You can also specify an external Photoshop action for performing merging.
This action is particularly usefull for Photoshop CS users, as CS does not have a built-in Merge to HDR feature. However, even CS2 users might find it useful, if they want to create custom merge routines. Note that the built-in merge routine does not create a 32-bit final file, as Photoshop’s Merge to HDR facility does.
Important Note: This is the only action in the collection that operates outside of the Open/Render architecture described on page 10. To use this action, simply pass it the images you want to merge. It will immediately process the images and either save them, or leave them open in Photoshop, depending on which options you choose.
Parameters
Number of images to merge: The internal merge routine requires all of the source images to be open simultaneously. The HDR Merge action will work its way through your entire source batch, and open this number of images for each operation. So, if you pass it a batch of 18 images, and specify the Number of images to merge as 3, then it will open the first 3 images, merge them, then move on to the next three.
Use Internal Merge Routine: Causes the action to use its internal merging routine, which was based on HDR merging routines developed by Jook Leung.
Blur Radius: Impacts how much image data will be incorporated from each merged image.
Use Photoshop Action: Lets you specify your own Photoshop Action-based merge routine. The Action Name and Action Set must be typed exactly as they appear in Photoshop.
Pass original image list instead of merged results: By default, the action passes on the merged results to the rest of the workflow. If you check this box, the action will pass on the original list instead of the merged results.
Save merged file: Saves the merged file as a Photoshop document. The document is saved using the name of the first source image, with a .PSD extension, and is saved into the same folder as the first source image.
Close merged file: Closes the final merged file. Since each source image is closed as it is processed, selecting this option results in no files being open at the end of the action’s execution.

Photoshop Action Pack �0
Hue/Saturation
Applies Photoshop’s Hue/Saturation adjustment. See Photoshop’s Help file for more information on Hue/Saturation’s controls.
Properties
Edit: Allows you to select which channel you’d like to adjust.
Hue, Saturation, Lightness: These are the same fields as provided in Photoshop’s Hue/Saturation dialog box. Each entry can accept a value from -100 to 100.
Add as Adjustment Layer: Adds the effect as a Hue/Saturation Adjustment Layer rather than as a destructive effect.
Invert
Invert’s the colors in the current layer. Photoshop remembers the last-selected layer of a document from session to session.
Load Selection
Loads the specified alpha channel as a selection.

Photoshop Action Pack �1
Parameters
Load selection: Enter the name of the channel you want to load. The selection name must be entered exactly as it appears in Photoshop.
Invert: Inverts the selection. This is the same as choosing Select > Inverse in Photoshop.
Maximum/Minimum
Applies Photoshop’s Maximum or Minimum filter. If an image has layers, then the action is applied to the currently selected layer. Photoshop remembers the last-selected layer of a document from session to session.
Parameters
Type: Lets you select whether you want to apply the Maximum or Minimum filter.
Radius: Adjusts the strength of the effect. See Photoshop’s documentatino for more details.
Motion Blur
Applies Photoshop’s Motion Blur filter. If an image has layers, then the action is applied to the currently selected layer. Photoshop remembers the last-selected layer of a document from session to session.
Parameters
Radius: Pixel radius of the blur.
Angle: Direction of the blur.

Photoshop Action Pack ��
NTSC Colors
Applies Photoshop’s NTSC Colors filter. If an image has layers, then the action is applied to the currently selected layer. Photoshop remembers the last-selected layer of a document from session to session.
Noise, Mono Gaussian
Applies Photoshop’s Noise filter with Gaussian and Monochrome pre-selected. You can control the amount using the Amount parameter. If an image has layers, then the action is applied to the currently selected layer. Photoshop remembers the last-selected layer of a document from session to session. You can also choose to add the noise as its own layer, with a blending mode and opacity setting. This allows you to add noise as a separate layer that can be deactivated or deleted later. In a sense, it makes for “non-destructive” noise.
Parameters
Amount: Amount of noise to apply.
Add noise as layer: Opts to add noise to a new layer.
Fill noise layer with: You can fill the new noise layer with either white or black.
Noise layer blending mode: Specify the blending mode of the new noise layer.
Opacity: Specify the opacity of the new noise layer.

Photoshop Action Pack ��
Ocean Ripple
Executes Photoshop’s Ocean Ripple filter. If an image has layers, then the action is applied to the currently selected layer. Photoshop remembers the last-selected layer of a document from session to session.
Parameters
Ripple Size: The diameter of the ripple.
Ripple Size: The strength of the ripple.
Open
Opens the selected images for processing in Photoshop. This operation must be executed before any other commands in the Action Pack can be applied (except for HDR Merge). When the Open command is executed, the images are not immediately opened. Instead, a list of files to be opened is stored. The images are actually opened and processed by the Render action (see page 10). If you pass a compatible Photoshop Camera Raw file to the Open command, then the file will be processed using Camera Raw. See page 11 for more details.
Parameters
Store a copy of file list: Stores a copy of the list of files sent to the Open action. If you plan on later filtering the batch and the want to “unfilter” to perform additional operations, then you must have a copy of the original list stored. See page 13 for more details.

Photoshop Action Pack ��
Open as Raw Data
Opens the selected images as raw data. This is not the same as the camera raw files generated by your digital camera. Raw data is a format that Photoshop supports for writing out pixel information according to specified parameters, but that doesn’t necessarily conform to the specifications of any particular file format standard. This is only useful if the file was originally saved as raw data. Note that you’ll have to configure the parameters exactly as you configured them upon saving, or the image will be garbled.
Open as raw data serves the same function as the Open command, in that it creates a list of files to be processed by the Render action.
Parameters
For an explanation of the Open as Raw Data parameters, please consult Photoshop’s documentation.
Paint Daubs
Applies Photoshop’s Paint Daubs filter to the current layer. In addition to creating painterly effects, this filter can be useful for sharpning low-res images (see page 20). Consult Photoshop’s Help file for more info on Paint Daubs’ parameters.

Photoshop Action Pack ��
Photo Filter
Applies Photoshop’s Photo Filter effect to the current layer. Consult Photoshop’s Help file for more information on the Photo Filter parameters. If you prefer to work non-destructively, you can apply the effect as an Adjustment Layer by checking the Add as Adjustment Layer checkbox.
Pinch
Executes Photoshop’s Ocean Ripple filter. If an image has layers, then the action is applied to the currently selected layer. Photoshop remembers the last-selected layer of a document from session to session.
Parameters
Amount: Controls the size of the Pinch distortion.
Polar Coordinates
Converts your document from polar to rectangular coordinates, or rectangular to polar, depending on how you configure the Kind pop-up menu.

Photoshop Action Pack ��
Parameters
Kind: Lets you specify whether you want a polar to rectangular, or rectangular to polar conversion.
Posterize
Executes Photoshop’s Posterize filter. If an image has layers, then the action is applied to the currently selected layer. Photoshop remembers the last-selected layer of a document from session to session.
Parameters
Levels: Specifies how many levels you want the image posterized to.
Purge
Executes Photoshop’s Purge command. If you’re executing a particularly memory-intensive workflow (such as one that makes new layers) then executing a Purge command will help keep Photoshop from running out of RAM or bogging down.
Parameters
Purge: Selects the cache to purge.

Photoshop Action Pack ��
Radial Blur
Executes Photoshop’s Posterize filter. If an image has layers, then the action is applied to the currently selected layer. Photoshop remembers the last-selected layer of a document from session to session.
Properties
Amount: Strength of the blur effect.
Blur method: The type of blur.
Quality: The quality of the blur algorithm Higher quality will take longer to process.
Reduce Noise (CS2 only)
Applies Photoshop’s Reduce Noise filter to the currently selected layer. Consult Photoshop’s Help file for more information on the Reduce Noise parameters.

Photoshop Action Pack ��
Resize Canvas
Lets you change the size of the document canvas. This is, of course, different from changing the size of the image. The image data remains the same size, but the size of the document changes. If you reduce the size of the canvas, then your image will be cropped. Increase canvas size results in additional empty space around the image.
Parameters
Width: The width of the new canvas size.
Height: The height of the new canvas size.
Anchor: Lets you change the point around which the canvas will be resized.
Units: Lets you specify the units you want to use for the resizing.
Background color: Lets you specify the background color used during resizing. The background color is what is used to fill in any extra, exposed canvas. Allows you to pick between the current background color, black, or white. Sorry, but I can’t figure out how to get a color picker to work, so you can’t yet select a custom color. Hopefully in a future update...

Photoshop Action Pack ��
Render
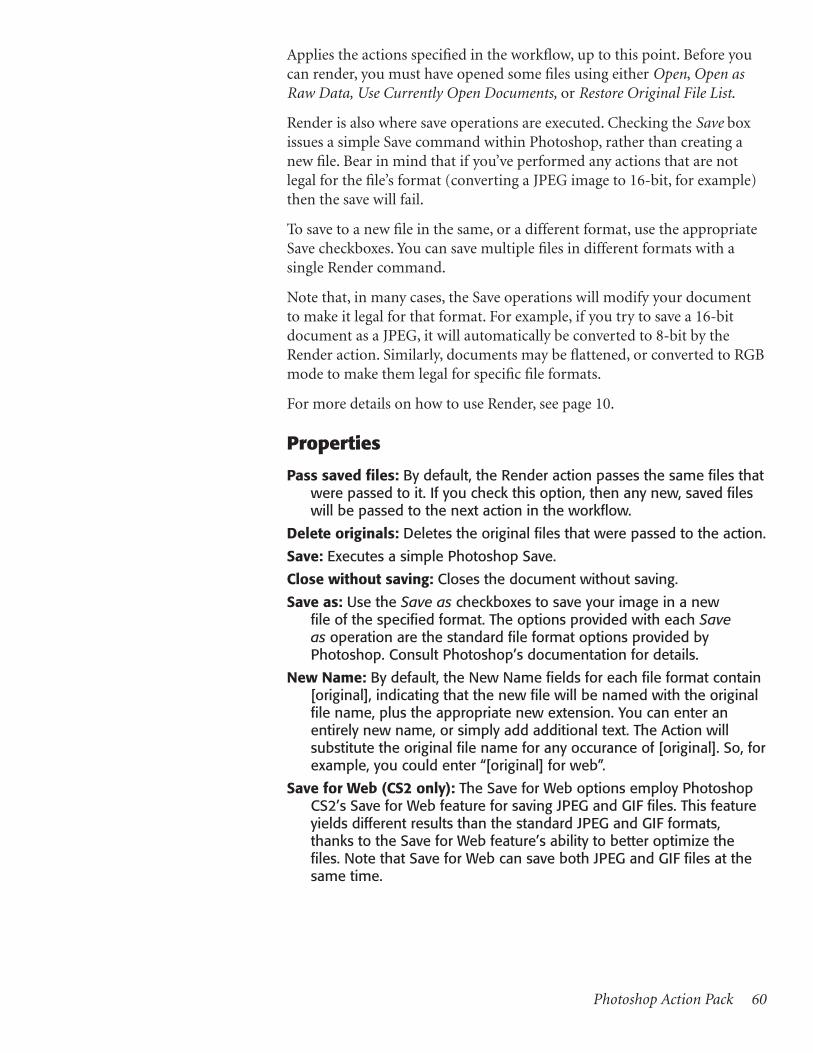
Photoshop Action Pack �0
Applies the actions specified in the workflow, up to this point. Before you can render, you must have opened some files using either Open, Open as Raw Data, Use Currently Open Documents, or Restore Original File List.
Render is also where save operations are executed. Checking the Save box issues a simple Save command within Photoshop, rather than creating a new file. Bear in mind that if you’ve performed any actions that are not legal for the file’s format (converting a JPEG image to 16-bit, for example) then the save will fail.
To save to a new file in the same, or a different format, use the appropriate Save checkboxes. You can save multiple files in different formats with a single Render command.
Note that, in many cases, the Save operations will modify your document to make it legal for that format. For example, if you try to save a 16-bit document as a JPEG, it will automatically be converted to 8-bit by the Render action. Similarly, documents may be flattened, or converted to RGB mode to make them legal for specific file formats.
For more details on how to use Render, see page 10.
Properties
Pass saved files: By default, the Render action passes the same files that were passed to it. If you check this option, then any new, saved files will be passed to the next action in the workflow.
Delete originals: Deletes the original files that were passed to the action.
Save: Executes a simple Photoshop Save.
Close without saving: Closes the document without saving.
Save as: Use the Save as checkboxes to save your image in a new file of the specified format. The options provided with each Save as operation are the standard file format options provided by Photoshop. Consult Photoshop’s documentation for details.
New Name: By default, the New Name fields for each file format contain [original], indicating that the new file will be named with the original file name, plus the appropriate new extension. You can enter an entirely new name, or simply add additional text. The Action will substitute the original file name for any occurance of [original]. So, for example, you could enter “[original] for web”.
Save for Web (CS2 only): The Save for Web options employ Photoshop CS2’s Save for Web feature for saving JPEG and GIF files. This feature yields different results than the standard JPEG and GIF formats, thanks to the Save for Web feature’s ability to better optimize the files. Note that Save for Web can save both JPEG and GIF files at the same time.

Photoshop Action Pack �1
Resize Image
Resizes an image to the specified pixel dimensions and resolution. If you enter zero in either height or width, it will resize proportionally. If you enter zero in width and height, but provide a resolution, then it will change the res with resampling. If you want to change the resolution without resampling, you have to use the Change Resolution action.
Parameters
Width: Target width.
Height: Target height.
Resolution: Target resolution.
Interpolation: Lets you specify the interpolation method that you want to use for the resizing.
Units: Allows you to specify the units that you want to use for resizing.
Resize to File Size
Resizes the current image so that it’s final size matches the specified target file size, in megabytes. Allows you to specify a target resolution. If you’re preparing photos for a publication or stock agency that demands sizes of a particular size, then you can simply enter that size into this action, and your images will automatically be resized to pixel dimensions that will yield your desired size.
Parameters
Target file size: The size (in megabytes) that you want the final file to be.
Resolution: Resolution of the final file.

Photoshop Action Pack ��
Resize to X by 10%
Resizes the current document to the specified size, but does so in multiple steps of 10% increments. In many cases, performing a large resizing in 10% increments yields better final image quality. This action will perform the whole process in one step. Enter either a width or a height to scale the image proportionally to that amount. Alternately, you can enter a resolution only to resize the image to a specific resolution.
Restore Original File List
Restores the current batch to the batch of files saved by the Store Original File List command in the Open action. In other words, for this action to work, you must previously have saved a file list using the Open action. Restore Original File List is used for times when you want to filter a batch of images, and then unfilter them later for additional processing or re-filtering. To learn more about filtering, see page 12.
Note that the Inverse option of Restore Original File List won’t work if you’ve used nested filters. Also, Automator may throw an error if your original filter operation did not yield any results. In other words, a saved filter list that is empty will stop your workflow.
Properties
Restore Original File List/Inverse Current Filtering: Lets you specify whether to restore the complete original file list, or the inverse of the currently filtered images. If you select inverse, then all of the images that weren’t passed by the previous filter operation will be selected.

Photoshop Action Pack ��
Ripple
Executes Photoshop’s Ripple filter. If an image has layers, then the action is applied to the currently selected layer. Photoshop remembers the last-selected layer of a document from session to session.
Properties
Amount: Number of ripples.
Ripple size: Changes the size of the ripples.
Scale Image
Proportionally scales the image so that the specified size is a particular length. If you need to resize a large batch of images of mixed orientation, then Scale Image is a better way to go than Resize image, as it will resize all of the images so that their longest sides are the same. If you need to resize a batch images with mixed orientation so that they fit within a certain area, then use the Fit Image action.
Properties
Longest/Shortest: Which dimension you want to use as the base of the scale.
Length: The length that you want to scale the given side to.
Resolution: The target resolution for your final image.

Photoshop Action Pack ��
Shadow/Highlight
Executes Photoshop’s Adjust > Shadow Highlight command. Though this command is not available as an Adjustment Layer, the Action does allow you to automatically duplicate your source layer (with or without a Layer Mask) and apply the effect to that duplicate.
Parameters:
Shadows/Highlights: These are the parameters found in Photoshop’s Shadow/Highlight dialog box. See Photoshop’s Help system for details.
Apply to Duplicate Layer: Duplicates the currently selected layer and then applies the adjustment to that duplicate.
Add layer mask: Adds a Layer Mask to the duplicate layer.
Sharpen Edges
Applies Photoshop’s Sharpen Edges filter to the currently selected layer.
Sharpen More
Applies Photoshop’s Sharpen More filter to the currently selected layer.
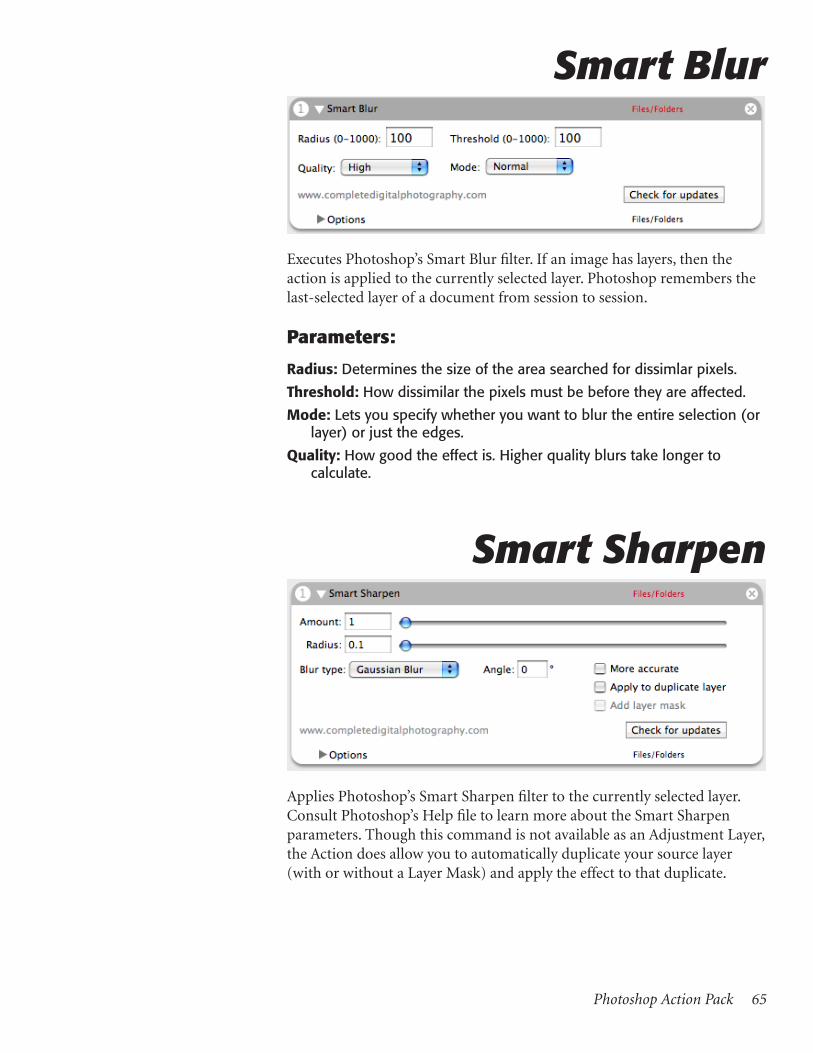
Photoshop Action Pack ��
Smart Blur
Executes Photoshop’s Smart Blur filter. If an image has layers, then the action is applied to the currently selected layer. Photoshop remembers the last-selected layer of a document from session to session.
Parameters:
Radius: Determines the size of the area searched for dissimlar pixels.
Threshold: How dissimilar the pixels must be before they are affected.
Mode: Lets you specify whether you want to blur the entire selection (or layer) or just the edges.
Quality: How good the effect is. Higher quality blurs take longer to calculate.
Smart Sharpen
Applies Photoshop’s Smart Sharpen filter to the currently selected layer. Consult Photoshop’s Help file to learn more about the Smart Sharpen parameters. Though this command is not available as an Adjustment Layer, the Action does allow you to automatically duplicate your source layer (with or without a Layer Mask) and apply the effect to that duplicate.

Photoshop Action Pack ��
Sphereize
Executes Photoshop’s Sphereize filter. If an image has layers, then the action is applied to the currently selected layer. Photoshop remembers the last-selected layer of a document from session to session.
Swap Colors
Swaps the current foreground and background colors. This is the same as clicking the Switch Foreground and Background Colors switch on Photoshop’s main tool palette, or pressing X.
Threshold
Identifies highlights and shadows in your image by reducing the number of tones so that highlights appear in pure white, and shadows appear in pure black. Lighter and darker tones are represented by correspondingly lighter or darker shades of gray.
Parameters:
Level: Specifies how many levels of gray to reduce the image to.

Photoshop Action Pack ��
Trap
Applies trap to an image,to help prevent troubles stemming from mis-registration when printing on a four-color press.
Parameters:
Trap Width: The width in pixels fo the trap you want to apply.
Trim
Crops your image according to the specifications you define. You can choose to crop only certain sides, and specify the method that will be used to determine what should be cropped.
Parameters:
Top, left, bottom, right: Indicates which sides of the image to crop.
Basing trim on: Indicates how the Photoshop will decide what to crop. Top left pixel color will remove an area the color of the top left pixel. Bottom right pixel color will do the same for an area the color of the bottom right pixel. Transparent pixels will trim away all transparent pixels at the edge of the image, leaving the smallest image that contains nontransparent pixels.

Photoshop Action Pack ��
Twirl
Executes Photoshop’s Sphereize filter. If an image has layers, then the action is applied to the currently selected layer. Photoshop remembers the last-selected layer of a document from session to session.
Parameters:
Angle: This filter rotates a selection more sharply in the center than at the edges. Specifying an angle produces a twirl pattern.
Unsharp Mask
Applies Photoshop’s Unsharp Mask filter If an image has layers, then the action is applied to the currently selected layer. Photoshop remembers the last-selected layer of a document from session to session. Though this command is not available as an Adjustment Layer, the Action does allow you to automatically duplicate your source layer (with or without a Layer Mask) and apply the effect to that duplicate.
Parameters
Amount, Radius, Threshold: These are the parameters found in Photoshop’s Unsharp Mask dialog box. See Photoshop’s Help system for more info.
Apply to Duplicate Layer: Duplicates the currently selected layer and then applies the adjustment to that duplicate.
Add layer mask: Adds a Layer Mask to the duplicate layer.

Photoshop Action Pack �0
Use Currently Open Documents
Works as a substitute for the Open command, but rather than opening files, sends the names of all documents that are currently open in Photoshop to the rest of the workflow. If other applications in your workflow have opened Photoshop documents, then this action will let you process those documents using the actions in the Photoshop Action Pack.
Parameters
Store a copy of file list: Stores a copy of the list of files sent to the Open action. If you plan on later filtering the batch and the want to “unfilter” to perform additional operations, then you must have a copy of the original list stored. See page 13 for more details.