peration hannibal” the seizure of corinth canal bridge ... · crete 1941 – osprey campaign...
TRANSCRIPT
“OPERATION HANNIBAL” THE SEIZURE OF CORINTH CANAL BRIDGE
27TH APRIL 1941 (GREECE)BASED ON THE ORIGINAL SCENARIO BY COLIN RUMFORD UPDATED BY MARK PIPER. GRAPHICS BY COLIN.
Background
As the British and Commonwealth forces retreated from Greece they were funnelled to a single crossing point over the Corinth Canal. The Germans considered that if the bridge could be captured and held Allied evacuation plans would be frustrated.
A simple plan was devised. German Fallschirmjager assault engineers would seize both ends in a surprise glider assault. Both battalions of the 2nd Fallschirmjager Regiment were to parachute to the north and south of the objective.
The dawn attack was a success with complete surprised achieved. Demolition charges were located and disabled just prior to the airborne assault.
Allied forces in the area reacted quickly and counter-attacked. In the next few hours 12,000 Allied prisoners were taken. The operation was not a complete success as the bridge mysteriously disappeared in a big explosion.
The Wargame Scenario
The game table is approximately 9’ x 5’. The Corinth Canal can only be crossed at the bridge. Elevations are a continuous obstacle for movement. Buildings start undamaged. Olive groves are treated as open woods. The railway track does not affect the game.
To simulate the possibility of the bridge being destroyed roll percentage dice at the end of each allied turn. 5% or less destroys the bridge. Any forces on the bridge at the time of the explosion are lost and removed from play.
The Germans win if they achieve at least two out of three of the following at the end of 15 moves:(a) control both end of the bridge intact (not destroyed), (b) capture or eliminate both allied anti-aircraft batteries or (c) eliminate all allied forces. Allied forces win if the Germans achieve none of their conditions. A draw occurs if neither side can achieve their victory conditions.
Sources
“Corinth” scenario (original Rapid Fire rules) – Colin Rumford“Greece, Crete and Syria” - Australia in the War of 1939-1945 - Gavin Long“The Corinth Canal” NZ Electronic Text Centre http://www.nzetc.org/tm/scholarly/tei-WH2Gree-c19.htmlThe Green Devils http://www.greendevils.com/greendevils/ops1941.htmStorming Eagles – James LucasGerman Airborne Troops – Roger EdwardsCrete 1941 – Osprey Campaign Series – Peter Antill
Pages 2 and 3 are for the Allied player’s eyes onlyPages 4 and 5 are for the German player’s eyes only

ALLIED ORDER OF BATTLE (“ISTHMUS FORCE”)All troops are regular.
C SQUADRON
NEW ZEALAND DIVISIONAL CAVALRY(Entry point A - turn 3)
2 x Vickers MkVI light tank
COMPOSITE ANZAC BATTALION GROUP (Major Gordon) - test @ 18 figures - North Side
HQ Company CO + 5 figures, 2” mortar
A Company 8 figures
B Company 8 figures
C Company 8 figures
Support Company6 figures, 3" mortar, Vickers MMG
Transport Platoon3 x light truck
122ND NEW ZEALAND
LIGHT AA BATTERY 8 figures, 2 x Bofors 40mm AA gun
ISTHMUS FORCE HQ*(Lt Col Lilingston)
CO* + 2 figures, light truck
ELEMENTS 26TH NEW ZEALAND BATTALION (Lt Colonel Page) - test @ 13 figures (Entry B - turn 5)
HQ CO + 3 figures, 2” mortar, light truck
A Company 8 figures, light truck
B Company 8 figures, light truck
COMPOSITE GREEK BATTALION Test @ 16 figures - Corinth
HQ CO + 3 figures
A Company 8 figures
B Company 8 figures
C Company 8 figures
Support Platoon3 figures, MMG
Transport Platoon2 x lorry
COMBINED CARRIER PLATOONS 22ND AND 28TH BATTALIONS
Combine with 26th NZ Battalion for morale(Entry point B - turn 1)
6 figures, 2 x Bren Carrier
* Highest level HQ for all allied forces for morale purposes

ALLIED DEPLOYMENT AND ARRIVALS
N
Olive Groves
MALEMETavronitis River Bed
A
CORINTH CANAL
Farm
HillCORINTH
Railway Station
B
Bridge
Allied reinforcements arrive at the point indicated on the map. They may not move more than 6” onto the table on their turn of arrival.
Allied on-board forces are positioned after the German player has identified the drop zones on a map for the 1st and 2nd battalions (one on each side of the canal). The composite Greek battalion is located in Corinth and the composite ANZAC battalion on the north side of the canal (no closer than 20” of the bridge).
On-board forces start dug-in (hard cover +1) and concealed.
The two emplaced Bofors guns can be sited anywhere on the board and are able to engage ground targets. Allied “reserve fire” on the first turn is restricted to these guns.
Dock
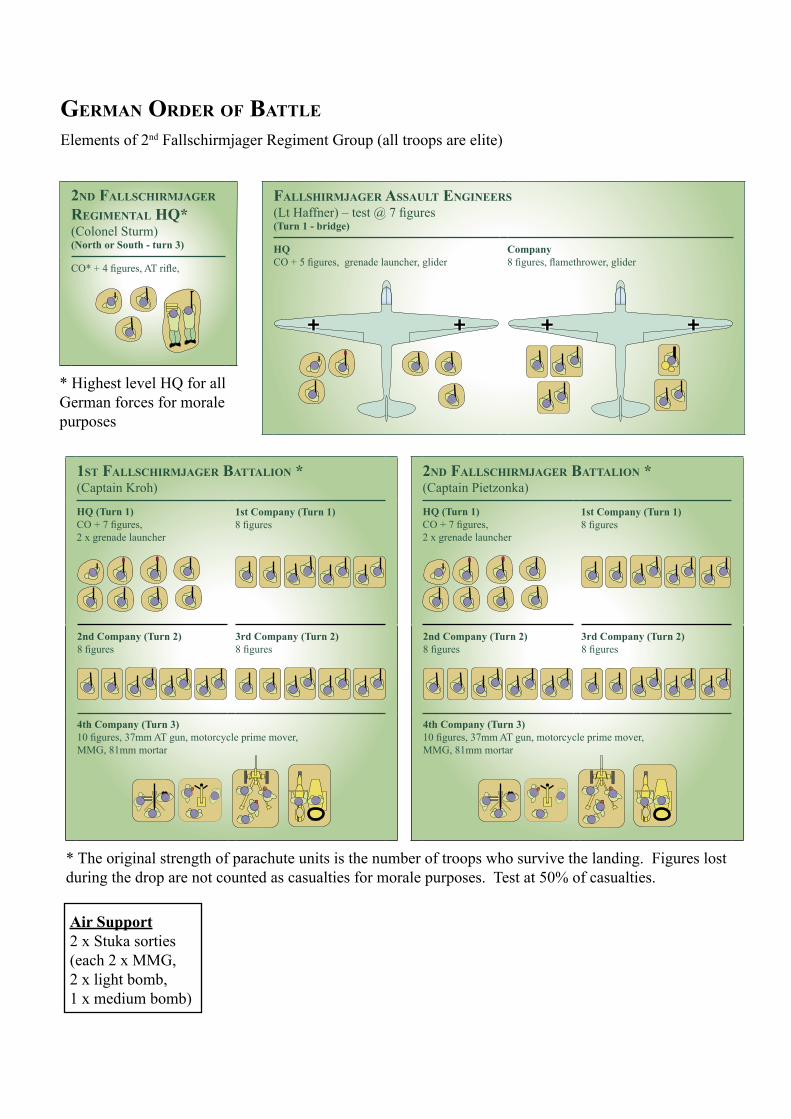
GERMAN ORDER OF BATTLE Elements of 2nd Fallschirmjager Regiment Group (all troops are elite)
Air Support 2 x Stuka sorties(each 2 x MMG, 2 x light bomb, 1 x medium bomb)
FALLSHIRMJAGER ASSAULT ENGINEERS (Lt Haffner) – test @ 7 figures (Turn 1 - bridge)
HQ CO + 5 figures, grenade launcher, glider
Company 8 figures, flamethrower, glider
1ST FALLSCHIRMJAGER BATTALION *(Captain Kroh)
HQ (Turn 1)CO + 7 figures, 2 x grenade launcher
1st Company (Turn 1)8 figures
2nd Company (Turn 2)8 figures
3rd Company (Turn 2)8 figures
4th Company (Turn 3)10 figures, 37mm AT gun, motorcycle prime mover, MMG, 81mm mortar
2ND FALLSCHIRMJAGER REGIMENTAL HQ*(Colonel Sturm)(North or South - turn 3)
CO* + 4 figures, AT rifle,
2ND FALLSCHIRMJAGER BATTALION *(Captain Pietzonka)
HQ (Turn 1)CO + 7 figures, 2 x grenade launcher
1st Company (Turn 1)8 figures
2nd Company (Turn 2)8 figures
3rd Company (Turn 2)8 figures
4th Company (Turn 3)10 figures, 37mm AT gun, motorcycle prime mover, MMG, 81mm mortar
* The original strength of parachute units is the number of troops who survive the landing. Figures lost during the drop are not counted as casualties for morale purposes. Test at 50% of casualties.
* Highest level HQ for all German forces for morale purposes
FALLSHIRMJAGER ASSAULT ENGINEERS (Lt Haffner) – test @ 7 figures (Turn 1 - bridge)
HQ CO + 5 figures, grenade launcher, glider
Company 8 figures, flamethrower, glider
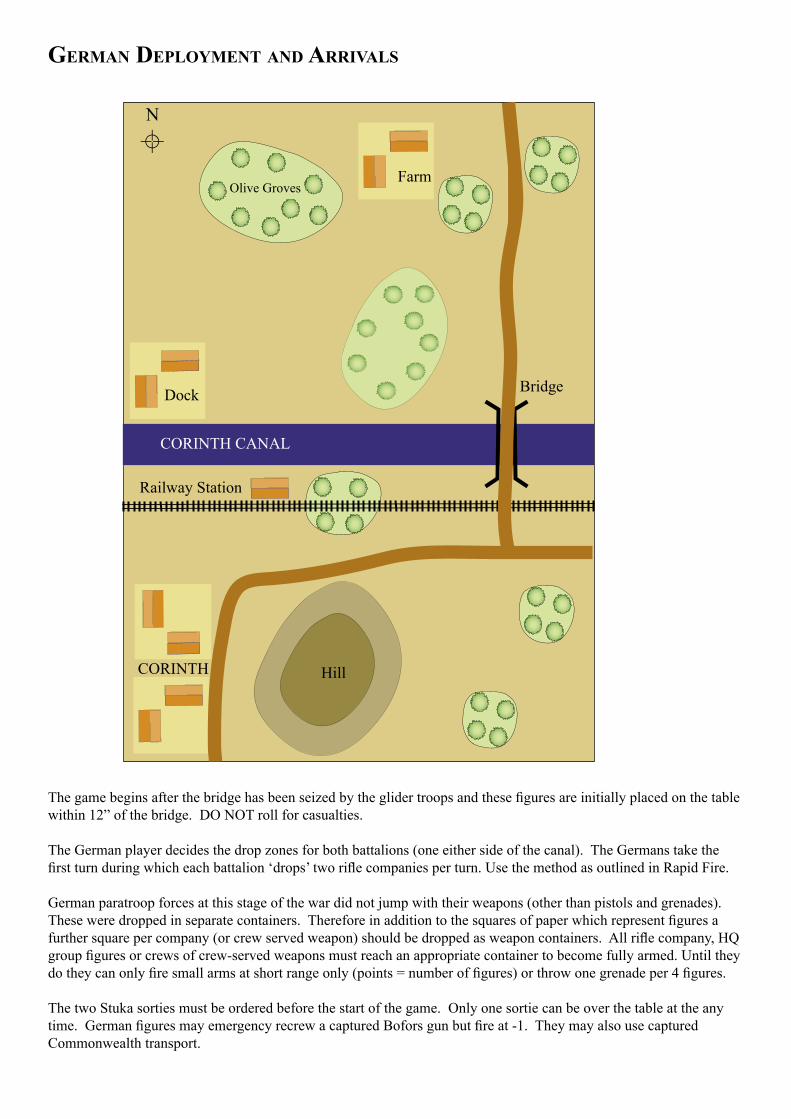
GERMAN DEPLOYMENT AND ARRIVALS
N
Olive Groves
MALEMETavronitis River BedCORINTH CANAL
Farm
HillCORINTH
Railway Station
Bridge
The game begins after the bridge has been seized by the glider troops and these figures are initially placed on the table within 12” of the bridge. DO NOT roll for casualties.
The German player decides the drop zones for both battalions (one either side of the canal). The Germans take the first turn during which each battalion ‘drops’ two rifle companies per turn. Use the method as outlined in Rapid Fire. German paratroop forces at this stage of the war did not jump with their weapons (other than pistols and grenades). These were dropped in separate containers. Therefore in addition to the squares of paper which represent figures a further square per company (or crew served weapon) should be dropped as weapon containers. All rifle company, HQ group figures or crews of crew-served weapons must reach an appropriate container to become fully armed. Until they do they can only fire small arms at short range only (points = number of figures) or throw one grenade per 4 figures.
The two Stuka sorties must be ordered before the start of the game. Only one sortie can be over the table at the any time. German figures may emergency recrew a captured Bofors gun but fire at -1. They may also use captured Commonwealth transport.
Dock