pentagon log cabin models - forest log cabins & · pdf filelog cabins pentagon log cabin...
TRANSCRIPT
Lo
g c
abin
sP
enta
gon
log
cabi
n m
odel
s
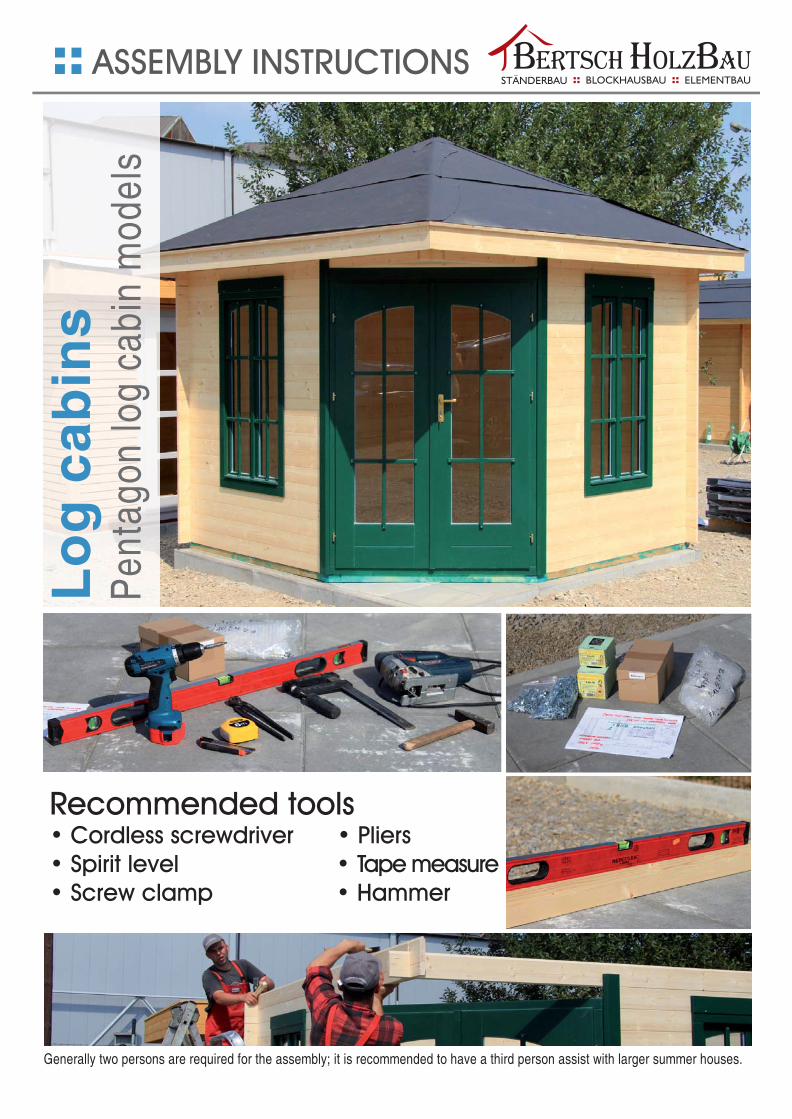
Generally two persons are required for the assembly; it is recommended to have a third person assist with larger summer houses.
ASSEMBLY INSTRUCTIONS
Recommended tools• Cordless screwdriver • Pliers• Spirit level • Tape measure• Screw clamp • Hammer
STEP 1 Before you begin!
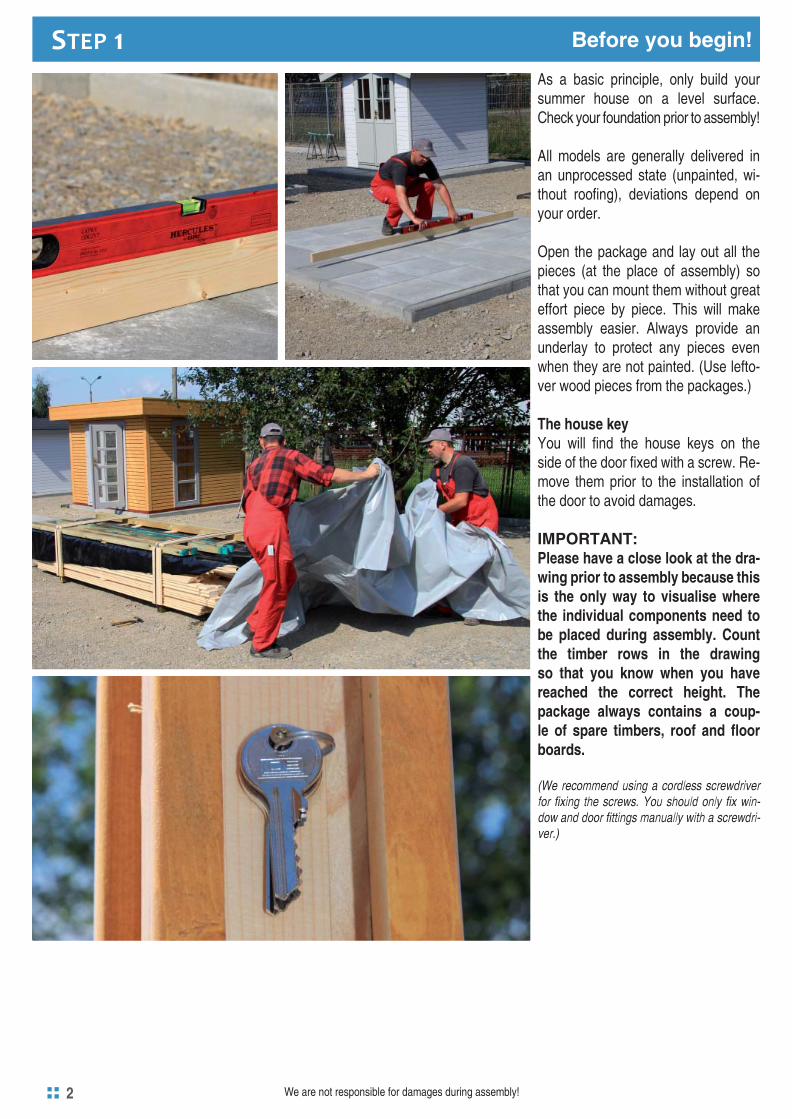
As a basic principle, only build your summer house on a level surface. Check your foundation prior to assembly!
All models are generally delivered in an unprocessed state (unpainted, wi-thout roofi ng), deviations depend on your order.
Open the package and lay out all the pieces (at the place of assembly) so that you can mount them without great effort piece by piece. This will make assembly easier. Always provide an underlay to protect any pieces even when they are not painted. (Use lefto-ver wood pieces from the packages.)
The house keyYou will fi nd the house keys on the side of the door fi xed with a screw. Re-move them prior to the installation of the door to avoid damages.
IMPORTANT:Please have a close look at the dra-wing prior to assembly because this is the only way to visualise where the individual components need to be placed during assembly. Count the timber rows in the drawing so that you know when you have reached the correct height. The package always contains a coup-le of spare timbers, roof and fl oor boards.
(We recommend using a cordless screwdriver for fi xing the screws. You should only fi x win-dow and door fi ttings manually with a screwdri-ver.)
2 We are not responsible for damages during assembly!
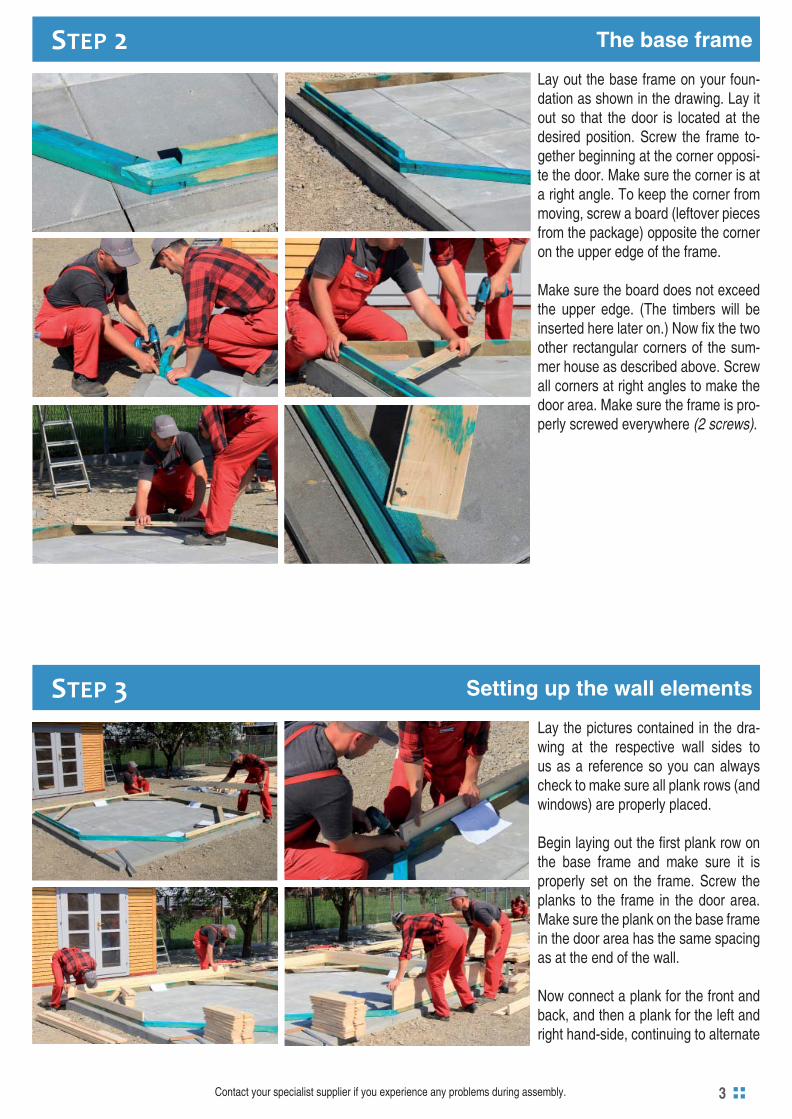
Lay the pictures contained in the dra-wing at the respective wall sides to us as a reference so you can always check to make sure all plank rows (and windows) are properly placed.
Begin laying out the fi rst plank row on the base frame and make sure it is properly set on the frame. Screw the planks to the frame in the door area. Make sure the plank on the base frame in the door area has the same spacing as at the end of the wall.
Now connect a plank for the front and back, and then a plank for the left and right hand-side, continuing to alternate
STEP 2 The base frame
Lay out the base frame on your foun-dation as shown in the drawing. Lay it out so that the door is located at the desired position. Screw the frame to-gether beginning at the corner opposi-te the door. Make sure the corner is at a right angle. To keep the corner from moving, screw a board (leftover pieces from the package) opposite the corner on the upper edge of the frame.
Make sure the board does not exceed the upper edge. (The timbers will be inserted here later on.) Now fi x the two other rectangular corners of the sum-mer house as described above. Screw all corners at right angles to make the door area. Make sure the frame is pro-perly screwed everywhere (2 screws).
STEP 3 Setting up the wall elements
3Contact your specialist supplier if you experience any problems during assembly.
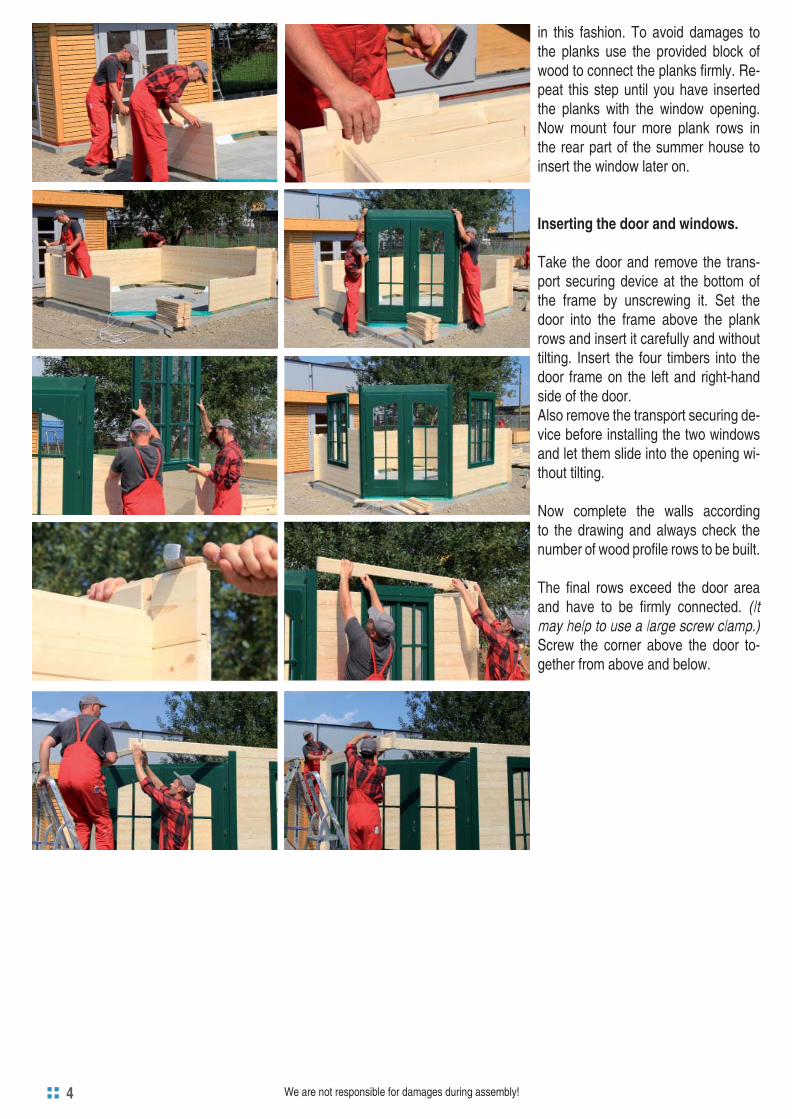
in this fashion. To avoid damages to the planks use the provided block of wood to connect the planks fi rmly. Re-peat this step until you have inserted the planks with the window opening. Now mount four more plank rows in the rear part of the summer house to insert the window later on.
Inserting the door and windows.
Take the door and remove the trans-port securing device at the bottom of the frame by unscrewing it. Set the door into the frame above the plank rows and insert it carefully and without tilting. Insert the four timbers into the door frame on the left and right-hand side of the door.Also remove the transport securing de-vice before installing the two windows and let them slide into the opening wi-thout tilting.
Now complete the walls according to the drawing and always check the number of wood profi le rows to be built.
The fi nal rows exceed the door area and have to be fi rmly connected. (It may help to use a large screw clamp.) Screw the corner above the door to-gether from above and below.
We are not responsible for damages during assembly!4
Attaching the roof frame.Lay the four pre-assembled roof frame timbers on the wall timbers and align them so that they are fl ush with the wall. Attach the timbers with screws (through the recess for the rafters) to the wall timbers. Attach them in every recess.
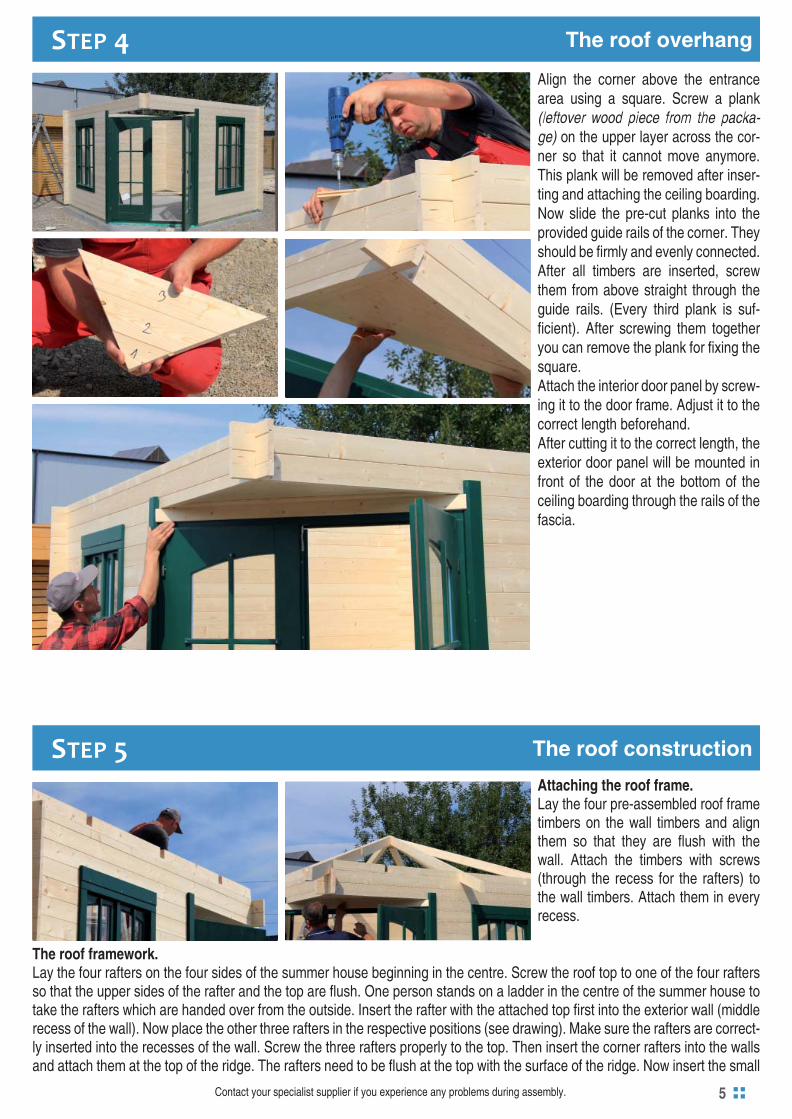
STEP 4 The roof overhang
STEP 5 The roof construction
Align the corner above the entrance area using a square. Screw a plank (leftover wood piece from the packa-ge) on the upper layer across the cor-ner so that it cannot move anymore. This plank will be removed after inser-ting and attaching the ceiling boarding.Now slide the pre-cut planks into the provided guide rails of the corner. They should be fi rmly and evenly connected. After all timbers are inserted, screw them from above straight through the guide rails. (Every third plank is suf-fi cient). After screwing them together you can remove the plank for fi xing the square.Attach the interior door panel by screw-ing it to the door frame. Adjust it to the correct length beforehand.After cutting it to the correct length, the exterior door panel will be mounted in front of the door at the bottom of the ceiling boarding through the rails of the fascia.
The roof framework.Lay the four rafters on the four sides of the summer house beginning in the centre. Screw the roof top to one of the four rafters so that the upper sides of the rafter and the top are fl ush. One person stands on a ladder in the centre of the summer house to take the rafters which are handed over from the outside. Insert the rafter with the attached top fi rst into the exterior wall (middle recess of the wall). Now place the other three rafters in the respective positions (see drawing). Make sure the rafters are correct-ly inserted into the recesses of the wall. Screw the three rafters properly to the top. Then insert the corner rafters into the walls and attach them at the top of the ridge. The rafters need to be fl ush at the top with the surface of the ridge. Now insert the small
Contact your specialist supplier if you experience any problems during assembly. 5
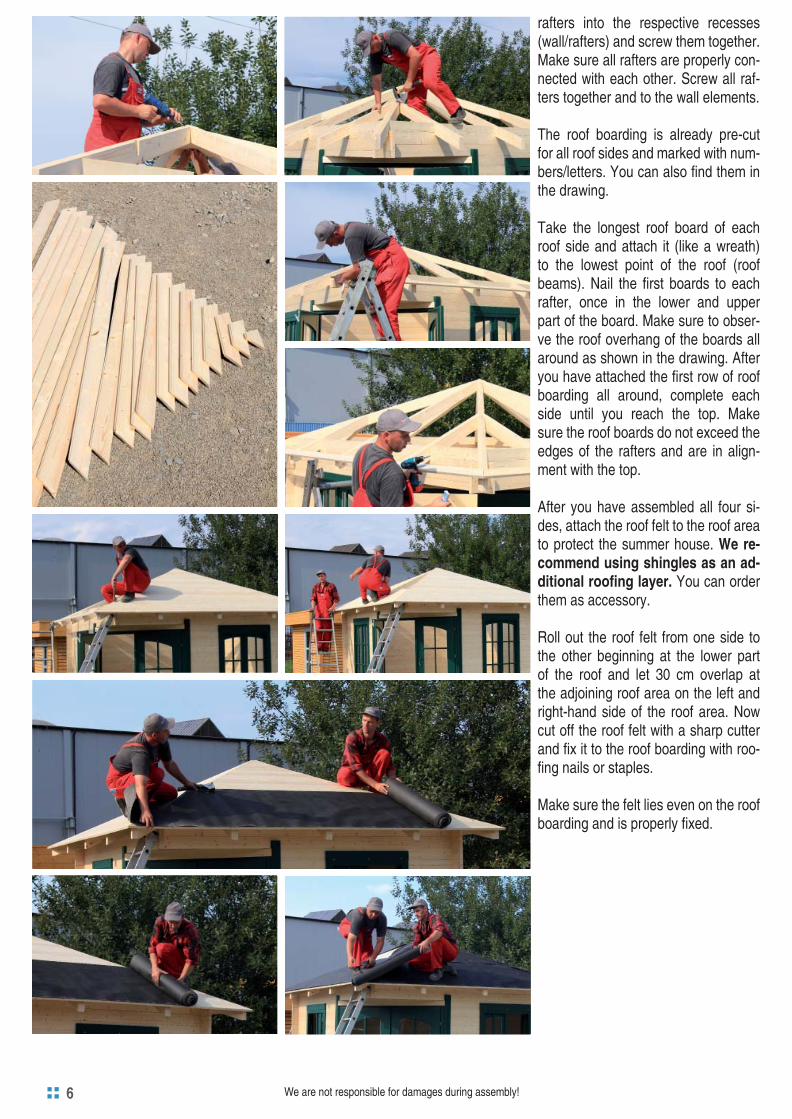
rafters into the respective recesses (wall/rafters) and screw them together. Make sure all rafters are properly con-nected with each other. Screw all raf-ters together and to the wall elements.
The roof boarding is already pre-cut for all roof sides and marked with num-bers/letters. You can also fi nd them in the drawing.
Take the longest roof board of each roof side and attach it (like a wreath) to the lowest point of the roof (roof beams). Nail the fi rst boards to each rafter, once in the lower and upper part of the board. Make sure to obser-ve the roof overhang of the boards all around as shown in the drawing. After you have attached the fi rst row of roof boarding all around, complete each side until you reach the top. Make sure the roof boards do not exceed the edges of the rafters and are in align-ment with the top.
After you have assembled all four si-des, attach the roof felt to the roof area to protect the summer house. We re-commend using shingles as an ad-ditional roofi ng layer. You can order them as accessory.
Roll out the roof felt from one side to the other beginning at the lower part of the roof and let 30 cm overlap at the adjoining roof area on the left and right-hand side of the roof area. Now cut off the roof felt with a sharp cutter and fi x it to the roof boarding with roo-fi ng nails or staples.
Make sure the felt lies even on the roof boarding and is properly fi xed.
6 We are not responsible for damages during assembly!
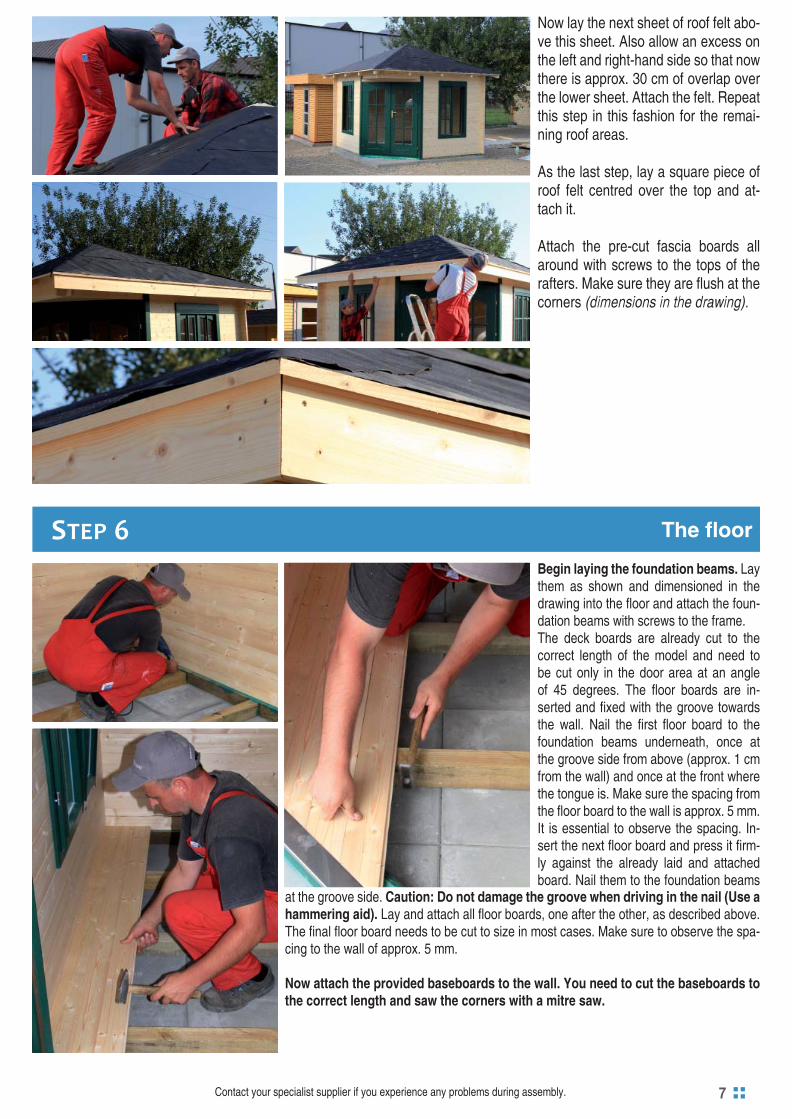
Now lay the next sheet of roof felt abo-ve this sheet. Also allow an excess on the left and right-hand side so that now there is approx. 30 cm of overlap over the lower sheet. Attach the felt. Repeat this step in this fashion for the remai-ning roof areas.
As the last step, lay a square piece of roof felt centred over the top and at-tach it. Attach the pre-cut fascia boards all around with screws to the tops of the rafters. Make sure they are fl ush at the corners (dimensions in the drawing).
STEP 6 The fl oor
Begin laying the foundation beams. Lay them as shown and dimensioned in the drawing into the fl oor and attach the foun-dation beams with screws to the frame.The deck boards are already cut to the correct length of the model and need to be cut only in the door area at an angle of 45 degrees. The fl oor boards are in-serted and fi xed with the groove towards the wall. Nail the fi rst fl oor board to the foundation beams underneath, once at the groove side from above (approx. 1 cm from the wall) and once at the front where the tongue is. Make sure the spacing from the fl oor board to the wall is approx. 5 mm. It is essential to observe the spacing. In-sert the next fl oor board and press it fi rm-ly against the already laid and attached board. Nail them to the foundation beams
at the groove side. Caution: Do not damage the groove when driving in the nail (Use a hammering aid). Lay and attach all fl oor boards, one after the other, as described above. The fi nal fl oor board needs to be cut to size in most cases. Make sure to observe the spa-cing to the wall of approx. 5 mm.
Now attach the provided baseboards to the wall. You need to cut the baseboards to the correct length and saw the corners with a mitre saw.
7Contact your specialist supplier if you experience any problems during assembly.

You can fi nd assembly videos on our websitewww.bertsch-holzbau.de
Love your summer house?
Please note:These assembly instructions provide support for proper assembly.The order of the described steps is not necessarily binding.Nevertheless, if you should experience any problems with the assembly of your summer house, please ask your specialist supplier for help. He will gladly assist you. Bertsch Holzbau rejects any warranty for damages resulting from incorrect assem-bly or gross negligent actions.
Always read the attached drawing and these assembly instructions before commencing the assembly.Ensure in advance that no damages have occurred.
Thank you for choosing a Bertsch Holzbau product and we hope you enjoy your new summer house.
Take a picture of your summer house and send it to [email protected].
If we publish your picture in our catalogue, we will give you ₤ 20.In addition, each submitted and printed picture is automatically entered in our annual raffl e:
1st place ₤ 200, 2nd place ₤ 100, 3rd place ₤ 50.