pc-pakratt for windows for windows... · pc-pakratt 2.1 for windows 3.x, referred to as ppwin...
TRANSCRIPT

1
INDEX
PC-PAKRATT OPERATIONWelcome to PPWIN ...................................................................................... 3Help Conventions ........................................................................................ 4Files Menu .................................................................................................. 4Edit Menu ................................................................................................... 5TNC Menu ................................................................................................... 5Parameters Menu ........................................................................................ 6Configure Menu ........................................................................................... 8Tools Menu ................................................................................................. 9Window Menu ............................................................................................. 10Help Menu .................................................................................................. 11
TNC PARAMETERSPacket Parameters ....................................................................................... 11AMTOR Parameters ...................................................................................... 11Baudot/ASCII/Morse Parameters ................................................................... 11PACTOR Parameters ..................................................................................... 12Mail Drop Parameters ................................................................................... 12Dual Port Parameters ................................................................................... 12Misc. Parameters ......................................................................................... 12NAVTEX/TDM Parameters ............................................................................. 12Dumb Terminal Parameters .......................................................................... 13Signal Parameters ........................................................................................ 13
CONFIGURATIONConfigure Menu ........................................................................................... 14TNC Configuration ....................................................................................... 15Setting TNC Parameters ............................................................................... 17
MACROSMacros ........................................................................................................ 19Adding & Editing Macros .............................................................................. 20

2
OPERATING WINDOWSPacket Operation ......................................................................................... 21AMTOR Operation ........................................................................................ 23Baudot/ASCII Operation ............................................................................... 26PACTOR Operation ....................................................................................... 28SIAM Operation ........................................................................................... 30MORSE Operation ........................................................................................ 31NAVTEX/TDM Operation ............................................................................... 33Dumb Terminal Operation ............................................................................. 34Packet Monitor Window ................................................................................ 35
SCROLL BACK BUFFERScroll Back Buffer ........................................................................................ 36BBS Operation ............................................................................................. 38
MAILDROP OPERATIONMailDrop Operation ...................................................................................... 40Editing MailDrop Msgs .................................................................................. 41Sending MailDrop Msgs ................................................................................ 41
QSO LOGQSO Log ..................................................................................................... 43QSO Log Print Menu .................................................................................... 44
MODEMSSelecting Modems ........................................................................................ 45
MISCELLANEOUSGateway Operation ...................................................................................... 46PPWIN.INI Parameters ................................................................................. 57LogWindows Interface ................................................................................. 57ANSI Graphics ............................................................................................. 58
PcPakratt for Windows PC-Pakratt Operation
3
PC-PAKRATT OPERATION
Welcome to PPWIN
PC-PakRatt 2.1 for Windows 3.x is designed to take advantage of the non preemptive multitaskingenvironment Windows has to offer. PC-PakRatt 2.1 for Windows 3.x, referred to as PPWIN through-out, offers a graphical interface for your TIMEWAVE TNC and makes your job of operating mucheasier.
Here are some of the features of PC-PakRatt 2.1 for Windows 3.x:
Dual port operation with TIMEWAVE's DSP-2232 or PK-900.
Dual TNC operation with any of TIMEWAVE's TNCs including the PK-232, PK-900, DSP-1232/2232, DSP 232, PK-88, PCB-88, PK-96 ,PK-12, IDR-96 as well as R.L. Drake's TNC270TNC Radio.Independent operating windows for each TNC and for each radio port on the DSP-2232 or PK-900.
Mode dependent status bars and customized buttons to facilitate operation.
Separate TNC parameter values for VHF and HF Packet.
ASCII and Binary File transfers in Packet and PACTOR. ASCII transfers in all other modes.Packet File transfers can take place while conversing on another Packet channel.
Separate CQ and SK macros for AMTOR, BAUDOT, ASCII, MORSE & PACTOR. Custom buttonsin the status bar to execute these macros. PC-PakRatt 2.1 for Windows 3.x executes the propermacro for each mode.
Support for quick call sign exchanges.
Up to 50 macros for each TNC.
Support for automatic Packet Node connections.
Separate QSO logs for each TNC.
Separate transmit buffers for each Packet channel.
Separate Packet Monitor channel.Ability to 'Paste' text from the ClipBoard to the Transmit buffer and 'Copy' text from the ScrollBack buffer.
Ability to send a file to the Mail Drop and save individual messages in the Mail Drop to an AS-CII file. Mail Drop messages can be saved to disk when the program exits and re-loaded whenthe program runs.
Support for BBS operation; click on a message # to automatically bring up a 'Quick BBS' com-mand menu.
Supports quick callsign exchange in Morse, Baudot, ASCII, AMTOR and PACTOR.

PcPakratt for Windows PC-Pakratt Operation
4
Scroll Back buffer size (default 64K) can be increased to 256K bytes for each operating win-dow.
ANSI Graphics Support.
Supports communications with TIMEWAVEs LogWindows Program.
Monitor window to display unproto packets while operating packet on any TNC or Port.
Help File Conventions
Certain conventions are used throughout this Help file.
Blue refers to keys on your keyboard. For example: Press ESC means to press the ESCAPE keyon your keyboard.
Slate refers to characters you type exactly. For example: Type [HB 1200].
Magenta refers to words you fill in with your own text. For example: Type DE your callsign.
Red refers to a hint or a warning. For example: Don't turn your TNC off while the PPWIN isrunning.
Green refers to a Cross Reference. For example: See Also Index.
BOLD refers to buttons or menu items.
This help file will usually refer to buttons and icons by displaying the actual button or icon. Thebuttons in the help file are only images and are not really active.
Files Menu
This menu allows you to load and/or save the TNC1 and TNC2 parameters. This menu also allowsyou to change the default printer setup.
Load TNC1 ParametersReads the TNC1 parameters from disk. If Fast Initialization is on, the TNC will be re-initialized.
Load TNC2 ParametersReads all the TNC2 parameters from disk. If Fast Initialization is on, the TNC will be re-initialized.
Load All ParametersReads both TNC1 and TNC2 parameters from disk. If Fast Initialization is on, the TNCs will be re-initialized.
Save TNC1 ParametersSaves the TNC1 parameters to disk.
Save TNC2 ParametersSaves the TNC2 parameters to disk.
Save All Parameters

PcPakratt for Windows PC-Pakratt Operation
5
Saves both TNC1 and TNC2 parameters to disk.
Load/Init TNC1 ParametersReads all the parameters from disk and initializes TNC1 if the operating window is open.
Load/Init TNC2 ParametersReads all the parameters from disk and initializes TNC2 if the operating window is open.
Load/Init All ParametersReads all the parameters from disk and initializes the TNCs which have windows open.
Printer SetupCalls the Windows Printer Setup. This is the same as opening the Control Panel and choosing Print-er Setup.
ExitCauses the program to terminate.
When the program exits and if you have specified an exit macro, the macro will execute before theprogram terminates. The exit macro will not execute ifyou double-click on the in the upper lefthand corner of the operating window.
Also, if the Save Mail drop messages box was checked, the program will save any Mail drop mes-sages to disk when quitting the program. If the HostMode on Exit box is not checked, the TNC willbe placed back into Human mode.
Edit Menu
This menu allows you to Copy selected text from the scroll-back buffer to the ClipBoard and/orpaste text from the ClipBoard into the transmit buffer.
CopyCopies the selected text from the scroll-back buffer into the ClipBoard. Once the text is in the Clip-Board it may be pasted into the transmit buffer or used in another Windows application.
PastePastes text data from the ClipBoard into the transmit buffer to be sent. Data in the ClipBoard mayoriginate from the scroll back buffer with the Copy command (see above) or from another Win-dows application.
TNC Menu
To begin operating, a TNC window must be first opened by choosing the TNC to operate. PPWINsupports up to two TNCs and with a DSP-2232 or a PK-900, a separate operating window for eachradio port.
Open TNC1:DSP-2232Opens TNC1 operating window (In this example TNC1 is a DSP-2232)
Open TNC1 Port 2Opens TNC1: Port 2 operating window (if applicable)

PcPakratt for Windows PC-Pakratt Operation
6
Open TNC2:PK-88Opens TNC2 operating window (In this example TNC2 is a PK-88)
Open TNC2 Port 2Opens TNC2, Port 2 operating window, if applicable. (The PK-88 has only one port so this will begrayed)
Open Monitor WindowOpens the Packet Monitor Window to allow displaying of unproto packets from any TNC or port.
PPWIN will identify the type of TNC that is attached to TNC1 and TNC2 when the program is runfor the first time. For example, if a PK-232MBX is attached to TNC1, DSP-2232 would be replacedwith TNC1:PK-232MBX and TNC1 Port 2 would be grayed and inactive. (Since the two radio portson the PK-232 do not support simultaneous operation)
Once a TNC window has been opened, the menu will change to Close TNC1:DSP-2232.
Parameters Menu
The Parameters Menu will allow you to change the values for the TNC's parameters and the stateof the TNC.
TNC1 Parameters
TNC1 HF Packet ParamsContains most of the HF Packet parameters.
TNC1 HF Packet Msg ParamsContains parameters such as BTEXT, CTEXT and UNPROTO as well as CFROM, DFROM,MFROM, MTO and MBX.
TNC1 Port 2 ParamsAll Port 2 parameters. (Only applies to a DSP-2232 or PK-900)
TNC1 VHF Packet ParamsContains most of the VHF Packet parameters.
TNC1 Hi Speed Packet ParamsContains most of the VHF Packet parameters for high baud rate operation.
TNC1 VHF Packet Msg ParamsContains parameters such as BTEXT, CTEXT and UNPROTO as well as CFROM, DFROM,MFROM, MTO and MBX.
TNC1 Hi Speed Packet Msg ParamsContains parameters such as BTEXT, CTEXT and UNPROTO as well as CFROM, DFROM,MFROM, MTO and MBX. for high baud rate operation
TNC1 Port 2 VHF ParamsAll Port 2 VHF parameters. (Only applies to a DSP-2232 or PK-900)
TNC1 Port 2 Hi Speed ParamsAll Port 2 parameters for high baud rate operation. (Only applies to a DSP-2232 or PK-900)

PcPakratt for Windows PC-Pakratt Operation
7
TNC1 AMTOR/NAVTEX/TDM ParamsAMTOR, NAVTEX and TDM parameters.
TNC1 PACTOR ParamsPACTOR parameters. (requires PACTOR firmware)
TNC1 BAUDOT/ASCII/MORSE ParmsBAUDOT, ASCII and MORSE parameters.
TNC1 Misc. ParamsMiscellaneous TNC parameters.
TNC1 MailDrop ParamsAll MailDrop parameters for TNC1.
TNC2 Parameters
TNC2 HF Packet ParamsAll HF Packet parameters.
TNC2 HF Packet Msg ParamsContains parameters such as BTEXT, CTEXT and UNPROTO as well as CFROM, DFROM,MFROM, MTO and MBX.
TNC2 Port 2 HF ParamsAll Port 2 parameters. (Only applies to a DSP-2232 or PK-900)
TNC2 VHF Packet ParamsAll VHF Packet parameters.
TNC2 Hi Speed Packet ParamsContains most of the VHF Packet parameters for high baud rate operation.
TNC2 VHF Packet Msg ParamsContains parameters such as BTEXT, CTEXT and UNPROTO as well as CFROM, DFROM,MFROM, MTO and MBX.
TNC2 Hi Speed Packet Msg ParamsContains parameters such as BTEXT, CTEXT and UNPROTO as well as CFROM, DFROM,MFROM, MTO and MBX. for high baud rate operation
TNC2 Port 2 VHF ParamsAll Port 2 VHF parameters. (Only applies to a DSP-2232 or PK-900)
TNC2 Port 2 Hi Speed ParamsAll Port 2 parameters for high baud rate operation. (Only applies to a DSP-2232 or PK-900)
TNC2 AMTOR/NAVTEX/TDM ParamsAMTOR, NAVTEX and TDM parameters.
TNC2 PACTOR ParamsPACTOR parameters. (requires PACTOR firmware)

PcPakratt for Windows PC-Pakratt Operation
8
TNC2 BAUDOT/ASCII/MORSE ParamsBAUDOT, ASCII and MORSE parameters.
TNC2 Misc ParamsMiscellaneous TNC parameters.
TNC2 MailDrop ParamsAll MailDrop parameters for TNC2.
A TNC window must be open before any of the TNC parameter dialogs can be accessed. The TNCPort 2 parameter menu items will be disabled (grayed) unless the TNC is a DSP-2232 or PK-900.The PACTOR parameter menu items will be disabled if the firmware in the TNC does not supportPACTOR.
Configure Menu
Load Configuration Loads the program configuration for both TNCs from disk.
Save Configuration Saves the program configuration for both TNCs to disk.
TNC1
Set Color Set the received text colors for TNC1.
TNC Configuration Set the TNC type, COM Port, baud rate & program parametersfor TNC1.
Program Files Set program filenames and paths for TNC1.
Program Configuration Set Port Auto Open, start/exit macros, & RX buffer size forTNC1.
QSO Log Defaults Set default values for the TNC1 QSO log.
TNC2
Set Color Set the received text colors for TNC2.
TNC Configuration Set the TNC type, COM Port, baud rate & program parametersfor TNC2.
Program Files Set program filenames and paths for TNC2.
Program Configuration Set Port Auto Open, start/exit macros & RX buffer size forTNC2.
QSO Log Defaults Set default values for the TNC2 QSO log.

PcPakratt for Windows PC-Pakratt Operation
9
Set Font Brings up the Font selection menu for both TNCs.
Choose Font This allows you to set the font used in the receive and transmit windows. Note that Windows will not show the programdefault font (OEM Fixed Font).The TERMINAL fonts which can be installed using the FONTSapplication in the Windows Control Panel will show the IBMscreen graphics characters used in many MS-DOS applicationsand in PACTOR pictures.
Select OEM Fixed Font Reset to the default OEM Fixed Font.The OEM Fixed Font properly displays control characters andthe IBM screen graphic characters. This font is a fixed pitchfont.
Choose Printer Font Selects a font to be used in printing.
Specify Editor Allows you to specify your favorite text editor (or any other application of your choosing) that can be called from the Tools menu. Thedefault is Write.exe.
Reset Rx Window Colors Allows you to reset the Rx Window colors back to the current de-faults. When receiving ANSI graphics, the screen colors may be left atsome undesirable color. This features allows you to reinstate the de-fault colors for the Rx window.
The TNC type, COM Port, and baud rate should be set first.
PPWIN supports COM Ports 1-4. The setup of these COM Ports must be done through the Win-dows 3.1 Control Panel 'Port Setup' applet. For OS/2 2.1, refer to the OS/2 help for the COM andVCOM driver parameters.
Do not assign a TNC to a COM Port which shares the same port address or IRQ with another COMPort which is in use!
Tools Menu
The Tools menu allows you access to several of the more popular Windows applications and app-lets.
Control Panel Call the Windows Control Panel applet.
Notepad Call Windows Notepad.
Write.exe Call Windows Write. The program called here can be changed withthe "Specify Editor" option in the Configuration Menu.
ClipBoard Call the Windows ClipBoard Viewer.
Sync With Log Windows Polls Log Windows To begin commications. If Log Windows is run
ning, the in the TNC Status Dialog will change from .
Terminate Log Windows Link ?
PcPakratt for Windows PC-Pakratt Operation
10
Window Menu
Arrange Icons Arranges the icons at the bottom of the Main Window.
Cascade Cascades the open windows.
Tile Vertically Tiles windows vertically.
Tile Horizontally Tiles windows horizontally.
Save TNC1 Port 1 PositionSaves the location and size of the operating window for TNC1 port-1.
Save TNC1 Port 2 PositionSaves the location and size of the operating window for TNC1 port-2.
Save TNC2 Port 1 PositionSaves the location and size of the operating window for TNC2 port-1.
Save TNC2 Port 2 PositionSaves the location and size of the operating window for TNC2 port-2.
Save Program Position Saves the location and size of the operating window for the PC-PakRatt 2.1 for Windows 3.x program.
Save Monitor Window PositionSaves the location and size of the Packet monitor window.
Help Menu
Welcome to PC-PakRatt 2.1 for Windows 3.xCalls the Windows Help program and displays the Welcome to PC-PakRatt2.1 for Windows 3.x topic.
Technical Support Shows how to obtain technical support for TIMEWAVE products.
Firmware Shows the program version and the TNC(s) firmware dates. (If the TNC isopen)
About... Shows the Copyright information and program author.

PcPakratt for Windows TNC Parameters
11
TNC PARAMETERS
Please refer to the manual of the data controller that you use!
Packet Parameters
ACKPRIORACRPACKALFPACKALTMODEMAUDELAYAX25L2V2AXDELAYAXHANGBBSMSGSBEACONBTEXTCASEDISPCFROMCHCALLCHECKCMDTIMECMSGCODECONALARM
CONNECTCONPERMCONSTAMPCPACTIMECSTATUSCTEXTDAYSTAMPDCDCONNDFROMDIRECTDISCONNEDWAITFRACKFRICKFULLDUPGUSERSHBAUDHEADERLNHID
ILFPACKLITEMAILDROPMAXFRAMEMBELLMBXMCONMDIGIMDMONMFILTERMFROMMHEARDMIDMODEMMONITORMPROTOMRPTMSTAMPMTO
MXMITMYALIASMYCALLMYGATEPACLENPACTIMEPASSALLPERSISTPPERSISTQHPACKETQVPACKETRADIORELINKRESPTIMERETRYSCANSENDPACSLOTTIMESQUELCH
STEPSTEPLENSTEPRESTSTEPSIZESTEPUPTCLEARTIMETONETRIESTXDELAYUBITUNPROTOUSERSWHYNOTXGATEWAYXMITOK
AMTOR Parameters
AABACHGACRRTTYADELAYAFILTERALISTAMTORARQARQTMOARQTOLARXTOR
AUDELAYCODECONALARMCONSTAMPCWIDDAYSTAMPDCDCONNDIRECTERRCHARFECGUSERS
HEREISIDLOCKMARSDISPMIDMDMONMFILTERMODEMMWEIGHTMYALTCALMYIDENT
MYSELCALNUMSQTORRECEIVERFECRXREVSELFECSRXALLTCLEARTIMETMAIL
TXREVUBITUSOSWIDESHFTWRUXGATEWAYXLENGTHXMITOK
BAUDOT/ASCII/MORSE Parameters
8BITCONVAABABAUDACRRTTYAFILTERALFRTTYAUDELAYATXRTTYBITINV
CODECRADDCWIDDIDDLEDIRECTERRCHARHEREISIDLOCK
MARSDISPMFILTERMODEMMOPTMSPEEDMWEIGHTNUMSQMORSEQRTTY
QWIDERBAUDRCVERECEIVERFRAMERXREVTCLEARTIMETXDELAY
TXREVUBITUSOSWIDESHFTWRUXBAUDXLENGTHXMITXMITOK

PcPakratt for Windows TNC Parameters
12
PACTOR Parameters
8BITCONVAABACHGACRRTTYADELAYAFILTERARQTMOARXTORAUDELAYCONALARM
CONSTAMPCWIDDAYSTAMPDCDCONNDIRECTERRCHARGUSERSHEREISMDMONMFILTER
MODEMMWEIGHTMYPTCALLOVERPT200PTCONNPTDOWNPTHUFFPTLISTPTOVER
PTROUNDPTSENDPTSUMPTTRIESPTUPQPTORRCVERECEIVETCLEARTIME
TMAILUBITUCMDWRUXLENGTHXGATEWAYXMITOK
MailDrop Parameters
3RDPARTYHOMEBBSKILONFWD
LASTMSGMAILDROPMDMON
MDPROMPTMMSGMTEXT
MYGATEMYMAILTMAIL
TMPROMPTUBIT
Dual Port Parameters
ACKPRIORAUDELAYAX25L2V2AXDELAYAXHANGBEACONCFROMCHECKCMSGDFROM
DWAITFRACKFRICKFULLDUPHBAUDHIDLITEMAXFRAMEMBELLMFROM
MIDMODEMMONITORMRPTMPROTOMTOMYALIASMYCALLPACLENPASSALL
PERSISTPPERSISTRADIORELINKRESPTIMERETRYSCANSLOTTIMESQUELCHSTEP
STEPLENSTEPRESTSTEPSIZESTEPUPTXDELAYUNPROTOUSERSVHF
Misc. Parameters
AFILTERBARGRAPHBITINVBRIGHT
CANLINECANPACCOMMANDCWID
DIRECTHEREISMARKMODEM
OKQSIGNALRECEIVEREDISPLA
SENDPACSPACETIMEUBIT
NAVTEX/TDM Parameters
ARQECODEERRCHARLOCK
MARSDISPMODEMNAVMSGNAVSTN
NAVTEXNUMSQTDMRXREV
TDBAUDTDCHANTDMUBIT
WIDESHFT
PcPakratt for Windows TNC Parameters
13
Dumb Terminal Parameters
5BIT6BITACRDISPANSAMPLEAUTOBAUDCALIBRATECANLINECANPACCMDTIMECOMMAND
CONMODECONVERSECSTATUSDAYTIMEDISPLAYDSPDATAEASECHOESCAPEEXPERT
FLOWKISSKISSADDRMDCHECKNEWMODENOMODENUCRNULFNULLSOPMODE
PASSPRCONPRFAXPROUTPRTYPEQDATAQFAXQLOADREINITRESET
RESTARTSAMPLETRACETRANSTRFLOWTXFLOWWHYNOTWORDOUTXFLOW
Signal Parameters
BITINVCODE
OKQSIGNAL
QWIDERXREV
TXREVWIDESHFT
Please refer to the manual of the data controller that you use!

PcPakratt for Windows Configuration
14
CONFIGURATION
Configure Menu
Load Configuration Loads the program configuration for both TNCs from disk.
Save Configuration Saves the program configuration for both TNCs to disk.
TNC1
Set Color Set the received text colors for TNC1.
TNC Configuration Set the TNC type, COM Port, baud rate & program parametersfor TNC1.
Program Files Set program filenames and paths for TNC1.
Program Configuration Set Port Auto Open, start/exit macros, & RX buffer size forTNC1.
QSO Log Defaults Set default values for the TNC1 QSO log.
TNC2
Set Color Set the received text colors for TNC2.
TNC Configuration Set the TNC type, COM Port, baud rate & program parametersfor TNC2.
Program Files Set program filenames and paths for TNC2.
Program Configuration Set Port Auto Open, start/exit macros & RX buffer size forTNC2.
QSO Log Defaults Set default values for the TNC2 QSO log.
Set Font Brings up the Font selection menu for both TNCs.
Choose Font This allows you to set the font used in the receive and transmit windows. Note that Windows will not show the programdefault font (OEM Fixed Font).
The TERMINAL fonts which can be installed using the FONTSapplication in the Windows Control Panel will show the IBMscreen graphics characters used in many MS-DOS applicationsand in PACTOR pictures.
Select OEM Fixed Font Reset to the default OEM Fixed Font.
The OEM Fixed Font properly displays control characters andthe IBM screen graphic characters. This font is a fixed pitchfont.

PcPakratt for Windows Configuration
15
Choose Printer Font Selects a font to be used in printing.
Specify Editor Allows you to specify your favorite text editor (or any other application of your choosing) that can be called from the Tools menu. Thedefault is Write.exe.
Reset Rx Window Colors Allows you to reset the Rx Window colors back to the current de-faults. When receiving ANSI graphics, the screen colors may be left atsome undesirable color. This features allows you to reinstate the de-fault colors for the Rx window.
The TNC type, COM Port, and baud rate should be set first.
PPWIN supports COM Ports 1-4. The setup of these COM Ports must be done through the Win-dows 3.1 Control Panel 'Port Setup' applet. For OS/2 2.1, refer to the OS/2 help for the COM andVCOM driver parameters.
Do not assign a TNC to a COM Port which shares the same port address or IRQ with another COMPort which is in use!
TNC Configuration
The TNC Configuration Dialog contains three List Boxes, the first to define the TNC model, the sec-ond to define the COM Port and the third to define the baud rate between the TNC and the com-puter (TBAUD). This Dialog also contains switches (Check Boxes) which controls how the programinteracts with the TNC.
TNC Models The TNC List Box allows you to specify the TNC model attached toTNC1 or TNC2 (depending on which configuration Dialog youopened). PC-PakRatt 2.1 for Windows 3.x supports all of TIMEWAVE'scontrollers from the PK-88 to the DSP-2232.
The TNC model can not be changed while the TNC operating win-dow is open.
COM Port Selection The COM Port List Box allows you to specify which COM Port to usefor the specified TNC (TNC1 or TNC2).
The TNC COM Port can not be changed while the TNC operating win-dow is open.
Do not assign a TNC to a COM Port which shares the same port ad-dress or IRQ with another COM Port which is in use !
Windows 3.1 and OS/2 2.1 handle COM port contention problemfairly well. You will not be able to access the TNC if there is an IRQconflict.
In Windows 3.1, the COM port addresses and IRQ numbers are de-fined in the Ports applet in the Control Panel. If you plan to use COMPort 3 or 4, check the setup of these ports as they may not representyour COM board setup. For OS/2 2.1, refer to the OS/2 help for theCOM and VCOM drivers.

PcPakratt for Windows Configuration
16
If the COM Port selected is NONE, PPWIN will run in demo mode.PPWIN will not attempt to communicate with your TNC.
Computer Baud Rate The baud rate between the computer and TNC (TBAUD) must also bespecified. The baud rate between the computer and TNC must beagree before the two can communicate. If you try to access your TNCand the baud rates are different you will receive an error messagesaying that the TNC can not be accessed.
If the operating window is open, PPWIN will issue the proper TBAUDcommand, RESTART the TNC and reset the computer's COM port.
Program Switches Also in this Dialog are Check Boxes which determine how the TNCand Program operate. If the Check Box is checked, the program actsas follows:
Echo Packets Transmitted packets are echoed to the receive window as theyare sent to the TNC.
Echo Port 2 Packets Transmitted packets are echoed as they are sent to the DSP-2232s or PK-900s Radio Port 2.
UTC TNC Time Sets the TNC time to UTC time and highlights the UTC timeand date displayed in the operating window Status Bar. Whenthis box is unchecked, the local time entered in your PC ishighlighted and used to set the TNC time.
UTC Port 2 Time Highlights the UTC time and displays the UTC date in the ope-rating window Status Bar for radio port 2. The TNC time iscontrolled by UTC TNC Time. (DSP-2232 or PK-900 only).
Fast Initialization TNC parameters are not initialized when the TNC operatingwindow is opened. When not checked, the parameters are initialized each time the TNC window is opened. Fast Initialization will save time when starting PC-PakRatt 2.1 for Windows3.x but is not recommended if other programs besides PC-PakRatt 2.1 for Windows 3.x will be used.
Note that the parameters are always loaded if the TNC hasbeen reset or is not in the Host mode when PC-PakRatt 2.1 forWindows 3.x starts.
Host Mode on Exit The TNC is left in Host Mode when the program terminates.When not checked, the TNC is placed back in Human Mode.
Remaining in Host mode after exiting the program is a goodidea. It allows the TNC to save data that it may receive whenthe computer is off such as when another packet station connects to you.
If you will be using other programs besides PC-PakRatt 2.1 forWindows 3.x however, you may want to un-check this box.This may make starting your other program easier. Remember though, if you do not remain in the Host mode on Exitingthe program, you may loose data when the computer is off.

PcPakratt for Windows Configuration
17
Save/Restore Mail drop PC-PakRatt 2.1 for Windows 3.x can automatically save anymessages in the Mail Drop to disk when the program terminates and re-load the TNC when the program starts. The TNCis RESET when messages are loaded in to the TNC to preventduplicate messages.
If you have the battery back-up in your TNC enabled, we recommend that you do not check this box and simply let thebattery hold your MailDrop messages. If you have disabledthe battery back-up to make it easier to run other programsbesides PC-PakRatt 2.1 for Windows 3.x, then you may wantto check the box and automatically save and restore your MailDrop messages.
Dumb Term Initialization When checked, the TNC is initialized after leaving the Dumbterminal mode. This is a good idea to prevent any problemsthat might occur from accidentally changing any parameters inthe Dumb Terminal mode.
Show Unknown Command ErrorsWhen checked, TNC Unknown Command errors are displayedwhen they occur. This option may be turned off for TNCs witholder firmware or without the PACTOR option installed.
Show Not While Connected ErrorsWhen checked, TNC 'Not While Connected' errors are dis-played during initialization. This option may be turned on ifdesired, when this box is checked, error messages will be displayed during initialization should another station be con-nected to the TNC.
Auto QSO Check When checked and if the QSO Log is open, PC-PakRatt 2.1 forWindows 3.x will display the QSO information for the stationjust connected to (in Packet Only). Since each TNC has it'sown log, the respective QSO Dialog must be opened first.This also works when the QSO Log is minimized.
Be sure and select the SAVE parameters option if you want the changes you make to be saved forthe next time you run the program.
Setting TNC Parameters
PC-PakRatt 2.1 for Windows 3.x maintains separate parameter files for TNC1 and TNC2 parame-ters. The parameters for both TNCs can be loaded or saved individually or in concert. The parame-ter file names are specified in the Program Configuration Dialog).

PcPakratt for Windows Configuration
18
The parameter Dialogs are divided by operating mode.
HF Packet ParametersVHF Packet ParametersDual Port ParametersPort 2 HF Parameters (If TNC is Dual Port)Port 2 VHF Parameters (If TNC is Dual Port)AMTOR ParametersNAVTEX/TDM ParametersPACTOR ParametersBAUDOT/ASCII/MORSE ParametersMail Drop ParametersDumb Terminal ParametersSignal Analysis ParametersMiscellaneous Parameters
VHF Packet parameters are loaded in to the TNC when the TNC mode is changed to VHF Packet.Likewise, HF Packet parameters are loaded when the TNC is changed to HF Packet . PPWIN re-members the last Packet mode used so parameters are only reloaded when you go from HF to VHFpacket , not when you go to HF Packet to AMTOR and back to HF Packet.
Some parameters show up in multiple parameter dialogs because they affect more than one mode.Because of this, those parameters which are in multiple dialogs will affect other modes. Changesto the parameters will immediately be sent to the TNC when you press the OK button. For exam-ple, if you change the value of MYCALL, PPWIN will update the TNC when you click on the OK but-ton to close the Dialog. If PPWIN is in VHF Packet mode, changing any of the HF Packet parame-ters will effect the state of the TNC since the TNC is updated when the OK button is clicked.
Parameters can be saved or re-loaded from disk by selecting LOAD PARAMETERS and SAVE PA-RAMETERS in the File Menu. The TNC can be re-initialized by selecting LOAD/INIT TNC1 PA-RAMETERS, LOAD/INIT TNC2 PARAMETER and LOAD/INIT ALL PARAMETERS.
TNC parameter Dialogs can not be accessed while in Dumb Terminal mode since the TNC is no lon-ger in Host mode.

PcPakratt for Windows Macros
19
MACROS
The Macro Dialog contains a List Box all of the macros that currently exist for a particular TNC.Each TNC has it's own Macro File and it's own set of Macros. If the TNC is a PK-900 or DSP-2232,the macros are shared between Port 1 and Port 2.
Up to 50 macros can be stored in the macro file. The Macro files can be changed from the Pro-gram Files option from the Configure Menu.
To Execute a macro, click the left mouse button on the name of the macro you wish to executeand then click on the OK Button. You can also double click on the macro name to execute the mac-ro. Click on the Quit Button to close the dialog box if you do not wish to execute any macros.
The following macro names has a special meaning for PC-PakRatt 2.1 for Windows 3.x.
CQ-AMTOR....CQ macro for AMTORCQ-BAUDOT...CQ macro for BAUDOTCQ-ASCII....CQ macro for ASCIICQ-PACTOR...CQ macro for PACTORCQ-MORSE....CQ macro for MORSESK-AMTOR....Terminate link macro for AMTORSK-BAUDOT...Terminate link macro for BAUDOTSK-ASCII....Terminate link macro for ASCIISK-PACTOR...Terminate link macro for PACTORSK-MORSE....Terminate link macro for MORSEEQUIP-LIST..Equipment list macro
AMTOR, BAUDOT, ASCII and MORSE Status Bars all have a CQ, SK and EQ Button. When the CQor SK Button is clicked in AMTOR, the macro CQ-AMTOR (or SK-AMTOR) is executed.
The EQUIP-LIST macro in generic to all operating modes.
PPWIN also allows you to assign Macros to the ALT-1 through ALT-0 keys. This is done by begin-ning the macro name with M1- (for ALT-1), M2- (for ALT-2) and so forth. These macros are notspecific to any operating mode.
For example to attach a macro to ALT-1, you would title your macro M1-MYMACRO. To attach amacro to ALT-5, you would title your macro M5-MYMACRO.
Once a macro is executing, the Status Bar displays the word "Macro". A macro can be canceled byclicking (on the Status Bar) or typing ALT-M.
To Edit a macro, select the macro from the List Box, then click on the Edit Button. The Macro EditDialog will then appear. From here you can edit both the macro name and the contents of themacro.
To add a new macro, click on the Add Button. The Macro Edit Dialog will appear and you can beginto create a new macro.
To Delete a macro, select the macro from the List Box then click on the Delete button. The se-lected macro will be removed from the List Box and deleted from the file.
See the Macro Edit section for more information on Macros.

PcPakratt for Windows Macros
20
Adding & Editing Macros
The Macro Edit Dialog allows you to create a new macro or edit an existing macro. The Macro EditDialog is selected when you click on the Add or Edit Button in the Macro Dialog. Once inside theMacro Edit Dialog, the procedures for creating and editing macros are the same.
To enter or change the title of the macro, move the cursor to the Title Edit Box using the tab keyor the mouse. Enter or edit the existing macro name.
Macro titles are not limited by MS-DOS and can be up to 40 characters in length.
To enter or change the macro text, move the cursor to the bottom Edit Box using the tab key orthe mouse. Do not hit the ENTER key as ENTER is equivalent to clicking the mouse on the OK but-ton (in a Windows Dialog Box). To place a carriage return in to an Edit Box, type CTRL-ENTER in-stead. Macros can be up to 1024 characters. The Edit Box will not accept more than 1024 charac-ters. You can also copy text into the Edit Box from the ClipBoard by typing CTRL-INS.
Unlike earlier versions of PC-Pakratt, the Windows Edit Box can not accept most control characters.To get around this problem, PPWIN has a special convention for handling control characters. Thecontrol sequence must be enclosed by [ ] and the control sequence is entered as ASCII.
For example, to enter a Control-D into your macro, type [^D].
The control sequence must be enclosed in [ ] or PC-PakRatt 2.1 for Windows 3.x will sent the char-acters ^ and D to the TNC rather than the CTRL-D character.
PC-PakRatt 2.1 for Windows 3.x allows you to directly enter TNC commands into your macro. Thisis especially handy with the AUTOSTART and AUTOEXIT macros where commands such as 'Monitor0' can be entered to automatically disable packet monitoring when quitting PC-PakRatt 2.1 for Win-dows 3.x.
As with control characters, the TNC command must be enclosed by [ ]. The TNC command musthowever be specified using the Host Mode Mnemonic. Host Mode mnemonics are listed in thecommand section of the TNC operating manual and in the TNC Parameters section of these HelpFiles.
As an example, to tell the TNC to go into FEC mode (such as for calling CQ-AMTOR), enter intoyour macro [FE]. If you look up the FEC command in the TNC Parameters section of these helpfiles, you will notice that the Host mode command is 'FE'. PPWIN takes care of changing the StatusBar. When a TNC parameter is changed, the value is updated in the program as well.
As an example, to enter an AMTOR FEC CQ call, you would enter [FE]CQ CQ CQ CQ CQ DE K1ABCK1ABC (KABC KABC)[^D]
Note that the macro is ended with a CTRL-D. If you terminate the macro with the TNC command[AM], the TNC will be placed in AMTOR standby before all text is transmitted. The CTRL-D allowsthe TNC is transmit all the characters in it's buffer before going back to receive.

PcPakratt for Windows Operating Windows
21
OPERATING WINDOWS
Packet Operation
Key Definitions:
ALT-A: Calls the MailDrop Dialog.ALT-B: Sets the Packet radio baud rate HBAUD.ALT-I: Issues an ID command to the TNC.ALT-M: Calls the Macro Dialog.ALT-Q: Refreshes the windows.ALT-R: Clears Receive Window and Scroll Back Buffer.ALT-S: Holds/Releases Transmit Buffer.ALT-U: Initiates a File Capture.ALT-V: Toggles Radio ports on the DSP-1232 Only.ALT-X: Calls the File Transfer Dialog.ALT-Y: Clears Transmit Window and sends TCLEAR to the TNC.ALT-Z: Changes the Operating Mode.
SHIFT-INS: Pastes text from the ClipBoard into the TX window.PgUP: Calls the Scroll Back Buffer.HOME: Calls the QSO Log Dialog.END: Calls the Mheard Dialog.
PRINT Screen: Saves incoming data to the printer.
F3: Calls the CONNECT Dialog.F4: Issues a DISCONNEct command.F6: Toggles the HF Packet LITE feature on/off.^F6: Issues a FREE memory inquiry.F7: Toggles the MailDrop Monitor (MDMON) on/off.Sh-F7: Toggles MAILDROP on/off.F8: Toggles CONPERM on/off.Up: Increases the Packet Channel.Dn: Decreases the Packet Channel.
Button Descriptions:
Toggles the RX window from the Display ALL mode to the Display individual CHannel mode.When the Mode is Display CHannel, the button changes to .
Hold/Release transmit buffer. When pressed, the data you type into the transmit buffer will beheld until this button is released.
Packet Connect. Brings up the packet Connect dialog and allows you to connect to other Packetstations.
Packet Disconnect. Initiates the packet Disconnect process when you are through talking to theother station.
Clears the transmit window and issues a TCLEAR, command to the TNC.

PcPakratt for Windows Operating Windows
22
Clears the receive window and the Scroll Back Buffer.
Opens the File Transfer Dialog.
Opens and Displays the Macro Dialog. If clicked while a macro is executing, the Macro in prog-ress will be terminated.
ID Performs a Packet Identification of your station if HID is also checked.
Displays the MailDrop Dialog. If there is mail in the MailDrop for the SYSOP, the button will turnwhite (with 7/92 firmware or newer).
Turns on the File Capture to begin saving incoming received text to disk. When a File capture isin progress the button is stays depressed. Click on the depressed button to stop the File Capture.
File Capture hold/release button. When a File Capture is taking place, the button changes to. Clicking on the button while it is green will temporarily pause the File Capture. The button
then will change to . Clicking on the button will change it back to green and the File Capturewill continue. When the File Capture is terminated, the button returns back to gray.
Saves incoming data so it can to be printed. When data is being saved, the button will changeto . Click on the button again to stop saving data and spool the data to the printer. Be sure toset the Printer font and point size before printing.
Opens and Displays the QSO Log Dialog.
Calls the MHEARD Dialog to show a list of the most recently heard packet stations.
Makes a packet connection 'permanent' toggling the CONPERM command on/off. The button isdepressed when a packet link is 'CONPERMed'.
Enables/Disables sending received data to Log Windows. When data is to be sent to Log Win-
dows, the button will change to . Communications with Log Windows must first be started fromthe Tools Menu.
Toggles the HF packet LITE feature on/off. When LITE is ON, the button changes to .
Toggles MAILDROP on/off. When MAILDROP is on, your packet MailDrop is available to remotestations wishing to log on to your MailDrop. The button will change to when your MailDrop isavailable for others to use.
Toggles the MailDrop Monitor feature (MDMON) on/off. When MDMON is on, the buttonchanges to .
Packet connects are initiated by pressing . PPWIN will then display the Connect Dialog. The dia-log contains a List Box to hold the callsigns of stations you frequently connect to. To add a callsignto the list, type the callsign in the Edit Box and click on ADD. The call will be added to the list andsaved to disk. To Establish a connect, either double click on a callsign in the List Box or type thecallsign in the Edit Box and click on OK or press Enter. To Delete a callsign from the list, click onthe callsign to select it and press DELETE.

PcPakratt for Windows Operating Windows
23
To establish connect through multiple NET/ROM or <TheNet> compatible packet nodes, separatethe node callsigns with a semicolon. For example:
MLB;C ORL;C N4PZM
This example will allow you to connect to N4PZM using first the MLB then the ORL nodes. The con-nect Dialog will not return back to the operating screen until all connections have been made. Ifany of the connections fail, the Dialog will close. The Dialog will also show the progress of eachconnect in the path.
You can close the Connect Dialog and the connect process will stop after the connect in processcompletes (or fails).
PPWIN maintains a separate connect file for each TNC.
AMTOR Operation
Key Definitions:
ALT-A: Calls the MailDrop Dialog.ALT-I: Sends the ID command to the TNC.ALT-L: Sends the LOCK (Ltrs) command to the TNC.ALT-J: Toggles ARXTOR.ALT-M: Calls the Macro Dialog.ALT-N: Sends the NUMS command to the TNC.ALT-Q: Refreshes the windows.ALT-R: Clears Receive window and Scroll Back Buffer.ALT-S: Holds/Releases Transmit BufferALT-U: Initiates a File Capture.ALT-V: Toggles Radio ports on the DSP-1232 Only.ALT-X: Calls the File Transfer Dialog.ALT-Y: Clears Transmit window and sends TCLEAR to the TNC.ALT-Z: Changes Operating Mode.
SHIFT-INS: Pastes text from the ClipBoard into the TX window.PgUP: Calls the Scroll Back BufferHOME: Calls the QSO Log Dialog.END: Sends a '+?' if linked in ARQ.PRINT Screen:Saves incoming data to the printer.PgDn: Quick Call Exchange terminate by a +?.^PgDN: Quick Call Exchange terminate by a ^D.
F3: Starts an FEC AMTOR transmission.Sh-F3: Starts a SELFEC transmission.F4: Starts ARQ AMTOR call to another station.F6: Toggles RXREV on/off.Sh-F6: Toggles TXREV on/off.^F6: Issues a FREE command check to the TNC.F7: Toggles the MailDrop Monitor (MDMON) command.Sh-F7: Toggles the TMAIL command on/off.F8: Places the TNC in AMTOR Standby.F9: Starts the AMTOR Listen (ALIST) mode.Sh-F9: Grabs the ARQ link with the ACHG command.

PcPakratt for Windows Operating Windows
24
Button Descriptions:
Hold/Release transmit buffer. The transmit buffer can hold up to 1000 characters. PPWIN willbeep of more than 1000 characters are entered while the buffer is being held.
Toggles the ARXTOR command on and off.
FEC. The Button allows you to make an FEC AMTOR transmission such as for calling CQ orwhen in a "roundtable" AMTOR contact. This button stays depressed when TNC is in FEC transmitmode.
SELFEC. This button initiates a SELective FEC transmission. The Button stays depressed whiletransmitting.
The ARQ Button opens the ARQ AMTOR Link dialog and allows you to make an ARQ call to an-other station. This button stays depressed when in ARQ mode.
The ALIST button enters the AMTOR Listen mode allowing other AMTOR stations to be moni-tored. The Button stays depressed when in ALIST.
This Button returns the TNC to AMTOR Standby receive when pressed.
This Button transfers to the PACTOR screen and enters the PACTOR Listen mode whenpressed.
This button grabs the link from the ARQ AMTOR station you are linked to with the ACHG com-mand. You must be linked with another AMTOR station to use this feature.
Opens the File Transfer Dialog. Only ASCII transfers are permitted in AMTOR.
Clears the transmit window and issues a TCLEAR, command to the TNC.
Clears the receive window and the Scroll Back Buffer.
Displays the MailDrop Dialog window. If there is mail in the Mail Drop for the SYSOP, the but-ton will turn white (with 7/92 firmware or newer).
Turns on the File Capture. When a File capture is in progress the button is stays depressed.Click on the depressed button to stop the File Capture.
File Capture hold/release button. When a File Capture is taking place, the button changes to. Clicking on the button while it is green will pause the File Capture. The button then will
change to . Clicking on the button will change it back to green and the File Capture will contin-ue. When the File Capture is terminated, the button returns back to gray.
Saves incoming data so it can to be printed. When data is being saved, the button will changeto . Click on the button again to stop saving data and spool the data to the printer. Be sure toset the Printer font and point size before printing.
Opens and displays the QSO Log Dialog.
Opens and displays the Macro Dialog. If clicked while a macro is executing, terminates themacro.
PcPakratt for Windows Operating Windows
25
LOCK Forces Letters should the printing suddenly shift to Figs due to a received error.
Sends an ID command to the TNC.
Toggles the RXREV command on/off.
Toggles the TXREV command on/off.
NUMS (BAUDOT and AMTOR only) Forces Numbers should the printing suddenly shift to Lettersdue to a received error.
This button toggles the WRU feature of the TNC on/off enabling other stations such as APLINKand AMTOR BBS stations to automatically determine your callsign. See the AAB command for a de-scription of what to enter.
Enables/Disables sending received data to Log Windows. When data is to be sent to Log
Windows, the button will change to . Communications with Log Windows must first be startedfrom the Tools Menu.
Calls CQ by executing the CQ-AMTOR Macro.
Executes the SK-AMTOR Macro.
Execute the EQUIP-LIST Macro.
Toggles TMAIL on/off. When TMAIL is on, the button changes to and your AMTOR MailDropis available to any other AMTOR station who links to you in ARQ.
Toggles MDMON on/off. When MDMON is on, the button changes to and you will monitorany other station linked to your AMTOR MailDrop.
ARQ links are initiated by pressing . SELFEC transmissions are initiated by pressing . PPWINwill then display the AMTOR Dialog. The dialog contains a List Box to hold the callsigns of stationsyou frequently link to.
To add a callsign to the list, type the callsign in the Edit Box and click on ADD. The will be addedto the list and saved to disk. To Establish an ARQ link, either double click on a callsign in the ListBox or type the callsign in the Edit Box and press OK or press Enter. To Delete a callsign from thelist, click on the callsign to select it and press DELETE.

PcPakratt for Windows Operating Windows
26
BAUDOT/ASCII Operation
Key Definitions:
ALT-B: Changes the Baudot (RBAUD) or ASCII (ABAUD) radio baud rate.ALT-I: Sends the ID command to the TNC.ALT-L: Sends the LOCK (Ltrs) command to the TNC.ALT-M: Calls the Macro Dialog.ALT-N: Sends the NUMS command to the TNC.ALT-Q: Refreshes the windows.ALT-R: Clears Receive window and the Scroll Back Buffer.ALT-S: Holds/Releases Transmit Buffer.ALT-U: Initiates a File Capture.ALT-V: Toggles Radio ports on the DSP-1232 Only.ALT-X: Calls the File Transfer Dialog.ALT-Y: Clears Transmit window and sends TCLEAR to the TNC.ALT-Z: Changes Operating Mode.
SHIFT-INS: Pastes text from the ClipBoard into the TX window.PgUP: Calls the Scroll Back Buffer.HOME: Calls the QSO Log Dialog.PRINT Screen:Saves incoming data to the printer.PgDn: Quick Call Exchange terminate by a ^D.^PgDN: Quick Call Exchange terminate by a ^D.
F3: Places the TNC into Baudot or ASCII XMIT.F4: Places the TNC into Baudot or ASCII RCVE.Sh-F4: Sends the LOCK (Ltrs) command to the TNC.F6: Toggles receive reverse (RXREV) on/off.Sh-F6: Toggles transmit reverse (TXREV) on/off.^F6: Issues a FREE command check to the TNC.F9: Toggles the WIDESHFT command on/off.
Button Descriptions:
Hold/Release transmit buffer. The transmit buffer can hold up to 1000 characters. PPWIN willbeep of more than 1000 characters are entered while the buffer is being held.
Places the TNC in Baudot or ASCII receive (RCVE) mode.
Places the TNC in Baudot or ASCII transmit (XMIT) mode.
Sends an ID command to the TNC.
Displays the File Transfer Dialog.
Clears the transmit window and issues a TCLEAR command to the TNC.
Clears the receive window and the Scroll Back Buffer.
Saves incoming data so it can to be printed. When data is being saved, the button will changeto . Click on the button again to stop saving data and spool the data to the printer. Be sure toset the Printer font and point size before printing.

PcPakratt for Windows Operating Windows
27
Turns on the File Capture. When a File capture is in progress the button is stays depressed.Click on the depressed button to stop the File Capture.
File Capture hold/release button. When a File Capture is taking place, the button changes to. Clicking on the button while it is green will pause the File Capture. The button then will
change to . Clicking on the button will change it back to green and the File Capture will contin-ue. When the File Capture is terminated, the button returns back to gray.
NUMS (BAUDOT and AMTOR only) Forces Numbers should the printing suddenly shift to Lettersdue to a received error.
LOCK Forces Letters should the printing suddenly shift to Figs due to a received error.
Displays the QSO Log Dialog.
Opens and Displays the Macro Dialog. If clicked while a macro is executing, terminates themacro.
Toggles the RXREV command on/off.
Toggles the TXREV command on/off.
Toggles the WIDESHFT command on/off.
This button toggles the WRU feature of the TNC on/off enabling other stations to automaticallydetermine your callsign. See the AAB command for a description of what to enter.
Enables/Disables sending received data to Log Windows. When data is to be sent to Log Win-
dows, the button will change to . Communications with Log Windows must first be started fromthe Tools Menu.
Executes the CQ-BAUDOT or CQ-ASCII Macro.
Executes the SK-BAUDOT or SK-ASCII Macro.
Execute the EQUIP-LIST Macro.

PcPakratt for Windows Operating Windows
28
PACTOR Operation
Key Definitions:
ALT-A: Calls the MailDrop Dialog.ALT-I: Sends the ID command to the TNC.ALT-J: Toggles ARXTOR.ALT-M: Calls the Macro Dialog.ALT-Q: Refreshes the windows.ALT-R: Clears Receive window and the Scroll Back Buffer.ALT-S: Holds/Releases Transmit BufferALT-U: Initiates a File Capture.ALT-V: Toggles Radio ports on the DSP-1232 Only.ALT-X: Calls the File Transfer Dialog.ALT-Y: Clears Transmit window and sends TCLEAR to the TNC.ALT-Z: Changes Operating Mode.
SHIFT-INS: Pastes text from the ClipBoard into the TX window.PgUP: Calls the Scroll Back Buffer.HOME: Calls the QSO Log Dialog.END: Sends a ^Z if connected to another PACTOR station.PRINT Screen:Saves incoming data to the printer.PgDn: Quick Call Exchange terminate by a ^Z.^PgDN: Quick Call Exchange terminate by a ^D.
F3: Starts a PTSEND transmission.F4: Starts PACTOR Connect with the PTCONN command.^F6: Issues a FREE command check to the TNC.F7: Toggles the MailDrop Monitor (MDMON) command.Sh-F7: Toggles the TMAIL command on/off.F8: Places the TNC in PACTOR Standby.F9: Starts the PACTOR Listen (PTLIST) mode.Sh-F9: Grabs the PACTOR link with the ACHG command.
Button Descriptions:
Hold/Release transmit buffer. The transmit buffer can hold up to 1000 characters. PPWIN willbeep of more than 1000 characters are entered while the buffer is being held.
Toggles the ARXTOR command on and off.
When this button is pressed, the PACTOR Standby mode is entered.
PTLIST. When this button is pressed, the PACTOR Listen mode is entered. This is the modewhich monitors other PACTOR stations.
When this button is pressed, the PACTOR Connect dialog box appears letting you connect withother PACTOR stations using the PTCONN command.
Press this button to start an FEC PACTOR transmission with the PTSEND command. UsePTSEND for calling CQ (or simply press the CQ Macro) or for round table PACTOR conversations.
This button grabs the link from the PACTOR station you are connected to with the ACHG com-mand. You must be connected to another PACTOR station to use this command.

PcPakratt for Windows Operating Windows
29
ALIST. The Button automatically transfers you to the AMTOR operating screen and enters theAMTOR Listen mode.
When this button is pressed, the PT200 command is enabled letting PACTOR automaticallyswitch to 200 baud if conditions are good. This will speed traffic flow when conditions permit.
Opens the File Transfer Dialog.
Clears the transmit window. If double clicked, issues a TCLEAR, command to the TNC.
Clears the receive window and the Scroll Back Buffer.
Displays the MailDrop Dialog window. If there is mail in the MailDrop for the SysOp, the buttonwill turn white (with 7/92 firmware or newer).
Turns on the File Capture. When a File capture is in progress the button is stays depressed.Click on the depressed button to stop the File Capture.
File Capture hold/release button. When a File Capture is taking place, the button changes to. Clicking on the button while it is green will halt the File Capture. The button then will change
to . Clicking on the button will change it back to green and the File Capture will continue. Whenthe File Capture is terminated, the button returns back to gray.
Saves incoming data so it can to be printed. When data is being saved, the button will changeto . Click on the button again to stop saving data and spool the data to the printer. You will beprompted by the Printer Setup Dialog and the Font Dialog to specify and set up your printer. Besure to set the Printer font and point size before printing.
Opens and Displays the QSO Log Dialog.
Displays the Macro Dialog. If clicked while a macro is executing, terminates the macro.
Enables/Disables sending received data to Log Windows. When data is to be sent to Log Win-
dows, the button will change to . Communications with Log Windows must first be started fromthe Tools Menu.
Executes the CQ-PACTOR Macro.
Executes the SK-PACTOR Macro.
Execute the EQUIP-LIST Macro.
[?] Toggles TMAIL on/off. When TMAIL is on, the button changes to [?] and your PACTOR Mail-Drop is available to any other PACTOR station who connects to you.
Toggles MDMON on/off. When MDMON is on, the button changes to and you will monitorany other station connected to your PACTOR MailDrop.

PcPakratt for Windows Operating Windows
30
Signal Analysis Operation
The Signal Identification and Analysis Mode (SIAM) allows a wide variety of digital signals to be au-tomatically analyzed so they can be copied by your multimode TNC. The TNC will listen to a signalfor a few seconds and the display the type of signal and its speed. You then can decide whether ornot to copy the signal.
Tuning in the FSK signal properly is critical to successful SIAM operation. SIAM can only decode asignal properly if it is tuned correctly.
Make sure your transceiver is either in LSB or FSK depending on your TNC /radio setup.
Turn any IF-shift and Pass band Tuning controls to the center or OFF position.
Tune you receiver carefully across the band looking for the distinctive 2 tone sound of an FSKsignal.
The received signal is tuned properly when the tuning indicator is spread out and looks some-
thing like .
If you are using a PK-232MBX or PK-900 adjust the THRESHOLD control so that the DCD indi-cator lights when properly tuned to the RTTY station. If you are using a DSP data controller,make sure the volume from the receiver is high enough light the DCD LED.
After about 15 seconds, your TNC should respond with the mode, baud rate, the state of RXREVand the % confidence the signal is what the TNC thinks it is. For example:
0.47 50 Baud, BAUDOT, RXREV OFF
When you click on the OK and a valid mode has been determined by the TNC, PPWIN will set theTNC to the proper operating mode and adjust RXREV and the baud rate if necessary.
Clears the receive window and the Scroll Back Buffer.
Toggles the WIDESHFT command on/off.
PPWIN also allow you to change the values of CODE and BITINV. If you have a PK-900 or DSP da-ta controller the QSIGNAL and QWIDE commands can be set as well. Click on the appropriate con-trol to change the parameter.
Other parameters that affect the Signal Identification mode can be found in the Signal Parametershelp topic.

PcPakratt for Windows Operating Windows
31
MORSE Operation
Key Definitions:
ALT-I: Sends the ID command to the TNC.ALT-L: Sends the Speed LOCK command to the TNC.ALT-M: Calls the Macro Dialog.ALT-Q: Refreshes the windows.ALT-R: Clears Receive window and the Scroll Back Buffer.ALT-S: Holds/Releases Transmit BufferALT-U: Initiates a File Capture.ALT-V: Toggles Radio ports on the DSP-1232 Only.ALT-X: Calls the File Transfer Dialog.ALT-Y: Clears Transmit window and sends TCLEAR to the TNC.ALT-Z: Change Operating Mode.
SHIFT-INS: Pastes text from the ClipBoard into the TX window.PgUP: Calls the Scroll Back BufferHOME: Calls the QSO Log Dialog.PRINT Screen:Saves incoming data to the printer.PgDn: Quick Call Exchange terminate by a ^D.^PgDN: Quick Call Exchange terminate by a ^D.
F3: Places the TNC into Morse XMIT.F4: Places the TNC into Morse RCVE.Sh-F4: Sends the Speed LOCK command to the TNC.
Button Descriptions:
Hold/Release transmit buffer. The transmit buffer can hold up to 1000 characters. PPWIN willbeep of more than 1000 characters are entered while the buffer is being held.
Places the TNC in Morse receive (RCVE) mode.
Places the TNC in Morse transmit (XMIT) mode.
Displays the File Transfer Dialog.
Clears the transmit window and issues a TCLEAR command to the TNC.
Clears the receive window and the Scroll Back Buffer.
Saves incoming data so it can to be printed. When data is being saved, the button will changeto . Click on the button again to stop saving data and spool the data to the printer. Be sure toset the Printer font and point size before printing.
Turns on the File Capture. When a File capture is in progress the button is stays depressed.Click on the depressed button to stop the File Capture.
File Capture hold/release button. When a File Capture is taking place, the button changes to. Clicking on the button while it is green will pause the File Capture. The button then will
change to . Clicking on the button will change it back to green and the File Capture will contin-ue. When the File Capture is terminated, the button returns back to gray.

PcPakratt for Windows Operating Windows
32
Sends the Morse Speed LOCK command to the TNC.
Displays the QSO Log Dialog.
Opens and Displays the Macro Dialog. If clicked while a macro is executing, terminates themacro.
Enables/Disables sending received data to Log Windows. When data is to be sent to Log Win-
dows, the button will change to . Communications with Log Windows must first be started fromthe Tools Menu.
Executes the CQ-MORSE Macro.
Executes the SK-MORSE Macro.
Execute the EQUIP-LIST Macro.
PPWIN also allow you to change the values of your transmitted Morse speed in Words per minute(MSPEED) and the dot-dash ratio with the MWEIGHT command. Click on the appropriate up/downcontrol to change the parameter. Other parameters that affect Morse operation are described inthe Baudot/ASCII/Morse Parameters help topic.

PcPakratt for Windows Operating Windows
33
NAVTEX/TDM Operation
Key Definitions:
ALT-L: Sends the LOCK (Ltrs) command to the TNC.ALT-N: Sends the NUMS command to the TNC.ALT-Q: Refreshes the windows.ALT-R: Clears Receive window and Scroll Back Buffer.ALT-U: Initiates a File Capture.ALT-V: Toggles Radio ports on the DSP-1232 Only.ALT-Z: Changes Operating Mode.
PgUP: Calls the Scroll Back BufferHOME: Calls the QSO Log Dialog.PRINT Screen:Saves incoming data to the printer.
F6: Toggles RXREV on/off.^F6: Issues a FREE command check to the TNC.
Button Descriptions:
ARQE. Press this button to enter the ARQE receive mode. The Button will stay depressed whenin ARQE mode.
TDM. Press this button to enter the TDM receive mode. The Button will stay depressed when inTDM mode.
NAVTEX. Press this button to enter the NAVTEX receive mode. The Button will stay depressedwhen in NAVTEX.
Clears the receive window and the Scroll Back Buffer.
Saves incoming data so it can to be printed. When data is being saved, the button will changeto . Click on the button again to stop saving data and spool the data to the printer. Be sure youhave selected the printer font and point size before printing.
Turns on the File Capture. When a File capture is in progress the button is stays depressed.Click on the depressed button to stop the File Capture.
File Capture hold/release button. When a File Capture is taking place, the button changes to. Clicking on the button while it is green will pause the File Capture. The button then will
change to . Clicking on the button will change it back to green and the File Capture will contin-ue. When the File Capture is terminated, the button returns back to gray.
LOCK (Ltrs) Forces Letters should the printing suddenly shift to Figs due to a received error.
NUMS Forces Numbers should the printing suddenly shift to Letters due to a received error.
Toggles the RXREV command on/off.
Opens and displays the QSO Log Dialog.
Toggles the WIDESHFT command on/off.

PcPakratt for Windows Operating Windows
34
Dumb Terminal Operation
Key Definitions:
SHIFT-INS: Pastes text from the ClipBoard into the TX window.HOME: Calls the QSO Log Dialog.END: +?PRINT Screen:Saves incoming data to the printer.
Button Descriptions:
Clears the transmit window and issues a TCLEAR command to the TNC.
Turns on the File Capture. When a File capture is in progress the button is stays depressed.Click on the depressed button to stop the File Capture.
File Capture hold/release button. When a File Capture is taking place, the button changes to. Clicking on the button while it is green will pause the File Capture. The button then will
change to . Clicking on the button will change it back to green and the File Capture will contin-ue. When the File Capture is terminated, the button returns back to gray.
Opens and Displays the Macro Dialog. If clicked while a macro is executing, terminates themacro.
Saves incoming data so it can to be printed. When data is being saved, the button will changeto . Click on the button again to stop saving data and spool the data to the printer. Be sure toset the Printer font and point size before printing.
Opens and Displays the QSO Log Dialog.
Opens and Displays the File Transfer Dialog.
Pastes the contents (up to 1024 characters) from the ClipBoard to the transmit window (in theform of a Macro).

PcPakratt for Windows Operating Windows
35
Packet Monitor Window
Key Definitions:
ALT-Q: Refreshes the windows.ALT-R: Clears Receive Window and Scroll Back Buffer.ALT-U: Initiates a File Capture.
PgUP: Calls the Scroll Back Buffer.HOME: Calls the QSO Log Dialog.END: Calls the Mheard Dialog.PRINT Screen:Saves incoming data to the printer.
F3: Toggles the Port 1 button for TNC1.F4: Toggles the Port 1 button for TNC 1.F5: Toggles the Port 1 button for TNC 2.F6: Toggles the Port 2 button for TNC 2.
Button Descriptions:
Enables displaying unproto data from Port 1. Then button will change to when dis-playing of unproto packets is enabled. The button works similiarily. The label to the right ofthese buttons denotes which TNC is affected.
Clears the receive window and the Scroll Back Buffer.
Turns on the File Capture to begin saving incoming received text to disk. When a File capture isin progress the button is stays depressed. Click on the depressed button to stop the File Capture.
File Capture hold/release button. When a File Capture is taking place, the button changes to. Clicking on the button while it is green will temporarily pause the File Capture. The button
then will change to . Clicking on the button will change it back to green and the File Capturewill continue. When the File Capture is terminated, the button returns back to gray.
Saves incoming data so it can to be printed. When data is being saved, the button will changeto . Click on the button again to stop saving data and spool the data to the printer. Be sure toset the Printer font and point size before printing.
In order for the Packet Monitor Window to display data, The TNC and port must be in Packetmode. This window will not display nonpacket data nor will it display data which directed towardsa specific channel; only unproto data will be displayed.
The Packet Monitor Window receives its data from the respective TNC window, so if there are noTNC windows open, data is not being received from the TNC and nothing will be displayed in themonitor window.
Data from a tnc will be displayed in the same color same Monitor Channel for that tnc. For exam-ple, data from TNC 2 will be displayed in the same color as the Monitor channel for TNC 2.
While connected, MCON should be set to 4 or higher to be able to display unproto packets in themonitor window.

PcPackratt for Windows Scroll Back Buffer
36
SCROLL BACK BUFFER
There is a separate Scroll Back buffer for each TNC, and each radio port if you are using a DSP-2232 or PK-900 dual port TNC.
To view the contents of PC-Pakratt's Scroll Back buffer, press the PgUP key or click on the receivewindow's scroll bar. The Status bar will change to reflect that you are in the Scroll Back mode asshown below. The # of lines in buffer and the current lines being displayed are shown in the lowerleft hand corner of the Status bar.
Use the scrollbar or Shift-PgUp and Shift-PgDn to navigate around the buffer.
The status bar shows the current Packet Channel, the # of lines in the buffer and the current linesdisplayed. In Packet, use the UP/DOWN Arrows or Arrow Buttons to change the Packet Channel. Innon-packet modes, the UP/DOWN Arrows are disabled.
Incoming data will be held in a 10K byte temporary buffer until you exit the Scroll Back buffer. Ifthe temporary buffer overflows, PPWIN will beep every time new data arrives and is thrown away.The data stored in the temporary buffer transferred to the Scroll Back buffer when you return tothe operating window.
The following features are available in the Scroll Back buffer.
Backward Searches backwards through the buffer for the selected string immediately belowthe button.
Forward Searches forwards through the buffer for the selected string immediately below thebutton.
Case SensitiveIf checked, text searches will be case sensitive.
Find Select a file to store the contents of the buffer. Once a file is selected, the filenameis placed in the Edit Box above.
If you have selected the callsign of the station you are currently working, pressingthe button places the call in the QX buffer Edit Box to the right. A faster way toenter the callsign into the QX buffer is to point at the desired callsign with themouse and double-click the right mouse button. This callsign can then be used withthe PgDn key for "Quick exchanges". See the "Quick Call Exchange" section belowfor more information.
It is not necessary to be in the scroll back buffer to use this feature.

PcPackratt for Windows Scroll Back Buffer
37
Close Close the Scroll Back buffer & restore the Status Bar to the mode you were in previ-ously. Pressing ESC will also close the Scroll Back buffer.
Saves the contents of the buffer (or the selected text) to a file specified in the EditBox to the right.
Writes the buffer or selected text to the printer.
Copies the highlighted text into the ClipBoard.
Pastes the contents (up to 1024 characters) from the ClipBoard to the transmit win-dow in the form of a Macro.
Clears the Scroll Back Buffer.
While the Scroll Back Buffer is being displayed. Text can be entered in the Transmit window andthe Text will be sent to the TNC and transmitted just as it would be normally.
Selecting Text
Text can be selected by moving the mouse cursor over the desired text while holding down the leftmouse button. Once the text is selected, it can be copied to the ClipBoard by pressing .
Text that is highlighted can be inserted in to the Quick Call Exchange Edit Box by pressing .Double clicking the right mouse button while pointing to a callsign will also place the call in theQuick Call Exchange Edit Box without pressing the QX button.
Text that is copied into ClipBoard can be again copied to any Edit Box, such as the Search and QXEdit Box by pressing CTRL-INSERT. Once the text is copied into the ClipBoard, the text can bepasted into the TX window by pressing .
To clear the highlight text, click the right mouse button.
Quick Call Exchange
PPWIN helps to automate the callsign exchange process. When a callsign is entered in the QuickCall Exchange buffer, PPWIN will execute a call exchange when you press the PgDn key. Your call-sign is grabbed from the value of MYCALL (HF Packet Parameters). In AMTOR, the +?, sequence isadded, in PACTOR the <Ctrl-Z> sequence is added and for other modes, a CTRL-D is appended.The exchange is entered in to the Transmit window as a Macro.
For example, if the call entered in to the Quick Call buffer was N4ABC and your call entered intoMYCALL was DC7XJ the exchange would be:
in AMTOR: N4ABC DE DC7XJ +?in PACTOR: N4ABC DE DC7XJ ^Zin BAUDOT, ASCII or MORSE: N4ABC DE DC7XJ ^D
The Ctrl-PgDn key executes the call exchange and always attaches a ^D to the end of the ex-change in AMTOR and PACTOR as well as BAUDOT, MORSE and ASCII. This is handy for the finalAMTOR or PACTOR transmission of the conversation. The ^D at the end will cause the AMTORLink or PACTOR Connection to be terminated ending the QSO.
A Quick Call Exchange can not be executed when a Macro is currently in progress.

PcPackratt for Windows Scroll Back Buffer
38
Text Searching
To search for a particular string in the buffer, enter the text in the Search Edit Box in the ScrollBack Status Bar. If you check the Case Sensitive Box, the search will be case sensitive. That is tosay, lowercase characters are matched only to lowercase characters. If the Checkbox is notchecked, the lowercase characters will be matched to both lower and uppercase characters andvice versa.
To begin the search, click on the Forward or Backward buttons. If a match is found, the linecontaining the match will be displayed as the 1st line at the top of the receive window and thematching text will be highlighted. If no match was found, a message box will appear stating so. Tocontinue search, simply continue to click on either the Forward and Backward buttons.
Saving the Buffer
To save the contains of the buffer to a file, click on the button. The contains will be saved tothe file shown in the box next to the button. The default is BUFFER1.TXT for TNC1 (and BUF-FER1A.TXT for TNC1, Port 2). If text has been highlighted, only the highlighted text will be saved.
Printing the Buffer
To print all or part of the buffer, the procedure is the same as for saving the buffer to disk exceptyou will need to click on the button to begin printing.
BBS Support
PPWIN offers support for frequent BBS users. By highlighting a message number (in the ScrollBack Buffer) or double-clicking the left mouse button while pointing at a message number, PPWINwill offer a dialog box with BBS commands. This simplifies many common BBS operations such asREADing and KILLing messages. Once a BBS command is selected, PPWIN will issue the commandto the Transmit window as a macro. A BBS command can not be issued while macro is currentlybeing executed.
See BBS Support for more information.
BBS Support
PPWIN offers support for frequent BBS users. By highlighting a message number (in the ScrollBack Buffer) or double-clicking the left mouse button while pointing at a message number, PPWINwill display a dialog box with BBS commands as shown below.

PcPackratt for Windows Scroll Back Buffer
39
This simplifies many common BBS operations such as READing and KILLing messages. Simply se-lect the desired option from the dialog box above and click OK or press Enter. Once a BBS com-mand is selected, PPWIN will issue the command to the Transmit window as a macro.
Most BBS allow commands to be queued so you can select and execute a number of BBS com-mands, then close the Scroll Back buffer to begin receiving the messages. Note that all known BBSsystems support the Read and Kill commands in the dialog. The other commands may not be sup-ported by all systems.
A BBS command can not be issued while macro is currently being executed.

PcPackratt for Windows MailDrop Operation
40
Mail Drop Operation
The MailDrop in your TIMEWAVE TNC or data controller operates in Packet, AMTOR and PACTORmodes. To access the MailDrop from any of these modes press the button on the Tool Bar.
Before other stations can access your MailDrop, you must enter your MYMAIL callsign and enablethe MailDrop by pressing the button. Also, be sure and review the MailDrop Parameters in theParameter menu if you are unfamiliar with A.E.A. MailDrop operation.
PC-PakRatt 2.1 for Windows 3.x gives you full control over your TNC's Mail Drop. When the MailDrop Dialog opens, the messages in the TNC are listed and displayed near the top of the windowin an area called the message List Box as shown below.
To Read a message, double-click on the message in the List Box. The message text will then bedisplayed in the Read box immediately below. To save the message that is presently being dis-played in the Read box, click on the File button. The file dialog will appear prompting you for a filename to save the message to.
To Print a message, the message must first be read. The font selected as the default printer fontwill be used. The printer font is selected from the Configure Menu.
To delete a message, the message must first be selected from the List Box. Once a message is se-lected, click on KILL.
To edit a message header, first select the message then click on Edit. The Edit Message Dialog willallow you to change the status of the message and change the source/destination/BBS callings.
To Load Mail Drop messages from disk, click on the Load Button. Do not worry, the TNC will notbe RESET.
To Save Mail Drop messages to disk, click on the Save Button.
The Font button allows you to change the font used in the MailDrop dialog. The default is a Termi-nal font. The Terminal font supports all 256 possible characters from the IBM PC characters. Otherfonts, such as Arial, only support a limit set of characters.
To enter a message in to the MailDrop, click on the Send button. The MailDrop Send Dialog will al-low you to send messages to your MailDrop.

PcPackratt for Windows MailDrop Operation
41
The MailDrop dialog can also be sized (in the horizontal dimension only) to take maximum advant-age of your screen resolution.
To close the MailDrop dialog, click on the Quit button.
Editing Mail Drop Messages
To edit a message header, first select the message then click on Edit. The Edit Message Dialog willallow you to change the status of the message and change the source/destination/BBS callsigns.
Message Status
PrivateMessage can only be read by the SYSOP (you) or the destination station.
TrafficMessage is designated as traffic.
BulletinMessage is designated as a bulletin message which can be read by anyone.
Reverse ForwardMessage will be forwarded to the BBS designated by HOMEBBS.
ReadMessage will be tagged as having been read.
Not ReadMessage will be tagged as not being read.
Click on the OK button to have the changes take effect.
Sending MailDrop Messages
To send a message, first enter the title of the message in the Title Edit Box. Next enter the callsignof the station to receive the message (including the @ BBS if applicable) in the Call Edit Box.
Now enter the message text in the Message edit Box at the bottom of the window as shown.When the message is ready to send, click on the Send Button. The Clear Button clears the title,callsign and Message edit Boxes.
Text can be pasted from the clipboard to any of the edit boxes by pressing CTRL-INS. To place acarriage return in to your message, type CTRL-ENTER.
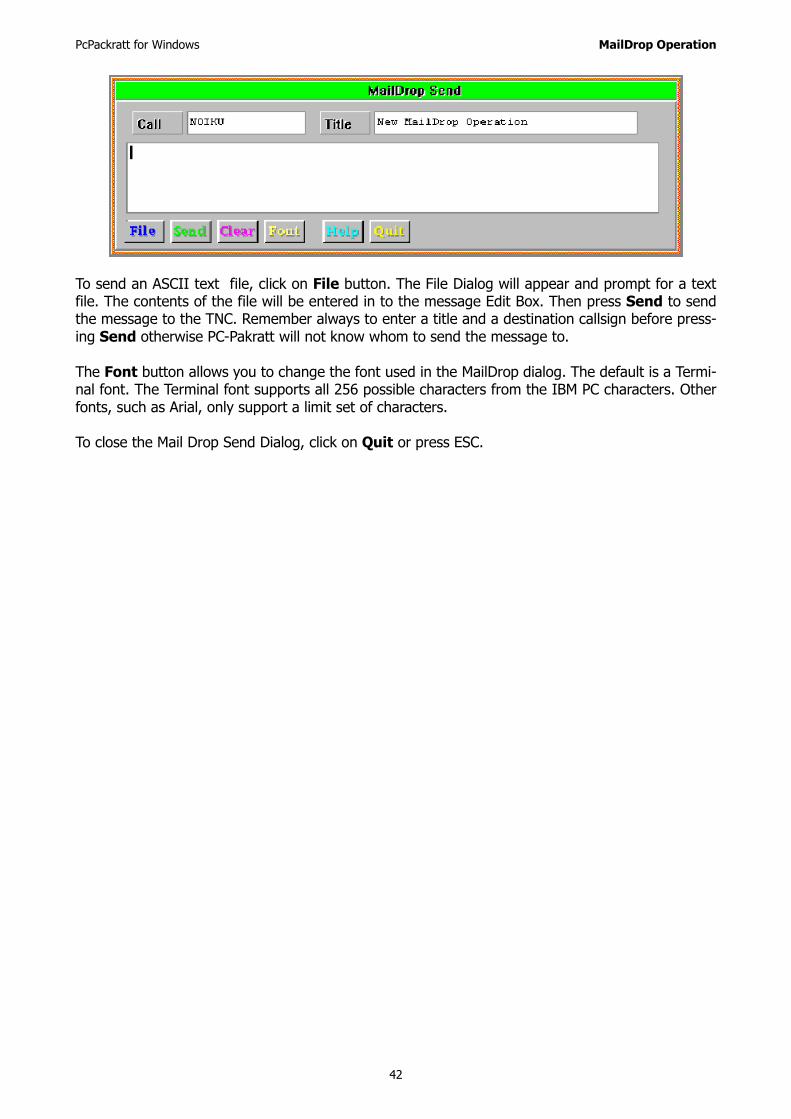
PcPackratt for Windows MailDrop Operation
42
To send an ASCII text file, click on File button. The File Dialog will appear and prompt for a textfile. The contents of the file will be entered in to the message Edit Box. Then press Send to sendthe message to the TNC. Remember always to enter a title and a destination callsign before press-ing Send otherwise PC-Pakratt will not know whom to send the message to.
The Font button allows you to change the font used in the MailDrop dialog. The default is a Termi-nal font. The Terminal font supports all 256 possible characters from the IBM PC characters. Otherfonts, such as Arial, only support a limit set of characters.
To close the Mail Drop Send Dialog, click on Quit or press ESC.
PcPakratt for Windows QSO Log
43
QSO Log
PC-PakRatt 2.1 for Windows 3.x' QSO log allows you to maintain a database of your contacts. EachTNC has it's own QSO Log Dialog and database file. The DSP-2232 and PK-900 Port 1 and Port 2windows share the same QSO facilities.
The QSO Log is opened by clicking on the button which is displayed in the Status Dialog ofeach operation window. The QSO Log Dialog is an independent window which can be any whereon the Desktop. Also that the upper right hand corner of the QSO Log window contains a Mini-mize button so the Log can be out of sight and still active (Minimized). This is handy since it allowsthe 'Auto QSO Check' feature to be work even when the QSO Log is out of sight.
The QSO Log contains fields for:
† Callsign † Name† Freq. † QTH Time Antenna† Date Rig10-10 # OperatorPower RST Your RST† Mode QSL Sent QSL ReceivedComments
Fields which have an † are also search fields. To search for an entry in your log, check one ofthese boxes and press the FORWARD or BACKWARD buttons. PPWIN will attempt to find thenext entry which matches. One of the fields must be checked for a search to be conducted.
PPWIN uses the checked fields to match all or part of the same field in the log. For example, if youenter J4PZ as the callsign, PPWIN will find a match if your log contains NJ4PZ, J4PZA or KJ4PZQ.Also long as the entry in the log contains the same sequence of letters, a match will be found.
Delete Deletes the Log Entry currently displayed.
Clr Entry Clears all the fields in the Dialog, but does not delete the displayed entry.
Overwrite Overwrites the current entry.
Save Saves the data to the end of the Log file.
Print Allows you to print the current entry or all of the entries. You also have thechoice of printing the entries as a QSL label or as they are shown in the Dia-log. You also have the option to print all or some of the comments for eachQSO entry printed. See also QSO Log Print Menu.
1st Entry Displays the 1st entry in the Log.
Last Entry Displays the last entry in the Log.
Prev Displays the previous entry in the Log.
Next Displays the next entry in the Log.
Time/Date Places the current time and date into the Log.

PcPakratt for Windows QSO Log
44
Defaults Places the QSO Log Defaults and the current time/date into the log. The De-faults file contains the Operator, rig, antenna and power. These values canbe specified in the TNC Configuration Menu (under TNC and QSO Log De-faults). The QSO Log database file can be specified under the TNC Configu-ration Menu, under TNC Program Files.
QSO Log Print Menu
PC-PakRatt 2.1 for Windows 3.x allows you to print the entries in your QSO Log. When the PRINTbutton is selected from the QSO Log Dialog, the QSO Log Print Menu is displayed.
When the OK Button is clicked, the selected entries are sent to the printer or to a file if the 'PrintTo File' option is selected. Be sure you have set up your printer for Windows by selecting the Print-er Setup option from the Files Menu. Also be sure to select a printer font and print size from theSelect Font option in the Configure Menu.
Printing QSO Entries
Print QSO Prints the currently displayed entry
Print Matching QSOsPrints all entries which match the fields selected. The fields to be matchedare shown in the Print menu. Check the box next to the fields which are tobe used as keywords in the search. Remember, PPWIN matches the text inthe field if the database contains the sequence of characters in the keyword.See the description in the QSO Log section for details.
Print All QSOs Prints all entries in the database file.
Printing Comments
Prompt Remarks PPWIN prompts you for each of the 3 comments in the entry, for each entryto be printed.
Print All Remarks All comments are printed automatically.
Don't Print RemarksComments are not printed at all.
Printing Style
Print As QSL PPWIN prints each entry as a QSL Label.
Print as LOG PPWIN prints each entry as it appears in the QSO Log.
Destination
Print to File PPWIN prints each entry to the specified file. The default is QSO.BUF.
Print to Printer PPWIN prints each entry to the printer.
Number of Line Between EntriesPPWIN places the number of specified blank lines between each entry. If thenumber is specified as 99, a form feed is placed between each entry.

PcPakratt 2.0 for Windows Selecting Modems
45
Selecting Modems
The DSP or PK-900 modems can be selected from many of the Parameter Dialogs. Each of thesedialogs contains the respective modem parameters for each mode. For example, the Packet Param-eters Dialogs contain the parameters QVPACKET and QHPACKET. The AMTOR Parameters Dialogcontains QTOR and QTDM. The Baudot/ASCII/Morse Parameters Dialog contains QRTTY, QWIDEand QMORSE. The Parameters Dialog for the DSP-1232 and -2232 contains the QPTOR command.
To change the modem, for example QVPACKET, click on the QVPACKET button. The Modem Dialogwill then be displayed. The dialog contains a List Box which is filled with the modems available toyour DSP or PK-900 TNC. Double click on the modem to select it and return back to the parameterdialog. Now, when you click OK, QVPACKET will be updated. If the TNC mode is VHF Packet, theparameter MODEM will be also be set to QVPACKET. If the TNC is in AMTOR and you changeQTOR, MODEM will be set to the value of QTOR. Remember you can always get a DIRECTory ofavailable modems by clicking on a Q-modem button.
PPWIN polls the DSP or PK-900 for the modem directory if the file PPW1.MOD does not exist(PPW2.MOD for TNC2). If the modem firmware date is different than that stored in the file(s), thefile(s) are re-created with the new modem directory. The modem directory stored in these files arewhat PPWIN uses in the Modem Dialog.

PcPakratt 2.0 for Windows Miscellaneous
46
MISCELLANEOUS
Gateway Operation
The Gateway command in TIMEWAVE data controllers now supports a "node" function as well asthe cross-port digipeater function previously supported. The dual connection function, called a"node" by other manufacturers, is still called a "gateway" by us.
The old gateway functioned as a digipeater between Ports 1 and 2. MYGATE works the same asMYALIAS, except that incoming packets from one port are digipeated out the other port.This cross-port digipeater function uses end-to-end acknowledgments. This means that an I-frame sent bythe local station must be received correctly by both the digipeater and the remote station. The ac-knowledgment of the I-frame must similarly pass from the remote station through the digipeaterand arrive at the local station intact. If there are any errors in either hop, the whole I-frame/ac-knowledgment cycle must start over.
Fortunately, this is now a thing of the past. The new Gateway is a node.
The Gateway now supports local acknowledgments. This function is available in all TIMEWAVEpacket radio TNCs. Instead of digipeating through the MYGATE callsign, a station may now con-nect to the MYGATE callsign, then instruct the gateway to set up another connection, either on thesame radio port or the opposite port. The station's I-frames are acknowledged by the Gateway lo-cally, rather than by the remote station through a digipeater. The Gateway itself now has the re-sponsibility of seeing that the I-frame gets to the remote station.
There are two new commands supporting the new Gateway functions:
GUSERS sets the maximum number of stations allowed to establish connections with thecallsign MYGATE.
XGATEWAY turns ON and OFF the ability to allow cross-port connections in the PK-900 ofDSP-2232 dual port products.
The requirements for Gateway connection are:
- If Port 1 is to be used, OPMODE must be PACKET, AMTOR or PACTOR.
Port 2 is of course always PACKET.
- RADIO must be set to enable the appropriate port(s).
- A modem supporting the appropriate port(s) and operating mode(s) must be selected.
- MYCALL must be set for each radio port to be used.
- MYGATE must be set to some callsign, but not the same as MYCALL, MYALIAS or MYMAIL.
- GUSERS must be set to 1, 2 or 3.
Once connected to the Gateway, the user is dealing with a command processor similar to that in aBBS. Command responses start with "+++" to show that they came from the Gateway commandprocessor, rather than the "***" from a TNC (or "###" from a competitor's product). "+++" waschosen because the "+" is present in the AMTOR character set while the other examples are not.

PcPakratt 2.0 for Windows Miscellaneous
47
Here is what a user sees when using the Gateway as a packet node. In this example, MYGATE isset to N7ML-7, and the user connects to N7ML-7:
cmd:c n7ml-7
*** CONNECTED to N7ML-7+++ N7ML Gateway. Type ? for help.de N7ML-7 (B,C,D,J,L,N,S,?) >
The first line is the user's command to his own TNC. The second line is the connect message fromthe user's TNC. At this point the user is connected to the Gateway in a "Command" mode. Thethird line is the greeting and the fourth is the command prompt from the Gateway. The user types"? <Return> " to get help:
B(ye) Log off gatewayC(onnect) n Connect to station 'n'C n STAY Stay connected to gateway when 'n' di sconnectsD(isconnect) Cancel a connect attemptJ(heard) Display stations heardL(isten) Toggle monitoringN(odes) Display nodes heardS(end) Broadcast unprotode N7ML-7 (B,C,D,J,L,N,S,?) >
BYE – This is similar to the Bye command found in the TIMEWAVE Maildrop and BBS stations. TheGateway initiates a Disconnect. Alternatively, the user may initiate the Disconnect.
CONNECT – Similar to the TNC's Connect command for Packet mode. Also used to connect in AM-TOR and PACTOR, instead of using the ARQ and PTCONN commands respectively. For a packetconnection, the user may specify a string of digipeaters:
c w1aw via w2xy, w1xxz
The Gateway now tries to establish a connection with W1AW as the destination, and the user'scallsign as the source, with a difference: the user's SSID is decremented by one, to avoid protocolconflicts on the same frequency.
Here is an example of the frames sent in establishing a typical connection:
USER>GATE [C]GATE>USER (UA)GATE>USER [I]: +++ N7ML Gateway. Type ? for help. de GATE (B,C,D,J,L,N,S,?) >USER>GATE (RR)USER>GATE [I]: c remoteGATE>USER (RR) USER-15>REMOTE [C] REMOTE>USER-15 (UA)GATE>USER [I]: +++ CONNECTED to REMOTE at GATEUSER>GATE (RR)USER>GATE [I]: hello.GATE>USER (RR) USER-15>REMOTE [I]: hello.

PcPakratt 2.0 for Windows Miscellaneous
48
REMOTE>USER-15 (RR) REMOTE>USER-15 [I]: Yes?GATE>USER [I]: USER-15>REMOTE (RR) Yes?USER>GATE (RR)
Once the remote connection is established, the Gateway notifies the user of the connection andthen goes from "Command" mode into a "Converse" mode. Now anything the user sends goes tothe remote station as data, instead of to the Gateway as commands.
When the remote station disconnects, normally the user will also be disconnected from the Gate-way. Typing out the word STAY as the last argument in the Connect command ("c remote stay")makes sure that if the remote station disconnects, the user will remain connected to the Gateway.If the connect attempt to a remote station retries out, or the remote station is busy, the Gatewaysends the user a "Retry count exceeded" or "(Remote) busy" message but stays connected to theuser even if the word STAY was not specified.
DISCONNECT (Cancel a connect attempt) – Since the user remains in command mode until theconnection is established, there is no need to wait the full number of retries to attempt a differentconnection. The user may send the Gateway a Disconnect command, which cancels the Connectcommand the same way as in the local TNC's command mode. The user stays connected to theGateway even if the word STAY was not used in the original Connect command. The Disconnectcommand may be used at any time before the connection is established, regardless of any preced-ing commands.
Once a connection is established and the Gateway is in QSO mode, the user can end the connec-tion either by sending a Bye command to the remote station if the remote supports it, or by issu-ing a disconnect frame using the local TNC's Disconnect command. The user's disconnecting fromthe Gateway causes the Gateway to disconnect the other side of the link.
JHEARD – The Gateway TNC sends its MHEARD list to the user. The Gateway TNC's DAYTIME andDAYSTAMP commands affect the display. In the DSP-2232 and PK-900, the designators "p1" and"p2" show the port on which each station was heard. A maximum of 18 stations is kept in theJHEARD list.
LISTEN – The Gateway toggles monitoring on or off. The Gateway monitors only on the radio portselected by the user (see "Port" below), using the appropriate operating mode.
NODES – The Gateway sends the user a list of nodes heard. The format is the same as that of theJHEARD command. The difference is that a callsign is put in the Nodes list only if the monitoredpacket was a UI frame with a PID of CF (NET/ROM) or CD (IP). A maximum of 10 stations is keptin the Nodes list. The Gateway owner clears the nodes list and the MHEARD list simultaneouslywith the same command.
SEND – The Gateway TNC responds with
+++ Sending. To end, type '='.
and sends all subsequent data in the broadcast format appropriate to the selected port's operatingmode. The data characters are held until the user sends a carriage return, whereupon the held da-ta is broadcast.
In all operating modes, the user can stop sending unproto by sending the "=" character. The Gate-way then issues a command prompt. The "=" character should not be used within the user's

PcPakratt 2.0 for Windows Miscellaneous
49
broadcast text.
Cross port gateway:
The requirements for cross-port Gateway connection are, in addition to the above:
- OPMODE must be PACKET, AMTOR or PACTOR.
- If AMTOR is to be used, MYSELCAL must be set.
- If PACTOR is to be used, MYPTCALL must be set.
- If AMTOR or PACTOR are to be used, the DCD threshold must be set so that the DCD dis- play is lit if and only if signals are present.
- RADIO must be set to RADIO 1/2 (both ports enabled).
- Modems supporting the appropriate OPMODE on Port 1 and Packet on Port 2 must be se- lected.
- XGATEWAY must be ON.
Packet to Packet:
Here is what a user sees when using a cross-port Gateway as a packet node:
cmd:c n7ml-7
*** CONNECTED to N7ML-7+++ N7ML Gateway. Other port (2) is 1200 bps Packet . Type ? for help.+++ Access: Port 1, 1200 bps Packet. Your ID is KB7 B-15.de N7ML-7 (B,C,D,J,L,N,P,S,?) >
There is extra information showing which radio port the user is on and the configuration of theother radio port. The Help ("?") display shows an additional command:
P(ort) 1/2 Access Port 1 or 2
PORT – Changes the port on which the user wishes to connect, listen and broadcast. At the timethe Packet user connects to the gateway, access is always on the same radio port, so a Port 2Packet user must always set PORT 1 in order to establish cross-port connections. Typing "Port" byitself shows the current value of PORT, the operating mode on that port, and the user's ID to beused on that port. Port 1 AMTOR and PACTOR users always access only Port 2 (Packet), so thePort command is not implemented for them.
LISTEN – None of the Gateway TNC's local commands affect monitoring; packet frames are shownto the user as if MONITOR and MCON were set to a value of 4 (UI, I, C, D, UA and DM frames).
Other than that, monitoring behaves as if all other commands were set to their default values (noMPROTO, etc.).
SEND – The Gateway sends UI frames with a destination of "CQ". The source field is the user'scallsign with the SSID decremented by one.

PcPakratt 2.0 for Windows Miscellaneous
50
Packet to AMTOR:
Here is what a Port 2 Packet user sees when crossing over to AMTOR:
cmd:c n7ml-7
*** CONNECTED to N7ML-7+++ N7ML Gateway. Other port (1) is AMTOR. Type ? for help.+++ Access: Port 2, 1200 bps Packet. Your ID is K B7B-15.de N7ML-7 (B,C,D,J,L,N,P,S,?) >
p 1
+++ Access: Port 1, AMTOR. Your ID is KKBB.de N7ML-7 (B,C,D,J,L,N,P,S,?) >
At this point there are two ways to establish an AMTOR link. One is to call a known station di-rectly:
c nbcd
+++ CONNECTED to NBCD at N7ML-7+++ Note: Over = "+?", End = <CTRL-D>. You're sen ding.
n7bcd de kb7b - hello +?
HI THERE. ...
Keeping in mind that only one station can transmit at a time. The packet user must end eachtransmission with "+? <Return>" to let the remote station respond. Either station may end thecommunication; if it is to be the user, a <CTRL-D> within the user's packet frame tells the Gate-way to shut down the AMTOR link.
The other way to set up a link is to call CQ in AMTOR FEC and wait for an ARQ response:
s
+++ Sending. To end, type '='.cq cq cq de kb7b selcal kkbbcq cq cq de kb7b selcal kkbbpse k=de N7ML-7 (B,C,D,J,L,N,P,S,?) >+++ CONNECTED to ? at N7ML-7+++ Note: Over = "+?", End = <CTRL-D>. You're rec eiving.KB7B DE VE7ZZY HI NAME IS RALPH +?hello ...
Note that the Gateway reports "CONNECTED to ?". When using four-character identification, AM-TOR has no provision for identifying the calling station. The caller generally identifies within thetransmission text.
LISTEN - The Gateway TNC is placed in ARQ Listen mode (Mode L). If the Gateway TNC's ARXTORcommand is ON, it will also copy AMTOR FEC (Mode B).
SEND - The Gateway is placed in AMTOR FEC (Mode B) transmit mode. Transmission ends whenthe user sends "=".
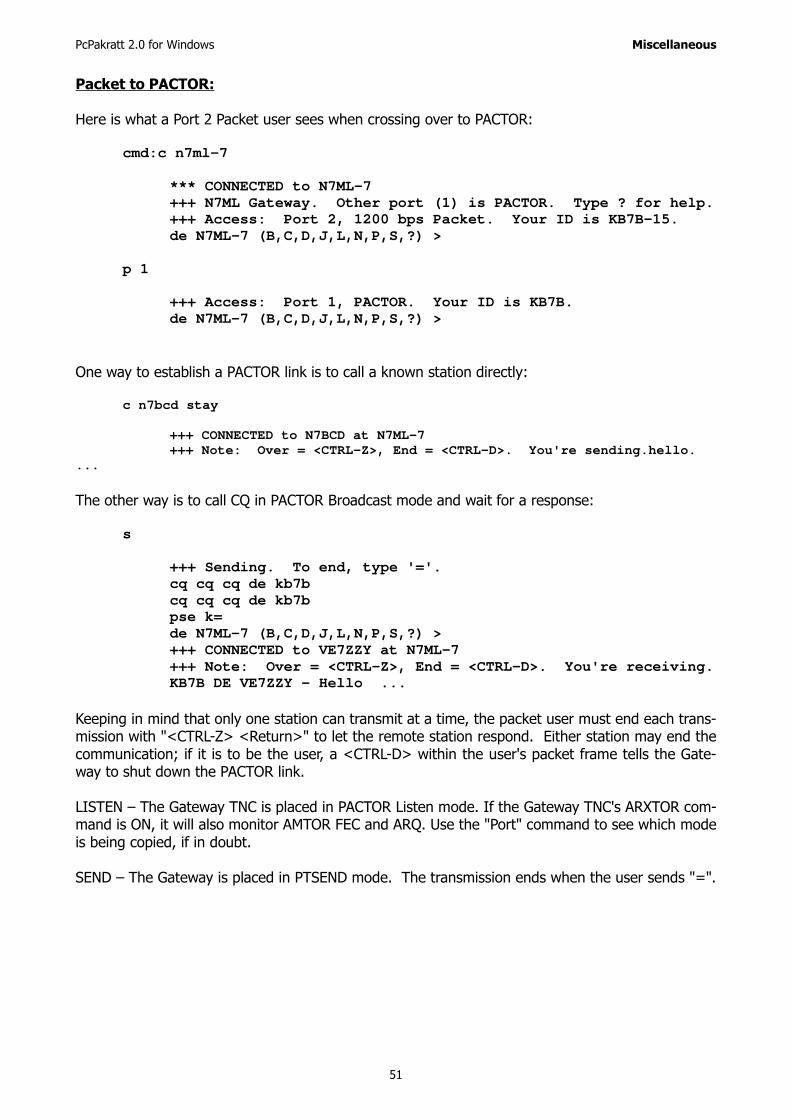
PcPakratt 2.0 for Windows Miscellaneous
51
Packet to PACTOR:
Here is what a Port 2 Packet user sees when crossing over to PACTOR:
cmd:c n7ml-7
*** CONNECTED to N7ML-7+++ N7ML Gateway. Other port (1) is PACTOR. Type ? for help.+++ Access: Port 2, 1200 bps Packet. Your ID is K B7B-15.de N7ML-7 (B,C,D,J,L,N,P,S,?) >
p 1
+++ Access: Port 1, PACTOR. Your ID is KB7B.de N7ML-7 (B,C,D,J,L,N,P,S,?) >
One way to establish a PACTOR link is to call a known station directly:
c n7bcd stay
+++ CONNECTED to N7BCD at N7ML-7+++ Note: Over = <CTRL-Z>, End = <CTRL-D>. You're sending.hello.
...
The other way is to call CQ in PACTOR Broadcast mode and wait for a response:
s
+++ Sending. To end, type '='.cq cq cq de kb7bcq cq cq de kb7bpse k=de N7ML-7 (B,C,D,J,L,N,P,S,?) >+++ CONNECTED to VE7ZZY at N7ML-7+++ Note: Over = <CTRL-Z>, End = <CTRL-D>. You're receiving.KB7B DE VE7ZZY - Hello ...
Keeping in mind that only one station can transmit at a time, the packet user must end each trans-mission with "<CTRL-Z> <Return>" to let the remote station respond. Either station may end thecommunication; if it is to be the user, a <CTRL-D> within the user's packet frame tells the Gate-way to shut down the PACTOR link.
LISTEN – The Gateway TNC is placed in PACTOR Listen mode. If the Gateway TNC's ARXTOR com-mand is ON, it will also monitor AMTOR FEC and ARQ. Use the "Port" command to see which modeis being copied, if in doubt.
SEND – The Gateway is placed in PTSEND mode. The transmission ends when the user sends "=".

PcPakratt 2.0 for Windows Miscellaneous
52
AMTOR to Packet:
If XGATEWAY is OFF, the TNC accepts AMTOR calls to MYSELCAL as normal AMTOR link-ups. IfXGATEWAY is ON, an AMTOR call to MYSELCAL results in access to the Gateway and thereforePacket mode on Port 2. The callsign in MYGATE plays no part in Gateway access from AMTOR.
The AMTOR MailDrop has priority over the AMTOR Gateway. This means that if TMAIL is ON, link-ing to MYSELCAL accesses the MailDrop. The user may type the new MailDrop command "G" to ac-cess the Gateway; this surrenders the MailDrop to possible access by other users. There is no com-mand in the Gateway to return to the MailDrop.
If a Packet user is already connected to the Gateway on Port 2 and has issued the "PORT 1" com-mand to access AMTOR, the Gateway detects AMTOR calls only to the packet user's selcall, notMYSELCAL.
There is no PORT command for AMTOR access. The AMTOR user is given access to Packet on Port2 automatically.
An AMTOR station linked to the Gateway command processor does not need to send "+?" to letthe Gateway transmit. The Gateway detects the carriage return at the end of the line and seizesthe link to give the command response, then gives transmission back to the user by ending thetransmission with "+?".
Once a packet connection has been established on Port 2, the Gateway seizes the AMTOR link onPort 1 only when it has data to send to the user, then gives the link back by ending the transmis-sion with "+?".
Here is what an AMTOR user sees when connecting to the Gateway:
cmd:arq nnml
+++ N7ML GATEWAY. TYPE ? FOR HELP.+++ ENTER YOUR CALLSIGN: +?kb7b+++ ACCESS: PORT 2, 1200 BPS PACKET. YOUR ID IS K B7B-15.KB7B DE N7ML-7 GA+?
One way to establish a Packet connection is to call a known station directly:
j
18:30:56 P2 N7BCDKB7B DE N7ML-7 GA+?
c n7bcd stay
+++ CONNECTED TO N7BCD AT N7ML-7+?helloHI, NAME IS WALT ...

PcPakratt 2.0 for Windows Miscellaneous
53
The other way is to call CQ in Unproto mode and wait for a response:
+++ SENDING. TO END, TYPE '='.+?cq de kb7b-15 from amtor=KB7B DE N7ML-7 GA+?+++ CONNECTED TO N7BCD AT N7ML-7+?HI, NAME IS WALT. WHAT DO YOU MEAN BY 'FROM AMTOR' ?hello ...
One thing to keep in mind when accessing VHF Packet from AMTOR is that the data rates on thetwo radio ports are widely different. In reading a long message from a packet BBS, the BBS sendsthe entire message to the Gateway Packet port, then may time out and disconnect before the mes-sage has completed transmission on the AMTOR port. The Gateway buffers the data, so none ofthe message is lost. But on the Packet side, the BBS has wasted time waiting for the next com-mand, preventing other stations from using the BBS.
LISTEN – Port 2 Packet frames are shown to the user as if MONITOR and MCON were set to a val-ue of 4 (UI, I, C, D, UA and DM frames). Some TNC monitoring characters are translated for AM-TOR:
L
+++ LISTENING ONKB7B DE N7ML-7 GA+?P2 N7BCD)W1AW (C)P2 N7BCD)W1AW (D)+?
L
+++ LISTENING OFFKB7B DE N7ML-7 GA+?
SEND – The Gateway sends UI frames with a destination of "CQ". The source field is the user'scallsign with the SSID decremented by one. The Gateway holds the data characters until the usersends a carriage return, whereupon the held data is broadcast.
PACTOR TO Packet:
If XGATEWAY is OFF, the TNC accepts PACTOR calls to MYPTCALL as normal PACTOR link-ups. IfXGATEWAY is ON, a PACTOR call to MYPTCALL results in access to the Gateway and thereforePacket mode on Port 2. The callsign in MYGATE plays no part in Gateway access from PACTOR.
The PACTOR maildrop (TMAIL ON) has priority over the PACTOR Gateway. The maildrop command"G" gives access to the Gateway, as in AMTOR (see above).
If a Packet user is already connected to the Gateway on Port 2 and has issued the "PORT 1" com-mand to access PACTOR, the Gateway detects PACTOR calls only to the packet user's callsign, notMYPTCALL.
There is no PORT command for PACTOR access. The PACTOR user is given access to Packet onPort 2 automatically.

PcPakratt 2.0 for Windows Miscellaneous
54
A PACTOR station linked to the Gateway command processor does not need to send the PTOVERcharacter to let the Gateway transmit. In "command" mode, the Gateway detects the carriage re-turn at the end of the line and seizes the link to give the response, then gives transmission back tothe user. Once a packet connection has been established on Port 2, the Gateway seizes the PAC-TOR link on Port 1 only when it has data to send to the user, then gives the link back.
Here is what a PACTOR user sees when connecting to the Gateway:
cmd:ptconn n7ml
+++ N7ML Gateway. Type ? for help.+++ Access: Port 2, 1200 bps packet. Your ID is K B7B-15.KB7B de N7ML (B,C,D,J,L,N,S,?) >
One way to establish a Packet connection is to call a known station directly:
18:30:56 p2 N7BCDKB7B de N7ML (B,C,D,J,L,N,S,?) >
c n7bcd stay
+++ CONNECTED to N7BCD at N7ML-7hellohi, name is walt ...
The other way is to call CQ in Unproto mode and wait for a response:
s
+++ Sending. To end, type '='.cq de kb7b-15 from pactor=KB7B de N7ML (B,C,D,J,L,N,S,?) >+++ CONNECTED to N7BCD at N7ML-7Hi, name is Walt. What do you mean by "from pactor "?hello ...
LISTEN – Port 2 Packet frames are shown to the user as if MONITOR and MCON were set to a val-ue of 4 (UI, I, C, D, UA and DM frames).
L
+++ Listening ONKB7B de N7ML (B,C,D,J,L,N,S,?) >p2 N7BCD>W1AW [C]p2 N7BCD>W1AW [D]
L
+++ Listening OFFKB7B de N7ML (B,C,D,J,L,N,S,?) >
SEND – The Gateway sends UI frames with a destination of "CQ". The source field is the user'scallsign with the SSID decremented by one. The Gateway holds the data characters until the usersends a carriage return, whereupon the held data is broadcast.

PcPakratt 2.0 for Windows Miscellaneous
55
Error Messages to The Remote User:
"Bad"
An invalid callsign in response to the AMTOR prompt "Enter your callsign."An invalid callsign as oneof the arguments in the Connect command. An invalid argument to the Port command.
"Too many"
Too many callsigns in the Connect command.Arguments in the Bye, Disconnect, Jheard, Listen, Nodes or Send commands.
"Too long"
Command longer than 85 characters.PACTOR callsign in Connect command was longer than 8characters.
"Range"
Port command argument not "1" or "2".
"Callsign"
No argument in the Connect command.
"What?"
Unrecognized command.
"?VIA"
Connect command: second argument was not "STAY" or "VIA".
"Not during connect"
While a connect attempt was in progress, the user issued a Listen, a Send or another Connectcommand, or tried to change Ports. User must first type the "Disconnect" command.
"Already disconnected"
User issued the Disconnect (abort) command when no connect was in progress.
"Need MYSelcal"
Packet user tried to make an AMTOR connect, but the Gateway TNC's MYSELCAL was not set.
"None heard"
The Jheard or Nodes list is empty.
"Channel busy"
Connect or Send command while there is AMTOR or PACTOR activity on the channel. Gatewayuses synced radio DCD to determine activity.

PcPakratt 2.0 for Windows Miscellaneous
56
"Port busy"
Connect, Listen or Send command on a packet port where all multi-connect channels are beingused. Attempt to use the Port command to access a port whose operating mode is not Packet, AM-TOR Standby or PACTOR Standby. Port 2 user attempt to access AMTOR or PACTOR Port 1 if it wasalready in use by another Port 2 Packet user of the Gateway.
"Not while listening"
While listening, the user issued a Send or Connect command, or tried to change Ports. User mustfirst type "Listen" again to toggle listening off.
Miscellaneous:
Every 9½ minutes, the Gateway sends a Packet ID frame containing the Gateway callsign. The IDframe is sent even if the HID command is OFF.
In translating AMTOR or PACTOR input to Packet output, the Gateway bundles the characters andsends them in packets every 10 seconds. The AMTOR/PACTOR user should be aware that thePacket station may receive the data characters anywhere from 0 to 10 seconds later.
No-activity timers: When the TNC's CHECK timer runs out on a packet channel involving the Gate-way, the Gateway stations are disconnected. CHECK defaults to 5 minutes. For AMTOR and PAC-TOR Gateway access, if "Traffic" status has not been achieved for 5 minutes, the Gateway termi-nates the link gracefully, and disconnects any related packet connection on Port 2.
The MDMON command controls the monitoring of Gateway activity in addition to monitoring Mail-drop activity.
To operate AMTOR or PACTOR modes normally (no gateway), disable the cross-mode gateway bysetting XGATEWAY OFF. Subsequent remote calls to MYSELCAL or MYPTCALL will go to the opera-tor, not the gateway.
The gateway owner should take care that changes in the OPMODE, RADIO or MODEM commandsettings will not ruin a remote user's gateway session. Check the CSTATUS before changing theTNC's configuration.
It is important to set the DCD threshold on the AMTOR/PACTOR radio port so the DCD display fol-lows the presence or absence of signals. This prevents the Gateway Send and Connect commandsfrom interfering with other stations. If DCD is active at the time of a command that transmits, theGateway sends the remote user a "Channel busy" message.
The Gateway owner may set ARXTOR ON and leave OPMODE set to PACTOR. This gives both AM-TOR and PACTOR users access to the Gateway (and/or the maildrop).
The Gateway owner may set up upper/lower case AMTOR operation for better Packet interfacingby setting CODE 2 (Cyrillic method) or CODE 7 (APLINK/Martinez method, to be added shortly).The remote AMTOR user must of course set comparable commands in his own TNC.
The local TNC commands CTEXT, CMSG, MTEXT and MMSG have no effect on Gateway operation.

PcPakratt 2.0 for Windows Miscellaneous
57
PPWIN.INI Parameters
PCPakRatt 2.0 for Windows 3.x creates a .INI file during the it's initial installation. Normally theuser will not need to made changes to this file. The exception is when using higher screen resolu-tions (1024x768 or higher) with some graphics boards. The higher screen resolutions can causethe Status Dialog not to be sized correctly, thus cutting off the bottom of the dialog and some ofthe text windows. (This seems to be particularly necessary for folks running OS/2 in 1024x768mode with the 32 bit S3 video drivers). The problem is caused by differences in the report size ofthe font being used for the Status window.
PPWIN allows for a variable to be specified in the .INI to increase the size of the Status Window soall text windows in the Dialog can be seen. This entry will have to be added manually. The formatof this variable is:
[STATUS_DLG]
OFFSET=##
Where ## is the number of pixels to add to the height of the status dialog.
The other parameters in the .INI control the default directory for PPWIN, the state of the Log-Windows connection, information regarding the monitor window as well as the size and state ofthe Main and child windows. These keys should not be changed by the user.
LogWindows Interface
PcPakRatt 2.0 for Windows 3.x provides a TNC interface for LogWindows. Data being received orechoed by the TNC can be sent to LogWindows. Likewise data typed in LogWindows transmit win-dow canbe send to PcPakratts transmit window (in the form of a macro). PcPakratt acts as a dataengine for LogWindows. All PcPakratt functions are still enabled while communicating with Log-Windows. LogWindows 2.0 or greater is required.
To allow all this to happen, PcPakratt must first become aware that LogWindows is running. To dothis, select the Sync With LogWindows menu item from the Tools Menu. If LogWindows is not run-ning, PcPakratt will report an error.
If LogWindow is running and the two programs have synced. the button found in the TNC Sta-
tus Dialogs will change to . To allow a particular TNC window to communication with LogWind-
ows, click on the button. The button will change to . To stop communications with LogWind-ows, click on the button again so it is no longer depressed.
Only one TNC window may communication with LogWindows at a time. By clicking on the LW but-ton in a different TNC window will enable that window to communicate with LogWindows and stopthe previous window from communicating with LogWindows.
PcPakRatt 2.0 for Windows 3.x automatically saves which window last had talked with LogWind-ows.
PcPakRatt 2.0 for Windows 3.x periodically polls LogWindows to verify it is there. If LogWindows isterminated, PcPakratt will sense this and stopping polling and sending data to LogWindows. TheLW buttons will also become grayed.

PcPakratt 2.0 for Windows Miscellaneous
58
When PcPakratt terminates, it also informs LogWindows so it will know not to try to send any moredata to PPWIN. The link with LogWindows can also be terminated from the Tools Menu.
When operating Packet, the state of the button effects the data sent to Log Widnows. Whenthe button is up, all data is sent to LogWindows. When the button is depressed, , only data sentto the current channel (as shown in the Status Dialog) will be echoed to LogWindows.
Refer to your LogWindows operation manual for more information on LogWindows operation.
ANSI Graphics With PcPakRatt 2.0 for Windows 3.x
Because PcPakRatt 2.0 for Windows 3.x is a true windows program and ANSI graphics were de-signed for a DOS text screen there are some special considerations for designing ANSI graphicswhich will be send to others using PcPakRatt 2.0 for Windows 3.x. There are also a few considera-tions when receiving graphics..
For Best Results...
The receive ANSI graphics, 8BITCONV must be set on ON and MFILTER must be set to 0. The pro-gram and receiving window should maximized to reduce many of the limitation described later onin this section.
For the best results, all lines should end with a <CR>. PcPakRatt 2.0 for Windows 3.x displays textin terms of lines and sizes lines according to the width of the window. Control sequences still canbe used to set the position of text on a line however, this may cause the graphics to appear overtext that is received after the graphics if the window is repainted. Graphics which do not have a<CR> and use only escape sequences to set the text position may not be displayed properly if thereceiving window is not large enough for the graphic. Using the scroll back buffer to review agraphic can have some interesting effects if the graphic does not contain any <CR> at the end ofeach line. However, the scroll back buffer can be refreshed using the ALT-Q key.
Graphics should only be large enough to display the message. Graphics which are made to fit in astandard 80x25 text window may not fit on the receiving stations display. It also takes much moretime to send a graphic like this since they are typically padded with blanks. In Pactor, characterswhich have an ASCII value greater than 127 (like the line drawing character set) can not be com-pressed. These characters will slow down the effected baud rate of the transmission.
Saving ANSI Graphics Sequences
Graphics which are being reviewed can be saved to a file by using the file capture function of theprogram. Graphics can also be copied in to the clipboard from the scroll back buffer. Graphics thencan be pasted in to the transmit window, a macro or a mail message.
Limitations
The background color of the receive window is determined by the default color at the time of dis-play. Normally the color is set by the Windows Control Panel – window color. However, an ANSIgraphic may change the background color of the display. If the receive window is forced to repaint(because the receive was hidden by another window, the user pressed ALT-Q & etc.), the windowbackground will be set to the current color of the background. This may cause areas of thegraphics to be a different color than what was intended by the author.

PcPakratt 2.0 for Windows Miscellaneous
59
The following scenios are possible when receiving an ANSI graphics picture using PcPakRatt 2.0 forWindows 3.x.
A) ANSI Graphics which do not contain <CR> at the end of each line and/or use the A,B, H or f sequence to control the Y position.
1) If the receive window height is more than high enough to display a graphic:
a) The graphic will be displayed normally and the text that follows will be dis-played normally.
b) If the window scrolls, the graphics will scroll off the screen.
c) If the window is re-painted, the last 'X' lines will not be displayed. X' varieswith the size of the screen. Characters incoming after that will be displayed.
d) The scroll back buffer will scroll up correctly. When scrolling down, the entiregraphic may not be displayed correctly unless the entire window is forced tobe repainted.
e) When returning to the receive window after reviewing the scroll back buffer,if the graphics is still visible on the screen, the last X lines will not be dis-played. Incoming text will be displayed.
f) If the receive window is repainted, the current default background color willbe used. Normally this color is white. If repainting occurs while a graphic isbeing painted, the background color being used at the time will be used.
2) If the received graphic's height is greater than the receive window height
a) The last lines of the graphic will overwrite the last line in the window.
b) Incoming text will be put at the end of the last line.
c) If the window is re-painted, the graphic will be repainted, text after thegraphic will not be displayed. Also the next incoming line may not be dis-played. Further lines will be displayed.
d) Once enough lines have been received so no part of the graphic is displayed,the receive window will behave normally.
e) If the receive window is repainted, the current default background color willbe used. Normally this color is white. If repainting occurs while a graphics isbeing painted, the background color being used at the time will be used.
B) ANSI Graphics which do contain <CR> at the end of the line and do not use the H orf sequence to control the Y position.
1) Text & graphics will be displayed normally (if the width of the window is wide enoughto properly display the line otherwise the line will wrap like text).
2) Scroll back buffer will behave normally.

PcPakratt 2.0 for Windows Miscellaneous
60
3) If the receive window is repainted, the current default background color will be used.Normally this color is white. If repainting occurs while a graphics is being painted, thebackground color being used at the time will be used.
C) Text without graphics will display normally.
D) Misc.
1) The background color is set by the ANSI escape sequence. If an ESC[2J sequence issent, the screen is cleared using the current background color.
2) Clicking the mouse on the receive window while in the scroll back mode forces a paintincase text was hilited or unhilited.
3) A backspace may cause the screen to be repainted if the BS forces the current text po-sition to be on a different line.
4) A window overlapping the receive window will cause the receive window to repaint thepart of the window covered. The window is repaint from the top of the invalidated re-gion to the bottom of the receive window.
5) The receive window is displayed in terms of lines. Lines are set by either a <CR> orwhen the X position exceeds the width of the window. The lines are re-adjusted whenthe window is sized.
6) Scrolling causes a portion of the window to be invalidated forcing the receive windowto repaint part of the window. When scrolling up, the last line on the receive window isrepainted, when scrolling down, the top line is invalidated.