part i jquery api - john wiley & sons · 4 part i: jquery api in this chapter, i begin...
TRANSCRIPT

Part I
jQuery API
Chapter 1: Introduction to jQuery
Chapter 2: Selecting and Filtering
Chapter 3: Events
Chapter 4: Manipulating Content and Attributes
Chapter 5: Arrays and Iteration
Chapter 6: CSS
Chapter 7: AJAX
Chapter 8: Effects
Chapter 9: PluginsCOPYRIG
HTED M
ATERIAL


1Introduction to jQuery
JavaScript frameworks have arisen as necessary and useful companions for client-side web devel-opment. Without JavaScript frameworks, client-side programming becomes a crater-filled mine-field of cross-browser, cross-platform inconsistencies and idiosyncrasies. JavaScript frameworks pave over those craters and inconsistencies to create a seamless, enjoyable client-side program-ming experience.
The most important hole filled by a JavaScript framework is inconsistencies between Internet Explorer’s and the W3C’s standard Event APIs. jQuery fills in this hole by making a cross-browser Event API that is very similar to the W3C’s, adding some original helpful extensions of its own.
Another hole filled by most of the popular client-side JavaScript frameworks is the ability to select and traverse through nodes in the Document Object Model (DOM) using more than the very reme-dial selection and traversal APIs that are provided by browsers’ default DOM implementations.
jQuery provides a selection mechanism that uses selector syntax like that used in cascading style sheets. However, not content to support only the standard selectors supported in CSS and even the new Selectors API implementations supported by WebKit and Internet Explorer 8, jQuery again extends the standard to support new, innovative, and useful selectors that make sense when using selectors to select DOM nodes.
In a nutshell, jQuery reduces significantly the amount of JavaScript programming and Q/A (qual-ity assurance) you have to undertake. It takes what might take several lines of code to write, and more often than not reduces that to just one or a few lines of code. jQuery makes your JavaScript more intuitive and easier to understand. jQuery takes JavaScript programming (which at one time had a higher barrier of entry due to complexity and cross-browser, cross-platform idiosyncrasies) and makes it easier and more attractive to average web developers.
Throughout this book, I will discuss jQuery’s Application Programming Interface, or API. We’ll look in depth and up close at each little bit of programming syntax that enables jQuery to do what it does. With each new bit, I also provide simple, to-the-point examples that demonstrate how that bit works. I show you how to write JavaScript applications using jQuery, and by the end of this book, you too will be able to create Web 2.0 applications that function seamlessly across multiple browsers and platforms.
4
Part I: jQuery API
In this chapter, I begin discussion of jQuery by introducing what you get out of jQuery, who develops jQuery, how you obtain jQuery, and how you install jQuery and test that it is ready to use.
As I mentioned in the Introduction, I do not assume that you are a JavaScript expert in this book, but I do assume that you are familiar with basic JavaScript concepts, such as the DOM and attaching events. I will do my best to keep examples simple and to the point and avoid layering on thick programming jargon.
What Does jQuery Do for Me?jQuery makes many tasks easier. Its simplistic, comprehensive API has the ability to completely change the way you write JavaScript, with the aim of consolidating and eliminating as many common and redundant tasks as possible. jQuery really shines in the following areas:
jQuery makes iterating and traversing the DOM much easier via its various built-in methods for ❑
doing the same.
jQuery makes selecting items from the DOM easier via its sophisticated, built-in ability to use ❑
selectors, just like you would use in CSS.
jQuery makes it really easy to add your own custom methods via its simple-to-understand ❑
plug-in architecture.
jQuery helps reduce redundancy in navigation and UI functionality, like tabs, CSS and markup- ❑
based pop-up dialogues, animations, and transitions, and lots of other things.
jQuery won’t do your laundry, walk the dog, or broker world peace (yet), but it does bring a lot to the table in terms of making client-side website development easier.
Is jQuery the only JavaScript framework? — no, certainly not. You can pick from several JavaScript frameworks: base2, Yahoo UI, Prototype, SproutCore, Dojo, and so on. I picked jQuery for this book simply because I enjoy its simplicity and lack of verbosity. On the other hand, among the other frame-works, you’ll find that there is a lot of similarity and each provides its own advantages in terms of uni-fying Event APIs, providing sophisticated selector and traversal implementations, and providing simple interfaces for redundant JavaScript-driven UI tasks.
In the past, I’ve been a big fan of base2, simply for its commitment to supporting W3C-sanctioned and de facto standard APIs seamlessly. But I have decided to focus on jQuery exclusively and exhaustively for this book because I think its popularity merits comprehensive coverage, which I’m able to present in a way that is more befitting novice programmers.
In a nutshell, jQuery blurs and even erases lines in some places that existed as barriers for true cross-browser, cross-platform development. It gives you a standard Event API, a standard Selectors API, use-ful traversal and enumeration methods, and a very useful UI library that work across the board in Internet Explorer, Safari, Firefox, and Opera on Windows, Mac, and Linux platforms.
That’s not to say that you won’t ever encounter cross-browser issues with your programs, but jQuery makes it much less likely and eliminates a hefty chunk of compatibility issues.
5
Chapter 1: Introduction to jQuery
Who Develops jQuery?I won’t spend a lot of time talking about the history of JavaScript frameworks, why they exist, and so on. I prefer to get straight to the point. That said, a brief mention of the people involved with developing jQuery is in order.
jQuery’s lead developer and creator is John Resig, whose website is located at www.ejohn.org. John resides in Boston, Massachusetts and is a JavaScript Evangelist for the Mozilla Corporation.
There are also several other people who have contributed to jQuery and continue to assist with its development. You can learn more about these people and what roles they played in jQuery’s develop-ment at http://docs.jquery.com/About/Contributors.
Obtaining jQueryjQuery is a free, Open Source JavaScript Framework. The current stable, production release version, as of this writing, is 1.2.6. I use version 1.2.6 throughout the course of this book. Getting jQuery is easy — all you have to do is go to www.jquery.com and click on the “Download” link. You’ll see three options for downloading: a packed and gzipped version, an uncompressed version, and a packed version; these all refer to the same jQuery script. Download “uncompressed” if you want to be able to look at jQuery’s source code. Download “packed” if you, for whatever reason, are unable to use gzip compression. The packed version is the same JavaScript code minus all comments, white space, and line breaks. Otherwise, for the best possible download performance, the packed and gzipped version is the best.
Installing jQueryThroughout this book, I will refer to the jQuery script as though it is installed at the following path: www.example.com/Library/jquery/jquery.js.
Therefore, if I were using the domain example.com, jQuery would have this path from the document root, /Source Code/jquery/jquery.js. You do not have to install jQuery at this exact path.
The following “Try It Out” assists you with installing jQuery by giving you an alternative dialogue when the script is properly installed.
Try It Out Installing and Testing jQuery
Example 1-1To install and test jQuery, follow these steps.
1. Download the jQuery script from www.jquery.com. Alternatively, I have also provided the jQuery script in this book’s source code download materials available for free from www.wrox.com.
2. Enter the following XHTML document, and save the document as Example 1-1.html. Adjust your path to jQuery appropriately; the path that I use reflects the path needed for the example to
6
Part I: jQuery API
work when opened in a browser via the source code materials download made available for this book from www.wrox.com.
<!DOCTYPE html PUBLIC “-//W3C//DTD XHTML 1.0 Transitional//EN” “http://www.w3.org/TR/2002/REC-xhtml1-20020801/DTD/xhtml1-transitional.dtd”><html xmlns=’http://www.w3.org/1999/xhtml’ xml:lang=’en’> <head> <meta http-equiv=’content-type’ content=’text/html; charset=utf-8’ /> <meta http-equiv=’content-language’ content=’en-us’ /> <title>Link</title> <script type=’text/javascript’ src=’../../../Source Code/jQuery/jQuery.js’> </script> <script type=’text/javascript’ src=’Example 1-1.js’></script> <link type=’text/css’ href=’Example 1-1.css’ rel=’stylesheet’ /> </head> <body> <p> jQuery is not loaded. </p> </body></html>
3. Enter the following JavaScript document, and save the document as Example 1-1.js:
if ($) { $(document).ready( function() { $(‘p’).addClass(‘tmpFrameworkLoaded’); $(‘p’).text(‘jQuery successfully loaded and running!’); } );}
4. Enter the following CSS document, and save the document as Example 1-1.css:
body { font: 16px sans-serif;}p { color: red; border: 1px solid red; padding: 5px; margin: 5px;}p.tmpFrameworkLoaded { color: green; border: 1px solid green;}
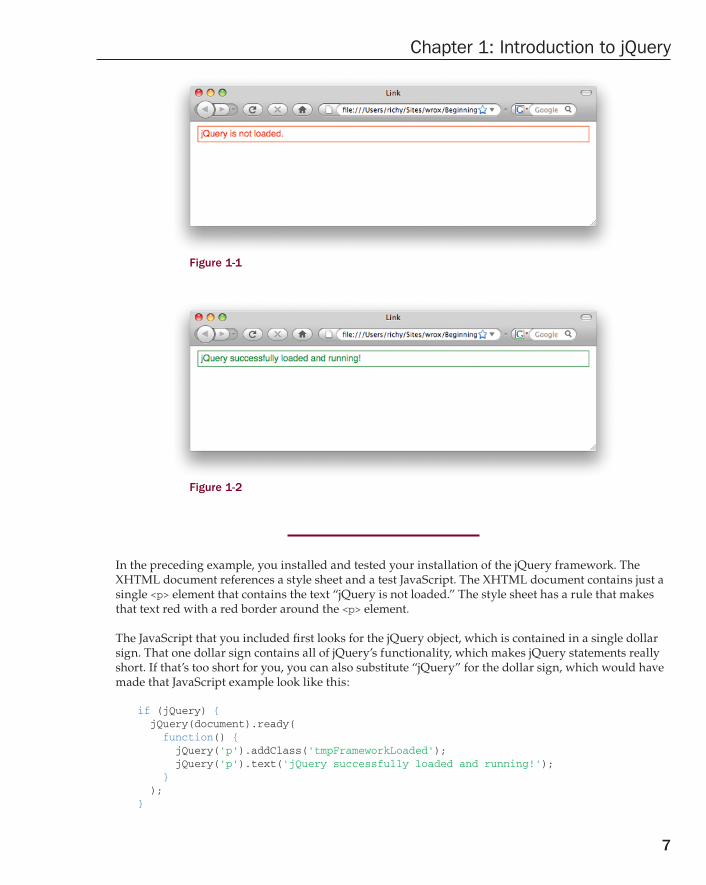
The preceding code results in the screenshot that you see in Figure 1-1, if the installation was unsuc-cessful; and the screenshot in Figure 1-2, if the installation was successful.
7
Chapter 1: Introduction to jQuery
Figure 1-1
Figure 1-2
In the preceding example, you installed and tested your installation of the jQuery framework. The XHTML document references a style sheet and a test JavaScript. The XHTML document contains just a single <p> element that contains the text “jQuery is not loaded.” The style sheet has a rule that makes that text red with a red border around the <p> element.
The JavaScript that you included first looks for the jQuery object, which is contained in a single dollar sign. That one dollar sign contains all of jQuery’s functionality, which makes jQuery statements really short. If that’s too short for you, you can also substitute “jQuery” for the dollar sign, which would have made that JavaScript example look like this:
if (jQuery) { jQuery(document).ready( function() { jQuery(‘p’).addClass(‘tmpFrameworkLoaded’); jQuery(‘p’).text(‘jQuery successfully loaded and running!’); } );}
8
Part I: jQuery API
An event is attached to jQuery’s ready event, which is executed as soon as the DOM is fully loaded, or all markup content, JavaScript and CSS, but not images. In old-time JavaScript, you would have made your JavaScript execute at page load, or the onload event. The onload event can be much slower, how-ever, since it waits for all content and images to load before executing, instead of just content.
With an event attached to the ready event, you’re ready to do something with the document. In this case, once the document is loaded, jQuery selects the <p> element and gives it the class name tmpFramework Loaded. Then jQuery selects the <p> element again and changes its text content to say “jQuery successfully loaded and running!” The addition of the class name results in the <p> element having green text with a green border around the element.
The preceding is a pretty simple, cut-and-dry test of jQuery’s existence, and with this simple example, you see a huge difference with traditional, framework-less JavaScript. Without the jQuery framework, this is what the preceding example would have looked like:
window.onload = function() { var $p = document.getElementsByTagName(‘p’)[0];
$p.className = ‘tmpFrameworkLoaded’;
if ($p.innerText) { $p.innerText = ‘jQuery successfully loaded and running!’; } else { $p.textContent = ‘jQuery successfully loaded and running!’; }};
Programming ConventionsIn web development, it’s common for professional web designers, web developers — and anyone with a job title whose day-to-day activities encompass the maintenance of source code — to adopt standards and conventions with regard to how the source code is written. Standardization bodies like the W3C, who define the languages that you use to create websites, already decide on some standards for you. Some standards are not written, but are rather de facto standards. De facto standards are standards that have become accepted throughout the industry, despite not appearing in any official document developed by a standards organization.
Throughout this book, I talk about standards, de facto and official, and how to develop and design web-based documents and even web-based applications that take those standards into account. For example, I talk extensively about how to separate behavior (JavaScript) from presentation (CSS) and structure (XHTML). JavaScript written in this way is commonly referred to as non-intrusive JavaScript — it’s non-intrusive because it supplements the content of a web document, and, were it turned off, the document would still be functional. CSS is used to handle all the presentational aspects of the document. And the structure of the document lives in semantically written XHTML. XHTML that is semantically written is organized meaningfully with the right markup elements and contains very little, if any at all, presenta-tional components directly in the markup.
9
Chapter 1: Introduction to jQuery
In addition to standards, I discuss how to develop web-based documents, taking into account different browser inconsistencies, discrepancies, and idiosyncrasies. There is some interactive functionality that nearly every browser handles differently; in those situations, other web professionals have already pio-neered de facto standards that are used to bring all browsers into accord. The idea of a JavaScript foun-dational framework has become more popular and increasingly a dependency for so-called Web 2.0 applications, like the ones you’ll learn to develop using the jQuery framework.
Before I begin the discussion of jQuery, in the coming sections, I provide a generalized overview of pro-gramming conventions and good practice that should be followed.
XHTML and CSS ConventionsIt’s important that your web documents be well-organized, cleanly written, and appropriately named and stored. This requires discipline and even an obsessive attention to the tiniest of details.
The following is a list of rules to abide by when creating XHTML and CSS documents:
Catch errors in XHTML and CSS. ❑
When selecting ID and Class names, make sure that they are descriptive and are contained in a ❑
namespace. You never know when you might need to combine one project with another — name-spaces will help you to prevent conflicts.
When defining CSS, avoid using generic type selectors. Make your CSS more specific. This will ❑
also help with preventing conflicts.
Organize your files in a coherent manner. Group files from the same project in the same folder; ❑
separate multiple projects with multiple folders. Avoid creating huge file dumps that make it difficult to locate and associate files.
Avoid inaccessible markup. Stay away from frames, where possible. Organize your markup ❑
using semantically appropriate elements. Place paragraphs in <p> elements. Place lists in <ul> or <ol> elements. Use <h1> through <h6> for headings, and so on.
If you are able to, also consider the loading efficiency of your documents. For development, use ❑
small, modularized files organized by the component; combine and compress those modular-ized files for a live production site.
In the following sections, I present some examples of why the preceding list of rules is important.
Catching Errors in XHTML and CSSThere are certain times when you won’t be able to easily spot markup or style errors. More often than not, getting into a routine of indenting and spacing markup documents and style sheets will make it much easier to spot errors during the initial development of a document, and much easier to perform ongoing maintenance. However, neat and tidy development of a document isn’t always an option. Maybe you’ve inherited an old content management system or have to deal with some other piece of software that generates your source code for you. Next I’ll talk about what you can do to more easily detect and repair errors.
10
Part I: jQuery API
Markup Errors in XHTML and HTMLMarkup errors typically come about from simple human error. You may forget to type in a closing tag for an element. You may forget to encode certain special characters. You may use an ID name more than once in a document by mistake.
If a web document contains errors, the browser may carry on as if everything is just fine and dandy, and it may not be obvious that it contains errors. Some errors go undetected because browsers are designed to handle errors in HTML as they are found. The browser decides what to do with an error when it comes to it and then simply moves on with processing the HTML document. (For example, it may be able to guess where a closing tag is supposed to be.) When an error is found, the browser tries to continue on and display a document to the end-user, and more often than not, it succeeds.
In some cases, you may notice a visual glitch and see clearly that something is out of place, but it’s also possible that something not so obvious has been affected by the error. For example, you may try attach-ing an event with JavaScript, and the event doesn’t fire. You may try manipulating the document with script by removing or inserting elements and find that the elements aren’t being inserted, or are being inserted in the wrong place. The effects of markup errors like this are much more subtle. Markup errors do not appear in your browser’s error console. The only place where a structural markup error will show up is in a validation of the document using the W3C’s markup validation service located at http://validator.w3.org.
XHTML, on the other hand, is not forgiving of markup errors, and assuming that the browser properly supports XHTML, the browser won’t attempt any kind of error correction when it encounters an error in an XHTML document. One type of markup error that will bring processing to a halt is an incorrectly specified MIME (Multipurpose Internet Mail Extensions) type.
The MIME standard is used by browsers and Web Servers to facilitate the automatic identification and handling of files, which is to say that a MIME type is part of what a browser uses to identify the con-tents of a document. XHTML documents are supposed to be served with an application/xhtml+xml MIME type. The following is one way of setting the MIME type for an XHTML document:
<!DOCTYPE html PUBLIC “-//W3C//DTD XHTML 1.0 Strict//EN” “http://www.w3.org/TR/xhtml1/DTD/xhtml1-strict.dtd”> <html xmlns=’http://www.w3.org/1999/xhtml’ xml:lang=’en’> <head> <meta http-equiv=’Content-Type’ content=’application/xhtml+xml; charset=UTF-8’ /> </head> <body>
In the preceding code example, the XHTML MIME type is set using a <meta /> element that’s included in the document headers. The http-equiv attribute included in a <meta /> element is used to set HTTP headers within the markup document itself. In the preceding code example, the Content-Type HTTP header is being set, which, when supported by the browser, will force the browser to interpret an XHTML document as application/xhtml+xml, rather than text/html.
An XHTML document properly served with the application/xhtml+xml MIME type with markup errors like mismatched tags, or missing tags, or any markup error of any kind will result in what’s commonly called the XML yellow screen of death (YSOD). The name yellow screen of death was coined because Mozilla’s (and later, Firefox’s) XML error messages appear against a yellow background, and XML error messages

11
Chapter 1: Introduction to jQuery
prevent the display of the document, which prevents the user from seeing a web page, hence the “death” part. Of course, the XML/XHTML error message isn’t yellow in every browser, but the point is that, in properly served XHTML, one error could make a document unviewable by the end-user.
The yellow screen of death is also related to another error message, the blue screen of death, which, of course, is the de facto name for error messages in the Windows Operating System that result in a complete system crash — at the time of the crash, an error message with white lettering on a blue screen is seen.
XHTML 1.0 documents are not typically served with the correct, intended MIME type. Rather, they are usually served as an HTML document — which isn’t techni-cally illegal, as long as they are XHTML 1.0 documents. XHTML 1.1, on the other hand, must be served as application/xhtml+xml.
It’s a good idea, if you’re going the XHTML route, to properly serve the document with the application/xhtml+xml MIME type. Setting the XHTML MIME type is the best, most compatible approach, since browsers like IE that don’t understand the XHTML MIME type will carry on and inter-pret the document as plain-old HTML, while Firefox, Safari, and the like will correctly interpret the XHTML document. If errors are present, these browsers won’t show a rendered document but, rather, will show an error message complaining that something is awry in the document.
If you’re going the XHTML route, keeping the document neat becomes a matter of keeping the document maintainable, and thus a matter of personal preference. Typically, dynamic websites strip the markup source of excess white space in order to reduce the size of the document for performance advantages, and even in the age of ubiquitous broadband connections, it’s still a good idea to optimize a document for very slow dial-up connections, which are still in widespread use in rural areas. Dynamic websites typically also have the best of both worlds in place. That is to say, on a pre-production server, the website may serve uncompressed markup, while on a production server, the website serves compressed markup.
For your own sanity as a programmer, I strongly recommend that you maintain neat and organized markup, check your markup documents for validation errors using the W3C validation service, and consider using XHTML. Ultimately, however, XHTML or HTML is a matter of personal preference. Both are perfectly acceptable Internet standards for the creation of web documents. The examples in this book use the XHTML standard — however, these examples will work equally well with the HTML standard.
Errors in CSSErrors in style sheets usually make themselves known by not displaying the style you applied.
However, errors in CSS can also be more subtle and difficult to spot. To catch errors in CSS, I recom-mend one of the two following approaches:
Use Mozilla Firefox (or another browser that reports CSS errors), and look for CSS errors in the ❑
browser’s Error Console. In Firefox, that’s located in Tools?Error Console.
Use the W3C’s CSS validation service at ❑ http://jigsaw.w3.org/css-validator.
Either of these solutions will assist you in locating and extinguishing style-sheet errors.

12
Part I: jQuery API
It’s also good practice to get into the habit of writing neat and organized CSS. Indent your style sheets with white space, and use line breaks to make the style sheets more maintainable. The browser doesn’t care what your style sheet looks like, as long as the basic syntax is correct. You may add or remove white space to your heart’s content.
I continue to revisit the topics of neat and organized source code throughout this book by way of example.
ID and Class Naming ConventionsMost web developers don’t think too much about the topics of namespacing and naming conventions. Naming conventions are just as important in your markup ID and class names as namespacing is impor-tant in programming languages.
First, what is namespacing, and why do you need to do it? Namespacing is the concept of making your programs, source code, and so on tailored to a particular naming convention, in an effort to make your programs more portable and more capable of living in diverse, foreign programming environments. In other words, if you want to be able to directly insert a web application into your document, you want to be sure that the class and ID names, style sheets and script, and all the bits that make your web applica-tion what it is do not conflict with any applications that are already present in the document. Your appli-cations should be fully self-contained and self-sufficient and not collide or conflict with any elements already present in a document.
What are some common ID names that people use in style sheets? Think first about what the typical components of a web application are. There’s a body. There may be one or more columns. There may be a header and a footer, and there are lots of components that can potentially be identified as generic, redundant pieces that all web applications may have. Then, it stands to reason that plenty of websites are probably using ID and class names like body, header, footer, column, left, right, and the like. If you name an element with the ID or class name body, you have a very good chance of conflicting with an overwhelming majority of websites in existence today. To avoid this type of conflict, it’s considered good practice to prefix ID and class names within a web application to avoid conflicts and namespace collisions. If you write an application called tagger, you might namespace that application by prefixing all of your ID and class names with the word tagger. For example, you might have taggerBody, tagger Header, taggerFooter, and so on. It may be possible, however, that someone has already written an application called tagger. To be safe, you might do a Web search on the name you’ve chosen for your application to make sure that no one’s already using that name. Typically, simply prefixing your ID and class names with your application’s name is enough.
Additionally, it also helps to prefix ID and class names with type selectors in style sheets. Type selectors help you narrow down what to look for when modifying or maintaining a document. For example, the ID selector #thisID is ambiguous. You don’t know what kind of element thisID is, and thus would likely have to scan the entire document to find it. But div#thisID is more specific. By including the div in the selector, you instantly know you’re looking for a <div> element. Including the type in the selector also helps you in another way: When dealing with class names, you can have the same class name applied to different types of elements. While I may not condone that as good practice, at least in the style sheet, you can control which element gets which style. span.someClass and div.someClass are selectors that dif-ferentiate style based on the type of element, whereas .someClass is more ambiguous and applies to any element.
ID and class names should also be descriptive of their purpose in a semantically meaningful way. Keep in mind that an ID name can potentially be used in a URL as an HTML anchor. Which is better:
13
Chapter 1: Introduction to jQuery
www.example.com/index.html#left or www.example.com/index.html#exRelatedDocuments? The lat-ter ID anchor is namespaced ex for example.com, and RelatedDocuments is the name of the element; thus, the latter URL includes more information about what purpose the element serves and greatly increases the maintainability of the document in a very intuitive way. Additionally, the latter has more benefit in terms of search engine optimization (SEO). The former is too ambiguous and won’t provide much in the way of SEO. Think of each of your ID and class names as though it is part of the URL of your document. Give each ID and class name that you create semantic names that convey meaning and purpose.
Generic Type SelectorsGeneric type selectors are style-sheet rules that look something like this:
a { color: #29629E;}
In the preceding style-sheet rule, you see what’s probably a pretty common scenario, changing the color of every link in a document via a generic type selector that refers to all <a> elements. Generic type selec-tors should be avoided for the same reason that it is good to namespace ID and class names within a document, avoiding conflicts when multiple scripts or style sheets are combined in the same document. Instead, it’s best practice to apply ID or class names to these elements, or at the very least, place them in a container that has an ID or class name, and only use descendent selectors when referencing those ele-ments via a style sheet.
div#tmpBanner a { color: #29629E;}
The preceding example avoids the pitfalls introduced by using a blanket, generic selector style-sheet rule by limiting the scope of the style-sheet rule’s application. Now, only <a> elements that are descen-dants of a <div> with the ID name tmpBanner will receive the declaration color: #29629E;.
Storing and Organizing FilesHow files are organized and stored is important to the maintainability of a document. You should main-tain your documents in an easy-to-understand, easy-to-learn directory hierarchy. Different people have different approaches to storing and organizing files, obviously. What matters is that there is an organiza-tion scheme, rather than none at all. Some choose to store documents by type and then separate them by application, while others prefer to separate by application first, then sort by type.
Avoid Making Documents InaccessibleAccessibility is also an important factor to consider in the design of a web document. You should do your best to make your JavaScript non-intrusive, but also avoid taking away a document’s accessibility by either script or markup.
Avoid using frames. ❑
Limit the number of images to those that actually contribute to the content of a document (as ❑
opposed to the design). Try to contain as much of the design as possible in CSS background
14
Part I: jQuery API
images, and keep images that contribute to the content in <img /> elements. Be sure to include alt attributes that describe the image for each <img /> element.
Place content in semantically appropriate markup containers — use ❑ <p> for paragraphs, <h1> through <h6> for headings, for example.
Make the design high contrast. Imagine what the document would look like in black and white ❑
through the eyes of someone with poor vision. Can you easily read the content?
Avoid wandering too far away from established user-interface conventions. Can you distinguish ❑
hyperlinks from normal content?
Make the content keyboard-accessible. Can you navigate without a pointing device? ❑
Make the content unobtrusive. Can you use the website without flash and JavaScript functional- ❑
ity? JavaScript and flash should enhance web content in a complementary way, not be a requirement.
Avoid placing a large number of links at the beginning of every document. If you were listening ❑
to the content being read to you, rather than seeing it visually, would the experience be enjoyable?
Accessibility should be practiced to the point of becoming an automatic reflex. It should be cemented in your development practices in a fundamental way in the same way that namespacing, file organization, and validation are; but while other best practices can become second nature easily, it’s also very easy to get into the habit of ignoring accessibility, so a conscious effort must be made to periodically review accessibility and ingrain accessibility in the development process.
Efficiency in Markup and CSSMarkup and CSS in a complex website can easily become large and bloated and drag down overall load-ing and execution times more and more. This can become particularly troublesome as the overall popu-larity of a site increases. As the complexity of a website increases, it becomes necessary to look into ways of streamlining the content. It’s best to limit the number of external files being loaded, but all CSS and JavaScript should be included in at least one external file. Were JavaScript and CSS included directly in a document, the initial loading time would improve, but you’d also lose the advantage of caching JavaScript and CSS on the client side.
For the best of the best in efficiency, combine the following concepts:
Server-side gzip compression ❑
Client-side caching ❑
Automatic compression of markup content ❑
Automatic compression and consolidation of multiple CSS and JavaScript files ❑
When the preceding items are combined, you make the loading times of a web document the best pos-sible; however, there are some caveats to consider that may at first seem contradictory:
Maintainable markup should be written in a neat and organized manner. It should be well- ❑
spaced and indented and contain line breaks where appropriate.
Good programming practice means modularized development, so break up your CSS and ❑
JavaScript by component and application. Make small, easy-to-digest chunks. This will speed up your ability to maintain and extend projects.
15
Chapter 1: Introduction to jQuery
Client-side caching can lead to headaches when updates are made to CSS or script files. ❑
Browsers will continue to use the old version of the CSS and script files after an update is made, when caching is working correctly.
The good news is, all of the preceding caveats can be overcome. The bad news is, it’s not particularly easy to overcome them.
The best way to implement efficiency in markup, JavaScript, and CSS documents is to make the effi-ciency automatic. That is to say, write server-side applications that handle efficiency tasks for you. A well-designed professional content management system will work out those bits for you. It will allow you to make your JavaScript, markup, and CSS documents modularized, and separate them based on the task each is designed to perform, but automatically combine and compress those documents for you.
Unfortunately, not everyone can use a professional content management system to serve their content. For those individuals, there are some compromises to be made:
JavaScript and CSS can be hand-compressed using a web-based utility like Dean Edwards’s ❑
packer, http://dean.edwards.name/packer. Development can continue to be modularized, and the compression and consolidation portion of development simply becomes a manual task.
You can limit the amount of white space you use in a document. Indent content with two spaces ❑
instead of four.
Overcoming the headaches with document caching, on the other hand, is a much easier task. You can force a browser to update a document by changing its path. For example, say you have the following script included in your markup:
<script src=’/script/my.js’ type=’text/javascript’></script>
You change the path from /script/my.js to /script/my.js?lastModified=09/16/07. The latter references the same, my.js, but is technically a different path to the browser and, consequently, will force the browser into refreshing its cached copy of the document. The ?lastModified=09/16/07 portion of the path is what’s called the query string portion of the path. The query string begins with a question mark and then con-tains one or more query string variables. Query string variables are used by a server-side programming language or client-side JavaScript to pass information from one document to another. In this example, there is no information being passed per se. You’re including the time of the last modification, although I could have just as easily included the revision, or even a random string of characters. The inclusion of a query string in this example has only one purpose: to force the browser into refreshing the cached version of the document.
The same can be done with CSS:
<link type=’text/css’ rel=’stylesheet’ href=’/styles/my.css?lastModified=09/16/07’ />
In the preceding snippet of markup that includes an external CSS document, the query string is used to force a refresh of the browser’s cached copy of the style sheet my.css.
In the next section, I talk about some conventions specific to JavaScript.
16
Part I: jQuery API
JavaScript ConventionsIn JavaScript, there are several things that should be considered bad practice and avoided:
Include All Script in External Documents ❑ — JavaScript code should only be included in exter-nal script files. Script should not be embedded in markup documents or be included inline, directly on markup elements.
Write Clean, Consistent Code ❑ — JavaScript code should be neatly formatted and organized in a consistent, predicable way.
Namespace JavaScript Code ❑ — JavaScript variables, functions, objects, and the like should be namespaced to minimize potential namespace conflicts and collisions with other JavaScript applications.
Avoid Browser Detection ❑ — Browser detection should be avoided where possible. Instead, detect specific browser features.
In the next sections, I present cursory, generalized overviews of each of the preceding concepts.
Include All Script in External DocumentsPart of making JavaScript non-obtrusive means making JavaScript complementary and supplemental, rather than required and mandatory. This concept is explored in detail throughout this book; however, it should be noted why this is the best approach.
Consider the following code example:
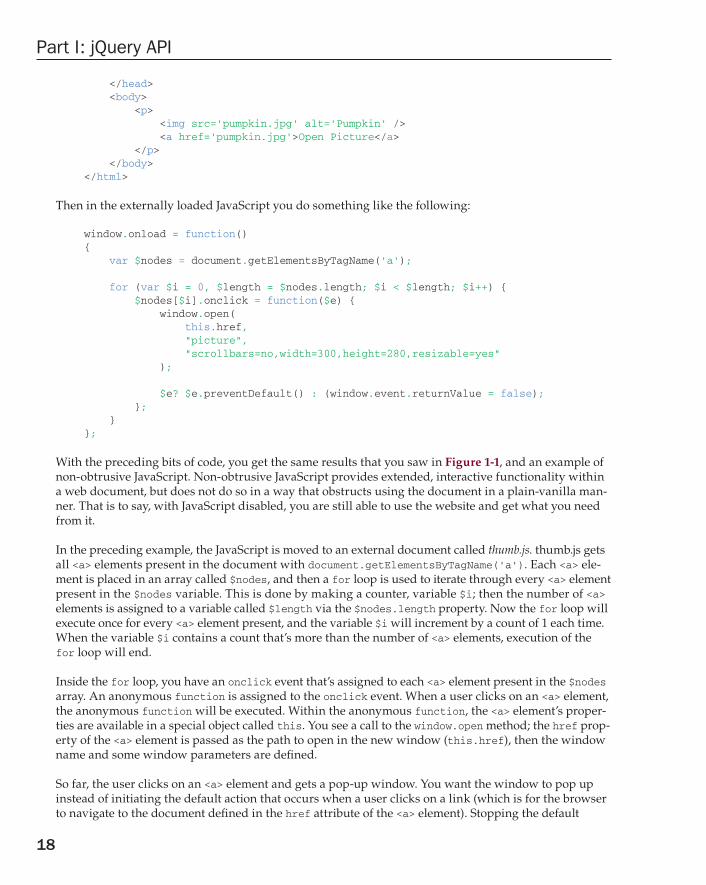
<!DOCTYPE html PUBLIC “-//W3C//DTD XHTML 1.0 Strict//EN”vvvvvv “http://www.w3.org/TR/xhtml1/DTD/xhtml1-strict.dtd”> <html xmlns=”http://www.w3.org/1999/xhtml” xml:lang=”en”> <head> <meta http-equiv=”Content-Type” content=”application/xhtml+xml; charset=UTF-8”/> <title>Inline JavaScript</title> <link rel=’stylesheet’ type=’text/css’ href=’style.css’ /> </head> <body> <p> <img src=’pumpkin.jpg’ alt=’Pumpkin’ /> <a href=’javascript:void(0);’ onclick=’window.open( “pumpkin.jpg”, “picture”, “scrollbars=no,width=300,height=280,resizable=yes” );’>Open Picture</a> </p> </body> </html>
Combine the preceding markup with the following style sheet:
img { display: block;
17
Chapter 1: Introduction to jQuery
margin: 10px auto; width: 100px; border: 1px solid rgb(128, 128, 128); } body { font: 14px sans-serif; } p { width: 150px; text-align: center; }
The preceding code gives you something like what you see in Figure 1-1.
In Figure 1-1, you see what is probably a pretty common scenario: You have a thumbnail, and you can click to see a bigger version of the thumbnail. This is the kind of thing that JavaScript works well for — giving you the bigger version in a separate pop-up window that doesn’t have any controls.
Now let’s examine why what I did in Figure 1-1 was the wrong way to go about adding this functionality.
Here are the problems with this approach:
If JavaScript is disabled, viewing the larger picture doesn’t work. ❑
JavaScript can be disabled out of personal preference. ❑
JavaScript can be disabled because of company policy. ❑
JavaScript can be disabled if the end-user is using a handheld device or viewing the site ❑
through any kind of alternative medium.
Search bots may not understand the JavaScript, so Search Engines may not properly index this ❑
content.
Placing the JavaScript directly in the markup document adds unnecessary bloat and complexity ❑
to the markup document.
The overwhelming point in all of this is that inline JavaScript is a really bad way to approach adding complementary, interactive functionality to a web document.
Here is a better approach to the application presented in Figure 1-1. First, you take the inline JavaScript out of the markup and replace it with a reference to an externally loaded JavaScript. In the following example, I’ve named the externally loaded JavaScript thumb.js:
<!DOCTYPE html PUBLIC “-//W3C//DTD XHTML 1.0 Strict//EN” “http://www.w3.org/TR/xhtml1/DTD/xhtml1-strict.dtd”> <html xmlns=”http://www.w3.org/1999/xhtml” xml:lang=”en”> <head> <meta http-equiv=”Content-Type” content=”application/xhtml+xml; charset=UTF-8”/> <title>Inline JavaScript</title> <link rel=’stylesheet’ type=’text/css’ href=’style.css’ /> <script type=’text/javascript’ src=’thumb.js’></script>
18
Part I: jQuery API
</head> <body> <p> <img src=’pumpkin.jpg’ alt=’Pumpkin’ /> <a href=’pumpkin.jpg’>Open Picture</a> </p> </body> </html>
Then in the externally loaded JavaScript you do something like the following:
window.onload = function() { var $nodes = document.getElementsByTagName(‘a’); for (var $i = 0, $length = $nodes.length; $i < $length; $i++) { $nodes[$i].onclick = function($e) { window.open( this.href, “picture”, “scrollbars=no,width=300,height=280,resizable=yes” ); $e? $e.preventDefault() : (window.event.returnValue = false); }; } };
With the preceding bits of code, you get the same results that you saw in Figure 1-1, and an example of non-obtrusive JavaScript. Non-obtrusive JavaScript provides extended, interactive functionality within a web document, but does not do so in a way that obstructs using the document in a plain-vanilla man-ner. That is to say, with JavaScript disabled, you are still able to use the website and get what you need from it.
In the preceding example, the JavaScript is moved to an external document called thumb.js. thumb.js gets all <a> elements present in the document with document.getElementsByTagName(‘a’). Each <a> ele-ment is placed in an array called $nodes, and then a for loop is used to iterate through every <a> element present in the $nodes variable. This is done by making a counter, variable $i; then the number of <a> elements is assigned to a variable called $length via the $nodes.length property. Now the for loop will execute once for every <a> element present, and the variable $i will increment by a count of 1 each time. When the variable $i contains a count that’s more than the number of <a> elements, execution of the for loop will end.
Inside the for loop, you have an onclick event that’s assigned to each <a> element present in the $nodes array. An anonymous function is assigned to the onclick event. When a user clicks on an <a> element, the anonymous function will be executed. Within the anonymous function, the <a> element’s proper-ties are available in a special object called this. You see a call to the window.open method; the href prop-erty of the <a> element is passed as the path to open in the new window (this.href), then the window name and some window parameters are defined.
So far, the user clicks on an <a> element and gets a pop-up window. You want the window to pop up instead of initiating the default action that occurs when a user clicks on a link (which is for the browser to navigate to the document defined in the href attribute of the <a> element). Stopping the default
19
Chapter 1: Introduction to jQuery
action, unfortunately, depends on what browser you’re using. IE has its way, and all the others have a standard way. The JavaScript code accounts for both in the following line:
$e? $e.preventDefault() : (window.event.returnValue = false);
The preceding line says that if the variable $e evaluates to a Boolean true value, execute the prevent Default method of the event object, as in, $e.preventDefault();, otherwise, if $e evaluates to a false value, evaluate this expression: (window.event.returnValue = false). So if $e is true, use the standard W3C method for preventing the default action; if $e is false, use Microsoft’s method for preventing the default action.
In this very simple example, you’ve seen how a really simple example can balloon into something much more complex. All of the concepts I’ve presented in this example are ones I continue to revisit through-out this book, but you get a pretty good idea of some of the challenges that non-obtrusive JavaScript prevents. You run into situations in which one browser has one way of doing things, and another has its way of doing things, and sometimes all of the popular browsers differ on how to go about accomplish-ing a given task. Therefore, doing JavaScript the right way often involves quite a bit more thought and planning. The good thing about this additional thought and planning is that it becomes second nature once you understand how to account for all of the browser differences. The good news is that there are people out there looking out for you, and who’ve already braved all the deep, dark corners of browser inconsistencies, incompatibilities, and lack of common, coherent standards.
At this point, you might be asking yourself, so what are the benefits of going through all of this hassle to get non-obtrusive, multiplatform JavaScript? I’m glad you asked.
In the preceding example, if JavaScript had been disabled, the end-user could still have clicked ❑
on the link to see a larger version of the thumbnail image. This makes your website much more accessible.
When JavaScript is included in an externally loaded file, you get a speed boost, since the ❑
JavaScript only has to be loaded once, and from there on is cached by the client browser.
While it takes some planning, the cross-browser inconsistencies and incompatibilities can be ❑
completely overcome.
You can achieve better search rankings, since search engines can now access and see all of your ❑
content.
You’ll appear more hip, all the girls (or guys) will like you, a pretty butterfly will land on your ❑
shoulder, there will be world peace, and so on.
Well, maybe not that last one, but non-obtrusive JavaScript is, simply, A Good Thing™.
Write Clean, Consistent CodeIt’s important to follow some predetermined criteria for producing clean, consistent, well-organized code. In the professional world, most programmers have a particular way they like to see their code for-matted. Earlier in this section, I talked about how indenting and spacing markup and CSS documents can help you more easily catch errors in those documents and make those documents more maintain-able. Well, the same can be applied to JavaScript, although, with JavaScript and other programming lan-guages, programming conventions are typically much more defined, down to a very fine-grained level of detail. Here I talk about each of the programming conventions that I follow for writing JavaScript source code.
20
Part I: jQuery API
Indenting and Line LengthIt’s a good idea to indent your code so that it’s easier to read and maintain. Take the following, for example:
window.onload=function(){var $nodes=document.getElementsByTagName(‘a’);for(var $i=0,$length=$nodes.length;$i<$length;$i++){$nodes[$i].onclick=function($e){window.open(this.href,”picture”,”scrollbars=no,width=300,height=280,resizable=yes”);$e? $e.preventDefault():(window.event.returnValue=false);};}};
In the preceding block of code, you see the contents of thumb.js presented above in this section, format-ted without any indenting or spacing. Now, imagine that the preceding code is 10,000 lines of code spread out over many files, all formatted the same way. It’s not a bad idea to reduce spacing for a live, production script; in fact, many professionals use compression routines specifically for this. But those same professionals don’t maintain their scripts in the compressed format and often have a rigid pro-gramming standard to which every script they produce must conform.
A common, fairly universal programming standard is setting the size of an indentation to four spaces, although some use just two spaces. This is in addition to setting a blanket rule that tabs cannot be used in place of individual spaces, even though, technically, a tab character results in less bytes added to a file when compared to four individual space characters. The “no tab” rule exists because of the wide variance in the interpretation of what a tab character is in text applications. Some text applications say that a tab character is equal to eight individual spaces. Some text applications say that a tab character is equal to four individual spaces, while others still let you explicitly define how big a tab character is. These variances have led to the tab character being unreliable. Most professional integrated developer environments (IDEs) let you define the [Tab] key on a keyboard as individual spaces, in addition to let-ting you define how many spaces to insert.
Some examples of IDEs are Adobe Dreamweaver, Zend Studio, and Microsoft Visual Studio: These are all development environments for either directly writing or generating source code. Additionally, most IDEs try to guess what you mean when writing a source document, by intelligently adjusting the num-ber of spaces. For example, when you press [Return] to begin a new line in your source code document, the IDE can indent the new line with at least as much space as the preceding line. Most IDEs behave this way by default. Dreamweaver automatically inserts two spaces when you hit the [Tab] key. Zend Studio can be configured to insert spaces instead of tab characters when you press the [Tab] key.
Throughout this book, I try to use four characters for a [Tab] key, although limited space may sometimes require that I use two characters. Generally, the professional standard for client-side source code is two characters, since four characters makes file sizes much larger. I’ve stuck with four because concerns about file size and bandwidth usage can be addressed by compressing your source code when it’s used on a production website.
Control StructuresControl structures include programming statements that begin with the keywords if, if else, switch, case, else, for, while, try, catch, and the like. Control structure programming statements are the building blocks of any programming language. Let’s see how control structure statements should be formatted with regard to popular programming standards and guidelines.
21
Chapter 1: Introduction to jQuery
Although, ultimately, different people have different preferences for how to write source code, there are two prevailing methods for formatting control structures in use by the majority of the professional pro-gramming community.
The following convention, which is formally called K&R Style, is included in Sun’s Coding Standards Guidelines for Java:
if ($condition) { $something = 1; } else if ($another) { $something = 2; } else { $something = 3; }
In the preceding code example, you see that the curly braces and the parentheses are used as markers for indention.
Compare the preceding to the next convention, which is known as Allman Style, which is the default in Microsoft Visual Studio:
if ($condition) { $something = 1; } else if ($another) { $something = 2; } else { $something = 3; }
In Allman Style, all the curly braces line up in the source code, which makes it easier to detect when one is missing, in addition to preventing typos like missing curly braces from occurring in the first place, since you have a visual aid for their placement.
When function calls, like window.open in the example, are very long, sometimes the function call is bro-ken up over multiple lines to make it easier to read. To the browser,
window.open( this.href, “picture”, “scrollbars=no,width=300,height=280,resizable=yes”);
and
window.open(this.href, “picture”, “scrollbars=no,width=300,height=280,resizable=yes”);
22
Part I: jQuery API
are exactly the same. The former example just makes it easier for humans to parse the arguments pres-ent in the function call.
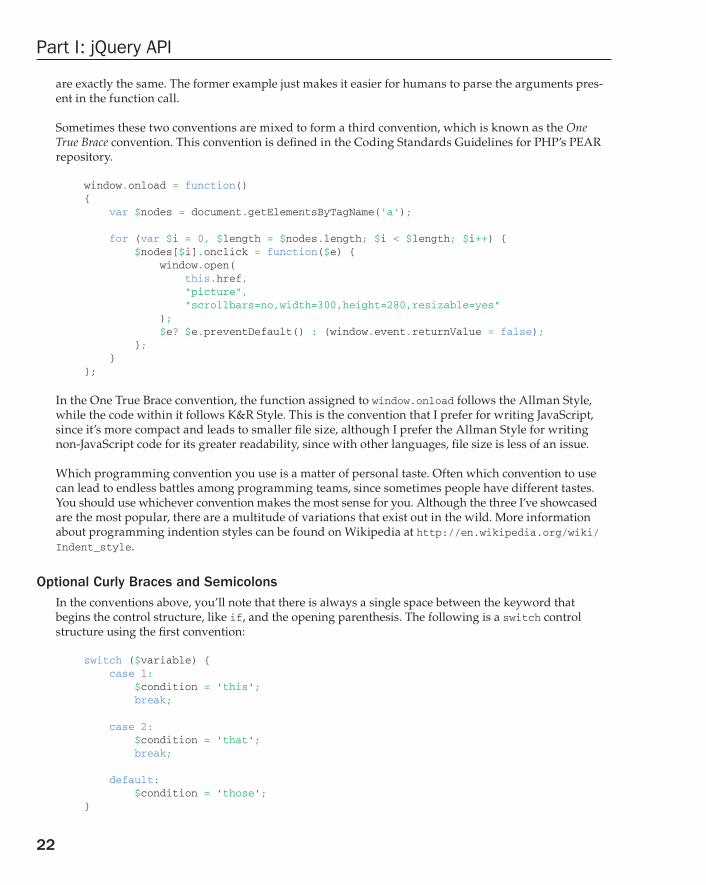
Sometimes these two conventions are mixed to form a third convention, which is known as the One True Brace convention. This convention is defined in the Coding Standards Guidelines for PHP’s PEAR repository.
window.onload = function() { var $nodes = document.getElementsByTagName(‘a’); for (var $i = 0, $length = $nodes.length; $i < $length; $i++) { $nodes[$i].onclick = function($e) { window.open( this.href, “picture”, “scrollbars=no,width=300,height=280,resizable=yes” ); $e? $e.preventDefault() : (window.event.returnValue = false); }; } };
In the One True Brace convention, the function assigned to window.onload follows the Allman Style, while the code within it follows K&R Style. This is the convention that I prefer for writing JavaScript, since it’s more compact and leads to smaller file size, although I prefer the Allman Style for writing non-JavaScript code for its greater readability, since with other languages, file size is less of an issue.
Which programming convention you use is a matter of personal taste. Often which convention to use can lead to endless battles among programming teams, since sometimes people have different tastes. You should use whichever convention makes the most sense for you. Although the three I’ve showcased are the most popular, there are a multitude of variations that exist out in the wild. More information about programming indention styles can be found on Wikipedia at http://en.wikipedia.org/wiki/Indent_style.
Optional Curly Braces and SemicolonsIn the conventions above, you’ll note that there is always a single space between the keyword that begins the control structure, like if, and the opening parenthesis. The following is a switch control structure using the first convention:
switch ($variable) { case 1: $condition = ‘this’; break; case 2: $condition = ‘that’; break; default: $condition = ‘those’; }
23
Chapter 1: Introduction to jQuery
Note in the preceding that no break statement appears in the default case. As the default, a break is implied, and it is necessary to include the break statement. I tend to deviate from the norm with how I prefer switch control structures to be written.
switch ($variable) { case 1: { $condition = ‘this’; break; }; case 2: { $condition = ‘that’; break; }; default: { $condition = ‘those’; }; }
I like to add curly braces around each case in the switch statement; I do this because I believe it makes the switch statement easier to read; however, ultimately, these are not necessary. Concerning optional curly braces, I always include them, even if they’re technically optional. The same goes for semicolons. Terminating each line with a semicolon is technically optional in JavaScript, although there are some circumstances in which you won’t be able to omit it. I include all optional semicolons and curly braces, as I think that this not only makes the code cleaner, more organized, and consistent, but also gives you a technical benefit. If you want to compress your code to remove all additional white space, comments, and so on, these optional bits suddenly are no longer optional, but needed to keep the program functional once it’s been compressed. In the following example, you can see what I mean by optional components:
if ($condition) $something = 1 else if ($another) $something = 2 else $something = 3
In JavaScript, the preceding code is perfectly valid. The semicolon is implied where there is a line break. And as long as there is only a single statement being executed, technically you don’t have to include curly braces. However, the above fails when it is compressed:
if ($condition) $something = 1 else if ($another) $something = 2 else $something = 3
The preceding fails with a syntax error when you try to execute it. It fails because the script interpreter has no idea where you intend one statement to end and the next to begin. The language could probably be extended to guess in some circumstances, but it’s better to just be as explicit as possible.
Something else that you might think is odd is the inclusion of a semicolon after some function defini-tions. You’ll see this in JavaScript because a function can be a type of data, just like a number is a type of data or a string is a type of data. In JavaScript, it’s possible to pass a function around as you would a
24
Part I: jQuery API
number or a string. You can assign a function to a variable and execute the function later. You’ve already seen an example of this, and here it is again in the following code example:
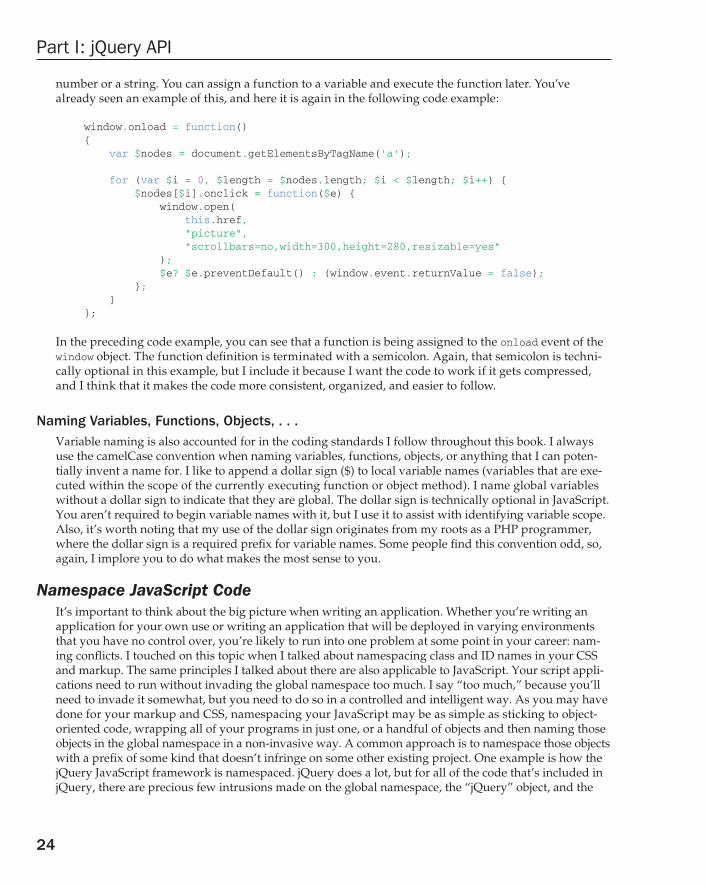
window.onload = function() { var $nodes = document.getElementsByTagName(‘a’); for (var $i = 0, $length = $nodes.length; $i < $length; $i++) { $nodes[$i].onclick = function($e) { window.open( this.href, “picture”, “scrollbars=no,width=300,height=280,resizable=yes” ); $e? $e.preventDefault() : (window.event.returnValue = false); }; } };
In the preceding code example, you can see that a function is being assigned to the onload event of the window object. The function definition is terminated with a semicolon. Again, that semicolon is techni-cally optional in this example, but I include it because I want the code to work if it gets compressed, and I think that it makes the code more consistent, organized, and easier to follow.
Naming Variables, Functions, Objects, . . .Variable naming is also accounted for in the coding standards I follow throughout this book. I always use the camelCase convention when naming variables, functions, objects, or anything that I can poten-tially invent a name for. I like to append a dollar sign ($) to local variable names (variables that are exe-cuted within the scope of the currently executing function or object method). I name global variables without a dollar sign to indicate that they are global. The dollar sign is technically optional in JavaScript. You aren’t required to begin variable names with it, but I use it to assist with identifying variable scope. Also, it’s worth noting that my use of the dollar sign originates from my roots as a PHP programmer, where the dollar sign is a required prefix for variable names. Some people find this convention odd, so, again, I implore you to do what makes the most sense to you.
Namespace JavaScript CodeIt’s important to think about the big picture when writing an application. Whether you’re writing an application for your own use or writing an application that will be deployed in varying environments that you have no control over, you’re likely to run into one problem at some point in your career: nam-ing conflicts. I touched on this topic when I talked about namespacing class and ID names in your CSS and markup. The same principles I talked about there are also applicable to JavaScript. Your script appli-cations need to run without invading the global namespace too much. I say “too much,” because you’ll need to invade it somewhat, but you need to do so in a controlled and intelligent way. As you may have done for your markup and CSS, namespacing your JavaScript may be as simple as sticking to object-oriented code, wrapping all of your programs in just one, or a handful of objects and then naming those objects in the global namespace in a non-invasive way. A common approach is to namespace those objects with a prefix of some kind that doesn’t infringe on some other existing project. One example is how the jQuery JavaScript framework is namespaced. jQuery does a lot, but for all of the code that’s included in jQuery, there are precious few intrusions made on the global namespace, the “jQuery” object, and the

25
Chapter 1: Introduction to jQuery
dollar sign method the jQuery object is aliased to. All of the functionality that jQuery provides is pro-vided through those objects.
Without a well-thought-out approach to the namespacing problem, it’s possible that your application may cause conflicts with others. It’s best to just assume that everything you place in the global namespace will cause a conflict, and thus set out to make as minimal as possible an intrusion into the global namespace.
Avoid Browser DetectionBrowser detection can be a real annoyance. You’re surfing the Web using your favorite browser, and you hit a website that locks you out — not because your web browser is technically incapable, but because it didn’t match what the website’s creators presupposed would be capable. So, I propose the following:
Make no assumptions about the capabilities of a visitor’s browser. ❑
Test for feature compatibility, rather than a browser name or browser version. ❑
Account for the official standards and the de facto standards. (Official standards should take ❑
precedence — de facto standards will either become or be replaced by the former.)
The world is always changing — what’s most popular today may not remain the most popular ❑
in the months and years to come.
It may be time to turn to a framework for some compatibility bridging. ❑
Anyone remember a little company called Netscape? At one time, Netscape was the dominant, de facto standard. Now Netscape holds just under 0.6 percent of world market share, and Microsoft’s IE is domi-nant. At its most popular, IE held more than 90 percent of the market. Now IE holds around 70 percent; Firefox holds 21 percent; and Safari holds roughly 7 percent, Opera and others have around 2 percent combined. The browsing market can and does fluctuate. In the real world, there are lots of people who use less popular browsers. And 2 percent may sound small at first glance, but keep in mind that is 2 percent of a very large number. According to www.internetworldstats.com, in 2008, as I write this, there are just over 1.4 billion Internet users world-wide, which is 21.9 percent of the world’s population. Therefore, the so-called less popular browsers aren’t really doing too shabby in the grand scheme of things, and while 2 percent sounds small, it’s actually a pretty large base of users.
SummaryjQuery takes what would otherwise be a more complex or verbose task in plain-vanilla JavaScript, and it makes it much easier, sometimes reducing many lines to one or a few. Throughout this book, you will learn about what jQuery has to offer and how to use its simple, easy-to-understand API to write spectacu-lar, professional-appearing web applications that have all the polish and sparkle of a Fortune 500 company.
In this chapter, I talked a little about what jQuery is, where it comes from, and who develops and main-tains it; and I showed you how to install it and begin using it. In the next chapter, you get right down to business, learning about jQuery’s powerful implementation of the Selectors API and its world-class Event API.
If you are interested in learning more about jQuery’s origins, visit www.jquery.com and www.ejohn.org.

26
Part I: jQuery API
This chapter also covered some things that a good programmer will want to get into the habit of doing, such as adopting a formal programming convention and avoiding conflicts with others’ code through using a namespace of some sort (whether that be via a feature provided by the language, or through prefixing the names that you use that make an impact on the global namespace). I’ve shown a few of the practices that I have adopted for myself, although I should emphasize that it doesn’t matter what pro-gramming convention that you adopt, but rather that you adopt one. The premise of a programming convention is that you have a set of rules that you can follow to format your code so that it is neat, orga-nized, and easy to follow. My conventions might not be what you want, but there are many others to choose from.
You should avoid detecting the user’s browser, especially when it may lead to one group or another being locked out from functionality.
Your code should take advantage of client-side caching and the increase in performance it provides.
In my opinion, it is better to write code in neatly organized modules and combine those into a larger script later using server-side programming.
Finally, it is also important that you adopt standards for the presentation and maintenance of client-side markup and CSS. Choose either XHTML or HTML, since both are accepted standards. I personally use XHTML, although XHTML may be too strict for your taste. Use the W3C’s validation services to discover errors in your markup or your CSS, as sometimes errors in CSS or markup can cause errors in your JavaScript.