part 3: data collection overview · collection in connection with the steps online data management...
TRANSCRIPT

Part 3: Data Collection
Overview
In this Part This Part covers the following topics
Topic See Page
Section 1: Introduction to eSTEPS and Preparation of the
Data Collection Environment
3-1-1
Section 2: Data Collectors Training and Pilot Test 3-2-1
Section 3: Data Collection Process 3-3-1
Section 4: Collecting Step 1 data: Interviews 3-4-1
Section 5: Collecting Step 2 data: Physical
Measurements
3-5-1
Section 6: Collecting Step 3 data: Biochemical
Measurements
3-6-1


Part 3: Data Collection 3-1-1
Section 1: Introduction to eSTEPS and Preparation of the Data Collection Environment WHO STEPS Surveillance
Last Updated: 26 January 2017
Section 1: Introduction to eSTEPS and Preparation of the
Data Collection Environment
Overview
Introduction This section covers all the tasks that need to be conducted to setup and
prepare for the electronic collection of the STEPS survey data.
Intended
audience This section is designed for use by people who have been assigned the
following roles:
• Field team supervisors
• Data manager and analysis team
• STEPS Survey Coordinator.
Timeframe The set up of the data collection environment can be done within a few days.
Task Name Duration Month 2
Adapting electronic STEPS Instrument 3 days
Preparing Android devices and loading
electronic STEPS Instrument
2 days
Testing Android devices 1 day
In this section This section covers the following topics:
Topic See Page
Introduction 3-1-2
Creating the electronic STEPS Instrument 3-1-3
Preparing the online eSTEPS platform 3-1-7
Preparing the Android devices 3-1-10

Part 3: Data Collection 3-1-2
Section 1: Introduction to eSTEPS and Preparation of the Data Collection Environment WHO STEPS Surveillance
Last Updated: 26 January 2017
Introduction
Background eSTEPS refers to the use of handheld electronic devices for STEPS data
collection in connection with the STEPS online data management platform.
The WHO STEPS team previously developed a Windows Mobile application
for data collection, which has been used by dozens of countries since 2008.
As this operating system has since been retired by Microsoft, in 2015 the
WHO STEPS team developed an Android application for data collection.
The STEPS Android application provides the primary interface for STEPS
data collection, though it works in conjunction with two pre-existing data
collection tools:
• ODK Collect: This is a widely used, free, open-source application for
electronic data collection. It is installed on the Android device and
works seamlessly with the STEPS app.
• Online eSTEPS platform: A web-based, data management site that
provides basic data management tools, allowing for remote data
submission (via mobile data or wi-fi connection) while field work is
ongoing.
Rationale of
eSTEPS eSTEPS provides the following benefits:
• Immediate error-checking during data collection (e.g. inadvertently skipped
questions or out-of-range responses);
• Significantly reduced data entry errors;
• Marked reduction of materials to be carried by data collectors (one tablet vs.
hundreds of paper instruments);
• No additional data entry needed.
With the change to the Android application, eSTEPS also allows for remote
data submission using wi-fi or mobile data connections. This not only
ensures greater data security but allows for closer monitoring of field work by
the local STEPS Coordinating Committee.
While eSTEPS does require the use of several Android devices (one per data
collector), this additional cost is partially offset by the savings in data entry
expenses. If resources do not exist to purchase Android devices, consider
pooling resources with other teams in your organization. The Android
devices can be used for other surveys and therefore they can be made
available in your organization as a shared resource. Alternatively, contact the
WHO Country or Regional Office to enquire about the possibility of
borrowing WHO-owned Android devices for the survey.
eSTEPS
support WHO provides support for eSTEPS and can provide assistance and training as
needed.
Part 3: Data Collection 3-1-3
Section 1: Introduction to eSTEPS and Preparation of the Data Collection Environment WHO STEPS Surveillance
Last Updated: 26 January 2017
Creating the electronic STEPS Instrument
Introduction In order to use the STEPS Android app, the country-specific STEPS
Instrument must be translated into the XLSForm format. This is a widely-
used survey form standard that allows you to create complex forms in
multiple languages using Microsoft Excel. An XLSForm version of the
generic STEPS Instrument has been created by the WHO STEPS team. Thus,
the generation of the country-specific STEPS Instrument should only entail
modifications to the generic instrument file.
XLSForm
overview XLSForm files are Excel worksheets comprised of the following three
worksheets:
Work-
sheet
Description
Survey Contains the majority of the instrument content and its overall
structure.
Choices Contains the response options for all multiple choice questions in
the instrument.
Settings Allows for the setting of advanced options for the instrument.
This is an optional worksheet but is used in STEPS Instruments
to clearly specify the Form ID (see next topic in this Section). If
not explicitly named here, the name of the Excel file is used as
Form ID.
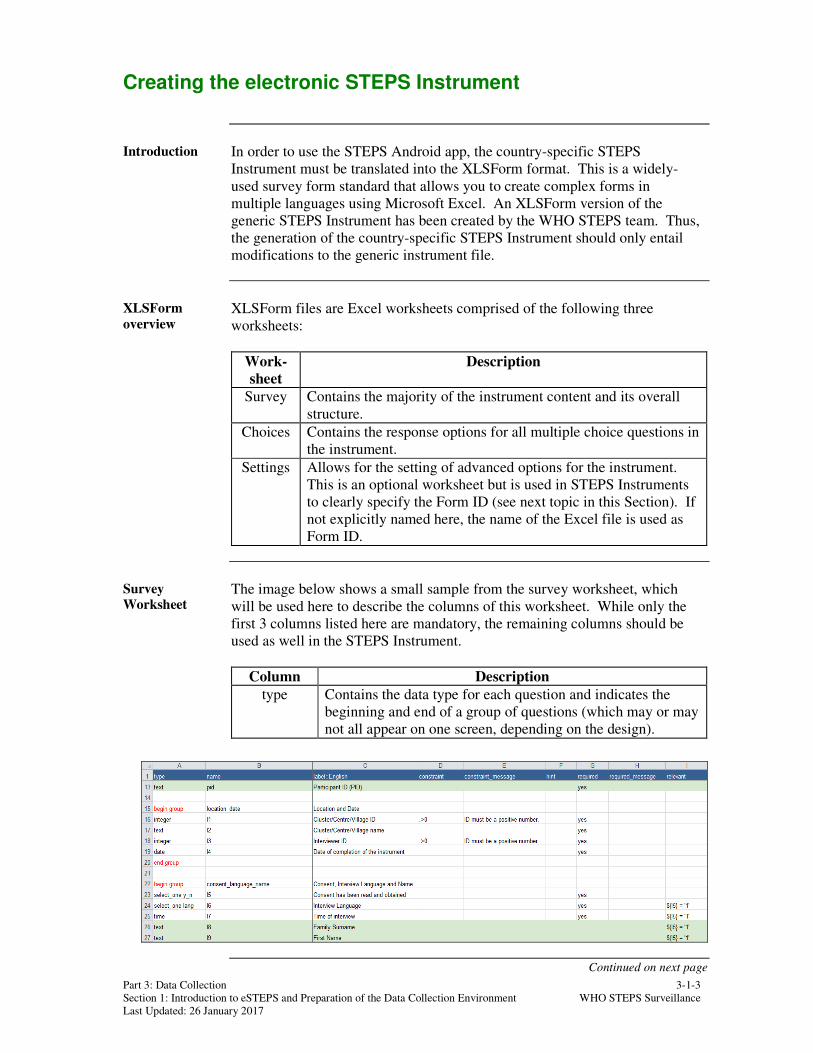
Survey
Worksheet The image below shows a small sample from the survey worksheet, which
will be used here to describe the columns of this worksheet. While only the
first 3 columns listed here are mandatory, the remaining columns should be
used as well in the STEPS Instrument.
Column Description
type Contains the data type for each question and indicates the
beginning and end of a group of questions (which may or may
not all appear on one screen, depending on the design).
Continued on next page

Part 3: Data Collection 3-1-4
Section 1: Introduction to eSTEPS and Preparation of the Data Collection Environment WHO STEPS Surveillance
Last Updated: 26 January 2017
Creating the electronic STEPS Instrument, Continued
Survey
Worksheet
(cont.)
Column Description
name Contains the question ID for each question (e.g. I1, I2) as well
as the short-hand names of any question groups. The question
IDs will serve as variable labels in the final dataset. Note that
question groups are not visible in the final dataset.
label Contains the question text. The text entered here is what the
interviewer will see on the question screen on the Android
device. If multiple languages in the questionnaire are desired,
label columns that are named accordingly can be used, e.g.
label::English, label::Spanish, label::French. Also contains
the long names of any question groups.
constraint Contains the limitations for the questions, such as minimum
or maximum values or error code values.
constraint_
message
Contains the error message that will appear on the screen
when data is entered that does not comply with the constraint
logic.
hint Contains any additional explanatory text to accompany the
question text. The text entered here will appear below the
question text and will be italicized.
required Enter “yes” in this column if the question is required. Leave
blank if the question is not required.
required_
message
For required questions: contains the error message that will
appear on the screen if the data collector tries to proceed to
the next question without entering any data.
relevant Contains the skip logic indicating under what conditions the
question should be shown. For example, questions to be
asked only of females would have a relevant check of
${C1}=’2’ (i.e. sex is female).
appearance
Forces grouped questions to appear on the same screen. Enter
the text "field-list” on the row containing “Begin group” in
the type column to make all questions in the group appear on
the same screen.
Choices
worksheet The image below shows a segment from an example choices worksheet.
Continued on next page

Part 3: Data Collection 3-1-5
Section 1: Introduction to eSTEPS and Preparation of the Data Collection Environment WHO STEPS Surveillance
Last Updated: 26 January 2017
Creating the electronic STEPS Instrument, Continued
Choices
worksheet
(cont.)
As shown in the image, the worksheet contains a list of response options,
grouped together by question. These response options can be used as many
times as needed throughout the instrument. For example the Yes/No response
options can be used for all Yes/No questions throughout the instrument. A
description of each column is provided in the table below.
Column Description
list name Contains the name of the list of response options.
name Contains the numeric value for each response option in the
list.
label Contains the text that will appear for each response options
(numeric values in the name column do not appear on the
question screen).
If the country-specific instrument has multiple languages, be
sure to include a label column for each language, as shown in
the example image.
Question types The table below describes the question types used in the standard STEPS
Instrument. This is not an exhaustive list of all possible question types in
XLSForms. Refer to the website xlsform.org for a complete list of all
question types.
Type Description
integer whole number (non-decimal) input
decimal decimal input
text text input
select_one [option name] multiple choice (drop-down list) allowing
only one option can be picked; “[option
name]” must be replaced with the name of
the response option list from the choices
worksheet
note text screen or image
date date input (can be viewed as calendar)
time time input
barcode scan a barcode or QR code
Images It is possible to insert country-specific show cards directly into the instrument
file so that they will appear on the screen of the device.
To insert an image into the country-specific instrument add a new line to the
XLSForm where the image should appear (e.g. insert the tobacco show card
at the beginning of the tobacco module). Complete the line as described in
the following table.
Continued on next page

Part 3: Data Collection 3-1-6
Section 1: Introduction to eSTEPS and Preparation of the Data Collection Environment WHO STEPS Surveillance
Last Updated: 26 January 2017
Creating the electronic STEPS Instrument, Continued
Images (cont.) Column Content
type note
name Shorthand name of the show card. This does not appear
anywhere in the dataset or on the screen, so any shorthand
can be used.
label Any text that should appear above the show card on the
same screen. This can be explanatory text for the data
collector to read out loud or just a title. Be sure to complete
the label fields of any other languages included in the
country-specific instrument.
media::image The precise file name of the show card
(e.g. work_vigorous_showcard.png). If there are multiple
languages in the country-specific instrument, this
information needs to be repeated in a media::image column
for each language (e.g. media::image::English,
media::image::French).
Any images listed in the country-specific instrument must be added to the
online eSTEPS platform and downloaded to each data collection device with
the data collection form.
Testing It is recommended to thoroughly test the country-specific instrument prior to
data collection. In order to install it on a device, follow the instructions in the
next topic of this section.
When testing the country-specific instrument, go through the instrument
several times, entering different response options each time. Be sure to check
not only that all questions are appearing correctly, but also check that all skip
logic is functioning correctly and that invalid data cannot be entered in any
field. A thorough test of the country-specific instrument should take at least
an hour, if not more, depending on its complexity.
Support Please contact the WHO STEPS team for further assistance in generating the
country-specific instrument.
For those wishing to learn more on their own, the website xlsform.org is an
excellent reference detailing the structure of XLSForm files.

Part 3: Data Collection 3-1-7
Section 1: Introduction to eSTEPS and Preparation of the Data Collection Environment WHO STEPS Surveillance
Last Updated: 26 January 2017
Preparing the online eSTEPS platform
Introduction A project must be created on the online eSTEPS platform for the survey,
which will serve as the web-interface for the management of the survey.
Online eSTEPS
project creation Please contact the WHO STEPS team for assistance in creating a project for
your STEPS survey on the online eSTEPS platform. The site address (URL)
will then be provided.
Once the project has been created, a user name and password to access the
project on the eSTEPS platform will be set up. The country-specific
instrument as well as any related images (including show cards) can be
uploaded to the eSTEPS project and, during data collection, submissions from
data collectors in the field can be monitored.
A username and password for the online household database will also be
provided, where the household listing information for the survey can be
accessed.
Adding forms
to the eSTEPS
project
Once logged into the online eSTEPS platform, your STEPS survey will be
listed as a project. Click on the title of the project to see the instruments
(referred to as “forms”) associated with the project.
It is possible to have multiple instruments for one survey if Step 3 data
collection will be done separately from Step 1 and 2. In this case, one
instrument will contain only Step 1 and 2, another one will contain Step 3,
and potentially a third one will contain information from urine analyses.
To add a new form to a project, click on “Add form”, as indicated in the
image below. Then follow the instructions in the pop-up window to upload
the XLSForm file to the site. The form may be set as “Active” even if it is
still being tested.
Continued on next page

Part 3: Data Collection 3-1-8
Section 1: Introduction to eSTEPS and Preparation of the Data Collection Environment WHO STEPS Surveillance
Last Updated: 26 January 2017
Preparing the online eSTEPS platform, Continued
Adding forms
to the eSTEPS
project (cont.)
If there are any errors in the XLSForm file, you will be informed during the
upload process and the upload will not complete. Please contact the WHO
STEPS team for help in correcting any errors.
Modifying
forms in the
eSTEPS project
Once a form has been uploaded to the site, you may wish to modify it during
the testing process to correct any issues that have been discovered while
testing. Any modifications must be done in the XLSForm Excel file and then
this file must be re-uploaded to the eSTEPS project.
To update a form that has already been uploaded to a project, click on the
small arrow to the right of the screen and click on “Replace Form” from the
drop-down menu that appears (see screenshot below).
Confirm that you definitely want to replace the form and follow the
instructions in the pop-up window to re-upload the XLSForm file.
Important: Forms should not be modified once data collection has begun.
Continued on next page

Part 3: Data Collection 3-1-9
Section 1: Introduction to eSTEPS and Preparation of the Data Collection Environment WHO STEPS Surveillance
Last Updated: 26 January 2017
Preparing the online eSTEPS platform, Continued
Adding images
(show cards) If show cards are included in the XLSForm file, these images must be
uploaded to the eSTEPS project along with the XLSForm file. Once the form
has been uploaded, click on the title of the form, then click on “Settings”
towards the top of the screen. On the Settings screen, click on “Form Media
Files” on the left-hand side of the screen (see screenshot below).
In the Form Media Files page, all images (show cards) will be listed, if any,
associated with the XLSForm file. Click on “Select file to upload” in the
upper right-hand corner of the screen to upload additional files. Both .jpeg
and .png images are allowed.

Part 3: Data Collection 3-1-10
Section 1: Introduction to eSTEPS and Preparation of the Data Collection Environment WHO STEPS Surveillance
Last Updated: 26 January 2017
Preparing the Android devices
Introduction In order to prepare the Android devices for data collection, the STEPS app
and ODK collect app must be installed on each device.
Setting up the
STEPS app The STEPS app is available from the Google Play store, or from the WHO
STEPS team upon request. After installing the STEPS app on an Android
device, you will first see a welcome screen and then be asked to pick which
app type you wish to use: Household or Participant. These two app types are
described in the following table.
App type Description
Household Intended for household-based data collection. The data
collector will enter all eligible household members and
then use the device to select one person from this list to
participate in the survey.
Participant Intended for Step 3 data collection where the participant
has been previously selected, or for surveys where
individuals have been directly sampled from the sampling
frame. The data collector will only need to enter the
individual’s Participant ID number, their name, age and
sex and will then be able to proceed directly to the
instrument.
Even though each device will most likely be used exclusively for one type of
data collection, it is still recommended to complete the settings for both app
types on all devices in the event any device is used for a different type of data
collection than originally planned.
The table below describes each of the settings and what to enter for each.
Setting Description / What to Enter
Survey ID Unique ID for the entire survey (e.g. Switzerland2015) that
is used to identify the household listing data for the survey.
What to enter: The unique Survey ID for the survey,
typically the country name + year.
Device ID Unique ID number for the Android device. This number is
used to generate Household IDs and PIDs, so it is critical
that every device used for a survey has a unique number.
What to enter: The unique Device ID for this particular
device, typically devices are numbered 1 through n for
each survey.
Continued on next page

Part 3: Data Collection 3-1-11
Section 1: Introduction to eSTEPS and Preparation of the Data Collection Environment WHO STEPS Surveillance
Last Updated: 26 January 2017
Preparing the Android devices, Continued
Setting up the
STEPS app
(cont.)
Setting Description / What to Enter
Starting
Household ID
The starting number used to generate Household IDs on
the device.
What to enter: By default, this is automatically set to 1.
Normally this should not be changed.
Form ID The name of XLSForm file to open for this app type. The
FormID of your XLSForm file can be found on the
Settings tab of the Excel file.
What to enter: The Form ID for the instrument that
should be opened for this app type. Note that it is possible
to have a different instrument associated with each app
type, i.e. a Step 1 and 2 instrument can be opened when
using the Household app type and a Step 3 instrument can
be opened when using the Participant app type.
Min and max
age
The minimum and maximum ages for participants in the
survey.
What to enter: By default these are set to 18 and 69,
modify to the age range of a survey if it has a different age
range.
URL to export This provides the address of the server where the
household listing data will be sent when exported from the
device.
What to enter: Do not edit. The URL of the server is
automatically entered and must not be modified.
URL to import This provides the address of the server from which
household listing data will be received. This allows for a
new device to “inherit” the household listing from another
device, in the event a device fails.
What to enter: Do not edit. The URL of the server is
automatically entered and must not be modified.
Important: Once the settings have been entered, be sure to tap “Done” to
save the changes to the settings. If you tap on the “X” in the upper left-hand
corner, the changes to the settings will not be saved. You can return to the
Settings at any time from the STEPS app home screen from the Menu in the
upper right-hand corner.
Continued on next page

Part 3: Data Collection 3-1-12
Section 1: Introduction to eSTEPS and Preparation of the Data Collection Environment WHO STEPS Surveillance
Last Updated: 26 January 2017
Preparing the Android devices, Continued
Setting up the
ODK Collect
app
After installing the ODK Collect app on an Android device, you will need to
modify the settings of the app to ensure the instrument is loaded correctly and
to hide a variety of tools to prevent data collectors from modifying them.
Follow the instructions in the table below to set up ODK Collect. After
completing these steps, you may exit from the ODK Collect app.
Step Description
1 Open the General Settings by tapping on the menu icon (3
squares) on the ODK Collect home screen.
2 Tap on Configure platform settings in the General Settings
screen.
3 Enter the URL for the eSTEPS platform (please contact the
WHO STEPS team) and the username and password for your
eSTEPS account.
4 Return to the ODK Collect home screen by using the device’s
back button.
5 Tap on Get Blank Form.
6 Confirm the login information in the pop-up window. Once
the device connects to the ODK server, all instruments
associated with your Ona account will be visible. Tap on
each instrument to select it and then tap “Get Selected”. Once
the instrument(s) have downloaded, you will automatically
return to the ODK Collect home screen.
Important: Your device must have a mobile data or wi-fi
connection activated in order to download the instrument(s).
If wi-fi is not available, please contact the WHO STEPS team
for an alternative method to put the instrument(s) on a device.
7 Return to the General Settings and modify the Navigation
option so that both forward/backward buttons are used as well
as swipes. (This is a recommended but optional step.)
8 Return to the ODK Collect home screen and go to the Admin
Settings (accessed from the same menu as the General
Settings).
9 In the Admin Settings, uncheck all boxes EXCEPT:
• Change language (if the country-specific instrument
exists in more than one language)
• Go To Prompt
• Save Form
• Mark form as finalized
10 At the top of the Admin Settings, tap on Admin Password to
prevent any users from making changes to the Settings. (This
is a recommended but optional step.)
11 Save the changes to the Admin Settings by tapping on the
menu in the upper right-hand corner.
Continued on next page

Part 3: Data Collection 3-1-13
Section 1: Introduction to eSTEPS and Preparation of the Data Collection Environment WHO STEPS Surveillance
Last Updated: 26 January 2017
Preparing the Android devices, Continued
Additional
setup: security It is strongly advised to install an additional app on the devices to block all
apps other than the STEPS and ODK Collect apps. Please contact the WHO
STEPS team for current recommendations.
Additional
setup: language
settings
Both the STEPS and ODK Collect apps are available in English, French,
Spanish and Russian. The language in which the app appears depends on the
language setting of the device. Thus, in order to change the language of the
app, you must change the language of the device. Typically, this can be
found under Settings>Controls>Language and Input, but the location may
vary by device and Android version.
If the instrument is in multiple languages, which language is viewed is not
linked to the language setting of the device. Changing the language version
of the instrument can only be done once the questionnaire is open by going to
the Menu (3 squares icon) visible on the question screens. It is recommended
to have the data collectors modify the instrument setting during training (if
applicable) as this is a setting they must know how to modify on their own.

Part 3: Data Collection 3-1-14
Section 1: Introduction to eSTEPS and Preparation of the Data Collection Environment WHO STEPS Surveillance
Last Updated: 26 January 2017

Part 3: Data Collection 3-2-1
Section 2: Data Collectors Training and Pilot Test WHO STEPS Surveillance
Last Updated: 26 January 2017
Section 2: Data Collectors Training and Pilot Test
Overview
Introduction This section provides guidance on how to plan, prepare for and deliver the
training to the data collection team.
Intended
audience This section is designed for use by people that fulfil the following roles:
• STEPS Survey Coordinator
• STEPS Coordinating Committee
• Data Collection Team
• Statistical Adviser
• IT Specialist/Data Manager and Analysis Team.
Purpose The purpose of the training is to:
• explain the rationale of the STEPS survey
• ensure a uniform application of the STEPS survey methodology and
materials
• prepare data collectors to undertake the fieldwork for the survey
• motivate interviewers and survey staff
• ensure good overall quality of data.
In this section This section covers the following topics:
Topic See Page
Training Workshop 3-2-2
Training Preparation 3-2-3
Training Lesson Plan 3-2-5
Training Delivery Tips 3-2-9
Pilot Testing 3-2-13
Part 3: Data Collection 3-2-2
Section 2: Data Collectors Training and Pilot Test WHO STEPS Surveillance
Last Updated: 26 January 2017
Training Workshop
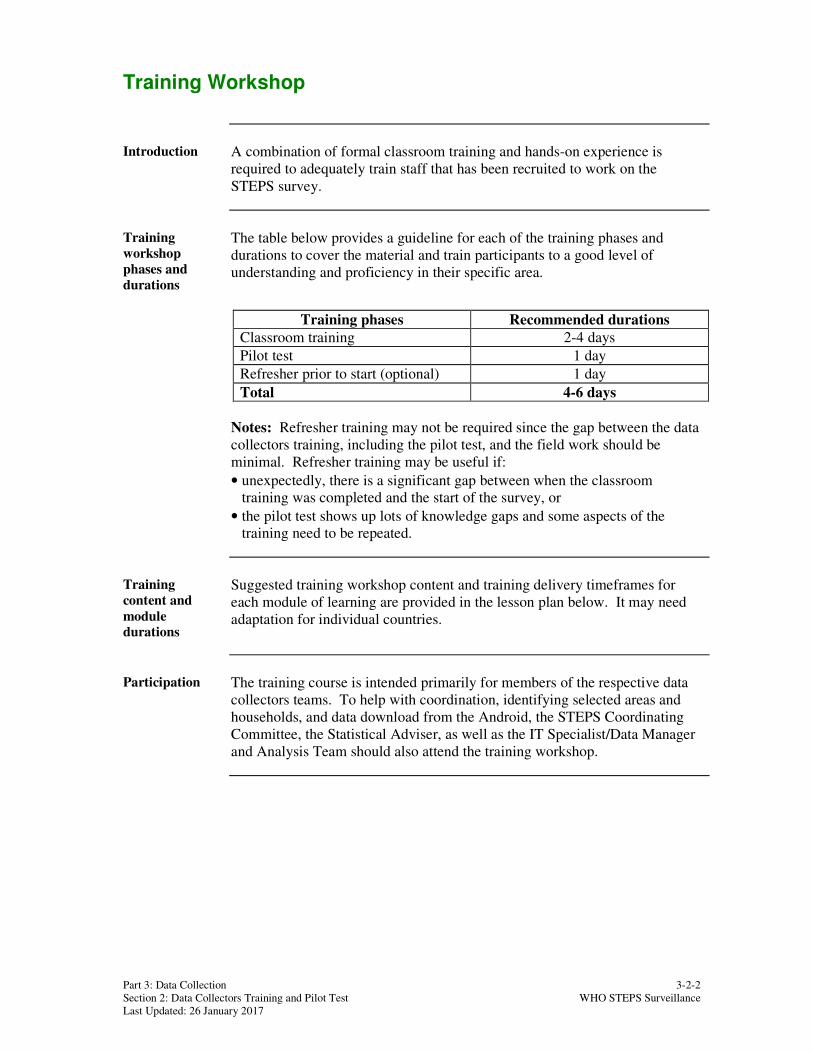
Introduction A combination of formal classroom training and hands-on experience is
required to adequately train staff that has been recruited to work on the
STEPS survey.
Training
workshop
phases and
durations
The table below provides a guideline for each of the training phases and
durations to cover the material and train participants to a good level of
understanding and proficiency in their specific area.
Training phases Recommended durations
Classroom training 2-4 days
Pilot test 1 day
Refresher prior to start (optional) 1 day
Total 4-6 days
Notes: Refresher training may not be required since the gap between the data
collectors training, including the pilot test, and the field work should be
minimal. Refresher training may be useful if:
• unexpectedly, there is a significant gap between when the classroom
training was completed and the start of the survey, or
• the pilot test shows up lots of knowledge gaps and some aspects of the
training need to be repeated.
Training
content and
module
durations
Suggested training workshop content and training delivery timeframes for
each module of learning are provided in the lesson plan below. It may need
adaptation for individual countries.
Participation The training course is intended primarily for members of the respective data
collectors teams. To help with coordination, identifying selected areas and
households, and data download from the Android, the STEPS Coordinating
Committee, the Statistical Adviser, as well as the IT Specialist/Data Manager
and Analysis Team should also attend the training workshop.
Part 3: Data Collection 3-2-3
Section 2: Data Collectors Training and Pilot Test WHO STEPS Surveillance
Last Updated: 26 January 2017
Training Preparation
Introduction Training preparation involves the following tasks:
Task Description
1 Finding and setting up a suitable training room
2 Scheduling training sessions
3 Coordinating training tasks and events
4 Preparing, printing and distributing training materials
5 Informing participants about workshop content, date, time and
location details and prerequisite requirements
Note: Each of these tasks is described further below.
Training
location
requirements
A training room will need to be located and arrangements made for use over a
one week period to train all recruited relevant personnel.
The room should be able to accommodate the number of people being trained,
the number of trainers or facilitators, plus several extras, at a time.
Requirements for the room include:
• tables
• chairs
• blackboard, white board or flip chart
• chalk, marker pens, or crayons
• projector
• sufficient room to practice taking physical and biochemical measurements
• props to help with scenarios
• wi-fi or LAN
• several laptops.
Scheduling
training
sessions
Training sessions for data collection will need to be scheduled in advance to
ensure the workshop is well attended and training is provided to all team
members before the survey begins.
Each participant should be provided with a letter confirming the workshop
agenda, including date and place of training.
Continued on next page

Part 3: Data Collection 3-2-4
Section 2: Data Collectors Training and Pilot Test WHO STEPS Surveillance
Last Updated: 26 January 2017
Training Preparation, Continued
Training
coordination The following coordination tasks will need to be planned for and arranged:
• select a pilot community, ideally not too far from the training workshop
site;
• order and arrange tea/coffee and lunches for classroom training sessions;
• book accommodation and arrange transport for the participants (if
necessary);
• develop and set up exercises to be used during classroom training;
• determine, develop and compile training and reference materials that will
need to be used by workshop participants;
• obtain maps or list of households.
Preparing
materials Prior to training sessions, one set per participant of the relevant materials
from the STEPS Manual will need to be printed out. The table below can be
used as a guide to the most relevant materials.
Topics Part, Section
Introduction Part 1, Section 1
Introduction to eSTEPS and Preparation of
the Data Collection Environment
Part 3, Section 1
Data Collection Process Part 3, Section 3
Collecting Step 1 data: Interviews Part 3, Section 4
Collecting Step 2 data: Physical
Measurements
Part 3, Section 5
Collecting Step 3 data: Biochemical
Measurements
Part 3, Section 6
STEPS Instrument Part 5, Section 1
Question-by-Question Guide Part 5, Section 2
Show Cards Part 5, Section 3
Forms for STEPS Field Work Part 6, Section 2
Participant
preparation Prior to attending a training session, all training participants will need to study the
STEPS Instrument and appropriate sections in the STEPS Manual.
Generic
training
presentations
A set of generic training presentations is available from the WHO STEPS team
for the data collectors training. These presentations cover each of the sessions
included in the Training Lesson Plan below, but may need some adaptation or
translation to the local context.

Part 3: Data Collection 3-2-5
Section 2: Data Collectors Training and Pilot Test WHO STEPS Surveillance
Last Updated: 26 January 2017
Training Lesson Plan
Introduction The following lesson plan is a guide for people responsible for delivering the data collectors training. In most cases, this would be
the STEPS Survey Coordinator.
Training topics Duration Section
reference
Outcomes or competencies Exercises
Day 1
Introductions, objectives of the workshop,
agenda
9.00-9.30 3-2 Establish a new team, set expectations
and course agenda.
Overview and Rationale of the WHO
STEPwise approach to NCD risk factor
surveillance
9.30-10.00 1-1 Understand NCDs and their key risk
factors, importance of surveillance
framework, get an overview of what
STEPS is and how it works.
Introduction to the STEPS survey in [...] 10.00-11.00 Presentation by the STEPS
Coordinating Committee on how the
STEPS approach was adapted to the
local context. Get a clear idea on scope
and methods of the country-specific
STEPS survey.
Interview tracking, Reaching and
Approaching selected households
11.00-12.00 3-3
6-2
Understand the importance of interview
tracking (e.g., tracking of non-
response) and know how to use the
Interview Tracking Form. Understand
how the information from the Interview
Tracking Form will be used in data
analysis.
Competently follow procedures for
reaching and approaching households.
Talk through examples on
how to fill in the Interview
Tracking Form.
Scenarios, moving from
simple to more difficult.
Lunch

Part 3: Data Collection 3-2-6
Section 2: Data Collectors Training and Pilot Test WHO STEPS Surveillance
Last Updated: 26 January 2017
Training topics Duration Section
reference
Outcomes or competencies Exercises
Introduction to eSTEPS 13.00-13.30 3-1 Understand the basics of electronic
data collection. Get familiar with the
basic components of the Android
devices for data collection.
Basic practice with the
Android devices for data
collection.
Selection of an individual within a
selected household
13.30-15.30 3-3 Understand how an individual within a
selected household is selected, know
how to use the Android devices for
data collection to do this.
Practice selection of an
individual within selected
households using the Android
devices for data collection.
Informing participants and obtaining
consent
15.30-16.30 3-3
6-2
Know why and how to inform
participants in detail. Understand
ethical considerations and their
relevance for interviewing. Follow
guidelines to obtain consent.
Practice how to inform
participants and obtain
consent. Scenarios with e.g.
reluctant, objecting, unwell,
or over-busy respondents.
Interview skills 16.30-17.00 3-4 Understand and demonstrate good
interview practices.
Use scenarios to demonstrate
how responses can be swayed
by different interview
techniques.
Day 2
Review of day 1, warm up 9.00-9.30 Recognize previous day’s learning.
Identify and handle any queries.
STEPS Instrument, Question-by-Question
Guide and show cards
9.30-12.00 5-1
5-2
5-3
Understand the Instrument, the
different risk factors and what they aim
to measure, response options (including
don't know and refuse), skip
instructions and show cards.
Understand how to use the Question-
by-Question Guide and the show cards.
Talk through the STEPS
Instrument and Question-by-
Question Guide section by
section.
Lunch
Recording and checking information on
the Android devices for data collection
13.00-13.30 3-1 Understand the functions of the
Android devices for data collection.

Part 3: Data Collection 3-2-7
Section 2: Data Collectors Training and Pilot Test WHO STEPS Surveillance
Last Updated: 26 January 2017
Training topics Duration Section
reference
Outcomes or competencies Exercises
Collecting demographic and behavioural
risk factor information (Step 1)
13.30-15.30 3-4 Get familiar with using the Android
devices for data collection for
interviewing. Understand the
questions, know how to clarify.
Record responses, deal with different
people.
Practice interviews.
Taking and recording physical measures
(Step 2)
15.30-17.00 3-5 Assemble equipment and supplies for
Step 2 measurements. Measure blood
pressure, height, weight, waist and hip
circumference. Record results.
Learn and practice on team
members, all participants'
measure independently then
compare results.
Day 3
Review of day 2, warm up 9.00-9.30 Recognize previous day’s learning.
Identify and handle any queries.
Taking and recording physical measures
(Step 2), cont.
9.30 - 10.30 3-5 Assemble equipment and supplies for
Step 2 measurements. Measure blood
pressure, height, weight, waist and hip
circumference. Record results.
Learn and practice on team
members, all participants'
measure independently then
compare results.
Completing the Participant Feedback
Form (Step 2)
10.30 - 11.00 6-2 Understand how to record information
on the Participant Feedback Form.
Know how to use the BMI
Classification Chart.
Practice recording
information on the
Participant Feedback Form
and using the BMI
Classification Chart.
Referrals and procedures for biochemical
measures (Step 3)
11.00-12.00 3-6
6-2
Know how to make appointments for
those selected for Step 3, know what
interviewees need to know for Step 3,
know how to use forms related to Step
3.
Explain referrals and
procedures related to
biochemical measures.
Lunch
Taking and recording biochemical
measures (Step 3)
13.00-15.00 3-6 Assemble equipment and supplies for
Step 3 measurements. Measure blood
sugar and lipids. Record results.
Learn and practice on team
members.

Part 3: Data Collection 3-2-8
Section 2: Data Collectors Training and Pilot Test WHO STEPS Surveillance
Last Updated: 26 January 2017
Training topics Duration Section
reference
Outcomes or competencies Exercises
Completing the Participant Feedback
Form (Step 3)
15.00-15.30 6-2 Understand how to record information
on the Participant Feedback Form.
Practice recording
information on the
Participant Feedback Form.
Check-list for equipment and supplies,
checking paperwork
15.30- 16.30 3-5
3-6
6-2
Know what documents, equipment and
supplies are needed for field work.
Know how to organize the material.
Explain all equipment,
supplies and documents and
how to organize the material.
Wrap-up and discussion 16.30-17.00 Review of most important issues that
arose during training, discussion.
Wrap-up, clarify all questions
that have not been answered
during the training.
Day 4
Review of day 3, warm up 9.00-9.30 Recognize previous day’s learning.
Identify and handle any queries.
Preparing pilot test 9.30-10.00 3-2 Clarification of final questions before
interviewers do the pilot test.
Pilot test 10.00-16.00 3-2 Major aspects of data collection
thoroughly tested. Identify weaknesses
or failures in current systems and
processes.
Go to a residential area, with
a pre-determined sampling
plan. Participants do a
complete run-through of
whole data collection
process.
Discussion and closure of workshop 16.00-17.00 Reporting of issues and experiences
from the pilot test.

Part3: Training and Practical Guides 3-2-9
Section: 1 Trainer's Guide WHO STEPS Surveillance
Last Updated: 26 January 2017
Training Delivery Tips
Introduction The training delivery tips below may be useful for those that have been
assigned the role of training, but are not in fact trained trainers.
Introductions
and warm up Before the training starts, it is important for team development to introduce
yourself and find out a little about the people in the room. Use the table
below to help with the introductions.
Step Action
1 Introduce yourself and any other co-trainers to the participants.
2 If you don’t already know everyone in the room, or they don’t
know each other, get each participant to briefly introduce
themselves (or a person beside them).
3 Ask participants and adapt according to the class:
• what they understand by 'noncommunicable disease risk factors';
• what they think the biggest NCD health issues are in their
country or area;
• in what ways do those diseases impact on the health and welfare
of the people in their communities.
Note: Write the responses on a board. Acknowledge that there is
not necessarily a 'correct' answer, it varies by time and community.
Encourage discussion so you can gauge the level of understanding
that the staff already have. The staff can begin to learn on what
they and their colleagues will be working.
4 Ask participants if they have any questions or topics they would
really like to have covered in the training.
Note: Write the responses on the board and try and answer them
during the training workshop.
Course agenda
and setting
expectations
Participants will need to know what to expect in terms of training content,
how long it will take and what is expected of them during the workshop. Use
the table below (and lesson plans) to help explain the agenda and set
expectations:
Step Action
1 Explain the aim of the training.
2 Outline what will be covered.
3 Tell them how long the training will take.
4 Explain what is expected of them during training.
Continued on next page

Part3: Training and Practical Guides 3-2-10
Section: 1 Trainer's Guide WHO STEPS Surveillance
Last Updated: 26 January 2017
Training Delivery Tips, Continued
Using material The STEPS Manual has been structured into modular sections that can be
easily extracted and recompiled to provide customised manuals for training.
The manual content has been designed for use as both training material and in
the field reference.
Exercises Exercises should be created that:
• are relevant to the local environment
• support the training material
• work through typical problems and issues that are likely to be encountered
• allow for hands on practice.
Encouraging
participation The workshop is not about how much you as the trainer fill it with content,
but how much the participants take away in new learning and understanding
of skills.
Continually encourage all attendees to participate. Use the table below for
guidance.
Topic Guidance
Comfort zones Acknowledge that participants may be asked to do
things out of their comfort zone (particularly in the
interviewing session where scenarios are an important
part of training).
Criticism Ensure participants are not criticised or demoralised
when offering comments and questions.
Experience Develop or build on participants own experiences and
understandings.
Fears Recognize fears and concerns and offer strategies to
handle them.
Support Offer praise when appropriate and support when
participants demonstrate feelings of inadequacy or
difficulty.
Strengths and
weaknesses
Assure everyone that we all have strengths and
weaknesses and that they have been selected as a team,
with skills that complement those of others.
Team work Encourage teams to work together and communicate
well.
Being self reliant Once the survey starts, there will not always be an
"expert" available to answer questions. Participants
must understand enough to be self reliant and know
when to seek advice or help from others.
Continued on next page

Part3: Training and Practical Guides 3-2-11
Section: 1 Trainer's Guide WHO STEPS Surveillance
Last Updated: 26 January 2017
Training Delivery Tips, Continued
Beginning and
ending sessions It is always helpful to introduce each session with an introduction covering:
• the previous work that builds a foundation for this session
• the content and purpose of the session
• briefly the resources and format to be used.
At the end of the session, summarise:
• what topics and skills have been covered;
• whether that is the end of that topic or a future session will cover further
material;
• acknowledge areas of good progress, but also areas where further work
will be required.
Handling
problems and
participation
issues
Use the guidance in the table below to help with some typical problems
encountered in the training environment.
Problem/ situation Guidance
Late arrivals Recap briefly what has just been covered and
politely make it clear that you want all participants
to be punctual.
Interruptions Remain patient at all times.
Participant does not
seem to follow and
understand.
Show patience and understanding. Repeat the
point/topic in a different way and then ask if the
participant understands better.
A participant is
dominating the
sessions, making it
difficult for others to
participate and learn.
First try commenting during discussions that you’d
like everyone to contribute, even use the phrase
"let’s hear from someone else this time".
If that does not achieve anything, take the staff
member aside during a break and suggest that others
also need to participate. Give a little praise, if
warranted, about their grasp of the topic, but state
that, as the trainer, you need to hear from other
participants, too.
Participant is not
keeping up with the
others, or appears
unable to "engage".
During a break, seek out the staff member to see
whether anything is wrong, or if they are finding
anything particularly difficult. If so, a short "catch-
up" session may help. If the participant is unwell or
troubled it might be best if they leave.
Continued on next page

Part3: Training and Practical Guides 3-2-12
Section: 1 Trainer's Guide WHO STEPS Surveillance
Last Updated: 26 January 2017
Training Delivery Tips, Continued
Celebrating
milestones Within the context of the training workshop, as in the conduct of the survey
itself, recognize milestones to encourage the participants and to help develop
a sense of "team-ship".
Think particularly of those who may be regarded as outsiders in any way –
perhaps they are from out-of-town, are not known to other members of a
group, or are of a different language group or cultural background – who may
be more hesitant to participate.
You may like to have markers of effort, mastery, achievement or other
contribution - use your imagination to select small gifts, snack food treats or
certificates to award to participants.

Part3: Training and Practical Guides 3-2-13
Section: 1 Trainer's Guide WHO STEPS Surveillance
Last Updated: 26 January 2017
Pilot Testing
Introduction A pilot test of the entire data collection process must be conducted among a
limited number of people with a broad range of backgrounds prior to
implementing the actual survey. It involves all aspects of the survey
including:
• approaching selected households
• explanation of the purpose of the visit
• selection of an individual within the household
• interview tracking
• seeking and obtaining informed consent
• making arrangements/appointments for data collection
• site preparation and set-up
• collecting all needed data
• identifying participants who may need follow-up.
When to
conduct pilot
test
Ideally, the pilot test should be conducted as soon as the translated versions of
the country-specific Instrument and all other interview materials are ready.
In practical terms, however, it is recommended that it be conducted after the
recruitment and training of data collection staff so trained interviewers can be
used during the pilot. This will ensure interviewer consistency and test
interviewer skills prior to the main survey.
Test group The test group should include the following:
• at least 2-3 people per trained data collection staff
• both men and women
• cover age range used in STEPS
• more than one ethnic or language group (if applicable)
• people with differing levels of education
• people from a range of socio-economic groups.
Test
environment Where possible conduct the pilot test under realistic field conditions.
Timeframe When planning the pilot test, allow sufficient time for adjustments to be made
prior to starting data collection.
Continued on next page

Part3: Training and Practical Guides 3-2-14
Section: 1 Trainer's Guide WHO STEPS Surveillance
Last Updated: 26 January 2017
Pilot Testing, Continued
Conducting the
pilot test Follow the steps below to conduct the pilot test with each participant.
Task Description ����
1 Approach selected households.
2 Brief household members on purpose of the survey.
3 Select a participant from all eligible members within a
selected household.
4 Record information on the Interview Tracking Form.
5 Inform the selected participant using the Participant
Information Form and obtain written consent.
6 Conduct the interview and record results for Step 1.
7 Take measurements and record results for Step 2.
8 Fill in Participant Feedback Form on results of Step 2
measurements for the participant.
9 Make appointment for Step 3 (if applicable), provide
instructions for urine sampling and inform participant on
fasting.
10 Report any difficulties to supervisor.
Feedback At the end of each interview, ask the participant the following questions and
record their feedback:
• Did any of the questions make you feel uncomfortable?
• Did you understand all the words?
• How clear was the intent of the questions?
• Did you know what was being asked?
• How could we make it clearer?
• How else could we improve this survey?
Evaluation and
refining the
Instrument
On completion of the pilot test:
• compile all participants' comments into a single report;
• where necessary, adapt and refine the country-specific STEPS Instrument -
taking care not to change intended meanings;
• send the country-specific STEPS Instrument to WHO STEPS Team for
comments and quality assurance.

Part 3: Data Collection 3-3-1
Section 3: Data Collection Process WHO STEPS Surveillance
Last Updated: 26 January 2017
Section 3: Data Collection Process
Overview
Introduction This section gives an overview of the data collection process in the field. It
covers supervision of data collection and provides step-by-step instructions
regarding the sequence of interviewer’s tasks during the field work before an
interview with a participant starts.
Intended
audience This section is designed for use by those fulfilling the following roles:
• Field team supervisors
• Data collection staff
• STEPS Survey Coordinator.
Timeframes Data collection takes approximately 10-12 weeks. This depends, however, on
the number of staff available as well as on the logistics in a country.
In this section This section covers the following topics:
Topic See Page
Supervising Data Collection 3-3-2
Sequence of Data Collector’s Tasks 3-3-5
Approaching Selected Households and Participants 3-3-7
Selecting a Participant within a Selected Household 3-3-9
Informing Participants 3-3-10
Obtaining Consent 3-3-12
Completing the Interview Tracking Form 3-3-13

Part 3: Data Collection 3-3-2
Section 3: Data Collection Process WHO STEPS Surveillance
Last Updated: 26 January 2017
Supervising Data Collection
Introduction Members of the data collection team may have different levels of skills,
experience and varying strengths and abilities. To ensure high standards of
data collection, appointing field team supervisors to lead and supervise the
data collection teams is necessary.
Core tasks The core tasks of a field team supervisor are provided in the checklist below.
Role Description
1 Obtaining and preparing household lists and maps for each area, or
other lists to be used as the sampling frame, data collection forms,
devices for data collection, supplies and equipment, and
distributing them to data collectors
2 Coordinating logistics and assigning interviewers to households in
each cluster or primary sampling unit
3 Making travel arrangements for data collectors
4 Informing local authorities about the survey
5 Supervising the interview process and recording daily activities
6 Ensuring data quality
7 Ensuring regular submission of the data to the server
8 Managing human resource performance and issues
9 Sending regular progress reports to STEPS Survey Coordinator
Note: The core tasks are further described below.
Obtain and
manage
household lists
and maps
The field team supervisors will need to obtain household lists and maps of the
selected clusters from the Statistical Adviser or the STEPS Survey
Coordinator, manage them, and provide them to the data collectors during the
field work.
Coordinate
logistics and
assign
interviewers to
households
Create a plan for visits to the enumeration areas to be surveyed, and assign
data collectors to each household:
• schedule the data collection team to complete the survey of one
enumeration area before moving to another;
• assign data collectors to each household within the enumeration area;
• schedule time to revisit households within each enumeration area to finish
interviews;
• keep a record of all interviewers that need transport and schedule the
transport;
• keep track of which enumeration areas and households were visited.
Continued on next page

Part 3: Data Collection 3-3-3
Section 3: Data Collection Process WHO STEPS Surveillance
Last Updated: 26 January 2017
Supervising Data Collection, Continued
Making travel
arrangements
for data
collectors
The field team supervisors are responsible for making travel arrangements for
the data collectors to move within selected enumeration areas from household
to household, and between selected areas.
Contact local
authorities The field team supervisors will need to contact appropriate local authorities to
inform them about the survey and gain their support and cooperation.
Supervise
interview
process and
record daily
activities
Interviewers should use the Interview Tracking Form, available in Part 6,
Section 2, to track household and participant response information on a daily
basis. Collect and review the forms regularly to track process and recording
quality.
To ensure high-quality data collection, the supervisor will need to observe a
certain proportion of the interviews conducted by each interviewer,
particularly at the beginning of the data collection period. The proportion
may vary depending on the interviewers' experience, the timeframe and the
budget involved.
Ensuring data
quality The supervisors should check that data have been recorded properly by the
data collectors in their team, and ensure proper follow up for unavailable
selected participants and unfinished interviews.
Regular data
submission It is strongly recommended that field team supervisors ensure that all data
collectors in their team submit their data electronically at the end of
completion of the each enumeration area or least once a week. A wi-fi
connection is needed to send data electronically. If data collectors have
periodic access to a wi-fi connection during data collection, they can submit
their data electronically whenever they have a connection.
Manage
Human
Resources
Manage and support the data collection team to ensure :
• good quality interviews are conducted and all data are complete;
• interview timeframes are adhered to;
• interviewers are supported if any issues arise in the community or with
individual participants;
• performance issues are dealt with appropriately;
• confidentiality of all STEPS material is respected at all times;
• feedback is provided to data collection staff;
• any leave is appropriately covered.
Continued on next page

Part 3: Data Collection 3-3-4
Section 3: Data Collection Process WHO STEPS Surveillance
Last Updated: 26 January 2017
Supervising Data Collection, Continued
Progress
reports During the data collection stage, field team supervisors will need to provide
regular updates to the STEPS Survey Coordinator. This should include:
• updates on progress against scheduled data collection timeframes
• issues and problems encountered.

Part 3: Data Collection 3-3-5
Section 3: Data Collection Process WHO STEPS Surveillance
Last Updated: 26 January 2017
Sequence of Data Collector’s Tasks
Introduction Data collection starts in the field only when the actual planning of the STEPS
survey has been done, and all data collectors have been trained. Each of the
stages for data collection needs to be undertaken appropriately to ensure
accurate data is being collected.
Interviewers have a key role to play in the STEPS survey. The quality of the
data collected and therefore the available results depends on successful
interviews done correctly.
Interviewer
Tasks during
Data Collection
Process
An overview of the tasks of an interviewer are included in the following
checklist.
Task Description ����
1 Approach selected households.
2 Brief household members on purpose of the survey.
3 Select a participant from all eligible members within a
selected household using the Android Device.
4 Record information on the Interview Tracking Form.
5 Inform the selected participant using the Participant
Information Form and obtain written consent.
6 Conduct the interview and record results for Step 1.
7 Take measurements and record results for Step 2.
8 Fill in Participant Feedback Form on results of Step 2
measurements for the participant.
9 Make appointment for Step 3 (if consent given), provide
instructions for correct collection of urine sample and inform
participant on correct method of fasting.
10 Report any difficulties to supervisor.
Continued on next page

Part 3: Data Collection 3-3-6
Section 3: Data Collection Process WHO STEPS Surveillance
Last Updated: 26 January 2017
Sequence of Data Collector’s Tasks, Continued
What the
interviewer will
need
The forms and resources the interviewer will need for data collection are
listed in the following checklist:
For Step Form ����
1 2 Map or list of households in sample
1 2 Name tag
1 2 Notification of WHO STEPS survey visit
1 2 3 Participant Information Form
1 2 Consent Form 1
3 Consent Form 2
1 2 Interview Tracking Form
1 2 3 Question-by-Question Guide
1 2 Show cards
3 Step 3 Appointment Card (with map if necessary)
3 Instructions for Spot Urine Collection
3 Fasting instructions
2 Participant Feedback Form (Step 2)
3 Participant Feedback Form (Step 3)
3 Step 3 Registration Form

Part 3: Data Collection 3-3-7
Section 3: Data Collection Process WHO STEPS Surveillance
Last Updated: 26 January 2017
Approaching Selected Households and Participants
Introduction For Step 1 and Step 2 of the Instrument, the interviewers will need to
physically visit individual households to conduct the survey.
Contact process See the table below for an overview of the contact process.
Stage Description
1 Obtain household lists with associated addresses (and map if
necessary) from your supervisor.
2 Physically approach the household.
3
If … Then …
Nobody is home Leave a Notification Card and record on
the Interview Tracking Form.
Somebody is home Introduce yourself and exchange
greetings.
4 Explain the reason for your visit and purpose of the STEPS survey.
5 Record each eligible person living in the household between the
ages of 18-69 on the Android device for data collection.
6 Select one household participant using the electronic device for
data collection.
Note: Each of these stages is described in more detail below.
Procedure of
approaching
the household
Contact attempts must be made by actually making yourself noticeable to the
household; simply walking by and thinking that no one is at home cannot be
counted as an attempted contact.
Use the following table to help with different situations when you approach
the household.
If… Then…
Someone is at home Speak to the first adult you encounter in
the household. Verify that they live in the
household and then explain the purpose of
the visit.
Nobody answers Look around to see if someone is nearby.
Nobody is at home Leave a notification of WHO STEPS
survey visit and record details in the
Interview Tracking Form (see below how
to complete this form).
Household members are not
available at the time of the first
visit.
Make at least 2 different visits to obtain an
interview. Choose times that are different
– early morning or late afternoon.
Continued on next page

Part 3: Data Collection 3-3-8
Section 3: Data Collection Process WHO STEPS Surveillance
Last Updated: 26 January 2017
Approaching Selected Households and Participants, Continued
Recording
household
details
Record if anyone is home and the date and time of the visit on the Interview
Tracking Form. See "Completing the Interview Tracking Form" on page 3-3-
13 below.
Introducing
yourself Make sure your name tag is attached and clearly visible.
Introduce yourself and explain the reason for your visit as follows:
My name is _______ and this is________. We are employees of the
<Ministry of Health> and we are working in a team to conduct a survey on
health issues. We are hoping that the people in this household will
participate in this survey. We would like to find out the number of people
usually residing in this house between the ages of 18-69. Can you please
give me the first name of those who usually live in this house between the
ages 18-69 (starting, for example, with the oldest male)?
Explaining
purpose of the
survey
Explain that the purpose of this study is to determine the extent of
noncommunicable disease (NCD) (i.e. long-standing diseases not caused by
infections) risk factors in your country. These risk factors include:
• tobacco use
• alcohol consumption
• low intake of fruit and vegetable
• diet high in salt
• insufficient physical activity
• obesity
• raised blood pressure
• raised fasting blood glucose
• high levels of fat in the blood.
Explain that once the survey data has been collected and analysed, this will
help your health services plan and determine public health priorities to:
• prevent NCD epidemics before they occur
• monitor and evaluate population-wide NCD programmes.

Part 3: Data Collection 3-3-9
Section 3: Data Collection Process WHO STEPS Surveillance
Last Updated: 26 January 2017
Selecting a Participant within a Selected Household
Introduction From each selected household, one participant needs to be randomly chosen.
The STEPS app on the Android device will assist you in performing this
selection.
Create a new
household Prior to selecting a participant within a household, an entry for the household
must first be made in the STEPS app. To create a new household simply tap
on “Add New Household” on the STEPS home screen. You can then add a
contact phone number or any comments (e.g. how to locate the household)
pertaining to this household. Entering this information is optional.
Enter all
eligible
household
members
To add a new household member, tap on “Add New Member”. Then enter
the individual’s name, age, and sex.
Continue to add new household members until all eligible members have
been listed. Even if there is only one eligible household member, a household
entry must be created and that person must be listed as (the sole) household
member.
Eligibility criteria for household and members of the households to be
included in the survey will need to be defined in advance of the fieldwork.
Select
participant
using the
electronic
device for data
collection
Once all eligible household members have been added to the household,
confirm that the list of eligible members entered on your Android device
reflects the eligible members of this household. Once you have confirmed the
accuracy of the list of eligible household members, simply tap on “Select
Participant” to select one household member at random.
The selected participant will be highlighted on your screen and you will be
given the option to conduct the interview now, defer the interview for a later
time, or a refusal.
While there is an option at this point to cancel the selection, this option
should be used very rarely, in the event that an error has been made in the
household listing. This option should never be used in the event of a refusal.
Note that canceled selections are recorded by the device and submitted to the
server along with the household listing data so that canceled selections can be
monitored by the local STEPS Coordinating Committee.
Part 3: Data Collection 3-3-10
Section 3: Data Collection Process WHO STEPS Surveillance
Last Updated: 26 January 2017
Informing Participants
Introduction After having chosen a survey participant from a household, this participant
needs to be informed on the details of the study before he/she will be asked to
sign the Consent Form. For informing the participant, the Participant
Information Form can be read out (see Part 6, Section 2).
Explaining aim
of the survey Explain that the aim of the survey is to determine population levels of major
NCD risk factors. Also explain how the information will be used, i.e. for
policy making in order to decrease risk factor levels.
Explaining
survey process Explain that you will collect information from a number of pre-selected
households throughout the country. Explain how data will be collected, as
appropriate, i.e. through:
• interview questions (Step 1)
• measurements of blood pressure, height, weight, waist, and hip (Step 2)
• urine samples and blood tests for sugar and fats (Step 3).
Explaining
collection
methods
Use the table below to help run through the whole data collection process
with the participant:
Stage Description
1 Step 1, asking questions about participant's:
• age;
• education, ethnicity, marital status;
• employment, income;
• tobacco and alcohol use;
• fruit and vegetable intake, salt in diet;
• physical activity;
• knowledge and history of raised blood pressure, diabetes, raised
total cholesterol, cardiovascular diseases;
• lifestyle advice;
• cervical cancer screening
2 Step 2, taking the following measurements:
• blood pressure and heart rate
• height and weight
• waist and hip circumference.
3 Step 3, taking urine samples to determine urinary sodium, and a
small amount of blood from a prick on your finger to determine
blood sugar and blood lipid levels.*
*Note: This may cause some mild pain
4 Respond to any questions the participant may have.
Continued on next page
Part 3: Data Collection 3-3-11
Section 3: Data Collection Process WHO STEPS Surveillance
Last Updated: 26 January 2017
Informing Participants, Continued
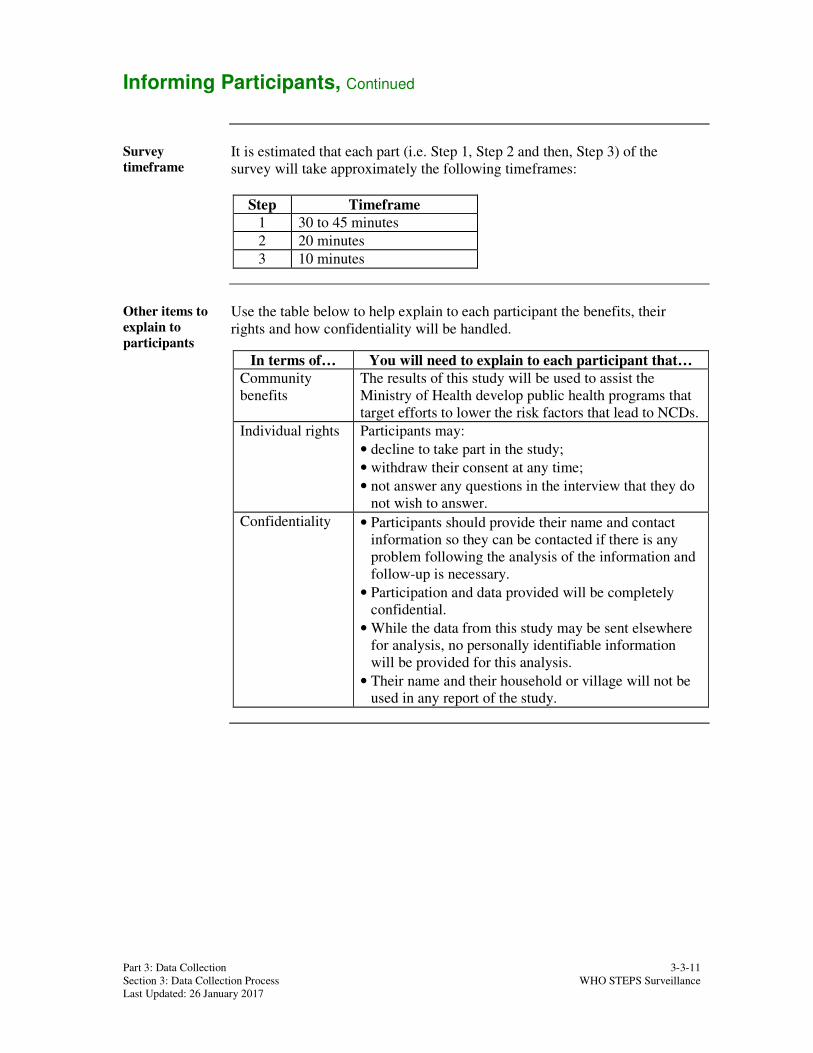
Survey
timeframe It is estimated that each part (i.e. Step 1, Step 2 and then, Step 3) of the
survey will take approximately the following timeframes:
Step Timeframe
1 30 to 45 minutes
2 20 minutes
3 10 minutes
Other items to
explain to
participants
Use the table below to help explain to each participant the benefits, their
rights and how confidentiality will be handled.
In terms of… You will need to explain to each participant that…
Community
benefits
The results of this study will be used to assist the
Ministry of Health develop public health programs that
target efforts to lower the risk factors that lead to NCDs.
Individual rights Participants may:
• decline to take part in the study;
• withdraw their consent at any time;
• not answer any questions in the interview that they do
not wish to answer.
Confidentiality • Participants should provide their name and contact
information so they can be contacted if there is any
problem following the analysis of the information and
follow-up is necessary.
• Participation and data provided will be completely
confidential.
• While the data from this study may be sent elsewhere
for analysis, no personally identifiable information
will be provided for this analysis.
• Their name and their household or village will not be
used in any report of the study.

Part 3: Data Collection 3-3-12
Section 3: Data Collection Process WHO STEPS Surveillance
Last Updated: 26 January 2017
Obtaining Consent
Introduction Each participant must provide both verbal and written consent before taking
part in the survey.
Obtain consent For those who will take part in the survey, follow the steps below to obtain
verbal and written consent.
Step Action
1 Use the following table to select the appropriate consent form for
each person taking part:
In… Then use Consent Form…
Step 1 and 2 only 1
Step 1, 2 and 3 1 and 2
Note: See Part 6, Section 2 for suggested drafts of consent forms.
2 For each participant, use two copies of the consent form(s) as
follows:
• one for the participant to keep
• one for the STEPS coordination office.
3 Allow the participant to read the consent form(s) or, in case of poor
eyesight or illiteracy, read it out to them.
4 Use the table below to help with the following situations:
If… Then...
The intended participant
declines to take part in the
survey or parts of it.
Ask the participant whether
he/she understands the purpose
of the survey.
The participant does not
understand the purpose of the
survey or specific aspects of it.
Rephrase the purpose of the
survey and try to clarify
further.
The participant understands the
purpose of the survey and the
still declines to take part.
Circle “Refused” in the
consent form and record age
and sex as best you can.*
*This means that the household member will not participate in the
survey. However, you must still include him / her in the Interview
Tracking Form, then move to the next selected household.
5 Get the participant to sign both copies.
6 As the interviewer, you must sign as a witness.
7 Thank him/her for agreeing to take part in the survey.

Part 3: Data Collection 3-3-13
Section 3: Data Collection Process WHO STEPS Surveillance
Last Updated: 26 January 2017
Completing the Interview Tracking Form
Introduction You need to record every household visited on the Interview Tracking Form.
For a copy of the Interview Tracking Form, see Part 6, Section 2.
Purpose of
Interview
Tracking Form
The purpose of the Interview Tracking Form is to document and be able to
report on:
• number of households visited;
• number of eligible individuals in each household;
• Participant ID;
• if the participant was at home on either the first or second visit;
• age group and sex of the participant;
• participant eligibility for Step 1, Step 2, and Step 3 and if they consented or
declined each step;
• appointment date and time for a scheduled interview (in case participant
was not at home at the first visit);
• individual comments.
Note: The Interview Tracking Form is used during analysis. If this form is
not used, you will not be able to properly weight your data which will reduce
the quality of your results.
Completion
guidelines Depending on the sample design the Interview Tracking Form may already be
partially completed (see Part 2, Section 2 "Preparing Data Collection
Forms"). Use the following table for guidance on how to finish completing
this form.
Column Guidelines for completion
Cluster ID ID code associated with the cluster. Separate forms
need to be used for different clusters.
Household ID Use the predetermined codes, see Part 2 Section 2.
Number eligible in
household
Record the number of eligible people (aged 18 to 69) in
the household.
Participant ID
Mark the Participant ID that is generated by the
Android device.
At home (visit 1 and
visit 2) • If participant is at home, then mark "Y".
• If participant is not at home, then mark "N".
Male/female by age
group
Mark an "X" in the box according to the sex and age
group of the participant.
Continued on next page

Part 3: Data Collection 3-3-14
Section 3: Data Collection Process WHO STEPS Surveillance
Last Updated: 26 January 2017
Completing the Interview Tracking Form, Continued
Completion guidelines (cont.)
Column Guidelines for completion
Step 1 (Yes, Decline) Mark an "X" in the appropriate column if participant
has agreed to participate or declined Step 1.
Step 2 (Yes, Decline) Mark an "X" in the appropriate column if participant
has agreed to participate or declined Step 2.
Step 3 (Yes, Decline) Mark an "X" in the appropriate column if participant
has agreed to participate or declined Step 3.
Appointment Time If you schedule an appointment with a participant,
record the date and time here.
Individual Comment
Free area for interviewers to record comments. Some
reasons to use this field may be that:
• The interview got interrupted (in this case, the
interviewer should note the Instrument code of where
the interruption occurred);
• Participant has a communication problem (e.g. speaks
a local dialect only, has hearing impairment);
• Participant refuses to consider participation;
• Participant is ill, cannot obtain consent;
• Participant has a disability;
• Participant cannot miss work;
• Participant refuses to take part in Step 3 (e.g. is afraid
of needles or has cultural/religious preference not to
provide blood).
Notes:
• If a country altered the age range of the survey, these changes will
need to be reflect on the interview tracking form (for example, if the
sample is for ages 18+ years, one or two columns need to be added to
the tracking form).
• If a country decides to report on less than 4 age groups per gender, the
age group columns need to be removed and modified accordingly.
• If a country does not do Step 3 measurements, the Interview Tracking
Form should be altered by removing the corresponding columns.

Part 3: Data Collection 3-4-1
Section 4: Collecting Step 1 data: Interviews WHO STEPS Surveillance
Last Updated: 26 January 2017
Section 4: Collecting Step 1 data: Interviews
Overview
Introduction The quality of a STEPS survey results and their usefulness for intra- and
intercountry comparisons largely depends on the quality of the interviews.
This section provides generic guidelines for interviewers.
Intended
audience This section is designed for use by those fulfilling the following roles:
• Interviewers
• Field team supervisors
• STEPS Survey Coordinator.
Purpose The purpose of this section is to cover:
• interview skills;
• how to interview participants;
• how to complete participants' Instruments by entering data into the Android
devices;
• how to use the Question-by-Question Guide;
• how to use the show cards.
Learning
outcomes The learning outcome of this module is to conduct consistent and effective
interviews and record accurate data.
In this section This section covers the following topics:
Topic See Page
Interview Skills 3-4-2
Recording information on the Android devices 3-4-8
Question-by-Question Guide 3-4-11
Show Cards 3-4-12
Demographic Information (Step 1) 3-4-13
Behavioural Measurements (Step 1) 3-4-14

Part 3: Data Collection 3-4-2
Section 4: Collecting Step 1 data: Interviews WHO STEPS Surveillance
Last Updated: 26 January 2017
Interview Skills
Introduction The STEPS interview is about finding out and recording a list of facts and
behaviours relating to selected participants.
The participant needs to feel comfortable about the survey and can refuse to
be interviewed as participation is voluntary. An interview should therefore be
as natural as possible and conducted politely, like a normal conversation.
Behaviour and
tact The table below provides guidelines on appropriate behaviour during an
interview:
Behaviour Guidelines
Respect confidentiality Maintain the confidentiality of all information you
collect.
Respect participants
time
You are asking participants for their time so be
polite and prepared to explain.
Tact If you feel that a person is not ready to assist you,
do not force them but offer to come back later.
Friendly disposition Act as though you expect to receive friendly co-
operation and behave accordingly.
Body language Maintain good eye contact and adopt appropriate
body language.
Pace of interview Don't rush the interview. Allow the participant
enough time to understand and answer a question.
If pressured, a participant may answer with
anything that crosses their mind.
Patience Be patient and polite at all times during the
interview.
Acceptance No matter what the responses to questions are, do
not be judgemental of a participant’s lifestyle.
Expression of any criticism may lead to refusing or
concealing important information.
Appreciation Thank them for their help and cooperation.
Continued on next page

Part 3: Data Collection 3-4-3
Section 4: Collecting Step 1 data: Interviews WHO STEPS Surveillance
Last Updated: 26 January 2017
Interview Skills, Continued
Asking
questions The table below provides guidelines for asking questions in an interview:
Topic Guidelines
Issues relating to
NCDs and their risk
factors
Do not discuss or comment on issues relating to
NCDs and their risk factors. Participants may not
give correct answers to the questions but give the
answers they think the interviewer is looking for.
Right or wrong
answers
Point out that there are no right or wrong answers
and that the interview is not a test.
Biased answers Ask your questions according to guidelines given
in the Question-by-Question Guide to avoid biased
answers and ensure comparability of data (see Part
5, Section 2).
Read all options Where stated, all options must be read to the
participant except for Don't know/Don't remember,
Refused, and Other.
Reading questions Questions should be read:
• as they are written in the text;
• slowly and clearly emphasizing key words in
bold;
• in a pleasant voice that conveys interest and
professionalism;
• entirely to make sure the participant has heard it
completely.
Do not change the:
• wording
• order of the questions.
Making assumptions Don't make assumptions about the participants’
answers with comments such as "I know this
probably doesn’t apply to you, but…".
This practice may prevent accurate and unbiased
information.
Continued on next page

Part 3: Data Collection 3-4-4
Section 4: Collecting Step 1 data: Interviews WHO STEPS Surveillance
Last Updated: 26 January 2017
Interview Skills, Continued
Providing
clarification The interviewer may need to provide clarification when the participant:
• is unable to answer the question asked;
• does not seem to understand the question and gives an inappropriate reply;
• does not seem to have heard the question;
• is taking a long time to answer the question and hesitates;
• asks about a specific part of the question to be repeated (it is acceptable to
repeat only that part);
• asks for one option to be repeated (read all options again but you may omit
one option if it has clearly been eliminated by the participant);
• asks for one term to be clarified (refer to the explanations provided in the
Question-by-Question Guide).
When to probe
further The interviewer will need to probe further to get an appropriate response
when the participant:
• seems to understand the question but gives an inappropriate response
• does not seem to understand what is asked
• misinterprets the question
• cannot make up his or her mind
• digresses from the topic or gives irrelevant information
• needs to expand on what has been said or clarify the response
• gives incomplete information or an answer is unclear
• says that he or she doesn’t know the answer.
Continued on next page

Part 3: Data Collection 3-4-5
Section 4: Collecting Step 1 data: Interviews WHO STEPS Surveillance
Last Updated: 26 January 2017
Interview Skills, Continued
Common
responses that
need probing
The table below lists some common responses that may need further probing:
If the participant
replies…
Then…
“I don’t know” Repeat the question.
“I still don’t know” Probe once before recording “Don’t know”,
for example, ask “Could you give me your
best estimate”.
“I still don't know” This may mean the participant:
• is taking time to think and wants to gain
time;
• does not want to answer because of personal
reasons;
• in fact does not know or has no opinion.
“Not applicable”
• ask him/her why the question does not apply
to him/her;
• all questions should apply to each
respondent.
Note:
• Don't know/Don’t remember and Refuse should be used only as an absolute
last resort.
Probing
techniques The table below provides a few techniques to use when probing further:
Technique Guidelines
Repeat the question The participant may come up with the right answer
if he/she hears the question a second time.
Make a pause This gives the participant time to collect his/her
thoughts and expand on his/her answer.
Repeat the
participant’s reply
This is often a very effective way of having the
participant reflect on the answer he/she has just
given.
Use neutral probes Avoid biased responses and probes. Never give
the impression that you approve or disapprove
what the participant says, or that their answer is
right or wrong. Instead, if you want more
information, ask “anything else?”, or “could you
tell me more about…?”
Continued on next page

Part 3: Data Collection 3-4-6
Section 4: Collecting Step 1 data: Interviews WHO STEPS Surveillance
Last Updated: 26 January 2017
Interview Skills, Continued
Interruptions Interruptions may occur during an interview. If they become too long or too
many, suggest returning at another time to complete the interview.
Take care that even if interrupted or delayed, you should remain patient and
polite at all times.
Refusal to
answer Some participants may refuse to be interviewed. Reasons for this are varied
and differ from one participant to another. Some participants may not refuse
outright but may express hesitancy, reservation or hostility.
You will learn to distinguish between refusals (e.g. hesitancy from a definite
refusal). Success in obtaining cooperation will depend upon your manner and
resourcefulness.
Participants must not be forced to respond to the whole interview or to any
part of the survey process. However, the more refusals that are made, the less
representative the survey is of the whole population.
Handling
refusals Be prepared to obtain cooperation from a participant who does not want to be
interviewed. In general, be pleasant, good-natured and professional and most
participants will cooperate.
Use the table below to help you handle some refusal situations:
If... Then…
The participant becomes
defensive • show patience and understanding;
• provide token agreement and
understanding of his/her viewpoint, that
is, saying something like, “I can
understand that” or “You certainly have
the right to feel that way”;
• convey the importance of the survey to
the participant.
You may have visited at a bad
time
Try again later.
The participant may have
misunderstood the purpose of
the visit
Try to explain the purpose again.
You think you may get a “no” Try to leave and suggest coming back later
before you get a partial or an absolute “no”.
Continued on next page

Part 3: Data Collection 3-4-7
Section 4: Collecting Step 1 data: Interviews WHO STEPS Surveillance
Last Updated: 26 January 2017
Interview Skills, Continued
Language
issues ‘Interpreters of convenience’ (such as members of the participant’s family or
household, the village headman, or domestic staff) should never be used,
since you may get incorrect data being recorded.
If the interviewer doesn’t get sufficient cooperation due to a language barrier,
this should be reported to the field team supervisor.
Working with
the Android
devices
After some practice, data collectors usually get proficient in using the
Android devices quickly. However, they should always try to not get too
absorbed recording, and to keep the participant’s interest by saying the
participant’s response aloud as they record it.

Part 3: Data Collection 3-4-8
Section 4: Collecting Step 1 data: Interviews WHO STEPS Surveillance
Last Updated: 26 January 2017
Recording information on the Android devices
Introduction Once the standard STEPS Instrument has been adapted, translated and loaded
onto the Android devices, it is ready for use during the survey.
One instrument is to be completed for each participant that is interviewed and
measured. Apart from questions that should be skipped depending on the
response given to other questions, all items on the instrument must be
completed for the response to be valid.
Introductory
statements Where a section of items has an introductory statement, this should be read
out to the participant before asking the questions in the section. All
statements to be read out are displayed on the screen of the Android device.
“Hint” text in italics is not to be read aloud but is there to provide additional
guidance for data collectors.
Entering the
participants’
responses
Depending on the required response for a question/item on the STEPS
Instrument, there are different types of data entry fields on the Android
devices.
• Radio buttons allow the data collector to select one option from a short list
of options;
• Dropdown lists allow the data collector to select one option from a long list
of options;
• Number fields allow the data collector to enter numeric data using the
number pad;
• Text fields allow the data collector to enter text responses using the
keyboard.
Date fields and time fields are also used to record the date and time of
interview and time of collection of Step 3 measures. These fields are pre-
filled with the date and time from the data collection device but entries can be
modified if needed.
Continued on next page

Part 3: Data Collection 3-4-9
Section 4: Collecting Step 1 data: Interviews WHO STEPS Surveillance
Last Updated: 26 January 2017
Recording information on the Android devices, Continued
“Don't know”
responses Many questions in the STEPS Instrument have a “don’t know” or “refused”
option. For numeric fields, a pre-defined error code is used (typically 77 or
777) and must be entered in the field to indicate “don’t know” or “refused”.
The on-screen hint will instruct the data collector as to which code to enter.
“Don’t know” or “refused” responses should be used rarely and only as an
absolute last resort. Refer to the topic on Interview Skills earlier in this
Section for guidance on how to avoid “don’t know” or “refused” response
options.
Skip
instructions Skips are programmed into the electronic instrument and are performed
automatically, thus skip instructions are not included.
Comments If an interviewer needs to record any comments pertaining to the interview,
(for example, if the right arm was used instead of the left arm to take a blood
pressure measurement) these should be inserted in the comments field at the
end of the instrument (if such a field is included in the country-specific
instrument) or in the comments for the household in the STEPS app.
Records
management During the data collection process, it is very likely that selected participants
will not be immediately available to complete the interview following their
selection. Thus, most interviewers will see a listing of households on their
device showing interviews that have been completed, deferred or partially
completed, as shown in the image below.
Continued on next page

Part 3: Data Collection 3-4-10
Section 4: Collecting Step 1 data: Interviews WHO STEPS Surveillance
Last Updated: 26 January 2017
Recording information on the Android devices, Continued
Records
management
(cont.)
Each of the icons is explained below:
Note that partially completed interviews (i.e. interviews that have been
interrupted) and deferred interviews are always listed at the top, followed by
households where the listing of eligible members has not yet been done, then
finally completed and refused interviews.
In order to start an interview that has been deferred, the data collector simply
needs to tap on the household in the household list on their screen and then
tap on the “Interview Now” button on the screen. Similarly, to continue an
interrupted interview, simply tap on the household in the household list and
then tap on “Continue Interview”.
Submitting
data Whenever there is a wi-fi connection available, it is recommended to submit
all data on the Android device to the server. It is recommended to submit
both the household listing data and completed questionnaires at the same
time, using the button “Submit Data” on the STEPS home screen.
You will get a pop-up window in which to confirm the export. Both boxes
should be left checked to send both household listing data and questionnaire
data.
To submit your completed questionnaires, the STEPS app will automatically
take you to the listing of all completed forms in the ODK collect app.
Records can be selected by tapping on “Toggle All” at the bottom of the
screen. Alternatively, records can be selected one by one by ticking the boxes
to the right. Once all records to be submitted have been checked, tap on
“Send Selected” at the bottom of the screen. If there are no unsubmitted
records, no records will be listed and you will see the message “Nothing
available to display. Try finalizing forms before sending.”

Part 3: Data Collection 3-4-11
Section 4: Collecting Step 1 data: Interviews WHO STEPS Surveillance
Last Updated: 26 January 2017
Question-by-Question Guide
Introduction The Question-by-Question Guide (Q-by-Q) is a 'master' version of the
standard STEPS instrument. It provides instructions and guidelines for each
question.
A copy of the Q-by-Q Guide can be found in Part 5, Section 2.
Purpose of the
Q-by-Q guide The purpose of the Q-by-Q Guide is to provide background information,
explanations and examples of correct information to help interviewers
accurately complete each Instrument with participants.
It is to be used as both a training and data collection tool.
Using the guide Before conducting the interviews, data collection staff should:
• read the Q-by-Q Guide many times over until they are comfortable
with the information;
• practice asking the questions;
• become thoroughly familiar with the contents of the country-specific
STEPS instrument.
Depending on the design of the electronic version of the instrument, the
guidance text from the Q-by-Q may be included for some or all questions and
would appear in italics on the screen next to the question text.
Responding to
questions for
clarification
If participants request clarification about specific questions, the Q-by-Q
Guide should be used to help, rather than offering own interpretations.

Part 3: Data Collection 3-4-12
Section 4: Collecting Step 1 data: Interviews WHO STEPS Surveillance
Last Updated: 26 January 2017
Show Cards
Introduction Show cards are useful tools to help explain what is meant by some of the
questions on the STEPS Instrument. To be useful, they must be adapted to
local settings.
Applicable
show cards For each interview you may need to have show cards that cover the following
topics:
• list of work status
• list and/or show cards of tobacco products
• alcohol consumption (standard drink)
• diet (typical fruit and vegetables and serving sizes, foods high in salt)
• types of physical activities.
Note: Templates for show cards can be found in Part 5, Section 3.
Instructions for
use These cards will need to be adapted so they are appropriate for each setting.
Use the show cards to:
• help clarify what is meant by specific questions and terms used on the
STEPS Instrument;
• show participants examples of the kind of products mentioned.
Show cards appear on the screen of the Android device along with the related
question(s).

Part 3: Data Collection 3-4-13
Section 4: Collecting Step 1 data: Interviews WHO STEPS Surveillance
Last Updated: 26 January 2017
Demographic Information (Step 1)
Introduction Accurate core demographic information is essential for analysing and
reporting on the overall results of the STEPS survey.
If the age and sex of a participant cannot be recorded, their responses cannot
be used in the analysis, as most analyses report results that are grouped by
these variables.
Core
demographic
information
The core demographic information that is captured with the STEPS
Instrument includes:
• sex
• age
• years spent at school.
Dates of birth
and age In some countries, some individuals may not know their exact dates of birth
and/or age. In these situations their age has to be estimated. To estimate
someone's age, the interviewer will need to ask them how old, or at what
stage in life they were at the time that a number of widely known major local
events occurred.
Expanded
demographic
information
Expanded demographic information includes:
• highest level of education
• ethnic/racial group
• marital status
• work status
• household earnings.
Please note that it will be easier for respondents to answer the question on
work status if a list of work status is used (see Part 5, Section 3 "Show
Cards").
Some of the expanded demographic questions will have been adapted for
your country so the terms and phrases make sense to participants in your
environment, e.g., insertion of country specific examples for work status.
Automatic
skips The Android devices include the following automatic skips in the
demographic information section of the STEPS Instrument:
• C2: If date of birth is known, C3 ("How old are you?") is skipped;
• C10a-d: If average earnings of the household are known, C11 (income
quintiles) is skipped.

Part 3: Data Collection 3-4-14
Section 4: Collecting Step 1 data: Interviews WHO STEPS Surveillance
Last Updated: 26 January 2017
Behavioural Measurements (Step 1)
Introduction The behavioural measures in the STEPS Instrument relate to risky behaviour
with regards to NCDs. In particular, they are designed to record details
about:
• tobacco use
• alcohol consumption
• fruit and vegetable consumption
• salt intake
• physical activity
• history of raised blood pressure, diabetes, raised total cholesterol and
cardiovascular diseases
• lifestyle advice
• cervical cancer screening.
For the rationale for capturing information on these topics, see Part 1,
Section 1.
Core questions The STEPS Instrument includes core questions for each of the following:
• tobacco use
• alcohol consumption
• fruit and vegetable consumption
• salt intake
• physical activity
• history of raised blood pressure, diabetes, raised total cholesterol and
cardiovascular diseases
• lifestyle advice
• cervical cancer screening.
The core questions of each are explained in detail in this section below.
Expanded
questions The behavioural measurements section of the STEPS Instrument includes
expanded questions for each of the following:
• tobacco use
• alcohol consumption
• salt intake
• sedentary behavior.
The expanded questions of each are explained in detail in this section below.
Continued on next page

Part 3: Data Collection 3-4-15
Section 4: Collecting Step 1 data: Interviews WHO STEPS Surveillance
Last Updated: 26 January 2017
Behavioural Measurements (Step 1), Continued
Core questions
on tobacco use The tobacco-related questions recommended for the STEPS approach are
based on the WHO guidelines for tobacco use surveillance, and are aligned
with the Tobacco Questions for Surveys (TQS).
Even though in some countries it is mostly men who smoke, women as well
as men must be asked these questions.
The core questions in the STEPS Instrument ask about:
• current smoking
• daily smoking
• age when starting smoking
• number of items smoked per day/week
• quit attempts
• past smoking
• current use of smokeless tobacco
• daily use of smokeless tobacco
The following skip instructions that are automatically programmed on the
Android devices apply:
• T1: If a person does not currently smoke, go to the questions on past
smoking (T8);
• T3: If a smoker knows the age when he/she started smoking, T4a-c ("how
long ago was this?") can be skipped;
• T5a/aw-T5other: current (non-daily) smokers are only asked about their
weekly smoking of each item. For daily smokers, where any item is smoked
less than daily, they are asked about their weekly smoking of that item;
• T7: Daily smokers can skip over all questions on past smoking (T8-T11),
while current (non-daily) smokers are asked if they ever smoked daily in the
past (T9) and skip the other questions related to past smoking;
• T8: Respondents that have never smoked in the past and are not current
smokers are not asked any other question on past smoking (T9-T11);
• T12: If a person does not use smokeless tobacco, go to T15 (past use of
smokeless tobacco).
Continued on next page

Part 3: Data Collection 3-4-16
Section 4: Collecting Step 1 data: Interviews WHO STEPS Surveillance
Last Updated: 26 January 2017
Behavioural Measurements (Step 1), Continued
Expanded
questions on
tobacco use
The expanded tobacco questions focus on past smoking, the number of times
smokeless tobacco is used and on exposure to smoke and include questions on
• age stopped smoking
• number of times smokeless tobacco is used per day/week
• past use of smokeless tobacco
• passive smoking.
The following skip instructions that are automatically programmed on the
Android devices apply:
• T10: If a past daily smoker knows the age when he/she stopped smoking,
T11a-c ("how long ago was this?") can be skipped;
• T14a/aw-T14other: current (non-daily) users are only asked about their
weekly use of each item. For daily users, where any item is used less than
daily, they are asked about their weekly use of that item;
• T14a-other: Daily users of smokeless tobacco can skip over the questions
on past use (T15-T16), while current (non-daily) users are asked if they ever
used tobacco daily in the past (T16), but skip the question on past use
(T15);
• T15: Respondents that have never used smokeless tobacco products in the
past are not asked about their daily use in the past (T16).
Use of
smokeless
tobacco
In some settings, smokeless tobacco will be more prevalent than smoking
tobacco. For these settings, it is strongly recommended to include all
expanded questions on smokeless tobacco use.
Tobacco use
show card See Part 5, Section 3 for a list of tobacco products as well as tobacco show
cards. It is recommended that countries develop their own show cards
displaying country specific examples of tobacco products.
Continued on next page

Part 3: Data Collection 3-4-17
Section 4: Collecting Step 1 data: Interviews WHO STEPS Surveillance
Last Updated: 26 January 2017
Behavioural Measurements (Step 1), Continued
Core questions
on alcohol
consumption
The consumption of alcohol varies a lot within and across countries, and
different patterns of alcohol consumption are associated with different levels
of risk. Alcohol consumption can be episodic, and asking individuals about
their average (daily) consumption can be problematic. In addition, while
some communities abstain from alcohol entirely or may use alcohol on very
rare and specific occasions, others usually consume it rather regularly. Even
though in some countries, it is mostly men who may consume alcohol,
women as well as men must be asked these alcohol-related questions.
Due to the above mentioned reasons, surveys of alcohol consumption should
attempt to capture amount and frequency as well as patterns of drinking.
The questions in the STEPS Instrument ask about:
• lifetime consumption of alcohol;
• past 12 month consumption of alcohol and it's frequency;
• reasons for stopping drinking;
• general consumption of alcohol in past 30 days;
• number of occasions of alcohol consumption in the past 30 days;
• average number of drinks per drinking occasion;
• largest number of drinks per drinking occasion;
• number of occasions with six or more drinks in one occasion;
• past 7 days drinking;
• unrecorded alcohol consumption and number of standard drinks of
unrecorded alcohol during the past 7 days.
The following skip instructions that are automatically programmed on the
Android devices apply:
• A1: If a person has never drunk, all other core alcohol questions can be
skipped;
• A2: If a respondent has drunk alcohol during the past 12 months, the
question on stopping drinking can be skipped (A3);
• A3: This question only applies to respondents that have drunk alcohol in
their lifetime, but not in the past 12 months. After answering this question,
these respondents can skip over the rest of the core alcohol questions;
• A5: If a person has not drunk within the past 30 days, all other core alcohol
questions can be skipped;
• A11: If a respondent has not drunk any unrecorded alcohol during the past
7 days, A12 can be skipped.
Continued on next page

Part 3: Data Collection 3-4-18
Section 4: Collecting Step 1 data: Interviews WHO STEPS Surveillance
Last Updated: 26 January 2017
Behavioural Measurements (Step 1), Continued
Expanded
questions on
alcohol
consumption
The expanded alcohol questions have been adopted from the Alcohol Use
Disorders Identification Test (AUDIT) and focus on early signs of hazardous
and harmful drinking and on identifying mild dependence.
Alcohol
consumption
show card
The definition of a "standard drink" will have to be reviewed and potentially
modified by each country on the show cards, included in Part 5, Section 3, to
reflect local types of alcohol. This will include:
• types and strengths of products
• common measures
• local terms used for both.
If domestic manufacture of beer, wine or spirits is common, information on
the usual ethanol content of such products should also be available to help
determine the volume of absolute alcohol that makes a "standard drink".
Core questions
on diet The STEPS questions on diet include:
• the number of days fruit is eaten in a typical week
• the number of servings on one of these days
• the number of days vegetables are eaten in a typical week
• the number of servings on one of those days
• adding of salt or salty sauce to the food
• consumption of processed food high in salt
• perception of the amount of salt consumed.
The following skip instructions that are automatically programmed on the
Android devices apply:
• D1: If a person reports 0 days of fruit consumption, go to D3
• D3: If a person reports 0 days of vegetables consumption, go to D5.
Expanded
questions on
diet
The expanded diet questions ask about lowering and controlling salt intake:
• importance of lowering salt intake
• knowledge of health effects of consumption of too much salt
• measures to control salt intake.
Continued on next page

Part 3: Data Collection 3-4-19
Section 4: Collecting Step 1 data: Interviews WHO STEPS Surveillance
Last Updated: 26 January 2017
Behavioural Measurements (Step 1), Continued
Diet show card The diet show card in Part 5, Section 3 will have to be updated to show
examples of fruits and vegetables considered most typical for the country. A
serving size is standardized to represent 80 grams. Furthermore, the
examples for foods high in salt should be adapted to the country context.
Core
questions on
physical
activity
The STEPS physical activity questions represent the Global Physical Activity
Questionnaire, version 2 (GPAQ). This questionnaire assesses physical
activity behaviour in three different domains: at work (which includes paid
and unpaid work, in and outside of the home), for transport (to get to and
from places), and during leisure time.
Some people will be physically active in all three domains, others may not be
active in any of the settings. In any case, questions from all three domains
should be asked.
The GPAQ questions include:
• vigorous activities at work;
• number of days in a typical week with vigorous physical activity at work,
and time spent in this activity on one of those days;
• moderate activities at work;
• number of days in a typical week with moderate physical activity at work,
and time spent in this activity on one of those days;
• physical activity for transport;
• number of days in a typical week with activity for transport, and time spent
in this activity on one of those days;
• vigorous activities during leisure time;
• number of days in a typical week with vigorous physical activity during
leisure time, and time spent in this activity on one of those days;
• moderate activities during leisure time;
• number of days in a typical week with moderate physical activity during
leisure time, and time spent in this activity on one of those days.
The following skip instructions that are automatically programmed on the
Android devices apply:
• P1: If a person does not do vigorous physical activities at work, go to
moderate physical activities at work (P4);
• P4: If a person does not do moderate physical activities at work, go to
physical activities for transport (P7);
• P7: If a person does not do physical activity for transport, go to vigorous
physical activities during leisure time (P10);
• P10: If a person does not do vigorous physical activities during leisure time,
go to moderate physical activities during leisure time (P13);
• P13: If a person does not do moderate physical activities during leisure
time, go to sedentary behaviour (P16).
Continued on next page

Part 3: Data Collection 3-4-20
Section 4: Collecting Step 1 data: Interviews WHO STEPS Surveillance
Last Updated: 26 January 2017
Behavioural Measurements (Step 1), Continued
Expanded
question on
physical
activity
The expanded question on physical activity assesses the time spent sitting on
a typical day.
Physical
activity show
card
The physical activity show cards will have been adapted by each country to
show types of physical activities.
See Part 5, Section 3 for a list of typical physical activities as well as show
cards that display examples of physical activities for each type of activity.
Core
questions on
history of
raised blood
pressure
The STEPS questions on history of raised blood pressure include:
• whether a person has ever had his/her blood pressure measured
• diagnosis of raised blood pressure
• treatment of raised blood pressure
• traditional treatment of raised blood pressure.
The following skip instructions that are automatically programmed on the
Android devices apply:
• H1: If a person's blood pressure has never been measured, the rest of the
history of raised blood pressure questions can be skipped;
• H2a: If a person has never been told that he/she has raised blood pressure, the
rest of the history of raised blood pressure questions can be skipped.
Core questions
on history of
diabetes
The STEPS questions on history of diabetes include:
• whether a person has ever had his/her blood sugar measured
• diagnosis of raised blood sugar
• treatment of raised blood sugar
• traditional treatment of raised blood sugar.
The following skip instructions that are automatically programmed on the
Android devices apply:
• H6: If a person's blood sugar has never been measured, the rest of the
history of diabetes questions can be skipped;
• H7a: If a person has never been told that he/she has raised blood sugar, the
rest of the history of diabetes questions can be skipped.
Continued on next page

Part 3: Data Collection 3-4-21
Section 4: Collecting Step 1 data: Interviews WHO STEPS Surveillance
Last Updated: 26 January 2017
Behavioural Measurements (Step 1), Continued
Core
questions on
history of
raised total
cholesterol
The STEPS questions on history of raised total cholesterol include:
• whether a person has ever had his/her total cholesterol measured
• diagnosis of raised total cholesterol
• treatment of raised total cholesterol
• traditional treatment of raised total cholesterol.
The following skip instructions that are automatically programmed on the
Android devices apply:
• H12: If a person's total cholesterol has never been measured, the rest of the
history of raised total cholesterol questions can be skipped;
• H13a: If a person has never been told that he/she has raised total cholesterol,
the rest of the history of raised total cholesterol questions can be skipped.
Core questions
on history of
cardiovascular
diseases
The STEPS questions on history of cardiovascular diseases include:
• whether a person has ever had a heart attack, chest pain from heart disease or
a stroke;
• prevention and treatment of heart disease.
Core questions
on lifestyle
advice
The STEPS questions on lifestyle advice are around six areas of potential
advice from a doctor or other health worker to prevent NCDs.
Core question
on cervical
cancer
screening
The STEPS question on cervical cancer screening asks female respondents
whether they have ever had a screening test for cervical cancer.

Part 3: Data Collection 3-4-22
Section 4: Collecting Step 1 data: Interviews WHO STEPS Surveillance
Last Updated: 26 January 2017

Part 3: Data Collection 3-5-1
Section 5: Collecting Step 2 data: Physical Measurements WHO STEPS Surveillance
Last Updated: 26 January 2017
Section 5: Collecting Step 2 data: Physical Measurements
Overview
Introduction This section provides information on and is a guide to working with the topics
covered under Step 2 of the STEPS Instrument.
Intended
audience This section is designed for use by those fulfilling the following roles:
• Interviewers
• Field team supervisors
• STEPS Survey Coordinator.
In this section This section covers the following topics:
Topic See Page
Physical Measurements Overview 3-5-2
Physical Measurements 3-5-3
Taking Blood Pressure and Recording Heart Rate 3-5-5
Measuring Height 3-5-8
Measuring Weight 3-5-9
Measuring Waist Circumference 3-5-10
Measuring Hip Circumference 3-5-12
Completing the Participant Feedback Form (Step 2) 3-5-14
Referrals and information for Step 3 Measurements 3-5-15

Part 3: Data Collection 3-5-2
Section 5: Collecting Step 2 data: Physical Measurements WHO STEPS Surveillance
Last Updated: 26 January 2017
Physical Measurements Overview
Introduction Step 2 of the STEPS Instrument includes selected physical measures to
determine the proportion of adults that:
• have raised blood pressure
• are overweight and/or obese.
What you will
learn In this section, you will learn:
• what the physical measures are and what they mean
• what equipment is needed
• how to assemble and use the equipment
• how to take physical measurements and accurately record the results.
Learning
outcomes
objectives
The learning outcome of this section is to understand what the physical
measures are and how to accurately take the measurements and record the
results.
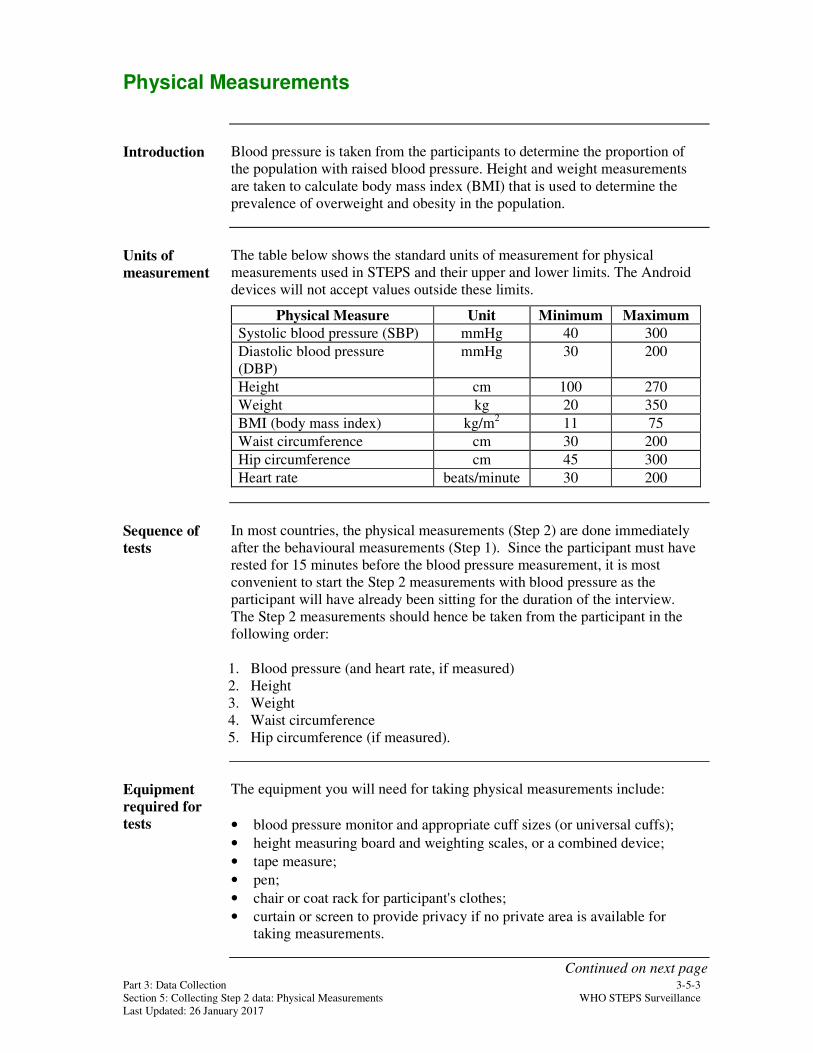
Part 3: Data Collection 3-5-3
Section 5: Collecting Step 2 data: Physical Measurements WHO STEPS Surveillance
Last Updated: 26 January 2017
Physical Measurements
Introduction Blood pressure is taken from the participants to determine the proportion of
the population with raised blood pressure. Height and weight measurements
are taken to calculate body mass index (BMI) that is used to determine the
prevalence of overweight and obesity in the population.
Units of
measurement
The table below shows the standard units of measurement for physical
measurements used in STEPS and their upper and lower limits. The Android
devices will not accept values outside these limits.
Physical Measure Unit Minimum Maximum
Systolic blood pressure (SBP) mmHg 40 300
Diastolic blood pressure
(DBP)
mmHg 30 200
Height cm 100 270
Weight kg 20 350
BMI (body mass index) kg/m2 11 75
Waist circumference cm 30 200
Hip circumference cm 45 300
Heart rate beats/minute 30 200
Sequence of
tests
In most countries, the physical measurements (Step 2) are done immediately
after the behavioural measurements (Step 1). Since the participant must have
rested for 15 minutes before the blood pressure measurement, it is most
convenient to start the Step 2 measurements with blood pressure as the
participant will have already been sitting for the duration of the interview.
The Step 2 measurements should hence be taken from the participant in the
following order:
1. Blood pressure (and heart rate, if measured)
2. Height
3. Weight
4. Waist circumference
5. Hip circumference (if measured).
Equipment
required for
tests
The equipment you will need for taking physical measurements include:
• blood pressure monitor and appropriate cuff sizes (or universal cuffs);
• height measuring board and weighting scales, or a combined device;
• tape measure;
• pen;
• chair or coat rack for participant's clothes;
• curtain or screen to provide privacy if no private area is available for
taking measurements.
Continued on next page

Part 3: Data Collection 3-5-4
Section 5: Collecting Step 2 data: Physical Measurements WHO STEPS Surveillance
Last Updated: 26 January 2017
Physical Measurements, Continued
Privacy Where possible, all physical measurements should be conducted in a private
area. In some settings, a separate room in the household may be set up with
the necessary equipment to take each measurement. Where this is not
possible, a separate area should be screened off to provide privacy for waist
and hip circumference measurements at minimum.
Allow the participant to select the degree of privacy – some may be
concerned about going behind a screen or out of sight of others with people
they do not know.
When to take
physical
measurements
and record
results
It is recommended that physical measurements are taken immediately after
the Step 1 interviews. Results of Step 2 measures are to be recorded on the
same Android device.
If physical measurements are taken some time after Step 1 interviews (not
recommended), care should be taken to ensure data are recorded correctly on
the Android devices where the participant’s record already exists.
Introductions
and
explanations
Prior to taking physical measurements, explain that the following
measurements will be taken:
For Core
• blood pressure
• height
• weight
• waist circumference
For Expanded
• heart rate
• hip circumference.

Part 3: Data Collection 3-5-5
Section 5: Collecting Step 2 data: Physical Measurements WHO STEPS Surveillance
Last Updated: 26 January 2017
Taking Blood Pressure and Recording Heart Rate
Introduction Blood pressure is taken to determine the prevalence of raised blood pressure
in the population.
Equipment To take blood pressure you will need the following:
• digital automatic blood pressure monitor, e.g. Bosch & Sohn Medicus
UNO, or OMRON M6
• appropriate size cuffs or universal cuffs.
Preparing the
participant Ask the participant to sit quietly and rest for 15 minutes with his/her legs
uncrossed. If physical measurements (Step 2) are done immediately after the
behavioural measurements (Step 1), as recommended, the participant should
have already been seated for at least 15 minutes, and the blood pressure
measurements can be done immediately after finishing the Step 1 questions.
If the participant has moved around during the interview, have him/her rest
after the interview while you set-up the equipment.
Furthermore, the participant should have an empty bladder when the
measurements are taken, should not have coffee before or during the
measurements, and should not talk during the measurements. The elbow
should be supported during the measurements.
Three
measurements Three blood pressure measurements should be taken. During data analysis
the mean of the second and third readings will be calculated. The participant
will rest for three minutes between each of the readings.
Recording the
blood pressure
measurements
For recording the results of the blood pressure measurements, do the
following:
• record your Interviewer ID on the Android device;
• record the device ID of the blood pressure machine you are using;
• after each of the three measurements, record the results;
• check that all readings are correctly filled in;
• inform the participant on the last blood pressure reading only after the
whole process is completed.
Recording
heart rate
measurements
Heart rate and blood pressure results are displayed simultaneously on the
digital blood pressure monitor. If a country decides to include the expanded
measurement of heart rate, the recording should be done along with the
recording of the blood pressure measurements after each of the three
measurements.
Continued on next page
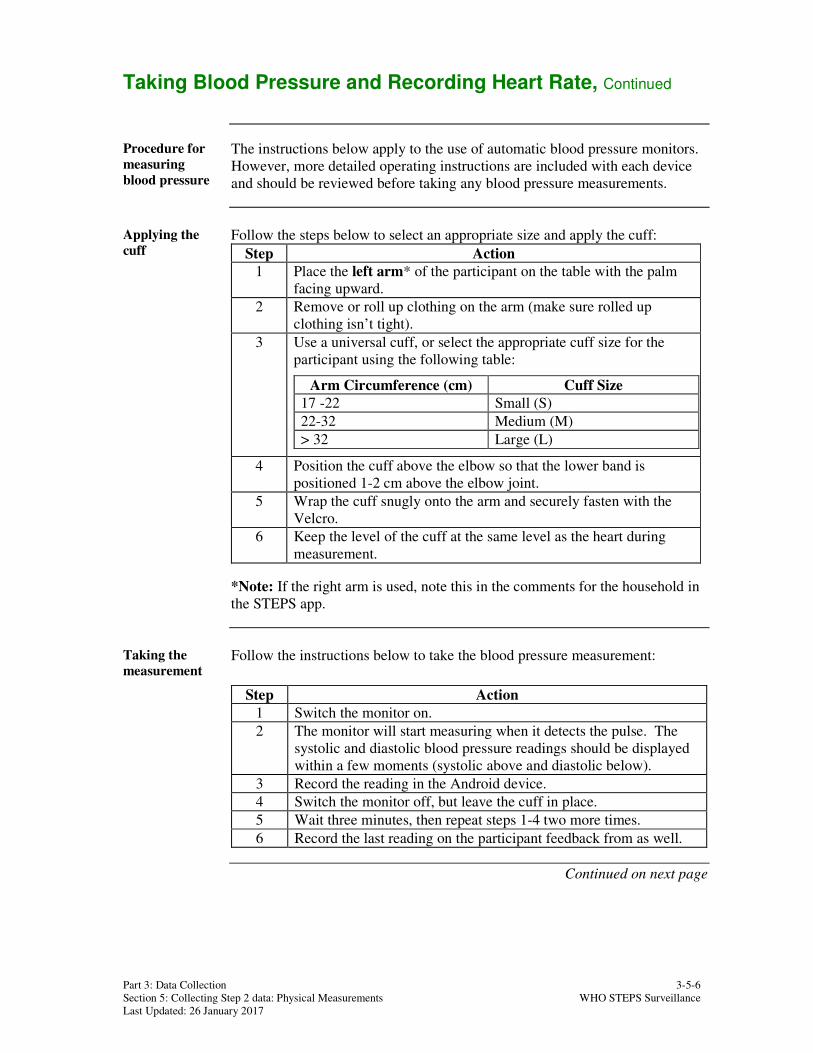
Part 3: Data Collection 3-5-6
Section 5: Collecting Step 2 data: Physical Measurements WHO STEPS Surveillance
Last Updated: 26 January 2017
Taking Blood Pressure and Recording Heart Rate, Continued
Procedure for
measuring
blood pressure
The instructions below apply to the use of automatic blood pressure monitors.
However, more detailed operating instructions are included with each device
and should be reviewed before taking any blood pressure measurements.
Applying the
cuff Follow the steps below to select an appropriate size and apply the cuff:
Step Action
1 Place the left arm* of the participant on the table with the palm
facing upward.
2 Remove or roll up clothing on the arm (make sure rolled up
clothing isn’t tight).
3 Use a universal cuff, or select the appropriate cuff size for the
participant using the following table:
Arm Circumference (cm) Cuff Size
17 -22 Small (S)
22-32 Medium (M)
> 32 Large (L)
4 Position the cuff above the elbow so that the lower band is
positioned 1-2 cm above the elbow joint.
5 Wrap the cuff snugly onto the arm and securely fasten with the
Velcro.
6 Keep the level of the cuff at the same level as the heart during
measurement.
*Note: If the right arm is used, note this in the comments for the household in
the STEPS app.
Taking the
measurement Follow the instructions below to take the blood pressure measurement:
Step Action
1 Switch the monitor on.
2 The monitor will start measuring when it detects the pulse. The
systolic and diastolic blood pressure readings should be displayed
within a few moments (systolic above and diastolic below).
3 Record the reading in the Android device.
4 Switch the monitor off, but leave the cuff in place.
5 Wait three minutes, then repeat steps 1-4 two more times.
6 Record the last reading on the participant feedback from as well.
Continued on next page

Part 3: Data Collection 3-5-7
Section 5: Collecting Step 2 data: Physical Measurements WHO STEPS Surveillance
Last Updated: 26 January 2017
Taking Blood Pressure and Recording Heart Rate, Continued
When to use a
Sphygmomano-
meter
The sphygmomanometer is generally not recommended, but may be used in
the following circumstances:
• the automatic blood pressure monitor is not functioning;
• the automatic blood pressure monitor display shows multiple errors;
• to cross check automatic blood pressure monitor readings in various
clinical states such as irregular pulse, peripheral circulatory disturbance,
extreme hypotension;
• for calibration of the automatic blood pressure monitor.
Procedure for
Sphygmomano-
meter
Follow the steps below or refer to the operating instructions included with the
device to measure the blood pressure of a participant using the
sphygmomanometer.
Step Action
1 Apply the cuff (as detailed above).
2 Put stethoscope earpieces in ear and set to bell.
3 Palpate pulse at either brachial or radial artery. Take a pulse
count for one full minute.
4 Pump up pressure and inflate cuff until unable to feel pulse.
5 Continue to inflate cuff 30 mmHg beyond this point.
6 Apply the bell of the stethoscope to the right antecubital fossa.
7 Listen for pulse sounds while deflating the cuff slowly.
8 Record the systolic blood pressure (SBP) when a pulse is first
audible.
9 Record the diastolic blood pressure (DBP) when the pulse sound
disappears.
10 Deflate the cuff fully and let the arm rest for three minutes
(between each of the readings).
11 Repeat Steps 2-10 twice to obtain three readings.
12 Check that all readings are correctly filled in on the Android
device.
13 Inform the participant about the blood pressure readings only after
the whole process is completed, and record the last reading on the
participant feedback form.

Part 3: Data Collection 3-5-8
Section 5: Collecting Step 2 data: Physical Measurements WHO STEPS Surveillance
Last Updated: 26 January 2017
Measuring Height
Introduction The height of eligible participants is taken to help calculate their body mass
index (BMI), which is their weight relative to their height, and therefore to
determine the prevalence of overweight and obese people in the population.
Equipment To measure height, you need a portable height/length measuring board, such
as from SECA. Alternatively, a BMI scale measuring both height and weight
(e. g. Growth Management Scale) can be used.
Assembling the
measuring
board
Follow the steps below to assemble the measuring board:
Step Action
1 Separate the pieces of the board (usually 3 pieces) by unscrewing
the knot at the back.
2 Assemble the pieces by attaching each one on top of the other in
the correct order.
3 Lock the latches in the back.
4 Position the board on a firm surface against a wall.
Procedures Follow the steps below to measure the height of a participant:
Step Action
1 Ask the participant to remove their:
• footwear (shoes, slippers, sandals, etc)
• head gear (hat, cap, hair bows, comb, ribbons, etc).
• any fancy or high hairdos may have to be pressed.
Note: If it would be insensitive to seek removal of a scarf or veil,
the measurement may be taken over light fabric.
2 Ask the participant to stand on the board facing you.
3 Ask the participant to stand with:
• feet together
• heels against the back board
• knees straight.
4 Ask the participant to look straight ahead and not tilt their head
up.
5 Make sure eyes are the same level as the ears.
6 Move the measure arm gently down onto the head of the
participant and ask the participant to breathe in and stand tall.
7 Read the height in centimetres at the exact point to the nearest
mm.
8 Ask the participant to step away from the measuring board.
9 Record the height measurement in centimetres in the Android
device, along with the device ID and your Technician ID.

Part 3: Data Collection 3-5-9
Section 5: Collecting Step 2 data: Physical Measurements WHO STEPS Surveillance
Last Updated: 26 January 2017
Measuring Weight
Introduction The weight of eligible participants is taken to help determine their body mass
index (BMI), which is their weight relative to their height, and therefore to
determine the prevalence of overweight and obese people in the population.
Equipment To measure weight, you will need a portable weighting scale, such as a SECA
scale or the Tanita HS301 Solar Scale. Alternatively, a BMI scale measuring
both height and weight (e. g. Growth Management Scale) can be used.
Set up
requirements Make sure the scales are placed on a firm, flat surface. Do not place the
scales on:
• carpet
• a sloping surface
• a rough, uneven surface.
Set up scales Follow the steps below to put the scales into operation:
Step Action
1 Put the scale on a firm, flat surface.
2 Connect the adaptor to the main power line or generator, if the
scale is not battery operated.
3 Turn on the scale and wait until the display shows 0.0.
Procedures Follow the steps below to measure the weight of a participant:
Step Action
1 Ask the participant to remove their footwear (shoes, slippers,
sandals, etc) and socks. They should also take off any heavy belts
and empty out their pockets of mobiles, wallets and coins.
2 Ask the participant to step onto scale with one foot on each side of
the scale.
3 Ask the participant to:
• stand still
• face forward
• place arms on the side and
• wait until asked to step off.
4 Record the weight in kilograms on the Android device, along with
the device ID and your Technician ID.
If the participant wants to know his/her weight in pounds, convert
by multiplying the measured weight by 2.2.

Part 3: Data Collection 3-5-10
Section 5: Collecting Step 2 data: Physical Measurements WHO STEPS Surveillance
Last Updated: 26 January 2017
Measuring Waist Circumference
Introduction Waist circumference measurements are also taken to provide additional
information on overweight and obesity.
Equipment To take waist circumference measurements you will need a:
• constant tension tape (for example, Figure Finder or Myo Tape Body
Tape Measure);
• chair or coat stand for participants to place their clothes.
Privacy A private area is necessary for this measurement. This could be a separate
room, or an area that has been screened off from other people within the
household.
Preparing the
participant This measurement should be taken without clothing, that is, directly over the
skin.
If this is not possible, the measurement may be taken over light clothing. It
must not be taken over thick or bulky clothing. This type of clothing must be
removed.
How to take the
measurement This measurement should be taken:
• at the end of a normal expiration;
• with the arms relaxed at the sides;
• at the midpoint between the lower margin of the last palpable rib and the
top of the iliac crest (hip bone).
Continued on next page

Part 3: Data Collection 3-5-11
Section 5: Collecting Step 2 data: Physical Measurements WHO STEPS Surveillance
Last Updated: 26 January 2017
Measuring Waist Circumference, Continued
Procedure Follow the steps below to measure the waist circumference of a participant:
Step Action
1 Standing to the side of the participant, locate the last palpable rib
and the top of the hip bone. You may ask the participant to assist
you in locating these points on their body.
2 Ask the participant to wrap the tension tape around themselves
and then position the tape at the midpoint of the last palpable rib
and the top of the hip bone, making sure to wrap the tape over the
same spot on the opposite side.
Note: Check that the tape is horizontal across the back and front
of the participant and as parallel with the floor as possible.
3 Ask the participant to:
• stand with their feet together with weight evenly distributed
across both feet;
• hold the arms in a relaxed position at the sides;
• breathe normally for a few breaths, then make a normal
expiration.
4 Measure waist circumference and read the measurement at the
level of the tape to the nearest 0.1 cm, making sure to keep the
measuring tape snug but not tight enough to cause compression of
the skin.
5 Record the measurement on the Android device, along with the
device ID.
Note: Measure only once and record.

Part 3: Data Collection 3-5-12
Section 5: Collecting Step 2 data: Physical Measurements WHO STEPS Surveillance
Last Updated: 26 January 2017
Measuring Hip Circumference
Introduction Hip circumference measurements are taken in some countries as an expanded
option to measure overweight and obesity.
Equipment To take hip circumference measurements you will need a:
• constant tension tape (for example, Figure Finder or Myo Tape Body
Tape Measure);
• chair or coat stand for participants to place their clothes.
Privacy A private area is necessary for this measurement. This could be a separate
room, or an area that has been screened off from other people within the
household. Hip measurements are taken immediately after waist
circumferences.
Preparing the
participant This measurement should be taken without clothing, that is, directly over the
skin.
If this is not possible, the measurement may be taken over light clothing. It
must not be taken over thick or bulky clothing. This type of clothing must be
removed.
How to take the
measurement This measurement should be taken:
• with the arms relaxed at the sides
• at the maximum circumference over the buttocks.
Continued on next page

Part 3: Data Collection 3-5-13
Section 5: Collecting Step 2 data: Physical Measurements WHO STEPS Surveillance
Last Updated: 26 January 2017
Measuring Hip Circumference, Continued
Procedure Follow the steps below to take hip circumference measurements.
Step Action
1 Stand to the side of the participant, and ask them to help wrap the
tape around themselves.
2 Position the measuring tape around the maximum circumference
of the buttocks.
3 Ask the participant to:
• stand with their feet together with weight evenly distributed
over both feet;
• hold their arms relaxed at the sides.
4 Check that the tape position is horizontal all around the body and
snug without constricting.
5 Measure hip circumference and read the measurement at the level
of the tape to the nearest 0.1 cm.
6 Record the measurement on the Android device, along with the
device ID.
Note: Measure only once and record.

Part 3: Data Collection 3-5-14
Section 5: Collecting Step 2 data: Physical Measurements WHO STEPS Surveillance
Last Updated: 26 January 2017
Completing the Participant Feedback Form (Step 2)
Introduction After having completed the Step 2 measurements, the participant should be
informed on his/her results. You can use the Participant Feedback Form
(Step 2) in order to give the participant feedback on his body measurements
(see Part 6, Section 2). This form stays with the participant after having
completed the survey.
Filling in the
Participant
Feedback Form
Please follow the following guidelines when completing the Participant
Feedback Form:
• blood pressure: record reading 3 for both systolic and diastolic blood
pressure;
• blood pressure classification: tick the appropriate box;
• heart rate: record reading 3;
• height and weight: record height in cm (to the nearest mm) and weight in kg
(to the nearest 0.1 kg);
• body mass index: calculate the body mass index and record (weight in kg
divided by meters squared: kg/m2), the BMI Classification Chart helps
calculating the BMI (see Part 6 Section 2). If a BMI scale is used
measuring both height and weight, record BMI as displayed on the scale;
• BMI classification: tick the appropriate box, the BMI Classification Chart
helps finding the BMI category;
• waist and hip circumference: record waist and hip circumference (if
applicable) in cm (to the nearest mm).

Part 3: Data Collection 3-5-15
Section 5: Collecting Step 2 data: Physical Measurements WHO STEPS Surveillance
Last Updated: 26 January 2017
Referrals and Information for Step 3 Measurements
Referrals for
Step 3
measurements
If your country plans to take biochemical measurements for Step 3, including
spot urine and blood samples, you will need to
• provide the participant with a small container (50 ml), a plastic bag to carry
the sample and instructions for the urine collection that is done in the
evening before fasting for the blood measurements;
• schedule and appointment for the blood measurements with the participant;
• provide the participant with a copy of the appointment card and the fasting
instructions (see Part 6, Section 2);
• remind the participant to bring the appointment card and the urine sample to
the appointment the next day.
Scheduling Follow the steps below to schedule and brief participants:
Step Action
1 Advise the participant the day and time they should come to the
Step 3 site for blood tests using the times assigned to your team.
2 If necessary, provide a map showing the venue.
3 Record the time in the appropriate box on the Step 3 Appointment
Card (see Part 6, Section 2). Leave this card with the participant.
Take note of the appointment time for communication to the field
team supervisor.
4 Provide a copy of the Fasting Instructions and explain the
importance of fasting properly.
5 Remind the participant to bring to the Step 3 site their own copy of
the signed consent form as well as the Step 3 Appointment Card as
a means of identification.
6 Remind the participant to bring the urine sample to the designated
place at their appointment time.
7 In cases where participants need transportation to the Step 3 site
for blood tests, make the arrangement and inform your supervisor.

Part 3: Data Collection 3-5-16
Section 5: Collecting Step 2 data: Physical Measurements WHO STEPS Surveillance
Last Updated: 26 January 2017

Part 3: Data Collection 3-6-1
Section 6: Collecting Step 3 data: Biochemical Measurement WHO STEPS Surveillance
Last Updated: 26 January 2017
Section 6: Collecting Step 3 data: Biochemical
Measurements
Overview
Introduction This section provides information on taking biochemical measures required
under Step 3 of the STEPS Instrument.
Intended
audience This section is designed for use by those fulfilling the following roles:
• Field team supervisors
• Step 3 data collectors
• STEPS Survey Coordinator.
In this section This section covers the following topics:
Topic See Page
Biochemical Measurements Overview 3-6-2
Urine Collection 3-6-4
Urinary Sodium and Creatinine Measurement 3-6-6
Blood Collection 3-6-7
Measurement of Blood Glucose and Lipids 3-6-9
Completing the Participant Feedback Form (Step 3) 3-6-11

Part 3: Data Collection 3-6-2
Section 6: Collecting Step 3 data: Biochemical Measurement WHO STEPS Surveillance
Last Updated: 26 January 2017
Biochemical Measurements Overview
Introduction Step 3 includes selected biochemical measurements that require taking urine
and blood samples.
Step 3 blood testing is usually conducted jointly for all the participants who
have completed Step 1 and 2 the day before and had given consent for Step 3.
This is usually done at a convenient community setting, closer to the homes
of the participants. Step 3 urine samples are usually collected by the
participants the evening before the blood testing, and the samples are brought
to the Step 3 site the next day.
What you will
learn In this module, you will learn:
• what the biochemical measures are and what they mean
• the process of urine collection and instructions for participants
• the fasting process and instructions for participants
• what equipment will be needed
• how to take biochemical measurements
• how to record the results.
Learning
outcome The learning outcome of this section is to understand what the biochemical
measures are and how to accurately prepare participants, take the
measurements and record results.
Recording
results and field
logistics
Since results for Steps 1 and 2 and results for Step 3 will have to be recorded
at different times and places (Step 1 and 2 usually in the household, Step 3
usually at the Step 3 site), Step 1 and 2 data will need to be linked to Step 3
data at a later point in time. The participant identification number (PID) plays
a crucial role here, since it is the variable used for matching the data.
Additionally, it is recommended to use stickers with a unique bar or QR codes
for each participant.
The Step 3 Appointment Card (Part 6, Section 2) is an important form in this
process: the PID (either automatically or manually generated for Step 1 and 2)
should be written on the form, and the participant should bring the form with
her/him to the appointment for the Step 3 measurements. The same PID will
then be used to record the Step 3 information of the participant. The bar or
QR code should be printed on a sticker that is placed on the Step 3
Appointment Card. This code should be scanned with the Android device
twice: once by the interviewer before Step 1 and 2 data are collected, and
once by the Step 3 data collector before recording Step 3 results.
Continued on next page
Part 3: Data Collection 3-6-3
Section 6: Collecting Step 3 data: Biochemical Measurement WHO STEPS Surveillance
Last Updated: 26 January 2017
Biochemical Measurements Overview, Continued
Recording
results and
field logistics
(cont.)
Options for recording of Step 3 data include:
• recording on a separate set of Android devices, specifically for Step 3, and
linking of the data at the end of the entire field work period;
• recording on paper, and entering of Step 3 data into the Android devices
where Step 1 and 2 data are already recorded during regular (ideally daily)
field team meetings, for example each evening after data collection.
Required forms The following forms should be used for Step 3:
• Consent Form 2 (Step 3)
• Step 3 Appointment Card
• Instructions for Spot Urine Collection
• Fasting Instructions
• Participant Feedback Form Step 3
• Step 3 Registration Form.
Note: These forms can be found in Part 6, Section 2.
Dry vs. wet
chemistry for
blood testing
There are two main blood chemistry screening methods: dry and wet
chemistry. Dry chemistry means that blood is taken from the fingertip, while
wet chemistry means that a venous blood sample is drawn. See Part 2, Section
1 for further information on dry and wet chemistry.
Note: In this section, only the dry chemistry method is described since wet
chemistry is done directly at the laboratory.

Part 3: Data Collection 3-6-4
Section 6: Collecting Step 3 data: Biochemical Measurement WHO STEPS Surveillance
Last Updated: 26 January 2017
Urine Collection
Introduction Urine samples are taken from eligible participants to measure urinary sodium
and creatinine.
24-hour Urine
Collection vs
Spot Urine
Collection
The “gold-standard” approach to assessing population salt intake is to obtain
urine samples collected over 24 hours (to avoid diurnal variations) on a
representative sample of the population. However, this approach is difficult
to do well, and provides significant challenges in terms of skills and
resources, particularly when done as part of large scale, comprehensive
population heath surveys in low and middle income countries.
Several new important research papers have concluded that it is possible to
accurately estimate average population 24 hour salt intake from spot urine
samples. Spot urine samples are collected as part of a STEPS survey.
Scheduling
Spot Urine
Collection
Participants will be asked to collect their urine in the evening before fasting,
and take it with them to the appointment for blood testing the next morning.
Material
needed for Spot
Urine
Collection
In order for them to collect their urine, participants will be provided with a
container, a bag, and instructions for urine collection.
Instructions for
Spot Urine
Collection
Instructions for spot urine collection are listed in the table below:
1. We are asking you to collect a sample of your
urine (pee) in the evening before you commence
your fast. 2. When you go the bathroom (toilet) void urine
(pee) into the container. Once the container is
half full finish voiding in the toilet. Screw on the
lid tightly and place the container in the zip
closable plastic bag (do not remove labels).
3. Write down the time you collect your sample: ____:____
4. Place container filled with urine (pee) in the zip
closable plastic bag and store upright in a cool,
dark place.
5. Bring your container filled with urine in the zip
closable plastic bag and this instruction sheet to
the Step 3 site.
Continued on next page

Part 3: Data Collection 3-6-5
Section 6: Collecting Step 3 data: Biochemical Measurement WHO STEPS Surveillance
Last Updated: 26 January 2017
Urine Collection, Continued
General
guidelines for
urine collection
General guidelines for urine collection include:
• Samples should be kept at a dark place (no direct exposure to sunlight)
• Samples should be kept cool, if possible (this is because of the smell;
heat won’t change sodium or creatinine levels in the sample);
• Participants should take any prescribed medication as usual on the day
they provide the urine sample;
• Participants should NOT fast before they take their sample;
• Contamination of the sample with blood should be avoided (women
having their period should use a tampon).
Samples should be excluded from the analysis
• From pregnant women
• If the participant has fasted before taking the sample
• If the sample is contaminated with blood.

Part 3: Data Collection 3-6-6
Section 6: Collecting Step 3 data: Biochemical Measurement WHO STEPS Surveillance
Last Updated: 26 January 2017
Urinary Sodium and Creatinine Measurement
Introduction Urinary sodium and creatinine are measured to determine population levels of
high salt intake, a risk factor mainly for hypertension and cardiovascular
disease.
Storing of urine
samples There is no specific temperature at which samples should be stored, although
it is sometimes more convenient to freeze them.
Transport of
urine samples
and Laboratory
analysis
In most countries, urine samples will be analysed at a central laboratory by a
laboratory technician. Results of this analysis will need to be recorded on the
Android devices, in order to have each participant’s data complete. The
participant ID plays a crucial role here, since it is the variable used for
matching the data.
If samples are stored frozen/unfrozen for future use or sent elsewhere for
analysis, then there may be need to consider further consent taking to account
of cultural beliefs.

Part 3: Data Collection 3-6-7
Section 6: Collecting Step 3 data: Biochemical Measurement WHO STEPS Surveillance
Last Updated: 26 January 2017
Blood Collection
Introduction Blood samples are taken from eligible participants to be used to perform tests
to measure blood glucose and blood lipids.
Infection
control Infection control procedures appropriate for the setting should be followed.
Whole blood is more infective with regard to blood borne disease than
centrifuged serum or plasma. There may be an increased risk in handling
whole blood and universal precautions should be adopted.
Units of
measurement The table below shows the standard units of measurement for biochemical
tests used in STEPS and their upper and lower limits for data entry purposes
on the Android devices.
Blood Test Unit Minimum Maximum
Fasting glucose mmol/L 1.1 33.3
Total cholesterol mmol/L 2.59 10.36
HDL mmol/L 0.30 2.59
Fasting triglycerides mmol/L 0.56 5.65
Blood Test Unit Minimum Maximum
Fasting glucose mg/dl 20 600
Total cholesterol mg/dl 100 400
HDL mg/dl 10 100
Fasting triglycerides mg/dl 50 500
Participant
fasting
requirements
To obtain accurate results, participants must fast for at least 8 hours before
blood collection (12 hours if triglycerides are also measured). This is
particularly important for the measurements of blood glucose as well as
triglycerides, if applicable.
Most blood samples are to be taken in the morning. This means participants
must not to eat or drink anything (except plain water) from about 10 pm the
night before.
Diabetic patients on medication are required to bring their tablets and insulin
with them and to take them after their blood measurement if possible (if they
have not done so, they should inform the relevant laboratory staff).
Note: Fasting Instructions for Step 3 can be found in Part 6, Section 2.
Continued on next page

Part 3: Data Collection 3-6-8
Section 6: Collecting Step 3 data: Biochemical Measurement WHO STEPS Surveillance
Last Updated: 26 January 2017
Blood Collection, Continued
Preparing the
participant After greeting the participant, and asking them to take a seat, follow the steps
below to prepare the participant for a blood test:
Step Action
1 Fill in the following details on the Step 3 Registration Form:
• Date
• Participant ID (if not already filled in)
• Participant Name (if not already filled in)
• check if Consent Form 2 has been signed
• scan the participant QR code.
2 Ask the fasting question (first question on the instrument under
Step 3, Code B1) and record the answer.
3 If the participant has not fasted correctly, then:
• explain that to get accurate results participants need to fast for a
minimum of 8 hours (12 hours if triglycerides are being
measured);
• ask if they would try fasting again and come back for a blood test
the following day.
If the participant agrees to come back the following day, then:
• give the participant an appointment time and fasting instructions;
• note the time of the new appointment in the Step 3 Registration
Form;
• inform the supervisor.
4
If... Then explain to the participant that…
The participant has
fasted correctly • blood is going to be collected from a
small prick on the finger;
• tests will be done on: fasting blood
sugar, cholesterol, fasting triglycerides
and HDL.

Part 3: Data Collection 3-6-9
Section 6: Collecting Step 3 data: Biochemical Measurement WHO STEPS Surveillance
Last Updated: 26 January 2017
Measurement of Blood Glucose and Lipids
Introduction Blood sugar tests are taken to measure for raised blood sugar levels which are
a risk factor for diabetes.
Blood cholesterol tests are taken to measure total cholesterol and HDL
cholesterol levels.
Triglyceride tests are taken to measure the fasting levels of natural fats and
oils in the bloodstream.
Equipment
required Dry chemistry equipment and supplies required for blood glucose and lipid
tests include:
• a device that measures blood glucose and lipids (such as: Cardiochek PA,
Refloton Plus, Cholestech LDX), or separate devices that measure blood
glucose and lipids;
• batch of sufficient reagent test strips (note: for some devices, combined
strips measuring several items are available);
• single use lancets;
• capillary tubes and plungers for collection of the right amount of blood;
• cotton balls and swabs;
• gloves;
• disposable container.
Preparing the
device Follow the appropriate device instructions to set up, prepare and use the meter
for blood tests.
Continued on next page

Part 3: Data Collection 3-6-10
Section 6: Collecting Step 3 data: Biochemical Measurement WHO STEPS Surveillance
Last Updated: 26 January 2017
Measurement of Blood Glucose and Lipids, Continued
Measurement
procedure Follow the steps below to take blood measurements and record the results.
Note that you should also read the instructions provided with the device
carefully.
Step Action
1 Put on gloves.
2 Remove a test strip, put it into the machine and close the test strip box.
The strips are sensitive to heat and humidity, so only take one strip at a
time and close the box tightly.
3 Rub and kneed a fingertip to help withdraw blood (rub the side of the
participant's finger closest to the thumb).
4 Wipe or swab the fingertip by using a sterile swab.
5 Lance the massaged place on the fingertip with lancing device.
6 Allow a hanging blood drop to form without applying too much pressure.
7 Carefully collect the blood with the capillary tube until the blood reaches
the mark on the tube. Put the blood onto the test field without touching it.
Note: The test field must be completely covered with blood. If too little
blood is applied, do not rub it in or apply a second drop, but repeat the
measurement with a fresh test strip.
8 Give the participant a cotton ball to press on the puncture.
9 Wait for the measurement to be displayed. The results are usually
displayed in mmol/L or mg/dL.
10 Record the results of the readings on the Android device and on the
Participant Feedback Form (Step 3). Also tick the corresponding boxes
on this form.
11 Record Technician ID, Device ID, time of day and answer to medication
questions (B6 for glucose, B9 for lipids) on the Android device.

Part 3: Data Collection 3-6-11
Section 6: Collecting Step 3 data: Biochemical Measurement WHO STEPS Surveillance
Last Updated: 26 January 2017
Completing the Participant Feedback Form (Step 3)
Introduction After having completed the Step 3 measurements, the participant should be
informed on his/her results. The Participant Feedback Form (Step 3) can be
used in order to give the participant feedback on his blood measurements (see
Part 6, Section 2). This form stays with the participant after having
completed the survey.
Filling in the
Participant
Feedback Form
Please follow the following guidelines when completing the Participant
Feedback Form:
• fasting blood glucose: record the result for fasting blood glucose in mmol/L
or mg/dL;
• fasting blood glucose classification: tick the appropriate box;
• total blood cholesterol: record the result for total blood cholesterol in
mmol/L or mg/dL;
• total blood cholesterol classification: tick the appropriate box;
• HDL cholesterol: record the result for HDL cholesterol in mmol/L or
mg/dL;
• HDL cholesterol classification: tick the appropriate box;
• fasting triglycerides: record the result for fasting triglycerides in mmol/L or
mg/dL;
• fasting triglycerides classification: tick the appropriate box.

Part 3: Data Collection 3-6-12
Section 6: Collecting Step 3 data: Biochemical Measurement WHO STEPS Surveillance
Last Updated: 26 January 2017