owner’s manual - clarion.commanual).pdf · play/pause (s) / mute button 4 pause (in tape mode or...
TRANSCRIPT
XMA1
Owner’s manual
AM/FM CASSETTEWITH CD CHANGER CONTROL
XMA1
Contents
1. PRECAUTIONS ................................. 22. FEATURES ........................................ 23. CONTROLS ....................................... 34. BUTTON TERMINOLOGY ................. 35. WIRED REMOTE CONTROL UNIT
OPERATIONS.................................... 46. CASSETTE PRECAUTIONS AND
CARE ................................................. 57. OPERATION ...................................... 58. TROUBLESHOOTING ....................... 99. SPECIFICATIONS ........................... 10
Simple Guide .................................. 11
2 XMA1
2.FEATURES Z-Enhancer with 3 Mode Sound Selector ® FM Reception System AM/FM Bands-1 AM, 3 FM/18 FM/6 AM Touchbutton Memory Full Logic Tape Transport with True Function Auto Reverse with Dual Azimuth Adjust Auto Metal Tape EQ Multi-Color LC Display 4-Channel RCA Line Level Output with Fader Control 180 W (45 W × 4) Maximum Power Output Wire-Remote Controller Capability Water Resistance Escutcheon
This equipment has been tested and found to comply with Part 15 ofthe FCC Rules. These limits are designed to provide reasonable pro-tection against harmful interference in a residential installation. Thisequipment generates, uses, and can radiate radio frequency energyand, if not installed and used in accordance with the instructions,may cause harmful interference to radio communications. However,there is no guarantee that interference will not occur in a particularinstallation. If this equipment does cause harmful interference to ra-dio or television reception, which can be determined by turning theequipment off and on, the user is encouraged to consult the dealeror an experienced radio/TV technician for help.
1.PRECAUTIONS
USE OF CONTROLS, ADJUSTMENTS, OR PERFORMANCEOF PROCEDURES OTHER THAN THOSE SPECIFIED HEREIN,MAY RESULT IN HAZARDOUS RADIATION EXPOSURE.THE CASSETTE PLAYER SHOULD NOT BE ADJUSTED ORREPAIRED BY ANYONE EXCEPT PROPERLY QUALIFIED SER-VICE PERSONNEL.
CAUTION
INFORMATION FOR USERS:
CHANGES OR MODIFICATIONS TO THIS PRODUCT WILL VOID THE WARRANTY AND WILL VIOLATE FCC APPROVAL.
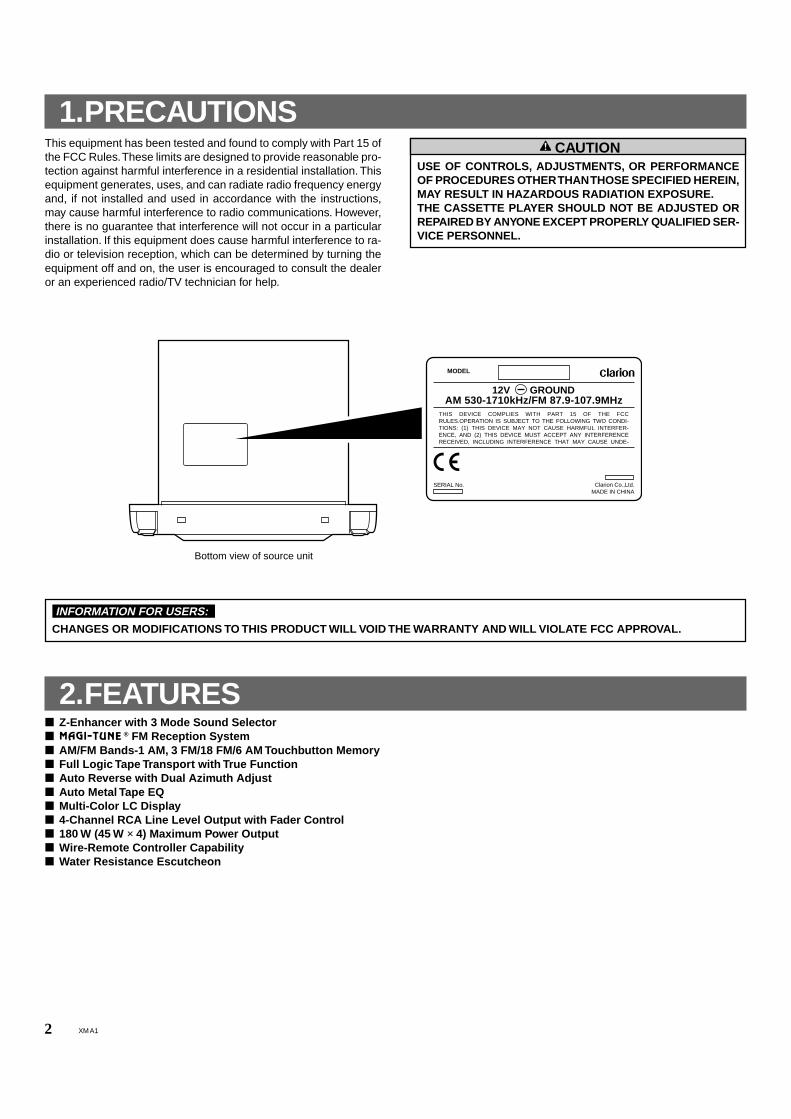
Bottom view of source unit
AM 530-1710kHz/FM 87.9-107.9MHz12V GROUND
MODEL
THIS DEVICE COMPLIES WITH PART 15 OF THE FCC RULES.OPERATION IS SUBJECT TO THE FOLLOWING TWO CONDI-TIONS: (1) THIS DEVICE MAY NOT CAUSE HARMFUL INTERFER-ENCE, AND (2) THIS DEVICE MUST ACCEPT ANY INTERFERENCE RECEIVED, INCLUDING INTERFERENCE THAT MAY CAUSE UNDE-
SERIAL No. Clarion Co.,Ltd.MADE IN CHINA
3XMA1
3.CONTROLS
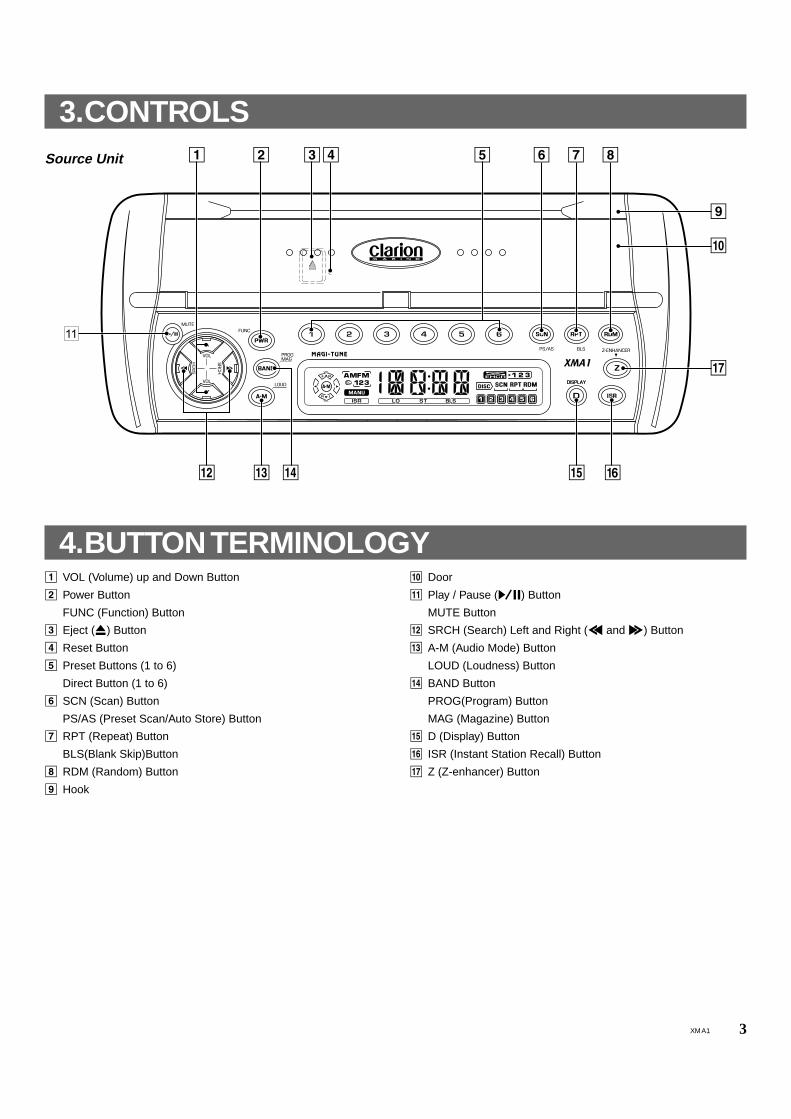
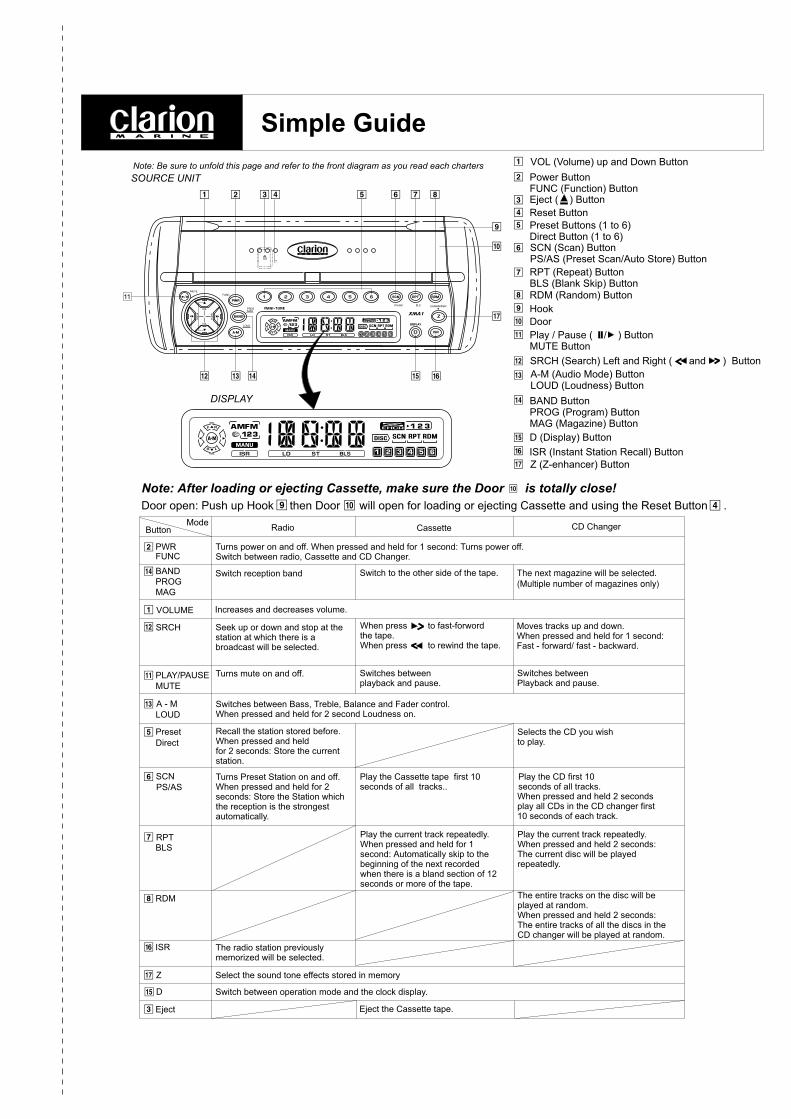
4.BUTTON TERMINOLOGY1 VOL (Volume) up and Down Button
2 Power Button
FUNC (Function) Button
3 Eject (Q) Button
4 Reset Button
5 Preset Buttons (1 to 6)
Direct Button (1 to 6)
6 SCN (Scan) Button
PS/AS (Preset Scan/Auto Store) Button
7 RPT (Repeat) Button
BLS(Blank Skip)Button
8 RDM (Random) Button
9 Hook
0 Door
! Play / Pause (s) Button
MUTE Button
@ SRCH (Search) Left and Right (a and d) Button
# A-M (Audio Mode) Button
LOUD (Loudness) Button
$ BAND Button
PROG(Program) Button
MAG (Magazine) Button
% D (Display) Button
¥ ISR (Instant Station Recall) Button
& Z (Z-enhancer) Button
Source Unit
4 XMA1
5.WIRED REMOTE CONTROL UNIT OPERATIONS
PWR / FUNC Button 1Turning on and off the powerPress the PWR button 1 to turn the power on and press and hold itfor 1 second or longer to turn the power off.
Changing the operation modeEach time the FUNC button 1 is pressed, the mode switches in thefollowing order:
XMA1 following operations are enabled by remote control with the Wired Remote Control Unit M101RC (sold separately).
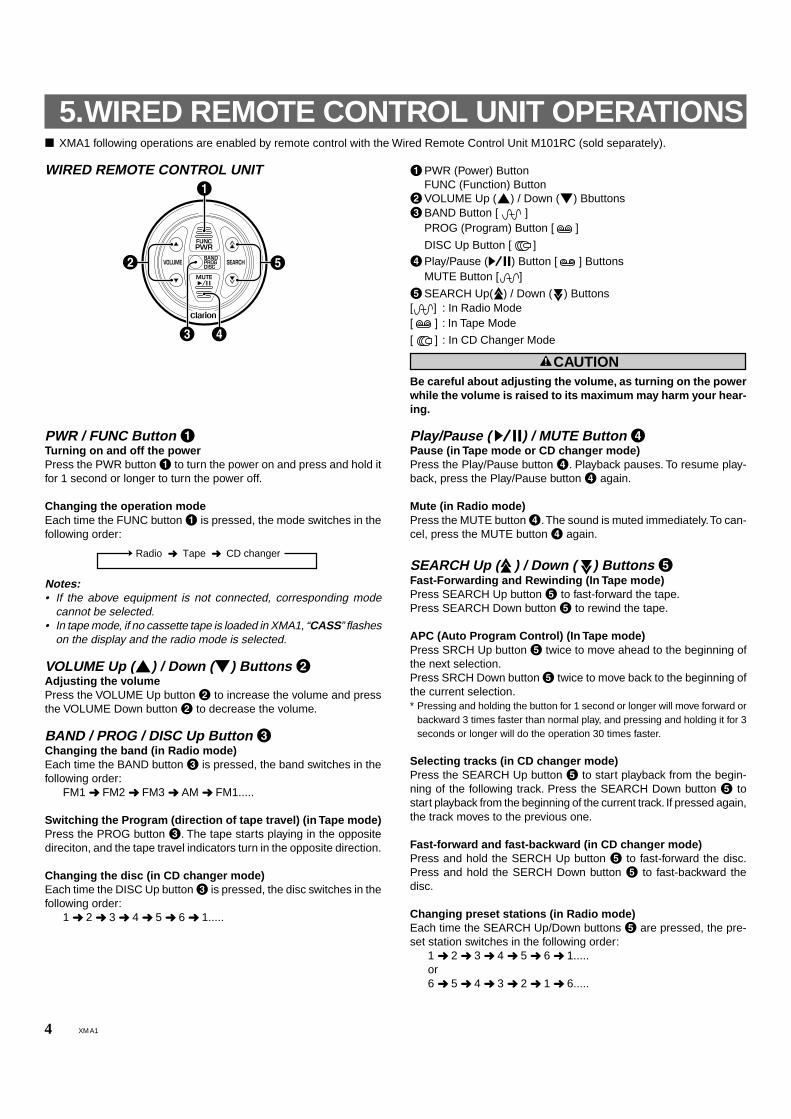
WIRED REMOTE CONTROL UNIT 1PWR (Power) ButtonFUNC (Function) Button
2VOLUME Up (w) / Down (z) Bbuttons3BAND Button [ ]
PROG (Program) Button [ ]
DISC Up Button [ ]4Play/Pause (s) Button [ ] Buttons
MUTE Button [ ]
5SEARCH Up( ) / Down ( ) Buttons[ ] : In Radio Mode[ ] : In Tape Mode
[ ] : In CD Changer Mode
Play/Pause ( s) / MUTE Button 4Pause (in Tape mode or CD changer mode)Press the Play/Pause button 4. Playback pauses. To resume play-back, press the Play/Pause button 4 again.
Mute (in Radio mode)Press the MUTE button 4. The sound is muted immediately. To can-cel, press the MUTE button 4 again.
SEARCH Up ( ) / Down ( ) Buttons 5Fast-Forwarding and Rewinding (In Tape mode)Press SEARCH Up button 5 to fast-forward the tape.Press SEARCH Down button 5 to rewind the tape.
APC (Auto Program Control) (In Tape mode)Press SRCH Up button 5 twice to move ahead to the beginning ofthe next selection.Press SRCH Down button 5 twice to move back to the beginning ofthe current selection.* Pressing and holding the button for 1 second or longer will move forward or
backward 3 times faster than normal play, and pressing and holding it for 3seconds or longer will do the operation 30 times faster.
Selecting tracks (in CD changer mode)Press the SEARCH Up button 5 to start playback from the begin-ning of the following track. Press the SEARCH Down button 5 tostart playback from the beginning of the current track. If pressed again,the track moves to the previous one.
Fast-forward and fast-backward (in CD changer mode)Press and hold the SERCH Up button 5 to fast-forward the disc.Press and hold the SERCH Down button 5 to fast-backward thedisc.
Changing preset stations (in Radio mode)Each time the SEARCH Up/Down buttons 5 are pressed, the pre-set station switches in the following order:
1 2 3 4 5 6 1.....or6 5 4 3 2 1 6.....
Be careful about adjusting the volume, as turning on the powerwhile the volume is raised to its maximum may harm your hear-ing.
CAUTION
Radio Tape CD changer
Notes:• If the above equipment is not connected, corresponding mode
cannot be selected.• In tape mode, if no cassette tape is loaded in XMA1, “CASS” flashes
on the display and the radio mode is selected.
VOLUME Up (w) / Down (z) Buttons 2Adjusting the volumePress the VOLUME Up button 2 to increase the volume and pressthe VOLUME Down button 2 to decrease the volume.
BAND / PROG / DISC Up Button 3Changing the band (in Radio mode)Each time the BAND button 3 is pressed, the band switches in thefollowing order:
FM1 FM2 FM3 AM FM1.....
Switching the Program (direction of tape travel) (in Tape mode)Press the PROG button 3. The tape starts playing in the oppositedireciton, and the tape travel indicators turn in the opposite direction.
Changing the disc (in CD changer mode)Each time the DISC Up button 3 is pressed, the disc switches in thefollowing order:
1 2 3 4 5 6 1.....
5XMA1
6. CASSETTE PRECAUTIONS AND CARE
7. OPERATIONNote:• Be sure to read this chapter referring to the front diagrams of chapter 3. CONTROLS on page 3 (unfold).
When this unit is turned on, starting and stopping the engine ofa boat with its volume raised to the maximum level may harmyour hearing.Be careful about adjusting the volume.
Basic Operations
1. Tape slack can lead to operating difficulties. Remove tape slackbefore inserting a cassette, particularly when using C-90 or pre-recorded cassettes.
2. Use C-30 to C-90 cassettes. Avoid use ofC-120 or longer cassettes (The very thin tape may stretch or break).
3. Clean the head periodically with a good commercial head cleaner.Avoid touching the head with magnetic or hard objects.
4. Do not oil the cassette mechanism.
5. Always remove the cassette from the mechanism when not inuse. Exposure to direct sunlight, extreme temperatures or highhumidity may damage cassettes.
6. The cassette tape will automatically eject from the mechanism if itis damaged. Always ensure that cassette tapes are in good con-dition prior to use.
Adjusting the Treble1) Press A-M button # and select “TREB”.2) Press volume button 1 w to emphasizes the treble;
press z to attenuates the treble.* The factory default setting is “0”. (Adjustment range: –6 to +6)
3) When the adjustment is complete, press A-M button # severaltimes until the function mode is reached.
Adjusting the Balance1) Press A-M button # and select “BAL”.2) Press volume1 w to emphasizes the sound from the right
speaker;press z to emphasizes the sound from the left speaker.∗ The factory default setting is “0”. (Adjustment range: L9 to R9)
3) When the adjustment is complete, press A-M button # severaltimes until the function mode is reached.
Adjusting the Fader1) Press A-M button # and select “FAD”.2) Press volume1 w to emphasizes the sound from the front
speaker;press z to emphasizes the sound from the rear speakers.∗ The factory default setting is “0”. (Adjustment range: F9 to R9)
3) When the adjustment is complete, press A-M button # severaltimes until the function mode is reached.
Setting the Z-enhancerThis unit comes with three types of sound tone effects stored inmemory. Select the one you prefer.∗ The factory default setting is “Z-EHCR OFF”.Each time you press Z-EHCR button &, the tone effect changes inthe following order.“Z-ENHANCER 1” “Z-ENHANCER 2” “Z-ENHANCER 3” “Z-EHCR OFF” “Z-ENHANCER 1”...• Z-ENHANCER 1: bass emphasized• Z-ENHANCER 2: treble emphasized• Z-ENHANCER 3: bass and treble emphasized• Z-EHCR OFF: no sound effect
Loudness FunctionPress the LOUD button # for at least 2 seconds to turn the loud-ness function on and off.
Switching the DisplayPress the DISP button % to enter the clock display mode.Operation mode display Clock display Operation mode display
CAUTION
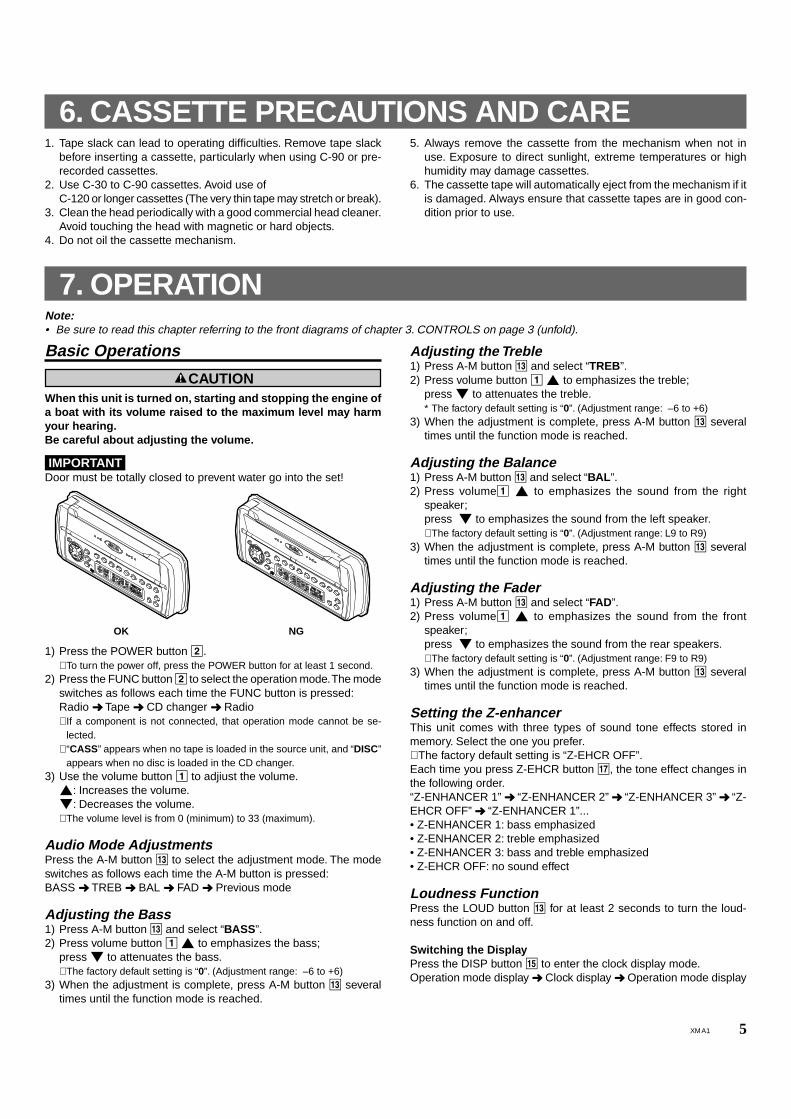
IMPORTANTDoor must be totally closed to prevent water go into the set!
OK NG
1) Press the POWER button 2.∗ To turn the power off, press the POWER button for at least 1 second.
2) Press the FUNC button 2 to select the operation mode. The modeswitches as follows each time the FUNC button is pressed:Radio Tape CD changer Radio∗ If a component is not connected, that operation mode cannot be se-
lected.∗ “CASS” appears when no tape is loaded in the source unit, and “DISC”
appears when no disc is loaded in the CD changer.3) Use the volume button 1 to adjiust the volume.
w: Increases the volume.z: Decreases the volume.∗ The volume level is from 0 (minimum) to 33 (maximum).
Audio Mode AdjustmentsPress the A-M button # to select the adjustment mode. The modeswitches as follows each time the A-M button is pressed:BASS TREB BAL FAD Previous mode
Adjusting the Bass1) Press A-M button # and select “BASS”.2) Press volume button 1 w to emphasizes the bass;
press z to attenuates the bass.∗ The factory default setting is “0”. (Adjustment range: –6 to +6)
3) When the adjustment is complete, press A-M button # severaltimes until the function mode is reached.
6 XMA1
Setting the Clock1) Press the DISP button % to enter the clock display mode.2) Press the DISP button % for 2 seconds or more. This enables
clock editing.∗ The editable fields will be indicated by flash.
3) To move between the hour and minute fields, use the SRCH Left(hour) and Right (minute) buttons @.
4) To confirm the clock setting, press the DISP button %.
Notes:• If you select another operation mode before completing the above
procedure, the clock setting operation will be canceled.• Removing the battery for a check or repair causes the clock to be
reset. Set the clock again in such a case.
Switching to the Other Side of the TapePress the PROG button $. Playback is switched to the other side ofthe cassette tape.
FF Scan Function (Intro Music Scan)When the SCN button 6 is pressed, “SCN” appears on the display,and the first 10 seconds of all the tracks on the cassette tape areplayed. Press the SCN button again to stop scanning.
Repeat Function (Repeat Play)When the RPT button 7 is pressed, “RPT” appears on the displayand the current track is played repeatedly. Press the RPT button againto cancel the repeat mode.
Blank Skip FunctionUse this function to automatically skip to the beginning of the nextrecorded section when there is a blank section of 12 seconds ormore on the tape.When the BLS button 7 is pressed for 1 second or longer, the blankskip mode is set and “BLS” appears on the display. Press the BLSbutton 7 again for 1 second or longer to cancel the blank skip mode.
Notes:The APC, scan, repeat and blank skip functions will not work withthe following types of tapes:• Tapes on which the recording level is low• Tapes on which there is less than 4 seconds of blank space be-
tween selections• Tapes on which there are long pauses in the middle of selections• Tapes on which there is much noise between selections
Tape Operation
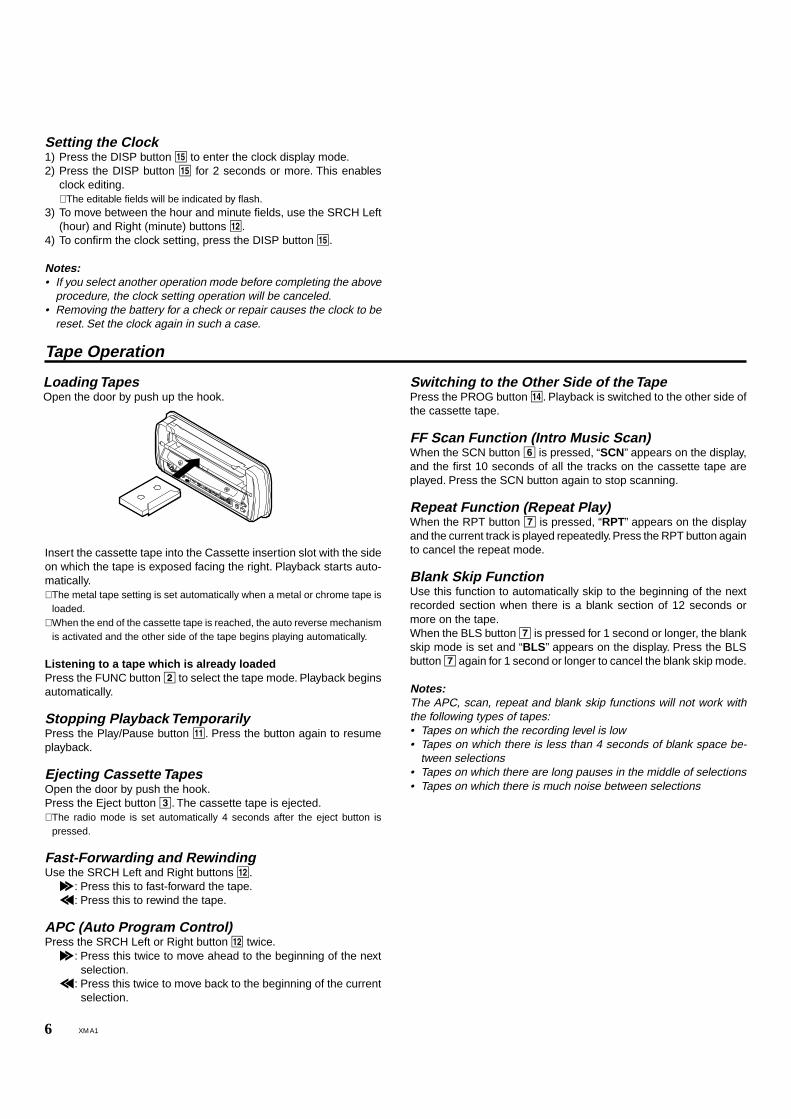
Loading TapesOpen the door by push up the hook.
Insert the cassette tape into the Cassette insertion slot with the sideon which the tape is exposed facing the right. Playback starts auto-matically.∗ The metal tape setting is set automatically when a metal or chrome tape is
loaded.∗ When the end of the cassette tape is reached, the auto reverse mechanism
is activated and the other side of the tape begins playing automatically.
Listening to a tape which is already loadedPress the FUNC button 2 to select the tape mode. Playback beginsautomatically.
Stopping Playback TemporarilyPress the Play/Pause button !. Press the button again to resumeplayback.
Ejecting Cassette TapesOpen the door by push the hook.Press the Eject button 3. The cassette tape is ejected.∗ The radio mode is set automatically 4 seconds after the eject button is
pressed.
Fast-Forwarding and RewindingUse the SRCH Left and Right buttons @.
d: Press this to fast-forward the tape.a: Press this to rewind the tape.
APC (Auto Program Control)Press the SRCH Left or Right button @ twice.
d: Press this twice to move ahead to the beginning of the nextselection.
a: Press this twice to move back to the beginning of the currentselection.
7XMA1
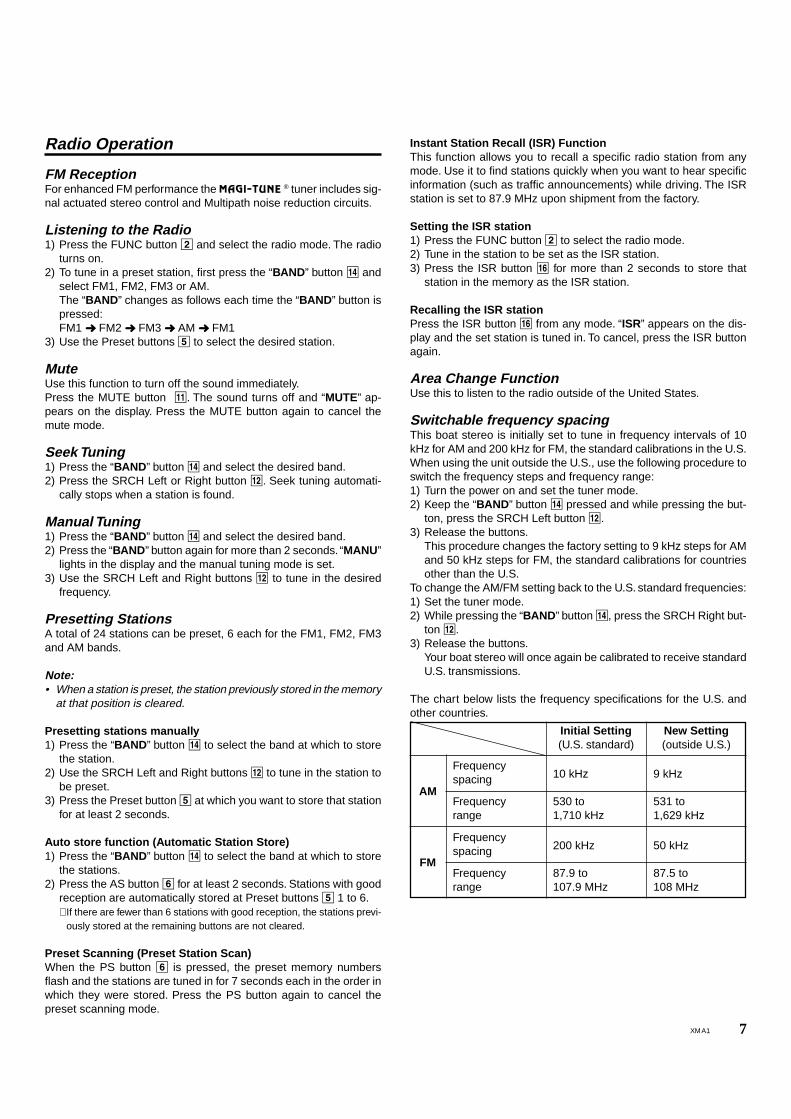
87.5 to108 MHz
AM
FM
Frequencyspacing
Frequencyrange
Frequencyspacing
Frequencyrange
Initial Setting(U.S. standard)
New Setting(outside U.S.)
10 kHz
530 to1,710 kHz
200 kHz
87.9 to107.9 MHz
9 kHz
531 to1,629 kHz
50 kHz
Radio Operation
FM ReceptionFor enhanced FM performance the ® tuner includes sig-nal actuated stereo control and Multipath noise reduction circuits.
Listening to the Radio1) Press the FUNC button 2 and select the radio mode. The radio
turns on.2) To tune in a preset station, first press the “BAND” button $ and
select FM1, FM2, FM3 or AM.The “BAND” changes as follows each time the “BAND” button ispressed:FM1 FM2 FM3 AM FM1
3) Use the Preset buttons 5 to select the desired station.
MuteUse this function to turn off the sound immediately.Press the MUTE button !. The sound turns off and “MUTE” ap-pears on the display. Press the MUTE button again to cancel themute mode.
Seek Tuning1) Press the “BAND” button $ and select the desired band.2) Press the SRCH Left or Right button @. Seek tuning automati-
cally stops when a station is found.
Manual Tuning1) Press the “BAND” button $ and select the desired band.2) Press the “BAND” button again for more than 2 seconds. “MANU”
lights in the display and the manual tuning mode is set.3) Use the SRCH Left and Right buttons @ to tune in the desired
frequency.
Presetting StationsA total of 24 stations can be preset, 6 each for the FM1, FM2, FM3and AM bands.
Note:• When a station is preset, the station previously stored in the memory
at that position is cleared.
Presetting stations manually1) Press the “BAND” button $ to select the band at which to store
the station.2) Use the SRCH Left and Right buttons @ to tune in the station to
be preset.3) Press the Preset button 5 at which you want to store that station
for at least 2 seconds.
Auto store function (Automatic Station Store)1) Press the “BAND” button $ to select the band at which to store
the stations.2) Press the AS button 6 for at least 2 seconds. Stations with good
reception are automatically stored at Preset buttons 5 1 to 6.∗ If there are fewer than 6 stations with good reception, the stations previ-
ously stored at the remaining buttons are not cleared.
Preset Scanning (Preset Station Scan)When the PS button 6 is pressed, the preset memory numbersflash and the stations are tuned in for 7 seconds each in the order inwhich they were stored. Press the PS button again to cancel thepreset scanning mode.
Instant Station Recall (ISR) FunctionThis function allows you to recall a specific radio station from anymode. Use it to find stations quickly when you want to hear specificinformation (such as traffic announcements) while driving. The ISRstation is set to 87.9 MHz upon shipment from the factory.
Setting the ISR station1) Press the FUNC button 2 to select the radio mode.2) Tune in the station to be set as the ISR station.3) Press the ISR button ¥ for more than 2 seconds to store that
station in the memory as the ISR station.
Recalling the ISR stationPress the ISR button ¥ from any mode. “ISR” appears on the dis-play and the set station is tuned in. To cancel, press the ISR buttonagain.
Area Change FunctionUse this to listen to the radio outside of the United States.
Switchable frequency spacingThis boat stereo is initially set to tune in frequency intervals of 10kHz for AM and 200 kHz for FM, the standard calibrations in the U.S.When using the unit outside the U.S., use the following procedure toswitch the frequency steps and frequency range:1) Turn the power on and set the tuner mode.2) Keep the “BAND” button $ pressed and while pressing the but-
ton, press the SRCH Left button @.3) Release the buttons.
This procedure changes the factory setting to 9 kHz steps for AMand 50 kHz steps for FM, the standard calibrations for countriesother than the U.S.
To change the AM/FM setting back to the U.S. standard frequencies:1) Set the tuner mode.2) While pressing the “BAND” button $, press the SRCH Right but-
ton @.3) Release the buttons.
Your boat stereo will once again be calibrated to receive standardU.S. transmissions.
The chart below lists the frequency specifications for the U.S. andother countries.

8 XMA1
CD Changer Operation
When a separately sold CD changer is connected, it can be con-trolled from the source unit.
Notes:• Some CDs recorded in CD-R mode may not be usable.• Even when recorded in CD-RW mode, some CDs may not be us-
able.
Listening to the DiscPress the FUNC button 2 and select the CD changer mode, thenthe CD starts playing.
Stopping (pausing) PlaybackPress the Play/Pause button !.Press the Play/Pause button ! again to resume playback.
Selection of CDsPress the Direct button 5 to select 1 to 6, then select the CD youwish to play.
Selecting Tracks (songs)Press the SRCH Left and Right buttons @.
d: Playback will start from the next track.a: Playback will start from the beginning of the track currently
playing. When this button is pressed again, the CD will playfrom the previous track.
Fast-Forward and Fast-BackwardPress and hold the SRCH Left and Right buttons @.
d: To fast-forwarda: To fast-backward
∗ Pressing the SRCH Left / Right button for 1 second or longer will moveforward or backward 5 times faster than normal play, and pressing it for 3seconds or longer will do the operation 30 times faster.
Scan Play (Intro Music Scan)Press the SCN button 6, then the display shows “SCN”, then theCD will play the first 10 seconds of all the tracks of all CDs. Press theSCN button 6 again to disengage the unit from scan play.∗ A scan play will start from the track following the one currently playing.
Disc scan playPress and hold the SCN button 6 for 2 seconds or longer, then thedisplay will show “ ” and “SCN”, and plays the first 10 secondsof the first tracks of all the CDs in the CD changer.Press the SCN button 6 again to disengage the unit from disc play.∗ A scan play will start from the first tracks of next CDs following the one
currently playing.
Repeat PlayPress the RPT button 7, then the display shows “RPT”, then thetrack currently playing will be played repeatedly. Press the RPT but-ton 7 again to disengage the unit from repeat play.
Disc repeat playPress and hold the RPT button 7 for 2 seconds or longer, then thedisplay shows both the “ ” and “RPT”, then the disc currentlybeing played will be played repeatedly.Press the RPT button 7 again to disengage the unit from disc re-peat play.
Random PlayPress the RDM button 8, then the display will show “RDM”, thenthe entire tracks on the disc will be played at random.Press the RDM button 8 again to disengage the unit from disc ran-dom play.
Disc random playbackPress and hold the RDM button 8 for 2 seconds or longer, then thedisplay will show both the “ ” and “RDM”, then the entire tracksof all the discs in the CD changer will be played at random.Press the RDM button 8 again to disengage the unit from disc play.
Switching MagazineThis function can be used only when the connected CD changer canstore a multiple number of magazines.Every time the MAG button $ is pressed, the next magazine will beselected.
9XMA1
8.TROUBLESHOOTINGProblem Cause Measure
Power does not turn on.(or no sound is produced.)
Sound quality is poor.
No sound while unit can be operated.
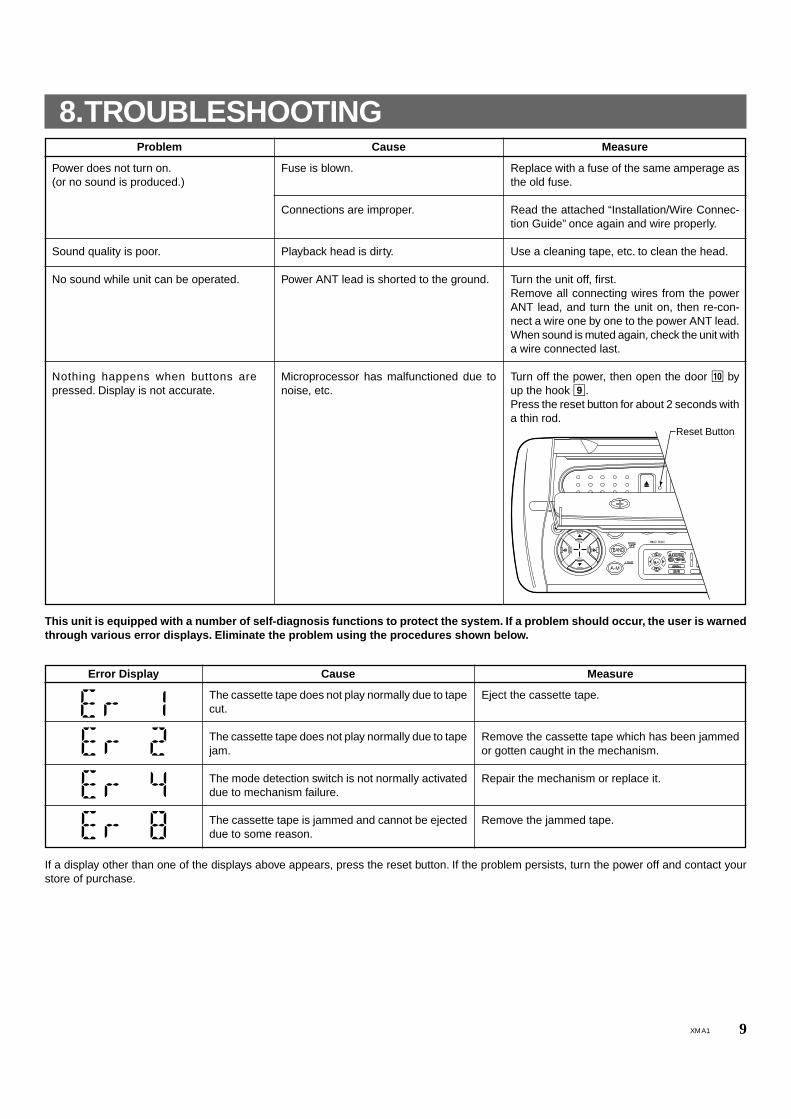
Nothing happens when buttons arepressed. Display is not accurate.
Fuse is blown.
Connections are improper.
Playback head is dirty.
Power ANT lead is shorted to the ground.
Microprocessor has malfunctioned due tonoise, etc.
Replace with a fuse of the same amperage asthe old fuse.
Read the attached “Installation/Wire Connec-tion Guide” once again and wire properly.
Use a cleaning tape, etc. to clean the head.
Turn the unit off, first.Remove all connecting wires from the powerANT lead, and turn the unit on, then re-con-nect a wire one by one to the power ANT lead.When sound is muted again, check the unit witha wire connected last.
Turn off the power, then open the door 0 byup the hook 9.Press the reset button for about 2 seconds witha thin rod.
This unit is equipped with a number of self-diagnosis functions to protect the system. If a problem should occur, the user is warnedthrough various error displays. Eliminate the problem using the procedures shown below.
Error Display Cause Measure
The cassette tape does not play normally due to tapecut.
The cassette tape does not play normally due to tapejam.
The mode detection switch is not normally activateddue to mechanism failure.
The cassette tape is jammed and cannot be ejecteddue to some reason.
Eject the cassette tape.
Remove the cassette tape which has been jammedor gotten caught in the mechanism.
Repair the mechanism or replace it.
Remove the jammed tape.
If a display other than one of the displays above appears, press the reset button. If the problem persists, turn the power off and contact yourstore of purchase.
Reset Button
10 XMA1
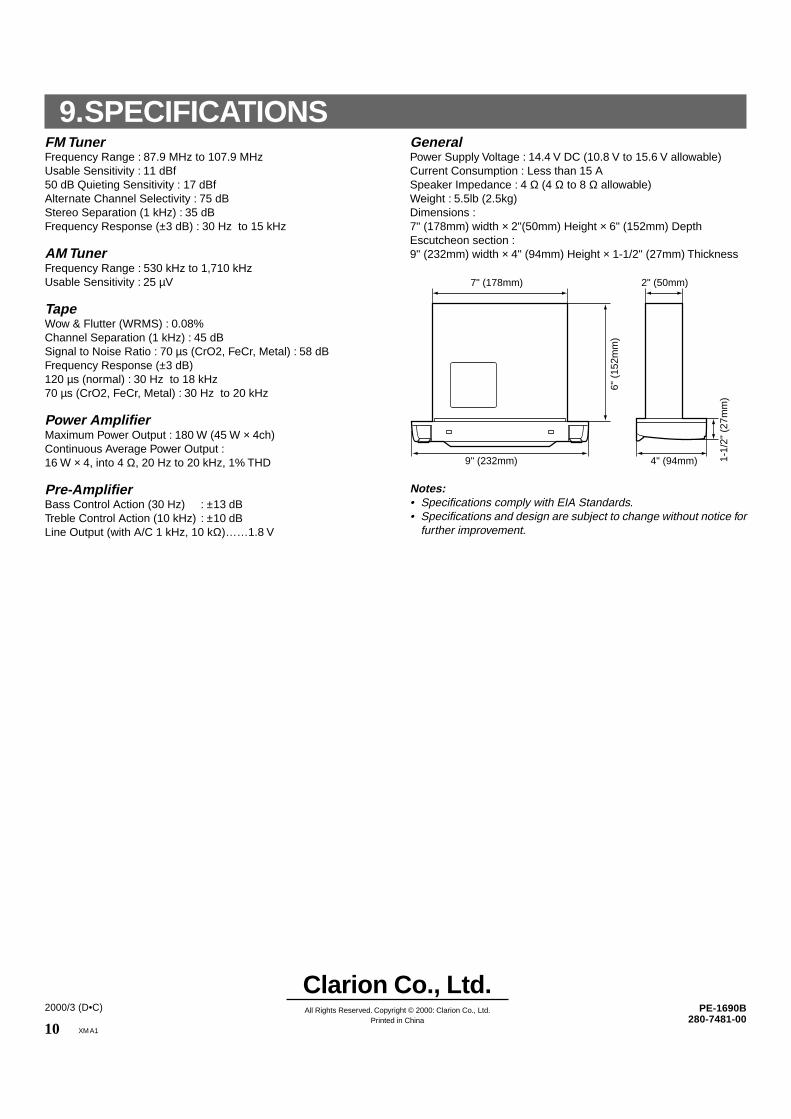
FM TunerFrequency Range : 87.9 MHz to 107.9 MHzUsable Sensitivity : 11 dBf50 dB Quieting Sensitivity : 17 dBfAlternate Channel Selectivity : 75 dBStereo Separation (1 kHz) : 35 dBFrequency Response (±3 dB) : 30 Hz to 15 kHz
AM TunerFrequency Range : 530 kHz to 1,710 kHzUsable Sensitivity : 25 µV
TapeWow & Flutter (WRMS) : 0.08%Channel Separation (1 kHz) : 45 dBSignal to Noise Ratio : 70 µs (CrO2, FeCr, Metal) : 58 dBFrequency Response (±3 dB)120 µs (normal) : 30 Hz to 18 kHz70 µs (CrO2, FeCr, Metal) : 30 Hz to 20 kHz
Power AmplifierMaximum Power Output : 180 W (45 W × 4ch)Continuous Average Power Output :16 W × 4, into 4 Ω, 20 Hz to 20 kHz, 1% THD
Pre-AmplifierBass Control Action (30 Hz) : ±13 dBTreble Control Action (10 kHz) : ±10 dBLine Output (with A/C 1 kHz, 10 kΩ)……1.8 V
9.SPECIFICATIONS
Notes:• Specifications comply with EIA Standards.• Specifications and design are subject to change without notice for
further improvement.
7" (178mm)
9" (232mm) 4" (94mm) 1-1/
2" (
27m
m)
6" (
152m
m)
2" (50mm)
GeneralPower Supply Voltage : 14.4 V DC (10.8 V to 15.6 V allowable)Current Consumption : Less than 15 ASpeaker Impedance : 4 Ω (4 Ω to 8 Ω allowable)Weight : 5.5lb (2.5kg)Dimensions :7" (178mm) width × 2"(50mm) Height × 6" (152mm) DepthEscutcheon section :9" (232mm) width × 4" (94mm) Height × 1-1/2" (27mm) Thickness
All Rights Reserved. Copyright © 2000: Clarion Co., Ltd.Printed in China
2000/3 (D•C) PE-1690B280-7481-00
Clarion Co., Ltd.
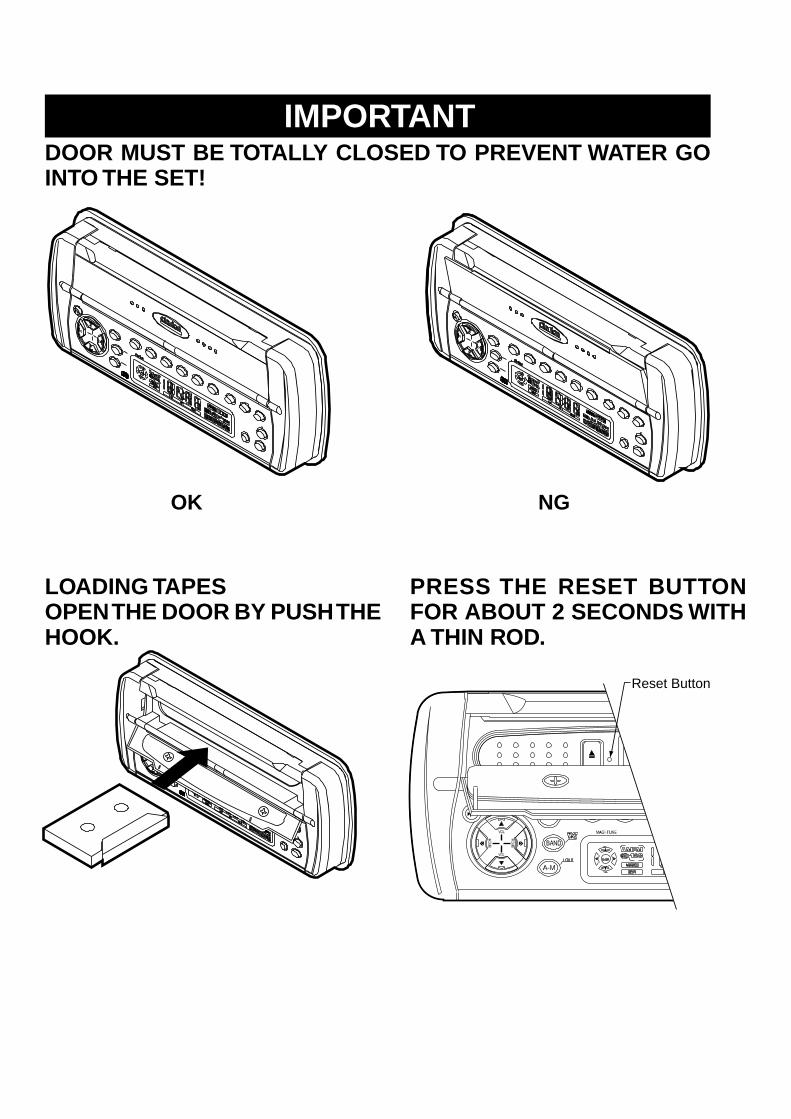
LOADING TAPESOPEN THE DOOR BY PUSH THEHOOK.
Reset Button
IMPORTANTDOOR MUST BE TOTALLY CLOSED TO PREVENT WATER GOINTO THE SET!
OK NG
PRESS THE RESET BUTTONFOR ABOUT 2 SECONDS WITHA THIN ROD.