owner's manual ic..ftsmnwl - appliance parts | … · 917.377660 • espasol, p. 19 caution:...
TRANSCRIPT

Owner's Manual
IC..FTSMnWlROTARY LAWN MOWER6.5 Horsepower
Power-Propelled
21" Rear Discharge
Model No.
917.377660
• EspaSol, p. 19
CAUTION:Read and follow all
Safety Rules and Instructionsbefore operating this equipment
Sears, Roebuck and Co., Hoffman Estates, IL 60179 U.S.A.Visit our Craftsman website: www.sears.com/craftsman

Warranty ................................................... 2Safety Rules .......................................... 2-4Product Specifications .............................. 4Assembly / Pre-Operation ........................ 6Operation ............................................ 7-10Maintenance Schedule ........................... 11
Maintenance ...................................... 11-14Service and Adjustments ................... 14-15Storage .............................................. 15-16Troubleshooting ................................. 17-18Repair Parts ....................................... 35-43Sears Service .......................... Back Cover
LIMITED TWO YEAR WARRANTY ON CRAFTSMAN POWER MOWER
For two years from date of purchase, when this Craftsman Lawn Mower is maintained,lubricated, and tuned up according to the operating and maintenance instructions in theowner's manual, Sears will repair free of charge any defect in material or workmanship.
If this Craftsman Lawn Mower is used for commercial or rental purposes, this warrantyapplies for only 90 days from the date of purchase.
This Warranty does not cover:• Expendable items which become worn during normal use, such as rotary mower
blades, blade adapters, belts, air cleaners and spark plug.• Repairs necessary because of operator abuse or negligence, including bent crank-
shafts and the failure to maintain the equipment according to the instructions con-tained in the owner's manual.
Warranty service is available by returning the Craftsman power mower to the nearest SearsParts & Repair Center in the United States. This warranty applies only while this productis used in the United States.
This Warranty gives you specific legal rights, and you may also have other rights whichvary from state to state.
Sears, Roebuck And Co., D/817 WA, Hoffman Estates, IL 60179
IMPORTANT: This cutting machine is capable of amputating hands and feet and throw-ing objects. Failure to observe the following safety instructions could result in seriousinjury or death.
_¢l,Look for this symbol to point outimportant safety precautions. It meansCAUTION!H BECOME ALERT!HYOUR SAFETY IS INVOLVED.• I,WARNING: In order to prevent ac-cidental starting when setting up, trans-porting, adjusting or making repairs,always disconnect spark plug wire andplace wire where it cannot contact sparkplug._,WARNING: Engine exhaust, some of itsconstituents, and certain vehicle compo-nents contain or emit chemicals knownto the State of California to cause cancerand birth defects or other reproductiveharm.
2
Ai_WARNING: Battery posts, terminals andrelated accessories contain lead and leadcompounds, chemicals known to the Stateof California to cause cancer and birthdefects or other reproductive harm. Washhands after handling.• 1,CAUTION: Muffler and other engineparts become extremely hot duringoperation and remain hot after engine hasstopped. To avoid severe burns on contact,stay away from these areas.

I. GENERAL OPERATION• Read, understand, and follow all
instructions on the machine and in themanual(s) before starting. Be thoroughlyfamiliar with the controls and the properuse of the machine before starting.
• Do not put hands or feet near or underrotating parts. Keep clear of the dis-charge opening at all times.
• Only allow responsible individuals, whoare familiar with the instructions, to oper-ate the machine.
• Clear the area of objects such as rocks,toys, wire, bones, sticks, etc., whichcould be picked up and thrown by theblade.
• Be sure the area is clear of other peoplebefore mowing. Stop machine if anyoneenters the area.
• Do not operate the mower when bare-foot or wearing open sandals. Alwayswear substantial foot wear.
• Do not pull mower backwards unlessabsolutely necessary. Always look downand behind before and while movingbackwards.
• Do not operate the mower withoutproper guards, plates, grass catcher orother safety protective devices in place.
• See manufacturer's instructions forproper operation and installation ofaccessories. Only use accessories ap-proved by the manufacturer.
• Stop the blade(s) when crossing graveldrives, walks, or roads.
• Stop the engine (motor) whenever youleave the equipment, before cleaning themower or unclogging the chute.
• Shut the engine (motor) off and wait untilthe blade comes to complete stop beforeremoving grass catcher.
• Mow only in daylight or good artificiallight.
• Do not operate the machine while underthe influence of alcohol or drugs.
• Never operate machine in wet grass.Always be sure of your footing: keep afirm hold on the handle and walk; neverrun.
• Disengage the self-propelled mech-anism or drive clutch on mowers soequipped before starting the engine(motor).
• If the equipment should start to vibrateabnormally, stop the engine (motor) andcheck immediately for the cause. Vibra-tion is generally a warning of trouble.
• Always wear safety goggles or safetyglasses with side shields when operating
II. SLOPE OPERATION
Slopes are a major factor related to slipand fall accidents which can result insevere injury. All slopes require extra cau-tion. If you feel uneasy on a slope, do notmow it.DO:
• Mow across the face of slopes: neverup and down. Exercise extreme cautionwhen changing direction on slopes.
• Remove obstacles such as rocks, treelimbs, etc.
• Watch for holes, ruts, or bumps. Tallgrass can hide obstacles.
DO NOT:
• Do not trim near drop-offs, ditches orembankments. The operator could losefooting or balance.
• Do not trim excessively steep slopes.• Do not mow on wet grass. Reduced foot-
ing could cause slipping.
III. CHILDREN
Tragic accidents can occur if the operatoris not alert to the presence of children.Children are often attracted to the machineand the mowing activity. Never assumethat children will remain where you lastsaw them.• Keep children out of the trimming area
and under the watchful care of anotherresponsible adult.
• Be alert and turn machine off if childrenenter the area.
• Before and while walking backwards,look behind and down for small children.
• Never allow children to operate the ma-chine.
• Use extra care when approaching blindcorners, shrubs, trees, or other objectsthat may obscure vision.
IV. SERVICE
• Use extra care in handling gasoline andother fuels. They are flammable andvapors are explosive.- Use only an approved container.- Never remove gas cap or add fuel
with the engine running.Allow engine to cool before refueling.Do not smoke.
- Never refuel the machine indoors.- Never store the machine or fuel
container inside where there is anopen flame, such as a water heater.
• Never run a machine inside a closed area.• Never make adjustments or repairs with
the engine (motor) running. Disconnect thespark plug wire, and keep the wire away
mower.3 from the plug to prevent accidental starting.

• Keepnuts and bolts,especiallybladeattachmentbolts, tightand keepequip-ment ingood condition.
• Nevertamperwith safetydevices.Checktheir properoperationregularly.
• Keep machine free of grass, leaves, orotherdebrisbuild-up.Cleanoilorfuelspill-age.Allowmachineto coolbeforestoring.
• Stop and inspectthe equipmentif youstrikean object.Repair,if necessary,before restarting.
• Neverattempttomakewheelheightadjust-mentswhiletheengine(motor)is running.
• Grasscatchercomponentsaresubjectto wear, damage,and deterioration,which couldexposemovingpartsorallowobjectsto be thrown.Frequentlycheckcomponentsand replacewithmanufacturer'srecommendedparts,when necessary.
• Mowerbladesare sharp and can cut.Wrap the blade(s)or wear gloves,anduseextracautionwhenservicingthem.
• Donot changethe enginegovernorset-ting or overspeedthe engine.
Serial Number:Dateof Purchase:
GasolineCapacity/Type: 1.6 Quarts (Unleaded Regular)
Oil Type (API-SF-SJ): SAE 30 (above 32°F); SAE 5W-30 (below 32°F)
Oil Capacity: 20 Ounces
Spark Plug (Gap: .030") Champion RJ19LM or J19LM
Blade Bolt Torque: 35-40 ft. Ibs.
• The model and serial numbers will be found on a decal on the rear of the lawn mowerhousing. Record both serial number and date of purchase in space provided above.
Repair Protection Agreements
Congratulations on making a smart pur-chase. Your new Craftsman® product isdesigned and manufactured for years ofdependable operation. But like all prod-ucts, it may require repair from time totime. That's when having a Repair Protec-tion Agreement can save you money andaggravation.
Purchase a Repair Protection Agreementnow and protect yourself from unexpectedhassle and expense.
Here's what's included in the Agreement:
• Expert service by our 12,000 profe-sional repair specialists.
• Unlimited service and no charge forparts and labor on all covered repairs.
• Product replacement if your coveredproduct can't be fixed.
• Discount of 10% from regular price ofservice and service-related parts notcovered by the agreement; also, 10%off regular price of preventive mainte-nance check.
Fast help by phone - phone supportfrom a Sears technician on productsrequiring in-home repair, plus conve-nient repair scheduling.
Once you purchase the Agreement, asimple phone call is all that it takes for youto schedule service. You can call anytimeday or night, or schedule a service ap-pointment online.Sears has over 12,000 professional repairspecialists, who have access to over 4.5million quality parts and accessories.That's the kind of professionalism you cancount on to help prolong the life of yournew purchase for years to come. Purchaseyour Repair Protection Agreement today!Some limitations and exclusions apply.For prices and additional informationcall 1-800-827-6655.
Sears Installation Service
For Sears professional installation of homeappliances, garage door openers, waterheaters, and other major home items, inthe U.S.A. call 1-800-4-MY-HOME®.
4

These accessories were available when this lawn mower was produced. They are notshipped with your mower. They are also available at most Sears retail outlets andservice centers. Some of these accessories may not apply to your lawn mower.
LAWN MOWER PERFORMANCE
CLIPPING
__ DEFLECTORSFOR STABILIZER
REAR DISCHARGELAWN MOWERS
\\\ GRASS CATCHERS GRASS CATCHERS\\ \ FOR FOR
REAR DISCHARGE SIDE DISCHARGELAWN MOWERS LAWN MOWERS
LAWN MOWER MAINTENANCE
MUFFLERS AIR FILTERS SPARK PLUGS
BELTS BLADES BLADE ADAPTERS WHEELS ENGINE OIL
5

Read these instructions and this manual inits entirety before you attempt to assembleor operate your new lawn mower.IMPORTANT: This lawn mower is shippedWITHOUT OIL OR GASOLINE in the engine.Your new lawn mower has been as-sembled at the factory with the excep-tion of those parts left unassembled forshipping purposes. To ensure safe andproper operation of your lawn mower, allparts and hardware you assemble must betightened securely. Use the correct toolsas necessary to ensure proper tightness.All parts such as nuts, washers, bolts, etc.,necessary to complete the assembly havebeen placed in the parts bag.
TO REMOVE LAWN MOWER FROMCARTON
1. Remove loose parts included withmower.
2. Cut down two end corners of cartonand lay end panel down flat.
3. Remove all packing materials exceptpadding between upper and lowerhandle and padding holding operatorpresence control bar to upper handle.
4. Roll lawn mower out of carton andcheck carton thoroughly for additionalloose parts.
HOWTO SET UPYOUR LAWNMOWERTO UNFOLD HANDLE
IMPORTANT: Unfold handle carefully soas not to pinch or damage control cables.1. Raise lower handle section to operat-
ing position and squeeze the bottomends of lower handle towards eachother until the pin in handle can beinserted into one of the three heightadjustment holes.
2. Remove protective padding, raise up-per handle section into place on lowerhandle and tighten both handle knobs.
3. Remove any packing material fromaround control bar.
Your lawn mower handle can be adjustedfor your mowing comfort. Refer to "AD-JUST HANDLE" in the Service and Adjust-ments section of this manual.
Operator presencecontrol bar
LIFTUF
Mowingposition
Lower handle
SQL
Handlebracket
Handle pin
J
TO ASSEMBLE GRASS CATCHER
1. Put grass catcher frame into grass bagwith rigid part of bag on the bottom.Make sure the frame handle is outsideof the bag top.
2. Slip vinyl bindings over frame.NOTE: If vinyl bindings are too stiff, holdthem in warm water for a few minutes. Ifbag gets wet, let it dry before using.
Catcherframehandle
TO INSTALL ATTACHMENTS
Your lawn mower was shipped ready to beused as a mulcher.To convert to bagging, see"TO CONVERT MOWER" in the Operationsection of this manual. 6
Frameopening

KNOW YOUR LAWN MOWERREAD THIS OWNER'S MANUAL AND ALL SAFETY RULES BEFORE OPERATINGYOUR LAWN MOWER. Compare the illustrations with your lawn mower to familiarizeyourself with the location of various controls and adjustments. Save this manual forfuture reference.
These symbols may appear on your lawn mower or in literature supplied with theproduct. Learn and understand their meaning.
CAUTION ENGINE ENGINE FAST SLOW CHOKE FUEL OIL DANGER, KEEP HANDSOR WARNING ON OFF AND FEET AWAY
Starterhandle
Operator presence control bar
Drive control lever
Handleknol
Gasoline filler cap
Grass Engine oil capwith dipstick
Primer
Mulcherplug
Single point heightadjuster handle
Air filterHousing
IMPORTANT: This lawn mower is shipped WITHOUT OIL OR GASOLINE in the engine.
MEETS CPSC SAFETY REQUIREMENTSSears rotary walk-behind power lawn mowers conform to the safety standards of theAmerican National Standards Institute and the U.S. Consumer Product Safety Com-mission. The blade turns when the engine is running.
Operator presence control bar - mustbe held down to the handle to start theengine. Release to stop the engine.Primer - pumps additional fuel from thecarburetor to the cylinder for use whenstarting a cold engine.
Drive control lever - used to engagepower-propelled forward motion of mower.Mulcher plug - located at the rear dis-charge opening. Must be removed whenconverting to bagging operation.Single point height adjuster - used to
Starter handle - used for starting engine. 7 adjust cutting height of lawn mower.

The operationof any lawnmowercan result in foreignobjectsthrown into theeyes,whichcan result insevereeye damage.Always
wear safety glassesor eyeshieldswhileoperatingyour lawn moweror performingany adjustmentsor repairs.We recom-menda standardsafetyglassesor widevision safetymask worn overspectacles.HOW TO USE YOUR LAWN MOWERENGINE SPEED
The engine speed was set at the factoryfor optimum performance. Speed is notadjustable.ENGINE ZONE CONTROL
ACAUTION: Federal regulations requirean engine control to be installed on thislawn mower in order to minimize therisk of blade contact injury. Do not underany circumstances attempt to defeat thefunction of the operator control. The bladeturns when the engine is running.• Your lawn mower is equipped with an
operator presence control bar whichrequires the operator to be positionedbehind the lawn mower handle to startand operate the lawn mower.
DRIVE CONTROL
• Self-propelling is controlled by hold-ing the operator presence control bardown to the handle and pulling the drivecontrol lever rearward to the handle.The farther toward the handle the leveris pulled, the faster the unit will travel.
• Forward motion will stop when eitherthe operator presence control bar ordrive control lever are released. To stopforward motion without stopping engine,release the drive control lever only. Holdoperator presence control bar downagainst handle to continue mowingwithout self-propelling.
NOTE: If after releasing the drive controlthe mower will not roll backwards, pushthe mower forward slightly to disengagedrive wheels.
3resence control bar
Drivecontrol
TO leverAdjustment ENGAGE DRIVEbutton (on DRIVE CONTROLunderside) CONTROL DISENGAGED
8
DRIVE CONTROL ADJUSTMENT
Over time, the drive control system may be-come "loose", resulting in decreased speed.There is a button on the underside of the drivecontrol housing to increase tension on thedrive cable. Proceed as follows:1. Turn unit off and disconnect spark plug
wire from spark plug.2. Pull drive control lever ALL THE WAY
BACK to the handle.3. Push button on underside of drive
control. While holding button in, returndrive control lever to disengaged posi-tion ALL THE WAY FORWARD.
NOTE: Do not ratchet the adjustment.4. Release button.5. Operate mower to test drive speed.
If condition becomes worse after theabove steps (forward speed has becomeslower), you r system was not "loose". Re-peating the above steps will return yourunit to the proper adjustment and speed.
6. If condition fails to improve after theabove steps (forward speed remainsthe same), your drive belt is worn andshould be replaced.
TO ADJUST CUTTING HEIGHT
All four wheels are adjusted by a single lever.• Pull adjuster lever toward wheel. To
raise mower, move lever forward todesired position. To lower mower, movethe lever toward the rear.
LEVERBACKWARDTO LOWERMOWER
LEVERFORWARDTO RAISEMOWER
Singlepoint
heightjusterlever
TO ATTACH GRASS CATCHER1. Lift the rear door of the lawn mower
and place the grass catcher frame sidehooks into the slots of the rear door.
2. The grass catcher is secured to the lawnmower housing when the rear door islowered onto the grass catcher frame.
ACAUTION: Do not run your lawn mowerwithout mulcher plug, clipping deflector orapproved grass catcher in place. Never at-tempt to operate the lawn mower with therear door removed or propped open.

Rear door slotsGrass
catcherhandle
Catcher frame ho
TO EMPTY GRASS CATCHER
1. Lift up on grass catcher using theframe handle.
2. Remove grass catcher with clippingsfrom under lawn mower handle.
3. Empty clippings from bag using bothframe handle and bag handle.
NOTE: Do not drag the bag when empty-ing; it will cause unnecessary wear.
Grasscatcher
framehandle
Baghandle
TO CONVERT MOWER
Your lawn mower was shipped ready to beused as a mulcher. To convert to bagging:• Open reardoorand remove mulcherplug.
Store mulcher plug in a safe place.• You can now install grass catcher or
optional clipping deflector.• To convert to mulching or discharging
operation, install mulcher plug into rear_idischarge opening of mower.
CAUTION: Do not run your lawn mowerwithout mulcher plug, clipping deflector orapproved grass catcher in place. Never at-tempt to operate the lawn mower with therear door removed or propped open.
BEFORE STARTING ENGINEADD OIL
Your lawnmower is shipped without oil inthe engine. For type and grade of oil touse, see "ENGINE" in the Maintenancesection of this manual.
CAUTION: DO NOT overfill engine withoil, or it will smoke heavily from the muffleron startup.1. Be sure lawnmower is level.2. Remove oil dipstick from oil fill spout.3. You receive a container of oil with the
unit. Slowly pour the entire containerdown the oil fill spout into the engine.
4. Insert and tighten dipstick.IMPORTANT:• Check oil level before each use. Add oil
if needed. Fill to full line on dipstick.• Change the oil after every 25 hours of
operation or each season. You mayneed to change the oil more oftenunder dusty, dirty conditions. See "TOCHANGE ENGINE OIE' in the Mainte-nance section of this manual.
ADD GASOLINE• Fill fuel tank to bottom of tank filler neck.
Do not overfill. Use fresh, clean, regularunleaded gasoline with a minimum of 87octane. Do not mix oil with gasoline. Pur-chase fuel in quantities that can be usedwithin 30 days to assure fuel freshness.
• 1=CAUTION: Wipe off any spilled oil orfuel. Do not store, spill or use gasolinenear. an open flame.
CAUTION: Alcohol blended fuels (calledgasohol or using ethanol or methanol) canattract moisture which leads to separationand formation of acids during storage. Acidicgas can damage the fuel system of an enginewhile in storage. To avoid engine problems,the fuel system should be emptied beforestorage of 30 days or longer. Empty the gastank, start the engine and let it run until thefuel lines and carburetor are empty. Use freshfuel next season. See Storage Instructionsfor additional information. Never use engineor carburetor cleaner products in the fuel tankor permanent damage may occur.
GasolineEngineoil cap
f
Mulcher plu£
9

TO STOP ENGINE
• To stop engine, release operator pres-ence control bar.
TO START ENGINE
NOTE: Due to protective coatings on theengine, a small amount of smoke may bepresent during the initial use of the prod-uct and should be considered normal.1. To start a cold engine, push primer
three (3) times before trying to start.Use a firm push. This step is notusually necessary when starting anengine which has already run for a fewminutes.
2. Hold operator presence control bardown to the handle and pull starterhandle quickly. Do not allow starterrope to snap back.
NOTE: In cooler weather it may be necessaryto repeat priming steps. In warmer weatherover priming may cause flooding and enginewill not start. If you do flood engine, wait afew minutes before attempting to start anddo not repeat priming steps.
MOWING TIPSCAUTION: Do not use de-thatcher
blade attachments on your mower. Suchattachments are hazardous, will damageyour mower and could void your warranty.• Under certain conditions, such as very
tall grass, it may be necessary to raisethe height of cut to reduce pushingeffort and to keep from overloading theengine and leaving clumps of grass clip-pings. It may also be necessary to re-duce ground speed and/or run the lawnmower over the area a second time.
• For extremely heavy cutting, reduce thewidth of cut by overlapping previouslycut path and mow slowly.
• For better grass bagging and most cut-ting conditions, the engine speed shouldbe set in the FAST position.
• When using a rear discharge lawnmower in moist, heavy grass, clumpsof cut grass may not enter the grasscatcher. Reduce ground speed (pushingspeed) and/or run the lawn mower overthe area a second time.
• If a trail of clippings is left on the rightside of a rear discharge mower, mow ina clockwise direction with a small overlapto collect the clippings on the next pass.
• Pores in cloth grass catchers can be-come filled with dirt and dust with useand catchers will collect less grass. Toprevent this, regularly hose catcher offwith water and let dry before using.
10
• Keep top of engine around starter clearand clean of grass clippings and chaff.This will help engine air flow and extendengine life.
MULCHING MOWING TIPS
IMPORTANT: For best performance,keep mower housing free of built-upgrass and trash. See "CLEANING" in theMaintenance section of this manual.
• The special mulching blade will recutthe grass clippings many times andreduce them in size so that as they fallonto the lawn they will disperse intothe grass and not be noticed. Also, themulched grass will biodegrade quicklyto provide nutrients for the lawn. Alwaysmulch with your highest engine (blade)speed as this will provide the best recut-ting action of the blades.
• Avoid cutting your lawn when it is wet.Wet grass tends to form clumps andinterferes with the mulching action. Thebest time to mow your lawn is the earlyafternoon. At this time the grass hasdried, yet the newly cut area will not beexposed to direct sunlight.
• For best results, adjust the lawn mowercutting height so that the lawn mowercuts off only the top one-third of thegrass blades. If the lawn is overgrown itwill be necessary to raise the height ofcut to reduce pushing effort and to keepfrom overloading the engine and leavingclumps of mulched grass. For extremelyheavy grass, reduce your width of cutby overlapping previously cut path andmow slowly.
MAXI_
• Certain types of grass and grassconditions may require that an area bemulched a second time to completelyhide the clippings. When doing a sec-ond cut, mow across (perpendicular) tothe first cut path.
• Change your cutting pattern from weekto week. Mow north to south one weekthen change to east to west the nextweek. This will help prevent matting andgraining of the lawn.

MAINTENANCE SCHEDULE /_:;,_°_o_y
AS YOU COMPLETE SREGO RSERV,CELubrication It#'CheckTires tf'CheckDriveWheels(Power-Propelled Mowers) I_
Check for Loose Fasteners t_' Ikf
Clean/Inspect Grass Catcher(If Equipped) _W Clean Lawn Mower _
RE Clean Under Drive Cover(Power-Propelled Mowers)
Check drive belt/pulleys(Power-Propelled Mowers)
Check/Sharpen/Replace BladeClean Battery/RechargeIElectdc Start MowersI
E Check Engine Oil LevelChange Engine Oil
G Clean Air FilterInspect Muffler
N Replace Spark PlugReplace Air Filter Paper Cartridge
V'=
1 - Change moreoftenwhen opem6ngundera heavy loador inhigh ambient temperatures.2 - Service moraoftenwhen operatingindirtyor dustyconditions,3 - Replacebladesmoreoftenwhen mowinginsandysoil,
4 - Charge48 hoursat end of season.5 - And aftereach 5 hoursof use.
GENERAL RECOMMENDATIONS
The warranty on this lawn mower does notcover items that have been subjected tooperator abuse or negligence. To receivefull value from the warranty, operator mustmaintain unit as instructed in this manual.Some adjustments will need to be madeperiodically to properly maintain your unit.At least once a season, check to see ifyou should make any of the adjustmentsdescribed in the Service and Adjustmentssection of this manual.• At least once a year, replace the spark
plug, clean or replace air filter elementand check blade for wear. A new sparkplug and clean/new air filter elementassure proper air-fuel mixture and helpyour engine run better and last longer.
• Follow the maintenance schedule in thismanual.
BEFORE EACH USE
• Check engine oil level.• Check for loose fasteners.
LUBRICATION
Keep unit well lubricated(See "LUBRICATION CHART").
LUBRICATION CHART
;ne oil
(_) Rear door
hinge
(_) Handle bracket mounting pins
_ Spray lubricantSee "ENGINE" in Maintenance section.
IMPORTANT: Do not oil or grease plasticwheel bearings. Viscous lubricants willattract dust and dirtthatwill shorten the life ofthe self-lubricating bearings. If you feel theymust be lubricated, use only a dry, powdered
1 1graphite type lubricant sparingly.

LAWN MOWERAlways observe safety rules when per-forming any maintenance.TIRES• Keep tires free of gasoline, oil, or insect
control chemicals which can harm rub-ber.
• Avoid stumps, stones, deep ruts, sharpobjects and other hazards that maycause tire damage.
DRIVE WHEELS
Check rear drive wheels each time youmow to be sure they move freely. Thewheels not turning freely means trash,grass cuttings, etc., may be inside thedrive wheel and dust cover area and mustbe cleaned out to free drive wheels.If necessary to clean the drive wheels,check both rear wheels.BLADE CAREFor best results, mower blade must bekept sharp. Replace a bent or damagedblade.
TO REMOVE BLADE
1. Disconnect spark plug wire from sparkplug and place wire where it cannotcome in contact with spark plug.
2. Turn lawn mower on its side. Makesure air filter and carburetor are up.
3. Use a wood block between blade andmower housing to prevent blade fromturning when removing blade bolt.
NOTE: Protect your hands with glovesand/or wrap blade with heavy cloth.4. Remove blade bolt by turning counter-
clockwise.5. Remove blade and attaching hard-
ware (bolt, lock washer and hardenedwasher).
TO REPLACE BLADE
1. Position blade on the blade adapteraligning the two (2) holes in the bladewith the raised lugs on the adapter.
2. Be sure the trailing edge of blade (op-posite sharp edge) is up toward theengine.
3. Install the blade bolt with the lockwasher and hardened washer intoblade adapter and crankshaft.
4. Use block of wood between blade andlawn mower housing and tighten theblade bolt, turning clockwise.
• The recommended tightening torque is35-40 ft. Ibs.
IMPORTANT: Blade bolt is heat treated.If bolt needs replacing, replace only withapproved bolt shown in the Repair Partssection of this manual.
Blade adapter CrankshaftKey _ keyway
Blade
Blade shaftbolt / \
washer Trailing edge Blade adapter
TO SHARPEN BLADENOTE: We do not recommend sharpeningthe blade - but if you do, be sure the bladeis balanced.Care should be taken to keep the bladebalanced. An unbalanced blade willcause eventual damage to lawn mower orengine.• The blade can be sharpened with a file
or on a grinding wheel. Do not attemptto sharpen while on the mower.
• To check blade balance, drive a nail intoa beam or wall. Leave about one inch ofthe straight nail exposed. Place centerhole of blade over the head of the nail.If blade is balanced, it should remain ina horizontal position. If either end of theblade moves downward, sharpen theheavy end until the blade is balanced.
GRASS CATCHER
The grass catcher may be hosed withwater, but must be dry when used.Check your grass catcher often for dam-age or deterioration. Through normaluse it will wear. If catcher needs replac-ing, replace only with approved replace-ment catcher shown in the Repair Partssection of this manual. Give the lawnmower model number when ordering.
ENGINELUBRICATION
Use only high quality detergent oil rated withAPI service classification SF-SJ. Select theoil's SAE viscosity grade according to yourexpected operating temperature.
SAE VISCOSITY GRADES
F
c ._ -2o .I; ; 17 io 3o 4;TEMPERATURE RANGE ANTICIPATED BEFORE NEXT OIL CHANGE
12

NOTE: Although multi-viscosity oils(5W30, 10W30 etc.) improve starting incold weather, these multi-viscosity oils willresult in increased oil consumption whenused above 32°E Check your engine oillevel more frequently to avoid possibleengine damage from running low on oil.Change the oil after every 25 hours of opera-tion orat least once a year if the lawn moweris not used for 25 hours in one year.Check the crankcase oil level beforestarting the engine and after each five (5)hours of continuous use. Tighten oil plugsecurely each time you check the oil level.
TO CHANGE ENGINE OIL
NOTE: Before tipping lawn mower to drainoil, empty fuel tank by running engine untilfuel tank is empty.1. Disconnect spark plug wire from spark
plug and place wire where it cannotcome in contact with spark plug.
2. Remove engine oil cap; lay aside on aclean surface.
3. Tip lawn mower on its side as shownand drain oil into a suitable container.Rock lawn mower back and forth to re-move any oil trapped inside of engine.
4. Wipe off any spilled oil from lawnmower or side of engine.
5. Slowly pour oil down the oil fill spout,stopping every few ounces to checkthe oil level with the dipstick.
6. Stop adding oil when you reach theFULL mark on the dipstick. Wait aminute to allow oil to settle.
7. Continue adding small amounts of oil,rechecking the dipstick until oil levelsettles at FULL. DO NOT overfill, orengine will smoke heavily from themuffler on startup.
8. Always be sure to retighten oil dipstickbefore starting engine.
9. Reconnect spark plug wire to sparkplug.
AIR FILTER
Your engine will not run properly and maybe damaged by using a dirty air filter.Replace the air filter cartridge every 100hours of operation or every season, which-ever occurs first. Service air cleaner moreoften under dusty conditions.
TO CLEAN AIR FILTER1. Loosen screw and tilt cover to remove.2. Carefully remove cartridge.3. Clean by gently tapping on a flat sur-_i face. If very dirty, replace cartridge.
CAUTION: Petroleum solvents, such askerosene, are not to be used to clean car-tridge. They may cause deterioration of thecartridge. Do not oil cartridge. Do not usepressurized air to clean or dry cartridge.4. Install cartridge, then replace cover
making sure the tabs are aligned withthe slots in the back plate. Fastenscrew securely.
BackSlots
CoverCover tabs
MUFFLER
Inspect and replace corroded muffler as itcould create a fire hazard and/or damage.SPARK PLUG
Replace spark plug at the beginning ofeach mowing season or after every 100hours of operation, whichever occursfirst. Spark plug type and gap settingare shown in the "PRODUCT SPECIFIC-ATIONS" section of this manual.
CLEANINGIMPORTANT: For best performance, keepmower housing free of built-grass andtrash. Clean the underside of your mowerafter each use.
• II,CAUTION: Disconnect spark plug wirefrom spark plug and place wire where itcannot come in contact with spark plug.• Clean the underside of your lawn mower
by scraping to remove build-up of grassand trash.
• Clean engine often to keep trash fromaccumulating. A clogged engine runs
13 hotter and shortens engine life.

• Keep finished surfaces and wheels freeof all gasoline, oil, etc.
• We do not recommend using a gardenhose to clean lawn mower unless the
electrical system, muffler, air filter andcarburetor are covered to keep waterout. Water in engine can result in short-ened engine life.
CLEAN UNDER DRIVE COVERClean under drive cover at least twice aseason. Scrape underside of cover withputty knife or similar tool to remove anybuild-up of trash or grass on underside ofdrive cover.
AI::_WARNING: To avoid serious injury,before performing any service andadjustments:1. Release control bar and stop engine.2. Make sure the blade and all moving
parts have completely stopped.3. Disconnect spark plug wire from spark
plug and place wire where it cannotcome in contact with spark plug.
LAWN MOWER
TO ADJUST CUTTING HEIGHT
See "TO ADJUST CUTTING HEIGHT" inthe Operation section of this manual.REAR DEFLECTOR
The rear deflector, attached between the rearwheels of your mower, is provided to minimizethe possibility that objects will be thrown outof the rear of the mower into the operatormowing position. If the deflector becomesdamaged, it should be replaced.TO REMOVE DRIVE BELT
1. Disconnect spark plug wire from sparkplug and place wire where it cannotcome in contact with spark plug.
2. Remove screws retaining drive cover(not shown); and remove drive coverfrom lawn mower housing.
3. Remove drive cable from anchor, thendetach spring from idler arm assembly.
5. Turn lawn mower on its side. Makesure air filter and carburetor are up.
6. Use a wood block between blade andmower housing to prevent blade fromturning when removing blade bolt.
NOTE: Protect your hands with glovesand/or wrap blade with heavy cloth.7. Remove blade bolt.8. Remove blade, attaching hardware
(bolt, lock washer, hardened washer),blade adapter and debris shield. Notethat the debris shield has a tab whichfits into the housing hole.
9. Remove drive belt from engine pulley;discard old belt.
Crankshaft
Housing hole
Tab-
Hardenedwasher
3ladebolt
Trailing edge
Drive anchor
pulley Drive belt
Belt
4_
r arm Housingnut assembly hole
Remove idler arm assembly from hous-ing by removing hex nut; then removedrive belt from drive pulley, belt keepersand idler arm assembly. 14
TO REPLACE DRIVE BELT
f. Place new drive belt on engine pulley.2. Route the other end of the new drive
belt through hole in housing.3. Return mower to upright position.4. Install new drive belt into idler arm
assembly, then around the drive pulley.Be sure belt is inside of belt keepers.
5. Reattach idler arm assembly with hexnut previously removed.
6. Turn lawn mower on its side. Makesure air filter and carburetor are up.
7. Reattach debris shield to housing withtab of debris shield in housing hole.
8. Position blade on the blade adapteraligning the two (2) holes in the bladewith the raised lugs on the adapter.

9. Be sure the trailingedgeof blade (op-positesharp edge) is up towardtheengineas shown.
10.Installthe bladebolt with the lockwasherand hardenedwasher intobladeadapterand crankshaft.
11.Useblockof woodbetweenbladeandlawnmowerhousingand tighten thebladebolt, turningclockwise.
• The recommendedtighteningtorque is35-40ft. Ibs.
IMPORTANT:Bladebolt is heattreated.If bolt needsreplacing,replaceonly withapprovedbolt shownin the RepairPartssection of this manual.12.Returnmowerto uprightposition.13.Reattachdrive cablespringto the idler
arm assembly,then reattachdrivecableto anchor.
14.Reattachdrive coverwithscrewsprevi-ously removed.
15.Connectspark plugwire to sparkplug.
TO ADJUST HANDLE
The handle on your lawn mower has three(3) height positions - adjust to the heightthat suits you.• Squeeze the bottom ends of lower
handle towards each other until the pinin handle can be inserted into one of thethree height adjustment holes.
SQL pin
Lob
Handlebracket
ENGINEENGINE SPEED
Your engine speed has been factory set.Do not attempt to increase engine speedor it may result in personal injury. If youbelieve that engine is running too fast ortoo slow, take your mower to a Sears orother qualified service center for repairand adjustment.CARBURETOR
Your carburetor is not adjustable. If yourengine does not operate properly due tosuspected carburetor problems, take yourlawn mower to a Sears or other qualifiedservice center for repair and/or adjust-ment.IMPORTANT: Never tamper with theengine governor, which is factory setfor proper engine speed. Overspeedingthe engine above the factory high speedsetting can be dangerous. If you thinkthe engine-governed high speed needsadjusting, contact a Sears or otherqualified service center, which has properequipment and experience to make anynecessary adjustments.
Immediately prepare your lawn mower forstorage at the end of the season or if theunit will not be used for 30 days or more.
LAWN MOWERWhen lawn mower is to be stored for aperiod of time, clean it thoroughly, removeall dirt, grease, leaves, etc. Store in aclean, dry area.
.
15
1. Clean entire lawn mower (See"CLEANING" in the Maintenance sec-tion of this manual).
2. Lubricate as shown in the Maintenancesection of this manual.
3. Be sure that all nuts, bolts, screws, andpins are securely fastened. Inspectmoving parts for damage, breakageand wear. Replace if necessary.Touch up all rusted or chipped paintsurfaces; sand lightly before painting.

HANDLE
You can fold your lawn mower handle forstorage.NOTE: The upper handle has an "anti-fold"bracket located on the right side of thehandle. This bracket prevents the upperhandle from folding forward, which helpsprotect control cable(s) from damage.1. Loosen the two (2) handle knobs on
sides of the upper handle and allowhandle to fold down to the rear.
2. Squeeze the bottom ends of lowerhandle toward each other until pinsin handle clear the brackets and pivotentire handle assembly forward andallow it to rest on mower.
• When setting up your handle from thestorage position, you must manuallylock lower handle into mowing position.
IMPORTANT: When folding the handle forstorage or transportation, be sure to foldthe handle as shown or you may damagethe control cables.
Operator presencecontrol bar
Lower
Mowingposition
SQUEEZE
Handlebmc_t
Handle pin
J
ENGINE
FUEL SYSTEM
IMPORTANT: It is important to prevent
gum deposits from forming in essentialfuel system parts such as carburetor, fuelfilter, fuel hose, or tank during storage.Also, alcohol blended fuels (called gasoholor using ethanol or methanol) can attractmoisture which leads to separation andformation of acids during storage. Acidicgas can damage the fuel system of anengine while in storage.• Empty the fuel tank by starting the en-
gine and letting it run until the fuel linesand carburetor are empty.
• Never use engine or carburetor cleanerproducts in the fuel tank or permanentdamage may occur.
• Use fresh fuel next season.NOTE: Fuel stabilizer is an acceptablealternative in minimizing the formation offuel gum deposits during storage. Addstabilizer to gasoline in fuel tank or stor-age container. Always follow the mix ratiofound on stabilizer container. Run engineat least 10 minutes after adding stabilizerto allow the stabilizer to reach the car-buretor. Do not empty the gas tank andcarburetor if using fuel stabilizer.ENGINE OIL
Drain oil (with engine warm) and replacewith clean engine oil. (See "ENGINE" inthe Maintenance section of this manual).CYLINDER
1. Remove spark plug.2. Pour one ounce (29 ml) of oil through
spark plug hole into cylinder.3. Pull starter handle slowly a few times
to distribute oil.4. Replace with new spark plug.
OTHER
• Do not store gasoline from one seasonto another.
• Replace your gasoline can if your canstarts to rust. Rust and/or dirt in yourgasoline will cause problems.
• If possible, store your unit indoors andcover it to protect it from dust and dirt.
• Cover your unit with a suitable protectivecover that does not retain moisture. Donot use plastic. Plastic cannot breathe,which allows condensation to form andwill cause your unit to rust.
IMPORTANT: Never cover mower whileengine and exhaust areas are still warm.• I,CAUTION: Never store the lawn mowerwith gasoline in the tank inside a buildingwhere fumes may reach an open flameor spark. Allow the engine to cool beforestoring in any enclosure.
16

TROUBLESHOOTING - See appropriate section in manual unless directedto a Sears Service Center.
PROBLEM CAUSE CORRECTION
Does not start
Loss of power
1. Dirty air filter.2. Out of fuel.3. Stale fuel.
4. Water in fuel.
5. Spark plug wire isdisconnected.
6. Bad spark plug.7. Loose blade or broken
blade adapter.8. Control bar in released
position.9. Control bar defective.
2.3.
4.
5.
6.7.
8.
9.
Clean/replace air filter.Fill fuel tank.Empty fuel tank and refill tankwith fresh, clean gasoline.Empty fuel tank and refill tankwith fresh, clean gasoline.Connect wire to plug.
Replace spark plug.Tighten blade bolt orreplace blade adapter.Depress control bar tohandle.Replace control bar.
10. Fuel valve lever (if soequipped) in OFF position.
11. Weak battery (if equipped).12. Disconnected battery
connector (if equipped).
1. Rear of lawn mowerhousing or cutting bladedragging in heavy grass.
2. Cutting too much grass.3. Dirty air filter.4. Buildup of grass, leaves,
and trash under mower.5. Too much oil in engine.6. Walking speed too fast.
10. Turn fuel valve leverto the ON position.
11. Charge battery.12. Connect battery to engine.
1. Raise cutting height.
2. Raise cutting height.3. Clean/replace air filter.4. Clean underside of mower
housing.5. Check oil level.6. Cut at slower walking speed.
17
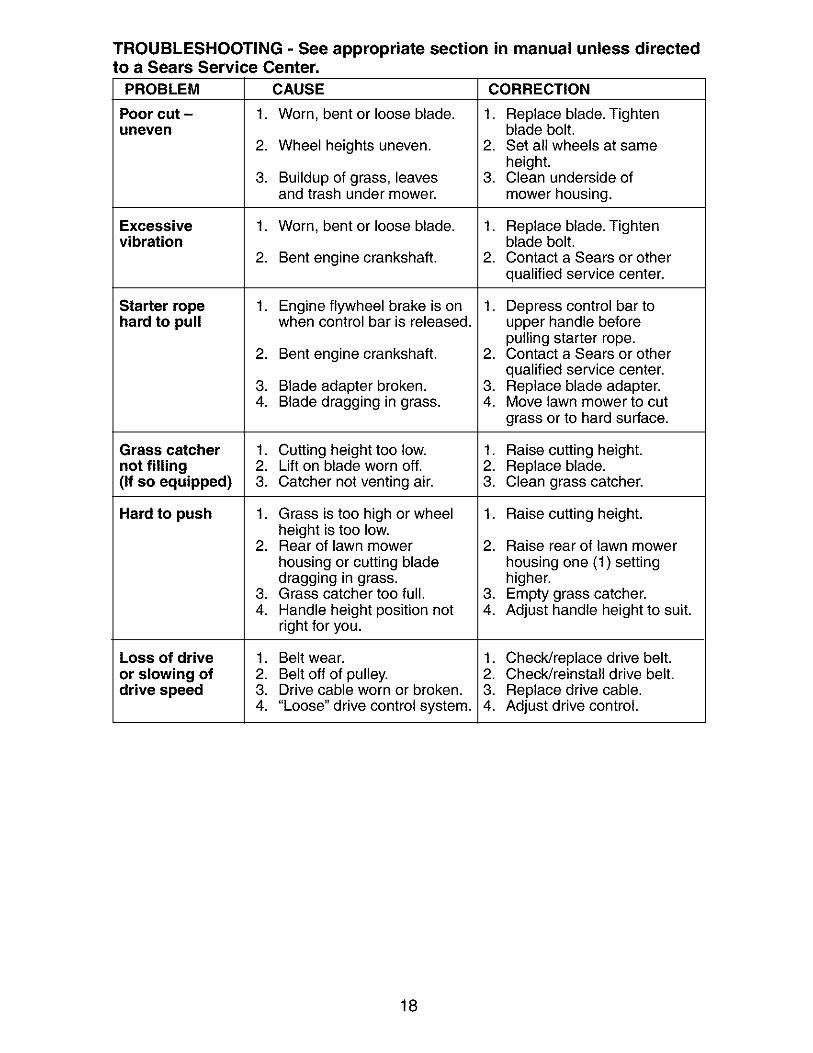
TROUBLESHOOTING - See appropriate section in manual unless directedto a Sears Service Center.
CAUSE CORRECTIONPROBLEM
Poor cut -uneven
Excessivevibration
Starter ropehard to pull
1. Worn, bent or loose blade.
2. Wheel heights uneven.
3. Buildup of grass, leavesand trash under mower.
1. Worn, bent or loose blade.
2. Bent engine crankshaft.
.
2.
3.4.
Engine flywheel brake is onwhen control bar is released.
Bent engine crankshaft.
Blade adapter broken.Blade dragging in grass.
1. Replace blade. Tightenblade bolt.
2. Set all wheels at sameheight.
3. Clean underside ofmower housing.
1. Replace blade. Tightenblade bolt.
2. Contact a Sears or otherqualified service center.
1. Depress control bar toupper handle beforepulling starter rope.
2. Contact a Sears or otherqualified service center.
3. Replace blade adapter.4. Move lawn mower to cut
grass or to hard surface.
Grass catcher 1. Cutting height too low. 1. Raise cutting height.not filling 2. Lift on blade worn off. 2. Replace blade.(If so equipped) 3. Catcher not venting air. 3. Clean grass catcher.
Hard to push 1. Raise cutting height.
Loss of drive
or slowing ofdrive speed
1. Grass is too high or wheelheight is too low.
2. Rear of lawn mowerhousing or cutting bladedragging in grass.
3. Grass catcher too full.4. Handle height position not
right for you.
1. Belt wear.2. Belt off of pulley.3. Drive cable worn or broken.4. "Loose" drive control system.
2. Raise rear of lawn mowerhousing one (1) settinghigher.
3. Empty grass catcher.4. Adjust handle height to suit.
1. Check/replace drive belt.2. Check/reinstall drive belt.3. Replace drive cable.4. Adjust drive control.
18

Garantfa ......................................................... 19Reglas de Seguridad ................................ 19-21Especificaciones del Producto ....................... 21Montaje / Pre-Operaci6n ............................... 22Operaci6n ................................................. 24-27Mantenimiento .......................................... 28-30
Programa de Mantenimiento ......................... 28Servicio y Adjustes ................................... 31-32Almacenamiento ....................................... 32-33Identificaci6n de problemas ...................... 33-34Partes de repuesto .................................. 35-43Servicio Sears .................................. Contratapa
GARANTfA LIMITADA DE DOS AI_IOS PARA LA SEGADORA A MOTOR CRAFTSMAN
Per dos (2) ai_os, a partir de la fecha de compra, cuando esta Segadora Craftsman se mantenga,lubrique y afine segt]n las instrucciones para la operaci6n y el mantenimiento en el manual deldueiSo, Sears repararA gratis todo defecto en el material y la mano de obra.
Si la Segadora Craftsman se usa para fines comerciales o de arriendo, esta garantfa s61o se aplicapor noventa (90) dfas a partir de la fecha de compra.
Esta Garantia no cubre:
° Articulos que se desgastan durante el uso normal tales como las cuchillas segadoras rotatorias,los adaptadores de la cuchilla, las correas, los filtros de aire y las bujias.
° Reparaciones necesarias debido al abuso o a la negligencia del operador, incluy6ndose a loscigeeSales doblados y a la falta de mantenimiento del equipo segt]n las instrucciones que seincluyen en el manual del dueSo.
El servicio de garant[a esta disponible al devolver la segadora a motor Craftsman al Centre deServicio Sears mas cercano en los Estados Unidos. Esta garantfa se aplica solamente mientras elproducto este en use en los Estados Unidos.
Esta Garantfa le otorga derechos legates especfficos, y puede que tambi_n tenga otros derechosque varfan de estado a estado.
Sears, Roebuck and Co., D/817WA, Hoffman Estates, IL 60179 USA
IMPORTANTE: Esta maquina cortadaora es capaz de amputar las manos y los manos y los pies yde lanzar objetos. Si no se observan las instrucciones de seguridad siguientes se pueden producirlesiones graves o la muerte.
• kBusque este sfmbolo que seSala las precau-ciones de seguddad de importancia. Quieredecir- iiiATENCION!!! iiiESTE ALERTO!!!SU SEGURIDAD ESTA COMPROMETIDA.
_DVERTENClA: Siempre desconecte elalambre de la bujia y p6ngalo donde no puedaentrar en contacto con la bujfa, para evitar elarranque por accidente, durante la preparaci6n,el transporte, el ajuste o cuando se hacenreparaciones.
_I_ADVERTENCIA: Los bornes, terminales yaccesodos relativos de la bateria contienenplomo o compuestos de plomo, productosqufmicos conocidos en el Estado de Californiacomo causa de cancer y defectos al nacimientou otros daSos reproductivos. Lavar las manosdespues de manipularlos.
_ILPRECAUCl0N: El tubo de escape del motor,algunos de sus constituyentes y algunos com-ponentes del vehiculo contienen o desprendenproductos qufmicos conocidos en el Estado deCalifornia como causa de cancer y defectos alnacimiento u otros daSos reproductivos.
_PRECAUCI(3N: El silenciador y otraspiezas del motor Ilegan a sre extremadamentecatientes durante ta operaci6n y siguen siendocalientes despu6s de que el motor haya parade.Para evitar quemaduras severas, permanezcalejos de estas Areas.
19

I. OPERAClON• Antes de empezar, debe familiarizarse comple-
tamente con los controles y el uso correcto dela maquina. Para esto, debe leer y comprendertodas las instrucciones que aparecen en la ma-quina yen los manuales de operaci6n.
• No ponga las manos o los pies cerca odebajo de las partes rotatorias. Mant6ngasesiempre lejos de la abertura de la descarga.
• Permita que solamente las personas re-sponsables que est6n familiarizadas con lasinstrucciones operen la mAquina.
• Despeje el Area de objetos tales como pie-dras, juguetes, alambres, huesos, palos, etc.que pueden ser recogidos y lanzados por lascuchillas.
• AsegSrese que el Area no se hallen per-sonas, antes de segar. Pare la mAquina sialguien entra en el Area.
• No opere la maquina sin zapatos o con sanda-lias abiertas. P6ngase siempre zapatos s61idos.
• No tire de la segadora hacia atrAs a menosque sea absolutamente necesado. Miresiempre hacia abajo y hacia detrAs antes ymientras que se mueve hacia atrAs.
• No opere la segadora sin los respectivosresguardos, las placas, el recogedor dec6sped u otros aditamentos dise ados parasu protecci6n y seguridad.
• Refi_rase alas instrucciones det fabricantepara el funcionamiento e instataci6n deaccesorios. Use t_nicamente accesoriosaprobados por el fabricante.
• Detenga la cuchilla o las cuchillas cuando crucepor catzadas, calles o caminos de grava.
• Parar el motor cada vez que se abandona elaparato, antes de limpiar la segadora o deremover residuos del tubo.
• Apagar el motor y esperar hasta que lascuchillas est_n completamente paradasantes de remover el receptor de hierba.
• Segar solamente con luz del dfa o con unabuena luz artificial.
• No opere la mAquina bajo la influencia delalcohol o de las drogas.
• Nunca opere la maquina cuando la hierbaest_ mojada. Asegt]rese siempre de tenerbuena tracci6n en sus pies; mantenga elmango firmemente y camine; nunca corra.
• Desconectar el mecanismo de propulsi6naut6noma o el embrague de transmisi6n enlas segadoras que Io tienen antes de poneren marcha el motor.
• Si el equipo empezara a vibrar de unamanera anormal, pare el motor y revise deinmediato para averiguar la causa. General-mente la vibraci6n suele indicar que existe •alguna averia.
• Siempre use gafas de seguridad o anteojos con •protecci6n lateral cuando opere la segadora.
II. OPERACION SOBRE LAS CUESTASLos accidentes ocurren con mAs frecuencia enlas cuestas. Estos accidentes ocurren debido aresbaladas o caidas, las cuales pueden resultar •en graves lesiones. Operar la recortadora encuestas requiere mayor concentraci6n. Si sesiente inseguro en una cuesta, no la recorte. 20
HACER:• Puede recortar a trav6s de la superficie de
la cuesta, nunca hacia ardba y hacia abajo.Proceda con extrema precauci6n cuandocambie de direcci6n en las cuestas.
• Renueva todos los objetos extraSos, talescomo guijarros, ramas, etc.
• Debe prestar atenci6n a hoyos, baches oprotuberancias. Recuerde que la hierba altapuede esconder obstAculos.
NO HACER:• No recorte cerca de pendientes, zanjas o
terraplenes. El operador puede perder latracci6n en los pies o el equilibrio.
• No recorte cuestas demasiado inclinadas.• No recorte en hierba mojada. La reducci6n
en la tracci6n de la pisada puede causarresbalones.
III. NINOSSe pueden producir accidentes trAgicos si eloperador no presta atenci6n a la presenciade los niSos. A menudo, los niSos se sientenatraidos por la maquina y por la actividad dela siega. Nunca suponga que los niSos van apermanecer en el mismo lugar donde los viopor _ltima vez.• Mantenga a los niSos alejados del Area de
la siega y bajo el cuidado estricto de otrapersona adulta responsable.
• Est6 alerta y apague la maquina si hay niSosque entran at Area.
• Antes y cuando este retrocediendo, mirehacia atrAs y hacia abajo para verificar si hayniSos pequeSos.
• Nunca permita que los ni_os operen la mAquina.• Tenga un cuidado extra cuando se acerque
a esquinas donde no hay visibilidad, a losarbustos, Arboles u otros objetos que puedeninterferir con su linea de visi6n.
IV. SERMIClO• Tenga cuidado extra al manejar la gasolina y
los demAs combustibles. Son inflamables ylos gases son explosivos.- Use solamente un envase aprobado.- Nunca remueva la tapa del dep6sito de
gasolina o agregue combustible con el mo-tor funcionando. Permita que el motor seenfrfe antes de volver a pone combustible.No fume.
- Nunca vuelva a poner combustible en lamAquina en recintos cerrados.
- Nunca almacene la mAquina o el envasedel combustible dentro de algt]n lugar endonde haya una llama expuesta, tat comola del calentador de agua.
Nunca haga funcionar una mAquina dentrode un Area cerrada.Nunca haga ajustes o reparaciones mientrasel motor est_ en marcha. Desconecte etcable de la bujfa, y mant_ngalo a ciertadistancia de 6sta para prevenir un arranqueaccidental.Mantenga las tuercas y los pernos, espe-cialmente los pernos del accesorio de lacuchilla, apretados y mantenga el equipo enbuenas condiciones.

• Nuncamanipuledeformaindebidalosdispositivosdeseguddad.Controleregular-mentesufuncionamientocorrecto.
• MantengalamAquinalibredehierba,hojasuotrasacumulacionesdedesperdicio.Limpielosderramesdeaceiteo combustible.PermitaquelamAquinaseenfrfeantesdealmacenarla.
• Paree inspeccioneelequiposi lepegaa unobjeto.Rep_,relo,siesnecesado,antesdehacerloarrancar.
• Enningt]ncasohayqueregularlaalturadelasruedasmientraselmotorestAenmarcha.
• Loscomponentesdelreceptordelahierbavansujetosadesgaste,daSosy deterioro,quepuedenexponerlaspartesenmov-imientoopermitirqueobjetosseandispara-dos.Controlarfrecuentementey cuandoseanecesariosustituirconpartesaconsejadasporelfabdcante.
• Lascuchillasdelasegadoraest#,nafiladasypuedencortar.CubrirlashojasoIlevarguantes,y utilizarprecaucionesespecialescuandoseefectQa mantenimiento sobre las mismas.
• No cambie el ajuste del regulador del motorni exceda su velocidad.
N6mero de Serie:
Fecha de Compra:
Capacidad y Tipo de Gasolina: 1.6 Cuartos (Regular sin PIomo)
Tipo de Aceite (API-SF-SJ): SAE 30 (Sobre 32°F); SAE 5W-30 (Debajo 32°F)
Capacidad de Aceite: 20 Onzas
Bujfa (Abertura: .030") Champion RJ19LM o J19LM
Torsi6n del Perno de la Cuchilla: 35-40 ft. Ibs.
El nSmero del nodelo y el de serie se encuentran en la calcomania adjunta a la parte traserade la caja de la segadora. Debe registrar tanto el nSmero de serie come la fecha de compra ymantengalos en un lugar seguro para refencia en el futuro.
Acuerdos de Protecci6n para la Reparaci6n
Congratulaciones por su buena compra. Sunuevo producto Craftsman_ est& diseSadoy fabricado para funcionar de mode fiable pormuchos aSos. Pero como todos los productos,puede necesitar alguna reparaci6n de tantoen tanto. En este caso tener un Acuerdo deProtecci6n para la Reparaci6n puede hacerlesahorrar dinero y fastidios.
Compre ahora un Acuerdo de Protecci6n parala Reparaci6n y protegese de molestias y gas-tos inesperados.
Un Acuerdo inctuye los puntos siguientes:
• Servicio experto de nuestros 12.000 espe-cialistas profesionales en la reparaci6n.
• Servicio ilimitado sin cargo alguno paralas partes y la mano de obra sobre todas lasreparaciones garantizadas.
• Sustitucion del producto si su productogarantizado no puede set arreglado.
• Descuento de110% sobre el precio cor-dente del servicio y de las partes relativas alservicio no cubiertas por el acuerdo; tambi_nel 10% menos sobre el precio cordente deun control de mantenimiento preventivo.
• Ayuda rapida por tel_fono - soporte tele-f6nico per parte de un t_cnico Sears sobreproductos que requieren un arreglo en casa,y adem&s una programaci6n sobre los areglos mAs convenientes.
Cuando se ha comprado el Acuerdo, basta conuna llamada telef6nica para programar el servi-cio. Puede tlamar cuando quiera, dia y noche ofijar en linea una cita para obtener el servicio.Sears tiene m_,s de 12.000 especiatistasprofesionales en la reparaci6n, que tienenacceso a m&s de 4.5 millones de partes yaccesodos de calidad. Este es el tipo deprofesionalidad con que puede contar paraayudar a alargar la vida del producto que acabade comprar, por muchos aSos. iCompre hoy suAcuerdo de Protecci6n para la Reparaci6n!Se aplican algunas limitaciones y exclu-siones. Para conocer los precios y tenerrods informacibn, Ilame al 1-800-827-6655.
Servicio de Instalacion SearsPara la instalaciSn profesional Sears deaparatos de casa, puertas de garaje,calentadores de agua y otros importantesarticulos para la casa, en U.S.A. llamar a1-800-4-MY-HOME®.
21

Estos accesorios estaban disponibles cuando se produjo la segadora. No son facilitados junto alcortacesped. Tambi6n est&n disponibles en la mayorfa de las tiendas de Sears y en los centros deservicio. Algunos de estos accesorios tal vez no se apliquen a su segadora.
RENDIMIENTO DE LA SEGADORA
__ DESVIADOR
DE RECORTESPAPA Sr:GADORA8 _ ESTABILI-
CON DESCARGA ZADORES
TRASERA , --
\\ RECOREDOR RECOREDOR\\\\ \\ PAPA PARA
SEGADORAS _ / SEGADORAS
CON DESCARGA _ CON DESCARGATRASERA LATERAL
MANTENIMIENTO DE LA SEGADORA
SILENCIADORES FILTROS DE AIRE BUJ[AS
ADAI_rAI_RES ACEI_CORREAS CUCHILLAS DE CUCHILLA RUEDAS DEL MOTOR
22

Lea estas instrucciones y este manual comple-tamente antes de tratar de montar u operar susegadora nueva.IMPORTANTE: Este cortac_sped viene SINACEITE O GASOLINA en el motor.
Su segadora nueva ha side montada en laf&brica con la excepci6n de aquellas partes quese dejaron sin montar por razones de envio.Todas tas partes como las tuercas, tas arande-las, los pernos, etc., que son necesadas paracompletar el montaje han side colocadas en labolsa de partes. Para asegurarse que su sega-dora funcione en forma segura y adecuada,todas las partes y los arficulos de ferreteria quese monten tienen que ser apretados segura-mente. Use las herramientas correctas, comosea necesario, para asegurar que se aprietenadecuadamente.PARA REMOVER LA SEGADORA DELA CAJA DE CARTON1. Remueva las partes sueltas que se incluyen
con la segadora.2. Corte las dos esquinas de los extremos
de la caja de cart6n y tienda el panel delextremo piano.
3. Remueva todo el material de empaque, ex-cepto la curia entre el mango superior y _1 Soporte deinferior, y la curia que sujeta la barra de los mangocontrol que exige la presencia del operadorjunto con el mango superior.
4. Haga rodar la segadora hacia afuera de lacaja de cart6n y revisela cuidadosamentepara verificar si todavia quedan partessueltas adicionales.
COMO PREPARAR SU SEGADORAPARA DESDOBLAR EL MANGOIMPORTANTE: Despliegue el mango conmucho cuidado para no pellizcar o dafiar loscables de control.1. Levante la secci6n del mango inferior a la
posici6n de operaci6n y presione las ex-tremidades inferiores del mando inferior unaen contra una de la otra hasta que la pinzadet mando pueda ser insertada en uno delos tres agujeros del control de ta altura.
2. Levante la secci6n del mango superiorhasta la posici6n de operaci6n, remueva lacuria protectora y apdete las manillas delmango en forma segura.
3. Remueva et material de empaque de alred-edor de la barra de control.
El mango de la segadora puede ajustarse Mango delseg_n le acomode para segar. Refi6rase a bastidor del"AJUSTE DEL MANGO" en la secci6n de Servi- recogedorcioy Ajustes de este manual.
Barra de control c
Mango superior
Mango Inferior
LEVANTAR
la presencia del operador
Posici6npara segar
a del mango
J
PARA MONTAR EL RECOGEDOR DE ClaSPED1. Ponga el bastidor del recogedor de c6sped
en la bolsa del c_sped con la parte rfgidade la bolsa en la parte inferior. Asegt]reseque el mango del bastidor est_ en el exte-rior de la parte superior de la bolsa.
2. Destice los sujetadores de vinilo sobre elbastidor.
AVlSO: Si los sujetadores de vinilo est&n muyduros, m6talos en agua catiente por algunosminutos. Si se moja la bolsa, d6jela que seseque antes de usarla.
PARA INSTALAR LOS ACCESORIOSSu segadora rue enviada lista para usarsecomo una acolchadora de capa vegetal. Paraconvertirla de mode que pueda ensacar,refi_rase a "PARA CONVERIR LA SEGADORA"en la secci6n de Operaci6n de este manual.
23 "_ Aberturadel bastidor

FAMILIARICESE CON SU SEGADORALEA ESTE MANUAL DEL DUENO Y LAS REGLAS DE SEGURIDAD ANTES DE OPARAR SUSEGADORA. Compare las ilustraciones con su segadora para familiarizarse con la ubicaci6n delos diversos controles y ajustes. Guarde este manual para referencia en el futuro.
Estos simbolos pueden apareser sobre su segadora o en la literatura proporcionada con elproducto. Aprenda y comprenda sus significados.
A'n'ENCI(_N O MOTOR MOTOR RAPIDO LENTO ESTRANGU COM- ACEITE PELIGRO, GUARDE LASADVERTENCIA ENCENDIDO APAGADO LACION BUSTIBLE MANOS Y LOS PIES LEJOS
Cord6n
Barra de control que exige lapresencia del operador
Palanca de control de la impulsi6n
Manilla deldel deposito de la gasolina
RecogedorTapa del deposito de acietedel motor con varilla indica-dora de nivel
Tapon delaacolchadora
Mango del ajustadorde un solo punto
Filtro de abeC_ja
IMPORTANTE: Este cortac_sped viene SIN ACEITE O GASOLINA en motor.
CUMPLE CON LOS REQUISlTOS DE SEGURIDAD DE LA CPSCLas segadoras a motor, que se conducen desde la parte de atr&s, rotatorias, Sears, cumplen conlos est&ndares de seguridad del American National Standards Institute y de la U.S. ConsumerProduct Safety Commission. La cuchilla gira cuando el motor estA funcionando.
Barra de control que exige la presencia deloperador - tiene que sujetarse abajo, juntocon el mango, para hacer arrancar el motor.Su_ltela para parar el motor.Cebador - bombea combustible adicionaldesde el carburador al cilindro para uso cuandose necesita hacer arrancar un motor fr[o.Palanca de control de la impulsion - se usapara enganchar la segadora para movimientohacia adelante impulsada a motor.
Cordon arrancador - se usa para hacerarrancar el motor.Tapon de la acolchadera - situada en laabertura de la descarga y debe ser quitadacuando se convierte la operaci6n de ensacadoa descarga.Mango del ajustador de un solo punto -se usa para ajustar la attura de corte de lasegadora.
24

La operaci6n de cualquiersegadora puede hacer quesatten objetos extrafios dentro desus ojos, Io que puede producirdafios graves en _stos. Siempre
use anteojos de seguridad o protecci6n paralos ojos mientras opere su segadora o cuandohaga ajustes o reparaciones. Recomendamosgafas o una mascara de seguridad de visi6namplia de seguridad usada sobre las gafas.COMO USAR SU SEGADORA
VELOCIDAD DEL MOTORLa velocidad del motor se estableci6 en la f_-brica para un rendimiento 6ptimo. La velocidadno se puede ajustar.
JI_NTROL DE ZONA DEL MOTORPRECAUCI(_N: Las regulaciones federales
exigen que se instale un control para el motoren esta segadora para reducir a un minimo elriesgo de lesionarse debido al contacto con lacuchilla. Por ningt]n motivo trate de eliminarla funci6n del control del operador. La cuchillagira cuando el motor est& funcionando.• Su segadora viene equipada con una barra
de controles que exigen la presencia deloperador, Io que requiere que el operadorest_ detrAs del mango de la segadora parahaceda arrancar y operarla.
CONTROL DE LA IMPULSI(_N• La autopropulsi6n se controla manteniendo
la patanca de mando operador presenteabajo hacia el mango y tirando ta palanca deaccionamiento atr&s hacia el mango. Cuantom_,s lejos se tira la patanca hacia el mango,mAs r#,pida ira la unidad.
• El movimiento hacia adelante se detienecuando sea la palanca de mando operadorpresente o la palanca de accionamiento sesueltan. Para detener el movimiento haciaadelante sin apagar el motor, soltar s61ola patanca de accionamiento. Mantener lapalanca de mando operador presente abajocontra el mango para continuar a cortar sinautopropulsi6n.
AMISO: Si despu6s haber desenganchado de lapalanca de control, la segadora no roda haciaatr_,s, empuje ta segadora un poco hacia adelantepara desenganchar las ruedas de la impulsi6n.
Barra de control que ,perador
PARABot6n ajuste ENGANCHAR EL(en la parte CONTROL DE LAtrasera) IMPULSION
Controlla impulsi6n
CONTROL DE LAiMPULSION
DESENGANCHADO
AJUSTE DEL MANDOOcasionalmente, el sistema de mando puede"aflojarse", provocando una disminuci6n de lavelocidad. Hay un bot6n en la parte trasera dela sede del mando para apretar la tensi6n delcable. Proceder de la siguiente manera:
1. Apagar la unidad y desconectar el cable debujia de la bujfa.
2. Tirar la palanca de accionamiento TODOATR/_S HACIA el mango.
3. Empujar el bot6n en la parte trasera delmando. Con et bot6n apretado, revuelva lapalanca de controles det mecanismo impul-sor a la posici6n desenganchada TODODELANTERO HACIA et mango.
AMISO: No el trinquete el ajuste.4. Soltar el bot6n.5. Opere la segadora para probar la velocidad
del mecanismo. Si tras los pasos descritos ar-riba la situaci6n se empeora (la vetocidad deavance ha disminuido), el sistema no estaba"aflojado". Repitiendo los pasos de arriba sevuelve la unidad al ajuste y velocidad correctos.
6. Si las condiciones no mejoran despu6s de lospasos descritos (la velocidad hacia adelantequeda la misma), la correa de transmisi6nest#, desgastada y tiene que ser sustituida.
PARA AJUSTAR LA ALTURA DE CORTELas cuatro ruedas son ajustadas con unapatanca Qnica.• Tire de la palanca de ajustes hacia la rued&
Levante la segadora, mueva la palancahasta delante a la posici6n deseada. Parabajar la segadora, mueva la palanca haciala retaguardia.
Mang,
PALANCA HACIAATR,a,S PARA BAJAR
EL CORTACESPED
J
PALANCA HACIAADELANTE
PARALEVANTAR EL
CORTACESPED
PARA MONTAR Y ADJUNTAREL RECOGEDOR DE ClaSPED1. Levante la puerta trasera de la segadora de
c_sped y ponga el marco del recogedor dec_sped a dentro de las ranuras de la puertatrasera.
2. El recogedor de c6sped queda aseguradoen la caja de la segadora cuando se baja lapuerta trasera para descansar en el basti-
_ilL dor del recogedor de c6sped.PRECAUCION: No haga funcionar su sega-
dora sin el planco o tap6n de la acolchadera,el desviador de recortes o sin et recogedor dec6sped, aprobados, en su lugar. Nunca trate deoperar la segadora cuando se ha removido lapuerta trasera o cuando estA un poco abierta.
25

Ranuras de PuertaMango del
bastidor delrecogedor de
c_sped
Gancho lateral delbastidor del recogedor
PARA MACIAR EL RECOGEDOR DE ClaSPED1. Levante el recogedor de c_sped usando el
mango del bastidor.2. Remueva el recogedor de c_sped, con los
recortes, de debajo del mango de la segadora.3. Vacfe los recortes de la bolsa usando tanto
el mango del bastidor como 51de la bolsa.AMISO: No arrastre ta bolsa cuando la vacfe;se producirA un desgaste innecesario.
Mango del
recogedorde c_sped
Mango dela bolsa
PARA CONVERTIR LA SEGADORASu segadora fue enviada lista para usarsecomo acolchadora de capa vegetal. Para con-vertir la a una operaci6n de ensacado:• Abra la puerta trasera y remueva la tap6n
acolchadora. GuArdela en un lugar seguro.• Ahora puede instatar el recogedor o el des-
viador de recortes opcionaL• Para volver a la operaci6n de acolchamiento
o descarga, el tap6n acolchador en la aber-A(_ura de descarga de ta segadora.
RECAUCION: No haga funcionar su sega-dora sin el tap6n de la acolchadera, el desvia-dor de recortes o sin el recogedor de c6sped,aprobados, en su lugar. Nunca trate de operarla segadora cuando se ha removido la puertatrasera o cuando estA un poco abierta.
Tap6nacolchadora'
ANTES DE HACER ARRANCAR ELMOTORAGREGUE ACEITESu segadora fue enviada sin aceite en et motor.Para et tipo y el grado del aceite a utilizar, veael "MOTOR" en la secci6n del Mantenimiento deeste manual._PREOAUCl0N: NO sobretlene el motor con
aceite, o fumarA pesa demante del silenciadorcuando lo valla a arrancar.
1. Asegt]rese que la segadora est_ nivelada.2. Remueva la varila medidora de aceite del
tubo de desarga de aceite.3. Usted recibe un envase de aceite con la
unidad. Vierta lentamente el envase enterode aceite en el tubo de retleno del motor.
4. Inserte y apriete la varilla medidora deaceite.
IMPORTANTE:• Revise el nivel del aceite antes de cada uso.
Agregue aceite si es necesario. Ltene hastala linea de lleno en la varilla medidora denivel.
• Cambie el aceite despu6s de 25 horas deoperaci6n o una vez pot temporada. Puedenecesitar cambiar el aceite m#,s a menudocuando las condiciones son polvorosas o su-cias. Vea "PARA CAMBIAR EL ACEITE DELMOTOR" en la seccion de Mantenimiento deeste manual.
AGREGUE GASOLINA• Llene el estanque de combustible hasta
la parte inferior del cuello de relleno delestanque de gasolina. No Io Ilene demasiado.Use gasolina regular, sin plomo, nueva y lim-pia con el minimo de 87 octanos. No mezcleel aceite con la gasolina. Para asegurarque la gasolina utilizada sea fresca compreestanques los cuates puedan ser utilizadosdurante los primeros 30 dias.
_kPRECAUCION: Limpie et aceite o elcombustible derramado. No almacene, derrameo use gasolina cerca de una llama expuesta.,_ILPREOAUCION: Los combustiblesmezctados con alcohol (conocidos comogasohol, o el uso de etanol o metanol) puedenatraer la humedad, la que conduce a laseparaci6n y formaci6n de &cidos durante elalmacenamiento. La gasolina acidica puededaSar el sistema del combustible de un motordurante el almacenamiento. Para evitar losproblemas con el motor, se debe vaciar elsistema del combustible antes de guardadopor un periodo de 30 dias o m&s. Vacie elestanque del combustible, haga arrancar elmotor y h&galo funcionar hasta que las lineasdel combustible y el carburador queden vacios.La pr6xima temporada use combustible nuevo.Vea las Instrucciones Para El Almacenamientopara mAs informaci6n. Nunca use productos delimpieza para el motor o para el carburador enel estanque del combustible pues se puedenproducir daSos permanentes.
26

Tapa deldeposito de
aceite
rellenadorde gasolina
PARA PARAR EL MOTOR• Para parar el motor, suelte ta barra de con-
troles que exigen la presencia del operador.PARA HACER ARRANCAR EL MOTORAMISO: Debido alas capas protectoras del mo-tor, una cantidad pequeSa de humo puede es-tar presente durante el uso inicial del productoy se debe considerar normal.1. Para hacer arrancar un motor fifo, empuje
el cebador tres (3) veces antes de tratarlo.Empuje firmemente. Este paso normal-mente no es necesado ouando se hacearrancar un motor que ya ha estado funcio-nando por unos cuantos minutos.
2. Sujete la barra de controles que exigen lapresencia del operador abajo en el mangoy tire el mango del arrancador r&pidamente.No permita que el cord6n arrancador sedevuelva abruptamente.
AVISO: En climas m&s frios puede que seanecesado repetir los pasos del cebado. En cli-mas m&s calurosos el cebar demasiado puedeproducir el ahogo y el motor no va a arrancar.Si se ahoga el motor espere unos cuantosminutos antes de tratar de hacerlo arrancar yno repita los pasos del cebado.
JI_ONSEJOS PARA SEGARRECAUCI(_N: No utilizar dispositivos anti-
paja de la hoja en la segadora ya que estosaccesorios son peligrosos, pueden daSar susegadora y anular su garantia.• Bajo ciertas condiciones, tal como c_sped muy
alto, puede ser necesario el elevar la altura detcorte para reducir el esfuerzo necesario paraempujar la segadora y para evitar sobrecar-gar el motor, dejando montones de recortesde c_sped. Puede que sea necesario reducirla velocidad del recorrido y/o haga funcionarla segadora sobre el &rea pot segunda vez.
• Para un corte muy pesado, reduzca el ancho delcorte pasando parcialmente por encima del lugaranteriormente cortado y siegue lentamente.
• Para un mejor ensacado del c_sped y para lamayoria de tas condiciones de corte, la velo-cidad del motor debe ajustarse a la posici6nde R_,PIDO. •
• Cuando use una segadora con descargatrasera en c6sped hOmedo y pesado, losmontones del c6sped cortado puede que noentren en el recogedor de c6sped. Reduzcala velocidad del recorddo (vetocidad de em-puje) y/o haga funcionar la segadora sobre el •Area por segunda vez.
• Si queda una huella de cortes en el lado dere-cho de una segadora con descarga trasera,siegue en la direcci6n en que giran las manillas 27
del reloj, solapando un poco para recaudar losrecortes en la pr6xima pasada.
• Los poros en los recogedores de c6sped detela pueden Ilenarse con mugre y polvo conel uso y los recogedores recaudar&n menosc_sped. Para evitar _ste, roc[e et recogedorcon la manguera de agua regularmente yd6jelo secarse antes de usarlo.
• Mantenga la parte superior del motor, alred-edor del arrancador, despejada y sin recortesde c_sped y paja. Esto ayudar& el flujo delaire del motor y extender& su duraci6n.
CONSEJOS PARA SEGARY ACOLCHARIMPORTANTE: Para obtener el mejor rendimientomantenga la caja de la segadora sin acumulacionde cesped y basura. Vea "LIM PIEZA ° en la seccionde Mantenimento de este manual.
• La cuchilla acolchadora especial va a volver acortar los recortes de c_sped muchas veces, ylos reduce en tamaSo, de modo que si se caenen el c_sped se van a dispesar entre _ste y nose van a notar. Tambi_n, el c6sped acolchadose va a deshacer r&pidamente entregandosubstancias nutritivas para el c_sped. Siempreacolche con la velocidad del motor (cuchilla)m&s alta, pues asi se obtendr& la mejor acci6nde recorte de las cuchillas.
• Evite cortar el c_sped cuando est6 mojado.El c6sped mojado tiende a formar montonese interfiere con la acci6n de acolchado.La mejor hora para segar el c_sped estemprano en la tarde. A esa hora 6ste se hasecado y el Area reci6n cortada no quedar&expuesta al sol directo.
• Para obtener los mejores resultados, ajustela altura del corte de ta segadora de modoque _sta corte solamente el tercio superiorde las hojas de c_sped. En el caso de que elc_sped haya crecido demasiado, puede sernecesario el elevar la altura del corte parareducir el esfuerzo necesado para empujar lasegadora y para evitar sobrecargar el motor,dejando montones de recortes de c_sped.Para un c_sped muy pesado, reduzca el an-cho del corte pasando por encima del lugaranteriormente cortado y siegue lentamente.
MAX 1/3
Ciertos tipos de c_sped y sus condicionespueden exigir que un Area tenga que seracolchada por segunda vez para escondercompletamente los recortes. Cuando se hagael segundo corte, siegue atravesado (en formaperpendicular) a la pasada del primer corte.Cambie su patr6n de corte de semana asemana. Siegue de norte a sur una semanay luego cambie de este a oeste la pr6ximasemana. Esto evitar& que el c_sped seenrede y cambie de direcci6n.

PROQRAMA DE MANTENIMIENTO /__ _-_'_
0uLubricaci6n ql_Controlarlosneum_.ticos I_#
vControlarlasruedasmotrices
S (segadoras con poder propulsor)Revisarsihaysujetadoressueltos V' V'
Limpiar/inspecoionar el recogedor de
G c_sped(sivieneequipado) I_ _Limpiarlasegadora
Limpiar debajo delacubiertade latrans-misidn(segadorasconpoderpropulsor) ll_
R Revisarlascorreasylaspoleasimpul-sadas (segadorascon poder propulsor) 11_Revisaro/afilar/cambiarlacuchilla V' 3Limpiarla baterfa/recargar(segadorasconarranqueeldctrico) l## _4
M Revisarelniveldelacelte
Cambiar el aceite del motor _1,2Limpiar elfiltrodeairo _2
O Inspecci°narelsilenciad°r _ _2Cambiarlabuj[a
Cambiarel cortuchode papel delfiltrodeaire
1 - Cambiar mdsa menudocuandose opensbajocarga pesadao en ambientesconaltas temperaturas.2 - Dar servido mdsa menudo cuandose opensencondicionessudas o polvorosas. 4 - Cargarpor48 horasal finde la temporada.3 - Cambielas cuchillasmdsa menudocuandosiegue en terrenoarenoso. 5 - Y despu_sde 5 horasde funclonarnlento.
RECOMENDACIONES GENERALESLa garantia de esta segadora no cubre losart[culos que han estado sujetos at abuso o ala negligencia del operador. Para recibir todoel valor de la garant[a, el operador tiene quemantener la segadora segdn las instruccionesdescritas en este manual.Hay algunos ajustes que se tienen que haceren forma periddica para poder mantener suunidad adecuadamente.AI menos una vez cada estacidn comprobarsi es necesario efectuar los ajustes descdtosen las secciones de Servicio y Ajustes de estemanual.• Una vez al aSo, cambie la bujia, limpie o
cambie el elemento del filtro de aire y revisesi la cuchilla est& desgastada. Una bujianueva y un elemento del filtro de aire limpio/nuevo aseguran la mezcla de aire-com-bustible adecuada y ayudan a que su motorfuncione mejor y que dure mAs.
• Siga el programa de mantenimiento en estemanual.
ANTES DE CADA USO• Revise el nivel del aceite del motor.• Revise si hay sujetadores sueltos.
LUBRICACI()NMantenga la unidad bien lubricada(vea la "TABLA DE LUBRICACION').
TABLA DE LUBRICACION
(_) Aceitedel motor
(_ Bisagra de}uerta traser
(_ Ciavija de montaje del puntal del mango
Rocie el lubricante@ Vea "MOTOR" en la seccion de Mantenimiento
IMPORTANTE: No aceite o engrase los roda-mientos de la rueda de plastico. Los lubricantesviscosos atearan polvo y mugre, 1oacortara laduracion de los rodamientos autolubdcantes. Sicree que tienen que lubricarse, use losamenteun lubricante tipo crafito, de polvo seco, en
28forma mederada.

SEGADORASiempre observe las reglas de seguridad cu-ando haga el mantenimiento.LLANTAS• Mantenga las llantas sin gasolina, aceite o
substancias qu[micas para control de insec-tos que pueden dai_ar la goma.
• Evite los tocones, las piedras, las gdetas pro-fundas, los objetos afilados y otros peligrosque pueden daSar alas Ilantas.
RUEDAS DE IMPULSIONRevise las ruedas de impulsi6n traseras cadavez antes de segar, para asegurarse de que semueven libremente. Si las ruedas no giran li-bremente quiere decir que hay basura, recortesde c_sped, etc. dentro del Area de las ruedasde impulsi6n y de la cubierta contra el polvo ytienen que limpiarse para liberarlas.Es necesario limpiar las ruedas de impulsi6n;revise ambas ruedas traseras.CUIDADO DE LA CUCHILLAPara obtener los mejores resultados, la cuchillade la segadora tienen que mantenerse afilada.Cambie la cuchilla doblada o daSada.PARA REMOVER LA CUCHILLA
1. Desconecte el alambre de la bujfa y p6n-galo en donde no pueda entrar en contactocon 6sta.
2. Haga descansar la segadora en su lado.AsegSrese que el filtro de aire y que etcarburador queden mirando hacia ardba.
3. Use un bloque de madera entre la cuchillay la caja de la segadora para evitar que lacuchilla gire cuando sete quite el perno.
AVISO: Proteja sus manes con guantes y/oenvuelva la cuchilla con una tela gruesa.4. Remueva el perno de la cuchilla girAndolo
en el sentido contrado en que giran lasmanillas del reloj.
5. Remueva la cuchilla y los artfculos de fer-reteria adjuntadores (el perno, la arandelade seguddad y la arandela endurecida).
PARA CAMBIAR LA CUCHILLA
1. Ponga la cuchilla en el adaptador de _staalineando los dos (2) agujeros en la cuchillacon tas salientes elevadas en el adaptador.
2. AsegSrese de que el borde de salida dela cuchilla (opuesto at borde afilado) est6hacia arriba hacia el motor.
3. Instale el perno de la cuchilla con la aran-dela de seguddad y la arandela endurecidaen el adaptador de la cuchilla y el cigueSaL
4. Use un bloque de madera entre la cuchillay la caja de la segadora y apriete el pernode la cuchilla gir#,ndolo en el sentido en quegiran las manillas det reloj.
• La torsi6n para apretar recomendada es de35 - 40 pies libras.
IMPORTANTE: El perno de la cuchilla estratado a calo. Si es necesario sustituir lospernos, sustituirlos s61o con pernos aprobadosmostrados en la secci6n Partes de Reparaci6nde este manual.
Rant/ ciguenal
Cuchilla
Perno Arandelade la endurecida Cigu_nalcuchilla Borde de salida Adaptador de la cuchilla
PARA AFILAR LA CUCHILLAAVISO: No recomendamos el afilar la cuchilla- pero si Io hace, asegt]rese de que quedebalanceada.Se tiene que tener cuidado de mantenerlabalanceada. Una cuchilla que no est& bal-anceada va a producir eventuatmente daSo enla segadora o en el motor.• La cuchilla puede afilarse con una lima o en
una rueda rectificadora. No trate de afilarlamientras se encuentra en la segadora.
• Para revisar el balance de la cuchilla, claveun clavo en una viga o en la pared. Dejealrededor de una pulgada de un clavo rectoexpuesto. Ponga el agujero central de lacuchilla sobre la cabeza del clavo. Si tacuchilla est#, balanceada debe permaneceren la posici6n horizontal. Si cualquiera delos extremos de la cuchilla se mueve haciaabajo, afile et extremo pesado hasta que 6staquede balanceada.
RECOGEDOR DE ClaSPED• El recogedor de c6sped puede ser rociado
con el agua de la manguera pero tiene queestar seco cuando se vaya a usar.
• Revise su recogedor de c_sped a menudopara verificar si estA daSado o deteriorado.Se va a desgastar con el uso normal. Si senecesita cambiar el recogedor, cAmbielosotamente por uno que sea aprobado por elfabricante. D_ el nt]mero del modelo de lasegadora cuando Io ordene.
MOTORLUBRICACI(_NUse solamente aceite de detergente de alta cali-dad clasificado con la clasificaci6n SF-SJ de ser-vicio API. Seleccione la calidad de viscosidad SAEsegt]n su temperatura de operaci6n esperada.
CAUDADES DE VISCOSIDAD DE SAE
AVISO: A pesar de que los aceites de multi-viscosidad (5W30, 10W30, etc.) mejoran elarranque en clima fifo, estos aceites de mul-tiviscosidad van ha aumentar el consumo deaceite cuando se usan en temperaturas sobre32° E Revise el nivel del aceite del motor mas amenudo, para evitar un posible daSo en el mo-
29tor, debido a que no tiene suficiente aceite.

Cambieelaceitedespu6sde25horasdeoperaci6noporIomenosunavezalafiosi lasegadoraseutilizamenos25horaselafio.Reviseelniveldelaceitedelcarterantesdearran-carelmotorydespu_sdecadacinco(5)horasdeusocontinuado.Aprieteeltap6ndelaceiteenfor-maseguracadavezquereviseelniveldelaceite.PARACAMBIARELACEITEDELMOTORAVlSO: Antes de inclinar la segadora para drenarel aceite, drene el tanque de combustible hacien-do correr el motor hasta que el tanque est6 vacio.1. Desconecte el alambre de la bujfa y
p6ngato de modo que no pueda entrar encontacto con 6sta.
2. Remueva la tapa del dep6sito del aceite;d6jela a un lado en una superficie limpia.
3. Incline la cortadora de c_sped por estecostado tal como se muestra y purgue elaceite en un recipiente id6neo. Mueva lasegadora de atras para adelante para re-mover todo el aceite que se haya quedadoatrapado dentro del motor.
Envase
4. Limpie todo el aceite derramado en la sega-dora yen el lado del motor.
5. Echar aceite despacio en el conducto delaceite, par&ndose a intervalos regulares paracontrolar el nivel del aceite con la varilla.
6. Parar de afiadir aceite cuando se alcanza laserial de lleno (FULL) en la varilla. Esperar unminuto para dejar que el aceite se arregle.
7. ContinUe agregando cantidades pequeasde aceite y vuelva a inspeccionar la varillamedidora settles del nivel de aciete en Ileno(FULL). NO sobrellene el motor con aceite,o fumar& pesa demante del silenciadorcuando lo valla a arrancar.
8. Aseg_rese de apretar la varilla medidoradel aceite antes de arrancar el motor.
9. Vuelva a conectar el atambre de la buj[a a 6sta.FILTRO DE AIRESu motor puede sufdr aver[as y funcionar demanera incorrecta con un filtro del aire sucio.Sustituir el papel del cartucho una vez al afioo tras 100 horas de funcionamiento, m&s amenudo si se utiliza en condiciones de sucie-dad y polvo particulares.PARA LIMPIAR EL FILTRO DE AIRE
1. Suelte el tornillo e incline la cubierta pararemoverlo.
2. Cuidadosamente, remueva el cartucho.3. Lfmpielo golpe&ndolo suavemente en una
superficie plana. SiestA muy sucio cambieel cartucho.
_ilLPRECAUCI(_N: Los solventes de petr61eo,tales como el kerosene, no se deben usar paralimpiar el cartucho. Pueden producir el deteriorode 6ste. No aceite el cartucho. No use aire apresi6n para limpiarlo o secarlo.4. Instale el cartucho, luego vuelva a poner la
cubierta asegur#,ndose que las orejas est6nalineadas con las ranuras en la planchatrasera. Apriete el tornillo en forma segura.
RanurasLabio
Orejas deCubierta la cubierta
SILENCIADORInspeccione y cambie el silenciador si est#, corro[-do puede producir un peligro de incendio y/o dafio.BUJ|ACambie et bujfa at comienzo de cada tempo-rada de siega o despu6s de cada 100 horasde operaci6n, lo que suceda primero. El tipo debuj[a y el ajuste de la abertura aparecen en "ES-PECIFICACIONES DEL PRODUCTO" secci6nde este manual.LIMPIEZA
IMPORTANTE: Para obtener el mejor rendimineto,mantenga la caja de la segadora sin acumulacionde cesped y basura. Umpie la parte de abajo desu segadora despues de cada uso.,_ILPRECAUCI(_N: Desconecte el alambre de
la bujfa y p6ngalo en donde no pueda entrar encontacto con 6sta.
• Haga descansar la segadora en su lado.Asegt_rese que et filtro de aire y que el carbu-rador queden mirando hacia ardba. Limpie laparte inferior de su segadora rasp&ndola pararemover la acumulaci6n de c_sped y basura.
• Limpie el motor a menudo para evitar quese acumule la basura. Un motor tapado fun-ciona m&s catiente y se acorta su duraci6n.
• Mantenga las superficies pulidas y las rue-das sin gasolina, aceite, etc.
• No recomendamos el uso de una manguerade jardfn para limpiar la segadora a menosque el sistema el_ctrico, el silenciador, elfiltro de aire y el carburador est6n tapadospara evitar que les entre el agua. El agua enel motor puede acortar la duraci6n de 6ste.
LIMPIE DEBAJO DE LA CUBIERTA DE LAIMPULSI(_NLimpie debajo de la cubierta de la impulsi6n porIo menos dos veces cada temporada. Raspe de-bajo de la cubierta con un cuchillo para masillao con una herramienta parecida, para removertoda acumulaci6n de c_sped o basura en la parteinferior de la cubierta de la impulsi6n.30

_DVERTENCIA: Para evitar lesi6nes sedas,antes de dar calquier servico o de hacer ajustes:1. Suelte la barra de control y pare el motor.2. AsegSrese quela cuchillayque todaslas partes
movibles se hayan detenido completamente.3. Desconecte el alambre de la bujia y p6ngalo en
donde no pueda entrar en contacto con 6sta.SEGADORAPARA AJUSTAR LA ALTURA DE CORTEVea "PARA AJUSTAR LA ALTURA DE CORTE"en la secci6n de Operaci6n de este manual.DESVIADOR TRASEROSe proporciona un desviador trasero, adjunto en-tre las ruedas traseras de su segadora, para re-ducir a un minimo la posibilidad que objetos seanlanzados hacia afuera de la parte trasera de lasegadora, en la posici6n en donde se encuentra eloperador. Si se daSa el desviador debe cambiarse.PARA REMOVER LA CORREA DE IMPULSIONt. Desconecte el alambre de la bujfa y p6ngalo en
donde no pueda entrar en contacto con 6sta.2. Quitar los tornillos que sujetan la tapa del
mando (no mostrado); y quitar la tapa delmando del bastidor del cortac6sped.
3. Quitar el cable del mando de la ancla, luegoseparar el resorte del conjunto palanca detransmisi6n.
nclaPoleademando
Correa demando
Conj_nto OrificioTuerca palanca de en el
de fijaei6n hexagonal transmisi6n bastidor
4. Quitar el conjunto de la palanca de transmis-i6n det bastidor quitando la tuerca hexagonal;luego quitar la correa de mando de la polea demando, los dispositivos de fijaci6n de la correay el conjunto de la palanca de transmisi6n.
5. Haga descansar la segadora en su lado.AsegSrese que el filtro de aire y que etcarburador queden mirando hacia arriba.
6. Use un bloque de madera entre la cuchillay la caja de la segadore para evitar que lacuchilla gire cuando sete quite el perno.
AVISO: Proteja sus manos con guantes y/oenvuelva la cuchilla con una tela gruesa.7. Remueva el perno de la cuchilla.8. Quitar la cuchilla y todos los dispositivos de
fijaci6n (perno, arandela de freno, arandelatemplada), adaptador de la cuchilla y pantallade los escombros. Noten que la pantalla delos escombros tiene una lengQeta que se 14.introduce en un orificio del bastidor.
9. Quitar la correa de polea del motor; eliminar 15.la correa vieja. 31
CigueSalOrificio en de lael bastidor, cuchilla
_,randela deendurecida
OrejaPernode la
cuchilla
ArandelaBerde de salida, de seguridadPARA CAMBIAR LA CORREA DE IMPULSION1. Colocar la nueva correa de polea del motor.2. Colocar la otra extremidad de la nueva correa
de mando a trav6s del orificio en el bastidor.3. Volver a colocar el cortac_sped en posici6n
vertical.4. Instatar la nueva correa de mando en el
conjunto de la palanca de transmisi6n,luego alrededor de la polea de mando. Ase-gurarse de que la correa se halle at interiorde los dispositivos de fijaci6n de la correa.
5. Volver a colocar la conjunto de la palancade transmisi6n con el tuerca hexagonalprecedentemente quitados.
6. Haga descansar la segadora en su lade.Asegt]rese que el filtro de aire y que elcarburedor queden mirando hacia arriba.
7. Fijar otra vez la pantalla de los escombros albastidor con la lengQeta de la pantatla de losescombros se halle en el orificio del bastidor.
8. Ponga la cuchilla en el adaptador de 6staalineando los dos (2) agujeros en la cuchillacon las satientes elevadas en el adaptador.
9. Asegt_rese de que el borde de satida dela cuchilla (opuesto al borde afilado) est6hacia arriba hacia el motor.
10. Instale el pemo de la cuchilla con la aran-dela de seguridad y la arandela endurecidaen el adaptador de la cuchilla y el cigueSal.
11. Use un bloque de madera entre la cuchillay la caja de la segadora y apriete el pernode la cuchilla gir&ndolo en el sentido en quegiran las manillas del reloj.
• La torsi6n para apretar recomendada es de35 - 40 pies libras.
IMPORTANTE: El perno de la cuchilla es tratadoa calo. Si es necesario sustituir los pernos,sustituirlos s61ocon pernos aprobados mostradosen la secci6n Partes de Reparaci6n de este manual.12. Volver a colocar el cortac_sped en posici6n
vertical.13. Volver a colocar el resorte det cable del mando
en et conjunto de la palanca de transmisi6n,luego fijar el cable de mando al ancla.Volver a colocar la tapa del mando con lostornillos precedentemente quitados.Conectar el hilo de la bujfa de encendido ala bujia de encendido.

PARA AJUSTAR EL MANGOEl mango de su segadora cuenta con tres (3)posiciones de altura - ajt]stelo a la altura que leacomode.• Presione las extremidades inferiores del
mando inferior una en contra una de ta otrahasta que la pinza del mango pueda serinsertada en uno de los tres agujeros delcontrol de la altura.
AIta
Puntal
MOTORVELOClDAD DEL MOTORLa velocidad del motor ha side ajustada enla f&brica. No trate de aumentar la velocidaddel motor pues se pueden producir lesionespersonales. Si cree que el motor est& funcio-nando demasiado r&pido o demasiado lento,Ileve su segadora a mas con su centre deservicio Sears o con un otro centre de serviciocualificado.
CARBURADORSu carburador no es ajustable. Si su motor noest& funcionando en forma adecuada debidoa problemas que se sospecha vienen del carbu-rador, Ileve su segadora a contacto con su cen-tre de servicio Sears o con un otro centro deservicio cuatificado para repararla y/o ajustarla.IMPORTANTE: Nunca manipule el reguladordet motor, el que ha side ajustado en la fAbricapara la velocidad del motor adecuada. Puedeser peligroso hacer funcionar el motor a unavelocidad por sobre el ajuste de alta velocidadde la f_,brica. Si cree que la velocidad alta regu-lada del motor necesita ajuste, contacto con sucentro de servicio Sears o con un otro centrede servicio cualificado, el que cuenta con elequipo adecuado y la experiencia para hacerlos ajustes necesarios.
Inmediatamente prepare su segadora para elalmacenamiento al final de cada temporada o sila unidad no se va a usar por 30 dias o mas.SEGADORACuando se va a guardar la segadora por ciertoperiodo de tiempo, limpiela cuidadosamente,remueva toda la mugre, la grasa, las hojas, etc.GuArdeta en un &rea Iimpia y seca.1. Limpie toda ta segadora (Vea"LIMPIEZA °
en ta secci6n de Mantenimento de estemanual).
2. Lubriquela segSn se muestra en la secci6nde Mantenimento de este manual.
3. Aseg_rese de que todas las tuercas yctavijas y todos los pernos y tornillos est6napretados en foma segura. Inspeccionelas partes que se mueven para verificar siestan dai_adas, quebradas o desgastadas.C&mbielas si es necesario.
4. Retoque todas las superficies que est6noxidadas o con la pintura picada; use unalija antes de pintar.
MANGOPuede doblar el mango de su segadora para elalmacenamiento.NOTA: El mango superior tiene un soporte"contra-dobla" situado en el lado derechodel mango. Este soporte evita que el mangosuperior doble hacia adelante, Io cual ayudaa proteger _1(los) cable(s) de control contracualquier daSo.
1. Suelte tas dos (2) manillas del mango encada tado del mango superior y permita queel mango se doble hacia detras.
2. Apriete los extremos inferiores del mangoinferior entre sf hasta que el mango inferiorquede separado del puntal del mango,luego mu6valo hacia adelante.
• Cuando prepare su mango a partir de laposici6n de atmacenamiento, el mango infe-rior nesecitara cerrarlo manualmente para laposici6n de sega.
IMPORTANTE: Cuando doble el mango para elalmacenamiento o et transporte, aseg_rese queIo doble seg_n se muestra o purde daiSar loscables de control.
Barra de control que
operador
Mango
Posici6npa_ segar
32

MOTORSISTEMA DE COMBUSTIBLEIMPORTANTE: Es importante evitar quese formen depositos de coma en partesfundamentales det sistemade combustible talescomo el carburador, el filtro del combustible,la mangura del combustible o en el estanquedurante el almacenamiento. Los combustiblesmezclados con alcohol (conocido comegasohol o que tienen etanol o metanol)Pueden atraer humedad, lo que conduce a laseparacion y a la formaci6n de acidos duranteel almacenamiento. La gasolina acida puededanar el sistema de combustible de un motordurante el perido de almacenamiento.• Vaciar el dep6sito del carburante poniendo
en marcha el motor y dejAndolo funcionarhasta que el carburante termine y elcarburador est_ vacio.
• Nunca use los productos para limpieza delcarburador o del motor en el estanque decombustible pues se pueden producir dafiospermanentes.
• Use combustible nuevo la pr6xima temporada.AMISO: El estabilizador de combustible es unaalternativa aceptable para reducir a un minimola formaci6n de dep6sitos de goma en et com-bustible durante el periodo de almacenamiento.Agregue estabilizador a la gasolina en el es-tanque de combustible o en el envase para elatmacenamiento. Siempre siga la proporci6n demezcla que se encuentra en el envase del estabi-lizador. Haga funcionar el motor por 1omenos 10minutos despu6s de agregar et estabilizador, parapermitir que este llegue al carburador. No vaciar lagasolina del estanque de gasolina y el carburadorsi se estA usando estabilizador de combustible.
ACEITE DEL MOTOR
Drene el aceite (con el motor caliente) y c_mbielocon aceite de motor limpio. (Vea "MOTOR" en lasecci6n de Mantenimento de este manual).
ClLINDRO1. Remueva la bujfa.2. Vac[e una onza (29 ml) de aceite a tray,s
del agujero de la bujia en el cilindro.3. Tire la manilla de arranque lentamente unas
cuantas veces para distribuir el aceite.4. Vuelva a montar la nueva buj[a.
OTROS• No guarde la gasolina de una temporada a la
otra.• Cambie el envase de la gasolina si se emp-
ieza a oxidar. La oxidaci6n y/o la mugre ensu gasolina producirAn problemas.
• Si es posible, guarde su unidad en un recintocerrado y ct]brala para protegerla contra elpolvo y la mugre.
• Cubra su unidad con un forro protectoradecuado que no retenga la humedad. Nouse plAstico. El pl_stico no puede respirar, Ioque permite la formaci6n de condensaci6n,Io que producirA ta oxidaci6n de su unidad.
IMPORTANTE: Nunca cubra la segadoramientras el motor y las areas de escape todaviaestan catientes._ILPREOAUCI(_N: Nunca atmacene lasegadora con gasolina en el estanque dentrode un edificio en donde los gases puedenalcanzar una llama expuesta o una chispa.Permita que se enfrfe el motor antes dealmacenarla en atgSn recinto cerrado.
SOLUCION DE PROBLEMAS - Vea la secci6n apropiada en el manual amenos queest_ dirigido a un
PROBLEMA
centro de servico Sears.
CAUSA
No arranca 1. Filtro de aire sucio.2. Sin combustible.3. Combustible rancio.
4. Agua en el combustible.
5. Alambre de la bujia desconectado.6. Bujia mala.7. Cuchilla suelta o adaptador
de la cuchilla quebrado.8. Barra de control en la
posici6n suelta.9. Barra de control defectuosa.
10. V_lvula del combustible (si equ-ipada) est& en la posici6n OFE
11. Bateria d6bi (si equipada).12. Desconecte el conector
de la bater[a (si equipada).
CORRECCI(_N
1. Limpie/cambie el filtro de aire.2. Llene el estanque de combustible.3. Vaciar el estanque y vuelva a
llenarlo con combustible limpioy nuevo.
4. Vaciar el estanque y vuelva allenarlo con combustible limpioy nuevo.
5. Conecte el atambre a la bujia.6. Cambie la buj[a.7. Apriete el perno de la cuchilla
cambie el adaptador de la cuchilla.8. Presione la barra de control
hacia el mango.9. Cambie la barra de control.10. Gire a la vAlvula del combustible
a la posici6n ON.11. Cague la bateria.12. Conecte la bater[a al motor.
33

SOLUCION DE PROBLEMAS - Vea la secci6n apropiada en el manual amenos queestd dirigido a un centro de servico Sears.
PROBLEMA
Falta defuerza
Mal corte-
disparejo
Vibracionexcesiva
Cordbnarrancadordificil de tirar
Recogedor decdsped no seIlena (si vieneequipado)
Dificil deempujar
Pdrdida de
impulsiono retardasede lavelocidad
CAUSA
1. Cuchilla desgastada, dobladao suelta.
2. Altura de las ruedas dispareja.3. Velocidad del motor lenta.4. Acumulaci6n de c_sped, hojas o
basura debajo de la segadora.5. Demasiado aceite en motor.6. Velocidad de recorrido
demasiado rApida.
1. Cuchilla desgastada, dobladao suelta.
2. Altura de las ruedas dispareja.
3. Acumulaci6n de c_sped, hojas obasura debajo de la segadora.
1. Cuchilla desgastada, dobladao suelta.
2. CigueiSal del motor doblado.
1. El freno del volante del motor
est& aplicado cuando sesuelta la barra de control.
2. CigueiSal del motor doblado.
3. Adaptador de la cuchilla quebrado.4. La cuchilla se arrastra en
el c_sped.
1. Altura de corte demasiado baja.2. Levantamiento de la cuchilla
desgastado.3. Recogedor sin ventilaci6n de aire.
1. El c_sped est#, demasiado alto o laaltura de la rueda demasiado baja.
2. Parte trasera de la
caja/cuchilla de la segadoraarrastrAndose en el c_sped.
3. Recogedor de c6speddemasiado lleno.
4. Posici6n de la altura del mangono adecuada para usted.
1. Desgaste de la correa.2. La correa est& fuera de la polea.3. Cable de la impulsi6n usado o roto.4. El sistema de control del
mecanismo impulsor "suelto".
CORRECCI()N
1. Eleve la attura de corte.
2. Eleve la altura de corte.3. Limpie/cambie el filtro de aire.4. Limpie la parte inferior de la
caja de la segadora.5. Revise el nivel del aceite.6. Corte a una velocidad de
recorrido mAs lenta.
1. Cambie la cuchilla. Apriete el pernode la cuchilla.
2. Ajuste todas las ruedas a la mismaaltura.
3. Limpie la parte inferior de lacaja de la segadora.
1. Cambie la cuchilla. Apriete elperno de la cuchilla.
2. P6ngase en contacto con su centrode servicio Sears o con un otrocentro de servicio cualificado.
1. Presione la barra de control
hacia el mango superior antesde tirar el cord6n arrancador.
2. P6ngase en contacto con su centrode servicio Sears o con un otrocentro de servicio cualificado.
3. Cambie el adaptador de la cuchilla.4. Mueva la segadora a un lugar
en donde et c6sped ha sidocortado o a una superficie firmepara hacer arrancar el motor.
1. Eleve ta altura de corte.2. Cambie las cuchillas.
3. Limpie el recogedor de c_sped.
1. Eleve la attura de corte.
2. Eteve la parte trasera de la caja dela segadora (1) un lugar m&s alto.
3. Vacfe el recogedor de c_sped.
4. Ajuste la altura del mango demodo que le acomode.
1. Revise/cambie correa de impulsi6n.2. Revise/vuelva a instalar la
3. Cambie el cable de la impulsi6n.4. Ajuste el control del mecanismo
impulsor.
34

CRAFTSMAN ROTARY LAWN MOWER - - MODEL NUMBER 917.377660
GEAR CASE ASSEMBLY - PART NUMBER 180868
6
6
5
\
8\\\
7
10\
KEY PARTNO. NO. DESCRIPTION
1 17541011 Screw, Tapping #10-24 x .6682 160672 Gear Case, Upper3 57072 Seal4 179754 Drive Shaft5 160818 Bearing, Needle, Thrust6 77881 Bearing7 160817 Washer, Thrust8 850848 Key, Hi-pro9 160678 Shaft, Worm10 160679 Gear, Helical11 160673 Gear Case, Lower12 57079 Washer, Hardened13 12000039 E-Ring14 86447 Plug- - 750369 Grease- - 187540 Kit, Gearcase Replacement (Includes Grease)
NOTE: All component dimensions given in U.S. inches.1 inch = 25.4 mm
35

O3Cr_
4
\
CRAFTSMAN ROTARY LAWN MOWER - - MODEL NUMBER 917.377660
5
77 76 8
73 _-
"5 \20
22
0
lO
24
19
9O
31
34

CRAFTSMAN ROTARY LAWN MOWER - - MODEL NUMBER 917.377660
60"-4
KEY PARTNO. NO.
1 1827242 161105X4793 1827484 1860795 1320046 664267 1319598 1808339 182726
10 16155111 7399050012 5179316 18305817 17988518 18277819 18612520 181021X47921 181020X47922 15007823 16318324 6312425 16133326 16340927 16155028 8865229 18275531 17506434 85108487 15040638 ---
39 18602340 18002641 85463
KEY PARTDESCRIPTION NO. NO. DESCRIPTION
Handle, Upper, with GripHandle, LowerGrip, FoamRope Guide /Anti-Fold BracketNut, Hex, with Lockwasher Insert 1/4-20Wire, TieBolt, Handle 5/16-18 x 1.75Knob, HandleBail, WireBolt, CarriageNut, Hex, with Lockwasher Insert 5/16-18 UNCHairpin CotterKit, Door, RearSeal, DoorPlug, MulcherKit, HousingHandle, Bracket Assembly, LeftHandle, Bracket Assembly, RightScrew, Hex Washer HeadBolt, Hex Head 5/16-18 x 5/8Nut, Hex, with Lockwasher Insert 5/16-18Baffle, SideScrew #12 x 5/8SkirtScrew, Hinge 1/4-20x 1.25Cable, MZRBlade, 21"Bolt, Hex HeadBolt, EngineEngine, Briggs & Stratton, Model Number123K02-0258-E1 (See Breakdown)Grass Catcher BagGrass Catcher Frame
Danger Decal
57 179783X004 Bracket Assembly58 57808 Screw59 166042 Pulley, V-Groove60 166050 Spacer, Idler Arm61 145212 Nut, Hex, Flanged62 155552 Locknut, Hex63 179719X004 Idler Arm64 166043 Pulley, Idler65 160829 Shoulder Bolt73 182003 Clip76 850733X004 Bracket, Upstop77 750634 Screw84 54583 Screw85 187723 Key, Hi-Pro86 184941 Pulley87 851074 Washer88 850263 Lockwasher89 184590 Blade Adapter90 188245 Debris Shield91 182227 Bolt92 182001 Belt Keeper93 182228 Nut, Flex- - 161058 Warning Decal (Not Shown)- - 186123 Owner's Manual
Available accessories not thcluded with lawn mower:
71 3362371 3350071 3300071 33086
Gas Can (2.5 Gallon Capacity)Fuel StabilizerSAE 30W Oil (20 Ounce Bottle)Clipping Deflector
NOTE: All component dimensions given in U.S. inches.1 inch = 25.4 mm

b3CO
23
4
12
45
59\
28 27
49
CRAFTSMAN ROTARY LAWN MOWER - - MODEL NUMBER 917.377660
23
2122
19
5453
32 57
55 34
33
23 29 49--62
2O
3O
3O63
38
2827

CRAFTSMAN ROTARY LAWN MOWER - - MODEL NUMBER 917.377660
03
KEY PARTNO. NO.
1 1812322 1812333 1806124 1824945 1615376 7506347 1822128 1320109 184749
10 166021X00411 1754101112 18104513 18086814 14535415 5707916 16158417 16160218 160477X00419 16765020 1200002221 16336522 16991123 161118X00424 5780825 18060426 18060327 5216028 1200005829 18050430 18815231 18060732 18054533 83923
KEY PARTDESCRIPTION NO. NO. DESCRIPTION
Decal, Drive Control 34 180626Decal, Drive Control Operation 35 160785 X004Cable, Drive 36 160786X004Decal, Drive Control Adjustment 37 161463Cover Drive 38 163409Screw, Threaded, Rolled #10-25x .50 39 700279V-Belt 40 180542Nut, Hex, Flangelock, Zinc Plated 3/8-16 41 181609Pulley, Drive 42 181071Belt Keeper Bracket 43 19572216Screw, Hex Washer Head #10-24 x .668 44 180601Spring, Return, Lever 45 180982Gear Case Assembly (See Breakdown) 46 180602Pin, Spring, Thrust 47 181363X479Washer, Hardened 48 181698Rod, Connecting 49 175103Spring, Extension 50 175102Spring, Selector 51 175098Knob, Selector Spring 52 188291E-Ring 7/8 53 175104Bearing Support 54 175101Bearing, Ball 55 188293Retainer, Drive Assembly, Stamped 56 188292Screw, Hex Head, Tapping 1/4-20 x .75 57 67725Pulley, Split, Upper 58 175105Pulley, Split, Lower 59 180606Washer 60 52160
E-Ring 7/16 61 57079Cover, Dust, Wheel 62 54583O-Ring 63 88348Spring, Pulley AdjusterWheel 9 x 2Nut, Hex, Flangelock 3/8-16
Hubcap, Mag, PlatinumShaft Assembly, RearShaft Assembly, R'ontRetainer, Front ShaftScrew #12x 5/8Clip, RetainerWheel 8 x 2Connector, Lever / PulleyEZ Walk Drive Control AssemblyWasherCover, Top, EZ Walk Drive ControlLever, EZ Walk Drive ControlCover, Bottom, EZ Walk Drive ControlPlate, Trigger, EZ Walk Drive ControlScrew, Phillips Head #10-5/8Pinion, GearRetainer, Drive, RHPawlSpring, TorsionDisc, DriveSeal, FrictionPinion Assembly, RHPinion Assembly, LHWasher, Flat 1/2 x 1-1/2Retainer, Drive, LHScrewWasherWasherScrewWasher, Flat 3/8
NOTE: All component dimensions given in U.S. inches.1 inch = 25.4 mm

BRIGGS & STRATTON 4-CYCLE ENGINE MODEL NUMBER 123K02-0258-E1
I 1019 LABEL Kl'q
51_
383
635 _ 7 (
684
718 [_306
251 27 CJ
745
32
741
2o_
287 _ 8,_zJ
52511
524
4O

BRIGGS & STRATTON 4-CYCLE ENGINE MODEL NUMBER 123K02-0258-E1
425
968
445
443_
)66
188
358 ENGINE GASKET SET
3© 20_ 842@ s24_ 668
613
977 CARBURETORGASKET SET
365
6330 --61; 276_
121 CARBURETOR OVERHAUL KIT
'_ 6330
276_ 127_
127_ 130 95
617
1
137
276_
276 J276_
41
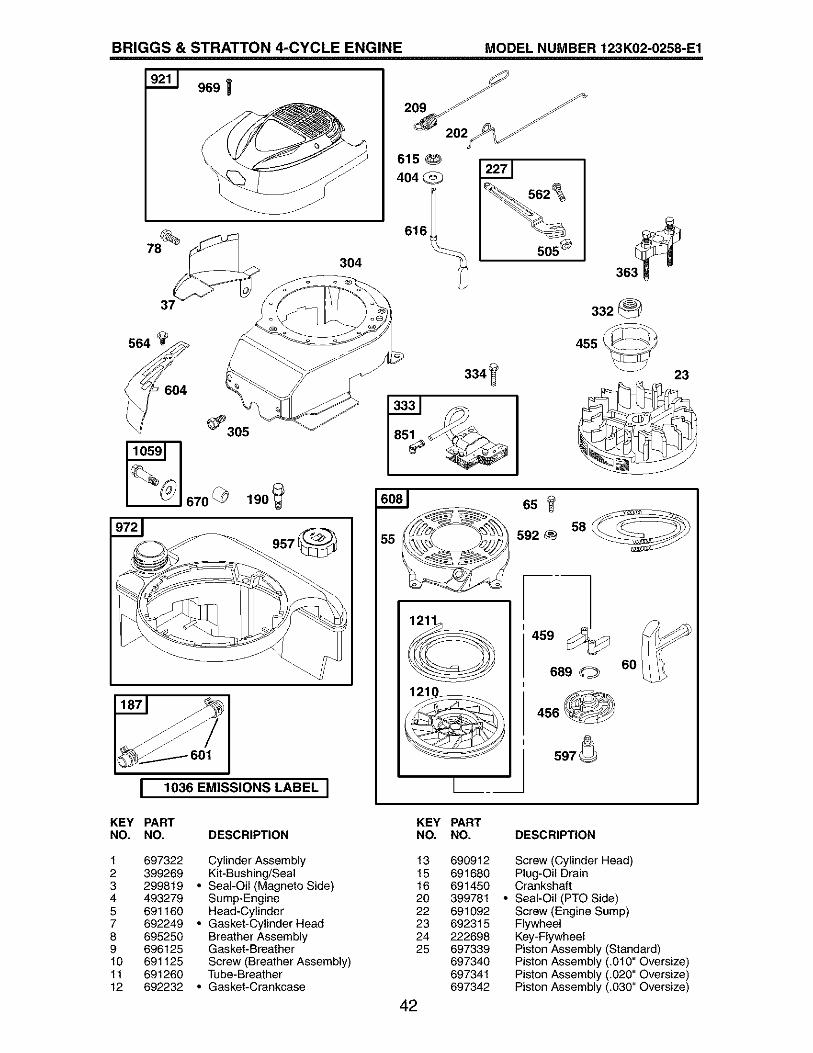
BRIGGS & STRATTON 4-CYCLE ENGINE MODEL NUMBER 123K02-0258-E1
969 !
304505 8
__Y
IL 1036 EMISSIONS LABEL J
334_
332 @
455
6558
592_
4so 6O
689
456
597_
23
KEY PARTNO. NO. DESCRIPTION
KEY PARTNO. NO. DESCRIPTION
1 697322 Cylinder Assembly2 399269 Kit-Bushing/Seal3 299819 • Seal-Oil (Magneto Side)4 493279 Sump-Engine5 691160 Head-Cylinder7 692249 • Gasket-Cylinder Head8 695250 Breather Assembly9 696125 Gasket-Breather10 691125 Screw (Breather Assembly)11 691260 Tube-Breather12 692232 • Gasket-Crankcase
13 69091215 69168016 69145020 39978122 69109223 69231524 22269825 697339
697340697341697342
42
Screw (Cylinder Head)Plug-Oil DrainCrankshaft
• Seal-Oil (PTO Side)Screw (Engine Sump)FlywheelKey-FlywheelPiston Assembly (Standard)Piston Assembly (.010" Oversize)Piston Assembly (.020" Oversize)Piston Assembly (.030" Oversize)

BRIGGS & STRATTON 4-CYCLE ENGINE MODEL NUMBER 123K02-0258-E1
KEY PARTNO. NO. DESCRIPTION
KEY PARTNO. NO. DESCRIPTION
26 499425 Ring Set-Piston (Standard) 443 692523499426 Ring Set-Piston (.010" Oversize) 445 491588499427 Ring Set-Piston (.020" Oversize) 455 691219499428 Ring Set-Piston (.030" Oversize) 456 692299
27 691866 Lock-Piston Pin 459 28150528 499423 Pin-Piston 505 23108229 499424 Rod-Connecting 523 49526432 691664 Screw (Connecting Rod) 524 69229632A 695759 Screw (Connecting Rod) 525 49526533 262651 Valve-Exhaust 529 69192334 262652 Valve-Intake 562 9261335 691270 Spring-Valve (Intake) 564 69858936 691270 Spring-Valve (Exhaust) 584 69234237 694086 Guard-Flywheel 585 69187940 692194 Retainer-Valve 592 69080043 691997 Slinger-Governor/Oil 597 69169645 690548 Tappet-Valve 601 9516246 691449 Camshaft 604 69858848 498829 Short Block (Replacement 608 497680
Engine 125K02-0253) 613 69134050 497465 Manifold-Intake 615 69034051 272199 • Gasket-Intake 616 69880154 691650 Screw (Intake Manifold) 617 27034455 691421 Housing-Rewind Starter 621 69231058 692259 Rope-Starter (Cut to Length) 633 69132160 281434 Grip-Starter Rope 635 6653865 690837 Screw (Rewind Starter) 668 49382378 691108 Screw (Flywheel Guard) 670 69229481 691740 Lock-Muffler Screw 684 69034595 691636 Screw (Throttle Valve) 689 69185597 696565 Shaft-Throttle 718 690959104 691242 OPin-FIoat Hinge 741 691830117 498978 Jet-Main (Standard) 745 691648118 497466 Jet-Main (High Altitude) 842 691031121 498260 Kit-Carburetor Overhaul 847 692017125 498170 Carburetor 851 493880127 694468 OPlug-Welch 868 697338130 696564 Valve-Throttle 869 691155133 398187 Float-Carburetor 870 690380134 398188 OVaIve-Needle/Seat 871 262001137 693981 OSGasket-FIoat Bowl 63709146 690979 Key-Timing 921 698587159 691753 Bracket-Air Cleaner Primer 922 692135163 272653 •QSGasket-Air Cleaner 923 695891187 691050 Line-Fuel (Cut to Required Length) 957 397974188 693399 Screw (Control Bracket) 966 496116190 690940 Screw (Fuel Tank) 968 692298202 691829 Link-Mechanical Governor 969 691138209 690319 Spring-Governor 970 691669222 692467 Bracket-Control 972 495224227 690783 Control Lever-Governor 975 493640276 271716 O$SealingWasher 976 694395287 690940 Screw (Dipstick Tube) 977 498261300 692038 Muffler 1019 494256304 695892 Housing-Blower 1036 697456305 691108 Screw (Blower Housing) 1059 692311306 690450 Shield-Cylinder 1210 498144307 690345 Screw (Cylinder Shield) 1211 498144332 690662 Nut (Flywheel)333 802574 Armature-Magneto334 691061 Screw (Armature Magneto)337 802592 Plug-Spark356 692390 Wire-Stop358 497316 Engine Gasket Set363 19069 Flywheel Puller365 692524 Screw (Carburetor)383 89838 Wrench-Spark Plug404 690272 Washer (Governor Crank)425 690670 Screw (Air Cleaner Cover)
Screw (Air Cleaner Primer Base)Filter-Air Cleaner CartridgeCup-FlywheelPlate-Pawl FrictionPawI-RatchetNut (Governor Control Lever)Dipstick
• Seal-Dipstick TubeTube-DipstickGrommetBolt (Governor Control Lever)Screw (Control Cover)Cover-Breather Passage
• Gasket-Breather PassageNut (Rewind Starter)Screw (Pawl Friction Plate)Clamp-HoseCover-ControlStarter-RewindScrew (Muffler)Retainer-Governor ShaftCrank-Governor
•O$SeaI-O Ring (Intake Manifold)Switch-Stop
O$SeaI-Throttle ShaftBoot-Spark Plug
• Spacer (Includes 2)Spacer-Fuel TankScrew (Breather Passage Cover)Spring-FrictionPin-LocatingGear-TimingScrew (Brake)
• SeaI-O Ring (DipstickTube)Assembly-Dipstick/TubeTerminal-Spark PlugSeal-ValveSeat-Valve (Intake)Seat-Valve (Exhaust)Bushing-Guide (Exhaust)Bushing-Guide (Intake)Cover-Blower HousingSpring-BrakeBrakeCap-Fuel TankBase-Air Cleaner PrimerCover-Air Cleaner
Screw (Blower Housing Cover)Screw (Air Cleaner Primer Bracket)Tank-FuelBowl-FloatPrimer-CarburetorSet-Carburetor GasketKit-LabelLabel-EmissionsKit-Screw/WasherAssembly-Pulley/Spring (Pulley)Assembly-Pulley/Spring (Spring)
RPM Settings: Low: 1900-2100; High: 3000-3200
Included in Engine Gasket Set, Key No. 358
O Included in Carburetor Overhaul Kit, Key No. 121
Included in Carburetor Gasket Set, Key No. 977
NOTE: All component dimensions given in U.S. inches1 inch = 25.4 mm
43

Your Home
For repair - in your home - of all major brand appliances,lawn and garden equipment, or heating and cooling systems,
no matter who made it, no matter who sold it!
For the replacement parts, accessories andowner's manuals that you need to do-it-yourself.
For Sears professional installation of home appliancesand items like garage door openers and water heaters.
1-800-4-MY-HOME _ Anytime, day or night
(1-800-469-4663) (U.S.A. and Canada)www.sears.com www.sears.ca
Our Home
For repair of carry-in products like vacuums, lawn equipment,and electronics, call or go on-line for the nearest
Sears Parts and Repair Center.
1-800-488-1222 Anytime, day or night (U.S.A. only)
www,seats.com
To purchase a protection agreement (U.S.A.)
or maintenance agreement (Canada) on a product serviced by Sears:
1-800-827-6655 (U.S.A.) 1-800-361-6665 (Canada)
Para pedir servicio de reparaciSna domicilio, y para ordenar piezas:
1-888-SU-HOGAR sM(1-888-784-6427)
Au Canada pour service en fran_;;ais:1-800-LE-FOYER Mc
(1-800-533-6937)www.sears.ca
SEARS© Sea_, Roebuck and Co.
® Registered Trademark / TMTrademark / SMService Mark of Sears, Roebuck and Co.® Marca Registrada / TMMarca de FAbrica / SMMarca de Servicio de Sears, Roebuck and Co.
MCMarque de commerce / MDMarque d_pos_e de Sears, Roebuck and Co.
186123 Rev. 3 09.03.03 BY Printed in U.S.A.