owner's manual€¦ · · 2018-02-28adjust swing economy fan speed lock ... heat or fan...
TRANSCRIPT

KSACN0101AAA
Wired Remote Controller (with Timer Function)For Ductless Systems
Owner's Manual

2
TABLE OF CONTENTSPAGE
SAFETY CONSIDERATIONS 3. . . . . . . . . . . . . . . . . . . . . . . . . . . . . . .
WIRED CONTROLLER FEATURES AND FUNCTIONS 5. . . . . . . . . .
WIRED CONTROLLER NAMES AND OPERATIONS 6. . . . . . . . . . .
CONTROLLER INDICATOR NAMES AND FUNCTIONS 7. . . . . . . .
BASIC FUNCTIONS 8. . . . . . . . . . . . . . . . . . . . . . . . . . . . . . . . . . . . . . .
COOL/HEAT/FAN MODE 9. . . . . . . . . . . . . . . . . . . . . . . . . . . . . . . . . . .
DRY MODE 10. . . . . . . . . . . . . . . . . . . . . . . . . . . . . . . . . . . . . . . . . . . . .
FOLLOW ME 11. . . . . . . . . . . . . . . . . . . . . . . . . . . . . . . . . . . . . . . . . . . .
SETTING AIR FLOW DIRECTION 12. . . . . . . . . . . . . . . . . . . . . . . . . .
TIMER SETTING 13. . . . . . . . . . . . . . . . . . . . . . . . . . . . . . . . . . . . . . . .
TIMER OFF AND TIMER OFF 14. . . . . . . . . . . . . . . . . . . . . . . . . . . . .
TROUBLESHOOT YOUR REMOTE CONTROL 14. . . . . . . . . . . . . . .

3
SAFETY CONSIDERATIONSInstalling, starting up, and servicing air−conditioning equipment can be hazardous due to systempressures, electrical components, and equipment location (roofs, elevated structures, etc.). Onlytrained, qualified installers and service mechanics should install, start−up, and service this equipment.
Untrained personnel can perform basic maintenance functions such as cleaning coils. All otheroperations should be performed by trained service personnel only. When working on the equipment,observe precautions in the literature and on tags, stickers, and labels attached to the equipment.
Follow all safety codes. Wear safety glasses and work gloves. Keep a quenching cloth and a fireextinguisher nearby when brazing. Use care in handling, rigging, and setting bulky equipment.
Read these instructions thoroughly and follow all warnings or cautions included in literature andattached to the unit. Consult local building codes and National Electrical Code (NEC) for specialrequirements. Recognize safety information.
This is the safety−alert symbol ! ! . When you see this symbol on the unit or in instructions or manuals,be alert to the potential for personal injury. Understand these signal words: DANGER, WARNING,and CAUTION.
These words are used with the safety−alert symbol. DANGER identifies the most serious hazardswhich will result in severe personal injury or death. WARNING signifies hazards which could result inpersonal injury or death.
CAUTION is used to identify unsafe practices which may result in minor personal injury or productand property damage. NOTE is used to highlight suggestions which will result in enhancedinstallation, reliability, or operation.

4
CAUTION!ELECTRICAL SHOCK HAZARD
Failure to follow this warning could result in personal injuryor death.
Before beginning any modification or installation of this kit,be sure the main electrical disconnect is in the OFF position.Ensure the power is disconnected to the fan coil unit.
On some systems, both the fan coil and the outdoor unit maybe on the same disconnect. Tag the disconnect switch with asuitable warning label. There may be more than onedisconnect.
CAUTION!
EQUIPMENT DAMAGE HAZARD
Failure to follow this caution may result in equipmentdamage or improper operation.Do not install the wired controller in an area subjected toexcessive steam, oil or sulfide gas. Doing so may cause thecontroller to deform and/or fail.

5
WIRED CONTROLLER FEATURES AND FUNCTIONSFeatures:
� LCD display� Malfunction code display − displays the error code (helpful for servicing)
� 5−way wire layout design
� Room temperature displayFunctions:
� Mode: choose Auto−Cool−Dry−Heat−Fan� Fan speed: Auto−Low−Med−High
� Swing (on some models)� Timer ON/OFF
� Temp setting
� FOLLOW ME� Child Lock
� LCD Display� Clock
6
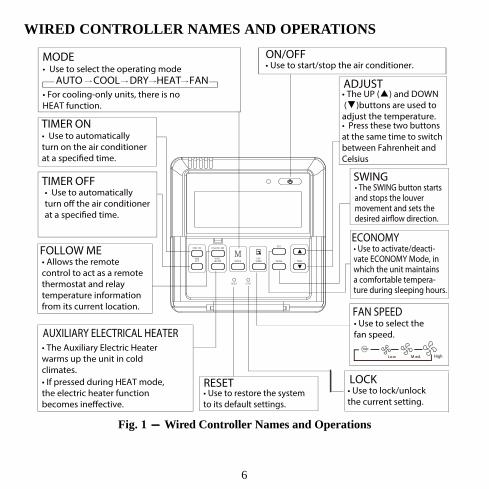
WIRED CONTROLLER NAMES AND OPERATIONS
MODE
TIMER ON
FOLLOW ME
TIMER OFF
AUXILIARY ELECTRICAL HEATER
RESET
ON/OFF
ADJUST
SWING
ECONOMY
FAN SPEED
LOCK
• Use to select the operating mode
• For cooling-only units, there is no HEAT function.
• Use to automatically turn on the air conditionerat a specified time.
• Use to automatically turn off the air conditionerat a specified time.
• Allows the remote control to act as a remote thermostat and relay temperature information from its current location.
• The Auxiliary Electric Heaterwarms up the unit in coldclimates.
• If pressed during HEAT mode, the electric heater function becomes ineffective.
• Use to restore the system to its default settings.
• Use to start/stop the air conditioner.
• The UP (▲) and DOWN (▼)buttons are used to adjust the temperature. • Press these two buttons at the same time to switch between Fahrenheit and Celsius
• The SWING button starts and stops the louver movement and sets the desired airflow direction.
• Use to activate/deacti-vate ECONOMY Mode, inwhich the unit maintainsa comfortable tempera-ture during sleeping hours.
• Use to select the fan speed.
• Use to lock/unlock the current setting.
Low M ed. High
AUTO COOL DRY HEAT FAN→→→→
RESE T LOCK
▼
▼TIME ON
TIMEOFF
FOLLOW ME
AUXI LHEATER MOD E
FANSPEED
ECO
SWING TEMP
Fig. 1 - Wired Controller Names and Operations
7
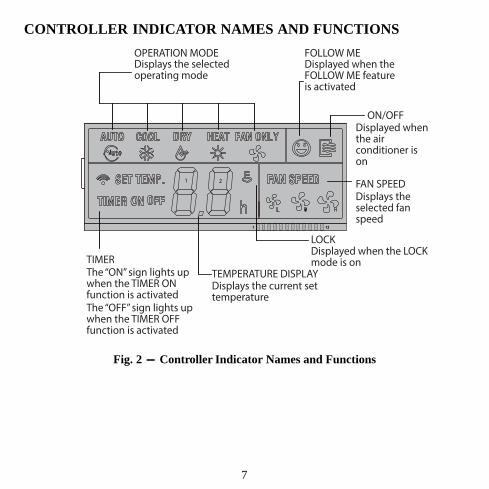
CONTROLLER INDICATOR NAMES AND FUNCTIONS
1 2
1 121 12
OPERATION MODEDisplays the selected operating mode
FOLLOW MEDisplayed when theFOLLOW ME feature is activated
ON/OFFDisplayed when the air conditioner is on
TIMERThe “ON” sign lights upwhen the TIMER ONfunction is activated The “OFF” sign lights upwhen the TIMER OFFfunction is activated
TEMPERATURE DISPLAYDisplays the current settemperature
LOCKDisplayed when the LOCKmode is on
FAN SPEEDDisplays the selected fan speed
Fig. 2 - Controller Indicator Names and Functions

8
BASIC FUNCTIONSAuto ModeIn AUTO mode, the unit automatically selects the COOL, HEAT, FAN or DRY function based on theset temperature.
1. Press MODE and select AUTO.
2. Press Y and B , set the desired temperature. The temperature can be set between 62�F (17�C) and86�F (30�C) in increments of 1�F or 1�C).
3. Press ON/OFF to start the unit.
NOTE: In AUTO mode, the fan speed is automatically set on AUTO mode and cannot be changed.ECONOMY Mode can also be activated.
12
3
TIME ON
TIMEOFF
FOLLOW ME
AUXI LHEATER MOD E
FANSPEED
ECO
SWING TEMP

9
COOL/HEAT/FAN MODE1. Press MODE, select COOL, HEAT or FAN ONLY.
2. Press the temperature adjust button to select the setting temperature.
3. Press FAN SPEED to select the speeds: HIGH/MID/LOW/AUTO.
4. Press ON/OFF and the indoor unit operation lamp lights and operates in the selected mode.Press ON/OFF again and it stops.
NOTE: When in the FAN mode the temperature can not be set.
12
4
3
LOCKRESE T
TIME ON
TIMEOFF
FOLLOW ME
AUXI LHEATER MOD E
FANSPEED
ECO
SWING TEMP
Fig. 3 - Cool/Heat/Fan Mode

10
DRY MODE1. Press MODE and select DRY.
2. Press the temperature adjust button to select the setting temperature.
3. Press ON/OFF and the indoor unit operation lamp lights and it works in the DRY mode. PressON/OFF again to turn off.
NOTE: In the DRY mode the ECONOMY operation and FAN speed are not available.
12
3
ECO
SWING TEMP
RESE T LOCK
TIME ON
TIMEOFF
FOLLOW ME
AUXI LHEATER MOD E
FANSPEED
Fig. 4 - Dry Mode

11
FOLLOW METhe FOLLOW ME function enables the remote control to measure the temperature at its currentlocation. When using the AUTO, COOL, or HEAT functions, measuring ambient temperature from theremote control (instead of from the indoor unit itself ) enables the air conditioner to ensure thetemperature around you is optimized for your comfort.
1. Press FOLLOW ME to activate function. The remote control sends a temperature signal to theindoor unit every three minutes.
2. Press FOLLOW ME again to turn off this function.
Follow Me ButtonRESE T LOCK
TIME ON
TIMEOFF
FOLLOW ME
AUXI LHEATER MOD E
FANSPEED
ECO
SWING TEMP
Fig. 5 - Follow Me Function

12
SETTING AIR FLOW DIRECTION1. Press SWING to activate the swing function. Press again to set the louver in the position you
desire.
2. Press and hold SWING for three seconds to move the louver.
NOTE: The swing range of the louvers is 30�. Only available in certain indoor units.
Swing ButtonRESE T LOCK
TIME ON
TIMEOFF
FOLLOW ME
AUXI LHEATER MOD E
FANSPEED
ECO
SWING TEMP
Fig. 6 - Setting Air Flow Function
Electric Heater FunctionPress HEAT mode to activate or deactivate the electrical heater function.
NOTE: Option only available when matched with Ducted indoor units (limited functionality).

13
TIMER SETTINGTimer On only
1. Press TIME ON and it displays SET on the LCD along with H and ON to indicate it is waitingfor the TIMER ON setting.
2. Press TIMER ON repeatedly to adjust the time setting.3. Press this button and hold to increase the time by 0.5h. After 10h, the time increases by 1h.4. After setting 0.5 second, the wired controller sends the TIMER ON information and it is
complete.
3 sec
1 2
x5TIMER
ON
TIMER
ON
Fig. 7 - Timer On SettingTimer Off only
1. Press TIME OFF and it displays SET on the LCD and H and ON to indicate it is waiting forthe TIMER ON setting.
2. Press TIME OFF repeatedly to adjust the time setting.3. Press this button and hold and the time increases by 0.5h. After 10h, the time increases by 1h.4. After setting 0.5 second, the wired controller sends the TIMER OFF information and it is
complete.
3 secx10TIMER
OFF
TIMER
OFF
1 2
Fig. 8 - Timer Off Setting

14
TIMER OFF AND TIMER OFF1. Set the TIMER ON time as detailed in the corresponding step 1 and 2.
2. Set the TIMER OFF time as described in the corresponding step 1 and 2.
3. The TIMER OFF time must be longer than the TIMER ON time.
NOTE: 0.5 seconds after setting, the wired remote controller sends the information and the setting iscomplete.
NOTE: When setting the TIMER ON or TIMER OFF functions, up to 10 hours, the time increases in 30minute increments with each press. After 10 hours and up to 24, it increases in 1 hour increments. The timerreverts to zero after 24 hours. You can select either function by setting its timer to “0.0 H.”
TROUBLESHOOT YOUR REMOTE CONTROL
Symptoms Possible Causes Solution
The fan speed cannot bechanged
Check whether the AUTO modeis selected
In AUTO mode, the FAN SPEEDis set automatically and cannotbe changed
Check whether the DRY mode isselected
In DRY mode, the FAN SPEEDis ineffective. The fan speed canonly be changed in COOL, FAN,and HEAT modes.
The temperature display is offCheck whether the FAN mode isselected
In FAN mode, the temperaturecannot be adjusted
The TIMER OFF disappears aftera period of time
If the TIMER OFF function wasactivated, the operation mayhave finished
The air conditioner willautomatically stop at the settime and the indicator light turnsoff.
The TIMER ON indicatordisappears after a period of time
If the TIMER ON function wasactivated, the operation mayhave finished.
The air conditioner automaticallystarts at the set time and theindicator light turns off.
Copyright 2018 CAC/BDP. � 7310 W. Morris St. � Indianapolis, IN 46231 Edition Date: 02/18
Manufacturer reserves the right to change, at any time, specifications and designs without notice and without obligations.Replaces: OMKSACN0101-02
Catalog No: OMKSACN0101- 03