orestar user's manual: candidacy filing · voters’ pamphlet filing published by elections...
TRANSCRIPT

ORESTAR User’s Manual Voters’ Pamphlet Filing
Published by
Elections Division 255 Capitol St NE Suite 501 Salem OR 97310-0722
503 986 1518 fax 503 373 7414 tty 1 800 735 2900 www.oregonvotes.gov
2014 Secretary of State

Elections Division
office hours: M-F | 8am – 5pm
For ORESTAR assistance, call the Elections Division or email [email protected].

Contents
INTRODUCTION 5
PRIVATE WORKSHOP 7
LOGGING IN TO ORESTAR 8
FILING A CANDIDATE STATEMENT 13
FILING A CANDIDATE STATEMENT IN ORESTAR 15 COMPLETING THE CANDIDATE STATEMENT BY FEE METHOD 22 COMPLETING THE CANDIDATE STATEMENT BY PETITION METHOD 24 AMENDING A CANDIDATE STATEMENT 25 WITHDRAWING A CANDIDATE STATEMENT 25
FILING A MEASURE ARGUMENT 27
FILING A MEASURE ARGUMENT IN ORESTAR 29 COMPLETING THE MEASURE ARGUMENT BY FEE METHOD 35 COMPLETING THE MEASURE ARGUMENT BY PETITION METHOD 37 AMENDING A MEASURE ARGUMENT 38 WITHDRAWING A MEASURE ARGUMENT 38


Introduction

6 Introduction
ORS chapter 260, “Campaign Finance Regulation; Election Offenses,” requires disclosure of contributions and
expenditures related to any candidate, measure, or political party active in any election including initiative,
referendum and recall petition drives. The chapter requires that all political committees and petition committees file
campaign finance transactions electronically. It also requires that the Secretary of State provide an electronic filing
system to committees free of charge to comply with this requirement.
The system developed by the Secretary of State is called Oregon Elections System for Tracking and Reporting, or
ORESTAR. It is a secure web-based application that can be accessed from any computer through the Internet.
The system has been enhanced to support candidacy filings and state Voters’ Pamphlet filings. This manual guides
users through the process of filing a Candidate Statement or Measure Argument for the state Voters’ Pamphlet.
There are separate user’s manuals for filing and managing a committee’s Statement of Organization, for filing
campaign finance transactions, and for filing a Declaration of Candidacy using ORESTAR. The ORESTAR Statement
of Organization manual also contains instructions for creating user accounts and accessing filings through the
ORESTAR Private Workshop. Users may find it useful to review these manuals online while logged in to ORESTAR.
ORESTAR User’s Manuals should be used in conjunction with the Candidate’s Manual, Campaign Finance Manual
and Voters’ Pamphlet Manual which are also published by the Elections Division. All Elections Division publications
and forms are available at www.oregonvotes.gov.
Users can access ORESTAR at www.oregonvotes.gov. This site should be bookmarked for repeated use.

Private Workshop
8 Private Workshop
Logging In to ORESTAR
To log in to ORESTAR, go to www.oregonvotes.gov and click on Elections and then ORESTAR Log in. Enter the
user name and password and click on Login again. If you have not established a user name and password, select
Sign Up Now and follow the instructions for Creating a User Account in the ORESTAR User’s Manual: Statement
of Organization, or view the ORESTAR video tutorials available online.
A successful login from www.oregonvotes.gov takes a user to the Private Workshop page in ORESTAR. However, in
certain circumstances the user may be taken to the Home page of the user management portion of the system. To
access the Private Workshop, click on ORESTAR (Elections Reporting) in the Applications section of the page.
note
If you are having trouble logging in, close all browsers, open a new browser window and try again.
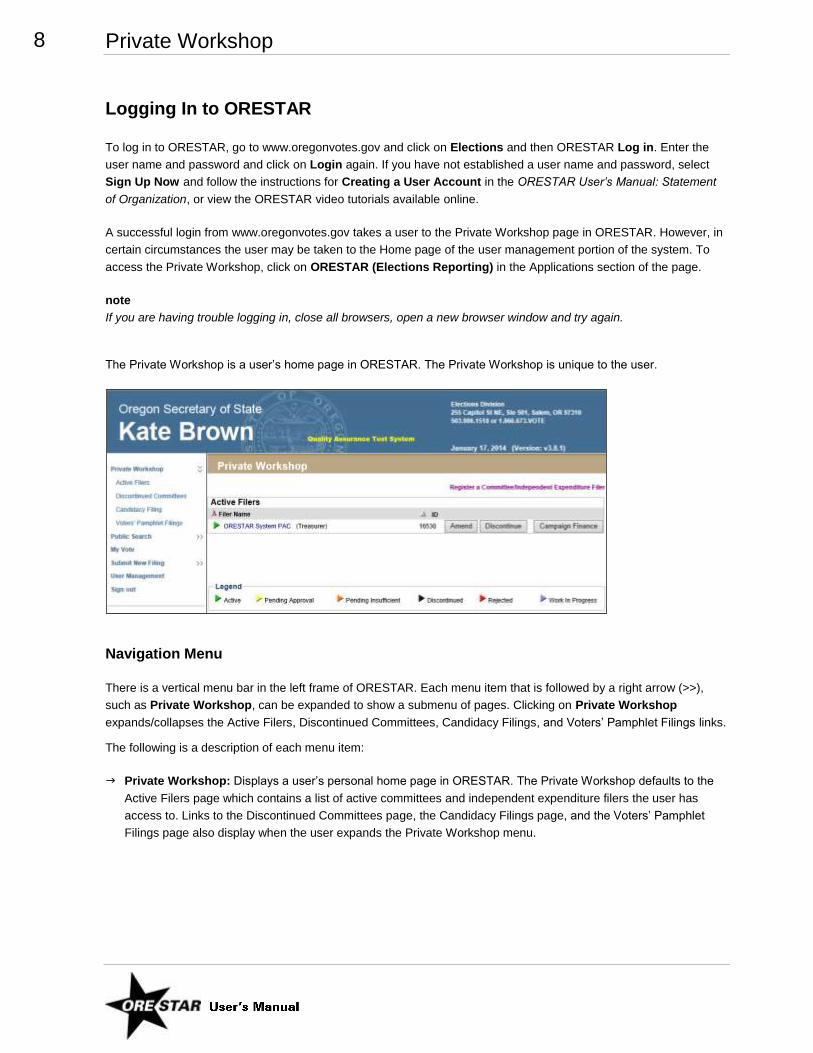
The Private Workshop is a user’s home page in ORESTAR. The Private Workshop is unique to the user.
Navigation Menu
There is a vertical menu bar in the left frame of ORESTAR. Each menu item that is followed by a right arrow (>>),
such as Private Workshop, can be expanded to show a submenu of pages. Clicking on Private Workshop
expands/collapses the Active Filers, Discontinued Committees, Candidacy Filings, and Voters’ Pamphlet Filings links.
The following is a description of each menu item:
Private Workshop: Displays a user’s personal home page in ORESTAR. The Private Workshop defaults to the
Active Filers page which contains a list of active committees and independent expenditure filers the user has
access to. Links to the Discontinued Committees page, the Candidacy Filings page, and the Voters’ Pamphlet
Filings page also display when the user expands the Private Workshop menu.

9 Private Workshop
Public Search: Clicking the Public Search menu opens a list of links to the public search pages:
Committee/Filer Search pages that allow a user to search for any committee or independent expenditure filer
registered with the Secretary of State. Searches can be performed by name information, election information
or by measure or petition information;
the Campaign Finance Transaction Search page that allows a user to search for transactions filed with the
Secretary of State by all registered filers;
the Campaign Finance Certificates Search page that allows a user to search for Certificates of Limited
Contributions and Expenditures filed with the Secretary of State by calendar year; and
the Candidate Filings Search page that allows a user to search for filings of candidacy for federal or state
offices that are filed with the Secretary of State.
Submit New Filing: Clicking the Submit New Filing menu opens links to three filing options:
Register a Committee/Independent Expenditure Filer, which links to the Filer Type Information page, the first
page when filing a Statement of Organization for a new committee or registering as an independent
expenditure filer.
File Candidacy (federal and state offices), which displays the Candidate Information page, the first page
when filing a Declaration of Candidacy. Only candidates for state office, US Senator and US Representative
in a primary election may use ORESTAR to file for candidacy.
File Voters’ Pamphlet Statement/Argument, which displays the filing type page, the first page when filing a
Voters’ Pamphlet statement or argument.
User Management: Accesses the user management portion of the system where a user can request access to a
committee, update profile information or change passwords. Authorized users can also approve an individual’s
request for access to a committee’s account or change a user’s role.
Sign Out: Logs the user out of the system. The user should close the browser after logging out.
Private Workshop Pages
The Private Workshop pages and a brief description of each follow:
Active Filers: This page displays a list of active committees or independent expenditure filers associated with the
logged-in user. The user’s role with each filer determines the function buttons that display.
Discontinued Committees: This page displays a list of discontinued committees associated with the logged-in
user. Only the Campaign Finance button displays.
Candidacy Filings: This page is used by candidates and it displays a list of candidacy filings the logged-in user
has filed.
Voters’ Pamphlet Filings: This page displays a list of Voters’ Pamphlet statements and arguments the logged-in
user is creating or has already filed.

10 Private Workshop
Voters’ Pamphlet Filings Page
The Voters’ Pamphlet Filings page in the user’s Private Workshop, is used for submitting Candidate Statements,
Measure Arguments, Fiscal Impact Statements, Explanatory Statements, Citizens’ Initiative Review Panel
Statements, Major Political Party Precinct Committeeperson Statements (primary election only), and
Political Party / Assembly of Electors Statements (general election only). The Voters’ Pamphlet Filings page lists
each Voters’ Pamphlet filing filed and appropriate function buttons display.
The function buttons display only if the action can be performed. For example, a Voters’ Pamphlet filing can be
amended until 5pm on the Voters’ Pamphlet filing deadline. After the filing deadline, the Amend button is no longer
available.
See the Elections Division publications and forms for information about filing fees and deadlines associated with filing
Voters’ Pamphlet statements or arguments, including amending or withdrawing a Voters’ Pamphlet filing.
Function Buttons
For each Voters’ Pamphlet filing listed in a user’s Private Workshop, up to three function buttons display. A brief
description of the action performed by each button follows:
Amend: This button allows the user to amend a Voters’ Pamphlet filing.
Continue with Filing: This button allows the user to continue with a work in progress Voters’ Pamphlet filing. The
Continue with Filing button replaces the Amend button when there is a work in progress Voters’ Pamphlet filing.
Withdraw: This button allows the user to withdraw a Voters’ Pamphlet filing.
Delete: This button allows the user to delete a work in progress Voters’ Pamphlet filing. The Delete button
replaces the Withdraw button when there is a work in progress Voters’ Pamphlet filing.

11 Private Workshop
Legend
Each Voters’ Pamphlet filing has an arrow to the left of the election/office information identifying the status of the
filing. The statuses are:
Pending Approval (yellow): Used for Voters’ Pamphlet petition filings only. Indicates that the user has filed a
Voters’ Pamphlet filing with the Elections Division but a determination has not been made as to whether the
petition is approved to circulate.
Approved to Circulate (orange): Used for Voters’ Pamphlet petition filings only. Indicates that the Elections
Division has reviewed the petition and approved it to be circulated to gather signatures.
Approved (green): Indicates that the Voters’ Pamphlet filing is complete. Note that before a petition filing can be
approved, signatures must be verified by the appropriate elections official (i.e., the Secretary of State for
candidates for state office, or the appropriate county elections official for candidates for local office). If a county is
verifying the signatures, the Voters’ Pamphlet filing will not receive a status of Approved until verified signature
sheets with sufficient signatures are turned in to the state Elections Division.
Work in Progress (blue): Indicates that the user has started a Voters’ Pamphlet filing that has not yet been filed
with the Elections Division.
Withdrawn (black): Indicates that the user had filed a Voters’ Pamphlet filing, but has chosen to withdraw the
filing.


Filing a Candidate Statement

14 Filing a Candidate Statement
This section guides a user through the process of filing a Candidate Statement for the state Voters’ Pamphlet. The
Candidate Statement filing must be done by the candidate, or an authorized agent of the candidate, and the filer must
be a registered user in ORESTAR. If the filer is not already registered in ORESTAR, the instructions for Creating a
User Account are located in the ORESTAR User’s Manual: Statement of Organization.
For county, city and Metropolitan Service District office candidates, if the jurisdiction lies within a county or counties
that do not produce a county Voters’ Pamphlet, a statement may be filed with the Secretary of State and is included
in the state Voters’ Pamphlet for each relevant county not producing a county Voters’ Pamphlet. Space in the state
Voters’ Pamphlet for city offices is limited to cities with populations over 50,000. As of July 2011, those cities are
Albany, Beaverton, Bend, Corvallis, Eugene, Gresham, Hillsboro, Medford, Portland, Salem and Springfield.
The Candidate Statement may be filed as either a petition filing (requiring collection of verified signatures) or a fee-
based filing. If the Candidate Statement filing is fee-based, the filing fee must be paid online by credit card at the time
of filing. Both VISA and MasterCard are accepted. Candidate Statement filings can also be amended or withdrawn
electronically, if necessary. See Amending a Candidate Statement and Withdrawing a Candidate Statement
(pages 25-26) for more information.
Information regarding who has filed a Voters’ Pamphlet filing is public record. However, the text of the Candidate
Statement is not public record until the fourth business day after the deadline to file (see ORS 251.145). Personal
information, such as residence address, home phone number and personal email address of a candidate, can be
blocked from public access if the candidate has been granted a public disclosure exemption under ORS 192.445.
See the Voters’ Pamphlet Manual for information about fees and deadlines associated with filing a Voters’
Pamphlet Candidate Statement.

15 Filing a Candidate Statement
Filing a Candidate Statement in ORESTAR
To file a Candidate Statement, log in to ORESTAR (see page 8), access the Private Workshop page and proceed
with the following:
1 In the left menu bar, click on Submit New Filing >> and File Voters’ Pamphlet Statement/Argument. Alternatively,
use the File Voters’ Pamphlet Statement/Argument link in the upper right of the Voters’ Pamphlet Filings page in
your Private Workshop.
2 The first of the Voters’ Pamphlet Filing entry pages requires that you select the election and type of Voters’ Pamphlet
filing. Choose the appropriate election and select Candidate Statement. Click the Continue button.
3 The Filing Information page opens for you to complete. See Filing Information Tab, page 16.
Use the tab key on the keyboard to move between fields on a single page or click in the field with the mouse pointer.
Use the Back and Next buttons or click on the tabs in the tab bar to navigate between pages.
Four additional function buttons display on all Voters’ Pamphlet Filing entry pages:
Save as work in progress allows a user to save an incomplete filing at any time and immediately continue with
the filing or return at a later time to complete the filing. A work in progress filing can be accessed at a later time
from a user’s Private Workshop by clicking on the Continue with Filing button.
Submit Filing performs validation on the Voters’ Pamphlet filing and notifies the user of any errors. If no errors
are found, the filer is presented with the Attestation page where the filer electronically signs the Statement and
files it with the Elections Division.
Preview opens a window that displays how the system is interpreting your Candidate Statement. The Preview
window does not use exact dimensions of a printed Voters’ Pamphlet column, nor does it employ fonts that will be
used in print, so there will be differences between Preview and the publication.
Cancel returns the user to the Private Workshop without saving the filing.

16 Filing a Candidate Statement
Filing Information Tab
1 Enter the following information:
Filing Method: Select whether you will pay the appropriate Voters’ Pamphlet Fee or file a Petition of the required
number of verified signatures.
Filer Name: The filer’s name (first, middle and last) is automatically populated from the user profile and cannot be
modified. Prefix (Mr. or Ms.), suffix (Jr., Sr., III, etc.) and title (MD, CPA, etc.) fields can be added if desired.
Enter the following information about the office.
Filing for Office of: Select the office the candidate is filing for.
District, Position, County or City: Select the district, position, county, or city of the office the candidate is filing
for.
Party Affiliation: Select the candidate’s party affiliation. ‘Nonpartisan’ will automatically populate if the office
selected is nonpartisan.
Name on Ballot: How the candidate’s name will appear on the ballot (first, middle, last and suffix). If a nickname
is used in connection with the candidate’s full name, the nickname should be in parentheses. Titles and
designations (e.g., Dr., CPA) should not be included as they will not appear on the ballot.
17 Filing a Candidate Statement
This Information Furnished By: The name of the candidate or committee, as it should appear in the state
Voters’ Pamphlet.
Mailing Address for Correspondence: The address where the Elections Division should send postal
correspondence relating to the Candidate Statement.
note
Most correspondence is sent via email unless the correspondence is specifically required to be sent via the US
Postal Service. Email correspondence is sent to the email address listed in Contact Information.
Contact Information: Enter work phone, home phone, cell phone, fax, email address. At least one phone number
(work, home, or cell) is required. An email address is required.
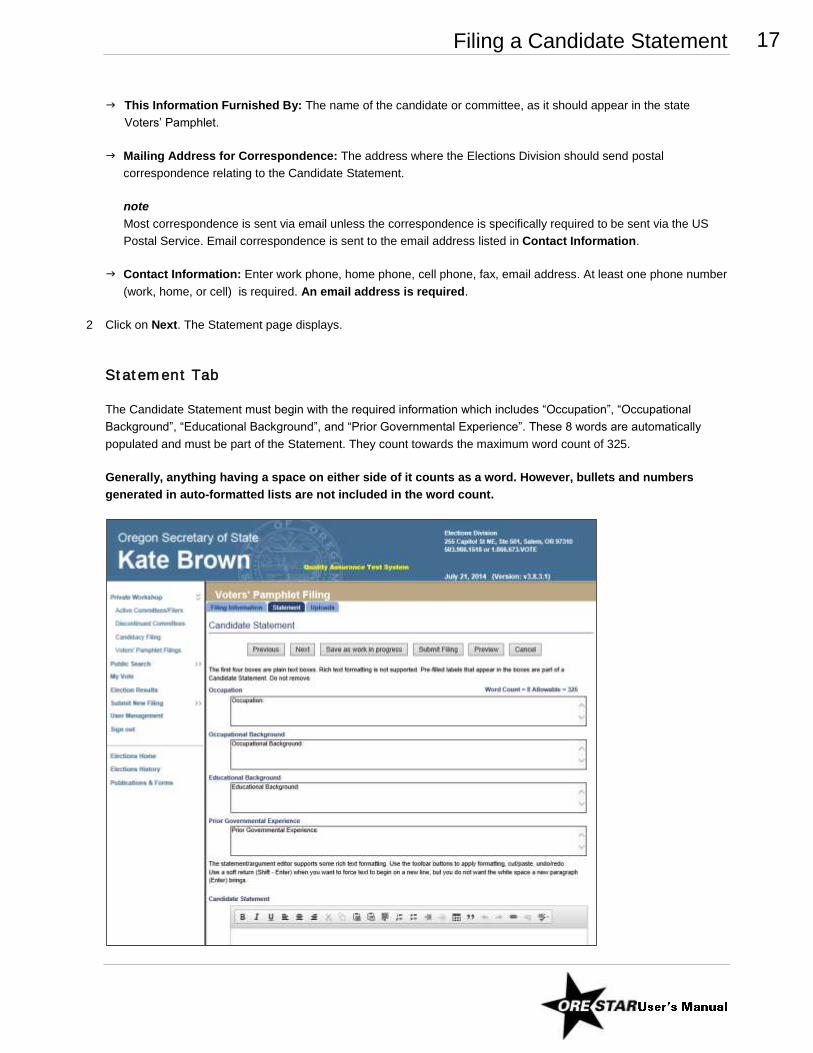
2 Click on Next. The Statement page displays.
Statement Tab
The Candidate Statement must begin with the required information which includes “Occupation”, “Occupational
Background”, “Educational Background”, and “Prior Governmental Experience”. These 8 words are automatically
populated and must be part of the Statement. They count towards the maximum word count of 325.
Generally, anything having a space on either side of it counts as a word. However, bullets and numbers
generated in auto-formatted lists are not included in the word count.
18 Filing a Candidate Statement
1 In the four text boxes at the top of the Statement page, enter the following required information. Enter the information
as you want it to appear in the Voters’ Pamphlet.
Occupation: The nature of an individual’s principal business, whether paid or unpaid. The current full or part-time
employment or other line of work, business, craft or professional information.
Occupational Background: Any previous occupations.
Educational Background: Any form of training of teaching an individual received.
Prior Governmental Experience: Any previous appointed or elected position with a governmental organization,
whether paid or unpaid.
See the Voters’ Pamphlet Manual for guidelines on ensuring that this required information is complete and
accurate. The manual is available at www.oregonvotes.gov.
notes
This information can include both paid and unpaid occupations or experience. You do not need to indicate “paid” or
“not paid”. Use semicolons to separate items such as jobs, organizations, dates, etc.
The word “none” must be used in any section of the required information if the candidate does not have any relevant
information for that section. The word “none” counts as part of the word count.
The four text boxes only support plain text. Formatting (e.g., bold text, lists) is not permitted in the required
information fields.
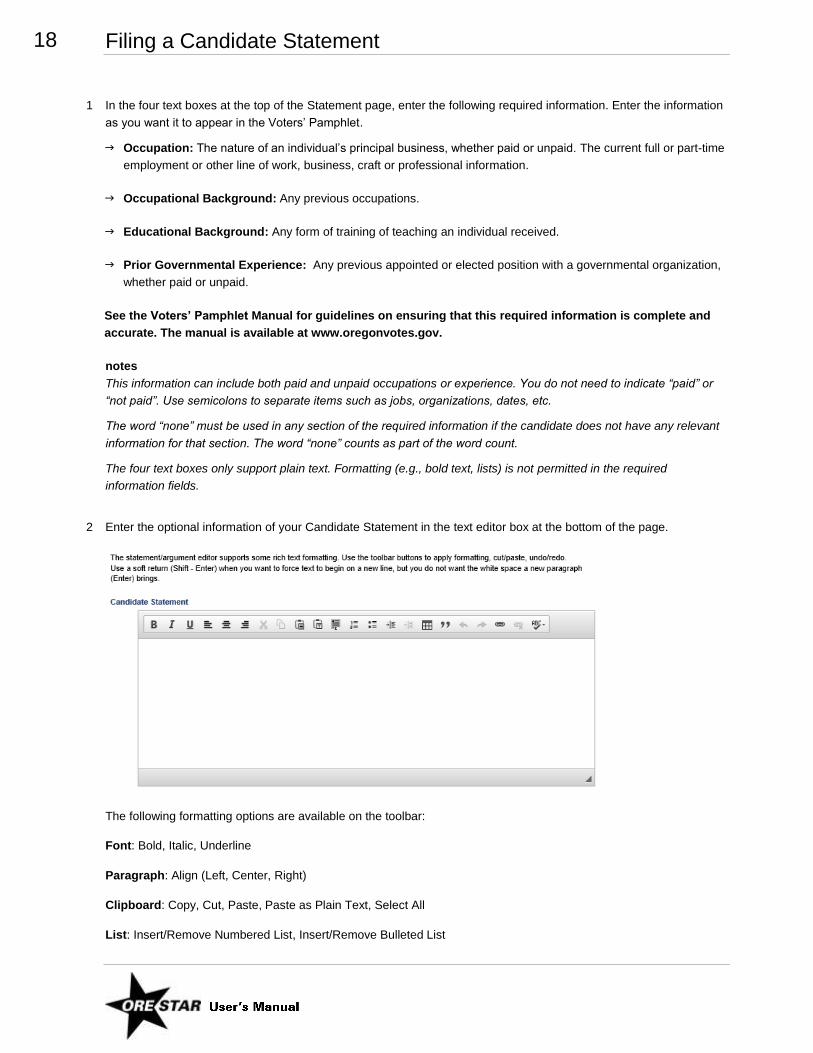
2 Enter the optional information of your Candidate Statement in the text editor box at the bottom of the page.
The following formatting options are available on the toolbar:
Font: Bold, Italic, Underline
Paragraph: Align (Left, Center, Right)
Clipboard: Copy, Cut, Paste, Paste as Plain Text, Select All
List: Insert/Remove Numbered List, Insert/Remove Bulleted List

19 Filing a Candidate Statement
Indent: Increase Indent, Decrease Indent
Insert / Edit Table: Use tables to apply two-column formatting to text. Table borders will not be published and cell
padding / spacing will not be enforced.
Block Quote: Margin is placed on either side of the text contained in the block quote. As a result, the block quote will
be narrower than the rest of the text.
Undo / Redo
Link / Unlink
Spell Check
note
It is possible to paste text from a text editor or word processor (e.g., Microsoft Word) into the Candidate Statement.
Pasting from a PDF document or email is not recommended. It is suggested that you use the Preview button to
review the formatting interpretation of the pasted text.
3 Click on Next. The Uploads page displays.
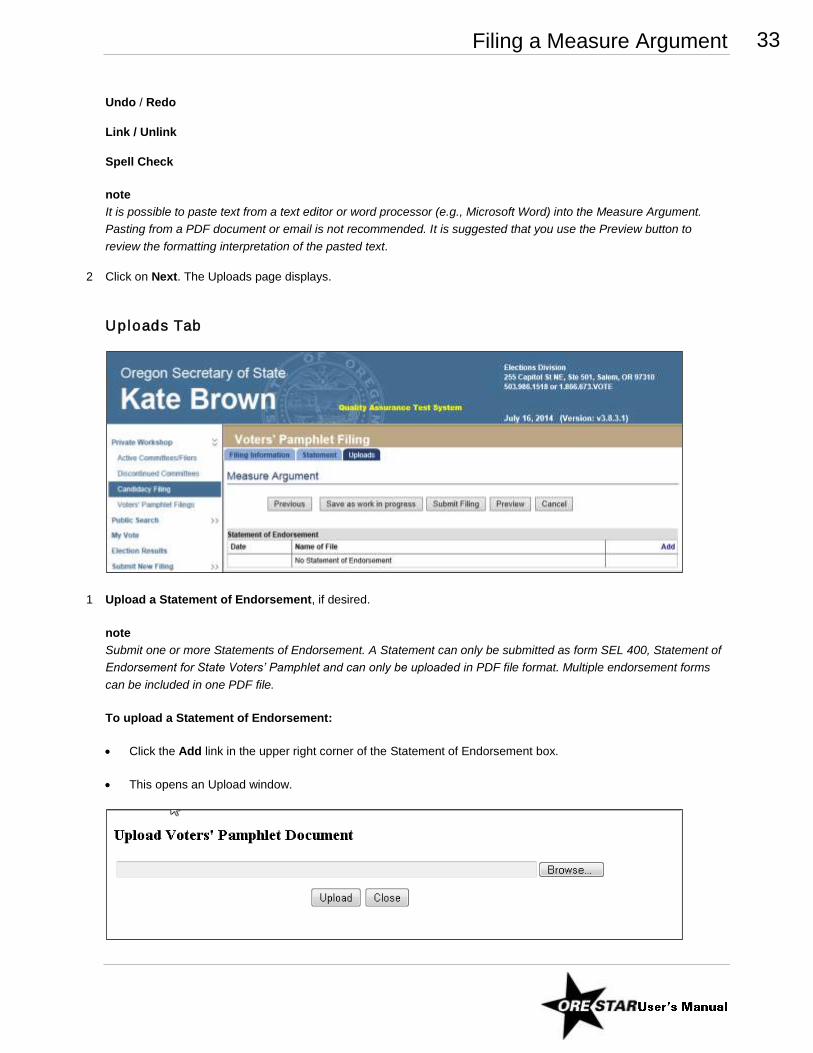
Uploads Tab
1 Upload portrait.
A portrait is not required, but you can upload a photograph of the candidate to be published as part of the Candidate
Statement.
notes
Image files will only be accepted in the following file formats: PNG, JPG, GIF, BMP
Photo must be black and white and of sufficient resolution to be printed at 1.5 inches x 1.75 inches.

20 Filing a Candidate Statement
Photo must be less than 4 years old and only show the face and shoulders of the candidate. The background of the
photo must be plain. No judicial robes, uniforms, hats, lapel pins, or other clothing or jewelry that may be construed
as representing an organization.
To upload your photograph:
Click Upload Picture. This opens an Upload window.
Click the Browse… button to find your image file. Select the file.
Click the Upload button.
If the upload succeeded, you will see the photo displayed in the image box.
2 Upload a Statement of Endorsement, if desired.
note
Submit one or more Statements of Endorsement. A Statement can only be submitted as form SEL 400, Statement of
Endorsement for State Voters’ Pamphlet and can only be uploaded in PDF file format. Multiple endorsement forms
can be included in one PDF file.
To upload a Statement of Endorsement:
Click the Add link in the upper right corner of the Statement of Endorsement box.
This opens an Upload window.
Click the Browse… button to find your PDF file. Select the file.
Click the Upload button.
21 Filing a Candidate Statement
Return to the Candidate Statement.
If the upload succeeded, you will see the file listed in the Statement of Endorsement box.
note
Once a Statement of Endorsement is added, click its Remove link to delete it, or Review link to view the document
that will be submitted to the Elections Division.
Submit Candidate Statement and Attest
1 Click the Preview button before you submit your Candidate Statement.
A Preview window opens. Determine whether the Candidate Statement is complete and accurate.
2 When the Candidate Statement is ready for submission, click on Submit Filing. The filing is validated and if no errors
are found, the Attestation page displays for the filer’s electronic signature.
If errors are found during the validation process, the user is returned to the data entry screen where the first error
exists. Messages identifying specific errors display above the fields in error. A user must fix all errors and click on
Submit Filing again.
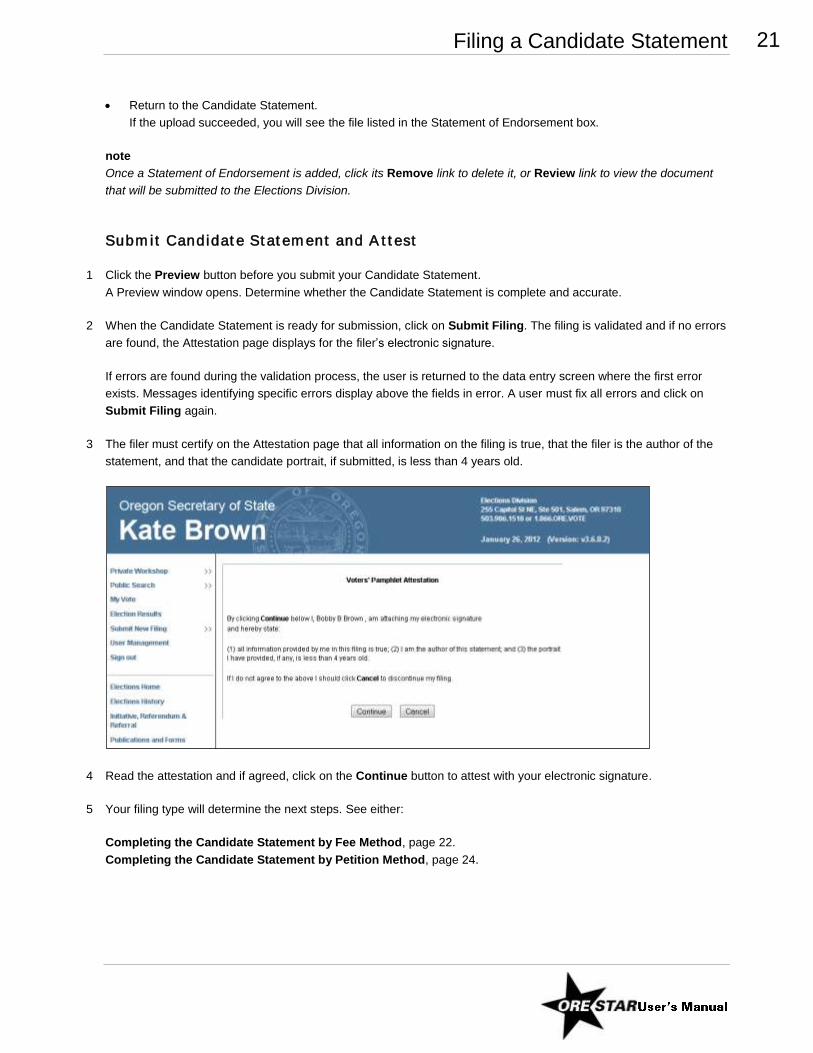
3 The filer must certify on the Attestation page that all information on the filing is true, that the filer is the author of the
statement, and that the candidate portrait, if submitted, is less than 4 years old.
4 Read the attestation and if agreed, click on the Continue button to attest with your electronic signature.
5 Your filing type will determine the next steps. See either:
Completing the Candidate Statement by Fee Method, page 22.
Completing the Candidate Statement by Petition Method, page 24.
22 Filing a Candidate Statement
Completing the Candidate Statement by Fee Method
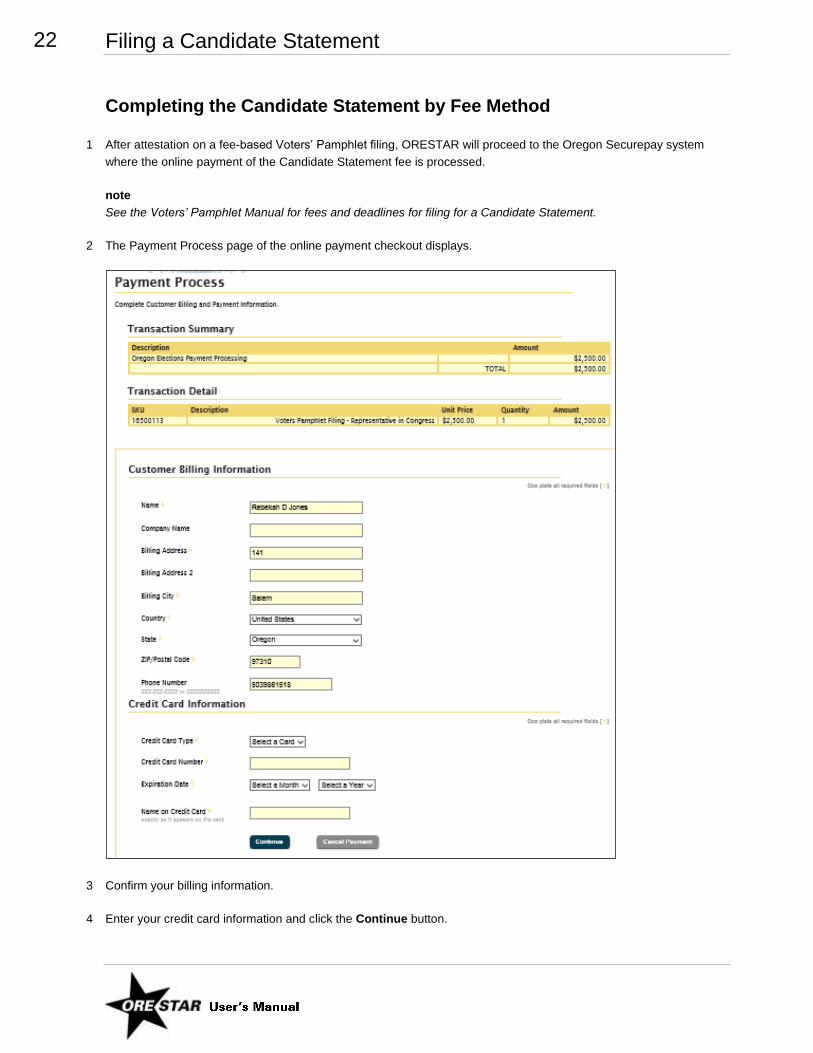
1 After attestation on a fee-based Voters’ Pamphlet filing, ORESTAR will proceed to the Oregon Securepay system
where the online payment of the Candidate Statement fee is processed.
note
See the Voters’ Pamphlet Manual for fees and deadlines for filing for a Candidate Statement.
2 The Payment Process page of the online payment checkout displays.
3 Confirm your billing information.
4 Enter your credit card information and click the Continue button.

23 Filing a Candidate Statement
5 The Payment Verification page of the online payment checkout displays.
6 Verify your information and click on the Make Payment button. The user returns to ORESTAR and a payment
confirmation page displays. The information on the page is also emailed to the user.
notes
Wait until you see the payment confirmation page before closing your browser.

24 Filing a Candidate Statement
Although the test confirmation page displayed above does not indicate an Amount Received,
your confirmation page will display the amount that will be charged to your credit card.
7 Click on the Continue button to return to the Private Workshop. The Candidate Statement will have an Approved
status.
8 A Voters’ Pamphlet Filing Confirmation email is sent to the Contact Information email address submitted in the filing.
Completing the Candidate Statement by Petition Method
1 After attestation on a petition filing, ORESTAR returns to the Private Workshop and the Candidate Statement has a
Pending Approval status.
2 A Voters’ Pamphlet Prospective Petition Filing Confirmation email is sent to the contact email address you submitted
in the filing. The email confirms that the Elections Division has received the Voters’ Pamphlet prospective petition
through ORESTAR.
3 The Elections Division reviews the prospective petition.
You will receive an email notification when the petition status is Approved to Circulate.
The Approval to Circulate email will include:
the signature sheet as a PDF attachment, and
a copy of the Candidate Statement that must be attached to or copied on the back of the approved signature
sheet.
4 The petition signatures must be turned in and verified by the appropriate elections official (i.e., the Secretary of State
for candidates for state office, or the appropriate county elections official for candidates for local office).
After the Secretary of State determines that a petition filing contains the required number of valid signatures, you will
receive an email from ORESTAR confirming the approval of your Candidate Statement filing. Petition filers are
advised to turn in signatures for verification at least 10 business days prior to the filing deadline to guarantee that
signature verification can be completed by the filing deadline.

25 Filing a Candidate Statement
If the county is the elections official, the verified signature sheets with sufficient signatures must be recovered from
the county and turned in to the state Elections Division by the filing deadline. The Elections Division approves the
Candidate Statement and you will receive a confirmation email from ORESTAR.
Amending a Candidate Statement
To amend a Candidate Statement, proceed with the following:
1 Click on the Amend button associated with the Candidate Statement on the Private Workshop. The Candidate
Statement data entry screens display with the data from the most recent filing.
2 Make the appropriate changes and click on Submit Filing. The Attestation page displays.
3 Read the attestation and click on the File button to attest and file the amended candidacy filing with the Elections
Division.
4 ORESTAR sends an email confirming the amendment to your Voters’ Pamphlet filing.
notes
The office on a Candidate Statement filing cannot be amended. To change the office on the filing, the candidate must
withdraw the Voters’ Pamphlet filing and submit a new Candidate Statement.
The Filing Method (Fee, Petition) can be amended such that a petition filing can be changed to a fee filing. However,
the Filing Method cannot be amended on a fee filing.
Once a petition filing receives a status of Approved to Circulate, amendments can no longer be made to the
information on the Statement Tab.
A Candidate Statement can be amended in ORESTAR until 5pm on the Candidate Statement deadline for the
election.
Withdrawing a Candidate Statement
To withdraw a Candidate Statement, proceed with the following:
1 Click on the Withdraw button associated with the Candidate Statement on the Private Workshop.
note
A Candidate Statement can be withdrawn in ORESTAR until 5pm on the Candidate Statement filing deadline for the
election.

26 Filing a Candidate Statement
2 A message box displays asking you to confirm the withdrawal. Click OK.
3 In your Private Workshop, the Candidate Statement now has a status of Withdrawn and the Amend / Withdraw
buttons are no longer available for this filing.
4 For a fee filing, a refund of the filing fee will be processed.

Filing a Measure Argument

28 Filing a Measure Argument
This section guides a user through the process of filing a Measure Argument for the state Voters’ Pamphlet. The
Measure Argument filing must be done by the individual who will be listed as furnishing the information in the Voters’
Pamphlet. If the filer is not already registered in ORESTAR, the instructions for Creating a User Account are located
in the ORESTAR User’s Manual: Statement of Organization.
The Measure Argument may be filed as either a petition filing (requiring collection of verified signatures) or a fee-
based filing. If the Measure Argument filing is fee-based, the filing fee must be paid online by credit card at the time of
filing. Both VISA and MasterCard are accepted. Measure Argument filings can also be amended or withdrawn
electronically, if necessary. See Amending a Measure Argument and Withdrawing a Measure Argument (pages
38-39) for more information.
Information regarding who has filed a Voters’ Pamphlet filing is public record. However, the text of the Measure
Argument is not public record until the fourth business day after the deadline to file (see ORS 251.145).
See the Voters’ Pamphlet Manual for information about fees and deadlines associated with filing a Voters’
Pamphlet Measure Argument.
29 Filing a Measure Argument
Filing a Measure Argument in ORESTAR
To file a Measure Argument, log in to ORESTAR (see page 8), access the Private Workshop page and proceed with
the following:
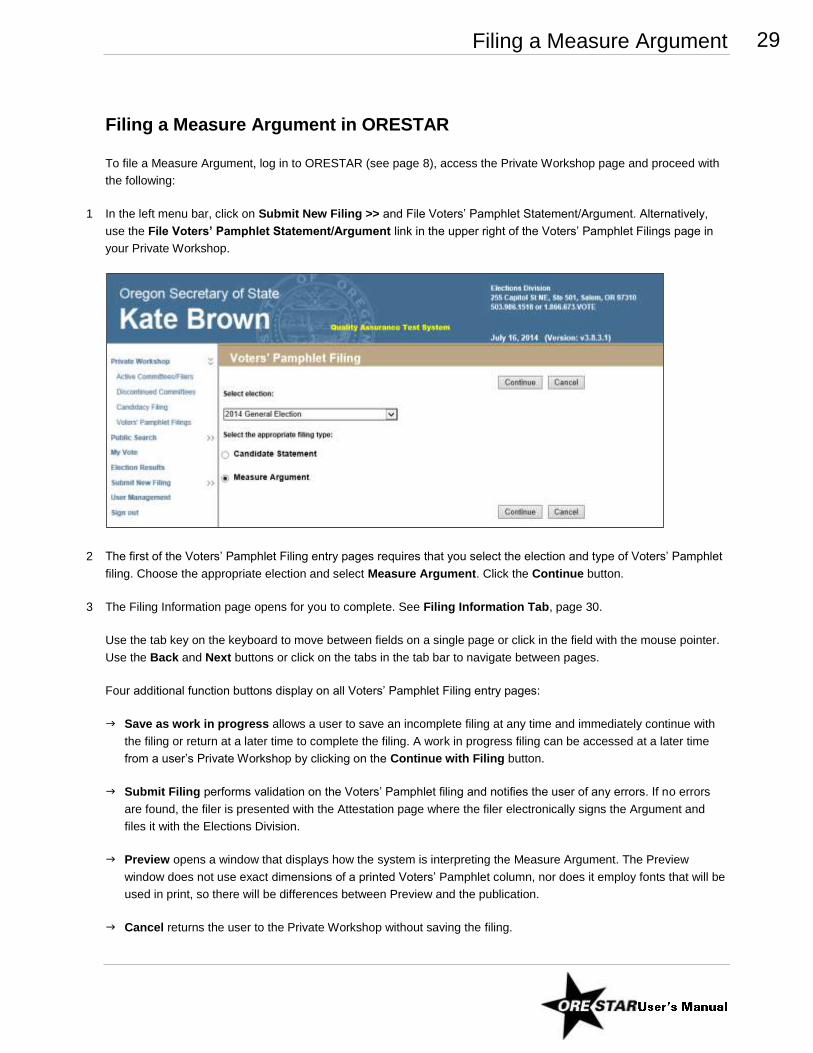
1 In the left menu bar, click on Submit New Filing >> and File Voters’ Pamphlet Statement/Argument. Alternatively,
use the File Voters’ Pamphlet Statement/Argument link in the upper right of the Voters’ Pamphlet Filings page in
your Private Workshop.
2 The first of the Voters’ Pamphlet Filing entry pages requires that you select the election and type of Voters’ Pamphlet
filing. Choose the appropriate election and select Measure Argument. Click the Continue button.
3 The Filing Information page opens for you to complete. See Filing Information Tab, page 30.
Use the tab key on the keyboard to move between fields on a single page or click in the field with the mouse pointer.
Use the Back and Next buttons or click on the tabs in the tab bar to navigate between pages.
Four additional function buttons display on all Voters’ Pamphlet Filing entry pages:
Save as work in progress allows a user to save an incomplete filing at any time and immediately continue with
the filing or return at a later time to complete the filing. A work in progress filing can be accessed at a later time
from a user’s Private Workshop by clicking on the Continue with Filing button.
Submit Filing performs validation on the Voters’ Pamphlet filing and notifies the user of any errors. If no errors
are found, the filer is presented with the Attestation page where the filer electronically signs the Argument and
files it with the Elections Division.
Preview opens a window that displays how the system is interpreting the Measure Argument. The Preview
window does not use exact dimensions of a printed Voters’ Pamphlet column, nor does it employ fonts that will be
used in print, so there will be differences between Preview and the publication.
Cancel returns the user to the Private Workshop without saving the filing.
30 Filing a Measure Argument
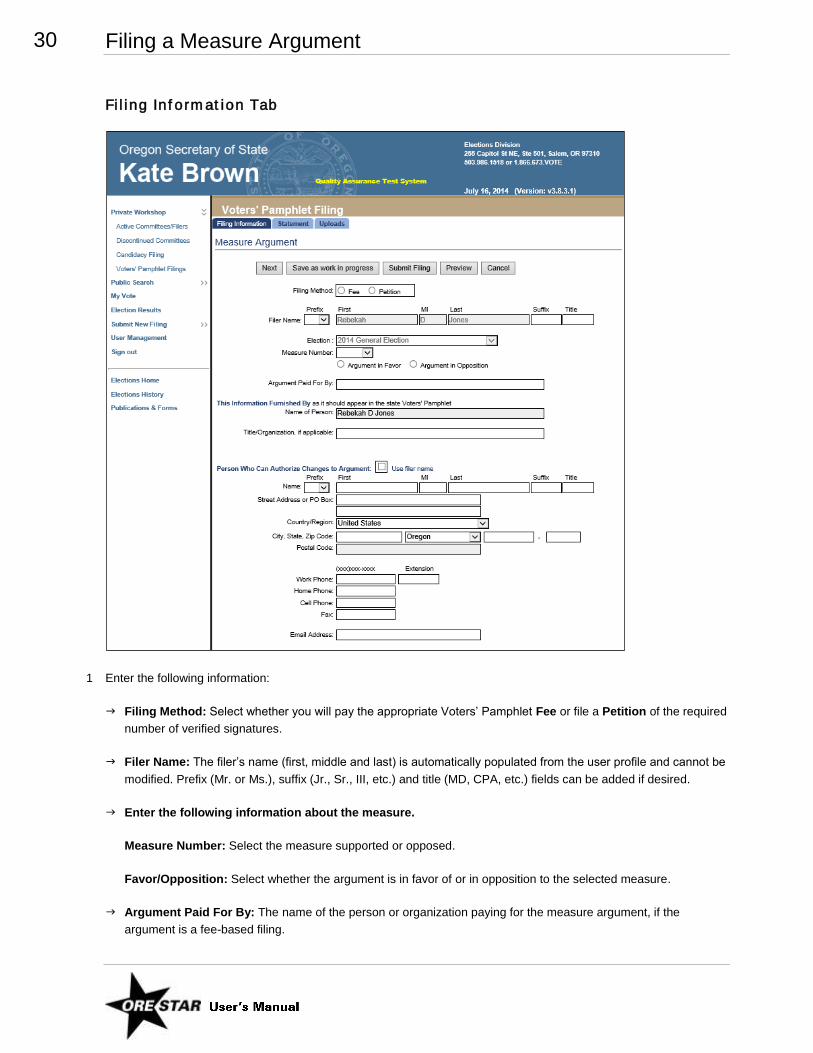
Filing Information Tab
1 Enter the following information:
Filing Method: Select whether you will pay the appropriate Voters’ Pamphlet Fee or file a Petition of the required
number of verified signatures.
Filer Name: The filer’s name (first, middle and last) is automatically populated from the user profile and cannot be
modified. Prefix (Mr. or Ms.), suffix (Jr., Sr., III, etc.) and title (MD, CPA, etc.) fields can be added if desired.
Enter the following information about the measure.
Measure Number: Select the measure supported or opposed.
Favor/Opposition: Select whether the argument is in favor of or in opposition to the selected measure.
Argument Paid For By: The name of the person or organization paying for the measure argument, if the
argument is a fee-based filing.

31 Filing a Measure Argument
This Information Furnished By as it should appear in the state Voters’ Pamphlet.
Name of Person: The name (first, middle, last and suffix, if applicable) is automatically populated from the Filer
Name fields.
Title/Organization, if applicable: The title of the person and/or the name of an organization the person
represents can be added if desired.
Person Who Can Authorize Changes to Argument.
Check the “Use filer name” checkbox if the filer is the person who can authorize changes to the argument. To
designate a person other than the filer, enter the person’s name. Additionally, enter an address, phone number
and email address for the person who can authorize changes. At least one phone number is required.
note
Most correspondence is sent via email unless the correspondence is specifically required to be sent via the US
Postal Service. Email correspondence is sent to the email address provided for the person who can authorize
changes to the argument.
2 Click on Next. The Statement page displays.
32 Filing a Measure Argument
Statement Tab
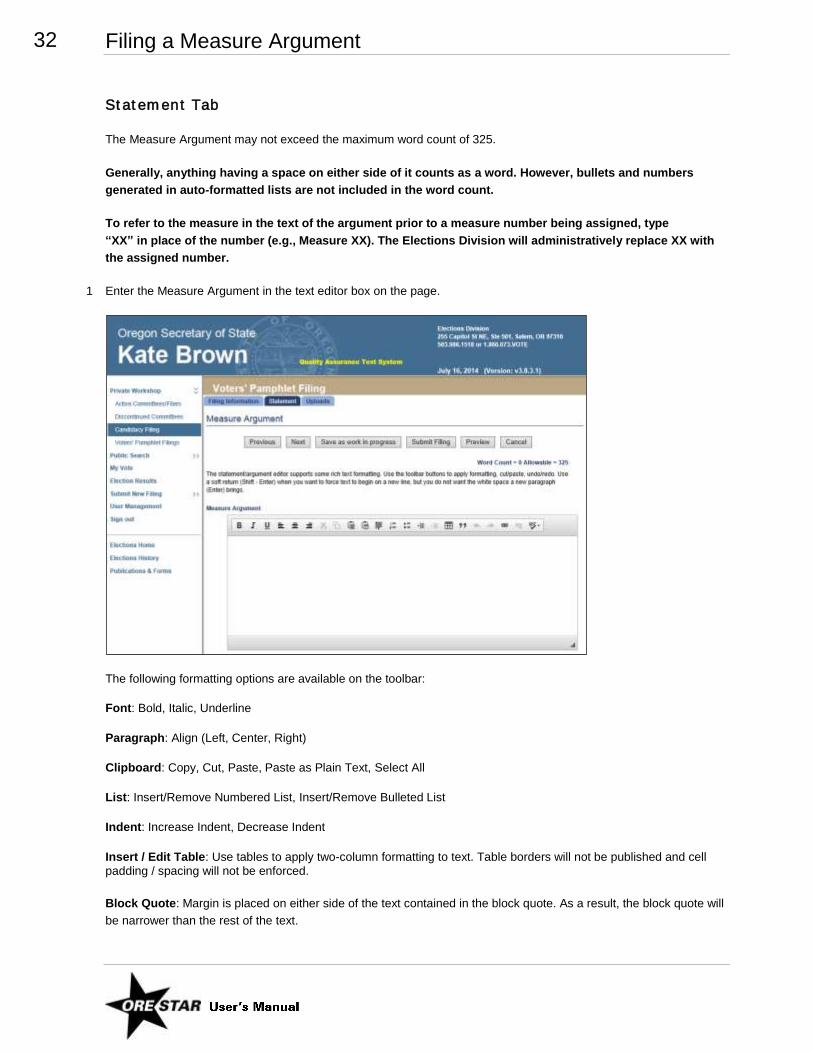
The Measure Argument may not exceed the maximum word count of 325.
Generally, anything having a space on either side of it counts as a word. However, bullets and numbers
generated in auto-formatted lists are not included in the word count.
To refer to the measure in the text of the argument prior to a measure number being assigned, type
“XX” in place of the number (e.g., Measure XX). The Elections Division will administratively replace XX with
the assigned number.
1 Enter the Measure Argument in the text editor box on the page.
The following formatting options are available on the toolbar:
Font: Bold, Italic, Underline
Paragraph: Align (Left, Center, Right)
Clipboard: Copy, Cut, Paste, Paste as Plain Text, Select All
List: Insert/Remove Numbered List, Insert/Remove Bulleted List
Indent: Increase Indent, Decrease Indent
Insert / Edit Table: Use tables to apply two-column formatting to text. Table borders will not be published and cell
padding / spacing will not be enforced.
Block Quote: Margin is placed on either side of the text contained in the block quote. As a result, the block quote will
be narrower than the rest of the text.
33 Filing a Measure Argument
Undo / Redo
Link / Unlink
Spell Check
note
It is possible to paste text from a text editor or word processor (e.g., Microsoft Word) into the Measure Argument.
Pasting from a PDF document or email is not recommended. It is suggested that you use the Preview button to
review the formatting interpretation of the pasted text.
2 Click on Next. The Uploads page displays.
Uploads Tab
1 Upload a Statement of Endorsement, if desired.
note
Submit one or more Statements of Endorsement. A Statement can only be submitted as form SEL 400, Statement of
Endorsement for State Voters’ Pamphlet and can only be uploaded in PDF file format. Multiple endorsement forms
can be included in one PDF file.
To upload a Statement of Endorsement:
Click the Add link in the upper right corner of the Statement of Endorsement box.
This opens an Upload window.

34 Filing a Measure Argument
Click the Browse… button to find your PDF file. Select the file.
Click the Upload button.
If the upload succeeded, you will see the file listed in the Statement of Endorsement box.
note
Once a Statement of Endorsement is added, click its Remove link to delete it, or Review link to view the document
that will be submitted to the Elections Division.
Submit Measure Argument and Attest
1 Click the Preview button before you submit your Measure Argument.
A Preview window opens. Determine whether the Measure Argument is complete and accurate.
2 When the Measure Argument is ready for submission, click on Submit Filing. The filing is validated and if no errors
are found, the Attestation page displays for the filer’s electronic signature.
If errors are found during the validation process, the user is returned to the data entry screen where the first error
exists. Messages identifying specific errors display above the fields in error. A user must fix all errors and click on
Submit Filing again.
3 The filer must certify on the Attestation page that the filer is the author of the argument.
4 Read the attestation and if agreed, click on the Continue button to attest with your electronic signature.
5 Your filing type will determine the next steps. See either:
Competing the Measure Argument by Fee Method, page 35.
Completing the Measure Argument by Petition Method, page 37.

35 Filing a Measure Argument
Completing the Measure Argument by Fee Method
1 After attestation on a fee-based Voters’ Pamphlet filing, ORESTAR will proceed to the Oregon Securepay system
where the online payment of the Measure Argument fee is processed.
note
See the Voters’ Pamphlet Manual for fees and deadlines for filing for a Measure Argument.
2 The Payment Process page of the online payment checkout displays.
3 Confirm your billing information.
4 Enter your credit card information and click the Continue button.

36 Filing a Measure Argument
5 The Payment Verification page of the online payment checkout displays.
6 Verify your information and click on the Make Payment button. The user returns to ORESTAR and a payment
confirmation page displays. The information on the page is also emailed to the user.

37 Filing a Measure Argument
notes
Wait until you see the payment confirmation page before closing your browser.
7 Click on the Continue button to return to the Private Workshop. The Measure Argument will have an Approved
status.
8 A Voters’ Pamphlet Filing Confirmation email is sent to the email address submitted in the filing.
Completing the Measure Argument by Petition Method
1 After attestation on a petition filing, ORESTAR returns to the Private Workshop and the Measure Argument has a
Pending Approval status.
2 A Voters’ Pamphlet Prospective Petition Filing Confirmation email is sent to the contact email address you submitted
in the filing. The email confirms that the Elections Division has received the Voters’ Pamphlet prospective petition
through ORESTAR.
3 The Elections Division reviews the prospective petition.
You will receive an email notification when the petition status is Approved to Circulate.
The Approval to Circulate email will include:
the signature sheet as a PDF attachment, and
a copy of the Measure Argument that must be attached to or copied on the back of the approved signature sheet.
4 The petition signatures must be turned in and verified by the Secretary of State.
After the Secretary of State determines that a petition filing contains the required number of valid signatures, you will
receive an email from ORESTAR confirming the approval of your Measure Argument filing. Petition filers are advised
to turn in signatures for verification at least 10 business days prior to the filing deadline to guarantee that signature
verification can be completed by the filing deadline.

38 Filing a Measure Argument
Amending a Measure Argument
To amend a Measure Argument, proceed with the following:
1 Click on the Amend button associated with the Measure Argument on the Private Workshop. The Measure Argument
data entry screens display with the data from the most recent filing.
2 Make the appropriate changes and click on Submit Filing. The Attestation page displays.
3 Read the attestation and click on the File button to attest and file the amended argument filing with the Elections
Division.
4 ORESTAR sends an email confirming the amendment to your Voters’ Pamphlet filing.
notes
The Filing Method (Fee, Petition) can be amended such that a petition filing can be changed to a fee filing. However,
the Filing Method cannot be amended on a fee filing.
Once a petition filing receives a status of Approved to Circulate, amendments can no longer be made to the
information entered in the ‘This Information Furnished By’ section or to the information on the Statement Tab.
A Measure Argument can be amended in ORESTAR until 5pm on the Measure Argument filing deadline for the
election.
Withdrawing a Measure Argument
To withdraw a Measure Argument, proceed with the following:
1 Click on the Withdraw button associated with the Measure Argument on the Private Workshop.
note
A Measure Argument can be withdrawn in ORESTAR until 5pm on the Measure Argument deadline for the election.
2 A message box displays asking you to confirm the withdrawal. Click OK.

39 Filing a Measure Argument
3 In your Private Workshop, the Measure Argument now has a status of Withdrawn and the Amend / Withdraw
buttons are no longer available for this filing.
4 For a fee filing, a refund of the filing fee will be processed.

07/30/2014