oracle webcenter forms recognition · webcenter forms recognition (“wfr”) with supervised...
TRANSCRIPT

Oracle® WebCenter Forms Recognition
Runtime Server User’s Guide
11g Release 1 (11.1.1.8.0)
E50185-01
November 2013
Page 2 of 60
WebCenter Forms Recognition
11g Release 1 (11.1.1.8.0)
Copyright © 2009, 2013 Oracle and/or its affiliates. All rights reserved.
This software and related documentation are provided under a license agreement containing restrictions on use and disclosure and are protected by intellectual property laws. Except as expressly permitted in your license agreement or allowed by law, you may not use, copy, reproduce, translate, broadcast, modify, license, transmit, distribute, exhibit, perform, publish, or display any part, in any form, or by any means. Reverse engineering, disassembly, or decompilation of this software, unless required by law for interoperability, is prohibited.
The information contained herein is subject to change without notice and is not warranted to be error- free. If you find any errors, please report them to us in writing.
If this software or related documentation is delivered to the U.S. Government or anyone licensing it on behalf of the U.S. Government, the following notice is applicable:
U.S. GOVERNMENT RIGHTS Programs, software, databases, and related documentation and technical data delivered to U.S. Government customers are "commercial computer software" or "commercial technical data" pursuant to the applicable Federal Acquisition Regulation and agency- specific supplemental regulations. As such, the use, duplication, disclosure, modification, and adaptation shall be subject to the restrictions and license terms set forth in the applicable Government contract, and, to the extent applicable by the terms of the Government contract, the additional rights set forth in FAR 52.227-19, Commercial Computer Software License (December 2007). Oracle USA, Inc., 500 Oracle Parkway, Redwood City, CA 94065.
This software is developed for general use in a variety of information management applications. It is not developed or intended for use in any inherently dangerous applications, including applications which may create a risk of personal injury. If you use this software in dangerous applications, then you shall be responsible to take all appropriate fail-safe, backup, redundancy, and other measures to ensure the safe use of this software. Oracle Corporation and its affiliates disclaim any liability for any damages caused by use of this software in dangerous applications.
Oracle is a registered trademark of Oracle Corporation and/or its affiliates. Other names may be trademarks of their respective owners.
This software and documentation may provide access to or information on content, products, and services from third parties. Oracle Corporation and its affiliates are not responsible for and expressly disclaim all warranties of any kind with respect to third-party content, products, and services. Oracle Corporation and its affiliates will not be responsible for any loss, costs, or damages incurred due to your access to or use of third-party content, products, or services.

Runtime Server Contents
WebCenter Forms Recognition Page 3 of 60
Contents
1 About Runtime Server .....................................................................................................................5
1.1 Remote Service Administration ...........................................................................................5
1.1.1. About Microsoft Management Console ............................................................................... 5 1.1.2. The Role of MMC ................................................................................................................ 6 1.1.3. Remote Administration Architecture .................................................................................... 6
2 About This User Guide ....................................................................................................................7
2.1 Intended Audience ...............................................................................................................7 2.2 Related Documentation .......................................................................................................7
3 Getting Started .................................................................................................................................8
3.1 Configuring the Batch Path File ...........................................................................................8 3.2 Configuring Runtime Service Manager ................................................................................8 3.3 Exiting Runtime Server ........................................................................................................9
4 The Concept of Batches ............................................................................................................... 10
4.1 Concept of a Batch ........................................................................................................... 10 4.2 Concept of a Virtual Folder ............................................................................................... 11 4.3 Batch Creation and Usage ................................................................................................ 11
5 Creating Batches ........................................................................................................................... 13
5.1 Creating Batches with Runtime Server ............................................................................. 13 5.2 Creating Batches with the Cedar BatchControl Library .................................................... 13
6 Setting up Runtime Administration ............................................................................................. 14
6.1 Setting up Snap-ins for Multiple Programs ....................................................................... 14 6.2 The User Interface ............................................................................................................ 15
6.2.1. The Title Bar ...................................................................................................................... 16 6.2.2. The Main Menu Bar ........................................................................................................... 16 6.2.3. The Toolbar ....................................................................................................................... 16 6.2.4. The Favorites Tab ............................................................................................................. 18 6.2.5. The Results Pane .............................................................................................................. 18
6.3 Adding Machine Groups ................................................................................................... 19 6.4 Adding Machines to a Group ............................................................................................ 19 6.5 Working With Runtime Server Instances .......................................................................... 20
6.5.1. Adding Instances to a Machine ......................................................................................... 20 6.5.2. Deleting Instances ............................................................................................................. 20 6.5.3. Cloning Instances .............................................................................................................. 21
7 Configuring Runtime Server ........................................................................................................ 22
7.1 Administration access ....................................................................................................... 22 7.2 General Settings ............................................................................................................... 22 7.3 Workflow Settings ............................................................................................................. 26 7.4 Import Settings .................................................................................................................. 28 7.5 OCR Settings .................................................................................................................... 32 7.6 Export Settings .................................................................................................................. 33 7.7 Clean up Settings .............................................................................................................. 34 7.8 Extended Processing Settings .......................................................................................... 35
7.8.1. File Replacement Options ................................................................................................. 36 7.8.2. Verifier Project Reference Options .................................................................................... 36 7.8.3. Display Format – JPEG Conversion .................................................................................. 37
7.9 Prepare an instance for “Document Separation” Feature ................................................. 37
7.9.1. Batch Properties ................................................................................................................ 37 7.9.2. Workflow for ADS .............................................................................................................. 38 7.9.3. Run of the ADS Instance ................................................................................................... 38

Runtime Server Contents
WebCenter Forms Recognition Page 4 of 60
8 Processing Batches ...................................................................................................................... 40
8.1 The Batch View ................................................................................................................. 40 8.2 Starting the Process .......................................................................................................... 41
8.2.1. Processing Projects containing SaxBasic Scripts .............................................................. 42
8.3 Stopping the Process ........................................................................................................ 42 8.4 Refreshing ......................................................................................................................... 42 8.5 Script Debugging .............................................................................................................. 42
9 Monitoring the Process ................................................................................................................ 43
9.1 With WebCenter Forms Recognition Runtime Server ...................................................... 43
9.1.1. The Statistics View ............................................................................................................ 43 9.1.2. The Document View .......................................................................................................... 43 9.1.3. The Classification View ..................................................................................................... 44 9.1.4. The Extraction View .......................................................................................................... 45
9.2 Event Viewer ..................................................................................................................... 45
9.2.1. The Event Log ................................................................................................................... 46 9.2.2. Monitoring Event Properties .............................................................................................. 46
9.3 Centralized Remote System Monitoring ........................................................................... 46
9.3.1. Configuring System Monitoring without E-mail Notification ............................................... 47 9.3.2. Configuring System Monitoring with E-mail Notification .................................................... 47
9.4 Unified Custom Logging.................................................................................................... 49 9.5 Advanced Logging ............................................................................................................ 50
9.5.1. System Resource Logging ................................................................................................ 50 9.5.2. Crash / Failure Logging ..................................................................................................... 51
Appendix A Launching the Runtime Service ............................................................................ 52 Appendix B Troubleshooting ...................................................................................................... 55 Appendix C Working with Large Document Volume ................................................................ 57 Glossary .................................................................................................................................. 58

Runtime Server About Runtime Server
WebCenter Forms Recognition Page 5 of 60
1 About Runtime Server
WebCenter Forms Recognition (“WFR”) with Supervised Learning is a product suite by Oracle Corporation, for automatically processing incoming documents. In principle, Forms Recognition works with any electronically available document. This includes scanned images, faxes, e-mails, and files. Forms Recognition automatically classifies these documents and extracts meaningful information from them.
Forms Recognition uses a trainable, self-learning algorithm that minimizes user definition and intervention tasks. As part of the WebCenter Forms Recognition suite, WFR Designer enables you to customize the automatic processing of incoming documents: which document classes are relevant in your enterprise and which information is to be extracted from the classified documents. All custom settings are saved in a WebCenter Forms Recognition project file.
To process large volumes of documents, WebCenter Forms Recognition organizes documents into batches. Runtime Server uses the project files and stored settings for production processing.
WebCenter Forms Recognition Runtime Server runs in the background as a server process. Multiple instances of Runtime Server can be started simultaneously in a network or on a single machine. Because all instances cooperate with each other, running multiple instances optimizes load distribution. Batches that cannot be entirely processed automatically by Runtime Server are forwarded to the quality assurance application WFR Verifier to be corrected manually.
1.1 Remote Service Administration
System administrators can remotely administer machines that run instances of WebCenter Forms Recognition Runtime Server. This Remote Service Administration feature, based on Microsoft Management Console (MMC) technology, provides a host environment for administering remote service.
1.1.1. About Microsoft Management Console
Microsoft Management Console (MMC) is a tool for creating, saving, and opening collections of administrative tools, called consoles. The Active Directory Domains and Trusts, Active Directory Sites and Services, and Active Directory Users and Computers administrative tools are all consoles. The console does not provide management, but it is the program that hosts management applications, called snap-ins. MMC provides a common host environment for snap-ins from a variety of software vendors. Using snap-ins, administrators and other users can create custom management tools. Administrators can save the tools they created for other uses or share them with other administrators and users. This model enables administrators to customize tools and create multiple tools of varying levels of complexity. By creating a custom MMC, you can avoid switching between programs and preconfigured MMCs.
The purpose of MMC is to create a set of integrated tools to perform specific tasks. The snap-ins provides the actual management behavior, while the MMC environment provides seamless integration between snap-ins. On its own, MMC is only a “container” (known as the “tools host.”) Snap-ins is extensions to the host that add management functionality. By combining snap-ins, you can create tailored administration consoles. Because a set of snap-ins can be saved into a tool, they can also be forwarded to others delegated to perform a specific task. When reopened, the tool will appear in the last saved state.
With MMC, you can:
Host Microsoft and independent software vendor (ISV) tools from one location.

Runtime Server About Runtime Server
WebCenter Forms Recognition Page 6 of 60
Customize the console for every administrative skill level.
Integrate your tools using the extensible model.
1.1.2. The Role of MMC
MMC is a Windows-based multiple document interface (MDI) application. Snap-ins extends the console while they perform management tasks. MMC programmatic interfaces permit the snap-ins to integrate with the console. However, the way that each snap-in actually does a task originates from within the snap-in. The relationship of the snap-in to the console consists of sharing a common hosting environment, and with cross-application integration. The console itself offers no management behavior. Snap-ins always resides in a console and do not run independently.
MMC is an integral part of all Microsoft Windows operating systems.
1.1.3. Remote Administration Architecture
In the WebCenter Forms Recognition Service Manager MMC snap-in, a hierarchical tree structure in the Tree view represents each individual machine and instance of Runtime Server. The Runtime Server pane displays batches for each instance.
A system administrator can:
Control the operation of each instance of WebCenter Forms Recognition Runtime Server over an entire network.
Change the settings of each instance, such as workflow, import/export folder and scripting parameters.
Monitor the progress and status of the instances.

Runtime Server About This User Guide
WebCenter Forms Recognition Page 7 of 60
2 About This User Guide
2.1 Intended Audience
This manual is for system administrators and others who will be customizing WebCenter Forms Recognition Runtime Server or administrating its server.
Readers should have sound knowledge of the Microsoft Windows operating system they work with.
For purposes of readability, this manual occasionally shortens the term WebCenter Forms Recognition Runtime Server to Runtime Server. These terms are synonymous.
2.2 Related Documentation
In addition to this manual, WebCenter Forms Recognition is shipped with the following documentation:
Installation Guide: Explains how to install Forms Recognition.
Release Notes: Highlights new features and enhancements available in Release 11.1.1.8.0.
Designer User Guide: Explains how to use WebCenter Forms Recognition Designer component to create custom applications.
Verifier User Guide: Explains how to use the WebCenter Forms Recognition’s quality assurance utility, Verifier.
Web Verifier: Explains how to use the web based extension of the Verifier.
Comprehensive online Help for Microsoft MMC and for Runtime Server.
All manuals are included on the installation media.

Runtime Server Getting Started
WebCenter Forms Recognition Page 8 of 60
3 Getting Started
WebCenter Forms Recognition Runtime Server requires some configuration after installing the program, including port assignment, creation of a batch path file, and set up of the Runtime Service Manager.
If the program was installed by Oracle personnel, Runtime Server should already be configured. If not, all configurations must be done by someone with administrative privileges.
Before configuring the Runtime Service Manager, ensure that the users and groups discussed in Platform Requirements in the WebCenter Forms Recognition Installation Guide exist. Specifically, check the domain user WFRRTSsvc. The WebCenter Forms Recognition Runtime Service Manager runs under the identity of this user. If you are in a Workgroup environment, make sure this user is configured on all WFR servers.
3.1 Configuring the Batch Path File
This file is used to specify the UNC name of the machine that contains the batches. To create it, use NotePad or another text editor to create a new file under the Batch directory and name it SrvName.DAT. In the body of the file, type either the name of the computer or its IP address. Use the following format:
\\computer name
\\IP address
In case file system batches are used on a shared network, the file SrvName.dat must be configured in both the batch root folder and shared license folder.
3.2 Configuring Runtime Service Manager
Below are the steps required for configuring the Runtime Service Manager. You must be logged on as an Administrator to do these steps.
1) Click Start.
2) Select Run.
3) At the command prompt, type “services.msc” and then press Enter.
4) In the Scope pane, double click the WebCenter Forms Recognition Runtime Service Manager.
5) On the General tab, under Startup type, select Automatic from the drop down list.
6) Go to the Log On tab.

Runtime Server Getting Started
WebCenter Forms Recognition Page 9 of 60
Figure 3-1: Log on tab for Runtime Service Manager Properties dialog box
7) Select This account.
8) Click Browse...
9) Find and add the domain user that is appropriate and sufficient for WebCenter Forms Recognition processing network access rights (e.g., WFRRTSsvc), and then click OK.
10) Type the domain password for the user in the fields provided.
11) Click Apply and OK. Close the Computer Management MMC.
3.3 Exiting Runtime Server
To quit the WebCenter Forms Recognition Service Manager MMC snap-in:
On the File menu, click Exit.
Runtime Server The Concept of Batches
WebCenter Forms Recognition Page 10 of 60
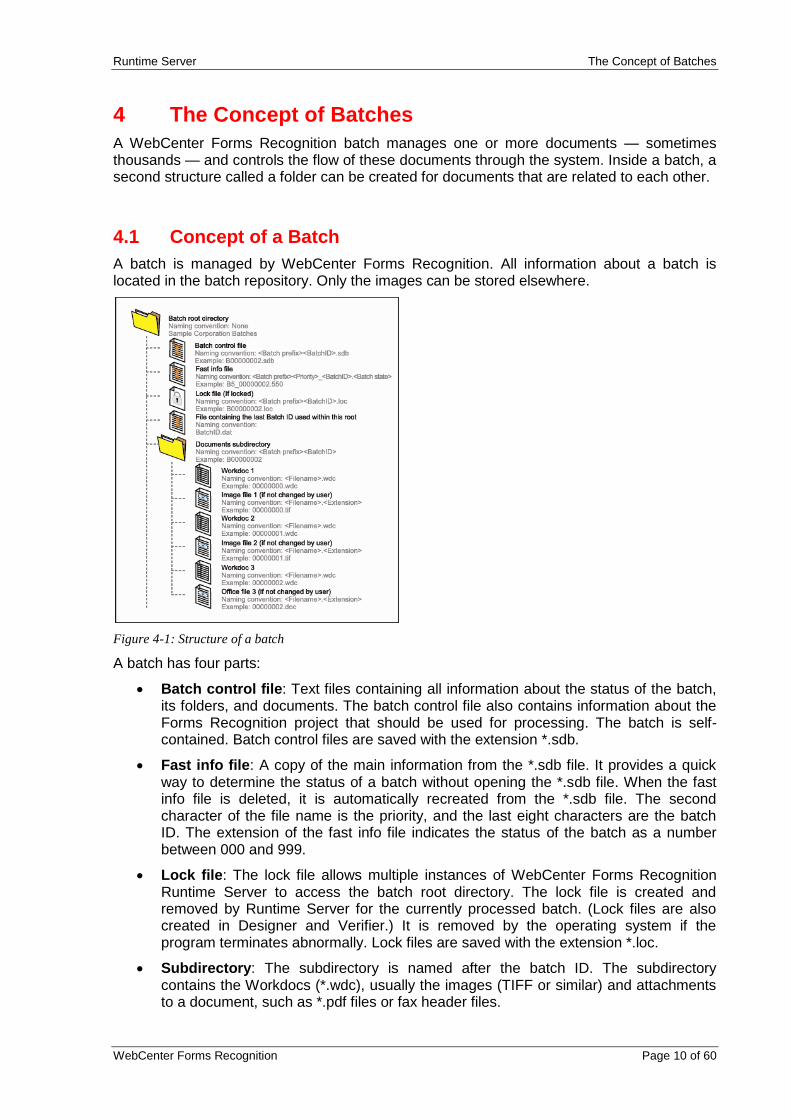
4 The Concept of Batches
A WebCenter Forms Recognition batch manages one or more documents — sometimes thousands — and controls the flow of these documents through the system. Inside a batch, a second structure called a folder can be created for documents that are related to each other.
4.1 Concept of a Batch
A batch is managed by WebCenter Forms Recognition. All information about a batch is located in the batch repository. Only the images can be stored elsewhere.
Figure 4-1: Structure of a batch
A batch has four parts:
Batch control file: Text files containing all information about the status of the batch, its folders, and documents. The batch control file also contains information about the Forms Recognition project that should be used for processing. The batch is self-contained. Batch control files are saved with the extension *.sdb.
Fast info file: A copy of the main information from the *.sdb file. It provides a quick way to determine the status of a batch without opening the *.sdb file. When the fast info file is deleted, it is automatically recreated from the *.sdb file. The second character of the file name is the priority, and the last eight characters are the batch ID. The extension of the fast info file indicates the status of the batch as a number between 000 and 999.
Lock file: The lock file allows multiple instances of WebCenter Forms Recognition Runtime Server to access the batch root directory. The lock file is created and removed by Runtime Server for the currently processed batch. (Lock files are also created in Designer and Verifier.) It is removed by the operating system if the program terminates abnormally. Lock files are saved with the extension *.loc.
Subdirectory: The subdirectory is named after the batch ID. The subdirectory contains the Workdocs (*.wdc), usually the images (TIFF or similar) and attachments to a document, such as *.pdf files or fax header files.

Runtime Server The Concept of Batches
WebCenter Forms Recognition Page 11 of 60
4.2 Concept of a Virtual Folder
The batch control file has the following structure:
[Batch]
BatchID=00000040
BatchName=Checks
BatchState=100
BatchPriority=5
Client=User04532
LastModule=Capture
LastUser=Anderson
CedarProjectName=D:\Proj\Sample.sdp
CedarProjectVersion=4
FolderCount=3
MaxFolderID=2
TotalDocCount=6
[Folders]
F0=F00000040_000000
F1=F00000040_000001
F2=F00000040_000002
[F00000040_000000]
FolderID=F00000040_000000
FolderName=ChecksFolder_0000
FolderState=100
DocCount=1
Doc0=DB_00000250.wdc
Doc0_State=100
Doc0_Class=
[F00000040_000001]
FolderID=F00000040_000001
FolderName=ChecksFolder_0001
FolderState=100
DocCount=3
Doc0=DB_00000251.wdc
Doc0_State=100
Doc0_Class=
Doc1=DB_00000252.wdc
Doc1_State=100
Doc1_Class=
…
// batch ID
// optional arbitrary name
// batch status (0-999)
// batch priority (0-9)
// client, i.e. license owner
// which module had processed
// the batch before
// operator which had processed
// the batch before
// path to the Designer
// project
// version of the Designer
// project
// number of folders in batch
// maximum folder ID in batch
// number of documents in batch
// enumeration of folders in
// the batch
// section of 1st folder
// section of 2nd folder
// ID of second folder
// optional arbitrary name
// of 2nd folder
// status of 2nd folder
// total number of documents in
// the second folder
// name of 1st doc. in the 2nd
// folder
// state of 1st document in the
// 2nd folder
// classification result of 1st
// document in the 2nd folder
Table 4-1: Batch control file
4.3 Batch Creation and Usage
In the WebCenter Forms Recognition process, batches are the primary mechanism for routing documents.
During production, batches are typically created in one of two ways:
They can be created as part of the scanning process and then imported by Runtime Server for processing.
WebCenter Forms Recognition can create the batches from documents stored in the file system and then process them. The Cedar BatchControl Library enables you to create batches programmatically.

Runtime Server The Concept of Batches
WebCenter Forms Recognition Page 12 of 60
If a batch stops processing at a certain pre-defined status that indicates failure of either the classification step or the extraction step, the batch can be handed over to WFR Verifier for manual correction. Verified batches obtain a corresponding status value and are then further processed by Runtime Server.
During application design, WFR Designer and WFR Verifier require batches as document input that are provided by WebCenter Forms Recognition Runtime Server.

Runtime Server Creating Batches
WebCenter Forms Recognition Page 13 of 60
5 Creating Batches
5.1 Creating Batches with Runtime Server
To create batches in WebCenter Forms Recognition Runtime Server, set up this option when you create configuration settings. The batches will be created as soon as you start processing. (See section STARTING THE PROCESS)
5.2 Creating Batches with the Cedar BatchControl Library
You can create batches programmatically using the Cedar BatchControl Library. The library can be used in Visual Basic or in Visual C++. It is installed with WebCenter Forms Recognition and saved in the following path:
[INSTALL DIRECTORY]\Components\Cedar\CdrBatch.dll.
You can use the library to create batches with arbitrary scan clients or e-mail application.

Runtime Server Setting up Runtime Administration
WebCenter Forms Recognition Page 14 of 60
6 Setting up Runtime Administration
MMC provides a common host environment for snap-ins from a variety of software vendors. The administrator can customize tools to work more efficiently. MMC provides the ability to create multiple tools of varying levels of complexity for task delegation. By creating a custom MMC, you can avoid switching between various programs and various pre-configured MMCs.
The starting point for setting up runtime administration in WebCenter Forms Recognition Runtime is to add the required number of servers to the console if you want more than one. Then, you build the Runtime Service Tree in the user interface by adding machines and adding instances of Runtime to those machines. Once you set up the machines and instances, you can process batches in Runtime Server and monitor the process. As the batches process, you can view statistics, documents, classification, extraction, and performance.
6.1 Setting up Snap-ins for Multiple Programs
When you start WebCenter Forms Recognition Runtime, you will notice a screen with two panes, the Tree Pane and the Runtime Server pane. The Tree pane contains the Console Root. The Console Root includes only one default folder called WebCenter Forms Recognition Runtime Server. If you want to run multiple instances of the application, or if you want to add other programs to customize your WebCenter Forms Recognition administration, you can add snap-ins. When you set up multiple snap-ins, you can remain in one program and within one configuration of MMC.
To add a snap-in:
1) Under a 32 bit platform, on the Windows desktop, click Start and select Run. Type mmc / 32. A Console window appears. (FIGURE 6-1) Consoles are saved as files with an .msc extension. When you save a console, all of the settings of the snap-ins save and appear when you open the file, even if you open the file on another computer or network.
Figure 6-1: Console Window
2) Select the Console. From the File menu, select Add/Remove Snap-in.

Runtime Server Setting up Runtime Administration
WebCenter Forms Recognition Page 15 of 60
Figure 6-2: The Add/Remove Snap-In dialog box
3) Click Add. A list of programs will appear in the Add Standalone Snap-In dialog box.
Figure 6-3: The Snap-in selection box
4) Add the desired application. To add another snap-in of Runtime Server, select WebCenter Forms Recognition Runtime Server snap-in. The new instance appears in the tree as WebCenter Forms Recognition Runtime Server. You can add groups and server instances to the snap-in. Items that you add to the console tree appear under the console root. The contents of the snap-in appear in the Runtime Server panel.
Note: When running a 64 bit platform, you can run MMC in different modes (64 or
32). The system analyzes your msc file and runs the appropriate MMC version. However,
when starting just mmc.exe you have to specify explicitly which version of MMC you want
to run. For example: mmc.exe /32.
6.2 The User Interface
The WebCenter Forms Recognition Runtime Server user interface (FIGURE 6-4) consists of a main menu, a toolbar, a navigation pane that contains a tree with a Favorites tab, a result panel, and a status bar.

Runtime Server Setting up Runtime Administration
WebCenter Forms Recognition Page 16 of 60
Figure 6-4: The WebCenter Forms Recognition Runtime Server user interface
6.2.1. The Title Bar
The title bar contains the name of the application and the path and name of the selected item in the scope panel.
6.2.2. The Main Menu Bar
The main menu bar includes general tools for Runtime Server. It also contains standard toolbar buttons for saving, opening, and viewing.
Option Description
Console Select Console to add a snap-in of either Runtime Server or another application.
Window Select Window to change the display type of the application. Select from cascade, tile, and arrange icons. You can also refresh your window to display any changes.
Help Online help is available in the Help menu. You can also find version information about Runtime Server here.
Table 6-1: Main Menu options
6.2.3. The Toolbar
This menu bar includes tools for using Runtime Server, and for viewing options and Favorites information. The toolbar contains buttons for performing the most common tasks. Depending on the item you select in the scope panel, the options on this menu will vary.
6.2.3.1. Options for WebCenter Forms Recognition Runtime Server Directory
Item Description
New WebCenter Forms Recognition RTS Group
Adds a new WebCenter Forms Recognition RTS Group. From here, you can add machine groups that include one or more machine instances.
New Window from Here
Adds a new window to simultaneously view items such as statistics and the document window. This is a standard MMC option.
New Taskpad View Adds a new Taskpad view, which is a customized view with shortcuts. This is a standard MMC function.
Export List Exports list. This is a standard MMC function.

Runtime Server Setting up Runtime Administration
WebCenter Forms Recognition Page 17 of 60
Item Description
Help Microsoft Management Console help. This is a standard MMC function.
Table 6-2: Toolbar Menu
6.2.3.2. Group Action Menu
Item Description
New Machine Adds a new machine from a list of WebCenter Forms Recognition installations. From here, you can add one or more machine instances.
Start All Starts processing all of the Runtime instances in the group.
Stop All Stops processing all of the Runtime instances in the group.
Refresh Same as calling Refresh on each machine level.
Delete Deletes the group.
New Window from Here
Adds a new window from the group. You can set up multiple windows with different machines and instances.
New Taskpad View Adds a new Taskpad view, which is a customized view with shortcuts. This is a standard MMC function.
Export List Exports a list of machines as a text file. This is a standard MMC function.
Help Microsoft Management Console help. This is a standard MMC function.
Table 6-3: Group Action Menu
6.2.3.3. Machine Action Menu
Item Description
Start All Starts all machine processes.
Stop All Stops all machine processes.
Refresh Refreshes display.
Delete Deletes a machine.
License Modifies or creates a license.
New RTS Instance Adds a new Runtime Server instance.
View
Choose Columns
Large Icons
Small Icons
List
Detail
Microsoft Windows view options for the view window.

Runtime Server Setting up Runtime Administration
WebCenter Forms Recognition Page 18 of 60
Item Description
Customize
New Window from Here
Adds a new window. You can set up multiple windows with different machines and instances.
New Taskpad View Adds a new Taskpad view, a customized view with shortcuts. This is a standard MMC function.
Export List Exports list of machines. This is a standard MMC function.
Help Microsoft Management Console Help. This is a standard MMC function.
Table 6-4: Machine Action Menu
6.2.3.4. View Options
Item Description
Choose Columns Selects columns to make visible in a folder.
Large Icons Displays large icons in the toolbars.
Small Icons Displays small icons in the toolbars.
List Views items as a list, sorted alphabetically without details.
Detail Gives a view of items with details on file size, type, and when last modified.
Customize Customizes the appearance of a folder.
Table 6-5: View Menu
6.2.3.5. The Scope Pane
The scope panel displays the console root, the Runtime Application folder, a group that contains one or more machines that run WebCenter Forms Recognition Runtime Server instances on each machine, and a list of items that display monitoring options and control batch states. There are also options to operate and modify WebCenter Forms Recognition Runtime Server.
6.2.4. The Favorites Tab
The Favorites tab is where you can place items that you may want to view again on each instance of WebCenter Forms Recognition Runtime Server.
6.2.5. The Results Pane
The Results panel displays a batch window that you can access by clicking on an instance in the tree tab. This window includes information about each batch. The Results pane also displays each of the monitoring functions, including windows for statistics, document, classification, extraction, and performance when selected in the scope pane. Each monitoring function has options for viewing items related to that function. For information on the displays for this window, see 9 MONITORING THE PROCESS.

Runtime Server Setting up Runtime Administration
WebCenter Forms Recognition Page 19 of 60
6.3 Adding Machine Groups
The flexibility of WebCenter Forms Recognition Runtime Server enables you to add machine groups that include one or more machine instances. Machine instances contain Runtime Server instances.
To add a machine:
1) Select the WebCenter Forms Recognition Runtime Server folder. From the Action menu, select New Forms Recognition RTS Group or right click on the machine group in the Navigation pane. Select New RTS Group. The New Group dialog box appears.
2) Enter a name for the machine group. Click OK. The new group appears on the Tree.
6.4 Adding Machines to a Group
Very Important! The WebCenter Forms Recognition Service Manager must be started on
the machine being added or the MMC will not connect to it.
After you set up a group, you need to add machines to that group. To add machines to a group:
1) Select the machine group and select Actions, Machines or
2) Right click on the machine group. Select New Machine. The Group Management dialog box appears. (FIGURE 6-5) It contains the names of all available WebCenter Forms Recognition machines that are part of the Runtime Server domain and the group associated with the machine. You cannot add a machine that is being used in another group.
Figure 6-5: Group Management dialog box
3) Select a domain.
4) Type the machine name in the field provided. If you are configuring Runtime Server to run as a stand-alone system, enter “LocalHost” as the machine name.
5) Click OK. The new machine appears under the group name in the tree.

Runtime Server Setting up Runtime Administration
WebCenter Forms Recognition Page 20 of 60
6.5 Working With Runtime Server Instances
Runtime Server instances include one or more batches. With Runtime Server, you can add, delete, or modify the characteristics of instances to customize a Runtime process. Each instance has Runtime Services, which are options for monitoring each step of the processing. The number of instances that you can run at one time depends on CPU utilization.
6.5.1. Adding Instances to a Machine
In WebCenter Forms Recognition Runtime Server, a list of instances appears under the machine name. You can add, modify, or delete instances to further customize the machine.
To add an instance to a machine:
1) On the main menu, click Action. Click New, and then select RTS Instance.
2) Enter a name for the new instance.
Use a name that is logical and representative of the information being processed. Click OK. The new instance name appears under the selected machine name. The new instances appear in the Result Window.
Note: Maximum character length for instance names is 32. While using Cloning of instances the maximum character length is set to 22. Find more information on the cloning of instances in section CLONING INSTANCES.
Figure 6-6: Runtime Server with Added Instances
6.5.2. Deleting Instances
To delete an instance from a machine:
1) Select the instance from the navigation panel.
2) Click Action, and then Delete or

Runtime Server Setting up Runtime Administration
WebCenter Forms Recognition Page 21 of 60
right click on the desired instance to delete from the machine list. A shortcut menu appears. Click Delete.
Note: If you are using cloned instances, do not delete them via MMC- This will
lead to loss of the settings.
6.5.3. Cloning Instances
The workflow steps OCR, Classification and Extraction are those with the most load workforce. You can share the workload and make the application faster by cloning an RTS instance which is already created and properly configured.
This will save much time as you are able to clone an instance multiple times using the same settings.
Note: Instances created for the workflow steps Import and Cleanup should not be
cloned. Only one instance of Cleanup is needed per batch job. An Import instance is
unique in its settings to import files from one import folder (any additional clones will
simply compete against the same files).
If you modify an instance’s settings, the clone instances will inherit these changes. Please note, that an RTS restart is required to apply the changes.
Enable the cloning of Runtime Server Instances by adding InstanceCount in the Windows registry. The value must be located within the Key for the Instance to be cloned:
1. Open the Windows registry.
2. Go to “HKEY_LOCAL_MACHINE \ Software \ Oracle \ Services \ ImportInstance” or on a 64bit system: “HKEY_LOCAL_MACHINE \ Software \ Wow6432Node \ Oracle \Services \ ImportInstance”.
3. Select the instance to be cloned.
4. Right-click on the instance.
5. Add the following value: “InstanceCount”.
6. Right-click on the new value and select Modify from the shortcut menu.
7. Enter an integer value.
Figure 6-7: Defining the registry value
The DWORD value reflects the number of instances you want to have. The entry shown above would create a second new instance being the clone of the original.
Note: The DWORD value of 0 would delete the existing instance!

Runtime Server Configuring Runtime Server
WebCenter Forms Recognition Page 22 of 60
7 Configuring Runtime Server
Configuring WebCenter Forms Recognition Runtime Server enables you to generate new batches and to specify processing options for existing batches.
7.1 Administration access
Usually, the WebCenter Forms Recognition Runtime Server is started as a service. The appropriate icon on your desktop is linked to the file “Start RTS as NT Service.bat” which is located in your WebCenter Forms Recognition/bin folder.
To configure WebCenter Forms Recognition Runtime Server:
On the Options menu, select Settings or
On the toolbar, click Properties :
This displays the Runtime Server Properties.
7.2 General Settings
For general settings such as referenced directories, files and program control options, select the General tab.
Figure 7-1: The General tab of RTS settings
Under Project File:

Runtime Server Configuring Runtime Server
WebCenter Forms Recognition Page 23 of 60
Use project file: Lets you select path and file name of the WebCenter Forms Recognition project that is used to process the documents. Select this option if WebCenter Forms Recognition Runtime Server creates the batches or to import existing batches without project specification in the batch control file.
Use batch specific project file: Uses the WebCenter Forms Recognition project referenced in the batch control file. Select this option to import existing batches where the project is already specified in the batch control file.
Under Directories:
Use Database: Uses the WebCenter Forms Recognition Database as the source. This option is enabled by default if user is using a new instance.
Select Job: Select the desired job from the job dropdown list here or create a new job by pressing Create Job. A job can be thought of as a Job Queue with batches pending for verification.
Batch Root: This is the directory where the batch control file will be written to. Subdirectories for the Workdocs will be created there.
Image Root: This is the directory where subdirectories with the scanned images will be created. As a rule, batch root and image root should be the same. In special cases such as security reasons, the image root can be different from the batch root. The image path can also be stored as an absolute path in the Workdoc. If so, the image root directory is ignored. This option cannot be used if using database.
Export: This is the directory used to export the results of the process. Exporting is normally script-controlled. The export directory is the standard path.
Under Batch Scanning Delay and Mode:
Wait…: Runtime Server constantly polls the batch root directory. This parameter specifies the seconds between two polling cycles. Use a defined polling interval for permanent operation. The value should not be too small to restrict the network load. To prepare batches for WFR Designer, scanning once is sufficient.
Activate High Priority Mode: If this option is checked, the processing order is determined according to priority and then input state. Otherwise it is determined according to input state and then priority (1 – highest priority). The benefit of this option is to easily determine urgent/ immediate batches for processing. This setting is typically reserved in configurations where Batch Priority is used in processing urgent/ immediate batches.
Note: For cleanup instances, it is recommended to disable the High Priority
Mode in order to maximize performance.
Under Logging Level:
No Logging / Info / Warning / Error: Sets the scope of logging. The log file is created in the directory [Installation Directory]\ WebCenter Forms Recognition\bin\Log. A new log file is created daily.
Delete log files…: Sets the number of days after which log files are deleted automatically.
Under Automatic Start/Stop:
Automatic Start of Specific Runtime Server Instances at Desired Time
Start at: WebCenter Forms Recognition provides a pair option Start at that allows starting specific Runtime Server host instances at desired time. This feature can be used to configure specific Runtime Server processes to be started at certain time of

Runtime Server Configuring Runtime Server
WebCenter Forms Recognition Page 24 of 60
the day, for example, when the overall system’s workload is not that high, e.g. at night time.
The screenshot below shows the Runtime Server configuration for a host instance that is to be started every day at 11:00 PM and then terminated at 2:00 AM:
Figure 7-2: Runtime Server configuration for automatic start
Terminate at: Sets the time for automatic shutdown.
The program will be blocked for a certain amount of time after the automatic shutdown. If the shutdown occurs during the first three quarters of an hour, you cannot activate the program within the same hour. If the shutdown occurs during the last quarter of an hour, you cannot activate the program within the same and the next hour.
Under Automatic Restart:
After timeout…: In error situations, Runtime Server can restart itself after a certain timeout. If the program gets stuck, it will mark the current document as processed with status invalid and restart automatically after the timeout you specify.
After … hours: In this case, an automatic shutdown and restart occurs after the specified period of time in hours, regardless of whether an error has occurred. This option can be used to prevent error situations.
Note: In case, an automatic restart occurs during an import, the
application is designed to maintain batch integrity.
After … documents: In this case, an automatic shutdown and restart occurs after a certain number of documents have been processed, regardless of whether an error occurred. This option can also be used to prevent error situations.
Under Client:
WFR Designer may use global variables in scripts that affect document processing. For each variable, it is possible to use client-specific values. In this box, you can enter the client name that must match one of the client names used by Designer. With the default entry, global variables do not vary by client.
Under Automated System Updates:
Update system security: Allows Runtime Server to update the system security according to the time configured by users. The Every… and Starting at… will be available if the check box has been selected.
Automatic pool update: Allows Runtime Server to automatically update the pool according to the time configured by users. The Every… and Starting at… will be available if the check box has been selected.

Runtime Server Configuring Runtime Server
WebCenter Forms Recognition Page 25 of 60
Under Extended Settings:
Enable Script debugging: Some script options, for instance export over folders, can only be tested with Runtime Server. This option enables script debugging with Runtime Server (for expert users only).
Note: This configuration option is only available when you start the Runtime
Server as an application and not as a service. See Scripting Guide on how to activate
this option.
Min. free storage / Min. free RAM: Stops processing when the limits have been reached. The system will remain idle until new resources are available.
Automatic Start: Allows Runtime Server to restart after a system reboot.
Enable batch integrity verification: This setting is used to keep integrity of file system batches. It must be enabled on one instance. It is not used if database batches are used.

Runtime Server Configuring Runtime Server
WebCenter Forms Recognition Page 26 of 60
7.3 Workflow Settings
To specify the steps that should be carried out when processing documents, select the Workflow tab.
Figure 7-3: The Workflow tab of RTS settings
Process Step:
Allows you select the steps that should be done.
A step is enabled if the corresponding button appears pressed; it is disabled if the corresponding button does not appear to be pressed. Only enabled steps will be carried out by this instance of WebCenter Forms Recognition Runtime Server. To switch selection, simply click on the buttons.
For example, prepare batches for WFR Designer by activating the Import and the OCR step, or process batches from Capture by activating all steps but Import.
The Runtime Server has a workflow step, Database Export, which allows the administrator, project developer, or user to migrate file system batches into the database. The Database Export button is only available if Use Database is deselected in the General tab.
The Custom Processing workflow step allows the configuration of an additional custom workflow step that can be launched between existing workflow steps. For example, the RTS can be configured to import, OCR, Classify, and then prior to Extraction, to have a custom processing option to review all classification results. The RTS will then loop through all available batches at state “input state” and fire a new project level "ProcessBatch" event allowing script to apply the required "re-batching" procedures, for example, resorting of

Runtime Server Configuring Runtime Server
WebCenter Forms Recognition Page 27 of 60
documents within the next processed batch.
The RTS will only update the output state using the value configured in GUI for the Workdocs if the documents' batch state remained the same (equal to input state) after completion of the script processing.
Input State / Output State:
Runtime Server polls the batch root directory. It processes batches from this directory only if their processing state corresponds to one of the defined input states.
When a processing step is finished, the batch assumes the corresponding defined output state. For some steps, there are two output states that indicate success or failure.
If the batch status indicates a failure, the batch will normally be handed to WFR Verifier, where the error is corrected. When the batch is verified, it again changes its status value to a valid input state for Runtime Server, which will then resume processing. Runtime Server displays the last 10 error messages in a table that includes the time that the error message appeared.
The status of the batch is calculated from the status of the folders. The status of the folders is in turn calculated from the status of the documents. On the batch level, steps succeed only if they were successful for all documents in the batch.
Use input and output states to control the flow of batches through the system. For successful steps, define output states with matching input states to ensure further processing. For failed steps, define output states that make sure that the system stops processing these batches. For instance, it doesn’t make sense to perform the extraction if the classification failed.
For imported batches, make sure that their output state matches the input state of the next processing step.
You can use any integer between 0 and 999 for input and output states.
Type the values into the appropriate boxes.
Perform advanced import failure processing:
This option is only available when Import button of the process step is selected. If enabled, the documents failing import steps are still organized into batches at failed import output state. If this is disabled the failing documents are not imported to the system at all and end up into the import_bad_images folder.
Note: It is recommended to activate this option if you have configured RTS instances for
an automatic restart after a certain time period. With this, batch integrity would be
maintained. Please see the paragraph ‘Under Automatic Restart’ in section 7.2.
Perform folder based classification & extraction step:
A folder is a structure within a batch that can be used for documents that are related to each other. For example, several TIFF images may be stored as multiple files, but actually belong to the same document.
Select this option to control batch classification and extraction processing using folders instead of batches.
Note: This option is mandatory for any kind of document separation (script based, phrase
based, Triton based or combined).
If enabled, the workflow steps are serialized per folder. This means that all documents within a folder are getting loaded at once prior to start folder processing. Classification and Extraction are then run on all documents in a folder before to process the next one.
Processing sequence:

Runtime Server Configuring Runtime Server
WebCenter Forms Recognition Page 28 of 60
Classify Doc1 Extract Doc1
Classify Doc2 Extract Doc2
Classify Doc3 Extract Doc3
If unchecked, Classification is first run on all documents in all folders before to apply Extraction.
With this option activated, the pWorkdoc.Folder/pWorkdoc.FolderCount script methods are available, and can be utilized to access neighbor documents that belong to the same folder of the batch.
Note: This option must be checked as prerequisite for phrase based multipage detection.
With multipage detection, classification and extraction must be performed together. See
the Designer User Guide for more about multipage detection.
Perform folder based serial processing:
Select this option to control serial processing using folders instead of batches. This affects the interrupting options.
With this option activated, it is possible to perform the workflow steps Classification and Extraction separately.
Processing sequence:
Classify Doc1 Classify Doc2 Classify Doc3 Extract Doc1 Extract Doc2 Extract Doc3
Corrupted document’s failure state:
This is a special output state indicating that processing failed because of an unexpected error, probably a damaged document. In this case, the document’s status, and therefore the status of the corresponding batch, is reset to 0.
7.4 Import Settings
Creating batches within WebCenter Forms Recognition Runtime Server happens during the import step. In this case, you need to define how and when your documents are to be organized in batches.
To specify the import options for images, select the Import tab.
Note: Prior to importing images, first make sure that the images’ file names do not contain curly brackets – {}. Images containing curly brackets in file name cannot be opened in the Web Verifier application. First rename the files where necessary.

Runtime Server Configuring Runtime Server
WebCenter Forms Recognition Page 29 of 60
Figure 7-4: The Import tab of RTS settings
Import Directory:
Select the directory where your images or files are stored.
Under Document Type:
Type: Select or type the file name extension for the documents you want to process. Supported file types include *.tif, *.doc, *.msg. Others may work, but require individual testing.
Under Document Grouping:
Set the options for creating batches and folder from files and subdirectories within the import directory.
1 folder per batch (no subdirectories): You can select this option if your import directory contains no subdirectories. A single batch with a single folder will be created from all the documents in the import directory. Additional batches will only be generated if the number of documents within a batch is restricted. (See below.)
Figure 7-5: One folder per batch

Runtime Server Configuring Runtime Server
WebCenter Forms Recognition Page 30 of 60
1 folder per document (no subdirectories): You can select this option if your import directory contains no subdirectories. A single batch will be created from the documents. Within the batch, a folder will be created for each document.
Note: You cannot use multipage detection if you select this feature.
Figure 7-6: One folder per document
1 batch per subdirectory, 1 folder per batch: You can select this option if your import directory contains subdirectories. A separate batch will be created for each subdirectory. Each batch will contain a single folder.
Figure 7-7: One batch per subdirectory, one folder per batch
1 batch per subdirectory, 1 folder per document: You can select this option if your import directory contains subdirectories. A separate batch will be created for each subdirectory. Within a batch, a separate folder will be created for each document.
Note: You cannot use multipage detection if you select this feature.
Figure 7-8: One batch per subdirectory, one folder per document
Under Import Condition:

Runtime Server Configuring Runtime Server
WebCenter Forms Recognition Page 31 of 60
Set the conditions that start the import and thus trigger the generation of batches. Set the file transfer mode accordingly.
Always import documents: The import starts continuously.
Import only if ready file…: The import directory is monitored for the presence of a trigger file called import.rdy, which may be located in a directory or subdirectory.
The import.rdy file is created by an external system at the end of data transfer to the shared directory. Runtime Server regularly scans the import.rdy file. If Runtime Server finds the *.rdy file, it deletes it and then imports data for OCR, classifying, extracting, and exporting. Use this option when you want to import files from external systems.
Import only if minimal number…: The import starts if the import directory including subdirectories contains a minimum number of documents. This is useful to pool the output of a fax or mail server.
Import only if all files older…: The import only starts if all files in the import directory including subdirectories are older than the specified period. If there is a document which does not meet the defined criteria, NO document will be imported. If you use this option and move documents from the import to the batch root directory, the import starts at regular intervals.
Import if min. no. docs OR…: Combines the previous options.
Import only files which are older than specified timespan: Files which meet the condition will be imported leaving behind the documents which do not meet the rule.
Under Further Settings:
Limit batch size: Creates an additional batch if the total number of documents exceeds the specified number of documents. The specified number will be the maximum number of documents per batch. This option is important if you want to have large batches in scanning to minimize operation costs but small batches in processing to optimize load balancing. Choose this option if you have large input directories and want to create small batches that can be distributed better.
Import priority: Sets the batch priority and thus the processing order. Enter an integer between 0 (very low priority) and 9 (very high priority.) The default value is 5.
Batch prefix: Sets a prefix for the batch name that will be complemented by a serial number. The batch name is visible in Runtime Server and WFR Designer.
Folder prefix: Sets a prefix for the folder name that will be complemented by a serial number. The folder name is visible in WFR Designer.
File transfer mode: Specifies whether documents will be copied from the import directory to the batch root, or moved. If you copy documents, there will always be input in the import directory. This can cause continuous batch generation unless the files are removed by another process.
Under Additional File Import:
Used alone or in conjunction with Import only if ready file… to check for additional associated files.
Import 1 Additional File…: This method checks for additional files that might be associated with documents and makes sure that you import only the desired associated files. Additional files could be faxes and associated header files. There must be a well-defined relationship between the file name of the image and the name of the associated file. To express this relationship, use literal characters, the * as a

Runtime Server Configuring Runtime Server
WebCenter Forms Recognition Page 32 of 60
wildcard character that represents the base name without the extension, and the special characters “#” and “?”.
Example 1:
You are processing e-mails that are written to the file system using the file name
<subject>.msg. Some of these e-mails contain a Word document as attachment which is
saved separately, but in the same directory. The e-mail and attachment have the same
file name, but the Word document is saved as <subject>.doc. In this case, enter the
expression *.doc.
e-mail: Final.msg
Attachment: Final.doc
Additional File name: *.doc
Example 2:
You are processing e-mails that are written to the file system using the file name
<subject>.msg. Some e-mails contain attachments. The attachment’s file name is
constructed using the following naming convention: <first 8 characters of the
subject>_att.doc. In this case, enter the expression ########_att.doc.
e-mail: Department.msg
Attachment: Departme_att.doc
Additional File Name: ########_att.doc
Note: If this option is used in conjunction with the Import only if ready file…: option,
Runtime Server will delete the *.rdy file first. Then it will check for additional files and
will import them.
Though most often used with a *.rdy file, you can also use this option independently,
even if there are no additional files.
Import Document Only…: Check this option if a missing additional file indicates that there is something wrong. For instance, if you are processing faxes, there should be a header file for each fax. Use this feature in conjunction with Additional File Import.
Note: Only TIFFS with additional files present will be imported. Any extra TIFF files not
associated with additional files will remain in the directory. In any case, the *.rdy will be
deleted even if no files had been imported.
7.5 OCR Settings
In general, OCR settings are defined in the WebCenter Forms Recognition Designer project. You can override some OCR options from within Runtime Server.
To change OCR settings, select the OCR+Export+Clean Up tab. The OCR group is located at the top.

Runtime Server Configuring Runtime Server
WebCenter Forms Recognition Page 33 of 60
Figure 7-9: The OCR + Export + Clean Up tab of RTS settings
Page Restrictions…:
With WebCenter Forms Recognition, by default, a full page OCR is done during the first processing step for all document pages. You can restrict the initial OCR to specified pages. If additional OCR results are required later, the recognition is performed on demand during the classification and extraction steps. On demand means that each processing step requires certain regions in a document to be recognized. The OCR results are stored in the Workdoc.
To specify a range for the initial OCR, enter numbers into the corresponding text boxes. The default value is 0 in either case, meaning that OCR is done for all pages.
CI docs only…: Select this option to skip the layout analysis for electronically generated documents, such as e.g. e-mails. The extraction may not work properly with these settings. In addition, scripts that are using geometrical structures such as blocks will not work. Note: Lightweight OCR works without detection of positional information, i.e. highlighting of words, blocks, lines will not be available.
Verify OCR processing time-out for each page: This option can be used when there are documents with huge amounts of pages (e.g., over 50). Once this option is activated the system is going to apply the so-called “time-out” check after the processing of each page to OCR. (See description of “After timeout…” option in the section GENERAL SETTINGS) If this setting is not activated and a 50-page document is being processed (with, e.g., 30 minutes timeout setting), the system may not be able to process all 50 pages within 30 minutes. The whole document will be considered as hanging, causing useless loss of OCR results for such a document.
7.6 Export Settings
In general, export settings are defined in the WebCenter Forms Recognition Designer project using script programming. Some export options can only be set from within Runtime Server.

Runtime Server Configuring Runtime Server
WebCenter Forms Recognition Page 34 of 60
To change the export settings, select the OCR+Export+Clean Up tab. The Export group is located in the center.
Perform export step…: A folder is a structure within a batch that can be used for documents that have a relationship with each other. For instance, several TIFF images may be stored as multiple files, but actually belong to the same document. Select one of these options to export every time a folder is processed or to export every time a batch is processed.
Trigger script based export: Use this option to switch export scripts on or off. This is useful for test purposes.
Generate protocol file for each exported batch: Generates a separate log file each time a batch is exported.
Copy documents to export directory: Copies the processed documents from the base directory to the image root directory.
Generate PDF files…: Select this option if you want to create PDF documents from your images and associated Workdoc. You keep the original layout and you can use the OCR results for full-text search within the PDF documents. The Workdoc is not visible.
7.7 Clean up Settings
Clean up means automatic removal of batch files from the batch root directory if they are no longer required.
To change the clean up settings, select the OCR+Export+Clean Up tab. The Clean Up group is located at the bottom.
Always clean up batches: Removes batch files once the batch’s last output state is reached.
Clean up batch only if ready file available: The batch root directory is monitored for the presence of a trigger file. Clean up starts if the file is found. You can use this option to trigger the clean up from external systems.
This option is only available if file system access is set on the General tab
(‘Use database’ is unchecked).
Clean up batch only if all files are older than…: The clean up starts if all items in the batch repository are older than the specified period. If you use this option and move documents from the import to the batch root directory, the clean up starts at regular intervals.
Clean up if ready file available OR…: Combines the previous options.
This option is only available if file system access is set on the General tab
(‘Use database’ is unchecked).

Runtime Server Configuring Runtime Server
WebCenter Forms Recognition Page 35 of 60
Note: If an RTS instance ONLY performs cleanup it is recommended NOT to activate “High priority Mode” in the General tab. But any combination of cleanup with other RTS steps except import it is highly recommended to keep High Priority Mode activated.
7.8 Extended Processing Settings
If you use information from external files such as databases to process your batches and you need to update these files from time to time, or if you want to synchronize WebCenter Forms Recognition Designer project files with WFR Verifier, select the Extended Processing tab. With extended processing, you can update an arbitrary number of target files with the information from the source files.
Runtime Server has a section in the Extended Processing tab for Document Separation. This section allows the user to configure a different project to use during processing for carrying out the document separation/merging workflow step.
Figure 7-10: The Extended Processing tab of RTS settings

Runtime Server Configuring Runtime Server
WebCenter Forms Recognition Page 36 of 60
7.8.1. File Replacement Options
Perform file replacement: Select this option to replace the target file with the source file. Clear this option if you only want to generate the target file if it does not yet exist.
Source File: Select the file that contains up-to-date information.
Target File: Select the file that is to be updated with information from the source file.
File Operation: Select whether you want to copy or to move the source file to the target file.
Add: Click this button to add a pair of source and target files to the list box.
Remove: Click this button to remove the selected entry from the list box.
Update: Click this button to perform the update for the selected entry in the list box.
7.8.2. Verifier Project Reference Options
There are two file paths to be set: Global Project and Local Project.
These options are useful for two purposes:
For Standard Verifiers referencing projects across mapped network drives, these options enable the system to substitute local mapping for the network mapping. Working with a local copy of the global project speeds up processing time by circumventing potential network bottlenecks.
For Advanced Verifiers, these paths are references to the local and global projects for the Supervised Learning Workflow. These options enable Advanced Verifiers to use different global projects with a local project. This is the most common use for these options. Usually, these options are used when you need to use different project files with similar Verifier/RTS configurations. For example, consider a project that uses one Import RTS instance to process U.S. invoices and another Import RTS instance to process German invoices, which have distinct formats for dates. Although the project imports all American and German invoices to the same batch root, one Import RTS instance looks to a project settings file called US.sdp to validate and extract U.S. dates, and the other instance looks to another file, DE.sdp, to validate and extract German dates.
The folders supplied for these paths may not exist when the RTS Import instance is working; they are created when the system writes this information into the batch structure in the *.sdp file during batch creation. If Use Batch Specific Project File is enabled in the Verifier settings, the system automatically loads either the U.S. or German project settings file, depending on the location of the imported documents source.

Runtime Server Configuring Runtime Server
WebCenter Forms Recognition Page 37 of 60
7.8.3. Display Format – JPEG Conversion
Additional optimization has been done to Web Verifier to reduce the time taken to render/convert images on the client browser side. The Runtime Server is now able to store rendered images directly in the database and reduce some of the loading time on the client side.
This can be done via the RTS Extended Processing setting tab. A Display Format section exists which enables the administrator to configure RTS to automatically convert images if the document will be presented to the Web Verifier user for classification, or extraction verification.
Select Convert image to display after failed classification when you want to store converted images within the database for documents that have failed to classify.
Select Convert image to display after failed extraction when you want to store converted images within the database for documents that have failed to extract data.
There is no further configuration required for the Web Verifier application. When the Web Verifier opens a batch for verification, when the document is displayed to the user, the application will immediately use the rendered document existing within the database.
Some additional items of note:
- If the settings are not used, and the Web Verifier opens a document, the rendering of the image will be done at real time for the user.
- The Display Format settings are only applicable to Web Verifier and will have no impact to the Thick Verifier, LSM, or Designer.
7.9 Prepare an instance for “Document Separation” Feature
To configure an RTS instance for Automatic Document Separation, we have to insert the ADS project (See Designer User Guide section 6.9.4 PROJECT PROPERTIES FOR DOCUMENT
SEPARATION) as a project file in general tab of the RTS instance properties.
Also, the batch root folder that contains the single page documents for merging has to be referenced.
7.9.1. Batch Properties
To create a batch for the Document Separation feature, configure an RTS instance for Import and OCR.
The documents to import must be single-sided documents.
The import creates batches with one folder per document.
The workflow states should be different to the default workflow states. Otherwise, there will be conflicts with the other instances using RTS that have their own state numbers.

Runtime Server Configuring Runtime Server
WebCenter Forms Recognition Page 38 of 60
7.9.2. Workflow for ADS
The most important setting for ADS is the checkbox for folder based serial processing, which is found on the Workflow tab of the instance settings just below the Workflow Step Definitions. This option has to be checked. (See WORKFLOW SETTINGS for details)
Figure 7-11: Workflow tab – Folder based serial processing
Configure the classification and the extraction step.
Pay particular attention to the incoming and outgoing states. These state numbers must be completely different to those of the other instances. With two Runtime Servers being used, both failed outgoing states (155 for classification and extraction failures) for each workflow step will have to be set to a special state allocated specifically for the “manual validation of document separation required” case. Extraction is successful, when the Document Separation engine makes a secure split/merge decision. Extraction will be unsuccessful, when the ADS is unable to make a confident decision based on the Learnset. (See Designer User Guide section 6.9.4 PROJECT PROPERTIES FOR DOCUMENT SEPARATION)
Close the settings by clicking OK. Now the Automatic Document Separator instance is ready to be started.
7.9.3. Run of the ADS Instance
The first run of the ADS instance can take a while. There are two main reasons for this:
Before the document separation can start, the ADS Learnset has to be generated. The documents in the prepared ADS Learnset folder (See Designer User Guide section 6.9.2 DOCUMENT SEPARATION LEARNSET) must be parsed and the Learnset information must be stored in the files: “Ads.dsf”, “Ads.ptb”, and “LearnTemp.ptb”,

Runtime Server Configuring Runtime Server
WebCenter Forms Recognition Page 39 of 60
which will be created in the ADS Learnset folder. This task is executed only once before first-time processing, when no Learnset information exists.
The processing is folder based. This means that all documents of the batch are loaded to memory before the processing starts.
After the Automatic Document Separation, followed by the manual validation of its results in WebCenter Forms Recognition, Verifier has finished the batch and it now goes in to “Document separation succeeded” state (e.g. 201 in the example above). The system is now ready to apply the next workflow steps such as classification, extraction, validation, export and so on. These workflow steps have to start from the “succeeded document separation” state as the input.

Runtime Server Processing Batches
WebCenter Forms Recognition Page 40 of 60
8 Processing Batches
8.1 The Batch View
Figure 8-1: The Batch view
The Batch view displays a list view of all batches with the following information:
Batch ID
Batch state
Batch priority
Batch name (optional)
Total number of folders in the batch
Total number of documents in the batch
Client (the owner of the license)
Last User (Name of the operator who previously processed the batch)
Last module (name of the application that previously processed the batch)
Locked. “Yes” indicates that the batch is locked because it is currently being accessed by another instance of Runtime Server or by an instance of Verifier.
External group ID can be assigned to a batch
External batch name is the name of the batch group
Transaction ID can be assigned to a batch
Transaction type can be assigned to a batch
Note: The four table columns External group ID, External batch name, Transaction ID
and Transaction type are not displayed by default. See the Installation Guide on how to
activate these columns.
The Administrator can filter batches by performing a query that would retrieve a subset of records. It enables the Administrator to easily manage and show a subset of batches. The subset can be further filtered by specifying that the MMC only returns a specified number of TOP records and not the whole result list.
Note: To filter for a batch ID, use a syntax as shown in the following example:
1. Batch ID = BatchIDnumber
example: BatchID = 00000231
2. State = 550

Runtime Server Processing Batches
WebCenter Forms Recognition Page 41 of 60
3. Priority=3 4. Last Module = QATESTBOX80
The Batch ID number always has 8 digits.
If processing is stopped, you can right-click on any entry in the list view.
Figure 8-2: Batch list shortcut menu
A context menu with the following commands appears:
Change Priority: You can manually enter a new priority for the selected batch. When you select Change Priority, a Change Batch Settings dialog box appears. Enter a different priority in this box, and then click OK.
Change State: You can manually enter a new state for the selected batch.
Delete Selected Batches: You can delete the selected batch, including the batch control file, the fast info file, and the documents in the subdirectory. If there is a separate image root directory, the images will not be deleted.
Refresh: Updates the entire list view with new batch information.
Double click on a batch list item to change the priority and state.
Figure 8-3: Batch Properties dialog box
Note: Runtime Server records information on users/machines that perform batch
changes. Each time one of the above operations takes place, the user name is recorded
for auditing purposes
8.2 Starting the Process
Once WebCenter Forms Recognition Runtime Server is configured, you can start processing batches.
To start processing do one of the following:
From the Action menu, select Start All.
In the toolbar, click the button with the green arrow.
Right-click on the desired instance. On the shortcut menu, click Start.
Runtime Server Processing Batches
WebCenter Forms Recognition Page 42 of 60
8.2.1. Processing Projects containing SaxBasic Scripts
Note: From version 11.1.1.8.0, WebCenter Forms Recognition does not support the Sax Basic scripting engine. If you try to start an RTS instance that uses an older project with Sax Basic engine scripts, it will report an error:
Project {path} is using an unsupported Sax Basic engine and cannot be used.
Please open this project in the Designer application to upgrade to the newer engine for custom scripting (WinWrap Basic).
The RTS instance will stop immediately.
You can then migrate this project to the supported WinWrap scripting engine in the Designer application.
8.3 Stopping the Process
To stop processing, do one of the following:
On the Control menu, click Stop.
In the toolbar, click the button with the red square.
Right click on the desired instance. On the shortcut menu, click Stop.
8.4 Refreshing
You can refresh groups when processing:
1) Select the group name in the scope panel.
2) Right click on the name.
3) On the shortcut menu, select Refresh. or Select Action, Refresh from the menu. This selection refreshes all machines by deleting them and re-adding the connections.
8.5 Script Debugging
If script debugging is enabled for the project (See section 7.2 GENERAL SETTINGS) you can debug script from Runtime Server. When a script fails while processing, you will be given the option of debugging the script in RTS. If you choose to debug the script in RTS, a script window will open in which you can modify the code.

Runtime Server Monitoring the Process
WebCenter Forms Recognition Page 43 of 60
9 Monitoring the Process
9.1 With WebCenter Forms Recognition Runtime Server
The View window of the Runtime Server MMC snap-in contains several windows that display information about the current processing state. This window enables administrators to monitor local and remote WebCenter Forms Recognition machines.
9.1.1. The Statistics View
To access the Statistics View, select Statistics in the Navigation panel.
Figure 9-1: Statistics View
The Statistics View displays the following information:
Project: The path to the currently used project file.
Batch: For the currently processed batch, the name, the ID, the serial number, and the total number of batches in the batch root directory.
Document: The path to the Workdoc of the currently processed document.
Statistics: Progress since the last time the program was started.
Under Status:
A status message is displayed informing of the task currently performed. The list below shows status messages stating which tasks have been completed and whether any errors occurred.
Reset: Counts the statistics from zero, starting with the next statistics change. To reset the counts, right click on the Statistics node in the scope panel. Select Reset.
9.1.2. The Document View
To access the Document View, click Document in the Navigation panel.

Runtime Server Monitoring the Process
WebCenter Forms Recognition Page 44 of 60
Figure 9-2: Document View
The Document View displays the first page of the currently processed document. Options for viewing the document appear in a toolbar above the document.
Button Description Keyboard Shortcut
Adjusts the document display to the height of the viewer window. n/a
Adjusts the document display to the width of the viewer window. n/a
Adjusts the document display to the height or the width of the viewer window so that the entire page is displayed.
n/a
Zooms in.
Zooms out.
Table 9-1: Buttons available in Document View.
9.1.3. The Classification View
To access the Classification View, click Classification in the Navigation panel.

Runtime Server Monitoring the Process
WebCenter Forms Recognition Page 45 of 60
Figure 9-3: Classification View
The Classification view displays the first page of the currently processed document with a continuously updated tree view of classification results, or just the updated tree view of classification results. Double click on a class to collapse or expand its sub-tree. Right click on the classification tree to view the document, or toggle off the document view.
9.1.4. The Extraction View
To access the Extraction View, click Extraction in the Navigation pane.
Figure 9-4: Extraction View
The Extraction View displays the first page of the currently processed document with a continuously updated list view of extraction results. On the document, valid fields are highlighted in green and invalid fields are highlighted in red. Move the cursor to the highlighted area to display the field name, and then right click on the extraction window to view the document.
9.2 Event Viewer
To access the Event Viewer, click Event Viewer in the Navigation pane.
Figure 9-5: EventViewer
Using the event logs in the RTS Event Viewer you can gather information about RTS errors, warnings, and successful processes.

Runtime Server Monitoring the Process
WebCenter Forms Recognition Page 46 of 60
The Event Log starts automatically when you start an RTS instance. Events are separated into pages. To move from one page of events to another, use the black arrows on the toolbar.
9.2.1. The Event Log
Information about RTS events is stored in a log file at [INSTALL_FOLDER]\WebCenter Forms Recognition\bin\log For example: C:\Program files\Oracle\WebCenter Forms Recognition\Log\M_YYYYMMDD.log
A log file is created daily for system monitoring.
This event log records three types of events:
Error
Warning
Information.
An error is a significant problem, such as loss of functionality.
A warning is an event that is not necessarily significant, but that may indicate a possible future problem.
An info is an event that describes the successful completion of a major processing step that would otherwise have an adverse effect on the system. For example, the creation of a shared license file on the license server would be recorded as an info event.
9.2.2. Monitoring Event Properties
Each event includes a description that you can use for troubleshooting or information gathering.
To view Event Properties, double click an event.
Figure 9-6: Event Properties
The Event Properties dialog box describes the event. This description is taken from the log file.
9.3 Centralized Remote System Monitoring
WebCenter Forms Recognition Runtime Server can cumulatively monitor all critical events in a distributed Runtime Server environment. Errors, warnings and informational messages can
Runtime Server Monitoring the Process
WebCenter Forms Recognition Page 47 of 60
be stored; filtered by date and type; and e-mails can be sent automatically to notify an administrator of critical events or to notify the manufacturer that the license is due to expire.
9.3.1. Configuring System Monitoring without E-mail Notification
Below are the steps required to start System Monitoring without e-mail notification.
Launch the Computer Management MMC from the Administrative Tools program group on the Forms Recognition server. To do this:
1) Click Start on the Windows Desktop, select Control Panel. Double click on Administrative Tools and then select Computer Management.
2) Double click on Services and Applications node to expand it.
3) Select the Services sub-node.
4) Click the Standard tab at the bottom of the window.
5) In the scope pane, right-click the Forms Recognition System Monitoring service and select Start.
The WebCenter Forms Recognition System Monitoring service running on a specific workstation can monitor only those Runtime Server machines that were configured from that workstation via the Runtime Server administration console.
The WebCenter Forms Recognition System Monitoring service has to be restarted after the RTS machines have been reconfigured in the MMC console; for example, after adding of a new remote RTS service.
9.3.2. Configuring System Monitoring with E-mail Notification
The Runtime Server has been updated in line with changes to the Microsoft Exchange API for email handling. Microsoft has made some changes in the attachment values returned through MAPI when emails are processed via RTS Import. The Runtime Server has been amended to incorporate these changes.
Additional tracing and document processing have been added to the Email Importing feature that will:
Provide additional logging level information on email processing failures.
More secure Route problematic documents into the _Bad_Mail folder.
To configure the WebCenter Forms Recognition System Monitoring service to perform automatic e-mail notification, its registry settings must be configured:
1) Open “Runtime Server Monitor Configuration.reg” registry file located in \Oracle\WebCenter Forms Recognition\Bin” folder using Windows Notepad.
Note: For 64 bit operating systems, open the “Runtime Server Monitor
Configuration 64bit.reg” registry file.
2) Modify the e-mail parameters as desired and then run the Registry file with regedit.exe or regedt.exe utility. (See table below for more details regarding available parameters)
3) Restart the “WebCenter Forms Recognition System Monitoring” NT service (See section 9.3.1 CONFIGURING SYSTEM MONITORING WITHOUT E-MAIL NOTIFICATION).
E-mail Notification features the encryption of E-mail ID and Password in the System Monitoring Service.
To activate ID and Password encryption follow these steps:
1. Open the Windows registry.

Runtime Server Monitoring the Process
WebCenter Forms Recognition Page 48 of 60
2. Go to HKEY_LOCAL_MACHINE/SOFTWARE/Oracle on 32 bit machines. On 64 bit machines go to HKEY_LOCAL_MACHINE/SOFTWARE/Wow6432Node/Oracle.
3. Create the DWORD value "Email_UserEncrypt" under System Monitoring and set the value to 0.
4. Restart the System Monitoring Services. The ‘E_Username’ and ‘Email_UserPassword’ will be encrypted.
Note: The service does not send e-mail messages immediately upon receipt but collects
them into a messages group. The next group of messages is sent as a single e-mail
periodically. If the group does not contain any messages nothing is sent. The default e-
mail notification frequency of 5 minutes can be changed by editing the “Email_Everymin”
parameter.
Example:
"Email_Everymin"=dword:00000005
"Email_Recipient"="[email protected];[email protected]"
"Email_SenderAddress"="[email protected]"
"Email_SendUsing"="Pickup"
"Email_SMTPServer"="smtp.johnsmithcompany.com"
"Email_UserName"="SysMon"
"Email_UserPassword"="smpassword"
Name Description
Email_Everymin Defines how often (in minutes) the e-mail notification service will check for messages and send them if any are available.
Email_Recipient Semi-colon separated list of system administrators to receive the e-mail notifications.
Email_SenderAddress Valid e-mail address to send the notifications from.
Email_SendUsing “Pickup” value means that the e-mails are to be sent via the local SMTP service. If this is the case the rest of configuration parameters below can be ignored as everything has to be configured via Windows SMTP service settings.
“Port” means that the e-mails are to be sent via a direct connection to a remote SMTP server. Below are the additional parameters for “send using port” method only.
Email_SMTPServer SMTP server (or “smart host” server).
Email_UserName User name for Email_SenderAddress’s account.
Email_UserPassword User password for Email_SenderAddress’s account.
Table 9-2: Setting Email notification for system monitoring
9.3.2.1. System Monitoring view
The System Monitoring view can be activated via clicking on System Monitoring item available in the Runtime Server Administration.
In order to refresh the view to see the latest download message the user should click Refresh.

Runtime Server Monitoring the Process
WebCenter Forms Recognition Page 49 of 60
The following messages properties are available in the system monitoring view:
Column Name Column Description
Type Type of the received message (can be error, warning or info).
Computer Network name of the machine the message was sent from.
Host Name of the Runtime Server host instance the message was sent by. If this name is empty, this means the message was sent by the Runtime Server Manager service.
Date & Time Date and time the message was sent at.
PID Windows Process ID of the processed the message was sent from.
Description Message content.
Table 9-3: Message properties
Currently displayed messages can be sorted by all properties listed above by clicking on the corresponding column header button.
The following filters are available for the downloaded messages:
Filter User Action to Activate Description & Comments
Errors filter Click on “Error” check-box at the top of system monitoring view to enable or disable the filter.
When checked, filters all messages with error type.
Warnings filter Click on “Warning” check-box at the top of system monitoring view to enable or disable the filter.
When checked, filters all messages with warning type.
Info filter Click on “Info” check-box at the top of system monitoring view to enable or disable the filter.
When checked, filters all messages with info type.
Time frame filter
Enter number of days value in “Show logs for last X days only” edit box.
As soon as this setting is entered the system will start filtering all messages received earlier than X days ago. In this connection, “0” value means “no filtering”.
Table 9-4: Available filters for downloaded messages
All downloaded messages stored in system “M_*” files placed into “Log” sub-directory of the application folder where WebCenter Forms Recognition software was installed. All filtering settings affect representation in the system monitoring view only. Setting up a filter does not mean that some entries are going to be removed from the original storage files, which means that the filtering can be always roll-backed.
The preferred (last used) filtering and sorting options are saved in the Windows Registry every time a user modifies them and shall be restored next time the user starts the Runtime Server Administration console.
9.4 Unified Custom Logging
User-defined errors, warnings and informational messages can be written to the Runtime Server log files reserved for calling applications with custom scripting. Supplementary information is written for every logged entry including the date and time the message was

Runtime Server Monitoring the Process
WebCenter Forms Recognition Page 50 of 60
generated, the available virtual memory, the process identifier, and Windows resource usage. The user-defined messages can be added to the custom script via a “LogScriptMessageEx” method of the Project interface (please refer to the Forms Recognition Scripting Guide for more information about usage of this method).
All logs are written into WebCenter Forms Recognition’s log folder where all Runtime Server component-level logs, crash logs, etc. are collected. The log files generated by the Verifier application have file names prefixed with “V_”; by Designer with “D_”; by Runtime Server with “H_” and with “U_” when logging from any other WebCenter Forms Recognition tool.
The message is always written to the log file but depending on the severity of the message, it can also be sent to the system monitoring service of the Runtime Server or via e-mail to the registered system administrator recipients. (See section 9.3 CENTRALIZED REMOTE SYSTEM
MONITORING)
For the script-generated log entries of severity “CDRSeveritySystemMonitoring” the corresponding message is going to be forwarded to the cumulative System Monitoring pane of the Runtime Server. For this particular Runtime Server instance it is going to happen only if at least one instance of the System Monitoring service is running on any machine in a local area network being correctly configured to accept system notification from the machine (physical server), where the host instance is running and logging messages.
For the script-generated log entries of severity “CDRSeverityEmailNotification” the message is going to be additionally sent via e-mail to the pre-configured list of WebCenter Forms Recognition system administrators / professional services members. The mandatory requirement (in addition to the requirements listed above for the system monitoring notification) for such a message to be sent is correct configuration of e-mail sub-system of the System Monitoring service.
9.5 Advanced Logging
The standard Runtime Server Log includes System Level Resource information and in the event of a system crash or failure, special error logs.
9.5.1. System Resource Logging
The following System Resource information has been added to the Standard Service Manager and Host Log files:
Available physical memory (in kb).
Used physical memory (in kb).
Available virtual memory (in kb).
Used virtual memory (in kb).
Virtual memory used by this RTS host instance process (in kb).
Physical memory used by this RTS host instance process (in kb).
Handles used by the process (in number of handles).
GDI resources used by the process (in number of handles).
User Objects used by the Process (in number of Objects).
These values are written to the Standard Service Manager:
[Application directory]\Log\S_yyyymmdd.log For example: C:\Program files\Oracle\WebCenter Forms Recognition\Log\S_20070521.log

Runtime Server Monitoring the Process
WebCenter Forms Recognition Page 51 of 60
And the Host Log files:
[Application directory]\Log\H_<instance name>_yyyymmdd.log For example: C:\Program files\Oracle\WebCenter Forms Recognition\Log\H_Test_20070521.log
Using the following format:
LoggingLevel | Date | Time | ErrorNumber | ProcessId |
UsedPhysicalMemory/AvailablePhysicalMemory |
UsedVirtualMemory/AvailableVirtualMemory |
UsedVirtualMemoryByThisHost/UsedPhysicalMemoryByThisHost | ProcessHandles |
GDIResources/UserObjects| Message | ServerName
For example: [Info] | August 03, 2005 | 15:46:47 | 010 | 1804 | 330564k/193172k | 366240k/911160k |
12176k/15388k | 183 | 43/59 | Check batches for further processing | W2K-MQUIJANO
9.5.2. Crash / Failure Logging
In the case of a System or Application Crash or Failure an additional error log file will be created with a format:
C_<Process ID>_yyyymmdd.log This will log crashes under the following circumstances.
Import Crashes: The log file will have stack information specific to the status of the system when the crash/failure occurred.
OCR Engine Crashes: The log file will have a "ReadZone" entry for the specific OCR engine for which the crash occurred and stack information specific to the status of the system when the crash/failure occurred.
Classification Engine Crashes: The log file will have a "Classify" entry for the specific Classification engine for which the crash occurred, the specific Class name where the crash occurs, and stack information specific to the status of the system when the crash/failure occurred.
Extraction Engine Crashes: The log file will have an "EvalZone" entry for the specific Extraction engine for which the crash occurred, the field where the crash occurs, and stack information specific to the status of the system when the crash/failure occurred.
Export crashes: The log file will have a "StepExport" and stack information specific to the status of the system when the crash/failure occurred.
Clean-up crashes: The log file will have a "ProcessDocumentsCleanUp" and stack information specific to the status of the system when the crash/ failure occurred.
Script Events: The name of the script event, the kind of sheet, which could be project level or a certain class, and, for script events on field level, the field name will be added to the crash/failure log.

Runtime Server Launching the Runtime Service
WebCenter Forms Recognition Page 52 of 60
Appendix A Launching the Runtime Service
Starting and Stopping the Runtime Service
To start the WebCenter Forms Recognition Runtime Service Manager, click on Windows Start, select Programs, Oracle, WebCenter Forms Recognition, Runtime Service group and click on Start Runtime Service. This option starts the WebCenter Forms Recognition Runtime Server NT service and then launches the MMC console automatically.
To stop the Runtime Service Manager, click on Windows Start, select Programs, Oracle, WebCenter Forms Recognition, Runtime Service group and click on Stop Runtime Service. This option stops the WebCenter Forms Recognition Runtime Server NT service.
Getting Started: Configuring Runtime Service for the First Use
Before configuring the Forms Recognition Runtime Service Manager, please read the WebCenter Forms Recognition Installation Guide.
Please refer to section 7.1 ADMINISTRATION ACCESS for the first time configuration of the Runtime service Manager on Administration level.
Below are the steps required to configure the Runtime Service Manager if you plan to start and stop the service regularly, you must log on as an Administrator.
Launch the Computer Management MMC from the Administrative Tools program group on the Forms Recognition server. To do this:
1) Click Start on Windows Desktop, select Control Panel. Double click on Administrative Tools and select Computer Management.
2) Double click on the Services and Applications node to expand it.
3) Select the Services sub-node.
4) Click the Standard tab at the bottom of the window.
5) In the scope pane, double-click the WebCenter Forms Recognition Runtime Service Manager service. The WebCenter Forms Recognition Service Manager Properties dialog box appears.
6) On the General tab, under Startup type, there are three selections for Runtime Server.
- Select Automatic to start Runtime Service when the machine boots up.
- Select Manual to manually start the service each time.
- Select Disabled to stop the service.
7) Click the Log On tab.
8) Under Log on as, select This account.
9) On the Log On tab, click Browse.
10) Click Location and browse to the domain that has the account.
11) Under Enter the object name to select, type WFRRTSsvc (the name of the domain user.) Click Check Names to verify your log on information and click OK.
12) If necessary, type the domain password for the user in the fields provided.
13) Click OK
14) On the Computer Management MMC screen:
- Start the service by clicking the Start arrow on the toolbar.
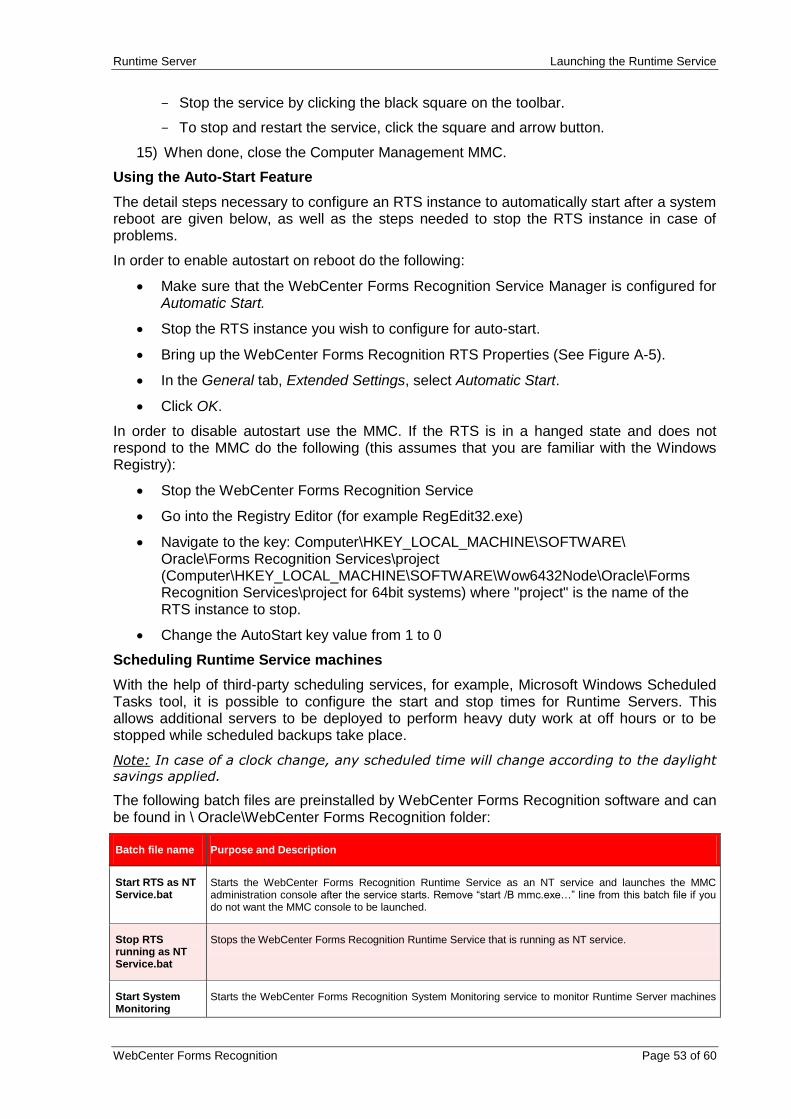
Runtime Server Launching the Runtime Service
WebCenter Forms Recognition Page 53 of 60
- Stop the service by clicking the black square on the toolbar.
- To stop and restart the service, click the square and arrow button.
15) When done, close the Computer Management MMC.
Using the Auto-Start Feature
The detail steps necessary to configure an RTS instance to automatically start after a system reboot are given below, as well as the steps needed to stop the RTS instance in case of problems.
In order to enable autostart on reboot do the following:
Make sure that the WebCenter Forms Recognition Service Manager is configured for Automatic Start.
Stop the RTS instance you wish to configure for auto-start.
Bring up the WebCenter Forms Recognition RTS Properties (See Figure A-5).
In the General tab, Extended Settings, select Automatic Start.
Click OK.
In order to disable autostart use the MMC. If the RTS is in a hanged state and does not respond to the MMC do the following (this assumes that you are familiar with the Windows Registry):
Stop the WebCenter Forms Recognition Service
Go into the Registry Editor (for example RegEdit32.exe)
Navigate to the key: Computer\HKEY_LOCAL_MACHINE\SOFTWARE\ Oracle\Forms Recognition Services\project (Computer\HKEY_LOCAL_MACHINE\SOFTWARE\Wow6432Node\Oracle\Forms Recognition Services\project for 64bit systems) where "project" is the name of the RTS instance to stop.
Change the AutoStart key value from 1 to 0
Scheduling Runtime Service machines
With the help of third-party scheduling services, for example, Microsoft Windows Scheduled Tasks tool, it is possible to configure the start and stop times for Runtime Servers. This allows additional servers to be deployed to perform heavy duty work at off hours or to be stopped while scheduled backups take place.
Note: In case of a clock change, any scheduled time will change according to the daylight
savings applied.
The following batch files are preinstalled by WebCenter Forms Recognition software and can be found in \ Oracle\WebCenter Forms Recognition folder:
Batch file name Purpose and Description
Start RTS as NT Service.bat
Starts the WebCenter Forms Recognition Runtime Service as an NT service and launches the MMC administration console after the service starts. Remove “start /B mmc.exe…” line from this batch file if you do not want the MMC console to be launched.
Stop RTS running as NT Service.bat
Stops the WebCenter Forms Recognition Runtime Service that is running as NT service.
Start System Monitoring
Starts the WebCenter Forms Recognition System Monitoring service to monitor Runtime Server machines

Runtime Server Launching the Runtime Service
WebCenter Forms Recognition Page 54 of 60
Batch file name Purpose and Description
Service.bat configured in the MMC console.
Stop System Monitoring Service.bat
Stops the WebCenter Forms Recognition System Monitoring service.
Table 9-5: Windows Batch Files.
User (script) initiated restarts of Runtime Server instances
In addition to standard functions of Runtime Server used to configure stop, start and restart frequency of particular working (host) instances, it is also possible to manage stopping and restarting of the instances per custom script calls. A method “PerformScriptCommandRTS” of the public Project interface allows commands to be invoked to control Runtime Server instances from custom scripts in Forms Recognition. See WebCenter Forms Recognition Scripting Guide for more details as to how this method is supposed to be utilized.

Runtime Server Troubleshooting
WebCenter Forms Recognition Page 55 of 60
Appendix B Troubleshooting
Configuring a Port for WebCenter Forms Recognition Runtime Server
In case of a conflict in port assignments or for the purpose of firewall configuration, it may appear to be required to set up a specific port for TCP/IP communication channel used by the Runtime Server.
Otherwise, you do not have to configure a port.
Do these steps after you have installed WebCenter Forms Recognition. This registry entry will be used by the main service as well by the Runtime Server instances and by the MMC. So it is not possible to use two different port numbers by different WebCenter Forms Recognition applications on the same machine.
To set up the port, you will be editing the system’s registry.
To do this:
1) Click Start on Windows Desktop.
2) Click Run.
3) At the command prompt, type RegEdit and press Enter.
4) Expand to HKEY_LOCAL_MACHINE\SOFTWARE or to HKEY_LOCAL_MACHINE\SOFTWARE\Wow6432Node for 64 bit systems.
5) Expand the Oracle key.
6) Right click on Services and select New, and then select DWORD Value.
Figure 9-7: Selecting DWORD Value
7) Change the name of the new value to Port
Figure 9-8: Changing the name of the new value to Port
8) Right click the Port, then an edit DWORD Value dialog will show up. For DWORD, set the value at 51876 if this port is available (if not, set to any available open port) and click OK.

Runtime Server Troubleshooting
WebCenter Forms Recognition Page 56 of 60
Figure 9-9: Setting the DWORD value for the port
If this port is already in use by another application, you must edit the system registry and set the port to a non-conflicting number on all WebCenter Forms Recognition servers. The new port number would then be used by all WebCenter Forms Recognition processes for communication.

Runtime Server Working with Large Document Volume
WebCenter Forms Recognition Page 57 of 60
Appendix C Working with Large Document Volume
When working with a large document volume, there are steps that can be taken to ensure that the performance to the database is maintained for WebCenter Forms Recognition.
WebCenter Forms Recognition can be optimized to process large volume of documents, 5+ million pages per day.
The following configurations are required when working with 10k (or more) pages per day:
1. The Runtime Server instance responsible for Import should not have any other workflow step enabled. If Import and Export are configured in one RTS instance, these should be separated into two individual instances.
2. Activate High Priority Mode on the Runtime Server instances. The instance responsible for import should not be configured with this setting.
3. The Enable Batch integrity verification option should be disabled for all the Runtime Server instances connecting to the database.
4. In the Runtime Server Management Console, ensure that the RTS Filter is used to request only the top 100 batches. The TOP setting should be enabled to allow for quick response time of the batch list viewing within the MMC.
5. The Database Parallelism setting should be reviewed for the environment to determine if this can be disabled. Disabling Parallelism could impact WVC performance, whilst improving RTS performance. Always consult with the DBA regarding enabling/ disabling parallelism and monitor results for each environment.
This is applicable to version 11.1.1.8.0 and above, where optimizations have been made for large scale document processing with the database.

Runtime Server Glossary
WebCenter Forms Recognition Page 58 of 60
Glossary
Absolute path A designation of the location of a file in relation to the root directory.
Batch A logical organizational structure to control a set of documents during the process. A batch is normally created during the scan process from a batch of paper. The status of a batch is used to manage the input flow.
Batch control file Text files containing all information about the status of the batch, its folders, and documents.
Batch root directory
The root directory for batch storage. Usually the same as the image root directory.
CI A setting used to import text documents that were created electronically, such as with a word processor or e-mail application should not be used to import image files.
Classification The process of assigning one or more classes and corresponding confidence values to one or more unknown documents.
Clean up Automatic removal of batch files those are no longer required from the batch root directory.
Console In Runtime Server, refers to a collection of administrative tools available in Microsoft MMC.
DCOM/COM+ Distributed Common Object Model DCOM (Distributed Component Object Model) is a set of Microsoft concepts and program interfaces in which client program objects can request services from server program objects on other computers in a network. DCOM is based on the Component Object Model (COM), which provides a set of interfaces allowing clients and servers to communicate within the same computer
Designer WebCenter Forms Recognition’s design application.
Document Any electronic file mainly consisting of ASCII text. If this is not the case, OCR or filtering must be applied to create the text representation. A document can be classified, a document can have fields for extraction, and a document can have one or more images attached.
Domain In Windows context, a domain is a set of network resources (applications, printers, and so forth) for a group of users. Users need only to log in to the domain to gain access to the resources, which may be located on a number of different servers in the network.
Error event A significant problem, such as loss of data or loss of functionality.
Event log Functionality in the event viewer. Enables you gather information about hardware, software, and system problems and to monitor RTS.
Extended processing
Used for updating WebCenter Forms Recognition files with information from external source files.
Extraction Extraction is the process of automatically finding specified information in a document and writing the information to data fields associated with the document. Extraction is used for automatic indexing. In extraction, selected data from a document is automatically written to an extraction file.
Extraction view Displays the first page of the currently processed document with a continuously updated list view of extraction results. On the document, valid fields are highlighted in green and invalid fields are highlighted in red.
Fast info file A copy of the main information from the *.sdb file. It provides a quick way to determine the status of a batch without opening the *.sdb file. When the fast info file is deleted, it is automatically recreated from the *.sdb file. The second character of the file name is the priority, and the last eight characters are the batch ID. The extension of the fast info file indicates the status of the batch as a number between 000 and 999.
Folder A logical structure inside a batch for coherent documents. A folder may consist of all pages of a correspondence with many folders inside one batch.
IDE Integrated development environment. A programming environment packaged as an application program, typically consisting of a code editor, a compiler, a debugger, and a GUI builder.
Image A digital raster image normally created during the scan process. The image is compressed and stored in a specific format. Internally, WebCenter Forms Recognition uses a structure called an image that represents the raster image. The image possesses methods to load, store and manipulate it. The image can be displayed in the viewer.
Image root The root directory for image storage. Usually the same as the batch root directory.

Runtime Server Glossary
WebCenter Forms Recognition Page 59 of 60
Information event An event that describes the successful Runtime Server operation.
ISV Independent software vendor
Lock file Allows multiple instances of WebCenter Forms Recognition Runtime Server to access the batch root directory. The lock file is created and removed by WebCenter Forms Recognition Runtime Server for the currently processed batch. It is removed by the operating system if the program terminates abnormally. Lock files are saved with the extension *.loc.
Log file File that keeps a record of computer transactions.
MDI Multiple document interfaces.
MMC Microsoft Management Console. An ISV-expandable common presentation service for management applications used to manage Windows-based hardware, software, and networking components, and include items such as controls, wizards, tasks, documentation, and snap-ins. May be from Microsoft or other software vendors, or user-defined.
OCR Optical Character Recognition. The reading and recognition of symbols of text from a piece of paper or a scanned image. OCR detects the symbols and converts them into characters and words that can be read electronically.
Parallel processing
Dividing programs among multiple processors with the objective of running a program in less time.
PDF Portable Document Format. A file format that has captured all the elements of a printed document as an electronic image that can be viewed, navigated, printed or forwarded.
Performance The speed at which a computer operates.
Results pane Displays information about each batch, each of the monitoring functions, including windows for statistics, document, classification, extraction, and performance when selected in the scope pane. Each monitoring function has options for viewing items related to that function.
Scope pane Displays the console root, the Runtime Application folder, a group that contains one or more machines that run WebCenter Forms Recognition runtime instances on each machine, and a list of items that display monitoring options and control batch states.
WebCenter Forms Recognition Runtime Server
A Windows process used by WebCenter Forms Recognition to process work based on a defined workflow step.
WebCenter Forms Recognition Service Manager
A Windows service used to instantiate each defined WebCenter Forms Recognition Runtime Server.
Oracle Cedar BatchControl Library
Library that enables you to create batches programmatically.
Serial processing Processing that occurs sequentially. There is an explicit order in which operations occur and in general the results of one action are known before a next action is considered.
Snap-in An object that can be attached to another object and then function as part of the whole. A snap-in is a program designed to function as a modular component of another application. Snap-ins is basic components of Microsoft's Management Console (MMC). The MMC snap-ins is the actual management tools; the console - sometimes referred to as a “tools host” - is simply a framework into which the snap-ins is added.
Subdirectory Contains the Workdocs (*.wdc), usually the images (TIFF or similar) and attachments to a document, such as PDF files or fax header files. Named after the batch ID.
Subtree A tree that is a child of a node.
Timeout A period of time after which an error condition is assumed if some event has not occurred.
Tree A parent-child data structure.
UNC Universal Naming Convention.
Verifier WebCenter Forms Recognition’s QA application.
Warning event An event that is not necessarily significant, but that may indicate a possible future problem.
Web Verifier WebCenter Forms Recognition’s web based extension of the Verifier Thick client.
Workdoc An internal structure representing the logical structure of a document. The Workdoc represents the data created during processing of a single document and is stored in a file

Runtime Server Glossary
WebCenter Forms Recognition Page 60 of 60
with the extension *.wdc. Because, a Workdoc includes all OCR and analysis results, it may be larger than the document files.