oracle® ireceivables · viii a features of oracle ireceivables b profile options related...
TRANSCRIPT
Oracle® iReceivablesImplementation GuideRelease 12.2Part No. E48858-01
September 2013
Oracle iReceivables Implementation Guide, Release 12.2
Part No. E48858-01
Copyright © 2002, 2013, Oracle and/or its affiliates. All rights reserved.
Primary Author: Leya William
Contributing Author: Mathew Daniel, Shivranjini Krishnamurthy, Robert MacIsaa, Rajesh Sinthre
Contributor: Kapil Advani, Joe Albowicz, Helen Chung, Manasa Elapakurthi, Editt Gonen-Friedman, Amir Izadpanah, Heli Lankinen, Joyce Leung, Jeremy Liou, Rajiv Menon, Oliver Steinmeier, Raghupathy Varadharajan
Oracle and Java are registered trademarks of Oracle and/or its affiliates. Other names may be trademarks of their respective owners.
Intel and Intel Xeon are trademarks or registered trademarks of Intel Corporation. All SPARC trademarks are used under license and are trademarks or registered trademarks of SPARC International, Inc. AMD, Opteron, the AMD logo, and the AMD Opteron logo are trademarks or registered trademarks of Advanced Micro Devices. UNIX is a registered trademark of The Open Group.
This software and related documentation are provided under a license agreement containing restrictions on use and disclosure and are protected by intellectual property laws. Except as expressly permitted in your license agreement or allowed by law, you may not use, copy, reproduce, translate, broadcast, modify, license, transmit, distribute, exhibit, perform, publish, or display any part, in any form, or by any means. Reverse engineering, disassembly, or decompilation of this software, unless required by law for interoperability, is prohibited.
The information contained herein is subject to change without notice and is not warranted to be error-free. If you find any errors, please report them to us in writing.
If this is software or related documentation that is delivered to the U.S. Government or anyone licensing it on behalf of the U.S. Government, the following notice is applicable:
U.S. GOVERNMENT END USERS: Oracle programs, including any operating system, integrated software, any programs installed on the hardware, and/or documentation, delivered to U.S. Government end users are "commercial computer software" pursuant to the applicable Federal Acquisition Regulation and agency-specific supplemental regulations. As such, use, duplication, disclosure, modification, and adaptation of the programs, including any operating system, integrated software, any programs installed on the hardware, and/or documentation, shall be subject to license terms and license restrictions applicable to the programs. No other rights are granted to the U.S. Government.
This software or hardware is developed for general use in a variety of information management applications. It is not developed or intended for use in any inherently dangerous applications, including applications that may create a risk of personal injury. If you use this software or hardware in dangerous applications, then you shall be responsible to take all appropriate fail-safe, backup, redundancy, and other measures to ensure its safe use. Oracle Corporation and its affiliates disclaim any liability for any damages caused by use of this software or hardware in dangerous applications.
This software or hardware and documentation may provide access to or information on content, products, and services from third parties. Oracle Corporation and its affiliates are not responsible for and expressly disclaim all warranties of any kind with respect to third-party content, products, and services. Oracle Corporation and its affiliates will not be responsible for any loss, costs, or damages incurred due to your access to or use of third-party content, products, or services.
iii
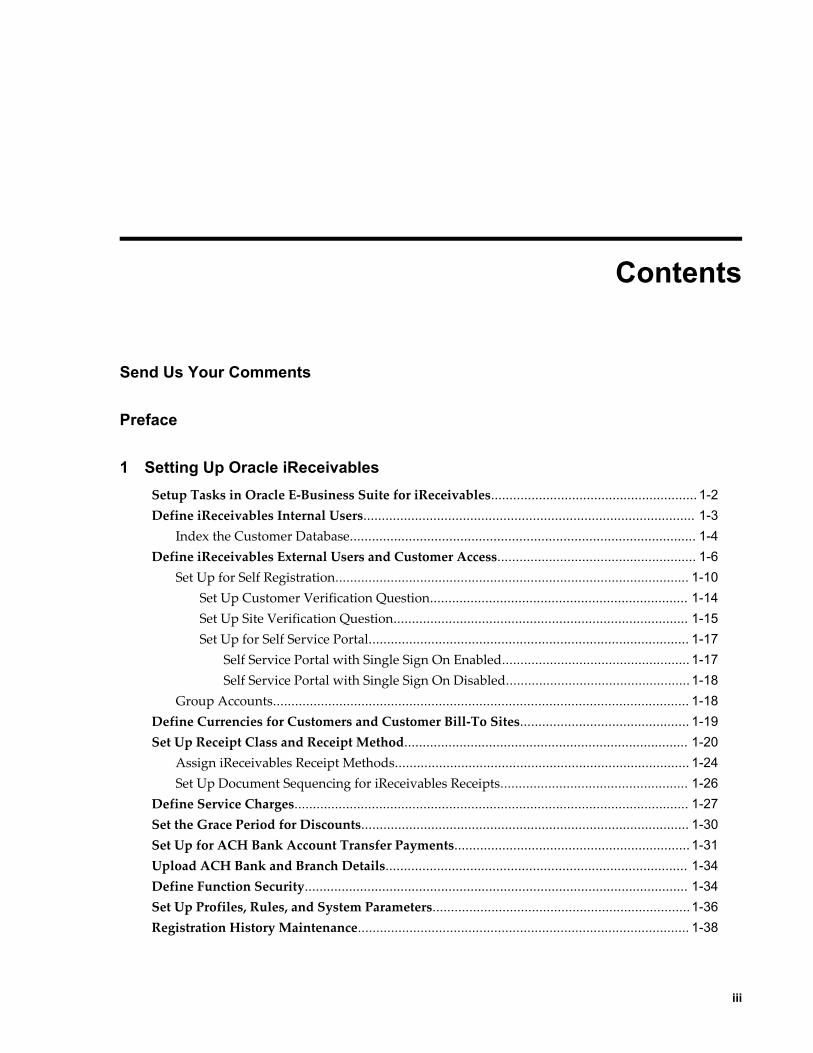
Contents
Send Us Your Comments
Preface
1 Setting Up Oracle iReceivables Setup Tasks in Oracle E-Business Suite for iReceivables........................................................ 1-2Define iReceivables Internal Users.......................................................................................... 1-3
Index the Customer Database.............................................................................................. 1-4Define iReceivables External Users and Customer Access...................................................... 1-6
Set Up for Self Registration................................................................................................ 1-10Set Up Customer Verification Question...................................................................... 1-14Set Up Site Verification Question................................................................................ 1-15Set Up for Self Service Portal....................................................................................... 1-17
Self Service Portal with Single Sign On Enabled................................................... 1-17Self Service Portal with Single Sign On Disabled.................................................. 1-18
Group Accounts................................................................................................................. 1-18Define Currencies for Customers and Customer Bill-To Sites.............................................. 1-19Set Up Receipt Class and Receipt Method............................................................................. 1-20
Assign iReceivables Receipt Methods................................................................................ 1-24Set Up Document Sequencing for iReceivables Receipts................................................... 1-26
Define Service Charges........................................................................................................... 1-27Set the Grace Period for Discounts......................................................................................... 1-30Set Up for ACH Bank Account Transfer Payments................................................................ 1-31Upload ACH Bank and Branch Details.................................................................................. 1-34Define Function Security........................................................................................................ 1-34Set Up Profiles, Rules, and System Parameters......................................................................1-36Registration History Maintenance.......................................................................................... 1-38

iv
Set Up for Anonymous User Login......................................................................................... 1-39Set Up for Applying On-Account Credits.............................................................................. 1-42Review and Update Receivables Lookups..............................................................................1-43Set the Aging Information...................................................................................................... 1-45Set Up for Bill Presentment Architecture............................................................................... 1-46
Print Invoices Using AR Print Program............................................................................. 1-47Modify the Display of Account Information..........................................................................1-47Custom Hooks for Payment, Dispute, and Print.................................................................... 1-49Integrate iReceivables into Your Business Processes............................................................. 1-50
2 Setting Up for Credit Memo Request WorkflowSetting Up Oracle Receivables for Credit Memo Request Workflow..................................... 2-1Define Credit Memo Approval Limits for Approvers............................................................. 2-2Update Transaction Types........................................................................................................ 2-3Define a Credit Memo Transaction Batch Source.................................................................... 2-3Set Up Credit Memo Request Workflow.................................................................................. 2-4
3 Configuring Oracle iReceivablesConfiguring iReceivables..........................................................................................................3-1Modifying the Account Summary Page Information Section..................................................3-2Modifying the Account Summary Page Discount Alerts and Dispute Statuses Section........ 3-2Customizing the Dispute Pages................................................................................................ 3-3Configuring the Contact Us Global Button Email Address..................................................... 3-4Extending the iReceivables Search........................................................................................... 3-5Editing iReceivables Messages................................................................................................. 3-6Custom Templates for Statement Downloads..........................................................................3-6Purge Process........................................................................................................................... 3-11
A Features of Oracle iReceivablesOverview of Oracle iReceivables............................................................................................. A-1
B Profile OptionsProfile Options for Oracle iReceivables...................................................................................B-1

v
Send Us Your Comments
Oracle iReceivables Implementation Guide, Release 12.2Part No. E48858-01
Oracle welcomes customers' comments and suggestions on the quality and usefulness of this document. Your feedback is important, and helps us to best meet your needs as a user of our products. For example:
• Are the implementation steps correct and complete? • Did you understand the context of the procedures? • Did you find any errors in the information? • Does the structure of the information help you with your tasks? • Do you need different information or graphics? If so, where, and in what format? • Are the examples correct? Do you need more examples?
If you find any errors or have any other suggestions for improvement, then please tell us your name, the name of the company who has licensed our products, the title and part number of the documentation andthe chapter, section, and page number (if available).
Note: Before sending us your comments, you might like to check that you have the latest version of the document and if any concerns are already addressed. To do this, access the new Oracle E-Business Suite Release Online Documentation CD available on My Oracle Support and www.oracle.com. It contains the most current Documentation Library plus all documents revised or released recently.
Send your comments to us using the electronic mail address: [email protected]
Please give your name, address, electronic mail address, and telephone number (optional).
If you need assistance with Oracle software, then please contact your support representative or Oracle Support Services.
If you require training or instruction in using Oracle software, then please contact your Oracle local officeand inquire about our Oracle University offerings. A list of Oracle offices is available on our Web site at www.oracle.com.

vii
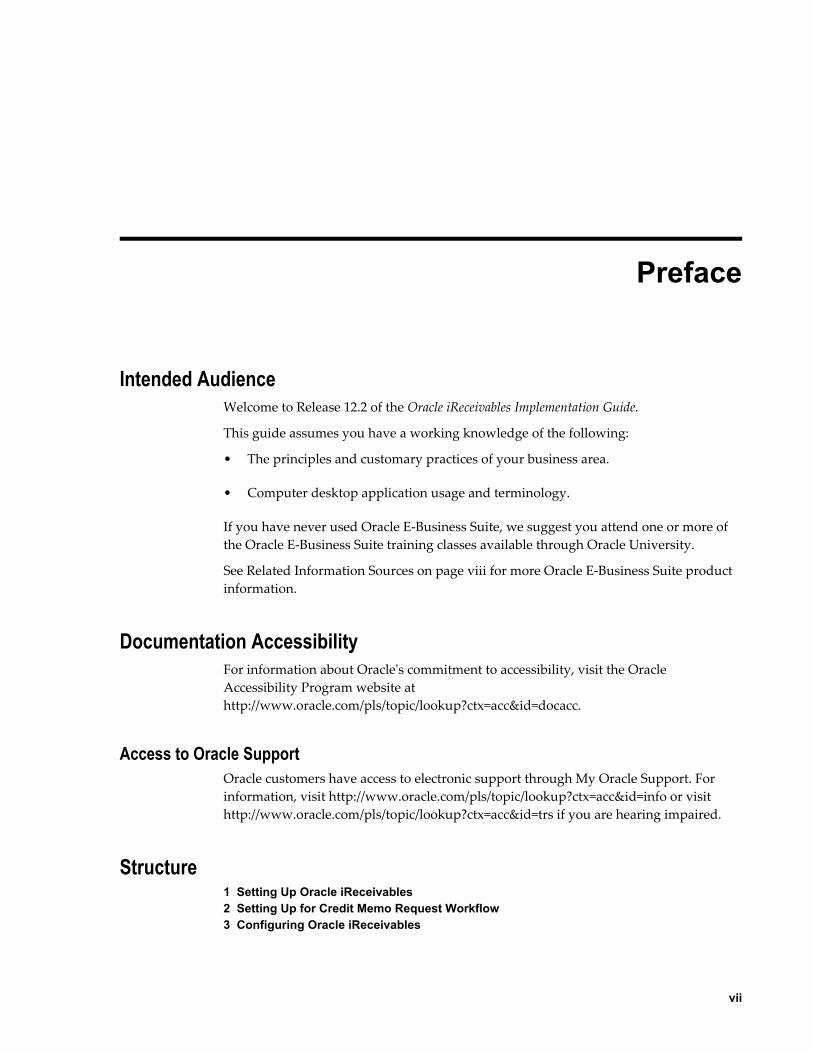
Preface
Intended AudienceWelcome to Release 12.2 of the Oracle iReceivables Implementation Guide.
This guide assumes you have a working knowledge of the following:
• The principles and customary practices of your business area.
• Computer desktop application usage and terminology.
If you have never used Oracle E-Business Suite, we suggest you attend one or more of the Oracle E-Business Suite training classes available through Oracle University.
See Related Information Sources on page viii for more Oracle E-Business Suite product information.
Documentation AccessibilityFor information about Oracle's commitment to accessibility, visit the Oracle Accessibility Program website at http://www.oracle.com/pls/topic/lookup?ctx=acc&id=docacc.
Access to Oracle SupportOracle customers have access to electronic support through My Oracle Support. For information, visit http://www.oracle.com/pls/topic/lookup?ctx=acc&id=info or visit http://www.oracle.com/pls/topic/lookup?ctx=acc&id=trs if you are hearing impaired.
Structure1 Setting Up Oracle iReceivables 2 Setting Up for Credit Memo Request Workflow3 Configuring Oracle iReceivables

viii
A Features of Oracle iReceivablesB Profile Options
Related Information SourcesThis book is included in the Oracle E-Business Suite Documentation Library, which is supplied in the Release 12.2 Media Pack. If this guide refers you to other Oracle E-Business Suite documentation, use only the latest Release 12.2 versions of those guides.
Online Documentation
All Oracle E-Business Suite documentation is available online (HTML or PDF).
• Online Help - Online help patches (HTML) are available on My Oracle Support.
• PDF Documentation - See the Oracle E-Business Suite Documentation Library for current PDF documentation for your product with each release.
• Release Notes - For information about changes in this release, including new features, known issues, and other details, see the release notes for the relevant product, available on My Oracle Support.
• Oracle Electronic Technical Reference Manual - The Oracle Electronic Technical Reference Manual (eTRM) contains database diagrams and a detailed description ofdatabase tables, forms, reports, and programs for each Oracle E-Business Suite product. This information helps you convert data from your existing applications and integrate Oracle E-Business Suite data with non-Oracle applications, and write custom reports for Oracle E-Business Suite products. The Oracle eTRM is available on My Oracle Support.
Related Guides
You should have the following related books on hand. Depending on the requirements of your particular installation, you may also need additional manuals or guides.
Oracle Alert User's Guide:
This guide explains how to define periodic and event alerts to monitor the status of your Oracle E-Business Suite data.
Oracle Application Framework Developer's Guide:
This guide contains the coding standards followed by the Oracle E-Business Suite development staff to produce applications built with Oracle Application Framework. This guide is available in PDF format on My Oracle Support and as online documentation in JDeveloper 10g with Oracle Application Extension.
Oracle Application Framework Personalization Guide:
This guide covers the design-time and run-time aspects of personalizing applications built with Oracle Application Framework.
ix
Oracle Fusion Middleware Adapter for Oracle Applications User's Guide (Oracle Application Server Adapter for Oracle Applications User's Guide):
This guide covers the use of Adapter for Oracle Applications in developing integrationsbetween Oracle E-Business Suite and trading partners.
Please note that the user's guide can be found in the following documentation libraries:
• As part of the Oracle Fusion Middleware and SOA Suite in 11g, Oracle Fusion Middleware Adapter for Oracle Applications User's Guide is available in the Oracle Fusion Middleware 11g Documentation Library.
• As part of the Oracle Application Server in 10g, Oracle Application Server Adapter for Oracle Applications User's Guide is available in the Oracle Application Server 10g Documentation Library.
Oracle Diagnostics Framework User's Guide:
This manual contains information on implementing and administering diagnostics tests for Oracle E-Business Suite using the Oracle Diagnostics Framework.
Oracle E-Business Suite Concepts:
This book is intended for all those planning to deploy Oracle E-Business Suite Release 12.2 contemplating significant changes to a configuration. After describing the Oracle E-Business Suite architecture and technology stack, it focuses on strategic topics, giving a broad outline of the actions needed to achieve a particular goal, plus the installation and configuration choices that may be available.
Oracle E-Business Suite CRM System Administrator's Guide:
This manual describes how to implement the CRM Technology Foundation (JTT) and use its System Administrator Console.
Oracle E-Business Suite Desktop Integration Framework Developer's Guide:
Oracle E-Business Suite Desktop Integration Framework is a development tool that lets you define custom integrators for use with Oracle Web Applications Desktop Integrator. This guide describes how to define and manage integrators and all associated supporting objects, as well as how to download and upload integrator definitions.
Oracle E-Business Suite Developer's Guide:
This guide contains the coding standards followed by the Oracle E-Business Suite development staff. It describes the Oracle Application Object Library components needed to implement the Oracle E-Business Suite user interface described in the Oracle E-Business Suite User Interface Standards for Forms-Based Products. It provides information to help you build your custom Oracle Forms Developer forms so that they integrate with Oracle E-Business Suite. In addition, this guide has information for customizationsin features such as concurrent programs, flexfields, messages, and logging.
Oracle E-Business Suite Flexfields Guide:
x
This guide provides flexfields planning, setup, and reference information for the Oracle E-Business Suite implementation team, as well as for users responsible for the ongoing maintenance of Oracle E-Business Suite product data. This guide also provides information on creating custom reports on flexfields data.
Oracle E-Business Suite Installation Guide: Using Rapid Install:
This book is intended for use by anyone who is responsible for installing or upgrading Oracle E-Business Suite. It provides instructions for running Rapid Install either to carryout a fresh installation of Oracle E-Business Suite Release 12.2, or as part of an upgrade to Release 12.2.
Oracle E-Business Suite Maintenance Guide:
This guide contains information about the strategies, tasks, and troubleshooting activities that can be used to help ensure an Oracle E-Business Suite system keeps running smoothly, together with a comprehensive description of the relevant tools and utilities. It also describes how to patch a system, with recommendations for optimizing typical patching operations and reducing downtime.
Oracle E-Business Suite Security Guide:
This guide contains information on a comprehensive range of security-related topics, including access control, user management, function security, data security, and auditing. It also describes how Oracle E-Business Suite can be integrated into a single sign-on environment
Oracle E-Business Suite Setup Guide:
This guide contains information on system configuration tasks that are carried out either after installation or whenever there is a significant change to the system. The activities described include defining concurrent programs and managers, enabling Oracle Applications Manager features, and setting up printers and online help.
Oracle E-Business Suite Upgrade Guide: Release 12.0 and 12.1 to 12.2:
This guide provides information for DBAs and Applications Specialists who are responsible for upgrading Release 12.0 and 12.1 Oracle E-Business Suite system (techstack and products) to Release 12.2 In addition to information about applying the upgrade driver, it outlines pre-upgrade steps and post-upgrade steps, and provides descriptions of product-specific functional changes and suggestions for verifying the upgrade and reducing downtime.
Oracle E-Business Suite Supportability Guide:
This manual contains information on Oracle Diagnostics and the Logging Framework for system administrators and custom developers.
Oracle E-Business Suite User's Guide:
This guide explains how to navigate, enter data, query, and run reports using the user interface (UI) of Oracle E-Business Suite. This guide also includes information on settinguser profiles, as well as running and reviewing concurrent requests.
Oracle E-Business Suite User Interface Standards for Forms-Based Products:
xi
This guide contains the user interface (UI) standards followed by the Oracle E-Business Suite development staff. It describes the UI for the Oracle E-Business Suite products andhow to apply this UI to the design of an application built by using Oracle Forms.
Oracle E-Business Suite Integrated SOA Gateway User's Guide:
This guide describes the high level service enablement process, explaining how users can browse and view the integration interface definitions and services residing in Oracle Integration Repository.
Oracle E-Business Suite Integrated SOA Gateway Developer's Guide:
This guide describes how system integration developers can perform end-to-end serviceintegration activities. These include orchestrating discrete Web services into meaningfulend-to-end business processes using business process execution language (BPEL), and deploying BPEL processes at run time.
This guide also explains how to invoke Web services using the Service Invocation Framework. This includes defining Web service invocation metadata, invoking Web services, and testing the Web service invocation.
Oracle E-Business Suite Integrated SOA Gateway Implementation Guide:
This guide explains how integration repository administrators can manage and administer the Web service activities for integration interfaces including native packaged integration interfaces, composite services (BPEL type), and custom integration interfaces. It also describes how to invoke Web services from Oracle E-Business Suite by employing the Oracle Workflow Business Event System, and how to manage Web service security, configure logs, and monitor SOAP messages.
Oracle e-Commerce Gateway User's Guide:
This guide describes the functionality of Oracle e-Commerce Gateway and the necessary setup steps in order for Oracle E-Business Suite to conduct business with trading partners through Electronic Data Interchange (EDI). It also describes how to runextract programs for outbound transactions, import programs for inbound transactions, and the relevant reports.
Oracle e-Commerce Gateway Implementation Guide:
This guide describes implementation details, highlighting additional setup steps neededfor trading partners, code conversion, and Oracle E-Business Suite. It also provides architecture guidelines for transaction interface files, troubleshooting information, and adescription of how to customize EDI transactions.
Oracle iSetup Developer's Guide:
This manual describes how to build, test, and deploy Oracle iSetup Framework interfaces.
Oracle iSetup User's Guide:
This guide describes how to use Oracle iSetup to migrate data between different instances of the Oracle E-Business Suite and generate reports. It also includes configuration information, instance mapping, and seeded templates used for data
xii
migration.
Oracle Report Manager User's Guide:
Oracle Report Manager is an online report distribution system that provides a secure and centralized location to produce and manage point-in-time reports. Oracle Report Manager users can be either report producers or report consumers. Use this guide for information on setting up and using Oracle Report Manager.
Oracle Web Applications Desktop Integrator Implementation and Administration Guide:
Oracle Web Applications Desktop Integrator brings Oracle E-Business Suite functionality to a spreadsheet, where familiar data entry and modeling techniques can be used to complete Oracle E-Business Suite tasks. You can create formatted spreadsheets on your desktop that allow you to download, view, edit, and create OracleE-Business Suite data, which you can then upload. This guide describes how to implement Oracle Web Applications Desktop Integrator and how to define mappings, layouts, style sheets, and other setup options.
Oracle Workflow Client Installation Guide:
This guide describes how to install the Oracle Workflow Builder and Oracle XML Gateway Message Designer client components for Oracle E-Business Suite.
Oracle Workflow Administrator's Guide:
This guide explains how to complete the setup steps necessary for any product that includes workflow-enabled processes. It also describes how to manage workflow processes and business events using Oracle Applications Manager, how to monitor the progress of runtime workflow processes, and how to administer notifications sent to workflow users.
Oracle Workflow API Reference:
This guide describes the APIs provided for developers and administrators to access Oracle Workflow.
Oracle Workflow Developer's Guide:
This guide explains how to define new workflow business processes and customize existing Oracle E-Business Suite-embedded workflow processes. It also describes how to define and customize business events and event subscriptions.
Oracle Workflow User's Guide:
This guide describes how users can view and respond to workflow notifications and monitor the progress of their workflow processes.
Oracle XML Gateway User's Guide:
This guide describes Oracle XML Gateway functionality and each component of the Oracle XML Gateway architecture, including Message Designer, Oracle XML Gateway Setup, Execution Engine, Message Queues, and Oracle Transport Agent. It also explainshow to use Collaboration History that records all business transactions and messages

xiii
exchanged with trading partners.
The integrations with Oracle Workflow Business Event System, and the Business-to-Business transactions are also addressed in this guide.
Oracle XML Publisher Report Designer's Guide:
Oracle XML Publisher is a template-based reporting solution that merges XML data with templates in RTF or PDF format to produce a variety of outputs to meet a variety of business needs. Using Microsoft Word or Adobe Acrobat as the design tool, you can create pixel-perfect reports from the Oracle E-Business Suite. Use this guide to design your report layouts.
This guide is available through the Oracle E-Business Suite online help.
Oracle XML Publisher Administration and Developer's Guide:
Oracle XML Publisher is a template-based reporting solution that merges XML data with templates in RTF or PDF format to produce a variety of outputs to meet a variety of business needs. Outputs include: PDF, HTML, Excel, RTF, and eText (for EDI and EFT transactions). Oracle XML Publisher can be used to generate reports based on existing Oracle E-Business Suite report data, or you can use Oracle XML Publisher's data extraction engine to build your own queries. Oracle XML Publisher also provides arobust set of APIs to manage delivery of your reports via e-mail, fax, secure FTP, printer, WebDav, and more. This guide describes how to set up and administer Oracle XML Publisher as well as how to use the Application Programming Interface to build custom solutions.
This guide is available through the Oracle E-Business Suite online help.
Oracle Financials and Oracle Procurement Functional Upgrade Guide: Release 11i to Release 12:
This guides provides detailed information about the functional impacts of upgrading Oracle Financials and Oracle Procurement products from Release 11i to Release 12. This guide supplements the Oracle E-Business Suite Upgrade Guide: Release 12.0 and 12.1 to 12.2.
Oracle Financials Concepts Guide:
This guide describes the fundamental concepts of Oracle Financials. The guide is intended to introduce readers to the concepts used in the applications, and help them compare their real world business, organization, and processes to those used in the applications.
Oracle Financials Glossary:
The glossary includes definitions of common terms that are shared by all Oracle Financials products. In some cases, there may be different definitions of the same term for different Financials products. If you are unsure of the meaning of a term you see in an Oracle Financials guide, please refer to the glossary for clarification. You can find theglossary in the online help or in the Oracle Financials Implementation Guide.
Oracle Financials Implementation Guide:
xiv
This guide provides information on how to implement the Oracle Financials E-Business Suite. It guides you through setting up your organizations, including legal entities, and their accounting, using the Accounting Setup Manager. It covers intercompany accounting and sequencing of accounting entries, and it provides examples.
Oracle Payments Implementation Guide:
This guide describes how Oracle Payments, as the central payment engine for the Oracle E-Business Suite, processes transactions, such as invoice payments from Oracle Payables, bank account transfers from Oracle Cash Management, and settlements against credit cards and bank accounts from Oracle Receivables. This guide also describes how Oracle Payments is integrated with financial institutions and payment systems for receipt and payment processing, known as funds capture and funds disbursement, respectively. Additionally, the guide explains to the implementer how to plan the implementation of Oracle Payments, how to configure it, set it up, test transactions, and how use it with external payment systems.
Oracle Payments User's Guide:
This guide describes how Oracle Payments, as the central payment engine for the Oracle E-Business Suite, processes transactions, such as invoice payments from Oracle Payables, bank account transfers from Oracle Cash Management, and settlements against credit cards and bank accounts from Oracle Receivables. This guide also describes to the Payment Administrator how to monitor the funds capture and funds disbursement processes, as well as how to remedy any errors that may arise.
Oracle Receivables Implementation Guide:
This guide provides you with information on how to implement Oracle Receivables. Use this guide to understand the implementation steps required for application use, including how to set up customers, transactions, receipts, accounting, tax, and collections. This guide also includes a comprehensive list of profile options that you canset to customize application behavior.
Oracle Receivables Reference Guide:
This guide provides you with detailed information about all public application programming interfaces (APIs) that you can use to extend Oracle Receivables functionality. This guide also describes the Oracle Receivables open interfaces, such as AutoLockbox which lets you create and apply receipts and AutoInvoice which you can use to import and validate transactions from other systems. Archiving and purging Receivables data is also discussed in this guide.
Oracle Receivables User Guide:
This guide provides you with information on how to use Oracle Receivables. Use this guide to learn how to create and maintain transactions and bills receivable, enter and apply receipts, enter customer information, and manage revenue. This guide also includes information about accounting in Receivables. Use the Standard Navigation Paths appendix to find out how to access each Receivables window.
xv
Integration RepositoryThe Oracle Integration Repository is a compilation of information about the service endpoints exposed by the Oracle E-Business Suite of applications. It provides a complete catalog of Oracle E-Business Suite's business service interfaces. The tool lets users easily discover and deploy the appropriate business service interface for integration with any system, application, or business partner.
The Oracle Integration Repository is shipped as part of the E-Business Suite. As your instance is patched, the repository is automatically updated with content appropriate for the precise revisions of interfaces in your environment.
You can navigate to the Oracle Integration Repository through Oracle E-Business Suite Integrated SOA Gateway.
Do Not Use Database Tools to Modify Oracle E-Business Suite DataOracle STRONGLY RECOMMENDS that you never use SQL*Plus, Oracle Data Browser, database triggers, or any other tool to modify Oracle E-Business Suite data unless otherwise instructed.
Oracle provides powerful tools you can use to create, store, change, retrieve, and maintain information in an Oracle database. But if you use Oracle tools such as SQL*Plus to modify Oracle E-Business Suite data, you risk destroying the integrity of your data and you lose the ability to audit changes to your data.
Because Oracle E-Business Suite tables are interrelated, any change you make using an Oracle E-Business Suite form can update many tables at once. But when you modify Oracle E-Business Suite data using anything other than Oracle E-Business Suite, you may change a row in one table without making corresponding changes in related tables.If your tables get out of synchronization with each other, you risk retrieving erroneous information and you risk unpredictable results throughout Oracle E-Business Suite.
When you use Oracle E-Business Suite to modify your data, Oracle E-Business Suite automatically checks that your changes are valid. Oracle E-Business Suite also keeps track of who changes information. If you enter information into database tables using database tools, you may store invalid information. You also lose the ability to track whohas changed your information because SQL*Plus and other database tools do not keep arecord of changes.

Setting Up Oracle iReceivables 1-1
1Setting Up Oracle iReceivables
This chapter covers the following topics:
• Setup Tasks in Oracle E-Business Suite for iReceivables
• Define iReceivables Internal Users
• Define iReceivables External Users and Customer Access
• Define Currencies for Customers and Customer Bill-To Sites
• Set Up Receipt Class and Receipt Method
• Define Service Charges
• Set the Grace Period for Discounts
• Set Up for ACH Bank Account Transfer Payments
• Upload ACH Bank and Branch Details
• Define Function Security
• Set Up Profiles, Rules, and System Parameters
• Registration History Maintenance
• Set Up for Anonymous User Login
• Set Up for Applying On-Account Credits
• Review and Update Receivables Lookups
• Set the Aging Information
• Set Up for Bill Presentment Architecture
• Modify the Display of Account Information
• Custom Hooks for Payment, Dispute, and Print
• Integrate iReceivables into Your Business Processes
1-2 Oracle iReceivables Implementation Guide
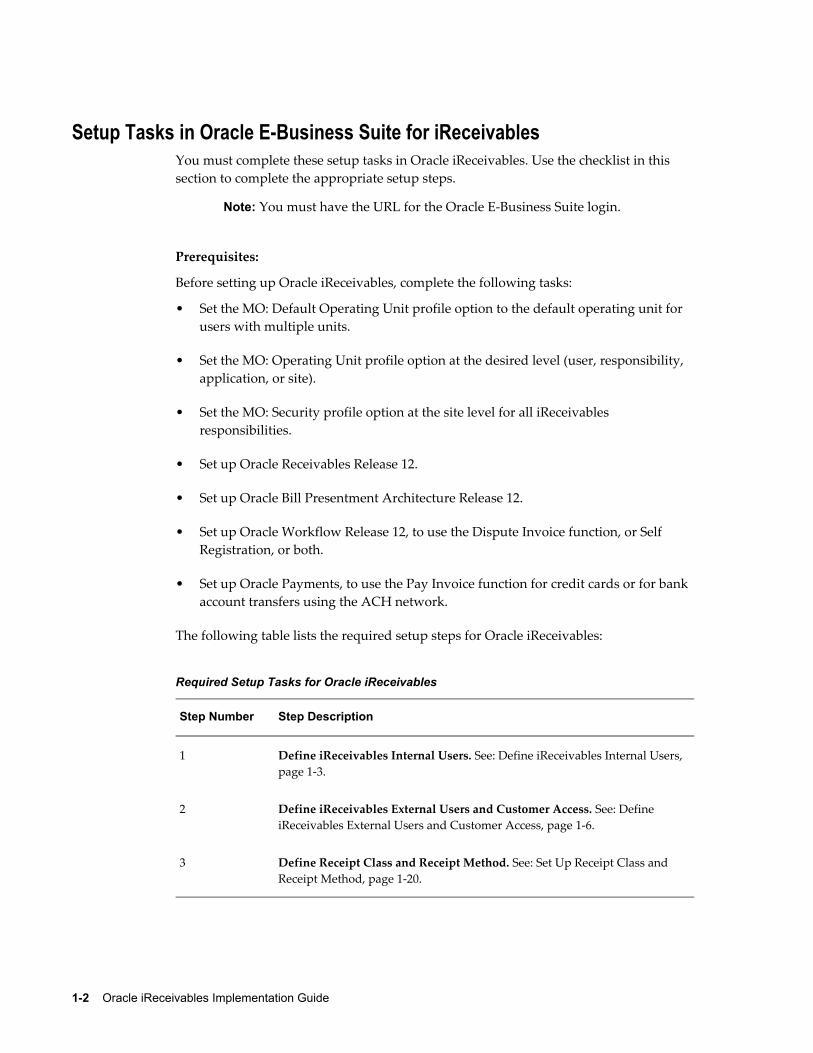
Setup Tasks in Oracle E-Business Suite for iReceivablesYou must complete these setup tasks in Oracle iReceivables. Use the checklist in this section to complete the appropriate setup steps.
Note: You must have the URL for the Oracle E-Business Suite login.
Prerequisites:
Before setting up Oracle iReceivables, complete the following tasks:
• Set the MO: Default Operating Unit profile option to the default operating unit for users with multiple units.
• Set the MO: Operating Unit profile option at the desired level (user, responsibility, application, or site).
• Set the MO: Security profile option at the site level for all iReceivables responsibilities.
• Set up Oracle Receivables Release 12.
• Set up Oracle Bill Presentment Architecture Release 12.
• Set up Oracle Workflow Release 12, to use the Dispute Invoice function, or Self Registration, or both.
• Set up Oracle Payments, to use the Pay Invoice function for credit cards or for bank account transfers using the ACH network.
The following table lists the required setup steps for Oracle iReceivables:
Required Setup Tasks for Oracle iReceivables
Step Number Step Description
1 Define iReceivables Internal Users. See: Define iReceivables Internal Users, page 1-3.
2 Define iReceivables External Users and Customer Access. See: Define iReceivables External Users and Customer Access, page 1-6.
3 Define Receipt Class and Receipt Method. See: Set Up Receipt Class and Receipt Method, page 1-20.
Setting Up Oracle iReceivables 1-3
Related TopicsSetting Up, Oracle Receivables Implementation Guide
Setting Up Oracle Workflow, Oracle Workflow Administrator's Guide
Configuring Oracle Payments, Oracle Payments Implementation Guide
Understanding Oracle Payments, Oracle Payments User's Guide
Viewing Online Bills, Oracle Bill Presentment Architecture User Guide
Oracle User Management, Oracle E-Business Suite Security Guide
Define iReceivables Internal UsersDefine your internal users for iReceivables. Internal users are the personnel in your company, such as collectors and salespersons, who have access to iReceivables customer information. Internal users have access to the full customer search capability to display customer information.
Note: You must have access to the system administrator responsibility to perform this setup step.
Use the Users window to assign the responsibility iReceivables 2.0 Internal to each user in your company that you want to have access to iReceivables. If you are using the Multi Print feature, you must also enter the user's e-mail address.
To define iReceivables internal users:
1. Select the System Administrator responsibility.
2. Navigate to the Users window.
3. Query or enter the users in your company that you want to have access to iReceivables.
4. If you are using the Multi Print feature, enter the e-mail address of the first user in the E-Mail field. The Multi Print feature sends an e-mail notification to this address after the Receivables Invoice Print concurrent program finishes.
5. Open the Direct Responsibilities tabbed region for this user.
6. In the Responsibility field, enter iReceivables 2.0 Internal.
Note: For internal users performing implementation setup for iReceivables, add iReceivables Setup responsibility.
1-4 Oracle iReceivables Implementation Guide
7. In the From and To fields, enter the effective dates for this user.
8. Save your work.
9. Repeat steps 4 to 8 for each internal user.
Related TopicsPrinting Transactions, Oracle Receivables User Guide
Entering and Updating Customer Information, Oracle Receivables User Guide
ORACLE Users Window, Oracle E-Business Suite Maintenance Guide
Index the Customer DatabaseRun the Customer text data creation and indexing concurrent program to index the customer information in your applications database. The first time that you run this concurrent program, it builds the indexes in your database. Depending on the volume of your customer data, the first run may take a fairly long time to complete.
Note: This index search is available only for internal users.
The Customer text data creation and indexing concurrent program includes the parameter 'Build Compact Index?' to control the level of indexing when you first build your customer index. Enter No to build the index with customer, customer site, customer contact, and customer site contact information. Enter Yes to build the index with customer and customer site information only, without contact information. The default value is Yes. If you run the concurrent program without any parameter, the system will default it to Yes and build the index without contact information.
Note: The index only includes customer contacts and customer site contacts that have roles assigned to them, with one role marked as primary.
Note: If you plan to assign external users the contact role Self Service User for customers and customer sites, you must build your index with the Build Compact Index? parameter set to No.
After you build customer indexes, schedule a regular run of the Customer text data creation and indexing concurrent program, in accordance with your business practices, to update the index with the changes to your customer data. A regular run of this programensures that all updates to your customer data are available to the iReceivables customer search engine. Subsequent runs of the Customer text data creation and indexing concurrent program act upon updates only, and therefore should take much less time to
Setting Up Oracle iReceivables 1-5
complete.
Note: Whenever you make changes to customer data, these changes arenot available to the iReceivables customer search engine until the next time that the concurrent program runs and recreates the interMedia index.
To build the customer indexes in your applications database:
1. Select the Receivables Manager responsibility.
2. Navigate to the Submit Request window.
3. In the Name field, choose Customer text data creation and indexing from the list of values.
4. In the Build Compact Index? field, enter:
• No to index all customer information.
• Yes to index customer and customer site information only.
5. Choose the Schedule button.
6. In the Schedule window, choose Once.
To schedule a regular update of your customer indexes:
1. Select the Receivables Manager responsibility.
2. Navigate to the Submit Request window again.
3. In the Name field, choose Customer text data creation and indexing from the list of values.
4. Choose the Schedule button.
5. In the Schedule window, choose Periodically.
6. In the Start At and End At fields, set the date and time for this program run.
7. In the Re-run Every field, enter 1 Day.
Related TopicsRequest Submission, Oracle E-Business Suite User's Guide

1-6 Oracle iReceivables Implementation Guide
Define iReceivables External Users and Customer AccessDefine your external users and their level of customer access to iReceivables. You can provide external users with access to their own bill-to site only, to multiple customers or customer sites, or both, by assigning users the customer contact role Self Service User. An external user has access to the search criteria "customer names" and "transaction numbers" to display account information for each applicable customer and customer site. There are two types of external users:
• For business-to-business external users, use the Contact: Roles region of the Customers - Standard window to assign iReceivables external users to customers and customer sites with the customer contact role Self Service User.
• For business-to-consumer external users, use the Customers - Standard window header region to enter users with the customer type Person.
For both types of external user, use the Users window to assign the iReceivables Account Management responsibility and the corresponding customer contact or person.If you are using the Multi Print feature, you must also enter the user's e-mail address.
Note: External users can only add attachments and view existing attachments. They cannot modify attachments.
External users can register themselves by logging through Register Here link or OIR Self Service portal page using the Self Registration feature. See: Set Up for Self Registration, page 1-10.
Defining iReceivables External UsersBy default, users with the iReceivables Account Management responsibility have access to the Manage Customer Account Access link, for use with the iReceivables Self Registration feature. If you do not plan to use Self Registration, then please remove this function from the iReceivables Account Management responsibility using function security. See: Define Function Security, page 1-34.
To define iReceivables external user for Business-to-Consumer Setup, with access to one site or multiple customer sites, for a single customer:
1. Select the Receivables Manager responsibility.
2. Navigate to the Customers - Standard window.
3. Select Customer Type as Person.
4. Query or enter the customer name.
5. Navigate to the Addresses tabbed region and choose the customer address.

Setting Up Oracle iReceivables 1-7
6. Open the Contacts: Roles tabbed region.
7. Enter the name of the external user and the user's contact information.
8. In the Description field, enter the role Self Service User.
9. Save the work.
10. To assign this user to a second site of the same customer, repeat steps 5 and 6.
11. From the Customer Standard form, query a customer, open the Account, open one of the Sites. Add a Contact by using the Communications tab.
12. Assign the role Self Service User to this contact.
13. Save the work.
14. To assign this user to additional sites of the same customer, repeat steps 10 to 13.
15. Select the System Administrator responsibility.
16. Navigate to the Users window.
17. Enter the User Name and Password of the external user.
18. In the Customer Name field, choose any version of the external user's name definedin step 7 from the list of values.
19. If using the Multi Print feature, enter the user's e-mail address in the E-Mail field. The Multi Print feature sends an e-mail notification to this address after completion of the Receivables Invoice Print concurrent program.
20. Open the Direct Responsibilities tabbed region.
21. In the Responsibility field, enter iReceivables Account Management.
22. In the From and To fields, enter the effective dates for this user.
Do not create a new contact with the same name for each site. If the contact name or address is a duplicate value, the application gives the option to select the contact from a list. If this does not happen, check the following profile option settings: HZ: Enable Party Search = YESHZ: Duplicate Allowed = NoHZ: Enable Duplicate Prevention at Party Creation = Person or OrganizationHZ: Match Rule for Contact Duplicate Prevention = SAMPLE: SEARCHHZ: Match Rule for Organization Duplicate Prevention = SAMPLE: SEARCHHZ: Match Rule for Person Duplicate Prevention = SAMPLE: SEARCH
Contact Duplication Prevention, Oracle Receivables User Guide
1-8 Oracle iReceivables Implementation Guide
To define iReceivables external user for Business-to-Business Setup, with access to multiple customer sites, for multiple customers:
1. Select the Receivables Manager responsibility.
2. Navigate to the Customers - Standard window.
3. Select Customer Type as Organization.
4. Query or enter the first customer to assign to an external user.
5. Open the Contacts: Roles tabbed region.
6. Enter the name of the external user and the user's contact information.
7. In the Description field, enter the role Self Service User.
8. Save the work.
9. Query the next customer in the Customer Name or Number field.
10. Open the Contacts: Roles tabbed region.
11. In the Last field, choose the external user name entered in step 6 from the list of values.
12. In the Description field, enter the role Self Service User.
13. Repeat steps 9 to 12 for all customers to be assigned to this external user.
14. Save the work.
15. Select the System Administrator responsibility.
16. Navigate to the Users window.
17. Enter the User Name and Password of the external user.
18. In the Customer Name field, choose any version of the external user's name definedin step 6 from the list of values.
19. If using the Multi Print feature, enter the user's e-mail address in the E-Mail field. The Multi Print feature sends an e-mail notification to this address after completion of the Receivables Invoice Print concurrent program.
20. Open the Direct Responsibilities tabbed region.
21. In the Responsibility field, enter iReceivables Account Management.

Setting Up Oracle iReceivables 1-9
22. In the From and To fields, enter the effective dates for this user.
To define an iReceivables external user for Business-to-Consumer Setup:
1. Select the Receivables Manager responsibility.
2. Navigate to the Customers - Standard window.
3. Query or enter the customer name.
4. Assign the user the Customer Type Person and enter the necessary Person party details.
5. Save the work.
6. Select the System Administrator responsibility.
7. Navigate to the Users window.
8. Enter the User Name and Password of the external user.
9. In the Customer Name field, choose any version of the external user's name definedin step 4 from the list of values.
10. If using the Multi Print feature, enter the user's e-mail address in the E-Mail field. The Multi Print feature sends an e-mail notification to this address after completion of the Receivables Invoice Print concurrent program.
11. Open the Direct Responsibilities tabbed region.
12. In the Responsibility field, enter iReceivables Account Management.
13. In the From and To fields, enter the effective dates for this user.
Minimum Characters for SearchThe profile option OIR: Minimum Characters for Search can be used to restrict charactersearch for external users. For example, if the value is set to three, minimum three characters are required to search for a customer. Value can be set as null for blind search.
Note: This profile option does not hold for Credit Requests.
Related TopicsPrinting Transactions, Oracle Receivables User Guide
1-10 Oracle iReceivables Implementation Guide
Entering and Updating Customer Information, Oracle Receivables User Guide
Oracle Users Window, Oracle E-Business Suite Maintenance Guide
Set Up for Self RegistrationThe iReceivables Self Registration feature lets users register for iReceivables Account Management (application) access to their customer account data. On the Self Registration pages, an external user is given three attempts to answer a challenge/response question correctly. These questions are setup using Rules by the administrator. If all three attempts are unsuccessful, the user is only able to re-register according to the Self Registration profile option settings that are specified.
For more information on setting up Rules and Profile Options, see: Set Up Rules, ProfileOptions, and System Parameters, page 1-36.
If registration is successful, iReceivables creates a user account, assigns the user the customer contact role Self Service User, and forwards the information necessary to accesscustomer account data.
Note: After successful registration, this new customer contact is not available to the iReceivables customer search engine until the next running of the Customer text data creation and indexing concurrent program. See: Index the Customer Database, page 1-4 for more information.
Performing Self RegistrationThe self registration process can be performed using the following processes. Users can set up any of these methods as per preference.
• Selecting the Register Here link created on the main portal page with or without SSO.
• Accessing SelfRegistration.jsp page. See Bookmark the Self Registration Page, page 1-13
• Accessing the OIR Self Service Portal page, http://machinename:portnumber/OA_HTML/IrecVisitor.jsp\. Add the iReceivables Self Service responsibility to the pre-seeded Guest User for this. For more information on setting up the Self Service portal, see: Set Up for Self Service Portal, page 1-17.
For additional access, select the Manage Customer Account Access link, when the user logs in to the iReceivables Account Management responsibility.
Note: By default, users with either the iReceivables Account Management responsibility or any responsibility that includes the

Setting Up Oracle iReceivables 1-11
iReceivables Account Management menu have access to the Manage Customer Account Access link. If responsibilities have been defined with menus other than the iReceivables Account Management menu and want to provide users with access to the Self Registration feature, then add the Manage Customer Account Access function to the menus attached to these custom responsibilities. Users can add or remove association to an account using the Request Additional Customer Access or Remove Access options from the Manage Customer Account Access page.
PrerequisitesBefore completing set up of iReceivables for Self Registration, perform the following steps:
• Associate the MO: Security profile option that has been already created to the GuestUser.
In the Security profile option, enter all the organizations that contain customer account data for which the external users should have access to.
• Set the ICX: Session Timeout profile option at a reasonable value to avoid session timeout while a user completes the self-registration process.
Enable Self RegistrationPerform the following steps to enable self registration:
Setup TasksTo set up iReceivables Self Registration:
1. Set up Register Here link.
• Set the Local Login Mask Site Level to 48 at site level in the System Profiles Values window.
• Set the UMX: Register Here Link - Default Registration Process value to iReceivables Self Registration at server level in the System Profile Values window.
2. In Oracle E-Business Suite, select the System Administrator responsibility.
3. Assign the iReceivables Registration responsibility to the pre-seeded guest user account specified by the Guest User Password profile option with the following steps:
1. Under System Administrator, navigate to the Profile and select System. The

1-12 Oracle iReceivables Implementation Guide
Profile System Values window opens.
2. In the Profile field, enter the user account and make note of the value (value format: user/password).
3. Navigate to the Users window.
4. In the User Name field, query the value of the same user account.
5. Navigate to the Responsibilities tabbed region.
6. Add the iReceivables Registration and iReceivables Account Management responsibilities.
4. Assign an e-mail address to the Contact Us global icon.
Enter the email address of the Self Registration administrator (or other qualified user responsible for answering inquiries from external users about Self Registration).
1. Navigate to the Form Functions window.
2. Query the function ARI Self Registration Contact Us.
3. Choose the Web HTML tab.
4. Enter the Self-Registration administrator's email address in the HTML Call field, using the format: mailto:<userid>@<domain>.com.
Note: User may need to restart the web server for the update to take effect.
5. Switch to the Applications Developer responsibility.
6. Use the Message Dictionary to configure the FND confirmation messages that are sent to users after successful registration.
The messages that should be configured contain this information:
• ARI_REG_APP_NAME - Enter the name of the iReceivables application that theuser has access to.
• ARI_REG_APPLICATION_LOGIN_URL - Enter the login URL to access iReceivables applications.
Note: Passwords created are case sensitive or case insensitive

Setting Up Oracle iReceivables 1-13
depending on the EBS Profile Option, SIGNON_PASSWORD_CASE. If this is set to NULL or Insensitive, the passwords in OID will be in lowercase irrespective of how it was entered. If set to Sensitive, passwords will be same as when entered.
Bookmark the Self Registration PageThe Self Registration URL can be bookmarked using the URL http://<machinename>:<port>/OA_HTML/SelfRegistration.jsp. The pre-seeded guest user should have iReceivables Account Management responsibility assigned.
Note: If user is bookmarking the URL for Self Registration, then there isno need to set the profiles Local Login Mask to 48 and UMX%Process toiReceivables Self Registration.
Redirect Self Registration Page:
The profile option, OIR: Self Registration Redirect URL, redirects external users who cancel the registration process coming through the bookmarkable Self Registration page, to the URL specified in the profile. If this profile value is set, the user is redirected to the URL specified. If not set, then the user is redirected to the URL specified in profilevalue APPS_SERVLET_AGENT, to which AppsLocalLogin.jsp is appended. For example, http://<machinename>:<port>/OA_HTML/AppsLocalLogin.jsp
Registration Hold profile optionsSet the Registration Hold profile options, OIR: Registration Hold Domain and OIR: Registration Hold Duration, to manage user re-registration.
OIR: Registration Hold Domain: If a user is unsuccessful in completing the self registration process, iReceivables prevents this user from attempting to re-register. Use this profile option to determine whether iReceivables prevents this user only or all usersbelonging to the same customer account from attempting to re-register.
OIR: Registration Hold Duration: This profile option works in conjunction with the OIR: Registration Hold Domain profile option. Use this profile option to set the number of days that iReceivables prevents a user or all users belonging to the same customer account from attempting to re-register.
Related TopicsUser Profiles and Profile Options in Oracle Application Object Library, Oracle E-BusinessSuite Setup Guide
Form Functions Window, Oracle E-Business Suite Security Guide
Message Dictionary, Oracle E-Business Suite Developer's Guide
Defining Workflow Process Components, Oracle Workflow Developer's Guide
1-14 Oracle iReceivables Implementation Guide
Managing Business Events, Oracle Workflow Developer's Guide
Set Up Customer Verification QuestionCustomer verification questions are used to verify access at the account level during selfregistration. The questions are set through the Customer Verification Question rule under iReceivables Setup. For information on setting up rules, see: Set Up Rules, page 1-36.
Users can create rules specific for a customer. Select the verification type from the Rules List. The following options are available:
Customer Verification QuestionSet a question and its answer. During self registration, the user is challenged with this question, and is allowed to proceed further only if the exact answer is provided.
Customer Dynamic Verification QuestionDynamic Customer Verification Question provides the flexibility to define questions at the Customer Verification rule. When the user tries to Self Register for a customer account, it challenges the user. The answer should be provided is based on the customerthe user is trying to register to. Maximum of three questions can be set at Customer Account level.
The option Dynamic Customer Verification Question is used to set the rule for Customer Verification Question, which has 15 parameters, with three sets of five parameters each. If first set is filled, then the user has to answer one question during Self Registration. If two sets are filled, the user has to answer two questions and if three sets are filled, then user has to answer all three questions. All the questions have to answer correctly for proceeding to the next step in the Self Registration train. The following parameters are available:
• Question: Question to be asked to the user during self registration.
• Answer Table: The list of table values, which has default tables as HZ_PARTIES, HZ_CUST_ACCOUNTS. where the answer exists. Custom tables can also be added.
• Answer Column: If a value has been set in the Answer Table above, then the columns in that table is populated in this drop down. The value in this column has the answer which should be given by the user during Self Registration.
• Answer Table Join Column: The column from Answer Table to be joined with HZ_CUST_ACCOUNTS table for getting a unique record.
Important: Customer related information can be found in Receivables Manager, Customer Standard form.
• HZ_CUST_ACCOUNTS Join Column: The column from HZ_CUST_ACCOUNTS

Setting Up Oracle iReceivables 1-15
table to be joined with Answer Table Join Column to get a unique record.
Answer TableTables can be added to or deleted from the Answer Table.
1. Navigate to Application Developer Responsibility, then to Flexfield , Descriptive, then Values. Enter Application as Receivables.
2. Enter Title as iReceivables Customer Verification Question and click Find.
3. Enter the table name in the Value field. Enter the table description. Select Enabled.
Important: The table added should be able to be joined with HZ_CUST_ACCOUNTS table to get a unique record.
The table added should be present in AR schema and its reference in APPS schema.
To remove a table, deselect the Enabled check box and set To Date prior to current date.
Set Up Site Verification QuestionSite verification questions are used to verify access at the site level for the user during self registration. The questions are set through the Site Verification Question rule under iReceivables Setup. For information on setting up rules, see: Set Up Rules, page 1-36.
Users can create rules specific to their site. Select the site verification type from the Rules List. The following options are available:
Dynamic Site Verification QuestionDynamic Site Verification Question provides the flexibility to define questions at the Site Verification rule. When the user tries to Self Register for a customer bill to site or alllocations, it challenges the user. The answer should be provided based on the customer bill to or the oldest bill to site information (for all locations) the user is trying to register to. Maximum of three questions can be set for Site Verification.
The option Dynamic Site Verification Question is used to set the rule for Site Verification Question, which has 15 parameters, with three sets of five parameters each. If first set is filled, then the user has to answer one question during Self Registration. If two sets are filled, the user has to answer two questions and if three sets are filled, then user has to answer all three questions. All the questions have to answer correctly for proceeding to the next step in the Self Registration train. The following parameters are available:
• Question: Question to be asked to the user during self registration.
• Answer Table: The list of table values, which has default tables as HZ_PARTIES,
1-16 Oracle iReceivables Implementation Guide
HZ_CUST_ACCOUNTS, HZ_CUST_ACCT_SITES_ALL, HZ_LOCATIONS, and HZ_PARTY_SITES where the answer exists. Custom tables can also be added.
• Answer Column: If a value has been set in the Answer Table above, then the columns in that table is populated in this drop down. The value in this column has the answer which should be given by the user during Self Registration.
• Answer Table Join Column: The column from Answer Table to be joined with HZ_PARTY_SITES table for getting a unique record.
Important: Customer bill to site related information can be found inReceivables Manager, Customer Standard form.
• HZ_PARTY_SITES Join Column: The column from HZ_PARTY_SITES table to be joined with Answer Table Join Column to get a unique record.
Answer TableTables can be added to or deleted from the Answer Table.
1. Navigate to Application Developer Responsibility, then to Flexfield, Descriptive, then Values. Enter Application as Receivables.
2. Enter Title as iReceivables Site Verification Question and click Find.
3. Enter the table name in the Value field. Enter the table description. Select Enabled.
Important: The table added should be able to be joined with HZ_PARTY_SITES table to get a unique record.
The table added should be present in AR schema and its reference in APPS schema.
To remove a table, deselect the Enabled check box and set To Date prior to current date.
Enable Default Question Based on InvoiceSelect Yes, No, or null. If Yes is selected, the challenge question is based on a previous invoice. If No or null is selected, the site verification step is skipped.
Enable Default Question Based on PaymentSelect Yes, No, or null. If Yes is selected, the challenge question is based on a previous payment. If No or null is selected, the site verification step is skipped.
Enable Default Question Based on Invoice and PaymentSelect Yes, No, or null. If Yes is selected, the challenge question is based on a previous invoice and payment. If No or null is selected, the site verification step is skipped.

Setting Up Oracle iReceivables 1-17
Site Verification QuestionSet a question and its answer. During self registration, the user is challenged with this question, and is allowed to proceed further only if the exact answer is provided.
Set Up for Self Service PortalSelf Service Portal page can be used as a landing page for external users for both Registration and Login. This page can be used in both Single Sign On (SSO) and non-SSO environments.
Prerequisites1. Assign iReceivables Self Service and iReceivables Account Management
responsibility to the guest user.
2. (Optional) Assign an iReceivables External User Responsibility Key value to the profile iReceivables Self Service Responsibility. This is required only if the customeruses self service registration using iReceivables in an SSO environment.
3. This step is required if the portal page has to be accessed outside the DMZ environment. Modify the file $FND_TOP/admin/template/url_fw_conf_1013.tmp to include the entry IrecVisitor.jsp under the line #Include URLs for product OIR (iReceivables) like this: RewriteRule ^/OA_HTML/IrecVisitor\.jsp$ - [L].
Note: If the above entry is already included, then ignore this step.
Accessing the iReceivables Self Service Portal PageThe iReceivables Self Service Portal page can be accessed in two ways. The following URLs direct to the same page. The page can be customized for external users.
• Using the IrecVisitor.jsp URL http://<machinename>:<port>/OA_HTML/IrecVisitor.jsp
• Using the function URL http://<machinename>:<port>/OA_HTML/OA.jsp?OAFunc=OIR_SELF_SERVICE_HOME_PAGE.
Self Service Portal with Single Sign On EnabledIf Single Sign on (SSO) is enabled, then in the portal page, the Login Here button is shown in Already registered on our Site region. iReceivables checks the profile Applications SSO Type set with value SSWA w/SSO or Portal w/SSO for SSO.
When SSO is enabled, clicking Register Now takes the user to the Profile User Creation page. Once the registration process is completed, the user is redirected to the Portal page. Click Login Here to login to iReceivables. Based on the responsibilities assigned tothe user, the following scenarios can happen:

1-18 Oracle iReceivables Implementation Guide
• User does not have valid iReceivables External User responsibility:
iReceivables checks if any responsibility assigned to the user has access to the iReceivables External Access function. If not, then the user is redirected the Partial Registration page.
Note: This usually happens to first time users without iReceivables External User responsibility.
Click Continue. This assigns the iReceivables External User responsibility as specified in the profile iReceivables Self Service Responsibility. If this value is not set, then it assigns standard iReceivables Account Management responsibility and redirects the user to the Self Registration process train. User has to complete the registration process and get access to a customer account.
• User has iReceivables External User responsibility, but does not have access to any customer account:
The user is redirected to the registration process on logging in, where the user can request access to the customer account.
• User has iReceivables External User responsibility and also access to customer account:
The user is redirected to the iReceivables Customer Search screen on logging in.
• User has access to more than one iReceivables External User responsibility:
The user is redirected to the Responsibility navigator window. Select the required responsibility and proceed further.
Self Service Portal with Single Sign On DisabledIf SSO is not enabled, then the email and Password fields are shown in Already registeredon our Site section of the portal page. Click Register Now to navigate to the iReceivables Self Registration page. Complete the registration process to get access to the customer account and iReceivables External user responsibility. After registration, fill the email and Password fields to log in. The user is redirected to the responsibility navigator page, to select the responsibility and function to access iReceivables.
Group AccountsGrouping of Accounts enables external users to group their accounts or sites. My All Locations link is available when the user has access to more than one site for an account, but not to all the bill to sites. Click this to get a summary of the account view for the account across all the sites the user has access to.
This feature is enabled using the profile option OIR: Account Grouping. Set it to one of the following values as required:

Setting Up Oracle iReceivables 1-19
• No Grouping: Account grouping is not enabled.
• Group Sites: Only grouping of sites for the customer account is enabled. On the Customer Search page, My Locations link is available, which shows the transactionsand account summary for the sites the user has access to.
• Group Accounts and Sites: Grouping of customer accounts and grouping of sites are enabled. On the Customer Search page, All My Accounts and Group My Accounts buttons are available. On clicking All My Accounts button, the user is navigated to the Account Summary page with a combined summarized view of all the accounts and account sites the user has access to. There is an option to change the account context to any customer account or back to all accounts.
• Always Group Accounts and Sites: Always groups customer accounts and sites. On logging in the user is taken directly to the Account Summary page, with all accounts selected, by-passing the Customer Search page.
Note: This feature is available only for External Users. Its not applicablefor Internal Users as they already have access to all the customer accounts within the security profile or operating unit.
Define Currencies for Customers and Customer Bill-To SitesThe list of available currencies in the Account Summary page and the Account Details page is based either on the profile amounts or on the amounts enabled in the credit profile. These profiles can be specified at the customer level and customer site level. If there are transactions for a customer in currencies which not defined in the customer profile, these are also shown in iReceivables Account Summary and Account Details page.
Use the Customers window to define credit profiles and profile amounts for iReceivables customers and customer bill-to sites.
To define currencies for a customer:
1. Select the Receivables Manager responsibility.
2. Navigate to the Customer Summary or the Customers window.
3. Query the customer.
4. Open the Account Profile tabbed region.
5. Enter a Profile Class.
6. To assign a profile class to a customer site, open the Addresses tabbed region, select
1-20 Oracle iReceivables Implementation Guide
the address, then choose Open. Repeat steps 4 and 5.
7. Open the Profile Amounts tabbed region.
8. In the Curr column, set the currency or currencies that this customer uses.
Note: iReceivables Currency drop-down list shows the currencies defined in AR Customer profile and the currencies in which the customer has made transactions.
Related TopicsDefining Customer Profile Classes, Oracle Receivables Implementation Guide
Assigning Profile Classes to Customers, Accounts, or Addresses, Oracle Receivables Implementation Guide
Set Up Receipt Class and Receipt MethodIf using the Pay Invoice function, define at least one receipt class and receipt method foreach iReceivables payment instrument:
• Credit card payments using Payments
• Bank account transfers using Payments
Bank account transfer payments can be processed globally. If receipt methods are used via Payments, then payment processing is restricted according to the Payments servlets.
A user can pay all open invoices in one payment transaction. The user can also make a partial payment on the entire open invoice balance. If the user is paying multiple invoices across multiple bill-to sites, Receivables creates the receipt using the primary receipt method specified at the customer level. For payments of multiple invoices acrossmultiple bill-to sites, provide specific settings to use the receipt methods that are assigned to customers and customer sites. See: Assign iReceivables Payment Methods, page 1-24 for more information.
For bank account transfers and credit card payments, run the Receivables remittance program to capture funds.
For credit card payments, define a receipt class and receipt method to enable credit cardpayment authorization and capture of funds using a two-step remittance method. In a two-step remittance method, iReceivables only authorizes the credit card charge. The Receivables remittance program has to be run to capture funds.

Setting Up Oracle iReceivables 1-21
Credit Card One-Time PaymentA user can make a "one-time payment" of open invoices with a credit card. iReceivables processes the transaction using the credit card but does not save the credit card information.
One step credit card payments are setup as Automatic and the profile option OIR: Save Payment Instrument Information is set to No.
Note: If the OIR: Save Payment Instrument Information profile option is set to No, iReceivables can only accept payment by new credit card option. Bank account transfer cannot be used to process payments.
Additional Credit Card VerificationThe profile option OIR: Verify Credit Card Details controls the Credit Card Security Code and Billing Address options shown in the iReceivables Payment UI. When makinga payment, the security code or billing address, or both are passed to the payment gateway based on the profile option.
Important: The fields displayed using this profile option are mandatoryfor successful payment using credit card.
The following options are available:
• Credit Card Address only: The card Billing Address fields are displayed in the iReceivables Payment UI.
• Credit Card Security Code only: The card Security Code field is displayed in the iReceivables PaymentUI.
• Both: The card Security Code and Billing Address are displayed in the iReceivables Payment UI.
• None: The card Security Code and Billing Address fields are not displayed in the iReceivables Payment UI.
Note: iReceivables uses the card security code for verification purposesonly and does not save the information but it saves the cardholder billing address.
Oracle Payments and Supported CurrenciesOracle Payments manages external processing of credit card payments and ACH bank
1-22 Oracle iReceivables Implementation Guide
account transfers. The banks and currencies supported by Payment are determined by the Payment servlets.
Note: Please consult Oracle Payment Implementation Guide for the currentlist of Payments servlets and the currencies they support.
For credit card processing, users can use the Payments integration with Verisign, which supports transactions in US dollars (USD) and Canadian dollars (CAD) only. They can also use the Payments integration with Paymentech, which supports transactions in anycurrencies supported by Visa and Master Card. For ACH bank account transfers, users can use the Payments integration with Chase Merchant Services, which supports transactions in US dollars (USD) only.
If their company uses the Verisign payment system, users cannot set up multiple bank accounts with multiple currencies for one payment method. Set up a single payment method for either USD or CAD, and assign a merchant ID and remittance bank that supports the corresponding currency. If the company uses a payment system other thanVerisign, users can set up a single payment method for multiple bank accounts with multiple currencies, if the payment system supports it.
Note: iReceivables does not support cross-currency payments. Though a user can still pay invoices with a credit card or bank account that has a different currency from that of the invoice, the receipt created in iReceivables will have the same currency as the invoice.
Define Receipt Class and Receipt MethodTo define a receipt class and receipt method for iReceivables:
1. Select the Receivables Manager responsibility.
2. Navigate to the Receipt Classes window under Setup.
3. Enter a Name for this receipt class. For example, enter a name that identifies this receipt class for iReceivables.
4. Leave the Notes Receivable and Require Confirmation check boxes deselected.
5. Enter a Creation Method of Automatic to process receipts by credit card or bank account transfer using Payments.
6. Enter a Remittance Method of Standard, Factoring, or Standard and Factoring, according to business practices, for credit card payments and bank account transfer payments. Receipts are created as Confirmed and require remittance.
Enter Standard, if refunds against credit card payments have to be allowed.
Setting Up Oracle iReceivables 1-23
7. Enter a Clearance Method of Directly, By Automatic Clearing, or By Matching, according to business practices.
8. Enter a Receipt Method name. For example, enter a name that identifies the type of payment, such as iReceivables direct debit, iReceivables credit card, or iReceivables bank transfer.
9. Enter a name in the Printed Name field. For example, iReceivables Credit Card.
10. Leave the Debit Memos Inherit Receipt Numbers check box deselected.
11. Leave the Receipts Inherit Transaction Numbers check box deselected.
iReceivables uses document sequences to number credit card or bank account transfer receipts.
12. Enter the number of receipts rule according to the business practices. This field is not used by iReceivables.
13. Enter receipt maturity date rule according to the business practices. This field is not used by iReceivables.
14. Enter the automatic print program according to the business practices.
15. Enter the lead days according to the business practices.
16. In the Payment Method field, enter:
• Credit Card for credit card payments.
• Bank Account Transferfor bank account transfer payments.
17. Enter the range of Effective Dates for this payment method.
18. Choose the Bank Accounts button to assign a remittance bank to this payment method.
If this payment method is for bank account transfers using Payments, provide a valid bank number for the bank associated with the account being linked to.
Note: Because iReceivables does not support cross-currency payments, ensure that the bank account assigned to the default credit card and bank account transfer payment methods are in the same currency as the customer invoices.
19. Save the work.
20. Assign the iReceivables receipt methods defined to the Receivables System Options
1-24 Oracle iReceivables Implementation Guide
window, Customers - Standard window, and Customer Addresses window according to you business practices. See: Assign iReceivables Payment Methods, page 1-24 for more information.
21. For bank account transfer, perform this additional step:
Set the OIR: Maximum Future Payment Days Allowed profile option to the maximum number of days that users can enter future-dated payments according to business practices. Setting a maximum future payment date, for example, prevents users from entering exaggerated future payment dates.
Invoice Payment NotificationWhen an Invoice is completed in AR, an email notification can be sent to users of Self Service User role. Perform the following steps to enable this subscription:
1. Login as system administrator and navigate to Workflow Administrator Web Applications responsibility.
2. Select Business Events and search for oracle.apps.ar.transaction.Invoice.complete.
3. Click the Subscription link to check the subscriptions for the event
4. For the ARI_UTILITIES.invoke_invoice_email_notwf function, click the Update linkand change Status to Enabled. Click Next and Apply.
Note: This subscription is disabled by default.
Related TopicsUnderstanding Oracle Payments, Oracle Payments User's Guide
About Remittances, Oracle Receivables User Guide
Integration with Other Oracle E-Business Suite, Oracle Payments Implementation Guide
Receipt Methods, Oracle Receivables Implementation Guide
Oracle Receivables Profile Options, Oracle Receivables Implementation Guide
Assign iReceivables Receipt MethodsAssign the iReceivables receipt methods defined in Define Receipt Class and Receipt Method, page 1-22 to the Receivables System Options window, Customers - Standard window, Customer Addresses window, and the profile options OIR: Credit Card Payment Method and OIR: Bank Account Payment Method according to business practices. The system searches for the Receipt Method first in the profile options mentioned above, next the bill to sites, then at the account level, and finally the system

Setting Up Oracle iReceivables 1-25
options.
Use the Receivables System Options window to assign a default iReceivables receipt method for credit card payments and bank account transfers. Use the Customers - Standard window and the Customer Addresses window to assign iReceivables receipt methods to specific customers and specific customer bill-to sites.
Receipt method assignments take precedence in the order:
• Profile options mentioned above
• Bill-to sites
• Account level
• Receivables system options
Mark one receipt method of each type as Primary at the customer and customer site level. If at the customer site level there are two or more receipt methods of the same type, the one marked as primary is taken as the receipt method for transactions billed tothis site. If no receipt method of the same type is marked as primary, then the payment method at the customer level is taken as the payment method for transactions billed to this site.
For credit card payments of multiple invoices across multiple bill-to sites, Receivables only uses the primary receipt methods defined at the customer and customer site level if the receipt methods are set up in this way:
• Associated receipt class has a Creation Method of Automatic.
• Associated Payment Type is Credit Card.
• There is an associated remittance bank account that accepts receipts in the payment currency.
For ACH payments of multiple invoices across multiple bill-to sites, Receivables uses the primary receipt methods defined at the customer and customer site level as long as the associated receipt class does not have a Remittance Method of No Remittance.
To assign iReceivables receipt methods:
1. Select the Receivables Manager responsibility select Setup, then System.
2. Navigate to the Receivables System Options window.
3. Open the Miscellaneous tabbed region.
4. Enter an iReceivables credit card payment method in the Credit Card Payment Method field.
5. Enter an iReceivables bank account transfer payment method in the Bank Account
1-26 Oracle iReceivables Implementation Guide
Payment Method field.
6. Navigate to the Customers - Standard window.
7. Query or enter the first customer.
8. Navigate to the Payment Details tabbed region to assign iReceivables receipt methods to this customer. Mark only one receipt method of each type as Primary.
9. In the Addresses tabbed region, choose the customer address.
10. Navigate to the Payment Details tabbed region to assign iReceivables receipt methods to this customer bill-to site.
11. Save the work.
12. Repeat steps 7 to 11 for each customer and customer bill-to site.
Related TopicsEntering and Updating Customer Information, Oracle Receivables User Guide
Defining Receivables System Options, Oracle Receivables Implementation Guide
Set Up Document Sequencing for iReceivables ReceiptsSet up document sequences to assign sequence numbers to iReceivables credit card receipts and bank account transfer receipts.
Note: System Administrator responsibility access is required to performthis setup step.
To set up document sequencing for iReceivables receipts:
1. Select the System Administrator responsibility.
2. Navigate to the System Profile Values window.
3. Set the Sequential Numbering profile option to Always Used or Partially Used.
4. Save the work.
5. Navigate to the Document Sequences window.
6. In the Name field, enter a document sequence name that identifies this sequence foriReceivables receipts, such as iReceivables Credit Card Receipts.
7. In the Application field, enter Oracle Receivables.

Setting Up Oracle iReceivables 1-27
8. In the From and To fields, enter the effective dates for this document sequence.
9. In the Type field, enter Automatic or Gapless.
10. Complete the fields for this document sequence.
11. Save the work.
12. Navigate to the Sequence Assignments window.
13. In the Application field, enter Oracle Receivables.
14. In the Category field, enter the document category created by the corresponding iReceivables payment method defined in Oracle Payments and Supported Currencies, page 1-21.
15. In the Method field, enter Automatic.
16. Open the Assignment tabbed region.
17. Enter the Start and End Dates for this sequence assignment.
18. In the Sequence field, enter the name of the document sequence defined in step 6.
19. Save the work.
20. Repeat steps 5 to 19 for each document sequence to be defined for iReceivables.
Related TopicsDefining Document Sequences, Oracle E-Business Suite Setup Guide
Define Service ChargesUsers can apply service charges to payments that customers make using the Pay Invoicefunction in iReceivables. iReceivables records a service charge as an adjustment to the invoice.
Setup Tasks Using RulesThe setup tasks for applying service charges for a new user to iReceivables are:
• Set the Service Charge Enabled and Service Charge Activity ID rules for an operating unit and/or customer
See: Set Up Rules, page 1-36.

1-28 Oracle iReceivables Implementation Guide
Setup Tasks Using Profile OptionsThe setup tasks for applying service charges are:
• Define a Receivables activity and document sequencing for service charges.
• Set the OIR: Enable Service Charge and OIR: Service Charge Activity ID profile options.
If migrating from Release 11i and before, the values set using the OIR: Service Charge Activity ID and OIR: Enable Service Charge profile options are automatically enabled in Release 12. See: Set Up Profiles, page 1-36.
• Enter the service charge calculation in the ARI_SERVICE_CHARGE_PKG.compute_service_charge function for bank account payments.
To define service charges on invoice payments using iReceivables:
1. Select the Receivables Manager responsibility.
2. Navigate to the Receivables Activities window.
3. Enter a Name and Description for the activity.
4. Enter Adjustment in the Type field.
5. Complete the Receivables Activities window according to business requirements.
6. Save the work.
7. Remain in the Receivables Activities window with the new activity that was just created. From the Help menu, choose Diagnostics, select Examine. The Examine window opens.
8. In the Field field, enter RECEIVABLES_TRX_ID. Make note of the value in the Value field. This value has to be entered in the OIR: Service Charge Activity ID profile option (see step 28, page 1-29).
9. Select the System Administrator responsibility.
10. Navigate to the System Profile Values window.
11. Set the Sequential Numbering profile option to Always Used or Partially Used.
12. Save the work.
13. Navigate to the Document Sequences window.

Setting Up Oracle iReceivables 1-29
14. In the Name field, enter a document sequence name that identifies this sequence foriReceivables service charges.
15. In the Application field, enter Oracle Receivables.
16. In the From and To fields, enter the effective dates for this document sequence.
17. In the Type field, enter Automatic or Gapless.
18. Complete the fields for this document sequence.
19. Save the work.
20. Navigate to the Sequence Assignments window.
21. In the Application field, enter Oracle Receivables.
22. In the Category field, enter the document category created by the Receivables activity defined above.
23. In the Method field, enter Automatic.
24. Open the Assignment tabbed region.
25. Enter the Start and End Dates for this sequence assignment.
26. In the Sequence field, enter the name of the document sequence defined in step 14.
27. Save the work.
28. Set these profile options for service charges:
• Set the OIR: Service Charge Activity ID profile option to the value of RECEIVABLES_TRX_ID for the new Receivables activity that was defined for service charges.
• Set the OIR: Enable Service Charge profile option to Yes.
29. Set the ARI_SERVICE_CHARGE_PKG.compute_service_charge function to calculate the appropriate service charge. The default calculation is .05% for bank account payments. For credit cards, different values can be setup. It is 0.05% by default.
Service Charge Based on Credit Card TypeThe lookup AR_CREDIT_CARD_SURCHARGE defines the Credit Card Types and the Service Charges for each type. To set this up, perform the following steps:
1-30 Oracle iReceivables Implementation Guide
1. Enable DFF Common Lookups with the following steps:
1. Navigate to Application Developer responsibility, and select Flexfield, then Descriptive, then Segments.
2. Search for Type with value Common Lookups.
3. Deselect Freeze Flexfield Definition option.
4. Select the Global Data Elements row and click Segments.
5. Enter the following values:Name: Credit Card SurchargeWindow Prompt: Credit Card SurchageColumn: Value for credit card surcharge
6. Save and compile.
7. Select the Freeze Flexfield Definition option.
2. Navigate to Receivables Manager responsibility. Select Setup, then System. Under QuickCodes, select Receivables.
3. Search for the lookup AR_CREDIT_CARD_SURCHARGE. Under DFF , enter the Credit Card Surcharge value for each credit card type. This value gets reflected while calculating the Service Charge when a Credit Card Type is selected during payment.
Related TopicsReceivables Activities, Oracle Receivables Implementation Guide
Defining Document Sequences, Oracle E-Business Suite Setup Guide
Oracle Receivables Profile Options, Oracle Receivables Implementation Guide
Set the Grace Period for DiscountsUsers can configure iReceivables to consider the discount grace days for a customer or customer site when calculating and displaying discount amounts for transactions.
Setup Tasks Using RulesThe setup tasks for setting the discount grace days for users new to iReceivables are:
• Set the Discount Grace Days rule for an operating unit and/or customer
See: Set Up Rules, page 1-36.
Setting Up Oracle iReceivables 1-31
Setup Tasks Using Profile OptionsThe setup tasks for setting the discount grace days are:
1. Use the OIR: Enable Discount Grace Days profile option to enable or disable the consideration of the grace period. When the grace period is enabled:
• Last Date column in the Discount Alerts table on the Home Page includes the grace days allowed for the discount.
• Discount amount displayed on the Payment page considers the grace days allowed for the discount.
• All payments made through iReceivables consider the grace days when calculating payment on transactions.
2. The setup tasks for setting the grace period days for discounts are:
• If necessary, enter the grace days in the Discount Grace Days field in the Profile:Transaction tabbed region of the Customers - Standard window or the Customer Addresses window for the customers and customer sites.
• Set the OIR: Enable Discount Grace Days profile option to Yes. The default value is No.
Note: When the OIR: Enable Discount Grace Days profile option is set to No, iReceivables does not consider grace days when calculating discounts, even if grace days are defined for the customer or customer site.
Related TopicsOracle Receivables Profile Options, Oracle Receivables Implementation Guide
Set Up for ACH Bank Account Transfer PaymentsUse the OIR: Bank Directory Source profile option to help manage bank account transfer payments for iReceivables. The source for the bank directory can be the CE_BANK_BRANCHES_V view or a local table AR_BANK_DIRECTORY, containing the bank branch information, downloaded from the Federal Reserve Financial Services web site (http://www.fedwiredirectory.frb.org).
Note: If OIR: Save Payment Instrument Information profile option is setto No, iReceivables can only accept payment by credit card using a

1-32 Oracle iReceivables Implementation Guide
one-step remittance method. The ACH bank account transfer to processpayments cannot be used. See: Define Receipt Class and Payment Method, page 1-20 for more information.
• Set the OIR: Bank Directory Source profile option to Local to access the bank branchinformation (routing number) from a local table, AR_BANK_DIRECTORY, which isdownloaded from the Federal Reserve Financial Services web site.
When a customer pays an invoice by ACH bank account transfer with a routing number that is not available in the system (CE_BANK_BRANCHES_V view), the routing number is checked against the local table, AR_BANK_DIRECTORY, containing the bank branch information. If this routing number is available in the local table, iReceivables still considers the information as valid and proceeds with the payment. Along with the payment, iReceivables uploads the routing number, bank and branch information into the system. To upload the ACH bank branch information to a local table, see: Download and Upload the E-Payment ACH Directory to a Local Table, page 1-32.
• Set the OIR: Bank Directory Source profile option to None to use the CE_BANK_BRANCHES_V view as the bank directory source. If the routing number is not present in the view, it will not be considered as a valid routing number.
To set up the profile option, see: Set Up Profiles, Registration History, Rules, and System Parameters, page 1-36.
Upload the E-Payment ACH Directory to a Local TableIf the OIR: Bank Directory profile option is set to Local, a copy of the E-Payment ACH directory must be present in the local table, AR_BANK_DIRECTORY. Retrieving the directory involves two steps:
• Download the E-Payment ACH directory from the Federal Reserve Financial Services web site.
• Use SQL*Loader to upload the directory to the AR_BANK_DIRECTORY table.
Note: System Administrator responsibility access is required to perform this task.
To upload the E-Payment ACH directory to the local table:
1. Open the web browser.
2. Navigate to the Federal Reserve Financial Services web site: http://www.fedwiredirectory.frb.org.
Setting Up Oracle iReceivables 1-33
3. Click Download E-Payments Routing Directories link to go to the Download E-Payments Directories page.
4. Right-click Receive All FedACH Participant RDFIs with commercial receipt volume link and choose Save Target As.
5. Save the file in a local file that the Receivables system can access.
6. In Oracle E-Business Suite, select the System Administrator responsibility.
7. Navigate to the Request Group window.
8. In the Group field, query Receivables All.
9. Add Import Bank Directory to the Requests.
10. Switch the responsibility from System Administrator to Receivables Manager.
11. Navigate to the Submit Request window.
12. In the Name field, choose Import Bank Directory from the list of values.
13. In the Parameters window, enter in the Data File field the path to the local file savedin step 5.
14. Press the OK button.
15. Press the Schedule button.
16. In the Schedule window, choose Once.
17. Press the OK button.
18. Press the Submit button to submit the request.
Note: ORACLE PROVIDES THE E-PAYMENT ROUTING DIRECTORY ON AN "AS IS" BASIS. ORACLE EXPRESSLY DISCLAIMS ALL WARRANTIES OF ANY KIND, WHETHER EXPRESS OR IMPLIED, INCLUDING, BUT NOT LIMITED TO THE IMPLIED WARRANTIES OF MERCHANTABILITY, FITNESSFOR A PARTICULAR PURPOSE AND NON-INFRINGEMENT. ORACLE MAKES NO WARRANTY THAT: (i) THE E-PAYMENT ROUTING DIRECTORY WILL BE AVAILABLE UNINTERRUPTED, ON A TIMELY BASIS, SECURE, OR ERROR-FREE, AND (ii) THE RESULTS THAT MAY BE OBTAINED FROM THE USE OF THE SERVICE WILL BE
1-34 Oracle iReceivables Implementation Guide
ACCURATE OR RELIABLE. IN NO EVENT SHALL ORACLE BE LIABLE FOR ANY INDIRECT, INCIDENTAL, SPECIAL, PUNITIVE OR CONSEQUENTIAL DAMAGES, OR DAMAGES FOR LOSS OF PROFITS, REVENUE, DATA OR DATA USE, INCURRED BY YOU OR ANY THIRD PARTY IN CONNECTION WITH THE E-PAYMENT ROUTING DIRECTORY, WHETHER IN AN ACTION IN CONTRACT OR TORT, EVEN IF ORACLE HAS BEEN ADVISED OF THE POSSIBILITY OF SUCH DAMAGES. ORACLE'S ENTIRE LIABILITY FOR DAMAGES IN RESPECT OF THE E-PAYMENT ROUTING DIRECTORY SHALL IN NO EVENTEXCEED TEN THOUSAND DOLLARS (U.S. $10,000).
Related TopicsOracle Receivables Profile Options, Oracle Receivables Implementation Guide
Upload ACH Bank and Branch DetailsThe concurrent program Import AR_BANK_DIRECTORY Table data to HZ_PARTIES imports AR_BANK_DIRECTORY table data to TCA tables like HZ_PARTIES.
• This CP takes one input parameter, Import New Banks Information Only. If set as N, then the CP imports all the new bank information from AR_BANK_DIRECTORYtable to TCA tables and also updates the existing information in the TCA Tables.
• If set as Y or no value, then the CP imports only new bank information from the AR_BANK_DIRECTORY to TCA tables. It does not update the existing information.
• This CP has been added to the request group OIR Request Group All, which is assigned to the iReceivables Internal User (ARI_INTERNAL).
Define Function SecurityUse function security to limit access to iReceivables functionality for selected users. Define a new responsibility based upon iReceivables 2.0 Internal or iReceivables Account Management with the limited access that is desired and assign this new responsibility to the internal users or to external users.
Use function security in these situations:
• Remove the Pay or Dispute function. By default iReceivables users have access to both the Pay Invoice function and Dispute Invoice function. The Pay Invoice function lets a user make online payments. The Dispute Invoice function allows a user to dispute all or part of an invoice and submit a credit memo request.
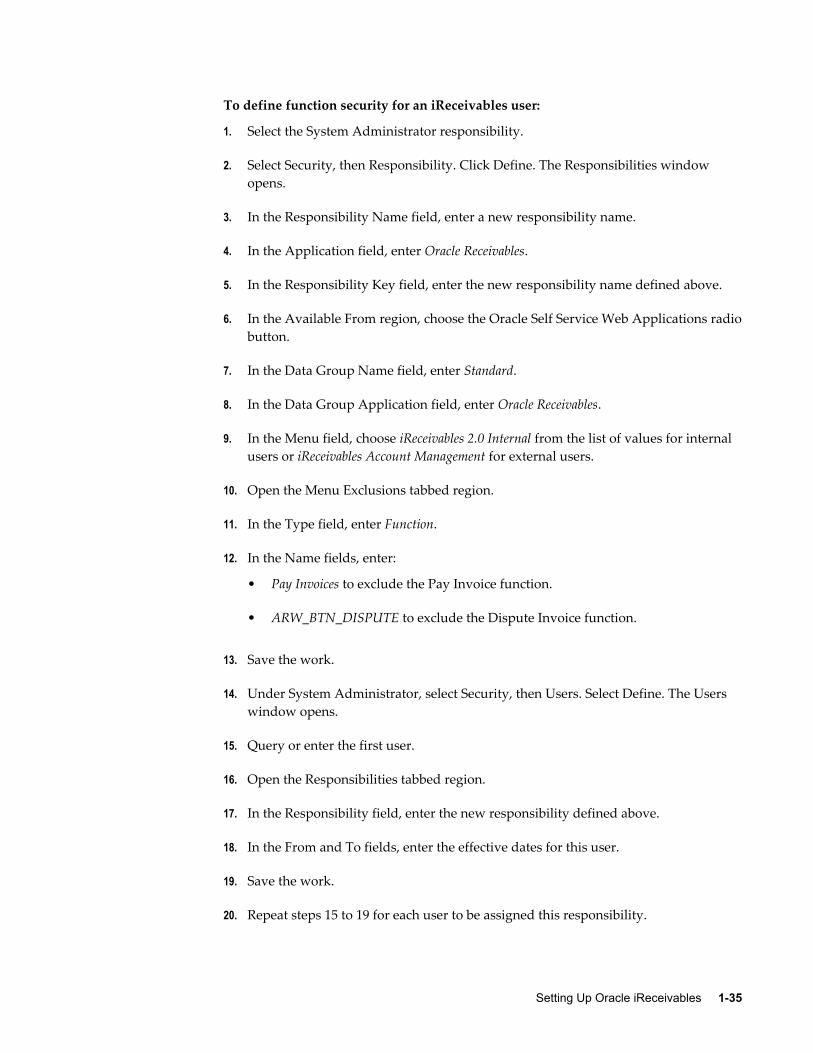
Setting Up Oracle iReceivables 1-35
To define function security for an iReceivables user:
1. Select the System Administrator responsibility.
2. Select Security, then Responsibility. Click Define. The Responsibilities window opens.
3. In the Responsibility Name field, enter a new responsibility name.
4. In the Application field, enter Oracle Receivables.
5. In the Responsibility Key field, enter the new responsibility name defined above.
6. In the Available From region, choose the Oracle Self Service Web Applications radiobutton.
7. In the Data Group Name field, enter Standard.
8. In the Data Group Application field, enter Oracle Receivables.
9. In the Menu field, choose iReceivables 2.0 Internal from the list of values for internal users or iReceivables Account Management for external users.
10. Open the Menu Exclusions tabbed region.
11. In the Type field, enter Function.
12. In the Name fields, enter:
• Pay Invoices to exclude the Pay Invoice function.
• ARW_BTN_DISPUTE to exclude the Dispute Invoice function.
13. Save the work.
14. Under System Administrator, select Security, then Users. Select Define. The Users window opens.
15. Query or enter the first user.
16. Open the Responsibilities tabbed region.
17. In the Responsibility field, enter the new responsibility defined above.
18. In the From and To fields, enter the effective dates for this user.
19. Save the work.
20. Repeat steps 15 to 19 for each user to be assigned this responsibility.

1-36 Oracle iReceivables Implementation Guide
Related TopicsResponsibilities Window, Oracle E-Business Suite Security Guide
Set Up Profiles, Rules, and System ParametersUse the Setup Checklist page to set up profile options, rules and system parameters for different functions of iReceivables.
User must have access to the iReceivables Setup responsibility to perform this setup step.
Important: In iReceivables Release 12, the rules set precedence over profile options. First the rules are checked for values and then the profile options are checked.
The Setup Checklist page gives access to the following setups:
• Profiles: Profile options can be set or updated easily from this page.
• Registration History: Self Registration details can be viewed and modified from thispage.
• Rules: Rules offer a high degree of flexibility in customizing the application behavior similar to e-mail rules. Rules can be set up and updated from this page.
• System Parameters: Various system options can be set from this page.
Set Up ProfilesTo set up profile options:
1. Click Go To Task to view profiles.
2. Select the profile option and click Go to display its properties.
3. Click Update to change the profile option details.
Set Up RulesTo set up rules:
1. Click Go To Task from the setup checklist page to view rules.
2. Two types of rules can be setup from this page; Global Rules Setup and Operating Unit Dependent Rules Setup.

Setting Up Oracle iReceivables 1-37
• For Global Rules Setup, set the Customer Verification Question rule, which is used as the verification question shown to the user in Validate Customer Accesspage during self registration. Click Setup Rules to set the verification rule.
• For Operating Unit Dependent Rules Setup, rules can be set for the following attributes. Select the organization and click Setup Rules to set any rule.
1. Site Verification Question rule, which is used as the verification question shown to the user in Verify Access page during self registration.
2. Service Charge Enabled rule, which is used to enable the iReceivables Service Charge feature.
3. Service Charge Activity ID rule, which is used to set the Receivables Activity identifier for the service charge transaction created while paying through iReceivables.
4. Multi Print Limit rule, which is used to set the maximum number of invoices for immediate printing from iReceivables.
5. Last Used Payment Instrument rule, which is used to configure iReceivables to remember previously used payment instruments.
6. Future Dated Payments rule, which is used to set the maximum limit (in days) for future dated ACH payments through iReceivables.
7. Discount Grace Days rule, which is used to set the grace days to determine if discount are eligible for payments through iReceivables.
8. Contact Information rule, which is used to configure contact information for iReceivables pages.
9. Aging Buckets rule, which is used to configure display of aging buckets on the home page.
Set Up System ParametersTo set up system parameters:
1. Click Go To Task to view system parameters.
2. Select the organization for which the system parameter has to be set.
Set the following parameters:
• Credit Card Receipt Method

1-38 Oracle iReceivables Implementation Guide
• Bank Account Payment Method
• Service Charge Activity
3. Click Update to change the system parameters details.
Registration History MaintenanceRegistration history data can be managed through this screen. The data is stored in the ARI_REG_VERIFICATIONS table.
To view and update registration history:
1. Using iReceivables Setup responsibility, navigate to the Setup Checklist page.
2. Click Go To Task on the Registration History row to view the Registration History Details page.
3. Enter the required fields and click Go.
Note: With blind search, the Date filter is defaulted and the search returns all registration performed in the last seven days.
4. Click Update to update the registration.
• Registration Type: Can be used to distinguish between new user and existing user.
• Status: Gives the status of registration.
• Update: Administrator can update the status. For example, if the external user on self registration fails the challenge questions three times, the registration is put on hold. The administrator can update this.
• The other fields are populated based on the customer chosen for registration.
Upon submission:
• Once the registration request is submitted, Administrator will not be able to modifythe Status of the Registration Request.
• UMX workflow is initiated for a new registration. Once the registration request is submitted, workflow link is enabled and Update button is disabled.
• For requests for additional access, the workflow is initiated if the profile option, OIR: Approval Required for Additional Access, is set to Yes. Click the workflow link available under Workflow Status column to view the workflow details.
Setting Up Oracle iReceivables 1-39
If the profile option is set to No, approval is not required and additional access is given.
Set Up for Anonymous User LoginThe iReceivables Anonymous User Login feature lets customers access customer account data without owning or registering for a user account. For example, this featurecan be used for bill collections to let users access account data to view and pay open invoices.
Anonymous users access their account data using the Anonymous Login page. The Anonymous Login page prompts the user for an account number, and then redirects to the set iReceivables page. The available pages for redirect are the Customer Search page, the Account Home page, the Account Details page, or an Anonymous Login Errorpage.
The Anonymous Login feature is contained in the jsp file AnonymousLogin.jsp. Use this jsp file to validate the guest user, create a session and redirect to the set iReceivablespage, and customize the number of parameters passed to the API. By default, the information entered by the user in the Account Number field on the Anonymous Login page is passed to the API.
The setup tasks for anonymous user login include:
• Update the anonymous login .htm files.
• Assign iReceivables 2.0 Anonymous Internal to the Guest User Password profile option.
• Modify the file AnonymousLogin.jsp, located in the OA_HTML directory, if migrated from Release 11i.
Caution: The iReceivables 2.0 Anonymous Internal responsibility by default has access to all the application features available to the registered user. Please carefully enable or disable the features accessibleto the anonymous user.
To set up iReceivables for anonymous user login:
1. Update the .htm files for the Anonymous Login page and the Anonymous Login Error page. The anonymous login .htm files are:/html/US/ARIANLGN.htm/html/US/ARIANERR.htm
To successfully access the anonymous login pages, modify these .htm files. To support multiple languages, copy these files, modify the alert in the logon_submit() function and any other language dependent attributes, and place the modified files in the appropriate directory structure. Place the modified static HTML pages in the
1-40 Oracle iReceivables Implementation Guide
directory:$OA_HTML/[country code]/
where: [country code] - Uppercase ISO 3166 2-letter code
2. In Oracle E-Business Suite, select the System Administrator responsibility.
3. If necessary, use function security to limit user access to functionality in the iReceivables Account Management responsibility. See: Define Function Security, page 1-34 for more information.
4. Assign the iReceivables anonymous login responsibility defined in step 3 to the pre-seeded guest user account.
1. Navigate to Security, then User, and select Define. The Users window opens.
2. In the User Name field, query the value of the guest user account.
3. Navigate to the Responsibilities tabbed region.
4. Add the iReceivables anonymous login responsibility defined above.
5. Modify the SQL code in AnonymousLogin.jsp.
Add any parameters needed as name-value pairs to the HashMap structure hParams, according to the following example:HashMap hParams = new HashMap();hParams.put("Ircustomerid",sCustId);
Here the code adds a parameter named IrcustomerId and its value sCustId to the hash table. An illustration is provided in the file for Customer Site ID.
The following table outlines the page-level semantics, and mandatory and optional parameters, for each iReceivables page.
Page Function Mandatory Parameters
Optional Parameters
Other Semantics
Customer Search
ARI_INTERNAL_PAGE
N/A N/A For internal users.
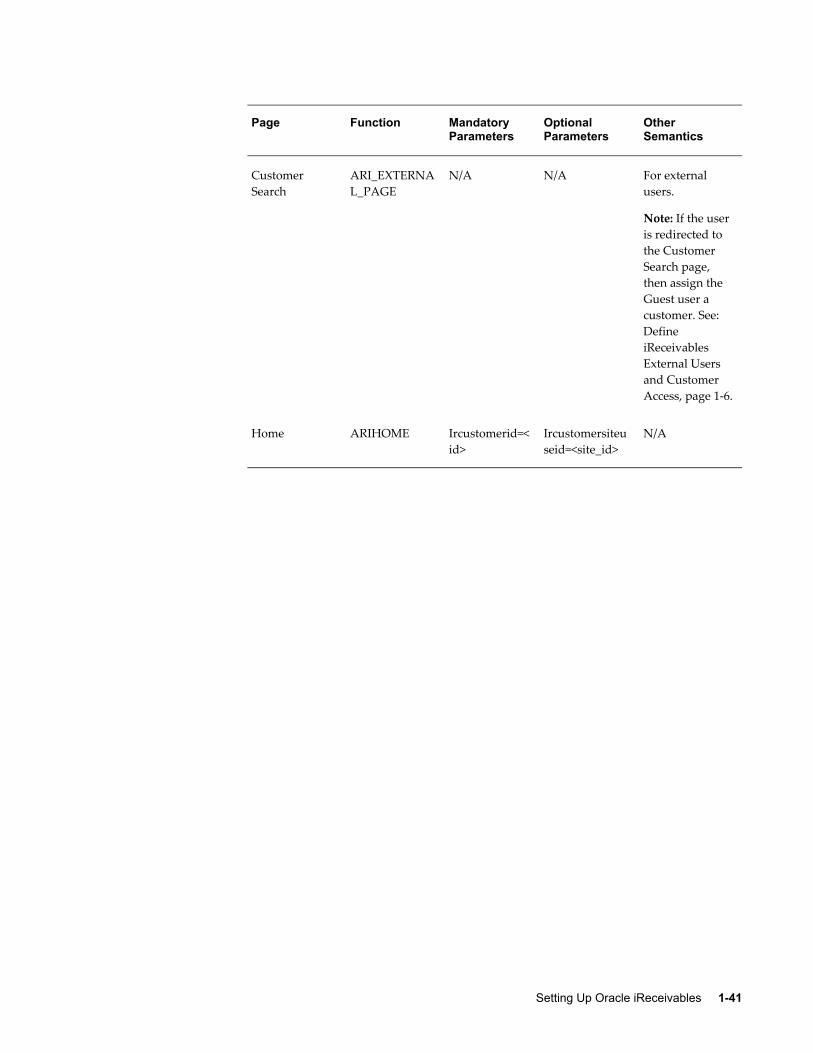
Setting Up Oracle iReceivables 1-41
Page Function Mandatory Parameters
Optional Parameters
Other Semantics
Customer Search
ARI_EXTERNAL_PAGE
N/A N/A For external users.
Note: If the user is redirected to the Customer Search page, then assign the Guest user a customer. See: Define iReceivables External Users and Customer Access, page 1-6.
Home ARIHOME Ircustomerid=<id>
Ircustomersiteuseid=<site_id>
N/A
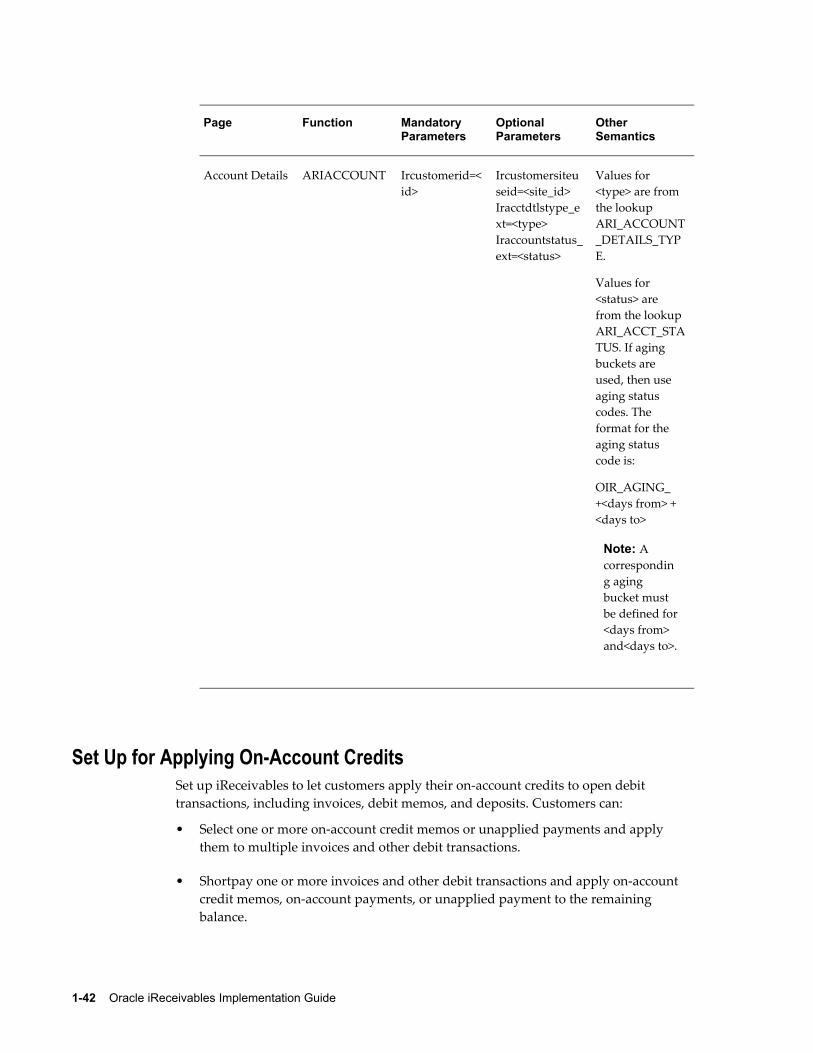
1-42 Oracle iReceivables Implementation Guide
Page Function Mandatory Parameters
Optional Parameters
Other Semantics
Account Details ARIACCOUNT Ircustomerid=<id>
Ircustomersiteuseid=<site_id> Iracctdtlstype_ext=<type> Iraccountstatus_ext=<status>
Values for <type> are from the lookup ARI_ACCOUNT_DETAILS_TYPE.
Values for <status> are from the lookup ARI_ACCT_STATUS. If aging buckets are used, then use aging status codes. The format for the aging status code is:
OIR_AGING_ +<days from> + <days to>
Note: A corresponding aging bucket must be defined for<days from> and<days to>.
Set Up for Applying On-Account CreditsSet up iReceivables to let customers apply their on-account credits to open debit transactions, including invoices, debit memos, and deposits. Customers can:
• Select one or more on-account credit memos or unapplied payments and apply them to multiple invoices and other debit transactions.
• Shortpay one or more invoices and other debit transactions and apply on-account credit memos, on-account payments, or unapplied payment to the remaining balance.
Setting Up Oracle iReceivables 1-43
Enabling on-account credits displays the Apply Credits button on the Account Details, Transaction List, Invoice, and On-Account Credit Memos pages. Choosing the Apply Credits button takes the user to the Apply Credits pages to select credits and debit transactions to apply.
For enabling on-account credit applications, set the OIR: Apply Credits profile option toYes. This enables the Apply Credits button and Apply Credits pages. To set up the profile option, see Set Up Profiles, page 1-36.
Note: System Administrator responsibility access is required to performthis setup step.
Related TopicsReceivables Activities, Oracle Receivables Implementation Guide
Oracle Receivables Profile Options, Oracle Receivables Implementation Guide
Review and Update Receivables LookupsUse the Lookups window to review and update Receivables lookup types for use with iReceivables. The lookup types are:
• CREDIT_MEMO_REASON
• ARI_CUSTOMER_SEARCH_TYPE
• ARI_INVOICE_SECTION
• AR_IREC_CREDIT_CARD_TYPES
• ARI_ACCOUNT_DETAILS_TYPE
• ARI_ACCT_STATUS
• ARI_CUSTOMER_HEADER_LABEL
For the lookup types CREDIT_MEMO_REASON and ARI_INVOICE_SECTION, reviewand update both seeded and user-defined lookup codes. For the lookup type AR_IREC_CREDIT_CARD_TYPES, update the seeded credit card types to be accepted for iReceivables payments.
Note: Users cannot modify the seeded lookups for the lookup types CREDIT_MEMO_REASON and AR_IREC_CREDIT_CARD_TYPES. Users cannot add new lookup codes for the lookup types ARI_INVOICE_SECTION and AR_IREC_CREDIT_CARD_TYPES.
1-44 Oracle iReceivables Implementation Guide
For the lookup type ARI_CUSTOMER_SEARCH_TYPE, review and update the seeded lookup codes that should appear on the Search By poplist on the Customer Search page.For extended customer search, define lookup codes for the new customer search attributes. Custom transaction search attributes that are defined are queried by the procedure search_custom_customer() in the file ARICNFGB.pls. See: Extending the iReceivables Search, page 3-5 for more information.
For the lookup types ARI_ACCOUNT_DETAILS_TYPE and ARI_ACCT_STATUS, review and update the seeded lookup codes that should appear on the Status and Transaction Type poplists on the Account Details page. For extended transaction search,define lookup codes for the new transaction search attributes. Custom transaction search attributes that are defined are queried by the procedure search_custom_trx() in the file ARICNFGB.pls. See: Extending the iReceivables Search, page 3-5 for more information.
The lookup type ARI_CUSTOMER_HEADER_LABEL is used to personalize header information shown in iReceivables. The following options are available:
• Operating Unit Name: Displays the Operating Unit
• Customer Name: Displays the Customer Name
• Customer Number: Displays the Customer Number
• Customer Site Name: Displays the Location of the Site
• Customer Site User ID - Displays the Site User Id
By default all these values are enabled and comes in the above mentioned order. If the Operating Unit has to be hidden, then disable Operating Unit Name option from the lookup. If order of options has to be changed, for example, Customer Number before Customer name, then set the Tag lower for Customer Number than Customer Name.
To update Receivables lookups for use with iReceivables1. Select the Receivables Manager responsibility.
2. Navigate to the Oracle Receivables Lookups window.
3. In the Type field, query the lookup type.
4. In the User Name field, enter the user name for the applicable lookup codes.
5. In the Application field, enter Oracle Receivables. The system displays the lookup codes.
6. To disable a lookup code, enter a date in the Effective Dates To field or deselect the Enabled box.
Setting Up Oracle iReceivables 1-45
7. For ARI_CUSTOMER_SEARCH_TYPE and CREDIT_MEMO_REASON, enter Y in the Tag field to make a code available to external users or N to make the code available to internal users only. Replace any null values in the Tag field with Y or N.
8. Enter any new lookup codes for ARI_CUSTOMER_SEARCH_TYPE and CREDIT_MEMO_REASON.
Related TopicsApplication Utilities Lookups and Oracle Application Object Library Lookups, Oracle E-Business Suite Developer's Guide
Defining Receivables Lookups, Oracle Receivables Implementation Guide
Set the Aging InformationUsers can set the aging information for iReceivables to view transactions across various age buckets. Customers can view aging buckets for their accounts in the Account Summary page. By clicking on an aging bucket balance number, the user can drill downto the Account Details page to review all the debit items in the aging bucket, including invoices, chargebacks, guarantees, deposits, debit memos, and credit memos. The Search list for transaction status in the Account Details page includes each of the active aging buckets as search criteria.
Setup Tasks Using RulesThe setup tasks for applying aging buckets if user is new to iReceivables are:
• Set the Aging Bucket rule for an operating unit and/or customer
See: Set Up Rules, page 1-36.
Setup Tasks Using Profile OptionsThe setup tasks for applying aging buckets are:
1. Set the OIR: Aging Buckets profile option to display aging information for iReceivables users.
Users can set this profile option at the site, responsibility, and user levels, accordingto the business practice. Users can display the standard aging buckets that Oracle Receivables provides, or the custom buckets that is defined in the Receivables Aging Buckets window. If all fields are left blank, then iReceivables does not display aging buckets.
To set the aging buckets profile option:
1. Select the System Administrator responsibility.

1-46 Oracle iReceivables Implementation Guide
2. Navigate to the System Profile Values window.
3. Set the OIR: Aging Buckets profile option at the site, responsibility, or user levelto display the preferred aging buckets.
Related TopicsOracle Receivables Profile Options, Oracle Receivables Implementation Guide
Aging Buckets and Interest Tiers, Oracle Receivables Implementation Guide
Set Up for Bill Presentment ArchitectureiReceivables integrates with Bill Presentment Architecture (BPA) to customize the content and format of billing data that customers view online. BPA lets users retrieve billing data from multiple data sources and template-based configuration of online bills,including content selection, layout design, drilldown and grouping capability, and billing template assignment. With BPA, the information on the bill is not limited to information contained within Oracle Receivables. By separating bill presentment from transaction accounting, Oracle BPA lets users configure and print invoices according to their company needs.
Perform the following setup steps to display and print invoices using the Bill Presentment Architecture in Oracle iReceivables:
• OIR: Bill Presentment Architecture Enabled profile option - Set the OIR: Bill Presentment Architecture Enabled profile option to display and print invoices in BPA format. This profile option can be set at the site, application, responsibility, anduser levels, according to business practices.
If all fields are left blank, then iReceivables displays invoices in the standard iReceivables format.
• OIR: Multi Print Limit profile option - Use the OIR: Multi Print Limit profile option to set a limit to the number of invoices printed immediately using the BPA Print program. If the user prints more invoices than the limit specified, then iReceivables uses the BPA Print concurrent program to print the invoices.
• Generate BPA Stylesheets - Run the Generate Stylesheet for BPA Templates concurrent program from BPA responsibility.
• Customize the print request messages - Users can customize the BPA print requestmessages according to requirements. The messages are:
• ARI_IMMEDIATE_PRINT_PROG_NAME - BPA Immediate Print program.
• ARI_PRINT_PROGRAM_NAME - BPA Print concurrent program.

Setting Up Oracle iReceivables 1-47
See: Editing iReceivables Messages, page 3-6.
Note: System Administrator responsibility access is required to performthis setup step.
For steps on setting up profile options, see: Set Up Profiles, Registration History, Rules, and System Parameters, page 1-36.
Related TopicsOverview of Bill Presentment Architecture, Oracle Bill Presentment Architecture User's Guide.
Print Management, Oracle Bill Presentment Architecture User's Guide.
Print Invoices Using AR Print ProgramThe profile option OIR: Bill Presentment Architecture Enabled can be used to select the print program used to print invoices. If the profile value is set to No, then iReceivables uses the AR Print program, Invoice Print Selected Invoices, to print the invoices. If the value is set to Yes or not set with any value, then iReceivables uses the BPA Print Program to print the invoices.
Modify the Display of Account InformationThe display of account information can be modified in the iReceivables Account Details and Transaction pages (including Invoice, Debit Memo, Deposit, and Payments) using Oracle E-Business Suite Personalization Framework. See: Oracle Application Framework Personalization Guide. By modifying the display of account information in the Account Details and Transactions pages, the regions and fields that external customers and one-time users have access to can be controlled.
In addition to displaying the customer's latest account activity, the Account Details page can also display transaction descriptive flexfields and the context field values defined for them, if these flexfields are enabled in the Receivables Transactions window. The flexfields are the Invoice Transaction flexfield and the Transaction Information flexfield. iReceivables stores flexfield information in the ARI_ACCOUNT_INVOICE table. Use the Descriptive Flexfield Segments window to enter context field values for the transaction flexfields.
The Invoice, Debit Memo, and Deposit pages can also display invoice line-level descriptive flexfields and the context field values defined for them, if these flexfields areenabled in the Receivables Transactions window. The flexfields are the Invoice Line Information flexfield and the Line Transaction flexfield. iReceivables stores flexfield information in the ARI_INVOICE_LINES table. Use the Descriptive Flexfield Segments window to enter context field values for the invoice line-level flexfields.

1-48 Oracle iReceivables Implementation Guide
The Payments page can also display the Receipt Information flexfield and the context field values defined for the flexfield in the Payment Row region. iReceivables can also display the Transaction Information and Invoice Transaction flexfields in the Payment Activities tables for the Account Details, Invoice, and Payment pages.
Administrator-level personalization changes can be made while logged in to iReceivables. Administrator-Level (Admin-level) personalizations apply to Function, Localization, Site, Organization, and Responsibility levels.
Controller Class RestrictionsSome restrictions may apply to personalization changes due to the controller class. A controller class is the code that controls how a page is rendered and how events are handled on the page. The restrictions are:
• Users cannot create new controller classes or modify existing controller classes. Anymodifications to controller classes are not supported.
• In some cases, the controller class for a given page may override the personalizationsettings.
To make Admin-level personalization changes to the Account Details page:
1. Set the Personalize Self-Service Defn profile option to Yes.
2. Log in to iReceivables and navigate to the Account Details page for the customer.
3. Click the available personalization link. These personalization links vary according to the search, but always appear in the Search region of the Account Details page, after the search results table.
To make Admin-level personalization changes to the Invoice page:
1. Set the Personalize Self-Service Defn profile option to Yes.
2. Log in to iReceivables and navigate to the Invoice page for the customer.
3. To display transaction header-level flexfields on the Invoice page, click the personalization link Personalize Invoice Terms Table. To display transaction line-level flexfields in the Invoice page, click the Personalize Invoice Lines Table personalization link.
To make Admin-level personalization changes to the Payments page:
1. Set the Personalize Self-Service Defn profile option to Yes.
2. Log in to iReceivables and navigate to the Payments page for the customer.
3. To display receipt flexfields in the Payments page, click the personalization link Personalize Payment Row. To display transaction line-level flexfields in the Payment

Setting Up Oracle iReceivables 1-49
page, click the personalization link Personalize Application Table.
Related TopicsPlanning and Defining Descriptive Flexfields, Oracle E-Business Suite Flexfields Guide
Creating Admin–Level Personalizations, OA Framework Personalization and Extensibility Guide
Transaction Flexfields, Oracle Receivables User Guide
Custom Hooks for Payment, Dispute, and PrintCustom hooks can be enabled for Payment, Dispute, and Print options from the Account Details page and the Transaction details page. If the user wants custom conditions to be passed before making payments, dispute, or print, these custom procedures can be set up.
Setting Up Profile OptionsThe profile options used are OIR: Custom Validate Payment, OIR: Custom Validate Dispute, and OIR: Custom Validate Print. Set the Custom PackageName.Procedure name (which contains the business logic whether to allow Payment, Dispute, or Print) as the profile value for the above profiles.
ExampleIf the custom procedures are in the package ARI_DEF_CUSTOM_HOOKS_PVT and theprocedures for validating Payment is VALIDATE_PAYMENT, Dispute is VALIDATE_DISPUTE and Print is VALIDATE_PRINT, then set the values of the profiles as follows at the appropriate level:
• OIR: Custom Validate Payment: ARI_DEF_CUSTOM_HOOKS_PVT.VALIDATE_PAYMENT
• OIR: Custom Validate Payment: ARI_DEF_CUSTOM_HOOKS_PVT.VALIDATE_DISPUTE
• OIR: Custom Validate Print: ARI_DEF_CUSTOM_HOOKS_PVT. VALIDATE_PRINT
The profile values can be set at either Site Level/Application Level/Responsibility Level/User Level. If they are not set, then by default the validations are returned as Success. For information on how to set up profile options, see: Set Up Profiles, Registration History, Rules, and System Parameters, page 1-36.
Important: The seeded package ARI_DEF_HOOKS_PVT returns validations as success. This package can be used as a reference. Do not
1-50 Oracle iReceivables Implementation Guide
modify this package. Define the custom package as required.
Custom Procedure SignaturesCustom procedures should follow their pre-defined signatures and should have six parameters. These parameter values are passed from the iReceivables application to the custom procedures.
Note: The signature is the same for payments, dispute and print, except for the procedure name.
Custom procedure for allowing Payment should have the following signature:procedure VALIDATE_PAYMENT(p_cust_account_id IN NUMBER,p_cust_site_use_id IN NUMBER,p_session_id IN NUMBER,p_payment_schedule_id IN NUMBER,x_return_status OUT NOCOPY VARCHAR2,x_msg_data OUT NOCOPY VARCHAR2);
For dispute and print, the signature is similar, with PAYMENT replaced with DISPUTE and PRINT respectively. The procedure should return status as either S (Success) or E (Error) and if it returns an Error, then the error message in x_msg_data procedure, is shown in Account Details and Transaction List pages.
Integrate iReceivables into Your Business ProcessesFind ways to integrate iReceivables into your business processes. Some examples of integrating iReceivables into your business include:
• Make sure your printed Collections and Receivables documents reference the URL that customers use to access your iReceivables web site.
• Make sure your voice messages reference your iReceivables web site.
• Have your collectors mention your iReceivables web site when speaking with customers.
• Advertise the iReceivables web site internally so that Sales, Collections, and Customer Service personnel start to use the application regularly.
Setting Up for Credit Memo Request Workflow 2-1
2Setting Up for Credit Memo Request
Workflow
This chapter covers the following topics:
• Setting Up Oracle Receivables for Credit Memo Request Workflow
• Define Credit Memo Approval Limits for Approvers
• Update Transaction Types
• Define a Credit Memo Transaction Batch Source
• Set Up Credit Memo Request Workflow
Setting Up Oracle Receivables for Credit Memo Request WorkflowThe Credit Memo Request Workflow routes credit memo requests from your customers to the appropriate personnel in your organization. Complete the setup steps in this section for Oracle Receivables and then proceed to the set up tasks for Credit Memo Request Workflow in Oracle Workflow.
Use this checklist to complete the appropriate setup steps in the correct order.
Setup Tasks for Credit Memo Request Workflow
Setup Tasks for Credit Memo Request Workflow
Step Number
Step Description Required or Optional
1 Define Credit Memo Approval Limits for Approvers. See: Define Credit Memo Approval Limits for Approvers,page 2-2.
Required

2-2 Oracle iReceivables Implementation Guide
Step Number
Step Description Required or Optional
2 Define a Credit Memo Transaction Batch Source. See: Define a Credit Memo Transaction Batch Source, page 2-3.
Required
3 Update Transaction Types. See: Update Transaction Types, page 2-3.
Required
4 Set Up Credit Memo Request Workflow. See: Set Up Credit Memo Request Workflow, page 2-4
Required
Define Credit Memo Approval Limits for ApproversUse the Approval Limits window to define credit memo approval limits for primary and non-primary approvers in your company. The Primary Approval subprocess routesa credit memo request for approval to the approver marked as Primary. The HR Management Approval subprocess routes requests to non-primary approvers accordingto the management hierarchy defined in your company.
To define credit memo approval limits for approvers:
1. Select the Receivables Manager responsibility.
2. Navigate to Setup, then Transactions. Select Approval Limits. The Approval Limits window opens.
3. In the User Name field, enter the first approver for defining approval limits.
4. In the Document Type field, select Credit Memo from the LOV.
5. In the Currency field, enter a currency code.
6. In the From Amount and To Amount fields, enter the minimum and maximum approval amounts in this currency for this user.
7. If this approver is the primary approver for this range, check the Primary box.
8. Save your work.
9. Repeat steps 3 to 8 for each approver.
Note: Add Receivable Role responsibility to the approver user. Without
Setting Up for Credit Memo Request Workflow 2-3
this responsibility, notifications will not be sent to the approver.
Related TopicsApproval Limits, Oracle Receivables Implementation Guide
Update Transaction TypesUse the Transaction Types window to define a Credit Memo Type for invoice, debit memo, and commitment transaction types. When a credit memo request is approved, the new credit memo uses the Credit Memo Type defined for the disputed transaction.
Note: If the invoices calculate tax, the credit memos assigned to them must also calculate tax. For this, ensure that the invoice transaction typeand the credit memo transaction type both have the Tax Calculation box checked. If necessary, set up a separate transaction type that does not calculate tax for the On Account credit memos.
To update transaction types for iReceivables:
1. Select the Receivables Manager responsibility.
2. Navigate to Setup and select Transactions. Select Transaction Types. The Transaction Types window opens.
3. Query or enter the first transaction type to update.
4. In the Credit Memo Type field, enter the credit memo type to use when crediting items with this transaction type.
5. Repeat steps 3 and 4 for each transaction type.
Related TopicsTransaction Types, Oracle Receivables Implementation Guide
Define a Credit Memo Transaction Batch SourceUse the Transaction Sources window to define a credit memo transaction batch source. The Credit Memo Request process uses the credit memo transaction batch source to create credit memos.
To define a credit memo transaction batch source:

2-4 Oracle iReceivables Implementation Guide
1. Select the Receivables Manager responsibility.
2. Navigate to Setup, then Transactions. Select Sources. The Transaction Sources window opens.
3. In the Name field, enter a name that identifies this batch source as a credit memo transaction batch source for iReceivables.
4. In the Type field, select Manual.
5. Check either the Automatic Transaction Numbering box or the Copy Document Number to Transaction Number box.
Related TopicsTransaction Batch Sources, Oracle Receivables Implementation Guide
Set Up Credit Memo Request WorkflowAfter setting up Oracle Receivables for Credit Memo Request Workflow, set up Oracle Workflow to specify which users will receive approval requests.
Refer to the following documentation to complete the setup of Credit Memo Request Workflow.
Related TopicsSetting Up the AME Credit Memo Request Workflow, Oracle Receivables User Guide
Setting Up Oracle Workflow, Oracle Workflow Administrator's Guide

Configuring Oracle iReceivables 3-1
3Configuring Oracle iReceivables
This chapter covers the following topics:
• Configuring iReceivables
• Modifying the Account Summary Page Information Section
• Modifying the Account Summary Page Discount Alerts and Dispute Statuses Section
• Customizing the Dispute Pages
• Configuring the Contact Us Global Button Email Address
• Extending the iReceivables Search
• Editing iReceivables Messages
• Custom Templates for Statement Downloads
• Purge Process
Configuring iReceivablesiReceivables includes the configuration package ARI_CONFIG, written in PL/SQL. The ARI_CONFIG configuration package can be used to modify attributes in iReceivables without having to make changes to any other part of the code. ARI_CONFIG contains in two files the variables and functions for this configurable component. The two files are ARICNFGS.pls (package specification) and ARICNFGB.pls (package body).
The ARICNFGS.pls package specification contains variables referenced in the ARICNFGB.pls package body. Functions and procedures in the package body are referenced elsewhere in the iReceivables code.
Users can modify these components using the ARI_CONFIG configuration package:
• Account Summary page information section
• Account Summary page discount alerts and dispute statuses section

3-2 Oracle iReceivables Implementation Guide
• iReceivables transaction search and customer search
Note: The other iReceivables components previously configurable using ARI_CONFIG are now managed by the tech stack. See: Configuring and Troubleshooting Oracle HTTP Server with Oracle E-Business Suite for more information.
Users can also:
• Customize the Dispute pages.
• Edit iReceivables messages using the Oracle Application Object Library.
Modifying the Account Summary Page Information SectionA company can provide its customers with access to additional information on the Account Summary home page, such as news, FAQs, and policy statements. The right side of the Account Summary page is devoted to displaying additional information.
When the Account Summary page is rendered, a call is made to the procedure ari_config.get_homepage_customization. This procedure returns the HTML code that isrendered in the information section.
The procedure get_homepage_customization takes the following parameters:
• user id
• customer id
• customer site use id
• encrypted customer id
• encrypted site use id
• language
With these parameters, users can create dynamic content, such as marketing messages and personalized account information.
For more information about the get_homepage_customization parameters, see the documentation included in ARICNFGB.pls.
Modifying the Account Summary Page Discount Alerts and Dispute Statuses Section
A company can configure the display of discount alerts and dispute statuses for each
Configuring Oracle iReceivables 3-3
customer or external user.
By default, the left side of the Account Summary page, below the customer's account summary, displays discount alerts and the status of open disputes for the accessing customer. If a customer does not have invoices eligible for discount or does not have open dispute requests, iReceivables either displays the messages "No Discounts" or "No Credit Requests" or, if preferred, iReceivables does not display this section at all.
Users can control the display of discount alerts and dispute statuses using the customization functions in the ARI_CONFIG package. Both functions operate in the same manner:
• The function returns a RENDER flag, indicating whether or not to render the region(Y or N).
• The function returns override HTML to replace the actual table.
If the function returns Y for the RENDER flag, iReceivables displays the current data or displays the messages "No Discounts" or "No Credit Requests" if there is no data. If the procedure returns N for the RENDER flag, the region is not displayed.
Depending on the customer or on the business needs, users can also replace the default messages with custom messages or information display.
Customizing the Dispute PagesUsers can customize iReceivables Dispute pages according to requirements. The following customizations can be performed:
• Create customized messages for the Enter Dispute Details page and the Review Credit Request page.
• Personalize the Invoice Summary table to display invoice flexfields and attachments.
• Personalize the Invoice Lines region of the Enter Dispute Details page and the Review Credit Request page to display the invoice line flexfield.
• Personalize the Invoice Lines region of the Enter Dispute Details page to display a Search region to search by invoice line attributes, when there is a large number of invoice lines.
Creating Customized MessagesAdd customized messages to the Message Dictionary for the Enter Dispute Details pageand the Review Credit Request page. Messages can be created based on the lookup types CREDIT_MEMO_REASON and ARI_INVOICE_SECTION in these formats:
• Enter Dispute Details page - ARI_DD_<CREDIT_MEMO_REASON lookup code>

3-4 Oracle iReceivables Implementation Guide
• Enter Dispute Details page: Invoice section - ARI_DD_<ARI_INVOICE_SECTION lookup code>
• Review Credit Request page - ARI_DR_<CREDIT_MEMO_REASON lookup code>
• Review Credit Request page: Invoice section - ARI_DR_<ARI_INVOICE_SECTION lookup code>
Note: The Enter Dispute Details page displays the default message when no customized message is defined.
See: Editing iReceivables Messages, page 3-6.
ExampleThis example provides custom messages for the dispute reason code DAMAGED_GOODS.
Define a message called ARI_DD_DAMAGED_GOODS that reads: "Please attach a digital image of the damaged goods." When the user selects this dispute reason, the Dispute Details page displays this additional instruction message. Along with the message, users can also personalize the Dispute Details page to enable attachments.
If this kind of dispute will take longer to process, define an additional message called ARI_DR_DAMAGED_GOODS that reads: "We will process your dispute within the next 7 business days. If you do not receive a response within this time frame, please email us quoting the request ID."
Configuring the Contact Us Global Button Email AddressThe Contact Us global button on the tool bar is a "mail-to" (HTML) link. When the user clicks the Contact Us global button, the user's email package opens with a new outgoingmessage pre-addressed to the contact person in the To field.
Setup TasksThe setup tasks for personalizing the email information if new to iReceivables are:
• Enable Contact Information rule
• Create a new rule as required giving values for the following parameters:
• Customer
• Customer Site Use
• Language String
Configuring Oracle iReceivables 3-5
• Page
• If the rule is not set, then the contact information is taken from WEB_HTML_CALL attribute of the ARICONTACTUS function.
To set up rules, see: Set Up Rules, page 1-36.
Related TopicsForm Functions Window, Oracle E-Business Suite Security Guide
Extending the iReceivables SearchUsers can extend the iReceivables transaction search and iReceivables customer search to include additional search attributes according to business practices. Transaction search is extended by providing additional transaction search attributes in the Status and Transaction Type lists on the Account Details page. Customer search is extended byproviding additional customer search attributes in the Search By list on the Customer Search page.
Custom code for custom search attributes is provided using the following procedures inthe ARICNFGB.pls file:
• search_custom_trx for the custom transaction search.
• search_custom_customer for the custom customer search.
These procedures are called by the client Java code whenever users initiate a search using the additional custom search attributes.
To extend the iReceivables search:
• Use the Lookups window to define look up codes for custom transaction or customer search attributes. See: Review and Update Receivables Lookups, page 1-43.
• Use the Messages window to define error messages that refer to validations on the input parameters.
• Write the code for the custom search attributes defined.
Related TopicsMessage Window, Oracle E-Business Suite Developer's Guide

3-6 Oracle iReceivables Implementation Guide
Editing iReceivables MessagesUse the Messages window in the Oracle Application Object Library to edit iReceivables messages according to the needs. All iReceivables messages use the prefix "ARI" or "OIR" in the message name.
Warning: Do not perform either of these actions while editing iReceivables messages:
• Do not insert returns. Inserting returns into HTML-based messages can cause a fatal system error.
• Do not modify text strings that contain an ampersand (&). These text strings are parameters that iReceivables replaces with actual values. For example, the text strings &trx_type and &salesperson represent the transaction type and salesperson name respectively. iReceivables cannot display these messages correctly if these strings are modified.
Before editing iReceivables messages, make a copy of the Message Dictionary runtime message file and store it in a directory protected from upgrades. The Message Dictionary runtime message file is located in the directory:
$AR_TOP/mesg/<language>
Note: System Administrator and Application Developer responsibilitiesaccess is required to perform this task.
Related TopicsImplementing Message Dictionary, Oracle E-Business Suite Developer's Guide
Custom Templates for Statement DownloadsUsers can customize the Statement Download templates present in the Accounts Summary page as per requirement. The Statement Download option launches a report based on the template selected.
Custom Template without Data TemplatePerform the following steps to customize:
1. Select the customer and navigate to the Account Summary page.
2. Select the Account tab. The Template LOV lists all available templates.
Configuring Oracle iReceivables 3-7
3. Select the template to be customized from the LOV. Click Export. This launches the report. Ensure that this is the correct report that needs to be customized. Note the template name.
4. Navigate to the Home page. Select XML Publisher Administrator responsibility. Click Home and select Templates. This launches the Templates Search page.
5. In the Name field, type the name of the template to be customized. Click Go.
Important: Note the data definition used by the template. If creating a new template, use the same data definition to view the template created as LOV in Account Details page.
6. From the search results, select the link for the template. This launches the View Template page.
7. The template file is available under the File Name section. Select the Download option and save the template locally.
8. Open the downloaded template. The data fields in the template are grayed out.
Important: The first column will always have F prefixed to the text. This indicates that from this point onwards, the data is to be repeated for each row. Each row will end with a column name that is suffixed with E. When new columns are added, ensure that the first column is prefixed with F.
9. Select a data field, right click, and select Properties. Click the Add Help Text button.This launches the Form Field Help Text window. The text box shows the data source for this template. Note this down. See How to Identify Available View Objects (VO) Attributes, page 3-8 to identify the attributes that can be used to this template.
10. Save this template under a new name using the Save As option under File. Open the saved file and make the required modifications to the template.
ExampleCopy and paste an already grayed out field and modify its properties. Right-click the field and select Properties. In the Text Form Field Options window, in the Default Text field, provide the new attribute name. Select the Add Help Text button. This launches the Form Field Help Text window. Modify the value in the text box to the exact attribute required in the customized report. Please note that this field is case-sensitive.
Be sure to start the first column with F as prefix and end the last column with E as suffix. The attributes for these should be the same as the one given in the VO

3-8 Oracle iReceivables Implementation Guide
attributes list, for the data to loop against a given header context. Save the final template with the RTF file format.
11. Navigate to XML Publisher Administrator and select Templates. The Templates Search page opens.
12. Click Create Template to upload the new customized template. Give the new Template Name and Code. Under Applications, select the appropriate application, for example, iReceivables. In the Data Definition, use the Search option and select the correct data definition for the new template. Use the Browse button to select the saved version of the new customized template. Select the Type as RTF. Click Apply.After successful upload, the file can be found under Localized Templates on the View Template page.
13. Navigate to iReceivables responsibility. The Account Details page will have the newtemplate as part of the Templates listed.
How to Identify Available View Objects (VO) AttributesPerform the following steps to identify available VO attributes that can be added in the template:
1. Navigate to the Home page and select iReceivables Internal User responsibility. Select the customer and navigate to the Account Summary page. Click Account to navigate to the Account Details page. Click the About this Page link. The About Page: Account Summary page opens.
2. Expand the Business Component References Details section to see the View Objects list.
3. Click AllDebTrxTableVO link. . It shows the attributes of the VO. These attribute can be used in the Templates above, Custom Template without Data Template, page 3-6.
Note: Header information in the templates comes up from the VO, CustomerInformationVO.
Custom Template With Data TemplatePerform the following steps:
1. Select the customer and navigate to the Account Summary page.
2. Under the Statement Download section, the Template LOV lists the available templates for statement downloads. Select the template to be customized from the LOV. Click the Download button. This launches the report. Ensure that this is the
Configuring Oracle iReceivables 3-9
correct report that needs to be customized. Note the template name.
3. Navigate to the Home page. Select XML Publisher Administrator responsibility. Click Home and select Templates. This launches the Templates Search page.
4. In the Name field, type the name of the template to be customized. Click Go.
5. From the search results, select the link for the template. This launches the View Template page.
6. The template file is available under the File Name section. Select the Download option and save the template locally.
Important: Note the data definition used by the template. If creating a new template, use the same data definition to view the template created as LOV in Account Summary page.
7. Open the downloaded template. The data fields in the template are grayed out.
Important: The first column will always have F prefixed to the text. This indicates that from this point onwards, the data is to be repeated for each row. Each row will end with a column name that is suffixed with E. When new columns are added, ensure that the first column is prefixed with F.
8. Right- click a grayed out field and select Properties. In the properties window, click the Add on Help Text button. The Form Field Help Text window opens. Note the data source for the template.
9. In the application, navigate to Home and select the XML Publisher Administrator responsibility. Under Home, select Data Definitions to open the Data Definitions page.
10. In the Name field, enter the data definition noted from the template, for example, iReceivables Customers Statement Data Definition, and click Go.
11. From the search results, select the correct data definition. The View page opens.
12. Select the Data Template file (xml file format) under Files to download and save thedata template.
13. Make the required changes to the data template to get the required values (through queries) for the customized report. See Tags Present in the Data Template, page 3-10 for some of the tags used in the data template.
3-10 Oracle iReceivables Implementation Guide
14. Select the Update file button to upload the modified data template.
15. Now, open the previously saved template file (step 6). Select File, click Save As. Give a new name and save the file.
16. Open the newly saved template and make the required modifications.
Copy and paste an already grayed out field and modify its properties. Right-click the field and select Properties. In the Text Form Field Options window, in the Default Text field, provide the new attribute name. Select the Add Help Text button. This launches the Form Field Help Text window. Modify the value in the text box to the exact attribute required in the customized report. Please note that this field is case-sensitive.
Be sure to start the first column with F as prefix and end the last column with E as suffix. The attributes for these should be the same as the one given in the VO attributes list, for the data to loop against a given header context. Save the final template with the RTF file format.
17. Navigate to XML Publisher Administrator responsibility and select Templates. Click the Create Template button.
18. Give a new Template Name and Code, as desired. Under Applications, select the appropriate application, for example, iReceivables.
19. In the Data Definition field, search for and select the correct data definition, for example, iReceivables Customers Statement Data Definition.
20. Under Template File section, click Browse. Select the customized template.
21. Select the Type as RTF from the LOV. Click Apply.
22. After successful upload, the file can be found under Localized Templates in the View Template page.
23. Navigate to the Account Summary page for the customer. The Template LOV underStatement Download will have the new customized template.
Tags Present in the Data TemplateThe following are some of the tags present in a data template:
• dataTemplate: This is the starting tag defining the data template. The name attribute is used as the starting/parent tag of the output xml. For example, CustomerStatement. So, the output of this data template would be enclosed between <CustomerStatement> and </CustomerStatement>.
• properties: There are many properties which define the outcome of the data

Configuring Oracle iReceivables 3-11
template. Some of the properties used are:
• xml_tag_case: The value for this is as_are. This defines that the elements mentioned in the dataStructure needs to be in the same case in the output of this template. By default, if this property is not set, the element names are converted to upper case.
• include_rowsettag: The value for this is either true or false. The default value istrue. This can be used if the sqlStatement might return multiple rows. When set to true, the output xml includes a row set tag with the name LIST_<group namementioned>, for example, <LIST_Customers>. If this property is set to false this tag is not included in the output.
• dataQuery: All the queries defined in the template must be enclosed in this tag. This can contain one or more sqlStatement tags with queries defined.
• sqlStatement: This tag holds a single sql query, which can be either a select statement or procedure call. This has an attribute name which is used in the group tag in source attribute. The query may contain bind parameters. The bind parameters are passed by iReceivables code. The parameters passed are created as tags in the output xml.
• dataStructure: This tag holds one or more groups based on the number of sqlStatement in the dataQuery tag.
• group: This tag contains the elements defined in the group. The group tag has two attributes, name and source. The name attribute is used as the tag in the output xml and source attribute is where the sqlStatement name is defined. A group is always formed based on a source which is either a query or a procedure.
• element: The element tag defines the name of the element which is seen in the output xml. The element tag has two attributes, name and value. The name attributegives the name which is displayed in the output xml and the value tag gives the value from the query which is defined in the source of the group.
Purge ProcessTo purge the print records and user session details records from OIR tables, run the following two concurrent programs.
Purge User Session Data:
System Administrator can run the concurrent program Purge AR_IREC_PURGE_USER_ACCT_SITES Table to purge user session data from the AR_IREC_USER_ACCT_SITES_ALL table.
• It is recommended to schedule this request to run daily.
3-12 Oracle iReceivables Implementation Guide
• Input parameter is the purge date. If provided, all records up to the purge date are deleted from the table. If it is not provided, then all records which are one day olderthan the system date are deleted.
• This CP is present in the request group OIR Request Group All, which is assigned to iReceivables Internal User (ARI_INTERNAL).
Purge Print Requests:
System Administrator can run the concurrent program Purge AR_IREC_PRINT_REQUESTS Table to purge the AR_IREC_PRINT_REQUESTS table, which is populated when the customer gives a print request.
• Can be scheduled based on customer need.
• The CP takes current date as the default parameter. If the date parameter is not provided, the table is purged automatically, matching the FND_CONCURRENT_REQUESTS dates.
• This CP is present in the request group OIR Request Group All, which is assigned to iReceivables Internal User (ARI_INTERNAL).

Features of Oracle iReceivables A-1
AFeatures of Oracle iReceivables
Overview of Oracle iReceivablesOracle iReceivables is an Internet-based, self-service application that both your customers and employees can use to access Receivables data. iReceivables provides personalized, secure access to online information using a standard web browser.
iReceivables reduces the cost structure of billing and collections by enabling customers to perform extensive inquiries, dispute bills, pay invoices, and review current account balances, all online. Companies reduce processing time and improve customer service by automating the traditional, manual bill dispute process. With Oracle iReceivables, bill disputes are automatically routed and processed, eliminating the need for intermediaries or paper-based claims management.
Your collectors, salespersons, and customer service representatives can use iReceivables, for example, to review customer accounts, note recent trends, and keep apprised of recent activities. Your customers can use iReceivables to view their account information, print transactions, pay an invoice, dispute an invoice, view the current status of disputes, and contact Receivables personnel with questions or comments.
Oracle iReceivables is part of Oracle's suite of Self-Service Web Applications, and uses the same system architecture and security features as the other applications. This ensures that data is accessible only to the users defined. Whenever your customers use iReceivables, they must provide a user name and password to view Receivables data. Use function security to limit user access to certain functionality, including disputes andinvoice payments.
Major FeaturesMajor features of iReceivables include:
• User Interface
• Customer Search
A-2 Oracle iReceivables Implementation Guide
• Configurable Account Summary Home Page
• Account Details Page
• Online Aging
• Interactive Invoice
• Payment by Credit Card
• Payment by Bank Account Transfer
• Multiple Customer Access
• External User Self Registration
• Dispute a Bill
• Credit Memo Request Workflow
• Credit Memo Request Display
• Multi Print
• Multi Pay
User InterfaceThe user interface enhances the user experience, providing a rich array of functionality and high performance. For example, the configurable Account Summary home page offers one-click access to most of the tasks to be performed in iReceivables. Hint messages alert the user to special conditions or specific actions that must take place. In addition, IT professionals can configure every iReceivables page to avoid burdening users with unnecessary fields or information, thereby presenting only the most relevant details to each user.
Customer SearchiReceivables provides internal users, such as sales representatives, collections agents and upper management, a customer search engine based on the Oracle database full text indexing. This technology allows an internal user to search for customer account information by transaction number or by using any of these customer data elements: customer name, customer number, tax registration number, contact name, contact phone number, contact fax number, and customer location. A multi-record display of search results allows drill-down to view account details for a customer or customer bill-to site.

Features of Oracle iReceivables A-3
Note: If searching for a customer by contact phone number or fax number, include wildcard "%" or "*" in the search string after typing thenumber. This is a system restriction.
External users with access to multiple customers or multiple sites of a single customer can search for account information by customer name or transaction number.
The search criteria can be customized according to business needs with the custom customer search. Use this to add your own custom search-by attributes for your iReceivables customers and customer sites. These custom attributes can then be used to search for customer accounts in the Customer Search page.
In the Customer Search page, Contact Us link picks the value from the following settings. If the MO: Default Operating Unit is set for the Site, App, Resp, or User, then for that Operating Unit if the Contact Information rule is set, it displays the value specified in the rule in the Customer Search Page. If no rule is set, then it picks the WEB_HTML_CALL value from the function ARICONTACTUS.
Configurable Account Summary Home PageThe Account Summary page is the iReceivables home page, the first page that customers and all external users see. It displays customer transaction balances, discountalerts, and information on dispute statuses. Customers can also download account statements. This page also contains a configurable information section that the deploying company can customize to provide users with additional information, such as news, FAQs, and policy statements.
Account Details PageThe Account Details page displays the customer's latest account activity. Users can viewand sort data from invoices, debit memos, credit memos, deposits, guarantees, chargebacks, and payments as well as all the transactions in Oracle Receivables. Customers can download invoice statements using the Export option. The search engineon the Account Details page provides users with the following capabilities:
• Web-style transaction search based on transaction numbers, amounts, dates, or related documents such as order number or PO number.
• Category, currency, and transaction status search to fine tune the inquiry.
• Advanced Search that lets users display transactions that match specific selection criteria based on date range, due-date range, or amount range. For example, a customer or employee can display all transactions for Superior Plumbing Co. with outstanding amounts ranging from $100 to $10,000 and with due dates between 01-JAN-1999 and 01-FEB-1999.
• Users can search transactions for a single organization or for multiple organizations

A-4 Oracle iReceivables Implementation Guide
within a single search operation.
• Multiple Transactions can be searched using any of the following formats:
• Enter the transaction numbers separated by comma.
• Enter each transaction number in a new line.
• Enter the transaction number with wild card characters * (asterisk) or % (percent sign) to search transactions that contain certain characters. For example, 10* or 10% retrieves 1001, 1002, and so on.
Users can also customize the search criteria according to business needs with the custom transaction search:
• Use the custom transaction search to add your own custom search-by attributes for iReceivables transactions. All customers can use these custom attributes to search for transactions in the Account Details page. For example, a shipping company can allow its users to search by bill of lading number, or a real estate company can allow its users to search by property address.
Online AgingThe Online Aging feature allows iReceivables external users to view the same aging information as collectors in the Receivables Collections workbench. If aging is enabled, the aging buckets appear on the customer's home page alongside the customer's account balance information. The Account Details page also supports searching by aging status. For example, the user can search for all invoices that are "1-30 Days Past Due". This functionality in the Account Details page lets the user drill down to the transactions that make up an aging bucket total.
iReceivables can be configured to use any of the aging bucket styles defined in Oracle Receivables at site, responsibility, and user levels.
Interactive InvoiceOracle iReceivables displays invoices in a format that closely resembles a printed invoice, with a real-time Balance Due. Users can display Receivables invoice-specific and invoice line-specific flexfields in the Invoice page. Users can toggle between invoicelines and invoice activities, including adjustments, payments, credits, charges and disputes. Full drill-down capabilities point to related transactions such as payments andcredits.
• Use the Pay button to make a full or partial payment by credit card or bank account transfer.
• Use the Dispute button to dispute a bill online. The dispute request automatically
Features of Oracle iReceivables A-5
triggers the Credit Memo Workflow process, routing the request for internal approval.
• Use the Apply Credits button to apply on-account credits to open debit transactions, including invoices, debit memos, and deposits.
• Use the Printable Page button to optimize the invoice presentation for printing on paper.
• Export data in comma delimited format.
Payment by Credit CardUsers can make both full and partial payment of their invoices by credit card. Once the user sets up a default credit card, iReceivables displays the Quick Payment page where the user can simply click Pay Now to pay a bill. iReceivables also offers an Advanced Payment page to change the default payment method, enter new credit card information, or make a partial payment. To protect against fraudulent card-not-present transactions, the user can also be prompted to enter the card security code, or the cardholder billing address, or both, as additional means of verification.
iReceivables supports external processing of credit card payments through Oracle Payments.
Payment by Bank Account TransferUsers can make both full and partial payments of their invoices by bank account transfer. Once the user sets up a default bank account, iReceivables displays the Quick Payment page where the user can simply click Pay Now to pay a bill. iReceivables also offers an Advanced Payment page to change the default payment method, enter new bank account information, or make a partial payment. Users can also schedule their bank account transfers for a future date.
iReceivables supports external processing of US-only bank account transfer payments through Oracle Payments and the Automated Clearing House (ACH) network. iReceivables also supports external processing of both US-only and non-US bank account transfer payments.
Multiple Customer AccessThe deploying company can provide its external users with access to multiple customers, or multiple customer sites, or both. A user with access to multiple customers, or multiple sites of a single customer, can use search criteria to access account information for these customers and customer sites.
A-6 Oracle iReceivables Implementation Guide
External User Self RegistrationiReceivables Support External user registration in a Single Sign On (SSO) and a non-SSO environment from iReceivables Portal page, which can be accessed through http://machinename:portnumber/OA_HTML/IrecVisitor.jsp. Users can add a Register Here link to the customer portal so that external customers (Business to Business or Business to Consumer users) can self register for iReceivables Account Management application access to their customer account data. The Self Registration feature uses the Challenge-Response Model. In this model, the user is asked a question pertaining to the customer account to which the user is requesting access. This lets iReceivables verify theuser's access privileges.
See: Set Up for Self Registration, page 1-10 for more information on the self registration process.
Dispute a BillCustomers can dispute all or part of an open invoice by choosing the Dispute button in the Invoice page or Activities page. Choosing the Dispute button lets the customer enterthe following information about the dispute:
• Reason for the dispute.
• Numerical amount, amount percentage to dispute, or dispute the Entire Remaining Amount, which is the entire remaining amount available for dispute.
The maximum amount allowed for dispute per invoice is the (Invoice Original Amount – Existing Dispute Amount) of the invoice, where Original Amount is the amount of the invoice section selected, and Existing Dispute Amount is (Total Pending Dispute Amount + Approved Dispute Amount).
ExampleInvoice Original Amount = 1000Already approved dispute amount = 100Already pending dispute amount = 200Existing Dispute Amount = Approved Dispute Amount + Pending Dispute AmountExisting Dispute Amount = 100 + 200 = 300Amount allowed for dispute (current dispute amount) = Invoice Original Amount - Exisiting Dispute AmountAmount allowed for dispute (current dispute amount) = 1000 - (100 + 200) = 700
Important: (Existing Dispute Amount + Current Dispute Amount) should be <= Original Invoice Amount
• Any comments
Once the user submits the dispute, the system creates a credit memo request.

Features of Oracle iReceivables A-7
Users can control access to the Dispute Invoice function via function security. The access to the Dispute Invoice function can be allowed or denied for both customers and internal users. If customer access is denied to the Dispute Invoice function, internal users, such as sales or customer service representatives, can still enter a dispute on the customer's behalf.
Note: While creating a new dispute for a single transaction, users can see both canceled and approved disputes, if any.
Multiple Transactions DisputeUsing iReceivables, users can dispute multiple transactions at once. Multiple transactions dispute can be performed from Account Details page and Transaction List page.
• One dispute per transaction is created.
• All the disputes carry the same comments.
• Dispute can be created at Total, Subtotal, Freight and Tax levels.
• Dispute can be created using Percent or Amount (absolute).
The maximum amount allowed for dispute per invoice is the (Invoice Original Amount – Existing Dispute Amount) of the invoice, where Original Amount is the amount of the invoice section selected, and Existing Dispute Amount is (Total Pending Dispute Amount + Approved Dispute Amount).
ExampleInvoice Original Amount = 1000Already approved dispute amount = 100Already pending dispute amount = 200Existing Dispute Amount = Approved Dispute Amount + Pending Dispute AmountExisting Dispute Amount = 100 + 200 = 300Amount allowed for dispute (current dispute amount) = Invoice Original Amount - Exisiting Dispute AmountAmount allowed for dispute (current dispute amount) = 1000 - (100 + 200) = 700
Important: (Existing Dispute Amount + Current Dispute Amount) should be <= Original Invoice Amount
• The existing dispute amount per each invoice can be seen in the transaction details table.
• In the Dispute Review page, Dispute Amount per Invoice and Total Dispute Amount can be seen.
A-8 Oracle iReceivables Implementation Guide
• Once the dispute is submitted, all the successful disputes are shown in a table with the transaction number and the dispute request number.
• Unsuccessful disputes are shown in another table with the transaction numbers andthe reason for failure.
Credit Memo Request WorkflowAfter submitting a credit memo request, the Credit Memo Request Workflow routes therequest to the appropriate personnel in your company for approval. If the request is approved, Oracle Receivables automatically creates a credit memo for the disputed amount and notifies the customer either via email or a Workflow web notification. The workflow also notifies customers when their requests are rejected.
Credit Memo Request DisplayThe Credit Memo Request display in the Account Summary and Account Details pages summarizes each request and displays the real-time status of the workflow process. Users can review the details of their credit memo requests and the current status of eachrequest.

Profile Options B-1
BProfile Options
Profile Options for Oracle iReceivablesThis section lists all the profile options available for Oracle iReceivables. See: Set Up Profiles, page 1-36 to set up the profile options.
• OIR: Account Grouping
This profile option enables the Account Grouping option. For more information, seeGrouping of Accounts, page 1-18.
• OIR: Active Contacts Display Limit
Use this profile option to specify the number of active contacts to be displayed on the Account Summary page.
• OIR: Aging Buckets
Use this profile option to specify the Oracle Receivables aging buckets to be used for Oracle iReceivables. For more information, see: Set the Aging Information, page 1-45.
• OIR: Allow Zero Payment Amount (When Dispute and Discount Amount >= Total Remaining Amount)
Use this profile option to allow zero amount payments in iReceivables, when the total of Dispute and Discount Amount is greater than, or equal to the Total Remaining Amount.
• OIR: Apply Credits
Use this profile option to enable credit memo application functionality for iReceivables. For more informations, see: Set Up for Applying On-Account Credits, page 1-42.
B-2 Oracle iReceivables Implementation Guide
• OIR: BPA Template Selection
Use this profile option to choose the BPA Template for print and print preview.
• OIR: Bank Account Payment Method
Use this profile option to choose the bank account payment method to be used by iReceivables while making payments.
• OIR: Bank Directory Source
Use this profile option to select the source from which bank details are picked. For more information, see: Set Up for ACH Bank Account Transfer Payments, page 1-31.
• OIR: Bill Presentment Architecture Enabled
This profile option enables BPA in iReceivables. For more information, see: Set Up for Bill Presentment Architecture, page 1-46.
• OIR: Credit Card Payment Method
Use this profile option to select the bank account payment method used by iReceivables while making payments.
• OIR: Custom Validate Dispute
Use this profile option to specify the custom Package.procedure for validating a transaction for allowing Dispute. For more information, see: Custom Hooks for Payment, Dispute, and Print, page 1-49.
• OIR: Custom Validate Payment
Use this profile option to specify the custom Package.procedure for validating a transaction for allowing Payment. For more information, see: Custom Hooks for Payment, Dispute, and Print, page 1-49.
• OIR: Custom Validate Print
Use this profile option to specify the custom Package.procedure for validating a transaction for allowing Print. For more information, see: Custom Hooks for Payment, Dispute, and Print, page 1-49.
• OIR: Default Attachment Category
Use this profile option to select the default attachment category to be used while attaching documents from iReceivables.
• OIR: Default currency code
Use this profile option to enable the default currency for iReceivables.

Profile Options B-3
• OIR: Enable Discount Grace Days
Use this profile option to enable the inclusion of grace days in discount period during payment through iReceivables. For more information, see: Set the Grace Period for Discounts, page 1-30.
• OIR: Enable Service Charge
Use this profile option to enable service charge during payment through iReceivables. For more information, see: Define Service Charges, page 1-27.
• OIR: Enable User Level Access Of Credit Cards
Use this profile option to enable user level access of credit cards in iReceivables. Select Yes to assign selected credit cards to selected users for a customer. The card isheld for only the selected user. If disabled (No) all users are able to view and use all credit cards for the customer.
• OIR: Filter Do not Print Transactions
If this profile option is enabled, filters do not print transaction type transactions from iReceivables.
• OIR: Filter Transactions Days older than
Use this profile option to filter transactions that are older than given value.
• OIR: Hide Account Sites
Use this profile option to hide account sites when user is attached with a single customer.
• OIR: Maximum Future Payment Days Allowed
Use this profile option to set the number of days for future payment, from current date of validity, in iReceivables. For more information, see: Maximum Future Payment Days Allowed, page 1-24.
• OIR: Minimum Characters for Search
Use this profile option to specify the minimum characters to be entered while searching for customers. For more information, see: Minimum Characters for Search, page 1-9.
• OIR: Multi Print Limit
Use this profile option to specify the limit for maximum invoices to be printed using the BPA Immediate Print. For more information, see: Set Up for Bill Presentment Architecture, page 1-46.
• OIR: Payment Approver Status
B-4 Oracle iReceivables Implementation Guide
Use this profile option to enable invoice approval feature within iReceivables.
• OIR: Registration Hold Domain
Use this profile option to determine whether a particular user or all users of the customer account are prevented from re-registering when a user fails registration. For more information, see: Registration History, page 1-38.
• OIR: Registration Hold Duration
Use this profile option to set the number of days that a particular user or all users ofthe customer account are prevented from re-registration. For more information, see:Registration History, page 1-38.
• OIR: Save Payment Instrument Information
Use this profile option to enable saving of payment instrument information during payment through iReceivables. If set to No, one-time credit card payment is enabled. For more information, see: Credit Card One-Time Payment, page 1-21.
• OIR: Search Default Customer Name and Number
Use this profile option to enable Customer Search based on customer name and customer number for iReceivables.
• OIR: Search Default Exclude Contacts
Use this profile option to enable Customer Search on excluding contacts for iReceivables.
• OIR: Self Registration Redirect URL
Use this profile option to provide the URL used during the bookmarked registration process if the user clicks cancel. For more information, see: Redirect SelfRegistration Page, page 1-13.
• OIR: Service Charge Activity Id
Use this profile option to enable the Service Charge Activity Id to be used during payments in iReceivables. For more information, see: Define Service Charges, page 1-27.
• OIR: Skip Quick Payment
Use this profile option to determine whether to skip Quick Payment page or not.
• OIR: Skip Routing Number Validation
Use this profile option to skip routing number validation during bank account payments.
• OIR: Verify Credit Card Details

Profile Options B-5
Use this profile option to verify credit card details during payment in iReceivables. For more information, see: Additional Credit Card Verification, page 1-21.
