optimum training manual training notes 2012.pdf · optimum training notes please make sure that...
TRANSCRIPT

OPTIMUM TRAINING MANUAL

OPTIMUM TRAINING NOTES Please make sure that your practice is registered to use the Optimum website. This website allows you to:
VALIDATE MEMBERSHIP CONFIRM BENEFITS CAPTURE CLAIMS REJECTIONS VIEW CLAIM LISTING AND RESUBMISSIONS VALIDATE-IT CREDIT NOTES VIEW REMITTANCES RECEIVE PPN NEWS/UPDATES OPTIMUM SUPPORT
1. HOW TO REGISTER: Contact Denise Johnson at PPN on 041-506 5938 or request one of the agents at the PPN call centre on 086 0103 529 or 086 1101 477 to fax the registration form to your practice. Once you are registered as a user, you can LOGIN to the website: http://optimum.ppn.co.za

2. HOW TO LOG IN: Enter the Practice Number, Username and Password and then CLICK on “Proceed” ***NB: PLEASE READ THROUGH THE INFORMATION ON THE LOGIN PAGE WHICH WILL LIST THE MEDICAL AIDS THAT CAN NOT BE CAPTURED ON OPTIMUM.
THE FOLLOWING HOME PAGE WILL BE DISPLAYED – INCLUDING LINKS TO RECENT NEWS, HELP & TRAINING:

3. PPN NOTIFICATIONS Should there be any new PPN Notifications; a pop up box will appear. Click CONFIRM once you have read the notification and it will not pop up again. Click IGNORE if you wish not to read immediately but would like to read the next time you log in.
4. HOW TO VALIDATE A MEMBER CLICK ON MEMBERSHIP VALIDATION TO EITHER VALIDATE A MEMBER OR TO CONFIRM BENEFITS:
After completion; click on ‘SEARCH’ to VALIDATE the MEMBERSHIP NUMBER. The next screen should automatically be displayed. If NOT, and the screen is not responding, the incorrect information was supplied and the membership is NOT VALIDATED as example below, phone the PPN call centre on 086 0103 529 for assistance.
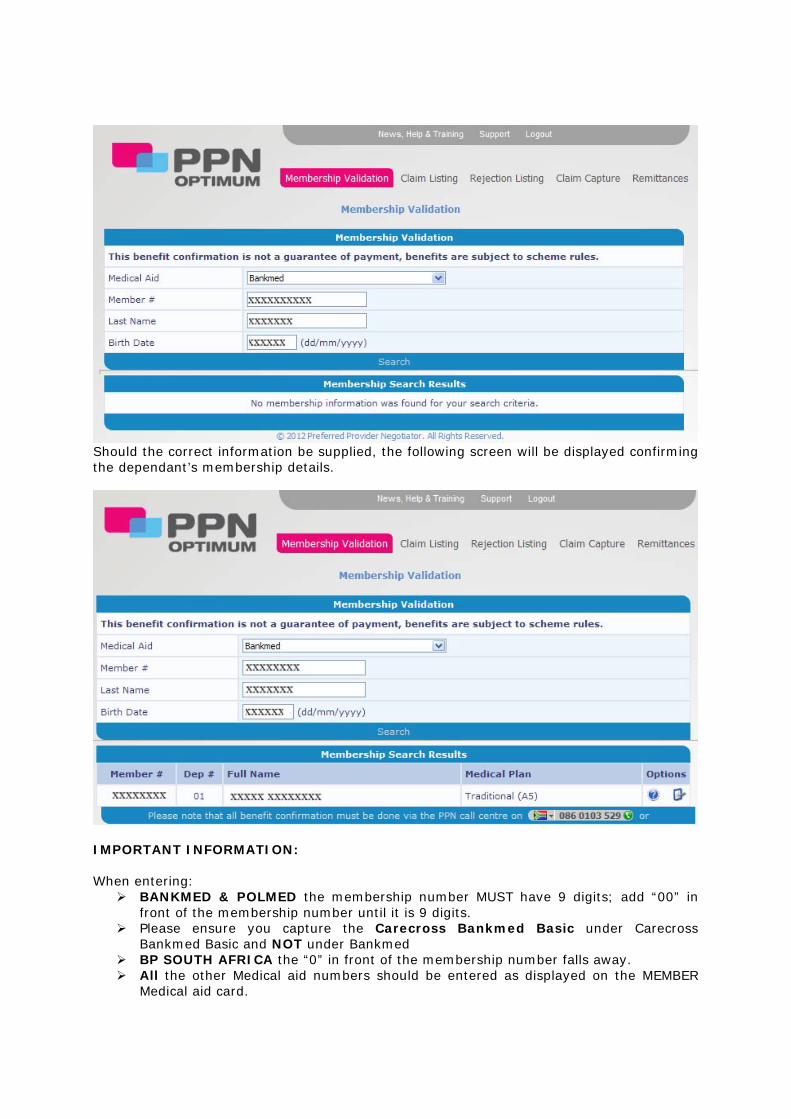
Should the correct information be supplied, the following screen will be displayed confirming the dependant’s membership details.
IMPORTANT INFORMATION: When entering:
BANKMED & POLMED the membership number MUST have 9 digits; add “00” in front of the membership number until it is 9 digits.
Please ensure you capture the Carecross Bankmed Basic under Carecross Bankmed Basic and NOT under Bankmed
BP SOUTH AFRICA the “0” in front of the membership number falls away. All the other Medical aid numbers should be entered as displayed on the MEMBER
Medical aid card.

5. HOW TO CONFIRM BENEFITS: Once the Membership has been validated, you can click on the AVAILABLE BENEFIT ICON, allocated under options on the right hand side of the page to confirm the benefits available. When the line item displays “(No Benefit available)”, then the member has used his benefit entitlement within his current benefit cycle and he has no benefits available at that point in time. The dates on which the member will be in benefit again will be displayed at the bottom of the page as per the below screenshot reflects:

Should the member have available benefits it will be displayed as in the screen shot below:
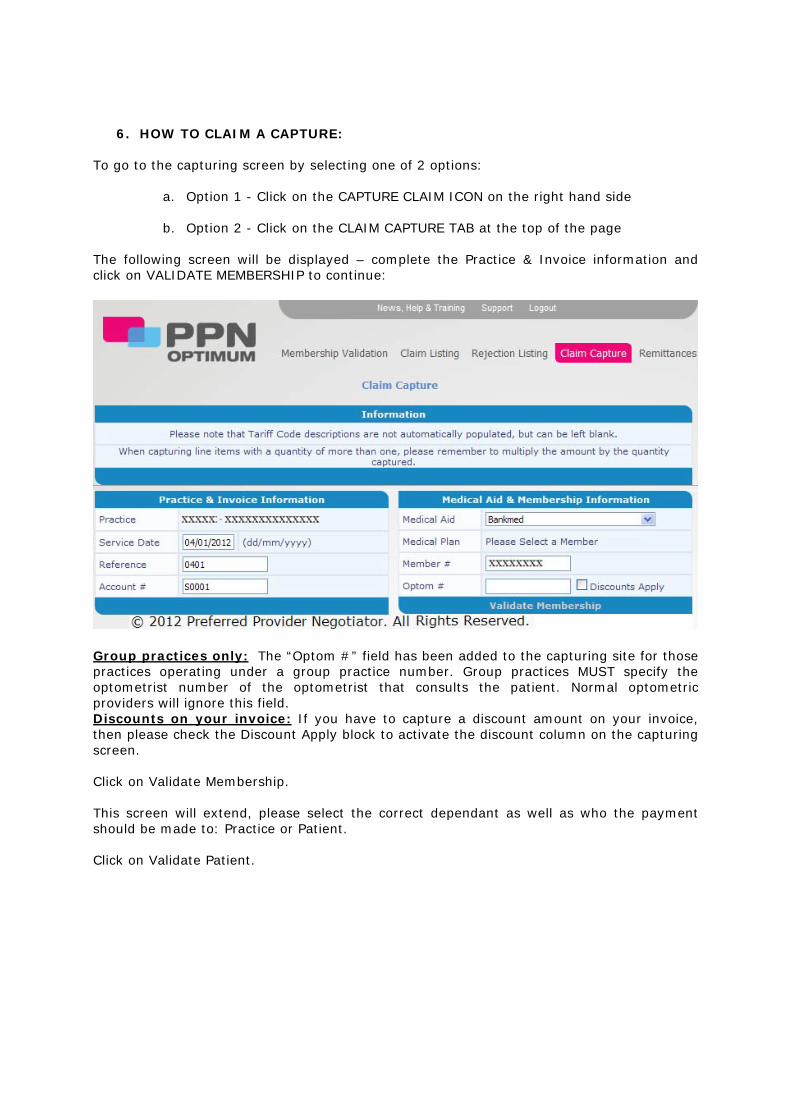
6. HOW TO CLAIM A CAPTURE:
To go to the capturing screen by selecting one of 2 options:
a. Option 1 - Click on the CAPTURE CLAIM ICON on the right hand side b. Option 2 - Click on the CLAIM CAPTURE TAB at the top of the page
The following screen will be displayed – complete the Practice & Invoice information and click on VALIDATE MEMBERSHIP to continue:
Group practices only: The “Optom #” field has been added to the capturing site for those practices operating under a group practice number. Group practices MUST specify the optometrist number of the optometrist that consults the patient. Normal optometric providers will ignore this field. Discounts on your invoice: If you have to capture a discount amount on your invoice, then please check the Discount Apply block to activate the discount column on the capturing screen. Click on Validate Membership. This screen will extend, please select the correct dependant as well as who the payment should be made to: Practice or Patient. Click on Validate Patient.

Once you have clicked on Validate patient you will enter the Line Item Information:

Please ensure that you have ticked both tick boxes before clicking on the Submit icon. The claim will not be submitted should these tick boxes be left unchecked. Remember to invoice the following:
1. Correct tariff structure PPN1/2 2. ICD 10 information 3. Correct pricing as per the tariff structure 4. Script, VA, Visual Fields, IOP, NVS tag and Lab information
Important script validations
Sphere – can be either Plus (+) or Minus (-) Cyl – ALWAYS Minus (-) , can never be Plus (+) Axis – between 1 and 180, can be a decimal (e.g.: 7.5) Add – ALWAYS Plus (+), can never be Minus (-) Prism – can be a decimal (e.g.: 1.5) Base – should be alpha characters V/A – must be either a fraction (6/6) or a decimal (1.00)
cannot be a single digit only (e.g.: 1 or 6) IOP – cannot be a fraction (6/6), but it can be a decimal (e.g.: 8.5) Visual Fields – can never be 0 or a slash only (/), a dash (-), a hash (#)
or a comma (,) Example: Full / Normal / Compromised / NAD / WNL
150/80, 155/85 Script examples: When capturing the script, only complete the fields that are supplied
1. If the lens prescription is plano - capture 0.00 only under the Sphere and leave the remaining fields BLANK
2. If the lens prescription is +1.00 - capture +1.00 under the Sphere and leave the
remaining fields BLANK (never capture the cyl or axis as 0.00 or 0)
3. If there is no reading add – capture only the prescribed information and leave the reaming fields BLANK
4. If there is a cyl script, then the AXIS must be captured and vice versa
Ready Made Readers: Should a patient claim for Ready-Made readers as well as either spectacles, or contact lenses, please advise the member that the spectacles / contact lenses will be processed for payment by the Medical Scheme and the ready-made readers will form part of their co-payment.

Lab Information: Lab Name – select the lab from the drop down box - if selecting lab 131 (Other), please specify the lab details in the notes
facility on the capturing screen Order Number – supply the order number used to order the lenses from the lab. The lab name and order number option will only become available when a patient is dispensed with either bifocal or multifocal lenses. Please ensure that when entering the lab that you select the correct lab and that you have confirmed with your lab that they are ACCREDITED with PPN.
PPN Frames: When invoicing for the PPN Frame, please invoice it under code 70406 at a value of R150.00 to ensure that you qualify for the replacement frame and rebate offering.
7. HOW TO ACTION AUTOMATIC REJECTIONS
Once you have submitted the claim, it will automatically give you the rejection codes should the information be insufficient or incorrectly entered next to each line that has been rejected as shown below:

The rejection reasons per rejection code will be displayed at the top of the same page:
You can then correct the invoice/capturing lines and click SUBMIT for the account to be processed again. If the account gets accepted, you will be given a reference number:

8. HOW TO VIEW THE CLAIM LISTING AND RESUBMISSIONS:
Click on CLAIM LISTING at the top of the page to make sure that the claim has been loaded or to view the actual claim detail. Complete the search detail for a more specific search:
Click on the question mark icon on the right-hand side of the page to view the full detail.

9. HOW TO MANAGE RESUBMISSIONS OF “BATCHED – REJECTED” ACCOUNTS
When an account has been rejected on “CLAIM LISTING” with the following Status “Batched – Rejected”, you can resubmit the amended account directly on Optimum.
The amended claim must be recaptured on the Optimum system.
10. HOW TO ACTION A CREDIT NOTE Should a practice need to process a credit note after incorrectly capturing a claim OR due to a member canceling their spectacles OR the member changed their minds about the products they selected, then Click on the Claim Listing icon and proceeds to search for the applicable claim. Only claims that have a positive value and are in the “Batched – Accepted” status may be credited on Optimum. Please note:
a) Credit notes can only be processed on Optimum for Capitated Medical Schemes (PPN 1 tariffs).
b) Credit notes for Fee for Service Schemes (PPN 2 tariffs), as well as Bankmed CAN NOT be processed on Optimum. These requests should be submitted directly to PPN via either contacting out PPN call centre on 086 0103 529 or via email to [email protected]
In Claim Listing search for the claim that requires reversal, then click ‘C’ icon on the right hand side of the page.

Firstly the claim details will appear and once the practice has confirmed that this is the correct claim to be reversed, they can continue and click on “Credit Claim”.
Once they have clicked on “Credit Claim”, the practice will then have to enter a descriptive note as to why the claim needs to be credited. Click “Submit Credit Note”

The system will supply them with a reference number for their Credit request.

11. HOW TO VIEW ACCOUNTS BY “STATUS”: To view your accounts by “Status”, go to “Transaction Type”, click on the drop-down list, and select the option that you would like your accounts to be listed by e.g. “Accepted” or “Rejected”. Go to “Captured Date” and complete the date range you want to view.
Click on “Search” and a listing of all claims matching the criteria entered will be supplied. Should you wish to view the detailed claim, click on the question mark icon.

12. VALIDATE-IT (corrections and resubmissions) To view a listing of accounts that have been identified for Validation, go to Claim Listing, click on the drop down list, and select “Non-Validate_IT Claims”. Go to “Captured Date” and complete the date range that you want to view. Click on “Search” and it will bring up the listing of all claims for that period that are not validated.
Click on “Search” and a listing of all claims matching the criteria entered will be supplied. Should you wish to view the detailed claim, click on the question mark icon. To view the claim and confirm or correct the lab information supplied, click on the question mark icon. It will open the claim beneath the listing and allow you to update any incorrect Lab information that has been supplied. Once you have entered the correct data, click on the “Update” icon. All claims where the information has been updated / corrected will be processed for Validation.
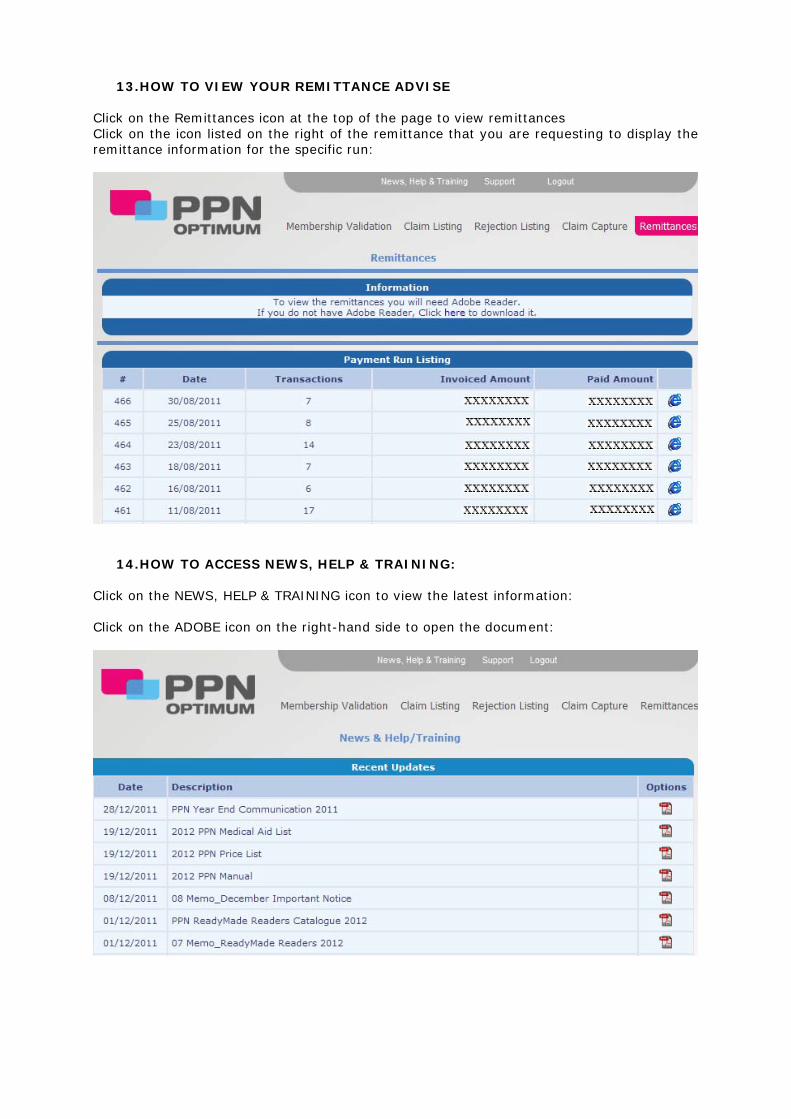
13. HOW TO VIEW YOUR REMITTANCE ADVISE
Click on the Remittances icon at the top of the page to view remittances Click on the icon listed on the right of the remittance that you are requesting to display the remittance information for the specific run:
14. HOW TO ACCESS NEWS, HELP & TRAINING:
Click on the NEWS, HELP & TRAINING icon to view the latest information: Click on the ADOBE icon on the right-hand side to open the document:

15. SHOULD YOU REQUIRE ANY OPTIMUM SUPPORT
This is a support tool designed to assist practices when they come across any problems on the website. Click on “Support”, and type a brief description of your query, and click “Submit”. An automatic e-mail is generated to the Support Group, which will reply via e-mail to the practice OR by contacting your practice directly for more information.
Please ensure that your e-mail address is updated at all times – if it changes, please inform Denise Johnson in our membership department via email on [email protected]
16. HOW TO LOG OUT
Keep your USERNAME and PASSWORD safe and make sure that you logout when you are not at your PC by simply clicking on the logout icon at the top of the page. PPN can track which user captured a claim on the system. Should any discrepancies occur or a fraudulent claim needs to be tracked back to a specific user, that user will be held responsible for such an account. SHOULD YOU HAVE ANY DIFFICULTY USING THIS SYSTEM, DO NOT HESITATE TO CONTACT THE PPN CALL CENTRE ON 086 0103 529 OR 086 1101 477