opie billing user guide - opedge.com · opie billing user guide -5- support: (800) 876-7740, option...
TRANSCRIPT

OPIE BILLING
USER GUIDE

OPIE Billing User Guide
www.opiehelp.com -2- Support: (800) 876-7740, option 3
Table of Contents Billing & Collections ................................................................................................................................................................ 5
Create a Claim ..................................................................................................................................................................... 5
Get Started in Billing – Add a New User to OPIE Billing ...................................................................................................... 5
Log into Billing and Use Batches ......................................................................................................................................... 6
Create a New Batch ......................................................................................................................................................... 6
Print a Batch Report and Close a Batch .......................................................................................................................... 7
Get Started in Billing - Set up Global Settings in Billing ...................................................................................................... 7
General Settings .............................................................................................................................................................. 8
Patient Statements & Invoices ...................................................................................................................................... 14
Statement Notes ........................................................................................................................................................... 16
Clean & Repair............................................................................................................................................................... 17
User Permissions ........................................................................................................................................................... 18
Task List ......................................................................................................................................................................... 20
1500 Form ..................................................................................................................................................................... 21
EDI ................................................................................................................................................................................. 22
Getting Started in Billing – Setting up Existing Insurance Companies .............................................................................. 23
Insurance Company – Contact Info ............................................................................................................................... 23
Insurance Company – Additional Options .................................................................................................................... 24
Insurance Company – 1500 Form ................................................................................................................................. 27
Insurance Company – Practitioner PIN Information ..................................................................................................... 28
Insurance Company – Invoices ...................................................................................................................................... 29
Insurance Company – Attachments .............................................................................................................................. 30
Claims – Find a Claim ........................................................................................................................................................ 31
Find a Claim Using Claims by Patient ............................................................................................................................ 31
Finding a Claim - What the OPIE Billing icons mean ..................................................................................................... 33
Find a Claim – Using the Task List ................................................................................................................................. 36
Understanding the Tabs on a Claim .................................................................................................................................. 36
Patient Tab on a Claim .................................................................................................................................................. 38
Primary Insurance Tab on a Claim ................................................................................................................................ 39
Secondary Insurance Tab on a Claim ............................................................................................................................ 42

OPIE Billing User Guide
www.opiehelp.com -3- Support: (800) 876-7740, option 3
Referring Physician/Other Tab on a Claim .................................................................................................................... 43
Codes Tab on a Claim .................................................................................................................................................... 44
Submissions Tab on a Claim .......................................................................................................................................... 52
Submit a Claim .............................................................................................................................................................. 53
Task Items Tab on a Claim ............................................................................................................................................. 57
Notes Tab on a Claim .................................................................................................................................................... 60
Attachments Tab on a Claim ......................................................................................................................................... 61
Validation Tab on a Claim ............................................................................................................................................. 62
The Payment History ..................................................................................................................................................... 64
The Transaction History ................................................................................................................................................ 66
Other Claims .................................................................................................................................................................. 67
Payments ........................................................................................................................................................................... 67
Patient Payments .......................................................................................................................................................... 68
Insurance Payments ...................................................................................................................................................... 74
Adjustments ...................................................................................................................................................................... 87
Adjust a Claim on Which a Payment Has Not Been Made and Applied........................................................................ 87
Create an Opie Billing Adjustment ................................................................................................................................ 87
Processing Insurance Take-Backs ...................................................................................................................................... 90
Refunds (On Unapplied Payments) ................................................................................................................................... 92
Refunds (on Overpaid Claims)........................................................................................................................................... 92
OPIE Balancing .................................................................................................................................................................. 99
Working with Batch Reports ......................................................................................................................................... 99
Balancing the Activity Report to the AR Aging Report ................................................................................................ 101
Posting Monthly Totals ............................................................................................................................................... 102
Posting Totals by Branch ............................................................................................................................................. 102
Running the Activity Report by Branch ....................................................................................................................... 102
Unapplied Payment by Branch .................................................................................................................................... 102
Other Key Opie Financial Reports ............................................................................................................................... 103
Important Notes about Permissions and Corrections/Deletions-Data Modification Log........................................... 104
Month-End Process ......................................................................................................................................................... 104
Step 1: Verify ALL billing batches are closed ............................................................................................................... 104

OPIE Billing User Guide
www.opiehelp.com -4- Support: (800) 876-7740, option 3
Step 2: Generate the Activity Report .......................................................................................................................... 105
Step 3: Generate the A/R Aging Report ...................................................................................................................... 106
Step 4: Generate the Sales Report [Charges Billed (by Date Billed)] .......................................................................... 108
Step 5: Generate the Payments Report ...................................................................................................................... 110
Step 6: Unapplied Payments – Balancing to the AR Aging Report .............................................................................. 111
Step 7: Generate Adjustments Report ........................................................................................................................ 113
Reports ............................................................................................................................................................................ 114
Activity Reports ........................................................................................................................................................... 114
AR Aging Report .......................................................................................................................................................... 115
Data Modification Log ................................................................................................................................................. 116
Patient Statements ......................................................................................................................................................... 117
Appendix A - TIPS ............................................................................................................................................................ 120
Correct New Payment Created Twice in Error; Payment Not Yet Applied ................................................................. 120
Moving Patient Overpayment from One Claim to Another ........................................................................................ 120
How to Correct LCodes or Quantities on Claims in OPIE Billing ................................................................................. 121
Preview a HCFA/1500 Form ........................................................................................................................................ 122
Add Modifiers .............................................................................................................................................................. 122
1500 form doesn’t line up on print ............................................................................................................................. 122
Billing claim shows incorrect default fee schedule ..................................................................................................... 123
How to modify an incorrect branch or location on a claim: ....................................................................................... 123
Delete a Claim ............................................................................................................................................................. 124
How can I get my Taxonomy Code to Print on the HCFA 1500 Form? ....................................................................... 124
Remove a Claim from Queued Claims: ....................................................................................................................... 127
Fix a Claim that has Different Dates of Service on the LCode Lines Shown on the Codes Tab ................................... 127
Task Items ....................................................................................................................................................................... 128
OPIE Billing Task Lists and Items ................................................................................................................................. 128
Statements ...................................................................................................................................................................... 134
Eliminate the Detail of L-Codes and Fees on Patient's Statement ............................................................................. 134
Billable Event ............................................................................................................................................................... 134
Show Prices/Fees ........................................................................................................................................................ 135

OPIE Billing User Guide
www.opiehelp.com -5- Support: (800) 876-7740, option 3
Billing & Collections Note: As you go through this manual and view OPIE Billing screens you will often see a question mark in an orange circle
(see image below). This will link you directly to the associated content in the online OPIE Billing User Guide.
Create a Claim
The practitioner must select a series of LCodes which will be used and billed as part of the creation of the patient’s
device. When this LCode selection is created in OPIE and Sent to Admin, it creates the initial claim in OPIE Billing and a
Task Item (the OPIE Billing’s Task List serves as the claim’s status indicator and tickler file). This initial task item will have
the Task description “Authorize/Preauthorize.” At this point, whoever is responsible for verifying and authorizing
insurance information will ensure all documentation required to correctly bill the claim when it is delivered is obtained.
The biller will open the claim and verify that the LCodes, modifiers, charges and allowables, etc. look correct.
The second critical pre-billing step occurs when the practitioner creates a Delivery Receipt in OPIE which the patient
must sign. This is created at delivery of the patient’s device. Once that form is saved and Sent to Bill a new Task Item is
created with the description “Bill Claim.” At this point the Biller can do a final review of the claim and then submit it to
the payer for payment.
Get Started in Billing – Add a New User to OPIE Billing
This process will begin in OPIE and then move to OPIE Billing.
This first step must be done by the OPIE Administrator. Open OPIE and go to Admin Tools. Add the user by going to
Users, Add User and type in the new User’s Name, Password and set all permissions you want them to have in OPIE.
Also include the permission for OPIE Billing. Save and Close.
1. The next step must be done by the OPIE Administrator who must also have been given access to OPIE Billing. 2. Log into OPIE Billing. At the top left of the screen there are three menus: File, Windows, and Help. Click on Help
and then Settings. 3. You will see a tab to the right which says User Permissions. 4. Select the new user’s name from the drop down and give the permissions they will need. They MUST have the
Batch Create/Close permission which will allow them to login.
Generally, we recommend that care should be taken in granting the following permissions:
Make Corrections/Delete Payments in any batch*
Log into Other Users’ Batches
Close Other Users’ Batches
Delete Claims (Any Time)*

OPIE Billing User Guide
www.opiehelp.com -6- Support: (800) 876-7740, option 3
Edit Payments in any Batch*
Edit Charge Amount after Submission
Edit Allowable Amount after Submission
Users who have the permissions listed above will be able to change history, that is, edit or make corrections to
submitted claims, payments or adjustments done in closed batches which are already part of the AR balances. They can
also Delete Claims (Any Time), which means they can also delete claims which have already been submitted to the payer
and whose AR balances are already part of the AR totals. The new permissions affecting other users batches could allow
a user to accidentally log in using someone else’s batch and close that batch at will.
5. Once all of the permissions have been marked, click on Save Permissions and then Save and Close. 6. Log out and allow the new user to log in by selecting the correct name from the drop down, typing in the
password you gave them in OPIE, selecting a branch and clicking on the + to create their first new batch and then clicking on Logon. OPIE Billing will open.
Please Note: if you do not select a batch you will be logged in, in a “read only” status.
If you need further assistance please call OPIE Billing Support at 1-800-874-7440.
Log into Billing and Use Batches
A new batch should be created every day as part of the daily work and balancing process. The batch groups together all
the financial transactions done for that day. These include submitting claims, entering and applying payments and
making adjustments. At the end of the day, run the batch report and balance to the total of new payments entered (the
total which presumably will be your bank deposit for the day) and to any miscellaneous adjustments, such as, write offs,
refunds, etc. that may be made to claims.
Please Note: if you do not select a batch you will be logged in, in a “read only” status.
Create a New Batch
Each OPIE Billing user can have only one batch open in OPIE Billing at any time. The format of the batch ID looks like this:
36, 10/24/2011 9:24:22 AM, SAM, O&P Digital
1. The first number is the Batch Number. Batch numbers increase incrementally for all batches.
2. The date and time shown is the date and time when the batch was created.
3. The user’s Initials follow the comma after the date and time.
4. The Branch Name follows the comma after the user's initials.
Login and create a new batch
You must have the proper permissions in OPIE Billing to be able to create a batch. If you already have a batch open, you
will not be allowed to create another batch until the first batch is closed.

OPIE Billing User Guide
www.opiehelp.com -7- Support: (800) 876-7740, option 3
1. Select the appropriate Username, enter your Password and select the Branch for the batch.
2. Click on the plus sign (+) on the Billing Batch line.
3. Click on the drop down to select the new batch. Please Note: if you do not select a batch you will be
logged in, in a “read only” status.
4. Click on Logon
If you logout of billing at any time during the day, your Username, branch and batch will appear automatically. In the
future, when you have closed your batch in the evening and click on the OPIE Billing shortcut the next morning the logon
screen will default to your username and branch. Only your password and the creation of the new batch will be
required.
Note: You will notice that on the bottom right corner of your Billing window you will see an entry like this.
This will display your batch number, the date and time it was created, your branch name, your status and who is
currently logged on with that batch.
Print a Batch Report and Close a Batch
1. On the left navigation bar, click on Close Batch under Batches
2. When the Close Batch window opens, click on the drop down arrow and select the batch number to close. You
will only be able to close your own batch unless you have permissions in OPIE Billing to close the batches of
others.
3. Click on the Batch Report button. When the Activity Report window opens, click on Generate Report. (Review
and balance to this report before closing the batch. You may also print the report if you wish.)
4. After the report has been reviewed, close it. If the report is accurate, click on the button Batch is Clean, Close
This Batch.
5. The batch will close and so will the OPIE Billing application.
6. To return to OPIE Billing, create a new batch.
Get Started in Billing - Set up Global Settings in Billing
Admin Rights in OPIE are required to access Billing Settings.
1. Log into OPIE Billing, go to the top left part of the Window to the menus: File, Windows, Help and click on Help
and then Settings.
2. There are 9 tabs: General, Statements & Invoices, Statement Notes, Clean & Repair, User Permissions, Task List,
1500 Form EDI and GL.

OPIE Billing User Guide
www.opiehelp.com -8- Support: (800) 876-7740, option 3
General Settings
AR Starting Balance: Enter 0.00 in this box.
Include estimated contractual adjustment in AR Report: Leave this box unchecked. See: Reports, AR Aging for further
explanation.
Idle Timeout: This is the number of minutes before OPIE Billing will lock itself for HIPAA protection. 3 minutes is the
default.
Federal Tax ID Numbers: This displays the tax ID numbers entered in OPIE under Admin Tools, Edit Branches. If there is
a different tax ID number for each branch, apply those tax IDs by branch to claims by clicking on Use Branch Tax ID.
Use Branch Tax ID: If checked will use branch tax ID’s entered in OPIE under Admin Tools, Edit Branches.

OPIE Billing User Guide
www.opiehelp.com -9- Support: (800) 876-7740, option 3
1500 Form Settings:
1. 1500 Form Version to Use: This is the version of the 1500 form that you want to use for most of your claims. It
should display 1500 (02/12).
2. PT Account Number: This is normally defaulted to the Patient ID – Claim Number.
3. Service Facility: Set this to where services are “Usually rendered”, i.e. Branch, Service Facility etc.
4. Billing Provider: This is normally defaulted to Home Office. The Home Office historically was the first branch
listed in OPIE Admin Tools when OPIE was installed for a client. Now there is an option, controlled by OPIE
Support, which can change the Home Office designation as your branches may change.
Appearance: Use Blue style is the normal default. However, if there are any problems seeing some of the buttons in the
billing application we recommend changing this setting to Use OS Style.
Default Scan Resolution: This is normally defaulted to Standard.
Note/Reason Pre-set:
To set pre-set adjustment or corrective notes, this will appear in a drop down menu when posting payments or making
corrections.

OPIE Billing User Guide
www.opiehelp.com -10- Support: (800) 876-7740, option 3
1. Select Adjustment or Corrective
2. Click Manage
3. Select Adjustment Type or Corrective Action
4. Enter the Note/Reason in Adjustment Note
or Corrective Reason field
5. Click Save each one entered will drop in the
Note/Reasons box
1. Show Allowables Column: Normally checked. This will allow you to see both the charge and the allowable
amount on each line of a claim.
2. Show DOS to Column: If checked will allow “span dates” for Date of Service.
3. Auto process/submit on batch close: Normally checked. This will allow an automatic submission to the next
payer after you post a payment. This submission occurs when your batch is closed.

OPIE Billing User Guide
www.opiehelp.com -11- Support: (800) 876-7740, option 3
4. Alphabetize Fee Schedule Drop Down: If selected will sort imported fee schedules in Alphabetic order when
attaching it to an existing Insurance
5. Use Sales Tax: Normally unchecked. This box should be checked if you charging sales tax on claims. If this box is
checked, never uncheck it without consulting with OPIE Support.
6. Sales Tax from Allowed: When checked will calculate sales tax from allowed amounts instead of Usual and
Customary charges
7. Includes Sales Tax on 1500 form: Normally unchecked: checked only if sales tax is charged and is to be included
on the 1500 form.
8. Round Sales Tax: Select one of these choices if you are using Sales Tax.
As you will see on your claims if you select this box, per item Sales Tax is calculated to 7 decimal places. Depending on your selection, calculated sales tax will round up, down, or will only round up if the calculated Sales Tax is exactly at .50.
How to Add Sales Tax in OPIE and OPIE Billing
1. Go into Administrative Tools in OPIE and click on Edit Branches.
2. Make sure you have entered a Sales Tax Rate for each branch in the box shown.
3. Now go into OPIE Billing and at the top left corner click on Help and Settings. Make sure the Sales Tax box on
the General Tab is checked. (Typically, the Include Sales Tax on 1500 form is left unchecked.) Click on Save and
Close.
4. If you open any claim at this point, you will see an extra column on the Codes tab of the claim which says Tax. If
that code is taxable, click in the Tax box and then click elsewhere on the form. The Sales Tax (per item) will
display. The Total charge will include the sales tax and the sales tax total will appear at the bottom of the form.
(See the example below.) If you have a quantity greater than 1, the sales tax on the line will show for 1 item, but

OPIE Billing User Guide
www.opiehelp.com -12- Support: (800) 876-7740, option 3
will calculate into the total as that amount times the quantity.
5. After you submit the claim the Sales Tax total will appear under Charges on your total page of your batch or
activity reports.
6. Sales Tax amounts will also appear on your Charges Billed reports. However, they do not appear by default so
you will have to click on Choose Fields and add Sales Tax and Billed Amount (Net) (that is, before the tax) to the
report.

OPIE Billing User Guide
www.opiehelp.com -13- Support: (800) 876-7740, option 3
7. There is a second option available to you regarding Sales Tax. You can request that OPIE Support set some of
your consistently taxable HCPC Codes to taxable. Then, whenever those codes appear either on a claim or in
OPIE on a service estimate, the tax will be automatically turned on and included.
OPIE Billing User Guide
www.opiehelp.com -14- Support: (800) 876-7740, option 3
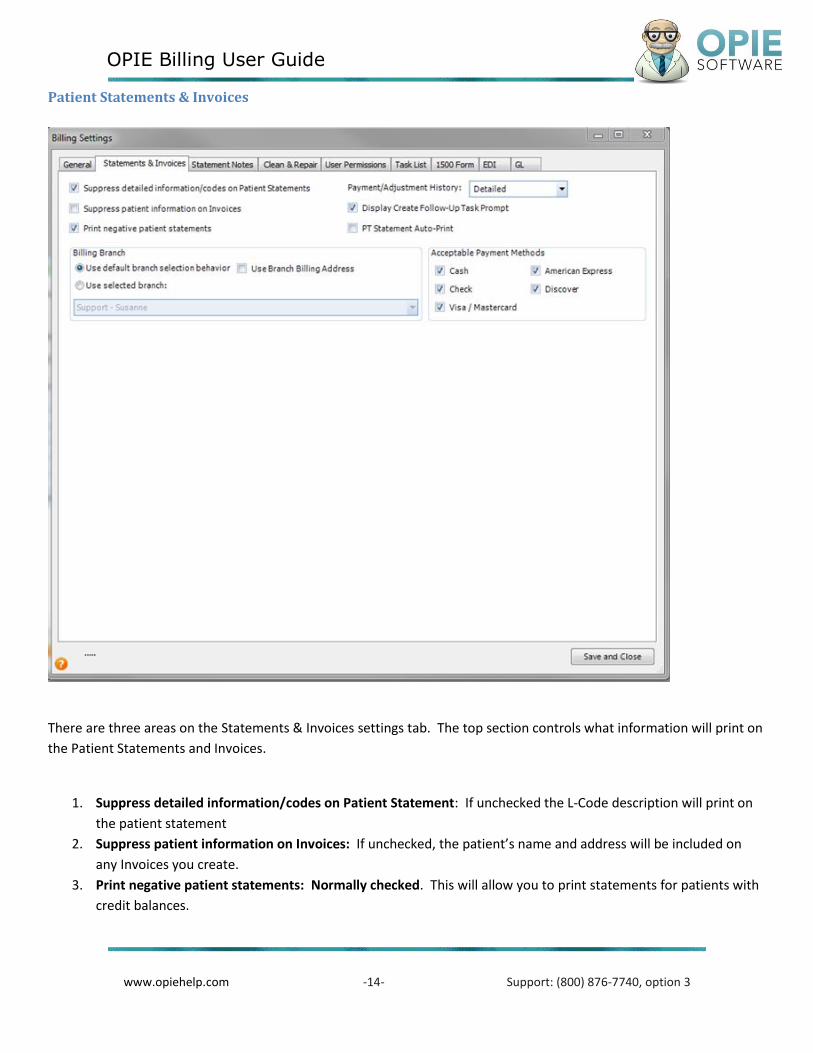
Patient Statements & Invoices
There are three areas on the Statements & Invoices settings tab. The top section controls what information will print on
the Patient Statements and Invoices.
1. Suppress detailed information/codes on Patient Statement: If unchecked the L-Code description will print on
the patient statement
2. Suppress patient information on Invoices: If unchecked, the patient’s name and address will be included on
any Invoices you create.
3. Print negative patient statements: Normally checked. This will allow you to print statements for patients with
credit balances.

OPIE Billing User Guide
www.opiehelp.com -15- Support: (800) 876-7740, option 3
4. Payment/Adjustment History: Allows the practice to select the amount of history printed on the statements by
default. Choices include Simple, Detailed or None.
5. Display Create Follow-up Task Prompt: If checked when patient statements are printed prompt will display
asking if you wish to create a follow up task.
6. PT Statement Auto-Print: If selected system will generate a patient statement for printing into the Patient
statement que once the claim has been submitted to Patient Responsibility.
Below are settings which control what branch address prints on the Patient Statements and Invoices.
1. Use default branch selection behavior: The default is for the radio button to be selected. This means that
depending on the branch of the claim, the physical address of that branch will print on the form.
2. Use Branch Billing Address: When completing the Edit Branch information in OPIE under Admin Tools, on the
right side of the screen for each branch, enter the billing address to be used for this branch. Typically, this is the
address of the ‘home office’ (the first branch in the list of branches). If this box is checked, the address that
appears in the right hand of that branch’s data under Billing Information will be the branch address that prints
on the form.
3. Use selected branch: This radio button is selected only to select a branch address (chosen in the box below) to
print on all patient statement s and invoices.
Acceptable Payment Methods: Place a check mark next to each payment method that you accept.

OPIE Billing User Guide
www.opiehelp.com -16- Support: (800) 876-7740, option 3
Statement Notes
This tab controls what automatic notes will print on the patient statements depending on how far past due each account
is. IMPORTANT: Aging on a patient statement is dependent on the number of days from when the first statement was
produced (and presumably sent to the patient).
Different standard messages can be entered for each time period. Changing the format controls how large the font is
that prints on that message. If desired, one can override the standard message that prints when a payment is received.
Check the “Override note if payment received within 30 days” box and enter the message the practice would like to
appear.
Note: Each of these automated notes can be overridden on the patient’s claim or claims.

OPIE Billing User Guide
www.opiehelp.com -17- Support: (800) 876-7740, option 3
Clean & Repair
These settings are to be used only under direction of the OPIE Support department.

OPIE Billing User Guide
www.opiehelp.com -18- Support: (800) 876-7740, option 3
User Permissions
There are settings which can be activated for each of the users who have access to Billing. These permissions must be
set for each Billing user after access to Billing in OPIE (Admin Tools, Users) has been granted.
While each administrator can set permissions as they choose based on the responsibilities of each biller, the settings
shown above are typical of an average workforce biller. Your Billing administrator would have increased permissions.
Restrict to Read-Only: If checked user will be able to view claims in OPIE Billing; they will not be able to edit, run
reports, bill etc….
To Print Patient Statements: Both of the below permissions need to be selected. a. Access Patient Statements b. Print Patient Statements

OPIE Billing User Guide
www.opiehelp.com -19- Support: (800) 876-7740, option 3
Generally, we recommend that care should be taken in granting the following permissions:
Make Corrections/Delete Payments in any batch*
Log into Other Users’ Batches
Close Other Users’ Batches
Delete Claims (Any Time)*
Edit Payments in any Batch*
Edit Charge Amount after Submission
Edit Allowable Amount after Submission
Users who have the permissions listed above will be able to change history, that is, edit or make corrections to
submitted claims, payments or adjustments done in closed batches which are already part of the AR balances. They can
also Delete Claims (Any Time), which means they can also delete claims which have already been submitted to the payer
and whose AR balances are already part of the AR totals. The new permissions affecting other users batches could allow
a user to accidentally log in using someone else’s batch and close that batch at will.
Editing a Charge or Allowable Amount after Submission will change those amount going back to the date the claim was
submitted which, if the Charge Amount is changed will make an abrupt change in your AR balance. Changing the
allowable may make a change in the way a payment was posted.
We recommend that no one should have or use these permissions unless you’ve first consulted with OPIE Support.
Note: Any changes made to payments or adjustments in a closed batch, any change made to charge and allowable
amounts and any claims deleted will be record on the OPIE Billing report called the Data Modification Log so that these
changes will be available for later review.

OPIE Billing User Guide
www.opiehelp.com -20- Support: (800) 876-7740, option 3
Task List
This tab will display all of the task items (status and tickler types) which are part of the system. Note that each title has a
number of days to use to set the due date on the task. This screen also allows editing or adding new task items.
Note: Some of these task items are automatically created or marked as completed as part of OPIE and Billing functions.
(See the section on Task Items later in this manual.) Therefore, it is recommended to discuss with OPIE support any
plans to change the wording or AutoDays on any of these existing tasks before changing them.
Notice there is also an additional permission here which will allow a task to be unchecked in case it is checked in error.
Checking a task indicates that it is done. Normally, this box should be checked.

OPIE Billing User Guide
www.opiehelp.com -21- Support: (800) 876-7740, option 3
1500 Form
The settings on this tab are the global settings for the 02/12 version of the 1500 form. The recommendation is that all of
your individual payer settings be set to “Default” unless an override is needed. This would allow you to make changes to
your 1500 form setups globally rather than having to update each of your individual insurance payers one at a time.

OPIE Billing User Guide
www.opiehelp.com -22- Support: (800) 876-7740, option 3
EDI
If you use ZirMed for your claims’ clearinghouse, a ZirMed implementation expert will enter your organization’s ZirMed
account number (Username), password and the Upload Location on the day they train you on how to use ZirMed.
If you don’t use ZirMed for your claims’ clearinghouse, but intend to send submission files to another clearinghouse;
check the box that says Generate manual upload file only. Your clearinghouse will then explain how to upload your
submission files to them.

OPIE Billing User Guide
www.opiehelp.com -23- Support: (800) 876-7740, option 3
Getting Started in Billing – Setting up Existing Insurance Companies
Each insurance company entered in OPIE is included in the Billing module. To access these, locate Insurance Companies
on the left window pane and select Existing. After highlighting the insurance company and using the Select Company
button, a window consisting of 6 tabs to view and/or set settings critical to the processing of claims, displays. These
must be set up properly before beginning to bill claims.
Insurance Company – Contact Info
The Insurance Company tab is primarily used to display the contact information previously set up in the OPIE module. A
Notes box is provided, which is useful for storing pertinent information billers may need. This box has a 500 character
limit.

OPIE Billing User Guide
www.opiehelp.com -24- Support: (800) 876-7740, option 3
Insurance Company – Additional Options
1500 Form Version to Use: Make sure this is set to [Use System Default] 1500 (02/12).
Payer ID: Enter Electronic Payer ID (Get this from Zir-Med)
Eligibility Payer ID: Enter the Electronic Eligibility Payer ID

OPIE Billing User Guide
www.opiehelp.com -25- Support: (800) 876-7740, option 3
ICD Override: As of October 1, 2015 Existing Insurances will switch to ICD 10. Change to ICD 9 if this Insurance is not
using ICD 10.
Plan Name:
Type: Choose type of Insurance, Medicare Medicaid, etc. This will check the appropriate box on the 1500 form in field
1. OPIE defaults to other.
Additional fields are informational only.
Plan ID:
Alternate Carrier ID:
Contractual Adj GC-RC: For Auto post users only, See autopost guide for definition
Sequestration Adj GC-RC: For Auto post users only, See autopost guide for definition
Automatically create Sequestration adjustment if this payer is: Creates a sequestration adjustment column in
payment posting for this Payer
Fee Schedules: You must select the correct fee schedule here for each payer. These settings will control the fees for
each payer as they will appear in both OPIE Practice Management and OPIE Billing. Make sure that all of your required
fee schedules have been set up in OPIEDex.

OPIE Billing User Guide
www.opiehelp.com -26- Support: (800) 876-7740, option 3
Fee Schedules Default Allowable: Click the drop down and select the Fee Schedule whose allowable matches
your contract with this payer. Medicare is the default if your practice has not provided a fee schedule for this
payer. (Note: The Medicare fee schedule for your state will automatically be set up in the system by OPIE
Software Support personnel as part of your OPIE installation.)
Fee Schedules Default Billing Amount: Click the drop down and select the Fee Schedule to use to bill this
payer. Reasonable and Customary is the default Billing Fee Schedule for all payers unless you select another.
View the Default Insurance Fee Schedules help topic video.
Note that you also have checkboxes for your use which can remind you if this payer requires a pre-authorization, LMN or
Detailed Rx. Please note: Informational Only

OPIE Billing User Guide
www.opiehelp.com -27- Support: (800) 876-7740, option 3
Insurance Company – 1500 Form
This is the screen on which you will set the requirements for your 1500 forms and electronic claims. While most of the
settings on this tab will work as defaulted, please check the settings for each payer to ensure correctness.
IMPORTANT NOTE: If you have multiple branches, it is recommended that for your Medicare payer that you change the
setting for field (33), Billing Provider, to Branch. Medicare must receive your branch name and NPI in boxes 33 and 33a
for claims done at other branches.
View the Line Level Authorizations help topic video.

OPIE Billing User Guide
www.opiehelp.com -28- Support: (800) 876-7740, option 3
Insurance Company – Practitioner PIN Information
The practitioner PIN Information tab is only used to change the display name which prints in box 31 on the 1500 form
and in the matching field on electronic data interface (EDI) transmissions to ZirMed. By default, the name of the
practitioner who delivered the claim will appear in box 31.
To change the display name manually, do the following.
1. Click on Add Edit, the Name, Display Name, Branch and PIN boxes will appear.
2. Type in the Display Name the name you wish to appear. Some practices enter the name of their practice; others
enter “Signature on File” or the name of their owner/primary practitioner. If you wish this field left blank, type a
space in this blank (as shown above).
3. In the PIN box type in one space and click on Save. A display similar to the one in the image above will appear.

OPIE Billing User Guide
www.opiehelp.com -29- Support: (800) 876-7740, option 3
Insurance Company – Invoices
The Invoices tab controls what will appear on the Invoices for each payer. Note: Typically, invoices are created for
payers such as hospitals, skilled nursing facilities or similar institutions. Use the checkboxes and include Payment Terms
and/or Additional information as needed.
OPIE Billing User Guide
www.opiehelp.com -30- Support: (800) 876-7740, option 3
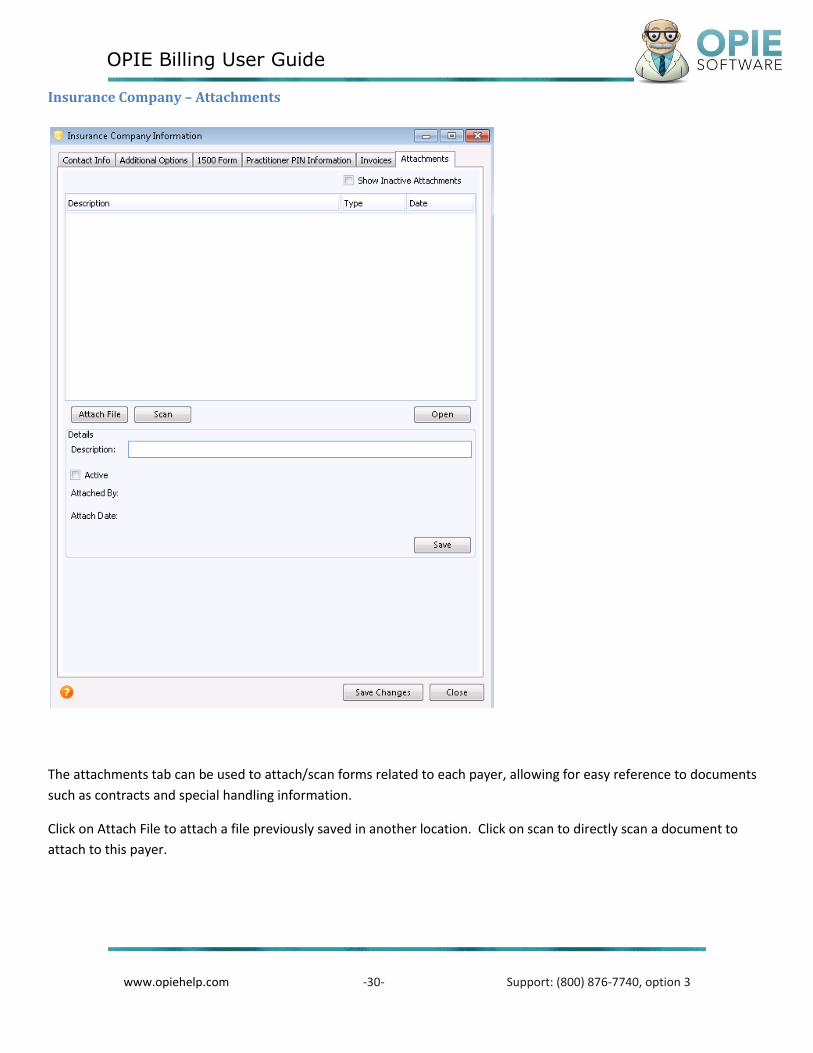
Insurance Company – Attachments
The attachments tab can be used to attach/scan forms related to each payer, allowing for easy reference to documents
such as contracts and special handling information.
Click on Attach File to attach a file previously saved in another location. Click on scan to directly scan a document to
attach to this payer.

OPIE Billing User Guide
www.opiehelp.com -31- Support: (800) 876-7740, option 3
Claims – Find a Claim
Find a Claim Using Claims by Patient
There are two ways to locate a claim in billing. The preferred way is to click on Claims By Patient in the left side
navigation pane. The display looks like this.
At the top is a Name Search box. You can search by both the First and Last Name, individually or in combination. To
search by the first name only, type a space or comma and start typing the first name. To search by a combination of the

OPIE Billing User Guide
www.opiehelp.com -32- Support: (800) 876-7740, option 3
last and first name, type the last name or one or more characters of the last name, enter a space or comma, then type in
the first name.
By default, you will only see patients who have claims in OPIE Billing. Check the Show All Patients box to see all patients
in OPIE, even if they do not have a claim in OPIE Billing.
The Refresh button will refresh the data which appears after changes are made to a claim.
Select a name from the list and the claim number(s) for that patient will appear at the bottom of the form along with the
Date of Service (DOS) for that claim.
To open a claim, either double-click on the claim number, or single-click on the claim number and click on Open Claim.
Click on the Jump to Patient button and you will immediately jump to the selected patient’s chart in OPIE.
A right click on the claim number will display a menu of additional options:
From this menu you can:
1. Open the Claim
2. Go immediately to the Adjustments tab with that patient selected.
3. Open the Financial Overview for the claim.
4. Go to a Print Patient Statement window like this.

OPIE Billing User Guide
www.opiehelp.com -33- Support: (800) 876-7740, option 3
Finding a Claim - What the OPIE Billing icons mean
View the OPIE Billing Icons help topic video.
On the Left navigation bar under claims click “claims by patient”
Search by patient ID # or Last name, click on the patient. One of these three icons appears by the claim number when
you open Claims By Patient
- The red A icon means that the L-Code selection has been saved and sent to Admin. An Authorize/Pre-Authorize task item has been created.
- The green dollar sign icon means that the delivery receipt has been saved and sent to billing. A Bill Claim task item has been created.
- The gray dollar sign icon means that the claim has been paid off. Typically, this means all task items have been
checked as done. There are some exceptions to this rule.
If checked will prevents statements from being printed for any claims assigned to this patient View Patient Info button will display additional information regarding the selected patient as shown in the samples below. These displays are primarily read only. (See Insurance information on tabs below.) If you wish to change information on a patient, the change must be made in OPIE practice management. Jump to Patient button. Propels you into the Patient Chart in OPIE Management.

OPIE Billing User Guide
www.opiehelp.com -34- Support: (800) 876-7740, option 3

OPIE Billing User Guide
www.opiehelp.com -35- Support: (800) 876-7740, option 3
If you highlight an Insurance Company Name and then click on the Select button it will take you automatically to that
payer under Insurance Companies Existing in OPIE Billing
Highlight a prescription and the details on that Rx will be shown in the Details box.

OPIE Billing User Guide
www.opiehelp.com -36- Support: (800) 876-7740, option 3
Find a Claim – Using the Task List
The Current Task Items list should open automatically upon login to Billing. If the window is closed for any reason it can
be re-launched by selecting Current under the Task Items in the left window pane.
Notice that in the upper right hand corner of the Task List there is a search box. If you know the claim number, type in
that claim number and an Open button will appear. Click on the Open Button to see the claim. You may also type in a
patient’s last name to see all current tasks associated with that patient.
If you have activated the Stock And Bill functionality in OPIE, you can click in the Stock And Bill box to see only those
claims.
Understanding the Tabs on a Claim

OPIE Billing User Guide
www.opiehelp.com -37- Support: (800) 876-7740, option 3
Across the top bar of each claim you will see a display that looks like this. It lists:
date of service
the claim number
the Patient’s ID in OPIE and the patient’s name
the prescription device type for this claim and any ‘label’ that you might have entered for the prescription in
OPIE.
Across the bottom bar of a claim you will see a display like this:
It includes:
an orange circle with a question mark to take you to context sensitive help
A button to take you to the Financial Overview screen.
If there are any unapplied patient payments their amount and number will appear in red here
If this claim is now or was ever resolved (that is, if the balance went to zero) the date it was resolved will appear
in the center.
To the right are buttons which will Allow Updates, Save/Update Claim or Close the claim.
There are 10 tabs on a claim. Become familiar with each one. Most of the information shown in the tabs of the claim
is pulled from OPIE and must be changed or modified in OPIE. However, there is some claim level data that can be
modified on the claim, such as Fees Schedules, modifiers, and date of service.
The Financial Overview button will bring forward an additional box which displays additional financial information for
the selected claim as well as the ability to print a patient statement on demand. To the right of this button, in red, you
may see any “Unapplied deposit” total on this claim. (These are unapplied patient payments.)

OPIE Billing User Guide
www.opiehelp.com -38- Support: (800) 876-7740, option 3
Patient Tab on a Claim
The Patient tab displays data that is pulled from the original patient input in OPIE. Most of the fields are self-
explanatory. Click on this tab and make sure that such critical information as Name, Date of Birth (DOB), Phone number
and Address are shown on this tab.
If the address of the patient has changed, this information will need to be updated in OPIE Management prior to porting
over to the Billing Interface. Click on the Change Address button in Billing and the following screen will display:

OPIE Billing User Guide
www.opiehelp.com -39- Support: (800) 876-7740, option 3
Click on the less than symbol ( ) and then click the drop-down to select the address to use; click on Select and Close.
At the bottom of the form is a box which says Address Statements To. For example, for a minor patient, the statement
goes to the parent(s). The patient’s parental information must be entered in Patient Contacts in OPIE to be able to select
the parent. Click the drop-down in the Address Statements To box to select the name of the person to send the
statements to.
There is a Jump to Patient button on this screen. Click on this button to automatically go into that Patient’s chart in
OPIE.
Primary Insurance Tab on a Claim
The Primary Insurance Tab shows information regarding the primary payer for the claim including the insured’s name

OPIE Billing User Guide
www.opiehelp.com -40- Support: (800) 876-7740, option 3
and address.
The lower portion of the tab displays the Insurance Verifications which may be viewed by double clicking. New
Verifications can also be entered on this screen by using the New Verification button. This will display the Insurance
Verification form for the user to enter the new Insurance Verification information. This form displays the General Tab,
Specific Tab, Codes Tab and Scan Tab just as it does when adding the form in the OPIE Administration software. Once
entered and saved this information will be saved into a new Administrative Documentation folder in OPIE.
Located in the upper area of the tab is a Change Insurances button. If selected, the following box will display:

OPIE Billing User Guide
www.opiehelp.com -41- Support: (800) 876-7740, option 3
This Claim Insurance Selection box allows the user to modify the insurance designations on the claim. Select the Allow
Updates button and modify the insurance priority settings as needed. Be sure to Save the changes and then Close the
box.
Once changes have been made, select the Save changes and then Close. Additionally the Save/Update button will need
to be selected for this claim setting the changes for this claim and future claims.
Located on the bottom right of the Primary Insurance Tab is the Open Company Info button. Selecting the Open
Company button displays the Insurance Company Information box. This is the same window that is shown when you
click on the insurance payer using the Existing menu option. It will allow you to make changes for this payer ‘on the fly’.

OPIE Billing User Guide
www.opiehelp.com -42- Support: (800) 876-7740, option 3
Secondary Insurance Tab on a Claim
The Secondary Insurance tab displays and has the same buttons as the Primary Insurance tab but displays the secondary
insurance on a claim.
Tertiary Insurance tab has the same options as the Primary and Secondary Insurances.

OPIE Billing User Guide
www.opiehelp.com -43- Support: (800) 876-7740, option 3
Referring Physician/Other Tab on a Claim
The Referring Physician/Other tab displays the referring and primary physicians on a claim, their NPI numbers and their
UPIN numbers.
Diagnosis codes are also listed as is the Accident Date for the claim if there is one.
Dx Type: Indicates whether the diagnosis code is ICD-9 or ICD-10.
Checking the Use Primary Physician for Billing box will override the setting on the 1500 form and put the Primary Care
Physician's name and NPI on the claim.
The bottom of the form displays the Branch, Branch NPI and Location of the claim.

OPIE Billing User Guide
www.opiehelp.com -44- Support: (800) 876-7740, option 3
Codes Tab on a Claim
The Codes tab on a claim contains critical information regarding the claim, the Date of Service (DOS) (From and To if you
added the DOS To column under Billing Settings above.) Place of Service (POS), Codes, EMG data, Codes, Modifiers,
Diagnosis Pointers, EPSDT data, Charges, Allowables, Quantities, Sales Tax (per item amount if applicable to the practice)
and the Provider on the claim. The Total for each line and the unresolved balance for each line are also shows. If you
have selected to add Line Level Rendering Provider to appear, (sometimes required for Medicaid claims) you will see a
place to enter the qualifier and codes in the columns labels 24I and 24J – Other.
Special Note on 24J, Line-Level Authorization Numbers: The Line-Level Authorization Number override for Field 24J is
now mapped to the Prior Authorization Number Override field in the ZirMed edit screen. In order to populate a line-
level authorization number from OPIE Billing, the user will append the "G1" prefix to the authorization number in the 24J
override field on the Codes tab of the claim form. Please contact OPIE Billing Support for additional information.
Displayed on this tab next in the claim grid next to the code is an Info button. This button when selected will display the
description for the code as well as any narrative that has been entered for the code.
Also displayed are the Billing and Allowable Fee Schedules for the claim which pulls from the Fee Schedule attached to
the Primary Payer.
Finally, the bottom of the display shows the Provider (the practitioner who delivered the claim) and the total Sales Tax,
Allowable, Claim (Charges) Total and the Unresolved balance on the claim.

OPIE Billing User Guide
www.opiehelp.com -45- Support: (800) 876-7740, option 3
Important: Unlike the other tabs on the claim most of the data on this tab can be modified. The exceptions to this are
the LCodes and the quantities. These cannot be modified on the claim because these changes would need to be
reflected in the Delivery Receipt. If you need to modify the LCode or the quantity on an unsubmitted claim, you’ll need
to delete the claim, modify your LCode Selection, redeliver and when you send the new Delivery Receipt to Bill it will
create a new, billable claim for you.
How to Add Additional Daignosis Codes
Now that the granularity and complexity of the Dx codes have increased tenfold the Dx pointer on the claim has become
even more important. Users MUST be keying the Dx pointer as part of the claim scrub BEFORE sending the claim to the
payer.
The Dx pointer will always default to “A.” The correct pointer(s) should be keyed into the codes tab of the claim without
delimiters of any kind as shown below:
One side issue to be aware of:
Paper claims will only print with the first 4 Dx code pointers but EDI transmissions will transmit with up to 12 pointers.
How to Add Billing Justifications
At times some LCodes will need additional information submitted on a claim. It can be for clarification of a
miscellaneous code, the need to report time spent on a repair or to communicate additional information that may be
required by specific insurance companies. This is handled by adding an LCode Narrative for the code on the LCode
Justification Form in OPIE. The narrative will print in the shaded area of box 24 above the LCode.
After the LCode selection has been completed, the user will open the LCode Justification form in OPIE.

OPIE Billing User Guide
www.opiehelp.com -46- Support: (800) 876-7740, option 3
The user will open the LCode Justification Form and highlight the code that needs the additional narrative and add in the
additional verbiage needed for the code in the Narrative box in the lower section of the screen.
Once the narrative has been added in OPIE the user may view it in OPIE Billing.
To confirm, navigate into OPIE Billing, select the patient and claim. On the codes tab locate the Info button:

OPIE Billing User Guide
www.opiehelp.com -47- Support: (800) 876-7740, option 3
Select the Info button that has the added narrative. A small box will appear and the user can review the narrative.
When the claim is generated, this narrative will be printed or transmitted, depending on the submission type, in box 24J:

OPIE Billing User Guide
www.opiehelp.com -48- Support: (800) 876-7740, option 3
If any changes or modifications need to be made on the entered Narrative the user will need to navigate into OPIE
Patient Management onto the LCode Justification tab to update.
Change the DOS on a Claim
View the How to Modify the DOS on a Claim help topic video.
The DOS on a claim is defaulted from the appointment date in which the delivery receipt was created. Note: The DOS
on a claim which appears after the LCode Selection was sent to Admin is temporary and uses the date the LCode
Selection was sent.
If the DOS on a claim is wrong, change it using the four step process below:
1. Click on the Allow Updates button on the bottom of the screen, a button labeled Update DOS will appear at the
top right of the screen above the Print button.
2. Use the dropdown to the left of the Update DOS button and select the desired date.
3. Click on the Update DOS button.
4. Click on Save/Update Claim

OPIE Billing User Guide
www.opiehelp.com -49- Support: (800) 876-7740, option 3
Change the DOS To on a claim
To change the DOS To on a rental claim, or other claim with different from and to dates, simply type in the correct DOS
To date.
Enter a Narrative to Appear on the Claim
Occasionally a payer will require narrative information for an LCode to appear on the claim submission. This is
sometimes referred to as a “line level note.” On a paper claim this information would appear in the shaded area above
the service lines on the 1500 claim form as shown below. On an electronic claim it will transmit with the proper loop
and segment information.
To enter narrative information for a particular code, navigate to the LCode Justification form in OPIE. Double-click on
the code for which you wish to enter a narrative. Enter the text in the narrative field at the bottom of the form.
Abbreviations may be necessary due to character limits. To save a standard narrative for future use click the blue +
symbol to the right of the narrative field and enter the narrative for later selection. Once the narrative entry is complete
save the LCode Justification form in OPIE.
To view the narrative on the claim go to OPIE Billing and open the Codes tab of the claim form. Click the INFO button on
the service line you wish to view and the narrative will appear as shown below. If the claim was already open when you
entered the narrative you’ll need to close and reopen the claim again to allow the narrative to appear.

OPIE Billing User Guide
www.opiehelp.com -50- Support: (800) 876-7740, option 3
Add a Modifier or Change the Modifier on a Claim
To add a Modifier to the system:
1. Open any claim, go to the Codes tab
2. Click on the + sign under Modifier 1.
3. Click on the Add Modifier button.
4. Add the new Modifier and its description in the boxes and click on Add.
5. Click on Close. The new modifier will now be available both in Billing and OPIE.
Note: At this time there is no way to edit, delete or deactivate modifiers once they have been entered into the system.
To change the modifiers on a claim, click on the drop down in each modifier box and change the modifier as necessary.
On a multiple line claim, a box will appear which says 'Would you like to carry line one’s data through all lines?' To apply
that modifier to all lines on a claim, click on Yes. This same function, to carry a change to all claim lines, will happen if
you change any of the following data:
DOS To
POS
TOS
MOD1 - 4
EPSDT
Change the Charges or Allowables on a Claim
Change the charge or allowable amounts on a claim in two ways:
1. Change the fee schedule for the Charge (Fee Schedule) and click on Update Fees or Allowable (Allowable Fee
Schedule) and then click on Update Allowables. OR
2. Go into the charge and allowable columns on the line of each code and type in a new amount.
3. You should never change the charge on a claim after it’s been submitted. This will change history and modify
the AR totals from the date the claim was submitted.
4. You should never change the allowable on a claim after the first payment has been applied. This will change
history. You should change the allowable on the apply payment screen rather than the claim.

OPIE Billing User Guide
www.opiehelp.com -51- Support: (800) 876-7740, option 3
Change the Provider on a Claim
The default Provider on a claim is the practitioner who delivered the device. Change the provider by clicking on the
drop-down at the bottom of the screen and selecting a different provider.
Change Other Fields on a Claim
To change the POS (Place of Service) or TOS (Type of Service), click the drop-down and select the correct POS or TOS.
Or, simply type a different POS/TOS into the appropriate box. NOTE: In order to see your TOS column you may need to
use your mouse to drag the space between the POS column and the EMG column on your claim. At this time the list of
POS and TOS selections cannot be edited or deactivated.
Note: Remember to always click on save/update claim after changing any field on a claim!
What Can’t be Changed on a Claim
The only fields which may not be modified on a claim are LCodes and quantities. Until the Delivery Receipt is Sent to Bill
on a claim, the LCode Selection is unlocked and can be changed. LCode and quantities may be modified by going back to
the LCode selection and making the necessary modifications.
Once the Delivery Receipt has processed, the LCode selection is locked. The user may split and merge line items to
modify line item quantities but the total billed quantity cannot be modified on a claim. If an LCode or quantity needs to
be changed, the user will have to delete the claim. This will unlock the LCode selection and necessary LCode changes
can be made. This will automatically be reflected on the Delivery Receipt. If the Delivery Receipt has a digital signature,
the additional step of clearing the digital signature is needed before your LCode Selection will unlock.
It’s also important to note that deletion of a claim cannot be undone. Be certain the correct claim is selected before
performing the deletion. All notes, attachments and task notes will be lost. Before deleting check these items to ensure
that all necessary information has been printed or otherwise saved.
Once the LCode Selection has been unlocked it may be modified and resent it to Admin. You will be required to re send
the Delivery Receipt to Bill. The new delivery receipt must be signed by the patient. A new claim will appear with the
correct information
It is not recommended to delete a claim after it has been submitted. This would change the AR history totals which will
become out of balance as of the date of the first submission on the deleted claim. A submitted claim should be adjusted
of and a new L-Code Selection and Delivery Receipt should be created. You should also label the old L-Code Selection
and Delivery Receipt to identify them as supporting documentation for the incorrect claim.

OPIE Billing User Guide
www.opiehelp.com -52- Support: (800) 876-7740, option 3
Submissions Tab on a Claim
The Submissions tab is used to submit claims to payers. The top portion of the window displays all submitted claims. If no claims have been processed for this patient, the area will be blank. In the middle of the window is an entry area for Box 19 (Reserved for Local Use box on the 1500 form). Input any additional information to add to the claim in this box. Note: A maximum of 80 characters will appear in this box though the new 02/12 form will support up to 71 characters. Currently on the submissions tab a checkbox for “Use Individual Page Totals” is displayed; however, the functionality for this has been moved to the 1500 form Tab located on the insurance company information screen, field 28-39.
Re-Print 1500/Statement or PT Statement: Click to re-print a previously printed 1500 form or patient statement. Print Payer Statement: Click to print a payer statement for this claim instead of a 1500 form. Hold Statement: If selected this claim would not appear on a patient statement.

OPIE Billing User Guide
www.opiehelp.com -53- Support: (800) 876-7740, option 3
Preview a Claim before Submission
The button labeled Re-Print 1500/Invoice allows two things. First, you can preview a claim before it is sent. Click this
button before a submission; you will see a 1500 form for this claim showing what the claim fields will look like. Simply
close the form after the preview and make any changes necessary to correct the claim before submission. Proceed to
submission if it appears correct.
Second, after submitting a claim, highlight the submission line and click on the Re-Print 1500/Invoice button. Then,
whether the claim was submitted electronically or to a 1500 form, it will display a 1500 form. If the claim was submitted
as an invoice, it will display an invoice. Important: if any settings were changed on the claim since the submission, the
“re-print” will incorporate the new settings into the display.
Keep in mind that a reprint of an invoice or a 1500 form will always shows the original balance on that invoice or 1500
form.
The Print Payer Statement button allows the creation of a payer statement for the submission that is highlighted. It will
display all adjustments as well as payments and the current balance for the claim.
On the bottom left of the display, is the Authorizations box where you can enter the current authorization number(s).
Any authorizations completed in OPIE or OPIE Billing will display. To pull an authorization number from an
authorization, highlight the authorization line and then click the drop down in the Current Auth # box. The
authorization number from that authorization, if there is one, will appear. You may complete an insurance authorization
directly from this window by clicking on “New Insurance Authorization.”
Note: Invoices have a place for a PO number on the form. If there is a PO for an invoiced claim, simply type it into the Current Auth# box and it will appear next to PO on the invoice. Make sure you click on Save/Update claim after entering the PO number.
Submit a Claim
To submit a claim, click on the Submit Claim button. This box will display:

OPIE Billing User Guide
www.opiehelp.com -54- Support: (800) 876-7740, option 3
1. At the top, select the payer needed for the submission.
2. Under Submission Method, click the drop-down to see the following choices:
1. ZirMed (EDI File)
2. Mail Form 1500 (02/12) (this will display the version of the 1500 form that your payer is set to print)
3. Patient Statement
4. Invoice
Check this box to create a batch of claims to transmit to ZirMed
or print 1500’s
Click to review claim and submit opens window allowing corrections to the claim and L-
Codes before submission or printing. Also allows ICD9 to ICD10 code change in box 21 see below:
ICD Indicator: If set to 9 the button search for ICD9 Diagnosis Codes if set to 0 allows search for ICD10.
Immediate submission or print of individual claim.

OPIE Billing User Guide
www.opiehelp.com -55- Support: (800) 876-7740, option 3
Split Line Items on a Claim
View the How to Split Line Items on a Claim help topic video.
ZirMed Submission
When ZirMed is selected, three boxes appear in sequence. The first will ask where to save the submission file. Create a
directory for this on your PC and save the file. All future submissions will go into that folder automatically, allowing a
single click of Save. The second box will show that the EDI (Electronic Data) file has been successfully created. Click OK.
The third box will show that the file has been uploaded successfully. Click OK.
Note: Make sure that the messages listed above are the ones displayed. Very rarely, there may be an error message. If
so, contact OPIE Support immediately. If the messages are different from above, please contact OPIE Support
immediately for assistance.
Mail Form 1500
When Mail Form 1500 is selected, the 1500 form will open on the screen using whichever program is associated with
.pdf files on your computer. Typically, this is Adobe Acrobat Reader. Review the form to make sure it looks correct,
then print it and mail it.
If the 1500 form is misaligned, click on the Reprint 1500/Invoice button to reopen it. Then click on the printer make sure
these settings are chosen. (The settings displayed will differ depending on the .pdf software version installed and the
individual printer software.)
If any settings display which say Page Scaling or Rotation, make sure they are “off” or set to “none.”
If a series of settings headed Page Sizing & Handling display, select Actual Size.
Call OPIE Support for further assistance if necessary.
Invoice
View the How to Create an Invoice help topic video.
When Invoice is selected and Submit is clicked, this box will appear:

OPIE Billing User Guide
www.opiehelp.com -56- Support: (800) 876-7740, option 3
To bill the allowable, click on Show Discount on Invoice. It will include both the charge and the allowable and display the
discount amount.
To print the shorter, ‘friendly’ HCPC code descriptions on the invoice, check the second box.
To print a special note on the invoice, type it in the Invoice Note box.
Then click on Generate Invoice. To display the invoice, click on the Print and Submit Invoice button.
IMPORTANT: After the invoice prints, another box will appear:
If the invoice has printed correctly, click on Yes. If the invoice has not printed correctly, click on No and restart the
printing process. That is the final step in the Invoice submission process. Note: Until “Yes” is selected in this dialog box,
the submission will not complete.

OPIE Billing User Guide
www.opiehelp.com -57- Support: (800) 876-7740, option 3
Patient Statement
Patient Statement only appears as a selection if the ‘payer’ is set to Patient Responsibility. Click on Submit and the
submission will go through.
View the How to Address Minor Patient Statements to a Parent/Guardian help topic video.
To print the Patient’s statement immediately, click on the Financial Overview button which is on the bottom left. When
it opens, click on the Print Patient Statement button. A choice to print All Outstanding Claims for this Patient or This
Claim Only appears. Make a selection and the statement will appear on the screen. Print it. (To print a group of
statements monthly, see the topic under Patient Statements later in this manual.)
Task Items Tab on a Claim
The Task Items tab lists all of the tasks created for a claim. Task items are an automated tickler file for maintaining the
status on each claim and entering notes for all tasks as needed. When a claim has had the Delivery Receipt Sent to Bill,

OPIE Billing User Guide
www.opiehelp.com -58- Support: (800) 876-7740, option 3
both the Authorize/Preauthorize task (which is created when the LCode selection is sent to Admin) and the Bill Claim
task (created when the Delivery Receipt is Sent to Bill) exist on the claim. They will be automatically checked off as Done
when the claim is submitted to a payer. These tasks may be manually checked off if desired according to the established
workflow.
The tasks on the claim are defaulted to list in entry date order with the most recent on the top. As with most tables in
OPIE Billing, it may be sorted by any of the column headings if desired. Tasks which are highlighted in pink are tasks
which are past the due date.
Each Task shows the Due Date, the Type or title of the Task, the initials of the person who created it and the date it was
entered. The Submission Info shows information about the last submission on a Verify Claim Receipt task types. On the
Authorize/Pre-Authorize and Bill Claim tasks, the Submission Info contains the name of the Primary payer in
parentheses. On all other task types, the name of the currently responsible payer appears.
Click on the Add button on a task to add an additional note on that task.
Click on the Edit button to edit the due date on the task, a new note may be added to the task at the same time.
Clicking in the Done box indicates that the task has been completed. However, if there is no other open task, and if the
claim has a non-zero balance, a pop-up will display which says “Task Item Required.” It will be necessary to select a new
task item. This is a feature of OPIE Billing and prevents claims with non-zero balances from getting “lost.”
Click on OK to display the Add Action Item box. Select a new Task Type from the drop-down, set up a due date either
from the calendar or using number of days, select the Associated Submission for that task and enter a Note. Click on
Save and the new task has been added.

OPIE Billing User Guide
www.opiehelp.com -59- Support: (800) 876-7740, option 3

OPIE Billing User Guide
www.opiehelp.com -60- Support: (800) 876-7740, option 3
Notes Tab on a Claim
The Notes tab allows several notes related options. First, at the top left, is the current auto-note for the claim pulled
from the Statement Notes tab under general settings. To the right of that is a First Statement Date if a statement has
been sent and a Last Statement Date.
There is a space to enter manual notes which can appear on the patient’s statement either for this claim only, or for all
claims for this patient. Note the check box below each of these notes boxes which, when checked, will override or
replace the auto-note for the claim or patient.
The invoice notes field is available to create notes which can print only on invoices for this claim or for all claims for the
patient.
Finally, the bottom fields are Internal Notes. The Claim and Patient Billing Alerts create a pop-up containing the words
of the respective notes when a specific claim, or any claim for this patient, is opened. The system will also display an
OPIE Billing User Guide
www.opiehelp.com -61- Support: (800) 876-7740, option 3
alert button, which you can click to display the alerts, in the Apply Payment and Adjustments windows. They will appear
when you select either the patient (for patient alerts) or the claim (for claim alerts). At the bottom is a place to put in
Additional notes that will not pop-up and can only be accessed when you access the notes tab of the claim.
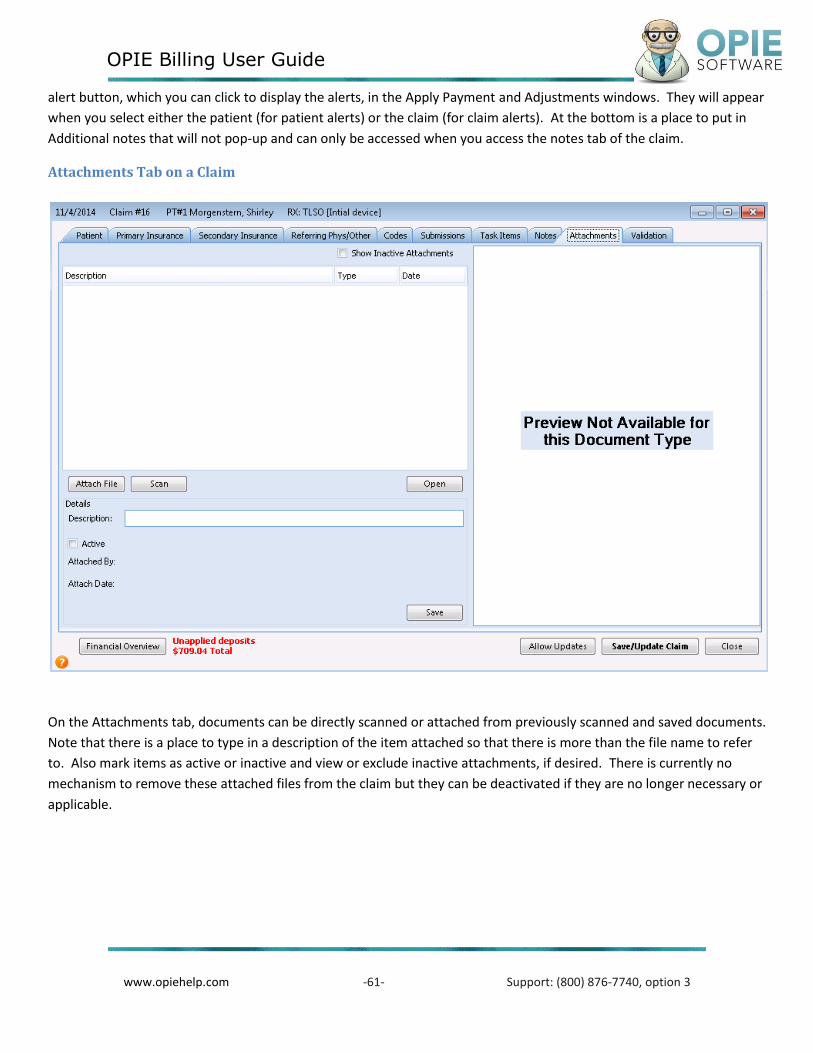
Attachments Tab on a Claim
On the Attachments tab, documents can be directly scanned or attached from previously scanned and saved documents.
Note that there is a place to type in a description of the item attached so that there is more than the file name to refer
to. Also mark items as active or inactive and view or exclude inactive attachments, if desired. There is currently no
mechanism to remove these attached files from the claim but they can be deactivated if they are no longer necessary or
applicable.

OPIE Billing User Guide
www.opiehelp.com -62- Support: (800) 876-7740, option 3
Validation Tab on a Claim
The validation tab on the claim was originally designed to display possible errors or omissions on claims. However, the Claim/Patient/Prescription level errors have become obsolete through development of the software. At this time, these sections may be disregarded. However, this tab may be used to delete a claim or recalculate a claim. Click on Delete Claim to delete it. Enter a reason and click OK. The claim will be deleted. This cannot be undone! Remember: Never delete a claim if it has been submitted to any payer. Adjust off the claim balance instead.
On deletion of a billable claim the system will ask the user whether or not they would like to reset the OPIE Patient Management WIP Status of the associated prescription.
1. Yes - System will reactivate the WIP record and reset the Delivery Receipt status to the appropriate yellow icon with signature indicator
2. No – System will not make any changes to the WIP record To recalculate the Financial Overview on a claim, move to the Validation tab, and click Recalculate. This would only be done on the rare occasion that the claim was not calculating the current responsibility correctly. Return to the Financial

OPIE Billing User Guide
www.opiehelp.com -63- Support: (800) 876-7740, option 3
Overview and the current responsibility amount displayed should have changed. Call OPIE Support for help if you need further assistance.
The additional buttons, Revalidate, Fix Missing Codes, Clear Snapshot and Repair Submission Insurance, located under
the “For Support Staff Use Only” are to be used under the direction and assistance of the OPIE Support Staff only.
The Financial Overview on a Claim
On the bottom left corner of each tab on a claim is a button which displays a Financial Overview on a claim, like this one,
when that button is clicked.
On the top left is a recap of the original charges on a claim, the net payments and adjustments made and finally, the
outstanding balance.

OPIE Billing User Guide
www.opiehelp.com -64- Support: (800) 876-7740, option 3
In the middle of the top section is a total of any unapplied payments on the claim. When doing a new payment, you can
choose to either assign the payment to a claim or not. This screen shows unapplied payments that are assigned or
unassigned to claims in separate totals.
The top right area shows the current responsible party for the claim and the total dollars in the balance. This total
should match the Outstanding Balance described previously.
The middle section of the claim shows a Summary by Payer, showing the total paid and/or total adjustments for each
payer. Note: The total due will show as zero as soon as that payer is not the current submission on that claim.
The bottom section has three tabs:
The Payment History
The Payment History includes the name of the payer, the dates the payment was entered (as a new payment) and then
applied, the Payment Type, Check Number and the Payment amount of the total check and finally the Total amount of
the payment which includes any credits (for example, from take backs also listed on the EOB.) If only a portion of that
check was applied to this claim, that amount is displayed on the next tab, the Transaction History tab.
Click on the Open button to the right of the amount to see details of exactly how that payment was applied to each

OPIE Billing User Guide
www.opiehelp.com -65- Support: (800) 876-7740, option 3
claim.
Click on the plus (+) to the left of the claim number to see complete details on how the payment was applied, as shown
below. If any columns are hidden, maximize the screen to see all columns of the payment.
If there were multiple claims paid by the payment you may see multiple plus (+) signs and claims numbers.
At the bottom of the screen you will see either No EOB Attached or a View EOB button. If you’ve attached a scan of the
EOB, View EOB will appear and the EOB will open when you click this button.

OPIE Billing User Guide
www.opiehelp.com -66- Support: (800) 876-7740, option 3
The Transaction History
The Transaction History tab shows the amount of the payment or adjustment that was applied to this claim. The + signs
to the left of each entry can be clicked to open and display a line-by-line detail of the payment or adjustment. You will
notice the line items also give you the user’s initials who applied the payment or adjustment and the batch in which it
was applied. The asterisk (*) shown next to the Contractual Adj entries below indicate that the Contractual Adjustment
was taken automatically as part of the payment.

OPIE Billing User Guide
www.opiehelp.com -67- Support: (800) 876-7740, option 3
Other Claims
The Other Claims tab shows information at a glance regarding any other claims for this patient. These other claims will
only appear if the claim has been submitted and is, therefore, an active claim. Click on the Open button to the right of
the claim to open it.
Payments

OPIE Billing User Guide
www.opiehelp.com -68- Support: (800) 876-7740, option 3
Posting payments is a two-step process: 1. Enter a New Payment
2. Post or Apply that payment to the patient's claim.
3. Auto Post Payment (If you are not currently signed up for Auto Post you will not see this option)
View the Auto Post Overview help topic video
Patient Payments
View the Enter a New Patient Payment help topic video.
New Payments reduce the amount of the current AR balance when they are entered and make up the Total Payments
shown on the Batch and Activity Report's Totals page.
The patient payment quite often is a down payment or co-payment and is received before the patient's device is
delivered. A patient payment cannot be applied until:
The device has been delivered.
The claim is submitted to Patient Responsibility.
The primary and second insurance payments have been applied
For this reason, it is not uncommon to have patient payments unapplied in OPIE Billing for extended periods until all
insurance payments for that claim have been received and posted.
How to Enter a New Patient Payment
A patient payment can be entered in either of two ways. It can be entered as a payment in the OPIE Financial
Responsibility Form and copied to OPIE Billing. If the workflow of the user’s office supports this functionality and it is
done correctly, there is no need to enter the payment into OPIE Billing as shown in the next step.
The second way is to enter the payment directly into OPIE Billing:

OPIE Billing User Guide
www.opiehelp.com -69- Support: (800) 876-7740, option 3
1. On the Opie Billing left navigation bar under Post Payments select New Payment.
2. Click the Payment Type drop-down at the top and select Cash, Patient Check or Patient Credit Card.
3. Click the drop-down at Patient and select the patient's name. (Note: If the L-Code selection has not yet been sent to
Admin, there will be no claim for this patient in OPIE Billing. To find the patient in this case, click on the All button
once. The All button is a toggle and turns on at the first click and off at the second. Then click the drop-down and all
patients in the Opie Practice Management software will be listed. Select the patient from this list.)
4. Date: this defaults to the current date. Change it to a different date if necessary.
5. Check Number: Will appear if this is a check payment. Enter the check number.
6. Payment Amount: Enter the total amount of the payment.
7. Credit: This field is rarely used. It would be used on a patient payment only if there was a balance from a previous
claim that has been adjusted off using the Patient Credit (+) adjustment code. The Credit field would be used to post
the amount from the previous claim to the current claim.
8. Claim: Select the appropriate claim from the drop down. (Note: If the LCode selection has not yet been sent to
Admin, there will be no claim to select. Select None.)
9. Payment Description: this field appears for a Check, Cash or Credit Card payment and is a mandatory field only for a
Cash payment. It is optional for Check or Credit Card payments.
10. It is possible to scan or attach any desired documents to the payment. A copy of the check or a copy of the credit
card receipt is sometimes scanned to a patient payment. This is optional.
11. To print a receipt, click on Print Receipt.

OPIE Billing User Guide
www.opiehelp.com -70- Support: (800) 876-7740, option 3
12. To apply the payments to a claim immediately, click Post and follow the steps under How To Apply Patient Payments
below. To apply the payment later, click on “OK” to save the payment and the New Payment window will close. If
you choose “Close” the window will close and no payment will be saved.
Once all payments have been entered for the day you may prepare your bank deposit. It is not recommended to
withhold the deposit until the payment has been applied as it can take several weeks to get all insurance payments for
the claim.
How to Apply Patient Payments
Claims by patient, while in the claim click on the unapplied deposit, the system will take you directly into the post
payment screen, from there you can post as outlined on the nex page.
To apply a patient payment to a claim you will need to access the Apply Payment window. This can be accomplished one of two ways. Clicking “Post” when the payment is entered will immediately bring up the Apply payment window. As long as the claim has already been submitted to Patient Responsibility, the patient information will auto-populate. If the patient information does not auto-populate you will need to click “Cancel” and go to the claim to verify that all insurance payments have already been entered and applied. Submit the claim to Patient Responsibility, Save and Close the claim, then go to the Post Payment window and find your payment.

OPIE Billing User Guide
www.opiehelp.com -71- Support: (800) 876-7740, option 3
If the payment was previously entered into the system and it is now ready to be applied click on the Post Payment link on the left-hand navigation bar in OPIE Billing. This displays the Post Payment window which is a search box to find all payments entered into OPIE Billing. Payments can be searched by Date by choosing the date in the Payment Date dropdown. If the payment date is unknown, click on All Dates to show all payments. The payments can then be further filtered in several ways:
a. Click on “Unapplied” to filter the payments to only show those that have not yet been fully applied.
b. Click on “Pending Deposits” to show any Unapplied Patient Payments on which the claim has been
submitted to Patient Responsibility.
c. Enter the Payer, Check # or Amount to filter by those fields
Once you have identified your payment, either double click on the payment or click once on the payment to highlight it
and click on the Apply button at the bottom of the window. The Apply Payment window will open in either case.
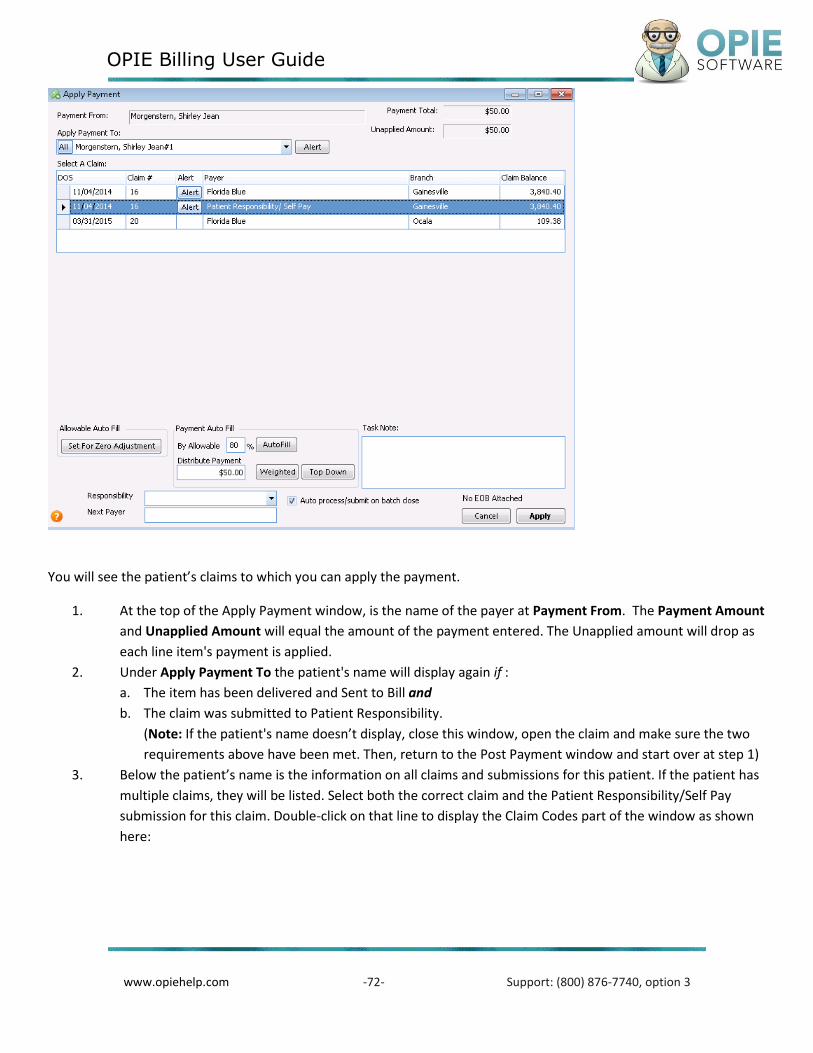
OPIE Billing User Guide
www.opiehelp.com -72- Support: (800) 876-7740, option 3
You will see the patient’s claims to which you can apply the payment.
1. At the top of the Apply Payment window, is the name of the payer at Payment From. The Payment Amount
and Unapplied Amount will equal the amount of the payment entered. The Unapplied amount will drop as
each line item's payment is applied.
2. Under Apply Payment To the patient's name will display again if :
a. The item has been delivered and Sent to Bill and
b. The claim was submitted to Patient Responsibility.
(Note: If the patient's name doesn’t display, close this window, open the claim and make sure the two
requirements above have been met. Then, return to the Post Payment window and start over at step 1)
3. Below the patient’s name is the information on all claims and submissions for this patient. If the patient has
multiple claims, they will be listed. Select both the correct claim and the Patient Responsibility/Self Pay
submission for this claim. Double-click on that line to display the Claim Codes part of the window as shown
here:

OPIE Billing User Guide
www.opiehelp.com -73- Support: (800) 876-7740, option 3
NOTE: To open a claim, right-click on the line showing that claim number and click OPEN.)
4. On the lower portion of the window, a list of the line items, with details of Quantities, Charges, Starting
Balance, Allowable, Adjustment, Payment, Deductible, Co-Pay and Ending Balance for each line displays.
5. It is recommended to always click the “Set for Zero Adjustment” button on patient payments. Only on
extremely rare occasions would a contractual adjustment be taken on a patient payment. This button would
almost never be used for an insurance payment.
6. On the right-hand side, a Select an adjustment type to add drop down is followed by an Add button. To
add an adjustment, for example a Financial Hardship adjustment, as part of this payment, select the
appropriate adjustment type from the dropdown and click on Add. If required, a note box will open. Enter a
note describing the reason for the adjustment and click OK.
7. To post the payment:
a. Apply the payment amount to each line item manually, by typing it into the Payment column for that
line item; OR
b. Click on one of the Payment AutoFill buttons, either the % of Allowable AutoFill, Weighted or Top Down.
% of Allowable applies that percentage of the allowable to each line. Weighted applies the money in a

OPIE Billing User Guide
www.opiehelp.com -74- Support: (800) 876-7740, option 3
weighted fashion based on the charge amount for each line item. Top Down applies the money starting
at the first line item until all of the money is exhausted. You CANNOT use an AutoFill button to pay
more than the balance due. If there has been an overpayment on a line item so that the balance is or
would be negative, the payments must be applied manually.
8. When all payment amounts for this claim have been entered, the total of the Payment column should equal
the Payment Amount at the top of the screen and the Unapplied Amount should now be zero.
9. The last step is selecting the correct options under Responsibility, Next Payer, Auto process/submit on batch
close and Create new PT Responsibility submission (See Using the Auto Process/Submit on Batch Close
Option on the Apply Payment Screen below for more details.)
10. Since the system recognizes Patient Responsibility/Self Pay as the final payer on any claim, there is no need
to change the Responsibility setting on a patient payment application.
11. Click Apply.
Click Cancel. The Apply Payment window will close.
Insurance Payments
Posting payments is a two-step process:
1. Enter a New Payment
2. Post or Apply that payment to the patient's claim.
View the Enter an Insurance Payment help topic video. Making payments is a two-step process: Enter a New Payment. Then Post or Apply that payment to a claim or series of claims. Typically, insurance payments will be entered and applied immediately. However, new payments can be entered and applied to claims later. (See the Help Topic - Applying Unapplied Payments.) Note: Never apply a payment from the secondary insurance before the payment from the primary insurance has been applied. New Payments reduce the amount of the current AR balance when they are entered and make up the Total Payments shown on the Activity Report's Totals page.

OPIE Billing User Guide
www.opiehelp.com -75- Support: (800) 876-7740, option 3
How to Enter a New Insurance Payment
1. On the Opie Billing left navigation bar under Post Payments, select New Payment.
2. Click the drop-down at the top and select the correct Insurance Payment Type.
3. Click the drop-down at Insurance and select the correct insurance company or payer.
4. Click on the Select Insurance button. Five more fields appear.
5. Date: will default to today. This can be changed to the check date or the date the check was received.
6. Check Number: Enter the check number or EFT transaction number. This field will take both alphabetic and
numeric characters.
7. Amount: Enter the total amount of the check or EFT transaction. Enter only the amount you were actually paid.
The amount of the check or EFT transaction. If there is an offset or take-back, this amount will be entered into
the “Credit” field. The total below should total the entire amount to be applied to patients as per your EOB.
8. Universal Identification Info: This field can be used for any other identification information or left blank.
9. To attach an EOB, click Scan/Attach.

OPIE Billing User Guide
www.opiehelp.com -76- Support: (800) 876-7740, option 3
10. If the EOB is already scanned for this payment, click on Attach File. Search for the scanned file and click on Open
and then Save. For direct scan, click Scan. (See Window below.) Select the scanning device at the top left, place
the EOB on the scanner and click Scan.
To apply the payment to the claims immediately, click Post and follow the steps under Apply Insurance Payments below.
To apply the payments later, click on OK and Close the New Payment window.
Apply Insurance Payments
To apply an insurance payment to a claim you will need to access the Apply Payment window. This can be accomplished
one of two ways.
Clicking “Post” at the time the payment is entered will immediately bring up the Apply payment window. As long as the
claim has already been submitted to the insurance payer, the patient information will appear in the “Apply Payment To”
dropdown. If the patient information does not appear, it is likely that the claim has not been submitted to the insurance

OPIE Billing User Guide
www.opiehelp.com -77- Support: (800) 876-7740, option 3
payer. Click “Cancel” and go to the claim to verify that all insurance submissions have already been properly created
and still active. Submit the claim to the appropriate insurance payer, Save and Close the claim, then go to the Post
Payment window and find your payment again.
If the payment was previously entered into the system and it is now ready to be applied click on the Post Payment link
on the left-hand navigation bar in OPIE Billing. This displays the Post Payment window which is a search box to find all
payments entered into OPIE Billing. Payments can be searched by Date by choosing the date in the Payment Date
dropdown. If the payment date is unknown, click on All Dates to show all payments. The payments can then be further
filtered in several ways:
a. Click on “Unapplied” to filter the payments to only show those that have not yet been fully applied.
b. Click on “Pending Deposits” to show any Unapplied Patient Payments on which the claim has been
submitted to Patient Responsibility.
c. Enter the Payer, Check # or Amount to filter by those fields

OPIE Billing User Guide
www.opiehelp.com -78- Support: (800) 876-7740, option 3
Once the payment has been identified, either double click on the payment or click once on the payment to highlight it and click on the Apply button at the bottom of the window. The Apply Payment window will open in either case.
1. At the top of the Apply Payment window, the name of the payer appears in the “Payment From” field. The
Payment Total should equal the total paid to patients as per the EOB. The Unapplied Amount will equal the
payment total less any previously applied amounts. The Unapplied amount will drop as each payment is
entered.
2. Click the drop-down under “Apply Payment To.” A list of all patients who have had claims submitted to this
payer appears. Select the name of the patient. If there is a take back or offset, it is recommended to choose
this patient first and apply the take-back or offset adjustment before beginning to apply the payments from
the EOB. Please see the Processing Insurance Take-Backs section for further information.
3. Advanced Search button, search by
a. Claim Custom Field 1
b. Claim Custom Field 2
4. ICN/Check number 5. Choosing a patient from the drop down will display a listing of all claims and submissions for the selected
patient. Make sure to select both the correct claim and the correct Payer for this payment. Double click on that line. NOTE: To open one of these claims, right-click on the line showing that claim number and click OPEN. The claim will open on the screen.
6. The Claim Codes box appears which lists all line items, with details of Quantities, Charges, Starting Balance, Allowable, Adjustment, Payment, Deductible, Co-Pay and Ending Balance for each line. On the right-hand side is a Select an adjustment type to add drop-down followed by an Add button. To add an adjustment, for example a Sequestration deduction, as part of this payment, select the appropriate adjustment type from the dropdown and click on Add. Except for the Sequester adjustment, a note box will open. Enter a note describing the reason for the adjustment and click on OK.

OPIE Billing User Guide
www.opiehelp.com -79- Support: (800) 876-7740, option 3
7. ICN: Manually enter the ICN number from the EOB to in OPIE Billing and OPIE Reports
8. Referring to the EOB, go to each line item and enter first the correct Allowable and then the correct Payment
for that line item. In some cases the Deductible for that line item will be entered also. As the allowable is
entered for each line item, the system will automatically create an adjustment for the difference between the
starting balance and the allowable. These represent the contractual adjustments for each line.
9. After entering all the allowable and payments for this claim, the total payment should equal the total payment
for that claim. If there are other claims to be paid, the Unapplied Amount at the top of the screen should have a
positive amount. Otherwise, it should be zero.
10. The final step is to identify what happens next with this claim when the batch is closed. If there is a positive
Ending Balance and the need to submit to another insurance company, from the Responsibility drop-down,
select either Next Print HCFA (to send a 1500 form) or Next Crossover (if the claim is automatically crossed-over
from the primary insurance or if the claim will be sent electronically to the secondary from ZirMed). The Next

OPIE Billing User Guide
www.opiehelp.com -80- Support: (800) 876-7740, option 3
Payer should display the name of the secondary insurance company. If the next 'payer' is the patient himself,
Next Payer should say Patient Responsibility. Select Patient Print Statement.
(See the Using the Auto Process/Submit on Batch Close Option on the Apply Payment Screen below for more
details.)
11. Click Apply.
If there is money left to be applied, (indicated by a positive Unapplied Amount), select and post the next patient and
claim. Once there is no money left to be applied and no more patients left on the EOB click Cancel to exit the Apply
Payment window.
Adding Interest Payments/Charges to a Claim
Occasionally the EOB will reflect an interest payment or charge. This will need to be added to the claim using the
Medicare Interest or Private Insurance adjustments. Note that each of these adjustment types have both (+) and (-)
adjustments. The (+) adjustment is primarily used to add the insurance payment amount to the claim. The (-)
adjustment type is primarily used to offset the interest charge on the claim.
Using the Auto Process/Submit on Batch Close Option on the Apply Payment Screen
1. When applying a payment, there is the option of allowing the system to automatically process a submission
to the next payer after the batch is closed. The Next Payer field will display who the next payer is. If the next
payer is NOT Patient Responsibility, use any of the selections except Patient Print Statement.
2. Selections under Responsibility include:
a. Next Print HCFA will submit to the next payer/insurer. It will automatically select the next payer in the
box below. After closing the batch:
i. The planned submission (1500 form) will appear in the queued claims list.
ii. It will also create a task of Submission Queued with the note "Subsequent submission queued
for printing."
iii. Go to the submission queue and process the submission(s) to print the 1500 form for mailing.
b. Next Crossover will submit to the next payer/insurer. It assumes that the current payer will
automatically send the claim to the next payer, as in the case of Medicare to Medicaid. Note: To submit
to the secondary payer manually using ZirMed, choose this selection. After closing the batch:
i. A submission will have been made to the next payer.
ii. A 'Verify Claim Receipt' task item will be created with the note "Claim was submitted Via
Crossover."
c. Same Appeal will create an 'Appeal' task and the claim will remain in the responsibility of the current
payer.
d. Same Hold will create an 'Other' task with the note "On Hold Pending Action" and the claim will remain
in the responsibility of the current payer.
3. Patient Print Statement will immediately assign responsibility for the claim to Patient Responsibility. After
closing the batch:
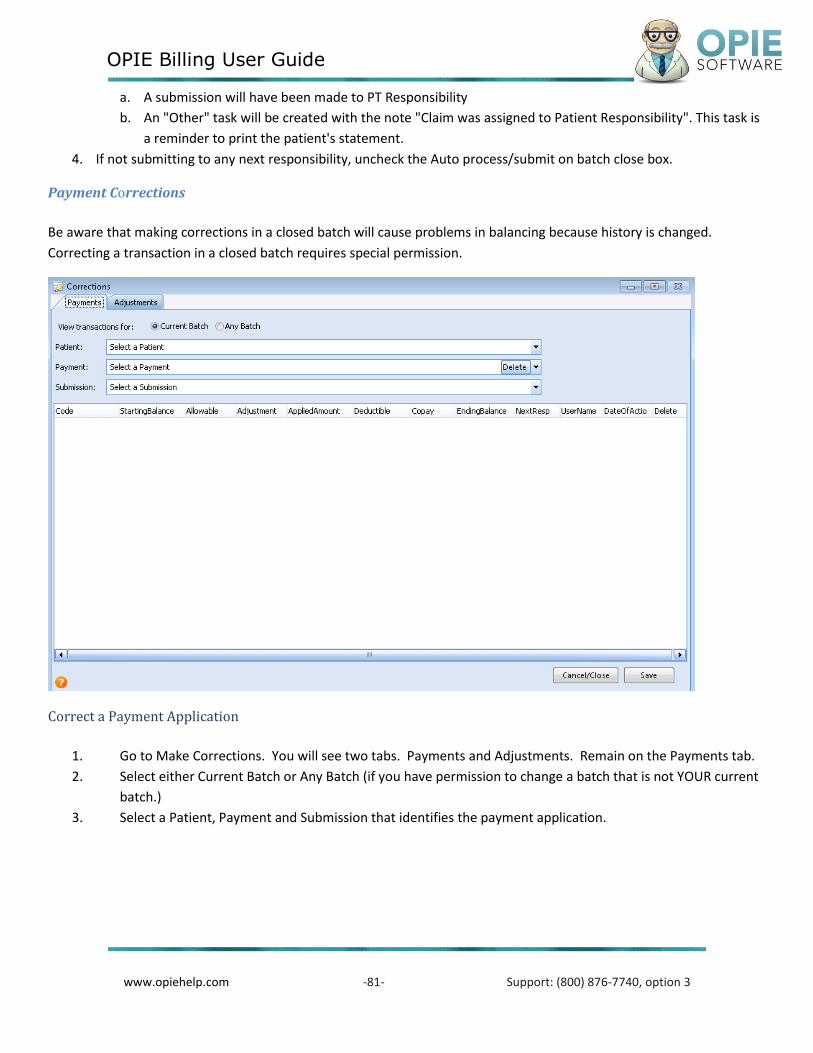
OPIE Billing User Guide
www.opiehelp.com -81- Support: (800) 876-7740, option 3
a. A submission will have been made to PT Responsibility
b. An "Other" task will be created with the note "Claim was assigned to Patient Responsibility". This task is
a reminder to print the patient's statement.
4. If not submitting to any next responsibility, uncheck the Auto process/submit on batch close box.
Payment Corrections
Be aware that making corrections in a closed batch will cause problems in balancing because history is changed.
Correcting a transaction in a closed batch requires special permission.
Correct a Payment Application
1. Go to Make Corrections. You will see two tabs. Payments and Adjustments. Remain on the Payments tab.
2. Select either Current Batch or Any Batch (if you have permission to change a batch that is not YOUR current
batch.)
3. Select a Patient, Payment and Submission that identifies the payment application.

OPIE Billing User Guide
www.opiehelp.com -82- Support: (800) 876-7740, option 3
4. The system will display exactly how the payment was applied. Make the necessary changes here. For
example, if the allowable was incorrectly entered and resulted in an adjustment, double-click on the
allowable amount on the affected L-Code to change it. Continue to make all necessary corrections.
5. Click on Save and (if making a correction in a closed batch) enter an explanation in the Corrective Action box.
Click OK. The dialog box will close.
6. Review the changes by navigating to the Financial Overview tab on the claim and verifying that the claim is
now correct.
Payment Incorrectly Applied to a Claim - Delete the Applied Payment
1. Go to Make Corrections.
2. Select either Current Batch or Any Batch.
3. Select the Patient, Payment and Submission that identifies the payment application.
4. The system will display exactly how the payment was applied. Click in the Delete box at the right end of each
line item. Then click on Save. Be careful not to click the “Delete” button near the top of the window in the
Payment line. This would delete the entire payment along with ALL associated applications and this would
change your AR history.
5. Enter an explanation in the Corrective Action box and OK. Each Line item will return the message
“Operation Was Completed Successfully”; the user will need to click on OK for each deleted line.

OPIE Billing User Guide
www.opiehelp.com -83- Support: (800) 876-7740, option 3
6. Click the Cancel/Close button to close the dialog box.
Incorrectly Saved New Payment Applied to Claim - delete the Payment and All Associated Payment Applications
1. Go to Make Corrections.
2. Select either Current Batch or Any Batch.
3. Select a Patient, Payment and Submission that identifies the payment application.
4. Delete the Payment by clicking the DELETE button on the payment line.
5. Click Cancel to close the dialog box.
Note: This will delete ALL associated payment applications and the New Payment also. Once deleted, re-
enter the New Payment and re-enter all payment applications. To delete a specific payment application,
refer to the instructions on correcting/deleting a payment application.
Adjustment Corrections
Be aware that making corrections in a closed batch will cause problems in balancing because history is changed.
Correcting a transaction in a closed batch required special permission.
Correct a Contractual Adjustment that was Part of a Payment
7. Go to Make Corrections. You will see two tabs. Payments and Adjustments. Remain on the Payments tab.
8. Select either Current Batch or Any Batch (if you have permission to change a batch that is not YOUR current
batch.)

OPIE Billing User Guide
www.opiehelp.com -84- Support: (800) 876-7740, option 3
9. Select a Patient, Payment and Submission that identifies the payment application.
10. The system will display exactly how the payment was applied. Make the necessary changes here. For
example, if the allowable was incorrectly entered and resulted in an adjustment, double-click on the
allowable amount on the affected L-Code to change it. If the adjustment amount needs to be removed, that
is, a contractual adjustment should not have been taken, zero the adjustment column.
11. Click on Save and (if making a correction in a closed batch) enter an explanation in the Corrective Action box.
Click OK. The dialog box will close.
12. Review the changes by navigating to the Financial Overview tab on the claim and verifying that the claim is
now correct.
Adjustment Incorrectly Applied to a Claim
1. Go to Make Corrections.
2. Click on the Adjustments tab.
3. Select either Current Batch or Any Batch.
4. Select the Patient and Submission that identifies the claim to which the adjustment was applied.
5. The system will display exactly how the adjustment was applied.

OPIE Billing User Guide
www.opiehelp.com -85- Support: (800) 876-7740, option 3
6. You will see the Data of Action, the Code line the amount, the adjustment type and an indication of whether
the adjustment was a + or -. The user’s initials and notes will also be shown.
If you want to remove the adjustment completely, click in the Delete box at the right end of each line shown. Then
click on Save. Then, click the Cancel/Close button to close the dialog box.
If you want to change the adjustment type, click the drop down next to the adjustment type and select the
adjustment type that you want it to be. It will look like this.

OPIE Billing User Guide
www.opiehelp.com -86- Support: (800) 876-7740, option 3
Click the Save button. Then click on Cancel/Close to close the dialog box.

OPIE Billing User Guide
www.opiehelp.com -87- Support: (800) 876-7740, option 3
Adjustments
Adjust a Claim on Which a Payment Has Not Been Made and Applied
Some adjustment types will not appear unless a payment has been applied or unless a submission has been made to
patient responsibility. Please contact OPIE Support if you need help with this issue.
Create an Opie Billing Adjustment
1. Select Adjustments under Corrections/Adjustments from the left navigation bar.
2. When the Adjustments window opens
a. Select the patient's name from the drop down.
b. At the submission field, select the claim #, DOS and payer from the drop down.
3. The L-Codes and Unresolved Charges for each L-Code will appear.

OPIE Billing User Guide
www.opiehelp.com -88- Support: (800) 876-7740, option 3
Adjust Individual Line Items
1. Double-click on the L-Code to adjust. The details of the transactions to date will appear in the right-hand
window. (NOTE: if there have not yet been any transactions the right hand window will be blank.) In the
upper right-hand corner, the L-Code to be adjusted will appear.
4. Select your adjustment type from the drop down.
5. Enter the amount of the adjustment you want to make. Always enter this as a positive amount. The sign (+
or -) on the adjustment type will indicate the effect it will have on the balance.
6. OPIE recommends leaving good notes so that you’ll know later why this adjustment was needed.
7. Once you are satisfied that your adjustment is correct, click “Add Adjustment.”
8. Double-click on the next L-Code you wish to adjust and repeat steps 5-9 until all adjustments for this claim
submission have been completed.

OPIE Billing User Guide
www.opiehelp.com -89- Support: (800) 876-7740, option 3
Adjust the Entire Claim at Once
To Distribute an Adjustment Across All Claim Lines
1. Open the Adjustment screen and select the patient and the submission /claim number you wish to adjust.
2. Select your Adjustment Type
3. Type the Amount of the total adjustment into the Amount box.
4. Click in the Distribute to All Codes box.
5. A note will appear that will tell you exactly how much of the adjustment will be applied to each code, like this.
6. Enter a note in the Note box explaining the adjustment.
7. Click on Add Adjustment.
8. All lines of the claim will be adjusted by the amount described in the note. Any remainder will be applied to the
last code and the details on the last code will be displayed in the right-hand screen.

OPIE Billing User Guide
www.opiehelp.com -90- Support: (800) 876-7740, option 3
9. Click on the Close button to close the window.
To zero out all claim lines
Pick an adjustment type that has the opposite sign of the claim line balances. That is, for positive balances, select a
negative adjustment type. For negative balances, select a positive adjustment type.
1. Select the appropriate adjustment type.
2. Click in the Zero Out Code box.
3. Click in the Apply Amount to Each Code box.
4. Enter a note in the Note box explaining the adjustment.
5. Click on Add Adjustment.
6. All lines of the claim will now show Unresolved Charges of zero.
7. Click on the Close button to close the window.
(Note: on a claim line which is a mix of positive and negative balances you will need to do two adjustments. First,
process a minus (-) adjustment. It will affect only line with positive balances, reducing them to zero. Then, process a
positive (+) adjustment. It will affect only line with negative balances, raising them to zero.)
Final Steps of Adjustment
1. The recommended procedure for finalizing adjustment transactions is to close the batch. This will
automatically close all transactions and recalculate the balances on affected claims.
2. To manually finalize transactions and recalculate the claim balance, reopen the claim.
3. Click on the Codes tab and review the outstanding balances on L-Codes to ensure that they are correct.
4. Click on Save/Update claim
5. Click on Financial Overview and make sure that both the outstanding balance and the Current Responsibility
have the same balance.
6. If they have not updated, close the claim again, reopen it, click on Save/Update claim and recheck the
financial overview.
7. If the outstanding balance and the Current Responsibility still do not match, contact OPIE Billing Support to
review the claim.
Processing Insurance Take-Backs
The functionality in the OPIE Billing module simplifies the process and integrates insurance take-backs with payment
entry which allows the user to apply the total amount of payment plus take-back in a single step.
This workflow begins with the entry of the New Payment into the OPIE Billing module:
1. From the left-hand navigation or from the Post Payment window, click on the New Payment button.

OPIE Billing User Guide
www.opiehelp.com -91- Support: (800) 876-7740, option 3
2. The system opens the New Payment form.
3. Select the Payment Type.
4. Select the Payer.
5. The system opens the detail section of the New Payment form. At this point, the system will display the updated payment fields. The New Payment form includes separate Payment Amount and Credit fields:
Payment Amount – The actual amount of the payment that has been received from the payer. This amount does not include any take backs or other credits.
Credit – The amount of the take back or other credit. This is the amount that is being recouped from a previously paid claim.
Total – This field is a live calculation of the total amount (Payment Amount + Credit) that is available to be applied to a claim as per the EOB.
Now the user will complete the process of entering the new payment into the OPIE Billing module:
6. Enter all required fields in the detail section of the New Payment form, including any Credit amounts.
7. Click on the Post button to navigate to the Apply Payment window, or click on the OK button to save the unapplied payment and reset the New Payment form.
When the payment is ready to be applied navigate to the Apply Payment window either by clicking on “Post” after entering the payment or searching for the payment through the Post Payment window.
8. Bring up the first patient who is being recouped from in the “Apply Payment To” field. Double-click the appropriate claim and submission.
9. Choose “Insurance Take Back (+)” from the “Select an adjustment type to add” drop down. Click “Add.” 10. In the newly created column, enter the appropriate take-back amounts for each line item from the EOB. 11. The Total in this column should equal the total of the recoupment for this patient. 12. It is very likely that this claim will now have a balance. Decide who will be responsible for this balance or if the
decision will be appealed. Choose the most appropriate selection under “Responsibility”. 13. Click “Apply” 14. If there are more recoupments on this EOB, bring up the next patient who is being recouped from in the “Apply
Payment To” field and repeat steps 8 – 14. When you have completed entering all recoupments, continue to step 15.
Remember: If the ‘recouped’ claims were closed and now have a balance create a Task Item which will indicate the current status of this claim. (For example, an Appeal task.)

OPIE Billing User Guide
www.opiehelp.com -92- Support: (800) 876-7740, option 3
15. Bring up the first patient payment on the EOB. Follow the steps as usual for applying insurance payments. When all patients on the EOB have been applied, you should have a zero Unapplied Amount. Click Cancel to close the form.
Refunds (On Unapplied Payments)
If you have the necessary permissions, you can process refunds on unapplied payments by editing payments. This type of refund is intended for patient payments which were entered as new payments before the device is delivered and on which the payment must be returned before the device is delivered. NOTE: A Refund adjustment is always the correct way to refund a payment that has been applied to the claim. Associated Permissions
Refund Payments – This permission should be assigned to select OPIE Billing administrators. This permission will allow users to process refunds on unapplied payments in OPIE Billing and Collections using Edit. Only users with this permission are allowed to process refunds on unapplied payments, regardless of the status (open/closed) of the batch that is linked to the payment.
The workflow begins after the entry of the New Payment into the OPIE Billing module:
1. From the left-hand navigation bar, click on the Post Payment button.
2. The system opens the Post Payment window.
3. Using the available filters and date selection, locate the previously saved unapplied payment.
4. Select the payment.
5. Click on the Edit button.
6. The system opens the New Payment form with all detail information for the unapplied payment. The system will display the Refund button in the detail section of the payment form as shown below.
Refunds (on Overpaid Claims)
When a patient payment has been pre-collected and there is a claim to post the collected funds OPIE Best Practice is to
apply the payment to the claim, resulting in an overpayment on the claim. The user may then proceed with using the
Refund Adjustment workflow.
The user is notified of outstanding patient payments when in the apply payment screens:

OPIE Billing User Guide
www.opiehelp.com -93- Support: (800) 876-7740, option 3
The system, upon batch close, will automatically create a Post Patient Deposit Task for any new patient responsible
claims with an unapplied patient payment in an unapplied status:
The workflow begins after then entry of the New Payment into the OPIE Billing Module:
1. From the left-hand navigation bar, click on the Post Payment Button 2. The System opens the Post Payment Window. 3. Select the payment 4. Select the Apply Button. 5. Select the claim to place the payment on 6. Post the collected patient payment on the zero balance claim. 7. This will result in a credit balance on the claim.

OPIE Billing User Guide
www.opiehelp.com -94- Support: (800) 876-7740, option 3
Once the user has posted the overpayment, and the sites internal refund process followed and the refund check has
been cut, the user will need to enter the refund adjustment to record the refund and zero out the claim.
Refund Adjustment Workflow:
1. From the left-hand navigation bar, click on Adjustments 2. Select the patient 3. Select the claim that has the credit balance. 4. Double click the line with the overpayment
a. If it is on several you will need to select each line individual -or- b. Use the Zero Out Code and Apply Amount to Each Code box
5. Enter in the Refund (+) adjustment type 6. Enter in the any needed notes 7. Add Adjustment

OPIE Billing User Guide
www.opiehelp.com -95- Support: (800) 876-7740, option 3
Once the add adjustment button is selected, the user will see the adjustment Refund (+) listed in the detail portion of
the screen:
The user may now select the Close Button to exit the Adjustment form.
The financial history of this claim can be viewed under Financial Overview within the Claim on the Transaction History
tab:

OPIE Billing User Guide
www.opiehelp.com -96- Support: (800) 876-7740, option 3
The Refund Adjustment is also shown on the Batch or Activity Report under Adjustments.
7. Click on the Refund button.
8. The system opens the Payment Refund dialog like this:

OPIE Billing User Guide
www.opiehelp.com -97- Support: (800) 876-7740, option 3
OR 9. If you don’t have permission you will see this message:
The Payment Refund prompt includes Refund Date, Refund Amount, and Refund Note fields:
Refund Date – The date that the refund was processed. This date may be set to an earlier date if necessary.
Refund Amount – The amount of the refund. This amount will be set to the Unapplied Balance of the payment by default. It may be edited to a lesser amount, but the system will not allow users to enter a Refund Amount that exceeds the Unapplied Balance on the payment.
Refund Note – This field is used to capture an internal note associated with the refund. Now the user will complete the process of refunding the unapplied payment from the OPIE Billing module:
10. Enter all required fields in the Payment Refund prompt.
11. Click on the Save button to complete the refund process.
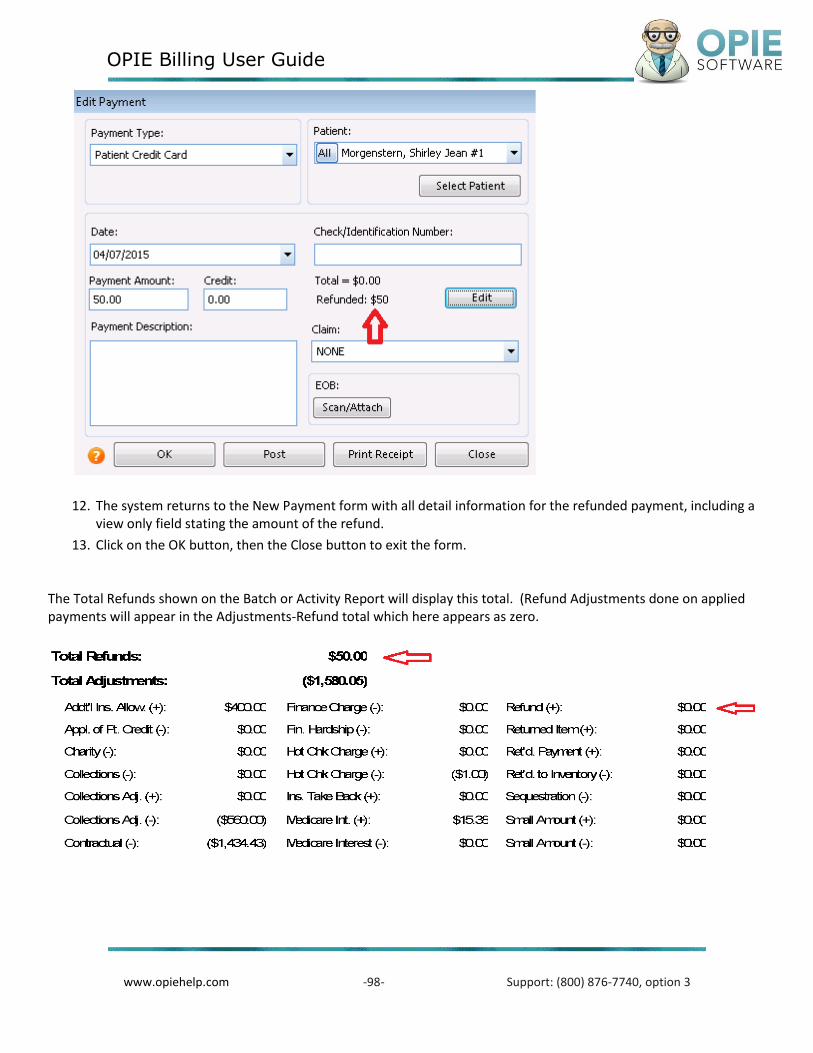
OPIE Billing User Guide
www.opiehelp.com -98- Support: (800) 876-7740, option 3
12. The system returns to the New Payment form with all detail information for the refunded payment, including a view only field stating the amount of the refund.
13. Click on the OK button, then the Close button to exit the form. The Total Refunds shown on the Batch or Activity Report will display this total. (Refund Adjustments done on applied payments will appear in the Adjustments-Refund total which here appears as zero.

OPIE Billing User Guide
www.opiehelp.com -99- Support: (800) 876-7740, option 3
OPIE Balancing
Working within OPIE Billing each day can include tasks such as submitting claims for billing (insurance and patient
responsibility), posting payer and patient payments as well as issuing various claim level adjustments. Each of these
transactions will affect the practice’s Accounts Receivable (AR) balance and generally the practice will use accounting
software such as QuickBooks or employ an accountant who will maintain the practice’s overall financial balances. In
order to keep OPIE Billing in balance with the accounting software totals must be entered into the accounting software
after being recorded into OPIE Billing. These entries can be obtained by generating reports in OPIE Billing and OPIE
Reports.
Working with Batch Reports
1. A new batch should be created for each day’s work.
a. If a practice has multiple individuals working in OPIE Billing it is recommended each user maintain an
individual batch.
2. Batches should be balanced and closed by the end of business each day.
a. To generate a batch report for balancing purposes:
i. Select Close Batch in the left navigation pane
ii. Find the batch you want to report on.
iii. Select Batch Report
iv. Once the Activity Report Interface box appears the user will notice the options defaulted to
Batch as well as the batch selection auto populated.
v. Select the Generate Report button to create the batch report.
3. Navigate to the last page of the batch report to locate the totals for each type of financial transaction. The
report should look similar to the following:

OPIE Billing User Guide
www.opiehelp.com -100- Support: (800) 876-7740, option 3
4. Total Charges, Total Payments, Total Refunds and Total Adjustments are values that will need to be entered into
your accounting system. It is important to balance the daily work to OPIE Billing so that the totals can be booked
correctly into the practice’s accounting software. If a total does not match, the user should research and correct.
a. Total Charges are all original submissions for a claim and are added to the AR Balance.
i. Subsequent submissions of a claim, for example, to a secondary or tertiary payer or to patient
responsibility will not add to the practice’s AR balance.
b. Total Payments reduce the accounts receivable totals. It is extremely important to balance the
payments recorded into OPIE Billing against the deposit slip for the day. If these do not match the user
will need to review and correct.
c. Total Refunds lists refunds of unapplied payments. These payments have not been applied to a claim
but are in need of refunding to the issuing party. Be sure to follow your practice’s defined process of
handling refunds from unapplied.
d. Total Credits, while not impacting AR balances, should be reviewed. This category denotes money that
has been moved between accounts or claims. This typically matches the adjustment totals for Patient
Credit (+) and/or Insurance Take Back (+)

OPIE Billing User Guide
www.opiehelp.com -101- Support: (800) 876-7740, option 3
e. Total Adjustments are items such as Contractual Adjustments, Refunds, and Write-Offs. Contractual
Adjustments are taken automatically when insurance payments are posted. This is the difference
between the billed amount and the allowable on the line item of the claim. Each type of adjustment
available in OPIE Billing is individually listed under the Total Adjustment and is important to balance
these totals too.
5. After the report has been balanced against the daily work the batch will need to be closed. Closing the batch
finalizes all transactions and these transactions will now appear on the Activity Reports by date.
a. Closing a Batch
i. Select Close Batch in the left navigation pane
ii. Choose your batch
iii. Select Batch is Clean, Close This Batch
iv. This will close the user out of billing. The user will need to create a new batch to log back into
OPIE Billing.
Balancing the Activity Report to the AR Aging Report
The Activity Report by Date closely resembles the batch report in format. However, unlike the individual batch reports,
it includes all transactions for the date range entered as long as all batches for that date range have been closed. If a
batch for the selected date range is in an open status, the recorded transactions in this batch will NOT be included in the
Activity Report.
The AR Aging report shows all non-zero-balance claims with their aging status.
It is OPIE Best practice to balance the practice’s Activity Report to the AR Aging Report daily, verifying the internal OPIE
Billing totals are correct.
1. Balancing formula: Activity Report Ending A/R Balance = AR Aging Total – Unapplied Payments.
2. Verify all of the day’s batches are closed. The user will need to open a new batch in order to enter Billing and
run the necessary reports.
3. Under Reports, click on Activity Reports, click the Date Range option and enter today’s date for the beginning
and ending date range. Click on Generate Report.
4. When the report finishes loading, navigate to the last page of the report and note the Ending A/R Balance
amount.
5. Run the AR Aging report by selecting AR Aging under the Reports heading in the left navigation pane in OPIE
Billing.
6. Once the report displays, scroll to the bottom of this report and find the Total Totals balance which will be at the
bottom right of the report. Make a separate note of this number.
7. Also on the AR Aging report, locate the Total Unapplied Payments total which is located near the bottom of the
AR Aging screen.
8. Subtract the Total Unapplied Payments from the AR Aging total.
9. The result should exactly match the Ending AR Balance total from the Activity report.

OPIE Billing User Guide
www.opiehelp.com -102- Support: (800) 876-7740, option 3
10. If these totals do not match, call OPIE Support at 1-800-876-7440, select options 3 and 2 and ask for Billing
Support. They will help to determine why these totals may be out of balance.
Posting Monthly Totals
If the practice wishes to book the accounting entries other than daily, run the Activity reports for the date range of the
totals desired. Clients will often run the Activity reports for a one month date range and use the totals for that month
to post to the accounting software.
Posting Totals by Branch
Instead of maintaining a grand total in their general ledger, some clients post totals by branch. This can also be done
using the Activity reports with one exception.
Activity reports show the payment totals for New Payments entered. However, until a payment is applied, it has no
branch. Therefore, you must get the total of any unapplied payments by branch from the Payments report under Opie
Reports.
Running the Activity Report by Branch
1. Go to Reports, Activity Reports and select Date Range and then enter the date range for the time period you
need.
2. Click on the Plus sign to the left of the Filter button. Select the branch desired and generate the report. Totals
for everything except unapplied payments will appear on the last page.
Unapplied Payment by Branch
Unapplied payments can be found on the Payments report in Opie Reports.
1. Go to Opie Reports and under Detail Reports: Category select Financial Reports. Under Report Data select
Payments.
2. Put in the date range needed and click on Generate Report.
3. When the report opens, click on Choose Fields and place a check mark next to Branch (Pt Primary) and
Unapplied Balance. Those fields will be added to the report.
4. Now click on the funnel-shaped icon at the top of the Unapplied Balance column and select Custom. When the
Custom Filter window opens, in the center column select to filter ‘Does Not Equal’ and in the next column type
in a zero. Click on OK.
5. Displayed will be a list of unapplied payments for the requested date range. The report can further be sorted by
clicking on the funnel-shaped icon at the top of the Branch (Pt Primary) column to filter for each branch
individually.
6. The report can be set to provide a sum of the payment amount. To do this go to the Amount column and at the
top of the column click on the Sigma and select Sum from the drop down. Then click on OK. The sum of the
payment column will display at the bottom of the column.

OPIE Billing User Guide
www.opiehelp.com -103- Support: (800) 876-7740, option 3
7. The above process will allow the practice to get unapplied payment totals by branch to add to the payment
totals gathered from the activity report.
Other Key Opie Financial Reports
Charges Billed (by Date Billed)
This is a Sales report showing detail of every claim billed (initial submissions only) for the date range specified. Opposite
the claim number, patient information and Billed date and Amount the report will also display the Allowable amount,
and the Total Payments and Adjustments processed against each claim to date and the current balance of the claim.
There is a second version of this report which breaks down each claim by LCode. It is titled Charges Billed (by Date
Billed), L-code detail.
Charges Billed or Sent to Bill (by DOS)
This is an alternate Sales report which will show detail of every claim delivered (and then either sent to billing or billed),
and will pull data by Date of Service (DOS). In addition to the amount billed (initial submissions only) for the date range
specified it will show the claim number, patient information and Billed date and Amount. The report will also display the
Allowable amount, and the Total Payments and Adjustments processed against each claim to date and the current
balance of the claim. There is a second version of this report which breaks down each claim by LCode titled Charges
Billed or Sent to Bill (by DOS), L-code detail.
Adjustments
This report provides a detailed list of all adjustments processed against claims in the date range specified. It includes the
claim number, patient information, and the type of adjustment, amount, as well as any notes entered when the
adjustment was done. This is a great report for reviewing in detail the frequency and amount of specific adjustment
types.
Work In Progress Financial
It is recommended that clients run this report at least monthly. It will show all claims which have had LCode selections
sent for authorization but which have never been billed. It’s a great report to use to catch ‘missed’ billing and also to
give you a picture of what claims should be billed in the near future. The status on each claim will indicate where it is in
the WIP process.
Applied Payments by Payment, by Payment Date and by Application Date
Each of these reports shows all payments applied for the date range selected. The reports by Payment Date and by
Application Date will show all payments by LCode for the date range selected. By Payment Date displays payments by
the date the New Payment was entered. By Date Applied displays by the date the payment was applied against the
claim.

OPIE Billing User Guide
www.opiehelp.com -104- Support: (800) 876-7740, option 3
The Applied Payments by Payment will show all payments applied by the date the New Payment was entered but will
not break the payment down by LCode.
Important Notes about Permissions and Corrections/Deletions-Data Modification Log
Generally a biller will need access to all permissions under Billing/Settings/User Permissions with these exceptions. OPIE
Support does not recommend giving billers permission to Make Corrections/Delete Payments in Any Batch, to Delete
Claims (Any Time) or To Edit Charge Amount after Submission as well as Edit Allowable Amount after Submission. If a
user makes a correction or deletes a payment in a closed batch, or if a claim is deleted which has already been
submitted the user will be changing totals in the past and when running an activity report or batch report for a prior
date will have totals changed. In addition any changes made to the Charge amount or Allowable amount after
Submission will change the AR Balances going back to the claim submission date. While these actions will write to the
data modification log, it is important for practices to avoid changing history.
While all of these transactions will appear on the Data Modification Log, it will still throw off totals of items which have
already been balanced.
Therefore, OPIE Support recommends that instead of making corrections, you should make adjustments to correct
errors in a prior day’s work.
Month-End Process OPIE Billing requires no special steps to officially close a month, outside of closing all batches with activity for the month.
Typically, practices will close all batches as normal at the end of the last business day of the month and open a new
batch to allow the user to reenter billing and run the reports needed.
Step 1: Verify ALL billing batches are closed
This information can be reviewed from within the OPIE Billing Module.
In the navigation pane on the left of the screen:
Locate Activity Report
Use the drop down selection for Batch to review for any open batches
All batches for the desired reporting time frame will need to be in a closed status.
NOTE: The only batch that should be open is the batch created to reenter billing and run these reports and it should contain no transactions for the closing month.

OPIE Billing User Guide
www.opiehelp.com -105- Support: (800) 876-7740, option 3
Step 2: Generate the Activity Report
In the navigation pane on the left of the screen:
Locate and launch the Activity Report
Click on Date Range
Use the drop down and choose the start and ending dates.
If the report needs to be generated by Branch, Select the + Filter and select the needed branch. The user will need to run this report for each branch to obtain all branch totals and practice grand totals.
If the practice is maintaining branch totals in their accounting software, the practice will need to obtain the total of any unapplied payment by branch from the Payments report under OPIE Reports. Unapplied payments are not associated to a branch until applied to a claim. General Patient Default Branch information is obtainable for the unapplied payments from the Payments report.
The following totals will be needed from this report o Total Charges o Total Payments o Total Adjustments
The totals in the next suggested reports will be compared to the totals from the Activity Report.

OPIE Billing User Guide
www.opiehelp.com -106- Support: (800) 876-7740, option 3
Step 3: Generate the A/R Aging Report
The A/R Aging Report is accessed from within OPIE Billing and is located in the left navigation pane under Reports.
Once you have selected the report and it displays:
Set the AR as of: field to the last date of the month desired:
Use the field selector icon to add any additional fields, such as branch if the practice is reviewing the aging based on branch.

OPIE Billing User Guide
www.opiehelp.com -107- Support: (800) 876-7740, option 3
Make a note of Unapplied Cash

OPIE Billing User Guide
www.opiehelp.com -108- Support: (800) 876-7740, option 3
The Total Account Receivable balance can be obtained from the A/R Aging Report by taking the total from the AR Totals
column and subtracting the unapplied payments (Total – Unapplied Payments = Total A/R)
Note: The Total A/R Balance obtained from the above formula using the AR Report should match the Ending A/R Balance
displayed on the last sheet of the Activity Report for the same time range.
These reports are used for balancing the entries and can be run and reproduced at any time, eliminating the need to
print out unless a copy is saved as part of your month end process.
Step 4: Generate the Sales Report [Charges Billed (by Date Billed)]
To run the Sales Report:
Launch OPIE Reports Module and Select the Charges Billed (by Date Billed) LCode Detail Report
Category: Financial Reports
Report Data: Charges Billed (by Date Billed), L-Code Detail
Select the desired date range
Generate Report
If the practice is entering into their accounting software by Branch, this report may be sorted and totaled by branch.
The Billed Amount column should match the Total Charges on the Activity Report

OPIE Billing User Guide
www.opiehelp.com -109- Support: (800) 876-7740, option 3

OPIE Billing User Guide
www.opiehelp.com -110- Support: (800) 876-7740, option 3
Step 5: Generate the Payments Report
To run the Payments Report:
Launch OPIE Reports Module and Select the Payments Report
Category: Financial Reports
Report Data: Payments
Select the desired date range
Generate Report
This will show all payments received during the month and the Payment Amount column should match the Total
Payment on the Activity Report.
If the practice is entering into their accounting software by Branch, Unapplied payments will need to be
accounted for since until payments are applied to a claim they are not assigned to a branch. The practice will
need to filter the payments report for unapplied payments and sort by the default Patient Branch, manually
adding this total to the payments total by branch.

OPIE Billing User Guide
www.opiehelp.com -111- Support: (800) 876-7740, option 3
Step 6: Unapplied Payments – Balancing to the AR Aging Report
Launch OPIE Reports Module and Select the Payments Report
Category: Financial Reports
Report Data: Payments
Select the desired date range; for unapplied payments the date ranges should be left blank o Reminder: Some of the unapplied payment will be from prior months
Generate Report
Use the Sigma ∑ to add in the Sum feature to the Unapplied Balance Column
The practice may also want to use the custom filter to include payments not equal to zero.

OPIE Billing User Guide
www.opiehelp.com -112- Support: (800) 876-7740, option 3
On the Payments Report, match the Unapplied Payments total to the displayed Unapplied amount on the AR Aging Report
The Unapplied Payments can be set to include the Patient’s Default Branch allowing for calculations per Branch.

OPIE Billing User Guide
www.opiehelp.com -113- Support: (800) 876-7740, option 3
Step 7: Generate Adjustments Report
Launch OPIE Reports and Select the Adjustments Report
Category: Financial Reports
Report Data: Adjustments
Select the desired date range
Generate Report
This will show all adjustments during the month and the adjustment column should match the Adjustments on the Activity Report.
If the practice is entering into their accounting software by Branch, this report may be sorted and totaled by branch.

OPIE Billing User Guide
www.opiehelp.com -114- Support: (800) 876-7740, option 3
After making the various journal entries into your Financial Software, verify your AR Ledger account on the Balance
Sheet ties out to the AR Aging report in OPIE.
If additional information or reporting is needed, please contact OPIE Support at 1-800-876-7740 option 3.
Reports
There are three reports which are a direct part of Opie Billing:
1. Activity Reports 2. AR Aging 3. Data Modification log
Activity Reports
The Activity reports option displays and prints either Batch or Date Range reports for any selected date range. Batch reports, which can also be run from the Close Batch option should be used to balance payments, adjustments and AR balances each day. If using multiple batches daily in your practice, the activity report by date range will not show each batch’s activity until those batches are closed.
Filter these reports by branch or by practitioner by clicking on the +Filter button and select the branch or practitioner (Provider) whose activity you would like to see.
The reports give detailed listings of these five activity types:
1. New Charges (Billed Amounts) - These are the initial submissions for each claim done for the date range or batch chosen. This amount will be added to the AR balance at the end of the report.
2. Additional Submissions - These are the subsequent submissions for each claim done for the date range or batch chosen. This amount will not be added to the AR balance at the end of the report.
3. Payments Entered - There are new payments entered for the date range or batch chosen. This amount will be subtracted from the AR balance at the end of the report. These will be listed in alphabetical order by payment type, cash, credit card payment, etc.
4. Adjustments - These are all adjustments for each claim done for the date range or batch chosen. They are listed by Adjustment Type and within type by Patient name. The total of each adjustment type will adjust the total AR balance at the end of the report.
5. Payments Applied - These are payments which have been applied to claims. They may or may not coincide with the payments entered today. They will not reduce the AR balance at the end of the report.
AR beginning balances and summaries of totals affecting these balances appear on the last page of the report. The report can be exported to Word, to a PDF or to Excel.

OPIE Billing User Guide
www.opiehelp.com -115- Support: (800) 876-7740, option 3
To search for something on the activity or batch reports, click on the Print Layout icon and type your search word(s) in the box to the left of the word Find. Then click on Enter to find the first instance of that entry and Next to find subsequent entries.
AR Aging Report
The AR Aging report is a snapshot of claims as of the current moment and with the use of the date selection feature, the user is able to generate a historical AR Aging Report. It will include all claims with a non-zero balance and show the aging on that balance. It can be used as part of your Collections procedures. To see the ‘allowable’ instead of the current balance on claims, click in the Include Estimated Contractual Adjustments box at the top of the report. For all claims without a payment, it will reduce the current balance by the amount of the estimated contractual adjustments. The allowable on a claim with a payment is the current balance.
The report will open with certain preset fields. Click on this icon to add or remove fields from the report.
Sort by any column by just clicking on the column title. Click on the header again and it will sort in descending order.
Drag one or more column headers into the grey area above the column headers to organize the data by that heading and provide totals of any columns totaled or counted.
Add a total to any column by clicking on the Σ symbol to the right of the column heading.
At the bottom of the report is a total of the unapplied payments currently on your system. The difference between the ending AR balance on the AR Aging Report and the ending AR balance on the current date Activity Report is the amount of these unapplied payments.
Filter any column by clicking on the Funnel - shaped icon for that column and making a selection, or by selecting Custom and setting up a Custom selection. The funnel will turn Blue in that column. To turn off the filter, select All from the drop down list.
There are preset layouts under the drop-down box located in the upper left of the screen. Default layout is the default setting which allows you to organize the report automatically by Insurance Company (Current responsibility), Branch, or to include the last payment.

OPIE Billing User Guide
www.opiehelp.com -116- Support: (800) 876-7740, option 3
Data Modification Log
The Data Modification Log details all edit and delete changes made to payments and claims in closed batches. These are changes which will change history and change the totals of AR balances on previous days’ batch and activity reports. Use this report to track down out-of-balances situations.
The report will open with certain preset fields. Click on the Choose Column button to add or remove fields from the report.
Sort by any column by just clicking on the column title. Click on the header again and it will sort in descending order.
Dragging one or more column headers into the grey area above the column headers will organize the data by that heading and provide totals of any columns totaled or counted. Drag the heading down into the body of the report to remove the selection.
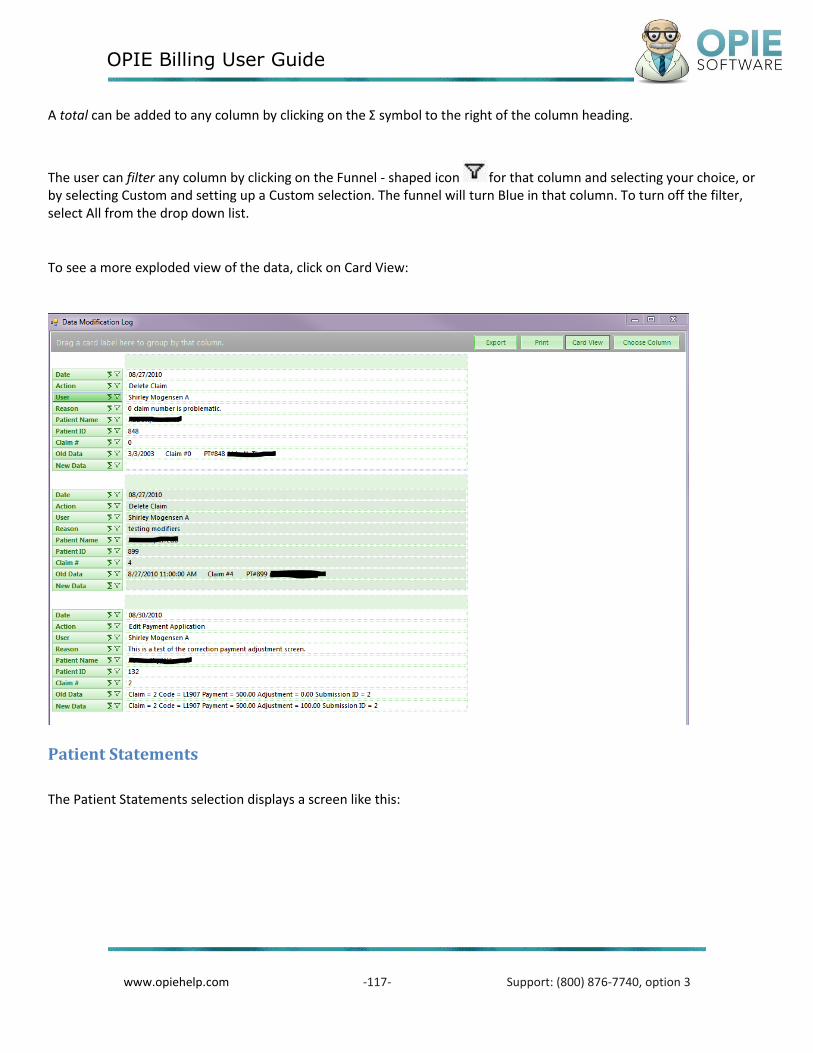
OPIE Billing User Guide
www.opiehelp.com -117- Support: (800) 876-7740, option 3
A total can be added to any column by clicking on the Σ symbol to the right of the column heading.
The user can filter any column by clicking on the Funnel - shaped icon for that column and selecting your choice, or by selecting Custom and setting up a Custom selection. The funnel will turn Blue in that column. To turn off the filter, select All from the drop down list.
To see a more exploded view of the data, click on Card View:
Patient Statements
The Patient Statements selection displays a screen like this:

OPIE Billing User Guide
www.opiehelp.com -118- Support: (800) 876-7740, option 3
Leave Print Statement Queue selected and click on Generate Statements to see this screen which shows the total pages of statements that will be printed. These are for claims which have not been generated for 30 days. Click on Print and Mark Follow-ups. After printing the user will be asked if the system should create follow-up tasks for the patient statements that have been printed. Say Yes to get a Phone Call Follow-up task created for each claim.

OPIE Billing User Guide
www.opiehelp.com -119- Support: (800) 876-7740, option 3
To select just certain statements, click on Print Statement Selection to see this screen:

OPIE Billing User Guide
www.opiehelp.com -120- Support: (800) 876-7740, option 3
When one of the plus signs next to the age of the claims is clicked, a list of claims will display similar to the following:
Click in the Print and/or Follow-up boxes next to the claims to print. The information shown includes the Patient’s Name, Claim #, DOS, Submission Date, Days Past Due (calculated from the first statement date), First Statement Date, Last Statement Date and Amount Due. When finished selecting the statements to print, click on Generate Statements. The preview of the statements will appear and will include the total pages to print. Click on the Print & Mark Followups button to print the statements.
Appendix A - TIPS
Correct New Payment Created Twice in Error; Payment Not Yet Applied
Go to the Post Payment window and find the unapplied duplicate payment.
1. Select the duplicate payment and click on the Delete button at the top of the screen. The Corrective Action
box will open; enter a reason for the Delete and Click on OK. Remember, if the payment was entered in a
closed batch, the AR totals will change going back to the date of that payment. Details of the delete will
display in the Data Modification Log.
Moving Patient Overpayment from One Claim to Another
View the Move Patient Overpayment help topic video.

OPIE Billing User Guide
www.opiehelp.com -121- Support: (800) 876-7740, option 3
Review the patient’s account, verifying which claim has the overpayment and which claim needs to have the
overpayment credited.
Select Adjustments in the left navigation pane.
Enter the patient’s name and the claim/submission. Locate the claim and line item(s) with the overpayment.
Double click on each line and enter the amount overpaid in the Adjustment Amount box for each line and select
the Patient Credit (+) adjustment type.
Click on Add Adjustment. Note that the balance, which may be negative, will have decreased by the amount
entered.
Navigate to the New Payment Entry, located in the left navigation pane in OPIE Billing
Select New Payment button.
Enter in the payment type (Patient Cash, Check, Patient Credit Card)
Select Cash as the payment type and the patient’s name.
Enter 0.00 in the Payment amount box.
Enter in the amount of total overpayment into the Credit box.
The user may then place the credit payment into unapplied by selecting OK
OR
The user may then select Post and continue posting the credit to the correct patient claim.
How to Correct LCodes or Quantities on Claims in OPIE Billing
There are two answers to this depending on whether the claim has been delivered or not.
1. If the claim has only been sent to admin but has not been delivered (that is, the delivery receipt has not yet
been created and sent to bill), the LCode selection is still unlocked. Therefore all you need to do is find the
LCode selection in OPIE and change the LCodes. If you change LCodes, the allowable amount shown on reports
like the WIP financial will change automatically. You'll probably need to log out of reports and go back in again
to see the change.
2. If the claim has been delivered (Delivery receipt sent to Billing) the LCode selection is locked. Therefore, the
claim must be deleted. However, you don't need to create a new LCode selection. Deleting the claim unlocks the
LCode selection and sets the LCode selection and delivery receipt to look like they've never been sent. All that
has to happen is to change the LCodes and/or quantities on the LCode selection and send it to admin again. The
delivery receipt will change automatically and you can then send it to Billing again. (It will, of course, have to be
re-signed by the patient.)
The effect on the WIP Financial is that claim number will most probably change to a new claim number with the
new allowables, although there is no requirement to create a new LCode selection.

OPIE Billing User Guide
www.opiehelp.com -122- Support: (800) 876-7740, option 3
IMPORTANT: Never delete a submitted claim. If you need to correct a claim that has already been submitted,
Contact the payer to tell them it’s an erroneous claim.
Write the claim off and then create another, correct claim.
Preview a HCFA/1500 Form
Preview the HCFA/1500 form prior to submission in OPIE Billing to ensure all of the fields that are required on a
submission are filled out correctly whether sending a paper form or an electronic submission through ZirMed.
To see the preview:
1. Open the claim and go to the Submissions tab
2. Click on Re-Print 1500/Invoice
The 1500 form will open on the screen.
Review all fields, making sure that it is correctly coded. Correct any errors and repeat the process until the claim is
correct.
Add Modifiers
Modifiers can be added through the Billing Module
1. Open any claim
2. Click on the codes tab and click on the + box under Mod1
3. Click the Add Modifier button
4. Add the modifier and description
5. Click the Add button
6. Click Close
1500 form doesn’t line up on print
Boxes not lining up properly or text dropping below the line may be fixed in Adobe Print options.
1. Select Print / Options in the Print dialog box
2. In Page Scaling, set shrink to printable area to None

OPIE Billing User Guide
www.opiehelp.com -123- Support: (800) 876-7740, option 3
3. Ensure that any settings for “scaling” or “rotation” are set to “off” or “none.”
4. For later versions of Adobe Acrobat Reader, under Page Sizing and Handlings select Actual Size.
If this does not correct the issue on the new 1500 form (02/12) there are also global print alignment tools available.
Click on Help, then Settings, then 1500 form (the user must have administrator rights in OPIE Billing to see this). On the
right hand bottom of the form is a “1500 Form Alignment button. The window that appears will have adjustment
settings that will allow the user to move the 1500 print up/down or right/left. These settings will affect only the
workstation in which they have been manipulated. The process will need to be repeated on any other workstations on
which the print needs to be adjusted.
Billing claim shows incorrect default fee schedule
A claim defaulting to the wrong fee schedule can be corrected in Billing.
1. In the left pane of Billing under Insurance Companies, select Existing.
2. From the list that appears, double-click the insurance company to modify.
3. Click the Additional Options tab.
At the bottom, in the Fee Schedules frame, click the drop-down for Default Allowable and Default Billing amount to
change them, and click the Save Changes button.
How to modify an incorrect branch or location on a claim:
A claim with an incorrect branch or location can be modified to display the correct branch or location.
1. Navigate into OPIE Admin. 2. Go to the patient chart and identify the visit where the delivery receipt was created. 3. Navigate to the List Scheduler and locate the appointment for this patient for this day.

OPIE Billing User Guide
www.opiehelp.com -124- Support: (800) 876-7740, option 3
4. Select Edit in the List Scheduler for this appointment and change the branch and/or the location to the correct selection.
5. Click Accept and Refresh Data. 6. Go into OPIE Billing and open the claim number and go to the Referring Phys/Other to verify the branch and
location information. 7. Save / Update Claim.
Delete a Claim
View the Delete a Claim help topic video.
Under permissions, users must have rights to delete claims or a certain status of claims. Permissions include:
1. Delete Claims (Auth Only)
2. Delete Claims (Until Submission)
3. Delete Claims (Any Time)
If the claim has not been submitted to a payer:
1. Open the claim and go to the validation tab.
2. Click on the Delete Claim button.
3. Enter an explanation in the Corrective Action box.
If the claim has been submitted to a payer (not recommended to delete):
1. Open the claim and go to the validation tab.
2. Hold down the Shift Key and click on the Delete Claim button.
3. Enter an explanation in the Corrective Action box.
4. It is not recommended practice to delete a claim that has been previously submitted to a payer. This will
change your AR history. Instead, write off the balance using an adjustment code and recreate the claim in
OPIE.
How can I get my Taxonomy Code to Print on the HCFA 1500 Form?
The practice will need to decide where to store the Taxonomy Code. Currently OPIE Billing does not have a designated
spot to store this information. The office will need to choose to store the Taxonomy code on the Branch Other ID 1 or
Other ID 2. These fields are located in administrative tools, Edit Branches.

OPIE Billing User Guide
www.opiehelp.com -125- Support: (800) 876-7740, option 3
Once the taxonomy code has been stored in the OPIE Patient Management system the OPIE Billing Module Insurance
Company 1500 form defaults can be set.
Navigate into OPIE Billing and open the Insurance Company Information. Navigate to the 1500 form tab, this is where
the defaults for specific insurance company 1500 form defaults are set.
Box 24J:
If the insurance company is requesting the information to be in box 24J of the form, complete the needed qualifier
setting for 24I and then set the second 24J box to print the taxonomy code. Simply select the Other ID field that the
taxonomy code was stored in OPIE Patient Management system.

OPIE Billing User Guide
www.opiehelp.com -126- Support: (800) 876-7740, option 3
Box 32:
If the insurance company is requesting the information to be in box 32B of the form, complete the needed qualifier
setting for 32B Qualifier and then set box 32B to print the taxonomy code. Simply select the Other ID field that the
taxonomy code was stored in OPIE Patient Management system.

OPIE Billing User Guide
www.opiehelp.com -127- Support: (800) 876-7740, option 3
Box 33:
If the insurance company is requesting the information to be in box 33B of the form, complete the needed qualifier
setting for 33B Qualifier and then set box 33B to print the taxonomy code. Simply select the Other ID field that the
taxonomy code was stored in OPIE Patient Management system.
Remove a Claim from Queued Claims:
Click the Remove button which appears to the right side of a queued claim and click “Yes” to confirm to remove the
queued claim. Note: The user must have the appropriate permission in user setup.
Fix a Claim that has Different Dates of Service on the LCode Lines Shown on the Codes Tab
1. Open the claim and go to the Codes tab. 2. At the bottom of the window, click on the Allow Updates button. An Update DOS button should appear to the
right of the DOS field in the upper right corner. 3. Modify the DOS using the DOS field calendar dropdown. 4. Click on the Update DOS button. That should make all the dates on the line items correct. 5. Click on Allow Updates to hide the Update DOS button. 6. Click on Save/Update Claim.
Claim shows incorrect default fee schedule
A claim defaulting to the wrong fee schedule can be corrected in Billing.
1. In the left pane of Billing / Insurance Companies, select Existing.

OPIE Billing User Guide
www.opiehelp.com -128- Support: (800) 876-7740, option 3
2. From the list that appears, double-click the insurance company to modify. 3. Click the Additional Options tab. 4. At the bottom, in the Fee Schedules frame, you can click the drop-down for Default Allowable and Default Billing
amount to change them, and click the Save Changes button.
Task Items
OPIE Billing Task Lists and Items
Opie Billing Task Items are created to always know the status of each claim and to indicate what next steps need to be
taken with each claim. Review Current Task items daily to 'work' claims and keep their status up to date.
There are three types of Task Lists
1. The Current Task list opens automatically when Billing is opened and lists all tasks which are due today or in the
past.
2. The Pending Task list shows all open tasks whether due or not.
3. The Resolved Task list shows all tasks which have been completed. There is a Search box at the upper right-hand
corner of the task list which allows searching by patient's last name or claim number.
The task list display includes the Outstanding Amount of the claim and the Branch under which that claim will be
categorized and billed. Note: The Outstanding Amount will show zero until the first time that claim is opened and saved
in Billing.
Right click functionality has been provided to the Task Items list. Select the task item and right click. The following
options are available: Mark Task Complete, Open Claim, Adjust Claim, Financial Overview and Print Patient Statement.
Mark Task Complete – Crosses off the task item on the open task list. Also places a check mark in the
“Done” box on the Task Items tab on the claim. If an additional task needs to be created (Reminder: All
claims must have an active task until they are paid off and closed) the system will present the Add Action
Item box allowing creation of the next task.
Open Claim – Opens the claim in a new window allowing for full review of the claim.
Adjust Claim – Launches the Adjustments window allowing the user to record an adjustment for the patient
and claim displayed on the task items list
Financial Overview – Launches the financial overview of the claim corresponding to the task.
Print Patient Statement – allows the user to generate a patient statement.
If a claim is displayed more than once in current or pending task lists, it indicates that the claim currently has multiple
open task items. This normally indicates that some clean-up is required. Resolve unneeded tasks by right-clicking on that

OPIE Billing User Guide
www.opiehelp.com -129- Support: (800) 876-7740, option 3
task item and selecting open claim. Open the claim and navigate to the Task Items tab to check off the tasks that are no
longer needed.
The Current Task Items look like this:
The task items list defaults to display with the most recent entry date first.
The task item tab on a claim looks like this:

OPIE Billing User Guide
www.opiehelp.com -130- Support: (800) 876-7740, option 3
There is an Add button under the Notes column which allows adding a Note to any task. When creating a note, it will
automatically be added with a stamp showing user initials and the date and time the note was added. Some notes are
added automatically as part of automatic task generation (See Task List below.)
The information shown on each task will help identify whether that task is related to the primary, secondary or other
payer or to Patient Responsibility. If the claim has not been submitted, as in the case of an Authorize/Preauthorize or Bill
Claim or Submission Queued task, the Insurance information will be in parentheses. If there is a related submission for a
task, the name of the payer to which the claim was submitted displays, and following that will be the submission
method in parentheses followed by the date and time of the submission. In many cases there will be a system-generated
note attached to the task giving more details about that task.
Remember, there must always be at least one task item open for each claim until the claim is paid off and closed. When
the claim is paid off, all open tasks on that claim will be closed automatically by the system.
Checking off all open tasks on an open claim will cause the following message to display:

OPIE Billing User Guide
www.opiehelp.com -131- Support: (800) 876-7740, option 3
Click OK to see the following box:
Select a Task Type from the drop down, set the task due date, select an Associated Claim Submission and enter a Note.
This will create a new task.
The task list can be sorted by either clicking on the column header to sort the data in ascending or descending order or
by dragging the column header into the upper grey area. This action will collapse the tasks and group them into buckets
organized by the type selected. The groups can be expanded by selected the + icon. Additional headers can be dragged
into the upper grey area allowing for subcategory sorting. The task screen can be reset by either dragging the headers
back into the lower section of the screen or by closing the task list and reopening.
Several task items are created automatically by the system. Sending an LCode Selection to Admin or the Delivery
Receipt to Billing, for example, will create system generated tasks. Additional tasks can be added manually to claims as
needed.
There are 23 tasks installed as part of the Billing system. 10 are automatically created by system functions, 2 of the 10
will be completed by system functions, and 13 may be generated manually by users. To add new tasks to the system
and/or modify existing tasks, navigate to Help, Settings and select the Task List tab.

OPIE Billing User Guide
www.opiehelp.com -132- Support: (800) 876-7740, option 3
Best Practice:
Avoid modifying task items until the system’s functionality is fully understood.
DO NOT CHANGE the description of tasks which are created automatically by the system.
How task items are generated
Below is a list of the task items that are part of the installed Billing program. They are listed in alphabetical order and
include information on their Task Type, Preset Due Days and whether they are created or completed automatically or
manually.
Task Type Preset
Due Days
Generated or Completed By
Adjust Account 0 Manual
Appeal 0 Selection of Same Appeal on
payment window.
Authorize Complete 30 Manual
Authorize/Pre-Authorize
0 LCode selection created and
sent to Admin
Bill Claim 0
Delivery receipt created and sent to Bill
This task is not available for manual selection on claims.
Automatically checked off on
Submission Queued or Verify Claim
Receipt.
Claim Processed/Await
EOB 14 Manual
Compile/Send Internal
Documentation 0 Manual
Data Changed 0
This task is not assigned on all data changes. Many updated fields do not trigger the Data Changed task item. Primarily,
the task is assigned with

OPIE Billing User Guide
www.opiehelp.com -133- Support: (800) 876-7740, option 3
changes to patient information.
Delete Claim 0 Manual
Note from OPIE 0 Manual This task is created when a note
is sent to billing from an LCode selection.
Other 7
Selection of Same Hold on payment window. Same hold
means the responsibility should be kept at current payer.
Includes an automatic note re responsibility assigned.
Pending receipt of external
documentation 7 Manual
Phone Call Follow-up
7 Created when patient
statements are generated for queue.
This task is assigned to the claim if the patient statement queue is
generated or if a statement is individually selected for print
and follow-up.
Post Patient Deposit
0
Selection of Print Patient Statement on payment
application AND the patient has an unapplied payment in the
system.
Rebill 0 Manual
Referred to Collection Agency
30 Manual
Adding this task will make this claim appear on the Referred to
Collections report in OPIE Reports.
Refund 0 Manual
Request External Documentation
0 Manual
Review Claim 0 If you turn off auto process
submit on batch close on the payment screen.
Send Statement 0
Selection of Print Patient Statement as Next
Responsibility on payment application with an outstanding

OPIE Billing User Guide
www.opiehelp.com -134- Support: (800) 876-7740, option 3
balance.
Submission Queued 0
Claim added to queue from Submissions tab or if you set
auto process on payment screen to Next Print HCFA.
Automatically checked off when the queued claim is submitted.
Submit Claim 0 Manual
Verify Claim Receipt
15 Claim submission or setting auto process on payment screen to Next Crossover
Verify Coverage 0 Manual
Add New Task Items
Note: The user must have OPIE Admin rights to access the Task List section of Billing Settings.
1. From the Help menu, select Settings.
2. When the Billing Settings window opens, navigate to the Task List tab.
3. On the bottom left-hand corner, click on the Add button.
4. Type in the name of the new Task Item.
5. Set the Default Days Till Due Date using the number counter.
6. Click on the Save button.
7. Repeat steps 4 through 7 for additional Task Items.
8. In the bottom left-hand corner, click on Commit All Task Changes.
9. The system will display a prompt, click on the OK button to close.
10. In the bottom right-hand corner, click on Save and Close.
11. All users will need to shut down OPIE Billing and login again to have the new Task Item available for
selection.
Statements
Eliminate the Detail of L-Codes and Fees on Patient's Statement
Under Help / Settings / Patient Statements and Invoices, click the check box next to Suppress detailed information/codes
on Patient Statements. L-Codes and Fees will not appear on the statement.
Billable Event
The billable event checkbox is used for updating the practitioner compliance screen, billable column. If the note is

OPIE Billing User Guide
www.opiehelp.com -135- Support: (800) 876-7740, option 3
marked as billable then NS appears in that column (NS = Codes Not Sent for Billing). If the note is not marked as billable
that column remains blank. This was originally used as an indicator that you are going to bill this visit and that the
practitioner still needs to do the code selection and send for authorization (basically tells the practitioner what they still
need to do for billing purposes). This was a pre-WIP feature. Users now start out using WIP and no longer rely so heavily
on the Practitioner Compliance screen, so the feature is less useful and can be turned off as noted below. It does not
affect billing, but it does appear on the visits report. If tracked accurately, it will allow for a percentage of billable versus
non-billable visits using the Visits Report.
The billable event prompt can be turned off under Admin Tools > Office Settings > Misc, and there is no harm in doing
so, unless your practice is using the billable indicator on the Practitioner Compliance screen or wishes to view the
billable versus non-billable events on the Visits report.
Show Prices/Fees
For a printout with prices and fees for an LCode selection, there are two forms that can be created in OPIE Practice
management.
1. Service Estimate: Shows fees based on the fee schedule selected in the LCode selection.
2. LCode-based Estimate: In the Browse list of forms, select Reports.
a. Click Add a Report to this Visit and select the LCode Based Estimate.