operation manual and user guide - joetapjoetap.com/.../07/joetap-manual-and-user-guide.pdf ·...
TRANSCRIPT
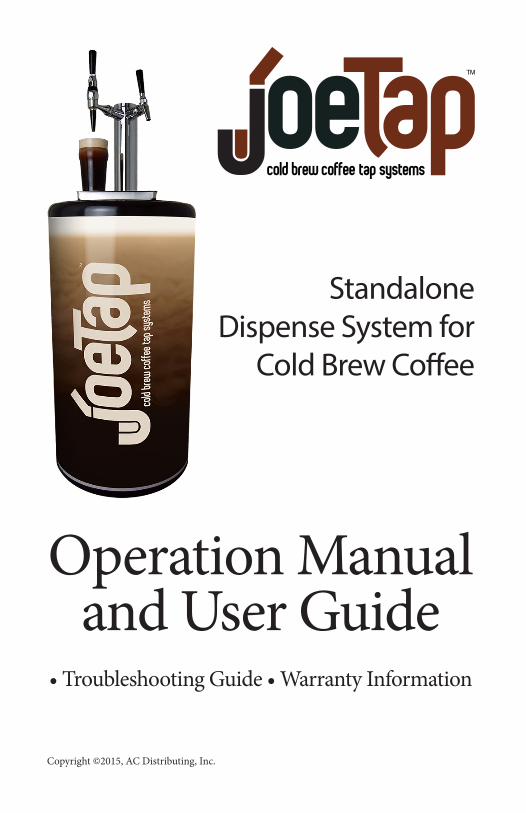
Standalone Dispense System for
Cold Brew Coffee
Operation Manualand User Guide
• Troubleshooting Guide • Warranty Information
Copyright ©2015, AC Distributing, Inc.
Thank you for purchasing the JoeTap™ cold brew coffee dispense system!
By following the detailed instructions in the following pages, you will keep your JoeTap™ in optimal operating condition to minimize down time and increase your earning potential.
Through years of research and development and a passion for quality dispensing methods, AC Beverage has developed a patented technology for nitrogenating cold brew coffee in-line and on-demand. The result is JoeTap™. You no longer need to wait several days while your cold brew coffee force-nitroge-nates in a keg. Your JoeTap™ dispenser instantly transforms any cold brew coffee* into nitro cold brew at the time of dis-pense.
*smallest particle size must be 5 microns or less.
While the technology is complex and sophisticated, the pro-cess is simple - Brew, Tap, Pour.
1
2
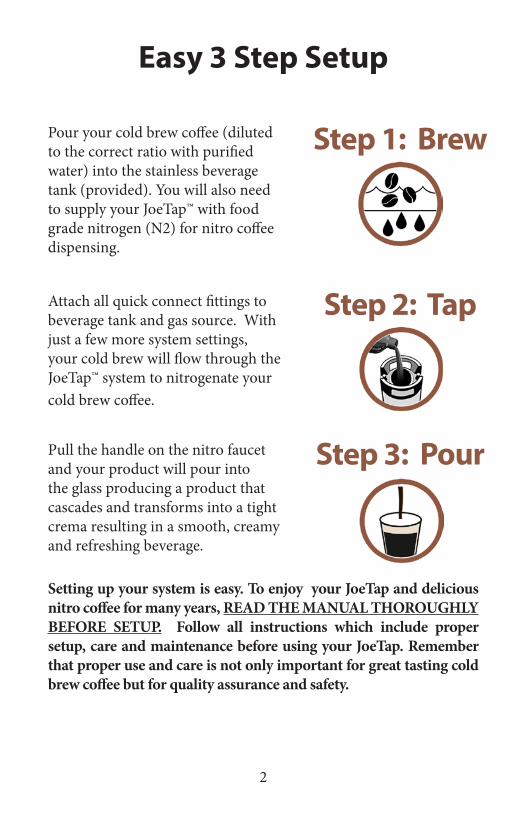
Easy 3 Step Setup
Pour your cold brew coffee (diluted to the correct ratio with purified water) into the stainless beverage tank (provided). You will also need to supply your JoeTap™ with food grade nitrogen (N2) for nitro coffee dispensing.
Attach all quick connect fittings to beverage tank and gas source. With just a few more system settings, your cold brew will flow through the JoeTap™ system to nitrogenate your cold brew coffee.
Pull the handle on the nitro faucet and your product will pour into the glass producing a product that cascades and transforms into a tight crema resulting in a smooth, creamy and refreshing beverage.
Setting up your system is easy. To enjoy your JoeTap and delicious nitro coffee for many years, READ THE MANUAL THOROUGHLY BEFORE SETUP. Follow all instructions which include proper setup, care and maintenance before using your JoeTap. Remember that proper use and care is not only important for great tasting cold brew coffee but for quality assurance and safety.
Step 1: Brew
Step 2: Tap
Step 3: Pour

IMPORTANT SAFEGUARDS
Follow these basic safety precautions when using electrical appli-ances, chemicals and gas supplies to reduce the risk of fire, electric shock, chemical burns, poisoning and any damage to the unit and/or personal injury:
• Read all instructions for installing, cleaning and maintaining.
• Use a standard grounded 110v/20amp electrical outlet. Use of im-proper extension cords, voltage variances or inadequate wiring may cause a fire or shorten the life of the unit.
• Do not get the cord or plug wet.
• Close supervision is necessary when the system is used by or around children and should never be left unattended.
• Using unapproved accessories may cause injury or even death and may cause damage to the JoeTap unit.
• External gas cylinder (where applicable) should be secured at all times and always be stationed on a hard dry surface.
• Never disconnect the JoeTap gas hoses without first turning gas supply off.
• Use only pure FOOD-GRADE nitrogen (N2).
• GAS REGULATOR NOT TO EXCEED 70 PSI! Read Step 10, page 8 of “Step-By-Step Instructions” to properly set the gas regulator.
• Use only approved regulators which are supplied with your JoeTap by AC Beverage.
• Never directly inhale nitrogen gas in a concentrated form or expel gas in a confined area. Be sure to use in a well ventilated area.
• Your JoeTap and gas source are designed to operate in an upright position only. When transporting in a position that is not upright, always follow instructions for ensuring that the correct side is up.
3
• When transporting and using gas tanks, follow all necessary safety precautions. AC Beverage is not responsible for improper handling, transporting or use of gas products. Nitrogen gas tanks are under high pressure and if damaged can cause extreme harm or even death.
• Use only JoeTap cleaning solution as outlined in the maintenance section. Other cleaning chemicals may damage the dispensing system, not adequately clean or shorten the life of the unit.
• Always store the JoeTap unit and gas source indoors and out of the reach of children.
• When using outdoors, always use on a hard, clean and dry surface.
• Never leave the JoeTap/gas source unattended. The JoeTap and gas source should never be used by children or anyone who is not familiar with these safety procedures.
• Be sure that all cords and hoses connected to outlet and gas source are not in a high traffic area, accessible to children or are a hazard in any way.
• Never make any modifications to any part of the JoeTap unit. Mod-ification to the unit, gas delivery system or overall design will void warranty and could cause hazardous conditions resulting in injury or possible death!
• When using JoeTap cleaning solution, be sure to not breath in powder when mixing, get in eyes, mucus membrane or allow skin contact for extended period of time. Do not ingest JoeTap clean-ing solution. TO ENSURE SAFE HANDLING WHEN MIXING, WEAR GLOVES AND PROTECTIVE EYEWEAR.
• Always rinse the unit and all beverage tanks thoroughly with warm water (70° - 90 °) after cleaning with JoeTap cleaning solution. Wa-ter should run clear after rinsing and PH test strips should be used to ensure a neutral PH level.
4

INITIAL SETUPWhat is Included:
When you unpack your JoeTap™, you should have the following components:
• Your JoeTap unit. Your JoeTap has three main parts:
1. The top with tower and either one or two faucets depending on your purchase. NOTE: The top of the JoeTap has been shipped upside down with the tower inside the JoeTap chamber for easier shipping.
2. The base of the unit has an enclosed refrigeration area and not accessible to you. It also has the electrical cord for plugging into a 110v power source (necessary for the refrigeration unit). Next to the power cord from the bottom of the unit is a braided hose used for delivering the nitrogen from your N2 tank. This hose connects on the outside to your gas source (tank or nitrogen generator) and on the inside of the unit it is accessible just beneath the basket in the JoeTap inner chamber. This is where your gas quick connect must be connected when in use and disconnected when removing the basket for cleaning and/or maintenance.
3. The inside of the JoeTap chamber contains all of the necessary components you will need in order to operate your JoeTap. These components include the JoeTap basket that contains all hoses with quick connect fittings, pump, filter and Nitroge-nator Infuser. The basket is also a holding area during shipping for all items below except for the beverage tanks.
• Two 2.5 gallon beverage tanks. These tanks have lids that are released and secured with handles. The lids have rubber gaskets which allow for a good seal when filling with cold brew coffee and gas. These tanks are also equipped with safety release rings that must be used anytime you are opening a tank that has been charged with gas.
• One box of 25 JoeTap cleaning solution packets. You will not need ANY other clean-ing product and should not use any other cleaning product to clean the JoeTap and/or beverage tanks. The product inside the packets is hazardous if not handled properly (MSDS sheets on this product are available upon request). Please read cleaning instruc-tion thoroughly before opening or handling.
• Gas regulator. The gas regulator included ONLY works with nitrogen (N2) gas tanks. You will need a wrench to tighten the nut when attaching to N2 tank and a flat head screwdriver to adjust the pressure on the regulator.
• Additional items include: Drip tray(s) for each faucet, spanner wrench (for removing faucet for monthly cleaning) and food grade lubricant (for lubricating O-rings weekly).
General instructions
Your JoeTap™ unit should be kept upright. Its refrigeration system will only operate with the unit in a standing position. It may be transported horizontally if secured and the vent port where the fan is located is facing up. IMPORTANT: IF YOUR JOETAP™ DISPENSER HAS NOT BEEN KEPT UPRIGHT OR TRANSPORTED VERTICALLY, SET UPRIGHT AND WAIT AT EIGHT (8) HOURS BEFORE PLUGGING UNIT IN.
Each JoeTap™ dispenser is shipped as a complete system. It requires only cold brew coffee, electricity and a supply of nitrogen gas (N2). NOTE: You will need a wrench to tighten the nut on the gas supply and a flathead screwdriver to adjust the pressure on the
5

regulator. The cold brew coffee should be filtered down to 5 microns or less and chilled between 34 to 38 degrees F. To chill the cold brew, place it in the 2-1/2 gallon stain-less beverage tank (provided with your unit), then place the tank inside the operating JoeTap™ dispenser. Alternatively, you may pre-make and pre-chill the cold brew in a separate container in a refrigerator or cold storage walk-in.
The JoeTap does not include a gas source. You will need to obtain nitrogen (N2) from a vendor who supplies beverage-grade compressed gas. A metallic off-taste or other undesirable flavors may develop from poor quality gas! You may also get your nitrogen from a nitrogen generator such as the Nitrogenator™ Elite from AC Beverage.
Step-by-step setup instructions
1. Inspect all parts to ensure everything is included in aforementioned list and that no parts are missing or damaged.
2. Remove the dispenser top from the JoeTap™ unit. The top was shipped upside down inside of the unit with the dispense tower facing down. If the unit was shipped and/or delivered without being in an upright position, BE SURE JOETAP SITS UPRIGHT FOR AT LEAST 8 HOURS BEFORE PROCEEDING.
3. The 2-1/2 gallon stainless beverage tanks are clean and ready for use. If needed, rinse with filtered water to remove any odors. Unlatch one of the tanks and fill with cold brew coffee. Replace lid and seal. Be sure that the seal is flush to the lip of the opening. An uneven seal can result in gas or coffee leaking from tank
NOTE: COLD BREW COFFEE USED IN THE JOETAP MUST HAVE PARTICU-LATES NO GREATER THAN 5 MICRONS. IF YOU BREW YOUR OWN, BE SURE TO HAVE YOUR COFFEE TESTED FOR DISSOLVED SOLIDS BEFORE USING.
4. Plug the power cord into a grounded 110v / 20 amp electrical outlet. Running amps for the JoeTap™ is 1.5 amps.
5. Connect the foam insulated dispense tower line(s) (coming from the bottom of the lid) to the quick connect cou-pler(s) located in the basket. NOTE: There are TWO lines if you have the dual faucet JoeTap.
6
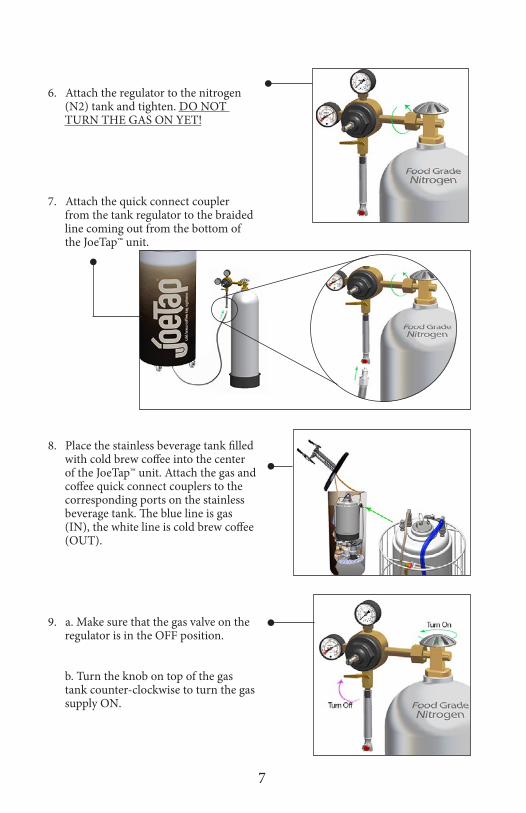
6. Attach the regulator to the nitrogen (N2) tank and tighten. DO NOT TURN THE GAS ON YET!
7. Attach the quick connect coupler from the tank regulator to the braided line coming out from the bottom of the JoeTap™ unit.
8. Place the stainless beverage tank filled with cold brew coffee into the center of the JoeTap™ unit. Attach the gas and coffee quick connect couplers to the corresponding ports on the stainless beverage tank. The blue line is gas (IN), the white line is cold brew coffee (OUT).
9. a. Make sure that the gas valve on the regulator is in the OFF position.
b. Turn the knob on top of the gas tank counter-clockwise to turn the gas supply ON.
7
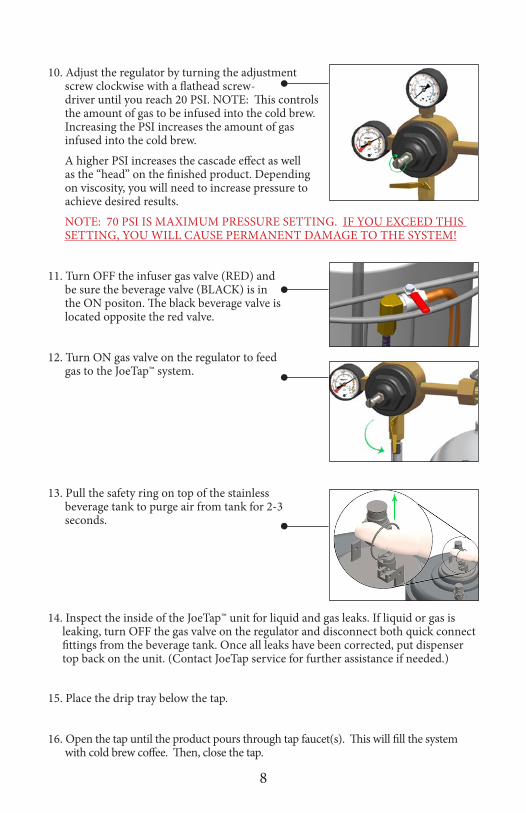
10. Adjust the regulator by turning the adjustment screw clockwise with a flathead screw-driver until you reach 20 PSI. NOTE: This controls the amount of gas to be infused into the cold brew. Increasing the PSI increases the amount of gas infused into the cold brew.
A higher PSI increases the cascade effect as well as the “head” on the finished product. Depending on viscosity, you will need to increase pressure to achieve desired results.
NOTE: 70 PSI IS MAXIMUM PRESSURE SETTING. IF YOU EXCEED THIS SETTING, YOU WILL CAUSE PERMANENT DAMAGE TO THE SYSTEM!
11. Turn OFF the infuser gas valve (RED) and be sure the beverage valve (BLACK) is in the ON positon. The black beverage valve is located opposite the red valve.
12. Turn ON gas valve on the regulator to feed gas to the JoeTap™ system.
13. Pull the safety ring on top of the stainless beverage tank to purge air from tank for 2-3 seconds.
14. Inspect the inside of the JoeTap™ unit for liquid and gas leaks. If liquid or gas is leaking, turn OFF the gas valve on the regulator and disconnect both quick connect fittings from the beverage tank. Once all leaks have been corrected, put dispenser top back on the unit. (Contact JoeTap service for further assistance if needed.)
15. Place the drip tray below the tap.
16. Open the tap until the product pours through tap faucet(s). This will fill the system with cold brew coffee. Then, close the tap.
8

17. Remove the dispenser top again. Find the red infuser gas valve (at the top rim of the basket) and turn to the ON position in order to feed gas to the Nitrogenator™ Infuser.
18. Put the dispenser top back on the unit. Open the tap and fill a glass with nitro cold brew coffee. The initial flow will sputter and then will flow smoothly in about 4-8 seconds. Pour another glass and evaluate both pours to determine the level of nitrogenation. Increase or decrease in 5 PSI increments to either add more nitrogen (for more cascade and head) or less.
19. Increase pressure setting if needed for more cascading and a larger foam head, or decrease pressure to reduce this effect. You will need to pour approximately 24 ounces of product to see the impact of any pressure adjustments.
Note: The temperature of your cold brew will affect the level of the nitrogenation. The optimal temperature is between 34 and 38 degrees F. If the product is warmer than this, there will be less nitrogenation.
20. Once you’ve obtained the desired pour, document the ideal pressure setting and dispense temperature for future reference. It is recommended to obtain a digital brix tester to test the viscosity of your cold brew. This will help determine optimal quality and gas pressure.
21. When you run out of cold brew, the stainless beverage tank is empty but the pump may continue to operate. To stop the pump, turn the pump valve to “off”. The pump (bever-age)valve is black and located on the basket rim opposite the red infuser gas valve. Turn lever 90 degrees to the tubing. This is the “off” position. You will conserve gas by preventing the pump from cycling while an empty beverage tank is on-line.
9
DigitalBrixTester
CLEANING AND MAINTENANCEYour JoeTap™ system should be cleaned regularly and maintained properly to assure reliability and a long service life. It is recommended to thoroughly clean the JoeTap™ at least once per week. However, you may need to clean more often if the cold brew coffee you are using has a higher amount of insolubles. If you are not using a commercially available cold brew coffee concentrate, we recommend that you test your cold brew coffee first to ensure that you have a low amount of insolubles and that no particles are larger than 5 microns.
Be sure to read all of the the following instructions first before per-forming cleaning and maintenance.
NOTE: Protective gloves and eye-ware are required when handling JoeTap™ Cleaning Solution! When opening solution package, be careful NOT to inhale residue. JoeTap™ Cleaning Solution is caustic and should not be breathed in, ingested or come into contact with skin. Thorough cleaning should be performed on a weekly basis using only approved JoeTap™ Cleaning Solution. Failure to do so will void product warranty !
CAUTION! If unit has been laid on its back or sides without ensuring that the fan vent is at the top you will need to place the unit upright and allow for a minimum of 8 hours before connecting power. Failure to follow this procedure may damage the compressor and void the warranty.
10

11
STEP-BY-STEP CLEANING INSTRUCTIONS
NOTE: ALWAYS UNPLUG JOETAP FROM POWER SOURCE BEFORE CLEANING!
1. Thoroughly rinse the 2.5 gallon stainless beverage tank and fill with tepid clean water (between 60 and 100 degrees F.) Note: damage will result from using wa-ter above 100 degrees F! After filling the tank, reattach and secure the lid to the beverage tank.
2. Place the beverage tank inside the JoeTap™ dispenser - connect gas and product lines.
3. Turn infuser gas valve to the OFF position.
4. Replace dispenser top on the JoeTap™, open the tap and run until water is pouring.
5. Remove the dispenser top, disconnect the stainless beverage tank and remove tank from the JoeTap™ unit.
6. a.) Disconnect primary gas feed quick connect in center of JoeTap basket mounted on top of fan dome (at bot-tom of unit).
b.) Remove basket from unit by pulling upward. Turn basket upside down to access filter/strainer assembly.
c.) With basket removed, remove plastic air deflector. Wipe clean entire inside of unit as well as deflector.
12
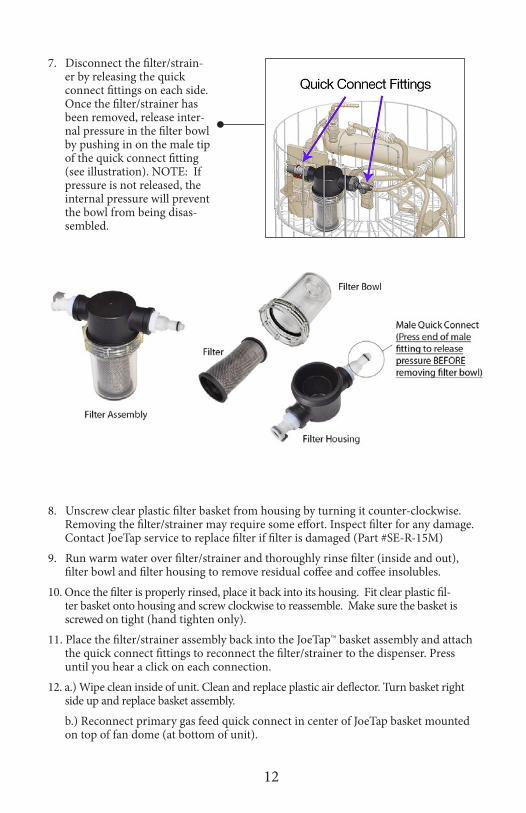
7. Disconnect the filter/strain-er by releasing the quick connect fittings on each side. Once the filter/strainer has been removed, release inter-nal pressure in the filter bowl by pushing in on the male tip of the quick connect fitting (see illustration). NOTE: If pressure is not released, the internal pressure will prevent the bowl from being disas-sembled.
8. Unscrew clear plastic filter basket from housing by turning it counter-clockwise. Removing the filter/strainer may require some effort. Inspect filter for any damage. Contact JoeTap service to replace filter if filter is damaged (Part #SE-R-15M)
9. Run warm water over filter/strainer and thoroughly rinse filter (inside and out), filter bowl and filter housing to remove residual coffee and coffee insolubles.
10. Once the filter is properly rinsed, place it back into its housing. Fit clear plastic fil-ter basket onto housing and screw clockwise to reassemble. Make sure the basket is screwed on tight (hand tighten only).
11. Place the filter/strainer assembly back into the JoeTap™ basket assembly and attach the quick connect fittings to reconnect the filter/strainer to the dispenser. Press until you hear a click on each connection.
12. a.) Wipe clean inside of unit. Clean and replace plastic air deflector. Turn basket right side up and replace basket assembly.
b.) Reconnect primary gas feed quick connect in center of JoeTap basket mounted on top of fan dome (at bottom of unit).
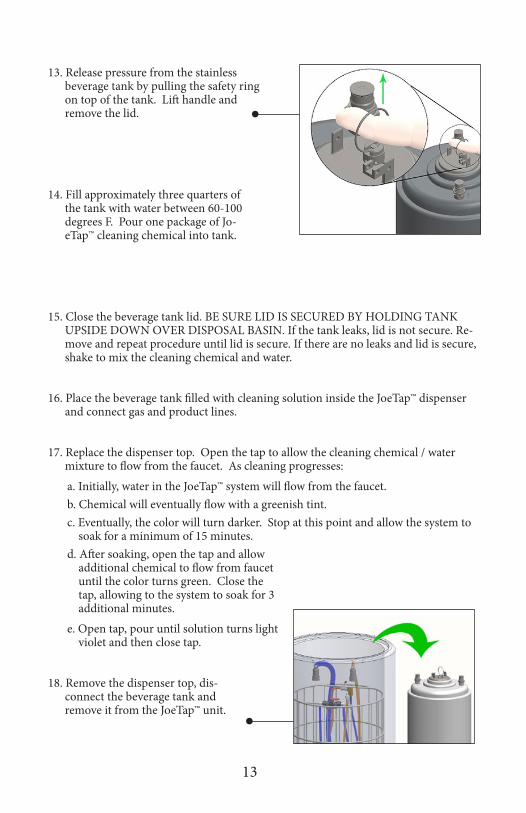
13. Release pressure from the stainless beverage tank by pulling the safety ring on top of the tank. Lift handle and remove the lid.
14. Fill approximately three quarters of the tank with water between 60-100 degrees F. Pour one package of Jo-eTap™ cleaning chemical into tank.
15. Close the beverage tank lid. BE SURE LID IS SECURED BY HOLDING TANK UPSIDE DOWN OVER DISPOSAL BASIN. If the tank leaks, lid is not secure. Re-move and repeat procedure until lid is secure. If there are no leaks and lid is secure, shake to mix the cleaning chemical and water.
16. Place the beverage tank filled with cleaning solution inside the JoeTap™ dispenser and connect gas and product lines.
17. Replace the dispenser top. Open the tap to allow the cleaning chemical / water mixture to flow from the faucet. As cleaning progresses:
a. Initially, water in the JoeTap™ system will flow from the faucet.b. Chemical will eventually flow with a greenish tint.c. Eventually, the color will turn darker. Stop at this point and allow the system to
soak for a minimum of 15 minutes.d. After soaking, open the tap and allow
additional chemical to flow from faucet until the color turns green. Close the tap, allowing to the system to soak for 3 additional minutes.
e. Open tap, pour until solution turns light violet and then close tap.
18. Remove the dispenser top, dis-connect the beverage tank and remove it from the JoeTap™ unit.
13
19. Repeat Step 13 above. Properly discard any remaining cleaning mix by pouring it into a suitable sink drain away from any food products. The cleaning chemical is caustic and should be handled with care when disposing. Thoroughly rinse any residual chemical down the drain.
20. Vigorously rinse the beverage tank by filling it with cold water and shaking it. Pour the contents of the rinsed tank down the drain. IF CLEANING SOLUTION COMES INTO CONTACT WITH SKIN, RINSE IMMEDIATELY.
21. Completely fill the beverage tank with cold water. Place the beverage tank inside the JoeTap™ dispenser. Connect the gas and product lines.
22. Open the tap to purge cleaning chemical from the JoeTap™ system, until a clear stream of water flows from each faucet.
23. Run a PH test strip (available at most drug stores or online) under water from the faucet after 1 gallon of clean water has run through the system. This will ensure that all cleaning chemical has been flushed from system. The test strip should not change color. If the test strip does not change color, you are done flushing the system.
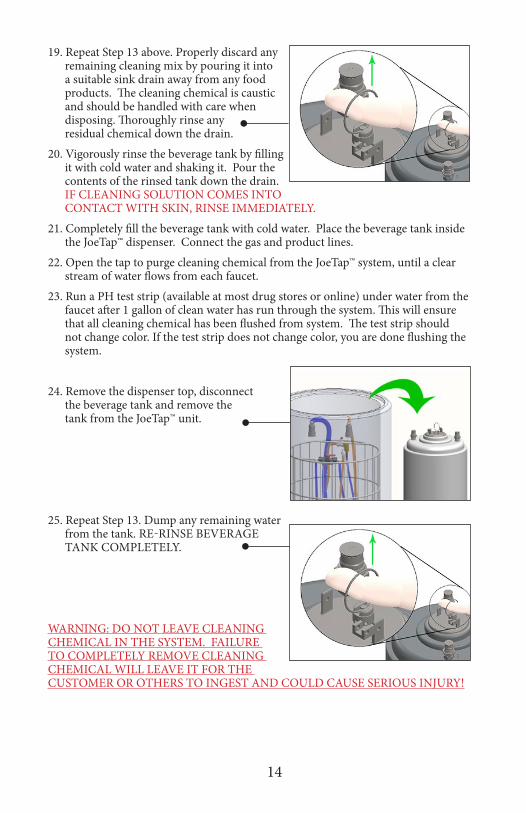
24. Remove the dispenser top, disconnect the beverage tank and remove the tank from the JoeTap™ unit.
25. Repeat Step 13. Dump any remaining water from the tank. RE-RINSE BEVERAGE TANK COMPLETELY.
WARNING: DO NOT LEAVE CLEANING CHEMICAL IN THE SYSTEM. FAILURE TO COMPLETELY REMOVE CLEANING CHEMICAL WILL LEAVE IT FOR THE CUSTOMER OR OTHERS TO INGEST AND COULD CAUSE SERIOUS INJURY!
14
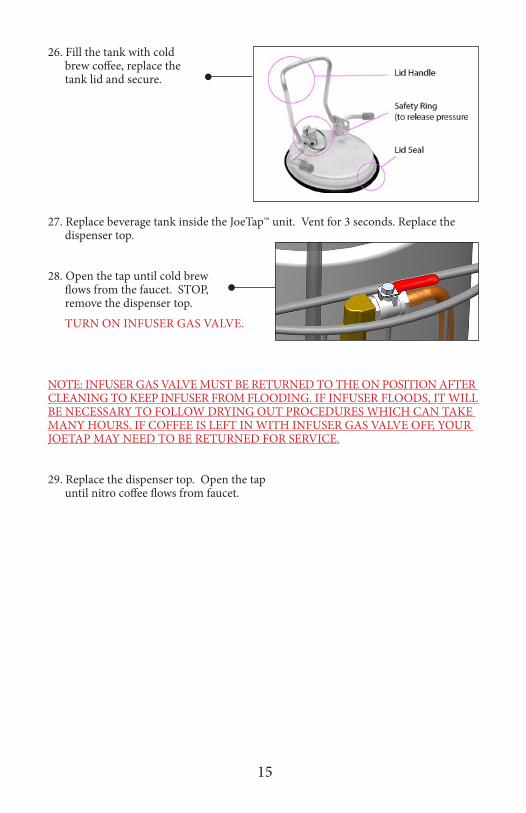
26. Fill the tank with cold brew coffee, replace the tank lid and secure.
27. Replace beverage tank inside the JoeTap™ unit. Vent for 3 seconds. Replace the dispenser top.
28. Open the tap until cold brew flows from the faucet. STOP, remove the dispenser top.
TURN ON INFUSER GAS VALVE.
NOTE: INFUSER GAS VALVE MUST BE RETURNED TO THE ON POSITION AFTER CLEANING TO KEEP INFUSER FROM FLOODING. IF INFUSER FLOODS, IT WILL BE NECESSARY TO FOLLOW DRYING OUT PROCEDURES WHICH CAN TAKE MANY HOURS. IF COFFEE IS LEFT IN WITH INFUSER GAS VALVE OFF, YOUR JOETAP MAY NEED TO BE RETURNED FOR SERVICE.
29. Replace the dispenser top. Open the tap until nitro coffee flows from faucet.
15

16
MAINTENANCE SCHEDULE
If maintained properly, your JoeTap™ system will operate as designed and provide many years of service. While regular cleaning is the most important function in maintaining the performance and durability, it is important to follow the suggested maintenance schedule:
WeeklyFollow the step-by-step cleaning instructions, as directed above. Lubricate O-rings on all fittings with food grade lubricant (included with your unit).
MonthlyUsing the spanner wrench (included with your JoeTap system), remove taps from towers and thoroughly clean and rinse.
Bi-monthlyRemove equipment basket and wipe down interior of the JoeTap™ dis-penser with warm water and a towel.
To remove equipment basket follow these steps:
• Disconnect the beverage tank and remove it from the unit which is located in center on top of fan deflector dome.
• Disconnect the main gas supply quick connect inside at base of unit.
As Needed
• Wipe down the dispense tower and exterior of unit with warm water and a towel.
• Inspect the power supply cord for damage.
• Assure air vents are clean, unobstructed and have proper air flow.
• A trained JoeTap™ technician will handle any additional questions about your unit.

17
Troubleshooting Guide
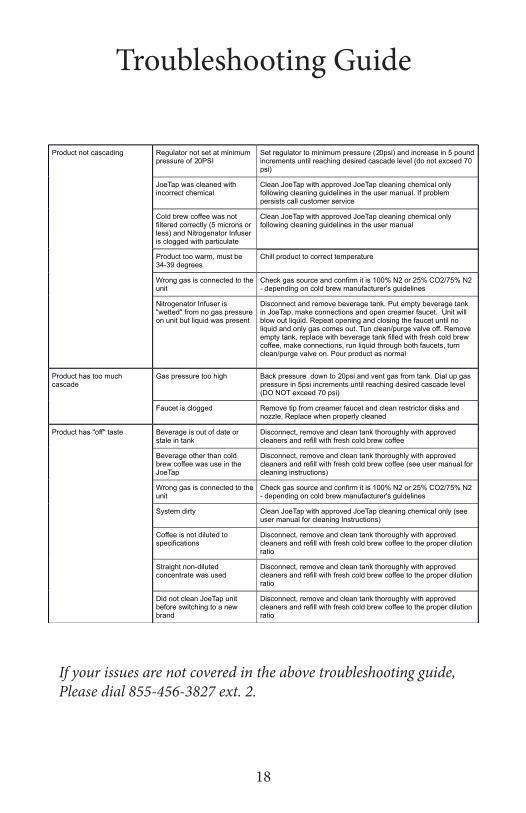
Troubleshooting Guide
18
If your issues are not covered in the above troubleshooting guide, Please dial 855-456-3827 ext. 2.
WARRANTYThe terms and conditions set forth below together with those appearing on the face of the Sales Order (the “Order”) constitute the complete and exclusive agreement between AC Distributing, Inc. (“ACD”) and the Buyer pertaining to the goods and / or services identified in the Order. If there is a discrepancy or conflict between any exhibit or supplement to the Order and these terms and conditions, these terms and conditions shall control. The Order is intended by ACD and Buyer to be the complete, exclusive, and final statement of their agreement. Any changes to an Order must be in writing and signed by ACD and Buyer.
WAIVERAny waiver of strict compliance with the provisions of an Order must be in writing. No such waiver shall be construed as a waiver of any other term or condition except as provided in writing, nor as a waiver of any subsequent breach of the same term or condition.
METHOD OF SHIPMENTAll shipments are carefully packed and labeled. Crates, boxes and cartons used are of approved weight and strength.
LOST and DAMAGED MERCHANDISETHE RESPONSIBILITY OF AC DISTRIBUTING, INC. CEASES UPON ACCEPTANCE OF ITS PRODUCTS BY THE CARRIER. Any damage or loss sustained in shipment is the carrier’s responsibility. Before giving the carrier a clean receipt at time of delivery, make sure you receive every item on the bill and inspect every carton, crate and box for concealed damage, i.e., broken boards, crushed or punctured cartons, torn cardboard. IF ANY ITEMS ARE SHORT OR DAMAGED, DO NOT ACCEPT THE SHIPMENT UNLESS THE CARRIER MAKES A NOTATION OF THIS ON YOUR FREIGHT BILL. Then request an inspection. Do not destroy the packing materials. If their agent does not make an inspection within five days, advise the carrier via letter that you notified them regarding the matter and they have failed to act. You will need this letter to sup-port your claim. Then file a claim with your carrier for your loss. When you give the carrier a clean receipt, you accept the total responsibility for the shipment.
RETURN OF MERCHANDISEDo not return any merchandise without our approval. Merchandise returned without a return merchandise authorization number will not be accepted at ACD. Used, discon-tinued, and custom-made items cannot be returned for credit. Items returned must be in new condition and packaged in their original carton or crate. Freight charges must be prepaid on all return shipments. When a return is authorized, a credit may be allowed pending an examination of the returned goods. The amount of the restocking charge
Limited Warranty
19
will depend on the condition of the equipment. The minimum restocking charge is 20% or $35.00, whichever is greater.
ONE YEAR PARTS WARRANTYJoeTap™ dispensers are guaranteed against defects in both material and workmanship for a period of one year from the date of sale. Defective parts will be replaced on a no-charge basis, when adjudged defective upon inspection. All costs associated with replacement, including freight and/or loss of sales, are the responsibility of the user, except for freight paid by ACD where the Buyer returns defective goods within 90 days of the invoice date. To expedite the warranty process, ACD in its discretion may authorize the shipment of replacement parts before ACD has received and inspected the defective parts; in this instance, ACD will require the Buyer to provide a valid credit card to guarantee that the defective parts will be returned to ACD within 10 business days and judged defective.
ACD’s warranty is subject to the following terms and conditions:
1) Parts returned to ACD shall be returned freight prepaid if returned later than 90 days after the invoice date, and shall be identified with ACD’s serial number and return merchandise authorization number.
2) The Buyer has complied with all instructions stated in JoeTap™ Operation Manual and User Guide.
3) ACD is not responsible for parts damaged by unauthorized service, alteration, mis-use, neglect, accident, transportation, flood, fire or other acts of God.
20
