operating instructions hardware guide - ricohsupport.ricoh.com/bb_v1oi/pub_e/oi/0001043/... · how...
TRANSCRIPT

Read this manual carefully before you use this machine and keep it handy for future reference. For safe and correct use, be sure to read "Safety Information" before using the machine.
1 Guide to the Printer
2 Setting Up the Printer
3 Installing Options
4 Connecting the Printer
5 Configuration
6 Loading Paper
7 Maintaining the Printer
8 Adjusting the Printer
9 Troubleshooting
10 Removing Misfed Paper
11 Appendix
Hardware GuideOperating Instructions

Introduction
This manual contains detailed instructions and notes on the operation and use of this machine. For your safety and
benefit, read this manual carefully before using the machine. Keep this manual in a handy place for quick reference.
Do not copy or print any item for which reproduction is prohibited by law.
Copying or printing the following items is generally prohibited by local law:
bank notes, revenue stamps, bonds, stock certificates, bank drafts, checks, passports, driver's licenses.
The preceding list is meant as a guide only and is not inclusive. We assume no responsibility for its completeness or
accuracy. If you have any questions concerning the legality of copying or printing certain items, consult with your
legal advisor.
Important
Contents of this manual are subject to change without prior notice.
In no event will the company be liable for direct, indirect, special, incidental, or consequential damages as a result
of handling or operating the machine.
For good print quality, the manufacturer recommends that you use genuine toner from the manufacturer.
The manufacturer shall not be responsible for any damage or expense that might result from the use of parts
other than genuine parts from the manufacturer with your office products.
Some illustrations in this manual might be slightly different from the machine.
Certain options might not be available in some countries. For details, please contact your local dealer.

TABLE OF CONTENTSHow to Read This Manual.................................................................................................................................6
Symbols...........................................................................................................................................................6
Model-Specific Information...............................................................................................................................7
Machine Types...............................................................................................................................................7
Positions of WARNING and CAUTION Labels...............................................................................................9
Power Switch Symbols.................................................................................................................................10
Manuals for This Printer...................................................................................................................................11
List of Options...................................................................................................................................................13
Operating Instructions......................................................................................................................................14
Reading the HTML Manuals on the CD-ROMs.........................................................................................14
Reading the HTML Manuals That You Install on the Computer...............................................................14
1. Guide to the Printer
Exterior: Front View..........................................................................................................................................17
Exterior: Rear View...........................................................................................................................................19
Interior...............................................................................................................................................................21
Control Panel....................................................................................................................................................23
Display Panel....................................................................................................................................................25
Entering Characters..........................................................................................................................................26
How to Enter Characters.............................................................................................................................27
2. Setting Up the Printer
Printer Setup Procedure...................................................................................................................................31
Place to Install...................................................................................................................................................32
Unpacking........................................................................................................................................................36
Turning the Printer's Power On and Off..........................................................................................................39
Turning on the Power...................................................................................................................................39
Turning off the Power...................................................................................................................................41
Selecting the Display Language......................................................................................................................43
Test Printing.......................................................................................................................................................44
3. Installing Options
Available Options............................................................................................................................................45
Order of Option Installation........................................................................................................................45
Where to Install Options.............................................................................................................................46
Caution When Re-installing the Controller Board.....................................................................................47
1

Attaching the Paper Feed Unit........................................................................................................................48
Installing the Memory Expansion Units..........................................................................................................52
Installing the Hard Disk................................................................................................................................52
Installing the SDRAM Module....................................................................................................................55
Installing the Interface Units.............................................................................................................................59
Installing the Gigabit Ethernet Board.........................................................................................................59
Installing the Wireless LAN Interface Board..............................................................................................61
Installing the IEEE 1284 Interface Board...................................................................................................63
Installing the SD Memory Card Options........................................................................................................65
4. Connecting the Printer
Ethernet Cable Connection.............................................................................................................................69
Reading the LED Lamps...............................................................................................................................70
USB Cable Connection....................................................................................................................................72
Parallel Cable Connection..............................................................................................................................74
5. Configuration
Ethernet Configuration.....................................................................................................................................75
Specifying an IP Address (No DHCP)........................................................................................................76
Receiving an IP Address Automatically (DHCP)........................................................................................78
Configuring Network Settings When Using NetWare.............................................................................79
Setting the Ethernet Speed..........................................................................................................................81
Wireless LAN Configuration...........................................................................................................................84
Setting the SSID............................................................................................................................................86
Confirming Wireless Network Connectivity...............................................................................................87
Cautions When Using a Wireless LAN......................................................................................................87
Setting Security Method of Wireless LAN......................................................................................................89
Setting a WEP Key.......................................................................................................................................89
Setting WPA.................................................................................................................................................90
Configuring IEEE 802.1X................................................................................................................................94
Installing a Site Certificate...........................................................................................................................94
Installing Device Certificate.........................................................................................................................94
Setting Items of IEEE 802.1X for Ethernet..................................................................................................95
Setting Items of IEEE 802.1X for Wireless LAN........................................................................................97
2

6. Loading Paper
Supported Paper for Each Tray....................................................................................................................101
Symbols......................................................................................................................................................101
Standard Paper Feed Tray.......................................................................................................................101
Optional Paper Feed Tray........................................................................................................................102
Bypass Tray................................................................................................................................................104
Supported Paper Types.................................................................................................................................105
Plain Paper.................................................................................................................................................105
Middle Thick..............................................................................................................................................106
Thick Paper.................................................................................................................................................106
Thin Paper..................................................................................................................................................106
Letterhead..................................................................................................................................................107
Label Paper................................................................................................................................................108
Special Paper............................................................................................................................................108
Preprinted Paper........................................................................................................................................109
Color Paper................................................................................................................................................109
Recycled Paper..........................................................................................................................................109
OHP transparencies..................................................................................................................................110
Envelopes...................................................................................................................................................110
Storing Paper.............................................................................................................................................113
Non-Recommended Paper Types................................................................................................................114
Print Area........................................................................................................................................................115
Loading Paper in Trays..................................................................................................................................117
Loading Paper into a Standard or Optional Paper Feed Tray..............................................................117
Loading Paper onto Bypass Tray.............................................................................................................126
Loading Envelopes........................................................................................................................................133
Loading Envelopes onto Bypass Tray......................................................................................................133
Loading Envelopes into a Standard or Optional Paper Feed Tray.......................................................138
Printing on Fixed-Orientation Paper.............................................................................................................144
Registering Unique Names to Paper Types.................................................................................................146
Registering Names to Paper Types..........................................................................................................146
Setting User Paper Types to Trays............................................................................................................146
Printing Using Registered Paper Types....................................................................................................147
3
7. Maintaining the Printer
Replacing the Print Cartridge........................................................................................................................149
Replacing the Maintenance Kit....................................................................................................................154
Cautions When Cleaning..............................................................................................................................155
Cleaning the Friction Pad and the Paper Feed Roller.................................................................................156
Cleaning the Registration Roller...................................................................................................................159
8. Adjusting the Printer
Adjusting the Image Density.........................................................................................................................163
Adjusting Printing Position.............................................................................................................................165
Adjusting the Paper Type..............................................................................................................................168
9. Troubleshooting
Error and Status Messages Appear on the Control Panel..........................................................................171
Status Messages (in alphabetical order).................................................................................................171
Alert Messages (in alphabetical order)...................................................................................................172
Panel Tones....................................................................................................................................................177
Printer Does Not Print....................................................................................................................................178
Checking the Port Connection..................................................................................................................179
Other Printing Problems.................................................................................................................................181
When You Cannot Print Properly.............................................................................................................181
Paper Misfeeds Occur Frequently...........................................................................................................183
The printed image is different from the image on the computer............................................................185
When Printer is Not Functioning Properly...............................................................................................186
Additional Troubleshooting...........................................................................................................................188
10. Removing Misfed Paper
When Paper is Jammed.................................................................................................................................191
Paper Misfeed Message (A).........................................................................................................................192
Paper Misfeed Message (B)(C)....................................................................................................................196
Paper Misfeed Message (Y1)(Y2)(Y3)(Y4)................................................................................................201
Paper Misfeed Message (Z1)(Z2)...............................................................................................................204
11. Appendix
Moving and Transporting the Printer............................................................................................................207
Moving the Printer in a Short Distance....................................................................................................207
Consumables..................................................................................................................................................209
4

Print Cartridge............................................................................................................................................209
Maintenance Kit........................................................................................................................................210
Specifications.................................................................................................................................................211
Mainframe.................................................................................................................................................211
Options.......................................................................................................................................................214
ENERGY STAR Program................................................................................................................................218
Recycled Paper..........................................................................................................................................218
Trademarks.....................................................................................................................................................219
INDEX...........................................................................................................................................................221
5

How to Read This Manual
Symbols
This manual uses the following symbols:
Indicates points to pay attention to when using the machine, and explanations of likely causes of papermisfeeds, damage to originals, or loss of data. Be sure to read these explanations.
Indicates supplementary explanations of the machine's functions, and instructions on resolving usererrors.
This symbol is located at the end of sections. It indicates where you can find further relevant information.
[ ]Indicates the names of keys on the machine's display or control panels.
(mainly Europe and Asia)(mainly North America)
Differences in the functions of Region A and Region B models are indicated by two symbols. Read theinformation indicated by the symbol that corresponds to the region of the model you are using. Fordetails about which symbol corresponds to the model you are using, see page 7 "Model-SpecificInformation".
6

Model-Specific InformationThis section explains how you can identify the region your machine belongs to.
There is a label on the front cover of the printer, and it is located in the position shown below. The labelcontains details that identify the region your machine belongs to. Read the label.
CEC247
The following information is region-specific. Read the information under the symbol that corresponds tothe region of your machine.
(mainly Europe and Asia)If the label contains the following, your machine is a region A model:
• CODE XXXX -22, -27
• 220-240V
(mainly North America)If the label contains the following, your machine is a region B model:
• CODE XXXX -11
• 120-127V
• Dimensions in this manual are given in two units of measure: metric and inch. If your machine is aRegion A model, refer to the metric units. If your machine is a Region B model, refer to the inchunits.
Machine Types
This printer comes in two models that have different printing speeds.
When describing procedures that are model-specific, this manual refers to the different printer models asType 1 or Type 2. The following table describes the model types.
7

Model types
Model types Model name
Type 1 SP 5200DN
Type 2 SP 5210DN
8

Positions of WARNING and CAUTION LabelsThis machine has labels for WARNING and CAUTION at the positions shown below. For safety,please follow the instructions and handle the machine as indicated.
CEC230
CEC202
Do not incinerate spilled toner or used toner. Toner dust is flammable and might ignite when exposed toan open flame.
Disposal should take place at an authorized dealer or an appropriate collection site.
If you dispose of the used toner containers yourself, dispose of them according to local regulations.
Keep toner (used or unused) and toner containers out of reach of children.
CEC203
Do not put your hands inside the printer. The inside of this printer becomes very hot. Do not touch partswith this label (indicating a hot surface).
9

CEC204
The inside of this printer becomes very hot. Do not touch parts with this label (indicating a hot surface).
CEC248
The printer weighs approximately 23 kg (51 lb.). When moving the printer, use the inset grips on bothsides, and lift slowly in pairs.
Power Switch Symbols
The meanings of the symbols for the switches on this machine are as follows:
• : POWER ON
• : POWER OFF
10

Manuals for This PrinterRead this manual carefully before you use this printer.
Refer to the manuals that are relevant to what you want to do with the printer.
• Media differ according to manual.
• The printed and electronic versions of a manual have the same contents.
• Adobe Acrobat Reader/Adobe Reader must be installed in order to view the manuals as PDF files.
• A Web browser must be installed in order to view the html manuals.
Safety Information
Contains information about safe usage of this printer.
To avoid injury and prevent damage to the printer, be sure to read this.
Quick Installation Guide
Contains procedures for removing the printer from its box, and connecting it to a computer.
Hardware Guide (This manual)
Contains information about paper; names and functions of the parts of this printer; and proceduressuch as installing options, replacing consumables, responding to error messages, and resolvingjams.
Driver Installation Guide
Contains procedures for installing the printer driver. This manual is included on the driver CD-ROM.
Software Guide
Contains information about using this printer, its software, and its security functions.
Security Guide
This manual is for administrators of the printer. It explains security functions that you can use toprevent unauthorized use of the printer, data tampering, or information leakage. Be sure to readthis manual when setting the enhanced security functions, or user and administrator authentication.
VM Card Extended Feature Settings Web Reference
Contains information about setting up the extended features settings using Web Image Monitor.
UNIX Supplement
Contains information about the usage of commands to operate this printer.
To obtain the "UNIX Supplement", visit our Web site or consult an authorized dealer.
This manual includes explanations of functions and settings that might not be available on thisprinter.
This manual is provided in English only.
11

• In this manual, "Enhanced Locked Print NX" is abbreviated as "ELP-NX".
• Manuals provided are specific to printer types.
12

List of OptionsThis section provides a list of options for this printer, and how they are referred to as in this manual.
Option List Referred to as
Paper Feed Unit TK1120 Paper feed unit
Paper Feed Unit TK1130 Paper feed unit with casters
Hard Disk Drive Type 2670 Hard disk
Memory Unit Type G 256 MB SDRAM module
Memory Unit Type I 512 MB SDRAM module
Gigabit Ethernet Board Type C Gigabit Ethernet board
IEEE 802.11a/g Interface Unit Type LWireless LAN interface unit
IEEE 802.11a/g Interface Unit Type MWireless LAN interface unit
IEEE 1284 Interface Board Type A IEEE 1284 interface board
SD card for NetWare printing Type E NetWare card
VM CARD Type O VM card
SD Card for Fonts Type C SD font card
IPDS Unit Type 5200 IPDS card
• For details about the specifications of each option, see page 211 "Specifications".
13

Operating InstructionsThis section explains how to use HTML format manuals.
Reading the HTML Manuals on the CD-ROMs
1. Insert the CD-ROM into the CD-ROM drive of your computer.
2. Select a language and a product, and then click [OK].
3. Click [Read HTML manuals].
4. Click the title of manual you want to read.
• The browsers we recommend are Internet Explorer 6 or later, Firefox 3.5 or later, and Safari 4.0 orlater.
• Non-recommended browsers can display the simplified manual only.
• If you are using an earlier or non-recommended browser and the simplified version of thedocumentation does not appear automatically, open index.htm, which can be found in thefollowing folder on the CD-ROM: MANUAL_HTML\LANG\(language)\(manual)\unv
• Depending on your computer's operating environments, you can select the HTML manual from thefollowing two versions:
• Standard version
• Simplified version
• If you want to read the HTML manuals on a Macintosh, insert the CD-ROM into the CD-ROMdrive, and then click [Read HTML manuals].
• If JavaScript is disabled or unavailable in your browser, you will not be able to search or usecertain buttons in the HTML documentation.
Reading the HTML Manuals That You Install on the Computer
For easy access, we recommend you install the manuals on your computer.
1. Insert the CD-ROM into the CD-ROM drive of your computer.
2. Select a language and a product, and then click [OK].
3. Click [Install manuals].
4. Install the HTML manuals following the on-screen instructions.
5. When the installation is complete, click [Finish].
6. Click [Exit].
14

7. Open the HTML manuals that you installed.
When opening the manuals from an icon, double-click the manual icon on the desktop. Whenopening the manuals from the [Start] menu, point to [All Programs], and then [Product Name].
8. Click the title of the manual you want to read.
• You need administrator permissions to install the manuals. Log in as an Administrators groupmember.
• The system requirements for installing the manuals are as follows:
• Operating system: Windows XP/Vista/7, Windows Server 2003/2003 R2/2008/2008R2
• Minimum display resolution: 800 × 600 pixels
• If you cannot install a manual, copy the "MANUAL_HTML" folder to your computer's hard drive,and then run "Setup.exe".
• To delete an installed manual, on the [Start] menu, click [All Programs], then [Product Name], andthen uninstall the data.
• Depending on the settings made during installation, menu folder names may differ.
15

16

1. Guide to the PrinterThis chapter explains the names and functions of the printer's components.
Exterior: Front View
CEC207
1. Standard Paper Feed Tray (Tray 1)
Up to 550 sheets of plain paper can be loaded.
2. Bypass Tray Extension
Pull this out when loading a sheet that is longer than A4 and 8 1/2" × 11" (Letter) on the Bypass Tray.
3. Bypass Tray
Up to 100 sheets of plain paper can be loaded.
See page 101 "Supported Paper for Each Tray" and page 101 "Loading Paper".
4. Tray Extension
Raise this barrier to prevent paper from falling off.
5. Control Panel
Contains keys for printer control and a display that shows the printer status.
17

6. Standard Tray
Prints are delivered here printed side facing down.
7. Vents
To prevent overheating, heat from internal components is released through these vents. Malfunctions andfailure can result if these vents are blocked or obstructed.
8. Front Cover Release Button
Press this to open the front cover.
9. Power Switch
Press this to turn the printer's power on and off.
10. Friction Pad
This ensures only one sheet of paper is fed in at a time. If multi-sheet feeds occur, clean the friction padcarefully.
1. Guide to the Printer
18

Exterior: Rear View
CEC208
1. Rear Cover
Open this cover to replace the fusing unit.
2. Power Connector
Connect the power cord to the printer here. Insert the other end of the cable into a nearby wall outlet.
3. Controller Board
Slide this out to install options such as the SDRAM module or printer hard disk. Plug cables such as a USBcable and Ethernet cable into their connectors.
4. Vents
To prevent overheating, heat from internal components is released through these vents. Malfunctions andfailure can result if these vents are blocked or obstructed.
5. SD Card Slots
Remove the cover and install SD cards here.
6. Optional Interface Board Slot
Insert an optional Wireless LAN interface unit, Gigabit Ethernet board, or 1284 interface board in this slot.
7. Ethernet Port
Use a network interface cable to connect the printer to the network.
8. USB Port B
Use a USB cable to connect the printer to a computer.
Exterior: Rear View
19

9. USB Port A
Use a USB cable to connect the optional USB devices such as the authentication card reader.
1. Guide to the Printer
20

InteriorFront view
CEC209
1. Print Cartridge
Contains toner and the photo conductor unit.
When "Replace Print Cartridge." appears on the display, replace this unit.
2. Registration Roller
Feeds in sheets of paper for printing. Be sure to clean this roller if it becomes dirty or replace the printcartridge.
See page 159 "Cleaning the Registration Roller".
3. Guide Board
Open this to remove jammed paper.
4. Front Cover
Open this to access the printer's interior.
5. Transfer Roller
When "Replacmnt Requrd:Maint. Kit" appears on the display, replace this roller.
Interior
21
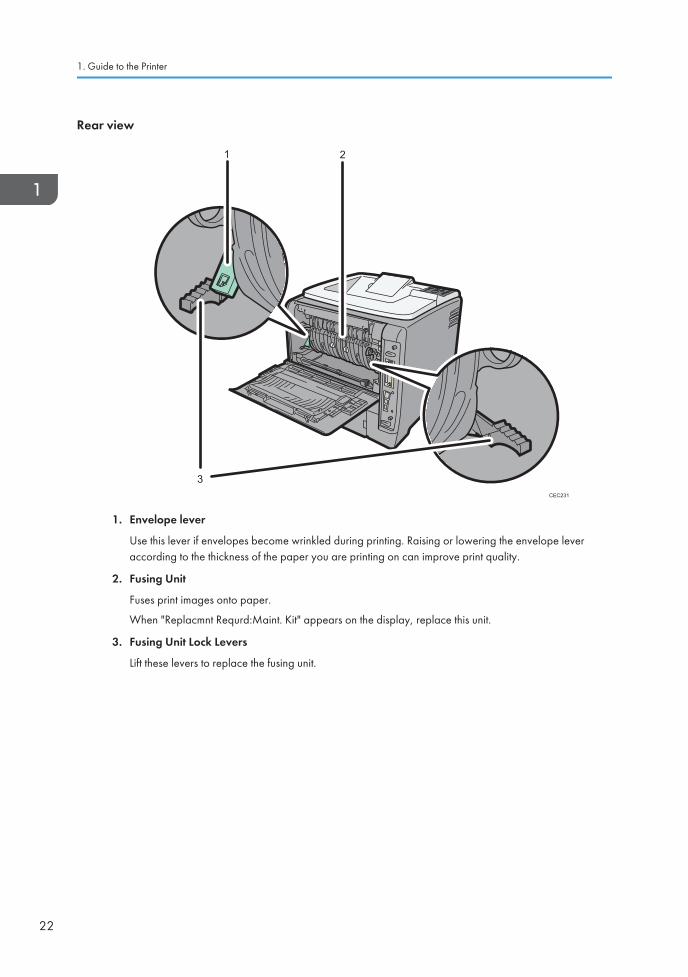
Rear view
CEC231
1. Envelope lever
Use this lever if envelopes become wrinkled during printing. Raising or lowering the envelope leveraccording to the thickness of the paper you are printing on can improve print quality.
2. Fusing Unit
Fuses print images onto paper.
When "Replacmnt Requrd:Maint. Kit" appears on the display, replace this unit.
3. Fusing Unit Lock Levers
Lift these levers to replace the fusing unit.
1. Guide to the Printer
22

Control Panel
CEC210
1. Display
Displays current printer status and error messages.
Entering energy saver mode turns off the back light. For details about energy saver mode, see SoftwareGuide.
2. Selection Keys
Correspond to the function items at the bottom line on the display.
Example: When this manual instructs you to press [Option], press the selection key on the left below the initialscreen.
3. [Switch Functions] Key
Press this key to switch between the operation screen of the printer function and the function screens of theextended features currently in use.
Control Panel
23

4. [Menu] Key
Press this key to configure and check the current printer settings.
5. [Job Reset] Key
When the printer is online, press this key to cancel an ongoing print job.
6. [Suspend/Resume] Key
Press this to suspend the print job currently being processed. The indicator remains lit as long as the job issuspended.
To resume the job, press this key again. Resumption of a suspended job will occur automatically when the timespecified in [Auto Reset Timer] elapses (default: 60 seconds).
For details about the [Auto Reset Timer] setting, see "Making Printer Settings Using the Control Panel",Software Guide.
7. Power Indicator
Lights up when the printer is ready to receive data from a computer. Flashes when the printer is warming up orreceiving data. It is unlit when the power is off or while the printer is in energy saver mode.
8. Alert Indicator
Lights up or flashes when a printer error occurs.
Steady red: printing is not possible, or is possible but print quality cannot be ensured.
Flashing yellow: the printer will soon require maintenance or a replacement consumable such as printcartridge.
Follow the instructions that appear on the display.
9. Data In Indicator
Flashes when the printer is receiving data from a computer. The data in indicator is lit if there is data to beprinted.
10. Number Keys
Use these to enter characters or numbers.
11. [OK] Key
Use this key to confirm settings, or setting values, or move to the next menu level.
12. [Escape] Key
Press this key to cancel an operation or return to the previous display.
13. Scroll Keys
Press these keys to move the cursor in each direction.
When the [ ] [ ] [ ] [ ] keys appear in this manual, press the scroll key of the same direction.
1. Guide to the Printer
24
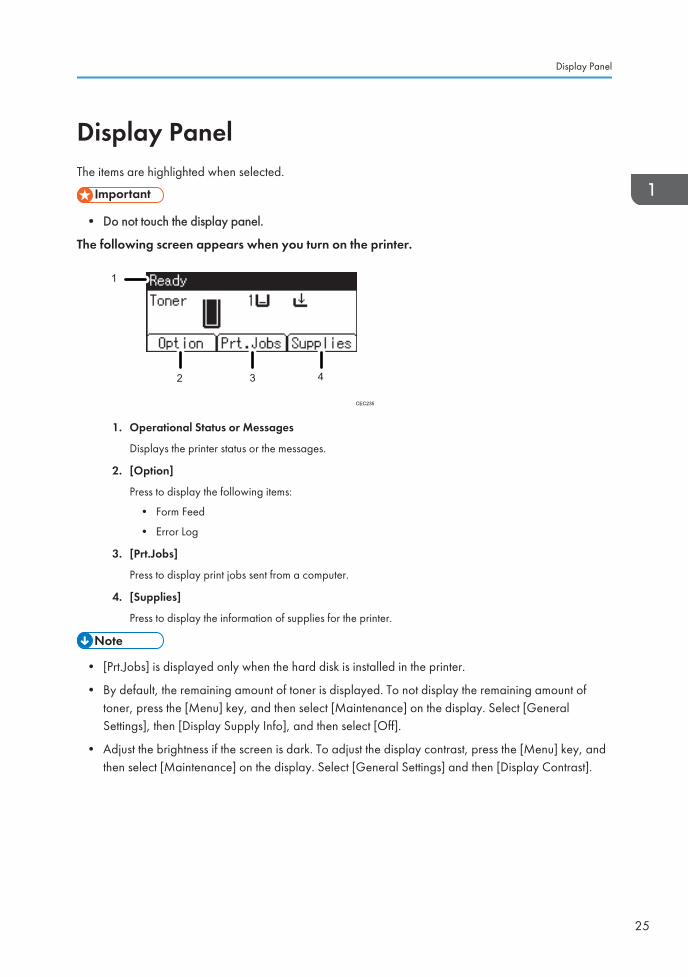
Display PanelThe items are highlighted when selected.
• Do not touch the display panel.
The following screen appears when you turn on the printer.
CEC235
1. Operational Status or Messages
Displays the printer status or the messages.
2. [Option]
Press to display the following items:
• Form Feed
• Error Log
3. [Prt.Jobs]
Press to display print jobs sent from a computer.
4. [Supplies]
Press to display the information of supplies for the printer.
• [Prt.Jobs] is displayed only when the hard disk is installed in the printer.
• By default, the remaining amount of toner is displayed. To not display the remaining amount oftoner, press the [Menu] key, and then select [Maintenance] on the display. Select [GeneralSettings], then [Display Supply Info], and then select [Off].
• Adjust the brightness if the screen is dark. To adjust the display contrast, press the [Menu] key, andthen select [Maintenance] on the display. Select [General Settings] and then [Display Contrast].
Display Panel
25

Entering CharactersWhen you enter a character, it will be displayed at the position indicated by the cursor. If a character isalready displayed at the cursor position, the entered character will be displayed before that.
CEC212
1. Selection Keys
Correspond to the function items on the bottom line of the display.
Example: When this manual instructs you to press [ab/AB/12], press the selection key on the left below thetext input screen.
Press the left selection key to switch the input mode between lowercase, uppercase, and numeric characters.
Press the right selection key to display a list of the symbols that you can enter.
2. Scroll Keys
Press to move the cursor in each direction.
When the [ ] [ ] [ ] [ ] keys appear in this manual, press the scroll key showing the same direction.
3. [Escape] Key
Clears the entered text and numbers, and returns the display to its previous state.
4. [OK] Key
Confirms the entered text and numbers, and displays the next menu.
5. Number Keys
To enter text using the number keys, select text input mode by pressing [ab/AB/12].
1. Guide to the Printer
26
When you press a number key repeatedly, the character changes in the order indicated above the key youare pressing.
6. [Clear] Key
Deletes the character at the cursor position. You can delete a character at the far right side of a line even if thecursor is placed to the right of the character.
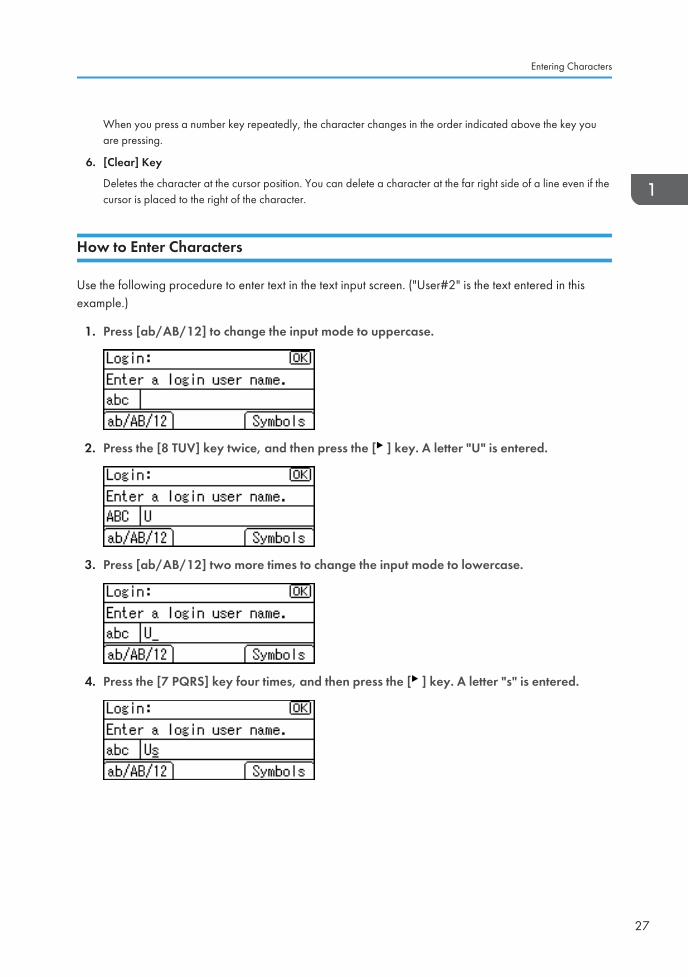
How to Enter Characters
Use the following procedure to enter text in the text input screen. ("User#2" is the text entered in thisexample.)
1. Press [ab/AB/12] to change the input mode to uppercase.
2. Press the [8 TUV] key twice, and then press the [ ] key. A letter "U" is entered.
3. Press [ab/AB/12] two more times to change the input mode to lowercase.
4. Press the [7 PQRS] key four times, and then press the [ ] key. A letter "s" is entered.
Entering Characters
27

5. Press the [3 DEF] key twice, and then press the [ ] key. A letter "e" is entered.
6. Press the [7 PQRS] key three times, and then press the [ ] key. A letter "r" is entered.
7. Press [Symbols] to display a list of the symbols you can enter.
8. Use the scroll keys to select "#", and then press the [OK] key.
The list of symbols disappears and a "#" symbol is entered.
9. Press [ab/AB/12] two more times to change the input mode to numeric.
1. Guide to the Printer
28

10. Press the [2 ABC] key. A number "2" is entered.
11. Press the [OK] key to proceed to the next menu.
Entering Characters
29

1. Guide to the Printer
30

2. Setting Up the PrinterThis chapter explains how to set up and configure the printer for operation.
Printer Setup ProcedureUse the following procedure to set up the printer.
1. Select a suitable location for your printer.
For details, see page 32 "Place to Install".
2. Take the printer out of its box, and then remove the protective materials and adhesivetape.
For details, see page 36 "Unpacking".
3. Load paper in the standard paper feed tray.
For details, see page 117 "Loading Paper in Trays".
4. Turn the printer power on.
For details, see page 39 "Turning the Printer's Power On and Off".
5. Select the language used on the display.
For details, see page 43 "Selecting the Display Language".
6. Print a test page.
For details, see page 44 "Test Printing".
7. Connect the printer to your network.
For details, see page 69 "Connecting the Printer".
8. Configure the printer's network settings.
For details, see page 75 "Configuration".
9. Install the printer driver.
For details, see Driver Installation Guide.
31

Place to InstallThe printer's location should be carefully chosen because environmental conditions greatly affect itsperformance.
• Do not use any frequencies other than those that match the specifications shown. Doing so couldresult in fire or electric shock.
• Do not use any power sources other than those that match the specifications shown in “SafetyInformation”. Doing so could result in fire or electric shock.
• Do not use multi-socket adaptors. Doing so could result in fire or electric shock.
• Do not use extension cords. Doing so could result in fire or electric shock.
• Do not use power cords that are damaged, broken, or modified. Also, do not use power cordsthat have been trapped under heavy objects, pulled hard, or bent severely. Doing so couldresult in fire or electric shock.
• Touching the prongs of the power cable's plug with anything metallic constitutes a fire andelectric shock hazard.
• The supplied power cord is for use with this machine only. Do not use it with other appliances.Doing so could result in fire, electric shock, or injury.
• It is dangerous to handle the power cord plug with wet hands. Doing so could result in electricshock.
• If the power cord is damaged and its inner wires are exposed or broken, contact your servicerepresentative for a replacement. Use of damaged power cords could result in fire or electricshock.
• Be sure to locate the machine as close as possible to a wall outlet. This will allow easydisconnection of the power cord in the event of an emergency.
• Do not use flammable sprays or solvents in the vicinity of this machine. Also, avoid placing theseitems in the vicinity of this machine. Doing so could result in fire or electric shock.
• Keep the machine away from humidity and dust. Otherwise a fire or an electric shock mightoccur.
2. Setting Up the Printer
32
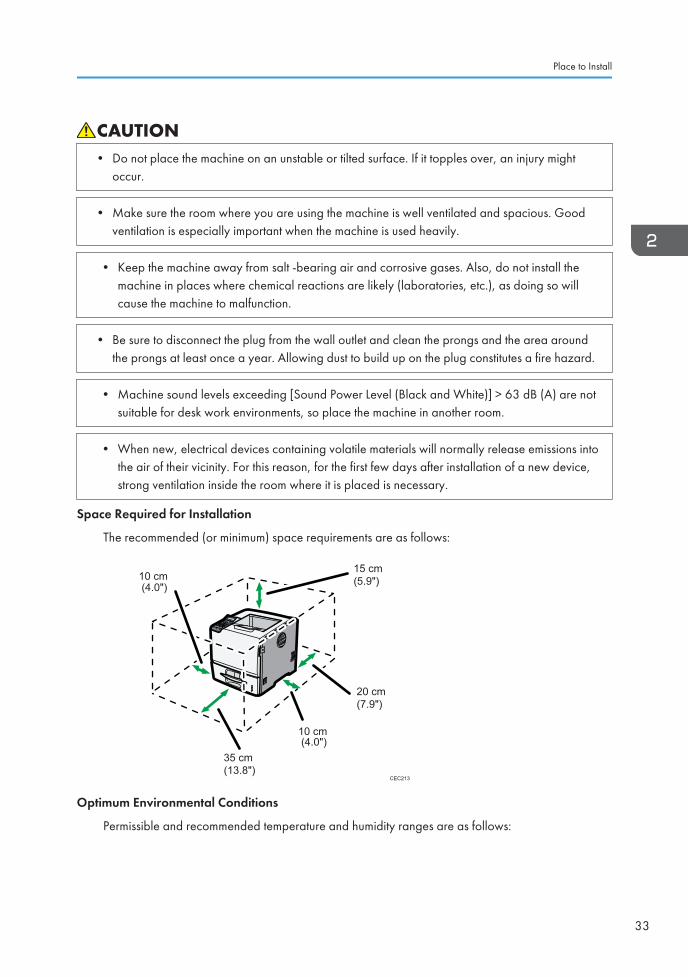
• Do not place the machine on an unstable or tilted surface. If it topples over, an injury mightoccur.
• Make sure the room where you are using the machine is well ventilated and spacious. Goodventilation is especially important when the machine is used heavily.
• Keep the machine away from salt -bearing air and corrosive gases. Also, do not install themachine in places where chemical reactions are likely (laboratories, etc.), as doing so willcause the machine to malfunction.
• Be sure to disconnect the plug from the wall outlet and clean the prongs and the area aroundthe prongs at least once a year. Allowing dust to build up on the plug constitutes a fire hazard.
• Machine sound levels exceeding [Sound Power Level (Black and White)] > 63 dB (A) are notsuitable for desk work environments, so place the machine in another room.
• When new, electrical devices containing volatile materials will normally release emissions intothe air of their vicinity. For this reason, for the first few days after installation of a new device,strong ventilation inside the room where it is placed is necessary.
Space Required for Installation
The recommended (or minimum) space requirements are as follows:
CEC213
Optimum Environmental Conditions
Permissible and recommended temperature and humidity ranges are as follows:
Place to Install
33

CBK019
• White area: Permissible Range
• Blue area: Recommended Range
• The printer must be level within 5 mm, 0.2" from both front to rear and left to right.
• When you use this printer for a long time in a confined space without good ventilation, you maydetect an odd smell. To keep the workplace comfortable, we recommend you keep it wellventilated.
Ventilation
When you use this machine in a confined space without good ventilation for a long time or printlarge quantities, you might detect an odd smell.
This might cause the output paper to also have an odd smell.
When you detect an odd smell, regularly ventilate in order to keep the workplace comfortable.
• Set up the machine so that it does not directly ventilate towards people.
• Ventilation should be more than 30 m3/hr/person.
New machine smell
When a machine is new, it might have a unique smell. This smell will subside in about one week.
When you detect an odd smell, sufficiently ventilate and circulate the air in the room.
Environments to Avoid
Do not use the printer in the following environments:
• Areas exposed to direct sunlight or strong light
• Dusty areas
• Areas with corrosive gases
• Areas that are excessively cold, hot, or humid
2. Setting Up the Printer
34
• Areas directly exposed to currents of hot, cold, or room-temperature air from air conditioners
• Areas directly exposed to radiant heat from heaters
• Locations near air conditioners, heaters, or humidifiers
• Locations near other electronic equipment
• Locations subject to frequent strong vibration
Power Source
Connect the power cord to a power source of the following specification:
(mainly Europe and Asia)220 - 240 V, 50/ 60 Hz, 6 A or more
(mainly North America)120 - 127 V, 60 Hz, 11 A or more
Place to Install
35

UnpackingTo protect it from shock and vibration during transit, this printer comes packaged in cushioning foam andsecured with tape. Remove these protective materials after bringing the machine to where it will beinstalled.
• Keep the polythene materials (bags, etc.) supplied with this machine away from babies andsmall children at all times. Suffocation can result if polythene materials are brought into contactwith the mouth or nose.
• Do not incinerate toner (new or used) or toner containers. Doing so risks burns. Toner will igniteon contact with naked flame.
• Do not crush or squeeze toner containers. Doing so can cause toner spillage, possibly resultingin dirtying of skin, clothing, and floor, and accidental ingestion.
• Store toner (new or used), toner containers, and components that have been in contact withtoner out of reach of children.
• If toner or used toner is inhaled, gargle with plenty of water and move into a fresh airenvironment. Consult a doctor if necessary.
• If toner or used toner gets into your eyes, flush immediately with large amounts of water. Consulta doctor if necessary.
• If toner or used toner is swallowed, dilute by drinking a large amount of water. Consult a doctorif necessary.
• When lifting the machine, use the inset grips on both sides. The printer could break or cause aninjury if dropped.
• Removed tape is dirty. Be careful not to let it touch your hands or clothes.
• Do not grip on the tray area when lifting the printer.
• Do not allow paper clips, staples, or other small metallic objects to fall inside the printer.
• Keep the uncovered print cartridge away from direct sunlight.
• When you use this printer for the first time, use the print cartridge packaged with the printer.
2. Setting Up the Printer
36

• Print cartridge (consumables) are not covered by warranty. However, if there is problem, contactthe store where they were purchased.
1. Remove the plastic bag.
2. Lift the printer with two people by using the inset grips on both sides of the printer.
Leave the tape holding the paper feed tray and cover in place while moving the printer. Lower themachine slowly and carefully to prevent trapping your hands.
CEC232
When moving the printer, do not hold on the following parts as doing so could cause amalfunction:
• The handle onto the standard paper feed tray.
• The underside of the bypass tray.
3. Remove the adhesive tape.
4. Open the front cover by pushing the front cover release button.
1
2
2
CEC025
Unpacking
37

5. Remove the fixing material and adhesive tape.
CEC226
6. Close the front cover.
CEC214
2. Setting Up the Printer
38

Turning the Printer's Power On and Off
• It is dangerous to handle the power cord plug with wet hands. Doing so could result in electricshock.
• Do not turn off the power switch before following the shutdown procedure shown here. Doing socan result in damage to the hard disk or memory, leading to malfunction.
• Do not physically disturb the printer while printing is in progress. Doing so may damage the printer.
Turning on the Power
• Make sure the power cord is plugged securely into the wall outlet.
• Turn the power switch off when plugging and unplugging the power plug.
• Do not turn off the power switch until initializing is completed. Doing so results in malfunction.
1. Make sure the power switch is set to " Off".
CEC056
Turning the Printer's Power On and Off
39

2. Plug in the power cable, and securely insert the plug of the power cord into the wallsocket.
2
1
CEC057
3. Turn the power switch to " On".
The power indicator on the control panel lights up.
CEC058
• Wait until "Ready" appears on the display panel.
• The printer may make a noise while initializing. This noise does not indicate a malfunction.
2. Setting Up the Printer
40
Turning off the Power
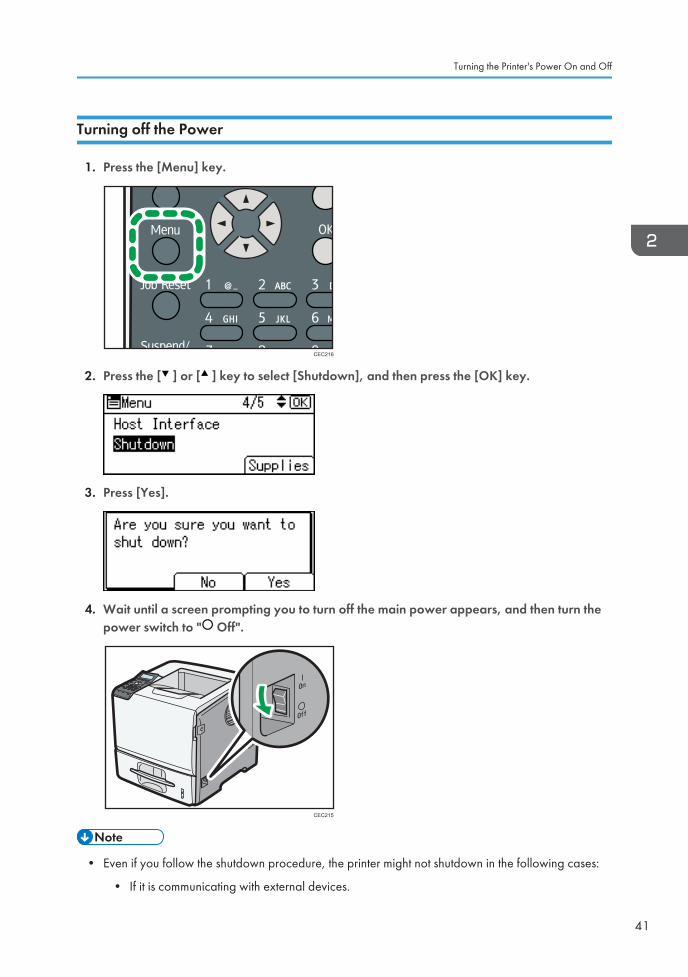
1. Press the [Menu] key.
CEC216
2. Press the [ ] or [ ] key to select [Shutdown], and then press the [OK] key.
3. Press [Yes].
4. Wait until a screen prompting you to turn off the main power appears, and then turn thepower switch to " Off".
CEC215
• Even if you follow the shutdown procedure, the printer might not shutdown in the following cases:
• If it is communicating with external devices.
Turning the Printer's Power On and Off
41

• If the hard disk is active.
• If the printer's cover is opened.
2. Setting Up the Printer
42

Selecting the Display Language1. Press the [Menu] key.
CEC216
2. Press the [ ] or [ ] key to select [Language], and then press the [OK] key.
3. Press the [ ] or [ ] key to select the preferred language, and then press the [OK] key.
4. Press the [Menu] key to return to the initial screen.
• The default setting is English.
Selecting the Display Language
43
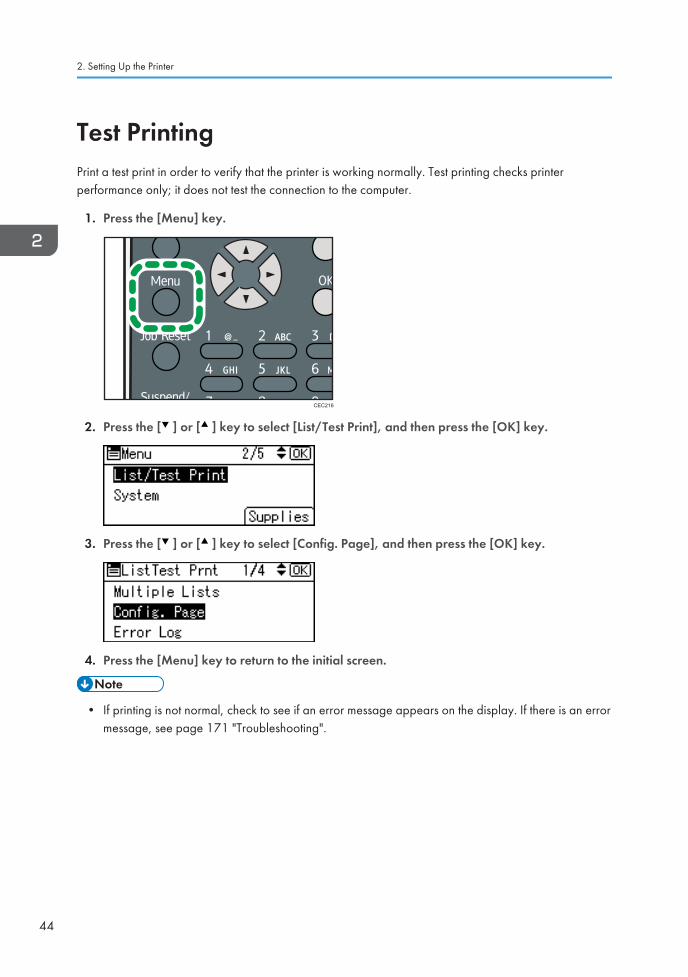
Test PrintingPrint a test print in order to verify that the printer is working normally. Test printing checks printerperformance only; it does not test the connection to the computer.
1. Press the [Menu] key.
CEC216
2. Press the [ ] or [ ] key to select [List/Test Print], and then press the [OK] key.
3. Press the [ ] or [ ] key to select [Config. Page], and then press the [OK] key.
4. Press the [Menu] key to return to the initial screen.
• If printing is not normal, check to see if an error message appears on the display. If there is an errormessage, see page 171 "Troubleshooting".
2. Setting Up the Printer
44
3. Installing OptionsThis chapter explains how to install various options for this printer.
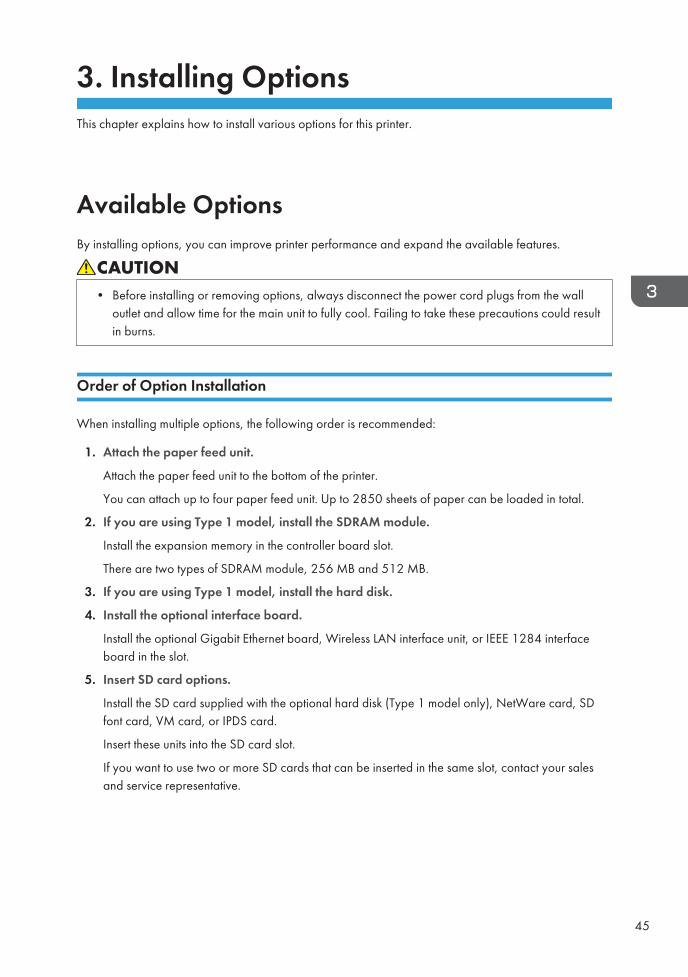
Available OptionsBy installing options, you can improve printer performance and expand the available features.
• Before installing or removing options, always disconnect the power cord plugs from the walloutlet and allow time for the main unit to fully cool. Failing to take these precautions could resultin burns.
Order of Option Installation
When installing multiple options, the following order is recommended:
1. Attach the paper feed unit.
Attach the paper feed unit to the bottom of the printer.
You can attach up to four paper feed unit. Up to 2850 sheets of paper can be loaded in total.
2. If you are using Type 1 model, install the SDRAM module.
Install the expansion memory in the controller board slot.
There are two types of SDRAM module, 256 MB and 512 MB.
3. If you are using Type 1 model, install the hard disk.
4. Install the optional interface board.
Install the optional Gigabit Ethernet board, Wireless LAN interface unit, or IEEE 1284 interfaceboard in the slot.
5. Insert SD card options.
Install the SD card supplied with the optional hard disk (Type 1 model only), NetWare card, SDfont card, VM card, or IPDS card.
Insert these units into the SD card slot.
If you want to use two or more SD cards that can be inserted in the same slot, contact your salesand service representative.
45

Where to Install Options
External options
• Paper feed unit
Loads up to 550 sheets of paper. Up to four paper feed unit can be installed on the printer.Installed tray unit is identified as "Tray 2", "Tray 3","Tray 4", and "Tray 5".
There are two types of the optional paper feed unit: the one with casters on its bottom side,and the one without casters. To set the printer directly on the floor, attach the optional paperfeed unit with casters to the bottom of the printer.
For details about attaching the paper feed unit, see page 48 "Attaching the Paper FeedUnit".
Internal options
CEC074
1. SDRAM module
For details about this option, see page 55 "Installing the SDRAM Module".
2. SD card options
For details about installing these options, see page 65 "Installing the SD Memory Card Options".
3. Optional interface boards
• Wireless LAN interface unit
• Gigabit Ethernet board
• IEEE 1284 interface board
For details about installing these options, see page 59 "Installing the Interface Units".
4. Hard disk
For details about this option, see page 52 "Installing the Hard Disk".
3. Installing Options
46
• For details about the specifications of each option, see page 211 "Specifications".
Caution When Re-installing the Controller Board
This section describes how to handle the controller board when installing options.
If you slide out the controller board to install units, carefully read the instructions about re-installing thecontroller board.
• The following may occur if the controller board is not properly installed:
• All control panel indicators light up.
• No control panel indicators light up.
• An error message appears on the display.
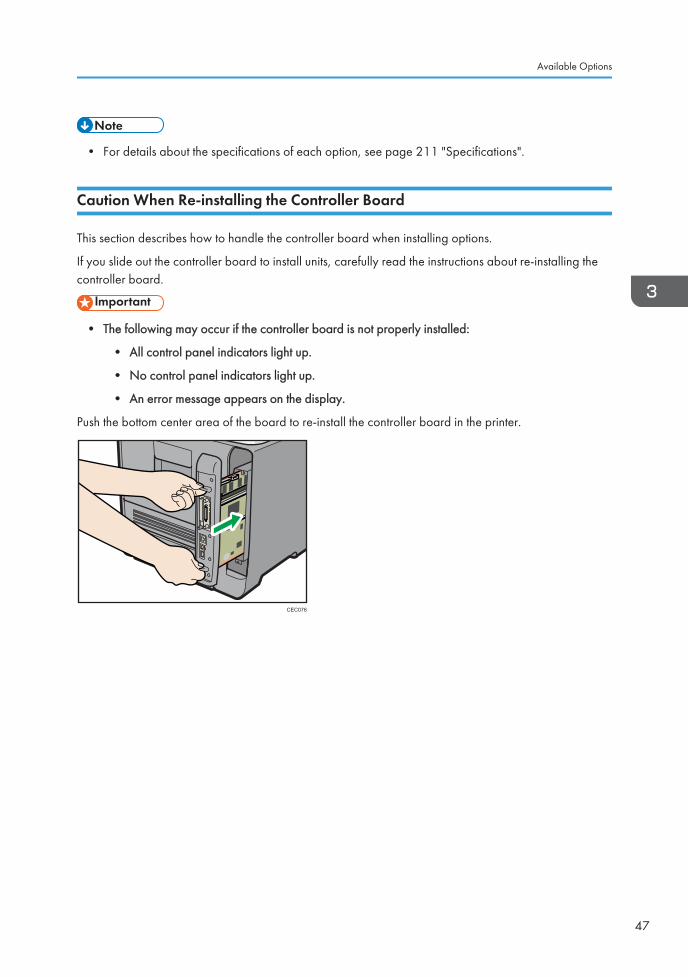
Push the bottom center area of the board to re-install the controller board in the printer.
CEC076
Available Options
47

Attaching the Paper Feed Unit
• If the machine topples, or if a cover or other part gets broken, you must turn the power switch tooff and disconnect the power cord plug from the wall outlet. Then contact your servicerepresentative and report the problem. Do not use the machine. Doing so could result in fire orelectric shock.
• The printer weights approximately 23 kg (51 lb.). When moving the printer, use the inset gripson both sides, and lift slowly. The printer will break or cause injury if dropped.
• Unplug the power cord from the wall outlet before you move the machine. While moving themachine, take care that the power cord is not damaged under the machine. Failing to take theseprecautions could result in fire or electric shock.
• Do not place the machine on an unstable or tilted surface. If it topples over, an injury mightoccur.
• Lifting the paper feed unit carelessly or dropping it may cause injury.
• The printer might topple over and cause damage and injuries if four optional paper feed unitsare stacked to a printer which is installed directly on the floor. For details about preventing themachine toppling over, contact your service representative.
• The printer should always be lifted by two people.
• Do not grip on the tray area when lifting the printer.
• When four paper feed units are installed, they are detected as "Tray 2", "Tray 3", "Tray 4", and"Tray 5", starting from the upper unit.
• The same procedure applies when attaching the optional paper feed unit with casters.
• The number of optional trays that can be attached differs depending on the location where theprinter is installed.
• If the printer is installed on a desk or other elevated surface, up to three optional paper feedunits can be stacked ( ). If the printer is installed directly on the floor, up to four optionalpaper feed units can be stacked ( ).
3. Installing Options
48

12
CEC259
• To install the printer directly on the floor, stack the optional paper feed unit with casters to thebottom of the printer.
CEC261
1. Paper feed unit
2. Paper feed unit with casters
1. Check the package contains the following:
CEC256
1. Paper feed unit (including a paper tray)
Attaching the Paper Feed Unit
49

2. Paper feed unit with casters (including a paper tray)
2. Turn off the printer's power switch, and then unplug the printer's power cord from thewall outlet.
3. Remove the adhesive tape from the optional paper feed unit.
4. Lift the printer using the inset grips on both sides of the printer.
CEC045
When moving the printer, do not hold on the following parts as doing so could cause amalfunction:
• The handle onto the standard paper feed tray.
• The underside of the bypass tray.
5. There are five upright pins on the optional paper feed unit. Align them with the holes onthe underside of the printer, and then carefully lower the printer.
CEC039
6. After installing the option, print the configuration page to confirm the installation.
• When moving the printer, remove the paper feed unit.
• After finishing the installation, you can check whether the paper feed unit is properly installed byprinting the configuration page from the [List/Test Print] menu. If the paper feed unit is properlyinstalled, "Tray 2", "Tray 3", "Tray 4", and "Tray 5" will appear for "Attached Equipment" on theconfiguration page.
3. Installing Options
50

• If the paper feed unit is not installed properly, reinstall it following this procedure. If you cannotinstall it properly even after attempting reinstallation, contact your sales or service representative.
• If the print area is not centered correctly, adjust the printing position for the optional paper feedunit. For details, see page 165 "Adjusting Printing Position".
• For details about printing the configuration page, see page 44 "Test Printing".
• For details about loading paper onto the paper tray, see page 117 "Loading Paper in Trays".
• After a new paper feed unit has been installed, the driver settings might need to be reconfigured.For details, see "Making Option Settings for the Printer", Driver Installation Guide.
Attaching the Paper Feed Unit
51

Installing the Memory Expansion UnitsThe following procedure applies to Type 1 model only.
• Do not touch the inside of the controller board compartment. Doing so may cause a machinemalfunction or a burn.
Installing the Hard Disk
• Before touching the hard disk, touch something metal to discharge any static electricity. Staticelectricity can damage the hard disk.
• Do not subject the hard disk to physical shocks.
1. Check the package contains the following:
CEC015
1. Hard disk
2. Screws
2. Turn off the power to the printer, and then unplug the power cable and interface cable.
3. Remove the two screws holding the controller board in place.
CEC073
3. Installing Options
52
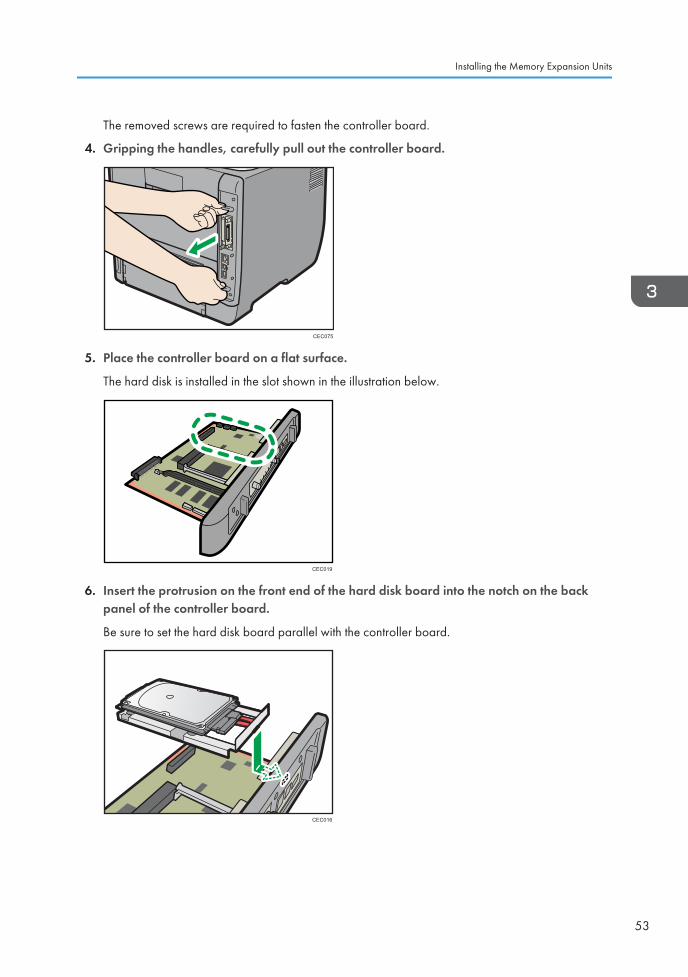
The removed screws are required to fasten the controller board.
4. Gripping the handles, carefully pull out the controller board.
CEC075
5. Place the controller board on a flat surface.
The hard disk is installed in the slot shown in the illustration below.
CEC019
6. Insert the protrusion on the front end of the hard disk board into the notch on the backpanel of the controller board.
Be sure to set the hard disk board parallel with the controller board.
CEC016
Installing the Memory Expansion Units
53

7. Fit the hard disk on the connector of the controller board carefully until it stops.
CEC017
8. Tighten the two screws by turning them clockwise with a coin, and then secure the harddisk board by tightening the third screw from the under side of the controller board.
CEC018
9. To install other options on the controller board, follow the installation procedure shown inthe documentation provided with the option.
10. Align the controller board with the top and bottom rails, and then push it carefully in, untilit stops.
The printer may malfunction if the controller board is not properly installed.
CEC076
3. Installing Options
54

11. Fasten the controller board to the printer with the two screws.
CEC072
First install the optional hard disk, and then install the SD card provided with the hard disk. Fordetails about the installation procedure, see page 65 "Installing the SD Memory Card Options".
• After finishing installation, you can check whether the hard disk is properly installed: Print theconfiguration page from the [List/Test Print] menu. If it is installed properly, you will see "Hard Disk"will appear for "Device Connection" on the configuration page.
• If the Hard disk is not properly installed, repeat this procedure. If you cannot install it properly evenafter reinstallation, contact your sales or service representative.
• For details on printing the configuration page, see page 44 "Test Printing".
Installing the SDRAM Module
• Before touching the SDRAM module, ground yourself by touching something metal to dischargeany static electricity. Static electricity can damage the SDRAM module.
• Do not subject the SDRAM module to physical shocks.
• The printer comes equipped with 256 MB of memory. This can be expanded to a maximum of 768MB.
1. Turn off the power of the printer, and then unplug the power cable and interface cable.
Installing the Memory Expansion Units
55

2. Remove the two screws holding the controller board in place.
CEC073
The removed screws are required to fasten the controller board.
3. Gripping the handles, carefully pull out the controller board.
CEC075
4. Place the controller board on a flat surface.
The SDRAM module is installed in the slot shown in the illustration below.
CEC012
3. Installing Options
56

5. To install the recommended memory, align the notch of the recommended memory withthe protruding part of the vacant slot, and then carefully insert the module at an angle.
CEC013
6. Keeping the module at an angle, press it down until it clicks into place.
CEC014
7. Align the controller board with the top and bottom rails, and then push it carefully in, untilit stops.
The printer may malfunction if the controller board is not properly installed.
CEC076
Installing the Memory Expansion Units
57
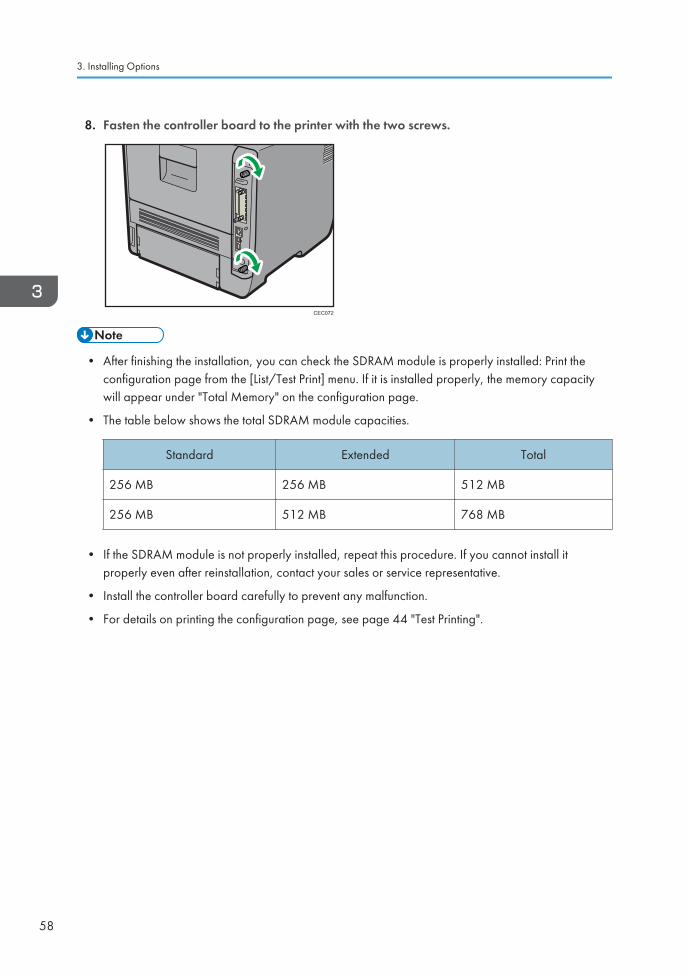
8. Fasten the controller board to the printer with the two screws.
CEC072
• After finishing the installation, you can check the SDRAM module is properly installed: Print theconfiguration page from the [List/Test Print] menu. If it is installed properly, the memory capacitywill appear under "Total Memory" on the configuration page.
• The table below shows the total SDRAM module capacities.
Standard Extended Total
256 MB 256 MB 512 MB
256 MB 512 MB 768 MB
• If the SDRAM module is not properly installed, repeat this procedure. If you cannot install itproperly even after reinstallation, contact your sales or service representative.
• Install the controller board carefully to prevent any malfunction.
• For details on printing the configuration page, see page 44 "Test Printing".
3. Installing Options
58
Installing the Interface Units
Installing the Gigabit Ethernet Board
• The printer's Ethernet and USB ports are not available when the Gigabit Ethernet board is installedin to the printer. Use the Ethernet and USB ports on the Gigabit Ethernet board.
• Before beginning work, ground yourself by touching something metal to discharge any staticelectricity. Static electricity can damage the Gigabit Ethernet board.
• Do not subject the Gigabit Ethernet board to physical shocks.
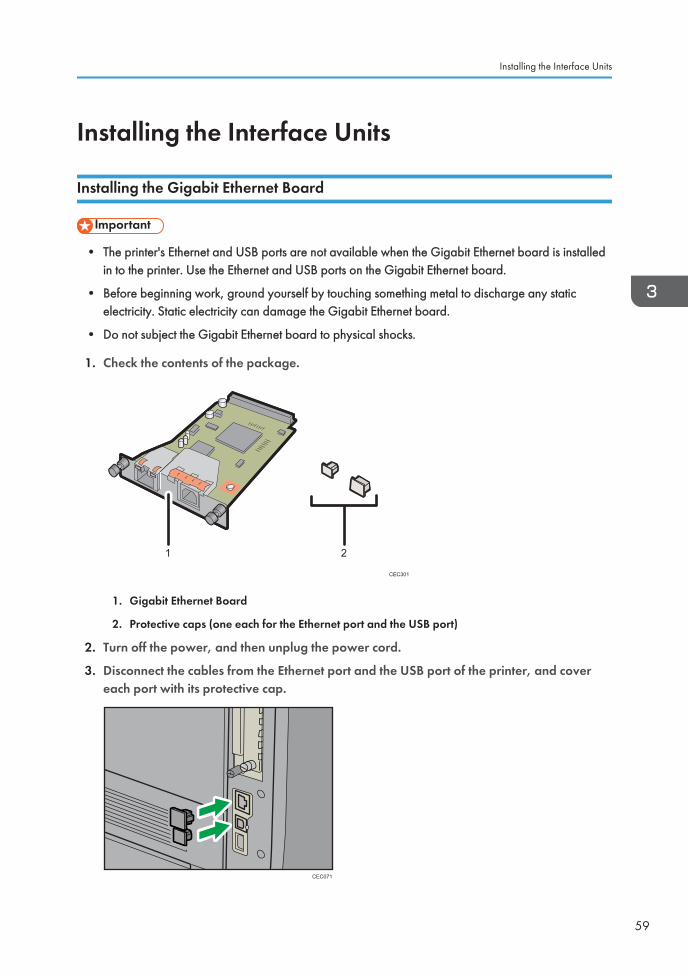
1. Check the contents of the package.
CEC301
1. Gigabit Ethernet Board
2. Protective caps (one each for the Ethernet port and the USB port)
2. Turn off the power, and then unplug the power cord.
3. Disconnect the cables from the Ethernet port and the USB port of the printer, and covereach port with its protective cap.
CEC071
Installing the Interface Units
59
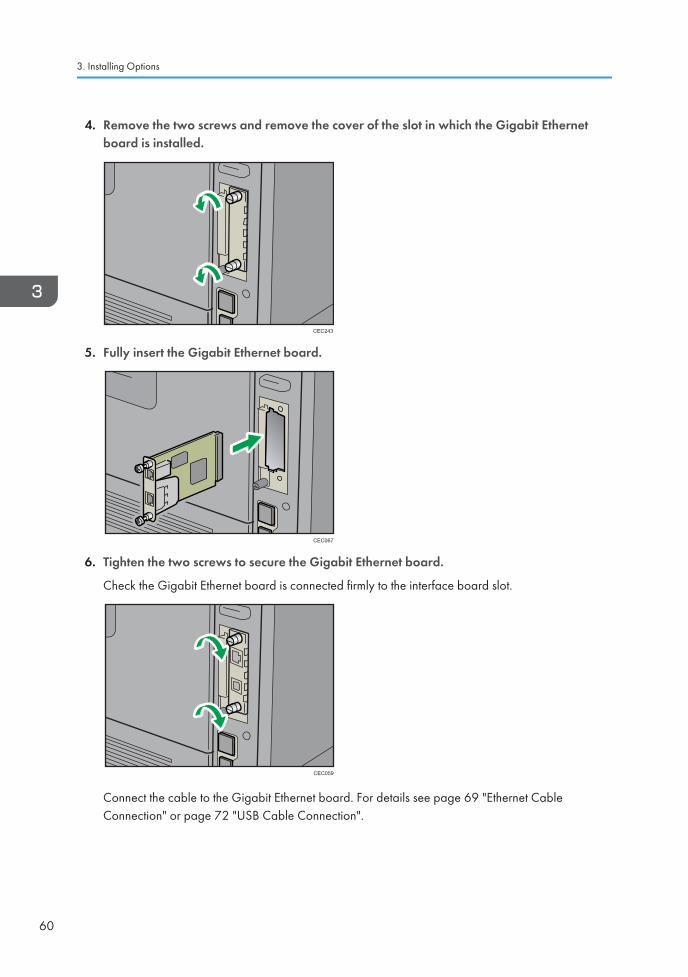
4. Remove the two screws and remove the cover of the slot in which the Gigabit Ethernetboard is installed.
CEC243
5. Fully insert the Gigabit Ethernet board.
CEC067
6. Tighten the two screws to secure the Gigabit Ethernet board.
Check the Gigabit Ethernet board is connected firmly to the interface board slot.
CEC059
Connect the cable to the Gigabit Ethernet board. For details see page 69 "Ethernet CableConnection" or page 72 "USB Cable Connection".
3. Installing Options
60
• Confirm that the Gigabit Ethernet board was correctly installed by printing the configuration page.If it is correctly installed, "Gigabit Ethernet" will appear for "Device Connection" on theconfiguration page.
• If the board was not installed properly, repeat the procedure from step 4. If it cannot be installedcorrectly even after reattempting installation, contact your sales or service representative.
• For details about printing the configuration page, see page 44 "Test Printing".
• Before using the Gigabit Ethernet board, you must configure settings from the printer control panel.For details, see page 75 "Ethernet Configuration".
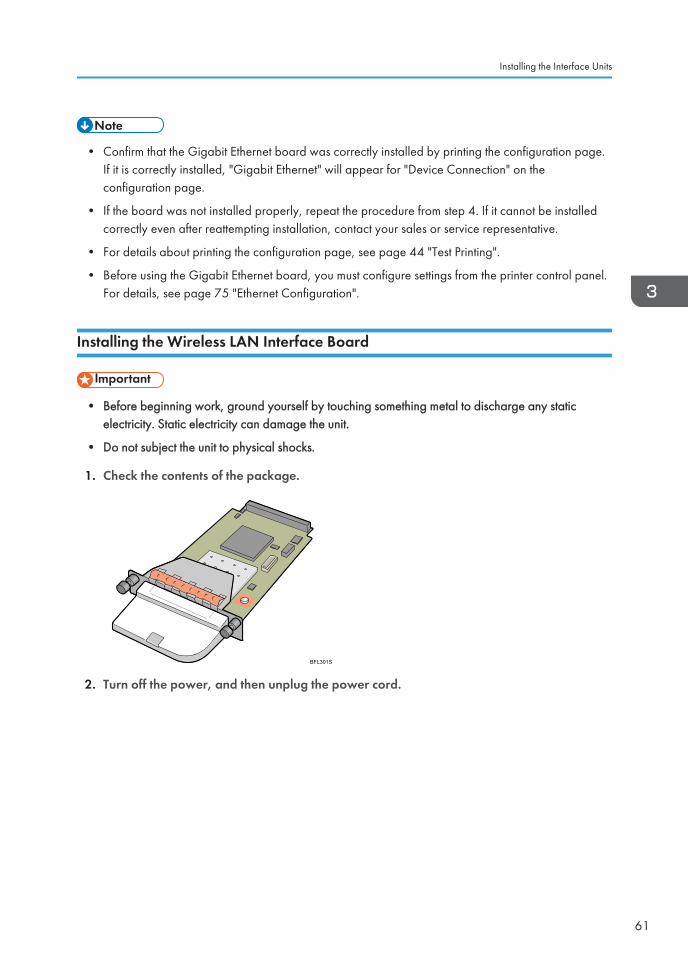
Installing the Wireless LAN Interface Board
• Before beginning work, ground yourself by touching something metal to discharge any staticelectricity. Static electricity can damage the unit.
• Do not subject the unit to physical shocks.
1. Check the contents of the package.
BFL301S
2. Turn off the power, and then unplug the power cord.
Installing the Interface Units
61
3. Remove the two screws and remove the cover of the slot in which the Wireless LANinterface board is installed.
CEC061
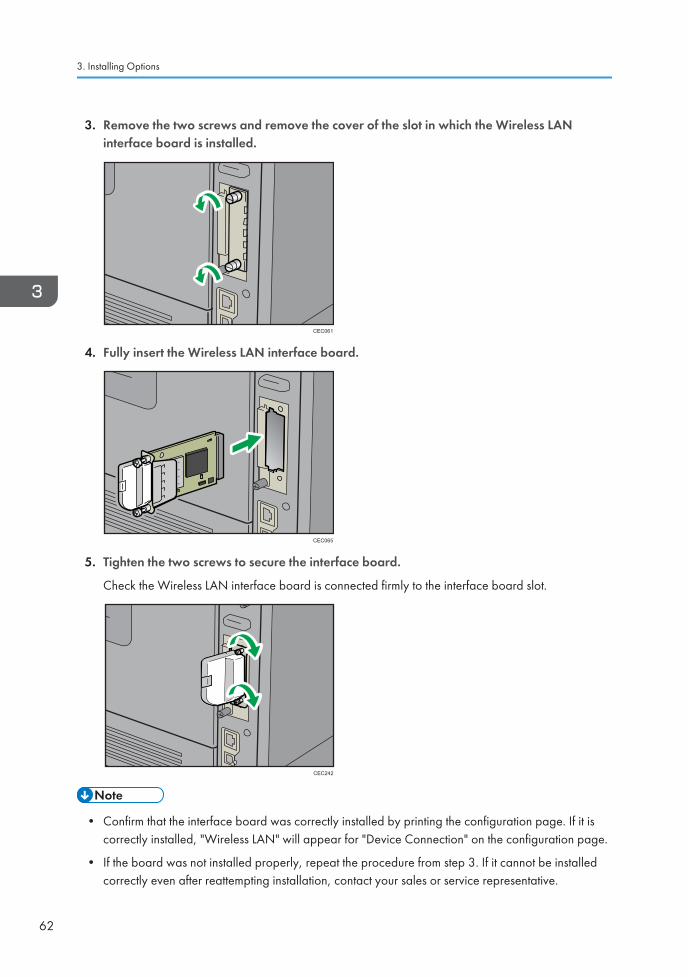
4. Fully insert the Wireless LAN interface board.
CEC065
5. Tighten the two screws to secure the interface board.
Check the Wireless LAN interface board is connected firmly to the interface board slot.
CEC242
• Confirm that the interface board was correctly installed by printing the configuration page. If it iscorrectly installed, "Wireless LAN" will appear for "Device Connection" on the configuration page.
• If the board was not installed properly, repeat the procedure from step 3. If it cannot be installedcorrectly even after reattempting installation, contact your sales or service representative.
3. Installing Options
62

• For details about printing the configuration page, see page 44 "Test Printing".
• Before using the Wireless LAN interface board, you must configure settings from the printer controlpanel. For details, see page 84 "Wireless LAN Configuration".
Installing the IEEE 1284 Interface Board
• Before beginning work, ground yourself by touching something metal to discharge any staticelectricity. Static electricity can damage the IEEE 1284 interface board.
• Do not subject the IEEE 1284 interface board to physical shocks.
• For connection to the IEEE 1284 interface board, use a half pitch 36-pin interface cable.
1. Check the contents of the package.
BFL302S
2. Turn off the power, and then unplug the power cord.
3. Remove the two screws and remove the cover of the slot in which the 1284 interfaceboard is installed.
CEC061
Installing the Interface Units
63

4. Fully insert the IEEE 1284 interface board.
CEC066
5. Tighten the two screws to secure the interface board.
Check the IEEE 1284 interface board is connected firmly to the interface board slot.
CEC060
• Confirm that the IEEE 1284 interface board was correctly installed by printing the configurationpage. If it is correctly installed, "Parallel Interface" will appear for "Device Connection" on theconfiguration page.
• If the board was not installed properly, repeat the procedure from step 3. If it cannot be installedcorrectly even after reattempting installation, contact your sales or service representative.
• For details about printing the configuration page, see page 44 "Test Printing".
3. Installing Options
64
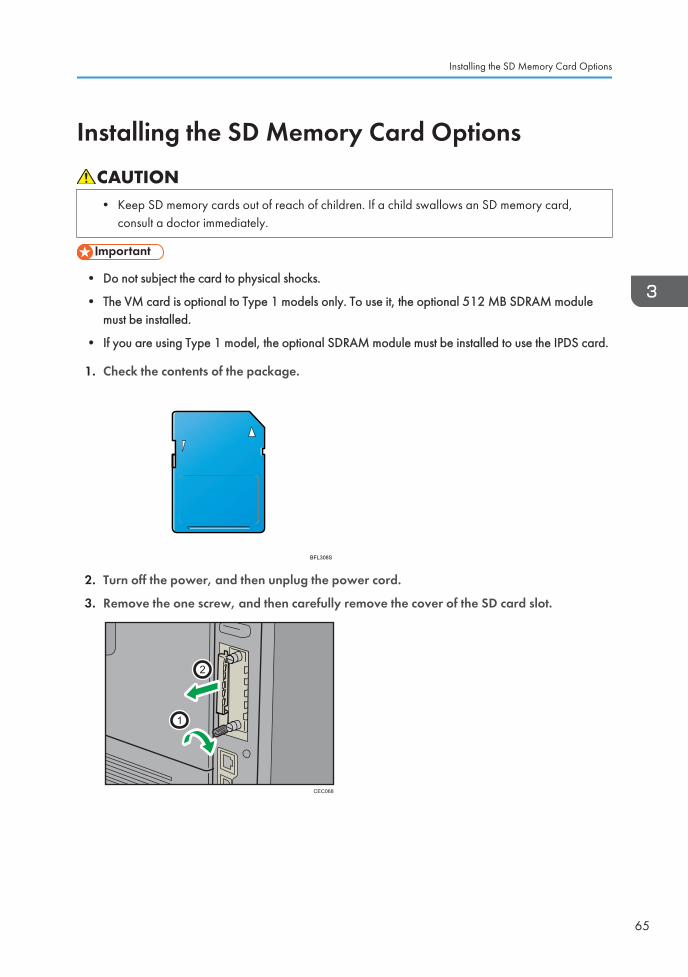
Installing the SD Memory Card Options
• Keep SD memory cards out of reach of children. If a child swallows an SD memory card,consult a doctor immediately.
• Do not subject the card to physical shocks.
• The VM card is optional to Type 1 models only. To use it, the optional 512 MB SDRAM modulemust be installed.
• If you are using Type 1 model, the optional SDRAM module must be installed to use the IPDS card.
1. Check the contents of the package.
BFL308S
2. Turn off the power, and then unplug the power cord.
3. Remove the one screw, and then carefully remove the cover of the SD card slot.
1
2
CEC068
Installing the SD Memory Card Options
65

4. Carefully push in the SD card (notched corner downward and leading), until it clicks intoplace.
CEC070
Insert the SD card in the appropriate slot as follows:
• Upper slot: SD font card, NetWare card, IPDS card
• Lower slot: VM card, ELP-NX card
The SD card supplied with the optional hard disk (Type 1 model only) can be used in either of thetwo slots.
To export the printer settings by selecting [Machine Settings Export], insert the SD card on whichthe settings are to be stored into the lower slot.
If you want to use two or more SD cards that can be inserted in the same slot, contact your salesand service representative.
5. Reattach the cover over the SD card. Fasten the one screw to secure the cover.
1
2
3
CEC069
If the ELP-NX card is inserted in the printer, the installation will automatically start when the printer isturned on. After the installation is complete, restart the printer.
• Do not touch the card while the printer is in use. It may come loose, even if pushed only slightly. Theslot cover must be reattached.
3. Installing Options
66

• You can confirm that the SD card was installed correctly by checking the control panel menu.Depending on the SD card, certain menu items appear on the display.
• SD card supplied with the optional hard disk (Type 1 model only): Make sure [Machine DataEncryption] appears in [Security Options]. Depending on settings, [Machine Data Encryption]might not appear. For details about how to confirm this setting, consult your administrator.
• IPDS card: Make sure [IPDS Menu] appears under [Print Settings].
• NetWare card: Make sure [NetWare] appears in [Effective Protocol] under [Network].
• ELP-NX card: Press the [Switch Functions] key, and then confirm that ELP-NX appears in[JavaTM/X].
• If the card is not installed properly, repeat the procedure from the beginning. If it cannot beinstalled correctly even after reattempting installation, contact your sales or service representative.
• For details about printing the configuration page, see page 44 "Test Printing".
Installing the SD Memory Card Options
67

3. Installing Options
68

4. Connecting the PrinterThis chapter explains how to connect network and USB cables.
Ethernet Cable ConnectionPrepare a hub and other network devices, and connect the Ethernet cable to the printer.
Connect 10BASE-T or 100BASE-TX cable to the printer's Ethernet port. For 1000BASE-T, the optionalGigabit Ethernet board is required.
• For users outside the United States of America: properly shielded and grounded cables andconnectors must be used for connections to a host computer (and/or peripheral) in order tomeet emission limits.
• For users in the United States of America: properly shielded and grounded cables andconnectors must be used for connections to a host computer (and/or peripheral) in order tomeet FCC emission limits.
• An Ethernet cable is not supplied with this printer. Select your cable according to the networkenvironment.
• The printer's Ethernet and USB ports are not available when the Gigabit Ethernet board is attachedto the printer.
Connecting to the standard Ethernet port
1. Connect the Ethernet cable to the Ethernet port.
CEC054
2. Connect the other end of the cable to the network, for example using a hub.
69

Connecting to the Ethernet port of the Gigabit Ethernet board
1. Connect the Ethernet cable to the Ethernet port of the Gigabit Ethernet board.
CEC302
2. Connect the other end of the cable to the network, for example using a hub.
• For details about configuring the network environment, see page 75 "Ethernet Configuration".
• For details about installing the Gigabit Ethernet board, see page 59 "Installing the Interface Units".
Reading the LED Lamps
Standard Ethernet port
1
2
CBK090
1. Yellow indicator
If the printer is connected to a 100BASE-TX Ethernet, the yellow indicator will be lit. This indicator will beunlit if the printer is connected to a 10BASE-T Ethernet.
2. Green indicator
If the printer is connected to a 10BASE-T Ethernet or 100BASE-TX Ethernet, the green indicator will belit.
4. Connecting the Printer
70
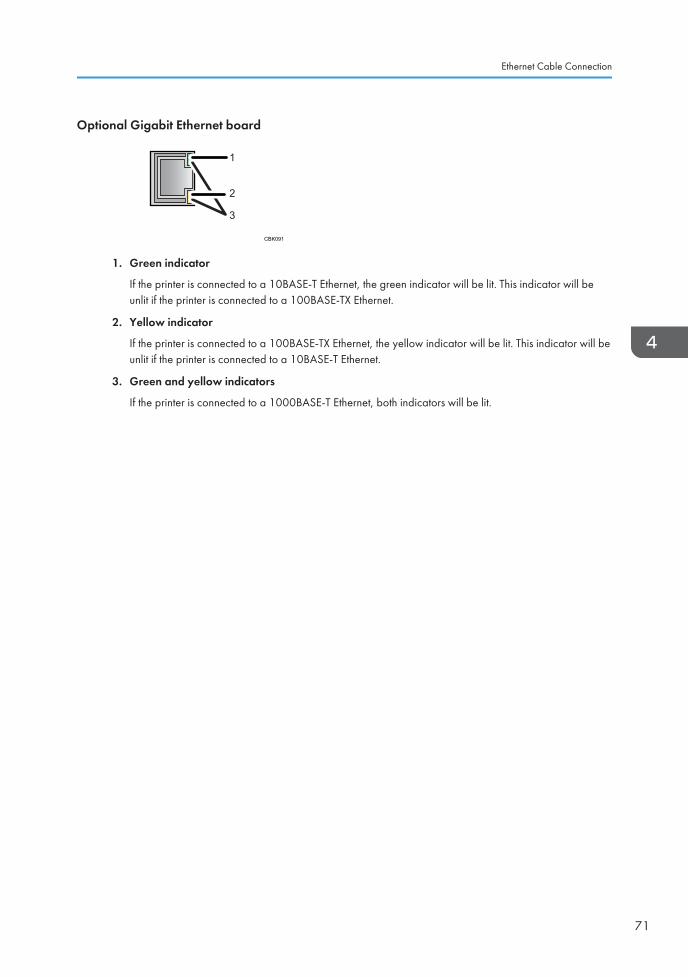
Optional Gigabit Ethernet board
CBK091
1
2
3
1. Green indicator
If the printer is connected to a 10BASE-T Ethernet, the green indicator will be lit. This indicator will beunlit if the printer is connected to a 100BASE-TX Ethernet.
2. Yellow indicator
If the printer is connected to a 100BASE-TX Ethernet, the yellow indicator will be lit. This indicator will beunlit if the printer is connected to a 10BASE-T Ethernet.
3. Green and yellow indicators
If the printer is connected to a 1000BASE-T Ethernet, both indicators will be lit.
Ethernet Cable Connection
71

USB Cable Connection
• For users outside the United States of America: properly shielded and grounded cables andconnectors must be used for connections to a host computer (and/or peripheral) in order tomeet emission limits.
• For users in the United States of America: properly shielded and grounded cables andconnectors must be used for connections to a host computer (and/or peripheral) in order tomeet FCC emission limits.
• USB connection is possible under Windows XP/Vista/7, Windows Server 2003/2003R2/2008/2008 R2, and Mac OS X 10.3.3 or later.
• A USB cable is not supplied with this printer. Select your cable according to the computer.
1. Connect the USB cable to the printer.
• Connecting the USB cable to the standard USB port B
Connect the smaller connector of the USB cable to the standard USB port B on the left side ofthe printer.
CEC055
• Connecting the USB cable to the Gigabit Ethernet board USB port
Connect the smaller connector of the USB cable to the USB port of the Gigabit Ethernetboard.
4. Connecting the Printer
72

CEC063
2. Connect the opposite end's flat connector to the desired device such as your computer'sUSB interface, or a USB hub.
The printer is now connected to the computer. The Plug and Play screen appears on the computerdisplay. For details, see "Installing the Printer Driver Using USB", Driver Installation Guide.
USB Cable Connection
73

Parallel Cable ConnectionThe type of cable required varies depending on the computer you are using. Make sure to use theinterface cable compliant with your computer.
• For users outside the United States of America: properly shielded and grounded cables andconnectors must be used for connections to a host computer (and/or peripheral) in order tomeet emission limits.
• For users in the United States of America: properly shielded and grounded cables andconnectors must be used for connections to a host computer (and/or peripheral) in order tomeet FCC emission limits.
• The printer's parallel connection is a standard bidirectional interface that requires an IEEE 1284-compliant half pitch 36-pin parallel cable and host computer parallel port.
• Use shielded interface cable. Unshielded cables create electromagnetic interference.
1. Turn off the printer and computer.
2. Connect the interface cable to the IEEE 1284 interface board.
CEC064
3. Connect the other end of the interface cable to your computer, and then secure the cable.
The printer is now connected to the computer. Install the printer driver. For details, see "Installing thePrinter Driver Using Parallel Cable", Driver Installation Guide.
• For details about installing the 1284 interface board, see page 59 "Installing the Interface Units".
4. Connecting the Printer
74

5. ConfigurationThis chapter explains supported network connections, and settings for the IP addresses and the WirelessLAN security.
Ethernet Configuration
• Configure the printer for the network using the control panel.
• The following table shows the control panel settings and their default values. These items appear inthe [Network] under [Host Interface] menu.
Setting Name Default
Machine IPv4 Address
• Auto-Obtain (DHCP): On
• IPv4 Address: 11.22.33.44
• Subnet Mask: 0.0.0.0
• Gateway Address: 0.0.0.0
IPv6 Stateless Setting Active
IPsec Inactive
NW Frame Type Auto Select
Effective Protocol
• IPv4: Active
• IPv6: Inactive
• NetWare: Inactive
• SMB: Active
• AppleTalk: Inactive
Ethernet Speed Auto Select
IEEE802.1X Auth.(Ethernet) Inactive
Restr.IEEE802.1X Auth.Def. -
LAN Type Ethernet
Permit SSL/TLS Comm. Ciphertext Priority
75
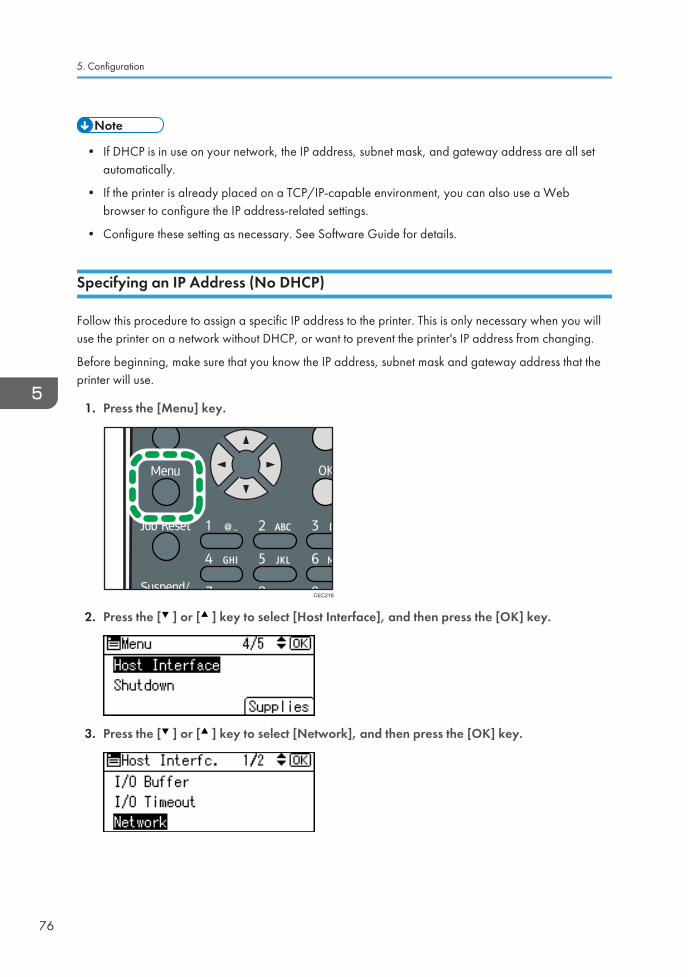
• If DHCP is in use on your network, the IP address, subnet mask, and gateway address are all setautomatically.
• If the printer is already placed on a TCP/IP-capable environment, you can also use a Webbrowser to configure the IP address-related settings.
• Configure these setting as necessary. See Software Guide for details.
Specifying an IP Address (No DHCP)
Follow this procedure to assign a specific IP address to the printer. This is only necessary when you willuse the printer on a network without DHCP, or want to prevent the printer's IP address from changing.
Before beginning, make sure that you know the IP address, subnet mask and gateway address that theprinter will use.
1. Press the [Menu] key.
CEC216
2. Press the [ ] or [ ] key to select [Host Interface], and then press the [OK] key.
3. Press the [ ] or [ ] key to select [Network], and then press the [OK] key.
5. Configuration
76

4. Press the [ ] or [ ] key to select [Effective Protocol], and then press the [OK] key.
5. Press the [ ] or [ ] key to select the appropriate network protocol, and then press the[OK] key.
6. Press the [ ] or [ ] key to select [Active] or [Inactive], and then press the [OK] key.
Set other protocols you need to set in the same way.
• Select [Inactive] for unused protocols.
• Enable IPv4 to use the pure IPv4 environment of NetWare5/5.1, NetWare 6/6.5.
7. Press the [Escape] key until the screen returns to the [Network] menu.
8. If you use IPv4, assign the IPv4 address to the printer. Press the [ ] or [ ] key to select[Machine IPv4 Address], and then press the [OK] key.
To get the IP address for the printer, consult your network administrator.
9. To specify the IP Address, press [IP Add.].
If you use IPv4, also assign the subnet mask and gateway address. To assign these, press [SubnetM] or [Gateway].
Ethernet Configuration
77

10. Enter the address, and then press the [OK] key.
Change the IP address from "11.22.33.44" to an IP address supported by your network.
11. Use the same method to assign the subnet mask and gateway address.
12. Press the [ ] or [ ] key to select [Specify], and then press the [OK] key.
13. Press the [Menu] key to return to the initial screen.
14. Print a configuration page to confirm the settings.
• For details about printing the configuration page, see page 44 "Test Printing".
Receiving an IP Address Automatically (DHCP)
Follow this procedure to set the printer to receive an IP address automatically using DHCP. The DHCPfeature is active by default, so this procedure is only required if you have changed the default settings.
• When [Auto-Obtain (DHCP)] is selected, you cannot configure the IP address, subnet mask, orgateway address.
• Consult your network administrator for information about configuring network settings.
1. Press the [Menu] key.
CEC216
5. Configuration
78

2. Press the [ ] or [ ] key to select [Host Interface], and then press the [OK] key.
3. Press the [ ] or [ ] key to select [Network], and then press the [OK] key.
4. Press the [ ] or [ ] key to select [Machine IPv4 Address], and then press the [OK] key.
5. Press the [ ] or [ ] key to select [Auto-Obtain (DHCP)], and then press the [OK] key.
To check the detected addresses, press the followings:
• [IP Add.]: IP address
• [Subnet M]: Subnet Mask
• [Gateway]: Default Gateway
6. Press the [Menu] key to return to the initial screen.
7. Print a configuration page to confirm the settings.
• For details about printing the configuration page, see page 44 "Test Printing".
Configuring Network Settings When Using NetWare
To use NetWare, select the appropriate NetWare frame type from the following.
• Auto Select
Ethernet Configuration
79

• Ethernet II
• Ethernet 802.2
• Ethernet 802.3
• Ethernet SNAP
• Usually, you can use the default (Auto Select). When you first select [Auto Select], the frame typedetected by the printer is adopted. However, if your network can use more than two frame types,the printer may fail to select the correct frame type with [Auto Select] selected. In this case, selectthe preferred frame type.
1. Press the [Menu] key.
CEC216
2. Press the [ ] or [ ] key to select [Host Interface], and then press the [OK] key.
3. Press the [ ] or [ ] key to select [Network], and then press the [OK] key.
4. Press the [ ] or [ ] key to select [NW Frame Type], and then press the [OK] key.
5. Configuration
80

5. Press the [ ] or [ ] key to select the frame type to use, and then press the [OK] key.
6. Press the [Menu] key to return to the initial screen.
7. Print a configuration page to confirm the settings.
• For details about printing the configuration page, see page 44 "Test Printing".
Setting the Ethernet Speed
You can set the speed that the printer will use for Ethernet communications. In most cases, this should beleft on the default setting, [Auto Select]. This setting allows two interfaces to automatically determine theoptimum speed when they are connected.
Router/HUB
Printer
[10Mbps HalfDuplex]
[10Mbps FullDuplex]
[100MbpsHalf Duplex]
[100MbpsFull Duplex]
[Auto Select]
10 Mbps halfduplex
- - -
10 Mbps fullduplex
- - - -
100 Mbpshalf duplex
- - -
100 Mbps fullduplex
- - - -
auto-negotiation(autoselection)
- -
• Connection cannot be established if the selected Ethernet speed does not match your network'stransmission speed.
Ethernet Configuration
81

• The use of this feature is recommended. To use it, select [Auto Select].
1. Press the [Menu] key.
CEC216
2. Press the [ ] or [ ] key to select [Host Interface], and then press the [OK] key.
3. Press the [ ] or [ ] key to select [Network], and then press the [OK] key.
4. Press the [ ] or [ ] key to select [Ethernet Speed], and then press the [OK] key.
5. Press the [ ] or [ ] key to select the Ethernet speed, and then press the [OK] key.
6. Press the [Menu] key to return to the initial screen.
7. Print a configuration page to confirm the settings.
5. Configuration
82

• For details about printing the configuration page, see page 44 "Test Printing".
Ethernet Configuration
83
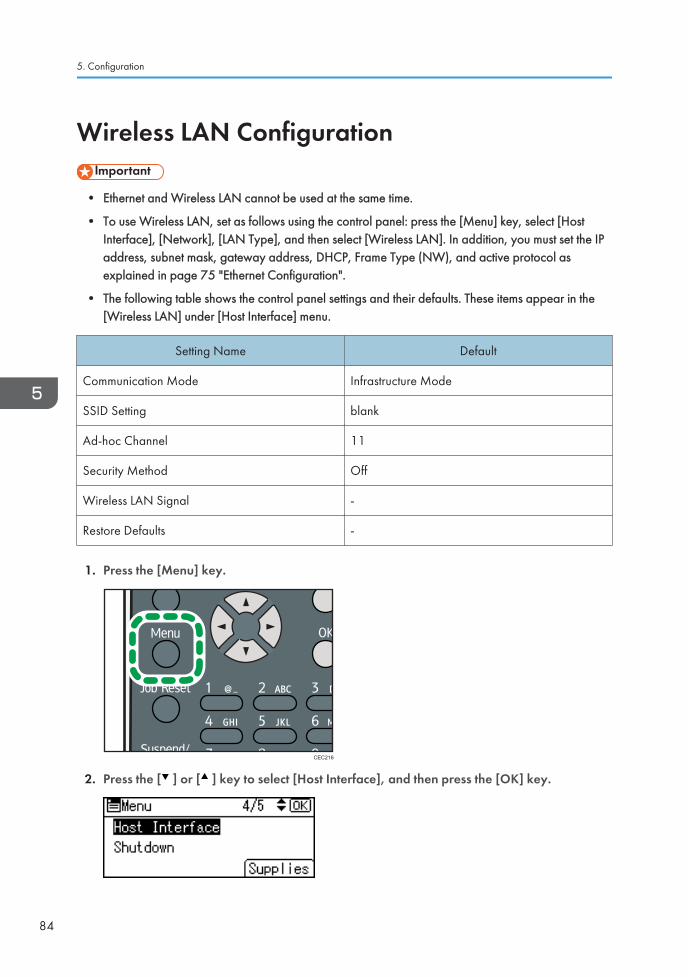
Wireless LAN Configuration
• Ethernet and Wireless LAN cannot be used at the same time.
• To use Wireless LAN, set as follows using the control panel: press the [Menu] key, select [HostInterface], [Network], [LAN Type], and then select [Wireless LAN]. In addition, you must set the IPaddress, subnet mask, gateway address, DHCP, Frame Type (NW), and active protocol asexplained in page 75 "Ethernet Configuration".
• The following table shows the control panel settings and their defaults. These items appear in the[Wireless LAN] under [Host Interface] menu.
Setting Name Default
Communication Mode Infrastructure Mode
SSID Setting blank
Ad-hoc Channel 11
Security Method Off
Wireless LAN Signal -
Restore Defaults -
1. Press the [Menu] key.
CEC216
2. Press the [ ] or [ ] key to select [Host Interface], and then press the [OK] key.
5. Configuration
84

3. Press the [ ] or [ ] key to select [Wireless LAN], and then press the [OK] key.
4. Press the [ ] or [ ] key to select [Communication Mode], and then press the [OK] key.
5. Press the [ ] or [ ] key to select the transmission mode of Wireless LAN, and then pressthe [OK] key.
The transmission mode of the Wireless LAN can also be set using Web Image Monitor.
6. If [802.11 Ad-hoc Mode] is selected for [Communication Mode], confirm the channel touse for transmission.
7. Press the [ ] or [ ] key to select [Ad-hoc Channel], and then press the [OK] key.
8. Press the scroll keys to select the Ad-hoc channel, and then press the [OK] key.
Select an Ad-hoc channel according to the IEEE 802.11 standard you are using.
• When using IEEE 802.11 b/g:
• (mainly Europe and Asia)Channels 1 to 13
• (mainly North America)
Wireless LAN Configuration
85

Channels 1 to 11
• When using IEEE 802.11 a:
Channels 36,40,44,48
9. Press the [Menu] key to return to the initial screen.
10. Print a configuration page to confirm the settings.
• For details, see Web Image Monitor Help, and "Using Web Image Monitor", Software Guide.
• For details about printing the configuration page, see page 44 "Test Printing".
Setting the SSID
When [Communication Mode] is set to [Infrastructure Mode] or [802.11 Ad-hoc Mode], you mustspecify the Service Set Identifier (SSID) of the wireless access point that the printer will connect to fornetwork access.
Ask your network administrator for the SSID to use.
1. In the [Wireless LAN] menu, press the [ ] or [ ] key to select [SSID Setting], and thenpress the [OK] key.
If an SSID has been set, you can check the current SSID setting.
2. Press [SSID], and then press [Enter].
3. Enter the characters, and then press the [OK] key.
You can switch among lower /upper cases and numeric characters by pressing [ab/AB/12].
The characters that can be used are ASCII 0 × 20-0 × 7e (32 bytes).
5. Configuration
86

4. Press the [Menu] key to return to the initial screen.
5. Print a configuration page to confirm the settings.
• The SSID can also be set using a Web browser. For details, see Web Image Monitor Help.
• For details about printing the configuration page, see page 44 "Test Printing".
Confirming Wireless Network Connectivity
After you have installed the Wireless LAN interface unit, use the following procedure to check forWireless LAN connectivity.
Make sure the LED on the Wireless LAN interface unit is lit.
CEC077
1
2
1
2
1. If the Wireless LAN unit is receiving power, the upper indicator will be lit green.
2. If the printer is connected to an operational network and is communicating normally, the lowerindicator will be lit orange.
Cautions When Using a Wireless LAN
A Wireless LAN uses radio waves instead of cables to send and receive data. Because radio wavesusually pass through walls and other obstructions, the following problems may arise if you do notconfigure wireless security settings.
Information leakage
Information such as IDs, passwords, credit card numbers, and e-mail content may be seen by anunauthorized 3rd party.
Unauthorized network access
• Damage to or alteration of data and/or system configurations by viruses or other malware.
• Impersonation of legitimate network users, resulting in data theft.
• Theft of sensitive or confidential data.
Wireless LAN Configuration
87

To minimize the possibility of these threats, it is recommended that you check the available features ofthis printer, wireless access points, and other equipment that uses the Wireless LAN, and configuresecurity settings for the Wireless LAN.
5. Configuration
88

Setting Security Method of Wireless LAN
Setting a WEP Key
If the wireless network uses WEP to encrypt transmitted data, the corresponding WEP key must be set tothe printer to allow communications with other network devices.
Ask your network administrator for the WEP key to use.
1. Press the [Menu] key.
CEC216
2. Press the [ ] or [ ] key to select [Host Interface], and then press the [OK] key.
3. Press the [ ] or [ ] key to select [Wireless LAN], and then press the [OK] key.
4. Press the [ ] or [ ] key to select [Security Method], and then press the [OK] key.
Setting Security Method of Wireless LAN
89
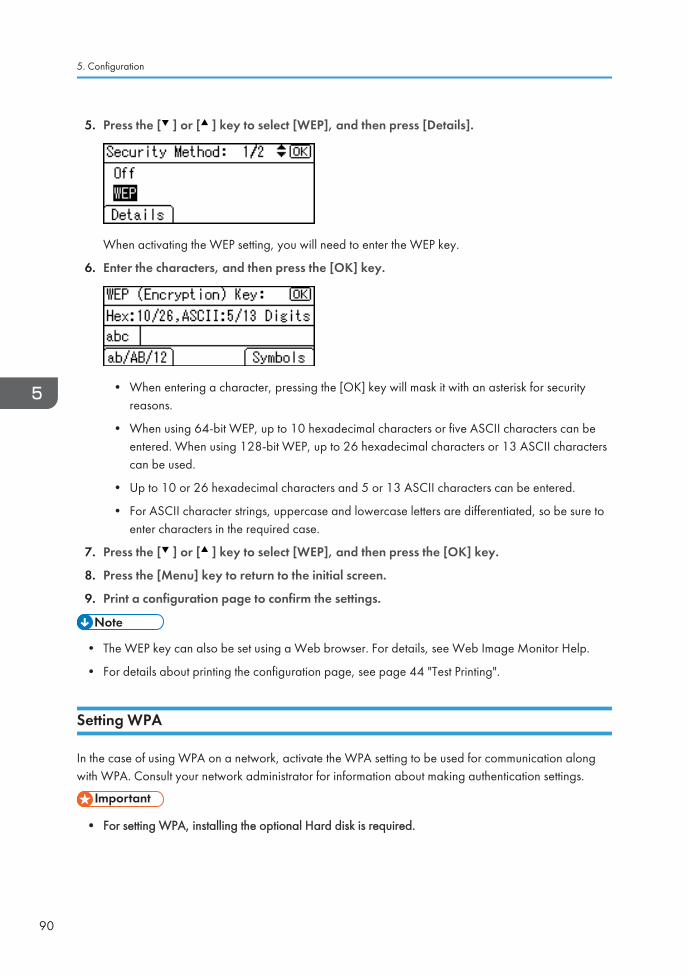
5. Press the [ ] or [ ] key to select [WEP], and then press [Details].
When activating the WEP setting, you will need to enter the WEP key.
6. Enter the characters, and then press the [OK] key.
• When entering a character, pressing the [OK] key will mask it with an asterisk for securityreasons.
• When using 64-bit WEP, up to 10 hexadecimal characters or five ASCII characters can beentered. When using 128-bit WEP, up to 26 hexadecimal characters or 13 ASCII characterscan be used.
• Up to 10 or 26 hexadecimal characters and 5 or 13 ASCII characters can be entered.
• For ASCII character strings, uppercase and lowercase letters are differentiated, so be sure toenter characters in the required case.
7. Press the [ ] or [ ] key to select [WEP], and then press the [OK] key.
8. Press the [Menu] key to return to the initial screen.
9. Print a configuration page to confirm the settings.
• The WEP key can also be set using a Web browser. For details, see Web Image Monitor Help.
• For details about printing the configuration page, see page 44 "Test Printing".
Setting WPA
In the case of using WPA on a network, activate the WPA setting to be used for communication alongwith WPA. Consult your network administrator for information about making authentication settings.
• For setting WPA, installing the optional Hard disk is required.
5. Configuration
90

1. Press the [Menu] key.
CEC216
2. Press the [ ] or [ ] key to select [Host Interface], and then press the [OK] key.
3. Press the [ ] or [ ] key to select [Wireless LAN], and then press the [OK] key.
4. Press the [ ] or [ ] key to select [Security Method], and then press the [OK] key.
5. Press the [ ] or [ ] key to select [WPA], and then press [Details].
Setting Security Method of Wireless LAN
91

6. Press the [ ] or [ ] key to select [Encryption Method], and then press the [OK] key.
7. Press the [ ] or [ ] key to select encryption method, and then press the [OK] key.
Consult your network administrator for information about making encryption settings.
Encryption settings are as follows:
• [TKIP]
Uses the same algorithm as RC4, but further reduces vulnerability using methods such as keymixing.
• [CCMP(AES)]
Increases security using AES (Advanced Encryption Standard).
The display returns to the [WPA] menu.
8. Press the [ ] or [ ] key to select [Authentication Method], and then press the [OK] key.
9. Press the [ ] or [ ] key to select authentication settings, and then press the [OK] key.
Authentication settings are as follows:
• [WPA-PSK]
Performs authentication using an encryption key (a Pre-Shared Key) that is shared by theaccess point and client.
• [WPA]
5. Configuration
92

WPA uses CA certificates and a RADIUS server to provide secure wireless communication.
• [WPA2-PSK]
As with WPA-PSK, authenticate using the encryption key (a Pre-Shared Key) shared by theaccess point and client. Enter Pre-Shared Key using between 8 and 63 ASCII characters.
• [WPA2]
WPA2 is an expanded version of WPA that fully supports IEEE 802.11i.
Wait for two seconds, the display returns to the [WPA] menu.
10. If [WPA] or [WPA2] is selected in step 9, a confirmation message appears. Press [OK].
Wait for two seconds. The display returns to the [WPA] menu, proceed to step 15.
11. If [WPA-PSK] or [WPA2-PSK] is selected in step 9, enter the Pre-Shared Key, and thenpress the [OK] key.
• When entering a character, pressing the [OK] key will mask it with an asterisk for securityreasons.
• Enter the Pre-Shared Key using between 8 and 63 ASCII characters.
• Uppercase and lowercase letters are differentiated, so be sure to enter characters in therequired case.
• Wait for two seconds. The display returns to the [Authentication Method] menu.
12. Press the [Escape] key.
13. Press [Exit].
14. Press the [ ] or [ ] key to select [WPA], and then press the [OK] key.
15. Press the [Menu] key to return to the initial screen.
16. Print a configuration page to confirm the settings.
• For details about printing the configuration page, see page 44 "Test Printing".
Setting Security Method of Wireless LAN
93
Configuring IEEE 802.1XIEEE 802.1X can be configured using Web Image Monitor's administrator mode. You can select fourtypes of EAP authentication method: EAP-TLS, LEAP, EAP-TTLS and PEAP. Note that each EAPauthentication method has different configuration settings and authentication procedures.
Types and requirements of certificates are as follows:
EAP Types Requiring a "Site Certificate"
EAP-TLS, EAP-TTLS, PEAP (Necessary except LEAP)
EAP Types Requiring a "Site Certificate" and a "Device Certificate"
EAP-TLS, PEAP (Phase 2 is for TLS only)
If a certificate is required, configure all settings after installing the certificate.
Installing a Site Certificate
Access the authentication server and obtain the CA certificate.
Methods of obtaining certificates differ according to the operating system you are using.
1. Log in to Web Image Monitor as an administrator.
2. In the menu area, click [Configuration].
3. Under "Security", click [Site Certificate].
4. Click [Browse] on the "Site Certificate to Import" window, and then select the CAcertificate you obtained.
5. Click [Import].
6. Check that the imported certificate's [Status] shows "Trustworthy".
If [Site Certificate Check] shows [Active], and the [Status] of the certificate shows [Untrustworthy],communication might not be possible.
7. Click [OK].
8. Click [Logout].
9. Quit the Web Image Monitor.
Installing Device Certificate
1. Log in to Web Image Monitor as an administrator.
2. In the menu area, click [Configuration].
3. Under "Security", click [Device Certificate].
4. Click [Certificate 2] on the "Device Certificate" window, and then click [Request].
5. Configuration
94

5. Enter appropriate "Common Name" and "Country Code" on "Certificate Information"page, and then click [OK].
6. "Updating..." appears. Wait for about 2 minutes, and then click [OK].
7. Click [Details], shown in the "Device Certificate" window as the memo pad icon for"Requesting".
8. Select all, and then copy the entire "Text for Requested Certificate" text that is displayedin the "Certificate Status" window.
9. Access the certificate authority server, and then obtain the CA signified certificate usingthe text copied into "Text for Requested Certificate" windows.
Obtaining the certificate differs depending on the environment you want to use.
10. Click [Certificate 2] on "Device Certificate" window, and then click [Install].
11. Using a text editor, open the CA signified certificate downloaded in step 9, and then copyover all the text.
12. In the [Enter Certificate Request] window, paste all the text copied into the CA signifiedcertificate.
13. Click [OK].
14. "Updating..." appears. Wait for about one or two minutes, and then click [OK].
15. Check that the "Device Certificate" shows "Installed".
16. Click [Certificate 2] on "Certification", and then click [OK].
17. Click [Logout].
18. Quit Web Image Monitor.
• If you request two certificates simultaneously, the certificate authority might not display eithercertificate. Click [Cancel Request] to cancel the request.
• You can select [Certificate 1-4] in the "Device Certificate" window. Note that if you select[Certificate 1] in the "Device Certificate" window, you must select "Certificate 1" in the "IEEE802.1X" drop down menu in the "Certification" window.
• Click [Cancel Request] to cancel the request for the server certificate.
• If "Not found" appears after clicking [OK] in steps 6 and 14, wait one or two minutes, and thenclick [Refresh].
Setting Items of IEEE 802.1X for Ethernet
1. Log in to Web Image Monitor as an administrator.
2. In the menu area, click [Configuration].
3. Under "Security", click [IEEE 802.1X].
Configuring IEEE 802.1X
95

4. In "User Name", enter the user name set in the RADIUS server.
5. Enter the domain name in "Domain Name".
6. Select "EAP Type". Configurations differ according to the EAP Type.
EAP-TLS
• Make the following settings according to the operating system you are using:
• Select [On] or [Off] in "Authenticate Server Certificate".
• Select [On] or [Off] in "Trust Intermediate Certificate Authority".
• Enter the host name of the RADIUS server on "Server ID".
• Select [On] or [Off] in "Permit Sub-domain".
LEAP
• Click [Change] in "Password", and then enter the password set in the RADIUS server.
EAP-TTLS
• Click [Change] in "Password", and then enter the password set in the RADIUS server.
• Click [Change] in "Phase 2 User Name", and then enter the user name set in the RADIUSserver.
• Select [CHAP], [MSCHAP], [MSCHAPv2], [PAP], or [MD5] in "Phase 2 Method".
Certain methods might not be available, depending on the RADIUS server you want to use.
• Make the following settings according to the operating system you are using:
• Select [On] or [Off] in "Authenticate Server Certificate".
• Select [On] or [Off] in "Trust Intermediate Certificate Authority".
• Enter the host name of the RADIUS server in "Server ID".
• Select [On] or [Off] in "Permit Sub-domain".
PEAP
• Click [Change] in "Password", and then enter the password set in the RADIUS server.
If [TLS] is selected for "Phase 2 Method", you do not need to specify a password.
• Click [Change] on "Phase 2 User Name", and then enter the user name set in the RADIUSserver.
• Select [MSCHAPv2] or [TLS] in "Phase 2 Method".
When you select [TLS], you must install "IEEE 802.1X Client Certificate".
• Make the following settings according to the operating system you are using:
• Select [On] or [Off] in "Authenticate Server Certificate".
• Select [On] or [Off] in "Trust Intermediate Certificate Authority".
• Enter the host name of the RADIUS server on "Server ID".
• Select [On] or [Off] in "Permit Sub-domain".
5. Configuration
96
7. Click [OK].
8. "Updating..." appears. Wait for about one or two minutes, and then click [OK].
9. Under "Interface", click [Interface Settings].
10. Select [Active] in "Ethernet Security".
11. Click [OK].
12. "Updating..." appears. Wait for about one or two minutes, and then click [OK].
13. Click [Logout].
14. Quit the Web Image Monitor.
• If there is a problem with settings, you might not be able to communicate with the printer. To identifythe problem, print a network summary.
• If you cannot identify the problem, reset the printer interface to normal, and then repeat theprocedure from the beginning.
Setting Items of IEEE 802.1X for Wireless LAN
1. Log in to Web Image Monitor as an administrator.
2. In the menu area, click [Configuration].
3. Under "Security", click [IEEE 802.1X].
4. In "User Name", enter the user name set in the RADIUS server.
5. Enter the domain name in "Domain Name".
6. Select "EAP Type". Configurations differ according to the EAP Type.
EAP-TLS
• Make the following settings according to the operating system you are using:
• Select [On] or [Off] in "Authenticate Server Certificate".
• Select [On] or [Off] in "Trust Intermediate Certificate Authority".
• Enter the host name of the RADIUS server on "Server ID".
• Select [On] or [Off] in "Permit Sub-domain".
LEAP
• Click Change in "Password", and then enter the password set in the RADIUS server.
EAP-TTLS
• Click [Change] in "Password", and then enter the password set in the RADIUS server.
• Click [Change] in "Phase 2 User Name", and then enter the user name set in the RADIUSserver.
Configuring IEEE 802.1X
97
• Select [CHAP], [MSCHAP], [MSCHAPv2], [PAP], or [MD5] in "Phase 2 Method".
Certain methods might not be available, depending on the RADIUS server you want to use.
• Make the following settings according to the operating system you are using:
• Select [On] or [Off] in "Authenticate Server Certificate".
• Select [On] or [Off] in "Trust Intermediate Certificate Authority".
• Enter the host name of the RADIUS server in "Server ID".
• Select [On] or [Off] in "Permit Sub-domain".
PEAP
• Click [Change] in "Password", and then enter the password set in the RADIUS server.
If [TLS] is selected for "Phase 2 Method", you do not need to specify a password.
• Click [Change] on "Phase 2 User Name", and then enter the user name set in the RADIUSserver.
• Select [MSCHAPv2] or [TLS] in "Phase 2 Method".
When you select [TLS], you must install "IEEE 802.1X Client Certificate".
• Make the following settings according to the operating system you are using:
• Select [On] or [Off] in "Authenticate Server Certificate".
• Select [On] or [Off] in "Trust Intermediate Certificate Authority".
• Enter the host name of the RADIUS server on "Server ID".
• Select [On] or [Off] in "Permit Sub-domain".
7. Click [OK].
8. "Updating..." appears. Wait for about one or two minutes, and then click [OK].
9. Under "Interface", click [Wireless LAN Settings].
10. Select [Wireless LAN] in "LAN Type".
11. Select [Infrastructure Mode] in "Communication Mode".
12. Enter the alphanumeric characters (a-z, A-Z, or 0-9) in [SSID] according to the accesspoint you want to use.
13. Select [WPA] in "Security Method".
14. Select [TKIP] or [CCMP (AES)] in "WPA Encryption Method" according to the access pointyou want to use.
15. Select [WPA] or [WPA2] in "WPA Authentication Method".
16. Click [OK].
17. "Updating..." appears. Wait for about one or two minutes, and then click [OK].
18. Click [Logout].
19. Quit the Web Image Monitor.
5. Configuration
98

• If there is a problem with settings, you might not be able to communicate with the printer. To identifythe problem, print a network summary.
• If you cannot identify the problem, reset the printer interface to normal, and then repeat theprocedure from the beginning.
Configuring IEEE 802.1X
99

5. Configuration
100
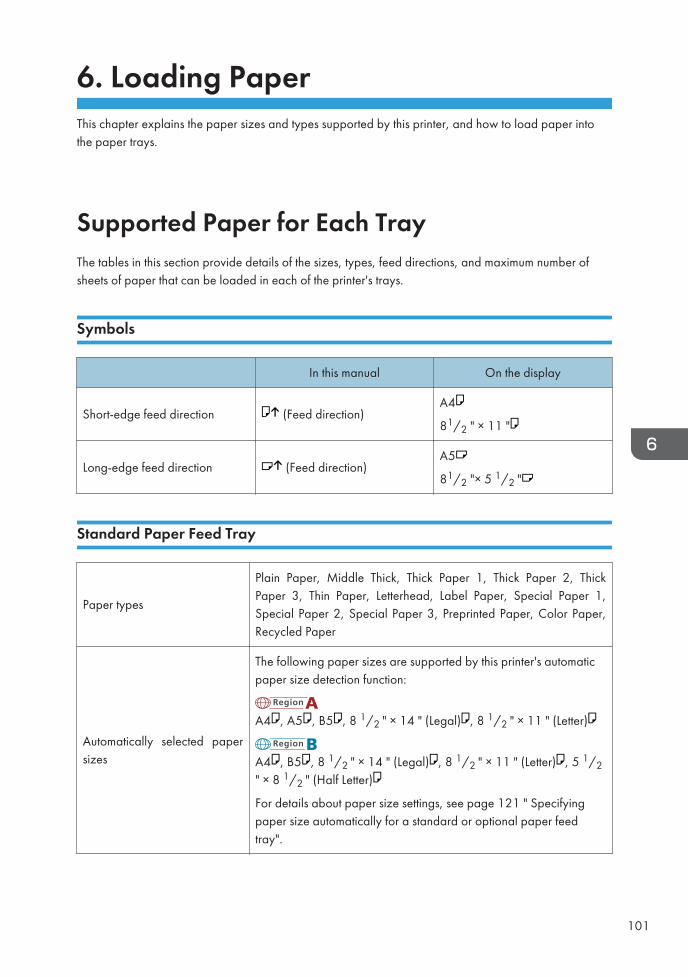
6. Loading PaperThis chapter explains the paper sizes and types supported by this printer, and how to load paper intothe paper trays.
Supported Paper for Each TrayThe tables in this section provide details of the sizes, types, feed directions, and maximum number ofsheets of paper that can be loaded in each of the printer's trays.
Symbols
In this manual On the display
Short-edge feed direction (Feed direction)A4
81/2 " × 11 "
Long-edge feed direction (Feed direction)A5
81/2 "× 5 1/2 "
Standard Paper Feed Tray
Paper types
Plain Paper, Middle Thick, Thick Paper 1, Thick Paper 2, ThickPaper 3, Thin Paper, Letterhead, Label Paper, Special Paper 1,Special Paper 2, Special Paper 3, Preprinted Paper, Color Paper,Recycled Paper
Automatically selected papersizes
The following paper sizes are supported by this printer's automaticpaper size detection function:
A4 , A5 , B5 , 8 1/2 " × 14 " (Legal) , 8 1/2 " × 11 " (Letter)
A4 , B5 , 8 1/2 " × 14 " (Legal) , 8 1/2 " × 11 " (Letter) , 5 1/2" × 8 1/2 " (Half Letter)
For details about paper size settings, see page 121 " Specifyingpaper size automatically for a standard or optional paper feedtray".
101

Paper sizes requiring manualsettings
The following sizes are supported, but they must be selected usingthe control panel. For details about paper size settings, seepage 122 " Specifying standard size paper for a standard oroptional paper feed tray".
A5 , A6 , B6 JIS , 8 1/2 " × 13 " (Foolscap) , 8 1/4 " × 13" (Folio) , 8 " × 13 " (F/GL) , 7 1/4 " × 10 1/2 " (Executive) , 51/2 " × 8 1/2 " (Half Letter) , 4 1/8 " × 9 1/2 " (Com10) , 37/8 " × 7 1/2 " (Monarch) , C5 Env. , C6 Env. , DL Env. , 16K
, Custom Size
A5 , A6 , B6 JIS , 8 1/2 " × 13 " (Foolscap) , 8 1/4 " × 13" (Folio) , 8 " × 13 " (F/GL) , 7 1/4 " × 10 1/2 " (Executive) , 51/2 " × 8 1/2 " (Half Letter) , 4 1/8 " × 9 1/2 " (Com10) , 3 7/8 "× 7 1/2 " (Monarch) , C5 Env. , C6 Env. , DL Env. , 16K ,Custom Size
Custom paper size
The following custom sizes are supported, but they must be selectedusing the control panel. For details about custom size paper settings,see page 123 " Specifying custom size paper for a standard oroptional paper feed tray".
• Approximately 98 - 216 mm (3.86 - 8.50 inches) in width
• Approximately 140 - 356 mm (5.52 - 14.01 inches) in length
Paper weight 52 to 220 g/m2 (14 to 59 lb.)
Paper capacity
550 sheets (75 g/m2, 20 lb.)
Do not load the paper so that the top of the stack exceeds the limitmark inside the tray.
Optional Paper Feed Tray
Paper types
Plain Paper, Middle Thick, Thick Paper 1, Thick Paper 2, ThickPaper 3, Thin Paper, Letterhead, Label Paper, Special Paper 1,Special Paper 2, Special Paper 3, Preprinted Paper, Color Paper,Recycled Paper
6. Loading Paper
102
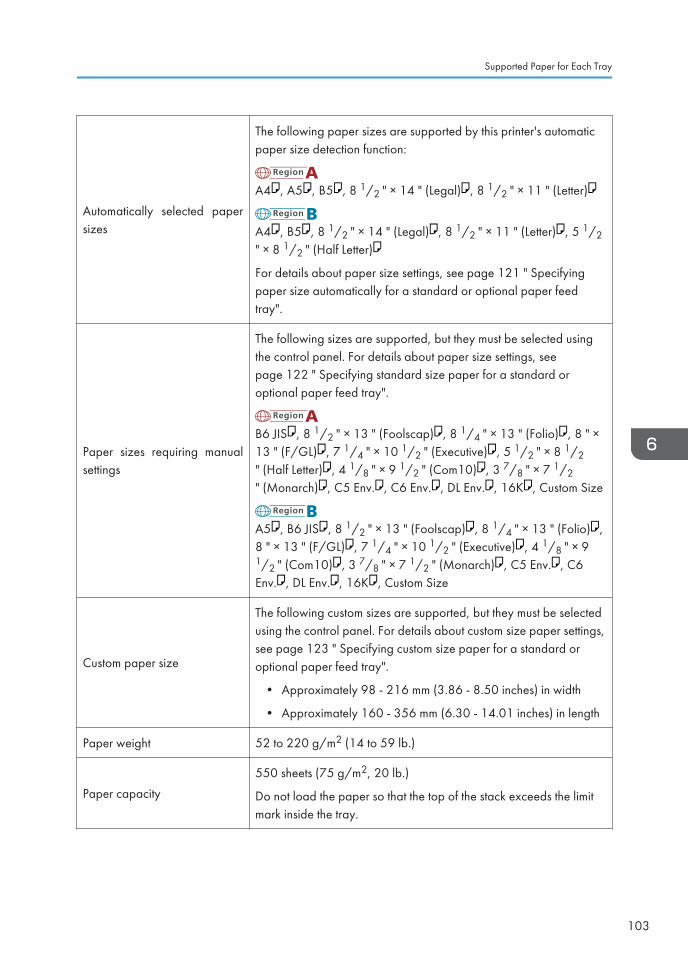
Automatically selected papersizes
The following paper sizes are supported by this printer's automaticpaper size detection function:
A4 , A5 , B5 , 8 1/2 " × 14 " (Legal) , 8 1/2 " × 11 " (Letter)
A4 , B5 , 8 1/2 " × 14 " (Legal) , 8 1/2 " × 11 " (Letter) , 5 1/2" × 8 1/2 " (Half Letter)
For details about paper size settings, see page 121 " Specifyingpaper size automatically for a standard or optional paper feedtray".
Paper sizes requiring manualsettings
The following sizes are supported, but they must be selected usingthe control panel. For details about paper size settings, seepage 122 " Specifying standard size paper for a standard oroptional paper feed tray".
B6 JIS , 8 1/2 " × 13 " (Foolscap) , 8 1/4 " × 13 " (Folio) , 8 " ×13 " (F/GL) , 7 1/4 " × 10 1/2 " (Executive) , 5 1/2 " × 8 1/2" (Half Letter) , 4 1/8 " × 9 1/2 " (Com10) , 3 7/8 " × 7 1/2" (Monarch) , C5 Env. , C6 Env. , DL Env. , 16K , Custom Size
A5 , B6 JIS , 8 1/2 " × 13 " (Foolscap) , 8 1/4 " × 13 " (Folio) ,8 " × 13 " (F/GL) , 7 1/4 " × 10 1/2 " (Executive) , 4 1/8 " × 91/2 " (Com10) , 3 7/8 " × 7 1/2 " (Monarch) , C5 Env. , C6Env. , DL Env. , 16K , Custom Size
Custom paper size
The following custom sizes are supported, but they must be selectedusing the control panel. For details about custom size paper settings,see page 123 " Specifying custom size paper for a standard oroptional paper feed tray".
• Approximately 98 - 216 mm (3.86 - 8.50 inches) in width
• Approximately 160 - 356 mm (6.30 - 14.01 inches) in length
Paper weight 52 to 220 g/m2 (14 to 59 lb.)
Paper capacity
550 sheets (75 g/m2, 20 lb.)
Do not load the paper so that the top of the stack exceeds the limitmark inside the tray.
Supported Paper for Each Tray
103

Bypass Tray
Paper types
Plain Paper, Middle Thick, Thick Paper 1, Thick Paper 2, ThickPaper 3, Thin Paper, Letterhead, Label Paper, Special Paper 1,Special Paper 2, Special Paper 3, Preprinted Paper, Color Paper,Recycled Paper, OHP (Transparency), Envelope
Paper sizes requiring manualsettings
The following sizes are supported, but they must be selected usingthe control panel. For details about paper size settings, seepage 127 "Specifying standard size paper for the bypass tray".
A4 , A5 , A6 , B5 JIS , B6 JIS , 8 1/2 " × 14 " (Legal) , 81/2 " × 13 " (Foolscap) , 8 1/2 " × 11 " (Letter) , 8 1/4 " × 13" (Folio) , 8 " × 13 " (F/GL) , 7 1/4 " × 10 1/2 " (Executive) , 51/2 " × 8 1/2 " (Half Letter) , 4 1/8 " × 9 1/2 " (Com 10) , 37/8 " × 7 1/2 " (Monarch) , C5 Env. , C6 Env. , DL Env. ,16K ,Custom Size
Custom paper size
The following custom sizes are supported, but they must be selectedusing the control panel. For details about custom size paper settings,see page 129 "Specifying custom size paper for the bypass tray".
• Approximately 64 - 216 mm (2.52 - 8.50 inches) in width
• Approximately 140 - 900 mm (5.52 - 35.43 inches) in length
Paper weight 52 to 220 g/m2 (14 to 59 lb.)
Paper capacity
100 sheets (75 g/m2, 20 lb.)
Do not load the paper so that the top of the stack exceeds the paperguides on the bypass tray.
• When a custom size is specified, duplex printing is possible on paper whose length is between 160and 356 mm (6.3 and 14.1 inches).
6. Loading Paper
104

Supported Paper TypesThe tables in this section provide details of the paper types supported by this printer. Use these tableswhen specifying a tray's paper settings and take note of the information under "Note".
Plain Paper
Paper weight 60 to 90 g/m2 (16 to 24 lb.)
Paper type setting using thecontrol panel
The [Menu] key > [Paper Input] > [Paper Type: (tray name)] > [NoDisplay (Plain Paper)] > the [OK] key
Paper type setting using theprinter driver
[Plain & Recycled] or [Plain (60 to 90 g/m2)]
Supported input tray Any input tray can be used.
Duplex printing Supported
Maintenance
• [Plain Paper 1]: 60 to 69 g/m2 (16 to 18 lb.)
• [Plain Paper 2]: 70 to 90 g/m2 (19 to 24 lb.)
Default: [Plain Paper 2]
If prints made using the paper tray show heavy smudging, use thefollowing procedure to change the paper type setting from thecontrol panel:
• Press the [Menu] key, select [Maintenance], [GeneralSettings], and then select [Plain Paper Setting]. Select thepaper tray, and then select [Plain Paper 1] or [Plain Paper 2].
When specifying paper thickness, remember that a higher numberindicates greater thickness. Also, because the paper thickness willnormally be detected automatically, change this setting only if aprint problem occurs.
Note
• Tray 1: 550
• Tray 2 (Paper feed unit): 550
• Tray 3 (Paper feed unit): 550
• Tray 4 (Paper feed unit): 550
• Tray 5 (Paper feed unit): 550
• Bypass Tray: 100
Supported Paper Types
105

Middle Thick
Paper weight 91 to 105 g/m2 (24 to 28 lb.)
Paper type setting using thecontrol panel
The [Menu] key > [Paper Input] > [Paper Type: (tray name)] >[Middle Thick] > the [OK] key
Paper type setting using theprinter driver
[Middle Thick (91 to 105 g/m2)]
Supported input tray Any input tray can be used.
Duplex printing Supported
Thick Paper
Paper weight 106 to 220 g/m2 (28 to 59 lb.)
Paper type setting using thecontrol panel
• The [Menu] key > [Paper Input] > [Paper Type: (tray name)] >[Thick Paper 1] or [Thick Paper 2] or [Thick Paper 3] > the[OK] key
• [Thick Paper 1]: 106 to 130 g/m2 (28 to 35 lb.)
• [Thick Paper 2]: 131 to 163 g/m2 (35 to 43 lb.)
• [Thick Paper 3]: 164 to 220 g/m2 (44 to 59 lb.)
Paper type setting using theprinter driver
• [Thick Paper 1]: [Thick 1 (106 to 130 g/m2)]
• [Thick Paper 2]: [Thick 2 (131 to 163 g/m2)]
• [Thick Paper 3]: [Thick 3 (164 to 220 g/m2)]
Supported input tray[Thick Paper 1], [Thick Paper 2], [Thick Paper 3]: Any input tray canbe used.
Duplex printing• [Thick Paper 1], [Thick Paper 2]: Supported
• [Thick Paper 3]: Not supported
Note Printing is slightly slower than when using plain paper.
Thin Paper
Paper weight 52 to 59 g/m2 (14 to 16 lb.)
6. Loading Paper
106

Paper type setting using thecontrol panel
The [Menu] key > [Paper Input] > [Paper Type: (tray name)] > [ThinPaper] > the [OK] key
Paper type setting using theprinter driver
[Thin (52 to 59 g/m2)]
Supported input tray Any input tray can be used.
Duplex printing Not supported
Letterhead
Paper type setting using thecontrol panel
The [Menu] key > [Paper Input] > [Paper Type: (tray name)] >[Letterhead] > the [OK] key
Paper type setting using theprinter driver
[Letterhead]
Supported input tray Any input tray can be used.
Maintenance
Default: [Letterhead 1]
• [Letterhead 1]
• [Letterhead 2]
• [Letterhead 3]
If prints made using the paper tray show heavy smudging, use thefollowing procedure to change the paper type setting from thecontrol panel:
• Press the [Menu] key, select [Maintenance], [GeneralSettings], and then select [Letterhead Setting]. Select the papertray, and then select [Letterhead 1], [Letterhead 2], or[Letterhead 3].
When specifying paper thickness, remember that a higher numberindicates greater thickness. Also, because the paper thickness willnormally be detected automatically, change this setting only if aprint problem occurs.
Duplex printing Supported
Supported Paper Types
107

Label Paper
Paper type setting using thecontrol panel
The [Menu] key > [Paper Input] > [Paper Type: (tray name)] >[Label Paper] > the [OK] key
Paper type setting using theprinter driver
[Labels]
Supported input tray Any input tray can be used.
Maintenance
Default: [Label Paper 1]
• [Label Paper 1]
• [Label Paper 2]
• [Label Paper 3]
• [Label Paper 4]
If prints made using the paper tray show heavy smudging, use thefollowing procedure to change the paper type setting from thecontrol panel:
• Press the [Menu] key, select [Maintenance], [GeneralSettings], [Label Paper Setting], and then select [Label Paper1], [Label Paper 2], [Label Paper 3], or [Label Paper 4].
When specifying paper thickness, remember that a higher numberindicates greater thickness. Also, because the paper thickness willnormally be detected automatically, change this setting only if aprint problem occurs.
Duplex printing Not supported
Special Paper
Paper weight 52 to 220 g/m2 (14 to 59 lb.)
Paper type setting using thecontrol panel
• The [Menu] key > [Paper Input] > [Paper Type: (tray name)] >[Special Paper 1] or [Special Paper 2] or [Special Paper 3] >the [OK] key
• [Special Paper 1]: 52 to 105 g/m2 (14 to 28 lb.)
• [Special Paper 2]: 106 to 163 g/m2 (28 to 43 lb.)
• [Special Paper 3]: 164 to 220 g/m2 (44 to 59 lb.)
6. Loading Paper
108
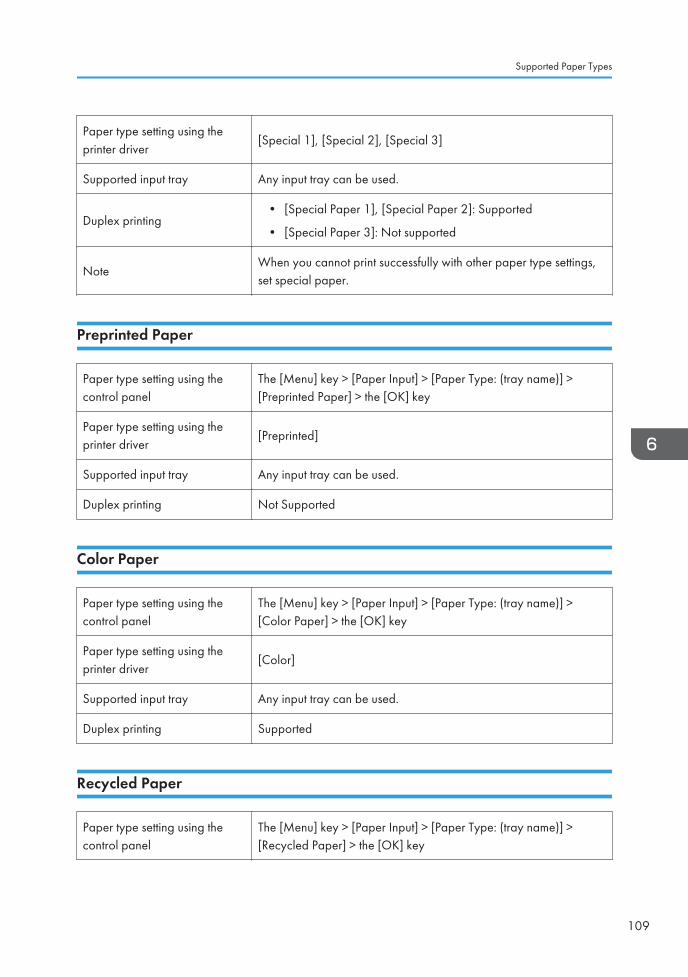
Paper type setting using theprinter driver
[Special 1], [Special 2], [Special 3]
Supported input tray Any input tray can be used.
Duplex printing• [Special Paper 1], [Special Paper 2]: Supported
• [Special Paper 3]: Not supported
NoteWhen you cannot print successfully with other paper type settings,set special paper.
Preprinted Paper
Paper type setting using thecontrol panel
The [Menu] key > [Paper Input] > [Paper Type: (tray name)] >[Preprinted Paper] > the [OK] key
Paper type setting using theprinter driver
[Preprinted]
Supported input tray Any input tray can be used.
Duplex printing Not Supported
Color Paper
Paper type setting using thecontrol panel
The [Menu] key > [Paper Input] > [Paper Type: (tray name)] >[Color Paper] > the [OK] key
Paper type setting using theprinter driver
[Color]
Supported input tray Any input tray can be used.
Duplex printing Supported
Recycled Paper
Paper type setting using thecontrol panel
The [Menu] key > [Paper Input] > [Paper Type: (tray name)] >[Recycled Paper] > the [OK] key
Supported Paper Types
109

Paper type setting using theprinter driver
[Recycled] or [Plain & Recycled]
Supported input tray Any input tray can be used.
Duplex printing Supported
OHP transparencies
Paper type setting using thecontrol panel
The [Menu] key > [Paper Input] > [Paper Type: Bypass Tray] >[OHP (Transparency)] > the [OK] key
Paper type setting using theprinter driver
[Transparency]
Supported input tray This paper type can be printed only from the bypass tray.
Duplex printing Not supported
Envelopes
Paper type setting using thecontrol panel
The [Menu] key > [Paper Input] > [Paper Type: Bypass Tray] >[Envelope] > the [OK] key
Paper type setting using theprinter driver
[Envelope]
Supported input tray This paper type can be printed only from the bypass tray.
6. Loading Paper
110

Maintenance
Default: [Envelope 3]
• [Envelope 1]
• [Envelope 2]
• [Envelope 3]
• [Envelope 4]
If prints made using the paper tray show heavy smudging, use thefollowing procedure to change the paper type setting from thecontrol panel:
• Press the [Menu] key, select [Maintenance], [GeneralSettings], [Envelope Setting], and then select [Envelope 1],[Envelope 2], [Envelope 3], or [Envelope 4].
When specifying paper thickness, remember that a higher numberindicates greater thickness. Also, because the paper thickness willnormally be detected automatically, change this setting only if aprint problem occurs.
Duplex printing Not supported
Supported Paper Types
111

Note
• Check there is no air in the envelopes before loading.
• Load only one size and type of envelope at a time.
• Some kinds of envelope might cause misfeeds, wrinkles orprint poorly.
• Print quality on envelopes may be uneven if parts of anenvelope have differing thicknesses. Print one or twoenvelopes to check print quality.
• In a hot and humid environment, the envelope might be outputcreased or improper printing quality.
• The number of envelopes that can be printed in one minute isapproximately half that of Plain Paper 1.
• Paper can be loaded only up to the lower of the two paperlimit marks of the bypass tray.
• If printed envelopes come out badly creased, load theenvelopes in the opposite direction. Also, configure the printerdriver to rotate the print object 180 degrees.
• Environmental factors can degrade the print quality on bothrecommend and non-recommended envelopes.
• After printing, envelopes sometimes have creases along theirlong edges and toner smear on their unprinted sides. Theirprint images might also be blurred. When printing large,black-solid areas, striping can occur as a result of theenvelopes overlapping. If this occurs, use the envelope lever toresolve this problem. For more information about the envelopelever, see page 133 "Loading Envelopes".
• To correctly specify the length of an envelope whose flap opens along its short edge, be sure toinclude the open flap when measuring.
ASH125S
6. Loading Paper
112

Storing Paper
Take care when storing paper. Improperly stored paper might result in poor print quality, papermisfeeds, or printer damage. Recommendations are as follows:
• Avoid storing paper in humid areas.
• Avoid exposing paper to direct sunlight.
• Store on a flat surface.
• Keep paper in its original package until time to use it.
Supported Paper Types
113

Non-Recommended Paper Types
• Do not use the following types of paper:
• Ink-jet printer paper
• GelJet special paper
• Bent, folded, or creased paper
• Curled or twisted paper
• Wet paper
• Paper that is dry enough to emit static electricity
• Paper that has already been printed onto, except a preprinted letterhead paper.
Malfunctions are especially likely when using paper printed on by other than a laser printer(e.g.monochrome and color copiers, ink-jet printers, etc.)
• Surface-processed paper (excluding specified paper)
• Special paper, such as thermal paper and carbon paper
• Paper whose weight is heavier or lighter than the limitation
• Perforated paper
• Adhesive label paper on which glue or base paper is exposed
• Paper with clips or staples
• Dirty or damaged paper
• Even if paper is adequate for the printer, poorly stored paper can cause paper misfeeds, printquality degradation, or malfunctions.
6. Loading Paper
114

Print AreaBe sure to set the print margins correctly by the application.
The following diagram shows the print area for this printer.
Paper
CEC244
2
3
3
1
4 4
Print area
Feed direction
Approx. 4.2 mm (0.2 inches)
Approx. 4.2 mm (0.2 inches)
• The print area may vary depending on the paper size, printer language and printer driver settings.
Print Area
115

Envelope
CEC245
4
1
2
3 3
3
Print area
Feed direction
Approx. 10 mm (0.4 inches)
Approx. 15 mm (0.6 inches)
• The print area may vary depending on the paper size, printer language and printer driver settings.
6. Loading Paper
116

Loading Paper in Trays
Loading Paper into a Standard or Optional Paper Feed Tray
• Do not put your hands inside the printer when the input tray is removed. Some internal partsbecome hot and are a burn hazard.
• Do not pull out the paper tray forcefully. If you do, the tray might fall and cause an injury.
• Take care to avoid cutting your hands when loading paper.
• Make sure paper is not stacked higher than the upper limit mark inside the paper feed tray.Excessive stacking can cause paper jams.
• Do not mix different types of paper in the same paper tray.
• First load the paper in the tray, and then specify the paper type and size using the control panel.When printing a document, specify the paper size and type in the printer driver to the same settingsused in the control panel.
• Do not move the side paper guides and end paper guide forcefully. Doing so can damage the tray.
• Curled paper may jam, straighten curled paper before loading.
• When loading paper, take care not to touch the surface of the paper.
• During printing, do not pull out or push in the paper tray.
1. Lift and pull tray carefully, and then pull it out with both hands.
CEC031
Place the tray on a flat surface.
Loading Paper in Trays
117

2. If you load paper larger than 8 1/2 " × 14 " (Legal) , you should extend the tray asfollows:
1. Slide the catches inwards to unlock the tray.
CEC007
2. Slide the tray until it stops.
CEC008
3. Return the catches to their original positions.
CEC009
6. Loading Paper
118

3. Pinch the clip on the side paper guide and slide it to match the standard size.
CEC010
4. Pinch the end guide and slide it inward to match the standard size.
CEC011
5. Fan the paper before loading paper in the tray.
CBK254
6. Load the new paper stack print side down.
Make sure paper is not stacked higher than the upper limit (upper line) marked inside the tray.
Loading Paper in Trays
119

CEC006
Slide the guides inward, until they are flush against the paper's sides.
7. Adjust the paper guides to close any gaps.
Do not move paper loaded in the tray more than a few millimeters.
Moving the loaded paper excessively can cause damage to paper edges on the openings of thetray's lifting plate, resulting in sheets being folded or becoming jammed.
8. Hold the tray with both hands, slide it along the rails of the printer body, and then push itstraight in.
CEC032
To avoid paper jams, make sure the tray is securely inserted.
6. Loading Paper
120

Specifying paper size automatically for a standard or optional paper feed tray
1. Press the [Menu] key.
CEC216
2. Press the [ ] or [ ] key to select [Paper Input], and then press the [OK] key.
3. Press the [ ] or [ ] key to select [Paper Size: (tray name)], and then press the [OK] key.
4. Select [Auto Detect] using the scroll keys, and then press the [OK] key.
5. Press the [Menu] key to return to the initial screen.
• For details about the available paper sizes, see page 101 "Supported Paper for Each Tray".
Loading Paper in Trays
121

Specifying standard size paper for a standard or optional paper feed tray
1. Press the [Menu] key.
CEC216
2. Press the [ ] or [ ] key to select [Paper Input], and then press the [OK] key.
3. Press the [ ] or [ ] key to select [Paper Size: (tray name)], and then press the [OK] key.
4. Select the paper size you want to set using the scroll keys, and then press the [OK] key.
5. Press the [Menu] key to return to the initial screen.
• For details about the available paper size, see page 101 "Supported Paper for Each Tray".
• After specifying the paper size, specify a paper type using the control panel and printer driver. Fordetails on specifying a paper type using the control panel, page 124 "Specifying a paper type forstandard or optional paper feed tray".
• For details about the printer driver, see the printer driver Help.
6. Loading Paper
122

Specifying custom size paper for a standard or optional paper feed tray
• The printer cannot print from applications that do not support custom size paper.
1. Press the [Menu] key.
CEC216
2. Press the [ ] or [ ] key to select [Paper Input], and then press the [OK] key.
3. Press the [ ] or [ ] key to select [Paper Size: (tray name)], and then press the [OK] key.
In the illustration below, [Paper Size:Tray 1] is selected for Tray 1.
4. Select [Custom Size] using the scroll keys, and then press the [OK] key.
5. Enter the horizontal value, and then press the [OK] key.
(mainly Europe and Asia)
Loading Paper in Trays
123
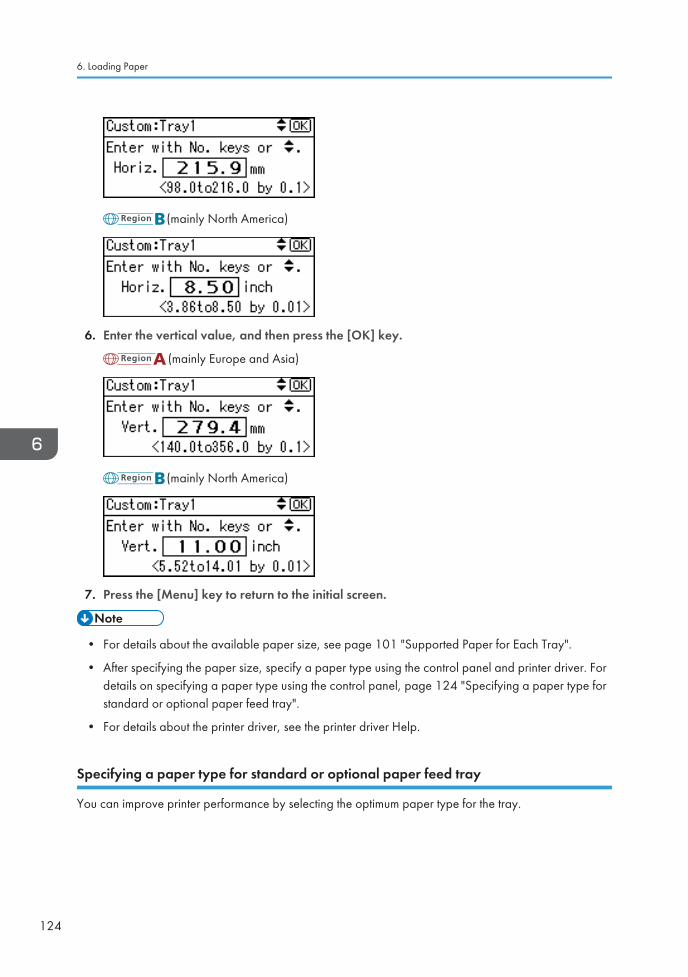
(mainly North America)
6. Enter the vertical value, and then press the [OK] key.
(mainly Europe and Asia)
(mainly North America)
7. Press the [Menu] key to return to the initial screen.
• For details about the available paper size, see page 101 "Supported Paper for Each Tray".
• After specifying the paper size, specify a paper type using the control panel and printer driver. Fordetails on specifying a paper type using the control panel, page 124 "Specifying a paper type forstandard or optional paper feed tray".
• For details about the printer driver, see the printer driver Help.
Specifying a paper type for standard or optional paper feed tray
You can improve printer performance by selecting the optimum paper type for the tray.
6. Loading Paper
124
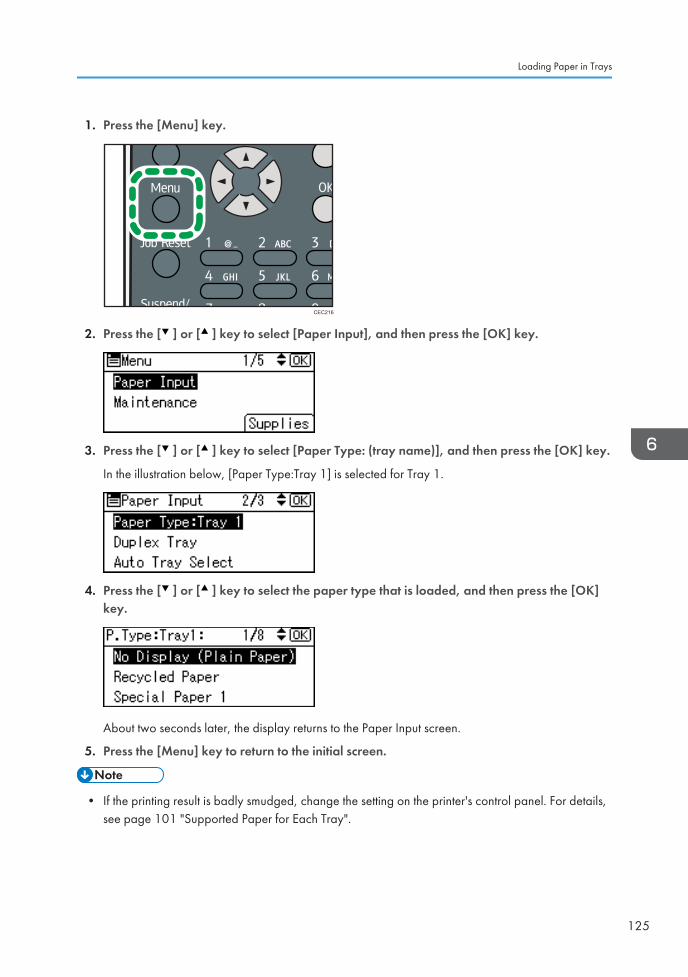
1. Press the [Menu] key.
CEC216
2. Press the [ ] or [ ] key to select [Paper Input], and then press the [OK] key.
3. Press the [ ] or [ ] key to select [Paper Type: (tray name)], and then press the [OK] key.
In the illustration below, [Paper Type:Tray 1] is selected for Tray 1.
4. Press the [ ] or [ ] key to select the paper type that is loaded, and then press the [OK]key.
About two seconds later, the display returns to the Paper Input screen.
5. Press the [Menu] key to return to the initial screen.
• If the printing result is badly smudged, change the setting on the printer's control panel. For details,see page 101 "Supported Paper for Each Tray".
Loading Paper in Trays
125

Loading Paper onto Bypass Tray
• Shuffle paper before loading the stack onto the tray, so multiple sheets are not fed in together.
• Set the size and direction of the loaded paper on the control panel or in the printer driver. Makesure the settings do not conflict. Otherwise, the paper may jam or the print quality may be affected.
• Load paper with the print side up.
• During printing, do not open or close the printer covers or bypass tray, or pull out or push in thepaper tray.
1. Hold the both sides of the bypass tray and pull it toward you.
CEC217
If you load A4 and 8 1/2" × 11" (Letter) size paper or longer, pull out the bypass trayextension.
CEC023
6. Loading Paper
126
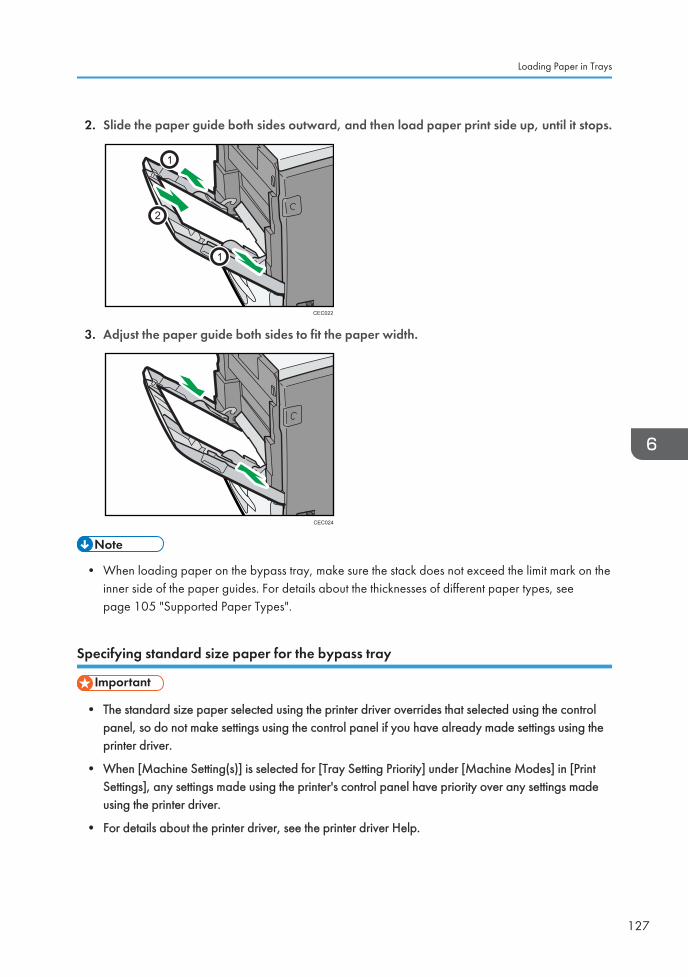
2. Slide the paper guide both sides outward, and then load paper print side up, until it stops.
1
1
2
CEC022
3. Adjust the paper guide both sides to fit the paper width.
CEC024
• When loading paper on the bypass tray, make sure the stack does not exceed the limit mark on theinner side of the paper guides. For details about the thicknesses of different paper types, seepage 105 "Supported Paper Types".
Specifying standard size paper for the bypass tray
• The standard size paper selected using the printer driver overrides that selected using the controlpanel, so do not make settings using the control panel if you have already made settings using theprinter driver.
• When [Machine Setting(s)] is selected for [Tray Setting Priority] under [Machine Modes] in [PrintSettings], any settings made using the printer's control panel have priority over any settings madeusing the printer driver.
• For details about the printer driver, see the printer driver Help.
Loading Paper in Trays
127

1. Press the [Menu] key.
CEC216
2. Press the [ ] or [ ] key to select [Paper Input], and then press the [OK] key.
3. Press the [ ] or [ ] key to select [Paper Size:Bypass Tray], and then press the [OK] key.
4. Select the paper size you want to set using the scroll keys, and then press the [OK] key.
5. Press the [Menu] key to return to the initial screen.
• After specifying the paper size, specify a paper type using the control panel or printer driver. Fordetails on specifying a paper type using the control panel, see page 131 "Specifying a papertype for the bypass tray".
• The number of pages that can be loaded on the bypass tray differs depending on paper type.
• For details about the printer driver, see the printer driver Help.
6. Loading Paper
128

Specifying custom size paper for the bypass tray
• The custom size paper selected using the printer driver overrides that selected using the controlpanel, so do not make settings using the control panel if you have already made settings using theprinter driver.
• When [Machine Setting(s)] is selected for [Tray Setting Priority] under [Machine Modes] in [PrintSettings], any settings made using the printer's control panel have priority over any settings madeusing the printer driver.
• You cannot print on custom size paper with an application that does not support the custom sizesetting.
• For details about the printer driver, see the printer driver Help.
1. Press the [Menu] key.
CEC216
2. Press the [ ] or [ ] key to select [Paper Input], and then press the [OK] key.
3. Press the [ ] or [ ] key to select [Paper Size:Bypass Tray], and then press the [OK] key.
Loading Paper in Trays
129

4. Select [Custom Size] using the scroll keys, and then press the [OK] key.
5. Enter the horizontal value, and then press the [OK] key.
(mainly Europe and Asia)
(mainly North America)
6. Enter the vertical value, and then press the [OK] key.
(mainly Europe and Asia)
(mainly North America)
7. Press the [Menu] key to return to the initial screen.
• After specifying the paper size, specify a paper type using the control panel or printer driver. Fordetails on specifying a paper type using the control panel, see page 131 "Specifying a papertype for the bypass tray".
• For details about the printer driver, see the printer driver Help.
6. Loading Paper
130
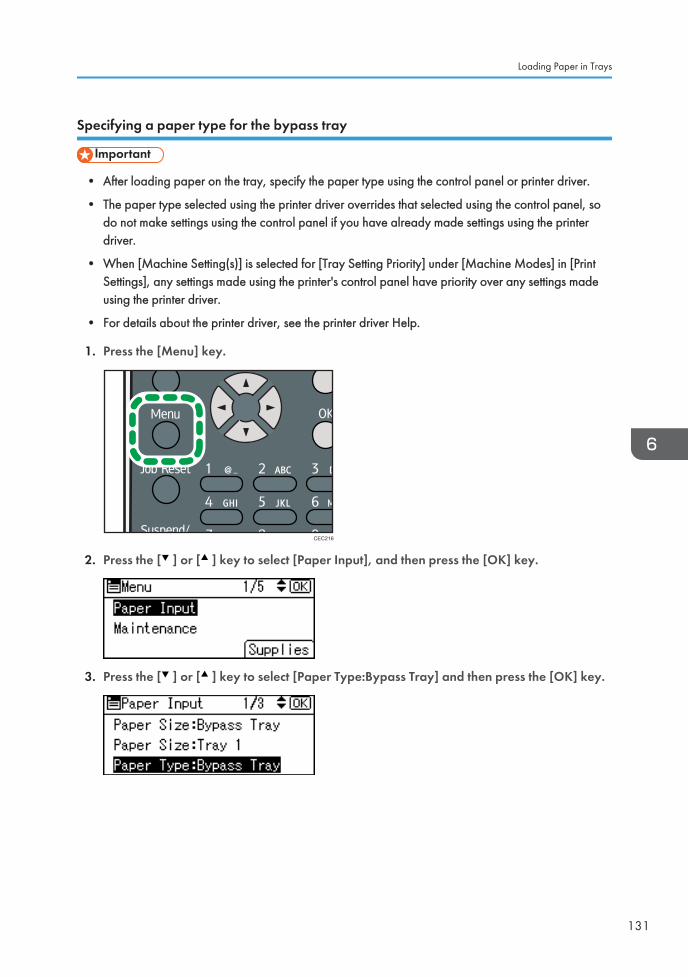
Specifying a paper type for the bypass tray
• After loading paper on the tray, specify the paper type using the control panel or printer driver.
• The paper type selected using the printer driver overrides that selected using the control panel, sodo not make settings using the control panel if you have already made settings using the printerdriver.
• When [Machine Setting(s)] is selected for [Tray Setting Priority] under [Machine Modes] in [PrintSettings], any settings made using the printer's control panel have priority over any settings madeusing the printer driver.
• For details about the printer driver, see the printer driver Help.
1. Press the [Menu] key.
CEC216
2. Press the [ ] or [ ] key to select [Paper Input], and then press the [OK] key.
3. Press the [ ] or [ ] key to select [Paper Type:Bypass Tray] and then press the [OK] key.
Loading Paper in Trays
131

4. Press the [ ] or [ ] key to select the paper type you want to use, and then press the[OK] key.
5. Press the [Menu] key to return to the initial screen.
• If the printing result is badly smudged, change the setting on the printer's control panel. For details,see page 101 "Supported Paper for Each Tray".
6. Loading Paper
132

Loading Envelopes
• The inside of the machine could be very hot. Do not touch the parts with a label indicating the"hot surface". Otherwise, an injury might occur.
• Some of this machine's internal components get very hot. For this reason, take care whenremoving misfed paper. Not doing so could result in burns.
• Check there is no air in the envelopes before loading.
• Load only one size and type of envelope at a time.
• Before loading envelopes, flatten their leading edges (the edge going into the printer) by running apencil or ruler across them.
• Some kinds of envelope might cause misfeeds, wrinkles or print poorly.
• Print quality on envelopes may be uneven if parts of an envelope have differing thicknesses. Printone or two envelopes to check print quality.
• In a hot and humid environment, the envelope might be output creased or improper printingquality.
Loading Envelopes onto Bypass Tray
1. Open the rear cover.
1
2
CEC046
2. Use the envelope lever.
Raising the envelope lever reduces roller pressure.
Loading Envelopes
133
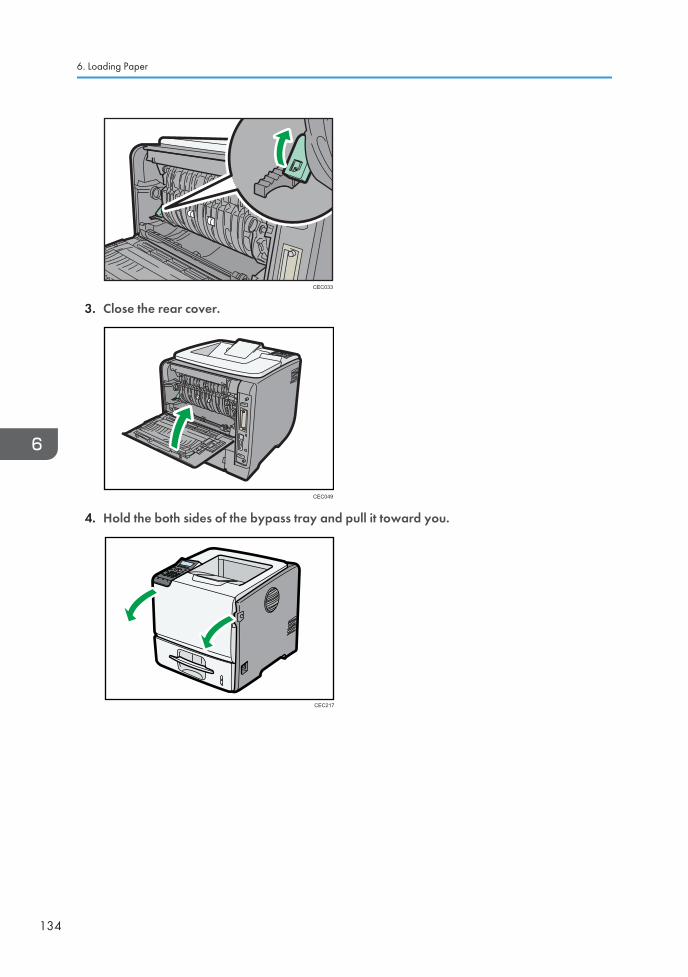
CEC033
3. Close the rear cover.
CEC049
4. Hold the both sides of the bypass tray and pull it toward you.
CEC217
6. Loading Paper
134

5. Fan envelopes, and then align their edges before loading.
CBK239
When fanning envelopes, make sure the envelope flaps are not stuck together. If they are stucktogether, separate them.
Before loading envelopes, flatten them out so that their curl does not exceed that shown in theillustration below.
CBK240
If the curl is severe, flatten out the envelopes using your fingers, as shown in the illustration below.
CBK241
If envelopes are severely curled after printing, flatten them by bending them back against the curl.
Loading Envelopes
135
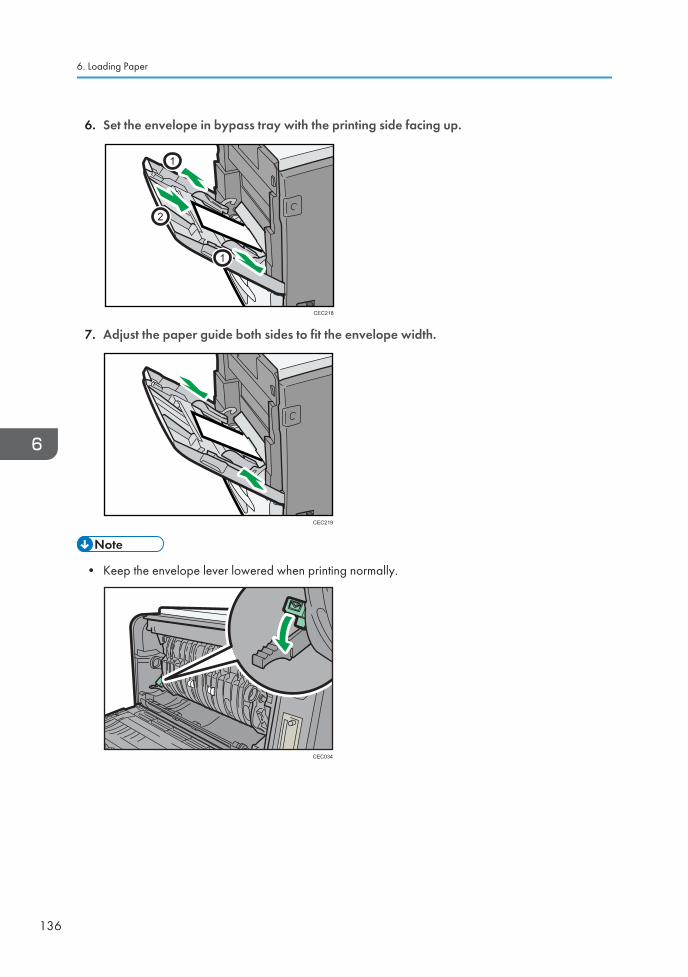
6. Set the envelope in bypass tray with the printing side facing up.
1
1
2
CEC218
7. Adjust the paper guide both sides to fit the envelope width.
CEC219
• Keep the envelope lever lowered when printing normally.
CEC034
6. Loading Paper
136

Specifying envelope size for the bypass tray
• The envelope size selected using the printer driver overrides that selected using the control panel,so do not make settings using the control panel if you have already made settings using the printerdriver.
• When [Machine Setting(s)] is selected for [Tray Setting Priority] under [Machine Modes] in [PrintSettings], any settings made using the printer's control panel have priority over any settings madeusing the printer driver.
• For details about the printer driver, see the printer driver Help.
1. Press the [Menu] key.
CEC216
2. Press the [ ] or [ ] key to select [Paper Input], and then press the [OK] key.
3. Press the [ ] or [ ] key to select [Paper Size:Bypass Tray], and then press the [OK] key.
4. Select the envelope type using the scroll keys, and then press the [OK] key.
5. Press the [Menu] key.
Loading Envelopes
137

• Confirm that the top of the stack is not higher than the limit mark on the side guides.
• Do not push the stack of envelopes with too much force.
• Confirm that the edges of envelopes fit under the side guides.
• After specifying the paper size, specify a paper type such as [Envelope] using the control panel orprinter driver. For details on specifying a paper type using the control panel, see page 131"Specifying a paper type for the bypass tray".
• For details about the printer driver, see the printer driver Help.
Loading Envelopes into a Standard or Optional Paper Feed Tray
1. Open the rear cover.
1
2
CEC046
2. Use the envelope lever.
Raising the envelope lever reduces roller pressure.
CEC033
6. Loading Paper
138

3. Close the rear cover.
CEC049
4. Lift and pull tray carefully, and then pull it out with both hands.
CEC031
Place the tray on a flat surface.
5. Pinch the side guides, and then slide them outward until they stop.
CEC263
Loading Envelopes
139

6. Pinch the rear guide, and then slide it toward the back.
CEC264
7. Fan envelopes, and then align their edges before loading.
CBK239
When fanning envelopes, make sure the envelope flaps are not stuck together. If they are stucktogether, separate them.
Before loading envelopes, flatten them out so that their curl does not exceed that shown in theillustration below.
CBK240
If the curl is severe, flatten out the envelopes using your fingers, as shown in the illustration below.
6. Loading Paper
140

CBK241
If envelopes are severely curled after printing, flatten them by bending them back against the curl.
8. Load envelopes into the paper tray, with the print side down and the flap on the left asshown in the illustration.
CEC262
9. Pinch the side guides, and then slide them along the edge of the envelope stack.
CEC265
Loading Envelopes
141

10. Pinch the rear guide, and then slide it along the edge of the envelope stack.
CEC266
11. Hold the tray with both hands, slide it along the rails of the printer body, and then push itstraight in.
CEC267
• Keep the envelope lever lowered when printing normally.
CEC034
6. Loading Paper
142

Specifying envelope size for a standard or optional paper feed tray
1. Press the [Menu] key.
CEC216
2. Press the [ ] or [ ] key to select [Paper Input], and then press the [OK] key.
3. Press the [ ] or [ ] key to select [Paper Size: (tray name)], and then press the [OK] key.
4. Select the envelope size you want to set using the scroll keys, and then press the [OK]key.
5. Press the [Menu] key to return to the initial screen.
• For details about the available paper size, see page 101 "Supported Paper for Each Tray".
• After specifying the paper size, specify a paper type such as [Thick Paper 2] using the controlpanel and printer driver. For details on specifying a paper type using the control panel, page 124"Specifying a paper type for standard or optional paper feed tray".
• For details about the printer driver, see the printer driver Help.
Loading Envelopes
143

Printing on Fixed-Orientation PaperThis section explains how to print on paper whose orientation and printing side are unchangeable(letterhead paper, for example).
When loading paper with a fixed orientation, such as letterhead or letter paper, misprints may occur.
The following table shows the printout result according to the combination of paper feed direction andletterhead settings in the control panel and PCL printer driver.
Paper Orientation
Paper trays 1-5 Bypass Tray
Letterhead Setting
[On]
Letterhead Setting
[Off]
Letterhead Setting
[On]
Letterhead Setting
[Off]
1-sided print
2-sided print
1-sided print
2-sided print
To make sure documents are printed correctly, follow the procedure to configure the print settings.
1. Press the [Menu] key.
CEC216
6. Loading Paper
144

2. Press the [ ] or [ ] key to select [Print Settings], and then press the [OK] key.
3. Press the [ ] or [ ] key to select [Machine Modes], and then press the [OK] key.
4. Press the [ ] or [ ] key to select [Letterhead Setting], and then press the [OK] key.
5. Select one of the following settings, and then press the [OK] key.
On (Always) The printer always prints on paper that has a fixed orientation
Auto DetectThe printer will print on paper that has a fixed orientation only if [Letterhead] or[Preprinted] is specified as the paper type in the printer driver's settings.
OffThe printer will print on paper in a fixed orientation, regardless of the specifiedpaper type or the printer driver's settings.
6. Press the [Menu] key to return to the initial screen.
Printing on Fixed-Orientation Paper
145

Registering Unique Names to Paper TypesYou can register a unique name to a paper type using Web Image Monitor. The name you registershould reflect the paper's type or usage, as this will make recognizing the paper type easier.
• This function can be used when the printer is operating in a network, and bidirectionalcommunication is enabled.
• This function cannot be used with the printer driver's [Manage Preset List...] function.
• The printer's logs do not record names of user paper types.
Registering Names to Paper Types
• The printer driver might not display the paper type name correctly if it is registered using anunsupported language.
• The control panel might not display the paper type name correctly if it is registered using non-alphanumeric characters (i.e., other than a-z, A-Z, or 0-9).
1. Log in to Web Image Monitor as an administrator.
2. Click [Configuration].
3. Click [User Paper Type] in the [Device Settings] area, and then change the settings asnecessary.
The screen for selecting [User Paper Type] appears.
4. Enter a descriptive name for easier recognition in Paper Name.
5. Select a suitable paper type from the Paper Type list.
6. Click [OK].
7. Click [Logout].
8. Quit the Web Image Monitor.
• You can register up to eight user paper types.
Setting User Paper Types to Trays
Before printing, set the paper registered on the user paper type to the paper tray, and then set the papertype already registered. Paper types can be set either from Web Image Monitor or from the printer'scontrol panel.
6. Loading Paper
146

1. Log in to Web Image Monitor as an administrator.
2. Click [Configuration].
3. Click [Paper] in the [Device Settings] area.
4. Set the paper tray you want to use as a user paper type, and then select the registeredpaper type.
5. Click [OK].
6. Click [Logout].
7. Quit the Web Image Monitor.
Printing Using Registered Paper Types
1. Select your application's print command.
2. On the tab in the properties dialog box that appears, select a registered paper typeunder [Paper Type:].
3. Execute the print command.
The preregistered settings are applied and print is performed.
• For details about printer driver settings, see the printer driver Help.
Registering Unique Names to Paper Types
147

6. Loading Paper
148

7. Maintaining the PrinterThis chapter explains how to replace consumables, and clean the printer.
Replacing the Print Cartridge
• Do not incinerate toner (new or used) or toner containers. Doing so risks burns. Toner will igniteon contact with naked flame.
• Keep the polythene materials (bags, gloves, etc.) supplied with this machine away from babiesand small children at all times. Suffocation can result if polythene materials are brought intocontact with the mouth or nose.
• Store toner (new or used), toner containers, and components that have been in contact withtoner out of reach of children.
• If toner or used toner is inhaled, gargle with plenty of water and move into a fresh airenvironment. Consult a doctor if necessary.
• If toner or used toner gets into your eyes, flush immediately with large amounts of water. Consulta doctor if necessary.
• If toner or used toner is swallowed, dilute by drinking a large amount of water. Consult a doctorif necessary.
• When removing jammed paper or replacing toner, avoid getting toner (new or used) on yourclothing. If toner comes into contact with your clothing, wash the stained area with cold water.Hot water will set the toner into the fabric and make removing the stain impossible.
• When removing jammed paper or replacing toner, avoid getting toner (new or used) on yourskin. If toner comes into contact with your skin, wash the affected area thoroughly with soap andwater.
• Actual printable numbers vary depending on image volume and density, number of pages printedat a time, paper type and size, and environmental conditions such as temperature and humidity.Toner quality degrades over time. Early replacement of the print cartridge might be necessary.Therefore, we recommend you always keep a new print cartridge ready.
149

• The print cartridge might need to be replaced even if there is toner remaining in it. This is due todepletion or wear of other components.
• Do not shake or shock the print cartridge.
• Do not allow paper clips, staples, or other small metallic objects to fall inside the printer.
• Do not expose the print cartridge without its cover to direct sunlight for a long time.
• When removing print cartridge, be careful not to drop it.
• Store print cartridges in a cool dark place.
• If print cartridge are not changed when necessary, printing will become impossible. Werecommend keeping a stock of print cartridge.
• Print cartridge (consumables) are not covered by warranty. However, if there is problem, contactthe store where they were purchased.
Replace the print cartridge if the following message appears on the display:
"Replace print cartridge."
• This message appears when the toner has run out.
"Replace print cartridge. /Print Cartridge replacement is required.(Out of toner)"
Print Cartridgereplacement is required.(Out of toner)
Replace print cartridge.
CEE107
• This message appears when the waste toner bottle is full.
"Replace print cartridge. /Print Cartridge replacement is required.(Waste Toner Bottle full)"
Replace print cartridge.Print Cartridgereplacement is required.(Waste Toner Bottle full)
CEE108
When the following message appears on the display, the print cartridge should be replaced soon.Prepare a new print cartridge.
"Replace print cartrdg soon."
7. Maintaining the Printer
150

Replace print cartrdg soon.Toner is almost empty. Contact your local vendor.
CEE109
Replace print cartrdg soon.Component at end of life.Replace if blurred/streaked
CEE133
The print cartridge must be replaced when the life of the photoconductor unit is ending.
When the printer detects this condition, it will display the following message on the control panel.
"Prepare Replacement"
Check print cartridgereplacement(s).
Prepare Replacement
CEE134
1. Open the front cover by pushing the front cover release button.
1
2
2
CEC025
Replacing the Print Cartridge
151

2. Pull the print cartridge out of the printer by holding the grips of the cartridge.
CEC026
3. Be sure to put the print cartridge on a stable, flat surface.
4. Wipe around the metallic registration roller by turning with a soft damp cloth.
CEC040
5. Take the new print cartridge from the box.
6. Hold the grips of the cartridge, and then insert it into the printer until it stops.
CEC028
7. Maintaining the Printer
152

7. Close the front cover.
CEC214
• Do not close the front cover with excessive force. If you cannot close the cover easily, pull out theprint cartridge from the printer and reinsert it again. After that, close the front cover again.
Replacing the Print Cartridge
153
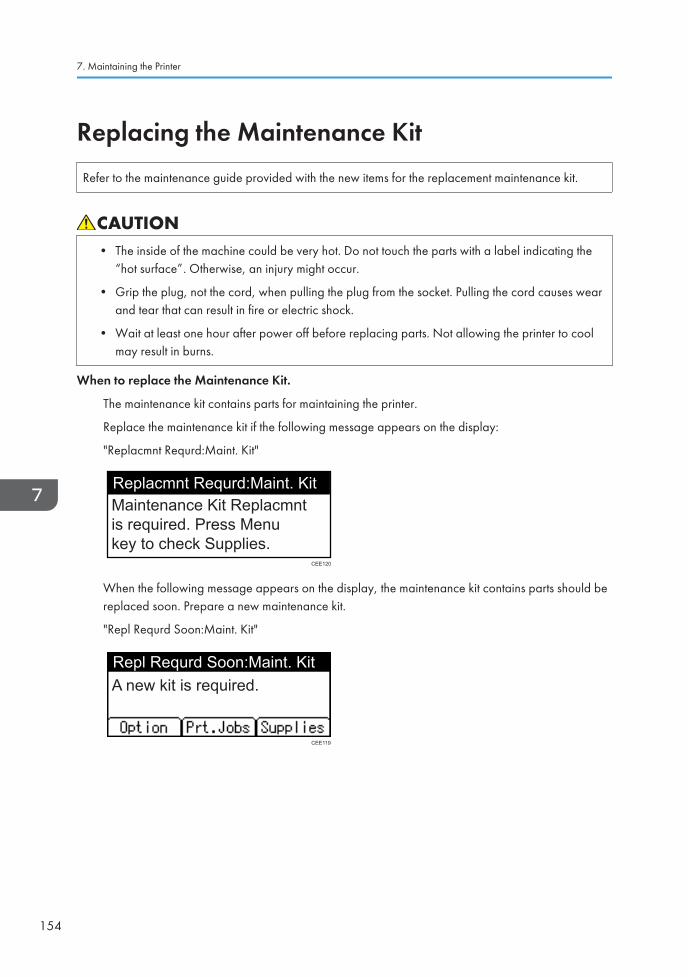
Replacing the Maintenance KitRefer to the maintenance guide provided with the new items for the replacement maintenance kit.
• The inside of the machine could be very hot. Do not touch the parts with a label indicating the“hot surface”. Otherwise, an injury might occur.
• Grip the plug, not the cord, when pulling the plug from the socket. Pulling the cord causes wearand tear that can result in fire or electric shock.
• Wait at least one hour after power off before replacing parts. Not allowing the printer to coolmay result in burns.
When to replace the Maintenance Kit.
The maintenance kit contains parts for maintaining the printer.
Replace the maintenance kit if the following message appears on the display:
"Replacmnt Requrd:Maint. Kit"
Replacmnt Requrd:Maint. KitMaintenance Kit Replacmntis required. Press Menukey to check Supplies.
CEE120
When the following message appears on the display, the maintenance kit contains parts should bereplaced soon. Prepare a new maintenance kit.
"Repl Requrd Soon:Maint. Kit"
Repl Requrd Soon:Maint. KitA new kit is required.
CEE119
7. Maintaining the Printer
154

Cautions When Cleaning
• Do not remove any covers or screws other than those explicitly mentioned in this manual. Insidethis machine are high voltage components that are an electric shock hazard and lasercomponents that could cause blindness. Contact your sales or service representative if any of themachine's internal components require maintenance, adjustment, or repair.
• Do not attempt to disassemble or modify this machine. Doing so risks burns and electric shock.Note again that exposure to the laser components inside this machine risks blindness.
• The inside of the machine could be very hot. Do not touch the parts with a label indicating the"hot surface". Otherwise, an injury might occur.
• Be sure to disconnect the plug from the wall outlet and clean the prongs and the area aroundthe prongs at least once a year. Allowing dust to build up on the plug constitutes a fire hazard.
• If the machine's interior is not cleaned regularly, dust will accumulate. Fire and breakdown canresult from heavy accumulation of dust inside this machine. Contact your sales or servicerepresentative for details about and charges for cleaning the machine's interior.
Clean the printer periodically to maintain fine printing.
Dry wipe the exterior with a soft cloth. If dry wiping is not enough, wipe with a soft, wet cloth that iswrung out well. If you still cannot remove the stain or dirt, apply a neutral detergent, and then wipe overwith a well-wrung wet cloth, dry wipe, and then let it dry.
• To avoid deformation, discoloration, or cracking, do not use volatile chemicals, such as benzineand thinner, or spray insecticide on the printer.
• If there is dust or grime inside the printer, wipe with a clean, dry cloth.
• You must disconnect the plug from the wall outlet at least once a year. Clean away any dust andgrime from the plug and outlet before reconnecting. Accumulated dust and grime pose a firehazard.
• Do not allow paper clips, staples, or other small metallic objects to fall inside the printer.
Cautions When Cleaning
155

Cleaning the Friction Pad and the Paper FeedRollerIf the friction pad or paper feed roller is dirty, a multi-feed or misfeed might occur.
In this case, clean the friction pad and paper feed roller as follows:
• When moving the machine, hold the inset grips at both sides, and then lift the printer slowly.Lifting it carelessly or dropping it may cause an injury.
• When performing maintenance on the machine, always disconnect the power cord from thewall outlet.
• When disconnecting the power cord from the wall outlet, always pull the plug, not the cord.Pulling the cord can damage the power cord. Use of damaged power cords could result in fireor electric shock.
• Do not pull out the paper tray forcefully. If you do, the tray might fall and cause an injury.
• Do not put your hands inside the printer when the input tray is removed. Some internal partsbecome hot and are a burn hazard.
• Do not use chemical cleaners or organic solvents such as thinners or benzine.
1. Turn off the power switch.
2. Pull out the plug from the socket. Remove all the cables from the printer.
3. Lift and pull Tray 1 carefully, and then pull it out with both hands.
CEC031
Place the tray on a flat surface. When there is paper in the tray, remove paper.
7. Maintaining the Printer
156

4. Wipe the friction pad with a damp cloth.
CEC041
5. Wipe the rubber part of the roller with a soft damp cloth. After that, wipe it with a drycloth to remove the water.
CEC078
6. Slide Tray 1 along the rails, and push it carefully all the way into the printer.
CEC240
Do not slide the paper tray in with force. If you do, the front and side guides might move.
7. Insert the plug of the power cord into the wall socket securely. Connect all the interfacecables that were removed.
8. Turn the power switch on.
Cleaning the Friction Pad and the Paper Feed Roller
157

• If misfeeds or multi-feeds of paper occur after cleaning the friction pad and paper feed roller,contact your sales or service representative.
• If the optional paper feed unit is installed, clean its friction pad and paper feed roller in the sameway as those of the main paper feed unit.
7. Maintaining the Printer
158
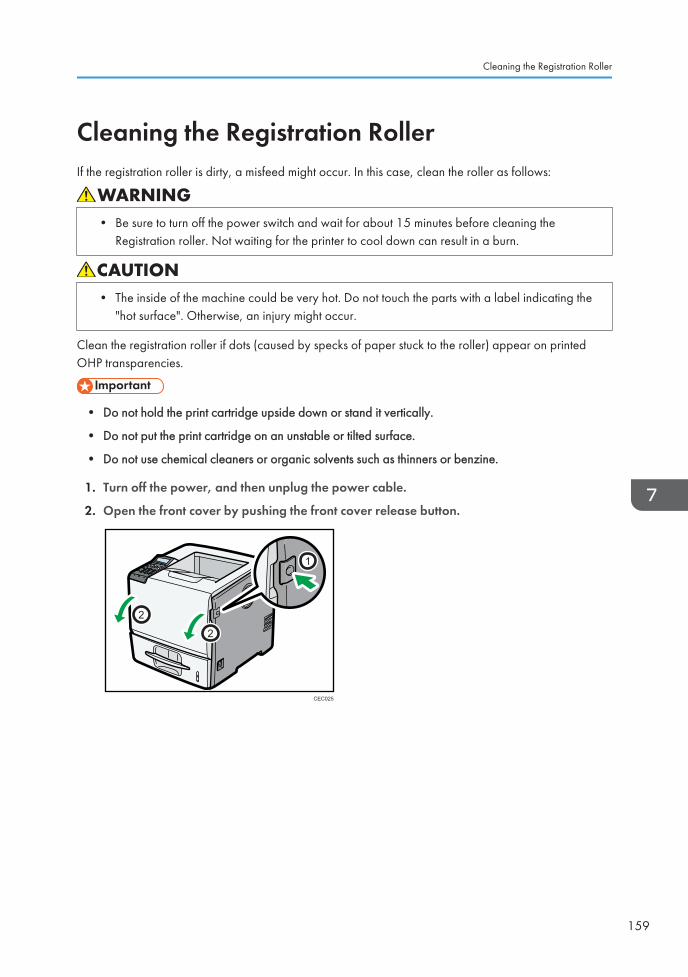
Cleaning the Registration RollerIf the registration roller is dirty, a misfeed might occur. In this case, clean the roller as follows:
• Be sure to turn off the power switch and wait for about 15 minutes before cleaning theRegistration roller. Not waiting for the printer to cool down can result in a burn.
• The inside of the machine could be very hot. Do not touch the parts with a label indicating the"hot surface". Otherwise, an injury might occur.
Clean the registration roller if dots (caused by specks of paper stuck to the roller) appear on printedOHP transparencies.
• Do not hold the print cartridge upside down or stand it vertically.
• Do not put the print cartridge on an unstable or tilted surface.
• Do not use chemical cleaners or organic solvents such as thinners or benzine.
1. Turn off the power, and then unplug the power cable.
2. Open the front cover by pushing the front cover release button.
1
2
2
CEC025
Cleaning the Registration Roller
159
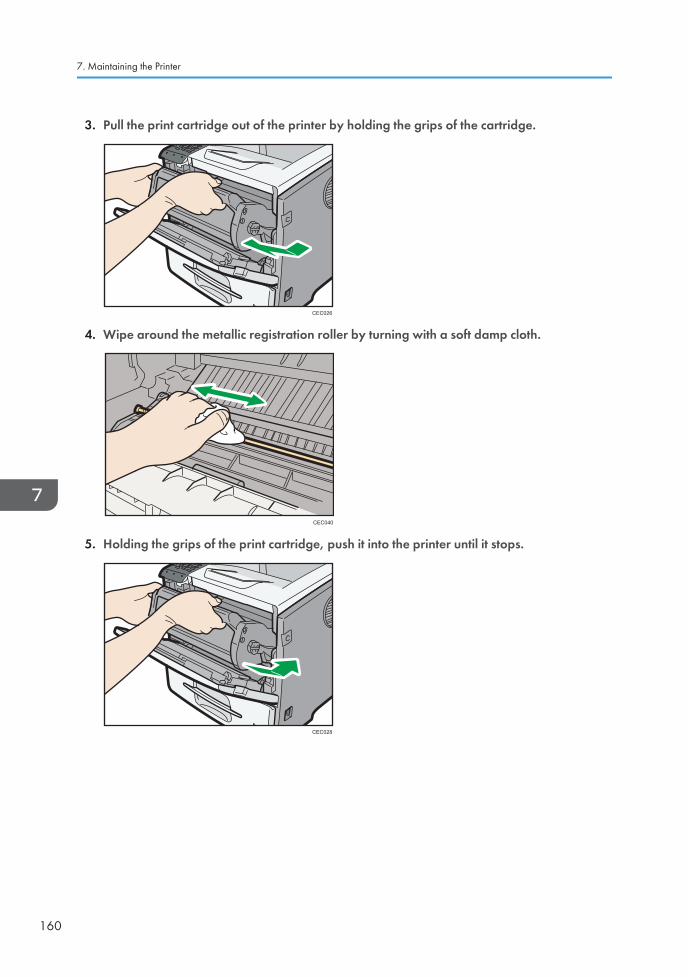
3. Pull the print cartridge out of the printer by holding the grips of the cartridge.
CEC026
4. Wipe around the metallic registration roller by turning with a soft damp cloth.
CEC040
5. Holding the grips of the print cartridge, push it into the printer until it stops.
CEC028
7. Maintaining the Printer
160

6. Close the front cover.
CEC214
• Carefully close the front cover. If you cannot close the cover easily, pull the print cartridge out ofthe printer and insert it again. After that, close the front cover again.
Cleaning the Registration Roller
161

7. Maintaining the Printer
162

8. Adjusting the PrinterThis chapter explains how to adjust the image density and print position.
Adjusting the Image Density
• Maximized settings may produce smudged printouts.
• Image Density settings should be made from the application or the printer driver wheneverpossible.
1. Press the [Menu] key.
CEC216
2. Press the [ ] or [ ] key to select [Maintenance], and then press the [OK] key.
3. Press the [ ] or [ ] key to select [Quality Maintenance], and then press the [OK] key.
163

4. Press the [ ] or [ ] key to select [Image Density Adjustment], and then press the [OK]key.
5. Press the [ ] or [ ] key to specify the image density, and then press the [OK] key.
You can specify the image density in the range from -3 to +3.
6. Press the [Menu] key.
• To maintain a darker image under high volume printing conditions, Selecting 3 from the controlpanel is highly recommended.
• You can adjust the image density in seven steps from -3 to +3. Increasing the value makes theprintouts darker and decreasing the value makes the printouts lighter.
8. Adjusting the Printer
164

Adjusting Printing PositionYou can adjust the printing position for each tray. "Horizontal" means perpendicular to the feeddirection. "Vertical" means it's parallel to the paper feed direction. Normally you do not need to updatethe printing position. However, updating is useful in some cases when the optional paper feed unit isinstalled.
1. Press the [Menu] key.
CEC216
2. Press the [ ] or [ ] key to select [Maintenance], and then press the [OK] key.
3. Press the [ ] or [ ] key to select [Quality Maintenance], and then press the [OK] key.
4. Press the [ ] or [ ] key to select [Registration], and then press the [OK] key.
Adjusting Printing Position
165
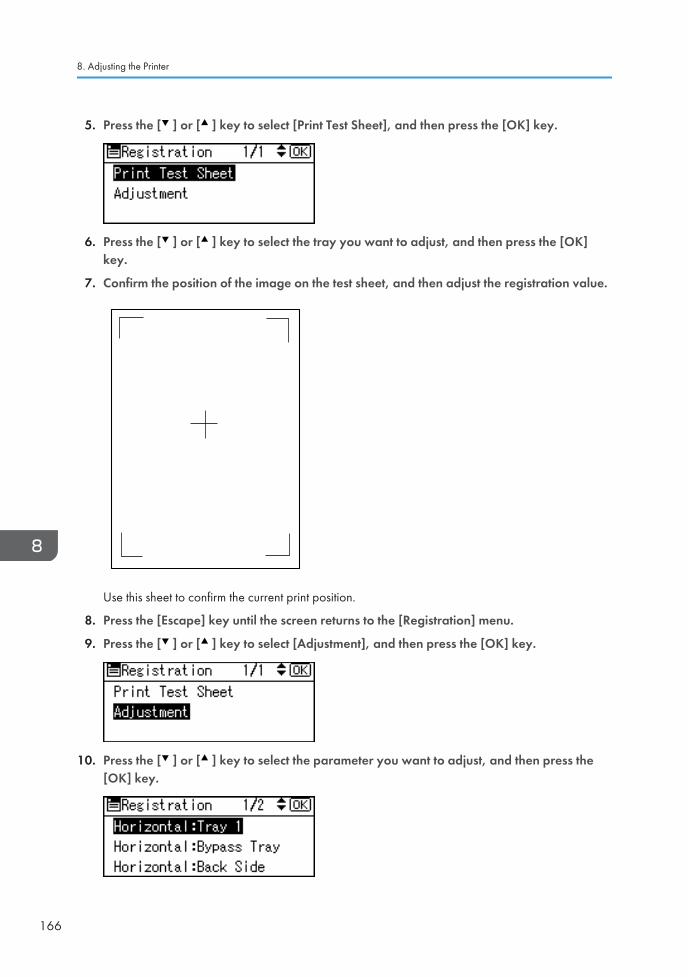
5. Press the [ ] or [ ] key to select [Print Test Sheet], and then press the [OK] key.
6. Press the [ ] or [ ] key to select the tray you want to adjust, and then press the [OK]key.
7. Confirm the position of the image on the test sheet, and then adjust the registration value.
Use this sheet to confirm the current print position.
8. Press the [Escape] key until the screen returns to the [Registration] menu.
9. Press the [ ] or [ ] key to select [Adjustment], and then press the [OK] key.
10. Press the [ ] or [ ] key to select the parameter you want to adjust, and then press the[OK] key.
8. Adjusting the Printer
166

11. Enter the value (mm), and then press the [OK] key.
Increase the value to shift the print area in the direction indicated by the " " symbol in the diagrambelow. Decrease the value to shift the print area in the direction indicated by the " " symbol.
1
2
CEC241
: Print Area
: Paper Feed Direction
Pressing the [ ] or [ ] key adjusts the value up or down in 0.1 mm increments.
12. Press the [OK] key to return to the [Registration] menu.
13. Print the test sheet to confirm the adjustment result.
14. Press the [Menu] key to return to the initial screen.
Adjusting Printing Position
167

Adjusting the Paper Type1. Press the [Menu] key.
CEC216
2. Press the [ ] or [ ] key to select [Maintenance], and then press the [OK] key.
3. Press the [ ] or [ ] key to select [General Settings], and then press the [OK] key.
4. Press the [ ] or [ ] key to select the paper type you want to use, and then press the[OK] key.
The following paper types are selectable:
Plain Paper, Letterhead, Label Paper, Envelope.
8. Adjusting the Printer
168

5. If you have selected the [Plain Paper Setting], select the tray you want to set using the [ ]or [ ] key, and then press the [OK] key.
6. Press the [ ] or [ ] key to select the paper setting, and then press the [OK] key.
7. Press the [Menu] key to return to the initial screen.
Adjusting the Paper Type
169

8. Adjusting the Printer
170

9. TroubleshootingThis chapter provides solutions to common problems and it also explains how to correct unwanted printresults.
Error and Status Messages Appear on theControl PanelThis section explains what the messages that appear on the control panel mean and what to do when aparticular message appears.
Status Messages (in alphabetical order)
@Remote Certif. updating...
The printer is updating the @Remote certificate.
Energy Saver Mode
The printer is in Energy Saver mode. Press any key to recover to the normal mode.
Hex Dump Mode
In Hex Dump mode, the printer receives data in hexadecimal format. Turn off the printer after printing,and then turn back on.
Job Suspended
All jobs are suspended. Turn off the printer, and turn it on again to recover.
Offline
The printer is offline and cannot print.
Please wait...
This message may appear for a few seconds. It means the printer is initializing, replenishing toner, orexecuting maintenance operations. Wait a while.
Printing...
The printer is printing. Wait a while.
Printing Suspended
Printing is suspended. To resume printing, press the [Suspend/Resume] key.
Ready
This is the default ready message. The printer is ready for use. No action is required.
171

Resetting Job...
The printer is resetting the print job. Wait a while.
Setting change...
The printer is applying the changes made to its settings. Wait a while.
Waiting for print data...
The printer is waiting for the next data to print. Wait a while.
Alert Messages (in alphabetical order)
(A) Remove misfeed in Trays. Opn & cls Frt. Cov.
Remove the jammed paper in the source tray, and then load the paper again. To reset the error, openthe front cover and then close it. For details, see page 192 "Paper Misfeed Message (A)".
(B)(C) Open Front/Rear Cover and remove misfeed.
Open the front or rear cover, and then remove the jammed paper. For details, see page 196 "PaperMisfeed Message (B)(C)".
(Y1) Remove misfeed in Tray 2. Opn & cls Frt. Cov.
Remove the jammed paper in the source tray, and then load the paper again. To reset the error, openthe front cover and then close it. For details, see page 201 "Paper Misfeed Message (Y1)(Y2)(Y3)(Y4)".
(Y2) Remove misfeed in Tray 3. Opn & cls Frt. Cov.
Remove the jammed paper in the source tray, and then load the paper again. To reset the error, openthe front cover and then close it. For details, see page 201 "Paper Misfeed Message (Y1)(Y2)(Y3)(Y4)".
(Y3) Remove misfeed in Tray 4. Opn & cls Frt. Cov.
Remove the jammed paper in the source tray, and then load the paper again. To reset the error, openthe front cover and then close it. For details, see page 201 "Paper Misfeed Message (Y1)(Y2)(Y3)(Y4)".
(Y4) Remove misfeed in Tray 5. Opn & cls Frt. Cov.
Remove the jammed paper in the source tray, and then load the paper again. To reset the error, openthe front cover and then close it. For details, see page 201 "Paper Misfeed Message (Y1)(Y2)(Y3)(Y4)".
(Z1)(Z2) Opn R.Cov/Tray1 & remove ppr. Opn & cls F.Cov
Open the rear cover, or remove tray 1 and open the front cover, and then remove the paper. Fordetails, see page 204 "Paper Misfeed Message (Z1)(Z2)".
9. Troubleshooting
172

@Remote Cert. update failed
Updating the @Remote certificate failed. Contact your sales or service representative.
Cannot connect=>Comm.Serv. Check proxy user/password.
The proxy user name or password is incorrect. Check the proxy server settings, and change the username and/or password if they are incorrect.
Cannot connect with DHCP server.(101/201)
Cannot obtain IP address from DHCP server. Consult your network administrator.
Cannot connect with NetWare print server. (107/207)
Connection with NetWare print server is unavailable.
Cannot connect with NetWare server.(106/206)
Connection with NetWare server is unavailable. Consult your network administrator.
Cannot print.
Check the file you want to print is a supported file type. Check for misfeeds and ask your networkadministrator for help.
Check network settings.(103/203)
The IP address setting is incorrect. Check the IP address, subnet mask, and gateway address. For details,see page 75 "Ethernet Configuration".
Classification Code Error
A classification code is not specified for the print job. Enter a classification code using the printerproperties and print the document again.
For details, see "Registering Classification Codes", Software Guide.
Connect failed:WirelessCard Turn power off, check card.
Check there is a Wireless LAN board installed.
Check that it is a supported board. If it is, check it is installed correctly.
Install the correct board properly. For details, see page 59 "Installing the Interface Units".
Cover Open. Please close the indicated cover.
Close the cover indicated on the control panel.
Duplex mode is in off position for (tray name)
The duplex mode for the indicated tray is off; you can only use one-sided printing. Press [Change] tochange the tray's settings, press [JobReset] to reset the job, or press [Form Feed] to force printing.
Error and Status Messages Appear on the Control Panel
173
Ethernet Board Error
An error on the Ethernet board is detected. Pull out and then re-install the controller board. If theproblem persists, contact your sales or service representative.
Failed to connect to server for Remote Diagnostics.
The printer cannot communicate with Remote Communication Gate. Check the connection to the RemoteServer Gate.
Independent-supply toner
Independent-supply toner is set. Use toner recommended for this printer.
IPDS font error. Turn power switch off then on. Select Reset IPDS Fonts in Maintenance.
IPDS font error has occurred. Perform the shutdown procedure, and then turn off the power of themachine. Turn on the power again, and then execute [Reset IPDS Fonts].
IPv6 Address already exists Link-local Address(109/209)
The same IPv6 address already exists. Consult your network administrator.
IPv6 Address already exists Stateless Address(109/209)
The same IPv6 address already exists. Consult your network administrator.
IPv6 Address already exists Manual Config. Address(109/209)
The same IPv6 address already exists. Consult your network administrator.
Load paper in (tray name) or [Cancel] to FormFeed.
There is no paper in the specified tray. Load the specified paper in the tray, press [JobReset] to reset thejob.
Option RAM Error
The printer cannot detect an optional SDRAM module. It may be incorrectly installed.
Check if it is installed properly.
For details about installing the unit, see page 52 "Installing the Memory Expansion Units".
Output tray is full.
The output trays are full. Remove the paper.
Parallel I/F Error
The printer's self diagnostic test failed due to a loopback error. Replace the IEEE 1284 board thatcaused the error. For details, see page 59 "Installing the Interface Units".
Prepare Replacement Check print cartridge replacement(s).
The toner has run out, or the photo conductor unit has reached the end of its service life. Prepare a newprint cartridge.
9. Troubleshooting
174

Printer Font Error.
There are problems with the printer's font file.
Contact your sales or service representative.
Problem with Hard Disk Please call service.
The printer cannot detect a hard disk. It may be incorrectly installed.
Check if it is installed properly or contact your sales or service representative.
For details about installing the unit, see page 52 "Installing the Memory Expansion Units".
Problem:Wireless card Please call service.
The printer cannot detect a Wireless LAN board. It may be incorrectly installed.
Check if it is installed properly or contact your sales or service representative.
For details about installing the unit, see page 59 "Installing the Interface Units".
Repl Requrd Soon:Maint. Kit
You will need to replace the maintenance kit soon. Contact your sales or service representative to obtaina new maintenance kit. For details, see page 154 "Replacing the Maintenance Kit".
Replace print cartridge. /Print Cartridge replacement is required.(Out of toner)
The toner has run out. Replace the print cartridge. For details, see page 149 "Replacing the PrintCartridge".
Replace print cartridge. /Print Cartridge replacement is required.(Waste Toner Bottle full)
The waste toner bottle is full. Replace the print cartridge. For details, see page 149 "Replacing the PrintCartridge".
Replacmnt Requrd:Maint. Kit /Maintenance Kit Replacmnt is required. Press Menu key tocheck Supplies.
You need to replace the Maintenance Kit. Contact your sales or service representative to obtain a newunit. For details, see page 154 "Replacing the Maintenance Kit".
Replace print cartrdg soon./ Component at end of life. Replace if blurred/streaked
Some parts inside the print cartridge have reached their end of life. Contact your sales or servicerepresentative to obtain a new print cartridge.
Replace print cartrdg soon./ Toner is almost empty. Contact your local vendor.
The toner is almost depleted. Contact your sales or service representative to obtain a new printcartridge.
SD Card authenticatn.failed Error recurs, call service.
Authentication from the SD card failed. Turn the power off, and then back on. If the error recurs, contactyour sales or service representative.
Error and Status Messages Appear on the Control Panel
175

Set the Fusing Unit correctly.
The fusing unit may not be installed correctly. Turn the printer off and re-install the fusing unit.
If the message is still displayed after re-installation, contact your sales or service representative.
For details, see the procedure for removing the Fusing unit in page 196 "Paper Misfeed Message (B)(C)" or the unit replacement procedure manual provided with the Fusing unit.
Set the Print Cartridge correctly.
The print cartridge may not be installed correctly. Turn the printer off and re-install the Print cartridge.
If the message is still displayed after re-installation, contact your sales or service representative.
For details, see page 149 "Replacing the Print Cartridge".
Supply order has failed.
The automatic supply order failed. The message indicates the supplies that the printer tried to order.
This NetBIOS name is already in use.(108/208)
The NetBIOS name specified for the printer is already in use by another device on the network. Consultyour network administrator.
The same IPv4 Address already exists.(102/202)
The IPv4 address specified for the printer is already in use by another device on the network. Consultyour network administrator.
The selected job has already been printed or deleted.
This message might appear if you print or delete a job from Web Image Monitor. Press Exit on themessage screen.
USB has a problem. Please call service.
The printer has detected a USB board failure. Turn the power off, and then on again. If the problempersists, contact your sales or service representative.
Values set for IPv6/Gateway addresses are invalid.(110/210)
The IPv6 address or gateway address is invalid. Check the network settings.
WPA Auth. incomplete.(211)
WPA authentication could not complete. Consult your network administrator.
• Confirm error details by printing the Error Log. For details, see page 44 "Test Printing".
9. Troubleshooting
176

Panel TonesThe following table explains the meaning of the various tone patterns that the printer emits to alerts usersabout its condition.
Tone pattern Meaning Cause
Two long beeps. Printer ready. After cooling or being switchedon, the printer has fully warmedup and is ready for use.
Single short beep. Panel/screen input accepted. A valid control panel or screenkey was pressed. Single shortbeeps are produced only whenvalid keys are pressed.
Single long beep. Job completed. A Printer job has finished.
Four long beeps. Printer initialized. The screen is changing back tothe initial screen after the printercame out of the energy-savingmode or was reset.
Five short beeps repeated fivetimes.
Printer alert. Printer requires user attention.Paper may have jammed orprint cartridge may needreplenishing.
• Users cannot mute the printer's tone alerts. When the printer beeps to alert users of a paper jam ortoner request, if the printer's covers are opened and closed repeatedly within a short space of time,the tone alert might continue, even after normal status has resumed.
Panel Tones
177

Printer Does Not PrintIs the power on?
Confirm that the cable is securely plugged into both the power outlet and the printer.
Turn on the power.
Does the Alert indicator stay red?
If so, check the error message on the display and take the required action.
For details, see page 171 "Error and Status Messages Appear on the Control Panel".
Is paper loaded?
Load paper into the paper tray or onto the bypass tray.
For details, see page 101 "Supported Paper for Each Tray".
Can you print a configuration page?
If you cannot print a configuration page, it probably indicates a printer malfunction. Contact your salesor service representative.
For details, see page 44 "Test Printing".
Is the interface cable connected securely to the printer and the computer?
Connect the interface cable securely. If it has a fastener, fasten it securely as well.
Are you using the correct interface cable?
The type of interface cable you should use depends on the computer you use. Be sure to use the correctone.
If the cable is damaged or worn, replace it with a new one.
For details, see page 211 "Specifications".
Is the Data In indicator blinking or lit after starting a print job?
If not blinking or lit, the data is not being sent to the printer.
• If the printer is connected to the computer using the interface cable
Check the port connection setting is correct. For details about checking the port connection, seepage 179 "Checking the Port Connection".
• Network Connection
Consult your network administrator.
How is the signal strength when using the Wireless LAN?
• 802.11 Ad hoc Mode
Either move to a location where the signal is good, or remove obstructions.
9. Troubleshooting
178

• Infrastructure Mode
Check the signal status in the [Wireless LAN] menu on the control panel. If the signal is poor, eithermove to a location where it is good, or remove obstructions.
Checking the Port Connection
When the Data in indicator does not flash or light up, check the port connection as shown below toconfirm the setting.
• For a parallel port connection, the port must be set to LPT 1 or LPT 2.
• For a USB port connection, the port must be set to USB00(n)*.
*(n) varies depending on the number of printers connected.
Windows
Windows XP Professional or Windows Server 2003/2003 R2
1. Click the [Start] button, and then click [Printers and Faxes].
2. Click the icon of the printer. On the [File] menu, click [Properties].
3. Click the [Ports] tab.
4. In the [Print to the following port(s)] list, confirm the correct port is selected.
Windows XP Home Edition
1. Click the [Start] button, and then click [Control Panel].
2. Click [Printers and Other Hardware].
3. Click [Printers and Faxes].
4. Click the icon of the printer. On the [File] menu, click [Properties].
5. Click the [Ports] tab.
6. In the [Print to the following port(s)] list, confirm the correct port is selected.
Windows Vista or Windows Server 2008
1. Click the [Start] button, and then click [Control Panel].
2. Click [Printer].
3. Click the icon of the printer. On the [File] menu, click [Properties].
4. Click the [Ports] tab.
5. In the [Print to the following port(s)] list, confirm the correct port is selected.
Printer Does Not Print
179
Windows 7 or Windows Server 2008 R2
1. Click the [Start] button, and then click [Devices and Printers].
2. Right-click the printer icon you want to check, and then click [Printer Properties].
3. Click the [Ports] tab.
4. In the [Print to the following port(s)] list, confirm the correct port is selected.
Mac OS X
When the printer is connected to Mac OS X and the Ready indicator does not flash or light up, try thefollowing procedures to check the port connection.
• Use [About This Mac] to check the USB information.
• Use the printer browser to check if the printer is displayed.
Using [About This Mac]
1. Click Apple Menu, and then select [About This Mac].
2. Click [More Info].
3. Under [Contents], for [Hardware], Select [USB].
Using the printer browser
1. Start [Printer Setup Utility] or [Printer Center] utility.
Under Mac OS X 10.5 or 10.6, start System Preferences and click [Print & Fax].
2. Click [Add] or [+] button.
The printer browser starts.
Confirm the printer is displayed on the browser.
9. Troubleshooting
180

Other Printing Problems
When You Cannot Print Properly
Toner smears appear on the print side of the page.
• The paper setting may not be correct. For example, you are using thick paper but the setting forthick paper might not be set.
• Check the paper settings.
• Check the printer driver's paper settings. See the printer driver Help.
• Check that the paper is not curled or bent. Envelopes can easily become curled. For details, seepage 105 "Supported Paper Types".
Photo images are coarse.
• Some applications lower the resolution for making prints.
Raise the resolution in the settings of the application.
Fine dot patterns do not print.
• Change the [Dithering:] setting in the PostScript 3 printer driver's dialog box.
For details, see the printer driver Help.
Solid lines are printed as broken lines.
• Change the [Dithering:] setting in the PostScript 3 printer driver's dialog box.
For details, see the printer driver Help.
The whole printout is blurred.
• The paper is damp, probably due to improper storage. Use dry paper that has been storedproperly.
For details, see page 105 "Supported Paper Types".
• Toner is almost depleted. When the "Replace print cartridge." message appears on the display,replace the print cartridge. For details, see page 149 "Replacing the Print Cartridge".
• Condensation may have collected. If rapid change in temperature or humidity occurs, use thisprinter only after it has acclimatized.
White streaks or color streaks appear.
• Toner is almost depleted. When the "Replace print cartridge." message appears on the display,replace the print cartridge. For details, see page 149 "Replacing the Print Cartridge".
Other Printing Problems
181

Images are not printed in the right position.
CEC225
• Adjust the printing position.
Adjust the printing position for each tray by specifying the adjustment values for [Registration] in[Quality Maintenance] under [Maintenance] using the control panel. For details, see page 165"Adjusting Printing Position".
• Adjust the end guide and both side paper guides to match the paper size. See page 117 "LoadingPaper in Trays".
Images are printed at an angle.
CEC223
• Adjust the end guide and both side paper guides to match the paper size. See page 117 "LoadingPaper in Trays".
White lines appear.
Toner is almost depleted. When the "Replace print cartridge." message appears on the display, replacethe print cartridge. For details, see page 149 "Replacing the Print Cartridge".
CEC224
9. Troubleshooting
182

The backs of printed sheets are blemished.
• When removing a jammed sheet, the inside of the printer may have become dirtied. Print severalsheets until they come out clean.
• If document size is larger than paper size, e.g. A4 document on B5 paper, the back of the nextprinted sheet may be dirtied.
If rubbed with your finger, it smears out.
• The setting of the paper may not be correct. For example, although thick paper is used, the settingfor thick paper may not be set.
• Check the paper settings of this printer.
For details, see page 105 "Supported Paper Types".
• Check the paper settings of the printer driver.
For details, see the printer driver Help.
• Check the envelope lever settings.
For details, see page 133 "Loading Envelopes".
• The fusing unit is deteriorated or damaged. Replace the unit.
For details, see page 154 "Replacing the Maintenance Kit".
When printing on OHP transparencies, black or white dots are obvious.
The registration roller is dirty. Clean the registration roller. Contact your sales/service representatives.Image quality varies when printing on thick paper or on OHP transparencies. Switch to Thick Papermode.
For details, see "Making Printer Settings Using the Control Panel", Software Guide.
When printing on plain paper, white dots are obvious.
• The registration roller or the paper tray is dirty. Clean the registration roller or the paper tray.
For details, see page 159 "Cleaning the Registration Roller".
Paper Misfeeds Occur Frequently
Paper jams occur frequently.
• Number of paper set in the tray exceeds the limit. Confirm that the top of the stack is not higher thanthe limit mark inside the tray.
For details, see page 101 "Supported Paper for Each Tray".
• There may be a gap between the front guide and the paper, or between the side guides and thepaper in the paper tray. Make sure there are no gaps.
For details, see page 101 "Supported Paper for Each Tray".
Other Printing Problems
183

• Paper is either too thick or too thin.
For details, see page 105 "Supported Paper Types".
• Paper is bent or wrinkled. Use paper that have no bents or wrinkles.
For details, see page 105 "Supported Paper Types".
• Paper has already been printed on.
For details, see page 105 "Supported Paper Types".
• Paper is damp. Use paper that has been stored properly.
For details, see page 105 "Supported Paper Types".
• When loading paper, separate paper from each other.
• The friction pad or paper feed roller or registration roller may be dirty. Clean the pertinent sectionas necessary. See page 156 "Cleaning the Friction Pad and the Paper Feed Roller" and page 159"Cleaning the Registration Roller".
• The paper setting may not be correct. For example, although you are using thick paper, the settingfor thick paper may not be set.
Check the printer driver's paper settings. See the printer driver Help.
Multiple pages are fed at once.
• There may be a gap between the end guide and the paper, or between the paper guides on bothsides and the paper in the paper tray. Be sure to close any gaps by repositioning the guides. Seepage 117 "Loading Paper in Trays".
• Paper is either too thick or too thin.
For details, see page 105 "Supported Paper Types".
• Paper has already been printed on.
For details, see page 105 "Supported Paper Types".
• Number of paper set in the tray exceeds the limit. Confirm that the top of the stack is not higher thanthe limit mark inside the tray.
For details, see page 101 "Supported Paper for Each Tray".
• Paper is static. Use paper that has been stored properly.
For details, see page 105 "Supported Paper Types".
• When loading paper, separate paper from each other.
• The friction pad or paper feed roller may be dirty. Clean the pertinent section as necessary.
See page 156 "Cleaning the Friction Pad and the Paper Feed Roller".
• Check that paper has not been added while there is still some left in the tray.
Only add paper when there is none left in the tray.
9. Troubleshooting
184
Paper gets wrinkles.
• Paper is damp. Use paper that has been stored properly.
For details, see page 105 "Supported Paper Types".
• Paper is either too thick or too thin.
For details, see page 105 "Supported Paper Types".
• There may be a gap between the front guide and the paper, or between the side guides and thepaper in the paper tray. Make sure there are no gaps.
For details, see page 101 "Supported Paper for Each Tray".
• The fusing unit is deteriorated or damaged. Replace the unit.
For details, see page 154 "Replacing the Maintenance Kit".
The printed image is different from the image on the computer
A printed image is different from the image on the computer's display.
• When you use some functions, such as enlargement or reduction, the layout of the image might bedifferent from that displayed on the computer display.
Images are cut off, or excess pages are printed.
• If you are using paper smaller than the paper size selected in the application, use the same sizepaper as that selected in the application. If you cannot load paper of the correct size, use thereduction function to reduce the image, and then print.
For details, see the printer driver Help.
PDF Direct Print is not executed (PDF file is not printed).
• You must install an optional hard disk drive or set the value of [RAM Disk] in the System Menu to 2MB or higher.
For details about [RAM Disk], see "System Menu", Software Guide.
• After adding a SDRAM module and setting the value of [RAM Disk] in the System Menu to 8 MB,value of [RAM Disk] returns to 0 MB if the SDRAM module is removed. If this happens, reset thevalue of [RAM Disk] to 2MB or higher.
For details about [RAM Disk], see "System Menu", Software Guide.
• When printing a PDF with a password set, set the password of the PDF file using the [Change PDFPassword] menu in [PDF Menu] or Web Image Monitor. For details about [Change PDF Password],see "Print Settings Menu", Software Guide.
For details about Web Image Monitor, see Web Image Monitor Help.
• PDF files not allowed to be printed by the PDF file security setting cannot be printed.
• Highly compressed PDFs cannot be printed using PDF Direct Print.
Other Printing Problems
185

Open the relevant application and print the PDF file using the printer driver.
Set the file format to standard PDF.
As a result of printing using PDF Direct Printing, characters are missing or misshapen.
• Before printing, embed the font in the PDF file to be printed.
The paper size appears on the control panel and printing is not performed with PDF DirectPrint.
• When using PDF Direct Print, printout requires paper set within the PDF file. When a messageindicating a paper size appears, either place the indicated size in the paper tray, or perform FormFeed.
Also, if [Sub Paper Size] in the [System] Menu is set to [Auto], printing is performed assuming lettersize and A4 size to be the same size. For example, When a PDF file set to A4 size paper is printedusing PDF Direct Print and letter size paper is loaded in the paper tray, the file will be printed out.This applies similarly to the opposite case.
When Printer is Not Functioning Properly
Paper is not fed from the selected tray.
• When you are using a Windows operating system, the printer driver settings override those setusing the control panel. Set the desired input tray using the printer driver.
For details, see the printer driver Help.
Prints do not stack properly.
• Paper is damp. Use paper that has been stored properly.
See page 105 "Supported Paper Types".
• Pull out the extender.
It takes too much time to turn on the printer.
• If the printer is turned off while it is still accessing the hard disk (for example: during file deletion),the printer will require more time to power-up the next time it is turned on. To avoid this time delay,do not turn the power off while it is in operation.
It takes too much time to resume printing.
• The data is so large or complex that it takes time to process it. If the data in indicator is blinking, thedata is being processed. Just wait until it resumes.
• The printer was in the Energy Saver mode. To resume from the Energy Saver mode, the printer hasto warm up, and this takes time until printing starts. To disable the Energy Saver mode, select [Off]for [Auto Off On/Off] in the [System], [Auto Off] menu.
9. Troubleshooting
186

It takes too much time to complete the print job.
• Photographs and other data intensive pages take a long time for the printer to process, so simplywait when printing such data.
Changing the settings with printer driver may help to speed up printing.
For details, see the printer driver Help.
• The data is so large or complex that it takes time to process it. If the data in indicator is blinking, thedata is being processed. Just wait until it resumes.
• If "Waiting for print data..." appears on the display, the printer is now warming up. Wait for awhile.
Attached options are not detected in the printer properties.
• The computer and printer are not in two-way communication. You must configure attached optionsin the printer properties.
For details, see the printer driver Help.
If the problem cannot be solved, contact your sales or service representative.
When doing aggregate prints or bound prints.
• Check that the paper size and direction set in the printer driver are the same as those set in theapplication.
If the settings are not the same, change the settings of the printer driver.
An empty tray is selected by Auto Tray Select, and the document does not print out due toout of paper error.
• If a paper tray is opened and closed while the printer is in Energy Saver mode, the printer willinitialize the tray upon recovery, but the tray will not be selectable by Auto Tray Select.
To print from a paper tray that you have opened and closed while the printer was in Energy Savermode, you must manually specify the tray as the source paper tray before printing. When theprinter recovers from Energy Saver mode and completes initialization, it will then print thedocument from the tray you have specified.
Other Printing Problems
187

Additional TroubleshootingStrange noise is heard.
• If a supply was recently replaced or an option attached in the area the strange noise is comingfrom, check the supply or option is properly attached. If the strange noise persists, contact yoursales or service representative.
No e-mail is received when an Alert occurs, and after resolving an Alert.
• Confirm [Auto E-mail Notify] is active in the [System] Menu on the Control Panel. See "SystemMenu", Software Guide.
• Access the printer through a Web browser, log in as an Administrator on Web Image Monitor, andthen confirm the following settings in [Auto E-mail Notification]:
• Device E-mail Address
• Groups to Notify
• Select Groups/Items to Notify
For details about the settings, see Web Image Monitor Help.
• Access the printer through the Web browser, log in as an Administrator on the Web ImageMonitor, and then confirm the settings of the SMTP server in [E-mail]. For details about the settings,see Web Image Monitor Help.
• When the power is turned off before the e-mail is transmitted, the e-mail will not be received.
• Check the e-mail address set for the destination. Confirm the printer's operation history using WebImage Monitor's System Log menu in [Network]. If the e-mail was sent but not received, it ispossible the destination was incorrect. Also check the information concerning error mail from the e-mail server.
The setting for [Auto E-mail Notify] on the System Menu was changed from [Off] to [On],but e-mail is not arriving.
• After changing the setting, turn the printer's power off and then back on again.
Error notification e-mail was received, but no error-solved e-mail is received.
• Check e-mail is set for sending using Web Image Monitor's [Auto E-mail Notification] at the timethe error was fixed. You must click the [Edit] button of [Detailed Settings of Each Item] in [Auto E-mail Notification], and set [Notify when error:] to [Occurs & Fixed] on the displayed screen.
For details about the settings, see Web Image Monitor Help.
Alert Resolving is set for sending e-mail, but no Alert-resolved e-mail is sent.
• If the power of the printer is turned off after an alert occurs, and the alert is resolved during the timethe power is off, no Alert-resolved e-mail is sent.
9. Troubleshooting
188

Alert Occurrence and Alert Resolving are set for sending e-mail, but while no AlertOccurrence mail is received, Alert-resolved e-mail is received.
• Alert-notification e-mail is not sent if the problem is resolved before sending. However, an Alert-resolved e-mail is sent.
Alert-notification level was changed, and e-mail stopped arriving.
• If an Alert-notification e-mail, set with the earlier notification level, arrives, later e-mail will not besent, even if the notification level is changed after.
When no date information is included in sent e-mail, the mail server has a malfunction.
• Configure the setting for obtaining time information from the SNTP server. Refer to Web ImageMonitor's Help to the settings.
• If the printer is still not operating satisfactorily, contact your sales or service representative. Consultwith the store where the printer was purchased for information about the location of sales or servicerepresentatives.
Additional Troubleshooting
189

9. Troubleshooting
190

10. Removing Misfed PaperThis chapter explains how to remove misfed paper.
When Paper is JammedAn error message appears if a paper misfeed occurs. The error message gives the location of themisfeed. Check the location and remove the paper.
• The inside of the machine could be very hot. Do not touch the parts with a label indicating the"hot surface". Otherwise, an injury might occur.
• Some of this machine's internal components get very hot. For this reason, take care whenremoving misfed paper. Not doing so could result in burns.
• When removing jammed paper or replacing toner, avoid getting toner (new or used) on yourclothing. If toner comes into contact with your clothing, wash the stained area with cold water.Hot water will set the toner into the fabric and make removing the stain impossible.
• When removing jammed paper or replacing toner, avoid getting toner (new or used) on yourskin. If toner comes into contact with your skin, wash the affected area thoroughly with soap andwater.
• Forcefully removing misfed paper may cause paper to tear and leave scraps of paper in theprinter. This might cause a misfeed and damage the printer.
• When paper is misfed a number of times, the following are possible causes.
• The control panel settings do not match the size or orientation of the loaded paper.
• The paper feed roller is dirty.
• For details about cleaning the paper feed roller, see page 156 "Cleaning the Friction Pad and thePaper Feed Roller".
• Misfed paper may be covered with toner. Be careful not to get toner on your hands or clothes.
• Toner on prints made after removing misfed paper may be loose (inadequately fused). Make a fewtest prints until smudges no longer appear.
• Paper jams can cause pages to be lost. Check your print job for missing pages and reprint anypages that did not print out.
• If paper is still misfed after you have checked the above-mentioned causes, contact your sales orservice representative.
191

Paper Misfeed Message (A)The " (A) Remove misfeed in Trays. Opn & cls Frt. Cov." error message appears when a papermisfeed occurs in the bypass tray, standard paper feed tray, or paper feed section.
• Forcefully removing misfed paper may cause paper to tear and leave scraps of paper in theprinter. This might cause a misfeed and damage the printer.
• Remove the paper from the bypass tray before opening the front cover.
When the paper was fed from the bypass tray
1. Remove the misfed paper.
CEC251
2. Close the bypass tray.
CEC252
10. Removing Misfed Paper
192

3. Open the front cover by pushing the front cover release button, and then close it to resetthe misfeed condition.
1
2
2
CEC025
CEC214
When the paper was fed from the standard paper feed tray or the optional paper feed tray
1. Pull out the paper tray until it stops, and then remove misfed paper.
CEC228
Paper Misfeed Message (A)
193

2. Carefully slide the paper tray into the printer until it stops.
CEC229
3. Open the front cover by pushing the front cover release button.
1
2
2
CEC025
4. Pull the print cartridge out of the printer by holding the grips of the cartridge.
CEC026
10. Removing Misfed Paper
194

5. Pull out the misfed paper by holding both sides of paper. Be careful not to get toner duston your hands or clothes.
1
2
CEC080
6. Hold the grips of the print cartridge, and then push it into the printer until it stops.
CEC028
7. Close the front cover.
CEC214
Paper Misfeed Message (A)
195

Paper Misfeed Message (B)(C)The " (B)(C) Open Front/Rear Cover and remove misfeed." error message appears when a papermisfeed occurs in the paper feed section.
• Forcefully removing misfed paper may cause paper to tear and leave scraps of paper in theprinter. This might cause a misfeed and damage the printer.
• If paper is fed from the bypass tray, be sure to remove all the paper from the bypass tray and closeit before opening the front cover.
• Be sure to put the print cartridge on a stable, flat surface.
• Do not hold the print cartridge upside down or stand it vertically.
1. Open the front cover by pushing the front cover release button.
1
2
2
CEC025
2. Pull the print cartridge out of the printer by holding the grips of the cartridge.
CEC026
10. Removing Misfed Paper
196

3. Pull out the misfed paper by holding both sides of paper. Be careful not to get toner duston your hands or clothes.
CEC246
4. Hold the grips of the print cartridge, and then push it into the printer until it stops.
CEC028
If the printer does not recover from the error, a paper jam may have occurred in another location.In that case, proceed to the following steps.
5. Open the rear cover.
1
2
CEC046
Paper Misfeed Message (B)(C)
197

6. Lift the lock levers of the fusing unit as shown in the illustration.
CEC050
7. Pull the fusing unit out.
CEC052
8. Hold the tab, and then remove the misfed paper.
CEC087
10. Removing Misfed Paper
198

9. Push the fusing unit until it stops.
CEC053
10. Push the lock levers of the fusing unit down until they click.
CEC051
11. Close the rear cover.
CEC049
Paper Misfeed Message (B)(C)
199

12. Close the front cover.
CEC214
10. Removing Misfed Paper
200

Paper Misfeed Message (Y1)(Y2)(Y3)(Y4)When a paper jam has occurred in one of the optional paper trays, " (Y1) (Y4) Remove misfeed in(Tray name). Opn & cls Frt. Cov." message appears. The optional paper trays to which this messageapplies to are as follow:
• (Y1): Tray 2
• (Y2): Tray 3
• (Y3): Tray 4
• (Y4): Tray 5
This section explains how to remove the jammed paper using tray 2 as an example. The sameprocedure can be used for the other optional trays.
• Forcefully removing misfed paper may cause paper to tear and leave scraps of paper in theprinter. This might cause a misfeed and damage the printer.
1. Pull out the paper tray until it stops, and then remove misfed paper.
CEC084
If paper jams occur in multiple trays, a message indicating multiple trays such as "(Y2) (Y3)"appears. Open all the trays indicated on the control panel, and then remove the jammed paper.
CEC085
Paper Misfeed Message (Y1)(Y2)(Y3)(Y4)
201

CEC086
2. Carefully slide the paper tray into the printer until it stops.
CEC083
3. Open the front cover by pushing the front cover release button, and then close it to resetthe misfeed condition.
1
2
2
CEC081
10. Removing Misfed Paper
202

CEC082
Paper Misfeed Message (Y1)(Y2)(Y3)(Y4)
203

Paper Misfeed Message (Z1)(Z2)The " (Z1)(Z2) Opn R.Cov/Tray1 & remove ppr. Opn & cls F.Cov" error message appears when apaper misfeed occurs inside the duplex section.
• Forcefully removing misfed paper may cause paper to tear and leave scraps of paper in theprinter. This might cause a misfeed and damage the printer.
• If paper is fed from the bypass tray, be sure to remove all the paper from the bypass tray and closeit before opening the front cover.
1. Open the rear cover.
1
2
CEC046
2. Remove the misfed paper.
CEC234
10. Removing Misfed Paper
204

3. Close the rear cover.
CEC049
If the printer does not recover from the error, a paper jam may have occurred in another location.In that case, proceed to the following steps.
4. Lift and pull Tray 1 carefully, and then pull it out with both hands.
CEC031
5. Push down on the Z2 lever, and remove the jammed paper.
1
2CEC079
Paper Misfeed Message (Z1)(Z2)
205

6. Hold the tray with both hands, slide it along the rails of the printer body, and then push itstraight in.
CEC032
7. Open the front cover by pushing the front cover release button, and then close it to resetthe misfeed condition.
1
2
2
CEC025
CEC214
10. Removing Misfed Paper
206

11. AppendixThis section explains maintenance and operation procedures for this printer. It also describes thespecifications of the printer and its options.
Moving and Transporting the Printer
• If the machine topples, or if a cover or other part gets broken, you must turn the power switch tooff and disconnect the power cord plug from the wall outlet. Then contact your servicerepresentative and report the problem. Do not use the machine. Doing so could result in fire orelectric shock.
• The printer weighs approximately 23 kg (51 lb.). When moving the printer, use the inset gripson both sides, and lift slowly in pairs. The printer will break or cause injury if dropped.
• When disconnecting the power cord from the wall outlet, always pull the plug, not the cord.Pulling the cord can damage the power cord. Use of damaged power cords could result in fireor electric shock.
• Unplug the power cord from the wall outlet before you move the machine. While moving themachine, take care that the power cord is not damaged under the machine. Failing to take theseprecautions could result in fire or electric shock.
• Be sure to disconnect all cables from the printer before transporting it.
• The printer is a piece of precision machinery. Take care to avoid damage during transportation.
• If optional paper feed units are attached, remove them from the printer and move them separately.
Moving the Printer in a Short Distance
1. Be sure to check the following points:
• The power switch is turned off.
• The power cord is unplugged from the wall outlet.
• The interface cable is unplugged from the printer.
2. If any external options are attached, remove them.
See the relevant sections in this manual and reverse the steps to remove options.
207

3. Lift the printer with two people by using the inset grips on both side of the printer, andthen move it horizontally to the place where you want to install it.
CEC045
4. If you removed options, reattach them.
For details, see the relevant sections in this manual.
• Be sure to move the printer horizontally. To prevent toner from scattering, move the printer slowly.
11. Appendix
208
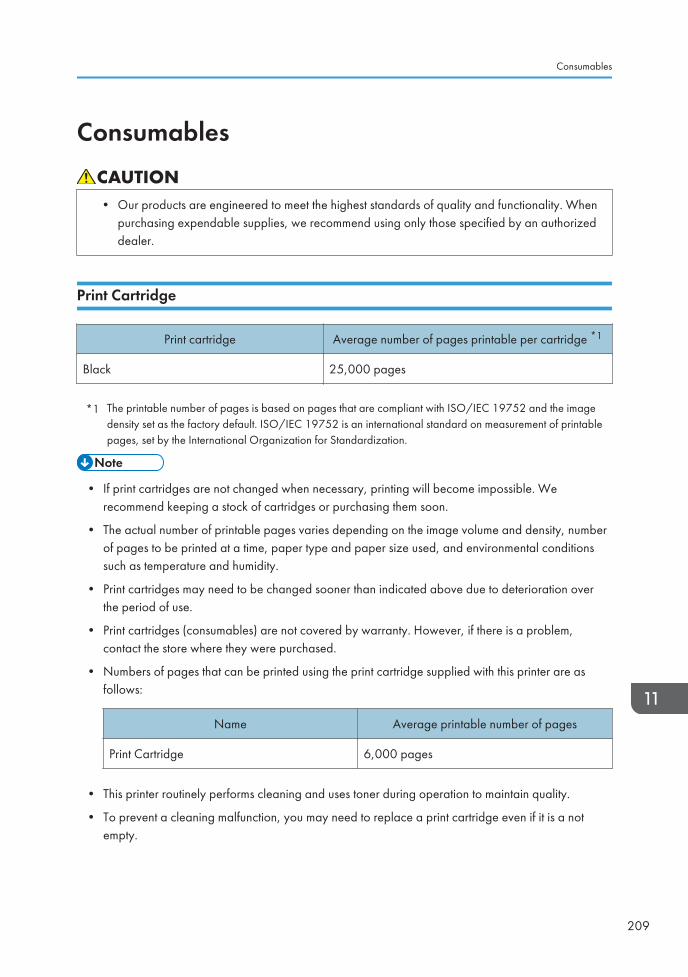
Consumables
• Our products are engineered to meet the highest standards of quality and functionality. Whenpurchasing expendable supplies, we recommend using only those specified by an authorizeddealer.
Print Cartridge
Print cartridge Average number of pages printable per cartridge *1
Black 25,000 pages
*1 The printable number of pages is based on pages that are compliant with ISO/IEC 19752 and the imagedensity set as the factory default. ISO/IEC 19752 is an international standard on measurement of printablepages, set by the International Organization for Standardization.
• If print cartridges are not changed when necessary, printing will become impossible. Werecommend keeping a stock of cartridges or purchasing them soon.
• The actual number of printable pages varies depending on the image volume and density, numberof pages to be printed at a time, paper type and paper size used, and environmental conditionssuch as temperature and humidity.
• Print cartridges may need to be changed sooner than indicated above due to deterioration overthe period of use.
• Print cartridges (consumables) are not covered by warranty. However, if there is a problem,contact the store where they were purchased.
• Numbers of pages that can be printed using the print cartridge supplied with this printer are asfollows:
Name Average printable number of pages
Print Cartridge 6,000 pages
• This printer routinely performs cleaning and uses toner during operation to maintain quality.
• To prevent a cleaning malfunction, you may need to replace a print cartridge even if it is a notempty.
Consumables
209

Maintenance Kit
Name Average printable number of pages
Maintenance Kit SP 5200 (includes a fusing unit,transfer roller, and paper feed roller)
120,000 pages
• The actual number of printable pages varies depending on the image volume and density, numberof pages to be printed at a time, paper type and paper size used, and environmental conditionssuch as temperature and humidity.
• The maintenance kit are not covered by warranty. However, if there is problem, contact the storewhere they were purchased.
11. Appendix
210

Specifications
• The supplied power cord is for use with this machine only. Do not use it with other appliances.Doing so could result in fire, electric shock, or injury.
Mainframe
Configuration:
Desktop
Print Process:
Laser beam scanning & Electrophotographic printing
First Print Speed:
7.5 sec or less (A4 or 81/2 " × 11 " (Letter) )
Note that if the printer has not been used for some time, there may be a short delay before the firstpage starts printing.
Printing Speed:
Model types Printing Speed: A4 Printing Speed: 81/2 " 11 " (Letter)
Type 1 maximum 45 pages per minute maximum 47 pages per minute
Type 2 maximum 50 pages per minute maximum 52 pages per minute
Resolution:
600 × 600 dpi
1200 × 600 dpi
Paper Size:
For details, see page 101 "Supported Paper for Each Tray".
Paper Weight:
For details, see page 101 "Supported Paper for Each Tray".
Media Type:
For details, see page 105 "Supported Paper Types".
Paper Output Capacity:
Standard 500 sheets (80 g/m2, 20 lb.)
Specifications
211

Paper Input Capacity
For details, see page 101 "Supported Paper for Each Tray".
Power Source:
• (mainly Europe and Asia)220-240 V, 50/ 60 Hz, 6 A or less
• (mainly North America)120 - 127 V, 60 Hz, 11 A or less
Power Consumption:
Printing 1400 W or less
Auto Off mode (sleep mode) 5 W or less
Warm-up Time:
Less than 20 seconds (23 °C, 71.6 °F) *1
*1 When no error is occurred.
Dimensions (W × D × H):
Printer only (tray not extended): 411 × 435 × 400 mm (16.2 × 17.1 × 15.8 inches)
Weight:
Approximately 23 kg (51 lb.) (Toner included)
Noise Emission: *1
• Sound Power Level
• Main unit only (Type 1)
Stand-by Less than 46.5 dB (A)
Printing Less than 71.8 dB (A)
• Main unit only (Type 2)
Stand-by Less than 48.0 dB (A)
Printing Less than 72.0 dB (A)
• Complete system (Type 1)
Stand-by Less than 50.5 dB (A)
Printing Less than 75.8 dB (A)
• Complete system (Type 2)
11. Appendix
212

Stand-by Less than 52.0 dB (A)
Printing Less than 76.0 dB (A)
• Sound Pressure Level *2
• Main unit only (Type 1)
Stand-by Less than 40.5 dB (A)
Printing Less than 65.8 dB (A)
• Main unit only (Type 2)
Stand-by Less than 42.0 dB (A)
Printing Less than 66.0 dB (A)
• Complete system (Type 1)
Stand-by Less than 44.5 dB (A)
Printing Less than 69.8 dB(A)
• Complete system (Type 2)
Stand-by Less than 46.0 dB (A)
Printing Less than 70.0 dB(A)
*1 The preceding measurements made in accordance with ISO 7779 are actual values.
*2 Measured at the position of a bystander.
Memory:
Type 1:
Standard 256 MB, up to 768 MB (with the optional SDRAM module)
Type 2:
Standard 768 MB
Hard disk:
Type 1:
80 GB (Optional)
Type 2:
80 GB (Standard)
Specifications
213

Interfaces:
Standard:
• Ethernet (10BASE-T/100BASE-TX)
• USB 2.0
To use USB 2.0, a USB computer port and cable that support USB 2.0 are required.
• USB Host
Optional:
• IEEE 802.11a/b/g (Wireless LAN)
• Parallel (Bidirectional IEEE 1284)
• Gigabit Ethernet (1000BASE-T)
Printer Language:
PCL5e/PCL6, PostScript 3/PDF
Fonts:
PCL 5e/PCL 6:
45 fonts, 13 International fonts
PostScript 3, PDF:
136 fonts
Network:
Topology: The physical or logical layout of the nodes (devices) in a network. (10BASE-T/100BASE-TX/1000BASE-T)
Protocol: TCP/IP, IPX/SPX, AppleTalk
Options
Paper Feed Unit TK1120
Paper Size:
For details, see page 101 "Supported Paper for Each Tray".
Dimensions (W × D × H):
Less than 400 × 435 × 150 mm (15.8 ×17.1 × 5.9 inches)
Paper weight:
52 - 220 g/m2 (14 - 59 lb.)
Weight:
Less than 7 kg (15.5 lb.)
11. Appendix
214

Paper Feed Unit TK1130
Paper Size:
For details, see page 101 "Supported Paper for Each Tray".
Dimensions (W × D × H):
Less than 755 × 725 × 215 mm (29.7 ×28.6 × 8.5 inches)
Paper weight:
52 - 220 g/m2 (14 - 59 lb.)
Weight:
Less than 8 kg (17.7 lb.)
Hard Disk Drive Type 2670
Storage Capacity (Formatted):
80 GB
Specifications:
• Spooling print data to collate
• Spooling Sample Print/Locked Print/Hold Print/Stored Print data
• Storing log data
• Storage capacity is subject to change without prior notice.
• The optional hard disk is provided with an SD card to enhance the security features. By using theprovided SD card, the following security features to prevent data leaks become available:overwriting data on the optional hard disk, and encrypting the address book data, authenticationinformation, and the data for stored prints.
Memory Unit Type G 256 MB
Module Type:
DIMM (Dual-in-line Memory Module)
Memory Type:
DDR-SDRAM (Double Data Rate Synchronous Dynamic RAM)
Number of Pins:
200 pins
Specifications
215

Memory Unit Type I 512 MB
Module Type:
DIMM (Dual-in-line Memory Module)
Memory Type:
DDR-SDRAM (Double Data Rate Synchronous Dynamic RAM)
Number of Pins:
200 pins
Gigabit Ethernet Board Type C
Interface Connector:
Ethernet (10BASE-T, 100BASE-TX, 1000BASE-T)
USB 2.0
To use USB 2.0, a USB computer port and cable that support USB 2.0 are required.
Data Transmission Speed: Ethernet: 10 Mbps, 100 Mbps, 1000 Mbps
USB: 480 Mbps (High speed: USB 2.0), 12Mbps (Full speed)
Protocol:
TCP/IP, IPX/SPX, AppleTalk
Maximum Length of Cable Between Devices:
Ethernet: 100 m
USB: 5 m
IEEE 802.11a/g Interface Unit Type M (mainly Europe and Asia)
Transmission Specification:
Based on IEEE 802.11a/b/g (Wireless LAN)
Data Transfer Speed:
Auto select from the following speed:
1 Mbps, 2 Mbps, 5.5 Mbps, 6 Mbps, 9 Mbps, 11 Mbps, 12 Mbps, 18 Mbps, 24 Mbps, 36Mbps, 48 Mbps, 54 Mbps
Frequency Range:
2412 to 2472 Mhz (1 to 13 Channels)
5180 to 5240 Mhz (36, 40, 44 and 48 Channels)
The channel in use might differ depending on the country.
The following channels are available : 2412 - 2462 Mhz (1-11 Channels)
11. Appendix
216

Transmission Mode:
• Ad hoc
• infrastructure mode
IEEE 802.11a/g Interface Unit Type L (mainly North America)
Transmission Specification:
Based on IEEE 802.11a/b/g (Wireless LAN)
Data Transfer Speed:
Auto select from the following speed:
1 Mbps, 2 Mbps, 5.5 Mbps, 6 Mbps, 9 Mbps, 11 Mbps, 12 Mbps, 18 Mbps, 24 Mbps, 36Mbps, 48 Mbps, 54 Mbps
Frequency Range:
2412 to 2472 Mhz (1 to 13 Channels)
5180 to 5240 Mhz (36, 40, 44 and 48 Channels)
Transmission Mode:
• Ad hoc
• infrastructure mode
IEEE 1284 Interface Board Type A
Transmission Specification:
IEEE 1284
Required Cable:
Standard IEEE 1284-compliant Micro Centronics 36-pin cable
Specifications
217

ENERGY STAR ProgramENERGY STAR® Program Requirements for Imaging Equipment
The ENERGY STAR® Program Requirements for Imaging Equipment encourage energy conservationby promoting energy efficient computers and other office equipment.
The program backs the development and dissemination of products that feature energy savingfunctions.
It is an open program in which manufacturers participate voluntarily.
Targeted products are computers, monitors, printers, facsimiles, copiers, scanners, and multifunctiondevices. Energy Star standards and logos are internationally uniform.
Auto Off Mode (Sleep Mode)
If this machine remains idle for a specified period, it automatically enters Sleep mode to reduce itselectrical consumption.
The default delay time the machine waits before entering Auto Off Mode is 1 minute. This defaulttime can be changed.
The machine can print jobs from computers while in Sleep mode.
Specifications
Auto Off Mode
(Sleep Mode)
Power Consumption 5 W or less
Default Time 1 minute
Recovery Time 20 seconds or less
Recycled Paper
We recommend use of recycled paper which is environment friendly. Please contact your salesrepresentative for recommended paper.
11. Appendix
218

TrademarksAdobe, Acrobat, Acrobat Reader, PostScript, and Reader are either registered trademarks ortrademarks of Adobe Systems Incorporated in the United States and/or other countries.
Apple, Macintosh, Mac OS, and Safari are trademarks of Apple Inc., registered in the U.S. and othercountries.
Firefox® is a registered trademark of the Mozilla Foundation.
IPDS is a trademark of Ricoh Co., Ltd.
IPS is a trademark or registered trademark of Zoran Corporation and/or its subsidiaries in the UnitedStates or other countries.
Microsoft®, Windows®, Windows Server®, Windows Vista®, and Internet Explorer® are registeredtrademarks of Microsoft Corporation in the United States and/or other countries.
Monotype is a registered trademark of Monotype Imaging, Inc.
PCL® is a registered trademark of Hewlett-Packard Company.
UNIX® is a registered trademark of The Open Group.
Other product names used herein are for identification purposes only and might be trademarks of theirrespective companies. We disclaim any and all rights to those marks.
The proper names of the Windows operating systems are as follows:
• The product names of Windows XP are as follows:
Microsoft® Windows® XP Professional Edition
Microsoft® Windows® XP Home Edition
• The product names of Windows Vista are as follows:
Microsoft® Windows Vista® Ultimate
Microsoft® Windows Vista® Business
Microsoft® Windows Vista® Home Premium
Microsoft® Windows Vista® Home Basic
Microsoft® Windows Vista® Enterprise
• The product names of Windows 7 are as follows:
Microsoft® Windows® 7 Home Premium
Microsoft® Windows® 7 Professional
Microsoft® Windows® 7 Ultimate
Microsoft® Windows® 7 Enterprise
• The product names of Windows Server 2003 are as follows:
Microsoft® Windows Server® 2003 Standard Edition
Trademarks
219

Microsoft® Windows Server® 2003 Enterprise Edition
• The product names of Windows Server 2003 R2 are as follows:
Microsoft® Windows Server® 2003 R2 Standard Edition
Microsoft® Windows Server® 2003 R2 Enterprise Edition
• The product names of Windows Server 2008 are as follows:
Microsoft® Windows Server® 2008 Standard
Microsoft® Windows Server® 2008 Enterprise
Microsoft® Windows Server® 2008 Standard without Hyper-VTM
Microsoft® Windows Server® 2008 Enterprise without Hyper-VTM
• The product names of Windows Server 2008 R2 are as follows:
Microsoft® Windows Server® 2008 R2 Standard
Microsoft® Windows Server® 2008 R2 Enterprise
11. Appendix
220

INDEXA
Additional troubleshooting.................................188
Adjusting the paper type....................................168
Alert indicator........................................................24
Alert messages....................................................172
Automatically.......................................................121
Available options..................................................45
B
Bypass tray.......................104, 126, 127, 129, 131
C
CAUTION label.......................................................9Cautions when cleaning.....................................155
CD-ROM................................................................14
Checking the port connection............................179
Cleaning the registration roller...........................159
Clear key................................................................27
Color paper.........................................................109
Consumables.......................................................209
Control panel.........................................................23
Custom size paper......................................123, 129
D
Data in indicator....................................................24
Device certificate...................................................94
DHCP......................................................................78
Display...................................................................23
Display language..................................................43
Display panel.........................................................25
E
ENERGY STAR Program.....................................218
Entering characters................................................26
Envelopes.............................................................110
Error message......................................................171
Escape key......................................................24, 26
Ethernet............................................................75, 95
Ethernet cable connection....................................69
Ethernet configuration...........................................75
Ethernet speed.......................................................81
Exterior.............................................................17, 19
F
Friction pad..........................................................156
G
Gigabit Ethernet board.........................................59
H
Hard disk drive......................................................52
How to enter character.........................................27
HTML manuals.......................................................14
I
IEEE 1284 interface board............................63, 74
IEEE 802.1X...........................................................94
Image density......................................................163
Installing options.............................................45, 46
Installing the memory expansion units.................52
Interface units.........................................................59
Interior....................................................................21
J
Job reset key..........................................................24
L
Label paper.........................................................108
LED lamps...............................................................70
Letterhead............................................................107
List of options.........................................................13
Loading envelopes..............................................133
Loading paper.....................................................117
M
Machine types.........................................................7Maintenance kit..........................................154, 210
Manuals...........................................................11, 14
Menu key...............................................................24
Middle thick.........................................................106
Model-specific information.....................................7Moving and transporting....................................207
Moving the printer a short distance...................207
N
NetWare................................................................79
Network...........................................................75, 84
Network setting.....................................................79
221

No DHCP...............................................................76
Non-recommended paper types.......................114
Number keys...................................................24, 26
O
OHP transparencies............................................110
OK key.............................................................24, 26
Operating instructions...........................................14
Operational status or messages...........................25
Option....................................................................25
Optional paper feed tray..........................102, 117
Order of option installation..................................45
Other printing problems.....................................181
P
Panel tone............................................................177
Paper feed roller.................................................156
Paper feed unit..............................................48, 117
Paper misfeed......................................................191
Paper Misfeed Message (A)..............................192
Paper Misfeed Message (B)(C).........................196
Paper Misfeed Message (Y1)(Y2)(Y3)(Y4)......201
Paper Misfeed Message (Z1)(Z2)....................204
Paper size...........................................122, 127, 143
Paper type...................................................124, 131
Parallel cable connection.....................................74
Place to install........................................................32
Plain paper..........................................................105
Power indicator......................................................24
Power off..........................................................39, 41
Power on................................................................39
Power switch symbols...........................................10
Preprinted paper.................................................109
Print area..............................................................115
Print cartridge..............................................149, 209
Print test sheet......................................................165
Printer does not print...........................................178
Printer set up procedure........................................31
Printing on fixed-orientation paper....................144
Printing position...................................................165
Prt.jobs....................................................................25
R
Recycled paper..........................................109, 218
Registration roller................................................159
Removing the packaging materials......................36
Replace................................................................154
S
Scroll keys........................................................24, 26
SD card..................................................................65
SDRAM module.....................................................55
Security...................................................................89
Selection keys..................................................23, 26
Shutdown.........................................................39, 41
Site certificate.........................................................94
Special paper......................................................108
Specifications......................................................211
SSID........................................................................86
Standard paper feed tray..........................101, 117
Status message....................................................171
Storing paper......................................................113
Supplies..................................................................25
Supported paper........................................101, 105
Suspend/resume key............................................24
Switch functions key..............................................23
Symbols....................................................................6
T
Test printing............................................................44
Thick paper..........................................................106
Thin paper............................................................106
Toner....................................................................149
Trademarks..........................................................219
Troubleshooting...................................................171
U
USB cable connection...........................................72
User paper type..........................................146, 147
W
WARNING label.....................................................9WEP key.................................................................89
Wireless LAN.....................................84, 87, 89, 97
Wireless LAN configuration.................................84
Wireless LAN connectivity....................................87
Wireless LAN interface unit..................................61
WPA.......................................................................90
222

WPA2.....................................................................90
223

MEMO
224 EN GB EN US M020-8502A

© 2010-2014
Operating Instructions H
ardware G
uide
M020-8502AEN US