open cv workbook - technocamps.com · k 2fc c*ma?j 5glbmuq "c@seecpn 2fgq @srrml ugjj @c sqcb...
TRANSCRIPT

Open CVWorkbook
Inspiring | Creative | FunYsbrydoledig | Creadigol | Hwyl

OpenCV
1
http://www.visualstudio.com/en-us/downloads
Visual Studio is the IDE (Integrated Development Environment) which will be used throughout this workbook and workshop. The IDE can be downloaded onto your Windows computer via the following link:
Throughout this workbook you will be given some code to input, this code will need to be typed into the code section of Visual Studio before running the program. Once this code has been entered there will be various tasks to complete yourself.
There are 3 main parts which will be used throughout the workbook, highlighting in the image above:
compiled. This includes any errors or warnings discovered in your code.
button (which looks like a play button). If everything is fine with your code, your program will run. However, if there are any issues with your code such as spelling mistakes, they will be displayed in area 3 of the interface.

#include <opencv2\opencv.hpp>
int main(){ //Load Image//////////////////////////////
cv::Mat img = cv::imread(“Media/car.jpg"); cv::namedWindow("Output"); cv::imshow("Output", img); cv::waitKey(0);
cv::destroyWindow("output");}
2
OpenCV
window.
Loading and displaying an image will be a basic task covered within this workbook. The following code allows you to do this:
This line is a pre-processor directive that includes header files into the application. They provide libraries needed for OpenCV.
“Mat” is a data structure that stores images in the memory. “imread” is a function that loads images from a directory.
“namedWindow” is a function that creates a window with the name of “Output”.
“imshow” is afunction that shows an image pointed by “img” variable on the “Output” window.
“waitKey” is a function that waits for a key press infinitely. Once key pressed it is returned to the function as an ASCII value and the program continues to next line of code.
“destroyWindow” is a function that destroys an open window called “Output”
By default images are loaded as a 3 channel, but can be changed with a flag to set a value:
>0 image told to be a 3 channel colour image=0 image told to be a 1 channel greyscale image<0 image loaded using number of channels in file.
1) Practice code
After testing the previous code, change the image showing to penguin.jpg found on a windows machine in pictures.Next, change the window name from “Output” to “Display”.
Don’t forget, when you run the program any errors will appear on the bottom. Make sure you have used the correct symbols in the correct places. Also, be careful of the use of UPPERCASE and lowercase letters.
The “Output” window.

OpenCV
3
Creating a blank image, the following code will create an image of height = 200 and width = 200 with 3 channels in the range 0 - 255. The colour will be set to red. Add the following code inside “int main”:
Creates an image with the height and width as 200 and the range 0 - 255 with 3 channels.E.g. cv::Mat(height, width, type, colour);
This sets the colour to red e.g. cv::Scalar(B, G, R);
cv::Mat img(200, 200, CV_8UC3, cv::Scalar(0, 0, 255));
const char* winTitle = “Blank Window”;cv::namedWindow(winTitle);cv::imshow(winTitle, img);cv::waitKey(0);cv::destroyAllWindows();
This is a simpler way to change and control naming of the window, creating the window title.
“imshow” displays the image, “waitKey” will wait for any user input and “destroyAllWindows” destroys all active windows.
The “Output” window.
2) Circle
After testing the previous code, adjust the size to be 400 height by 600 width. Next, usethe OpenCV methods to create a circle:
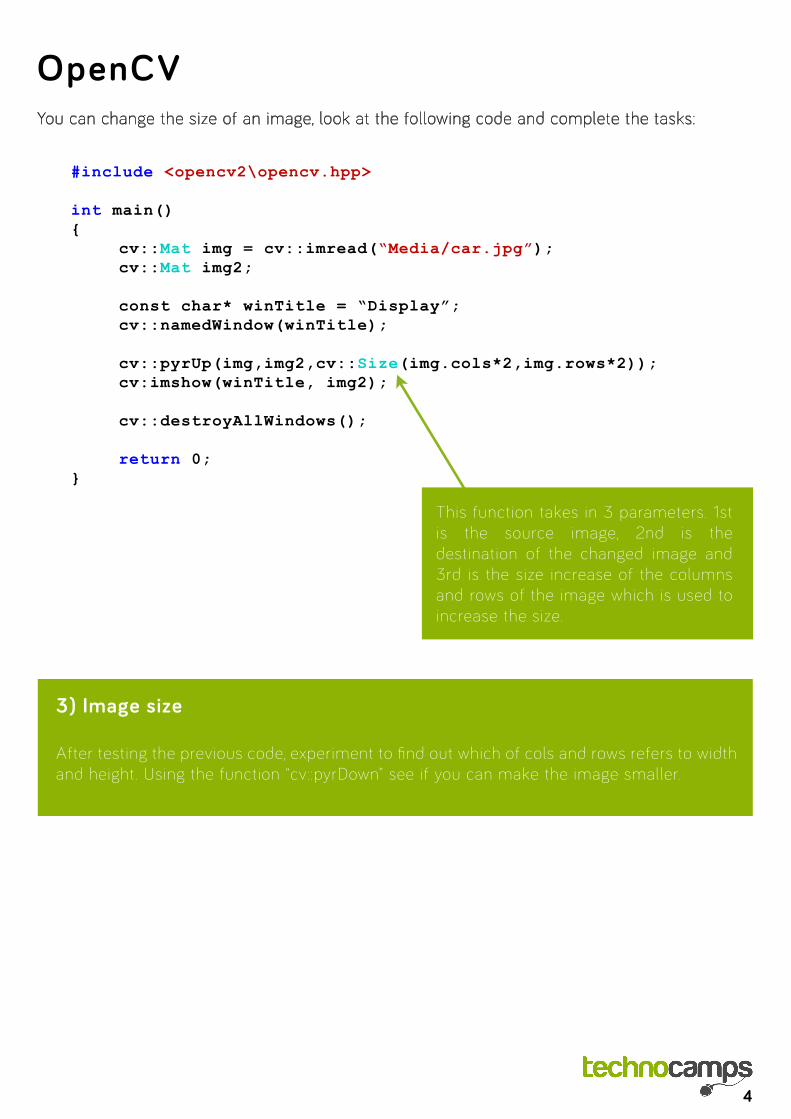
#include <opencv2\opencv.hpp>
int main(){ cv::Mat img = cv::imread(“Media/car.jpg”); cv::Mat img2;
const char* winTitle = “Display”; cv::namedWindow(winTitle);
cv::pyrUp(img,img2,cv::Size(img.cols*2,img.rows*2)); cv:imshow(winTitle, img2);
cv::destroyAllWindows();
return 0;}
4
OpenCV
window.
This function takes in 3 parameters. 1st is the source image, 2nd is the destination of the changed image and 3rd is the size increase of the columns and rows of the image which is used to increase the size.
You can change the size of an image, look at the following code and complete the tasks:
3) Image size
After testing the previous code, experiment to find out which of cols and rows refers to width and height. Using the function “cv::pyrDown” see if you can make the image smaller.

OpenCV
5
#include <opencv2\opencv.hpp>
int main(){ cv::Mat img = cv::imread(“Media/car.jpg”); const char* winTitle = “Display”; cv::namedWindow(winTitle); cv::imshow(winTitle, img);
const char* winFilter = “Eroded”; cv::Mat element = cv::getStructuringElement(cv::MORPH_RECT,cv::Size(5,5)); cv::erode(img, img, element); cv::imshow(winFilter, img);
cv::waitKey(0);
cv::destroyAllWindows();
return 0;}
This allows you to choose the size and the shape of the erosion.
Applying filters to images is often used within Computer vision. Using the code on the following page you can implement your own filter.
4) Applying filters: Erode
After testing the previous code, use “MORPH_CROSS_EROSION” to increase the erosion size. Then, make the erosion smaller.
Next, try eroding a different image.

6
OpenCV
window.
The following code will assist you applying dilation to an image.
#include <opencv2\opencv.hpp>
int { cv::Mat img = cv::imread(“Media/car.jpg”); const char* winTitle = “Display”; cv::namedWindow(winTitle); cv::imshow(winTitle, img);
const char* winFilter = “Dilated”; cv::Mat element = cv::getStructuringElement(cv::MORPH_RECT,cv::Size(5,5));
This allows you to choose the size and shape of dilation, the code is continued on the following page.
cv::dilate(img, img, element); cv::imshow(winFilter, img);
cv::waitKey(0);
cv::destroyAllWindows();
return 0;}
5) Applying filters: Dilate
After testing the previous code, use “MORPH_ECLIPSE” dilation, make the dilationsmaller and then erode and dilate the image.

OpenCV
7
#include <opencv2\opencv.hpp>
int main(){
cv::Mat img = cv::imread(“Media/car.jpg”); const char* winTitle = “Display”; cv::namedWindow(winTitle); cv::imshow(winTitle, img);
const char* winFilter = “Smoothed”; cv::blur(img, img, cv::Size(3, 3)); cv::imshow(winFilter, img);
cv::waitKey(0);
cv::destroyAllWindows();
return 0;}
This function smooths the image by the size determined by the “cv::Size()” function.
The following code will smooth the image, once comfortable with the code entered and that it successfully runs, complete the following task:
6) Applying filters: Smoothing
After testing the previous code, make the smoothing bigger.Smooth and erode the image.
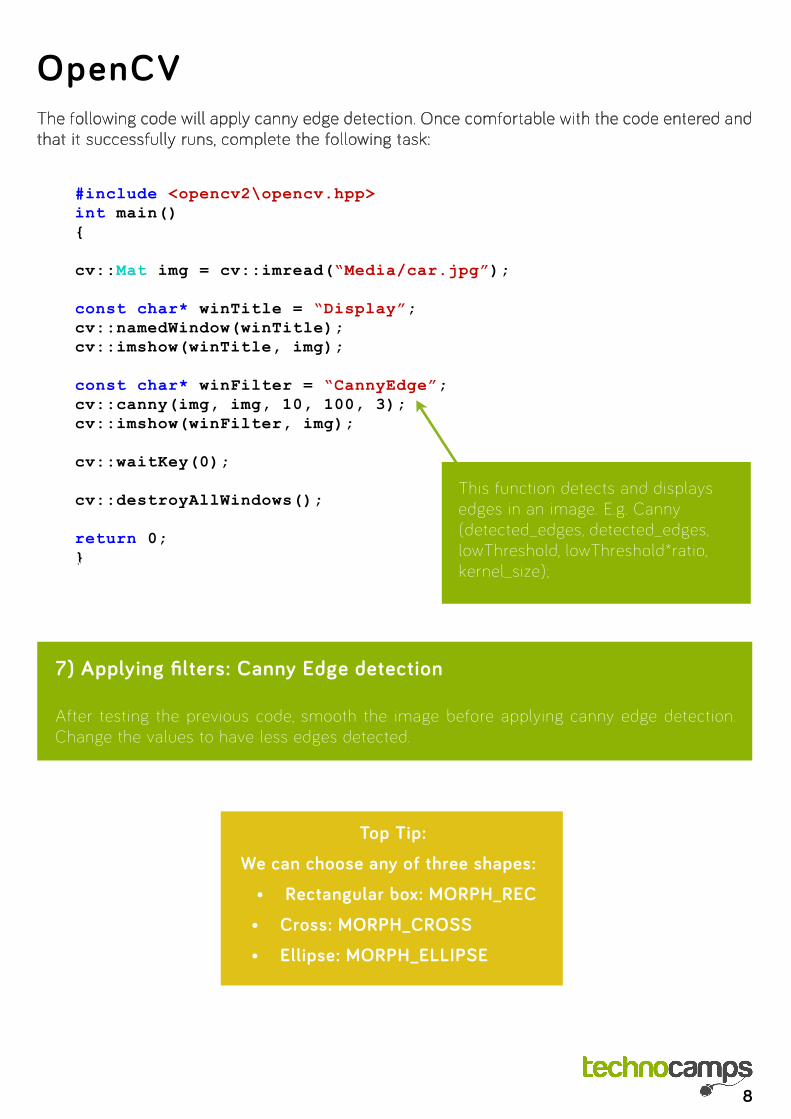
#include <opencv2\opencv.hpp>int main(){
cv::Mat img = cv::imread(“Media/car.jpg”);
const char* winTitle = “Display”;cv::namedWindow(winTitle);cv::imshow(winTitle, img);
const char* winFilter = “CannyEdge”;cv::canny(img, img, 10, 100, 3);cv::imshow(winFilter, img);
cv::waitKey(0);
cv::destroyAllWindows();
return 0;}
8
OpenCV
window.
This function detects and displays edges in an image. E.g. Canny (detected_edges, detected_edges, lowThreshold, lowThreshold*ratio, kernel_size);
The following code will apply canny edge detection. Once comfortable with the code entered and that it successfully runs, complete the following task:
7) Applying filters: Canny Edge detection
After testing the previous code, smooth the image before applying canny edge detection. Change the values to have less edges detected.
Top Tip: We can choose any of three shapes:

OpenCV
9
#include <opencv2\opencv.hpp>
int main(){
cv::Mat img = cv::imread(“Media/car.jpg”); cv::Mat img2;
cvtColor(img, img, CV_RGB2GRAY); const char* winTitle = “Display”; cv::namedWindow(winTitle);
cv::Sobel(img, img2, CV_16S, 0, 1, 3, 1, 0, 4); cv::convertScaleAbs(img2, img2); cv::imshow(winTitle, img2); cv::waitKey(0);
cv::destroyAllWindows(); return 0;}
The following code will detect edges and turn the image into greyscale (sobel filter). Once comfortable with the code entered and that it successfully runs, complete the following task:runs, complete the following task:
This function turns the input image into a greyscale image
This function detects and displays edges in an image.
This function detects and displays edges in an image.
8) Applying filters: Sobel
After testing the previous code, try out the Sobel filter with other images. Do not make the input images grey.
Next, apply smoothing to remove the noise from the image and increase the size of the image.

#include <opencv2\opencv.hpp>
int main(){
cv::Mat img = cv::imread(“Media/car.jpg”); cv::Mat img2;
const char* winTitle = “Display”; cv::namedWindow(winTitle);
int brightness = 50;
cv::createTrackbar(“Brightness”, winTitle, &brightness, 100, NULL);
do { cv::add(img, cv::Scalar(brightness-50, brightness-50, brightness-50),img2); cv::imshow(winTitle, img2); } while(cv::waitKey(40) != 27);
cv::destroyAllWindows();
return 0;}
10
OpenCV
window.
This function creates a track bar in a window. The first parameter gives the track bar a name (in this case brightness). The 2nd parameter tells it which window to appear in. The 3rd parameter says what is affected by the track bar. The 4th parameter determines what the max value is and the final parameter is used for call-back.
The following code will vary the brightness of the image using track bars. Once you try the code for yourself, give the following task a go too:
This function calculates the sum of the values in the parameter list, in this case calculating the sum of brightness for Red, Green and Blue values of the image. You can use the value 50 to say that the brightness is at half way (50%).
9) Track bars: Brightness
After entering the above code, rename the track bar to “Brightness Track-bar” andincrease the maximum brightness value to 180.See if you can make the default brightness value 90.

OpenCV
11
#include <opencv2\opencv.hpp>
int main(){
cv::Mat img = cv::imread(“Media/car.jpg”); cv::Mat img2;
const char* winTitle = “Display”; cv::namedWindow(winTitle);
int contrast = 50;
cv::createTrackbar(“Contrast”, winTitle, %contrast, 10, NULL);
do { img.convertTo(img2, -1, contrast, 0); cv::imshow(winTitle, img2); } while(cv::waitKey(40) != 27);
cv::destroyAllWindows();
return 0;}
The following code will vary the contrast of the image using track bars. Once you try the code for yourself, give the following task a go too:
This function converts the image by changing the contrast value.
10) Track bars: Contrast A
After entering the above code, rename the track bar to “Contrast Track bar” and showthe image with increased contrast from the start.

#include <opencv2\opencv.hpp>
int main(){ cv::Mat img = cv::imread(“Media/car.jpg”); cv::Mat img2;
cvtColor(img, img2, CV_RGB2GRAY);
const char* winTitle = “Display”; cv::namedWindow(winTitle);
cv::blur(img2, img2, cv::Size(3, 3)); cv::vector<cv::Vec3f> circles;
cv::HoughCircles(img2, circles, CV_HOUGH_GRADIENT, 1, img2.rows/8, 200, 120, 0, 0); for(size_t i = 0; i < circles.size(); i++) { cv::Point centre(cvRound(circles[i][0]), cvRound(circles[i][1])); int radius = cvRound(circles[i][2]);
circle(img, centre, 3, cv::Scalar(0, 255, 0), -1, 8, 0); circle(img, centre, radius, cv::Scalar(0, 0, 255), 3, 8, 0); }
cv::imshow(winTitle, img); cv::waitKey(0); cv::destroyAllWindows(); return 0;}
12
OpenCV
window.
This creates a vector to store 3 different values.
The following code will vary the contrast of the image using track bars, differently to the previous code. Once you try the code for yourself, give the following task a go too:
This adds the x and y positionswith the radius of the circle tothe circle vector.
This function finds the circles in the image that are bigger than 120 pixels but smaller than 200 pixels.
This draws a small green circle to indicate the centre of a circle
This draws a red circle to show the main outline of the detected circles.
11) Track bars: Contrast B
Now that you are confident with the above code, change the blur value to detect all 5coins. Display the grey image.

OpenCV
13
//load the video file to the memorycv::VideoCapture capture(“Wildlife.avi”);
if(capture.isOpened()){ cv::Mat frame; bool runFile = true;
//create a name that can be used for the window const char * winName = “Wildlife Video”;
//Create a window with the title “Video” cv::namedWindow(winName);
//Obtain the frames per second of that video int fps = capture.get(CV_CAP_PROP_FPS);
int interval = 40; //Set a default video tutorial if (fps != 0) //Can frame rate be read from video? interval = int(1000.0f/fps); //Wait for 1000/fps millisecs do { //Grab and retrieve each frame of the video sequentially capture >> frame; if (frame.empty()) runFile = false; else { //Show the retreieved frame in the “video” window cv::imshow(winName, frame); } } while(cv::waitKey(interval) != 27 && runFile); //Exit loop if user presses “ESC” (ASCII for ESC is 27) //Destroy the opened window cv::destroywindow(winName); return 0;}
To follow, there is code to try for yourself that will load a video file on a window and play it according to the built in frame rate.
This is a function that allocates and initialises a structure to read from video.
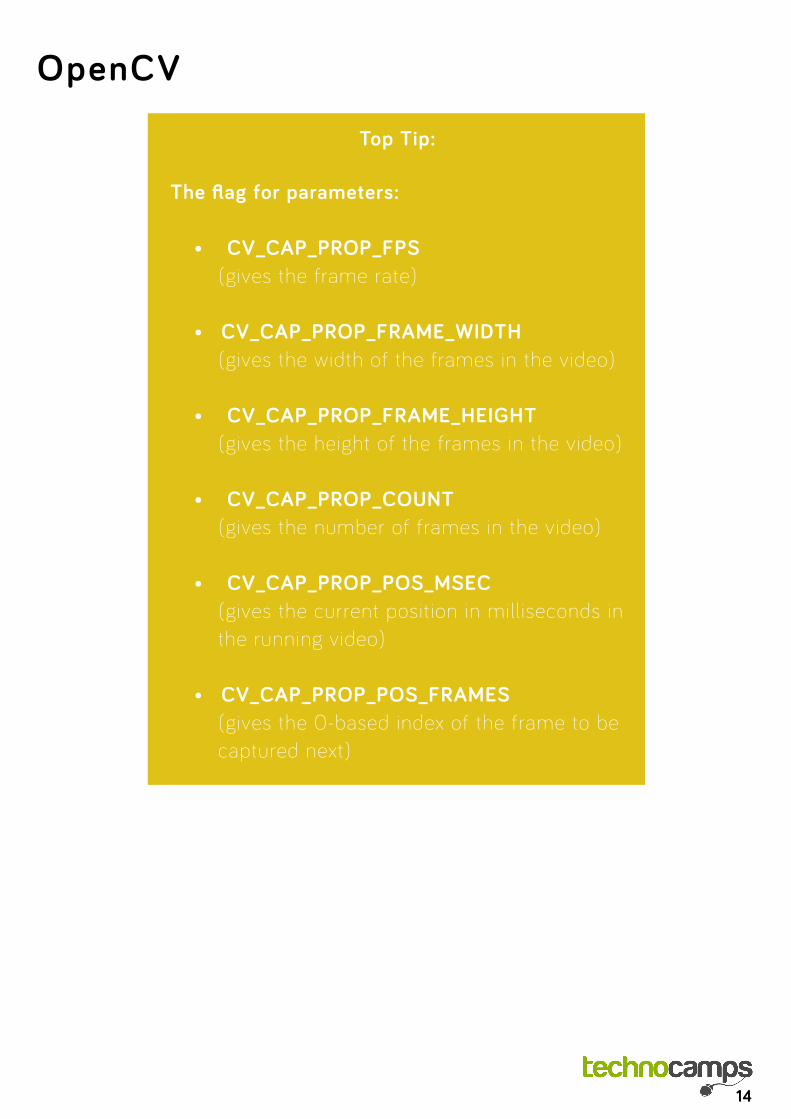
This function allows you to check the properties from the video feed. In this case frame per second.
This method sets up an interval of time for our file to wait.
This loops keeps the video playing until either end of the file or the user presses escape.
>> is an operator overload that gets the next frame from the video and parses it into a Mat structure.
14
OpenCV
Top Tip:
The flag for parameters:
(gives the frame rate)
(gives the width of the frames in the video)
(gives the height of the frames in the video)
(gives the number of frames in the video)
(gives the current position in milliseconds in the running video)
(gives the 0-based index of the frame to be captured next)

OpenCV
15
//load the video file to the memorycv::VideoCapture capture(0);
if(capture.isOpened()){ cv::Mat frame; //Create space for the image frame bool runFile = true;
//create a name that can be used for the window const char * winName = “Webcam Feed”;
//Create a window with the title “Video” cv::namedWindow(winName);
int interval = 40; //Set a default video interal
do { //grab and retrieve each frames of the video sequentially capture >> frame;
if (frame.empty()) runFile = false; else { //Show the retrieved frame in the “Video” window cv::imshow(winName, frame); } } (cv::waitKey(interval) != 27 && runFile); //exit the loop if user presses “ESC”(ASCII value of ESC is 27)
//Destroy opended window cv::destroyAllWindows(); return 0;}
To follow, there is code to try for yourself that will load a video feed from a camera on a window.
This is a function that allocates and Initialises a structure to read from camera. In this case camera 0, if there are multiple cameras the value would change to 1 or 2 Etc.

16
OpenCV
13) Colour Tracking
As above open “Colour tracking code.txt” and copy the code to your VS program and runit. Can you understand what it does and how it works?
Top Tip:
Don’t forget to comment your code using “//”, leaving yourself notes of how the code works.
12) Object Tracking
To see what CV techniques can be achieved using OpenCV, go to the media folder open“Object tracking code.txt” and copy the code to your VS program and run it. Can youunderstand what it does and how it works?

APPROPRIATE_IMAGEREPRESENTING_WORKSHOP
(REMOVE BORDER)
APPROPRIATE_IMAGEREPRESENTING_WORKSHOP
(REMOVE BORDER)
www.technocamps.com