one-eighty classic auto-magnet user guide · 6 the auto-magnet has the following sections available...
TRANSCRIPT
B27677, published March 27, 2015
ONE-EIGHTY Classic Auto-Magnet User Guide

ii
© 2015 CDK Global, LLC. All rights reserved. The CDK logo is a trademark of CDK Global, LLC.
Search, Bnnnnn.
iii
Table of Contents
Introduction ................................................................................................................... 5
Auto-Magnet Setups ..................................................................................................... 5
Accessing the Auto-Magnet Setup Screen ................................................................................................... 5 Setting up and activating a Follow-up ........................................................................................................... 6 Accessing Phone, Mail, and Email Templates .............................................................................................. 8 Opening Contact Templates ......................................................................................................................... 9
Phone ....................................................................................................................................................... 9 Mail ........................................................................................................................................................... 9 Email ...................................................................................................................................................... 10
Overview of Various Sections Available for Setup ...................................................................................... 12 Initial Contact and Demo Drive .............................................................................................................. 12 Post Delivery (Lease only) & Post Delivery (All) .................................................................................... 13 Post Cash Purchase .............................................................................................................................. 14 Pre Lease/Finance Maturity ................................................................................................................... 14 Service ................................................................................................................................................... 16
Auto-Magnet Reporting .............................................................................................. 17
If You Need Help .......................................................................................................... 18

ONE-EIGHTY Classic Auto-Magnet User Guide
iv
5
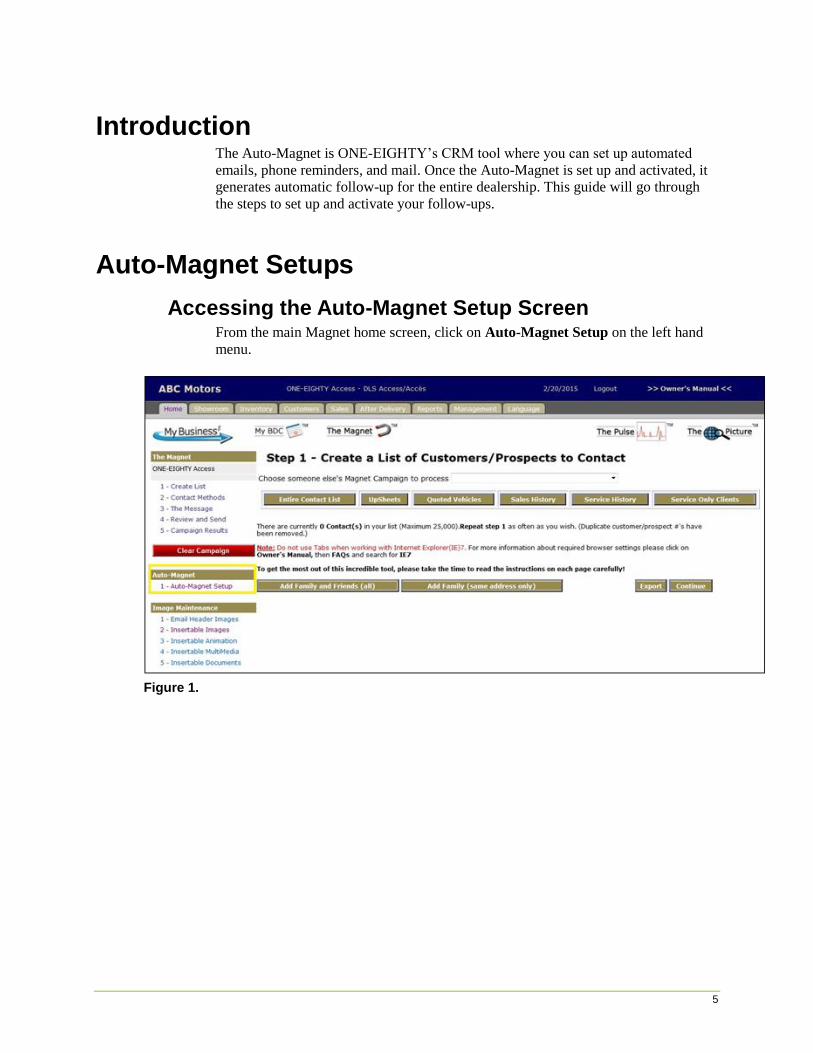
Introduction The Auto-Magnet is ONE-EIGHTY’s CRM tool where you can set up automated
emails, phone reminders, and mail. Once the Auto-Magnet is set up and activated, it
generates automatic follow-up for the entire dealership. This guide will go through
the steps to set up and activate your follow-ups.
Auto-Magnet Setups
Accessing the Auto-Magnet Setup Screen From the main Magnet home screen, click on Auto-Magnet Setup on the left hand
menu.
Figure 1.
ONE-EIGHTY Classic Auto-Magnet User Guide
6
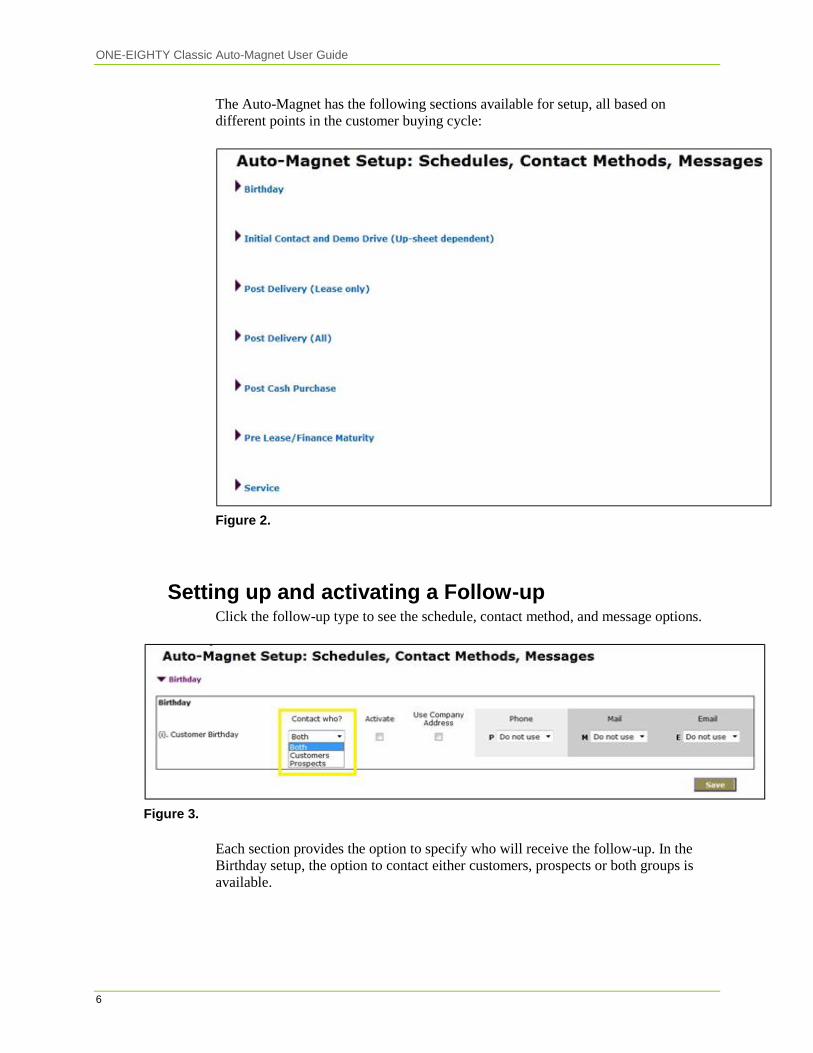
The Auto-Magnet has the following sections available for setup, all based on
different points in the customer buying cycle:
Figure 2.
Setting up and activating a Follow-up Click the follow-up type to see the schedule, contact method, and message options.
Figure 3.
Each section provides the option to specify who will receive the follow-up. In the
Birthday setup, the option to contact either customers, prospects or both groups is
available.

Auto-Magnet Setups
7
Figure 4.
You can run an Email, Phone, and/or Mail campaign for each follow-up (as was
explained at the beginning of the guide). Use the dropdowns to select your contact
methods.
If for example, you choose Email as first, Mail as second and Phone as third, the
Auto-Magnet will send as many emails as it can before defaulting to Mail and then
finally Phone. If you prefer to only try one or two methods, select “Do Not Use”.
When selecting Email as a method of contact, the option to “Limit to Express
Consent” appears. This component is available to ensure users have the ability to
comply with the Canada’s Anti-Spam Legislation for electronic communication
(emails). If you choose to limit the campaign to only those that have “Expressed
Consent” (leave the box checked, which is the default when turning on Email), the
Auto-Magnet will only email clients who have been surveyed for their consent and
have opted in, therefore removing the rest who have said no (opted out) or who have
not been surveyed at all (this is an opt-in campaign). If you choose to bypass the
Express Consent filter (uncheck the box), clients who have not been surveyed for
privacy will remain in the campaign. Whether the box is checked or not, all clients
that are unsubscribed from Email will NOT receive the follow-up. It is up to the user
which option they’d like to use, and should be determined based on if the particular
follow-up is within CASL’s Implied Consent timeframes.
For more information about Canada’s Anti-Spam legislation, please visit
http://fightspam.gc.ca/eic/site/030.nsf/eng/home.

ONE-EIGHTY Classic Auto-Magnet User Guide
8
Accessing Phone, Mail, and Email Templates To access and fill in templates for each contact method, you need to click on the
icons highlighted below. We will walk through each template in more detail below.
Figure 5.
Once contact methods have been set and templates have been filled out, the final step
is to “activate” a follow-up.
Figure 6.
Once activated, the Auto-Magnet will run this follow-up every day moving forward.

Auto-Magnet Setups
9
Opening Contact Templates By clicking the small P, M, and E icons, the following templates will open:
Figure 7.
Phone
First select who should receive the follow-up. Next, write the follow-up note to your
associate as you would like it to show up in their “ONE-EIGHTY To-Do” list.
The Mail template functions and looks the same as the Email template and won’t be
outlined in this document. Refer to the Email section below as a guide to using the
Mail template.
ONE-EIGHTY Classic Auto-Magnet User Guide
10
1. First, you can save a template for a particular language or gender (see the various
highlighted items in the screenshots below).
2. Second, you must decide who you want the email to look like it is coming from.
“Email Address in Dealer Info” is the general dealership email address. “Sales
Rep attached to Customer” will send each email to look like each client’s sales
rep emailed them personally. “Custom” is used if you want to make it look like
the email is coming from a specific person or department in the dealership.
3. Third, give your email a subject line (note that this is not internal and the client
will see this).
4. Finally, write your email content in the white box.
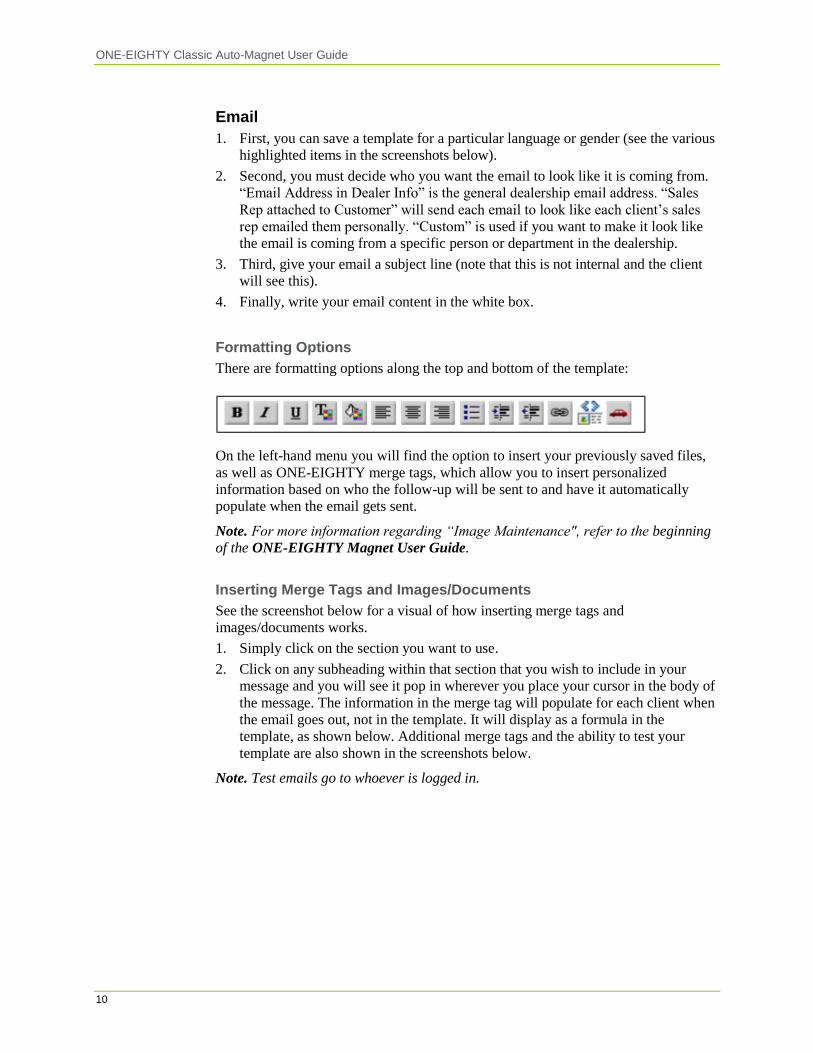
Formatting Options
There are formatting options along the top and bottom of the template:
On the left-hand menu you will find the option to insert your previously saved files,
as well as ONE-EIGHTY merge tags, which allow you to insert personalized
information based on who the follow-up will be sent to and have it automatically
populate when the email gets sent.
Note. For more information regarding “Image Maintenance", refer to the beginning
of the ONE-EIGHTY Magnet User Guide.
Inserting Merge Tags and Images/Documents
See the screenshot below for a visual of how inserting merge tags and
images/documents works.
1. Simply click on the section you want to use.
2. Click on any subheading within that section that you wish to include in your
message and you will see it pop in wherever you place your cursor in the body of
the message. The information in the merge tag will populate for each client when
the email goes out, not in the template. It will display as a formula in the
template, as shown below. Additional merge tags and the ability to test your
template are also shown in the screenshots below.
Note. Test emails go to whoever is logged in.

Auto-Magnet Setups
11
Figure 8.

ONE-EIGHTY Classic Auto-Magnet User Guide
12
Overview of Various Sections Available for Setup
Initial Contact and Demo Drive
This section is used for following up with new prospects and customers that are
starting a new buying cycle. The follow-up can be set up based on the number of
days that have passed AFTER a demo drive, how many days after a new prospect
was entered or a customer returned, and even how many weeks after a new prospect
was entered or customer returned. The follow-ups can then be customized based on
the lead type of a new prospect.
Figure 9.

Auto-Magnet Setups
13
Post Delivery (Lease only) & Post Delivery (All)
This is used for contacting clients after they have been marked sold and delivered.
– The Post Delivery (Lease only) section is used for setting up follow-up
within the weeks or months after a delivery date for customers that have
leased their vehicle. The follow-up can also be customized based on clients
that own or do not own that particular vehicle at the time of follow-up after
delivery.
– The Post Delivery (All) section does not distinguish based on what type of
deal was delivered (sends follow-up for lease, finance and cash customers).
Follow-up can be set up from within the few days after the expected delivery
date all the way to a repeating yearly anniversary follow-up that goes out
year to year for a specified number of years. Again, the follow-up can be
customized based on clients that own or do not own that particular vehicle at
time of follow-up after delivery.
Figure 10.

ONE-EIGHTY Classic Auto-Magnet User Guide
14
Post Cash Purchase
This section is used as additional delivery follow-up for customers that have a cash
deal. This follow-up is not initial delivery follow-up, but rather follow-up that starts
one (1) year after delivery and beyond to check in with these clients and to get them
to come back into the dealership. Similar to the Post Delivery sections, the follow-up
can again be customized based on clients that own or do not own that particular
vehicle at time of follow-up after delivery.
Figure 11.
Pre Lease/Finance Maturity
This section allows for 2 kinds of follow-up:
– Pre-Maturity Solicitation follow-ups (between 36 months and 1 month before
the system-determined maturity date of the lease or finance deal) and
– Lease Maturity Notification follow-ups (between 1year and 1week before the
system-determined maturity date of the LEASE deal).
Figure 12.

Auto-Magnet Setups
15
Like the Post Delivery sections, the follow-up can again be customized based on
clients that own or do not own that particular vehicle at time of follow-up:
Figure 13.
Follow-up can also be customized based on if it’s a lease or finance deal:
Figure 14.
Additionally, follow-up can be broken down by deals with New/Demo or Used
vehicles:
Figure 15.

ONE-EIGHTY Classic Auto-Magnet User Guide
16
Service
The Service section allows for 3 types of follow-up:
– 2 service appointment reminders within the 2 weeks before an appointment
(can be set up for everyone with a service appointment coming up or just for
those clients with the Service Only status – with no sales rep attached)
– 2 service follow-ups within the week after an appointment
– 2 service appointment invitations within 18 months of a client’s last service
appointment and clients that took delivery of a vehicle and have not
scheduled a service appointment yet. See breakdown below.
Figure 16.
Auto-Magnet Reporting
17
Auto-Magnet Reporting Once any follow-up item in the Auto Magnet is activated to run (“Activate”
checkbox is checked), the Auto Magnet will start generating a daily PDF report on
what activities it is completing, as well as what it could not complete and the reason
for the failure to contact. A ONE-EIGHTY user from the dealership must be
designated as the Auto-Magnet Rep to receive this PDF report in their “To Do List”
after the Auto-Magnet runs each day.
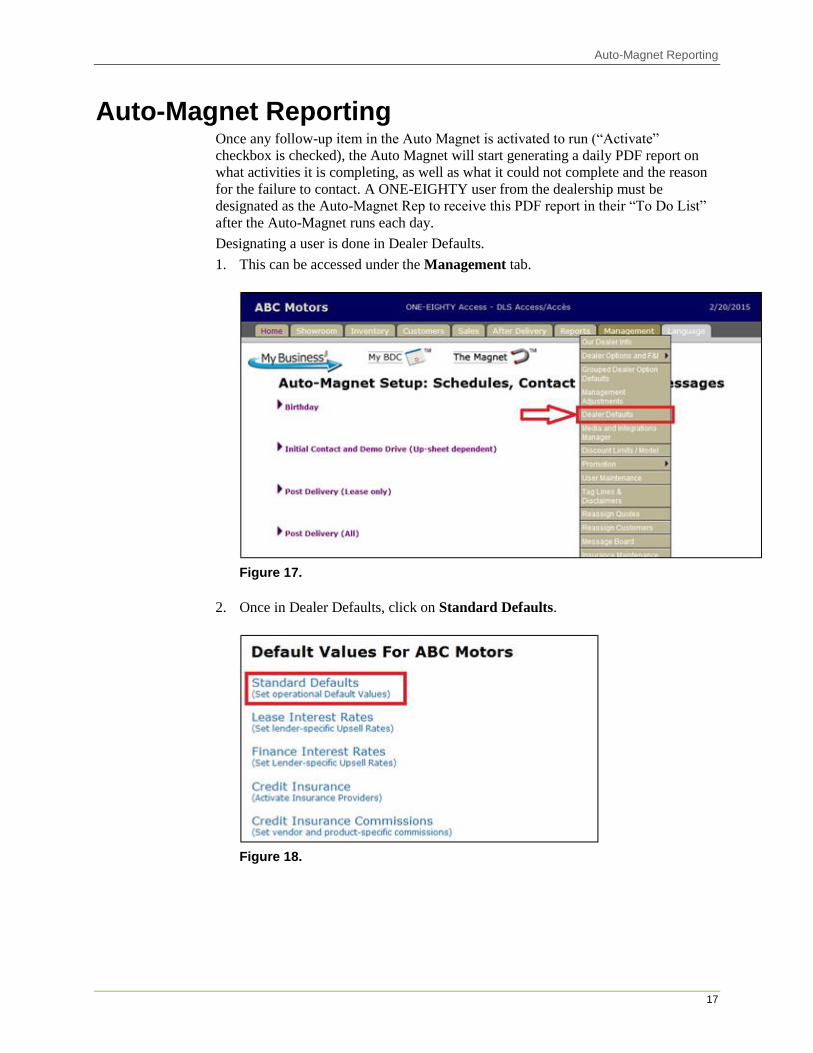
Designating a user is done in Dealer Defaults.
1. This can be accessed under the Management tab.
Figure 17.
2. Once in Dealer Defaults, click on Standard Defaults.
Figure 18.

ONE-EIGHTY Classic Auto-Magnet User Guide
18
3. About three quarters of the way down the page, the “Mail Rep for Auto-Magnet”
drop-down can be found. Select the name of the person who will receive the
daily PDF report.
Figure 19.
If You Need Help If you have any additional questions about utilizing your Auto-Magnet, please
contact the ONE-EIGHTY support team at 866-803-2003 or at
[email protected]. To schedule a training session, please contact