one day instructor training workshop - virgin active · for boxers and for pad holders to ensure...
TRANSCRIPT

1
Punch Instructors Course Handout
One Day Instructor Training Workshop

2
Today’s journey
10:00 – Welcome and introductions
10:15 – Master Class
11:15 – Break
11:30 – Technique Overview Part one
• General Boxing Safety
• Straights
• Hooks
• Uppercuts
• Defence
12:30 – Lunch
13:15 – Technique overview Part Two
• Recap earlier strikes
14:00 – Class structure overview
14:15 – Punch conditioning
14:45 – Boxing combinations
15:15 – Coaching workshop
15:45 – Break and Preparation time
16:00 – Teaching assessments
16:45 – Feedback and wrap-up
17:00 - Close

3
What is Punch?
Punch is a fitness based boxing workout that incorporates the best boxing moves, great
conditioning moves and motivational music to create a powerful workout than churns
through calories and leaves you fighting fit!
Each of the 3 minute rounds focuses on a different strike, making the workout progressive
and gradually more intense. It is an interval training workout mean that participants will get
fitter faster and continue to burn calories for some hours after the workout.
Aims and Objectives
Regardless of teaching experience or boxing ability prior to the course, this course will give
you the skills required to teach successful classes.
By the end of this one day course you will be able to correctly demonstrate all of the strikes
used in Punch. You will be able to successfully coach these moves to your class participants.
You will also be able to effectively plan and teach conditioning rounds within the class. You
will demonstrate these new skills during the assessment process at the end of the day and
will be measured against the Virgin Active Punch Standard.
Pass or Fail?
At the end of the day you will either be passed to teach, or a recommendation will be made
for you to return and repeat the module at a later date, or to work closely with your GEM
(provided they have passed the module) until they feel you are ready to teach on your own.
Before we start….
What would you like to achieve from today’s training?
How do you want to use your new skills when you return to your club?

4
Punch! Boxing technique overview
It is vital that when taking part in a Punch class, technique is the primary focus for your
participants. Below we will cover all of the strikes used in Punch, including coaching points
for boxers and for pad holders to ensure everyone has a safe, effective fitness boxing
workout!
General Boxing Safety
As Punch is a fitness boxing workout, there is a tendency to forget about safety, however,
this should always be of prime consideration as the potential for injury is great. The most
common injuries in fitness boxing occur to the hands, wrists, elbows and shoulders. We can
help to avoid these injuries by taking some simple steps:
Make a fist by wrapping the thumb around the index
finger and closing the hand tightly, do not let the
thumb stick out or tuck it under your fingers or you
could end up with a nasty thumb break/dislocation.
Always ensure that you punch with the index
knuckle (1st
) and middle (2nd
) knuckle, you must not
strike with the 4th
knuckle (pinkie knuckle) as this is
the weakest part of the hand and could result in a
broken knuckle.
Try to keep the wrist strong at the point of impact as
flexing the wrist could result in wrist injury and
ensure that you don’t over-extend the elbow or
shoulder joint as this could potentially damage ligaments and tendons. The use of hand
wraps under the boxing gloves will help to protect the bones in the hands and wrists.
(Provided they are wrapped properly!)
Remember that it will take time for all of the nerves, muscles and tendons in the hands and
wrists to adapt to striking an object so coach beginners to concentrate on technique first
and build up punch power and speed over a number of weeks.

5
Pad Holder Safety
There are also some safety points to be remembered when holding the focus pads,
remember that it is just as easy to be injured holding the pads as it is to be injured whilst
hitting them. Take the following steps to ensure safety of class participants:
Locking of elbows could potentially jar elbow or shoulder joint if you receive a heavy strike,
so prevent this by always keeping a slight bend in the arm and tension in the upper
back/shoulders at the point of impact to ‘brace’, this will take the ‘edge’ off of the strike –
DO NOT push the pad into ANY strike, this will compromise the boxers technique and
potentially damage their shoulder/elbow joints. On the flip side of this, failing to tense at
the point of impact could also result in the boxer over extending and potentially injuring
their elbow or shoulders, this will also place a great deal of strain on the ligaments and
tendons in the pad holder’s shoulders.
Straights (Jabs & Crosses) Hooks Uppercuts
• Avoid leaning away from the boxer as this could result in causing an injury to the
boxer from hyperextension of the elbow, and knock you off balance.
• Do not hold the pads directly in front of your face! During contact with the pads you
may end of with a nasty surprise!
(Leaning away) (Hands too close to your face)
Coach your participants to keep the focus pads at a reasonable distance from the face/body
to avoid getting hit, whilst ensuring that they are giving the boxer a realistic target to strike.

6
Striking
Although Punch is a fitness boxing class and not technical pad work, we ARE still hitting
pads, so when throwing punches coach your participants to think about hitting into and
through the pads with purpose, rather than stopping at the surface of the pad and landing
the strike with no real power.
Straight Punches
Straight punches are exactly that. They travel straight from your guard, to the target, in the
most direct route possible. These punches can be categorised into the jab and the cross:
Jab:
• Your jab comes from your lead (front) hand and is normally
the weaker of your two arms/punches.
• It travels in a straight line from your guard, to the target
(focus pad), and back along the same line to your guard position.
• On its way you will need to rotate your fist (thumb turns
inwards) to generate that snap in your punches. This will ensure it
is a punch and NOT just a push.
• When throwing your jab, keep your elbow in and rotate
your torso and lead shoulder towards your target to generate
power, rather than lifting your elbow away from your side and
simply straightening your arm.
Cross:
• Similar to your jab due to the fact it travels in a straight
line.
• Your Cross will be the stronger of your two straight
punches and come from the rear hand.
• As your Hip is loaded before you throw this punch you can
generate a lot more force, speed and power than your jab.
• Same technique as the jab, but focus more on really
rotating your torso and throwing your rear hip towards your target
to get authenticity in this punch.
• Your fist should end up with knuckles flat upon impact,
wrist straight and in-line with your forearm, thumb horizontal to
the ground and palm facing down.
• Return to the guard as quickly as possible.
• Pads for both strikes should be head height, and narrower than shoulder width apart
to give a realistic target. Pads should be facing the boxer and pad holder should have
a slight bend in their elbow to keep full control of pad position, keeping tension in
the muscles of the arms, shoulders and upper back will also help keep full pad
control.

7
Hooks
As a general rule of thumb in Punch, we throw hooks between chest and shoulder height to
ensure realistic targets. Hooks are circular punches that use rotation to generate power and
speed. We use the ‘push’ hook as opposed to the ‘snap’ hook as this is safer for our
participants to throw correctly and reduces the risk of hand/thumb/wrist injuries
• Hooks can be thrown from the front, or the rear arm. The
only difference in technique is that from the rear hand, the torso
and hip must rotate more.
• Start in your boxing guard.
• The strike should be initiated from the floor by lifting the
heel, the hip should then rotate towards the target, the arm and
torso then rotate as one to generate the power in the strike
• Try to land this strike with the thumb on top and pinkie
closest to the floor (push hook) with a 90° elbow bend.
• Return to the guard as fast as possible.
• Pads should be somewhere between chest to shoulder height to mimic realistic
targets.
• Pad holder should keep their elbows in and pads facing each other, tension in the
upper back and lats will help to keep the pads in position as the boxer strikes them.
Uppercuts
Uppercuts can be thrown from many positions and can be landed to many parts of the body
and head. In Punch, we only throw uppercuts from boxing guard and to a target of the
boxers chin height.
• Uppercuts can be thrown from the front, or the rear arm.
The only difference in technique is that from the rear hand, more
hip and shoulder rotation is required.
• From boxing guard, drop the shoulder of the hand you are
about to punch with and bend your knees a little
• Slightly pull your shoulder back to ‘load’ the hip and
generate more power, keep your elbow close to your body
• Strike by firstly pushing your hip and shoulder forward and
straightening your leg (not locking out)
• Keeping your elbow at around 45° and your palm facing
your chest, drive your hand up into the pad
8
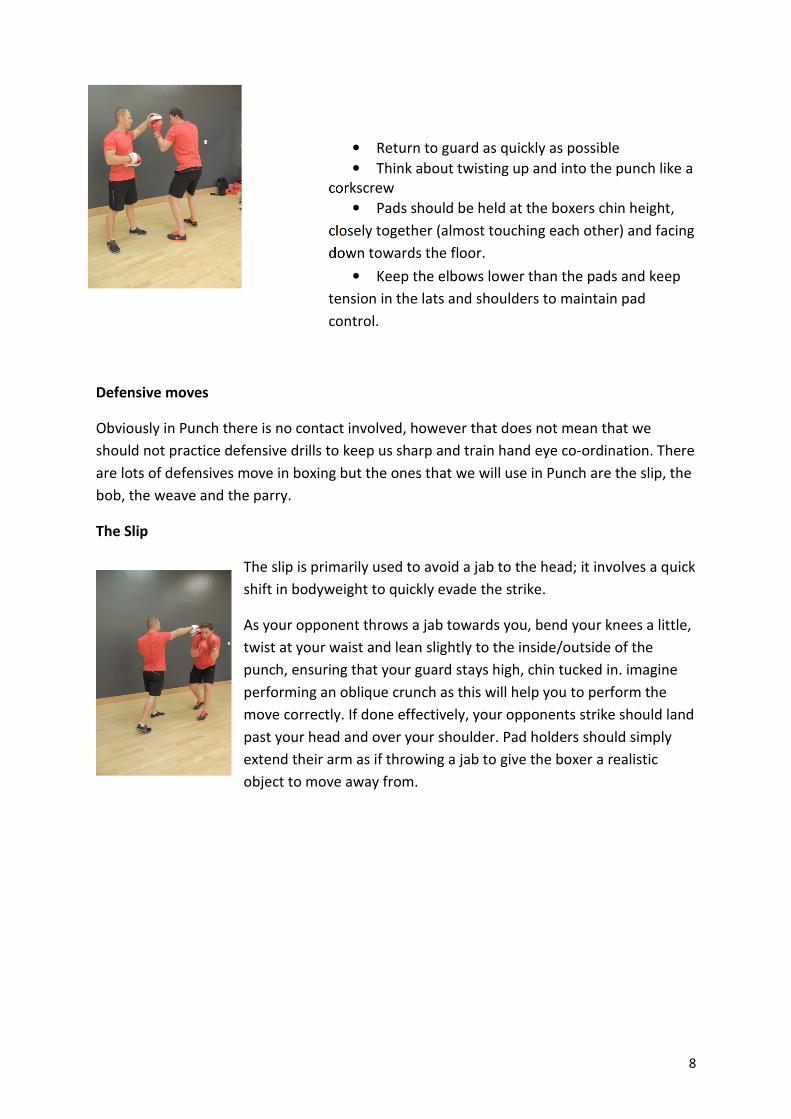
• Return to guard as quickly as possible
• Think about twisting up and into the punch like a
corkscrew
• Pads should be held at the boxers chin height,
closely together (almost touching each other) and facing
down towards the floor.
• Keep the elbows lower than the pads and keep
tension in the lats and shoulders to maintain pad
control.
Defensive moves
Obviously in Punch there is no contact involved, however that does not mean that we
should not practice defensive drills to keep us sharp and train hand eye co-ordination. There
are lots of defensives move in boxing but the ones that we will use in Punch are the slip, the
bob, the weave and the parry.
The Slip
The slip is primarily used to avoid a jab to the head; it involves a quick
shift in bodyweight to quickly evade the strike.
As your opponent throws a jab towards you, bend your knees a little,
twist at your waist and lean slightly to the inside/outside of the
punch, ensuring that your guard stays high, chin tucked in. imagine
performing an oblique crunch as this will help you to perform the
move correctly. If done effectively, your opponents strike should land
past your head and over your shoulder. Pad holders should simply
extend their arm as if throwing a jab to give the boxer a realistic
object to move away from.

9
The Bob
The bob is primarily used to avoid either the jab or the hook; it
involves you quickly dropping under your opponents strike to avoid a
strike to the head.
As your opponent throws their strike, quickly bend your knees; shift
your body weight slightly forward and down to ‘duck’ under the
incoming strike. Imagine performing a squat as this will help you to
perform the move correctly. Ensure that you keep your chin tucked in
and your guard high to protect your head. If done effectively, your
opponents strike should land over the top of your head. Pad holders should simply extend
their arm towards the boxer’s nose as if throwing a jab, or circle the pad towards the
boxer’s ear as if throwing a hook to give them a realistic object to move away from.
The Weave
The weave is primarily used to evade a wide flailing punch such as the
hook, it involves moving the body around and under your opponents
strike, and it is a defensive move but can leave you in a perfect
position to counter punch. It is basically an extension of the bob with
a lateral movement to set up a counter punch opportunity.
As your opponent throws their strike, let’s say the hook for example,
soften your knees a little, lean away from the incoming strike and
‘duck’ under it, coming back up to your guard position on the other
side of their strike, as a result your opponents strike should land way over and outside your
shoulder. Imagine trying to paint an ‘o’ with your nose as you move, this will help to ensure
you are performing the movement correctly. Keep the chin tucked throughout with the
guard up and ensure that you keep your eyes on the incoming strike. If performed correctly,
you should finish in the perfect position to throw a counter punch such as the hook,
straight, body shot, etc. Pad holders should throw a wide, flailing hook towards the ear of
the boxer to give a realistic punch to avoid.
10
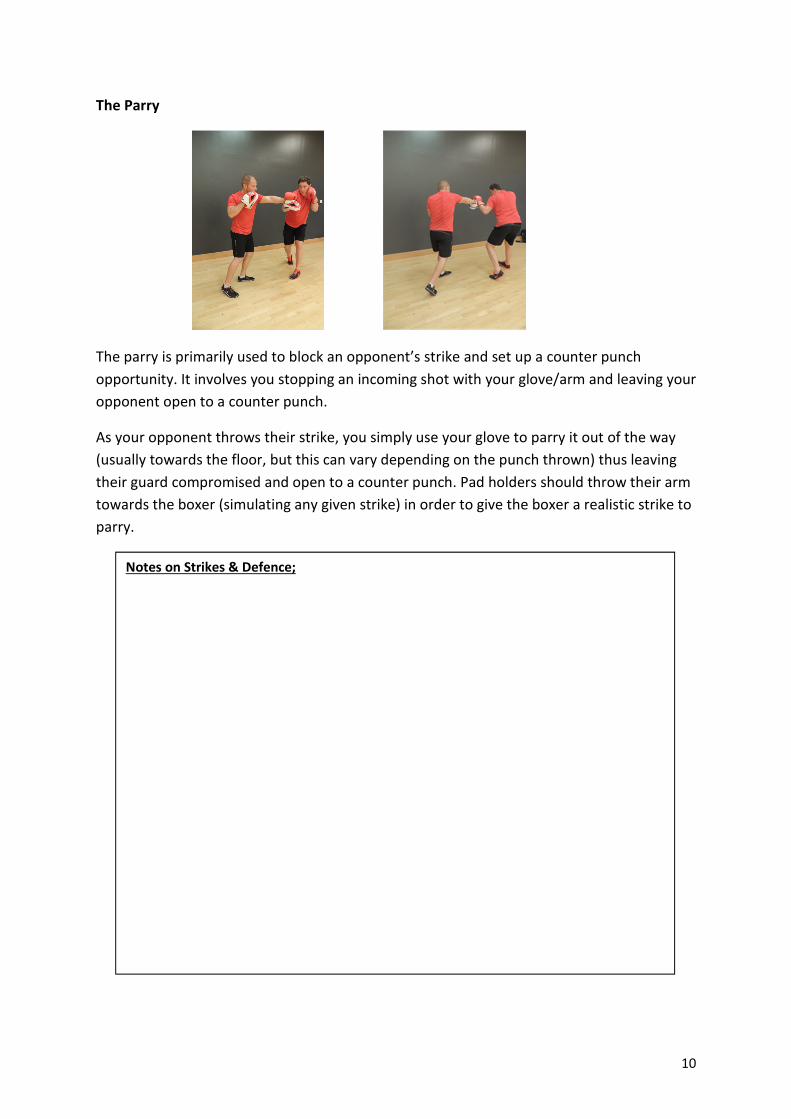
The Parry
The parry is primarily used to block an opponent’s strike and set up a counter punch
opportunity. It involves you stopping an incoming shot with your glove/arm and leaving your
opponent open to a counter punch.
As your opponent throws their strike, you simply use your glove to parry it out of the way
(usually towards the floor, but this can vary depending on the punch thrown) thus leaving
their guard compromised and open to a counter punch. Pad holders should throw their arm
towards the boxer (simulating any given strike) in order to give the boxer a realistic strike to
parry.
Notes on Strikes & Defence;

11
Class Structure
Punch is a boxing workout that uses a variety of strikes and conditioning exercises within
the pre-set class structure given below. When teaching Punch, this format should be used at
all times to ensure consistency in our clubs.
Section of Class Strikes/Exercises used in class section
Round 1 Straights and Hooks - Partner A
Round 2 Straights and Hooks - Partner B
Round 3 Conditioning Round 1
Round 4 Defence + Straights/Hooks - Partner A
Round 5 Defence + Straights/Hooks - Partner B
Round 6 Conditioning Round 2
Round 7 Uppercuts + Defence/Straights/Hooks - Partner A
Round 8 Uppercuts + Defence/Straights/Hooks - Partner B
Round 9 Conditioning Round 3
Round 10 Uppercuts/Defence/Straights/Hooks - Partner A
Round 11 Uppercuts/Defence/Straights/Hooks - Partner B
Round 12 Conditioning Round 4
Must be progressive. Includes mobility, f lexiblity and pulse raising components
and is specif ic to the class format (i.e. Boxing orientated)Warm Up
Include pulse low ering exercise, either maintenance or progressive stretches
of the main muscle groups used in classCool Down
The Strikes in BOLD should be the round ‘highlight’ and the focus should be on coaching
these moves in that particular round. However it is important to include the strikes from the
previous rounds to build more interesting combinations and a progressively harder workout
as the class goes on.

12
Punch Conditioning
So as we know, conditioning is a HUGE part of overall general fitness, but it is even more
critical to be well conditioned in Boxing, therefore, we devote around a ¼ of the class to
conditioning exercises to improve our general fitness levels. The exercises used in the
conditioning rounds should:
• Incorporate upper, lower body and core
• Be challenging enough for experienced class members whilst simple enough for
beginners to perform an option of the exercise
• Be related to martial arts or the muscles/movements used in martial arts in some
way
• Allow your class participants to work in pairs or teams to encourage greater
interaction in class.
• Should promote some healthy competition within your group of participants
• Be FUN!
• Should require minimal equipment so as not to upset the flow of the class
Conditioning Round Structure
The conditioning rounds can be structured in many different ways, you can group many
exercises together throughout the 3 minutes, or you could change the exercise every
minute. The easiest way to structure these rounds is to pick a single exercise for the 1st half
of the round (1 min 30sec) that your participants both perform together, or one at a time
for a prescribed number of repetitions, taking turns. Then choose another exercise for the
last half of the round (1 min 30 sec), again, they can perform this together or one at a time,
depending on the exercise.
Example Exercises
Below are some example exercises that you could use in the conditioning rounds in your
Punch classes, the possibilities are endless, but here are a few classic exercises to get you
started:
• Squats with Dumbbells/medicine ball/weight plate/Barbell
• Push ups
• Plank with rotation
• Mountain Climber
• Russian Twist

13
• WBI (Whole Body Integration) Exercises
• Lunge with rotation (weighted if progressed)
• Burpees
• Tombstones
• Partner games
Use the template below to plot out your 4 conditioning rounds;
Round Exercise Equipment Progressions Regressions
Conditioning
Round 1
Conditioning
Round 2
Conditioning
Round 3
Conditioning
Round 4
Conditioning Round Practice session

14
Combinations
After learning how to perform each strike, your participants are going to want to know how
to put a series of punches together (A combination), there are thousands and thousands of
combinations possible with the main strikes used in Punch, so your participants should
always be trying new ways of putting strikes together. Throwing combinations is what will
add real authenticity to the workout
When advising on what combinations to throw, it is important to remember the following:
We should be able to, theoretically, throw hundreds of punches in succession without losing
balance. The reason being is that every single punch, when thrown properly, should leave
you in a position where you can and will be able to throw another punch. For example,
when you throw a left jab you should automatically be in a position to throw a right cross.
When you finish with the right hand, you should be in a position to throw a left hook, etc. If
you throw a right hand, or any other punch, and you are off balance and NOT in a position
to throw another punch afterwards then you did not throw that punch effectively.
A very simple way to build effective combinations is to always throw left, right, left, right,
left, right, etc.
For Example: Left Jab
Right Cross
Left Hook
Right Uppercut
Left Hook
Right Cross
This is the easiest way to build combinations because after each punch, you are in a loaded
position for the next punch, making the combination flow and making it easier to generate
more power and speed.

15
Example 1 Example 2 Example 3 Example 4 Example 5
Combination Builder
Fill in the worksheet above with examples of 5 different combinations. Try and build at
least one, 10 punch combination, keeping in mind the principles from the previous page.
*Remember you have 20 seconds to demonstrate and coach you combination to the class

16
Coaching
Being able to effectively coach the strikes used in Punch will be the reason that your classes
are packed week after week.
The ability to verbally and visually coach each strike is vitally important to you the success of
your class. You only have a short amount of time to set-up and give 5 -10 initial cues for
each strike, so it is vital that you say the right things, in the right way and give clear visual
demonstrations.
Coaching session
Name of strike:
For example, to set-up the Uppercuts round, you might want to say something along the
lines of the following, giving an appropriate demonstration simultaneously:
• Uppercuts are a vertical punch
• When throwing this punch, keep a 45degree bend in your elbow and your palm
facing your chest
• Drop your shoulder to load the punch and draw the punching shoulder back slightly
• Bend your knees a little
• As you stand up, throw your hip and shoulder forward and keep the elbow at 45
degrees

17
• Strike through the pad with a strong wrist in a vertical direction
• Pad holders should keep pads at your boxers chin height, elbows in and pads facing
down with a slight angle.
• Tense lats, upper back and arms to absorb impact of punch
Music
Virgin Active will provide the music that you must use in your Punch classes. It has been
produced solely for use within Virgin Active Health Clubs and with the Punch programme.
This is available from Fitmixpro in download format, which will need to be burnt onto a CD.
There are regular music updates available for Punch, helping to keep your classes fresh and
help continually motivate your members. On returning to your club, speak to your Group
Exercise Manager who will be able to provide you with a code to download the latest mix.
What Now?
Ensure that you spend time preparing the conditioning rounds for your class in order to
always make it fresh, exciting and varied for your class participants. Ensure that you spend
time where possible, before and after class developing relationships with your participants,
focusing on getting to know the less familiar members of your class.
Ask for feedback from your peers and class participants to ensure that you are consistently
creating a fun, motivating experience.
Finally, enjoy teaching Punch, being an ambassador for the programme and selling the
benefits of Punch classes to your members.