on-premises im using cisco jabber · cisco jabber for iphone also provides voice-over-ip (voip)...
TRANSCRIPT
On-Premises IM Using Cisco JabberTeChnOlOgy desIgn gUIde
August 2013

Table of Contents
Table of Contents
Preface ........................................................................................................................................1
CVD Navigator .............................................................................................................................2Use Cases .................................................................................................................................. 2scope ......................................................................................................................................... 2Proficiency .................................................................................................................................. 2
Introduction .................................................................................................................................3Technology Use Case ................................................................................................................. 3
Use Case: On-Premises IM and Presence with Jabber .......................................................... 3design Overview ......................................................................................................................... 4
Deployment Details ......................................................................................................................7Preparing the Platform for Cisco Unified CM IM and Presence .............................................. 7Installing Cisco Unified CM IM and Presence ........................................................................11Configuring services for Cisco Jabber IM and Cisco UC ..................................................... 20Configuring Cisco Jabber for Windows ................................................................................ 30Configuring Cisco Jabber for iPad ........................................................................................ 38Configuring Cisco Jabber for iPhone .................................................................................... 48
Appendix A: Product List ...........................................................................................................59

Preface August 20131
PrefaceCisco Validated designs (CVds) provide the framework for systems design based on common use cases or current engineering system priorities. They incorporate a broad set of technologies, features, and applications to address customer needs. Cisco engineers have comprehensively tested and documented each CVd in order to ensure faster, more reliable, and fully predictable deployment.
CVds include two guide types that provide tested and validated design and deployment details:
• Technology design guides provide deployment details, information about validated products andsoftware, and best practices for specific types of technology.
• Solution design guides integrate or reference existing CVds, but also include product features andfunctionality across Cisco products and may include information about third-party integration.
Both CVd types provide a tested starting point for Cisco partners or customers to begin designing and deploying systems using their own setup and configuration.
How to Read CommandsMany CVd guides tell you how to use a command-line interface (ClI) to configure network devices. This section describes the conventions used to specify commands that you must enter.
Commands to enter at a ClI appear as follows:
configure terminal
Commands that specify a value for a variable appear as follows:
ntp server 10.10.48.17
Commands with variables that you must define appear as follows:
class-map [highest class name]
Commands at a ClI or script prompt appear as follows:
Router# enable
long commands that line wrap are underlined. enter them as one command:
police rate 10000 pps burst 10000 packets conform-action set-discard-class-transmit 48 exceed-action transmit
noteworthy parts of system output or device configuration files appear highlighted, as follows:
interface Vlan64
ip address 10.5.204.5 255.255.255.0
Comments and QuestionsIf you would like to comment on a guide or ask questions, please use the feedback form.
For the most recent CVd guides, see the following site:
http://www.cisco.com/go/cvd

CVd navigator August 20132
CVd navigatorThe CVd navigator helps you determine the applicability of this guide by summarizing its key elements: the use cases, the scope or breadth of the technology covered, the proficiency or experience recommended, and CVds related to this guide. This section is a quick reference only. For more details, see the Introduction.
Use CasesThis guide addresses the following technology use cases:
• On-Premises IM and Presence with Jabber—Organizations are challenged by the difficulty of getting their employees to connect with the right people at the right time, and the new workforce prefers immediate communication, which is easier than email and voicemail but less intrusive than a phone call or web-based meeting.
For more information, see the “Use Cases” section in this guide.
ScopeThis guide covers the following areas of technology and products:
• Unified communications applications, such as IP telephony, voicemail, instant messaging (IM), and presence
• Telephony call agent
• Voicemail server
• IM and presence server
• Virtualized servers
• Windows, iPad, and iPhone software clients
• lightweight directory Access Protocol integration
• Integration of the above with lAn and data-center switching infrastructure
For more information, see the “design Overview” section in this guide.
ProficiencyThis guide is for people with the following technical proficiencies—or equivalent experience:
• CCNP Voice—3 to 5 years designing, installing, and troubleshooting voice and unified communications applications, devices, and networks
• VCP VMware—At least 6 months installing, deploying, scaling, and managing VMware vsphere environments
Related CVD Guides
Telephony Using Cisco UCMTechnology Design GuideVALIDATED
DESIGN
To view the related CVd guides, click the titles or visit the following site:
http://www.cisco.com/go/cvd
Introduction August 20133
IntroductionThe ability to collaborate efficiently and effectively in a fast-growing enterprise is challenging for many organizations because they want their employees to work anywhere, anytime, and from any device. They want to lower their IT support requirements, but not stifle the ability of their employees to remain mobile. They also want to establish a common platform for communication inside and outside their organization, irrespective of geography or distance.
Technology Use CaseOrganizations are challenged by the difficulty of getting their employees to connect with the right people at the right time and the significantly increasing modes of communications. Most knowledge workers use several devices on a day-to-day basis to communicate, including traditional desk phones, smart phones, tablets, laptops, and desktop computers. The modes to communicate are time-consuming to learn because each device is different from the rest. This always-on and always-connected mentality is permeated by the youngest members of the workforce who have grown accustomed to using technology to give them more flexibility in how and where they work. The new workforce prefers immediate communication, which is easier than email and voicemail but less intrusive than a phone call or web-based meeting.
Use Case: On-Premises IM and Presence with JabberOrganizations need an application for laptops, desktops, Macs, tablets, and smartphones that allows them to be more productive, from anywhere, on any device. They want to find the right people, see if and how they are available, and collaborate using their preferred method of communication. They need an on-premises solution that is fast to deploy and easy to manage from a central location, without replicating costly features at their remote sites.
This design guide enables the following capabilities:
• Use a centralized design—each remote site connects to the headquarters site through a WAn and they receive IM and presence features from the headquarters location. This makes the on-premises solution simpler to deploy and easier to manage from a centralized site, while saving on infrastructure components.
• Reduce communication delays with presence and contact information—The Cisco Jabber application enables you to see the availability of co-workers and colleagues within and outside your organization. This capability helps reduce communication delays, which results in faster decision making and enhanced productivity.
• Quickly communicate with instant messaging—The Cisco Jabber application delivers instant messaging capabilities that are integrated with other communication capabilities, so you can simply move between chats, audio conversations, and web conferences.
• Bring IP telephony and video to the desktop—Cisco Jabber for Windows delivers voice and video to your desktop as a soft phone with wideband and high-fidelity audio, standards-based high-definition video (720p), and desk-phone control features. These features mean that high-quality and high-availability voice and video telephony is available at all locations.
• Accelerate team performance with multiparty conferencing and collaboration—The Cisco Jabber application provides for smooth escalation to desktop sharing or Cisco Webex Conferencing.
• Collaborate from common business applications—you can access the capabilities of the Cisco Jabber application from common desktop applications such as Microsoft Outlook, including lighting presence bubbles and click-to-communicate.
Introduction August 20134
Design OverviewCisco Jabber for Windows streamlines communications and enhances productivity by unifying presence, instant messaging, video, voice, voice messaging, desktop sharing, and conferencing capabilities securely into one desktop client. It offers flexible deployment models and integrates with commonly used applications. Cisco Jabber for Windows can also be deployed in virtual environments. In a virtual environment, it supports presence, instant messaging, and desk-phone control.
Cisco Jabber for iPad provides instant messaging, video and voice calling, corporate directory search, availability, and voicemail. Cisco Jabber for iPad uses video rate adaptation in order to negotiate optimal video quality based on your network conditions. Video rate adaptation dynamically scales video quality when video transmission begins, based on the available bandwidth.
Cisco Jabber IM for iPhone lets you reduce communication delays by knowing a person’s availability with rich presence status. you can use the application to connect quickly over IM and, if necessary, escalate to a phone call, send an email or text message, start an instant web conference, or use short Message service (sMs). Cisco Jabber for iPhone also provides voice-over-IP (VoIP) capabilities.
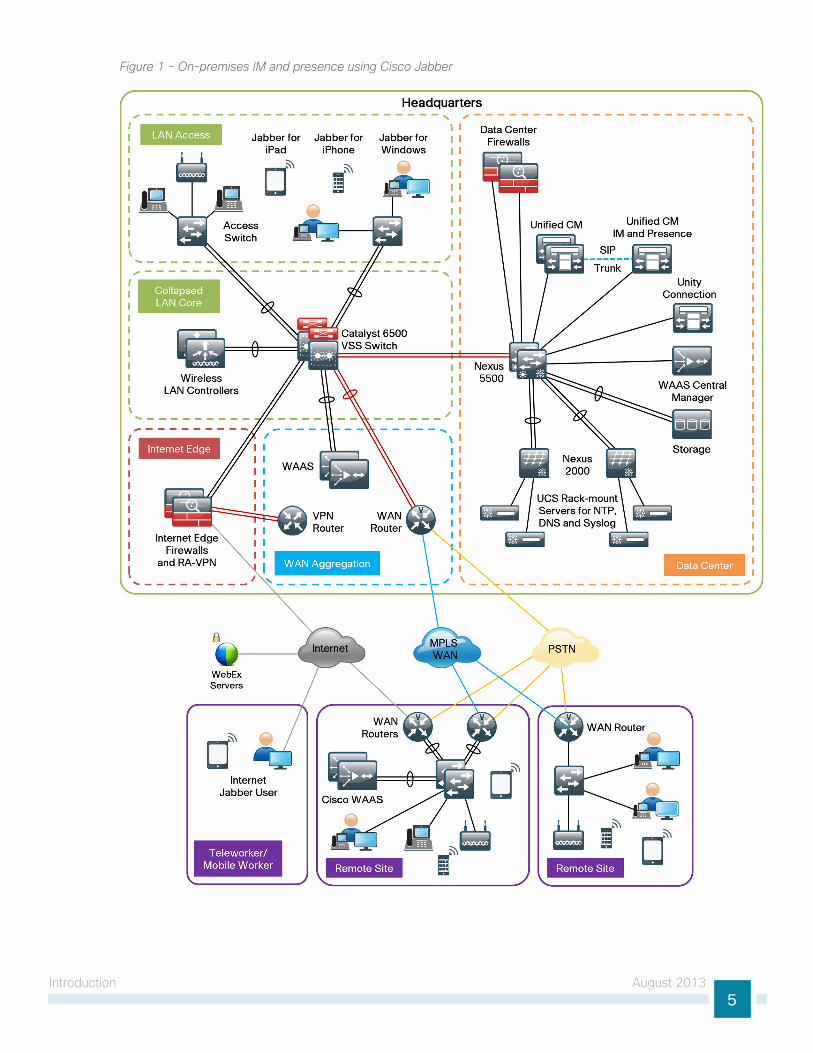
Cisco Jabber can be deployed on-premises or by using a cloud-based service, offering IT departments the flexibility to choose the model that best suits their business.
The on-premises Jabber solution includes the following components (shown in Figure 1):
• Unified CM IM and Presence for instant messaging and presence
• Unified CM for audio and video call management, user and device configuration, and Jabber software phone and directory synchronization
• Unity Connection for voice mail
• Jabber for Windows, Jabber for iPad, and Jabber for iPhone
• Ms Active directory for client user information
• Webex Meeting Center for hosted meetings
• network Time Protocol (nTP) server for logging consistency
• domain name system (dns) server for name-to-IP resolution
• syslog server for logging events (optional)
Introduction August 20135
Figure 1 - On-premises IM and presence using Cisco Jabber

Introduction August 20136
This guide includes the following Cisco Jabber features:
• Communication integration—Use a single, intuitive interface for instant messaging with individuals and groups, IP telephony, visual voicemail, voice and web conferencing, desktop sharing, communication history, and integrated directories.
• Presence—View real-time availability of co-workers and colleagues within and outside the enterprise network.
• Enterprise instant messaging—Chat in real time by using instant messaging. several chat modes are supported, ranging from:
◦ Point-to-point chat with co-workers inside your network, or supported federated business and personal contacts
◦ group chat, which enables multiple colleagues to communicate and collaborate in a single discussion
◦ Personal instant messaging history for your reference
• Predictive search—Provides suggestions to you as you type in a search query and is capable of indexing your Cisco Jabber contact list, recent contacts, Microsoft Active directory, or ldAP directory.
• Media escalation—escalate from a chat to an audio call, video call, desktop share, or web meeting. Media escalations are as easy as clicking a button.
• Desktop share—share what is on your desktop with Cisco Jabber users, as well as Cisco and other standards-based video endpoints.
• Integrated voice and video telephony—A coordinated video display on the screen and voice conversation with a dedicated soft phone.
◦ Make, receive, and control your phone calls whether you are in or out of the office.
◦ Business-quality video communication up to high-definition (720p) and high-fidelity wideband audio is supported.
◦ you can use voice, video, and even desktop share when interacting with telepresence endpoints and room-based and multipoint videoconferencing systems.
◦ Many call-control options are available, including mute, call transfer, call forwarding, and ad-hoc conferencing.
◦ The reliability and failover features of Cisco Unified Communications Manager are supported.
• Visual voice message access—Access and manage your voice messages.
◦ View, play back, and delete voice messages from Cisco Unity Connection.
◦ secure messaging is provided, with support for private and encrypted voice messages.

deployment details August 20137
deployment detailsThe procedures for configuring a basic Cisco Unified Communications Manager (Unified CM) cluster with ldAP and Cisco Unity Connection are documented in the Telephony Using Cisco UCM design guide, so the concepts are not covered again in this guide.
This guide covers the details for installing Cisco Jabber for Windows, Cisco Jabber for iPad, and Cisco Jabber for iPhone. The first three processes have to be completed by all users of this guide. however, the remaining processes can be done together or on an individual basis, depending on the type of Cisco Jabber clients you are planning to deploy.
Preparing the Platform for Cisco Unified CM IM and Presence
1. Configure platform connectivity to the lAn
2. Prepare the server for IM and PresencePR
OC
ESS
The on-premises design requires a server running the Cisco Unified Communications Manager Instant Messaging and Presence service. It runs on the same linux operating systems as several other unified communications platforms from Cisco. you install the operating system with the application by using the standard installation dVd or IsO file.
For a quick and easy installation experience, it is essential to know up-front what information you will need. For Cisco Unified CM Instant Messaging and Presence, make sure you have completed the following steps before you start:
• download the Open Virtualization Archive (OVA) file from the Cisco website at: http://www.cisco.com/cisco/software/release.html?mdfid=284330176&flowid=33722&softwareid=283757588&release=9.0&relind=AVAIlABle&rellifecycle=&reltype=latest
• Check the Cisco website to determine if there is a patch for your version of Cisco Unified CM IM and Presence: http://software.cisco.com/download/release.html?mdfid=284510549&flowid=37582&softwareid=282074312&release=9.1(1)&relind=AVAIlABle&rellifecycle=&reltype=latest

deployment details August 20138
Procedure 1 Configure platform connectivity to the LAN
The Cisco Unified CM IM and Presence server can be connected to a Cisco nexus switch in the data center or a Cisco Catalyst switch in the server room. In both cases, quality of service (Qos) policies are added to the ports in order to maintain voice and data quality. Please choose the option that is appropriate for your environment.
Option 1: Connect the Cisco Unified CM IM and Presence server to a Cisco Nexus 2248UP switch
Step 1: login to the Cisco nexus switch with a username that has the ability to make configuration changes.
Step 2: If there is a previous configuration on the switch port where the Cisco Unified CM IM and Presence server is connected, remove the individual commands by issuing a no in front of each one. This brings the port back to its default state.
Step 3: Configure the port as an access port and apply the Qos policy.
interface Ethernet107/1/14 description Unified CM IM and Presence
switchport access vlan 148 spanning-tree port type edge
service-policy type qos input DC-FCOE+1P4Q_INTERFACE-DSCP-QOS
When deploying a dual-homed Cisco nexus 2248 switch, you must apply this configuration to both nexus 5548 switches.
Tech Tip
Option 2: Connect the Cisco Unified CM IM and Presence server to a Cisco Catalyst 3750-X Series switchTo ensure that signaling traffic is prioritized appropriately, you must configure the Cisco Catalyst access switch port where the Cisco Unified CM IM and Presence server is connected to trust the differentiated services code point (dsCP) markings. The easiest way to do this is to clear the interface of any previous configuration and then, apply the egress Qos macro that was defined in the access-switch platform configuration of the Campus Wired lAn design guide.
Step 1: login to the Cisco Catalyst switch with a username that has the ability to make configuration changes.
Step 2: Clear the interface’s configuration on the switch port where the Cisco Unified CM IM and Presence server is connected.
default interface GigabitEthernet1/0/16
Step 3: Configure the port as an access port and apply the egress Qos policy.
interface GigabitEthernet1/0/16 description Unified CM IM and Presence
switchport access vlan 148 switchport host
macro apply EgressQoS
deployment details August 20139
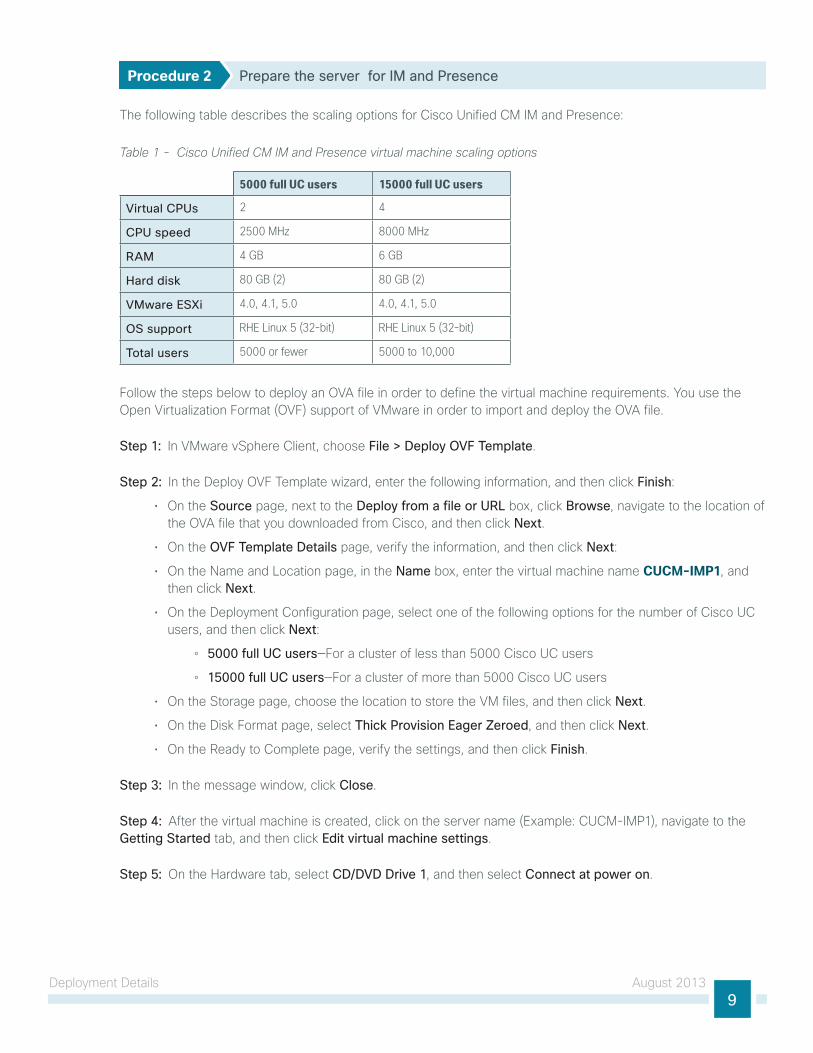
Procedure 2 Prepare the server for IM and Presence
The following table describes the scaling options for Cisco Unified CM IM and Presence:
Table 1 - Cisco Unified CM IM and Presence virtual machine scaling options
5000 full UC users 15000 full UC users
Virtual CPUs 2 4
CPU speed 2500 MHz 8000 MHz
RAM 4 GB 6 GB
Hard disk 80 GB (2) 80 GB (2)
VMware ESXi 4.0, 4.1, 5.0 4.0, 4.1, 5.0
OS support RHE Linux 5 (32-bit) RHE Linux 5 (32-bit)
Total users 5000 or fewer 5000 to 10,000
Follow the steps below to deploy an OVA file in order to define the virtual machine requirements. you use the Open Virtualization Format (OVF) support of VMware in order to import and deploy the OVA file.
Step 1: In VMware vsphere Client, choose File > Deploy OVF Template.
Step 2: In the deploy OVF Template wizard, enter the following information, and then click Finish:
• On the Source page, next to the Deploy from a file or URL box, click Browse, navigate to the location of the OVA file that you downloaded from Cisco, and then click Next.
• On the OVF Template Details page, verify the information, and then click Next:
• On the name and location page, in the Name box, enter the virtual machine name CUCM-IMP1, and then click Next.
• On the deployment Configuration page, select one of the following options for the number of Cisco UC users, and then click Next:
◦ 5000 full UC users—For a cluster of less than 5000 Cisco UC users
◦ 15000 full UC users—For a cluster of more than 5000 Cisco UC users
• On the storage page, choose the location to store the VM files, and then click Next.
• On the disk Format page, select Thick Provision Eager Zeroed, and then click Next.
• On the Ready to Complete page, verify the settings, and then click Finish.
Step 3: In the message window, click Close.
Step 4: After the virtual machine is created, click on the server name (example: CUCM-IMP1), navigate to the Getting Started tab, and then click Edit virtual machine settings.
Step 5: On the hardware tab, select CD/DVD Drive 1, and then select Connect at power on.

deployment details August 201310
Step 6: select Datastore ISO File, click Browse, and then navigate to the location of the Cisco Unified CM IM and Presence bootable installation file. After selecting the correct IsO image, click OK.
Step 7: On the getting started tab, click Power on the virtual machine.
Step 8: Click the Console tab, and then watch the server boot.
The virtual machine is prepared for installation.

deployment details August 201311
Installing Cisco Unified CM IM and Presence
1. Install Cisco Unified CM IM and Presence
2. Configure Unified CM IM and PresencePR
OC
ESS
Make sure you have the following information:
• Time zone for the server
• host name, IP address, network mask, and default gateway
• domain name system (dns) server IP addresses
• Administrator Id and password
• Organization, unit, location, state, and country
• network Time Protocol (nTP) server IP addresses
• security password
• Application username and password
Complete the tasks listed below before you start the installation:
• In dns, configure the Cisco Unified CM IM and Presence host name: CUCM-IMP1
• Obtain license files from the Cisco licensing system
Procedure 1 Install Cisco Unified CM IM and Presence
After the IsO/dVd loads, continue the installation on the server console.
Step 1: On the dVd Found page, choose Yes.
Step 2: If the media check is successful, choose OK.
If the media check does not pass, contact Cisco Technical Assistance Center or your local representative in order to replace the media, and then repeat step 1.

deployment details August 201312
Step 3: On the Product deployment selection page, verify the product is Cisco Unified Communications Manager IM and Presence, and then choose OK.
Step 4: On the Proceed with Install page, verify that the version is correct, and then choose Yes.
Step 5: On the Platform Installation Wizard page, choose Proceed.
Step 6: If no upgrade patch exists for the version you are installing, on the Apply Patch page, choose No.
If an upgrade patch does exist, on the Apply Patch page, choose Yes, and then follow the instructions on the pages to complete the process.
Step 7: On the Basic Install page, choose Continue.
Step 8: On the Timezone Configuration page, select the correct time zone for the server location, and then choose OK.
Step 9: On the Auto negotiation Configuration page, choose Continue.
Step 10: On the MTU Configuration page, choose No.
Step 11: On the dhCP Configuration page, choose No.
deployment details August 201313
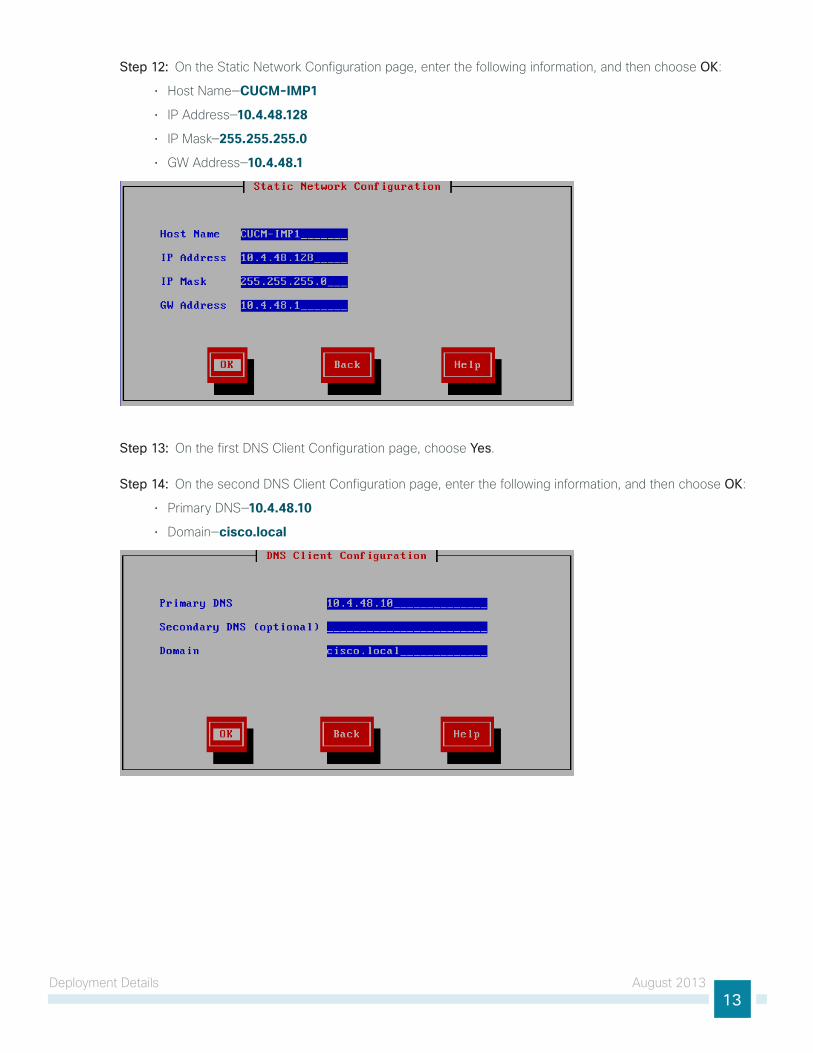
Step 12: On the static network Configuration page, enter the following information, and then choose OK:
• host name—CUCM-IMP1
• IP Address—10.4.48.128
• IP Mask—255.255.255.0
• gW Address—10.4.48.1
Step 13: On the first dns Client Configuration page, choose Yes.
Step 14: On the second dns Client Configuration page, enter the following information, and then choose OK:
• Primary dns—10.4.48.10
• domain—cisco.local

deployment details August 201314
Step 15: On the Administrator login Configuration page, enter the following information, and then choose OK:
• Administrator Id—Admin
• Password—[password]
• Confirm Password—[password]
Step 16: On the Certificate Information page, enter the information that will be used to generate security certificates, and then choose OK:
• Organization—Cisco Systems, Inc.
• Unit—Unified Communications Group
• location—San Jose
• state—California
• Country—United States
These fields must match the information submitted to Cisco, or the licenses will not be valid.
Tech Tip

deployment details August 201315
Step 17: On the First node Configuration page, choose Yes.
Step 18: On the network Time Protocol Client Configuration page, in the NTP Server 1 box, enter 10.4.48.17, and then choose OK.
Step 19: On the security Configuration page, enter the password for server-to-server communication, and then choose OK.
Step 20: On the sMTP host Configuration page, choose No.

deployment details August 201316
Step 21: On the Application User Configuration page, enter the following information, and then choose OK:
• Application User Username—IMPAdmin
• Password—[password]
• Confirm Password—[password]
Step 22: On the Platform Configuration Confirmation page, choose OK.
The system finishes the rest of the installation process without user input. The system reboots a few times during installation. The process can take 60 minutes or more, depending on your server hardware.
After the software has finished installing, the login prompt appears on the console.
Step 23: In the vsphere Client, navigate to the virtual machine’s Getting Started tab, and then click Edit virtual machine settings.
Step 24: On the hardware tab, select CD/DVD Drive 1.
Step 25: Clear Connect at power on, and then click OK.
Procedure 2 Configure Unified CM IM and Presence
After the software is installed, use the web interface in order to complete the rest of the procedures.
Step 1: In a web browser, access the IP address or hostname of the Cisco Unified CM IM and Presence server, and then in the center of the page under Administrative Applications, click Cisco Unified Communications Manager IM and Presence.
If you receive a message about the website’s security certificate, ignore it and continue to the page.
Tech Tip
Step 2: enter the name and password you entered on the Application User Configuration page in step 21 of Procedure 1 “Install Cisco Unified CM IM and Presence,” and then click Login.

deployment details August 201317
Step 3: On the Post Install setup page, enter the following information, and then click Next:
• hostname—CUCM-Pub1
• IP Address—10.4.48.110
Step 4: On the next page, enter the following information, and then click Next:
• AXl User—CUCMAdmin
• AXl Password—[password] (must match the password on Cisco Unified CM)
• Confirm Password—[password]

deployment details August 201318
Step 5: On the next page, enter the following information, and then click Next:
• security Password—[password] (must match the password on Cisco Unified CM)
• Confirm Password—[password]
Step 6: On the next page, verify the information, and then click Confirm.
Step 7: On the next page, click Home.
Step 8: In the Navigation list at the top right of the page, choose Cisco Unified IM and Presence Serviceability, and then click Go.

deployment details August 201319
Step 9: navigate to Tools > Service Activation, enter the following information, and then click Save:
• Cisco sIP Proxy—Select
• Cisco Presence engine—Select
• Cisco sync Agent—Select
• Cisco XCP Connection Manager—Select
• Cisco XCP directory service—Select
• Cisco XCP Authentication service—Select
Step 10: In the message window, click OK.
Step 11: In the Navigation list at the top right of the page, choose Cisco Unified CM IM and Presence Administration, and then click Go.

deployment details August 201320
Step 12: navigate to Application > Legacy Clients > Settings, enter the following information, and then click Save:
• Primary TFTP server—10.4.48.120
• Backup TFTP server—10.4.48.121
The initial application administration setup is now complete.
Configuring Services for Cisco Jabber IM and Cisco UC
1. Configure Cisco Unified CM for Jabber IM
2. Configure Unity Connection for Jabber
3. Configure IM and Presence services
4. Configure users for IM and Presence
PR
OC
ESS
The next several procedures will create the specific services on Cisco Unified CM, Cisco Unity Connection and the Unified CM IM and Presence servers for Cisco Jabber IM and Cisco UC installations.
Procedure 1 Configure Cisco Unified CM for Jabber IM
When you integrate Cisco Unified Communications Manager and Cisco Unified Communications IM and Presence, you must configure the required services in order to enable communication between the servers. This communication includes a session Initiation Protocol (sIP) publish trunk in order to enable synchronization of availability status between Cisco Unified Communications Manager and Cisco Unified Communications IM and Presence.
you also create several Cisco UC service profiles and apply them to a service profile for all Cisco Jabber users.
Step 1: In a web browser, access the IP address or hostname of the Cisco Unified CM publisher, and then in the center of the page, under Installed Applications, click Cisco Unified Communications Manager.
Step 2: enter the application username and password, and then click Login.
deployment details August 201321
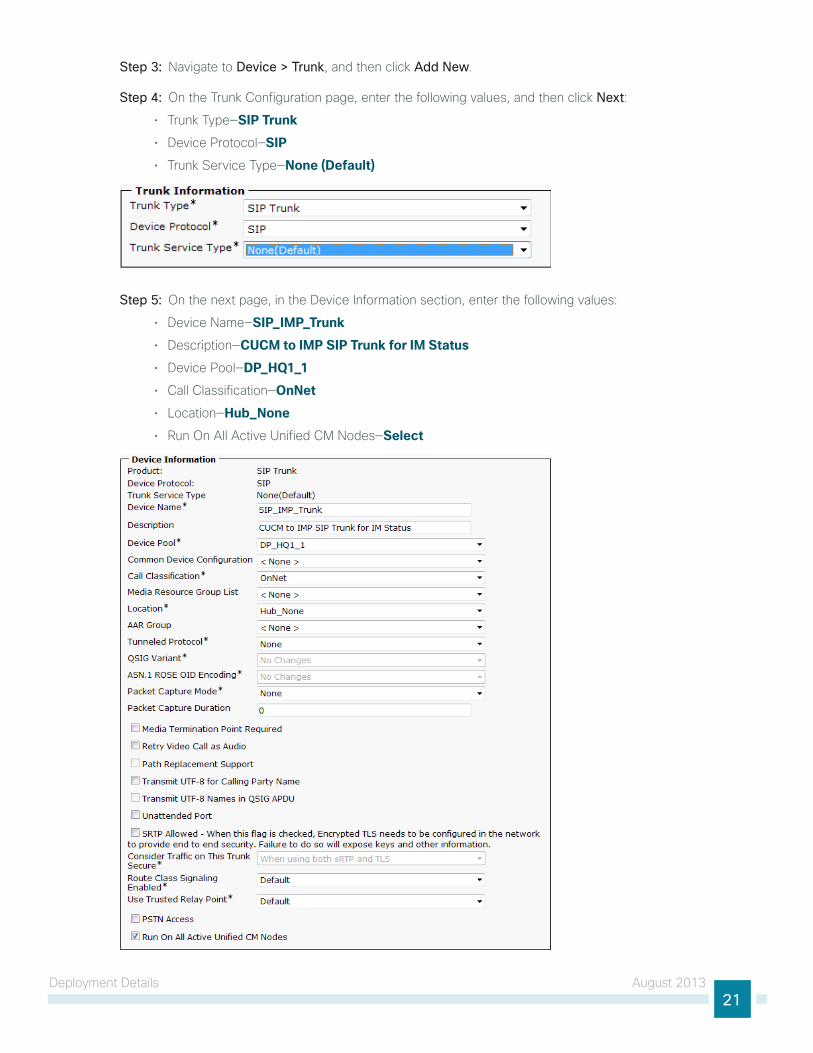
Step 3: navigate to Device > Trunk, and then click Add New.
Step 4: On the Trunk Configuration page, enter the following values, and then click Next:
• Trunk Type—SIP Trunk
• device Protocol—SIP
• Trunk service Type—None (Default)
Step 5: On the next page, in the device Information section, enter the following values:
• device name—SIP_IMP_Trunk
• description—CUCM to IMP SIP Trunk for IM Status
• device Pool—DP_HQ1_1
• Call Classification—OnNet
• location—Hub_None
• Run On All Active Unified CM nodes—Select

deployment details August 201322
Step 6: In the sIP Information section, enter the following values, and then click Save:
• destination Address 1—10.4.48.128
• destination Port 1—5060
• sIP Trunk security Profile—Non Secure SIP Trunk Profile
• sIP Profile—Standard SIP Profile
Step 7: In the Message window, click OK.
Step 8: On the Trunk Configuration page, click Reset.
Step 9: On the device Reset page, click Reset, and then click Close.
Step 10: navigate to User Management > User Settings > UC Service, and then click Add New.
Step 11: On the UC service Configuration page, in the UC service Type list, select IM and Presence, and then click Next.

deployment details August 201323
Step 12: In the Add a UC service section, enter the following information, and then click Save:
• Product Type—Unified CM (IM and Presence)
• name—On-Premises IM and Presence
• description—On-Premises IM and Presence on Unified CM
• host name/IP Address—10.4.48.128
Step 13: navigate to User Management > User Settings > UC Service, and then click Add New.
Step 14: On the UC service Configuration page, in the UC service Type list, select CTI, and then click Next.
Step 15: In the Add a UC service section, enter the following information, and then click Save:
• name—CTI Service for Jabber
• description—CTI Service for Jabber Clients
• host name/IP Address—10.4.48.111 (subscriber 1)
• Port—2748
Step 16: navigate to User Management > User Settings > UC Service, and then click Add New.
Step 17: On the UC service Configuration page, in the UC service Type list, select Voicemail, and then click Next.

deployment details August 201324
Step 18: In the Add a UC service section, enter the following information, and then click Save:
• Product Type—Unity Connection
• name—Voicemail Service for Jabber
• description—Voicemail Service for Jabber Clients
• host name/IP Address—10.4.48.123
• Port—443
• Protocol—HTTP
Step 19: navigate to User Management > User Settings > UC Service, and then click Add New.
Step 20: On the UC service Configuration page, in the UC service Type list, select Directory, and then click Next.
When using an ldAP directory service, the Cisco Jabber client’s click-to-call the phone number that is listed in the Telephone number attribute of ldAP. This may or may not be the same attribute that was used when you synchronized your users with Cisco Unified CM.
Tech Tip

deployment details August 201325
Step 21: In the Add a UC service section, enter the following information, and then click Save:
• Product Type—Directory
• name—LDAP for Jabber
• description—LDAP Service for Jabber Clients
• host name/IP Address—10.4.48.10
• Port—389
• Protocol—TCP
Step 22: navigate to User Management > User Settings > Service Profile, click Add New, and then enter the following information:
• name—Jabber
• description—Jabber Service Profile
• Make this the default service profile for the system—Select
Step 23: In the Voicemail Profile section, enter the following information:
• Primary—Voicemail Service for Jabber
• Credential source for voicemail service—Unified CM - IM and Presence
deployment details August 201326
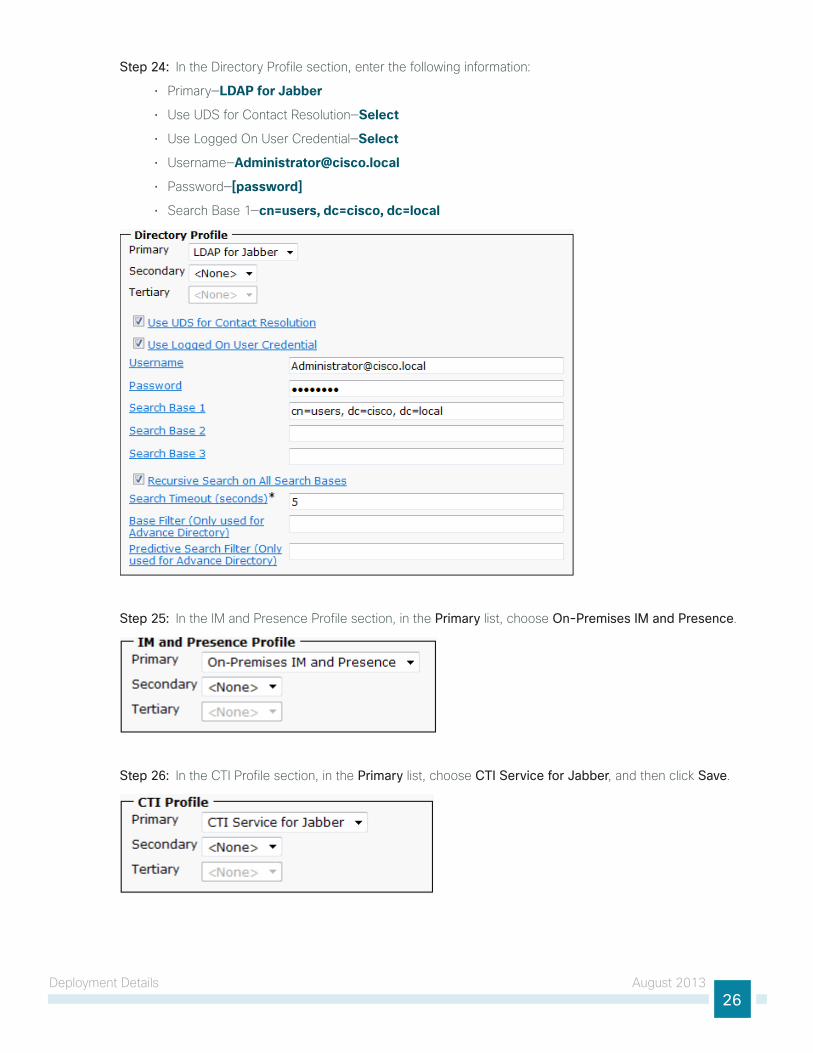
Step 24: In the directory Profile section, enter the following information:
• Primary—LDAP for Jabber
• Use Uds for Contact Resolution—Select
• Use logged On User Credential—Select
• Username—[email protected]
• Password—[password]
• search Base 1—cn=users, dc=cisco, dc=local
Step 25: In the IM and Presence Profile section, in the Primary list, choose On-Premises IM and Presence.
Step 26: In the CTI Profile section, in the Primary list, choose CTI Service for Jabber, and then click Save.

deployment details August 201327
Procedure 2 Configure Unity Connection for Jabber
The next set of steps will configure Cisco Unity Connection for use with Jabber.
Step 1: In a web browser, access the Cisco Unity Connection administration interface, and then in the center of the page, under Installed Applications, click Cisco Unity Connection.
Step 2: enter the application administrator username and password, and then click Login.
Step 3: navigate to Class of Service > Class of Service and then click Voice Mail User COS.
Step 4: On the edit Class of service (Voice Mail user COs) page, in the licensed Features section, select Allow users to Access Voice Mail Using IMPA Client and/or Single Inbox, select Allow IMAP Users to Access Message Bodies, and then click Save.
Procedure 3 Configure IM and Presence services
This procedure configures Cisco Unified CM IM and Presence with a publish trunk, presence gateway, and a Cisco Unified Communications Manager IP phone service profile.
Step 1: In a web browser, access the IP address or hostname of the Cisco Unified CM IM and Presence server, and then in the center of the page under Administrative Applications, click Cisco Unified Communications Manager IM and Presence.
Step 2: enter the name and password you entered on the Application User Configuration page in step 21 of Procedure 1 “Install Cisco Unified CM IM and Presence,” and then click Login.
Step 3: navigate to Presence > Settings, and in the CUCM IM and Presence Publish Trunk list, choose SIP_IMP_Trunk, and then click Save.

deployment details August 201328
Step 4: navigate to Presence > Gateways, and then click Add New.
Step 5: On the Presence gateway Configuration page, enter the following information, and then click Save:
• Presence gateway Type—CUCM
• description—Unified CM Gateway for Phone Status
• Presence gateway—10.4.48.110 (publisher)
Step 6: navigate to Application > Legacy Clients > CCMCIP Profile, and then click Add New.
Step 7: On the CCMCIP Profile Configuration page, enter the following information, and then click Save:
• name—CCMCIP for Jabber
• description—CCMCIP Profile for Jabber Clients
• Primary CCMCIP host—10.4.48.111 (subscriber 1)
• Backup CCMCIP host—10.4.48.112 (subscriber 2)
• server Certificate Verification—Self Signed or Keystore
• Make this the default CCMCIP Profile for the system—Select
Step 8: In the message window, click OK.

deployment details August 201329
Procedure 4 Configure users for IM and Presence
This procedure will configure Cisco Unified CM for Cisco Jabber for Windows, Jabber for iPad, and Jabber for iPhone users who require these capabilities.
Step 1: In a web browser, access the IP address or hostname of the Cisco Unified CM publisher, and then in the center of the page, under Installed Applications, click Cisco Unified Communications Manager.
Step 2: enter the Unified CM application username and password, and then click Login.
Step 3: navigate to User Management > End User, and then click Find.
Step 4: Find the appropriate Cisco Jabber user, and then click the username.
Step 5: In the service settings section, enter the following information, and then click Save:
• home Cluster—Select
• enable User for Unified CM IM and Presence—Select
• UC service Profile—Jabber
Step 6: In the Permissions Information section, select Add to Access Control Group.
Step 7: On the Find and list Access Control groups page, click Find, and then select the following groups:
• Access Control group—Standard CCM End users (existing)
• Access Control group—Standard CTI Enabled
Step 8: If you are using one of the following phone models, select the appropriate additional control group:
• Cisco Unified IP Phone 9900 series—Standard CTI Allow Control of Phones supporting Connected Xfer and conf
• Cisco Unified IP Phone 6900 series—Standard CTI Allow Control of Phones supporting Rollover Mode
Step 9: Click Add Selected.
Step 10: On the end User Configuration page, click Save.

deployment details August 201330
Step 11: Repeat step 3 through step 10 for each additional Cisco Jabber for Windows, Jabber for iPad, and Jabber for iPhone user.
Configuring Cisco Jabber for Windows
1. Configure Profiles in Unified CM
2. Configure Jabber for Windows softphones
3. Configure Jabber for Windows users
4. download and install Jabber for Windows
PR
OC
ESS
This process is only necessary if you plan to deploy Cisco Jabber for Windows.
In this process, you configure Cisco Unified CM to enable unified communications on Cisco Jabber for Windows clients. you also download and install Cisco Jabber for Windows and the Cisco Media services Interface software to a user’s laptop or desktop computer.
Procedure 1 Configure Profiles in Unified CM
To enable unified communications with voice and video calling capabilities from Cisco Unified CM, a software phone device is required for each Cisco Jabber for Windows user.
The first stage in building a software phone device is to create a sIP profile enabling video desktop sharing. you cannot edit or configure the default sIP profile, so you create a new sIP profile from the default and modify the specific settings.
you also modify the default standard common phone profile in order to enable Real-time Transport Control Protocol (RTCP).
Step 1: navigate to Device > Device Settings > SIP Profile, and then click Find.
Step 2: locate Standard SIP Profile, and then on the right side of the page in line with the profile, click the Copy icon.

deployment details August 201331
Step 3: On the sIP Profile Configuration page, in the sIP Profile Information section, enter the following information:
• name—Standard SIP Profile for Jabber for Windows
• description—SIP Profile for Jabber for Windows Users
Step 4: In the Trunk specific Configuration section, select Allow Presentation Sharing using BFCP, and then click Save.
Step 5: navigate to Device > Device Settings > Common Phone Profile, click Find, and then click Standard Common Phone Profile.
deployment details August 201332
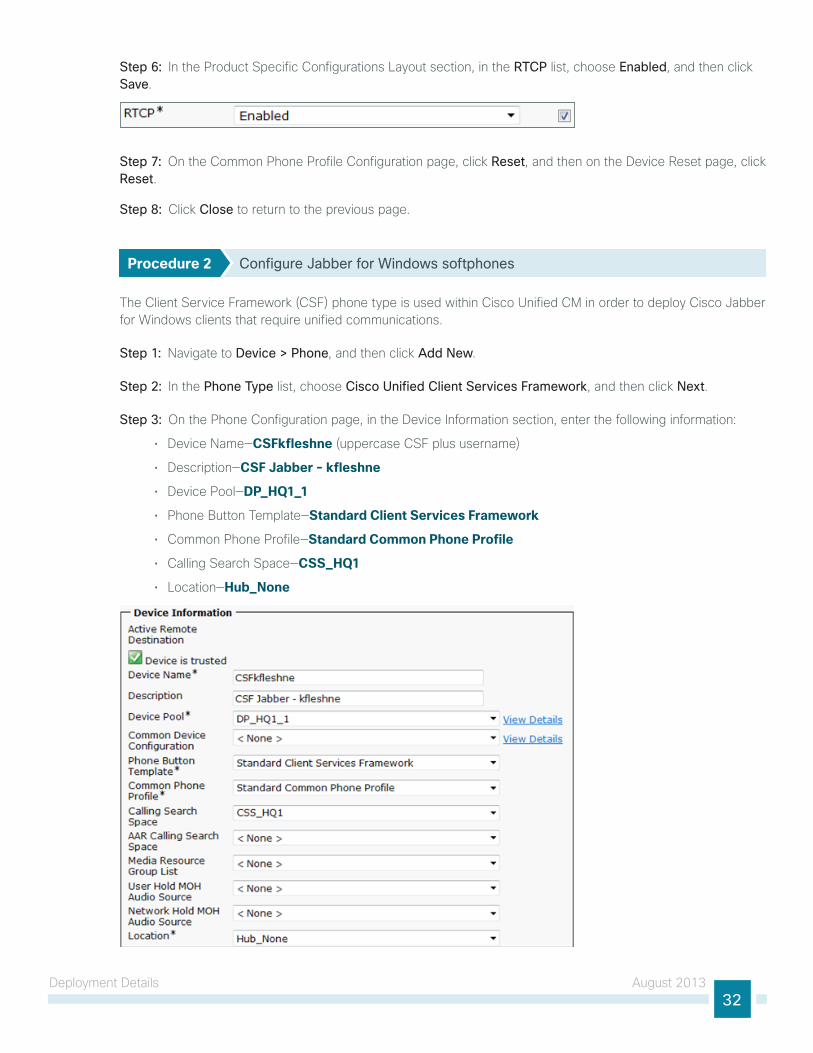
Step 6: In the Product specific Configurations layout section, in the RTCP list, choose Enabled, and then click Save.
Step 7: On the Common Phone Profile Configuration page, click Reset, and then on the device Reset page, click Reset.
Step 8: Click Close to return to the previous page.
Procedure 2 Configure Jabber for Windows softphones
The Client service Framework (CsF) phone type is used within Cisco Unified CM in order to deploy Cisco Jabber for Windows clients that require unified communications.
Step 1: navigate to Device > Phone, and then click Add New.
Step 2: In the Phone Type list, choose Cisco Unified Client Services Framework, and then click Next.
Step 3: On the Phone Configuration page, in the device Information section, enter the following information:
• device name—CSFkfleshne (uppercase CsF plus username)
• description—CSF Jabber - kfleshne
• device Pool—DP_HQ1_1
• Phone Button Template—Standard Client Services Framework
• Common Phone Profile—Standard Common Phone Profile
• Calling search space—CSS_HQ1
• location—Hub_None

deployment details August 201333
Step 4: In the Protocol specific Information section, enter the following information, and then click Save:
• device security Profile—Cisco Unified Client Services Framework - Standard SIP Non-Secure
• sIP Profile—Standard SIP Profile for Jabber for Windows
Step 5: On the Phone Configuration page, in the Association Information section, click Line [1] - Add a new DN.
When using an ldAP directory service, the Cisco Jabber client’s click-to-call the phone number that is listed in the Telephone number attribute of ldAP.
Confirm that the Telephone number attribute in your ldAP implementation matches the directory number used in Cisco Unified CM for your Cisco Jabber client.
Figure 3 has an example of the ldAP general Information page in Microsoft Active directory.
Tech Tip

deployment details August 201334
Step 6: On the directory number Configuration page, enter the following values:
• directory number—81004007
• Route Partition—PAR_Base
• description—Jabber - kfleshne
• Alerting name—[Alerting name]
• AsCII Alerting name—[ASCII alerting name]
• Allow Control of device from CTI—Select
Figure 2 - Cisco Unified CM Directory Number information

deployment details August 201335
Figure 3 - Example LDAP general information telephone number attribute
Step 7: In the Users Associated with line section at the bottom of the page, click Associate End Users, and then click Find.
Step 8: select the Cisco Jabber user, click Add Selected, and then click Save.
Step 9: On the directory number Configuration page, click Apply Config, and then on the Apply Configuration page, click OK.

deployment details August 201336
Procedure 3 Configure Jabber for Windows users
Associate the client services framework device with the end user to allow them to utilize the phone service from Unified CM.
Step 1: navigate to User Management > End User, and then click Find.
Step 2: Find the Cisco Jabber user, and then click the username.
Step 3: In the device Information section, click Device Association, and then click Find.
Step 4: select the user’s client services framework device (example: CsFkfleshne), and then click Save Selected/Changes.
Step 5: In the Related links list, choose Back to User, and then click Go.
Step 6: Repeat Procedure 2 and Procedure 3 for each Cisco Jabber for Windows user.
Procedure 4 Download and install Jabber for Windows
After adding the software phones into Cisco Unified CM, the users must download the software to their laptop or desktop computers in order to begin using Cisco Jabber for Windows.
Step 1: In a browser, access http://www.cisco.com/, login using your Cisco.com account name, and then navigate to Support > All Downloads.
Step 2: From the download home section, navigate to Voice and Unified Communications > Unified Communications Applications > Unified Communications Clients > Cisco Jabber for Windows, and then click the latest version.

deployment details August 201337
Step 3: download the Cisco Jabber for Windows and Cisco Media services Interface software, and then unzip the Cisco Jabber Install software into the local directory.
Step 4: Click on the msi_setup file, and then follow the installation instructions in the Cisco Media services Interface setup Wizard.
Step 5: depending on your operating system, you have to accept several security messages as the software installs. After the software installs, click Finish.
Step 6: Click the CiscoJabberSetup.msi file, and follow the installation instructions in the Cisco Jabber wizard.
Step 7: depending on your operating system, you have to accept several security messages as the software installs. After the software installs, select Launch Cisco Jabber, and then click Finish.
Step 8: On the Connection settings page, enter the following information, and then click Save:
• server type—Cisco Unified Presence
• login server—Use the following server
• server address—10.4.48.128
• domain—cisco.local

deployment details August 201338
Step 9: On the login page, enter the following information, and then click Sign In:
• Username—[username]
• Password—[password]
• sign me in when Jabber starts—Select
Step 10: Add contacts and favorites as needed.
Step 11: Repeat this procedure for each Cisco Jabber for Windows user.
Configuring Cisco Jabber for iPad
1. Prepare the servers for Jabber for iPad
2. Configure sIP Profile in Unified CM
3. Configure Jabber for iPad softphones
4. Configure Jabber for iPad users
5. download and install Jabber for iPad
PR
OC
ESS
This process is only necessary if you plan to deploy Cisco Jabber for iPad. The procedures for deploying Cisco Jabber for iPhone can be found in the next process.
Configure the Jabber for iPad softphones and users in Cisco Unified CM, and then download and install the Cisco Jabber for iPad software.
download the latest shipping version of the Cisco Jabber for iPad Cisco Options Package (COP) file and install it on the Cisco Unified CM servers in your cluster. you need a valid Cisco.com account in order to download the COP file. you also need secure File Transfer Protocol (sFTP) server software in order to safely transfer the file to your Unified CM servers.
next, you download the client software to the iPad from the App store and begin the configuration procedure.

deployment details August 201339
Procedure 1 Prepare the servers for Jabber for iPad
In this procedure, after transferring the COP file to the publisher and subscriber servers, you have to restart the Cisco Tomcat service in order to complete the installation. To avoid interruptions in phone service, ensure that each server has returned to active service before you perform this procedure on the next server.
Step 1: In a web browser, access www.cisco.com, login with your user Id, and then navigate to Support > All Downloads.
Step 2: On the Select a Product page, navigate to Products > Voice and Unified Communications > Unified Communications Applications > Unified Communications Clients > Cisco Jabber for iPad > Latest Releases, and then choose to download the compressed version of the Jabber for iPad Device COP file to a local directory on your PC.
Step 3: Unzip the Jabber for iPad COP file into the local directory on your PC using your favorite file archive program. For example: 7-Zip.
Step 4: start the sFTP server software on your PC, and then configure it with a username and password for accessing the downloaded software in a specified directory.
Step 5: In a web browser, access the Cisco Unified CM administration interface of the publisher server in your cluster.
Step 6: In the center of the page, under Installed Applications, click the Cisco Unified Communications Manager link.
Step 7: In the navigation list at the top of the page, choose Cisco Unified OS Administration, and then click Go.
Step 8: enter the case-sensitive username and password for the platform administrator, and then click Login. For example: Admin and [password]

deployment details August 201340
Step 9: navigate to Software Upgrades > Install/Upgrade, enter the following information and then, click Next:
• source—Remote Filesystem
• directory—\
• server—10.4.48.155 (IP address of the PC running sFTP server software)
• User name—root (user name on sFTP PC to access files)
• User Password—[password] (user password on sFTP PC to access files)
• Transfer Protocol—SFTP
Step 10: In the Options/Upgrades list, choose the Cisco Jabber tablet COP file that was extracted from the .zip in step 3, and then click Next.
Step 11: After the file is downloaded and validated, verify the Md5 hash Value on the server matches the Md5 hash Value on your PC.
Figure 4 - MD5 Hash Value from Cisco Unified CM
Figure 5 - MD5 Hash Value from your PC

deployment details August 201341
Step 12: If the Md5 hash Values do not match, transfer the file again.
If they match, click Next, and then confirm the file is successfully installed.
Step 13: log into the command line interface of the server by using the case-sensitive platform administrator username and password. For example: Admin and [password]
Step 14: Restart the Cisco Unified CM Cisco Tomcat service from the command line interface. This clears the Tomcat image cache and displays the table device icon properly.
utils service restart Cisco Tomcat
Step 15: If the service does not restart properly, execute the same command again. depending on your server hardware, the restart can take up to five minutes. Wait for the service to return to an active state before continuing.
Step 16: Repeat step 5 through step 15 for each subscriber server in your cluster.
Procedure 2 Configure SIP Profile in Unified CM
To enable unified communications with voice and video calling capabilities from Cisco Unified CM, a software phone device is required per Cisco Jabber for iPad user.
The first stage in building a software phone device is to create a sIP profile that enables the Cisco Jabber for iPad application to run in the background. you cannot edit or configure the default sIP profile, so you must create a new sIP profile from the default and modify the specific settings.
Step 1: navigate to Device > Device Settings > SIP Profile, and then click Find.
Step 2: locate the Standard SIP Profile, and then on the right side of the page in line with the profile, click the Copy icon.
deployment details August 201342
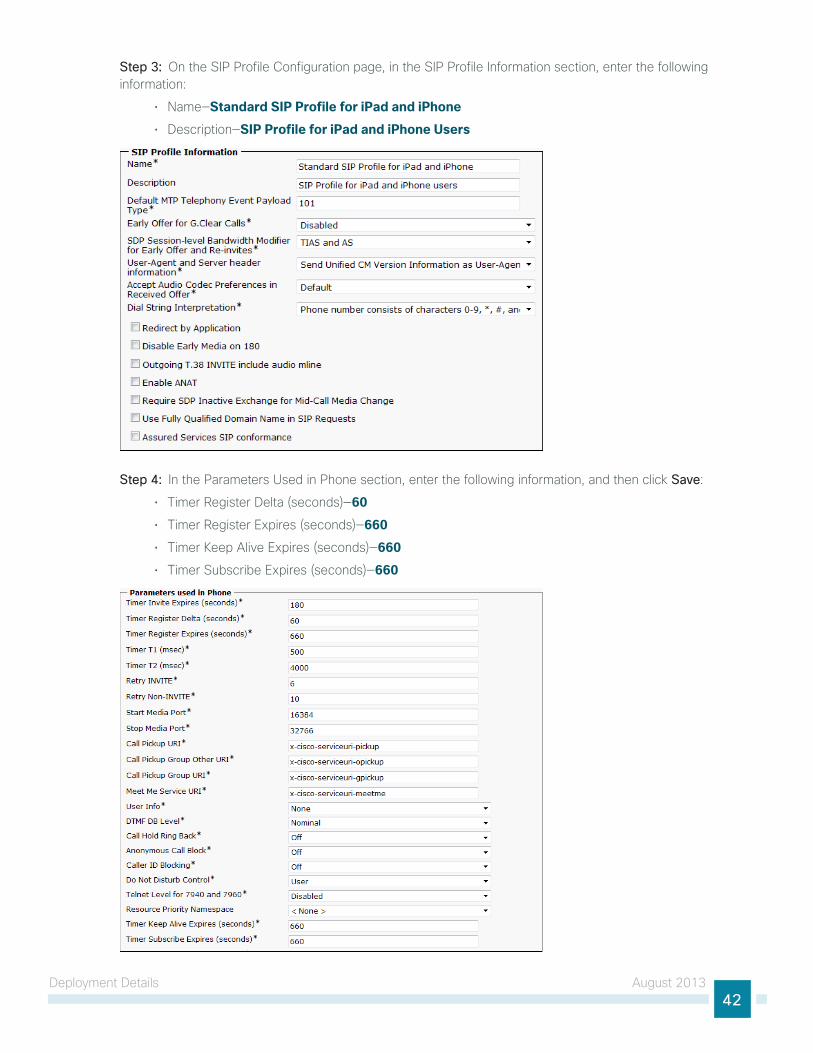
Step 3: On the sIP Profile Configuration page, in the sIP Profile Information section, enter the following information:
• name—Standard SIP Profile for iPad and iPhone
• description—SIP Profile for iPad and iPhone Users
Step 4: In the Parameters Used in Phone section, enter the following information, and then click Save:
• Timer Register delta (seconds)—60
• Timer Register expires (seconds)—660
• Timer Keep Alive expires (seconds)—660
• Timer subscribe expires (seconds)—660

deployment details August 201343
Procedure 3 Configure Jabber for iPad softphones
The Cisco Jabber for Tablet (TAB) phone type is used within Cisco Unified CM in order to deploy Jabber for iPad clients that require unified communications.
Step 1: navigate to Device > Phone, and then click Add New.
Step 2: In the Phone Type list, choose Cisco Jabber for Tablet, and then click Next.
Step 3: On the Phone Configuration page, in the device Information section, enter the following information:
• device name—TABKFLESHNE (TAB plus username, all uppercase)
• description—TAB Jabber for iPad - kfleshne
• device Pool—DP_HQ1_1
• Phone Button Template—Standard Jabber for Tablet
• Common Phone Profile—Standard Common Phone Profile
• Calling search space—CSS_HQ1
• location—Hub_None

deployment details August 201344
Step 4: In the Protocol specific Information section, enter the following information, and then click Save:
• device security Profile—Cisco Jabber for Tablet - Standard SIP Non-Secure
• sIP Profile—Standard SIP Profile for iPad and iPhone
Step 5: In the message windows, click OK.
Step 6: On the Phone Configuration page, in the Association Information section, click Line [1] - Add a new DN.
When using an ldAP directory service, the Cisco Jabber client’s click-to-call the phone number that is listed in the Telephone number attribute of ldAP.
Confirm that the Telephone number attribute in your ldAP implementation matches the directory number used in Cisco Unified CM for your Cisco Jabber client.
Figure 7 has an example of the ldAP general Information page in Microsoft Active directory.
Tech Tip
Step 7: On the directory number Configuration page, in the directory number Information section, enter the following information:
• directory number—81004007
• Route Partition—PAR_Base
• description—Jabber - kfleshne
• Alerting name—[Alerting name]
• AsCII Alerting name—[ASCII alerting name]
• Allow Control of device from CTI—Select

deployment details August 201345
Figure 6 - Cisco Unified CM Directory Number information
Figure 7 - Example LDAP general information telephone number attribute
Step 8: In the Users Associated with line section at the bottom of the page, click Associate End Users, and then click Find.

deployment details August 201346
Step 9: select the Cisco Jabber user, click Add Selected, and then click Save.
Step 10: On the directory number Configuration page, click Apply Config, and then on the Apply Configuration page, click OK.
Procedure 4 Configure Jabber for iPad users
Associate the Cisco Jabber for tablet device with the end user to allow them to utilize the phone service from Unified CM.
Step 1: navigate to User Management > End User, and then click Find.
Step 2: Find the Cisco Jabber user, and then click the username.
Step 3: In the device Information section, click Device Association, and then click Find.
Step 4: select the user’s Cisco Jabber for iPad device (example: TABKFleshne), and then click Save Selected/Changes.
Step 5: In the Related links list, choose Back to User, and then click Go.
Step 6: Repeat Procedure 3 and Procedure 4 for each Cisco Jabber for iPad user.
Procedure 5 Download and install Jabber for iPad
After adding the software phones into Cisco Unified CM, the users must download the software to their iPads in order to begin using Cisco Jabber for iPad.
Step 1: On the iPad, tap the App Store icon, and then in the search box, enter Cisco Jabber for iPad.
Step 2: locate the application, tap FREE, enter your Apple Id password, and then tap OK.

deployment details August 201347
Step 3: After the application finishes installing, tap the Jabber icon, and then tap Select Account.
Step 4: Under Cisco Instant Messaging, choose Unified Presence, enter the following information, and then tap Sign In:
• Username—kfleshne
• Password—[password]
• server address—10.4.48.128 (Unified CM IM and Presence server)
• Remember My Password—On
Step 5: On the right side of the page, tap Set Up Video and Voice Calling Account, and then choose Unified Communications Manager.
Step 6: enter the following information, choose Save, and then tap Done:
• Username—kfleshne
• Password—[password]
Step 7: In the top right corner of the page, tap the Settings icon, scroll down to the bottom of the page, and then tap Voicemail Pilot Number.

deployment details August 201348
Step 8: On the Voicemail Pilot number page, enter the voice mail pilot (example: 8009400), choose Settings, and then tap Done.
Step 9: Add contacts and favorites as needed.
Step 10: Repeat this procedure for each Cisco Jabber for iPad user.
Configuring Cisco Jabber for iPhone
1. Configure sIP Profile in Unified CM
2. Configure Jabber for iPhone softphones
3. Configure Jabber for iPhone users
4. download and install Jabber for iPhone
PR
OC
ESS
This process is only necessary if you plan to deploy Cisco Jabber for iPhone. The procedures for deploying Cisco Jabber for iPad can be found in the previous process.
First, you configure Jabber for iPhone softphones and users in Cisco Unified CM. next, you download the Cisco Jabber for iPhone software from the App store and begin the configuration procedure on your phone.
Procedure 1 Configure SIP Profile in Unified CM
If you have already configured the standard sIP Profile for iPad and iPhone in the “Configure sIP Profile in Unified CM” procedure in the previous process, please skip ahead to the next procedure in this process. If you have not previously configured a sIP profile in Unified CM, please follow the steps below.
To enable unified communications with voice and video calling capabilities from Cisco Unified CM, a software phone device is required per Cisco Jabber for iPhone user.
The first stage in building a software phone device to deploy with Cisco Jabber for iPhone users is to create a sIP profile that enables the application to run in the background. you cannot edit or configure the default sIP profile, so you must create a new sIP profile from the default and modify the specific settings.
Step 1: navigate to Device > Device Settings > SIP Profile, and click Find.
Step 2: locate the Standard SIP Profile, and on the right hand side of the page, click the Copy icon.

deployment details August 201349
Step 3: On the sIP Profile Configuration page, in the sIP Profile Information section, enter the following information:
• name—Standard SIP Profile for iPad and iPhone
• description—SIP Profile for iPad and iPhone Users
Step 4: In the Parameters Used in Phone section, enter the following information, and then click Save:
• Timer Register delta (seconds)—60
• Timer Register expires (seconds)—660
• Timer Keep Alive expires (seconds)—660
• Timer subscribe expires (seconds)—660
deployment details August 201350
Procedure 2 Configure Jabber for iPhone softphones
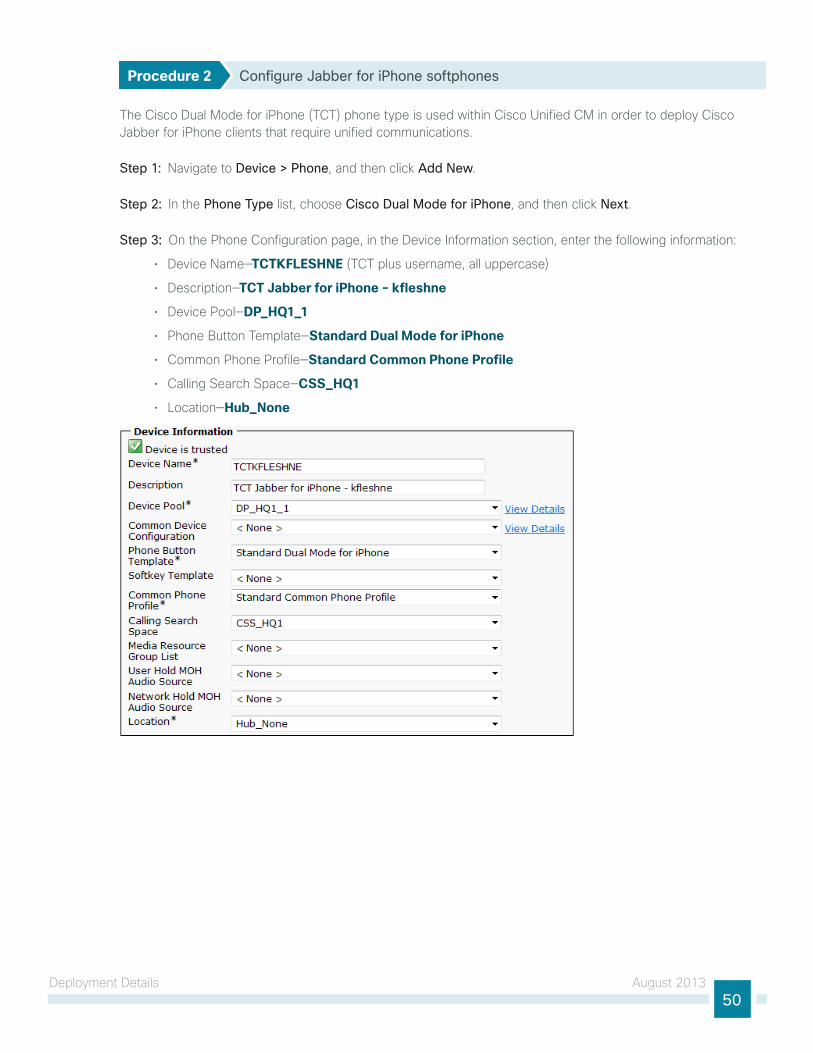
The Cisco dual Mode for iPhone (TCT) phone type is used within Cisco Unified CM in order to deploy Cisco Jabber for iPhone clients that require unified communications.
Step 1: navigate to Device > Phone, and then click Add New.
Step 2: In the Phone Type list, choose Cisco Dual Mode for iPhone, and then click Next.
Step 3: On the Phone Configuration page, in the device Information section, enter the following information:
• device name—TCTKFLESHNE (TCT plus username, all uppercase)
• description—TCT Jabber for iPhone - kfleshne
• device Pool—DP_HQ1_1
• Phone Button Template—Standard Dual Mode for iPhone
• Common Phone Profile—Standard Common Phone Profile
• Calling search space—CSS_HQ1
• location—Hub_None
deployment details August 201351
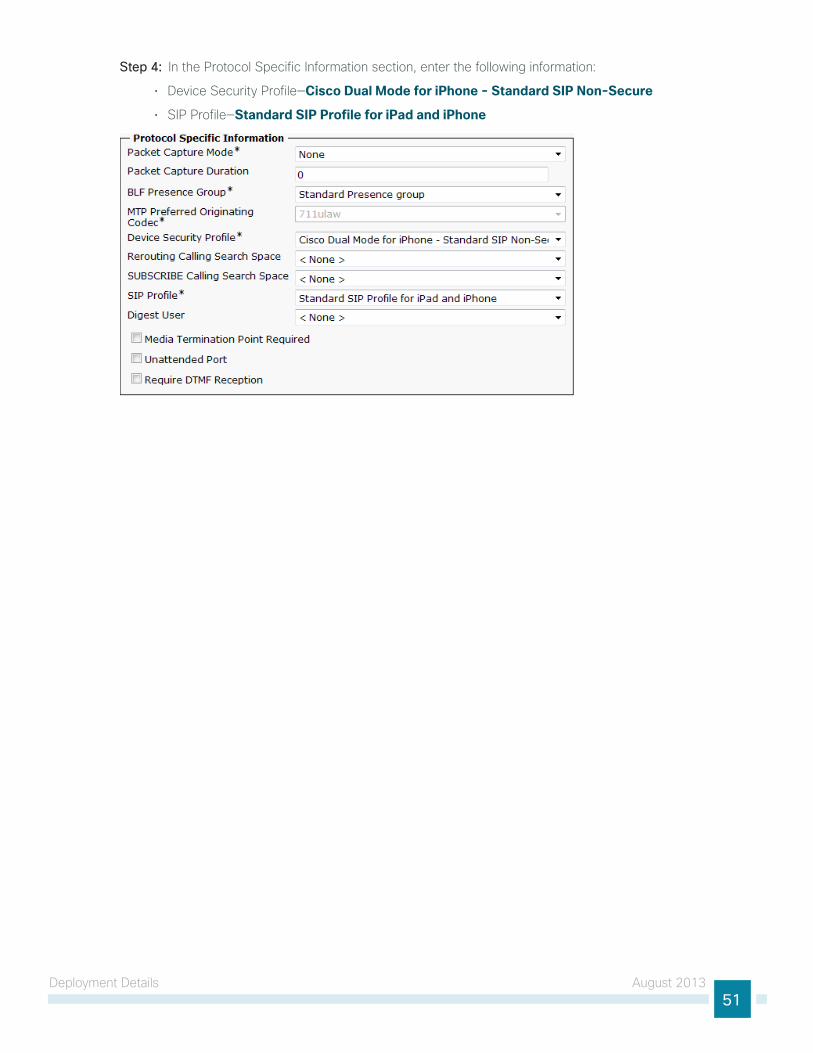
Step 4: In the Protocol specific Information section, enter the following information:
• device security Profile—Cisco Dual Mode for iPhone - Standard SIP Non-Secure
• sIP Profile—Standard SIP Profile for iPad and iPhone

deployment details August 201352
Step 5: In the Product specific Configuration layout section, enter the following information, and then click Save:
• Allow end User Configuration editing—Enabled
• Voicemail Username—kfleshne
• Voicemail server—10.4.48.123 (Unity Connection)
• enable ldAP User Authentication—Enabled
• ldAP Username—[email protected]
• ldAP Password—[password]
• ldAP server—10.4.48.10:389 (ldAP server and port)
• enable ldAP ssl—Disabled
• ldAP search Base—cn=users, dc=cisco, dc=local
Step 6: In the message window, click OK.

deployment details August 201353
Step 7: On the Phone Configuration page, in the Association Information section, click Line [1] - Add a new DN.
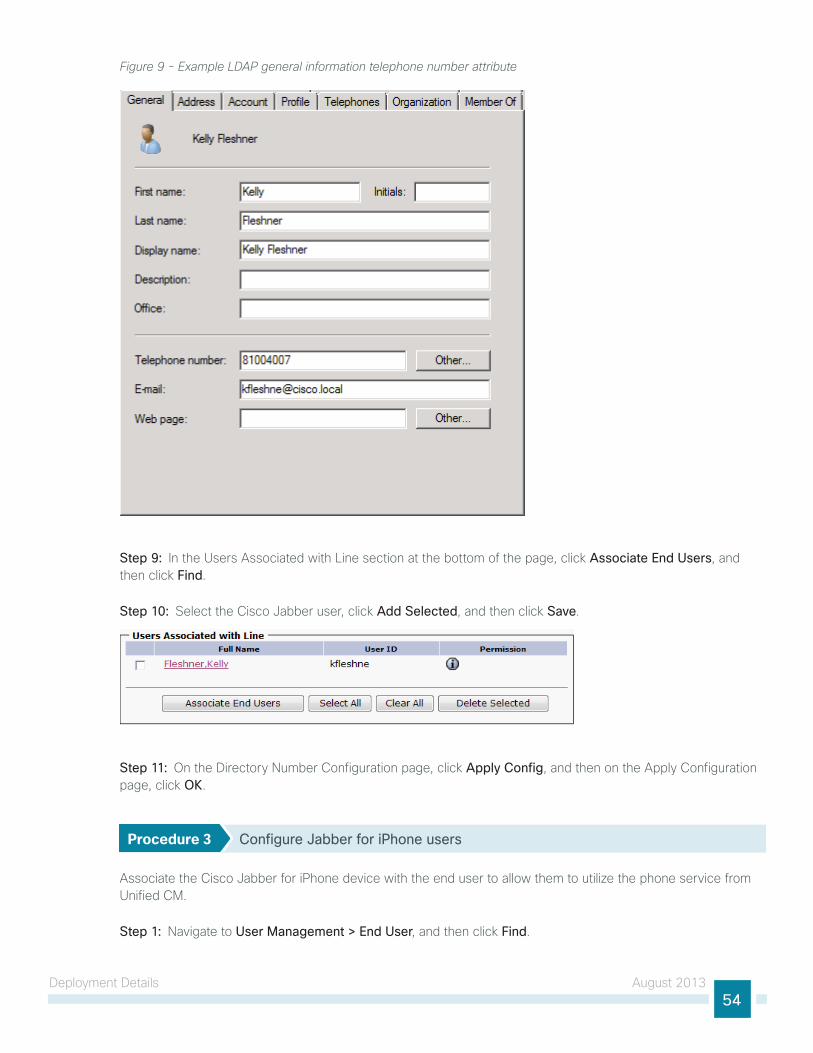
When using an ldAP directory service, the Cisco Jabber client’s click-to-call the phone number that is listed in the Telephone number attribute of ldAP.
Confirm that the Telephone number attribute in your ldAP implementation matches the directory number used in Cisco Unified CM for your Cisco Jabber client.
Figure 9 has an example of the ldAP general Information page in Microsoft Active directory.
Tech Tip
Step 8: On the directory number Configuration page, in the directory number Information section, enter the following information:
• directory number—81004007
• Route Partition—PAR_Base
• description—Jabber - kfleshne
• Alerting name—[Alerting name]
• AsCII Alerting name—[ASCII alerting name]
• Allow Control of device from CTI—Select
Figure 8 - Cisco Unified CM Directory Number information
deployment details August 201354
Figure 9 - Example LDAP general information telephone number attribute
Step 9: In the Users Associated with line section at the bottom of the page, click Associate End Users, and then click Find.
Step 10: select the Cisco Jabber user, click Add Selected, and then click Save.
Step 11: On the directory number Configuration page, click Apply Config, and then on the Apply Configuration page, click OK.
Procedure 3 Configure Jabber for iPhone users
Associate the Cisco Jabber for iPhone device with the end user to allow them to utilize the phone service from Unified CM.
Step 1: navigate to User Management > End User, and then click Find.

deployment details August 201355
Step 2: Find the Cisco Jabber user, and then click the username.
Step 3: In the device Information section, click Device Association, and then click Find.
Step 4: select the user’s Cisco Jabber for iPhone device (example: TCTKFleshne), and then click Save Selected/Changes.
Step 5: In the Related links list, choose Back to User and then click Go.
Step 6: Repeat Procedure 2 and Procedure 3 for each Cisco Jabber for iPhone user.
Procedure 4 Download and install Jabber for iPhone
After adding the software phones into Unified CM, the users must download two separate applications to their iPhones to begin using Cisco Jabber and Cisco Jabber IM for iPhone.
Step 1: On the iPhone, tap the App Store icon, and then in the search box, enter Cisco Jabber.
Step 2: locate the application Cisco Jabber, tap FREE, enter your Apple Id password, and then tap OK.
Step 3: On the iPhone, tap the App Store icon, and then in the search box, enter Cisco Jabber IM.
Step 4: locate the application Cisco Jabber IM for iPhone, tap FREE, enter your Apple Id password, and then tap OK.
Step 5: After the two applications finish installing, tap the Cisco Jabber IM for iPhone icon, and then tap Cisco Unified Presence.

deployment details August 201356
Step 6: enter the following information, and then tap Sign In:
• Username—kfleshne
• Password—[password]
• server address—10.4.48.128 (Unified CM IM and Presence server)
• Remember My Password—Select
Step 7: Add contacts and favorites as needed.
Step 8: Push the home button on the iPhone, tap the Cisco Jabber icon, tap Accept, and then tap Enter Account Settings.
Step 9: Tap Begin, tap Continue, enter the following information, and then tap Save:
• device Id—TCTKFLESHNE (TCT plus username, all uppercase)
• TFTP server—10.4.48.120 (CUCM TFTP server)
• User Authentication—Off

deployment details August 201357
Step 10: On the desk Phone Integration page, tap Yes, enter the following information, and then tap Save:
• User Integration—On
• Username—kfleshne
• Password—[password]
Step 11: On the Unified Messaging page, tap Continue, enter the following information, and then tap Save:
• Username—kfleshne
• Password—[password]
• server—10.4.48.123 (Unity Connection)
• Port—[blank]
deployment details August 201358
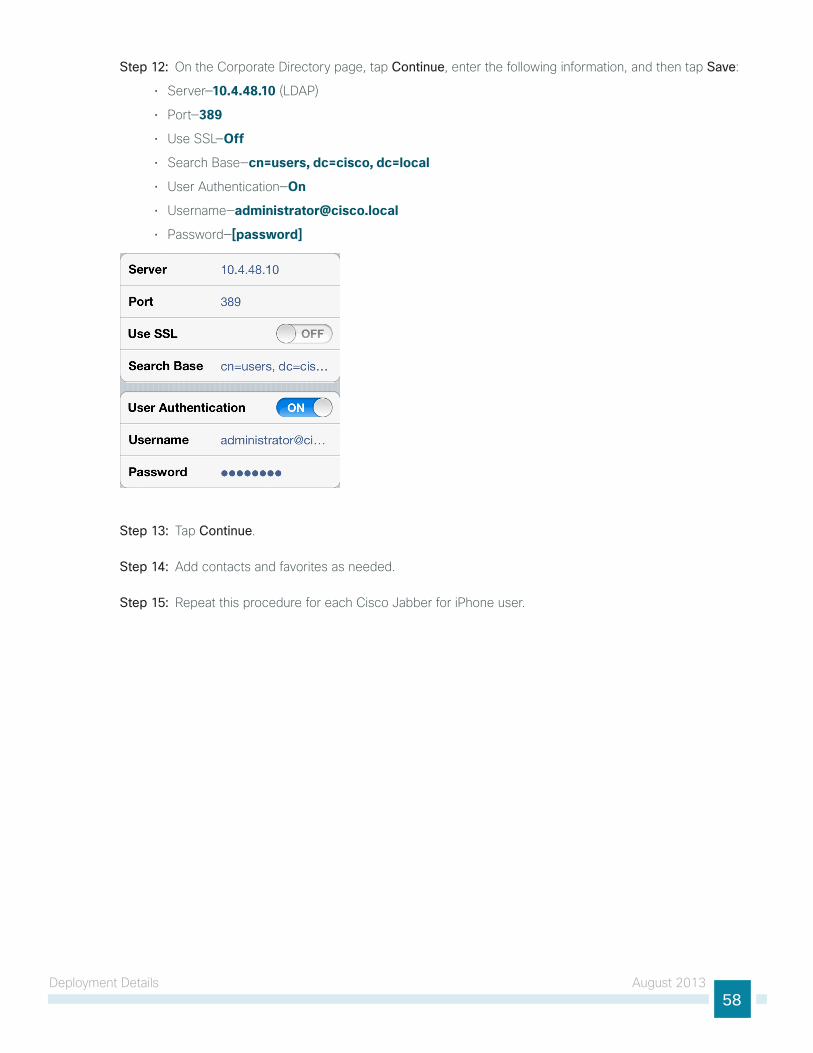
Step 12: On the Corporate directory page, tap Continue, enter the following information, and then tap Save:
• server—10.4.48.10 (ldAP)
• Port—389
• Use ssl—Off
• search Base—cn=users, dc=cisco, dc=local
• User Authentication—On
• Username—[email protected]
• Password—[password]
Step 13: Tap Continue.
Step 14: Add contacts and favorites as needed.
Step 15: Repeat this procedure for each Cisco Jabber for iPhone user.

Appendix A: Product list August 201359
Appendix A: Product listData Center or Server Room
Functional Area Product Description Part Numbers Software
Virtual Servers Cisco UCS C240 M3 C-Series Solution Pak for unified communications applications
UCUCS-EZ-C240M3S 9.1(1a) ESXi 5.0
Cisco UCS C220 M3 C-Series Solution Pak for unified communications applications
UCUCS-EZ-C220M3S
Cisco UCS C220 M3 for Business Edition 6000 UCSC-C220-M3SBE
Data Center CoreFunctional Area Product Description Part Numbers Software
Core Switch Cisco Nexus 5596 up to 96-port 10GbE, FCoE, and Fibre Channel SFP+
N5K-C5596UP-FA NX-OS 5.2(1)N1(3) Layer 3 License
Cisco Nexus 5596 Layer 3 Switching Module N55-M160L30V2
Cisco Nexus 5548 up to 48-port 10GbE, FCoE, and Fibre Channel SFP+
N5K-C5548UP-FA
Cisco Nexus 5548 Layer 3 Switching Module N55-D160L3
Cisco Nexus 5500 Layer 3 Enterprise Software License
N55-LAN1K9
Cisco Nexus 5500 Storage Protocols Services License, 8 ports
N55-8P-SSK9
Ethernet Extension Cisco Nexus 2000 Series 48 Ethernet 100/1000BASE-T (enhanced) Fabric Extender
N2K-C2248TP-E —
Cisco Nexus 2000 Series 48 Ethernet 100/1000BASE-T Fabric Extender
N2K-C2248TP-1GE
Cisco Nexus 2000 Series 32 1/10 GbE SFP+, FCoE capable Fabric Extender
N2K-C2232PP-10GE

Appendix A: Product list August 201360
Server RoomFunctional Area Product Description Part Numbers Software
Stackable Ethernet Switch Cisco Catalyst 3750-X Series Stackable 48 Ethernet 10/100/1000 ports
WS-C3750X-48T-S 15.0(2)SE2 IP Base license
Cisco Catalyst 3750-X Series Stackable 24 Ethernet 10/100/1000 ports
WS-C3750X-24T-S
Cisco Catalyst 3750-X Series Four GbE SFP ports network module
C3KX-NM-1G
Standalone Ethernet Switch Cisco Catalyst 3560-X Series Standalone 48 Ethernet 10/100/1000 ports
WS-C3560X-48T-S 15.0(2)SE2 IP Base license
Cisco Catalyst 3560-X Series Standalone 24 Ethernet 10/100/1000 ports
WS-C3560X-24T-S
Cisco Catalyst 3750-X Series Four GbE SFP ports network module
C3KX-NM-1G

Americas HeadquartersCisco Systems, Inc.San Jose, CA
Asia Pacific HeadquartersCisco Systems (USA) Pte. Ltd.Singapore
Europe HeadquartersCisco Systems International BV Amsterdam,The Netherlands
Cisco has more than 200 offices worldwide. Addresses, phone numbers, and fax numbers are listed on the Cisco Website at www.cisco.com/go/offices.
ALL DESIGNS, SPECIFICATIONS, STATEMENTS, INFORMATION, AND RECOMMENDATIONS (COLLECTIVELY, “DESIGNS”) IN THIS MANUAL ARE PRESENTED “AS IS,” WITH ALL FAULTS. CISCO AND ITS SUPPLIERS DISCLAIM ALL WARRANTIES, INCLUDING, WITHOUT LIMITATION, THE WARRANTY OF MERCHANTABILITY, FITNESS FOR A PARTICULAR PURPOSE AND NONINFRINGEMENT OR ARISING FROM A COURSE OF DEALING, USAGE, OR TRADE PRACTICE. IN NO EVENT SHALL CISCO OR ITS SUPPLIERS BE LIABLE FOR ANY INDIRECT, SPECIAL, CONSEQUENTIAL, OR INCIDENTAL DAMAGES, INCLUDING, WITHOUT LIMITATION, LOST PROFITS OR LOSS OR DAMAGE TO DATA ARISING OUT OF THE USE OR INABILITY TO USE THE DESIGNS, EVEN IF CISCO OR ITS SUPPLIERS HAVE BEEN ADVISED OF THE POSSIBILITY OF SUCH DAMAGES. THE DESIGNS ARE SUBJECT TO CHANGE WITHOUT NOTICE. USERS ARE SOLELY RESPONSIBLE FOR THEIR APPLICATION OF THE DESIGNS. THE DESIGNS DO NOT CONSTITUTE THE TECHNICAL OR OTHER PROFESSIONAL ADVICE OF CISCO, ITS SUPPLIERS OR PARTNERS. USERS SHOULD CONSULT THEIR OWN TECHNICAL ADVISORS BEFORE IMPLEMENTING THE DESIGNS. RESULTS MAY VARY DEPENDING ON FACTORS NOT TESTED BY CISCO.
Any Internet Protocol (IP) addresses used in this document are not intended to be actual addresses. Any examples, command display output, and figures included in the document are shown for illustrative purposes only. Any use of actual IP addresses in illustrative content is unintentional and coincidental.
© 2013 Cisco Systems, Inc. All rights reserved.
Cisco and the Cisco logo are trademarks or registered trademarks of Cisco and/or its affiliates in the U.S. and other countries. To view a list of Cisco trademarks, go to this URL: www.cisco.com/go/trademarks. Third-party trademarks mentioned are the property of their respective owners. The use of the word partner does not imply a partnership relationship between Cisco and any other company. (1110R)
Please use the feedback form to send comments and suggestions about this guide.
Feedback
B-0000418-1 08/13