oem mail notification
TRANSCRIPT

EMAIL NOTIFICATION SETUP IN ORACLE ENTERPRISE MANAGERSTEP 0. Login to OEM.
Open OEM URL. Enter Username and Password.
All Enterprise Manager Administrators can set up e-mail notifications for themselves. Super Administrators also have the ability to set up notifications for other Enterprise Manager administrators.
Before Enterprise Manager can send e-mail notifications, you must first specify the Outgoing Mail (SMTP) servers to be used by the notification system. Once set, you can then define e-mail notifications for yourself or, if you have Super Administrator privileges, other Enterprise Manager administrators.
STEP 1. Set the Notification Methods .
You must have Super Administrator privileges in order to set up SMTP servers.
Go to Setup (On Right top of OEM UI) ->Notification Methods (On left Panel).It should give page to setup Mail Server for notifications--------------------------------------------------
Outgoing Mail (SMTP) Server - smtp01.mycorp.com:587, smtp02.mycorp.com User Name - myadmin Password - ******
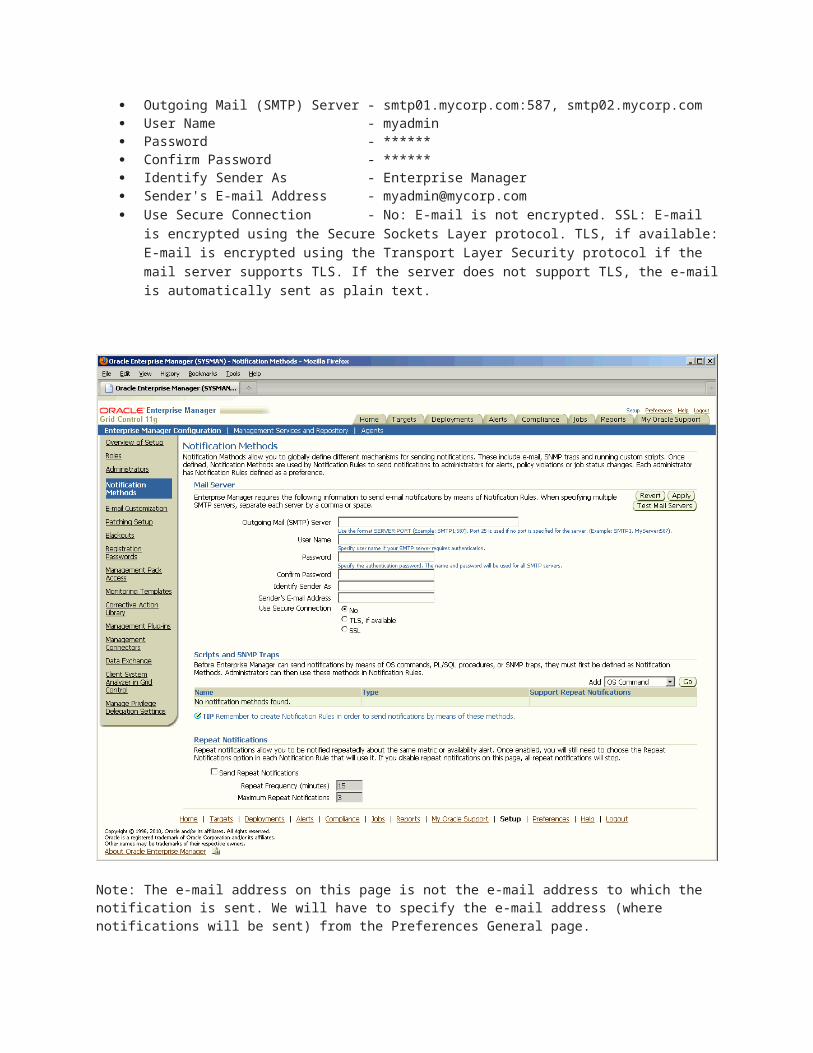
Confirm Password - ****** Identify Sender As - Enterprise Manager Sender's E-mail Address - [email protected]
Use Secure Connection - No: E-mail is not encrypted. SSL: E-mail
is encrypted using the Secure Sockets Layer protocol. TLS, if available:
E-mail is encrypted using the Transport Layer Security protocol if the
mail server supports TLS. If the server does not support TLS, the e-mail
is automatically sent as plain text.
Note: The e-mail address on this page is not the e-mail address to which the notification is sent. We will have to specify the e-mail address (where notifications will be sent) from the Preferences General page.
After configuring the e-mail server, click Test Mail Servers to verify the e-mail setup. We can verify that an e-mail message was received by the e-mail account specified in the Sender’s E-mail Address field.
STEP 2. S etup email for an OEM user To receive email notification, specify email address(s) on Preference page.Go to Preferences (On Right top of OEM UI) ->General (On left Panel).Add email address(s) and Test it (them).To add an e-mail address:
1. From the Grid Control console, click Preferences (On Right top of OEM UI) ->General (On left Panel).2. Click Add another Row to create a new e-mail entry field in the E-mail Addresses table.
3. Specify the e-mail associated with Enterprise Manager Account. All e-mail notifications we receive from Enterprise Manager will be sent to the e-mail addresses specified earlier.
For example, [email protected]
Select the message format for e-mail address. The Long Format sends a HTML formatted e-mail that contains detailed information. Example 1 shows a typical notification that uses the long format.
The Short Format (Example 2) sends a concise, text e-mail that is limited to a configurable number of characters, thereby allowing the e-mail be received as an SMS message or page. The content of the message can be sent entirely in the subject, entirely in the body or split across the subject and body. For example, in the last case, the subject could contain the severity type (for example, Critical) and the target name. The body could contain the time the severity occurred and the severity message. Since the message length is limited, some of this information may be truncated. If truncation has occurred there will be an ellipsis end of the message.
4. Click Apply to save the e-mail address.
Example 1- Long E-mail Notification for Alerts
Name=myhost.comType=HostHost=myhost.comMetric=Filesystem Space Available (%)Mount Point =/usrTimestamp=06-OCT-2006 16:27:05 US/PacificSeverity=WarningMessage=Filesystem / has only 76.07% available spaceRule Name=Host Availability and Critical StatesRule Owner=SYSMAN
Example 2 Short E-mail Notification for AlertsSubject is: EM: Unreachable Start: myhostBody is:Nov 16, 2006 2:02:19 PM EST: Agent is Unreachable (REASON = Connection refused) But the host is UP

STEP 3. To select a Notification Schedule [Optional]
A notification schedule is a repeating schedule used to specify the on-call schedule—the days and time periods and e-mail addresses that should be used by Enterprise Manager to send notifications. Each administrator has exactly one notification schedule. When a notification needs to be sent to an administrator, Enterprise Manager consults that administrator's notification schedule to determine the e-mail address to be used.
By default, for the first time, 24x7 weekly notification schedule is set automatically.
Go to Preferences (On Right top of OEM UI) ->Notification Schedule (On left Panel).

STEP 4. Define and subscribe to Notification Rules
A notification rule is a user-defined rule that defines the criteria by which notifications should be sent for alerts, policy violations, corrective action, execution status and job execution status.
OEM comes with predefined out-of-box notification rules that cover the most basic alerts – target down alerts as well as the more common critical alerts. Review these rules to determine if any or all of these are appropriate for our needs. Subscribe to receive notifications for the appropriate rules by selecting the rule and clicking on the ‘Send Me E-mail’ button.
Go to Preferences in the Enterprise Manager console and click Public Rules in the vertical navigation bar. If the conditions defined in the out-of-box notification rules meet the requirements, we can simply subscribe to receive e-mail notifications for the conditions defined in the rule by clicking on Subscribe column in the row of the Public Rules table that corresponds to the notification rule that we are interested in. Click Apply to save the changes.

If we find that the default notification rules do not meet the required needs, we can define our own custom rules. The below step provides the process of notification rule creation.
STEP 5. To create a Notification Rule and subscribe to it, to receive an e-mail
a. Go to Preferences (On Right top of OEM UI) ->Notification-> Rules (On left Panel). [For a super administrator, it will be display Rules while for a normal administrator, it will be My Rules]
b. Click Create button.It will display "Create Notification Rule" pages. Enter the required information on each page to create the notification rule.
E.g. In General tab, Provide rule-Name as "Database Availability and Critical States"-Description as "Database Availability and Critical States"-Select 'Make Public' check box-Select 'Target Type' as "Oracle Server"-Select appropriate radio button to apply rule to all Servers or selective Servers.

On Availability tab,Select 'Up' and 'Down' Checkboxes (and any other status that we are interested in)
If any metrics have been chosen, then add those metrics under Metrics tab.One can add policies/jobs via Policies/Jobs tabs.
On Actions tab,Select 'E-mail Notification', 'Send Me E-mail' checkbox.
Select OK Button.
Note: Notification rules allow us to choose the targets and conditions for which we want to receive notifications from Enterprise Manager. These notifications include e-mail, SNMP traps and running custom scripts.
E-mail Customization
Enterprise Manager allows Super Administrators to customize global e-mail notifications for the four alert types (Metric Alert, Target Availability, Policy Violation, and Job Status Change). Using predefined building blocks (called attributes and labels) contained within a simple script, Super Administrators can customize alert e-mails by selecting from a wide variety of information content.
To customize an e-mail:
1. Access the E-mail Customization page. Setup-->E-mail Customization2. Choose the Alert Type and Format.3. Click Edit. The Edit E-mail Template page is displayed.
From the Edit E-mail Template page, you can modify the content of the e-mail template Enterprise Manager uses to generate e-mail notifications. Extensive information on script formatting, syntax, and options is available from the Edit E-mail Template page via imbedded assistance and online help.

Setting Up E-mail for Other Administrators
If you have Super Administrator privileges, you can set up e-mail notifications for other Enterprise Manager administrators. To set up e-mail notifications for other Enterprise Manager administrators, you need to:
Step 1: Ensure Each Administrator Account has an Associated E-mail Address
Each administrator to which you want to send e-mail notifications must have a valid e-mail address.
1. Click Setup.2. Click Administrators from the vertical navigation bar.
3. For each administrator, define an e-mail address. This sets up a 24x7 notification schedule for this user that uses all the e-mail addresses specified.
Enterprise Manager also allows you to specify an administrator address when editing an administrator's notification schedule.
Step 2: Define Administrators' Notification Schedules
Once you have defined e-mail notification addresses for each administrator, you will need to define their respective notification schedules. Although a default 24x7 notification schedule is created when you specify an e-mail address for the first time, you should review and edit the notification schedule as needed.
1. Click Setup.2. From the vertical navigation bar, click Schedules (under Notification). The Notification Schedule page
appears.
3. Specify the administrator whose notification schedule you wish to edit and click Change.
4. Click Edit Schedule Definition. The Edit Schedule Definition: Time Period page appears. If necessary, modify the rotation schedule.
5. Click Continue. The Edit Schedule Definition: E-mail Addresses page appears.
6. Follow the directions on the Edit Schedule Definition: E-mail Addresses page to modify the notification schedule.
7. Click Finish when you are done.
8. Repeat steps three through seven for each administrator.
Step 3: Assign Notification Rules to Administrators
With the notification schedules set, you now need to assign the appropriate notification rules for each designated administrator.
1. Click Setup.2. From the vertical navigation bar, click Administrators.
3. Select the desire administrator.
4. Click Subscribe to Rules. The Subscribe <administrator> to Public Notification Rules page appears.
5. Select the desired notification rules and click Subscribe.
6. Click OK when you are finished.
7. Repeat steps three through six for each administrator.

Custom Notification Methods using Scripts and PL/SQL Procedure
You can create other custom notification methods based on OS scripts, PL/SQL procedures, or SNMP traps. Any administrator can then use these methods in Notification Rules.
Adding a Notification Method based on an OS Command
You can specify an Operating System command or script that will be called in Notification Rules. The OS Command is run as the user who started the Management Service. The OS command (or script) must exist and be placed on each Management Service host machine that connects to the Management Repository.
Notification methods based on OS commands must be configured by an administrator with superuser privileges before users can choose to select one or more of these OS command methods while creating/editing a notification rule.
The following information is required for each OS command notification method:
Name Description
Both Name and Description should be clear and intuitive so that the function of the method is clear to other administrators.
OS Command
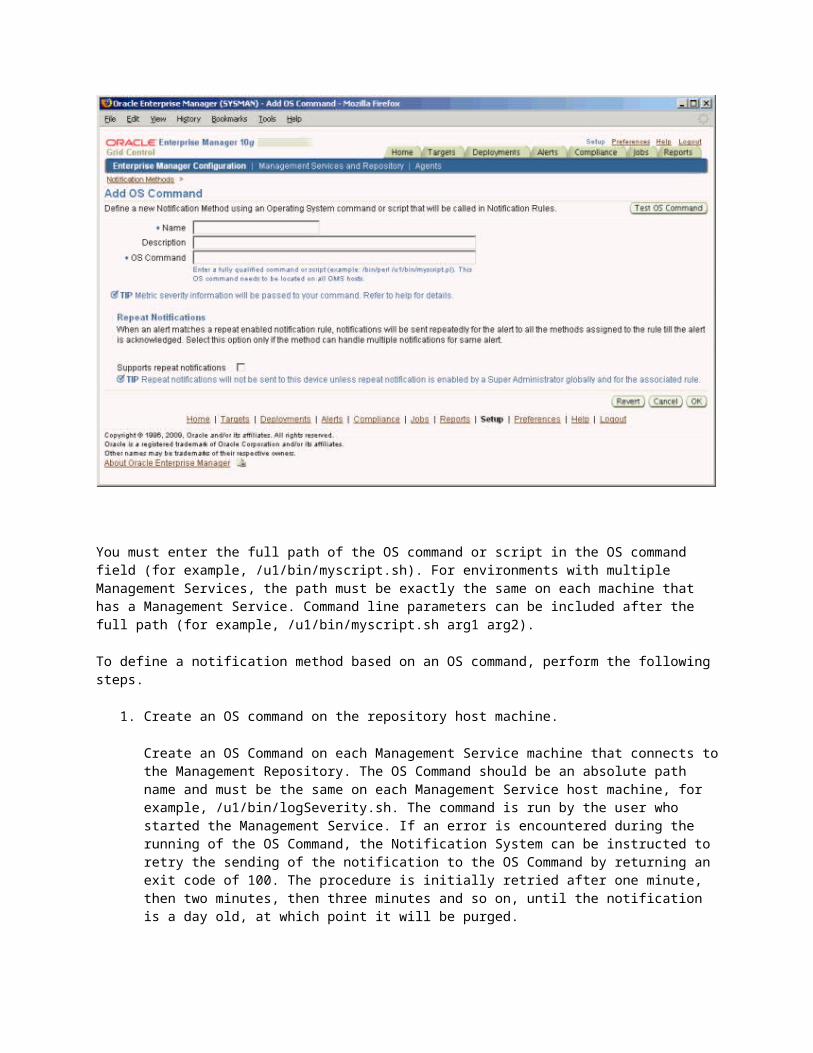
You must enter the full path of the OS command or script in the OS command field (for example, /u1/bin/myscript.sh). For environments with multiple Management Services, the path must be exactly the same on each machine that has a Management Service. Command line parameters can be included after the full path (for example, /u1/bin/myscript.sh arg1 arg2).
To define a notification method based on an OS command, perform the following steps.
1. Create an OS command on the repository host machine.
Create an OS Command on each Management Service machine that connects to the Management Repository. The OS Command should be an absolute path name and must be the same on each Management Service host machine, for example, /u1/bin/logSeverity.sh. The command is run by the user who started the Management Service. If an error is encountered during the running of the OS Command, the Notification System can be instructed to retry the sending of the notification to the OS Command by returning an exit code of 100. The procedure is initially retried after one minute, then two minutes, then three minutes and so on, until the notification is a day old, at which point it will be purged.
2. Add this OS command as a notification method that can be called in Notification Rules. 3. Define a notification rule (choose the targets and conditions for which you want to be notified), and
associate the OS command with the rule. See” STEP 5. To create a Notification Rule".
Example 3 shows an example of the required information.
Example 3 OS Command Notification Method
Name Database StatusDescription Notification to check Current database statusOS Command /private/mozart/bin/CheckStatus.sh
CheckStatus.sh#!/usr/bin/shecho "Database Status:" > /u1/results/alertmsg.txtecho "\n" >> /u1/results/alertmsg.txtecho "target name is " $TARGET_NAME >> /u1/results/alertmsg.txtecho "target type is " $TARGET_TYPE >> /u1/results/alertmsg.txtecho "target is on host " $HOST >> /u1/results/alertmsg.txtecho "metric in alert is " $METRIC >> /u1/results/alertmsg.txtecho "metric index is " $KEY_VALUE >> /u1/results/alertmsg.txtecho "timestamp is " $TIMESTAMP >> /u1/results/alertmsg.txtecho "severity is " $SEVERITY >> /u1/results/alertmsg.txtecho "message is " $MESSAGE >> /u1/results/alertmsg.txtecho "notification rule is " $RULE_NAME >> /u1/results/alertmsg.txtecho "rule owner is " $RULE_OWNER >> /u1/results/alertmsg.txtecho `
sqlplus -s user/pwdselect open_mode from v$database ;
` > Aecho "Open Mode is " $A >> /u1/results/alertmsg.txtmail -s ' Database Status ' [email protected] < alertmsg.txt

exit 0
Adding a Notification Method Based on a PL/SQL ProcedureComplete the following steps to define a notification method based on a PL/SQL procedure.
Step 1: Define the PL/SQL procedure.The procedure must have one of the following signatures depending on the type of notification that will be received.For alerts and policy violations:PROCEDURE p (severity IN MGMT_NOTIFY_SEVERITY)For job execution status changes: PROCEDURE p (job_status_change IN MGMT_NOTIFY_JOB)For corrective action status changes:PROCEDURE p (ca_status_change IN MGMT_NOTIFY_CORRECTIVE_ACTION)
Step 2: Create the PL/SQL procedure on the Management Repository.
Create the PL/SQL procedure on the repository database using one of the following procedure specifications:PROCEDURE p(severity IN MGMT_NOTIFY_SEVERITY)PROCEDURE p(job_status_change IN MGMT_NOTIFY_JOB)PROCEDURE p(ca_status_change IN MGMT_NOTIFY_CORRECTIVE_ACTION)The PL/SQL procedure must be created on the repository database using the database account of the repository owner (such as SYSMAN)
If an error is encountered during the running of the procedure, the Notification System can be instructed to retry the sending of the notification to the procedure by raising a user defined exception that uses the error code -20000. The procedure initially retried after one minute, then two minutes, then three minutes and so on, until the notification is a day old, at which point it will be purged.
Step 3: Register your PL/SQL procedure as a new notification method.
Log in as a Super Administrator, click Setup and then Notification Methods from the vertical navigation bar. From this page, you can define a new notification based on ’PL/SQL Procedure’. Make sure to use a fully qualified name that includes the schema owner, package name and procedure name. The procedure will be executed by the repository owner and so the repository owner must have execute permission on the procedure.
Create a notification method based on your PL/SQL procedure. The following information is required when defining the method:NameDescriptionPL/SQL Procedure
Note: The notification method based on a PL/SQL procedure must be configured by an administrator with Super Administrator privileges before a user can select it while creating/editing a notification rule.
You must enter a fully qualified procedure name (for example, OWNER.PKGNAME.PROCNAME) and ensure that the owner of the Management Repository has execute privilege on the procedure.An example of the required information is shown in Example 4.
Example 4- PL/SQL Procedure Required Information

Name Database StatusDescription Notification method to check Database statusPLSQL Procedure ticket_sys.ticket_ops.check_status