nvivo 9 network administrator's guide
TRANSCRIPT
Network Administrator’s Guide
NVivo 9
This reference guide has been developed specifically for Network Administrators, or anyone
who is installing QSR’s NVivo 9 software onto an organization’s network.
Read the entire guide, or go directly to the page with the information you need. For additional technical
resources, refer to the last page of this guide.
Table of contents
Introduction 2
What is NVivo? 2
What is NVivo Server? 2
Before you install 3
Hardware and software requirements 3
Compatibility with other QSR software 3
Managing updates to NVivo 9 4
Working with data in a language other than English 4
Working with NVivo projects stored on a network drive 4
Installing NVivo 9 without a local database component 5
Pre-installation checklist 5
Installing NVivo 9 6
Installing NVivo 9 using the Windows Installer (MSI) engine 7
Important points to note about installation 10
Activating NVivo 9 11
Activating via the Internet 11
Activating via command line and XML 12
Contacting QSR to activate 12
Extending an existing license 13
Deactivating NVivo 9 13
Deactivating via the Internet 13
Deactivating via command line 13
Removing NVivo 9 14
Removing NVivo 9 using a command line 14
Removing other components 14
Further information 15
For IT Administrators 15
For NVivo users 15
QSR International Pty Ltd Tel: +61 3 9840 1100 Email: [email protected] Web: www.qsrinternational.com
Network Administrator’s Guide Page 2
Introduction
What is NVivo?
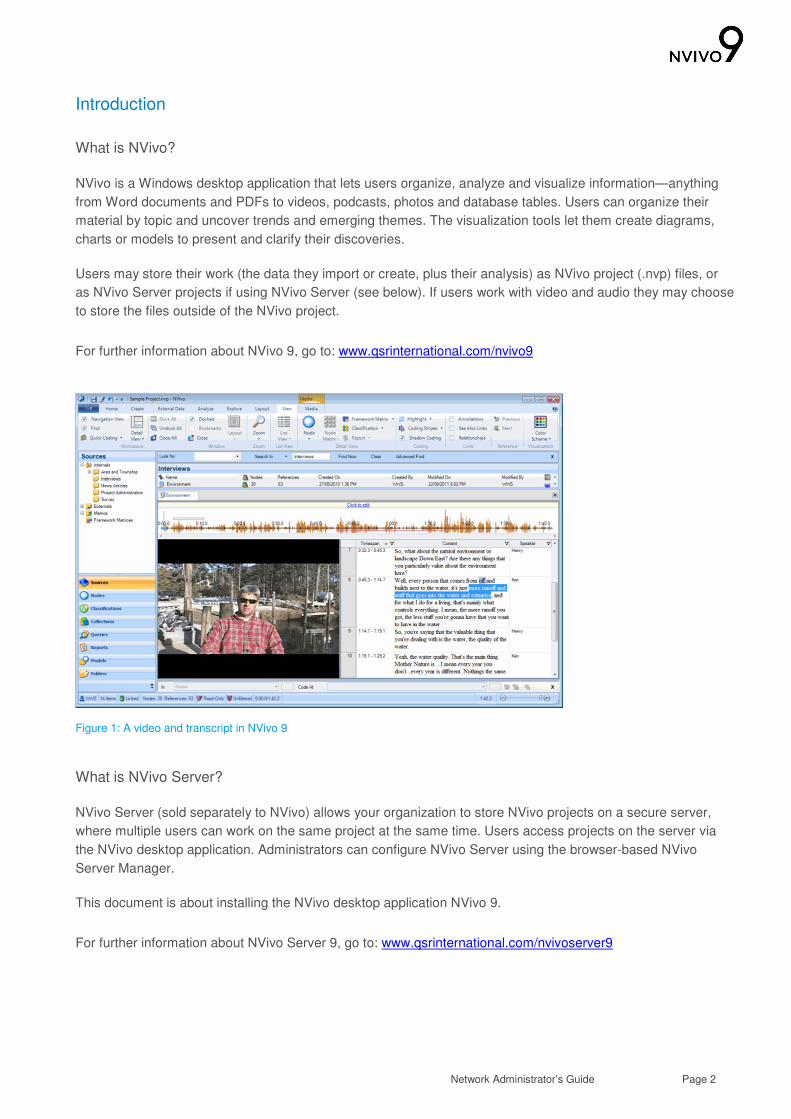
NVivo is a Windows desktop application that lets users organize, analyze and visualize information—anything
from Word documents and PDFs to videos, podcasts, photos and database tables. Users can organize their
material by topic and uncover trends and emerging themes. The visualization tools let them create diagrams,
charts or models to present and clarify their discoveries.
Users may store their work (the data they import or create, plus their analysis) as NVivo project (.nvp) files, or
as NVivo Server projects if using NVivo Server (see below). If users work with video and audio they may choose
to store the files outside of the NVivo project.
For further information about NVivo 9, go to: www.qsrinternational.com/nvivo9
Figure 1: A video and transcript in NVivo 9
What is NVivo Server?
NVivo Server (sold separately to NVivo) allows your organization to store NVivo projects on a secure server,
where multiple users can work on the same project at the same time. Users access projects on the server via
the NVivo desktop application. Administrators can configure NVivo Server using the browser-based NVivo
Server Manager.
This document is about installing the NVivo desktop application NVivo 9.
For further information about NVivo Server 9, go to: www.qsrinternational.com/nvivoserver9

Network Administrator’s Guide Page 3
Before you install
Hardware and software requirements
Before installing NVivo 9, make sure that your computer meets these hardware and software requirements:
Component Minimum Recommended
Processor 1.2 GHz Pentium III-compatible (32-bit) or
1.4 GHz Pentium 4-compatible (64-bit)
2.0 GHz Pentium 4-compatible or faster
Memory 1 GB 2 GB or more
Display 1024 x 768 screen resolution 1280 x 1024 screen resolution or higher
For non-English NVivo user interfaces, 1440 x 900
screen resolution or higher is recommended
Operating system Microsoft Windows XP SP2 Microsoft Windows XP SP2 or later, or Microsoft
Windows Vista SP1 or later, or Microsoft Windows 7
Hard disk Approximately 1 GB of available hard-disk
space – or more depending on data
storage needs
Approximately 2 GB of available hard-disk space –
or more depending on data storage needs
Other Internet connection
NVivo 9 is designed to operate on Microsoft Windows natively. If you are running the software on a virtual
platform on a Mac, these system requirements may not apply.
Compatibility with other QSR software
NVivo 9 allows users to open and work with projects from previous versions of QSR software: NVivo 8, NVivo 7,
NVivo 2, NVivo 1, N6 (NUD*IST 6), N5 and N4.
NVivo 9.1 and NVivo 9.2 (free updates for NVivo 9, released in June 2011 and September 2011 respectively)
allow users to open and work with projects created in NVivo 9.0, and with projects from the previous versions of
QSR software listed above.
These previous versions can continue to operate on the same computer as NVivo 9. However if you no longer
intend to use a previous version, we recommend that you uninstall it before installing NVivo 9.
If you are a site license customer, it is your obligation to ensure that the total number of QSR software products
installed does not exceed the permitted number you are entitled to have under your site license agreement.
Network Administrator’s Guide Page 4
Managing updates to NVivo 9
The following free updates have been made available for NVivo 9:
• NVivo 9.1 was released in June 2011. It provides many enhancements, including significantly improved
PDF handling.
• NVivo 9.2 was released in September 2011. It provides more enhancements, including the ability for
users to work with NVivo in five interface languages (in addition to English). These languages are
French, German, Portuguese, Spanish and Simplified Chinese. In addition, this update delivers support
for the Framework method within NVivo.
NVivo provides backward compatibility—if a user with a later version of NVivo attempts to open a project in an
earlier format (for example, a user opens an NVivo 9.1 project in NVivo 9.2), the user is prompted to convert the
project to the later format. The original project is not modified; instead a converted copy of the project is created.
NVivo does not provide forward compatibility—the user cannot open a project with a later format. For example,
if a user wants to open an NVivo 9.1 project, they must have NVivo 9.1 (or later) installed. Or, if a user wants to
open an NVivo 9.2 project, they must have NVivo 9.2 (or later) installed.
All users who are working together in a shared project should be using the same version of NVivo. If you install
NVivo 9.2 for one user, make sure the other team members are also using NVivo 9.2.
IMPORTANT: If your organization has NVivo Server 9, make sure that this software is up-to-date (SP1 or later)
before you update the NVivo 9 software installed on client machines. Only NVivo Server 9 (SP1 or later) can
host projects in all NVivo 9 formats, and permit connections from any version of the NVivo 9 desktop
application.
Working with data in a language other than English
You can import and work with data in virtually any language in NVivo. If you do intend to work with data in a
language other than English, you must ensure that the language has been installed on your computer. Refer to
the Microsoft Windows online help for more information.
NOTE: In addition to supporting data in virtually any language, NVivo 9.2 (or later) provides five interface
languages (in addition to English)—French, German, Portuguese, Spanish and Simplified Chinese. A separate
Japanese interface is also available.
Working with NVivo projects stored on a network drive
By default, when users work with NVivo projects that are stored on a network drive, project changes are saved
to a local temporary file until the user closes the project. When the user closes the project, the network file is
updated with all their changes. To avoid loss of data, users should close the NVivo project before they turn off
their computer.
Users can change the network save option in NVivo, so that NVivo updates the network file every time they
save. However, for large projects, the save process may take longer to execute (as the data is transferred
across the network).
You can also set the network save option when you install NVivo, see ‘Installing NVivo 9 using the Windows
Installer (MSI) engine’ on page 7.

Network Administrator’s Guide Page 5
Installing NVivo 9 without a local database component
If your organization has NVivo Server 9, and your NVivo 9 users intend to work exclusively with NVivo Server
projects, you may install NVivo 9 without a local database component (SQL Server 2008 R2 Express Edition).
Installing NVivo 9 without a local database component can simplify the deployment of NVivo 9 on virtual desktop
environments such as Citrix XenApp. However, if you choose to install NVivo 9 without a local database
component, NVivo 9 users cannot work with standalone NVivo project files (.nvp files) – they can only work with
NVivo Server projects.
To install NVivo 9 without a local database component, see ‘Installing NVivo 9 using the Windows Installer (MSI)
engine’ on page 7.
Installing 32-bit and 64-bit versions of NVivo 9
Two versions of NVivo 9 are available:
• 32-bit NVivo 9
• 64-bit NVivo 9 for 64-bit Windows 7
The software DVD for NVivo 9 Service Pack 1 (and later) includes both versions, and both versions are also
available to download from http://www.qsrinternational.com/support_downloads.aspx
To upgrade from a 32-bit version of NVivo 9 to a 64-bit version, you will need to deactivate and uninstall NVivo 9
prior to installing the new version. If you are considering upgrading, it is important that you first understand any
known limitations with the 64-bit version of NVivo 9—refer to http://redirect.qsrinternational.com/known-issues-
nv9-en.htm
Pre-installation checklist
We recommend that you check the following items before attempting to install NVivo 9:
• You need approximately 2 GB of available hard-disk space on the computer (on which you are installing
NVivo 9) during the installation process.
• You must have full Administrator privileges for the computer on which you are installing NVivo 9. After
installation, NVivo 9 can be run by a ‘least privileged’ user.
• You should disable Antivirus, Antispam and Firewall applications (such as Norton™ Internet Security) before
installing NVivo 9, as these applications can impact the successful installation of NVivo 9’s Microsoft SQL
Server Express database component. Importantly, these should be re-enabled after you have installed
NVivo 9.
• NVivo 9’s Microsoft SQL Server Express database component cannot be installed on compressed or virtual
drives, so if you have set up your computer in this manner to conserve disk space, you will need to install
NVivo 9 on an uncompressed drive.
• NVivo 9’s Microsoft SQL Server Express database component cannot be installed on a machine that is
running another edition of SQL Server, such as SQL Server Standard Edition.
Network Administrator’s Guide Page 6
• If there is an existing installation of Microsoft SQL Server Native Client on your machine then this may need
to be uninstalled before you install NVivo 9. It will be replaced during the installation process. You can
uninstall this via the Control Panel>Uninstall a program. Refer to Microsoft Windows online help for
detailed instructions on how to uninstall a program.
• If the C:\Program Files\Microsoft SQL Server directory or any of its subdirectories have the 'Compress' or
'Encrypt' options enabled, then SQL Server may not install or run correctly. You can check this by using the
following steps:
a Open Windows Explorer.
b Navigate to C:\Program Files\Microsoft SQL Server.
c Right click on this folder and select Properties from the context menu.
d In the General tab, click on the Advanced button and ensure both the 'Compress...' and 'Encrypt...'
checkboxes are unchecked.
e Reinstall NVivo 9 (you may need to uninstall first if you had previously attempted to install).
Installing NVivo 9
NVivo 9 can be installed using a setup wizard, or silently via the command line. This section describes how to
install NVivo 9 using the setup wizard. Installing via the command line is covered in the next section.
In either case, you must have full Administrator privileges for the computer on which you are installing NVivo 9.
You will also need your NVivo 9 license key. You can find this on your NVivo 9 DVD case, or—if you
downloaded the software—in the download email communication received from QSR.
Follow these steps to install NVivo 9 using the setup wizard:
1 Insert the NVivo 9 DVD into the DVD drive. If the DVD menu does not automatically display, locate and
double-click the file NV9Menu.exe on the DVD. Click Install now* to start the setup wizard.
OR
If you obtained NVivo electronically, locate and double-click the NVivo9.exe file you downloaded. The
installation process starts automatically.
* If you’re running a 64-bit version of Windows 7, you have the option of installing either a 32-bit or 64-bit
version of NVivo 9.
2 Follow the prompts in the setup wizard to:
• Install any prerequisite components. You may be asked to restart your computer—on restart the
installation will continue automatically.
• Accept the license agreement and enter your NVivo 9 license key.
• Select the Complete set up option, and then select other options as required.
NOTE: If you select the Custom set up option and choose not to install the Project Converters, users will be
unable to convert projects created in NVivo 2, NVivo 1, N6, N5 and N4 for use in this version of NVivo.
Network Administrator’s Guide Page 7
Installing NVivo 9 using the Windows Installer (MSI) engine
You can use the Microsoft Windows Installer (MSI) engine to perform a silent installation of NVivo 9. A silent
installation is undertaken entirely from the command line and requires no user interaction.
The MSI file and program files can be extracted from the NVivo 9 installer using the following commands:
For software delivered electronically via download, use: NVivo9.exe /a
For software on DVD, use: setup.exe /a
MSI installation is only supported for full installations (not service packs), so if you have a previous version of
NVivo 9 installed, you‘ll need to uninstall first.
Prerequisites
If you intend to install NVivo 9 using the Windows Installer (MSI) engine, you will need to ensure that the
prerequisites for NVivo 9 are installed before you install NVivo 9.
Installing NVivo 9 and its prerequisites requires Windows Installer 4.5, which can be downloaded (if not
already installed) from:
http://www.microsoft.com/downloads/details.aspx?FamilyID=5a58b56f-60b6-4412-95b9-54d056d6f9f4
Windows Installer Packages for NVivo 9’s prerequisites are available for download from the following locations:
Microsoft .NET Framework 3.5 SP1
http://download.qsrinternational.com/Software/NVivo9/Components/dotnetfx35.exe (231 MB)
Microsoft SQL Server 2008 R2 SP1 Express Edition (x86) - For the 32-bit version of NVivo 9 only
http://download.qsrinternational.com/Software/NVivo9/Components/SQLEXPR_x86_ENU.exe (106.0 MB)
Microsoft SQL Server 2008 R2 SP1 Express Edition (x64) - For the 64-bit version of NVivo 9 only
http://download.qsrinternational.com/Software/NVivo9/Components/SQLEXPR_x64_ENU.exe (117.0 MB)
Quick Time Player 7.7 - For the 32-bit version of NVivo 9 only
http://download.qsrinternational.com/Software/NVivo9/Components/QuickTimeInstaller.exe (37.1 MB)
Windows Media Player 11 (x86) - For Windows XP and Vista only
http://download.qsrinternational.com/Software/NVivo9/Components/wmp11-windowsxp-x86-enu.exe (24.5 MB)
Later releases of the above components may become available. However we recommend that you use the
versions listed above, as these have been tested with NVivo 9.
Performing a silent install (32-bit version of NVivo 9)
1 Go to the command line prompt.
2 Install Microsoft .NET Framework 3.5 SP1 (if not already installed) using the following command line:
dotnetfx35.exe /qb

Network Administrator’s Guide Page 8
3 Install NVivo 9’s Microsoft SQL Server 2008 R2 SP1 Express Edition database instance using the following
command line:
SQLEXPR_x86_ENU.exe /QS /ACTION=INSTALL /FEATURES=SQLEngine
/INSTANCENAME=QSRNVivo9 /SQLCOLLATION=Latin1_General_BIN
/SQLSVCSTARTUPTYPE=Automatic /SQLSVCACCOUNT="NT AUTHORITY\NETWORK SERVICE"
/SQLSYSADMINACCOUNTS="BUILTIN\ADMINISTRATORS"
/IAcceptSQLServerLicenseTerms="True"
NOTE: Omit this step if you wish to install NVivo 9 without a local database component. See ‘Installing NVivo
9 without a local database component’ on page 5 of this document.
4 Prepare to install QuickTime Player 7.7 by using this command line to extract its component packages:
QuickTimeInstaller.exe /extract
Then install each of its component packages using the following command lines:
AppleApplicationSupport.msi /qb
QuickTime.msi /qb DESKTOP_SHORTCUTS=0
AppleSoftwareUpdate.msi /qb
5 Install Windows Media Player 11 for Windows XP and Vista only (if not already installed) using the following
command line):
wmp11-windowsxp-x86-enu.exe /q
6 Install NVivo using the following command line:
msiexec /Option <Required Parameter> [Optional Parameter]
NOTE: For a list of command line options and public properties, refer to the tables in ‘Command
line options and public properties’ on the following page.
Performing a silent install (64-bit version of NVivo 9)
1 Go to the command line prompt.
2 Install Microsoft .NET Framework 3.5 SP1 (if not already installed) using the following command line:
dotnetfx35.exe /qb
3 Install NVivo 9’s Microsoft SQL Server 2008 R2 SP1 Express Edition database instance using the following
command line:
SQLEXPR_x64_ENU.exe /QS /ACTION=INSTALL /FEATURES=SQLEngine
/INSTANCENAME=QSRNVivo9 /SQLCOLLATION=Latin1_General_BIN
/SQLSVCSTARTUPTYPE=Automatic /SQLSVCACCOUNT="NT AUTHORITY\NETWORK SERVICE"
/SQLSYSADMINACCOUNTS="BUILTIN\ADMINISTRATORS"
/IAcceptSQLServerLicenseTerms="True"
NOTE: Omit this step if you wish to install NVivo 9 without a local database component. See ‘Installing NVivo
9 without a local database component’ on page 5 of this document.
4 Install NVivo using the following command line:
msiexec /Option <Required Parameter> [Optional Parameter]
NOTE: For a list of command line options and public properties, refer to the tables in ‘Command line options
and public properties’ on the following page.
Network Administrator’s Guide Page 9
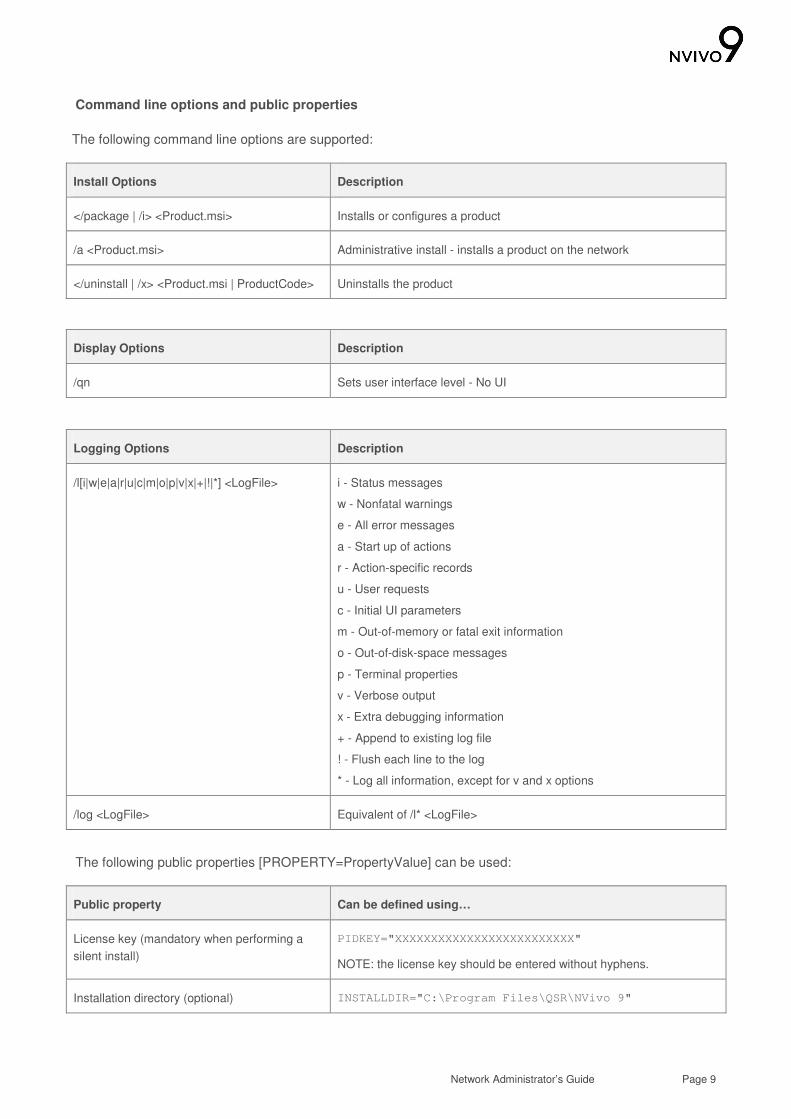
Command line options and public properties
The following command line options are supported:
Install Options Description
</package | /i> <Product.msi> Installs or configures a product
/a <Product.msi> Administrative install - installs a product on the network
</uninstall | /x> <Product.msi | ProductCode> Uninstalls the product
Display Options Description
/qn Sets user interface level - No UI
Logging Options Description
/l[i|w|e|a|r|u|c|m|o|p|v|x|+|!|*] <LogFile> i - Status messages
w - Nonfatal warnings
e - All error messages
a - Start up of actions
r - Action-specific records
u - User requests
c - Initial UI parameters
m - Out-of-memory or fatal exit information
o - Out-of-disk-space messages
p - Terminal properties
v - Verbose output
x - Extra debugging information
+ - Append to existing log file
! - Flush each line to the log
* - Log all information, except for v and x options
/log <LogFile> Equivalent of /l* <LogFile>
The following public properties [PROPERTY=PropertyValue] can be used:
Public property Can be defined using…
License key (mandatory when performing a
silent install)
PIDKEY="XXXXXXXXXXXXXXXXXXXXXXXXX"
NOTE: the license key should be entered without hyphens.
Installation directory (optional) INSTALLDIR="C:\Program Files\QSR\NVivo 9"
Network Administrator’s Guide Page 10
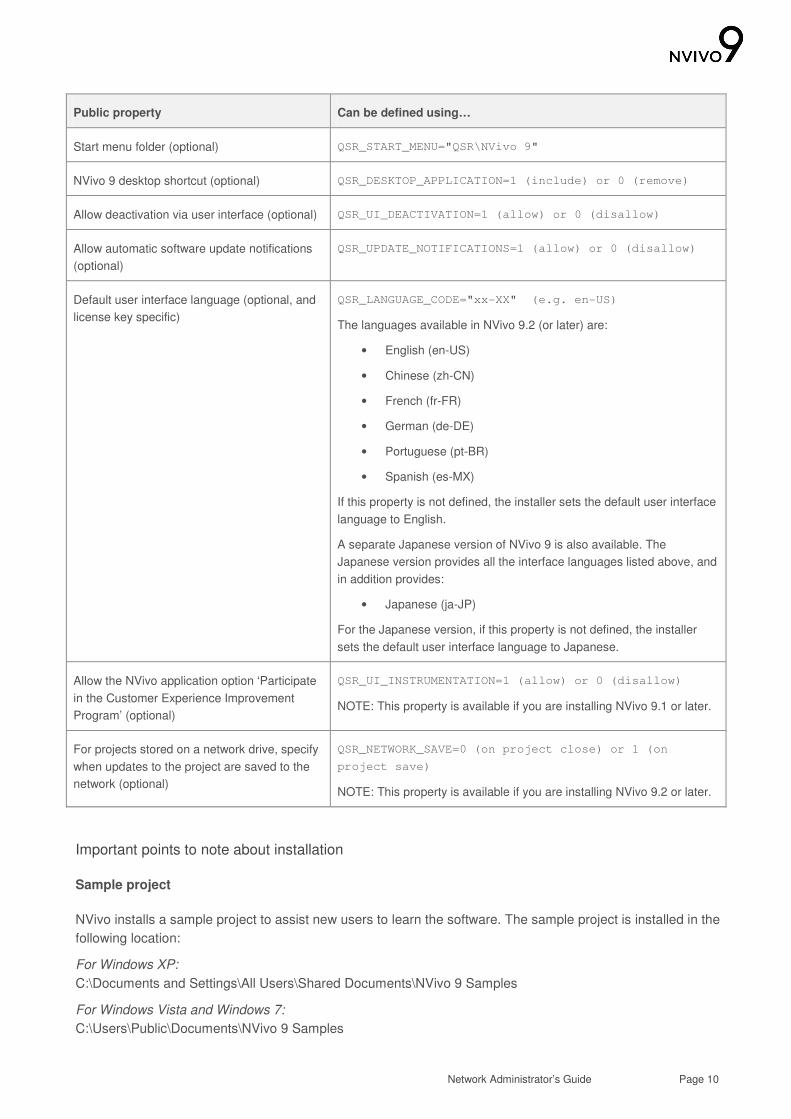
Public property Can be defined using…
Start menu folder (optional) QSR_START_MENU="QSR\NVivo 9"
NVivo 9 desktop shortcut (optional) QSR_DESKTOP_APPLICATION=1 (include) or 0 (remove)
Allow deactivation via user interface (optional) QSR_UI_DEACTIVATION=1 (allow) or 0 (disallow)
Allow automatic software update notifications
(optional)
QSR_UPDATE_NOTIFICATIONS=1 (allow) or 0 (disallow)
Default user interface language (optional, and
license key specific)
QSR_LANGUAGE_CODE="xx-XX" (e.g. en-US)
The languages available in NVivo 9.2 (or later) are:
• English (en-US)
• Chinese (zh-CN)
• French (fr-FR)
• German (de-DE)
• Portuguese (pt-BR)
• Spanish (es-MX)
If this property is not defined, the installer sets the default user interface
language to English.
A separate Japanese version of NVivo 9 is also available. The
Japanese version provides all the interface languages listed above, and
in addition provides:
• Japanese (ja-JP)
For the Japanese version, if this property is not defined, the installer
sets the default user interface language to Japanese.
Allow the NVivo application option ‘Participate
in the Customer Experience Improvement
Program’ (optional)
QSR_UI_INSTRUMENTATION=1 (allow) or 0 (disallow)
NOTE: This property is available if you are installing NVivo 9.1 or later.
For projects stored on a network drive, specify
when updates to the project are saved to the
network (optional)
QSR_NETWORK_SAVE=0 (on project close) or 1 (on
project save)
NOTE: This property is available if you are installing NVivo 9.2 or later.
Important points to note about installation
Sample project
NVivo installs a sample project to assist new users to learn the software. The sample project is installed in the
following location:
For Windows XP:
C:\Documents and Settings\All Users\Shared Documents\NVivo 9 Samples
For Windows Vista and Windows 7:
C:\Users\Public\Documents\NVivo 9 Samples
Network Administrator’s Guide Page 11
On installation, file system permissions for the sample project are set so that all users have full read/write
access.
Automatic services
Unless you have chosen to install NVivo 9 without a local database component (see ‘Installing NVivo 9 without a
local database component’ on page 5 of this document), the SQL Server (QSRNVIVO9) service is configured to
start automatically on workstation startup, operating under the Network Service account.
This service provides NVivo 9 with database access to standalone NVivo project files (.nvp files).
Any security software that checks for automatic services should be set to allow this service to start.
Registry keys
NVivo 9 requires all users to have full read/write access to the appropriate areas of the registry in order to
operate. These are:
HKEY_LOCAL_MACHINE/SOFTWARE/QSR; and
HKEY_LOCAL_MACHINE/SOFTWARE/Environment
NVivo sets these permissions during the installation process and no action is required by the Network
Administrator. However, if the registry permissions installed by NVivo 9 are modified after installation, NVivo 9
may fail to launch.
Deploying NVivo 9 using a disk image
If your organization has an NVivo 9 site license, you may choose to deploy NVivo 9 to multiple workstations by
installing it once and copying the disk image to the individual workstations.
However, you must activate NVivo 9 on each individual workstation that it is deployed to—see the section on
‘Activating NVivo 9’ below.
Activating NVivo 9
After installing NVivo, you have a limited amount of time before you are required to ‘activate’ the product.
Product activation is a simple and secure process that ensures only valid licenses are used to operate the
software.
Licenses may be activated via the Internet or by contacting QSR. Each instance of NVivo 9 needs to be
activated, so if you are installing NVivo 9 in an onsite laboratory or across a network, activation is required from
each workstation.
Activating via the Internet
If you are connected to the Internet, you can activate your license online.
1 Ensure that you are connected to the Internet.
2 Click File, point to Help, and then click Activate License (or Activate Now on the activation reminder). The
Activate dialog box is displayed.
3 Click Activate via Internet.
Network Administrator’s Guide Page 12
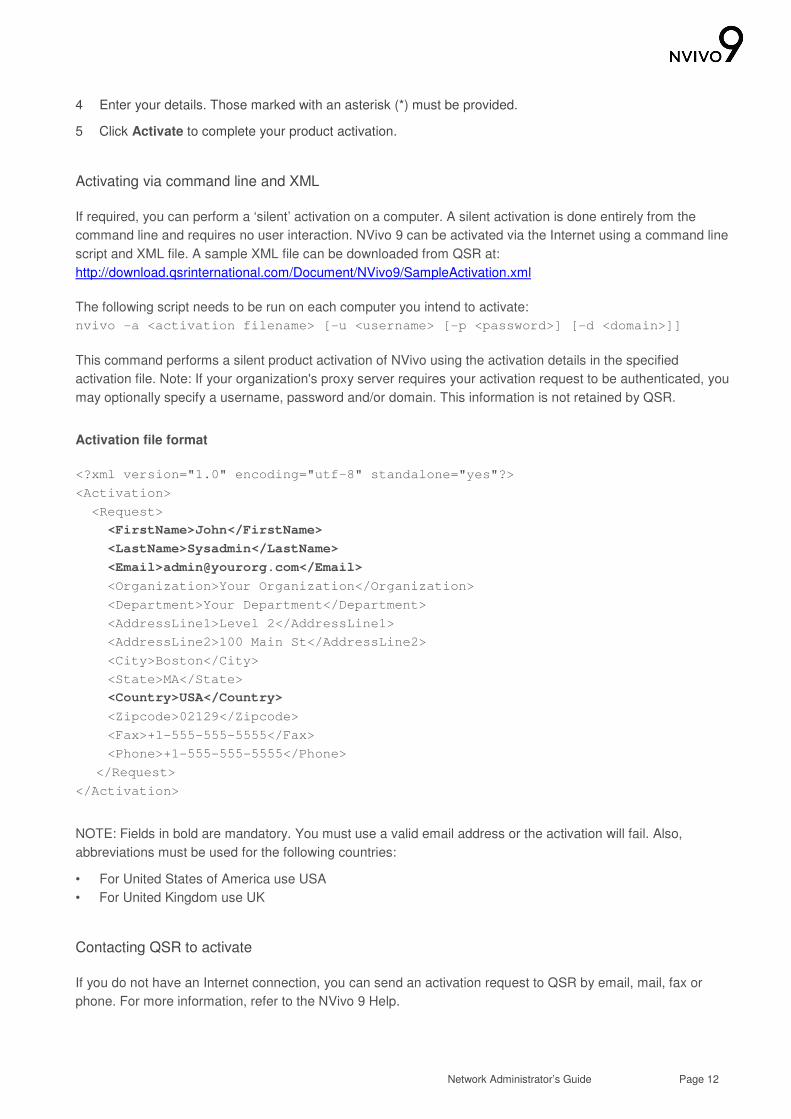
4 Enter your details. Those marked with an asterisk (*) must be provided.
5 Click Activate to complete your product activation.
Activating via command line and XML
If required, you can perform a ‘silent’ activation on a computer. A silent activation is done entirely from the
command line and requires no user interaction. NVivo 9 can be activated via the Internet using a command line
script and XML file. A sample XML file can be downloaded from QSR at:
http://download.qsrinternational.com/Document/NVivo9/SampleActivation.xml
The following script needs to be run on each computer you intend to activate:
nvivo -a <activation filename> [-u <username> [-p <password>] [-d <domain>]]
This command performs a silent product activation of NVivo using the activation details in the specified
activation file. Note: If your organization's proxy server requires your activation request to be authenticated, you
may optionally specify a username, password and/or domain. This information is not retained by QSR.
Activation file format
<?xml version="1.0" encoding="utf-8" standalone="yes"?>
<Activation>
<Request>
<FirstName>John</FirstName>
<LastName>Sysadmin</LastName>
<Email>[email protected]</Email>
<Organization>Your Organization</Organization>
<Department>Your Department</Department>
<AddressLine1>Level 2</AddressLine1>
<AddressLine2>100 Main St</AddressLine2>
<City>Boston</City>
<State>MA</State>
<Country>USA</Country>
<Zipcode>02129</Zipcode>
<Fax>+1-555-555-5555</Fax>
<Phone>+1-555-555-5555</Phone>
</Request>
</Activation>
NOTE: Fields in bold are mandatory. You must use a valid email address or the activation will fail. Also,
abbreviations must be used for the following countries:
• For United States of America use USA
• For United Kingdom use UK
Contacting QSR to activate
If you do not have an Internet connection, you can send an activation request to QSR by email, mail, fax or
phone. For more information, refer to the NVivo 9 Help.
Network Administrator’s Guide Page 13
Extending an existing license
You can extend an existing license that is about to expire. Click File, point to Help, and then click Extend
License.
Alternatively you can extend a license using the following command:
nvivo –e xxxxx-xxxxx-xxxxx-xxxxx-xxxxx
NOTE:
1 The hyphens are required when extending a license via command line.
2 After you have extended an existing license, your new license will need to be activated.
Deactivating NVivo 9
You can deactivate the NVivo 9 license on a particular computer. For example, if you get a new computer, you
should deactivate the NVivo license on your old computer, before installing and activating NVivo on your new
computer.
Deactivating via the Internet
To deactivate NVivo:
1 Ensure that you are connected to the Internet.
2 If you have an NVivo project open, you must close it before you can deactivate the license—click File, and
then click Close.
3 Click File, point to Help, and then click Deactivate License.
4 Click Yes to confirm.
NVivo deactivates the license and displays a message confirming that the license has been deactivated.
5 Click OK.
The NVivo application automatically closes.
Deactivating via command line
NVivo 9 can also be deactivated via the Internet using a command line script. The following script needs to be
run on each computer you want to deactivate:
nvivo -deactivate [-u <username> [-p <password>] [-d <domain>]]
This command performs a ‘silent’ deactivation of the NVivo license.
NOTE: If your organization’s proxy server requires your deactivation request to be authenticated, you may
optionally specify a username, password and/or domain. This information is not retained by QSR International.

Network Administrator’s Guide Page 14
Removing NVivo 9
To remove NVivo 9:
1 On your Windows Start menu, click the Control Panel option.
The Control Panel is displayed.
2 Click the Uninstall a program option.
3 Select QSR NVivo 9 (or QSR NVivo 9.x) from the list of currently installed programs.
4 Click the Uninstall button.
You are prompted to confirm the removal of QSR NVivo 9.
5 Click Yes.
The NVivo software is removed from your computer.
Removing NVivo 9 using a command line
Alternatively, to remove the NVivo 9 software using a command line, run the following command:
msiexec /x {82184A1C-52B8-438F-A79B-8D7580114987} /qb
Removing other components
NVivo relies on a number of other components to run, and if they are not already present when you install the
software using the setup wizard, NVivo will install them for you. However, when NVivo is uninstalled, these
components remain on the workstation. These components can be removed individually using the Uninstall a
program function which can be accessed from your computer Control Panel. You should only uninstall them if
you are certain that they are not utilized by other programs on your computer.
The components to be removed, in order, are:
• Microsoft SQL Server 2008 R2 SP1 Express Edition
• Microsoft .NET Framework 3.5 SP1
• Quick Time Player 7
• Windows Media Player 11

Network Administrator’s Guide Page 15
Further information
For IT Administrators
Go to: www.qsrinternational.com/it-admin for further resources for both NVivo 9 and NVivo Server 9, including:
• Licensing information
• Frequently asked questions and answers
• Tutorials for users
• User guides
For NVivo users
An extensive range of free resources are available to help NVivo users to get up and running. We encourage
you to make them widely available by posting a link on your organization’s Intranet for example. Here’s the link:
http://www.qsrinternational.com/getting-started
Copyright © 2011 QSR International Pty Ltd. ABN 47 006 357 213. All rights reserved. NVivo and QSR words and logos are trademarks or
registered trademarks of QSR International Pty Ltd. Microsoft, .NET, SQL Server, Windows, XP, Vista, Windows Media Player and Word
are trademarks or registered trademarks of the Microsoft Corporation in the United States and/or other countries. Citrix® and XenApp™ are
trademarks of Citrix Systems, Inc. and/or one or more of its subsidiaries, and may be registered in the United States Patent and Trademark
Office and in other countries. Norton™ is a trademark or registered trademark of Symantec Corporation or its affiliates in the U.S. and other
countries. QuickTime is a trademark or registered trademark of Apple Inc., used under license there from. This information is subject to
change without notice.
Version 1/20 September 2011