nouvelle construction...engineers, sei/asce 7-05, 2005 code international de construction,...
TRANSCRIPT
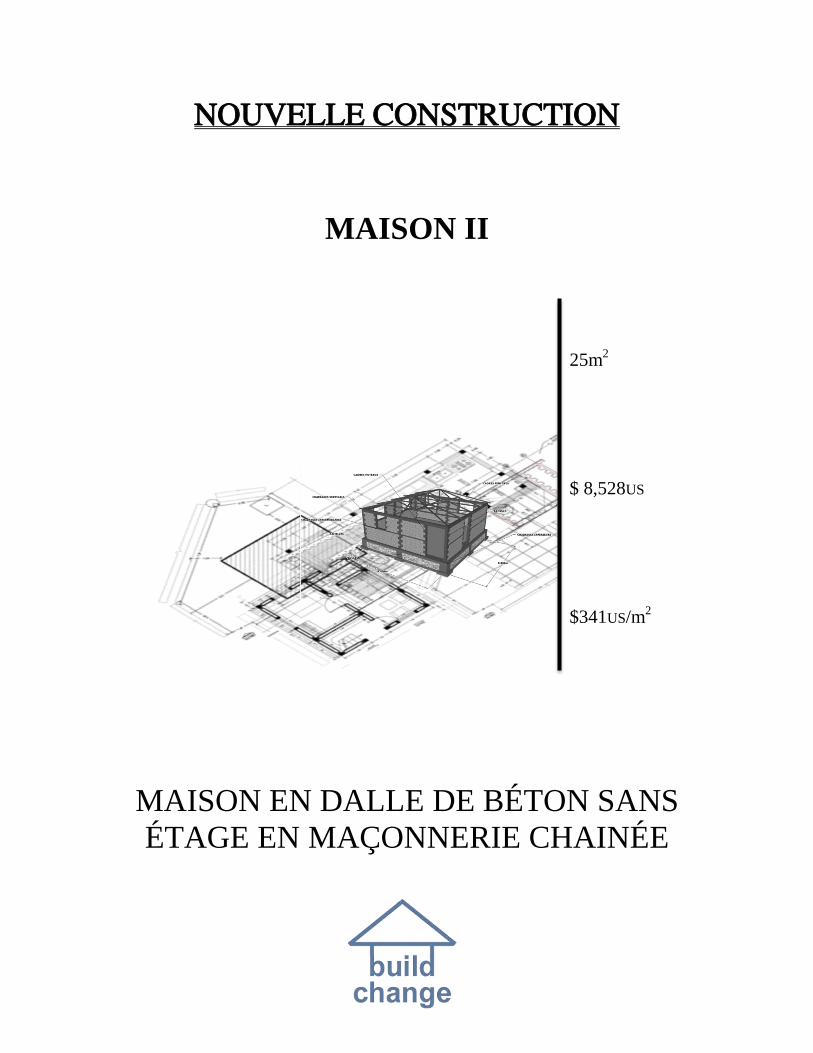
NOUVELLE CONSTRUCTION
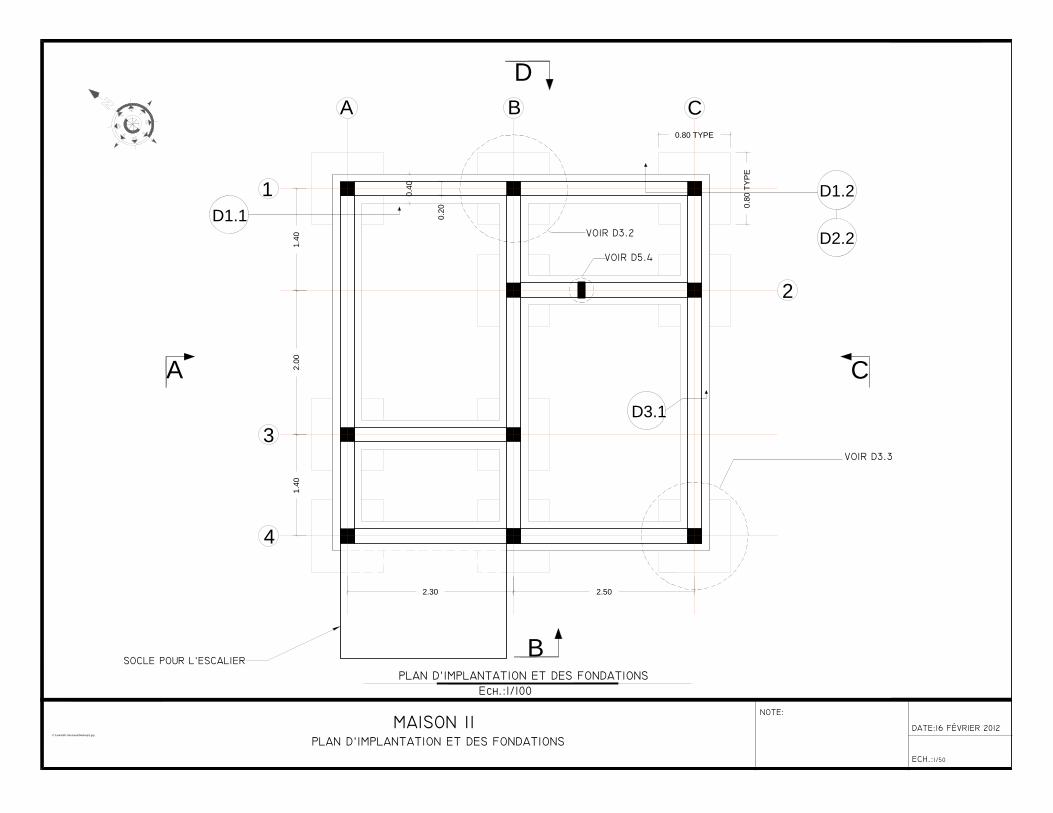
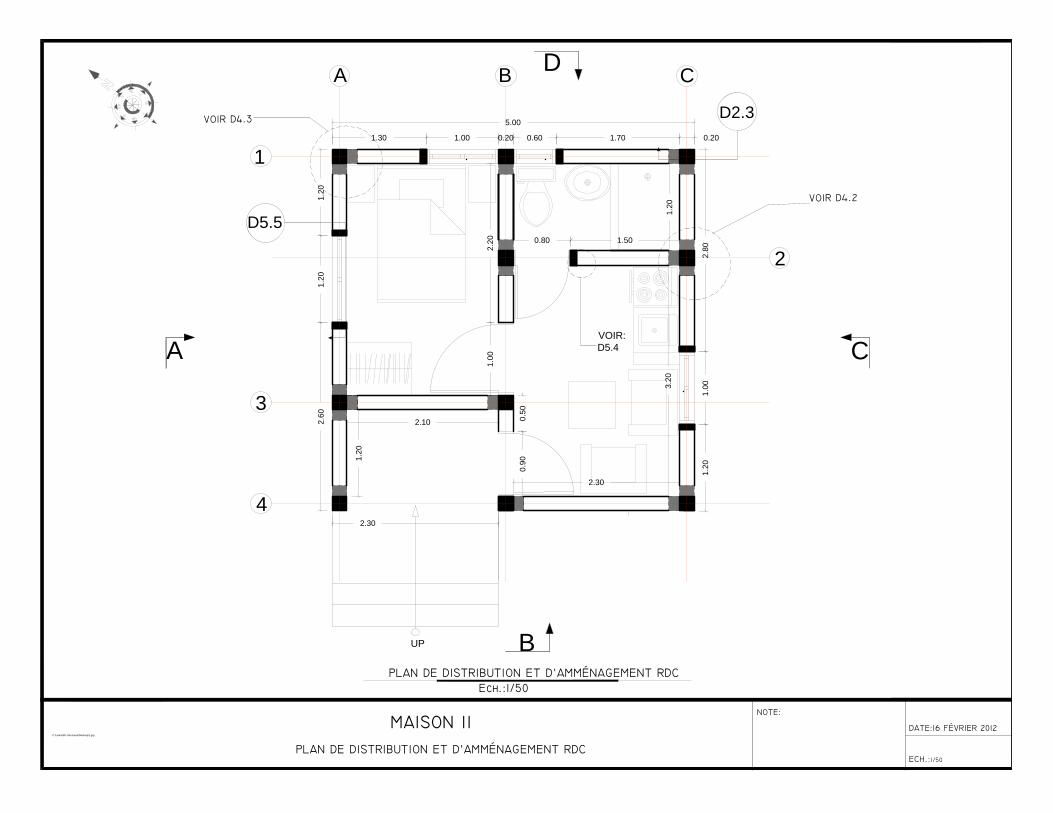
MAISON II
MAISON EN DALLE DE BÉTON SANS
ÉTAGE EN MAÇONNERIE CHAINÉE
25m2
$ 8,528US
$341US/m2
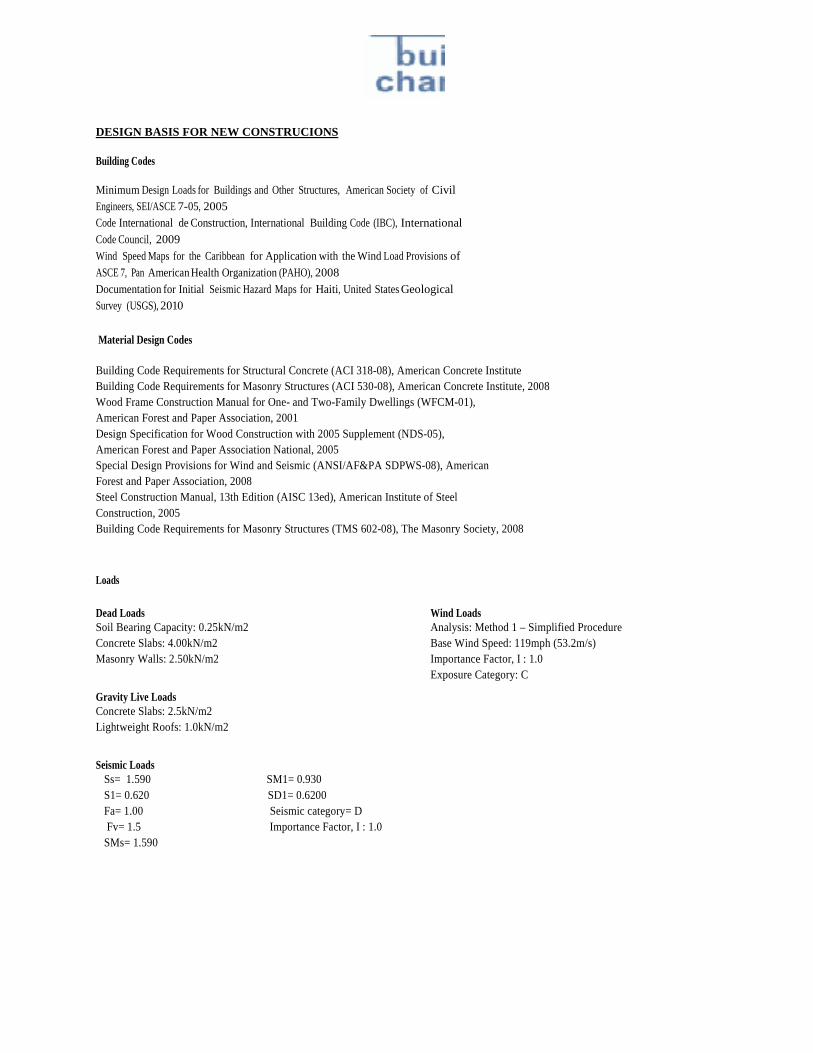
DESIGN BASIS FOR NEW CONSTRUCIONS
Building Codes
Minimum Design Loads for Buildings and Other Structures, American Society of Civil Engineers, SEI/ASCE 7-05, 2005 Code International de Construction, International Building Code (IBC), International Code Council, 2009 Wind Speed Maps for the Caribbean for Application with the Wind Load Provisions of ASCE 7, Pan American Health Organization (PAHO), 2008 Documentation for Initial Seismic Hazard Maps for Haiti, United States Geological Survey (USGS), 2010
Material Design Codes Building Code Requirements for Structural Concrete (ACI 318-08), American Concrete Institute Building Code Requirements for Masonry Structures (ACI 530-08), American Concrete Institute, 2008 Wood Frame Construction Manual for One- and Two-Family Dwellings (WFCM-01), American Forest and Paper Association, 2001 Design Specification for Wood Construction with 2005 Supplement (NDS-05), American Forest and Paper Association National, 2005 Special Design Provisions for Wind and Seismic (ANSI/AF&PA SDPWS-08), American Forest and Paper Association, 2008 Steel Construction Manual, 13th Edition (AISC 13ed), American Institute of Steel Construction, 2005 Building Code Requirements for Masonry Structures (TMS 602-08), The Masonry Society, 2008 Loads
Dead Loads Soil Bearing Capacity: 0.25kN/m2 Concrete Slabs: 4.00kN/m2 Masonry Walls: 2.50kN/m2
Gravity Live Loads
Wind Loads Analysis: Method 1 – Simplified Procedure Base Wind Speed: 119mph (53.2m/s) Importance Factor, I : 1.0 Exposure Category: C
Concrete Slabs: 2.5kN/m2 Lightweight Roofs: 1.0kN/m2
Seismic Loads Ss= 1.590 SM1= 0.930 S1= 0.620 SD1= 0.6200 Fa= 1.00 Seismic category= D Fv= 1.5 Importance Factor, I : 1.0 SMs= 1.590
1
A B C
3
4
2
0.80 T
YP
E
0.80 TYPE
0.20
0.4
0
2.30
1.40
2.00
1.40
2.50
C:\Users\BC Structural\Desktop\1.jpg
B
C
D
A
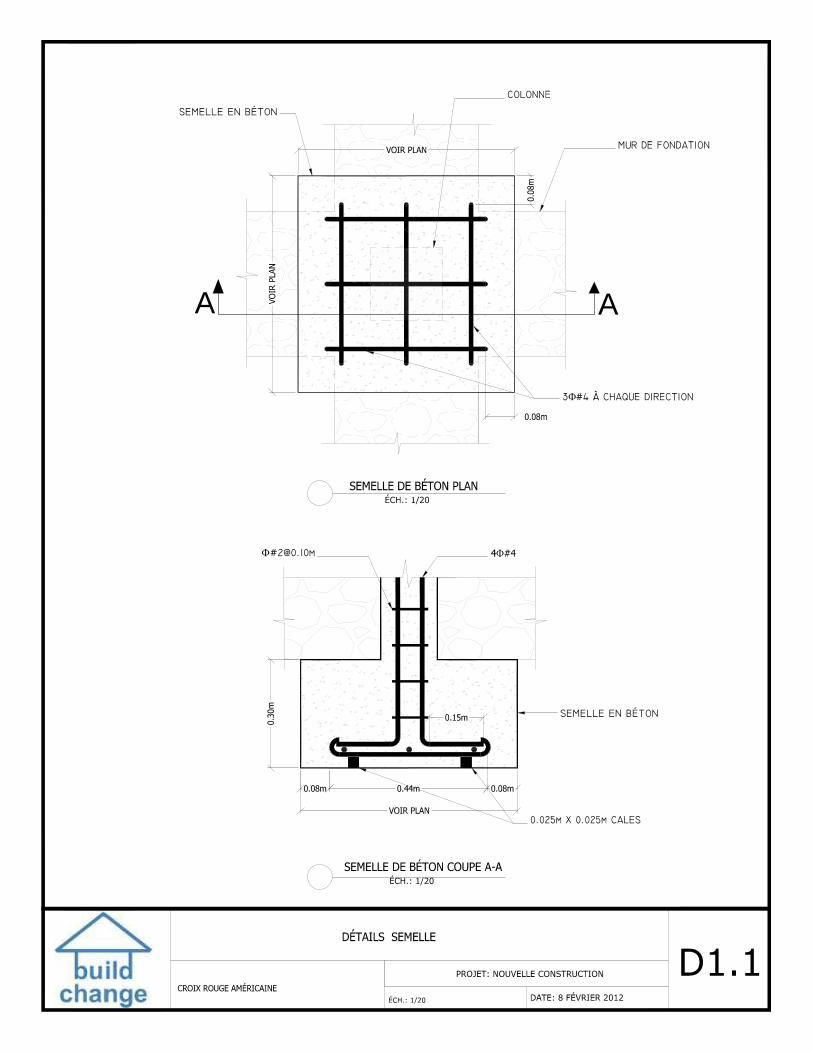
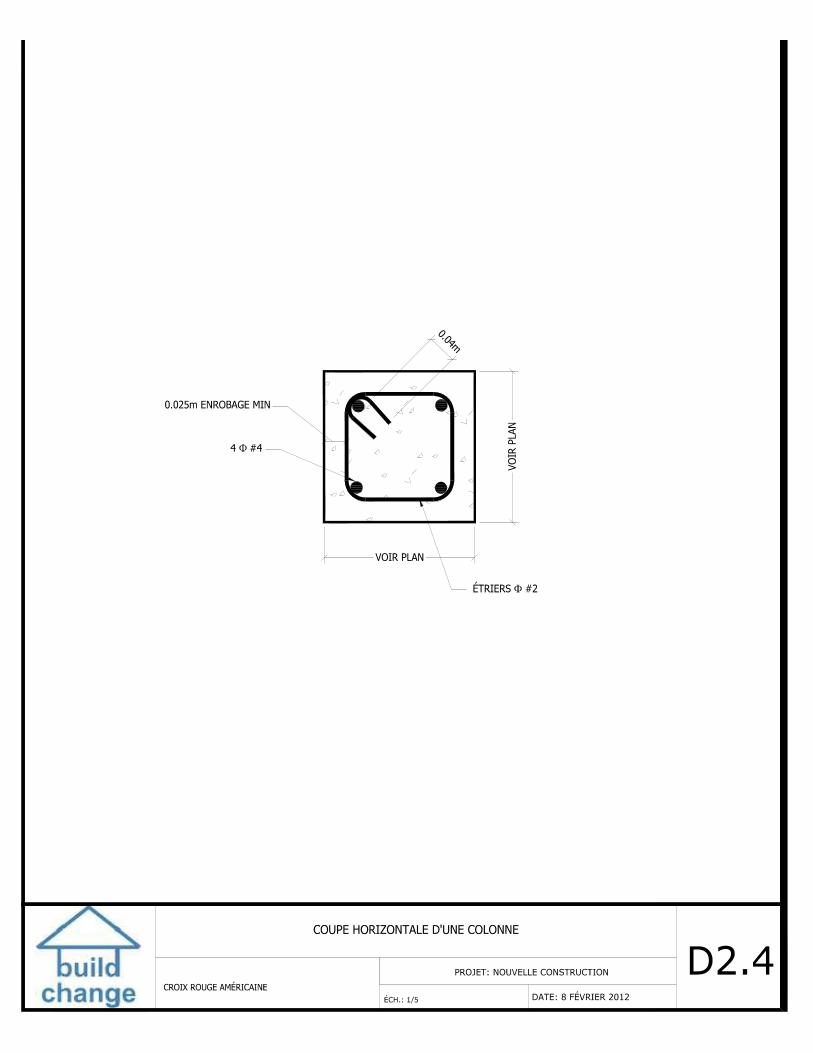
D1.1
D1.2
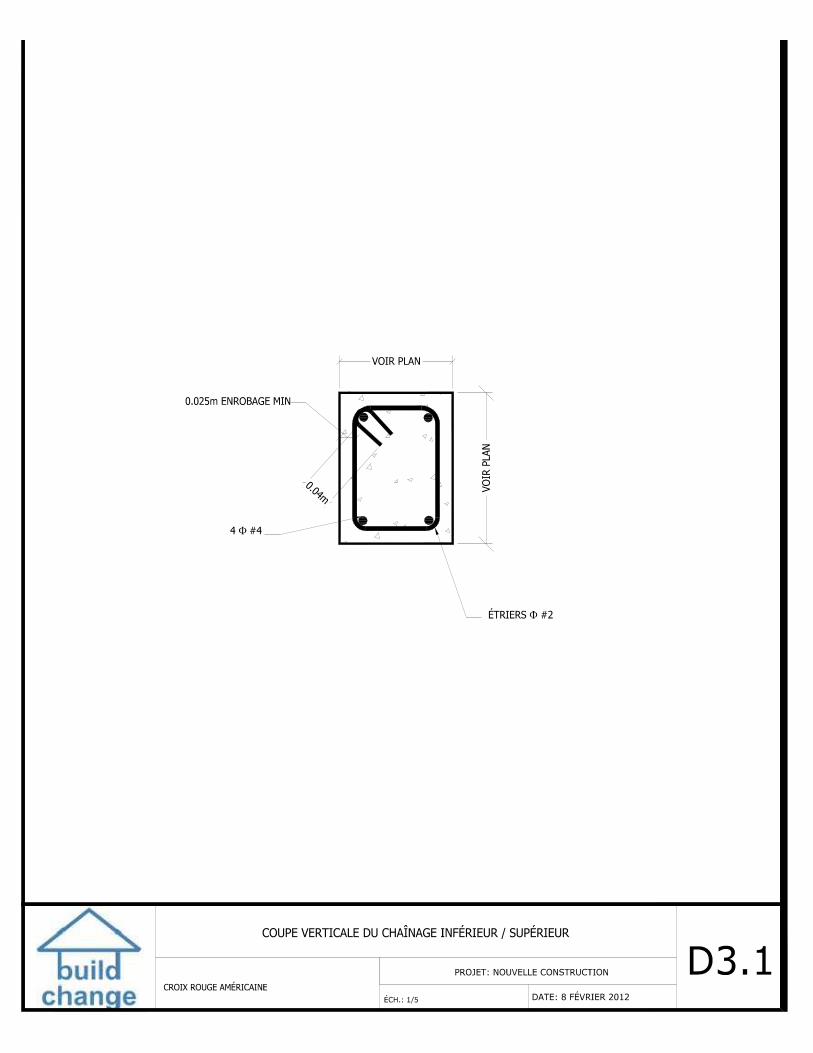
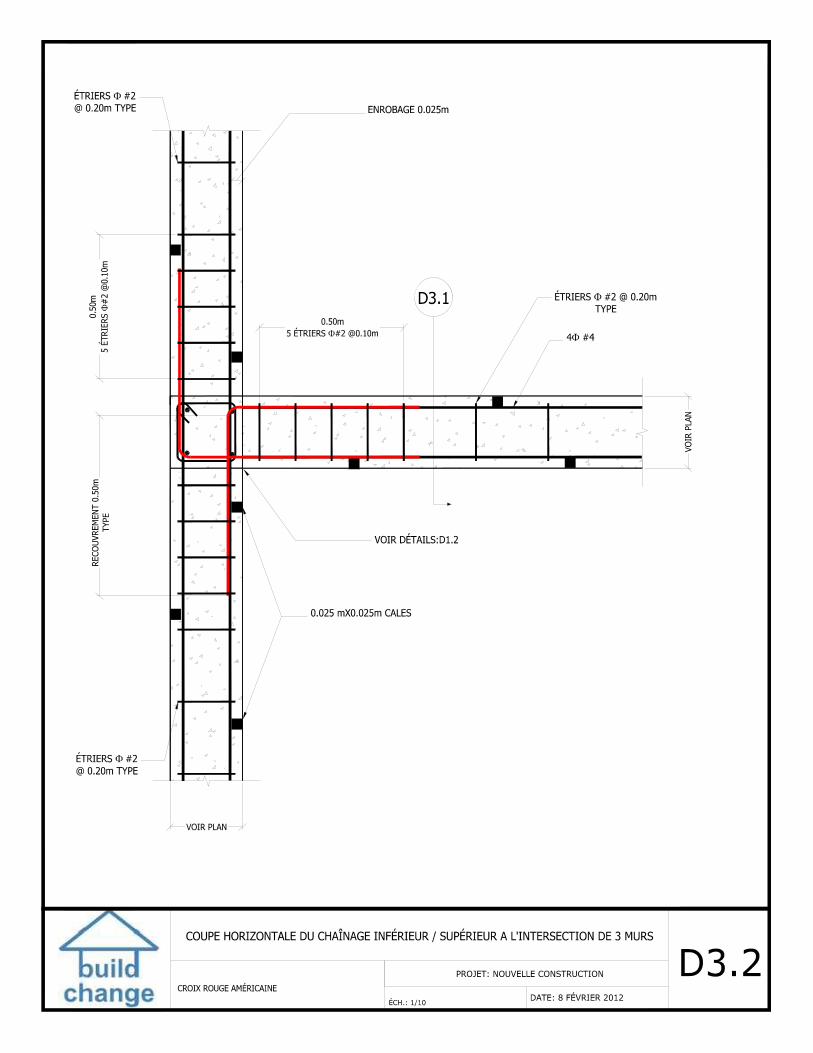
D3.1
D2.2
2.30
0.90
1.20
1.00 0.60 1.70
5.00
2.60
1.20
1.20
3.20
2.30
1.0
0
0.50
1.30
2.20
0.20
0.80 1.50
1.20
2.10
1.00
2.8
01
.20
1
A B C
3
4
2
UP
0.20
B
C
D
A
C:\Users\BC Structural\Desktop\1.jpg
D2.3
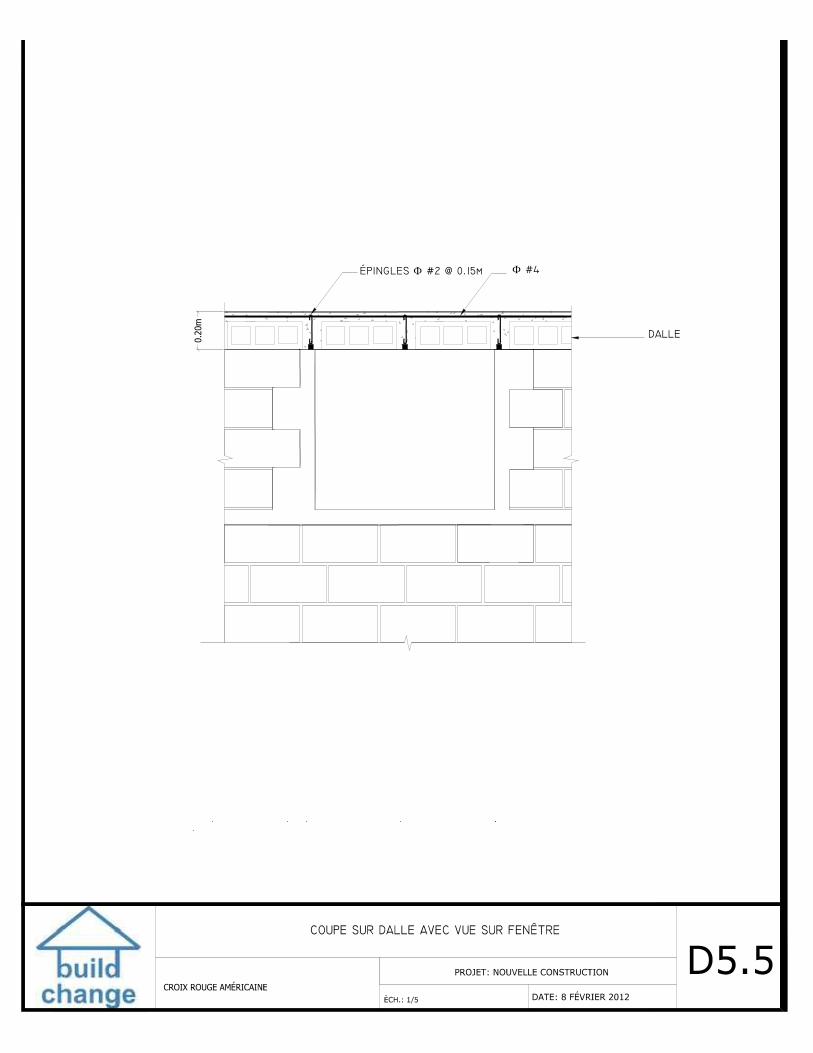
D5.5
VOIR:
D5.4
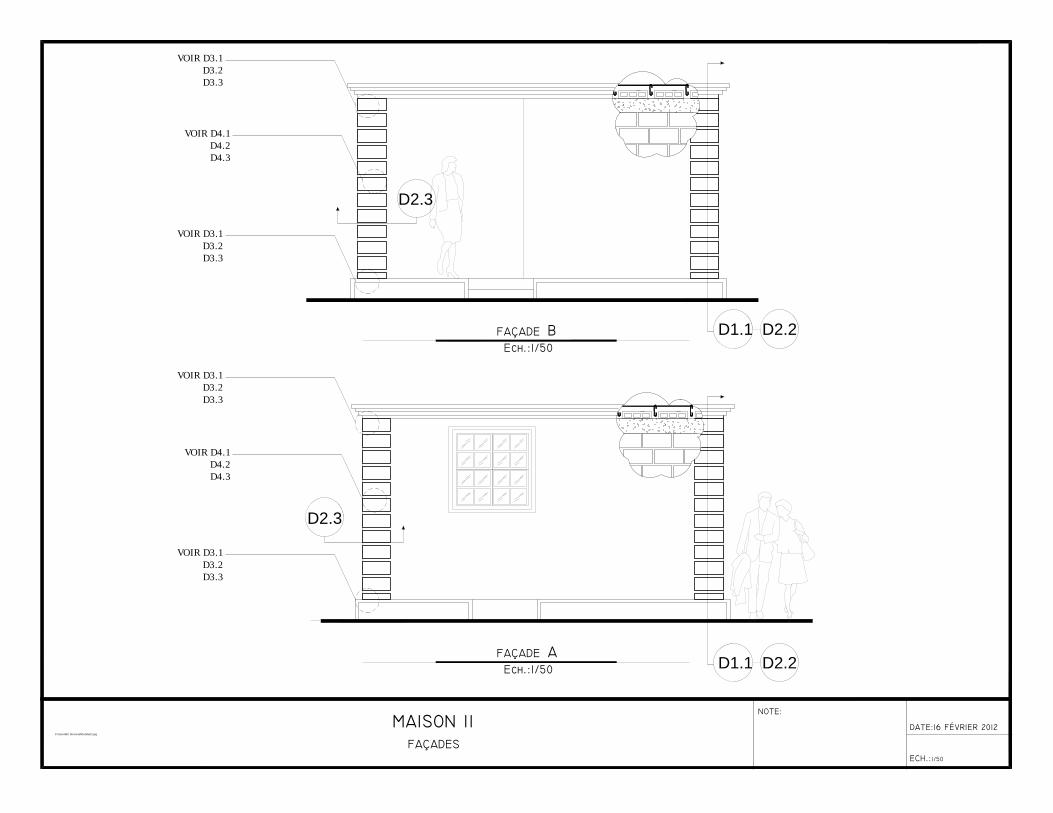
C:\Users\BC Structural\Desktop\1.jpg
D2.3
VOIR D3.1
D3.2
D3.3
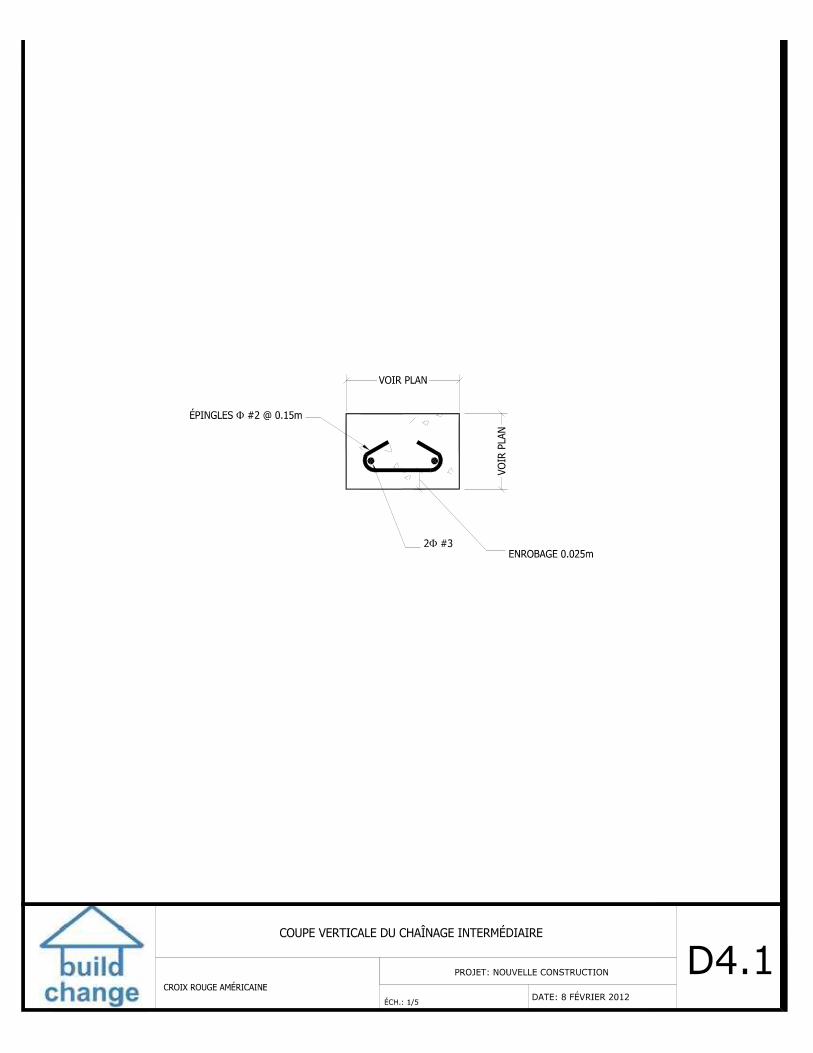
VOIR D4.1
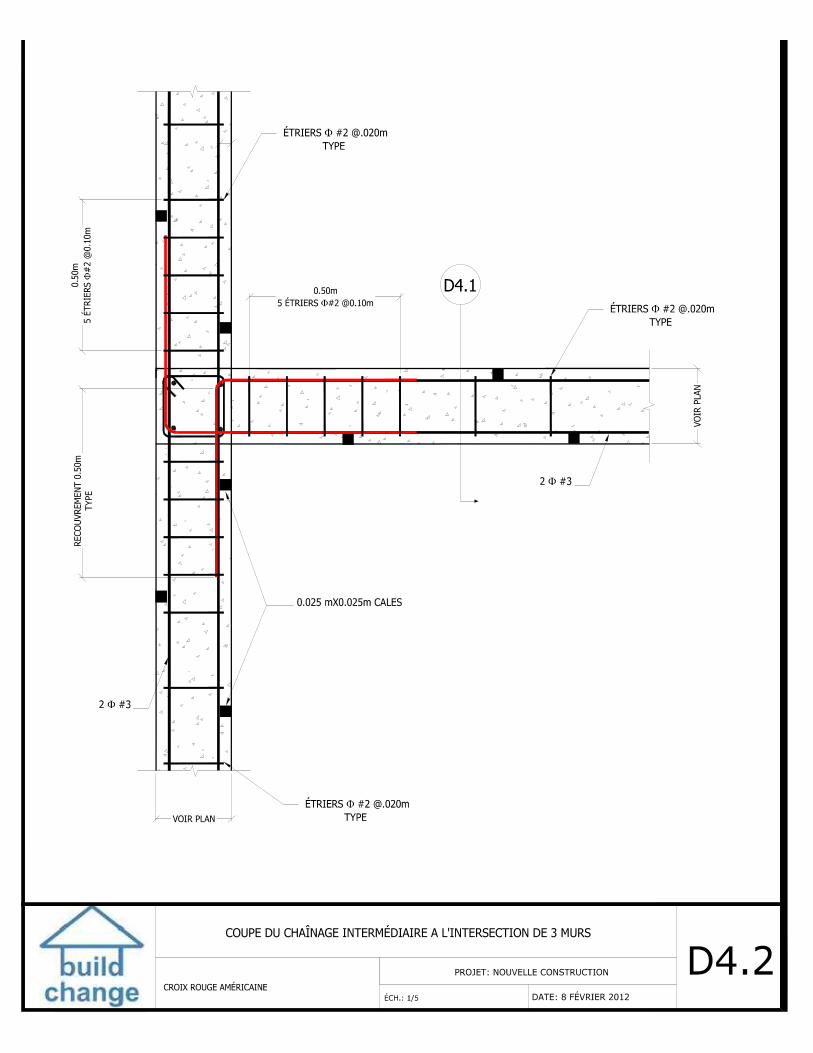
D4.2
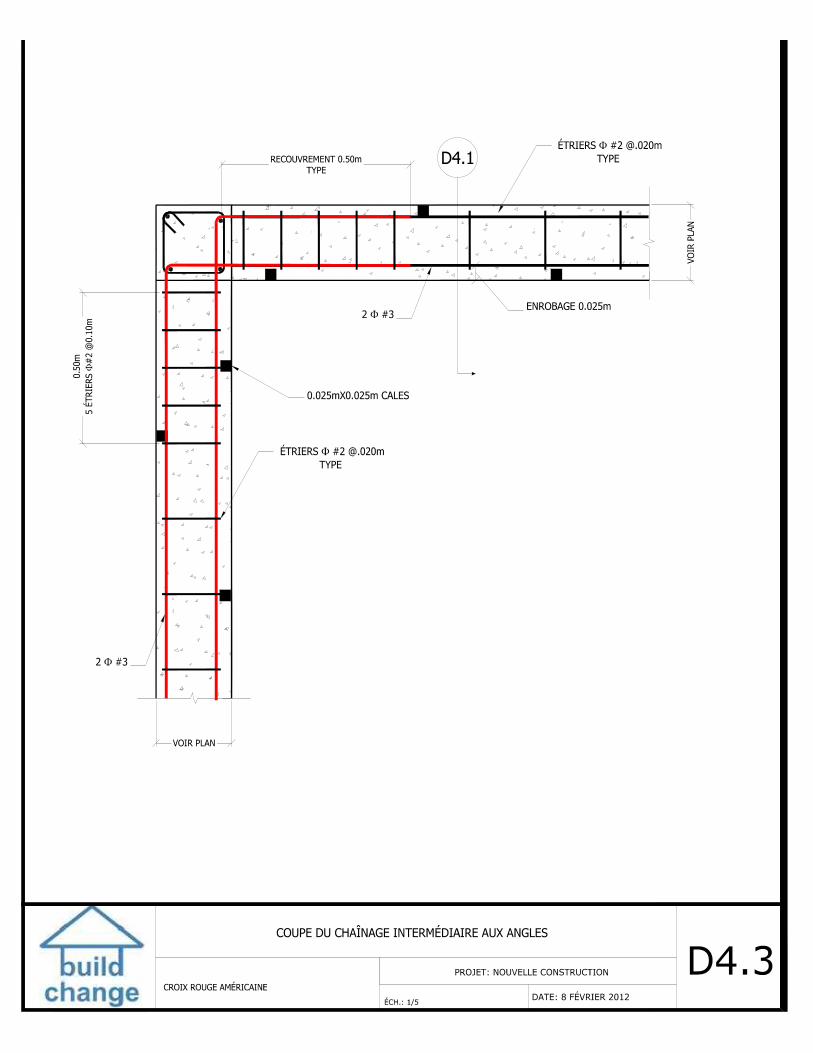
D4.3
D1.1 D2.2
D1.1 D2.2
VOIR D3.1
D3.2
D3.3
VOIR D4.1
D4.2
D4.3
D2.3
VOIR D3.1
D3.2
D3.3
VOIR D3.1
D3.2
D3.3

1
A B C
3
4
2
C:\Users\BC Structural\Desktop\1.jpg
B
C
D
A
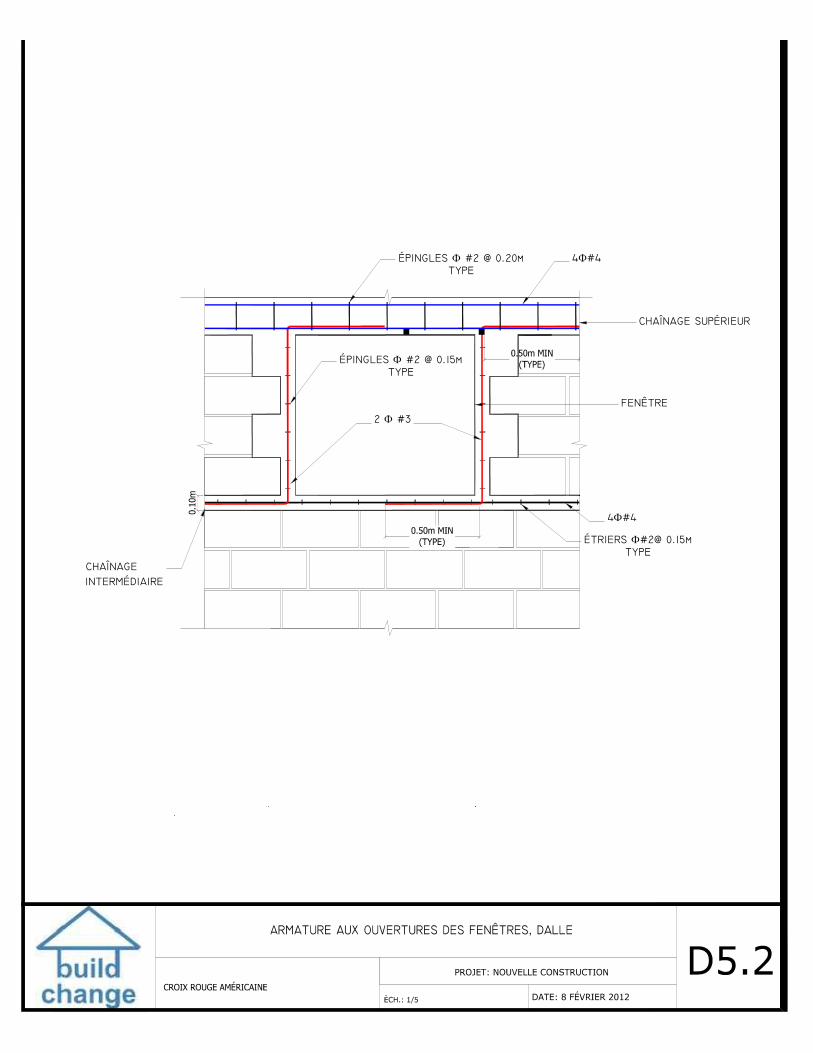
D5.2
D2.2
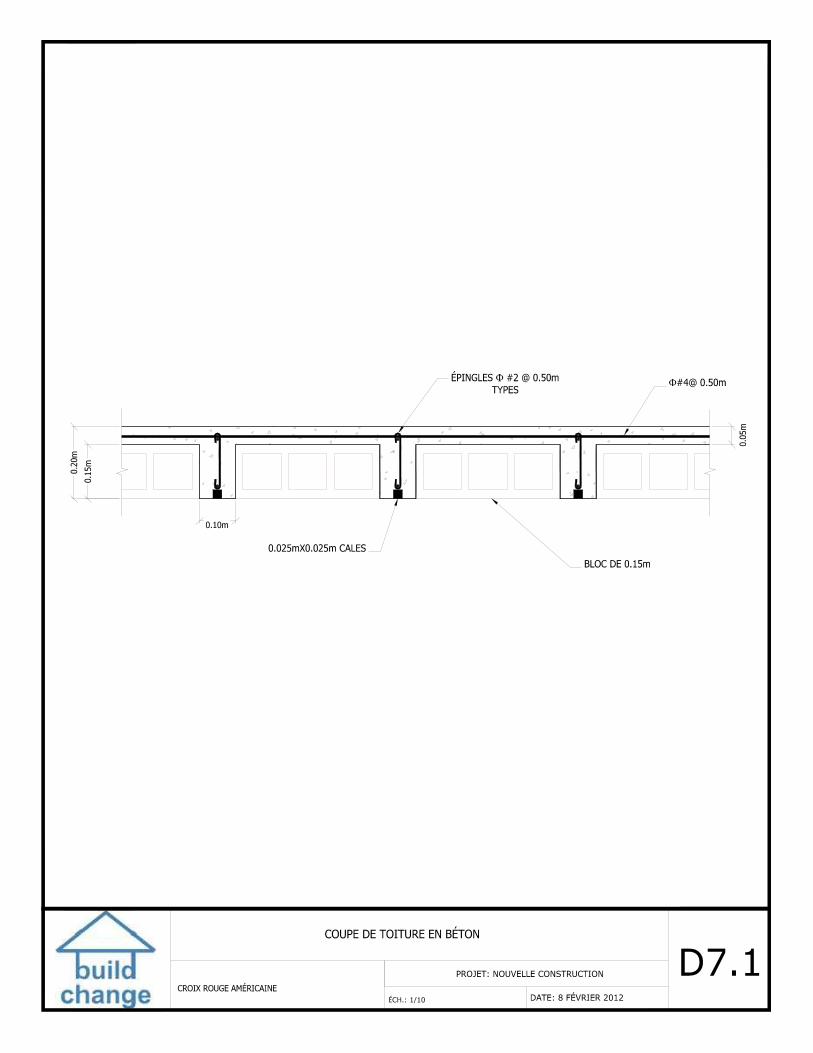
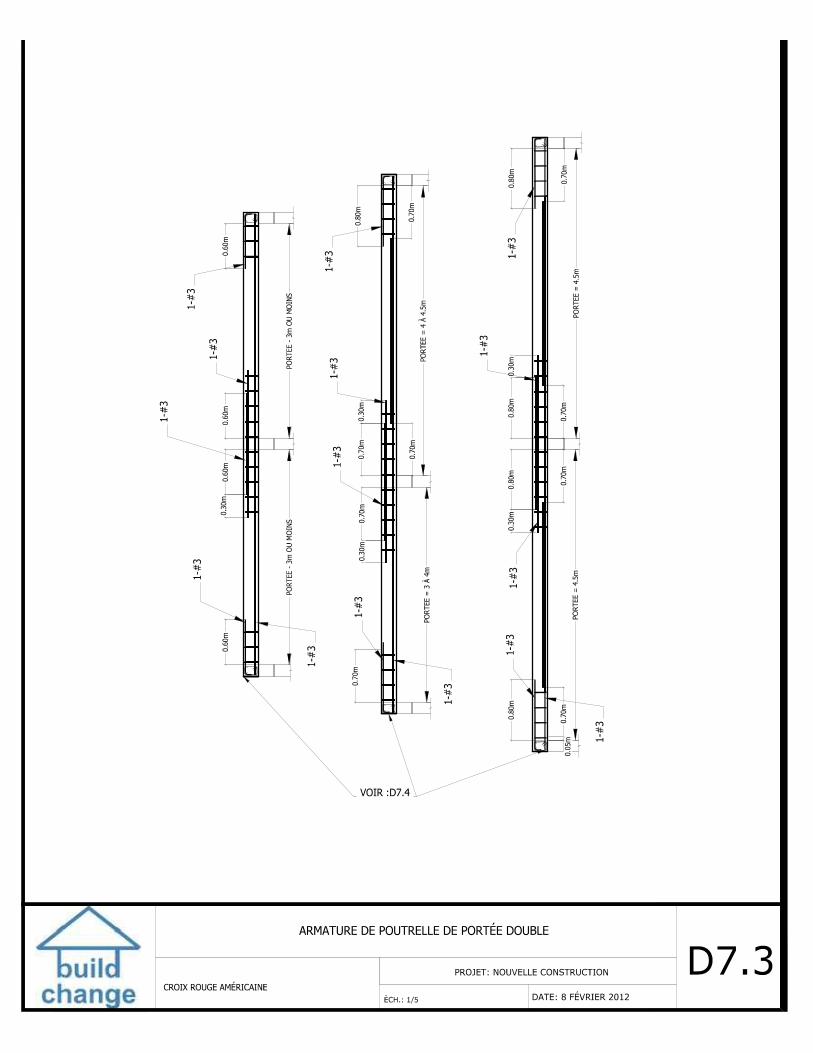
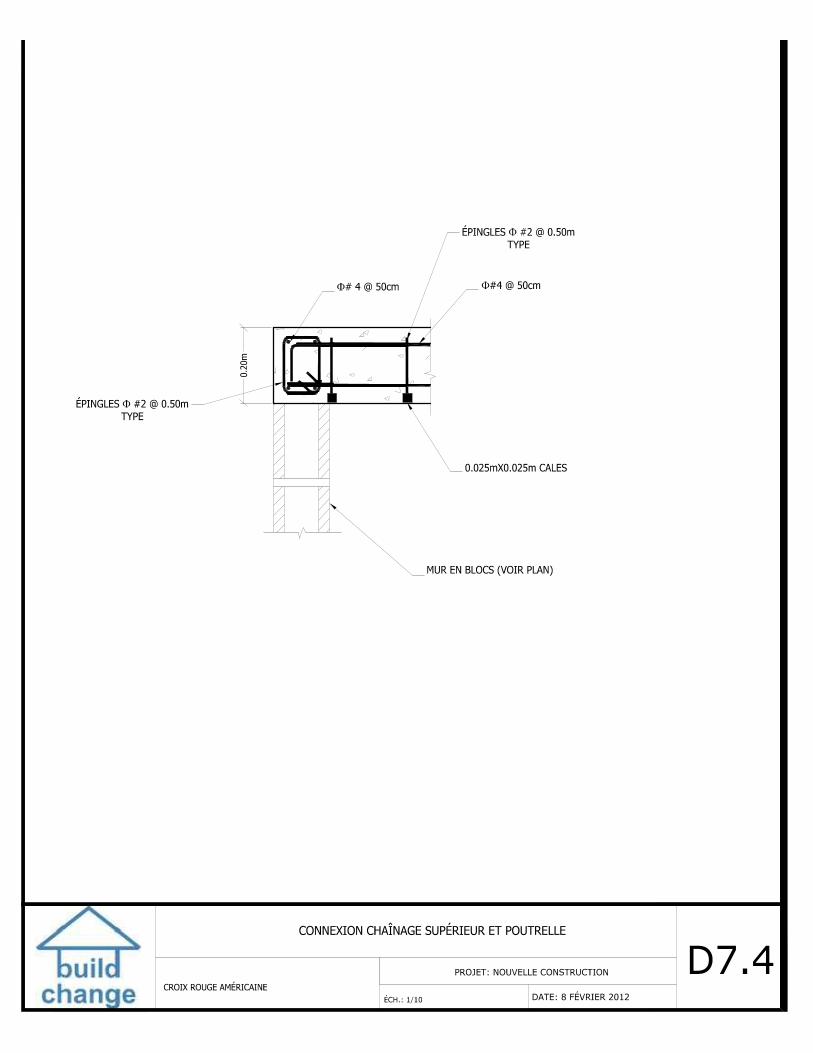
D7.1
D7.3
AA
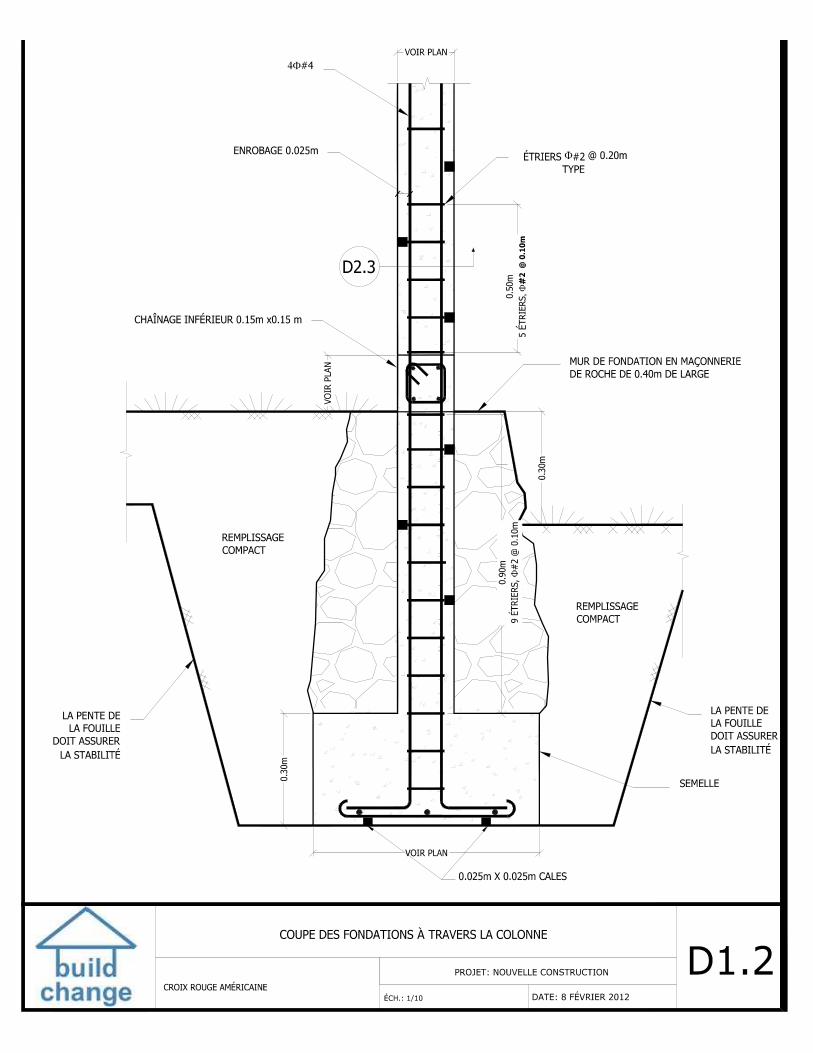
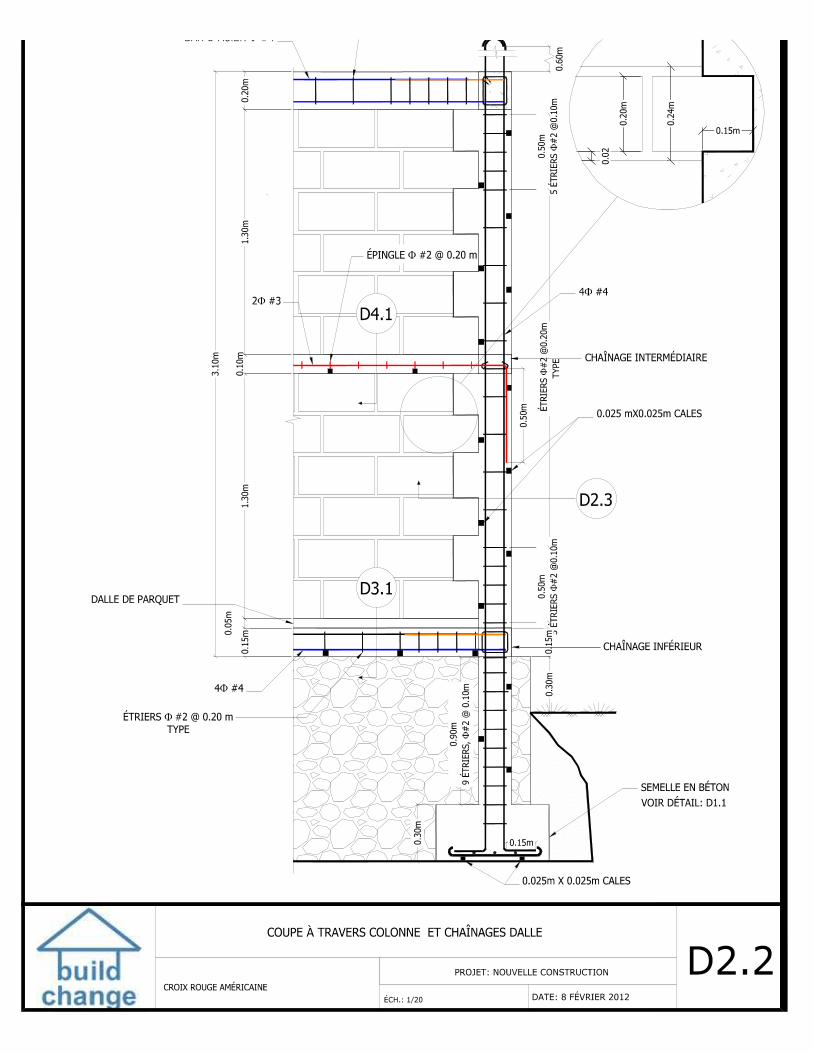
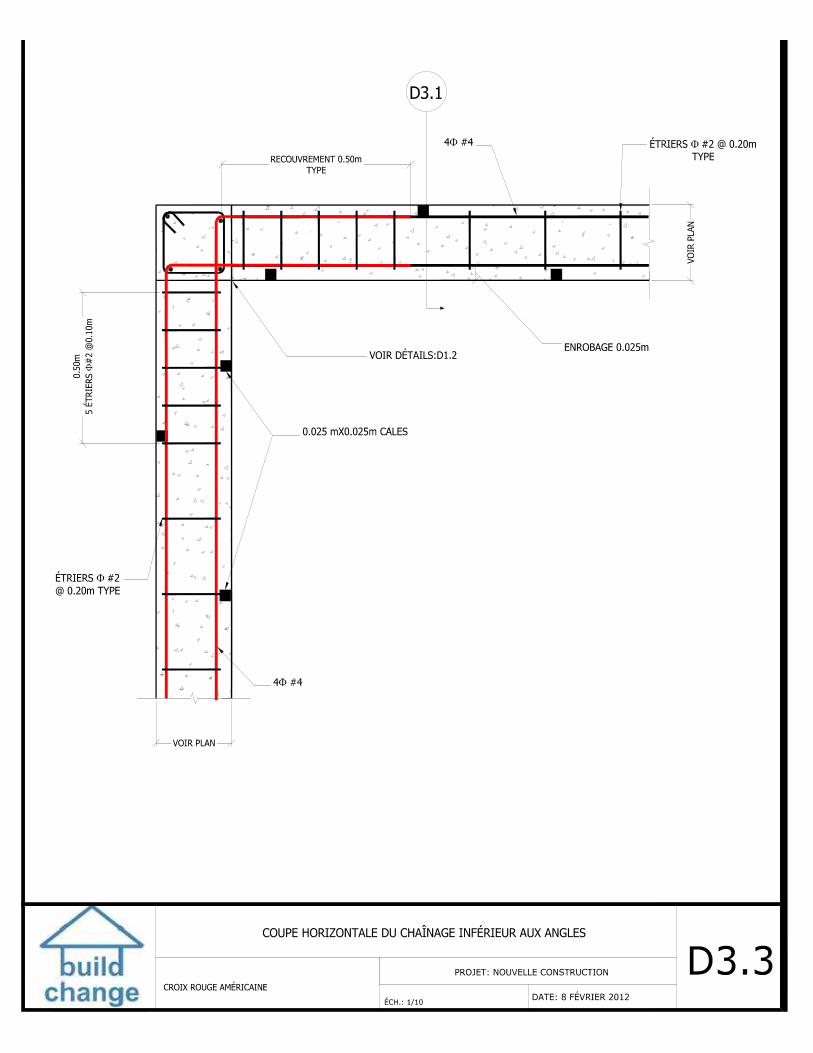
2.5 cm ENROBAGE MIN
TIE COLUMN REINFORCEMENT
ARMATURES DU CHAĊNAGE VERTICAL
#3 RIBBED BARS
(2 TOP/2 BOTTOM)
BARRES ê HAUTE ADH£RENCE #3
(2 EN HAUT/2 EN BAS)
#2 STIRRUPS
CADRES #2
#3 RIBBED BARS
(2 TOP/2 BOTTOM)
BARRES ê HAUTE ADH£RENCE #3
(2 EN HAUT/2 EN BAS)
#2 STIRRUPS
CADRES #2
WOOD POST
POTEAU EN BOIS
2.5 cm ENROBAGE MIN
TIE COLUMN REINFORCEMENT
ARMATURES DU CHAĊNAGE VERTICAL
#3 RIBBED BARS
(2 TOP/2 BOTTOM)
BARRES ê HAUTE ADH£RENCE #3
(2 EN HAUT/2 EN BAS)
#2 STIRRUPS
CADRES #2
#3 RIBBED BARS
(2 TOP/2 BOTTOM)
BARRES ê HAUTE ADH£RENCE #3
(2 EN HAUT/2 EN BAS)
#2 STIRRUPS
CADRES #2
£PINGLE #2 @ 0.15m
TYPE
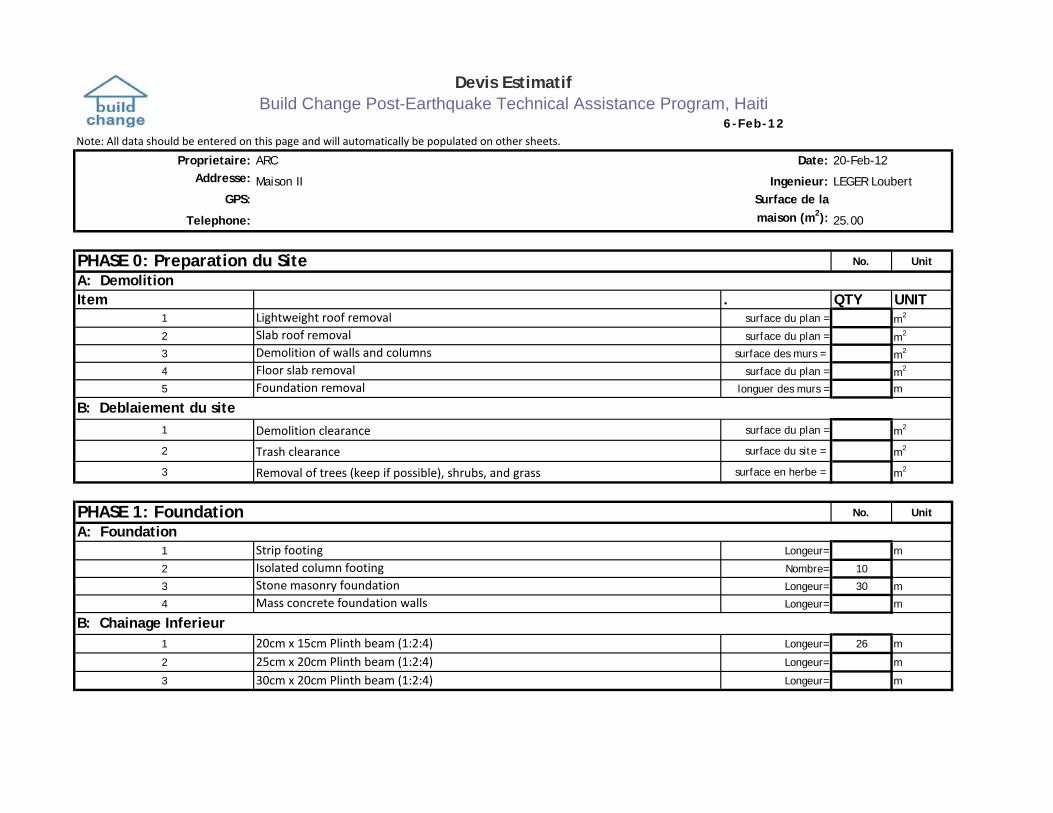
6-Feb-12Note: All data should be entered on this page and will automatically be populated on other sheets.
Proprietaire: ARC Date:Addresse: Maison II Ingenieur: LEGER Loubert
GPS:
Telephone:
No. Unit
Item . QTY UNIT1 Lightweight roof removal surface du plan = m2
2 Slab roof removal surface du plan = m2
3 Demolition of walls and columns surface des murs = m2
4 Floor slab removal surface du plan = m2
5 Foundation removal longuer des murs = m
1 Demolition clearance surface du plan = m2
2 Trash clearance surface du site = m2
3 Removal of trees (keep if possible), shrubs, and grass surface en herbe = m2
No. Unit
1 Strip footing Longeur= m
2 Isolated column footing Nombre= 10
3 Stone masonry foundation Longeur= 30 m
4 Mass concrete foundation walls Longeur= m
1 20cm x 15cm Plinth beam (1:2:4) Longeur= 26 m
2 25cm x 20cm Plinth beam (1:2:4) Longeur= m
3 30cm x 20cm Plinth beam (1:2:4) Longeur= m
Devis EstimatifBuild Change Post-Earthquake Technical Assistance Program, Haiti
A: Foundation
B: Chainage Inferieur
PHASE 1: Foundation
PHASE 0: Preparation du SiteA: Demolition
B: Deblaiement du site
25.00
20-Feb-12
Surface de la maison (m2):
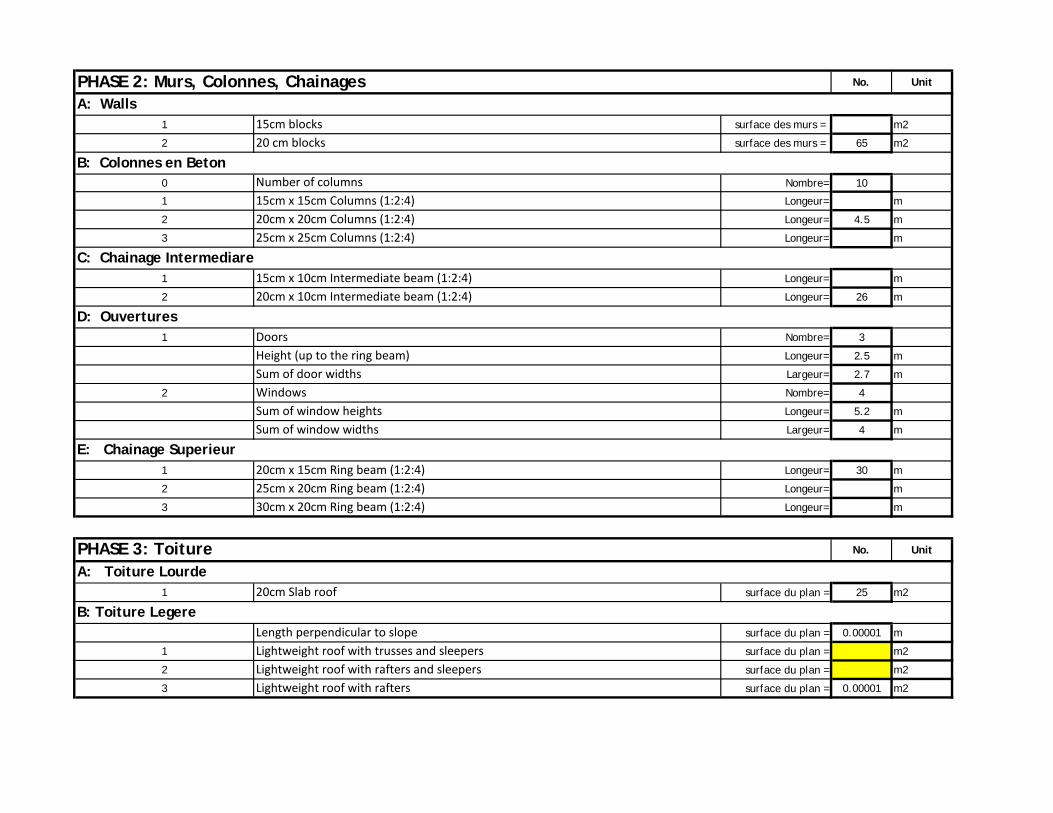
No. Unit
1 15cm blocks surface des murs = m2
2 20 cm blocks surface des murs = 65 m2
0 Number of columns Nombre= 10
1 15cm x 15cm Columns (1:2:4) Longeur= m
2 20cm x 20cm Columns (1:2:4) Longeur= 4.5 m
3 25cm x 25cm Columns (1:2:4) Longeur= m
1 15cm x 10cm Intermediate beam (1:2:4) Longeur= m
2 20cm x 10cm Intermediate beam (1:2:4) Longeur= 26 m
1 Doors Nombre= 3
Height (up to the ring beam) Longeur= 2.5 m
Sum of door widths Largeur= 2.7 m
2 Windows Nombre= 4
Sum of window heights Longeur= 5.2 m
Sum of window widths Largeur= 4 m
1 20cm x 15cm Ring beam (1:2:4) Longeur= 30 m
2 25cm x 20cm Ring beam (1:2:4) Longeur= m
3 30cm x 20cm Ring beam (1:2:4) Longeur= m
No. Unit
1 20cm Slab roof surface du plan = 25 m2
Length perpendicular to slope surface du plan = 0.00001 m
1 Lightweight roof with trusses and sleepers surface du plan = m2
2 Lightweight roof with rafters and sleepers surface du plan = m2
3 Lightweight roof with rafters surface du plan = 0.00001 m2
A: Walls
B: Colonnes en Beton
C: Chainage Intermediare
D: Ouvertures
E: Chainage Superieur
PHASE 2: Murs, Colonnes, Chainages
B: Toiture Legere
A: Toiture LourdePHASE 3: Toiture
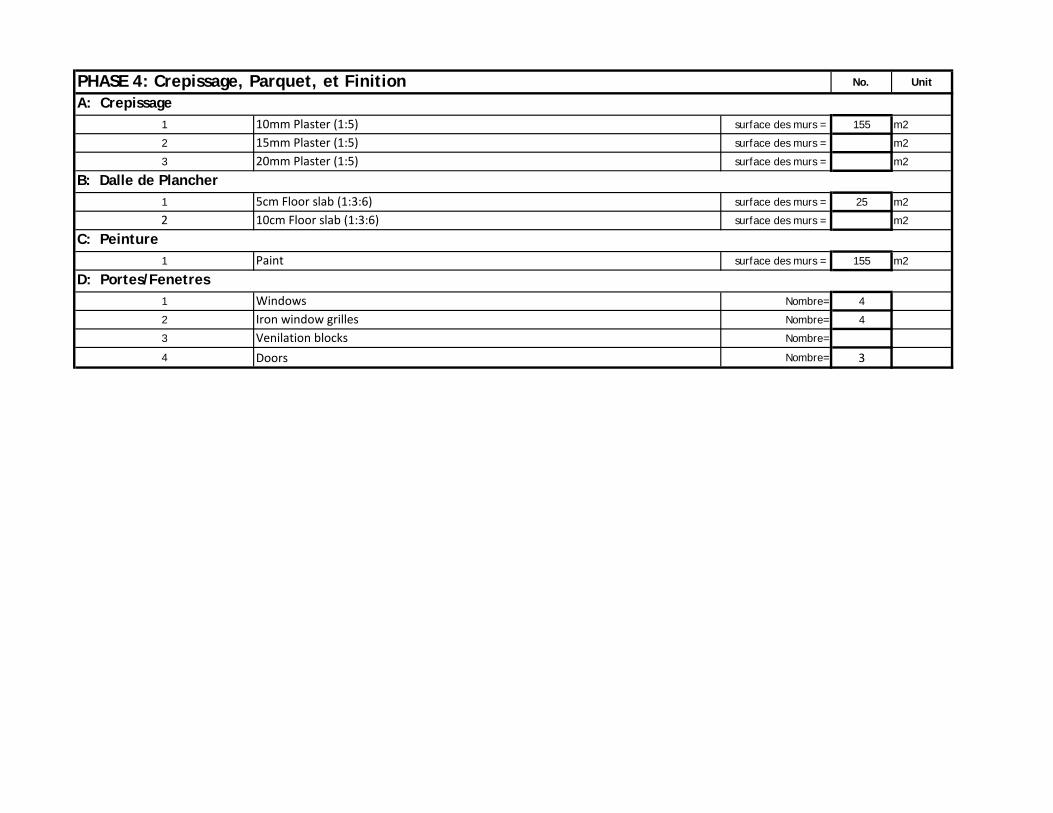
No. Unit
1 10mm Plaster (1:5) surface des murs = 155 m2
2 15mm Plaster (1:5) surface des murs = m2
3 20mm Plaster (1:5) surface des murs = m2
1 5cm Floor slab (1:3:6) surface des murs = 25 m2
2 10cm Floor slab (1:3:6) surface des murs = m2
1 Paint surface des murs = 155 m2
1 Windows Nombre= 4
2 Iron window grilles Nombre= 4
3 Venilation blocks Nombre=
4 Doors Nombre= 3
D: Portes/Fenetres
PHASE 4: Crepissage, Parquet, et FinitionA: Crepissage
B: Dalle de Plancher
C: Peinture
Building Address: 0 Date:
Storey: 0 Engineer: LEGER Loubert
No Item Unit Price Unit Total Total Price Total Total Price Total Total Price Total Total Price Total Total Price1 Cement $7.50 bag 34 $255.00 29 $217.50 33 $247.50 $0.00 $0.00 96 $720.002 River Sand - washed $25.00 m3 3 $75.00 0 $0.00 0 $0.00 $0.00 $0.00 3 $75.003 River Sand $19.00 m3 0 $0.00 2 $38.00 0 $0.00 $0.00 $0.00 2 $38.004 White Sand $20.00 m3 1 $20.00 2 $40.00 4 $80.00 $0.00 $0.00 7 $140.005 Crushed gravel $23.00 m3 2 $46.00 3 $69.00 3 $69.00 $0.00 $0.00 8 $184.006 Pea gravel $13.00 m3 0 $0.00 0 $0.00 0 $0.00 $0.00 $0.00 0 $0.007 River rock $21.00 m3 6 $126.00 0 $0.00 0 $0.00 $0.00 $0.00 6 $126.008 Limestone $20.00 m3 0 $0.00 0 $0.00 0 $0.00 $0.00 $0.00 0 $0.009 30cm Block $1.13 each 0 $0.00 0 $0.00 0 $0.00 $0.00 $0.00 0 $0.0010 20cm Block $0.80 each 0 $0.00 729 $583.20 0 $0.00 $0.00 $0.00 729 $583.2011 15cm Block $0.65 each 0 $0.00 0 $0.00 0 $0.00 $0.00 $0.00 0 $0.0012 12cm Block $0.45 each 0 $0.00 0 $0.00 209 $94.05 $0.00 $0.00 209 $94.0513 10cm Block $0.40 each 0 $0.00 0 $0.00 0 $0.00 $0.00 $0.00 0 $0.0014 Cement brick (6x10x20) $32.00 each 0 $0.00 0 $0.00 0 $0.00 $0.00 $0.00 0 $0.0015 Ventilation Blocks $0.80 each 0 $0.00 0 $0.00 36 $28.80 $0.00 $0.00 36 $28.8016 #7 Bars $6.50 m 0 $0.00 0 $0.00 0 $0.00 $0.00 $0.00 0 $0.0017 #6 Bars $5.25 m 0 $0.00 0 $0.00 0 $0.00 $0.00 $0.00 0 $0.0018 #5 Bars $3.30 m 0 $0.00 0 $0.00 0 $0.00 $0.00 $0.00 0 $0.0019 #4 Bars $1.11 m 24 $26.64 335 $371.85 0 $0.00 $0.00 $0.00 359 $398.4920 #3 Bars $0.77 m 110 $84.70 49 $37.73 300 $231.00 $0.00 $0.00 459 $353.4321 #2 Bars $0.33 m 104 $34.32 384 $126.72 30 $9.90 $0.00 $0.00 518 $170.9422 Binding Wire $1.40 lb 0 $0.00 0 $0.00 0 $0.00 $0.00 $0.00 0 $0.0023 1x4 Lumber $0.60 m 0 $0.00 0 $0.00 0 $0.00 $0.00 $0.00 0 $0.0024 1x6 Lumber $0.70 m 0 $0.00 0 $0.00 0 $0.00 $0.00 $0.00 0 $0.0025 1x8 S4S Lumber $0.90 m 0 $0.00 0 $0.00 0 $0.00 $0.00 $0.00 0 $0.0026 1x8 RS Lumber $0.80 m 0 $0.00 0 $0.00 0 $0.00 $0.00 $0.00 0 $0.0027 1x12 Lumber $1.55 m 0 $0.00 0 $0.00 0 $0.00 $0.00 $0.00 0 $0.0028 2x2 Lumber $0.63 m 0 $0.00 0 $0.00 0 $0.00 $0.00 $0.00 0 $0.0029 2x4 S4S Lumber $1.05 m 0 $0.00 0 $0.00 0 $0.00 $0.00 $0.00 0 $0.0030 2x4 S4S Lumber $0.85 m 0 $0.00 0 $0.00 3 $2.55 $0.00 $0.00 3 $2.5531 Plywood sheet (1/4") $13.00 each 0 $0.00 0 $0.00 0 $0.00 $0.00 $0.00 0 $0.0032 Plywood sheet (1/2") $25.00 each 0 $0.00 0 $0.00 0 $0.00 $0.00 $0.00 0 $0.0033 Plywood sheet (3/4") $36.00 each 0 $0.00 0 $0.00 0 $0.00 $0.00 $0.00 0 $0.0034 Hardboard $0.00 each 0 $0.00 0 $0.00 0 $0.00 $0.00 $0.00 0 $0.0035 Wood Preservative $20.00 gallon 0 $0.00 0 $0.00 0 $0.00 $0.00 $0.00 0 $0.0036 Hurricane Straps $1.65 m 0 $0.00 0 $0.00 2 $3.30 $0.00 $0.00 2 $3.3037 Assorted Nails $1.20 lb 0 $0.00 0 $0.00 1 $1.20 $0.00 $0.00 1 $1.2038 Roofing Nails $1.40 lb 0 $0.00 0 $0.00 1 $1.40 $0.00 $0.00 1 $1.4039 CGI 3'x6' $0.00 each 0 $0.00 0 $0.00 0 $0.00 $0.00 $0.00 0 $0.0040 CGI 3'x8' $26.00 each 0 $0.00 0 $0.00 0 $0.00 $0.00 $0.00 0 $0.00
Bill of Quantities -- New Confined Masonry Construction20-Feb-2012
TOTALINSTSALLMENT 3 Holdback / Add'l
Req
INSTALLMENT 3: Roof & Finish
INSTALLMENT 2: Walls up to the
rooof
INSTALLMENT 1: preparation &
Foundation

41 CGI 3'x10' $28.00 each 0 $0.00 0 $0.00 0 $0.00 $0.00 $0.00 0 $0.0042 CGI 3'x12' $30.00 each 0 $0.00 0 $0.00 1 $30.00 $0.00 $0.00 1 $30.0043 CGI squared 3'x12' $0.00 each 0 $0.00 0 $0.00 0 $0.00 $0.00 $0.00 0 $0.0044 CGI wave, 28ga $5.00 m3 0 $0.00 0 $0.00 0 $0.00 $0.00 $0.00 0 $0.0045 CGI squared, 28ga $0.00 m3 0 $0.00 0 $0.00 0 $0.00 $0.00 $0.00 0 $0.0046 Ridge Cap $5.00 m 0 $0.00 0 $0.00 0 $0.00 $0.00 $0.00 0 $0.0047 Door 36" x 80" $88.00 each 0 $0.00 0 $0.00 3 $264.00 $0.00 $0.00 3 $264.0048 Door frame 1x6 S4S $16.00 each 0 $0.00 0 $0.00 0 $0.00 $0.00 $0.00 0 $0.0049 Window $260.00 each 0 $0.00 0 $0.00 4 $1,040.00 $0.00 $0.00 4 $1,040.0050 Window Grill $45.00 each 0 $0.00 0 $0.00 4 $180.00 $0.00 $0.00 4 $180.0051 Paint $10.00 gallon 0 $0.00 0 $0.00 6 $60.00 $0.00 $0.00 6 $60.0052 Rented Formwork (boards) $0.29 m 0 $0.00 0 $0.00 0 $0.00 $0.00 $0.00 0 $0.0053 Rented Formwork (plywood) $1.68 m2 0 $0.00 0 $0.00 0 $0.00 $0.00 $0.00 0 $0.0054 Metal Shoring $2.50 each 0 $0.00 0 $0.00 0 $0.00 $0.00 $0.00 0 $0.0055 Labour $0.40 % mat's 0 $0.00 0 $0.00 0 $0.00 $0.00 $0.00 0 $0.00
Cost of Materials $668 $1,484 $2,343 $0 $4,494Rental of formwork and shoring $0 $0 $0 $0 $0Cost of Labor $179 $635 $930 $0 $1,745
Subtotal $847 $2,119 $3,273 $0 $6,23920% for unforseen costs $169 $424 $655 $0 $1,248
Total $1,016 $2,543 $3,927 $0 Grand Total= $7,487Installment Request $1,016 $2,543 $3,927 $0 $7,487
Remak= Tout pri yo an dola ameriken
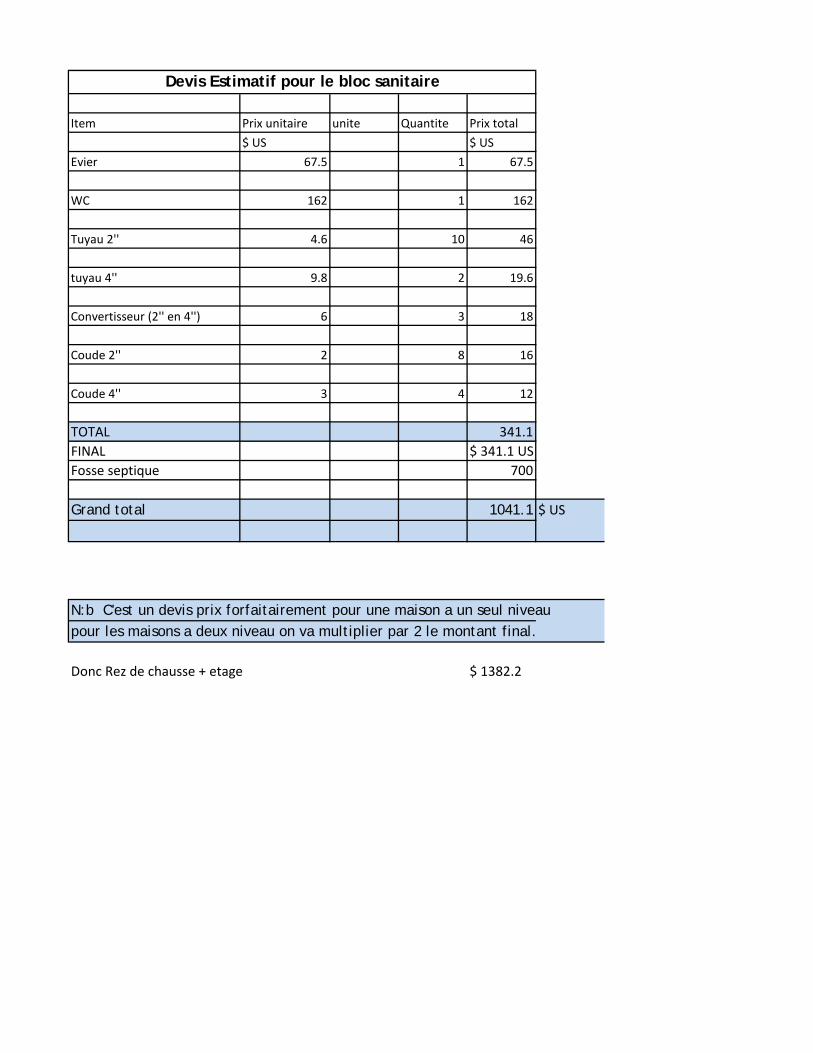
Item Prix unitaire unite Quantite Prix total$ US $ US
Evier 67.5 1 67.5
WC 162 1 162
Tuyau 2'' 4.6 10 46
tuyau 4'' 9.8 2 19.6
Convertisseur (2'' en 4'') 6 3 18
Coude 2'' 2 8 16
Coude 4'' 3 4 12
TOTAL 341.1FINAL $ 341.1 USFosse septique 700
Grand total 1041.1 $ US
N:b C'est un devis prix forfaitairement pour une maison a un seul niveau pour les maisons a deux niveau on va multiplier par 2 le montant final.
Donc Rez de chausse + etage $ 1382.2
Devis Estimatif pour le bloc sanitaire
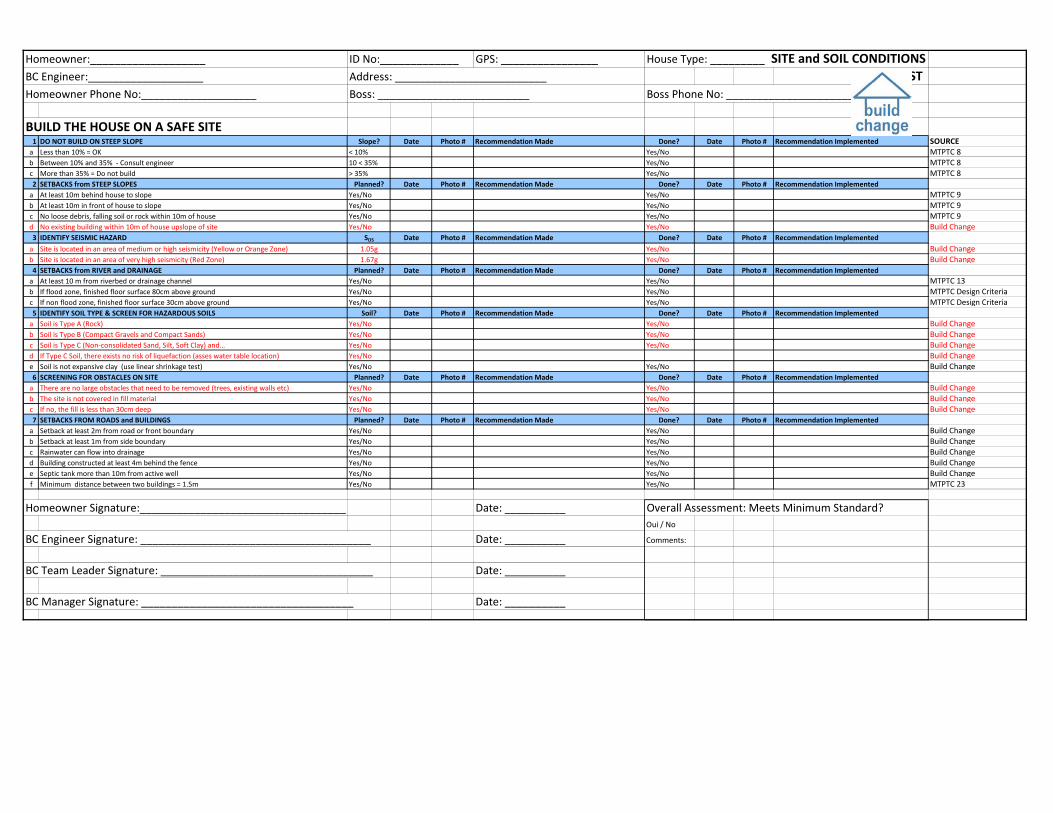
Homeowner:___________________ ID No:_____________ GPS: ________________ House Type: _________ SITE and SOIL CONDITIONSBC Engineer:___________________ Address: _________________________ CHECKLIST Homeowner Phone No:___________________ Boss: _________________________ Boss Phone No: _________________________
BUILD THE HOUSE ON A SAFE SITE 1 DO NOT BUILD ON STEEP SLOPE Slope? Date Photo # Recommendation Made Done? Date Photo # Recommendation Implemented SOURCE
a Less than 10% = OK < 10% Yes/No MTPTC 8b Between 10% and 35% - Consult engineer 10 < 35% Yes/No MTPTC 8c More than 35% = Do not build > 35% Yes/No MTPTC 82 SETBACKS from STEEP SLOPES Planned? Date Photo # Recommendation Made Done? Date Photo # Recommendation Implemented
a At least 10m behind house to slope Yes/No Yes/No MTPTC 9b At least 10m in front of house to slope Yes/No Yes/No MTPTC 9c No loose debris, falling soil or rock within 10m of house Yes/No Yes/No MTPTC 9d No existing building within 10m of house upslope of site Yes/No Yes/No Build Change 3 IDENTIFY SEISMIC HAZARD SDS Date Photo # Recommendation Made Done? Date Photo # Recommendation Implemented
a Site is located in an area of medium or high seismicity (Yellow or Orange Zone) 1.05g Yes/No Build Change b Site is located in an area of very high seismicity (Red Zone) 1.67g Yes/No Build Change 4 SETBACKS from RIVER and DRAINAGE Planned? Date Photo # Recommendation Made Done? Date Photo # Recommendation Implemented
a At least 10 m from riverbed or drainage channel Yes/No Yes/No MTPTC 13b If flood zone, finished floor surface 80cm above ground Yes/No Yes/No MTPTC Design Criteria c If non flood zone, finished floor surface 30cm above ground Yes/No Yes/No MTPTC Design Criteria 5 IDENTIFY SOIL TYPE & SCREEN FOR HAZARDOUS SOILS Soil? Date Photo # Recommendation Made Done? Date Photo # Recommendation Implemented
a Soil is Type A (Rock) Yes/No Yes/No Build Change b Soil is Type B (Compact Gravels and Compact Sands) Yes/No Yes/No Build Change c Soil is Type C (Non-consolidated Sand, Silt, Soft Clay) and… Yes/No Yes/No Build Change d If Type C Soil, there exists no risk of liquefaction (asses water table location) Yes/No Build Change e Soil is not expansive clay (use linear shrinkage test) Yes/No Yes/No Build Change 6 SCREENING FOR OBSTACLES ON SITE Planned? Date Photo # Recommendation Made Done? Date Photo # Recommendation Implemented
a There are no large obstacles that need to be removed (trees, existing walls etc) Yes/No Yes/No Build Change b The site is not covered in fill material Yes/No Yes/No Build Change c If no, the fill is less than 30cm deep Yes/No Yes/No Build Change 7 SETBACKS FROM ROADS and BUILDINGS Planned? Date Photo # Recommendation Made Done? Date Photo # Recommendation Implemented
a Setback at least 2m from road or front boundary Yes/No Yes/No Build Change b Setback at least 1m from side boundary Yes/No Yes/No Build Change c Rainwater can flow into drainage Yes/No Yes/No Build Change d Building constructed at least 4m behind the fence Yes/No Yes/No Build Change e Septic tank more than 10m from active well Yes/No Yes/No Build Change f Minimum distance between two buildings = 1.5m Yes/No Yes/No MTPTC 23
Homeowner Signature:__________________________________ Date: __________ Overall Assessment: Meets Minimum Standard?Oui / No
BC Engineer Signature: ______________________________________ Date: __________ Comments:
BC Team Leader Signature: ___________________________________ Date: __________
BC Manager Signature: ___________________________________ Date: __________
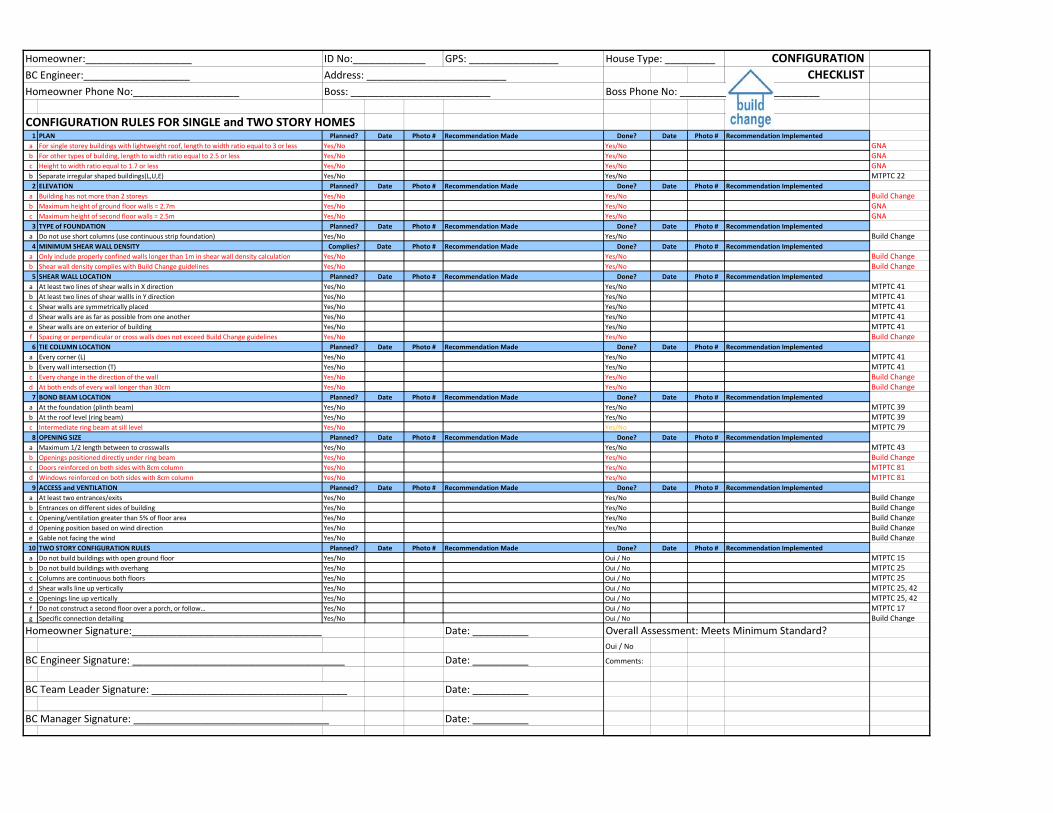
Homeowner:___________________ ID No:_____________ GPS: ________________ House Type: _________ CONFIGURATION BC Engineer:___________________ Address: _________________________ CHECKLIST Homeowner Phone No:___________________ Boss: _________________________ Boss Phone No: _________________________
CONFIGURATION RULES FOR SINGLE and TWO STORY HOMES 1 PLAN Planned? Date Photo # Recommendation Made Done? Date Photo # Recommendation Implemented
a For single storey buildings with lightweight roof, length to width ratio equal to 3 or less Yes/No Yes/No GNAb For other types of building, length to width ratio equal to 2.5 or less Yes/No Yes/No GNAc Height to width ratio equal to 1.7 or less Yes/No Yes/No GNAb Separate irregular shaped buildings(L,U,E) Yes/No Yes/No MTPTC 222 ELEVATION Planned? Date Photo # Recommendation Made Done? Date Photo # Recommendation Implemented
a Building has not more than 2 storeys Yes/No Yes/No Build Change b Maximum height of ground floor walls = 2.7m Yes/No Yes/No GNAc Maximum height of second floor walls = 2.5m Yes/No Yes/No GNA3 TYPE of FOUNDATION Planned? Date Photo # Recommendation Made Done? Date Photo # Recommendation Implemented
a Do not use short columns (use continuous strip foundation) Yes/No Yes/No Build Change 4 MINIMUM SHEAR WALL DENSITY Complies? Date Photo # Recommendation Made Done? Date Photo # Recommendation Implemented
a Only include properly confined walls longer than 1m in shear wall density calculation Yes/No Yes/No Build Change b Shear wall density complies with Build Change guidelines Yes/No Yes/No Build Change 5 SHEAR WALL LOCATION Planned? Date Photo # Recommendation Made Done? Date Photo # Recommendation Implemented
a At least two lines of shear walls in X direction Yes/No Yes/No MTPTC 41b At least two lines of shear wallls in Y direction Yes/No Yes/No MTPTC 41c Shear walls are symmetrically placed Yes/No Yes/No MTPTC 41d Shear walls are as far as possible from one another Yes/No Yes/No MTPTC 41e Shear walls are on exterior of building Yes/No Yes/No MTPTC 41f Spacing or perpendicular or cross walls does not exceed Build Change guidelines Yes/No Yes/No Build Change 6 TIE COLUMN LOCATION Planned? Date Photo # Recommendation Made Done? Date Photo # Recommendation Implemented
a Every corner (L) Yes/No Yes/No MTPTC 41b Every wall intersection (T) Yes/No Yes/No MTPTC 41c Every change in the direction of the wall Yes/No Yes/No Build Change d At both ends of every wall longer than 30cm Yes/No Yes/No Build Change 7 BOND BEAM LOCATION Planned? Date Photo # Recommendation Made Done? Date Photo # Recommendation Implemented
a At the foundation (plinth beam) Yes/No Yes/No MTPTC 39b At the roof level (ring beam) Yes/No Yes/No MTPTC 39c Intermediate ring beam at sill level Yes/No Yes/No MTPTC 798 OPENING SIZE Planned? Date Photo # Recommendation Made Done? Date Photo # Recommendation Implemented
a Maximum 1/2 length between to crosswalls Yes/No Yes/No MTPTC 43b Openings positioned directly under ring beam Yes/No Yes/No Build Change c Doors reinforced on both sides with 8cm column Yes/No Yes/No MTPTC 81d Windows reinforced on both sides with 8cm column Yes/No Yes/No MTPTC 819 ACCESS and VENTILATION Planned? Date Photo # Recommendation Made Done? Date Photo # Recommendation Implemented
a At least two entrances/exits Yes/No Yes/No Build Change b Entrances on different sides of building Yes/No Yes/No Build Change c Opening/ventilation greater than 5% of floor area Yes/No Yes/No Build Change d Opening position based on wind direction Yes/No Yes/No Build Change e Gable not facing the wind Yes/No Build Change 10 TWO STORY CONFIGURATION RULES Planned? Date Photo # Recommendation Made Done? Date Photo # Recommendation Implemented a Do not build buildings with open ground floor Yes/No Oui / No MTPTC 15 b Do not build buildings with overhang Yes/No Oui / No MTPTC 25c Columns are continuous both floors Yes/No Oui / No MTPTC 25d Shear walls line up vertically Yes/No Oui / No MTPTC 25, 42e Openings line up vertically Yes/No Oui / No MTPTC 25, 42f Do not construct a second floor over a porch, or follow… Yes/No Oui / No MTPTC 17g Specific connection detailing Yes/No Oui / No Build Change
Homeowner Signature:__________________________________ Date: __________ Overall Assessment: Meets Minimum Standard?Oui / No
BC Engineer Signature: ______________________________________ Date: __________ Comments:
BC Team Leader Signature: ___________________________________ Date: __________
BC Manager Signature: ___________________________________ Date: __________

Homeowner:___________________ ID No:_____________ GPS: ________________ House Type: _________ MATERIALS QUALITY BC Engineer:___________________ Address: _________________________ CHECKLIST Homeowner Phone No:___________________ Boss: _________________________
USE GOOD QUALITY MATERIALS!1 WATER, SAND and AGGREGATES Planned? Date Photo # Recommendation Made Done? Date Photo # Recommendation Implemented
a Use clean water (not salty) Yes/Nob Use clean river sand Yes/No Yes/Noc Use crushed/angular gravel for concrete Yes/No Yes/Nod Maximum gravel size 2cm for concrete Yes/No Yes/No MTPTC 482 CEMENT Planned? Date Photo # Recommendation Made Done? Date Photo # Recommendation Implemented
a Use Type 1 for columns, beams and blocks Yes/No Yes/Nob Store off the ground and out of rain Yes/No Yes/No3 STEEL Planned? Date Photo # Recommendation Made Done? Date Photo # Recommendation Implemented
a Verify Grade 60 marking (minimum) on bars or… Yes/No Yes/No MTPTC 60b Grade 40 for single story buildings with leightweight roofs Yes/No Yes/Noc Use ribbed bars Yes/No Yes/Nod Do not use rusty or recycled bars for longitudinal bars Yes/No Yes/Noe Use at least #3 bars for plinth beam and ring beam Yes/No Yes/Nof Use at least #4 bars for tie columns and door/window columns Yes/No Yes/Nog Use at least #2 bars for stirrups Yes/No Yes/Noh Cut column steel long enough for overlap ≥ ø 50 Yes/No Yes/No MTPTC 65i Store off the ground and out of rain Yes/No Yes/No4 CONCRETE BLOCKS Planned? Date Photo # Recommendation Made Done? Date Photo # Recommendation Implemented
a Compressive strength of blocks meets design requirements Yes/No Yes/No Build Change b Block width equal to, or greater than 15cm Yes/No Yes/No Build Change c Use block 15 for concrete slab Yes/No Yes/No MTPTC 90d Blocks have been cured for at least seven days Yes/No Yes/No Build Change e No cracks or chips or partial blocks unless intact 1/3 of 2/3 Yes/No Yes/No Build Change f Dimensionsdon not vary by more than 5mm Yes/No Yes/No Build Change g Longitudinal block wall thickness minimum 3.0 cm Yes/No Yes/No MTPTC 37h Transverse block wall thickness minimum 2.5 cm Yes/No Yes/No MTPTC 37
TIMBER and CGI SHEET Planned? Date Photo # Recommendation Made Done? Date Photo # Recommendation Implemented a Use dimensional lumber Yes/No Yes/Nob Use Visually Graded Southern Pine #2 or equivalent Yes/No Yes/Noc Timber used free of knots and splits Yes/No Yes/Nod Do not use green lumber or lumber with high moisture content Yes/No Yes/Noe Do not use CCA pressure treated lumber (has green tint) Yes/No Yes/No
Homeowner Signature:__________________________________ Date: __________ Overall Assessment: Meets Minimum Standard?Oui / No
BC Engineer Signature: ______________________________________ Date: __________ Comments:
BC Team Leader Signature: ___________________________________ Date: __________
BC Manager Signature: ___________________________________ Date: __________
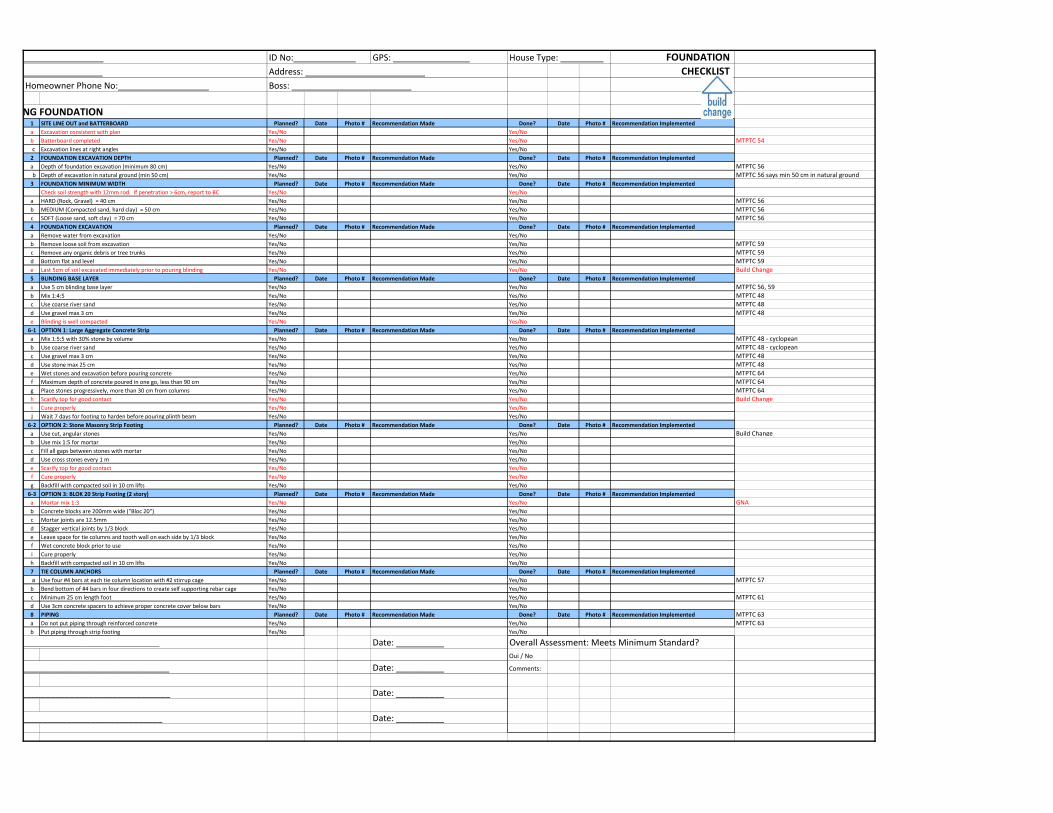
_________________ ID No:_____________ GPS: ________________ House Type: _________ FOUNDATION _________________ Address: _________________________ CHECKLIST
Homeowner Phone No:___________________ Boss: _________________________
NG FOUNDATION 1 SITE LINE OUT and BATTERBOARD Planned? Date Photo # Recommendation Made Done? Date Photo # Recommendation Implemented a Excavation consistent with plan Yes/No Yes/Nob Batterboard completed Yes/No Yes/No MTPTC 54 c Excavation lines at right angles Yes/No Yes/No2 FOUNDATION EXCAVATION DEPTH Planned? Date Photo # Recommendation Made Done? Date Photo # Recommendation Implemented a Depth of foundation excavation (minimum 80 cm) Yes/No Yes/No MTPTC 56
b Depth of excavation in natural ground (min 50 cm) Yes/No Yes/No MTPTC 56 says min 50 cm in natural ground 3 FOUNDATION MINIMUM WIDTH Planned? Date Photo # Recommendation Made Done? Date Photo # Recommendation Implemented
Check soil strength with 12mm rod. If penetration > 6cm, report to BC Yes/No Yes/Noa HARD (Rock, Gravel) = 40 cm Yes/No Yes/No MTPTC 56b MEDIUM (Compacted sand, hard clay) = 50 cm Yes/No Yes/No MTPTC 56c SOFT (Loose sand, soft clay) = 70 cm Yes/No Yes/No MTPTC 564 FOUNDATION EXCAVATION Planned? Date Photo # Recommendation Made Done? Date Photo # Recommendation Implemented a Remove water from excavation Yes/No Yes/Nob Remove loose soil from excavation Yes/No Yes/No MTPTC 59c Remove any organic debris or tree trunks Yes/No Yes/No MTPTC 59d Bottom flat and level Yes/No Yes/No MTPTC 59e Last 5cm of soil excavated immediately prior to pouring blinding Yes/No Yes/No Build Change 5 BLINDING BASE LAYER Planned? Date Photo # Recommendation Made Done? Date Photo # Recommendation Implemented a Use 5 cm blinding base layer Yes/No Yes/No MTPTC 56, 59b Mix 1:4:5 Yes/No Yes/No MTPTC 48c Use coarse river sand Yes/No Yes/No MTPTC 48d Use gravel max 3 cm Yes/No Yes/No MTPTC 48e Blinding is well compacted Yes/No Yes/No
6-1 OPTION 1: Large Aggregate Concrete Strip Planned? Date Photo # Recommendation Made Done? Date Photo # Recommendation Implemented a Mix 1:5:5 with 30% stone by volume Yes/No Yes/No MTPTC 48 - cyclopean b Use coarse river sand Yes/No Yes/No MTPTC 48 - cyclopean c Use gravel max 3 cm Yes/No Yes/No MTPTC 48d Use stone max 25 cm Yes/No Yes/No MTPTC 48e Wet stones and excavation before pouring concrete Yes/No Yes/No MTPTC 64f Maximum depth of concrete poured in one go, less than 90 cm Yes/No Yes/No MTPTC 64g Place stones progressively, more than 30 cm from columns Yes/No Yes/No MTPTC 64h Scarify top for good contact Yes/No Yes/No Build Change i Cure properly Yes/No Yes/Noj Wait 7 days for footing to harden before pouring plinth beam Yes/No Yes/No
6-2 OPTION 2: Stone Masonry Strip Footing Planned? Date Photo # Recommendation Made Done? Date Photo # Recommendation Implemented a Use cut, angular stones Yes/No Yes/No Build Change b Use mix 1:5 for mortar Yes/No Yes/Noc Fill all gaps between stones with mortar Yes/No Yes/Nod Use cross stones every 1 m Yes/No Yes/Noe Scarify top for good contact Yes/No Yes/Nof Cure properly Yes/No Yes/Nog Backfill with compacted soil in 10 cm lifts Yes/No Yes/No
6-3 OPTION 3: BLOK 20 Strip Footing (2 story) Planned? Date Photo # Recommendation Made Done? Date Photo # Recommendation Implemented a Mortar mix 1:3 Yes/No Yes/No GNAb Concrete blocks are 200mm wide ("Bloc 20") Yes/No Yes/Noc Mortar joints are 12.5mm Yes/No Yes/Nod Stagger vertical joints by 1/3 block Yes/No Yes/Noe Leave space for tie columns and tooth wall on each side by 1/3 block Yes/No Yes/Nof Wet concrete block prior to use Yes/No Yes/Noi Cure properly Yes/No Yes/Noh Backfill with compacted soil in 10 cm lifts Yes/No Yes/No7 TIE COLUMN ANCHORS Planned? Date Photo # Recommendation Made Done? Date Photo # Recommendation Implemented
a Use four #4 bars at each tie column location with #2 stirrup cage Yes/No Yes/No MTPTC 57b Bend bottom of #4 bars in four directions to create self supporting rebar cage Yes/No Yes/Noc Minimum 25 cm length foot Yes/No Yes/No MTPTC 61d Use 3cm concrete spacers to achieve proper concrete cover below bars Yes/No Yes/No8 PIPING Planned? Date Photo # Recommendation Made Done? Date Photo # Recommendation Implemented MTPTC 63a Do not put piping through reinforced concrete Yes/No Yes/No MTPTC 63b Put piping through strip footing Yes/No Yes/No
_____________________________ Date: __________ Overall Assessment: Meets Minimum Standard?Oui / No
_______________________________ Date: __________ Comments:
_______________________________ Date: __________
_____________________________ Date: __________
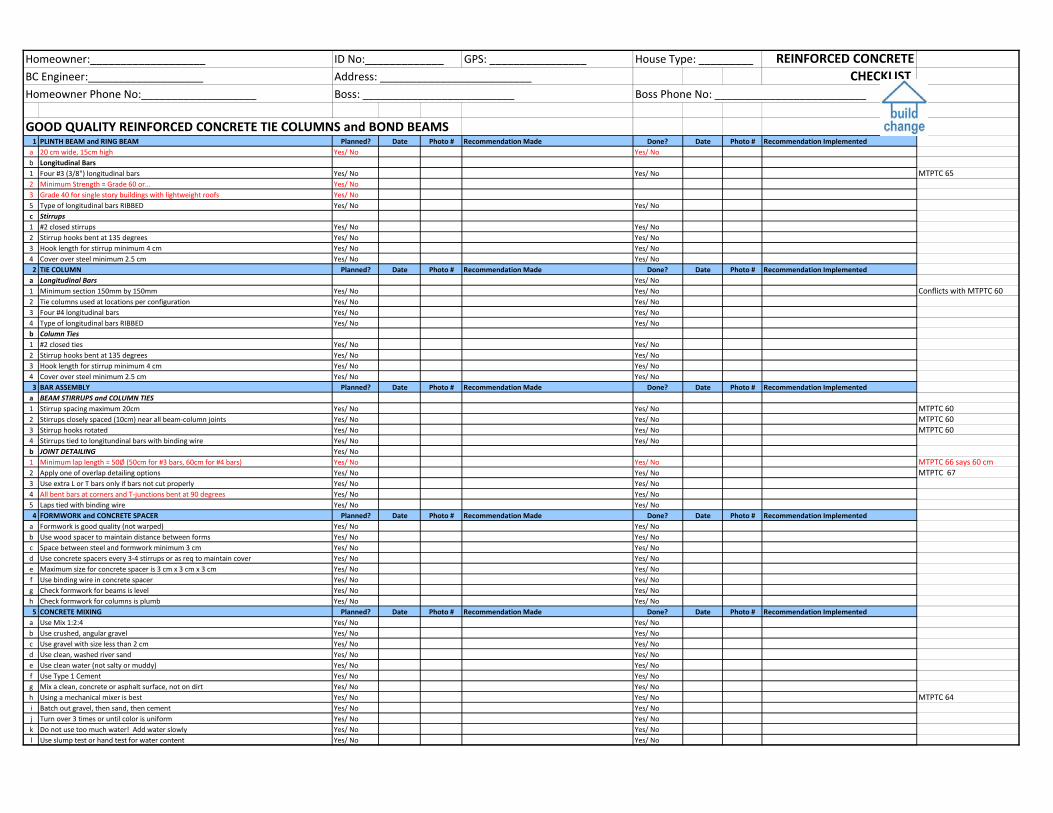
Homeowner:___________________ ID No:_____________ GPS: ________________ House Type: _________ REINFORCED CONCRETEBC Engineer:___________________ Address: _________________________ CHECKLIST Homeowner Phone No:___________________ Boss: _________________________ Boss Phone No: _________________________
GOOD QUALITY REINFORCED CONCRETE TIE COLUMNS and BOND BEAMS 1 PLINTH BEAM and RING BEAM Planned? Date Photo # Recommendation Made Done? Date Photo # Recommendation Implemented
a 20 cm wide, 15cm high Yes/ No Yes/ Nob Longitudinal Bars1 Four #3 (3/8") longitudinal bars Yes/ No Yes/ No MTPTC 652 Minimum Strength = Grade 60 or… Yes/ No3 Grade 40 for single story buildings with lightweight roofs Yes/ No5 Type of longitudinal bars RIBBED Yes/ No Yes/ Noc Stirrups1 #2 closed stirrups Yes/ No Yes/ No2 Stirrup hooks bent at 135 degrees Yes/ No Yes/ No3 Hook length for stirrup minimum 4 cm Yes/ No Yes/ No4 Cover over steel minimum 2.5 cm Yes/ No Yes/ No2 TIE COLUMN Planned? Date Photo # Recommendation Made Done? Date Photo # Recommendation Implemented
a Longitudinal Bars Yes/ No1 Minimum section 150mm by 150mm Yes/ No Yes/ No Conflicts with MTPTC 602 Tie columns used at locations per configuration Yes/ No Yes/ No3 Four #4 longitudinal bars Yes/ No Yes/ No4 Type of longitudinal bars RIBBED Yes/ No Yes/ Nob Column Ties1 #2 closed ties Yes/ No Yes/ No2 Stirrup hooks bent at 135 degrees Yes/ No Yes/ No3 Hook length for stirrup minimum 4 cm Yes/ No Yes/ No4 Cover over steel minimum 2.5 cm Yes/ No Yes/ No3 BAR ASSEMBLY Planned? Date Photo # Recommendation Made Done? Date Photo # Recommendation Implemented
a BEAM STIRRUPS and COLUMN TIES1 Stirrup spacing maximum 20cm Yes/ No Yes/ No MTPTC 602 Stirrups closely spaced (10cm) near all beam-column joints Yes/ No Yes/ No MTPTC 603 Stirrup hooks rotated Yes/ No Yes/ No MTPTC 604 Stirrups tied to longitundinal bars with binding wire Yes/ No Yes/ Nob JOINT DETAILING Yes/ No1 Minimum lap length = 50Ø (50cm for #3 bars, 60cm for #4 bars) Yes/ No Yes/ No MTPTC 66 says 60 cm 2 Apply one of overlap detailing options Yes/ No Yes/ No MTPTC 673 Use extra L or T bars only if bars not cut properly Yes/ No Yes/ No4 All bent bars at corners and T-junctions bent at 90 degrees Yes/ No Yes/ No5 Laps tied with binding wire Yes/ No Yes/ No4 FORMWORK and CONCRETE SPACER Planned? Date Photo # Recommendation Made Done? Date Photo # Recommendation Implemented
a Formwork is good quality (not warped) Yes/ No Yes/ Nob Use wood spacer to maintain distance between forms Yes/ No Yes/ Noc Space between steel and formwork minimum 3 cm Yes/ No Yes/ Nod Use concrete spacers every 3-4 stirrups or as req to maintain cover Yes/ No Yes/ Noe Maximum size for concrete spacer is 3 cm x 3 cm x 3 cm Yes/ No Yes/ Nof Use binding wire in concrete spacer Yes/ No Yes/ Nog Check formwork for beams is level Yes/ No Yes/ Noh Check formwork for columns is plumb Yes/ No Yes/ No5 CONCRETE MIXING Planned? Date Photo # Recommendation Made Done? Date Photo # Recommendation Implemented
a Use Mix 1:2:4 Yes/ No Yes/ Nob Use crushed, angular gravel Yes/ No Yes/ Noc Use gravel with size less than 2 cm Yes/ No Yes/ Nod Use clean, washed river sand Yes/ No Yes/ Noe Use clean water (not salty or muddy) Yes/ No Yes/ Nof Use Type 1 Cement Yes/ No Yes/ Nog Mix a clean, concrete or asphalt surface, not on dirt Yes/ No Yes/ Noh Using a mechanical mixer is best Yes/ No Yes/ No MTPTC 64i Batch out gravel, then sand, then cement Yes/ No Yes/ Noj Turn over 3 times or until color is uniform Yes/ No Yes/ Nok Do not use too much water! Add water slowly Yes/ No Yes/ Nol Use slump test or hand test for water content Yes/ No Yes/ No
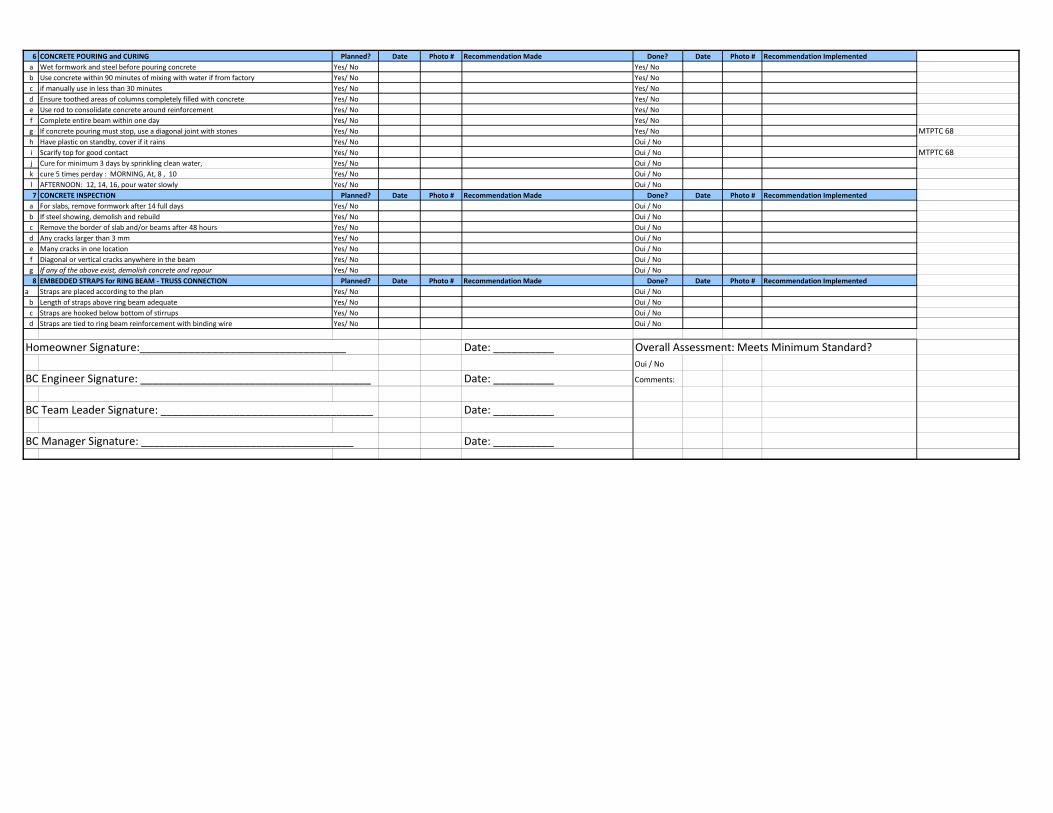
6 CONCRETE POURING and CURING Planned? Date Photo # Recommendation Made Done? Date Photo # Recommendation Implemented a Wet formwork and steel before pouring concrete Yes/ No Yes/ Nob Use concrete within 90 minutes of mixing with water if from factory Yes/ No Yes/ Noc if manually use in less than 30 minutes Yes/ No Yes/ Nod Ensure toothed areas of columns completely filled with concrete Yes/ No Yes/ Noe Use rod to consolidate concrete around reinforcement Yes/ No Yes/ Nof Complete entire beam within one day Yes/ No Yes/ Nog If concrete pouring must stop, use a diagonal joint with stones Yes/ No Yes/ No MTPTC 68h Have plastic on standby, cover if it rains Yes/ No Oui / Noi Scarify top for good contact Yes/ No Oui / No MTPTC 68j Cure for minimum 3 days by sprinkling clean water, Yes/ No Oui / Nok cure 5 times perday : MORNING, At, 8 , 10 Yes/ No Oui / Nol AFTERNOON: 12, 14, 16, pour water slowly Yes/ No Oui / No7 CONCRETE INSPECTION Planned? Date Photo # Recommendation Made Done? Date Photo # Recommendation Implemented
a For slabs, remove formwork after 14 full days Yes/ No Oui / Nob If steel showing, demolish and rebuild Yes/ No Oui / Noc Remove the border of slab and/or beams after 48 hours Yes/ No Oui / Nod Any cracks larger than 3 mm Yes/ No Oui / Noe Many cracks in one location Yes/ No Oui / Nof Diagonal or vertical cracks anywhere in the beam Yes/ No Oui / Nog If any of the above exist, demolish concrete and repour Yes/ No Oui / No8 EMBEDDED STRAPS for RING BEAM - TRUSS CONNECTION Planned? Date Photo # Recommendation Made Done? Date Photo # Recommendation Implemented
a Straps are placed according to the plan Yes/ No Oui / Nob Length of straps above ring beam adequate Yes/ No Oui / Noc Straps are hooked below bottom of stirrups Yes/ No Oui / Nod Straps are tied to ring beam reinforcement with binding wire Yes/ No Oui / No
Homeowner Signature:__________________________________ Date: __________ Overall Assessment: Meets Minimum Standard?Oui / No
BC Engineer Signature: ______________________________________ Date: __________ Comments:
BC Team Leader Signature: ___________________________________ Date: __________
BC Manager Signature: ___________________________________ Date: __________
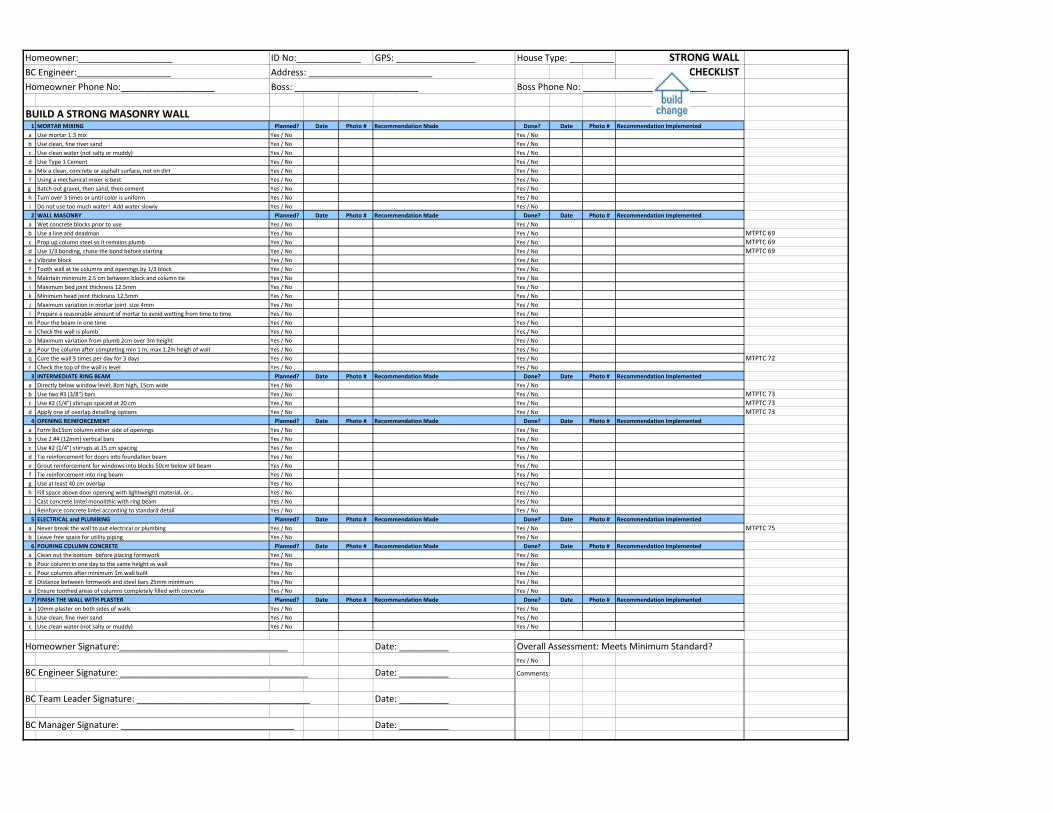
Homeowner:___________________ ID No:_____________ GPS: ________________ House Type: _________ STRONG WALL BC Engineer:___________________ Address: _________________________ CHECKLIST Homeowner Phone No:___________________ Boss: _________________________ Boss Phone No: _________________________
BUILD A STRONG MASONRY WALL 1 MORTAR MIXING Planned? Date Photo # Recommendation Made Done? Date Photo # Recommendation Implemented
a Use mortar 1:3 mix Yes / No Yes / Nob Use clean, fine river sand Yes / No Yes / Noc Use clean water (not salty or muddy) Yes / No Yes / Nod Use Type 1 Cement Yes / No Yes / Noe Mix a clean, concrete or asphalt surface, not on dirt Yes / No Yes / Nof Using a mechanical mixer is best Yes / No Yes / Nog Batch out gravel, then sand, then cement Yes / No Yes / Noh Turn over 3 times or until color is uniform Yes / No Yes / Noi Do not use too much water! Add water slowly Yes / No Yes / No2 WALL MASONRY Planned? Date Photo # Recommendation Made Done? Date Photo # Recommendation Implemented
a Wet concrete blocks prior to use Yes / No Yes / Nob Use a line and deadman Yes / No Yes / No MTPTC 69c Prop up column steel so it remains plumb Yes / No Yes / No MTPTC 69d Use 1/3 bonding, chase the bond before starting Yes / No Yes / No MTPTC 69e Vibrate block Yes / No Yes / Nof Tooth wall at tie columns and openings by 1/3 block Yes / No Yes / Noh Maintain minimum 2.5 cm between block and column tie Yes / No Yes / Noi Maximum bed joint thickness 12.5mm Yes / No Yes / Nok Minimum head joint thickness 12.5mm Yes / No Yes / Noj Maximum variation in mortar joint size 4mm Yes / No Yes / Nol Prepare a reasonable amount of mortar to avoid wetting from time to time Yes / No Yes / No
m Pour the beam in one time Yes / No Yes / Non Check the wall is plumb Yes / No Yes / Noo Maximum variation from plumb 2cm over 3m height Yes / No Yes / Nop Pour the column after completing min 1 m, max 1.2m heigh of wall Yes / No Yes / Noq Cure the wall 3 times per day for 3 days Yes / No Yes / No MTPTC 72r Check the top of the wall is level Yes / No Yes / No3 INTERMEDIATE RING BEAM Planned? Date Photo # Recommendation Made Done? Date Photo # Recommendation Implemented
a Directly below window level, 8cm high, 15cm wide Yes / No Yes / Nob Use two #3 (3/8") bars Yes / No Yes / No MTPTC 73c Use #2 (1/4") stirrups spaced at 20 cm Yes / No Yes / No MTPTC 73d Apply one of overlap detailling options Yes / No Yes / No MTPTC 734 OPENING REINFORCEMENT Planned? Date Photo # Recommendation Made Done? Date Photo # Recommendation Implemented
a Form 8x15cm column either side of openings Yes / No Yes / Nob Use 2 #4 (12mm) vertical bars Yes / No Yes / Noc Use #2 (1/4") stirrups at 15 cm spacing Yes / No Yes / Nod Tie reinforcement for doors into foundation beam Yes / No Yes / Noe Grout reinforcement for windows into blocks 50cm below sill beam Yes / No Yes / Nof Tie reinforcement into ring beam Yes / No Yes / Nog Use at least 40 cm overlap Yes / No Yes / Noh Fill space above door opening with lightweight material, or… Yes / No Yes / Noi Cast concrete lintel monolithic with ring beam Yes / No Yes / Noj Reinforce concrete lintel according to standard detail Yes / No Yes / No5 ELECTRICAL and PLUMBING Planned? Date Photo # Recommendation Made Done? Date Photo # Recommendation Implemented
a Never break the wall to put electrical or plumbing Yes / No Yes / No MTPTC 75b Leave free space for utility piping Yes / No Yes / No6 POURING COLUMN CONCRETE Planned? Date Photo # Recommendation Made Done? Date Photo # Recommendation Implemented
a Clean out the bottom before placing formwork Yes / No Yes / Nob Pour column in one day to the same height as wall Yes / No Yes / Noc Pour columns after minimum 1m wall built Yes / No Yes / Nod Distance between formwork and steel bars 25mm minimum Yes / No Yes / Noe Ensure toothed areas of columns completely filled with concrete Yes / No Yes / No7 FINISH THE WALL WITH PLASTER Planned? Date Photo # Recommendation Made Done? Date Photo # Recommendation Implemented
a 10mm plaster on both sides of walls Yes / No Yes / Nob Use clean, fine river sand Yes / No Yes / Noc Use clean water (not salty or muddy) Yes / No Yes / No
Homeowner Signature:__________________________________ Date: __________ Overall Assessment: Meets Minimum Standard?Yes / No
BC Engineer Signature: ______________________________________ Date: __________ Comments:
BC Team Leader Signature: ___________________________________ Date: __________
BC Manager Signature: ___________________________________ Date: __________
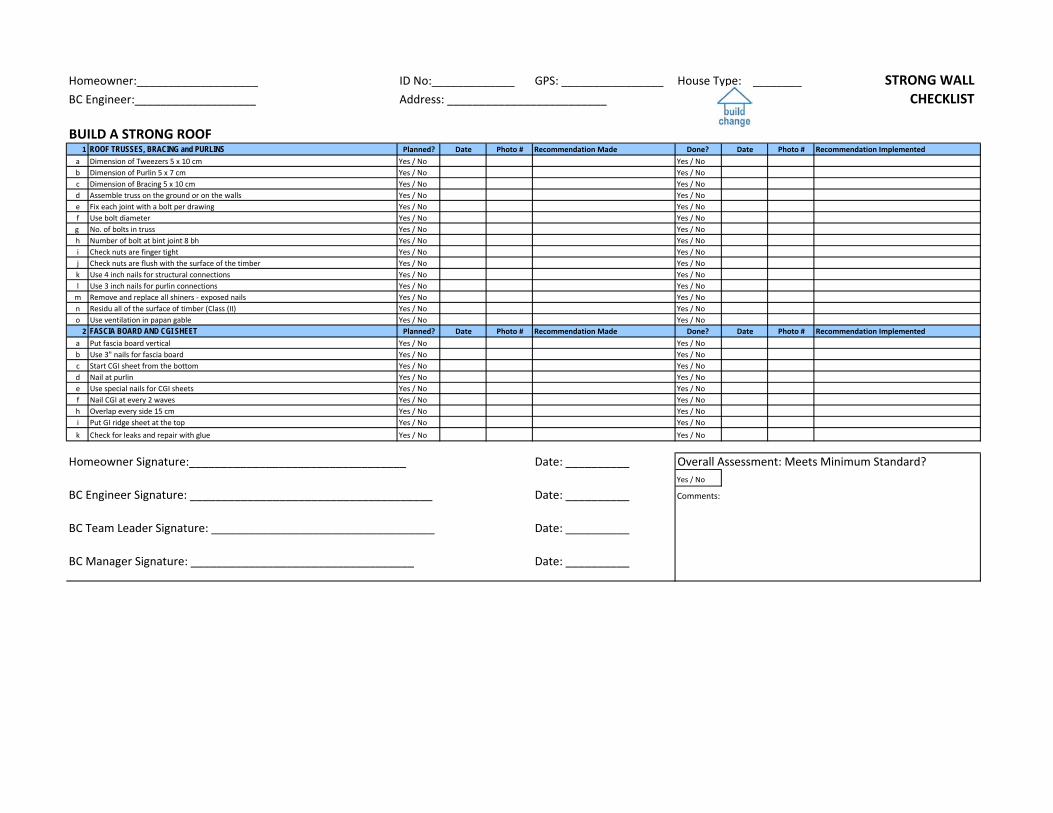
Homeowner:___________________ ID No:_____________ GPS: ________________ House Type: _________ STRONG WALL BC Engineer:___________________ Address: _________________________ CHECKLIST
BUILD A STRONG ROOF1 ROOF TRUSSES, BRACING and PURLINS Planned? Date Photo # Recommendation Made Done? Date Photo # Recommendation Implemented
a Dimension of Tweezers 5 x 10 cm Yes / No Yes / Nob Dimension of Purlin 5 x 7 cm Yes / No Yes / Noc Dimension of Bracing 5 x 10 cm Yes / No Yes / Nod Assemble truss on the ground or on the walls Yes / No Yes / Noe Fix each joint with a bolt per drawing Yes / No Yes / Nof Use bolt diameter Yes / No Yes / Nog No. of bolts in truss Yes / No Yes / Noh Number of bolt at bint joint 8 bh Yes / No Yes / Noi Check nuts are finger tight Yes / No Yes / Noj Check nuts are flush with the surface of the timber Yes / No Yes / Nok Use 4 inch nails for structural connections Yes / No Yes / Nol Use 3 inch nails for purlin connections Yes / No Yes / No
m Remove and replace all shiners - exposed nails Yes / No Yes / Non Residu all of the surface of timber (Class (II) Yes / No Yes / Noo Use ventilation in papan gable Yes / No Yes / No
2 FASCIA BOARD AND CGI SHEET Planned? Date Photo # Recommendation Made Done? Date Photo # Recommendation Implemented a Put fascia board vertical Yes / No Yes / Nob Use 3" nails for fascia board Yes / No Yes / Noc Start CGI sheet from the bottom Yes / No Yes / Nod Nail at purlin Yes / No Yes / Noe Use special nails for CGI sheets Yes / No Yes / Nof Nail CGI at every 2 waves Yes / No Yes / Noh Overlap every side 15 cm Yes / No Yes / Noi Put GI ridge sheet at the top Yes / No Yes / Nok Check for leaks and repair with glue Yes / No Yes / No
Homeowner Signature:__________________________________ Date: __________ Overall Assessment: Meets Minimum Standard?Yes / No
BC Engineer Signature: ______________________________________ Date: __________ Comments:
BC Team Leader Signature: ___________________________________ Date: __________
BC Manager Signature: ___________________________________ Date: __________