no retreat 3 - victorypointgames.net rules (book) v2-4... · 4 no retreat 3: the french front...
TRANSCRIPT

Maginot 3(a)
(1)
GOODFortress Holland (b)
1
SWISS
Switzerland
5 X
BELGIAN 3+4
3-3
Belgium
7th ARMY (b)
3 3BEF (a)
5-4
1st ARMY (b)
6-4
HOTH
3-6Open City
R2
6th ARMY (a)
6-3DE GAULLE (opt)
4-4R3
WIETERSHEIM
3-5
12th ARMY (a)
4-3
6th ARMY
6-3R3
2nd ARMY
3 3
16th ARMY (a)
3-3
3rd ARMY
4-3
Maginot
Maginot 3(b)
(1)
Maginot 3(c)
(1)
Groupement 1
2-3
Cadre
© 2012 Carl Paradis and Victory Point Games (VPG)“No Retreat 3, The French Front: May-June 1940” is VPG’s name for its World War 2 wargame.http://victorypointgames.com; [email protected]; (714) 957-4066
Deluxe Series #6
GAME DESIGNCarl Paradis
DEVELOPMENTAlan Emrich
MAPTim Allen
No Retreat 3The French Front: May-June 1940

NO RETREAT! 3 THE French Front May-JUNE 1940
© 2012 Carl Paradis and Victory Point Games
DESIGNER’S NOTES Welcome to the third game in the No
Retreat! series, simulating the highly controversial German invasion of France, May-June 1940. This was the most difficult subject I have tackled in a game design: how to make the game interesting, but not “script” the situation? How to keep it challenging for both sides and still keep it realistic? This is where the Plan cards concept evolved. They goad / limit both sides into following one of the many actual campaign plans that were studied by the Army Staffs. You won’t know your opponent’s goals at the start: maybe there will be no Ardennes sickle movement, nor an Allied advance into Belgium. Switzerland could be invaded and Holland left alone, etc. The historical manoeuvre used by the German OKW almost never happened. The original plan was more or less a replay of the WWI attack. It was only because of a series of unforeseen circumstances that it was changed to the risky Guderian plan (the battle maps having fallen into Belgian hands). So, could France have staved off total defeat in 1940? My conclusion is a resounding “Yes!” Again, a rerun of the actual WWI campaign could have happened, and the Wehrmacht halted at another “Miracle of the Marne.” Historically, it was a very hard fought campaign. The French Army was tailored for defense but had the units to defeat the Panzer spearheads (most of these would be lost in the Dunkirk pocket). When engaged, these forces fought hard and inflicted significant casualties on the Germans (who lost 60% of their Panzers, 40% of their aircraft and 210,000 soldiers), amounting to as many German losses as during the first year of Operation Barbarossa (the invasion of the USSR in 1941)! Given a more sensible Allied Operational strategy, the Nazi onslaught could have been slowed and then stopped. The Germans were not ready for a long campaign. When the Armistice was declared in June, their ammuni-tion reserves were dangerously low (the German’s pre-war ammunition expenditure estimates were off by more than 400%). This campaign could have been a more even fight
than the historical outcome suggests, and I hope my game demonstrates that. The Counterblows What do Counterblows represent? We wanted players to have some say during their opponent’s turn, and to reward careful management of their Event cards. Players need to envision counterblows as local spoiling counter-attacks launched in reaction to the enemy offensives. We did not go as far as to allow an actual attack by the defender (this is what players should do on their own turns), but it is close. And because those troops are leaving their positions to engage the enemy, they lose their defensive terrain benefits – thus, some risk is involved in launching a counterblow. Use the counterblow rule to quickly wipe out pockets of surrounded enemy units, and to allow your units a chance to advance during your opponent’s turn (if a CA result is rolled, and followed up with a successful counter-attack of your own). You can also use it to put pressure on unsupported fortified cities, lowering their defensive advantages, or even as a maneuver to gain an end-run advance. The Event Cards / Initiative Markers The very heart of the game is the Event card /Initiative marker “engine;” players simply never know what surprise their opponent can spring upon them with a sneaky card play. Consequently, perfect planning of moves or attacks is never entirely possible. For example, can you afford to temporarily leave a hole in your line, or will your adversary be able to play a card allowing him to move a unit there during your own turn, thus creating an unexpected breakthrough? Those cards are an excellent indicator of the resources a side still has at his disposal. If you start your turn with a full hand of cards, many initiative markers, and your opponent has none, then things are potentially very good for you! The cards and markers you have in reserve represent energy that you can spend: to replace troops, for Blitz! attacks, for counterblows, etc. With a low count, your options are limited. Sure, a player can still get by holding only a card/marker or two, but the game’s initiative is probably being
held by the opponent who is holding five or six cards, and a lot of Initiative markers! The Combat Result Tables The Combat Results Tables are a bit unusual. As an attacker, even at lower odds, you do not suffer many losses (save for the occasional EX result), but you could get a CA result, thus opening up interesting possibilities. A CA gives your opponent the option of counterattacking and possibly upsetting your position – thus making it easier for them to charge at you during their ensuing Player Turn. Or your opponent might simply “pass” the opportunity to counterattack and opt to play it safe and stay on the defensive. The Combat Results Tables are tailored to the counterblow feature. Upon study of the four different CRTs, you will notice subtle differences between them that have a substantial impact on how to play each side. The Blitz! and Shock! tables are your main offensive tools. The Attrition tables can be very useful for limited advances, local attacks and mopping up surrounded enemy troops, but you cannot decisively win this campaign by using such WWI attrition tactics! The Victory Conditions You must carefully study Rule 12.0, How to Win. Although each scenario has its own, separate victory con-ditions, this section of the core rules explains how to win the Campaign Game. This is the beating heart of this simulation. There are many ways to win the Campaign Game, and they are all important. The End of Game Victory is straight-forward and works as most traditional wargamers might expect: capture cities, destroy/evacuate units, and you win the game. But there are a few twists: First, the longer the game lasts, the fewer points the German Player might score as there is a VP penalty for turns 10, 11 and 12. So, the German’s goal is to capture Paris as soon as possible, and after scoring enough points, play that Armistice! Event card. Even then, under certain circumstances, it might be better to delay this, even at the cost of Victory Points, as there might be good scoring opportunities left, like exiting…
(Continued on inside back cover)

NO RETREAT 3: THE French Front: May-JUNE 1940 v2.4 1
© 2012 Carl Paradis and Victory Point Games
No Retreat 3 The French Front: May-June 1940
Table of Contents [1.0] INTRODUCTION ........................... 1 [2.0] GAME EQUIPMENT ...................... 1 [3.0] SETTING UP THE GAME ............... 2 [4.0] SEQUENCE OF PLAY .................... 2 [5.0] THE CARDS ................................. 2 [6.0] SUPPLY ........................................ 3 [7.0] ORGANIZATION ........................... 3 [8.0] MOVEMENT ................................. 4 [9.0] RESERVE MOVEMENT ................. 5 [10.0] COMBAT .................................... 6 [11.0] MARKER / UNIT REMOVAL ....... 9 [12.0] HOW TO WIN ............................. 9
REFERENCE SECTION ............. 12 [13.0] GAME TURN EVENTS ............... 12 [14.0] SPECIAL UNITS / RULES .......... 12 [15.0] OPTIONAL RULE...................... 14
SCENARIOS .............................. 15 [A] REGULAR GAME ...................... 15 [B] HISTORICAL GAME .................. 16 [C] SIMULATION GAME ................. 16 [D] OPERATION DYNAMO .............. 17
[16.0] EXTENDED EXAMPLES ............ 18 [17.0] EXTENDED MAGINOT LINE ..... 20 [18.0] SUDDEN DEATH VARIANT ....... 20
[0.0] USING THESE RULES New gaming terms, when they are initially defined, appear in dark red lettering for quick referencing. The instructions for this game are organized into major “Rules” sections as shown in large green CAPS font, and represented by the number to the left of the decimal point (e.g., rule 4.0 is the fourth rule). These rules generally explain the game’s subject matter, its components, the procedures for play, the game’s core systems and mechanics, how to set it up, and how to win. With each Rule, there can be “Cases” that further explain a rule’s general concept or basic procedure. Cases might also restrict the application of a rule by denoting exceptions to it. Cases (and Subcases) are extensions of a Rule shown in the way that they are numbered. For example, Rule 4.1 is the first Case of the fourth Rule; and Rule 4.1.2 is the second Subcase of the first Case of the fourth Rule. Important information is in red text. References to examples of a Rule or Case are in blue text and this font.
Text in shaded boxes, like this, provides the voice of the game’s designer, who is addressing you to explain an idea or concept that is not, itself, a Rule or a Case.
[1.0] INTRODUCTION No Retreat 3 is a two-player wargame depicting the struggle between the Germans and the French/Allies during World War 2 from the start of Fall Gelb (Case Yellow) on May 10, 1940 to the final decisive operations of Fall Rot (Case Red) up to the end of June, 1940: the Campaign in France.
[2.0] GAME EQUIPMENT Parts Inventory
● 2 11 x 17” map sheets ● 1 8.5” x 11” player aid mat ● 2 8.5” x 5.5” player aid sheets ● 117 thick, multi-shaped counters* ● 1 Rules booklet ● 1 six-sided die (boxed edition only) ● 37 Event & Plans Cards *Some slight soot and discoloration can occur during the laser cutting process. If any of these pieces are missing or damaged, please email us at [email protected] [2.1] The Game Map and Scale The map represents that portion of Western Europe where this campaign took place. A hexagonal grid has been superimposed to regulate movement and the position of the playing pieces. A unit must always be located in a specific hex which contains a certain type of terrain and might have hexsides with additional terrain features. The Terrain Effects Chart (TEC) explains the game’s various terrain features. Each hex is about 30 kilometers from side to side. Each turn represents four days of real time, except the first turn is only two days. [2.2] Game Charts & Tables
Included are various game aids for players that organize and illustrate certain game functions. These include the four Combat Results Tables, the Terrain Effects Chart, the Game Turn Track, and the Victory Point Track. [2.3] The Playing Pieces The playing pieces represent actual military units that fought in this campaign. The numbers and symbols on them indicate their strength and type. The German player controls the German Army (gray/green). The French player con-trols all French (blue), British (brown), and some Neutrals including Belgian (dark blue), Dutch (orange) and Swiss (red) units.
Round (Initiative/Blitz!, Initiative/Shock!, Disorganized/Unsupplied, Target/Counterblow, etc…) markers help players remember certain important pieces of information during play.
Sample Units Units (as opposed to markers) have information printed on them as shown here, representing their capabilities: Most Units have two ‘steps’ each. They are full-strength on their front side and reduced-strength on their (lighter-colored) reverse side. One-step units do not have unit information on their reverse sides. Hexagonal Fortifications are also units and function the same way, but cannot move.
Unit Type Symbols
Combat Strength measures a unit’s value in battle as expressed in Strength Points. Some units have outlined (white) Combat factors, indicating that they cannot usually attack. Movement Allowance determines how far that unit can move as measured in Move-ment Points that it can spend each turn. Some units have no Movement Allowance (as a reminder that they are immobile) and their Combat Strength is in parentheses as a reminder that they usually have no Zone of Control (see 8.5). Some units have a red Movement Allowance, indicating that they are Mobile units. They have certain Movement and Combat advantages (see 8.5.5 and 10.6.2). Hedgehog Defense: Some units have a Hedgehog Defense symbol. These units are not Forts, but have certain advantages in combat, namely immunity vs. the Armor Attack Bonus and a change in the Combat Results Table (see 10.6.3 and 10.7.5). Size Dot: Smaller units have a Black or Red Size Dot symbol to indicate that they can stack (see 8.4.2).
Unit Size & Designation Most square units generally represent Infantry Armies or Mobile Corps. The other-shaped units represent fixed

2 NO RETREAT 3: THE French Front May-JUNE 1940 v2.4
Systems Development by Alan Emrich
Fortifications (hexagon-shaped) or Paratroops (round). A unit’s Designation identifies it based on that formation’s historical name or that of its commander.
Sample Event Card
Initiative markers
These round markers are very important. They are used to pay for key actions such as playing certain Event cards, replacing losses, putting units in Reserve; or, when allowed, flipping them to their Blitz!/Shock! sides for Combat.
Players receive them at the start of most turns by discarding Event cards and they are occasionally awarded by combat results. Initiative markers are the game’s “money.” They represent Supplies, Operational Leadership, Support Assets (Artillery and Airplanes), Troop Replacements, etc.
[3.0] SETTING UP THE GAME Place the map between the players. The German player sits along the east edge and the French player on the west edge. The Player Aid Mat is placed between them along the north edge. Each player takes his/her Combat Results Table sheet. Refer to the Scenarios section of this book for set up instructions (also see 14.14).
[4.0] SEQUENCE OF PLAY How the Turns Work: Before players conduct their respective Player Turns, a mutual Housekeeping Phase takes place to organize things. Each Game Turn consists of a German player Turn followed by a French player Turn. During each player’s turn, sev-eral Phases (e.g., Movement and Combat) are conducted in strict sequence. Each Phase must be completed before the next begins. My Turn; Your Turn: The player who is currently conducting his Player Turn is called the Phasing Player. His opponent is known as the Non-Phasing Player.
Procedure New Game Turn Housekeeping A. Advance the Game Turn Marker: Advance
the Game Turn marker on the Turn Track. If the 12th turn was just completed, or an Armistice was declared, the game ends and the winner is determined.
B. New Game Turn Events Phase: Any Event listed on the Game Turn Track for the new Game Turn (i.e., the box the Game Turn marker was just moved into) is noted and, if applicable, implemented at this time (see 13.4 for a complete listing and explanations).
C. New Game Turn Victory Phase
Automatic Victory is checked (12.2 & 12.3). Sudden Death/Operational Collapse (12.1) and Plan Scoring (12.7.1) are also checked on turns denoted by a Death’s Head (T) symbol.
German player Turn 1. Card Phase: The Phasing player must discard
down to two (2) cards and then usually draws four (4) more cards (see 5.2).
2. Supply Check Phase: Place Unsupplied markers on both sides’ units that cannot trace a valid Supply Line at this time.
3. Organization Phase: The Phasing player takes this turn’s allotted Initiative markers, takes Reinforcements, Replacements and Evacuates Units. Both players can also buy more Initiative markers by discarding cards or (Phasing player only) convert them to Blitz!/Shock! markers.
4. Movement Phase: The Phasing player can move his units on the map, including moving one (only) off the map to the Reserve Box.
5. Combat Phase: All Voluntary, and then all Involuntary, Battles are Declared and Resolved as per the Battle Sequence in any order the Phasing player desires.
6. Marker / Unit Removal Phase: Some units and markers are removed from the map.
7. Mutual Reserve Phase: The Phasing player may put his unit(s) in the Reserve box back on the map; then the Non-Phasing player may do the same with his unit(s) in the Reserve box.
French player Turn The French player becomes the “Phasing Player” and repeats the above seven Phases, in order, that the German player just completed.
Exception: The French player declares most Voluntary Battles during the Organization Phase (see the Player Aid Sheets for the sequencing).
[5.0] THE CARDS General Rule
You draw cards, one at a time, from the Draw Pile during your Card Phase. The Draw Pile is reshuffled when there is one card left in it (that card is not drawn!) or as instructed by the play of certain Events.
Cards generate game events or are resources discarded for more Initiative markers. After their use, cards are placed, face-up, in a Discard Pile next to the Draw Pile. Note, the 10 Plan cards are not in the regular deck, and drawn differently (see 12.7).
Appropriate Timing Event cards are played when their corresponding actions are performed during the Sequence of Play (4.0). For Example: You can only play a card that gives you a free unit upgrade during your own Organization Phase, not during your opponent’s Combat Phase.
Card play is sequential. That is, cards are resolved in the order that they were played unless their effects conflict, in which case the card played last takes precedence. If both players play a card at the same time, the player whose Player Turn it is decides their play order; either his own card first, or his opponent’s.
Once is Enough Because cards are retrievable from the Dis-card Pile and thus reusable, this Rule applies: The exact same-named Event cannot occur twice during a single Player Turn.
Cases [5.1] Discard Step: The Card Phase begins by discarding. You can retain only two (2) cards in your hand before drawing at the start of your turn, so you must discard any excess cards in your hand at this time. [5.2] Draw Step: After discarding (if necessary) during the Discard Step (see 5.1), you usually draw four (4) cards from the Draw Pile and add them to your hand. The following conditions can affect the French player’s per turn Draw Rate (DR):
-1 French card if the German player controls the 3 Ports.
-1 French card if a German unit occupies any number of Paris hexes.
+1 French card if the Anglo-French Union! event is in effect (14.13.2).
[5.3] Events: The cards have text in boxes. The Green boxes are Events playable only by the German player, while the Blue boxes are Events playable only by the French player. Thus, the effect of each card is different depending upon who has it in his hand. Once played, cards are discarded.
[5.3.1] Event Effects: Events describe their exact timing and use on the cards themselves. When not specified, you can perform that Event any time. [5.3.2] Event Precedence: When there is a conflict between Event text and the Rules, the Event text takes precedence.
German Event on top (green-gray) Card #
Events with these symbols
can only be played as
Events when they are paid
for with an Initiative
marker
French Event on bottom (blue)

NO RETREAT 3: THE French Front: May-JUNE 1940 v2.4 3
© 2012 Carl Paradis and Victory Point Games
[5.3.3] Initiative Events: Each event with a German Cross symbol (E) is playable only if the German player spends one Initiative marker to do so. Each Event with a French Roundel symbol () is playable only if the French player spends one Initiative marker to do so. All other Events (i.e., those without these symbols) are playable for free.
[5.4] Other Card Uses: In addition to their use triggering Events, you can spend (i.e., discard) cards during Organization Phases to buy additional Initiative markers (see 7.1)
[6.0] SUPPLY General Rule
During this Phase, both players check the supply status of each of their on-map units: first, all of the Phasing Player’s units, and then the Non-Phasing Player’s units, marking those that are unsupplied.
Cases [6.1] Receiving Regular Supply: A unit is in Regular Supply if it is able to trace a valid Overland Supply Path. You trace a Supply Path from the unit requiring supply, through any number of hexes, to a friendly map edge. A friendly map edge is the east (dark gray) edge for the Germans, and the west and south (blue) edges for the French and British. [6.2] Alternative Supply Sources: A unit is always in supply if it is in a fortified hex in its own country. The Swiss unit is always in supply in Switzerland. Tracing to these alternative supply sources does not constitute an Overland Supply Path. Note that units in Ports are not automatically in supply in this game, but being there does allow them to receive Improvements (7.2.1). [6.3] Blocking Supply Paths: Enemy units always block a Supply Path. Enemy Zones of Control (see 8.5) also block Supply Paths unless there is a friendly unit in that hex. You cannot trace through Neutral countries not yet attacked by the German Player. That is, friendly units negate enemy Zones of Control for the purpose of tracing a Supply Path. [6.4] Unsupplied Markers: When a unit is Unsupplied during the Supply Phase, place an Unsupplied marker on it to denote its precarious status. [6.5] Unsupplied Effects: A unit with an Unsupplied marker suffers accordingly: Organization: Reduced-strength units are
restricted in their ability to recover back to full-strength (see 7.2.2).
Movement: Its Movement Allowance is reduced to a maximum of Three (3) Movement Points.
Combat: When attacking, it never receives an Armor Bonus (10.6.3), cannot conduct Multi-Hex Advance (10.8.1), and suffers a one shift to the left (1) penalty on the Combat Results Table. If it is eliminated in combat, it is placed in the Surrendered Units Box (10.7.1).
Scoring: A Maginot line Area is considered “Isolated” for Victory Point purposes if it cannot trace a valid Overland Supply Path.
Units are not automatically eliminated solely because they lack supply.
[7.0] ORGANIZATION Procedure
During your Organization Phase, perform the following Steps in order:
A. Initiative Buy Step: Purchase extra Initiative markers.
B. Flip Step: Improve units and (for the Germans only) Initiative markers.
C. Placement Step: In order: Reinforce, Replace, and Evacuate units.
D. French Attack Step: The French player (only) places his white target markers during this Step of his Player Turn. A. The Initiative Buy Step
[7.1] Buying Initiative markers: Both Players may discard any number of Event cards in their hand to purchase their side’s unused Initiative markers on a 1-for-1 basis: each card exchanged for one marker. Note that you can buy Initiative markers during your opponent’s Player Turn!
B. The Flip Step [7.2] Improving Reduced-Strength Units to Full-Strength, and German Initiative to Blitz! Markers:
[7.2.1] Improving Units: The Phasing player’s square, two-step units (only) that are currently on the map on their one-step (i.e., reduced-strength) side can be Improved (i.e., flipped over) to their full-strength side. [7.2.2] Improvement Restrictions: You can only flip a unit that is in Regular Supply (6.1) unless it can trace a Supply Path to a Friendly Port (see 7.2.4). [7.2.3] Reduced-Strength: When brought back onto the map as Replacements, two-step units always return to play showing their reduced-strength (one-step) side.
[7.2.4] Cost: You must pay two (2) Initiative markers for each Improvement, unless (7.2.2) Port Supply is being used: in this case, you must pay three (3) markers.
Note that it is cheaper to Replace (7.7) an eliminated unit (bringing it back at reduced-strength) than it is to Improve a reduced-strength unit back up to full-strength.
[7.2.5] Penalty (Important): Put a Disorganized marker on any unit that was just Improved. [7.2.6] Improving Initiative markers: The German player can flip, for free, any number of Initiative markers he has available for later play as Blitz! markers.
The French player does not have the capa-bility to freely flip his Initiative markers; only specific Event cards allow him to flip them over to Shock! markers. [7.3] One-Step Square Units: Some units have only one step, and some cost more to Replace (7.7). Cadre units have one step, but come back for free (see 14.9). [7.4] Paratroop/Fort Units: These non-square units are irreplaceable. When eliminated, Paratroops are removed from the game and Forts are placed in the Surrendered Units Box.
C. The Placement Step [7.5] Unit Placement: Place Reinforcement and Replacement units in play as follows: Place German, French and British units
into the Reserve Box. Place Neutral units in a friendly-
controlled city within their country. [7.6] Receiving Reinforcements: Players receive units as Reinforcements on the Game Turn indicated by their Reinforcement Numbers (i.e., as placed on the Game Turn Track during set up). Reinforcement units are placed in the Reserve Box. [7.7] Replacement of Destroyed Units: To take a unit from the Destroyed Units Box and return it to play (as per 7.5), the owning player must pay (discard) one (1) Initiative marker for each such Replacement received. Note that the one-step Allied Armored Units cost two (2) markers to replace, as indicated on their reverse sides. Example: A unit is eliminated on Turn 4. Its owner replaces it at the first opportunity on Turn 5’s Placement Step. It returns to the map on its one-step side. Raising it back to full-strength (i.e., two steps) cannot be done until the following turn’s Flip Step at the earliest, because the Flip Step occurs before the Placement Step. The sequencing is very strict about this!
[7.8] Unit Evacuations: You can try to move one (1) Unsupplied unit per turn, provided that it is in a

4 NO RETREAT 3: THE French Front May-JUNE 1940 v2.4
Systems Development by Alan Emrich
Port and stacked there with the Evacuation marker (see 14.7), to the Evacuated Box. Only Unsupplied units can be evacuated. The French player must pay one (1)
Initiative marker per unit Evacuated. After paying, draw an Event card to
determine the Evacuation’s success (do not resolve the Events on it!) as follows: A: If there’s a German Cross on the
card, the Evacuating unit takes a Step Loss.
B: If there’s a French Roundel on the card, put the unit in the Evacuated Units Box.
Note that both of these symbols can be on a card, so A and B could both apply. Thus, a one-step unit would be eliminated before being successfully evacuated! You can also evacuate one Unsupplied
unit by using card #24 (Dynamo). In this case you do not need to draw, the Evacuation automatically succeeds.
D. The French Attack Step [7.9] Target Placement: During this Step of his Player-Turn, the French player places his White Target markers according to the Battle Rules (10.1). Note that the German player places his, much more conveniently, at the start of his own Combat Phase. The Dark Blue Enhanced French Target
marker follows the regular rules and is placed like the German’s, i.e., at the start of the French Combat Phase (14.12).
[8.0] MOVEMENT General Rule
Each Turn, during your Movement Phase, you may move none, some or all of your non-fort (i.e., “mobile”) units through any combination of hexes up to the limit of their printed Movement Allowance, paying the appropriate Movement Point (MP) cost to enter each hex. Unlike Chess, in No Retreat 3 a player has the opportunity to move all his pieces during his turn. This gives the player the chance to set up his attacks by Concentrating units, or to enhance his defensive positions through their careful dispersal. You do not get to move your opponent’s units, and your opponent cannot move pieces during your turn except as a result of combat or through the play of certain Event cards.
Procedure You move your units one at a time, hex-by-hex, in any direction or combination of directions that you desire. A unit can continue moving until it has either expended all of its MPs, or it can move no further because entering another hex would exceed
its Movement Allowance, or it moves adjacent to an enemy unit, or you simply desire to stop moving it.
Cases [8.1] Movement Allowance: A unit cannot exceed its Movement Allowance during its Movement Phase except as permitted by certain Event cards. You cannot transfer MPs between units, or save them up and carry them over between Game Turns. Disorganized Units: Units under
a Disorganized marker have a -2 MP penalty to their Movement Allowance.
[8.2] Weather Effects: On Bad Weather Game Turns, all units with a Movement Allowance greater than four (>4) have their Movement Allowance reduced to four (4). That is, there is a “speed limit” of four Movement Points during Bad Weather. [8.3] Terrain Effects: The basic cost to enter a Clear hex is one Movement Point (1 MP). The cost to enter other hexes can be higher, as listed on the Terrain Effects Chart. When a unit does not have sufficient MPs left to pay the cost to enter a given hex, it cannot do so. Exception: A unit that has a Movement Allowance greater than zero (0) (i.e., a mobile unit) can always move one hex, regardless of terrain or other costs, but Rules regarding Enemy Zones of Control (8.5) and Prohibited hexes and hexsides still apply. [8.4] Stacking Effects: Friendly units can never enter hexes containing enemy units. Within the confines of other restrictions (e.g., terrain costs, Zones of Control), friendly units can freely enter and pass through hexes containing other friendly units without penalty. Stacking occurs when more than one friendly unit remains in a hex at the end of any Phase, Step or Battle. Information markers do not count for stacking.
[8.4.1] Unit Size: Smaller units and Forts have a black or red dot to the right of their unit type symbol to indicate that they are smaller troop sizes counting less for stacking. [8.4.2] Stacking Limit: A maximum of two (2) units can be stacked at the end of any Phase, Step or Battle. Only one unit per hex can be a non-dotted unit. Red-dotted units never count for stacking
and can be added freely to hexes with friendly units.
Thus the maximum you can have stacked in a hex is one non-dotted unit, plus one black-dotted unit; OR two black-dotted units; and to these you can add any number of red-dotted units.
[8.4.3] Overstacking Penalty: At the end of every Phase, Step or Battle, place all units in a hex in excess of the stacking limit (8.4.2) in the Destroyed Units Box. The owner chooses which units to destroy in each overstacked hex until every hex conforms to the stacking limit. [8.4.4] Allied Nationalities: Allied units of different colors cannot voluntarily stack in the same hex. If caused to do so by a retreat after combat, they are not placed in the Destroyed Units Box right away (unless overstacked, see 8.4.3). However, the Allied player must correct this multi-national stacking situation as soon as possible. Allied units cannot stack with an Open City marker.
Exceptions: 1) Bi-colored Blue/Tan units can be freely
stacked with French or British Units. 2) A mix of any unit
nationalities can be stacked with the orange Evacuation marker or in Switzerland.
3) Before Game Turn 3, the Allies cannot stack more than one Square unit in a hex, except in Switzerland.
[8.5] Zones of Control (ZOCs): The six hexes on the map adjacent to a unit are called that unit’s Zone of Control (“ZOC”) as shown here: This Zone of Control represents that area outside the hex a unit physically occupies that it can control by virtue of its size, mobility, and projection of firepower. ZOCs do not extend into or out of neutral countries (see 8.10) or into Marshes. Friendly units’ ZOCs do not affect other friendly units, but they do restrict enemy units. Hexes adjacent to enemy units, (i.e., in an Enemy Zone of Control, or EZOC) have these effects on friendly units:
[8.5.1] Stop! : A unit must cease its movement for that turn the moment it enters an EZOC, regardless of how many MPs it might have remaining.
Non-dotted unit (one per hex,
maximum)
Black-
dotted unit
Red-
dotted unit

NO RETREAT 3: THE French Front: May-JUNE 1940 v2.4 5
© 2012 Carl Paradis and Victory Point Games
[8.5.2] +1 MP to Enter or Exit: It costs a unit one additional (+1) MP to enter a hex in an EZOC. If a unit begins your Movement Phase adjacent to an enemy unit (i.e., in an EZOC), it costs one additional (+1) MP to exit that hex.
[8.5.3] No Infiltration: A unit cannot move directly from one hex in an EZOC directly into another unless the hex it is entering is also occupied by a friendly unit (whereupon the moving unit must immediately stop, as per 8.5.1). Otherwise, a unit must first leave an EZOC by way of an uncontrolled hex, and afterward it can continue moving. [8.5.4] Negating EZOCs: In addition to allowing some limited infiltration move-ment (8.5.3), the presence of a friendly unit negates an enemy-controlled hex for the purposes of tracing a Supply Path (6.3) and when Retreating (see 10.7.6). There are also no ZOCs (for any purposes) into Marsh hexes. [8.5.5] Mobile Units: Units with a red Movement Allowance (i.e., mobile units) can Retreat through enemy non-Mobile units’ ZOCs (only).
[8.6] Switzerland: French and German units (only) can enter Switzerland (14.2). There are no hexes, so consider the entire country as one huge Mountain terrain hex that is adjacent to three hexes in both France and Germany. It costs a unit its entire Movement Allow-ance (see 8.3) to enter that Area of the map. Double the regular stacking limit when applying it inside Switzerland, and normal Zone of Control rules apply to and from Switzerland.
Example: German units in the 3 German hexes adjacent to Switzerland can all attack it.
[8.7] Fortress Areas: There are no separate hexes in these areas, so consider each of the
Fortress areas as one (sometimes large) hex that is adjacent to many hexes on the map (akin to Switzerland, as per 8.6). Normal stacking rules apply inside each of these areas, and normal Zone of Control rules also apply. Fortress Areas that include a City are Fortresses for Movement and Combat. The City is only considered for Victory Point scoring purposes. [8.8] Ardennes Area: The large Forest area with the brown tinting behind it is the Ardennes Forest (pictured here). French/Allied units cannot voluntarily enter the Ardennes Forest (these rough/wooded) hexes before Game Turn 6 (see 13.4, Event #6). [8.9] Exiting the Map: Your units can exit the map during your Movement Phase along Gray/Blue map edges at a cost of 1MP plus one (1) Initiative marker per unit exited. German units (only) can exit along the
German (Gray) Map Edge. They are then placed in the Reserve Box.
Both sides’ units can exit along the French (Blue) Map Edge. They are then placed in the Southern France Box.
Some units in the Southern France Box score Victory Points at the end of the game, but once in this box, they cannot return to the map nor engage in combat there; they are out of play. [8.10] Neutral Countries: Belgium, Holland, Luxembourg, and Switzerland begin the game as neutral countries. German units can freely enter any neutral country or attack their units. The instant a German unit crosses a neutral country’s border or attacks a neutral country’s units, a state of war exists between that (now former) neutral country and Germany with these specific effects: ZOC rules between those units and across
those borders immediately take effect. That country allies with France and the
French player commands that country’s units for the rest of the game.
French and British units can also freely enter that now-active allied country.
The French player’s units cannot enter those countries before they are at war with the Germans, nor attack the units of these minors while they are neutral.
[8.11] Southern France Box: Units can move and Retreat to the Southern France Box (see 8.9 and 10.7.6). Once there,
however, they cannot leave. No Battles can involve the units there, so the units of both sides in that Box simply co-exist there until the end of the game.
[9.0] RESERVE MOVEMENT General Rule
During your Movement Phase, you can Put in Reserve your non-Fort units by placing them in the Reserve Box. You can relocate them back onto the map during a subsequent Reserve Phase.
Cases [9.1] Put in Reserve: Starting on Turn 2, you may take up to one friendly supplied unit (only!) from the map per Movement Phase and pay one (1) Initiative marker and place it in the Reserve Box in lieu of any other movement for that unit that turn.
[9.1.1] Reinforcements/Replacements: Units and markers arriving as Reinforce-ments/Replacements appear in the Reserve Box during your Organization Phase. These units do not count against your one-unit-per-turn-from-the-map limit. [9.1.2] Reserve Capacity: Each player can have a maximum of six (6) units in the Reserve Box, plus any Paratrooper markers. [9.1.3] Exceptions: Belgian, Dutch, Swiss and Fortification units are prohibited from being placed in Reserve.
The Reserve Box represents Operational redeployments, rail moves, and actual movement of reserve troops away from prying enemy eyes. It also accounts for the unexpected German moves through the Ardennes area early in the campaign. [9.2] Release of Reserves: During each Mutual Reserve Phase, both Players (with the player whose turn it currently is going first) may bring none, any or all of their units from the Reserve Box back onto the map. (Units in the Reserve Box can remain there indefinitely.) When thus Released, each such unit must be placed in: 1) A friendly City hex that can trace a
Regular Supply Path (even if that City hex is in an EZOC).
2) German units can be placed in any Ar-dennes hex (see 8.8), even in an EZOC, that he can trace a Regular Supply Path from unless the “No Ardennes Surprise” Event text is on his Plan card selected during set up (14.14).
3) Or any other hex that is within three (3) hexes, maximum (i.e., no more than two intervening hexes), from a friendly City or friendly map edge (Gray for the Germans and Blue for the French) that is

6 NO RETREAT 3: THE French Front May-JUNE 1940 v2.4
Systems Development by Alan Emrich
not in an EZOC. You cannot use a city for this purpose that was just captured during the current Player Turn.
[10.0] COMBAT General Rule
During your Combat Phase, each of your units might participate in an attack against an adjacent hex containing enemy units. Each unit has a Combat Strength representing its basic power to attack and defend. When a player initiates an attack between adjacent units, it results in a battle (i.e., completing all of the Steps in the Battle Procedure). Throwing the die and consulting the appropriate Player’s Combat Tables, and then applying the result, is how a given battle is resolved. The player who is initiating an attack is called the “Attacker” and his opponent is called the “Defender” in that battle (regardless of the overall situation).
Combat Phase Preparation A Combat Phase begins with the Phasing, and then the Non-Phasing Player, declaring all of the hexes that will be attacked. This is followed by each battle’s individual resolution. Exception: the French player declares most of the French voluntary battles during his Organization Phase (see the French player aid sheet for the exact sequence). For the French player, things are different. When he is the Phasing Player, he must place his Target markers on the map during his Organization Phase (except for his special Dark Blue Target marker). With that one exception, this means the French must make “prepared” attacks against units that they began the turn adjacent to, whereas the Germans can roll up to French units during the German Movement Phase and then declare their attacks! This represents some of the major doctrinal differences between the opposing armies. The French player places Counterblow markers normally, however (10.1.2).
Cases [10.1] Declaring All Battles: Before resolving any Battles, both players must declare all targeted defender’s hexes. A Target Hex is one containing forces of the Non-Phasing (i.e., the defending) player that is adjacent to one or more hexes containing forces of the Phasing (i.e., attacking) player. The attacking player places a Target marker in each Target Hex that he wishes to attack. He cannot put a Target marker on a hex that already contains a Counterblow marker.
At the start of the game, the French player has only 3 regular (white) Target/Counterblow markers; he receives the special (dark blue) one when the Anglo-French Union Event occurs. The German player always has 5 gray ones. The number of Target markers is a maximum limit (a player cannot have more Targets/Counterblows than his maximum number of markers).
[10.1.1] Voluntary Attacks Step: The Phasing player declares all of his desired attacks first and places his Target markers. All of these are Target Hexes that he will voluntarily attack that Phase.
Restrictions A unit with a Disorganized
marker cannot voluntarily participate in an attack.
A unit with a white Combat strength cannot voluntarily participate in an attack.
[10.1.2] Counterblows Step: After the Phasing player (i.e., the attacker) has declared all his voluntary attacks; the Non-Phasing player (the defender) may declare additional Target Hexes that the Phasing player must also attack during his Combat Phase. The Non-Phasing player places his Counterblow markers (blue for French/Allied occupied hexes and Gray-Green for German-occupied hexes) on these Target Hexes not already containing a Target marker.
Restrictions The Non-Phasing player pays one (1)
Initiative marker for each such Target hex he so designates with a Counterblow marker.
The Non-Phasing player’s white-strength and disorganized units cannot participate in a Counterblow, but they do suffer their results.
Any of the Phasing Player’s adjacent units can respond to a Counterblow, including Disorganized units and those with White-print Combat Strengths.
Units in Counterblow Target Hexes receive no terrain benefits for that Battle (i.e., combat shifts) when attacked by the Phasing player. Note that weather combat effects do apply.
Why pay to have your units attacked and forego terrain advantages? Opportunity or desperation; you may have unsupplied units trying to break out; or want to draw off units from your opponent’s nearby, carefully planned attack; or seek out a weak unit in hopes of
getting a CA combat result against it and punishing it. The purpose of a Counterblow is to seize an opportunity to unhinge your opponent’s plans or advance your own cunning plan.
[10.2] Order of Combat: All declared battles are resolved in any order the Phasing player (attacker) desires. Each battle must be completely resolved before commencing the next battle.
Battle Preparation [10.3] Combat Conditions: The following rules determine which units are eligible for combat.
[10.3.1] Attacker’s Prerogative: The Phasing Player decides which attacking units will attack which Target Hexes, in any combination he desires, as long as all declared Target Hexes are attacked. [10.3.2] Combining Units in a Battle: Attacking units in one or more hexes may combine their Combat Strengths and conduct a single battle together. [10.3.3] Adjacency: For an attack to be resolved as a single battle, all of the attacking units must be adjacent to all of the Target Hexes. Within that restriction, a battle can involve any number of attacking units and Target Hexes. [10.3.4] One Battle Per Unit: No unit may attack more than once per friendly Combat Phase, and no Target Hex can be the object of more than one battle per enemy Combat Phase (not including counterattack results; see 10.7.2) [10.3.5] Multi-Unit Attacks: Attacking units in a single hex may attack one or more Target Hexes in a single battle. Note that if one or more such units attack, this does not obligate any of the other Phasing Player’s units stacked with or adjacent to it to participate.
[10.4] Combat Strength Unity: A given unit’s Combat Strength is unitary; you cannot divide it among multiple battles during a single Phase. Units that are stacked together need not participate in the same battle when attacking (or counterattacking; 10.7.2). Conversely, all units in a Target Hex must defend together. [10.5] The Steps in a Battle: Battles are conducted via this Battle Procedure. You must complete these Steps for each attack, in the exact order listed below:
Battle Procedure 1. Strength Step: Total the Combat
Strengths of: first, the attacking units; and then the defending units. Target
marker

NO RETREAT 3: THE French Front: May-JUNE 1940 v2.4 7
© 2012 Carl Paradis and Victory Point Games
2. Commitment Step: The Attacker (only) may commit one Blitz! or Shock! marker to the Battle, but only if enough Mobile units are participating in the Attack to permit this commitment (see 10.6.2). Then, starting with the Attacker, each player may play one Event card that takes effect during a battle. This occurs before the die is rolled. Note that the Defender makes his card play decision after the Attacker, with full knowledge of the Attacker’s commitment (if any).
3. Initial Ratio Step: Divide the attacker’s strength by the defender’s strength and express this as an initial Odds Ratio (see the Combat Results Tables). Always drop fractions so that the math is “rounded off” in the Defender’s favor. For Example: 12 Strength Points attack 9; the ratio is 1.33 to 1, which rounds down for the Combat Results Tables to a simple 1:1 Odds Ratio battle. If the Attacker could have mustered 14 vs. 9, the Odds Ratio would have risen to 3:2. This simple Odds Ratio gives the initial Odds Column used on the Attacker’s Combat Results Table.
4. Final Odds Step: Shift the initial Odds Column (determined above) left and/or right as called for by the Terrain Effects Chart, weather, Support markers, armor, or Event card(s) in play for that battle. All effects are cumulative and only the net Odds Column shift is applied. This determines the final Odds Column used.
5. Attacker Rolls Step. The Attacking player rolls a six-sided die and cross-indexes its result with the final Odds Column (determined in Step 4, above) to obtain the Combat Result.
6. Apply Result Step. With the Combat Result known, it is now applied. This might result in repeating the above Steps due to a counterattack, a unit step loss or removal by either side, or a Retreat – followed by a possible Advance After Combat.
[10.6] Combat Odds Shifts: When adjusting the Final Odds Column (per Step 4, above), the following Subcases apply:
[10.6.1] Terrain Effects: The shifts caused due to terrain effects are based upon the defender’s hex or if all of the attacking units attack across the hexsides listed on the Terrain Effects Chart (TEC). If more than one hex is attacked at the same time, the defender chooses which single defending hex’s terrain will be used. [10.6.2] Support Markers: When available to a player, a maximum of one
(1) German Blitz! or French Shock! marker can be committed to a battle, and only when that player is the attacker (even in a counterattack situation). Use of these markers allows that player to use his Blitz!/Shock! Combat Results Table (otherwise, battles must be resolved using the attacker’s Attrition Table). Support markers can only be committed
to a battle if at least half of the attacking units are Mobile (i.e., have a red Movement Factor) and are in supply. Support markers do not remain on the
map. After their use, they are flipped and returned to the Unused Markers Holding Box.
Unused Support markers are carried over from one Game Turn to another. They’re good until used.
When you gain Support markers through card Events, you cannot flip Initiative markers that you already possess! You can only gain them by taking unused markers that are currently available for purchase.
So, contrary to previous No Retreat! games, Blitz! / Shock! markers do not provide a bonus column shift to an attack, but instead allow the use of a different (and more effective) Combat Results Table. This represents mobile training, superior doctrine, tactics and leadership, plus elements of surprise, airpower, logistical support, etc.
[10.6.3] Armor Bonus: When an attacking force includes an Armor type unit AND it is attacking infantry-type units in a Clear or Forest hex, the attacker receives one shift to the right (1). Armor attacks against units with an
Armor, Mechanized Infantry, or Hedgehog-Defense Capable units do not receive this bonus.
This bonus applies once for EACH armor unit taking part in the battle.
This bonus only applies when an armor-type unit is the attacker in a battle, never when it is the defender (but it does apply when an armor-type unit is in a counterattack situation).
This bonus does not apply during Bad Weather Game Turns.
[10.6.4] Odds Limits: Only the net shift applies to the final column used on the Combat Results Table. Whenever an initial (before shifting) or final (after shifting) Odds Ratio exceeds 6:1, it is treated as 6:1. When less than 1:3,
an initial Odds Ratio is not shifted and becomes an automatic CA result, as do final Odds Ratios of less than 1:3. For Example: 24 German Strength Points attack an Allied unit worth only 2 Strength Points that is in a City hex. The initial Ratio would be 24:2, or 12:1, which becomes a 6:1 (the maximum column before shifting). That is shifted one to the left (1) for the defender’s terrain and the attack would be resolved on the 5:1 Column.
[10.7] What the Combat Results Mean: Combat results are listed under each player’s respective Combat Results Table on their Player Aid Sheets. Below are the details for applying those results: BATTLE RESULTS: — = Indecisive Battle: No Effect CA = Counterattack: The defender may
launch an immediate counterattack. Re-compute the odds; no terrain modifiers.
CB = Counterblow: Place a Counterblow marker on a single Phasing Player’s units’ attacking hex. These markers are not removed during that side’s Marker / Unit Removal Phase, but are instead resolved as usual during the other side’s Combat Phase (i.e., during the next Player Turn).* If the Target Hex has a Fort unit in it, this result is No Effect.
DW = Defender Withdraws: The Defender Retreats his units 1 hex. Attacking units may Advance 1 hex (only, no bonuses). If the Target Hex has a Fort unit in it, this result is No Effect.
DR = Defender Retreat: Defender Retreats his units 2 hexes. Attacking units may Advance. If the Target Hex has a Fort unit in it, this result is No Effect.
DS = Defender Shattered: Defender retreats his units 3 hexes and they are Disorganized. Attacking units may Advance. If the Target Hex has a Fort unit in it, this result is an EX.
DD = Defender Destroyed: Defender Retreats his units 4 hexes, they are Disorganized AND each defending unit loses 1 step. Attacking units may Advance. If the Target Hex has a Fort unit in it, this result is 1 Fort Step loss and no Retreats. Attacking units may Advance if the hex is completely vacated after the step losses are applied.
EX = Exchange: Both sides lose 1 step. Neither side Retreats or Advances. The loss must be from a Mobile unit if the Blitz!/Shock! Table was used.
E/= Initiative: The German/French player gains one Initiative marker AND one Battle Victory Point. If the Target
Panzer or Tank

8 NO RETREAT 3: THE French Front May-JUNE 1940 v2.4
Systems Development by Alan Emrich
Hex has a Fort unit in it, this result is No Effect.
*Thus, your Player Turn could begin with some enemy Counterblow markers already in place, meaning that either: A) You must attack those enemy units if your friendly units remain adjacent to them during your Combat Phase; or B) You will have to move your friendly units away during your Movement Phase to avoid those battles (at which point the Counterblow marker has no effect). This can be a big decision!
[10.7.1] Step Losses: Certain results cause a step loss to either the defender’s (DD) or both sides’ units (EX). When these occur, a full-strength, two-step unit is reduced (flipped over) to its reduced-strength, one-step side OR a unit with only one step is eliminated (but see rule 14.9, Cadre Units). When there is a choice, the owning
player determines which of his units in that battle suffer any step loss.
Most Eliminated units are placed in the Destroyed Units Box or, if that unit had an Unsupplied marker on it at the time of its elimination, it is placed in the Surrendered Units Box instead. Exception: place German and French
Cadre units on the Turn Track when eliminated (see 14.9).
[10.7.2] Counterattacks: A CA result means the defender must decide to either: treat that battle’s outcome as No Effect and end it there, OR to conduct an immediate counterattack. If the defender counterattacks, remove any Support marker and discard played cards for that battle. Go back to Step 1 in the Battle Procedure and start a brand new battle, repeating all of the Steps. This new battle must include the exact same units that participated in the initial Battle, only this time: 1) the Counterat-tacking player is the attacker (and the other player is the defender), and 2) no terrain shift modifiers are applied to this battle (although other terrain effects that negate armor shifts and multi-hex advance still apply). Unengaged Units: It could happen in
counterattack battles that some units in a hex are being (counter) attacked, but other units in that hex are not; this is allowed. Only participating units are affected by any step loss and CA results; stacked, unengaged units must suffer any Retreat results.
A counterattack can lead to another counterattack, and so on until some other outcome takes place. These counterattacks, too, are conducted as per this Rule.
[10.7.3] Counterblows (Involuntary Counterattacks): A Non-Phasing player’s Counterblow (10.1.2) mandates the Phasing player’s involuntary counterattack in response. This is performed similarly to a regular counterattack in that the defender (i.e., the Non-Phasing player) receives no terrain shift modifiers, but: The Phasing player is the attacker and
the Target Hex is the one denoted by a Counterblow marker (see 10.1.2).
Disorganized and white strength units can participate in these Counterblows, but can never Advance After Combat (10.8) if victorious.
Remember that a Counterblow called for by the Combat Result Table (CB) is resolved during the next Player Turn. Simply flip the Target marker to its Counterblow side and place it on one of the Phasing player’s Attacking hexes (of the Phasing player’s choice, if there is more than one such hex); even when a CB result occurs during a Counterattack (CA).
You need to visualize this: Counterblows placed through discarding Initiative markers during the opponent’s turn are diversions made by the defender to force the Phasing player to commit some strength to attack those harassing units. Counterblows placed by a CB combat result (and thus resolved on the following Player Turn) are partial advances made by the attacker that forces the opponent to either cede the hexes adjacent to that Counterblow marker during the next turn, or to deal with the threat directly by attacking it.
[10.7.4] Forts: When the Target Hex contains a hexagon-shaped Fortified (a.k.a. “Fort”) unit, these outcomes are changed: A DR or DW becomes a
No Effect (‘–’). A DS becomes an EX. Ignore the Retreat part of a DD result
for all units in the Target Hex. No Initiative or VP markers are gained
from that battle. Ignore the Hedgehog Defense rule
(10.7.5). [10.7.5] Hedgehog Defense Units: When the Target Hex contains a unit with the
Hedgehog Defense symbol between its Combat Strength and Movement Allowance, and no counterblow markers, change the combat result as follows: Hedgehog Defense units (and the units stacked with them) suffer the next higher Combat Result listed on the tables when they are defending (only). The hierarchy of Combat Results (which get progress-sively better for the defender) are: DD DS DR or DW EX CB CA E/. An initial “E/-” stays as is.
For Example: A combat result of DS becomes a DR result, which is better for the defender (thanks to their Hedgehog Defenses). A DS becomes a DW on the Attrition Tables (as there is no DR result on these Combat Results Tables).
[10.7.6] Retreats: When required to Retreat, the defender must first move his units one to four hexes (depending on the specific Combat Result) further away from the battle (i.e., they cannot zig-zag so as to end up fewer hexes further away), toward a friendly supply source if possible, within the following restrictions: Units cannot Retreat into hexes
containing an enemy unit, across Prohibited hexsides or off the map.
Exception: Allied units can Retreat off the map through a French (blue) map edge; place these units in the Southern France Box (see 8.11).
Most units cannot Retreat into hexes in an Enemy ZOC unless there is also a friendly unit in that hex (i.e., friendly units negate EZOCs for Retreat purposes.) See the exception below:
Red-Movement Allowance (i.e., mobile) units can Retreat into hexes that are exclusively in Enemy Black-Movement Allowance (i.e., non-mobile) units’ ZOCs, but only if they can Retreat while moving towards their own lines and Supply sources (i.e., you cannot advance through enemy lines while Retreating!).
Thus, regular infantry units cannot easily surround elusive mobile units! Units can pass through and end their
Retreat stacked with friendly units, but if an overstacking situation occurs at the end of a Retreat, it must be resolved (see 8.4.3).
Retreating expends no Movement Points; you just count hexes.
Remember, Forts and units stacked with them never retreat; they ignore the Retreat part of DR and DD results. If a unit is prohibited from Retreating, it is eliminated instead (see 10.7.1).

NO RETREAT 3: THE French Front: May-JUNE 1940 v2.4 9
© 2012 Carl Paradis and Victory Point Games
[10.8] Advance After Combat: Following their Retreat or removal from their hex after the application of a DW, DR, DS, or DD combat result, if the Target Hex has become completely vacated, then attacking (non-Fort) units may Advance After Combat. This means that those attacking units can move into the defender’s just-vacated hex and possibly beyond. Advance After Combat expends no
Movement Points, nor do Enemy Zones of Control affect it in any way; you just charge forward counting hexes.
A number of surviving attacking units up to the stacking limit (8.4.2) can always advance into, and remain in, a Defending unit’s just-vacated hex.
Units cannot advance into hexes containing an enemy unit, across Prohibited hexsides or off the map. [10.8.1] Multi-Hex Advance: In a multi-hex advance, the first hex advanced into must be a defending unit’s just-vacated hex. After a DR or DS combat result, Mobile units, and all units after a DD result, can advance a second hex within the following restrictions for that second hex of advance: In Addition to the normal (see 10.8)
advance limitations, units cannot make a multi-hex advance during Bad Weather (see 13.1).
French/Allied units cannot do a Multi-Hex advance on a DR or DS combat result before Turn #8 (see the note on the Turn Track), but they can always do so on a DD result.
Units can pass through other friendly units during this advance. If they end their advance stacked with other friendly units and overstacking occurs, it must be resolved (see 8.4.3).
Advancing units need not follow the defending units’ retreat path! After occupying the just-vacated defender’s hex, multi-hex advancing units are free to go to any adjacent hex that is not otherwise prohibited.
Important: Units must cease their Advance After Combat immediately upon entering a Mountain, Ardennes Forest, City, Fortress or Marsh hex. Crossing a Major River or Fortified hexside also stops Advance After Combat (c.f.: Terrain Effects Chart). This means that if the defender’s just-vacated hex is, for example, a Marsh hex, then no multi-hex Advance After Combat can take place. Advancing units would have to stop their advance right there in that hex.
[10.8.2] Panzer Advance Bonus: All German Armor-type units whose multi-hex Advance after Combat has not been stopped in its second hex due to the above terrain considerations may, during Good weather turns only, continue on and advance a third hex.
Thus the French/Allies will be limited to a one-hex advance after combat for most of the game, unless winning an overwhelming victory (via a DD result). This simulates their slower, deliberate battle doctrine and low operational initiative.
[11.0] MARKER / UNIT REMOVAL PHASE
General Rule This Housekeeping Phase is when Unsup-plied units re-check their supply status, and some markers are removed from the map.
Cases [11.1] Marker Removal: Remove all Disorganized markers on the Phasing Player’s units (only); clear off all used Blitz! and Shock! markers on the map, and return them all to the Unused Markers Holding Box. The Phasing Player’s Paratroop units on the map are also removed from the game at this time. [11.2] Resupply: All units with Unsupplied markers retrace supply at this time, beginning with the Phasing Player’s units and then the Non-phasing Player’s units. Those that cannot trace a valid Supply Path during this Step keep their Unsupplied markers. Those that can now trace a valid Supply Path have those markers removed. Thus, unused markers on their Blitz! / Shock! sides can be saved between turns for later use, just as they can when they are on their Initiative side.
[12.0] HOW TO WIN It is very important to make a study of these methods and procedures for keeping track of how well players are doing. Many of this simulation’s ‘lessons’ are revealed through the victory conditions that motivate winning gameplay. That is, these Victory Conditions quantify the narration of this game’s ‘story.’
General Rule A Campaign Game (i.e., one played from the first game turn with the goal of playing to the last game turn) of No Retreat 3 is won in two different ways: 1) By a French or German Automatic Win
during play, OR 2) By an End of Game Victory
Determination.
Shorter scenarios have their own Victory Conditions listed with their instructions. 3) You also check for “operational Collapse” during that phase.
Cases [12.1] Operational Collapse Check: During the New Game Turn Victory Phase of the Sudden Death turns (indicated by a Death’s Head T symbol on the Turn Track; i.e., Game Turns 3, 6, 9 and 12),unless the Anglo-French Union Event is in effect;( see 14.13.2). Players check the Victory Point Track – the side (or sides) with their pictured symbol/color for the indicated Game Turn: If it is French and the VP total
is less than or equal to (≤) the number shown by his side’s symbol for the indicated Game Turn, then the German side suffers an “Operational Collapse” (see 12.1.2).
It is German and the VP total is equal to or greater than (≥) the number shown by his side’s symbol for the indicated Game Turn, then the French side suffers an “Operational Collapse” (see 12.1.1).
If it is a French VP Game Turn (i.e., Game Turns 3, 6 or 9), and the VP total is one to three higher than the number by the French symbol for that Game Turn, you may (you can chose not to do it) advance the British Aid marker one square right on the British Aid Track. In this case, the campaign is close-fought and the British feel confident enough to commit themselves further to the French Campaign. For Example: It is the Victory Phase to start the new Game Turn 9. Finding the T9 (Turn 9) notation in the German-colored 16 box on the VP Track means that the French Player would suffer an Operational Collapse if there are 16 or more Victory Points.
For Turn 9 (T9), the French player finds a French symbol on the 10 box on the VP Track; this means that the German Player would suffer an Operational Collapse if there are 10 or fewer VPs.
If at the beginning of Turn 9, AND if the VP count was 11, 12 or 13 (i.e., one to three higher than French T9 VP value), you would advance the British Aid marker on the British Aid Track one square. [12.1.1] French Operational Collapse: In this case, for the current turn, apply the instructions below for the French player:

10 NO RETREAT 3: THE French Front May-JUNE 1940 v2.4
Systems Development by Alan Emrich
He cannot Voluntarily Move any of his units on the map during the Movement Phases of the whole Game-Turn by more than one (1) hex (but can move units to and from the reserve). He cannot voluntarily put any Target/Counterblows markers on the map during the whole Game-Turn. Does not get any “initiative” markers for the Turn. Draws only two (2) cards for the turn. [12.1.2] German Operational Collapse: In this case, for the current turn, apply the instructions below for the German player: Does not get any “initiative” markers for the Turn. Draws only two (2) cards for the turn. This represents a temporary critical breakdown of Command and Control in the affected Army, Panic or Confusion. a multi-hex advance, the first hex advanced into must be a defending unit’s just-vacated hex. After a DR or DS combat result [12.2] French Automatic Victory: During any Victory Phase, the French win if the Victory Point Total is Zero or less, as indicated on the VP Track. At that point, the French player wins the game automatically. [12.3] German Automatic Victory: During any Victory Phase, the Germans win if the Victory Point Total is Twenty or more, as indicated on the VP Track and they control at least one Paris hex. At that point, the German player wins the game automatically. [12.4] End Game Victory: If neither player has won by the end of Game Turn 12, (or earlier if a French Armistice is declared using Event card #1 on Game Turns 9 through 12 when at least one hex of Paris is German-controlled; see 13.4 - section 9-12, in the Reference section) then the victorious side is determined according to the following procedure: 1. Remove all of the Open City markers
from the map, if any, and add those Cities’ VPs to the On-Map/Unit VPs.
2. Add the On-Map/Unit VPs to the End Game VPs. Do not include the Battle VPs (i.e., the round Battle marker) in this total! Compare this sum to the appropriate section below: 20 VPs or more (or a German
Sudden Death or Automatic Victory): Deutschland Über Alles! – German Major Victory. The bulk of the British Expeditionary Force surrenders. Operation Sealion looms as a dangerous and viable threat. Churchill is replaced as
Prime Minister by Lord Halifax who begins armistice negotiations with Hitler’s regime. It is probable that Operation Barbarossa can succeed with the Soviet Union collapsing in WWII much as it did in WWI.
15-19 VPs: Drang Nach Osten! – German Victory. France falls and the German Luftwaffe begins the Battle of Britain, an aerial prelude to the invasion of England. Churchill, however, rallies his nation and Britain endures the Blitz waiting for a strategic turn of events. This would come when Germany attacks the Soviet Union in 1941. This is the historical result.
10-14 VPs: Liberté, Liberté chérie! – French Victory. The Germans fail to achieve the victory they require in this campaign and stare once again at the prospect of a long war in France, just like the last one. Because France endures, Operation Barbarossa is not launched as the Germans plan for a renewed attack in France in 1942. Stalin seizes his opportunity and invades western Poland and Germany in the late summer of 1942, as he had been planning.
9 VPs or Less (or a French Sudden Death or Automatic Victory): Conduis, soutiens nos bras vengeurs! – French Major Victory. The Germans are severely checked, much as happened in 1914. Hitler’s regime cannot rally the loyalty and support for the nation as the Kaiser did, and the plots to kill him and dismantle the Nazi regime progress rapidly, culminating in a Putsch orchestrated by the conservatives on the General Staff who negotiate a status quo ante bellum and spare Europe years of agony and suffering.
[12.5] VP Scoring Schedule: Players earn VPs for control of certain hexes and by causing enemy units to surrender. Additionally, Event Cards can award VPs. See the Player Aid Mat for specifics. Key Concept: Only the German player scores Victory Points. French actions subtract Victory Points from the German’s running total.
[12.5.1] Controlling on-Map VP Hexes and Areas: A Victory Point hex is controlled by a side if its units were the last to pass through or occupy it. At the start of the game, the Germans control all of the hexes in Germany; the
Allies all of the hexes in France. The remaining hexes (Holland, Belgium, Switzerland) are neutral (controlled by nobody) until and unless invaded by the Germans, at which time their hexes immediately become Allied controlled. [12.5.2] Controlling Switzerland: You control Switzerland if, and only if, you have a friendly non-Cadre unit inside that country and keep it there. This means: 1) All enemy forces in Switzerland are gone. 2) You have occupied that country. 3) You maintain that occupation. [12.5.3] End Game VPs: These Victory Points are scored only if and when the game goes into an End Game Victory situation (see 12.4). Important: End Game VPs are not accounted for on the VP Track and thus do not count for either Sudden Death or Automatic Victories. [12.5.4] VP Markers: The round Battle VP marker is used to track the net VPs earned through some Combat Results on the Combat Results Table, plus certain Events on the British Aid Track. It cannot go higher than six (+6) VPs, nor lower than minus six (-6) VPs. Any excess Battle VPs beyond those extremes are lost (ignored). The square (two-sided) VP marker: A) Shows the Overall VPs for
the Game (determined by adding the On-Map/Units VPs to the VPs shown by the round Battle VPs marker).
B) Reminds players that the British Aid Track Event #6, Anglo-French Union! has occurred and is active. This is denoted by flipping this marker over to its other side.
[12.5.5] Keep the VP Count Current: It is important to maintain a current VP count. A complete audit should be made during each Victory Phase. Remember, End Game VPs are not added to this total. Those VPs are only added when an End Game Victory is checked, and never during Game Turns (12.4).
Battle VPs (not counted at End Game): +1 VP for each Paris City hex captured by
Advance After Combat.* +1 VP for each German Battle
Victory Point gained in combat.
-1 VP for each French Battle Victory Point gained in combat.
-2 VPs for triggering the Aid Pledged British Aid Track Event #2.

NO RETREAT 3: THE French Front: May-JUNE 1940 v2.4 11
© 2012 Carl Paradis and Victory Point Games
*The +1 VP for a Paris City hex captured by Advance After Combat applies to both sides. Consequently, the Allies are penalized thus if they retake such a hex in combat! On-Map/Unit VPs (always counted):
+1 VP for each Allied unit that is in the Surrendered Units Box.
-1 VP for each German unit that is in the Surrendered Units Box.
+1 VP for a German-controlled Switzerland Area.
+1 VP for each German-controlled OR isolated Maginot line Area.
+1 VP for each German-controlled Port or Non-Open City hex (see 14.10).
End Game VPs (counted only at End Game): +1 VP for each German Mobile unit in
the Southern France Box. +1 VP for each British unit in the
Destroyed Units Box (this includes the Franco-British Reserves unit).
-1 VP for each German unit in the Destroyed Units Box.
-2 VPs for each British unit in the Evacuated Units Box.
+X VPs for Each Successful Plan (see 12.7).
-X VPs for the End Game VP score on the Turn Track’s current turn, if any (e.g., for an Armistice Event ending).
[12.6] How to Work the VP Markers: The square VP marker always reflects the Game’s current total score; this includes the value of the round VP marker and excludes the value of any End Game VPs. For Example: On Turn 5, the French player retakes one of their lost cities. Since the VP marker always reflects the Germans’ score, the square Victory Point marker is reduced by one (-1) box to reflect the French’s city recapture. In effect, the Germans lost one (-1) VP when the French recaptured that city.
The round Battle VP marker is used as a reminder to reflect the current net score of Combat and Event-gained VPs (only). The value of that round Battle VP marker is added to (or subtracted from) the On-Map/Units VPs, and thus their sum is always reflected by the current value shown for the square VP marker. [12.7] Secret Plans (also see 14.14): During set up, players randomly draw, and keep secret, one of their Plan cards. The drawn card determines the strategic goals set by their Supreme HQ and/or Political Leaders. Each plan has three VP objectives that are checked for scoring during each Sudden Death Phase (i.e., on Game Turns 3, 6 and
9). Case 14.14 in the Reference section of this booklet explains Plan cards’ effects in detail.
Plans are drawn in the following sequence: A. French Plan Draw Step: The French
player secretly draws one card, keeping it if it is a labeled with a “K.” If it is labeled with a “D,” he may make a redraw by showing the card to the German player (to verify the “D” label), putting it back in the deck, reshuffling, then drawing again. He can do this only once, and must play with that second Plan card draw, even if he draws the same Plan card again.
B. German Intelligence Step: The German player secretly draws one (1) card from the French Deck, looks at it, and removes that Plan card from the game. He is certain that is not the French Plan, even if the French change plans mid-game!
C. German Plan Draw Step: The German player secretly draws one card, keeping it if it is a labeled with a “K.” If it is labeled with a “D,” he can show the card to the French player and either return it to his deck OR remove it from the game (thus giving the French player some free intelligence). The German player then reshuffles his Plan cards and draws again. He can do this only once, and must play with that second Plan card draw, even if it is a redraw of his first card draw!
D. French Intelligence Step: The French player secretly draws one (1) card from the German Deck, looks at it, and then removes it from the game. He is certain that is not the German Plan, even if the Germans change plans mid-game! [12.7.1] Plan Scoring: During each Sudden Death Phase (of Game Turns 3, 6 and 9), both players check their respective Plan cards to see if they have
accomplished that card’s Plan Objective for that particular Sudden Death Turn. If the condition(s) on that card for that
Sudden Death turn are met, that player places, Plan-side down, his corresponding lettered Plan marker in the Secret Plans Box at the top corner of the map. It is revealed for VP scoring during the End Game Victory Phase (12.4) only.
If the condition(s) on that card for that Sudden Death turn are not met, that player can either: A) put no marker in Secret Plans Box (in effect, admitting failure for his opponent to see), or B) place in his Dummy (“Plan X”) marker in the Secret Plans Box (to fool his opponent).
If and when the game ends in an End Game Victory (12.4), these Plan markers are turned over and compared to the scoring value on their owning player’s current Plan card. Those VPs are added to (or subtracted from) the Game’s total even if they were earned under a previous Plan card that has since been replaced (see 12.7.2).
Trust: Because you can score Plan VPs under one Plan and end the game operating under another (12.7.2), it is important to realize that it will be impossible to verify if VPs earned under a previous Plan card are legitimate. Players will have to be careful, therefore, when gaining their Plan markers and trust their opponent to play a strictly honest game. For Example: The French player has card F4 (Plan E 1938) as his plan during the End Game Scoring. His Plan markers in the Secret Plans Box are A, X and C. The X marker scores nothing, the A marker scores -6 VPs and the C scores -3 VPs, for a total of -9 VPs.
[12.7.2] Changing Plans: Players can change their Plan card during play by using a particular Event card to do so; namely card #22 (OKW Staff) for the Germans and card #16 (GHQ Reinforcements) for the French. Procedure: When exercising this Event card option, shuffle your Current Plan card together with your other, unused Plan cards, and draw one. Unlike during set up, there is no redraw allowed – whatever Plan you receive on that card, it becomes your new Current Plan. Exception: You cannot change plans after Game Turn 8 (since Turn 9 is the last turn for scoring).
Thus, you could end up with the same Plan card that you had before!
Scenario set up instructions Card #
D = Draw;
K = Keep
Plan A, B
and C goals
Special
instruction
Victory Point value Turn this condition is checked

12 NO RETREAT 3: THE French Front May-JUNE 1940 v2.4
Systems Development by Alan Emrich
Note also that you can “bluff” in that you do not have to follow or tell your opponent all of the plan’s instructions if they are not mandatory. For example, on a new Plan card drawn mid-game, the French player need not reveal its “+1 Bonus Movement Point” on Turn 1.”
Reference Section 0BRULES EXCEPTIONS Here is a summary of the rules exceptions affecting the French player over time: No attacks on Turn 1. No stacking units before Turn 3 (8.4.4). No entering an Ardennes Hex before Turn
6 (8.8). No Multi-Hex Advances after Combat
before Turn 8 (10.8.1). Combat Declarations are made in the
French Organization Phase (only) for the regular (white) Target markers.
[13.0] GAME TURN EVENTS When conducting a Game Turn’s House-keeping Phase, Turn Track Events (and other features of interest, including the weather, Support marker availability, Sudden Death turns, etc.) are noted (where they have a lasting effect) or applied (when the effect is an immediate, one-time occurrence). [13.1] Weather: Place the weather marker on its space on the Player Aid Mat to denote that turn’s weather:
Good Weather Effects There are no special effects.
Bad Weather Effects As listed on the Terrain Effects Chart: All units have a maximum
Movement Allowance of four (4) Movement Points.
There are no Armor Bonus shifts (10.6.3) in combat.
Multi-hex Advance After Combat (10.8.1) is prohibited (i.e., units can only advance into the defender’s hex).
Shock! / Blitz! markers cannot be used. You cannot drop Paratroops (14.8). [13.2] Sudden Death (T): At the beginning of this Game Turn (3, 6, 9 and 12), during the Victory Phase, check for Sudden Death Victory (12.1) and Plan Scoring (12.7.1). [13.3] Initiative markers: Both Players receive a set number of Initiative markers in the Organization Phase of their own Player-Turn, as indicated by their symbols on the Game Turn Track.
For Example: On Turn 5, the German player receives three Initiative markers and the French player receives one Initiative marker.
Initiative markers are the game’s currency, allowing players to do important things. They represent supplies, operational leadership, support assets (vehicles, artillery, airplanes), troop replacements, etc. [13.4] Game Turn Effects: The text in the Game Turn boxes reflect these effects as listed in chronological order (by Game Turn number) below: 1 – No Allied Combat: During Game Turn
1, the French player cannot initiate combat or Counterblows, and The Fortification Symbols and Hexsides of the Belgian Liege City hex have no effect.
This reflects German surprise after the long “Phony War” period during the past winter. 2 – Reserves Allowed: Beginning on this
turn, and for the rest of the game, both players can add units to the Reserve Box. A maximum of one such unit per turn is allowed, and at a cost of one Initiative marker per unit.
This represents rail movement, operational reserves and reactive redeployments. 3 – Allies Can Stack: The French player
can now stack his square units together (but see 8.4.4).
The operational performance of the relatively inexperienced French and Allied troops began poorly when compared to the experienced Germans troops who had recently won the Polish Campaign. 4 – Change Plans: Starting this turn, both
Players can change their Plans should the opportunity present itself (12.7.2).
5 – Halt Order: The French Haltbefehl! Event card is playable as an Event for the rest of the game (14.11).
6 – Ardennes: The French player’s units can enter the Ardennes hexes for the rest of the game.
This area was considered impassable by the French High Command. Consequently, only small detachments were sent to cover and hold it. 7 – Free Regional: Both sides’ Regional
units can move without restrictions for the rest of the game (see 14.1).
8 – Allied Advance: The French player’s Mobile units can make Multi-hex Advances after DR and DS combat results (10.8.1) for the rest of the game.
Initial Allied tactics were in the deliberate style of a WWI advance – notoriously timid in regard to exploiting success and plagued by bad unit communication.
9-12 – Game Ends “-x?”: The game will end this turn if an Armistice occurs by playing card #1’s Event. Immediately stop the game and compute the End Game Victory (12.4) with the indicated negative VPs being scored.
[14.0] SPECIAL UNITS/RULES To review and summarize the effects of some special units, markers and rules: [14.1] Regional and Fortified Units: Regional Infantry units ( ) have the following movement restrictions until Turn 7: French Regional units cannot move to
hexes, in France, that aren’t in or adjacent to Maginot line hexes.
German Regional units cannot move to hexes that aren’t adjacent to German Frontier hexsides.
Dutch, Belgian and Swiss Regional units cannot leave their respective home countries.
If such a move is made involuntarily (e.g., via a combat or event card), the affected unit (only) is freed from the restriction.
The Swiss unit cannot Retreat. Change the Retreat portion of a combat result to an EX result when it involves the Swiss unit (it takes the loss even if with Allied units).
Fortified units have the following restrictions at all times: Fortified units cannot voluntarily
attack (10.1.1), but they can attack in response to a Counterblow (10.1.2).
Fortified units do not suffer the effects of any Retreat outcomes in combat.
Lost steps from Fortified units are irreplaceable. When eliminated and not in Regular Supply (6.1), place these units in the Surrendered Units Box.
[14.2] French Allies: Holland, Belgium and Switzerland become French Minor Allies if and when any German unit moves into their country or attacks them. When this happens, the French player
controls them for the rest of the game. The Swiss are always in supply. The
others trace Supply in the same way that other Allied units do.
The Netherland unit does not benefit from the Hedgehog bonus (10.6.3), unless there is an Allied unit in Holland.
[14.3] Armor-Type Units: These represent large tank formations. They are

NO RETREAT 3: THE French Front: May-JUNE 1940 v2.4 13
© 2012 Carl Paradis and Victory Point Games
disadvantaged when moving through difficult terrain (having higher Armor Movement costs on the Terrain Effects Chart), but receive the following advantages in battle: A one-column shift to the right () when
attacking (or counterattacking) most infantry-type units defending in a Clear hex during a Good weather turn (10.6.3).
German Panzers enjoy an additional hex of Advance After Combat on Good weather turns (10.8.2).
Two of the Allied single-step Tank units cost two Initiative markers to replace, as indicated on their reverse sides.
[14.4] Mechanized Infantry: These are better-motorized formations with strong supporting tank and anti-armor capabilities. They move as infantry-type units (i.e., paying the Other Movement costs on the TEC). When defending in combat, the attacker does not receive the Armor Attack Bonus (see 10.6.3) against them. [14.5] Mobile Units: These units are better-equipped motorized formations and trained assault troops. They are identifiable by their red Movement Allowance. At least half the attacking units in a battle
must be comprised of Mobile troops in order to use the Blitz! or Shock! Combat Results Tables (10.6.2).
Only Mobile units can perform a Multi-Hex Advance after Combat (10.8.1).
[14.6] Hedgehog Defense Units: The reverse sides of some Allied and German units sport a Hedgehog symbol between their numbers. When defending, this unit negates the
attacker’s Armor bonus (; 10.6.3). They (and units stacked with them, but not
if with a counterblow marker) suffer a lower combat result when defending, unless if stacked with a Fortified unit (10.7.5). The order is: DD DS DR or DW EX CB CA E/. An initial “E/” stays as is.
These units have learned to resist Blitzkrieg tactics. For other units, this represents prepared/fortified positions, such as the Siegfried Line.
[14.7] The Evacuation Marker: This marker functions as the embar kation point for Allied units evacuated from the continent (7.8). It represents a hastily-fortified port perimeter and the determination to hold it.
This marker can only be placed from the Reserve Box to a friendly Port hex during the Reserve Phase, and vice-versa.
One Unsupplied unit (only) stacked with the marker can evacuate during the French Organization Phase each turn.
Event card #24 (Operation Dynamo) also allows an Unsupplied unit stacked with it to be evacuated.
The Allied stacking limit is doubled in that hex (only).
All DW and DR (Defender Retreat) combat results become EX (Exchanges).
Units cannot voluntarily attack out of a hex containing the Evacuation marker.
The Axis cannot use the Blitz! Combat Table against that hex.
This marker can absorb one step loss and, if eliminated, it is permanently removed from play.
[14.8] German Paratroop Markers: These units have no steps. After their placement on the map, they are removed from play during the next Marker/Unit Removal Phase. For Example: If this marker is placed on the map during the French Reserve Phase, it is removed from play in the German Marker/Unit Removal Phase.
Airdropping Placement: When Airdropped, that marker must “land” in a hex that has no more than one Allied unit it and is within six hexes of a German Frontier hexside. The Germans can drop more than one in a
hex. They can only be placed on the map
during good weather. They are placed from the Reserve Box at the start of either Player’s Reserve Movement Phase and cannot move once placed.
You must put all the markers you want to Airdrop on the map before resolving any of their landings.
When dropped, place that marker on the map on either side, then draw TWO Event cards and choose ONE to apply (do not resolve any Events on it):
A- If there’s a German Cross on the card, and there’s a fort unit in the hex, that fort takes a one (1) Step Loss.B
B- If there’s a French Roundel on the card, flip the Paratroop marker over.
C- If neither of those symbols appear on that card, immediately remove that Paratroop marker from the game.
It is possible for there to be two symbols on the same card; in that case, both A and B are applied to the same drop.
Paratrooper Effects: There are two sides to this marker, each with its own distinct effect: +2MP side: Enemy units entering
that hex must pay two extra (+2) Movement Points.
No TEC Side: Enemy units in this marker’s hex receive no defensive hexside terrain benefits, and friendly units do not have to pay hexside Movement costs when entering that hex.
Both Sides: If this marker is alone in a hex, that hex is considered captured, as if by a square German unit. These markers cannot be attacked; they are automatically removed from play during the next player’s Marker/Unit Removal Phase. The three Paratroops represent Elite forces that the Germans used to great effect against Eben-Emael, in Holland, and commando operations to capture enemy bridges.
Cadre Units German Kampfgruppe and Allied Groupement units are collectively called “Cadre” units. [14.9] Cadre Units: Cadre units represent a hodge-podge of stopgap units and Army remnants, put together as ‘scratch’ formations to plug an immediate hole in the line. They are also a core body of veterans around which a regular unit can be reformed. Cadres have only one step and cannot initiate Voluntary Attacks (10.1.1). They can participate in counterattacks and against Counterblows (10.1.2).
[14.9.1] Cadre Reinforcement Arrival: When received as Reinforcement, Cadre units are not placed in the Reserve Box; they are instead placed in the UCadre Units Holding U box for later placement. [14.9.2] On-Map Placement: Cadre units in the UCadre Units Available box can be voluntarily placed on the map by their owner in hexes where a friendly (non-Cadre) unit was just eliminated (10.7.1) to fulfill the step loss requirement of a DD or EX result. Belgian, Swiss and Holland units cannot be replaced by Cadre units. [14.9.3] Removal from the Map: When removed from the map for any reason, a Cadre unit is placed on the Game Turn Track to arrive on a future Game Turn as a reinforcement, as indicated on the back of their counter (e.g., “Back in one turn” or “Back in two turns”). If there is already a friendly Cadre unit scheduled to arrive as a reinforcement on that same Game Turn, that Cadre unit is placed instead on the following Game

14 NO RETREAT 3: THE French Front May-JUNE 1940 v2.4
Systems Development by Alan Emrich
Turn box where there is not already a Cadre unit scheduled to arrive. That is, each player’s Cadre units arrive at a rate of one per Game Turn, maximum. Note that this means a Cadre does not go into the Surrendered Units box, nor will it score the opponent 1 VP. [14.9.4] Replacement Locations: In addition to those locations described in Rule 7.5, Eliminated and Surrendered units that are Replaced as per 7.0 can also be placed in a hex where there is a friendly Cadre unit that can trace an overland Supply Path (6.1) to a friendly map edge or Port. When so placed, remove that Cadre unit from the map and place it on the Game Turn track as per Case 14.9.3. In effect, that eliminated unit is “rebuilt” on the front lines around a surviving Cadre formation.
[14.10] Open City Markers: This marker represents cities that The Allies have yielded without a fight during the campaign. Allied units cannot stack with an Open City marker. They are added to the Reserve Box during
the French Reinforcement Phase of Game Turn 2.
They enter play according to the instructions of Event card #25.
Cities with an Open City marker do not score VPs for the German player until an End Game Victory occurs (12.4).
[14.11] Halt Orders Marker: This marker represents the “Haltbefehl” plus a few other operational pauses. It goes in the Reserve Box in the French
Reinforcement Phase of Turn 4. If it is in the Reserve Box, it enters play
according to the instruction of Event card #17 (Haltbefehl). When played, place this marker on the Turn track to arrive two turns later as a regular French Reinforcement.
The German OKW’s order stopped the Panzer advance right after they reached the sea to regroup and wait for the infantry support, allowing the British to evacuate. For Example: It is Turn 6, and the Halt Orders marker is in the Reserve Box, thus the Event on card #17 can be played now. After doing so, the Halt Orders marker is put on Turn 8, to arrive as a reinforcement in the Reserve Box. Note that afterward, card #17’s Haltbefehl! is useable again if the French player gets that card back into his hand! [14.12] British Aid Counters/Markers: There are 3 of these, identified by their “BA” reinforcement number. They appear with an Anglo-French Union (14.13.2).
RAF Marker – This Dark Blue round Shock! marker is usable for free once per game turn.
Reserves Counter – This unit can stack and attack with both British and French units.
Enhanced Target Marker – This dark blue Target marker is used at the start of the French Combat Phase, not at the start of the French Movement Phase like the other (white) Target markers (see 10.1).
[14.13] The British Aid Track: It is used to keep track of the Support Level the British Government is willing to give to their French Ally on the continent.
[14.13.1] Track Marker: The British Aid marker denotes the status of this track. It begins the game in the “No Assistance” box. It can advance on the track during a Sudden Death Victory check (12.1) or when the Event card #22 (Winston Churchill) is played. [14.13.2] Track Events: When the British Aid marker is advanced on the track, resolve that box’s event, as explained below: No Assistance – Nothing happens. Aid Pledged – Subtract two (-2) VPs
from the total Battle Victory Points. Flip the British Aid marker over as a reminder.
No Evacuation – Remove the Evacuation counter from the game.
Support Sent – The French player immediately draws two extra cards.
RAF Fully Committed – The French player receives the RAF Shock! marker.
Anglo-French Union – Flip the Square Victory Point marker to its Anglo-French Union side to mark this Event. Then…
Remove all the Open City markers from the game (recalculate map VPs)
A French Armistice is no longer possible when playing Event card #1.
A Sudden Death Victory (12.1) can no longer happen.
The French player receives the Brit-ish Aid counter and markers (14.12).
The French player receives one extra (+1) card per turn during his Draw Phase (5.2).
This Union Event is a new “Miracle of the Marne” and Allied resolve to fight to the bitter end. “We shall Never Surrender!”
3B
[14.14] Plan Cards Set-up Instructions: The Plan cards all have special At Start set-up instructions for the game. Remove in Historical Scenario: When
playing the Historical Scenario, remove these cards from play before drawing your Plan card.
If Redrawn = Anglo-French Union! : If this Card is drawn a second time, the No Evacuation, RAF Fully Committed and Anglo-French Union Events are immediately applied (see 14.13.2). Remove the British Aid marker from play; you no longer need the British Aid Track.
7th Army Units in Reserve: The French player may set up the two 7th Army units in the Reserve Box.
+1 MP for units on Turn 1: Each French and British unit can spend one extra (+1) Movement Point on the first Game Turn (only).
No “Ardennes” Surprise: Rule 9.2 (#2) does not apply for the rest of the game (i.e., the German player cannot Release Reserves into any Ardennes hexes).
You can invade Switzerland: The German player is allowed to invade Switzerland (normally he cannot).
You cannot attack Holland’s units: The German player cannot attack those units, but he can enter Holland, and he can drop paratroops in the same hex as those units.
5 Mobile Units in Reserve: The German player must set up five (5) Mobile units in the Reserve Box.
[14.15] Plan Card Goals: Below are explanations for some of the more specific Plan Victory Point Goals: No Regional units have voluntarily left
the Maginot line: Units eliminated or retreated due to combat (only) are exempt from counting toward this goal.
Control all hexes of Paris: All 3 hexes, including the city of Paris, must be controlled to count for all goals.
All British Units are on the Map: The Mixed Reserve unit does not count; only the 3 tan British units do.
The Maginot line is Out of Supply: No French Maginot line hexes can trace an Overland Supply route (6.1).
[15.0] OPTIONAL RULE This rule is not usable in the Historical Game (Scenario B). See also 17.0. [15.1] Better French Armor: At the very start of the game the French player can replace the regular one step 2-4 “De Gaulle”

NO RETREAT 3: THE French Front: May-JUNE 1940 v2.4 15
© 2012 Carl Paradis and Victory Point Games
counter with the optional two-step 4-4 De Gaulle Tank counter. If this option is chosen, the French player
must also eliminate at start any two (2) Maginot line Fortified units (the hex-shaped counters). The German player does not receive Victory Points for this.
This represents the French Government listening to some of De Gaulle’s pre-war arguments, spending less on Fortifications and more on Mobile units.
[15.0] SCENARIOS There are four Scenarios: The Regular Game allows for some “What if” historical explorations via the Plan cards, while the Historical Game limits the Plan Options to give a less variable storyline to the flow of play. The Simulation Game and Operation Dynamo both commence play after some Game Turns have already occurred historically, allowing the players to pick up the action at that point. All the Victory Conditions are the same as in the Campaign Game.
A. THE REGULAR GAME Set Up Procedure
1. Place the round markers in the Unused Markers Holding Box. The German player receives seven (7), and the French player five (5), Initiative markers, on their respective Cross/Roundel side. These begin already purchased and ready for use.
2. Place the round Game Turn marker in the ‘1’ box of the Game Turn Track with its German side up. Place the square Victory Point marker in the ‘2’ box of the Victory Point Track with its German side up, and the round Battle Victory Points marker in the ‘0’ box of the VP Track. These Victory Points reflect the Axis control of Aachen and Saarbrucken. The Weather marker sets up with its Good side up, and place the British Aid marker in the “No Assistance” box on the British Aid Track.
3. Each player takes their remaining square and hexagonal units and turns them face-up (i.e., with their full-strength side showing). Place those with a Reinforcement Number or letter in the corresponding Turn Box on the Game Turn Track.
4. Beginning with the French player, both players draw their “Secret Plan” card as per Rule 12.7.
5. Both players place their remaining units on the map as shown on the set-up map, the French player first. During setup, the German player can place up to six (6) of
his starting square units (plus the 3 Paratroop markers) in the Reserve Box.
6. Shuffle the deck (of non-Plan cards) and place them face-down along the southern edge of the map forming the Draw Pile. The German player draws 6 cards into his hand, one at a time (playing the “Must play” cards normally). The French player starts with no cards in hand simulating lax Allied preparations following the long wait of the Phony War period and the Germans’ surprise attack.
7. Note the Game Turn 1 Events, including:
No Allied Combat: The French player cannot initiate voluntary attacks with his units on Game Turn 1.
No Reserves: Neither player can add units to the Reserve Holding Box on Game Turn 1.
8. As an exception to the normal rules, the German player may drop, before play starts, any or all of his Paratroop markers.
9. After completing these Steps and noting the above Rules, the German player commences Game Turn 1 with his Organization Phase.

16 NO RETREAT 3: THE French Front May-JUNE 1940 v2.4
Systems Development by Alan Emrich
B. THE HISTORICAL GAME Set Up Procedure Follow the exact same set-up instructions as in A. The Regular Game, from Steps 1 to 9, altering Step 4 (only) as follows: Before drawing his Secret Plan, the
French player removes from the game the Plan card F5 (Initiative!*).
Before drawing his Secret Plan, the German player removes from the game Plan card G2 (Anweisung No2).
C. THE SIMULATION GAME Set Up Procedure 1. Place the round markers in the Unused
Markers Holding Box. Both the German and the French player receive four (4) Initiative markers, on their respective Cross/Roundel sides. These begin already purchased and ready for use.
2. Place the round Game Turn marker in the ‘2’ box of the Game Turn Track with its German side up. Place the square Victory Point marker in the ‘6’ box of the Victory Point Track with its German side up, and the round Battle Victory Points marker in the ‘0’ box of the VP Track. The Weather marker sets up with its Good side up, and the British Aid marker is placed in the “No Assistance” box on the British Aid Track.
3. Each player takes their remaining square and hexagonal units and turns them face-up (i.e., with their full-strength side showing). Place those with a Reinforcement Number or letter in the corresponding Turn Box on the Game Turn Track.
4. The German player takes Plan card G5 (Fall Gelb No5). The French player draws one Plan at random from cards F1 (Plan Dyle A) or F2 (Plan Dyle B). Both players can change Plans (12.7.2). Also: The French player removes from the
game Plan card F5 (Initiative!*). The German player removes from the
game Plan card G2 (Anweisung No2). 5. Both players place their remaining units
on the map as shown on the set-up map. 6. Shuffle the deck (of non-Plan cards) and
place them face-down along the southern edge of the map forming the Draw Pile. The German player draws, one at a time, 6 cards into his hand, keeping any 2 he chooses (playing the “Must play” cards he opts to keep normally), and discarding the remaining 4. The French player then draws 3 cards into his hand, (playing the “Must play” cards normally), keeping all 3 (that were not “Must play” cards).
7. Note the Game Turn 2 Event: Reserves Allowed.
8. As an exception to the normal rules, the German player may deploy onto the map, before play starts, any/all of his units in the Reserve Holding Box, as per the Reserve Rules (see 9.2).
9. After completing these Steps and noting the above Rules, the German player commences Game Turn 2 with his Card Phase.

NO RETREAT 3: THE French Front: May-JUNE 1940 v2.4 17
© 2012 Carl Paradis and Victory Point Games
D. OPERATION DYNAMO Set Up Procedure
1. Place the round markers in the Unused Markers Holding Box. The German player receives three (3), and the French player two (2), Initiative markers, on their Cross/Roundel side. These begin already purchased and ready for use.
2. Place the round Game Turn marker in the ‘4’ box of the Game Turn Track with its German side up. Place the square Victory Point marker in the ‘10’ box of the Victory Point Track with its German side up, and the round Battle Victory Points marker in the ‘1’ box of the VP Track. The Weather marker sets up with its Good side up, and the British Aid marker is placed, with its “-2 VPs” side up, in the “Aid Pledged” box (that Event has already happened) on the British Aid Track. Both players’ Plan A markers are placed in the Plan Box (they have both success-fully completed their respective A Plans, so there is no need to put them on their “unknown” sides for this scenario).
3. Each player takes their remaining square and hexagonal units, placing those with a Reinforcement Number higher than 3 or better in the corresponding Turn Box on the Game Turn Track.
4. The German player takes Plan card G5 (Fall Gelb No5). The French player draws one Plan at random from cards F1 (Plan Dyle A) or F2 (Plan Dyle B). Both players can change Plans (12.7.2). Also: The French player removes from the
game Plan card F5 (Initiative!*). The German player removes from the
game Plan card G2 (Anweisung No2). 5. Both players place their remaining units
and the indicated markers on the map as shown.
6. Shuffle the deck (of non-Plan cards) and place them face-down along the southern edge of the map forming the Draw Pile. The German player draws, one at a time, 4 cards into his hand, keeping any 2 he chooses (playing the “Must play” cards he opts to keep normally), and discarding the remaining 2. The French player then draws 2 cards into his hand, (playing the “Must play” cards normally), keeping all 2 (that were not “Must play” cards).
7. Note the Game Turn 4 Event: Change Plans.
8. After completing these Steps and noting the above Rules, the German player commences Game Turn 4 with his Card Phase.

18 NO RETREAT 3: THE French Front May-JUNE 1940 v2.4
Systems Development by Alan Emrich
[16.0] EXTENDED EXAMPLES Movement Example
It is the German Movement Phase of Game Turn 2 – Scenario A. The German player had previously put on the map some Panzer units (Guderian and Hoth) from the Reserve Box in the previous French Turn (you can put units on the map even during the opponent’s Reserve Phase, see 9.2), and he is now ready to try to break the enemy’s lines along the Meuse river! The colored movement arrows and numbers indicate the number of Movement Points spent by the unit to move into each hex.
The 1st Army (a) at the bottom of this illustration moves one hex into Luxembourg, and stops. Since it’s a German Regional unit, it can only move to hexes adjacent to the German Frontier until Turn 7 (14.1), it spends 2 Movement Points (MPs) as it is entering an EZOC (the French 3rd Army). The 16th Army (b) also moves into contact with the French, spending a total of 3MP (note that difficult terrain mostly slows down Mobile units, not regular infantry). The 3-6 WIETERSHEIM Corps moves into the same hex as the Guderian Panzer unit, paying 4MP (2MP to enter an Ardennes hex for a mobile unit, +1MP for leaving, and +1MP for entering, EZOC hexes). Both of these units can stack together, since at least one of them has the “size dot” icon (8.4.2). Note that when moving onto a hex with a friendly unit you are able to move from one EZOC hex directly to another, but you must stop when entering the new EZOC (8.5.3). This is why the Blue “X” hexes could not be entered by a German unit. The Guderian Panzer Corps is under the same ZOC limitations, but if the Player had Card #20 in hand (Aufrollen Tactics) he could have used it to move Guderian to an adjacent Blue “X” hex. Finally, the REINHARDT Panzer unit moves into Weitersheim’s place, paying 5
MP to do so, and stopping because of the EZOC.
Combat Example After the Movement Phase, the German player attacks all four French units, using 4 of his 5 Target markers (the number of attacks you can make being limited by your available Target markers).
The French 1st Army(b) unit at the top of the illustration is attacked first by Hoepner and the 6th Army(b) using a Blitz! marker (which is allowed as at least half of the attackers are Mobile units). The Initial ratio is 10:6, which means the 3-2 Odds column on the German Blitz Combat Table; there is no Armor Bonus shift as the defenders are Mechanized (see 10.6.3). Not liking those poor odds, the attacker decides to play a Combat card, Screaming Stukas, giving them +6 Combat Strength in this Battle; this increases the ratio to 16:6 (i.e., 2-1 Odds), but the French player counters with the RAF Fighters card, paying one precious Initiative marker (see 5.3.3) to cancel the Stukas card. So, the Odds remain the same. Note that each side cannot use more than one Combat card before the battle (see 10.5), and spent Initiative markers remain spent if the card they are paying for is cancelled later on. A roll of 5 produces a DR result. The defending unit moves back 2 hexes, and the attacking Panzer unit occupies this now-vacated hex. Note that the Panzer unit could have advanced two additional hexes, since it was Blitz! attacking into clear terrain (see 10.8.2), but declines to do so, as there are powerful Allied units north of this illustration that could put it out of supply. Next, the German player opts to resolve the southernmost battle against the Maginot line: a long shot, as we shall soon see. Note that Fortified Maginot Area is treated as a single, very large hex! As shown in the illustration, there are the four units there that must all be attacked, as they are all stacked in the area.
The 3rd Army and all three Maginot 3 Forts are engaged by the 16th Army(a) and the 1st Army(a). The Initial ratio is 9:7, which is 1-1 Odds. They are shifted two left (2) for the Fortress Area plus the Fortified Hexside, for a final 1-3 Odds! What is more, at these low odds all the possible results have no chance of any effect against a hex containing Fort units (see the red notes on the CRTs)... Cursing silently, the German player throws the die, and a roll of 3 yields a CA result on the Attrition Table (No Blitz! marker is usable here); the defender can choose to stay put, or to order a Counter-attack. “Let’s show The Boche how we fight! vive la France!” exclaims the French player, and decides to attack back. In this case, the Germans now become the defender and no terrain modifiers are used (see 10.7.2). The ratio is 7:9, which is 1-2 Odds. The attacker decides to use the Corps d’Artillerie card, again spending one precious Allied Initiative marker, which increases the ratio to 12:9, which is 1-1 Odds, and the German player declines to use any cards. A roll of 5 on the French Attrition Table yields a CB result! A Counterblow marker must be placed on a German unit, as he is the Phasing player, even though the French were (counter-) attacking (see 10.7.3). The 16th Army(a) is chosen by its owner, and now the French must either attack it on his next turn or move away. As we shall see later on, it would have been better for the French to stay safely behind the Maginot line instead of rashly counterattacking... Note that if a CA result were obtained instead of a CB, the original battle would have been fought again, but this time with no terrain modifiers for the French defenders. Now the Germans decide to attack the 9th Army, safely positioned behind the Meuse River. This will be another tough attack! The 4th Army, Hoth Panzers and the 12th Army(a) are engaged (with the 12th Army(b) still in the Reserve Box, ready to exploit any Breakthroughs). The Initial ratio is 15:6, which is 2-1 Odds. They are shifted two to the left (2) down to 1-1 Odds due to the Forest and Major River, the same River that is also cancelling the Panzer Bonus CRT shift. But the Germans have a surprise in store for the defenders... He reveals his Shock Troops card (and pays one Initiative marker) to cancel the Major River, which also gets the Panzer Bonus CRT modifier back; now the shift is only one to the left (1) for the Forest, plus one right (1) for the Panzers, thus canceling each other out. The French player is out of useful cards and does not respond. A roll of 3 at 2-1 Odds yields a DR result: The 9th Army must retreat 2 hexes, but since the retreat
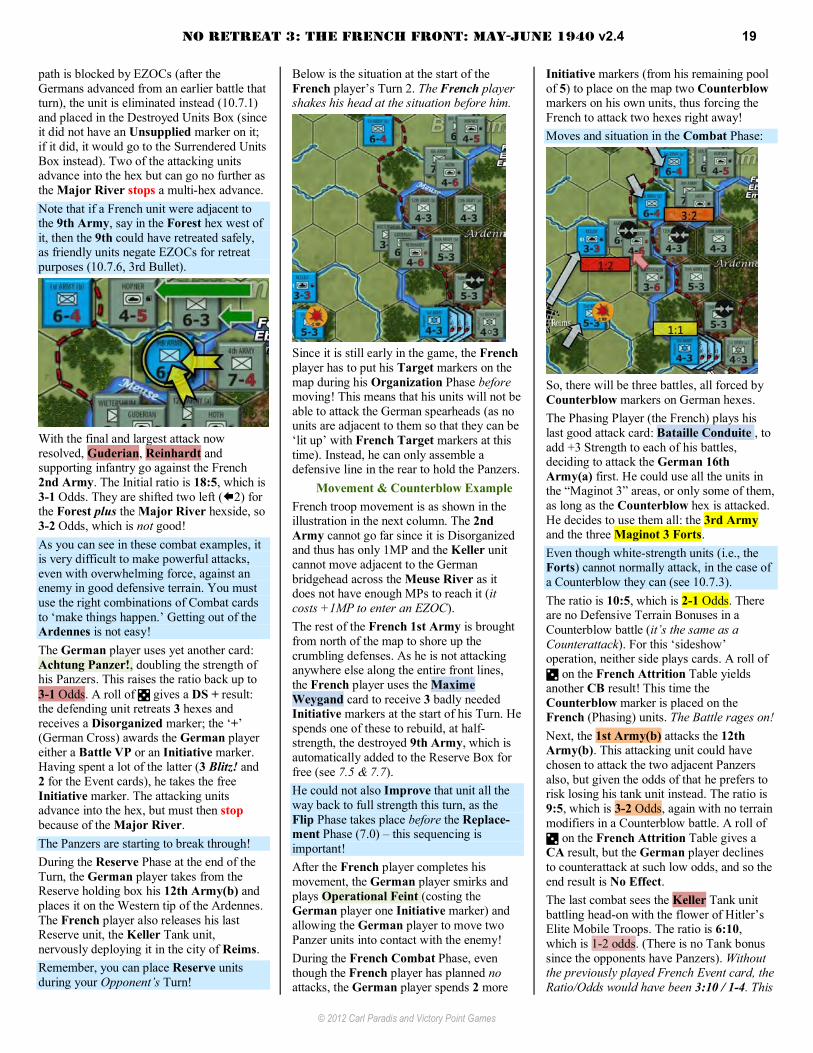
NO RETREAT 3: THE French Front: May-JUNE 1940 v2.4 19
© 2012 Carl Paradis and Victory Point Games
path is blocked by EZOCs (after the Germans advanced from an earlier battle that turn), the unit is eliminated instead (10.7.1) and placed in the Destroyed Units Box (since it did not have an Unsupplied marker on it; if it did, it would go to the Surrendered Units Box instead). Two of the attacking units advance into the hex but can go no further as the Major River stops a multi-hex advance. Note that if a French unit were adjacent to the 9th Army, say in the Forest hex west of it, then the 9th could have retreated safely, as friendly units negate EZOCs for retreat purposes (10.7.6, 3rd Bullet).
With the final and largest attack now resolved, Guderian, Reinhardt and supporting infantry go against the French 2nd Army. The Initial ratio is 18:5, which is 3-1 Odds. They are shifted two left (2) for the Forest plus the Major River hexside, so 3-2 Odds, which is not good! As you can see in these combat examples, it is very difficult to make powerful attacks, even with overwhelming force, against an enemy in good defensive terrain. You must use the right combinations of Combat cards to ‘make things happen.’ Getting out of the Ardennes is not easy! The German player uses yet another card: Achtung Panzer!, doubling the strength of his Panzers. This raises the ratio back up to 3-1 Odds. A roll of 5 gives a DS + result: the defending unit retreats 3 hexes and receives a Disorganized marker; the ‘+’ (German Cross) awards the German player either a Battle VP or an Initiative marker. Having spent a lot of the latter (3 Blitz! and 2 for the Event cards), he takes the free Initiative marker. The attacking units advance into the hex, but must then stop because of the Major River. The Panzers are starting to break through! During the Reserve Phase at the end of the Turn, the German player takes from the Reserve holding box his 12th Army(b) and places it on the Western tip of the Ardennes. The French player also releases his last Reserve unit, the Keller Tank unit, nervously deploying it in the city of Reims. Remember, you can place Reserve units during your Opponent’s Turn!
Below is the situation at the start of the French player’s Turn 2. The French player shakes his head at the situation before him.
Since it is still early in the game, the French player has to put his Target markers on the map during his Organization Phase before moving! This means that his units will not be able to attack the German spearheads (as no units are adjacent to them so that they can be ‘lit up’ with French Target markers at this time). Instead, he can only assemble a defensive line in the rear to hold the Panzers.
Movement & Counterblow Example French troop movement is as shown in the illustration in the next column. The 2nd Army cannot go far since it is Disorganized and thus has only 1MP and the Keller unit cannot move adjacent to the German bridgehead across the Meuse River as it does not have enough MPs to reach it (it costs +1MP to enter an EZOC). The rest of the French 1st Army is brought from north of the map to shore up the crumbling defenses. As he is not attacking anywhere else along the entire front lines, the French player uses the Maxime Weygand card to receive 3 badly needed Initiative markers at the start of his Turn. He spends one of these to rebuild, at half-strength, the destroyed 9th Army, which is automatically added to the Reserve Box for free (see 7.5 & 7.7). He could not also Improve that unit all the way back to full strength this turn, as the Flip Phase takes place before the Replace-ment Phase (7.0) – this sequencing is important! After the French player completes his movement, the German player smirks and plays Operational Feint (costing the German player one Initiative marker) and allowing the German player to move two Panzer units into contact with the enemy! During the French Combat Phase, even though the French player has planned no attacks, the German player spends 2 more
Initiative markers (from his remaining pool of 5) to place on the map two Counterblow markers on his own units, thus forcing the French to attack two hexes right away! Moves and situation in the Combat Phase:
So, there will be three battles, all forced by Counterblow markers on German hexes. The Phasing Player (the French) plays his last good attack card: Bataille Conduite , to add +3 Strength to each of his battles, deciding to attack the German 16th Army(a) first. He could use all the units in the “Maginot 3” areas, or only some of them, as long as the Counterblow hex is attacked. He decides to use them all: the 3rd Army and the three Maginot 3 Forts. Even though white-strength units (i.e., the Forts) cannot normally attack, in the case of a Counterblow they can (see 10.7.3). The ratio is 10:5, which is 2-1 Odds. There are no Defensive Terrain Bonuses in a Counterblow battle (it’s the same as a Counterattack). For this ‘sideshow’ operation, neither side plays cards. A roll of 3 on the French Attrition Table yields another CB result! This time the Counterblow marker is placed on the French (Phasing) units. The Battle rages on! Next, the 1st Army(b) attacks the 12th Army(b). This attacking unit could have chosen to attack the two adjacent Panzers also, but given the odds of that he prefers to risk losing his tank unit instead. The ratio is 9:5, which is 3-2 Odds, again with no terrain modifiers in a Counterblow battle. A roll of 3 on the French Attrition Table gives a CA result, but the German player declines to counterattack at such low odds, and so the end result is No Effect. The last combat sees the Keller Tank unit battling head-on with the flower of Hitler’s Elite Mobile Troops. The ratio is 6:10, which is 1-2 odds. (There is no Tank bonus since the opponents have Panzers). Without the previously played French Event card, the Ratio/Odds would have been 3:10 / 1-4. This

20 NO RETREAT 3: THE French Front May-JUNE 1940 v2.4
Systems Development by Alan Emrich
would mean an Automatic CA result, since the Initial Odds would have been below the minimum on the CRT (see 10.6.4). Sadly for the French player, he cannot spend his only Shock! marker on this crucial battle since the Bataille Conduite card works only for Attrition Combat. Note also that, contrary to the Germans, the French cannot freely flip/upgrade an Initiative marker to a Shock! marker (see 7.2.6). A roll of 4 on the French Attrition Table gives a CA, and the German player gladly launches a counterattack! The new odds from the attacking Panzers are 3:1, and the German player uses a just-flipped Blitz! marker to roll on the Blitz! Combat Results Table. No Combat cards are played for this battle, and the roll is 2, yielding an EX result. Both sides lose a step, and the French player breathes a sigh of relief. The Blitzkrieg was stopped in-extremis by the Heavy B1-bis Tanks, but at high cost! In the Reserve Phase, the French player places his reduced-strength 9th Army on the map from the Reserve Box. He cannot stack it with the 2nd Army, as neither of these units have any size dots, or with Keller, as it’s in an EZOC (see 9.2) The German player declines to do the same with his 12th Army (b) as he has no cities near enough to the front line for this to be worthwhile. You cannot deploy more than 3 hexes away from a friendly city (see 9.2). The Situation at the end of the turn is not rosy for the French, as the Germans might be able to concentrate Guderian, Reinhardt and Wietersheim against the Keller Tank unit; this would probably result in a major breakthrough and let the Panzers roll all the way to the English Channel! The Germans’ play of the Operational Feint Event was critical, as it stopped the deployment of the 9th Army on the Keller unit’s hex! Situation at the end of the French Turn:
Victory Point Scoring Example Rule 12.5.5 instructs players to “Keep the VP Count Current: It is important to maintain a current VP count. A complete audit should be made during each Victory Phase.” This example should help explain how the round and square Victory Point markers interact: Example: It's the Victory Phase of Game Turn 6, as shown below (and on the back of the rulebook).
The German player controls 8 Cities. However, 2 of them have Free City markers and thus do not count (so, a total of +6VPs). The Germans also control 2 Ports (+2VPs), and there are 3 Allied units in the Surrendered Box (reflecting the loss of the Belgian and Netherlands Fort units, for another +3VPs). This gives the Germans a total of +11 VPs. To this +11VP value is added or subtracted the round Battle marker’s VP score. It is currently in the 1 Box on its French side, so this translates to -1VP. The net VP score, then, is +10VPs (i.e., 11VPs - 1VP). Therefore, the square VP marker is placed in the 10 Box, while the round Battle marker remains where it is. Since Turn 6 is a Sudden Death turn, this 10VP score is compared to the French Sudden Death Victory level of 7VPs or less, as shown on the VP Track (so, 10VPs is too high for a French victory). It is also compared to the German Sudden Death victory level of 13VPs or more, also shown on the VP Track (so, 10VPs is too low for a German victory, and the game continues).
Since the VP count of +10VPs is 3 or fewer above the French Sudden Death Victory level of 7VPs, the British Aid marker is advanced one space on the British Aid Track (see 12.1).
[17.0] EXTENDED MAGINOT LINE This rule is not useable in the Historical Game (Scenario B); or if Optional Rule 15.2 (Better French Armor) was chosen. At the very start of the Campaign game, the French player can remove One Maginot 3 and one Maginot 5 Fort from their regular set-up spots and place them in France, one per hex, on hexes adjacent to the Belgian Frontier, North of the Maginot 3 Fortified area. If this option is chosen, then: The French player cannot discard &
redraw his original picked plan in the "French Plan Draw Step" at the start of the game (rule 12.7).
The "Allied units have +1MP on Game Turn 1" special instruction on the French Plan cards is not valid anymore.
This Represents an even more "defensive & conservative" stance for the French Army, but it will limit its grand operational choices. GAME CREDITS Game Design: Carl Paradis Documentation and Development: Carl Paradis & Alan Emrich Game Map: Tim Allen and Carl Paradis Playtesting: Xavier Delenclos, Arnaud de Peretti, Philippe Vialet, Patrick Receveur, David Chauvel, Andrei Shlepov, Dieter Schlaepfer, Benoit Larose Proofreaders: Bill Barrett, Brad Bernstein, Rasmus Larsen, Jason Malloy, Rick Partin, Arnaud de Peretti, Leigh Toms, Ian Wakeham Dedication: This game is dedicated to the French soldiers of the 3rd Division Légère Mécanique, who fought victoriously against Hitler’s Panzers at Hannut, Belgium, in May of 1940.
Proudly manufactured and assembled in the USA.

NO RETREAT! 3 THE French Front May-JUNE 1940
© 2012 Carl Paradis and Victory Point Games
…units off the South map edge, or forcing the surrender of more enemies (or the Armistice! card might just not be handy!). Also keep in mind each player’s secret “Plan” Victory Points. These are scored only with an "End Game" Victory, so you probably won’t know until then exactly how many your opponent might have scored. Sure, you can ignore those plan constraints and aim for a quick "Sudden Death" or an "Automatic Win,” where Plan Points do not count, but you’d better be prepared to suffer the consequences if you are not able to succeed! Also, note that your "Battle” Victory Points (represented by the Round marker) do not count for the VP Total in the "End Game" Victory. This bring us to the Sudden Death Victory Condition. It's very intriguing and keeps players paying attention to the current Victory Point (VP) score. Here is how it works: Every three Game Turns, this victory condition is checked against a sum of VPs on the Victory Point Track. There are many possible threshold scores, some French and some German. If a Player has met the required VP level at that moment, the game is over and that player wins outright! The same is true for the Automatic Win, albeit this one is more difficult to fulfill, but it can be achieved during any turn of the game. It isn’t easy to get that many VPs for an Automatic Win, but it’s not impossibly hard either. This fact will stop your opponent from becoming complacent as the pressure will always be on! Since, as hinted above, the Plan VPs do not count for a Sudden Death victory, nor do most of the Destroyed/Evacuated units, this is more of a Shock and Awe type of landslide win that only the most aggressive players might want to try. But the possibility is always there for a sudden catastrophe, making naught all your careful plans aiming for a long-term win!
French Player Notes You have a great defensive army. Alas, early in the campaign, your units will be hard to concentrate (no stacking), and you will have great difficulty in fighting a mobile battle as you must declare your targets at the start of the Movement Phase (meaning you will not be able to attack
enemy units that do not start adjacent to your own forces). Even your ability to mount effective Shock! attacks is also pitifully weak at the start. Spoiling “attrition” attacks are the name of the game early on. Depending on the Plan you draw, you might just have no choice but to move deep into Belgium at the start to gain those critical early Victory Points. If you survive the initial German attacks without losing too many mobile units, you should be able to build a reserve sufficient to stop additional Panzer breakthroughs (the de Gaulle tank unit is of great help for this). If not, then evacuate as many British as you can and hold the line as best you are able. Good luck, you’ll need it!
If the Event cards are kind, you might be able to pull off an Anglo-French Union, and that could just allow you to hold on until the very last turn of the game, earning you a good many Victory Points in the process. Hold fast No Retreat! German Player Notes You have a powerful, if fragile, offensive army. Unless you get dealt a conservative Plan card, you should be able, thanks to your hidden reserve (remember these can be deployed during the enemy’s Reserve Phase!) to deal the first decisive blow early in the game, unhinging your opponent’s defenses from the very start. You have the means to do this, too: strong Panzer units, lots of good Event cards in the deck, and plenty of Initiative
markers. But these advantages can be whittled down surprisingly fast. Stay aggressive and take risks! Never allow the French Army to regain its balance or you’ll be stuck in a hard-to-win war of attrition (see World War I). The historical Ardennes surprise attack is a great way to take the lead, but there are other means to do harm to the enemy if he decides to defend that specific area with his mobile troops – pin them there, and use your Panzers against his leg infantry forces elsewhere along the line before he can fully deploy into an effective defensive front. Move fast, concentrate your blows, and seek decisive results! Also, do not forget that sooner or later you’ll have to take Paris. You want the game to end as quickly as possible since the longer it lasts, the greater the chance that the Allies can recover (unless you inflicted huge losses early on, surrounding many of their units). Never let the French and British retreat and get away!
Conclusion I hope you have fun playing No Retreat! 3 and that this intense little game gives you some insight into what went on during this cataclysmic and tragic campaign. I look forward to your comments, suggestions and replays on the game’s page at www.boardgamegeek.com.
Vive la France! Carl Paradis Ste-Thérèse, Canada. July 2012.

Turn 3
Turn 5
Turn 6
Turn 8
Turn 9
Turn 11
Turn 2
Turn 7
EvacuationR4
(2)
Open CityR2
Turn 4Open City
R2
Turn 10Open City
R2
The German Advance across France, 1940