nimbus documentation
TRANSCRIPT
Nimbus Documentation
Markus Proeller
Nov 15, 2020

Contents:
1 Quickstart 31.1 Safety instructions . . . . . . . . . . . . . . . . . . . . . . . . . . . . . . . . . . . . . . . . . . . . 31.2 Functions and features . . . . . . . . . . . . . . . . . . . . . . . . . . . . . . . . . . . . . . . . . . 31.3 Items supplied . . . . . . . . . . . . . . . . . . . . . . . . . . . . . . . . . . . . . . . . . . . . . . 31.4 Mounting . . . . . . . . . . . . . . . . . . . . . . . . . . . . . . . . . . . . . . . . . . . . . . . . . 31.5 Operation . . . . . . . . . . . . . . . . . . . . . . . . . . . . . . . . . . . . . . . . . . . . . . . . . 51.6 Technical data . . . . . . . . . . . . . . . . . . . . . . . . . . . . . . . . . . . . . . . . . . . . . . 51.7 Compliance information . . . . . . . . . . . . . . . . . . . . . . . . . . . . . . . . . . . . . . . . . 5
2 Overview about the Nimbus Software 72.1 nimbus-web . . . . . . . . . . . . . . . . . . . . . . . . . . . . . . . . . . . . . . . . . . . . . . . 72.2 nimbus-ros . . . . . . . . . . . . . . . . . . . . . . . . . . . . . . . . . . . . . . . . . . . . . . . . 7
3 Installation 113.1 Raspberry Pi . . . . . . . . . . . . . . . . . . . . . . . . . . . . . . . . . . . . . . . . . . . . . . . 113.2 nimbus-userland . . . . . . . . . . . . . . . . . . . . . . . . . . . . . . . . . . . . . . . . . . . . . 113.3 nimbus-web . . . . . . . . . . . . . . . . . . . . . . . . . . . . . . . . . . . . . . . . . . . . . . . 123.4 nimbus-python . . . . . . . . . . . . . . . . . . . . . . . . . . . . . . . . . . . . . . . . . . . . . . 123.5 nimbus-ros . . . . . . . . . . . . . . . . . . . . . . . . . . . . . . . . . . . . . . . . . . . . . . . . 123.6 nimbus-ros (optional) . . . . . . . . . . . . . . . . . . . . . . . . . . . . . . . . . . . . . . . . . . 15
4 Working on the Raspberry Pi 174.1 Synchronous vs. Asynchronous Interface . . . . . . . . . . . . . . . . . . . . . . . . . . . . . . . . 174.2 Configuring nimbus . . . . . . . . . . . . . . . . . . . . . . . . . . . . . . . . . . . . . . . . . . . 184.3 Adding a custom processing stage . . . . . . . . . . . . . . . . . . . . . . . . . . . . . . . . . . . . 18
5 Nimbus over the network 21
6 3rd party libraries and licenses 23
7 Indices and tables 25
i

ii

Nimbus Documentation
Nimbus is a 3D-TOF Raspberry Pi camera frontend and an open source software platform allowing to capture andcalcualte 3D point-clouds based on raw TOF data.
Attention: The nimbus software platform is licensed under GPLv3 or later (see accompanying file COPYING).If this doesn’t fit your needs, contact us at info (at) pieye.org to obtain a different license.
Contents: 1

Nimbus Documentation
2 Contents:
CHAPTER 1
Quickstart
1.1 Safety instructions
Follow the instructions for safe use provided by the raspberry pi foundation, see qsg.pdf The camera emits strong,almost invisible IR light. Don’t look straight into the LEDs from a short distance.
1.2 Functions and features
Nimbus 3D is a time of flight sensor measuring the distance between the device and the nearest object/surface. Nimbus3D illuminates the scene with a modulated infrared light source. The distance is calculated by the phase shift betweenthe illumination unit and the reflected light. Nimbus 3D only works with a Raspberry Pi 3B and higher, which is notpart of the product. The measured data is available via Ethernet and canbe evaluated by the user. The nimbus 3Dsensor may only be used under the operating conditions specified by the Raspberry Pi foundation,see qsg.pdf Nimbus3D is designed for indoor use only.
1.3 Items supplied
• nimbus 3D
• safety instructions (get a copy here https://tinyurl.com/yykf6bc4)
• FFC jumper cable
• 2x spacers with screws
1.4 Mounting
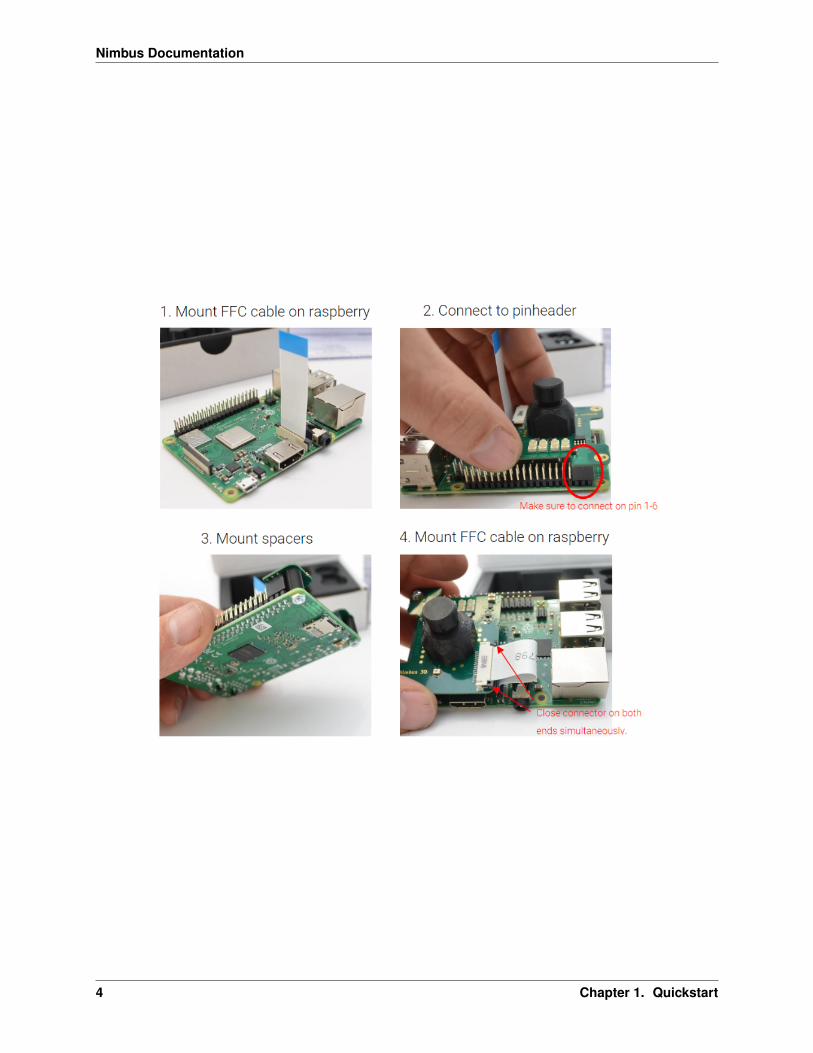
The following images illustrate the mounting process of nimbus 3D. The device must be powered off, while mountingthe camera.
3
Nimbus Documentation
4 Chapter 1. Quickstart
Nimbus Documentation
1.5 Operation
Fllow these two fundamental rules in order to get optimal performance: * Use a strong power supply (minimum 2.5A).The quality of onboard illumination highly depends on the supply (we recommend to use the official power supply) *Use a gigabit ethernet cable (cat6 and higher)
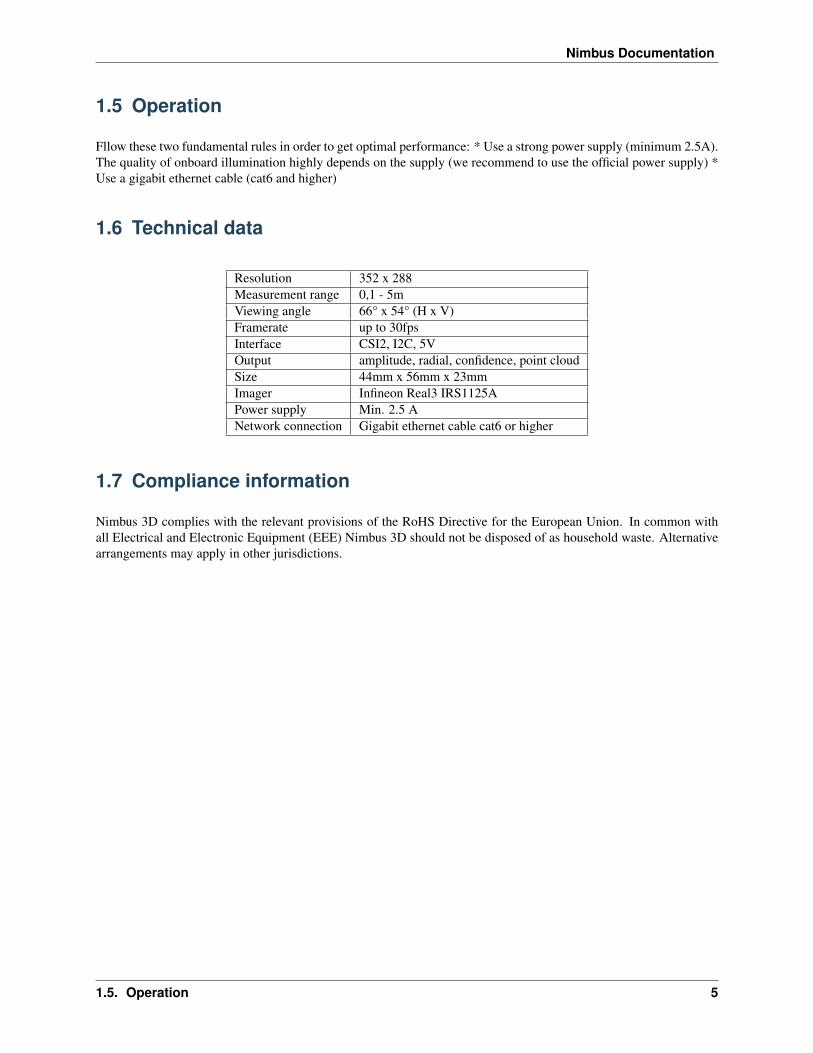
1.6 Technical data
Resolution 352 x 288Measurement range 0,1 - 5mViewing angle 66° x 54° (H x V)Framerate up to 30fpsInterface CSI2, I2C, 5VOutput amplitude, radial, confidence, point cloudSize 44mm x 56mm x 23mmImager Infineon Real3 IRS1125APower supply Min. 2.5 ANetwork connection Gigabit ethernet cable cat6 or higher
1.7 Compliance information
Nimbus 3D complies with the relevant provisions of the RoHS Directive for the European Union. In common withall Electrical and Electronic Equipment (EEE) Nimbus 3D should not be disposed of as household waste. Alternativearrangements may apply in other jurisdictions.
1.5. Operation 5

Nimbus Documentation
6 Chapter 1. Quickstart

CHAPTER 2
Overview about the Nimbus Software
In general there are two ways to work with nimbus which are discussed in the following chapters:
1. Working directly on the Raspberry Pi (embedded)
2. Working on a desktop machine or edge computing hardware connected to a Raspberry Pi over the network
The following graphic shows the underlying architecture of the Nimbus software. The imager takes the image andthe Linux kernel module developed by us makes it available via Video4Linux. Now two possibilities are available.Either the nimbus-server can be used, which makes the data available in the network via web sockets and lets youchange parameters via JSON RPC. nimbus-python and nimbus-web both use this interface. In this way the data canbe used asynchronously locally and in the network and a distributed system can be realized. The Python interface isparticularly suitable for easy use of the data. The web interface especially to get a live image and simply adjust theexposure.
Alternatively the local synchronous C-interface can be used, which allows the integration of own calculations into theprocessing stage. So you have direct low-level access to the point cloud in C. The ROS (Robot Operating System)driver is based on this interface.
You can use the prepared Raspberry Pi OS (buster) images with the already installed nimbus software.
2.1 nimbus-web
After successful installation and setup of nimbus-web it can be accessed in the browser via the IP address of theRaspberry Pi. On the left side the point cloud is visible, in the middle a grey value image and on the right side adepth image. With a click on the buttons below, the exposure settings and information about the current image can beopened.
2.2 nimbus-ros
Robot Operating System (ROS or ros) is robotics middleware. Although ROS is not an operating system, it providesservices designed for a heterogeneous computer cluster such as hardware abstraction, low-level device control, imple-
7

Nimbus Documentation
8 Chapter 2. Overview about the Nimbus Software
Nimbus Documentation
mentation of commonly used functionality, message-passing between processes, and package management. Runningsets of ROS-based processes are represented in a graph architecture where processing takes place in nodes that mayreceive, post and multiplex sensor data, control, state, planning, actuator, and other messages. Despite the importanceof reactivity and low latency in robot control, ROS itself is not a real-time OS.
In order to use the Nimbus in ROS you need the nimbus-ros and ROS itself on your Rasperry Pi.
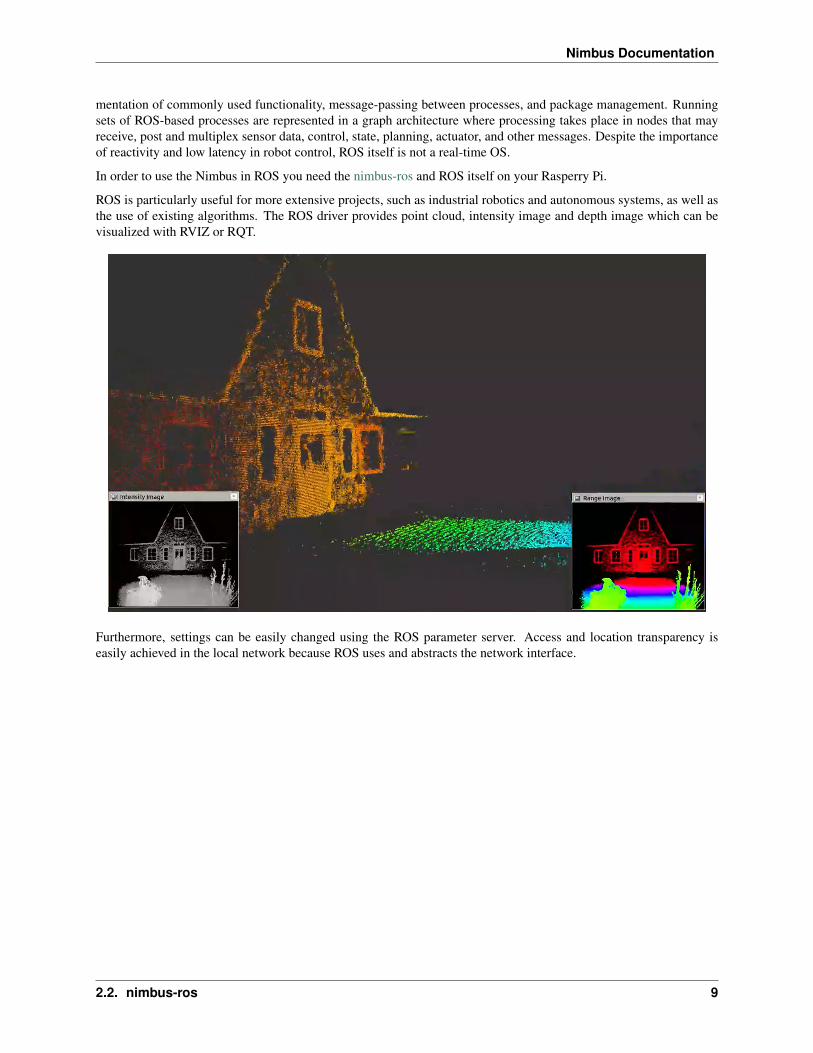
ROS is particularly useful for more extensive projects, such as industrial robotics and autonomous systems, as well asthe use of existing algorithms. The ROS driver provides point cloud, intensity image and depth image which can bevisualized with RVIZ or RQT.
Furthermore, settings can be easily changed using the ROS parameter server. Access and location transparency iseasily achieved in the local network because ROS uses and abstracts the network interface.
2.2. nimbus-ros 9

Nimbus Documentation
10 Chapter 2. Overview about the Nimbus Software
CHAPTER 3
Installation
3.1 Raspberry Pi
Nimbus 3D is a time-of-flight camera for the Raspberry Pi that captures high-resolution 3D point clouds. The Rasp-berry Pi4 is recommended for the best experience. Prepared Raspberry OS images are available. If these are used, thefollowing installation can be skipped.
3.2 nimbus-userland
The official Raspberry OS kernel includes an implementation for the Nimbus 3D. To use it, the corresponding embed-ded sources must be installed.
1. Update to bleeding edge kernel
sudo rpi-update
2. Add the Nimbus 3D apt repository
echo 'deb http://apt.pieye.org/debian/ nimbus-stable main' | sudo tee -a /etc/apt/→˓sources.list
wget -O - -q http://apt.pieye.org/apt.pieye.org.gpg.key | sudo apt-key add -
sudo apt update
3. Add the Imager to your boot config
sudo echo 'dtoverlay=irs1125' | sudo tee -a /boot/config.txt
4. Install the nimbus-server or libnimbus-dev
11
Nimbus Documentation
sudo apt-get install nimbus-server
sudo apt-get install libnimbus-dev
4. Reboot the Raspberry Pi
sudo reboot now
3.3 nimbus-web
Nimbus-web is the webinterface for the Nimbus 3D. There it is possible to see in real time the point cloud, depthimages and intensity images. Furthermore it is possible to adjust the exposure and read the log. The source code isavailable here: Github.
1. Install nginx and git
sudo apt-get install nginx git
2. Clone the code
git clone https://github.com/pieye/nimbus-web.git
3. Edit file /etc/nginx/sites-available/default (with sudo) and change line 41 from
root /var/www/html;
to
root /home/pi/nimbus-web;
4. Restart nginx
sudo service nginx restart
5. Open a browser with the IP address of your Raspberry Pi and you should see the webinterface.
3.4 nimbus-python
Nimbus-Python is the Python interface for the Nimbus 3D. Here it is possible to get the 3D data in Python within thelocal network. The source code is available here, but the package can also be installed directly via pip.
pip install nimbus-python
3.5 nimbus-ros
The Nimbus 3D can also provide data directly in ROS (Robot Operating System), which requires the installation ofnimbus-ros. It is strongly recommended to use the finished image, because the process is quite time-consuming.
To use the low level c interface it is necessary to stop the nimbus-server. Check with the following command if it isrunning and stop it. For the next use of nimbus-python or nimbus-web the nimbus-server must be activated again.
12 Chapter 3. Installation
Nimbus Documentation
sudo systemctl status nimbusServer.servicesudo systemctl stop nimbusServer.service
1. Clone this Repository in the src folder of your ROS workspace.
mkdir -p ~/catkin_ws/srccd ~/catkin_ws/srcgit clone https://github.com/pieye/nimbus-ros.git
2. To perform the following installation 4GB memory is required. If this is not available, the swap size must beincreased accordingly:
sudo dphys-swapfile swapoffsudo nano /etc/dphys-swapfile
3. Change these lines CONF_SWAPSIZE=3000 CONF_MAXSWAP=4096
dphys-swapfile setupsudo dphys-swapfile swapon
4. Install ROS Melodic from Source manually OR run the following install script:
./nimbus-ros/scripts/install.sh
5. Build the nimbus_3d_driver
cd ~/catkin_wscatkin_make
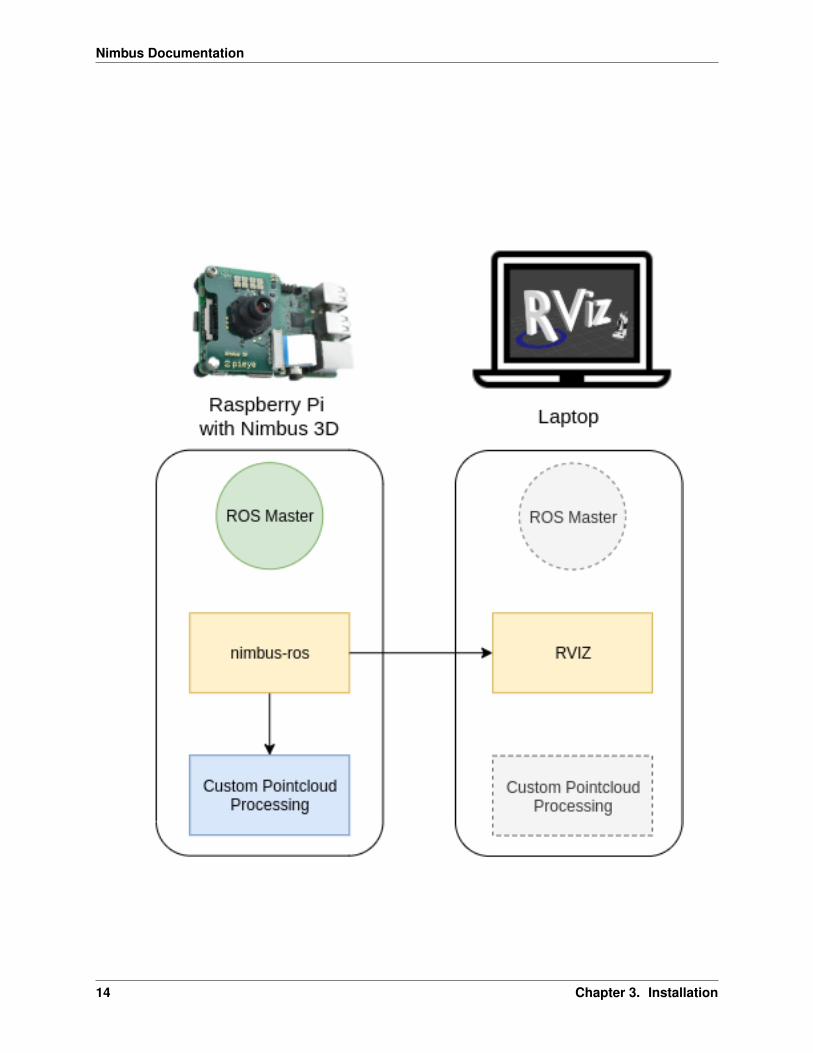
6. Configure ROS to run accros multiple machines The following diagram shows the possible architectures for usingyour Nimbus 3D. The ROS driver “nimbus_3d_driver” is running on the Raspberry Pi and publishes the pointcloud.In this guide the ROS master is also running on the Pi, but it could run on any other machine in your local network.The Pointcloud is afterwards visualized on another Computer with a Display connected e.g. Laptop. Your algorithmsto process the captured data can run locally on your Raspberry or any other device in the local network.
We now configure ROS to run the master on the Raspberry and access the data via another machine running ROSMelodic with RVIZ installed Add this line to the .bashrc of your other machine (laptop), after adapting the IP to yourRaspberry Pi if you are using Linux. You also need to add the IP of your local machine (ROS_IP):
nano ~/.bashrc
export ROS_MASTER_URI=http://192.168.1.1:11311export ROS_IP=192.168.1.1
If you are using Windows you need to set it up as an enviroment variable:
Name: ROS_MASTER_URI Value: http://192.168.1.1:11311Name: ROS_IP Value: 192.168.1.1
SSH into your Raspberry and run:
roscore
Start RVIZ on your machine:
rviz
3.5. nimbus-ros 13
Nimbus Documentation
14 Chapter 3. Installation
Nimbus Documentation
It should start if everything works as expected.
7. Start the Nimbus ROS Driver The given launch file starts the nimbus node and a static coordinate transform afterexecuting it on the Raspberry.
source devel/setup.bashroslaunch nimbus_3d_driver nimbus.launch
It is possible to adjust the topics where the Pointcloud, Intensity Image, and Range Image are published. Simply set anew topic name in the launch file. This is necessary when using multiple Nimbus cameras in your local network at thesame time.
3.6 nimbus-ros (optional)
3.6.1 Clock synchronization
Each pointcloud includes the timestamp of the initial image aquisition. If this is needed across devices, a clocksynchronization protocal such as NTP should be used. PTP hardware timestamping is not available on the RaspberryPi. Chrony is as often used tool for that task.
3.6.2 Configuration
It is possible to adjust the parameters that have an impact on the amount of transmitted data.
A 1GBit/s ethernet connection to the Raspberry Pi is highly recommended. If this is given you can launch the defaultconfiguration without making any changes. If you only have a 100MBit/s Interface you can load the given presetby changing the default.yaml to fast_ethernet.yaml in the launch file (launch/nimbus.launch). This will reduce theresolution! If you need to reduce the bandwitdh even further (e.g. wifi) but still need a reliable point cloud, youcan replace the config against the low_bandwitdh.yaml This will heavily reduce the resolution! Furthermore it ispossible to adjust the parameters to your own needs. Depending on the given setup it might be useful to adjust the autoexposure. If objects are moving fast or a minimum framerate should be achieved it can help do disable hdr and set amax value for the exposure time. The desired exposure can also be adjusted.
Furthermore it is possible to change the following parameters during runtime:
rosparam set /nimbus_3d_driver_node/XYZ_to_m [0.0 - 1.0]
rosparam set /nimbus_3d_driver_node/amplitude [0 - 3000]
rosparam set /nimbus_3d_driver_node/downsampling [true | false]
rosparam set /nimbus_3d_driver_node/downsampling_voxel_size [0.0 - 1.0]
rosparam set /nimbus_3d_driver_node/hdr_factor [0.0 - 1.0]
rosparam set /nimbus_3d_driver_node/exposure_mode [-1 (manual), 0→˓(default), 1 (Auto), 2 (HDR)]
rosparam set /nimbus_3d_driver_node/intensity_image [true | false]
rosparam set /nimbus_3d_driver_node/max_exposure [0 - 32766]
rosparam set /nimbus_3d_driver_node/pointcloud [true | false]
(continues on next page)
3.6. nimbus-ros (optional) 15

Nimbus Documentation
(continued from previous page)
rosparam set /nimbus_3d_driver_node/range_image [true | false]
16 Chapter 3. Installation
CHAPTER 4
Working on the Raspberry Pi
This chapter contains all details about working with the Nimbus directly on the Raspberry Pi, such as:
• acquiring and accessing data
• change settings like exposure time and resolution
• adding a custom processing statge to the processing pipeline
You can either use the nimbus interface in a synchronous or in an asynchronous manner.
4.1 Synchronous vs. Asynchronous Interface
4.1.1 Synchronous Interface
In computer science and network technology, synchronous communication is a mode of communication in which thecommunication partners (processes) always synchronize when sending or receiving data. They wait (block) until thecommunication is completed. Waiting both when sending and receiving data corresponds to a rendezvous of the twoprocesses involved.
Such a synchronous interface can be implemented with the C-Interface described below. It is not recommended toperform time-consuming calculations directly in the C-interface, since this reduces the frame rate due to the blockedmain process.
In such a case the use of the ROS (Robot Operating System) driver or a similar implemenation is recommended. TheROS driver implements the C-interface and forms an abstraction of it. If the frame rate limit is set high enough, allnew data will be provided directly in ROS. However, the preprocessing stage is no longer blocked when the data isavailable in ROS.
4.1.2 Asynchronous Interface
In computer science and network technology, asynchronous communication refers to a mode of communication inwhich the sending and receiving of data takes place with a time delay and without blocking the process. The Pyhton
17
Nimbus Documentation
interface (nimbus-python) represents such an asynchronous interface. The same applies to the web interface (nimbus-web). Both receive their data via websockets and settings are changed via JSON RPC.
4.2 Configuring nimbus
In the case of the nimbusServer, setting changes are made via the JSON RPC interface. In nimbus-python settings likeexposure are already available as function calls. In addition, it is possible to change the exposure in the web browserand to observe the result directly. An implemenation for the C-Interface is shown below.
4.3 Adding a custom processing stage
4.3.1 C-Interface
After having built and installed nimbus-userland (make install), all libraries are installed under /usr/local/lib, all head-ers are installed under /usr/local/include The header nimbusPreprocessInterface.h contains a low level c interface tolibnimbus-preprocessing.so. This is useful when you want to integrate nimbus with external applications.
4.3.2 Example
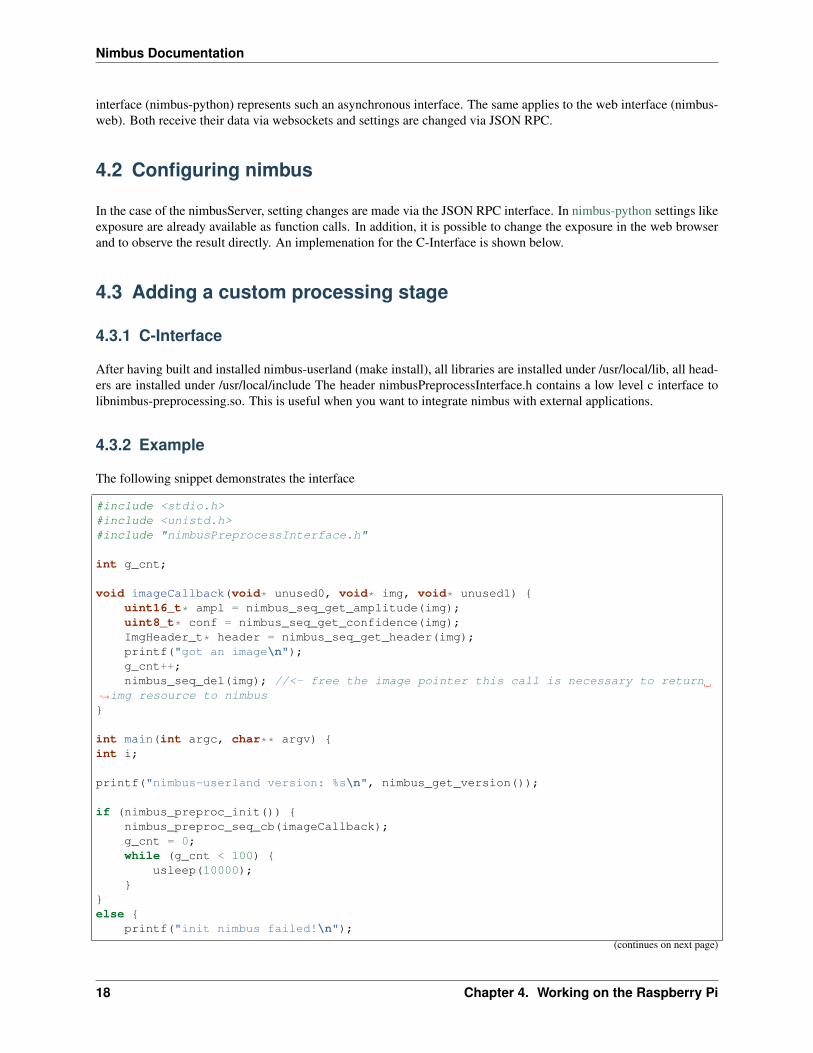
The following snippet demonstrates the interface
#include <stdio.h>#include <unistd.h>#include "nimbusPreprocessInterface.h"
int g_cnt;
void imageCallback(void* unused0, void* img, void* unused1) {uint16_t* ampl = nimbus_seq_get_amplitude(img);uint8_t* conf = nimbus_seq_get_confidence(img);ImgHeader_t* header = nimbus_seq_get_header(img);printf("got an image\n");g_cnt++;nimbus_seq_del(img); //<- free the image pointer this call is necessary to return
→˓img resource to nimbus}
int main(int argc, char** argv) {int i;
printf("nimbus-userland version: %s\n", nimbus_get_version());
if (nimbus_preproc_init()) {nimbus_preproc_seq_cb(imageCallback);g_cnt = 0;while (g_cnt < 100) {
usleep(10000);}
}else {
printf("init nimbus failed!\n");(continues on next page)
18 Chapter 4. Working on the Raspberry Pi
Nimbus Documentation
(continued from previous page)
}return 0;
}
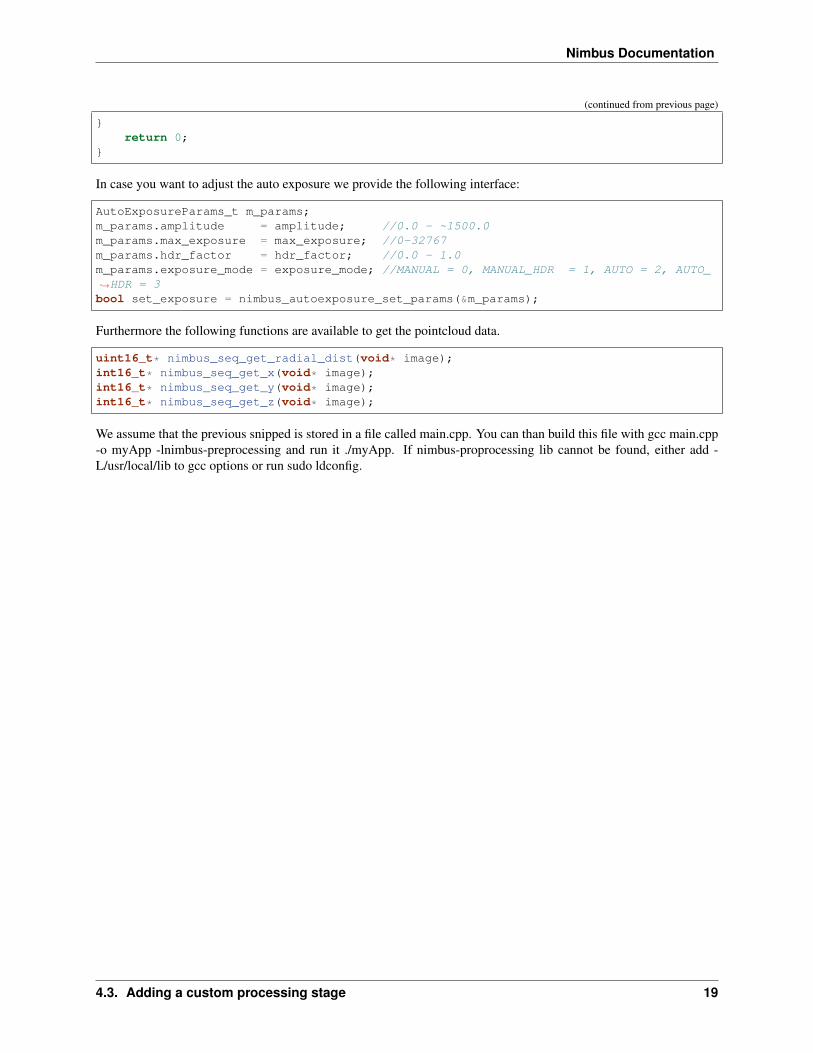
In case you want to adjust the auto exposure we provide the following interface:
AutoExposureParams_t m_params;m_params.amplitude = amplitude; //0.0 - ~1500.0m_params.max_exposure = max_exposure; //0-32767m_params.hdr_factor = hdr_factor; //0.0 - 1.0m_params.exposure_mode = exposure_mode; //MANUAL = 0, MANUAL_HDR = 1, AUTO = 2, AUTO_→˓HDR = 3bool set_exposure = nimbus_autoexposure_set_params(&m_params);
Furthermore the following functions are available to get the pointcloud data.
uint16_t* nimbus_seq_get_radial_dist(void* image);int16_t* nimbus_seq_get_x(void* image);int16_t* nimbus_seq_get_y(void* image);int16_t* nimbus_seq_get_z(void* image);
We assume that the previous snipped is stored in a file called main.cpp. You can than build this file with gcc main.cpp-o myApp -lnimbus-preprocessing and run it ./myApp. If nimbus-proprocessing lib cannot be found, either add -L/usr/local/lib to gcc options or run sudo ldconfig.
4.3. Adding a custom processing stage 19

Nimbus Documentation
20 Chapter 4. Working on the Raspberry Pi

CHAPTER 5
Nimbus over the network
To use nimbus over the network install the nimbus-server package. nimbus-python use nimbus-web this Interface.
This way it is very easy to use the Nimbus over the network. However, it is important that a sufficiently fast connectionis available. For the best user experience a 1GBit/s connection is recommended.
When using nimbus-python it is recommended to use nimbus-web in parallel to see live changes. Both are accessedvia the local IP and receive the data via websockets. See nimbus-python for the exact implementation of the interface.
For use in a large system, such as a robot, the use of ROS (Robot Operating System) is recommended. This frameworkprovides a large number of helpful tools such as visualization and data recording. ROS also makes it possible to writecode that runs both locally on the Raspberry and remotely on a PC without any changes to the program.
21

Nimbus Documentation
22 Chapter 5. Nimbus over the network
CHAPTER 6
3rd party libraries and licenses
Please check the README.md file of repository https://github.com/pieye/nimbus-userland to get a list of all 3rd partylibraries and their licenses used by the nimbus-userland project.
23

Nimbus Documentation
24 Chapter 6. 3rd party libraries and licenses

CHAPTER 7
Indices and tables
• genindex
• modindex
• search
25