netfee36 install en
TRANSCRIPT

8/2/2019 Netfee36 Install En
http://slidepdf.com/reader/full/netfee36-install-en 1/24
Installation Guide
Netstar NetWork Technology Inc
8/2/2019 Netfee36 Install En
http://slidepdf.com/reader/full/netfee36-install-en 2/24
1 . Con f i rm the se t t i ngs o f f i r ew a l l
Check firewall’s settings.
1 .1 I SA Se rve r 2000
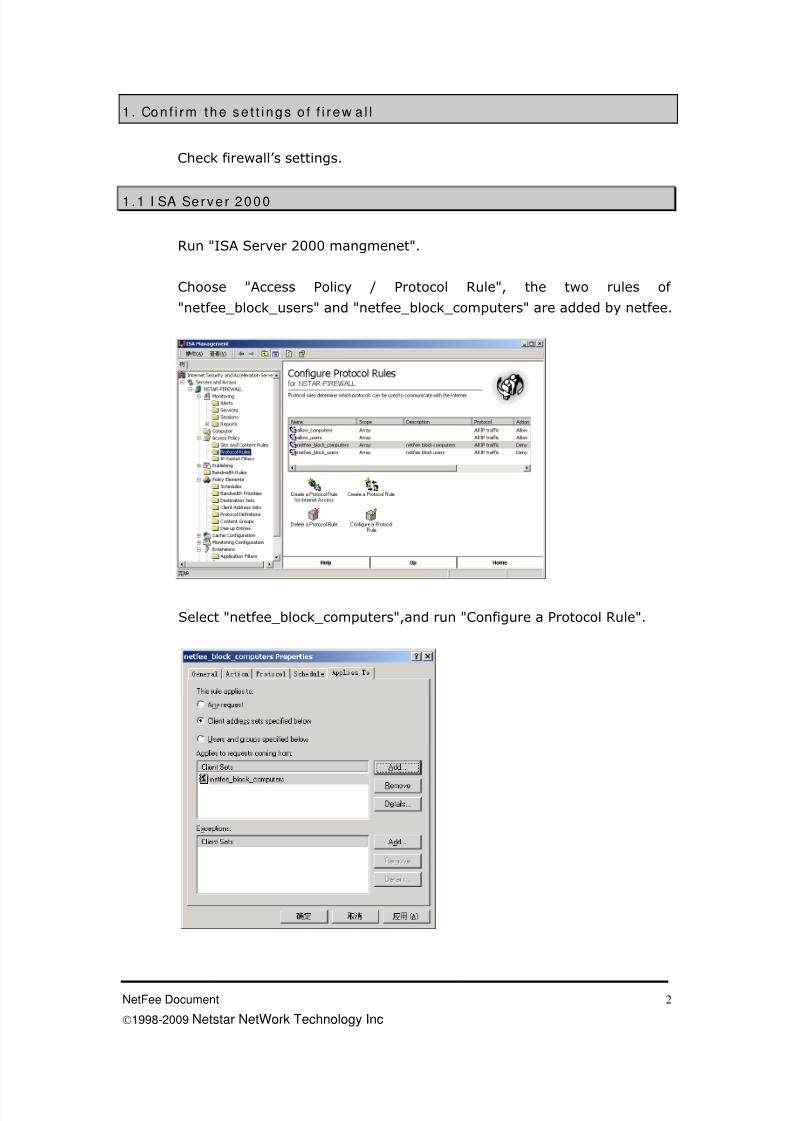
Run "ISA Server 2000 mangmenet".
Choose "Access Policy / Protocol Rule", the two rules of
"netfee_block_users" and "netfee_block_computers" are added by netfee.
Select "netfee_block_computers",and run "Configure a Protocol Rule".
NetFee Document
©1998-2009 Netstar NetWork Technology Inc
2

8/2/2019 Netfee36 Install En
http://slidepdf.com/reader/full/netfee36-install-en 3/24
Click "Add" button, add "netfee_block_computers" from "Ddefined sets" to
"Include these sets".
1 .1 .1 Admin by use r
If you want to admin in user mode, add Protocol Rule in "Access
Policy/Protocol Rule". Select "Users and groups specified below" in "Applies
To" and add users into list "Applies to request coming from".
NetFee Document
©1998-2009 Netstar NetWork Technology Inc
3

8/2/2019 Netfee36 Install En
http://slidepdf.com/reader/full/netfee36-install-en 4/24
1 .1 .2 Admin by compu t e rs
If you want to admin in computers mode, add Protocol Rule in "Access
Policy/Protocol Rule". Select "Client address set specified below" in "Applies
To" and add computers into list " Applies to request coming from ".
1.1 .3 Log se t t in gs
Select "Monitoring Configuration/Logs".
Select "ISA Server format" or "W3C extended log file format" as format of Web
Proxy, Firewall and Packet filter.
For Netfee for ISA server enterprise edition, must select "ISA Server format" as log
file format.
NetFee Document
©1998-2009 Netstar NetWork Technology Inc
4

8/2/2019 Netfee36 Install En
http://slidepdf.com/reader/full/netfee36-install-en 5/24
Fo l low Fie lds shou ld be inc luded in Log f i les
Web Proxy Serv ice :
Client
Client user name
Date
Time
Destination name
Destination portProcessing time
Bytes sent
Bytes received
Protocol name
Object name
Fi rew a l l serv ice :
Client IP
Client user name
Client agent
Date
Time
Destination IP
Destination port
Processing time
Bytes sent
Bytes received
NetFee Document
©1998-2009 Netstar NetWork Technology Inc
5
8/2/2019 Netfee36 Install En
http://slidepdf.com/reader/full/netfee36-install-en 6/24
1 .2 I SA Se rve r 2004 ( 2006 ) s tanda rd ed i t i on
1 .2 .1 Net fee po l icy
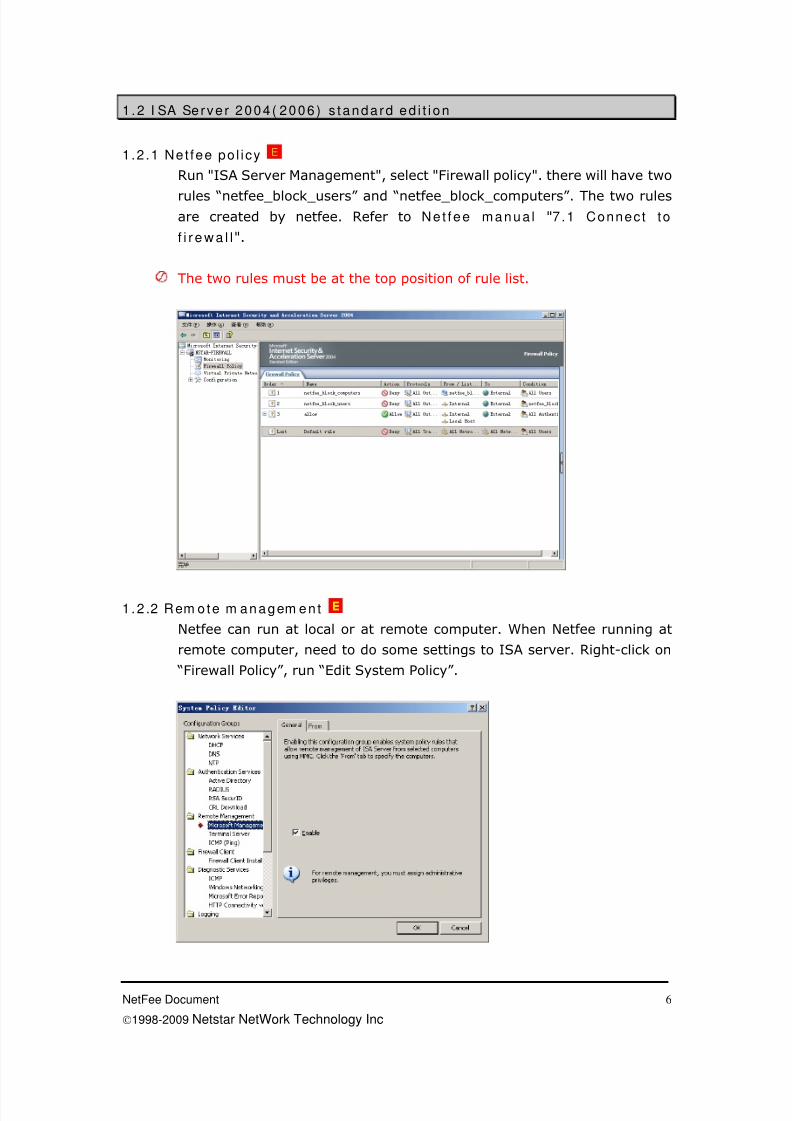
Run "ISA Server Management", select "Firewall policy". there will have two
rules “netfee_block_users” and “netfee_block_computers”. The two rulesare created by netfee. Refer to Net fee manua l "7.1 Connect to
f i r e wa l l".
The two rules must be at the top position of rule list.
1 .2 .2 Rem ote m anagem en t
Netfee can run at local or at remote computer. When Netfee running at
remote computer, need to do some settings to ISA server. Right-click on
“Firewall Policy”, run “Edit System Policy”.
NetFee Document
©1998-2009 Netstar NetWork Technology Inc
6
8/2/2019 Netfee36 Install En
http://slidepdf.com/reader/full/netfee36-install-en 7/24
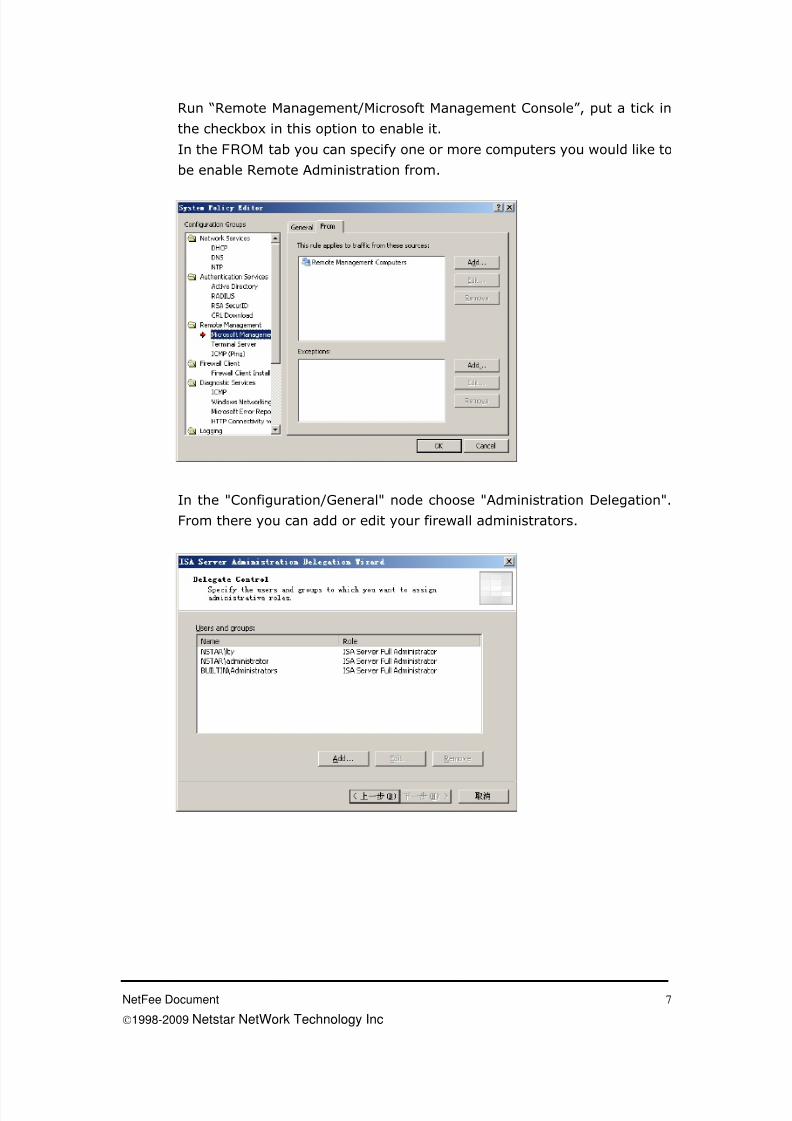
Run “Remote Management/Microsoft Management Console”, put a tick in
the checkbox in this option to enable it.
In the FROM tab you can specify one or more computers you would like to
be enable Remote Administration from.
In the "Configuration/General" node choose "Administration Delegation".
From there you can add or edit your firewall administrators.
NetFee Document
©1998-2009 Netstar NetWork Technology Inc
7

8/2/2019 Netfee36 Install En
http://slidepdf.com/reader/full/netfee36-install-en 8/24
1.2 .3 Logs
Click on "Monitoring", Select "Configure Firewall Logging" and "Configure
Web proxy Logging".
Select "I SA Se rve r f i l e fo rm a t " or "W3C extended log file format" as the
format of log files of Firewall.
For Netfee for ISA server enterprise, must select "ISA Server format" as log file
format.
NetFee Document
©1998-2009 Netstar NetWork Technology Inc
8

8/2/2019 Netfee36 Install En
http://slidepdf.com/reader/full/netfee36-install-en 9/24
NetFee Document
©1998-2009 Netstar NetWork Technology Inc
9
Fo l low Fie lds shou ld be inc luded in Log f i les
Web Proxy Serv ice :
Client IP
Client user nameDate
Time
Destination name
Destination port
Processing time
Bytes sent
Bytes received
Protocol name
Object name
Fi rew a l l serv ice :
Date
Time
Source
Destination
Resulut code
Bytes sent
Bytes received
Connection timeClient user name
Client agent

8/2/2019 Netfee36 Install En
http://slidepdf.com/reader/full/netfee36-install-en 10/24
1 .3 I SA Se rve r 2004 ( 2006 ) en te rp r i se ed i t i on
1 .3 .1 Net fee en terpr ise po l icy
In the console tree of ISA Server Management, click on "Enterprise Policies".
there will have a Enterprise Policy that contains two rules"netfee_block_users" and "netfee_block_computers". The two rules are
created by netfee. Refer to Net fee manua l "5 .3 .4 Connec t to f i r ew a l l".
The two rules must be at the top position of rule list.
The enterprise policy that contains the two rules should be applied to
firewall array.
In the console tree of ISA Server Management, right-click "array name".
Click "Properties", on the "Policy Settings", select the enterprise policy that
contains the two rules to apply this array.
NetFee Document
©1998-2009 Netstar NetWork Technology Inc
10

8/2/2019 Netfee36 Install En
http://slidepdf.com/reader/full/netfee36-install-en 11/24
1 .3 .2 Rem ote m anagem en t
Netfee can run at local or at remote computer. When Netfee running at
remote computer, need to do some settings to ISA server. Right-click on
“Firewall Policy”, run “Edit System Policy”.
Run “Remote Management/Microsoft Management Console”, put a tick in
the checkbox in this option to enable it.
In the FROM tab you can specify one or more computers you would like to
be enable Remote Administration from.
NetFee Document
©1998-2009 Netstar NetWork Technology Inc
11

8/2/2019 Netfee36 Install En
http://slidepdf.com/reader/full/netfee36-install-en 12/24
1.3 .3 Logs
Click on "Monitoring", Select "Configure Firewall Logging" and "Configure
Web proxy Logging".
Select "I SA Se rve r f i l e fo rm a t " or "W3C extended log file format" as the
format of log files of Firewall.
For Netfee for ISA server enterprise, must select "ISA Server format" as log file
format.
NetFee Document
©1998-2009 Netstar NetWork Technology Inc
12

8/2/2019 Netfee36 Install En
http://slidepdf.com/reader/full/netfee36-install-en 13/24
NetFee Document
©1998-2009 Netstar NetWork Technology Inc
13
Fo l low Fie lds shou ld be inc luded in Log f i les
Web Proxy Serv ice :
Client IP
Client user nameDate
Time
Destination name
Destination port
Processing time
Bytes sent
Bytes received
Protocol name
Object name
Fi rew a l l serv ice :
Date
Time
Source
Destination
Resulut code
Bytes sent
Bytes received
Connection timeClient user name
Client agent

8/2/2019 Netfee36 Install En
http://slidepdf.com/reader/full/netfee36-install-en 14/24
1.4 WinRoute 6 .0
At "Admistration console", select "Configuration/Traffic policy".
Edit each rules,run "Log matching connections" to produce logs.
At "Admistration console",Select "Configuration / Logs& Alerts / Logs
settings".
NetFee Document
©1998-2009 Netstar NetWork Technology Inc
14

8/2/2019 Netfee36 Install En
http://slidepdf.com/reader/full/netfee36-install-en 15/24
Edit "Connection" settings. Select "Enable logging to file", and fill "File
name" with "connection". Set "Rotation/Rotate regularly" to "Every day".
Edit "Http" settings. Select "Enable logging to file", and fill "File name" with
"http". Set "Rotation/Rotate regularly" to "Every day".
NetFee Document
©1998-2009 Netstar NetWork Technology Inc
15

8/2/2019 Netfee36 Install En
http://slidepdf.com/reader/full/netfee36-install-en 16/24
1 .5 W inProxy 5 .1
Run "File / Settings / Logging",select "Enable detailed loging".
NetFee Document
©1998-2009 Netstar NetWork Technology Inc
16
8/2/2019 Netfee36 Install En
http://slidepdf.com/reader/full/netfee36-install-en 17/24
2 . I ns ta l l a t i on
2 .1 I ns ta l l I SA serve r Managem en t
Netfee can run at local or at remote computer. When Netfee running at
remote computer, need to install ISA server Management at the computer
running netfee.
Firstly you shuold configure firewall for remote administration. Refer to
Net fee manua l "4 .2 .2 (4 .3 .2 ) Remote m anagem en t ".
Then can install "ISA server Management" onto the computer to netfee. To
do this we use the ISA Server CD. Just run the setup the usual way on the
local computer, however, when you get to the menu options you shouldchoose "Custom Setup". In the Custom Setup you should choose only the
ISA Server Management and hit "Next". The necessary files will be installed
and you will be on your way to remote admin.
2 .2 I ns ta l l Net fee
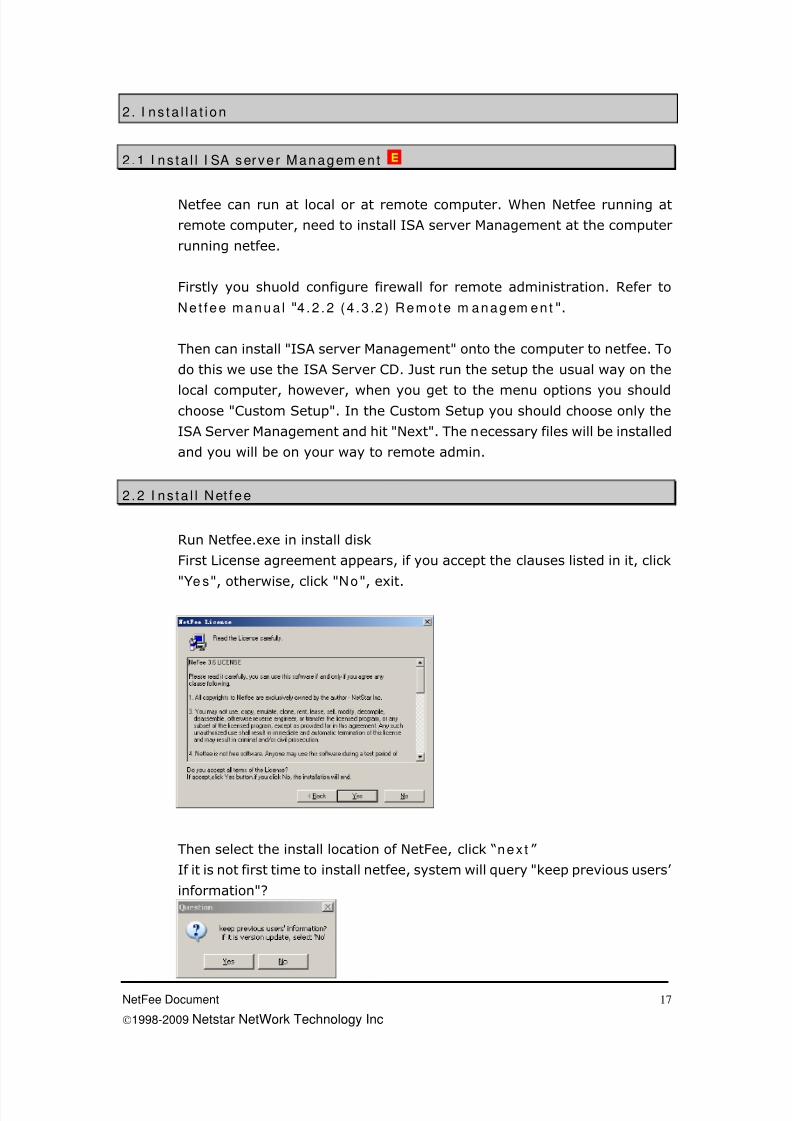
Run Netfee.exe in install disk
First License agreement appears, if you accept the clauses listed in it, click
"Ye s", otherwise, click "No", exit.
Then select the install location of NetFee, click “nex t ”
If it is not first time to install netfee, system will query "keep previous users’
information"?
NetFee Document
©1998-2009 Netstar NetWork Technology Inc
17

8/2/2019 Netfee36 Install En
http://slidepdf.com/reader/full/netfee36-install-en 18/24
If select "Yes", system will keep all previous users information.
If select "No", after finish installation and Start NetFee, run "Fi le / Resto re
use r i n fo rm a t ion" to restore user information backuped previously.
If update netfee to a new version, must select “No”.
After installation finished, you can select to run immediately. You also can
run "St a r t / p r o gr a m s / N et Fe e/ N et Fe e" for the first use.
When netFee run, an icon will shown at low-right corner of screen.
NetFee Document
©1998-2009 Netstar NetWork Technology Inc
18

8/2/2019 Netfee36 Install En
http://slidepdf.com/reader/full/netfee36-install-en 19/24
2 .3 I n i t i a l r u n n i n g t h e syste m
2.3.1 Connect
Netfee management connect to netfee service. About netfee service, refer
to Net fee manua l "6.1 Net f ee serv ice".
Run "File/Connect", Connect window appears..
If Netfee service running on another computer, input address of computer
running netfee service at the "co m p u te r".
If Netfee service running on local, leave Blank, or input "." or "Local" at
the "co m p u te r".
2.3 .2 Reg is te r
Run "Help/Register", system registry window appears.
If you want to use DEMO edition of NetFee, Click "DEMO"
If you are a legal user, click "reg is te r ", "System register" window appears.
Input your register information.
For DEMO edition, period of validity is 60 days (from installation).
NetFee Document
©1998-2009 Netstar NetWork Technology Inc
19

8/2/2019 Netfee36 Install En
http://slidepdf.com/reader/full/netfee36-install-en 20/24
2.3 .3 Net fee serv ice
Netfee enterprise edition can be run as service. Netfee service has two
method to logon: Local system and admin account.
Run "File/netfee service", select the method to logon.
When Database is SQL server or Log directory is on another computer
running ISA server, must select to logon as admin account.
2.3 .4 Database
When run netfee, system will connect database automatically. The default
database is data file - ne t fee .n t f (at “../programe files/netfee”).
If you want to select "SQL server" as database, you should create database
firstly. If the number of users or computers is more than 100, suggest using
Sql server as database. Run "To o ls / Se t t i n g s/ Data b se", fill in the address of SQL server, user
name and password, then click "Create".
The user to create database must have “Create database” priority to the
SQL server.
NetFee Document
©1998-2009 Netstar NetWork Technology Inc
20

8/2/2019 Netfee36 Install En
http://slidepdf.com/reader/full/netfee36-install-en 21/24
After database is created, you can specify another user to connect database.
The user doesn’t have to own the “Create database” priority.
2 .3 .5 Se lect admin m ode
You can select admin mode to admin users and computers. Refer to "7 .2A d m i n m o d e".
2 .3 .6 A d d u ser / com p u t e r
"Add department", refers to Net fee manua l "8 .1 .1 Add depa r tm en t ".
"Add user", refers to Net fee manua l "8.2 .1 Add user ".
"Add group", refers to Net fee manua l "9 .1 .1 Add g roup "."Add computer", refers to Net fee manua l "9 .2 .1 Add compu te r ".
2 .3 .7 Connec t t o f i r ew a l l
Netfee can run at local or at remote computer. When Netfee running at
remote computer, need to connect to remote ISA server.
Run "To o ls / Se t t i n g s/ Co n n ec t t o f i r e w a l l".
NetFee Document
©1998-2009 Netstar NetWork Technology Inc
21
8/2/2019 Netfee36 Install En
http://slidepdf.com/reader/full/netfee36-install-en 22/24
Specify name of computer running ISA server firewall or Configuration
storage server with computer_name or IP address. Then, type the user
name, password, and domain for the user who will remotely manage.
Refer to Net fee manua l "7 .1 Connec t to f i r ew a l l".
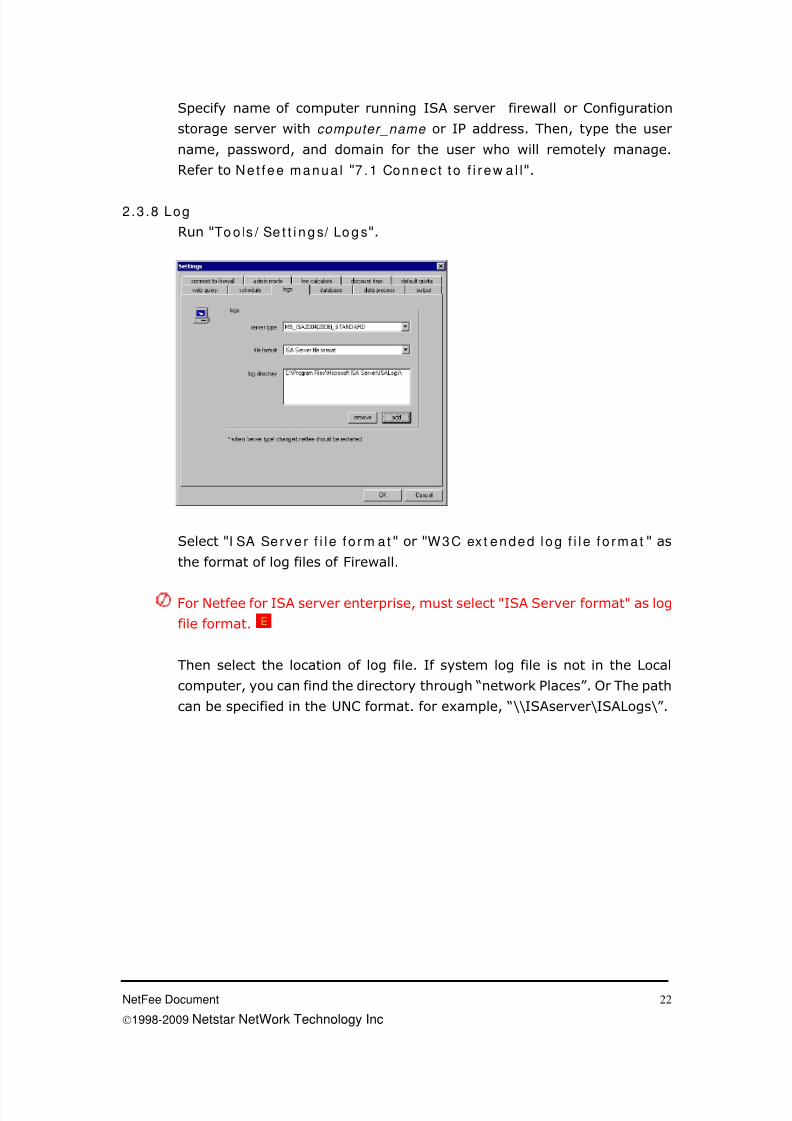
2.3 .8 Log
Run "To o ls / Se t t i n g s/ Lo g s".
Select "I SA Se rve r f i l e fo rm a t " or "W3C ex t ended log f i l e fo rma t " as
the format of log files of Firewall.
For Netfee for ISA server enterprise, must select "ISA Server format" as log
file format.
Then select the location of log file. If system log file is not in the Local
computer, you can find the directory through “network Places”. Or The path
can be specified in the UNC format. for example, “\\ISAserver\ISALogs\”.
NetFee Document
©1998-2009 Netstar NetWork Technology Inc
22

8/2/2019 Netfee36 Install En
http://slidepdf.com/reader/full/netfee36-install-en 23/24
2.3 .9 Schedu le
Run "To o ls / Se t t i n g s/ Sch ed u l e", confirm "Auto scan da ta" is selected.
2.3 .10 Scan log
Run "Data Process / s ta r t Da ta -scan " to scan log. you can see users
information at "r ea l - t ime pane".
At the same time, you can see log files being scanned.
2.3 .11 Fresh da t a
Run "Data Process / Fresh da ta" (or Ctrl + F5) to save data into
database.
On ly a f te r " Fresh data " can que ry i n fo rm a t ion .
Fo r the change to use r / depa r tm en t quo ta , on l y af te r " Fresh data "
to t ake e f fect .
NetFee Document
©1998-2009 Netstar NetWork Technology Inc
23
8/2/2019 Netfee36 Install En
http://slidepdf.com/reader/full/netfee36-install-en 24/24
2.3 .12 Query
Select the user/computer you want to query, run "Query".
2.3 .13 Arch ive
Run "Fi le/ A rch i ve da ta" to set archive schedule and content. Refer toNet fee manua l "11.6 .1 Data a rch ive".
2.3 .14 Event
At "Rea l - t ime pane / Even t ", can see the system return warning or error
message.
NetFee Document
©1998-2009 Netstar NetWork Technology Inc
24